Capturing your Desktop / Screen Recording
Here are a few solutions for capturing your desktop and recording a video of your screen with ffmpeg. (A Chinese version of this page is also available.)
For the sake of brevity, these commands do not specify any additional encoder settings. For more info about H.264 encoding, see the H.264 encoding guide.
By default, these commands will use the x264 encoder, which should be reasonably fast on modern machines. See Lossless Recording if you need to improve performance.
Linux
Use the x11grab device:
ffmpeg -video_size 1024x768 -framerate 25 -f x11grab -i :0.0+100,200 output.mp4
This will grab the image from desktop, starting with the upper-left corner at x=100, y=200 with a width and height of 1024⨉768.
If you need audio too, you can use ALSA (see Capture/ALSA for more info):
ffmpeg -video_size 1024x768 -framerate 25 -f x11grab -i :0.0+100,200 -f alsa -ac 2 -i hw:0 output.mkv
Or the pulse input device (see Capture/PulseAudio for more info):
ffmpeg -video_size 1024x768 -framerate 25 -f x11grab -i :0.0+100,200 -f pulse -ac 2 -i default output.mkv
macOS
Use the avfoundation device:
ffmpeg -f avfoundation -list_devices true -i ""
This will enumerate all the available input devices including screens ready to be captured.
Once you’ve figured out the device index corresponding to the screen to be captured, use:
ffmpeg -f avfoundation -i "<screen device index>:<audio device index>" output.mkv
This will capture the screen from <screen device index> and audio from <audio device index> into the output file output.mkv.
Windows
Use DirectShow
Use a DirectShow device:
ffmpeg -f dshow -i video="screen-capture-recorder" output.mkv
This will grab the image from entire desktop. You can refer to a list of alternative devices.
If you need audio too:
ffmpeg -f dshow -i video="UScreenCapture":audio="Microphone" output.mkv
If you want to capture the audio that is playing from your speakers you may also need to configure so-called «Stereo Mix» device.
or
ffmpeg -f dshow -i video="UScreenCapture" -f dshow -i audio="Microphone" output.mkv
You can list your devices with:
ffmpeg -list_devices true -f dshow -i dummy
Use built-in GDI screengrabber
You can also use gdigrab as input device to grab video from the Windows screen.
To capture all your displays as one big contiguous display:
ffmpeg -f gdigrab -framerate 30 -i desktop output.mkv
If you want to limit to a region, and show the area being grabbed:
ffmpeg -f gdigrab -framerate 30 -offset_x 10 -offset_y 20 -video_size 640x480 -show_region 1 -i desktop output.mkv
To grab the contents of the window named «Calculator»:
ffmpeg -f gdigrab -framerate 30 -i title=Calculator output.mkv
Use Windows 8+ Desktop Duplication API
Windows 8 introduced a new way of capturing whole desktops: The Desktop Duplication API
FFmpeg implements support for it in the form of the ddagrab filter.
It provides the user with on-gpu D3D11 textures, in the form of ffmpeg D3D11VA frames, which can then be directly encoded by a compatible hardware encoder:
ffmpeg -init_hw_device d3d11va -filter_complex ddagrab=0 -c:v h264_nvenc -cq:v 20 output.mkv
Or downloaded and processed as usual, though with a bit of overhead compared to pure on-GPU processing:
ffmpeg -filter_complex ddagrab=0,hwdownload,format=bgra -c:v libx264 -crf 20 output.mkv
Hardware Encoding
You can use hardware acceleration to speed up encoding and reduce the load on your CPU. For example, with NVIDIA hardware encoding:
ffmpeg -f gdigrab -framerate 30 -i desktop -c:v h264_nvenc -qp 0 output.mkv
Lossless Recording
If your CPU is not fast enough, the encoding process might take too long. To speed up the encoding process, you can use lossless encoding and disable advanced encoder options, e.g.:
ffmpeg -video_size 1920x1080 -framerate 30 -f x11grab -i :0.0 -c:v libx264rgb -crf 0 -preset ultrafast -color_range 2 output.mkv
-crf 0 tells x264 to encode in lossless mode; -preset ultrafast advises it to do so fast. Note the use of libx264rgb rather than libx264; the latter would do a lossy conversion from RGB to yuv444p (8 bit yuv444p is not enough to preserve 8 bit RGB, 10 bit YCbCr is needed). -color_range 2 is needed because otherwise it will write full range RGB yet will tag it as limited range (this was fixed in 7ca71b79f2b3256a0eef1a099b857ac9e4017e36 and thus is no longer needed).
The encoder should be fast enough on most modern hardware to record without any framedrop, and even leave enough CPU headroom for other applications.
If you’re going to archive the recording or are concerned about file size, re-encode it losslessly again, but with a slower preset. Note that since the initial recording was lossless, and the re-encode is lossless too, no quality loss is introduced in this process in any way.
ffmpeg -i output.mkv -c:v libx264rgb -crf 0 -preset veryslow output-smaller.mkv
I would like to add the command I use to capture the screen:
ffmpeg.exe -y ^
-vsync vfr ^
-f gdigrab ^
-indexmem 300M ^
-rtbufsize 1G ^
-probesize 7M ^
-max_probe_packets 50k ^
-draw_mouse 0 ^
-video_size 1280x720 ^
-offset_y 152 ^
-framerate 24 ^
-c:v bmp ^
-strict strict ^
-thread_queue_size 50k ^
-r 24 ^
-i desktop ^
-f dshow ^
-channel_layout stereo ^
-thread_queue_size 50k ^
-strict strict ^
-i "audio=Stereo-mix (Realtek High Definition Audio)" ^
-map 0:v ^
-max_muxing_queue_size 50k ^
-f mp4 ^
-movflags +faststart ^
-max_interleave_delta 0 ^
-c:v libx264 ^
-r 24 ^
-preset fast ^
-tune film ^
-strict strict ^
-crf 25 ^
-pix_fmt yuv422p ^
-map 1:a ^
-max_muxing_queue_size 50k ^
-max_interleave_delta 0 ^
-c:a aac ^
-strict strict ^
-ac 2 ^
screencapture.mp4
The value of probesize appears to have much influence on the audio/video synchronisation. Raising the value by a few megabytes may cause A/V out of sync. Change by 1M or 500k, e.g. to 7500k, at a time.
If you leave out the probesize option, ffmpeg will, by default, set the probesize to 5M.
max_interleave_delta option prevents ffmpeg forcing output. If ffmpeg forces output, a message will appear in your log, e.g.:
[mp4 @ 00000199f7512040] Delay between the first packet and last packet in the muxing queue is 10007271 > 10000000: forcing output
If ffmpeg takes to much processor time, try changing the -preset option (ultrafast, superfast, veryfast, faster, fast, medium (default), slow, slower, veryslow), larger -crf (constant rate factor), e.g. 32 or lower framerate (-framerate and -r options on several places in the command).

Когда мы пишем статьи о своем сервере в комментариях очень часто находится читатель, который говорит:
«И зачем такой огород городить? Все это одной FFmpeg командой делается!»
Вот, например, тот же скриншаринг. Всего одной FFmpeg командой можно записать происходящее на экране в файл. А дальше? Если например нужно транслировать скриншаринг на сайт? Будем записывать в файлы, загружать их на Web-сервер и запускать на сайте? Для какого-то статичного контента может быть и подойдет, но вот для «живой» трансляции вряд ли.
Вот на этом этапе и становится недостаточно только «одной команды» (хотя, забегая вперед, скажу, что одной командой мы все же обошлись), нужно еще какое-то промежуточное звено, которое позволит превратить скриншаринг захваченный FFmpeg-ом в WebRTC трансляцию.
Задача очень простая — нужно транслировать происходящее на экране компьютера на сайт, где поток будет воспроизводиться по технологии WebRTC. Захватить нужно как видео, так и звук.

Рассмотрим два варианта решения с помощью FFmpeg, под Linux и под Windows.
Когда лучшее враг хорошего
Здесь я решил сделать небольшое признание. При написании этой статьи мне впервые пришлось столкнуться с работой FFmpeg. Пришлось изучать мануалы и достаточно долго гуглить. В итоге, я нагуглил сочетание ключей программы FFmpeg для скриншаринга со звуком, на основании документации добавил ключи для передачи скриншаринга в поток на WCS сервере, успешно протестировал публикацию через FFMpeg и воспроизведение по WebRTC в среде Windows и Linux и начал писать эту статью-инструкцию.
На этапе тестирования команда для FFmpeg скриншаринга показалась мне достаточно хаотичной. Поэтому, работая над текстом статьи я решил ее «причесать» — собрал все что относится к захвату и кодированию видео в начале команды, потом собрал ключи для захвата и кодирования звука и завершил команду ключами для передачи данных на сервер и формирования потока.
Внимание! НЕ используйте эту команду!
ffmpeg.exe -f gdigrab -i desktop -draw_mouse 1 -rtbufsize 100M -framerate 30 -probesize 10M -c:v libx264 -r 30 -preset ultrafast -tune zerolatency -crf 25 -pix_fmt yuv420p -f dshow -i audio="@device_cm_{33D9A762-90C8-11D0-BD43-00A0C911CE86}wave_{F585B65B-4690-4433-8109-F16C6389C066}" -acodec aac -f flv rtmp://demo.flashphoner.com:1935/live/rtmp_streamПеред публикацией статьи в блоге я проверил получившуюся команду и, к своему разочарованию, получил полное отсутствие в потоке и аудио, и видео составляющих.

Пришлось вернуться к мануалам и Google.
Я вновь и вновь проверял ключи, с которыми запускается FFmpeg. Я даже нашел альтернативный способ захвата системного звука для Windows (о чем обязательно расскажу далее). Я тестировал с разными драйверами в Windows и разными версиями рабочих столов в Ubuntu, но все мои действия приводили к одному:
На WCS сервере формировался пустой поток.
В одном из мануалов мне попалась фраза, которая прочно засела в моей голове: «Не смешивайте ключи для аудио и видео!». Вот я старательно и раскладывал ключи по полочкам. Сначала связанное с аудио, потом связанное с видео, потом передача в поток.
В какой-то момент, я запустил исходную команду, которая на первый взгляд выглядела хаотичным набором ключей. И, о чудо! В плеере был поток скриншаринга со звуком. Тогда я внимательно присмотрелся к ключам, и, наконец-то, понял свою ошибку. Нельзя смешивать ключи для аудио и видео и ключи для разных действий!
Опытным путем мне удалось выяснить, что структура команды должна быть такой:
ключи для захвата аудио + ключи для захвата видео + ключи для кодирования аудио + ключи для кодирования видео + ключи для отправки данных в поток на сервереК сожалению, FFmpeg не поддерживает каких-либо служебных ключей для разделения секций команды, поэтому неопытному пользователю бывает сложно сориентироваться. Далее по тексту, в описаниях ключей я уточню, какие ключи к какому действию относятся.
FFmpeg скриншаринг под Windows
Рассмотрим запуск скриншаринга в поток с помощью FFmpeg. В командной строке Windows запустите на выполнение следующую команду:
ffmpeg.exe -f gdigrab -rtbufsize 100M -framerate 30 -probesize 10M -draw_mouse 1 -i desktop -c:v libx264 -r 30 -preset ultrafast -tune zerolatency -crf 25 -pix_fmt yuv420p -f flv rtmp://demo.flashphoner.com:1935/live/rtmp_streamгде:
//захват видео составляющей скриншаринга
-f gdigrab — драйвер захвата экрана Windows;
-rtbufsize 100M — буфер под видео. Трансляция с экрана должна идти быстро и гладко, чтобы не было пропусков кадров. Поэтому лучше сначала записывать видео в оперативную память, а затем FFmpeg сам передаст его в поток.
-framerate 30 — частота кадров при захвате экрана;
-probesize 10M — количество кадров необходимое FFmpeg для идентификации потока;
-draw_mouse 1 — захватывать движения мыши;
-i desktop — говорим FFmpeg записывать весь экран;
//кодирование видео составляющей скриншаринга
-c:v libx264 — сжимать будем в формат MP4 кодеком x264;
-r 30 — кодек запишет видео с частотой 30 кадров в секунду;
-preset ultrafast — говорим кодеку, чтобы долго не раздумывал и кодировал видеопоток, как можно быстрее (при записи экрана это актуально);
-tune zerolatency — опция кодека x264 для ускорения кодирования;
-crf 25 — качество записываемого видео (большее значение — хуже видео, меньшее — лучше);
-pix_fmt yuv420p — цветовой формат результирующего видео;
//формирование потока и передача его WCS
-f flv rtmp://demo.flashphoner.com:1935/live/rtmp_stream — запись в поток с именем «rtmp_stream» и передача его на сервер demo.flashphoner.com.
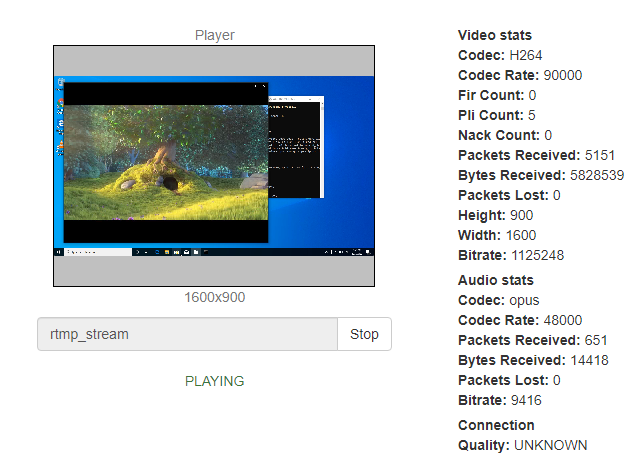
Итак. Захватываем экран в поток

и ловим его на стороне WCS. (Здесь и далее я использую плеер из примера «Media Devices», потому что он позволяет на скриншоте показать наличие или отсутствие аудио потока.)

Получаем поток скриншаринга. Правда без звука. На скриншоте видно, что в разделе «Audio stats» все по нулям.
Теперь предлагаю разобраться с захватом звука.
Первым шагом нужно определить доступные устройства для захвата звука. Все там же, в консоли Windows, выполняем команду:
ffmpeg -list_devices true -f dshow -i dummyПолучаем примерно такую картину:
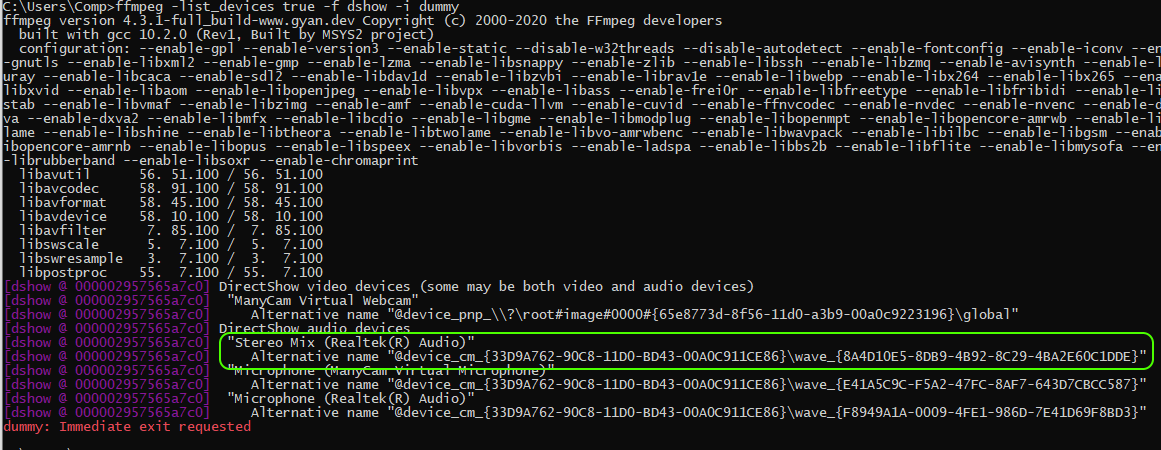
В результате выполнения команды выводится список устройств, которые могут записывать или выводить звук. Это будут колонки, микрофоны и веб-камеры. В этом списке найдите имя аудиоустройства, то есть ваших динамиков, с которых вы хотите записывать звук. На скриншоте аудиоустройство, с которого я собираюсь захватывать звук, называется «Stereo Mix (Realtek (R) Audio)». Stereo Mix – одно из устройств записи звука. Это виртуальное (программное) устройство, которое позволяет смешивать источники звука, воспроизводимые внутри операционной системы и получаемые с микрофона.
Чтобы захватить звук в исходную команду для скриншаринга нужно добавить ключи:
-f dshow -i audio="@device_cm_{33D9A762-90C8-11D0-BD43-00A0C911CE86}wave_{8A4D10E5-8DB9-4B92-8C29-4BA2E60C1DDE}" ... -acodec aacгде:
//захват аудио составляющей скриншаринга
-f dshow — драйвер захвата звука Windows;
-i audio= — параметр «audio» в этом случае ставим равным альтернативному имени нашего «Stereo Mix (Realtek (R) Audio)»;
//захват видео составляющей скриншаринга
//кодирование аудио составляющей скриншаринга
-acodec aac — сжимать аудио будем кодеком aac;
//кодирование видео составляющей скриншаринга
//формирование потока и передача его WCS
Запускаем:
ffmpeg.exe -f dshow -i audio="@device_cm_{33D9A762-90C8-11D0-BD43-00A0C911CE86}wave_{8A4D10E5-8DB9-4B92-8C29-4BA2E60C1DDE}" -rtbufsize 100M -f gdigrab -framerate 30 -probesize 10M -draw_mouse 1 -i desktop -acodec aac -c:v libx264 -r 30 -preset ultrafast -tune zerolatency -crf 25 -pix_fmt yuv420p -f flv rtmp://demo.flashphoner.com:1935/live/rtmp_streamИ наслаждаемся:
Существует еще альтернативный метод. Он будет полезен, если у вас на компьютере нет устройства «Stereo Mix» или драйвер вашей звуковой карты его, по каким-то причинам, не поддерживает.
Для реализации альтернативного метода нам понадобится небольшая утилита «VB-Audio Virtual Cable» (На момент написания этой статьи распространяется бесплатно).
VB-CABLE — это виртуальное аудиоустройство, работающее как виртуальный аудиокабель. Весь звук, поступающий на вход CABLE, просто пересылается на выход CABLE.
Скачиваем программу VB-CABLE и устанавливаем. Установка не представляет собой ничего примечательного.
Запускаем установочный файл от имени администратора:

И нажимаем кнопку «Install Driver»

После установки нужно переключить устройство по умолчанию для воспроизведения и записи аудио на установленный виртуальный кабель.

Теперь, звуки, воспроизводимые в программах, будут перенаправляться на виртуальное устройство Cable Output, которое будет работать как обычный микрофон и, соответственно, позволит захватить воспроизводимое аудио. Однако, при этом есть один недостаток: во время этого вы не будете слышать то, что записываете (т.е. звук вместо динамиков или наушников будет направляться на виртуальное устройство записи).
Теперь снова определяем доступные устройства для захвата аудио
ffmpeg -list_devices true -f dshow -i dummyВидим, что в списке устройств появилось устройство «CABLE Output (VB-Audio Virtual Cable)»

Запускаем захват скриншаринга с использованием этого устройства. Обращаемся к нему так же по альтернативному имени:
ffmpeg.exe -f dshow -i audio="@device_cm_{33D9A762-90C8-11D0-BD43-00A0C911CE86}wave_{F585B65B-4690-4433-8109-F16C6389C066}" -rtbufsize 100M -f gdigrab -framerate 30 -probesize 10M -draw_mouse 1 -i desktop -acodec aac -c:v libx264 -r 30 -preset ultrafast -tune zerolatency -crf 25 -pix_fmt yuv420p -f flv rtmp://demo.flashphoner.com:1935/live/rtmp_stream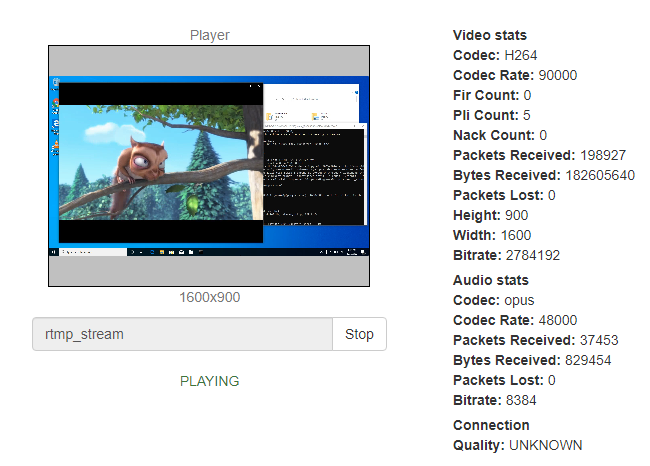
FFmpeg скриншаринг под Linux
В этом примере мы запускаем скриншаринг на ОС Ubuntu Desktop 20.04 LTS.
Начнем с определения доступных для захвата аудиоустройств. Выполните в консоли следующую команду:
pacmd list-sourcesВывод будет примерно таким как на скриншоте. Для дальнейшей работы нас интересует устройство, которое в Ubuntu называется «Monitor of Built-in Audio Analog Stereo». Это виртуальное устройство, которое, как и его кузен «Windows Stereo Mix», позволяет смешивать системные звуки и звуковой поток, получаемый с микрофона. Для дальнейшей работы нам понадобится значение индекса этого устройства.

Запускаем скриншаринг в поток с помощью FFmpeg:
ffmpeg -f pulse -ac 2 -i 0 -f x11grab -rtbufsize 100M -s 1200x720 -framerate 30 -probesize 10M -draw_mouse 1 -i :0.0 -acodec aac -c:v libx264 -r 30 -preset ultrafast -tune zerolatency -crf 25 -pix_fmt yuv420p -f flv rtmp://demo.flashphoner.com:1935/live/rtmp_streamгде:
//захват аудио составляющей скриншаринга
-f pulse — драйвер захвата звука Linux;
-ac 2 — режим аудио «стерео» (-ac 1 — режим аудио «моно»);
-i 0 — указываем индекс устройства для захвата аудио. Как мы ранее выяснили, для «Monitor of Built-in Audio Analog Stereo» это «0» ;
//захват видео составляющей скриншаринга
-f x11grab — опция необходима, если вы захватываете экран Linux;
-rtbufsize 100M — буфер под видео;
-s 1200×720 — размеры захватываемой на экране области. В px;
-framerate 30 — частота кадров при захвате экрана;
-probesize 10M — количество кадров необходимое FFmpeg для идентификации потока;
-draw_mouse 1 — захват движений мышки;
-i :0.0 — координаты «первой точки» захватываемой области экрана;
//кодирование аудио составляющей скриншаринга
-acodec aac — сжимать аудио будем кодеком aac;
//кодирование видео составляющей скриншаринга
-c:v libx264 — сжимать видео будем в формат MP4 кодеком x264;
-r 30 — кодек запишет видео с частотой 30 кадров в секунду;
-preset ultrafast — кодировать поток как можно быстрее (при записи экрана это актуально);
-tune zerolatency — опция кодека x264 для ускорения кодирования;
-crf 25 — качество записываемого видео (большее значение — хуже видео, меньшее — лучше);
-pix_fmt yuv420p — цветовой формат результирующего видео;
//формирование потока и передача его WCS
-f flv rtmp://demo.flashphoner.com:1935/live/rtmp_stream — запись в поток с именем «rtmp_stream» и передача его на сервер demo.flashphoner.com.
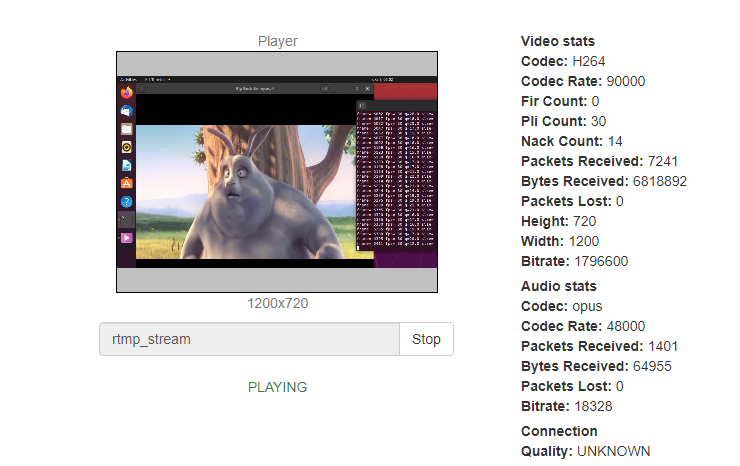
Проверяем.
Запускаем воспроизведение ролика в плеере, в консоли Ubuntu запускаем FFmpeg команду, которую разобрали выше:

На стороне WCS сервера открываем любой удобный плеер и запускаем воспроизведение захваченного потока скриншаринга по WebRTC (имя потока rtmp_stream).
Сравнение команд FFmpeg для Windows и Linux
Сравнительная таблица ключей FFmpeg для скриншаринга с захватом системного звука и передачи данных в поток на WCS
|
Windows |
Linux |
|
|---|---|---|
|
Драйвер захвата звука |
-f dshow |
-f pulse |
|
Указание устройства для захвата звука |
|
-i 0 |
|
Драйвер захвата экрана |
-f gdigrab |
-f x11grab |
|
Буфер под видео |
-rtbufsize 100M |
-rtbufsize 100M |
|
Размеры захватываемой на экране области |
-i desktop |
-i :0.0 -s 1200×720 |
|
Частота кадров при захвате экрана |
-framerate 30 |
-framerate 30 |
|
Количество кадров необходимое FFmpeg для идентификации поток |
-probesize 10M |
-probesize 10M |
|
Захватывать движения мыши |
-draw_mouse 1 |
-draw_mouse 1 |
|
Кодек для сжатия аудио |
-acodec aac |
-acodec aac |
|
Кодек для сжатия видео |
-c:v libx264 |
-c:v libx264 |
|
Частота кадров итогового видео |
-r 30 |
-r 30 |
|
Опция для ускорения кодирования |
-preset ultrafast |
-preset ultrafast |
|
Опция кодека x264 для ускорения кодирования |
-tune zerolatency |
-tune zerolatency |
|
Качество записываемого видео |
-crf 25 |
-crf 25 |
|
Цветовой формат результирующего видео |
-pix_fmt yuv420p |
-pix_fmt yuv420p |
|
Запись в поток на сервер demo.flashphoner.com |
-f flv rtmp://demo.flashphoner.com:1935/live/rtmp_stream |
-f flv rtmp://demo.flashphoner.com:1935/live/rtmp_stream |
Итог
Сегодня мы в подробностях разобрали тонкости скриншаринга со звуком при помощи FFmpeg для операционных систем Windows и Linux. В дальнейшем, с потоком скриншаринга, который был захвачен на сервере можно производить любые действия, поддерживаемые WCS. Он может быть записан, воспроизведен, ретранслирован, транскодирован или добавлен к микшеру.
Удачного стриминга!
Ссылки
Наш демо сервер
WCS на Amazon EC2 — Быстрое развертывание WCS на базе Amazon
WCS на DigitalOcean — Быстрое развертывание WCS на базе DigitalOcean
WCS в Docker — Запуск WCS как Docker контейнера
Документация по быстрому развертыванию и тестированию WCS сервера
Документация по захвату и транляции видеопотока на сервер при помощи FFmpeg
Instead of filming your desktop’s screen with a smartphone, you should record it “directly” from the system. Needless to say, quality of the video will be much better that way.
I’ll show you how to do it with FFmpeg on Windows.
I got most of the information from this article, customized it a bit and also performed several experiments with different settings.
First, you need to install FFmpeg build for Window and then a recording device — usually FFmpeg works with files, but for screen recording you need to provide a screen device, which will be the source for FFmpeg to record. From several possible options for Windows I picked this one.
Now, there are lots of possible quality settings for recording. But in general it’s all about the ballance between the nice picture and the file-size. Here are my experiments with different settings.
Default encoding settings, default FPS (30)
Nothing is specified, FFmpeg uses whatever default settings it has.
ffmpeg -f dshow -i video="screen-capture-recorder" output-no-codec.mp4CRF specified, default FPS (30)
Now we add the codec and specify the CRF parameter that controls the quality.
ffmpeg -f dshow -i video="screen-capture-recorder" -vcodec libx264 -crf 18 output.mp4Default encoding settings, FPS 20
When you record a screen, 30 FPS is actually too much, because it’s not a movie, you don’t need the video to be that smooth. So we can limit the framerate to 20 (or even lower). And first let’s leave the encoding settings as defaults again.
ffmpeg -f dshow -i video="screen-capture-recorder" -r 20 output.mp4CRF specified, FPS 20
And now with 20 FPS limit, but also with codec and CRF specified.
ffmpeg -f dshow -i video="screen-capture-recorder" -r 20 -vcodec libx264 -crf 18 output.mp4Finally, let’s see the results.
With each experiment I performed a one-minute-long screen-capture and I used different formats and containers (FLV, MP4, MKV) with different encoding and FPS settings.
Here’s a table with results (sorted by the file-size):
| Output file | Size, MB | CRF | FPS | MediaInfo report |
|---|---|---|---|---|
| output-no-codec.flv | 17.4 | — | 30 | open |
| output-no-codec-fps20.flv | 11.9 | — | 20 | open |
| output-codec-fps20.mp4 | 10.5 | 18 | 20 | open |
| output-codec.mkv | 9.16 | 18 | 30 | open |
| output-codec-fps20.mkv | 8.67 | 18 | 20 | open |
| output-no-codec-fps20.mkv | 8.56 | — | 20 | open |
| output-codec.mp4 | 8.44 | 18 | 30 | open |
| output-no-codec.mp4 | 7.40 | — | 30 | open |
| output-no-codec.mkv | 7.19 | — | 30 | open |
| output-no-codec-fps20.mp4 | 5.22 | — | 20 | open |
So, long story short: use AVC format, MP4 container, 20 FPS (or lower) and default encoding settings:
ffmpeg -f dshow -i video="screen-capture-recorder" -r 20 output.mp4My knowledge about video-encoding is close to nothing, so probably I’m wrong, but from these results I assume that FLV doesn’t use any encoding when not specified (that’s why it gets the biggest files (with the worst video quality an the same time)), and MP4/MKV always applies encoding (even when it wasn’t specified).
…But why default-encoded MKV with 20 FPS is bigger than default-encoded MKV with 30 FPS — I have no idea. And also why the smallest file is a result of default encoding without specifying the CRF 
If you need to go smaller, if you want to get the smallest file-size possible, then you need to operate with bitrate and profiles directly, do not rely on CRF only. This parameter, as I presume, is just an easy-way option for encoding-dummies like me.
[03.04.2019] Update: Grab from GDI
Actually, it is easier to grab directly from GDI. That way it will work out-of-the-box without installing additional devices. I wonder, why this option is not the first in the list.
Чтобы записать скринкаст с рабочего стола, есть много графических программ для этого. Но часто нет возможности их использовать по тем или иным причинам. В этой статье разберем, как можно записать скринкаст из консоли.
Для этого будетм использовать ffmpeg.
FFmpeg — это кодировщик и конвертер аудио/видео с интерфейсом командной строки и поддержкой большого количества входных и выходных форматов. Список его возможностей и количество опций довольно велико, поэтому попробуем разобраться в некоторых из них.
Содержание
- 1 Запись скринкаста без звука
- 2 Запись скринкаста со звуком
- 3 Перекодирование скринкаста
- 3.1 Кодирование видео без настроек
- 3.2 Кодирование видео с помощью кодека libx264 в формат MKV
- 3.3 Кодирование видео с помощью кодека Xvid
Запись скринкаста без звука
Для записи скринкаста будем использовать формат mov. Использование формата mov (QuickTime) без сжатия позволит сэкономить ресурсы процессора во время записи, но сильно скажется на размере конечного файла. В отличии от кодирования «на лету», которое создает файлы гораздо меньшего размера, но сильно нагружает процессор.
Пример записи скринкаста:
ffmpeg -r 50 -g 500 -s 1366x768 -f x11grab -i :0.0 -vcodec qtrle screencast.mov
где:
-f x11grab — источник сигнала, в данном случае вывод Х-сервера.
-s 1366×768 — размер захватываемой области, в данном случае соответствует разрешению монитора.
-r 50 — количество кадров в секунду.
-g 500 — каждый 500тый кадр будет ключевой.
-i :0.0 — экран X-сервера / номер монитора. Дополнительно можно указать смещение захватываемой области (положение верхнего левого угла) по X и Y следующим образом -i :0.0+10,20
-vcodec qtrle — видеокодек QuickTime.
screencast.mov — название файла в который будет записан скринкаст.
Размер захватываемой области вы определяете сами, в зависимости от вашего разрешения монитора.
Количество кадров в секунду, надо определять опытным путем. У кого-то на компьютере процессор тянет такое количество, а у кого-то притормаживает. Стандартно (и по умолчанию тоже) количество кадров в секунду — 25.
С ключевыми кадрами тоже надо экспериментировать. Если вы хотите выложить видео с каким-то багом, и не собираетесь в дальнейшем его как-то править в видео редакторах, то достаточно того что в примере. Если есть необходимость в дальнейшей правке видео, то лучше поставить ключевой кадр либо 80, либо 90, либо 100, либо 110. Тоже надо подбирать опытным путем. Но в таком случае размер записываемого файла будет больше.
Запись скринкаста со звуком
Для записи скринкаста со звуком, надо сначала посмотреть список доступных для записи устройств ALSA.
Это можно сделать, набрав команду в консоли:
arecord -l
У вас должно получиться что-то типа этого:
**** List of CAPTURE Hardware Devices ****
card 0: SB [HDA ATI SB], device 0: ALC887-VD Analog [ALC887-VD Analog]
  Subdevices: 1/1
  Subdevice #0: subdevice #0
card 0: SB [HDA ATI SB], device 2: ALC887-VD Analog [ALC887-VD Analog]
  Subdevices: 1/1
  Subdevice #0: subdevice #0
card 2: VX2000 [Microsoft® LifeCam VX-2000], device 0: USB Audio [USB Audio]
  Subdevices: 1/1
  Subdevice #0: subdevice #0
В данном примере есть web-камера Microsoft VX-2000 в которой встроен микрофон. И написано: card 2: далее device 0:. Запоминаем эти цифры. И пишем следующую команду для записи скринкаста с видео:
ffmpeg -f alsa -ac 1 -i hw:2,0 -acodec pcm_s16le -f x11grab -s 1366x768 -r 50 -g 500 -i :0.0 -vcodec qtrle screencast.mov
где:
-f alsa — источник сигнала, в данном случае вывод c через аудио сервер.
-ac 1 — сколько каналов будем записывать.
-acodec pcm_s16le — запись с помощью кодека pcm_s16le без сжатия.
-i hw:2,0 — устройство с которого пойдет запись звука. В данном случае с card 2 и device 0 — это web-камера.(запятая между ними обязательна)
screencast.mov — название файла в который будет записан скринкаст.
Стоит отметить один момент. Если вы хотите записать стерео звук, то в опции -ac 1 надо поменять цифру 1 на цифру 2, что указывает на 2 канала (стерео)
Перекодирование скринкаста
Так как мы использовали в примерах видео и аудио без сжатия, то некоторым понадобится все же сжать наш большой файл.
Кодирование видео без настроек
ffmpeg -i screencast.mov screencast2.avi
На выходе получим перекодированный файл screencast2.avi. Но учтите, что качество перекодированного видео может быть не совсем приемлемым. Т.к. мы использовали все опции по умолчанию.
Кодирование видео с помощью кодека libx264 в формат MKV
ffmpeg -i screencast.mov -vcodec libx264 -vpre slow -crf 22 -threads 0 -acodec libmp3lame -ar 44100 -ab 128k screencast2.mkv
Чем меньше значение -crf, тем лучше качество и больше размер файла. Наиболее приемлемые примерные пределы от 18 до 28.
Кодирование видео с помощью кодека Xvid
ffmpeg -i screencast.mov -vcodec libxvid -qscale 8 -me_method full -mbd rd -flags +gmc+qpel+mv4 -trellis 1 -threads 0 -acodec libmp3lame -ab 128k -ac 2 screencast2.avi
Опция -qscale отражается на качестве итогового видео. Чем меньше значение, тем выше качество, больше размер видео и дольше кодирование. Значения лежат в пределах от 1 (лучшее качество) до 31 (худшее).
Skip to content
There are hundreds of programs available on the internet that promise to record/capture your screen into a video file. But the video quality produced by them is not as good as it should be. For example, I have used a commercial software suite TechSmith Camtasia, which comes with an excellent video editor, to record the screen and it did not produce a video to my satisfaction. At the same time, I have used an open-source tool FFmpeg to record the computer screen in Windows 10 and it produced a very high quality video – in fact, I could not see any difference between the live screen output quality and the captured video quality.
If you want to record Windows desktop screen into a video along with the sound being played in your PC, then here is how you can go about it:
- Download FFmpeg from https://www.ffmpeg.org/. Choose the static build for Windows from the downloads. Extract the contents of the downloading archive to a folder say C:FFMPEG.
- Download UScreenCapture DirectShow filter from http://www.umediaserver.net/components/index.html and install it in Windows. For some reason the 64-bit version does not work in Windows 10 64-bit. But 32-bit version works in both 32-bit and 64-bit versions of Windows 10.
- Right-click on speaker icon in Windows system tray and select Recording devices. In the small window that opens, right-click and select Show Disabled Devices. Select Stereo Mix and click on the Properties button.

- In the Stereo Mix properties, enable the device by choosing Use this device (enable) and then under the Listen tab uncheck the option Listen to this device. Finally click on the OK button to save settings.
- In the folder where you extracted FFmpeg archive, double-click on ff-prompt.bat file to open the FFmpeg command prompt.
- Give the following command in the FFmpeg command prompt window –
ffmpeg -list_devices true -f dshow -i dummy
Note down the audio Stereo Mix device name. For example in my Windows 10 PC, it shows “Stereo Mix (Realtek High Definition Audio)”.

- Now in order to capture the screen activity along with all the sound being played into a video file, you can give this command –
ffmpeg -f dshow -i video="UScreenCapture":audio="Stereo Mix (Realtek High Definition Audio)" "C:videosout.mp4"
Of course, the name of the audio device should be changed to whatever you discovered in the previous step. Similarly, the output video file should be changed to wherever you want to save the recorded video file. The video file extension can also be picked to be anything supported by FFmpeg like MKV or MPG, but the MP4 and MKV give the best quality and fast performance.
- Press q in the FFmpeg command prompt window whenever you want to stop the recording of the video.


Conclusion: You do not need any expensive software to record the screen activity into video along with the sound being played. You can record the Windows desktop using free and open-source tools like FFmpeg.
We use cookies on our website to give you the most relevant experience by remembering your preferences and repeat visits. By clicking “Accept”, you consent to the use of ALL the cookies.
(NOTE: Newer versions of FFmpeg now have the gdigrab format for Windows. I will eventually update this tutorial with information on it.)
For a tutorial on how to record an X11 desktop (Linux/Unix/BSD) with FFmpeg see:
https://antumdeluge.wordpress.com/2013/08/24/recording-the-screen-of-an-x11-unixlinuxbsd-desktop/
Setting Up:
The first thing that you will need to do (after you have FFmpeg installed) if you want to record your Windows® desktop is to install a DirectShow filter/driver that is designed specifically for this purpose. I can recommend two filters: UScreenCapture and Screen Capture Recorder. There are subtle differences between the two. By default:
- Unless explicitly declared Screen Capture Recorder will process 30 frames per second by default while UScreenCapture will only do 10. In FFmpeg it is necessary to declare FPS (-r option) before the input (-i option) in order to correctly process the desired frame rate. If you have trouble getting UScreenCapture to use a higher frame rate check this tutorial.
- UScreenCapture is free proprietary software. It is part of the Unreal Media Server. Screen Capture Recorder is open source software (contact author about license details).
Now you can use FFmpeg to display your available DirectShow capture sources: From a command line type “ffmpeg -list_devices true -f dshow -i dummy”. At the end of the output you will see a number of devices listed under “DirectShow video devices” and “DirectShow audio devices”.
Image 1-1: DirectShow capture sources listed by FFmpeg

Using FFmpeg to Record:
Some options that you may want to consider:
- Real-Time Buffer: If you have problems with buffer overflow and/or skipped frames you may want to set the real-time buffer option. Example: -rtbufsize 1500M
- Video Quality: If you do not want to lose any video quality two good encoder options are the huffyuv video codec or libx264 with the “-crf 0” or “-qp 0” options. Example: -crf 0 -vcodec libx264.
- Audio Quality: For lossless audio compression use the pcm_s16le audio codec. This is the most commonly used PCM/WAV format (signed 16-bit little endian). You can also use the flac codec, but in my experience pcm is less buggy. It is probably also a good idea to record with a single audio channel (mono) since most likely you will be recording from a single audio input (microphone). This will reduce the size of the output file. If you want to use a frequency other than the default (generally 44,100 Hz) you can specify the audio rate option. Example: -acodec pcm_s16le -ac 1 -ar 44100
Recording:
Use the ffmpeg command and optionally set the real-time buffer:
ffmpeg -rtbufsize 1500M
Set the format to “dshow”.
ffmpeg -rtbufsize 1500M -f dshow
To avoid a few frame rate problems if want something other than the default it is a good idea to set it before declaring the video input:
ffmpeg -rtbufsize 1500M -f dshow -r 30
Now choose the video input source. This should be typed exactly (letter casing does not matter on Windows® systems) as displayed in the list of DirectShow devices (Image 1-1):
ffmpeg -rtbufsize 1500M -f dshow -r 30 -i video=”UScreenCapture”
If you want to capture audio as well add a colon (:) and set the audio input source. Just like the video capture source this should be typed exactly as displayed in the list of DirectShow devices. Note from the picture above that on my system there is no closing brace in the microphone name:
ffmpeg -rtbufsize 1500M -f dshow -r 30 -i video=”UScreenCapture”:audio=”Microphone (Realtek AC’97 Audio”
Specify the video and audio encoders. It is not important which comes first (Note that -vcodec and -acodec can be substituted by -c:v and -c:a respectively).
Video: Remember to use “-crf 0” or “-qp 0” if you want lossless compression with libx264 (Note: crf stands for “Constant Rate Factor” and qp I believe stands for “Quantization Parameter”). According to the FFmpeg documentation qp is recommended over crf but I am unsure of the difference. If you want more information on crf vs qp this document may be helpful. Note: I am not sure if it is important when this option is declared:
ffmpeg -rtbufsize 1500M -f dshow -r 30 -i video=”UScreenCapture”:audio=”Microphone (Realtek AC’97 Audio” -crf 0 -vcodec libx264
A nice feature of the huffyuv format is that it uses all I-frames. This makes editing the video much more simple in some cases. It allows cropping of the video at any frame without the need for re-encoding. There is also a way use I-frames only with libx264 by setting the keyframe interval to 1 using the option x264opts. However, this may result in a greater chance of buffer overflow:
ffmpeg -rtbufsize 1500M -f dshow -r 30 -i video=”UScreenCapture”:audio=”Microphone (Realtek AC’97 Audio” -crf 0 -vcodec libx264 -x264opts keyint=1
For other supporting encoders you can force I-frames only by adding “-force_key_frames expr:1” after the video codec:
-vcodec libxvid -force_key_frames expr:1
See here for a list of lossless video encoders that FFmpeg can use.
Audio:
ffmpeg -rtbufsize 1500M -f dshow -r 30 -i video=”UScreenCapture”:audio=”Microphone (Realtek AC’97 Audio” -crf 0 -vcodec libx264 -acodec pcm_s16le -ac 1 -ar 44100
Notes On Encoding AAC Audio:
FFmpeg has a few different AAC encoders: aac, libvo_aacenc, libfaac, and libfdk_aac. However, the official build only supplies aac and libvo_aacenc. If you want to use one of the other encoders you will either have to compile FFmpeg yourself or find an unofficial download that includes them. libfdk_aac is considered to be the best and libvo_aacenc the worst. libvo_aacenc is more limited than the other encoders as it can only use constant bitrate (CBR). aac can use variable bitrate (VBR) but the encoder is disabled by default. You must add “-strict experimental” or “-strict -2” to the command line to use it:
-strict experimental -acodec aac
If you want to output VBR with aac use the audio quantizer switch (-q:a or -qscale:a) which receives a floating point value. The audio bitrate switch (-ab or -b:a) will create a reference bitrate for the quantizer. By default it is 128k and a quantizer value of about 1.1 will place the average bitrate (ABR) close to that. The following examples demonstrate how the quantizer’s value is affected by the reference bitrate:
-strict experimental -acodec aac -q:a 0.47 (ABR will be about 64k)
-strict experimental -acodec aac -q:a 1.1 (ABR will be about 128k)
-strict experimental -acodec aac -q:a 0.47 -b:a 256k (ABR will be about 113k)
-strict experimental -acodec aac -q:a 1.1 -b:a 256k (ABR will be about 212k)
Choosing a Video Container Format (e.g. File Extension):
Finally specify the output filename and container (e.g. .avi, .mp4, .mkv, etc.). Note: Some container formats will not work correctly with certain codecs:
ffmpeg -rtbufsize 1500M -f dshow -r 30 -i video=”UScreenCapture”:audio=”Microphone (Realtek AC’97 Audio” -crf 0 -vcodec libx264 -acodec pcm_s16le -ac 1 -ar 44100 “out video.avi”
Troubleshooting:
In my experience I have had problems with buffer overflow, frame rate and audio synchronization on different systems. This may be due to higher screen resolutions or limited resources. If you are having similar problems some of these suggestions might help:
Audio and Video Out of Sync:
Set Async to Match Video Frame Rate:
This option seems to work the best for me to fix audio sync problems. Use -async and set its value to the same as the desired video frame rate:
-r 30 -vcodec libx264 -crf 0 -acodec pcm_s16le -ac 1 -ar 44100 -async 30
Setting Pixel Format:
Adding the pixel format option before the video and audio codecs may help with audio synchronization issues. Screen Capture Recorder and UScreenCapture both seem to process frames in rgb24 by default:
-crf 0 -pix_format rgb24 -vcodec libx264 -acodec …
Buffer Overflow:
Windows Resolution and Themes:
It may be possible to avoid buffer overflow by disabling any desktop themes that use transparency (e.g. Aero) or reducing the display resolution. This will free up some system resources.
Limiting I-frames:
Intra frames, a.k.a. key frames or I-frames, are larger than other types. Some encoders output in key frames only which requires a larger load on the encoder. If the encoder allows it, reducing the amount encoded into the video will probably greatly help. You can use the -x264opts switch to change the I-frames interval with the libx264 encoder:
-vcodec libx264 -x264opts keyint=100:min-keyint=80
Otherwise you can use the -force_key_frames expr:expr switch. But this is much more complicated.
Using HuffYUV FFmpeg Variant:
If you are having problems with the huffyuv encoder you can alternatively try the FFmpeg variant ffvhuff. This, however, will probably not solve problems with buffer overflow.
Using MPEG4 Encoder (Xvid):
If you are having trouble solving problems with any lossless encoders then I recommend trying to encode into the Xvid (MPEG-4 Part 2 ASP) format using the mpeg4 encoder. Unfortunately there will be some quality loss because the pixel format will be downscaled to yuv420p. Quality loss can be minimized by setting the video quantizer value (-q:v or -qscale:v) to “0”:
-vcodec mpeg4 -vtag xvid -q:v 0
Re-Processing Output Video to Correct Audio Synchronization:
If you are unable to prevent audio synchronization problems then as a last resort you can try running the output video file through some other video software which can re-sync. Below are some software options and the steps to do this.
VirtualDub:
So far this is the only solution I have found for reprocessing the video. I am currently checking out Mencoder to see if it is possible.
- Start VirtualDub and the output video file.
- In the menu bar: Select “Video” then “Direct stream copy”. Also Make sure that “Direct stream copy” is selected under “Audio”. This copies the video and audio streams without the need to re-encode.
- Again under “Video” select “Frame Rate”.
- Under “Source rate adjustment” select “Change so video and audio durations match” and press “OK”.
- If you want the output frame rate to be the same as input: Under “Frame rate conversion” select “Convert to fps:” and input the source frame rate in the adjacent field. (Note: You may need to do this step separately after you synchronize the audio)
- Go back to the menu bar and select “File” -> “Save as AVI”. Choose a file name and press “Save”.

Problems with this method: Depending on the change in frame rate the resulting video could end up “choppy”.
Re-encoding Video with FFmpeg or Mencoder:
In my testing I have been able to resync audio by simply re-encoding the video. This leads me to believe that though scanning the files shows that the video is encoded at 30fps it is actually not:
ffmpeg -i video_in.avi -vcodec libx264 -crf 0 -acodec copy video_out.avi
mencoder -ovc x264 -x264encopts crf=0 -oac copy -o video_out.avi video_in.avi
This is the command I tried:
.ffmpeg.exe -y -f gdigrab -framerate 30 -i desktop dshow -i "Stereo Mix (Realtek High Definition Audio)" -t 00:00:05 output.mkv
These are my devices:
PS C:Users[redacted]Desktoprecordingsoutputstaticbin> .ffmpeg.exe -list_devices true -f dshow -i dummy -hide_banner
[dshow @ 00000267a170b840] DirectShow video devices (some may be both video and audio devices)
[dshow @ 00000267a170b840]  "Lenovo EasyCamera"
[dshow @ 00000267a170b840]     Alternative name "@device_pnp_\?usb#vid_174f&pid_14e8&mi_00#6&1ab44360&0&0000#{65e8773d-8f56-11d0-a3b9-00a0c9223196}global"
[dshow @ 00000267a170b840] DirectShow audio devices
[dshow @ 00000267a170b840]  "Microphone Array (Realtek High Definition Audio)"
[dshow @ 00000267a170b840]     Alternative name "@device_cm_{33D9A762-90C8-11D0-BD43-00A0C911CE86}wave_{20835F58-BA76-43BA-A5FA-BFB93F9B2325}"
[dshow @ 00000267a170b840]  "Stereo Mix (Realtek High Definition Audio)"
[dshow @ 00000267a170b840]     Alternative name "@device_cm_{33D9A762-90C8-11D0-BD43-00A0C911CE86}wave_{B56C8754-8B13-48A9-A333-BE99220C6650}"
dummy: Immediate exit requested
If all I wanted was the video, then this works:
.ffmpeg.exe -y -f gdigrab -framerate 30 -i desktop -t 00:00:05 output.mkv
Other failed attempts:
.ffmpeg.exe -y -f gdigrab -framerate 30 -i desktop dshow -i audio="Stereo Mix (Realtek High Definition Audio)" -t 00:00:05 output.mkv
.ffmpeg.exe -y -f gdigrab -framerate 30 -i desktop dshow -i "Stereo Mix (Realtek High Definition Audio)"       -t 00:00:05 output.mkv
.ffmpeg.exe -y -f gdigrab -framerate 30 -i desktop       -i "Stereo Mix (Realtek High Definition Audio)"       -t 00:00:05 output.mkv
I even tried some others I found on other forums:
.ffmpeg.exe -video_size 1024x768 -framerate 25 -f gdigrab -i :0.0+0,0 -f alsa -ac 2 -i pulse -acodec aac -strict experimental output.fl
.ffmpeg.exe -video_size 1024x768 -framerate 25 -f gdigrab -i desktop -f alsa -ac 2 -i pulse -acodec aac -strict experimental output.fl
Let me make it clear: I am using Windows, which in my experience means MOST tutorials about which device to use don’t work.