Часто при реализации структуры на базе Windows Server возникают задачи связанные с настройкой сервера для файлов и распределением прав на пользователейгруппы.
В нашем случае мы будем настраивать файловый сервер на Windows Server 2019.
1. Подготовка.
Для того чтобы настроить файловый сервер на Windows Server 2019, требуется установить операционную систему на виртуальную или физическую машину. Активировать операционную систему и подключиться на сервер с правами администратора.
2. Установка роли файлового сервера.
Чтобы установить роль файлового сервера, требуется:
- Зайти в диспетчер серверов.
- Управление => Добавить роли и компоненты.
- В мастере добавления ролей нажимаем “Далее” до Ролей сервера.
- Устанавливаем роль “Файловый сервер” и нажимаем “Далее”.
- Нажимаем “Установить”Нажимаем “Установить”.
3. Настройка файлового сервера.
- Заходим в Диспетчер Серверов => Файловые службы и службы хранилища => Общие ресурсы.
- Нажимаем “Задачи” и выбираем “Новый общий ресурс”.
- Выбираем подходящий нам профиль общего файлового сервера. В нашем случае мы выбираем “Общий ресурс SMB — быстрый профиль” и нажимаем “Далее”.
- Выбираем том на котором будет располагаться папка для доступа по сети, нажимаем “Далее”.
- Создаем имя общего ресурса, нажимаем “Далее”.
- В следующем окне выбираем требуемые параметры и нажимаем “Далее”.
- В окне “Распределения разрешение для управления доступом” мы настраиваем параметры безопасности на сетевую папку. А именно распределяем правами разрешения для определенных пользователей или групп, нажимаем “Далее”.
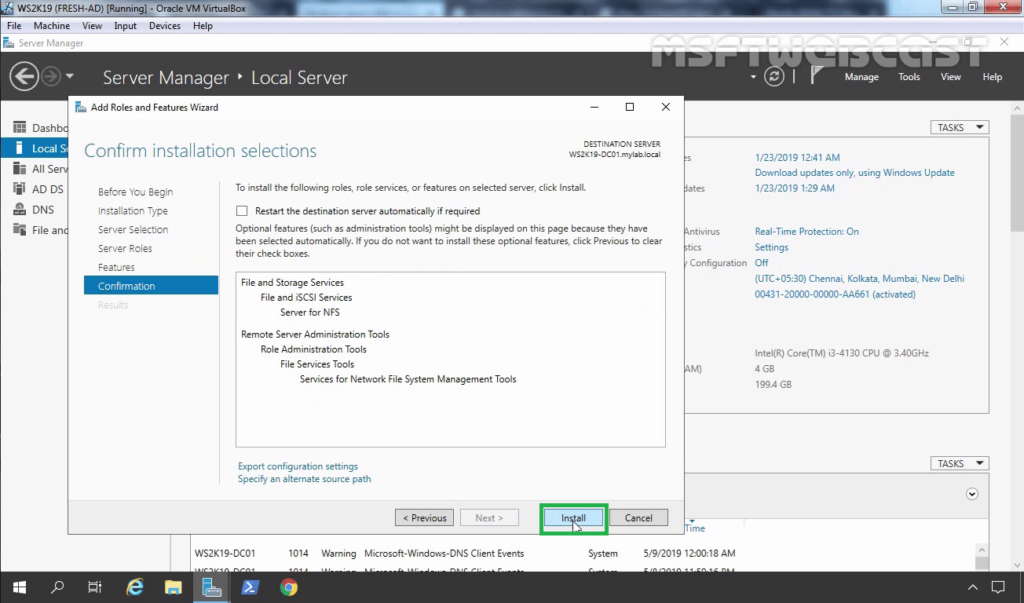
- В подтверждающем окне мы видим какие параметры будут сделаны и нажимаем “Создать”.

Рисунок 1 — Подтверждение выбора в мастере создания ресурсов
Убеждаемся в правильной настройки общей папки.
4. Проверка работоспособности файлового сервера.
Заходим на рабочую машину расположенную внутри локальной сеть. Подключаемся через проводник на сервер в нашем случае мы подключаемся к \10.15.73.38 так же можно вводить адрес сервера \domain.site.ru или по имени сервера \file-server
После авторизации мы подключились на сервере и видим нашу общую папку:

Рисунок 2 — Созданная общая папка
Мы провели настройку файлового сервера, чтобы можно было пользоваться общими папками и распределять права на определенные файлы. В дальнейшем можно увеличивать количество папок и строить файловую структуру по нуждам компании.
Эти и другие настройки для наших клиентов мы осуществляем в рамках ИТ-аутсорсинга.
| ms.assetid | title | description | ms.author | manager | ms.topic | author | ms.date |
|---|---|---|---|---|---|---|---|
|
0f2a7f7b-aca8-4e5d-ad67-4258e88bc52f |
What’s new in storage in Windows Server |
Learn more about: What’s new in Storage in Windows Server |
jgerend |
dongill |
article |
jasongerend |
05/29/2019 |
What’s new in Storage in Windows Server
Applies to: Windows Server 2022, Windows Server 2019, Windows Server 2016
This topic explains the new and changed functionality in storage in Windows Server 2019, Windows Server 2016, and Windows Server Semi-Annual Channel releases.
What’s new in storage in Windows Server, version 1903
This release of Windows Server adds the following changes and technologies.
Storage Migration Service now migrates local accounts, clusters, and Linux servers
Storage Migration Service makes it easier to migrate servers to a newer version of Windows Server. It provides a graphical tool that inventories data on servers and then transfers the data and configuration to newer servers—all without apps or users having to change anything.
When using this version of Windows Server to orchestrate migrations, we’ve added the following abilities:
- Migrate local users and groups to the new server
- Migrate storage from failover clusters
- Migrate storage from a Linux server that uses Samba
- More easily sync migrated shares into Azure by using Azure File Sync
- Migrate to new networks such as Azure
For more info about Storage Migration Service, see Storage Migration Service overview.
System Insights disk anomaly detection
System Insights is a predictive analytics feature that locally analyzes Windows Server system data and provides insight into the functioning of the server. It comes with a number of built-in capabilities, but we’ve added the ability to install additional capabilities via Windows Admin Center, starting with disk anomaly detection.
Disk anomaly detection is a new capability that highlights when disks are behaving differently than usual. While different isn’t necessarily a bad thing, seeing these anomalous moments can be helpful when troubleshooting issues on your systems.
This capability is also available for servers running Windows Server 2019.
Windows Admin Center enhancements
A new release of Windows Admin Center is out, adding new functionality to Windows Server. For info on the latest features, see Windows Admin Center.
What’s new in storage in Windows Server 2019 and Windows Server, version 1809
This release of Windows Server adds the following changes and technologies.
Manage storage with Windows Admin Center
Windows Admin Center is a new locally deployed, browser-based app for managing servers, clusters, hyper-converged infrastructure with Storage Spaces Direct, and Windows 10 PCs. It comes at no additional cost beyond Windows and is ready for production use.
To be fair, Windows Admin Center is a separate download that runs on Windows Server 2019 and other versions of Windows, but it’s new and we didn’t want you to miss it…
Storage Migration Service
Storage Migration Service is a new technology that makes it easier to migrate servers to a newer version of Windows Server. It provides a graphical tool that inventories data on servers, transfers the data and configuration to newer servers, and then optionally moves the identities of the old servers to the new servers so that apps and users don’t have to change anything. For more info, see Storage Migration Service.
Storage Spaces Direct (Windows Server 2019 only)
There are a number of improvements to Storage Spaces Direct in Windows Server 2019 (Storage Spaces Direct isn’t included in Windows Server, Semi-Annual Channel):
-
Deduplication and compression for ReFS volumes
Store up to ten times more data on the same volume with deduplication and compression for the ReFS filesystem. (It’s just one click to turn on with Windows Admin Center.) The variable-size chunk store with optional compression maximizes savings rates, while the multi-threaded post-processing architecture keeps performance impact minimal. Supports volumes up to 64 TB and will deduplicate the first 4 TB of each file.
-
Native support for persistent memory
Unlock unprecedented performance with native Storage Spaces Direct support for persistent memory modules, including Intel® Optane™ DC PM and NVDIMM-N. Use persistent memory as cache to accelerate the active working set, or as capacity to guarantee consistent low latency on the order of microseconds. Manage persistent memory just as you would any other drive in PowerShell or Windows Admin Center.
-
Nested resiliency for two-node hyper-converged infrastructure at the edge
Survive two hardware failures at once with an all-new software resiliency option inspired by RAID 5+1. With nested resiliency, a two-node Storage Spaces Direct cluster can provide continuously accessible storage for apps and virtual machines even if one server node goes down and a drive fails in the other server node.
-
Two-server clusters using a USB flash drive as a witness
Use a low-cost USB flash drive plugged into your router to act as a witness in two-server clusters. If a server goes down and then back up, the USB drive cluster knows which server has the most up-to-date data. For more info, see the Storage at Microsoft blog and documentation on how to deploy a file share witness.
-
Windows Admin Center
Manage and monitor Storage Spaces Direct with the new purpose-built Dashboard and experience in Windows Admin Center. Create, open, expand, or delete volumes with just a few clicks. Monitor performance like IOPS and IO latency from the overall cluster down to the individual SSD or HDD. Available at no additional cost for Windows Server 2016 and Windows Server 2019.
-
Performance history
Get effortless visibility into resource utilization and performance with built-in history. Over 50 essential counters spanning compute, memory, network, and storage are automatically collected and stored on the cluster for up to one year. Best of all, there’s nothing to install, configure, or start – it just works. Visualize in Windows Admin Center or query and process in PowerShell.
-
Scale up to 4 PB per cluster
Achieve multi-petabyte scale – great for media, backup, and archival use cases. In Windows Server 2019, Storage Spaces Direct supports up to 4 petabytes (PB) = 4,000 terabytes of raw capacity per storage pool. Related capacity guidelines are increased as well: for example, you can create twice as many volumes (64 instead of 32), each twice as large as before (64 TB instead of 32 TB). Stitch multiple clusters together into a cluster set for even greater scale within one storage namespace. For more info, see the Storage at Microsoft blog.
-
Mirror-accelerated parity is 2X faster
With mirror-accelerated parity you can create Storage Spaces Direct volumes that are part mirror and part parity, like mixing RAID-1 and RAID-5/6 to get the best of both. (It’s easier than you think in Windows Admin Center.) In Windows Server 2019, the performance of mirror-accelerated parity is more than doubled relative to Windows Server 2016 thanks to optimizations.
-
Drive latency outlier detection
Easily identify drives with abnormal latency with proactive monitoring and built-in outlier detection, inspired by Microsoft Azure’s long-standing and successful approach. Whether it’s average latency or something more subtle like 99th percentile latency that stands out, slow drives are automatically labeled in PowerShell and Windows Admin Center with ‘Abnormal Latency’ status.
-
Manually delimit the allocation of volumes to increase fault tolerance
This enables admins to manually delimit the allocation of volumes in Storage Spaces Direct. Doing so can significantly increase fault tolerance under certain conditions, but imposes some added management considerations and complexity. For more info, see Delimit the allocation of volumes.
Storage Replica
There are a number of improvements to Storage Replica in this release:
Storage Replica in Windows Server, Standard Edition
You can now use Storage Replica with Windows Server, Standard Edition in addition to Datacenter Edition. Storage Replica running on Windows Server, Standard Edition, has the following limitations:
- Storage Replica replicates a single volume instead of an unlimited number of volumes.
- Volumes can have a size of up to 2 TB instead of an unlimited size.
Storage Replica log performance improvements
We also made improvements to how the Storage Replica log tracks replication, improving replication throughput and latency, especially on all-flash storage as well as Storage Spaces Direct clusters that replicate between each other.
To gain the increased performance, all members of the replication group must run Windows Server 2019.
Test failover
You can now temporarily mount a snapshot of the replicated storage on a destination server for testing or backup purposes. For more information, see Frequently Asked Questions about Storage Replica.
Windows Admin Center support
Support for graphical management of replication is now available in Windows Admin Center via the Server Manager tool. This includes server-to-server replication, cluster-to-cluster, as well as stretch cluster replication.
Miscellaneous improvements
Storage Replica also contains the following improvements:
- Alters asynchronous stretch cluster behaviors so that automatic failovers now occur
- Multiple bug fixes
SMB
-
SMB1 and guest authentication removal: Windows Server no longer installs the SMB1 client and server by default. Additionally, the ability to authenticate as a guest in SMB2 and later is off by default. For more information, review SMBv1 is not installed by default in Windows 10, version 1709 and Windows Server, version 1709.
-
SMB2/SMB3 security and compatibility: Additional options for security and application compatibility were added, including the ability to disable oplocks in SMB2+ for legacy applications, as well as require signing or encryption on per-connection basis from a client. For more information, review the SMBShare PowerShell module help.
Data Deduplication
- Data Deduplication now supports ReFS: You no longer must choose between the advantages of a modern file system with ReFS and the Data Deduplication: now, you can enable Data Deduplication wherever you can enable ReFS. Increase storage efficiency by upwards of 95% with ReFS.
- DataPort API for optimized ingress/egress to deduplicated volumes: Developers can now take advantage of the knowledge Data Deduplication has about how to store data efficiently to move data between volumes, servers, and clusters efficiently.
File Server Resource Manager
Windows Server 2019 includes the ability to prevent the File Server Resource Manager service from creating a change journal (also known as a USN journal) on all volumes when the service starts. This can conserve space on each volume, but will disable real-time file classification. For more information, see File Server Resource Manager overview.
What’s new in storage in Windows Server, version 1803
File Server Resource Manager
Windows Server, version 1803 includes the ability to prevent the File Server Resource Manager service from creating a change journal (also known as a USN journal) on all volumes when the service starts. This can conserve space on each volume, but will disable real-time file classification. For more information, see File Server Resource Manager overview.
What’s new in storage in Windows Server, version 1709
Windows Server, version 1709 is the first Windows Server release in the Semi-Annual Channel. The Semi-Annual Channel is a Software Assurance benefit and is fully supported in production for 18 months, with a new version every six months.
For more information, see Windows Server Semi-annual Channel Overview.
Storage Replica
The disaster recovery protection added by Storage Replica is now expanded to include:
- Test failover: the option to mount the destination storage is now possible through the test failover feature. You can mount a snapshot of the replicated storage on destination nodes temporarily for testing or backup purposes. For more information, see Frequently Asked Questions about Storage Replica.
- Windows Admin Center support: Support for graphical management of replication is now available in Windows Admin Center via the Server Manager tool. This includes server-to-server replication, cluster-to-cluster, as well as stretch cluster replication.
Storage Replica also contains the following improvements:
- Alters asynchronous stretch cluster behaviors so that automatic failovers now occur
- Multiple bug fixes
SMB
-
SMB1 and guest authentication removal: Windows Server, version 1709 no longer installs the SMB1 client and server by default. Additionally, the ability to authenticate as a guest in SMB2 and later is off by default. For more information, review SMBv1 is not installed by default in Windows 10, version 1709 and Windows Server, version 1709.
-
SMB2/SMB3 security and compatibility: Additional options for security and application compatibility were added, including the ability to disable oplocks in SMB2+ for legacy applications, as well as require signing or encryption on per-connection basis from a client. For more information, review the SMBShare PowerShell module help.
Data Deduplication
- Data Deduplication now supports ReFS: You no longer must choose between the advantages of a modern file system with ReFS and the Data Deduplication: now, you can enable Data Deduplication wherever you can enable ReFS. Increase storage efficiency by upwards of 95% with ReFS.
- DataPort API for optimized ingress/egress to deduplicated volumes: Developers can now take advantage of the knowledge Data Deduplication has about how to store data efficiently to move data between volumes, servers, and clusters efficiently.
What’s new in storage in Windows Server 2016
Storage Spaces Direct
Storage Spaces Direct enables building highly available and scalable storage using servers with local storage. It simplifies the deployment and management of software-defined storage systems and unlocks use of new classes of disk devices, such as SATA SSD and NVMe disk devices, that were previously not possible with clustered Storage Spaces with shared disks.
What value does this change add?
Storage Spaces Direct enables service providers and enterprises to use industry standard servers with local storage to build highly available and scalable software defined storage. Using servers with local storage decreases complexity, increases scalability, and enables use of storage devices that were not previously possible, such as SATA solid state disks to lower cost of flash storage, or NVMe solid state disks for better performance.
Storage Spaces Direct removes the need for a shared SAS fabric, simplifying deployment and configuration. Instead it uses the network as a storage fabric, leveraging SMB3 and SMB Direct (RDMA) for high-speed, low-latency CPU efficient storage. To scale out, simply add more servers to increase storage capacity and I/O performance
For more information, see the Storage Spaces Direct.
What works differently?
This capability is new in Windows Server 2016.
Storage Replica
Storage Replica enables storage-agnostic, block-level, synchronous replication between servers or clusters for disaster recovery, as well as stretching of a failover cluster between sites. Synchronous replication enables mirroring of data in physical sites with crash-consistent volumes to ensure zero data loss at the file-system level. Asynchronous replication allows site extension beyond metropolitan ranges with the possibility of data loss.
What value does this change add?
Storage Replication enables you to do the following:
- Provide a single vendor disaster recovery solution for planned and unplanned outages of mission critical workloads.
- Use SMB3 transport with proven reliability, scalability, and performance.
- Stretch Windows failover clusters to metropolitan distances.
- Use Microsoft software end to end for storage and clustering, such as Hyper-V, Storage Replica, Storage Spaces, Cluster, Scale-Out File Server, SMB3, Deduplication, and ReFS/NTFS.
- Help reduce cost and complexity as follows:
- Is hardware agnostic, with no requirement for a specific storage configuration like DAS or SAN.
- Allows commodity storage and networking technologies.
- Features ease of graphical management for individual nodes and clusters through Failover Cluster Manager.
- Includes comprehensive, large-scale scripting options through Windows PowerShell.
- Help reduce downtime, and increase reliability and productivity intrinsic to Windows.
- Provide supportability, performance metrics, and diagnostic capabilities.
For more information, see the Storage Replica in Windows Server 2016.
What works differently?
This capability is new in Windows Server 2016.
Storage Quality of Service
You can now use storage quality of service (QoS) to centrally monitor end-to-end storage performance and create management policies using Hyper-V and CSV clusters in Windows Server 2016.
What value does this change add?
You can now create storage QoS policies on a CSV cluster and assign them to one or more virtual disks on Hyper-V virtual machines. Storage performance is automatically readjusted to meet policies as the workloads and storage loads fluctuate.
- Each policy can specify a reserve (minimum) and/or a limit (maximum) to be applied to a collection of data flows, such as a virtual hard disk, a single virtual machine or a group of virtual machines, a service, or a tenant.
- Using Windows PowerShell or WMI, you can perform the following tasks:
- Create policies on a CSV cluster.
- Enumerate policies available on a CSV cluster.
- Assign a policy to a virtual hard disk of a Hyper-V virtual machine.
- Monitor the performance of each flow and status within the policy.
- If multiple virtual hard disks share the same policy, performance is fairly distributed to meet demand within the policy’s minimum and maximum settings. Therefore, a policy can be used to manage a virtual hard disk, a virtual machine, multiple virtual machines comprising a service, or all virtual machines owned by a tenant.
What works differently?
This capability is new in Windows Server 2016. Managing minimum reserves, monitoring flows of all virtual disks across the cluster via a single command, and centralized policy based management were not possible in previous releases of Windows Server.
For more information, see Storage Quality of Service
Data Deduplication
| Functionality | New or Updated | Description |
|---|---|---|
| Support for Large Volumes | Updated | Prior to Windows Server 2016, volumes had to specifically sized for the expected churn, with volume sizes above 10 TB not being good candidates for deduplication. In Windows Server 2016, Data Deduplication supports volume sizes up to 64 TB. |
| Support for Large Files | Updated | Prior to Windows Server 2016, files approaching 1 TB in size were not good candidates for deduplication. In Windows Server 2016, files up to 1 TB are fully supported. |
| Support for Nano Server | New | Data Deduplication is available and fully supported in the new Nano Server deployment option for Windows Server 2016. |
| Simplified Backup Support | New | In Windows Server 2012 R2, Virtualized Backup Applications, such as Microsoft’s Data Protection Manager, were supported through a series of manual configuration steps. In Windows Server 2016, a new default Usage Type «Backup», has been added for seamless deployment of Data Deduplication for Virtualized Backup Applications. |
| Support for Cluster OS Rolling Upgrades | New | Data Deduplication fully supports the new Cluster OS Rolling Upgrade feature of Windows Server 2016. |
SMB hardening improvements for SYSVOL and NETLOGON connections
In Windows 10 and Windows Server 2016 client connections to the Active Directory Domain Services default SYSVOL and NETLOGON shares on domain controllers now require SMB signing and mutual authentication (such as Kerberos).
What value does this change add?
This change reduces the likelihood of man-in-the-middle attacks.
What works differently?
If SMB signing and mutual authentication are unavailable, a Windows 10 or Windows Server 2016 computer won’t process domain-based Group Policy and scripts.
[!NOTE]
The registry values for these settings aren’t present by default, but the hardening rules still apply until overridden by Group Policy or other registry values.
For more information on these security improvements — also referred to as UNC hardening, see Microsoft Knowledge Base article 3000483 and MS15-011 & MS15-014: Hardening Group Policy.
Work Folders
Improved change notification when the Work Folders server is running Windows Server 2016 and the Work Folders client is Windows 10.
What value does this change add?
For Windows Server 2012 R2, when file changes are synced to the Work Folders server, clients are not notified of the change and wait up to 10 minutes to get the update. When using Windows Server 2016, the Work Folders server immediately notifies Windows 10 clients and the file changes are synced immediately.
What works differently?
This capability is new in Windows Server 2016. This requires a Windows Server 2016 Work Folders server and the client must be Windows 10.
If you’re using an older client or the Work Folders server is Windows Server 2012 R2, the client will continue to poll every 10 minutes for changes.
ReFS
The next iteration of ReFS provides support for large-scale storage deployments with diverse workloads, delivering reliability, resiliency, and scalability for your data.
What value does this change add?
ReFS introduces the following improvements:
- ReFS implements new storage tiers functionality, helping deliver faster performance and increased storage capacity. This new functionality enables:
- Multiple resiliency types on the same virtual disk (using mirroring in the performance tier and parity in the capacity tier, for example).
- Increased responsiveness to drifting working sets.
- The introduction of block cloning substantially improves the performance of VM operations, such as .vhdx checkpoint merge operations.
- The new ReFS scan tool enables the recovery of leaked storage and helps salvage data from critical corruptions.
What works differently?
These capabilities are new in Windows Server 2016.
Additional References
- What’s New in Windows Server 2016
— Advertisement —
Hello, in this opportunity, we are going to talk a little about Windows Server 2019. Specifically about the file server and how to enable it. This is a server that is configured to provide a central location in the local network. The goal is to store files and share them with domain users. In this way, users can have access to files and applications. In other words, the file server is a simple and effective solution for sharing data. For that reason, let’s see how to enable the file server in Windows Server 2019
How to create a shared folder in Windows Server 2019
The first thing we have to do is create a new folder inside the server. This folder will function as a file server. Once created, you need to enter its properties. Next, go to the Sharing tab. Additionally, click on Advanced Sharing

In the next window, check the box corresponding to Share this folder. It is also possible to limit the number of simultaneous users in the folder. Press accept to continue.

From the same window, click on the Permissions menu. In this way, we will modify the access permissions of the folder. In the first place, remove the Everyone user group. This is done for security. In addition, click on the Add menu.

Then choose the group of users you want to have access to the folder:

For the purposes of this example, we have selected the Domain Users. Then give it read and write permission in the folder. This guarantees full access to the files by the selected users.

After applying the changes, press OK to set them. In the same way, the access path for the client machines is shown. With these steps, the folder for the file server has already been correctly configured. To check its functionality, simply log in from any client computer. Then access the newly created folder.

Configuring the file server in Windows Server 2019.
Next, we will manage the file server in Windows Server 2019. With this in mind, please enter the Server Dashboard and from the left menu select File and Storage Services.

In the next window click on Shares. Immediately view the shared folder:

Then double click on the folder to enter the properties of the folder. In this menu go to the Settings section. Additionally, click on the first option corresponding to Enable acces-based enumeration. This option allows users to only see the folders that have permission to be edited, the ones that are read-only will be hidden. This configuration is very useful to protect the privacy of the folders.

Adding the File Server Resource Manager
This function is enabled from the Server Dashboard. Specifically with the Add roles and features wizard. If you want to know how to do it, I invite you to check our post about IIS in Windows Server 2019. In this case, choose Server Roles. Then scroll down to File and Storage Services. Then check the box File Server Resources Manager.

Press next and wait while the wizard enables the resource.

Access to the File Server Resources Manager.
To access the recently created tool, please open the Server Dashboard. Now open the Tools menu and select it.

Immediately the menu will be displayed with the different options.

Some options shown in the window are as follows:
- Quota manager: this option allows you to define a space limit for users to add files to the shared folder. Consequently, the capacity of the disk on the server is not affected.
- File Screening Manager: This option allows access to a series of templates where elements such as executable files, video, audio, etc. are blocked.
Conclusion
Ultimately we have seen how to enable the file server in Windows Server 2019. With this option we give the ability to the clients of the server, to enter the desired data. In addition, it is possible to control the quota, size and amount of information available. All right, that’s it for the moment. See you later.
Introduction
In Windows Server 2019, Microsoft introduced a brand new feature called Storage Migration Service (SMS). With SMS, you can migrate unstructured data from any Windows Server version (even Windows Server 2003 if you still have them around) into physical, virtual machines, Azure IaaS, and Azure Files. It’s super-fast, consistent, and scalable, it takes care of all the complexity such as permissions, share properties, encrypted, attributes, in-use files, network settings, names, and Active Directory membership. The following diagram from Microsoft shows all the supported scenarios for Storage Migration Service in Windows Server 2019. SMS leverages the SMB protocol to migrate your data.

Storage Migration Service in Windows Server 2019 [image credit: Microsoft]
Storage Migration Service ships in Windows Server 2019 (Standard and Datacenter edition), and Windows Admin Center (WAC) is the primary management tool for Storage Migration Service, Windows Admin Center (WAC) leverages PowerShell under the covers.
In this article, I will show you step by step how to migrate a file server from Windows Server 2016 build 14393 to Windows Server 2019 build 17763. This also can apply to different versions of Windows Server.
Prerequisites
The requirements are very simple, to use Storage Migration Service, you need the following:
The Five Biggest Sports Clubs In Th…
Please enable JavaScript
1) A source server (Windows Server 2003, Windows Server 2008, Windows Server 2008 R2, Windows Server 2012, Windows Server 2012 R2, Windows Server 2016, Windows Server 2019, or Windows Server 2022).
2) A destination server (Windows Server 2012 R2, Windows Server 2016, Windows Server 2019, or Windows Server 2022). Destination servers running Windows Server 2022 or Windows Server 2019 have double the transfer performance of earlier versions of Windows Server. This performance boost is due to the inclusion of a built-in Storage Migration Service (SMS) Proxy service.
3) An orchestrator server (Windows Server 2019/2022 Standard or Datacenter). You need at least one Windows Server 2019/2022 to act as an orchestrator, but you don’t have to make your destination server 2019 or 2022, however, if your destination server is Windows Server 2019 or Windows Server 2022, then the transfer speed will be double compared to Windows Server 2012 R2, and Windows Server 2016. This performance boost is due to the built-in Storage Migration Service proxy service that was introduced in Windows Server 2019 and later release.
4) The source and the destination server must reside in the same domain and same forest as of today.
5) A PC or Server running Windows Admin Center (WAC) with minimum version 2103. Check my previous article on how to install Windows Admin Center.
6) Last but not least, make sure you have installed the extension Windows Server Storage Migration Service (msft.sme.storage-migration) in Windows Admin Center. At the time of this writing, we are running Version 2.6.1 of the Storage Migration Service extension.
As a side note, if you are installing the Storage Migration Service (SMS) Proxy service in a DMZ, you must open and allow the following 4 inbound firewall rules (File and Printer Sharing (SMB-In), Netlogon Service (NP-In), Windows Management Instrumentation (DCOM-In), and Windows Management Instrumentation (WMI-In).
Please note that installing the Storage Migration Service Proxy service on a Windows Server 2019 or Windows Server 2022 computer automatically opens the necessary firewall ports on that computer. To do so, connect to the destination server in Windows Admin Center and then go to Server Manager (in Windows Admin Center) > Roles and features, select Storage Migration Service Proxy, and then click Install as shown in the figure below.

How to do it…
Launch Windows Admin Center portal and take the following steps, assuming you have already added the source and destination server:
1) Choose the orchestrator server (Windows Server 2019 or Windows Server 2022), then select the Storage Migration Service from the left-hand side, and then click Install to install the Storage Migration Service feature.

2) A new window will pop up describing the three easy steps that you will go through to migrate your file shares and configuration to new servers without affecting existing apps and users. Click Close.

3) This is Phase 1, click +New job to create a new job, give it a name without any space (only alphanumeric), and then click OK.

4) Enter the credentials for the source server that you want to migrate from, select if you want to include all admin shares, and then click Next.

5) Click +Add a device, enter the source server, and then click OK. Please note that you can add more than one source server at a time. This is useful in the scenario where you want to migrate more than one file server to new Windows Servers, but not consolidate (more on this in the Summary section).

6) Click Start scan to start the inventory, in this step, the Storage Migration Service will start looking at all the configuration, network settings, and the data on the source server. This step may take some time depending on the amount of data you have on the source server.

7) Once the scan is complete, you will see all the shares, their path, size, files, including the configuration, network adapters, and volumes on the source server. Click on Next to continue.

 Now we move to Phase 2, enter the credentials for the destination server that you want to migrate to, and then click Next.

9) Add your destination server to map it against your source server, and then click Scan device. After a moment, you will see all the volumes on the destination server including their free space, you can change the destination volume if you wish to, and you can select which source share you want to include in the transfer. Make your selection and then click Next.

10) On the Adjust transfer settings page, you can set the Validation method (checksum), Max duration, and Retries, as well as whether to migrate local users and groups on the source servers. This is useful in case you have several local accounts on the Source server that you need to migrate. This lets you recreate any local users and groups on the destination servers so that file or share permissions set to local users and groups aren’t lost. Click on Next to continue.
> Please note that migrated user accounts are disabled on the destination server and assigned a 127-character password that’s both complex and random, so you’ll have to enable them and assign a new password when you’re finished to keep using them. This helps ensure any old accounts with forgotten and weak passwords on the source don’t continue to be a security problem on the destination.

11) Then you need to validate to check if the transfer is going to work, so you can make sure that everything will work before you start the migration. This is the best feature! Click Validate. In my example, the validation passed.

12) If you click on the Pass link, you will see all the migration test results. Click Close and then click on Next to continue.

13) On the Start transfer page, click Start transfer. The transfer will kick in and take some time depending on the amount of data you are transferring. Get a cup of coffee and then come back 

14) If you switch back to the Storage Migration Service dashboard in Windows Admin Center, you will see the migration job in real-time including the network throughput in a beautiful chart view. This is awesome!

15) Once the transfer is completed, you will see the status is Succeeded. Click on the job name at the bottom.

16) In the Start the transfer page, you will see transfer and error log details where you can download the logs as a CSV file and open it in Excel. This is so interesting because it will help you to cross-check that all files are migrated in case any user complains that he/she cannot see their files! Click on Next to continue.

17) Now we reach the final step, Phase 3, Cutover to the new servers. In this step, you can use the stored credentials or enter new ones in case they are changed on the destination server. Click on Next to continue.

18) In the Configure cutover page, you will see the network adapter for the source server, you can map the network adapter on the destination server, you can set a new static IP address for the source server, or you can use DHCP. Last but not least, you can rename the source server by giving it a new name or using a random name. Click on Next to continue.

19) In the Adjust cutover settings page, you can specify the cutover timeout in minutes, the default is 2880 minutes (48 hours).

20) In the Validate source and destination devices page, click Validate. This step will validate that everything will work before you cut over and remove the old server. If you click on the Pass link, you will see all the migration test results. Click Close and then click on Next to continue.

21) Finally, click Start cutover. Please note that this step requires downtime because it will reboot twice the source and the destination server, then map the network on the destination server, and renaming the source server, and change its IP address, so make sure to schedule a maintenance window before you proceed.

22) After the cutover process is succeeded. I was able to verify that the old server was renamed and the new server has the identity of the old server. Now if your destination server is Windows Server 2019, and is acting as an orchestrator as well as you are migrating to the same server as described in this example, then you need to connect to the old server name in Windows Admin Center because the name of the destination orchestrator server is changed to the source server name.

How it works…
The Storage Migration Service is three phases, inventory, transfer, and cutover.
The inventory phase is passive, there is no agent to install on the source or the destination server. You create a job, you add a server(s), then you start scanning, the discovery phase will scan the configuration, network settings, volumes, and OS info on the source server(s). This also includes SMB information, file count, file sizes, and their share properties. Once the scan is complete, you are ready to transfer.
In the transfer phase, you will map the destination volumes based on the list of sources you have from the inventory phase, you can skip shares not to be included in the transfer phase, you can also set retry flags, reservations, and checksum. Then you validate the transfer settings to see if it’s going to work, you proceed with the transfer (you can repeat the transfer as many times as you want and only the delta will be copied), by the end of the transfer you will get a CSV report, and finally, you are ready to cutover.
In the cutover phase, you will map the network adapter on the destination server, you can give your old file server a new set of IP addresses, and change its name if you want, you can specify the maximum duration of the cutover before it expires, then you validate the cutover settings to see if it’s going to work, and finally, you do the cutover and wait for the job to be complete.
Summary
Storage Migration Service (SMS) makes it easier to migrate your older Windows Server File Servers (2003 & later) to Windows Server 2016 and Windows Server 2019. SMS provides an elegant graphical UI (via Windows Admin Center) that inventories data on servers and then transfer the data and configuration to newer servers—all without apps or users having to change anything. This is a great feature!
SMS is designed to help by doing the following:
1) Inventory multiple servers and their data.
2) Rapidly transfer files, file shares, and security configuration from the source servers.
3) Optionally take over the identity of the source servers (also known as cutting over) so that users and apps don’t have to change anything to access existing data.
4) Manage one or multiple migrations from the Windows Admin Center user interface.
At the time of this writing, Storage Migration Service is in the second release, Microsoft is working to add additional features shortly such as:
> Full discovery option instead of typing source computer names.
> Add cluster support. The Storage Migration Service supports migrating from and to clusters after installation of cumulative update KB4513534 or subsequent updates on Windows Server 2019 and with Windows Server 2022 out of the box.
> Add support for NFS (Linux/Unix), Block, and NDMP protocol.
> Add support for Samba, NAS, and SAN devices.
> Azure File Sync integration. If you have Azure File Sync set up, you can sync this storage directly to Azure as well. The Storage Migration Services does support migration to a Windows Server or cluster running Azure File Sync with cloud tiering when using the latest version of Windows Admin Center and Windows Server 2022, or Windows Server 2019 after installation of cumulative update KB5006746.
> Add Azure Files support as a target (SMB/NFS).
> Consolidation. This is great for scenarios when you have many file servers and you want to consolidate them into one file server.
> Data analysis, reporting, and governance. This is interesting, but it will require having an agent installed on the source server.
__
Thank you for reading my blog.
If you have any questions or feedback, please leave a comment.
-Charbel Nemnom-
In this article, I will explain how you can install and configure an NFS Server on a Windows 2019 Server. I will also show you the steps to create an NFS shared folder and mount the shared folder on Linux clients.
What is the Network File System (NFS)?
Network File System (NFS) provides a file-sharing solution that lets you transfer files between computers running Windows Server and other non-Windows operating systems such as Linux or UNIX using the NFS protocol.
NFS in Windows Server includes Server for NFS and Client for NFS. A computer running Windows Server can use Server for NFS to act as an NFS file server for other non-Windows client computers.
Client for NFS allows a Windows-based computer running Windows Server to access files stored on a non-Windows NFS server.
Understanding Test lab:
For this, we will use the virtual test lab created in VirtualBox.
- WS2K19-DC01: Domain Controller and DNS
- UBUNTU1804: Ubuntu OS, NFS client.
Install Server for NFS role service in Windows Server 2019:
To install the Server for NFS role service in Windows Server 2019, follow the below steps:
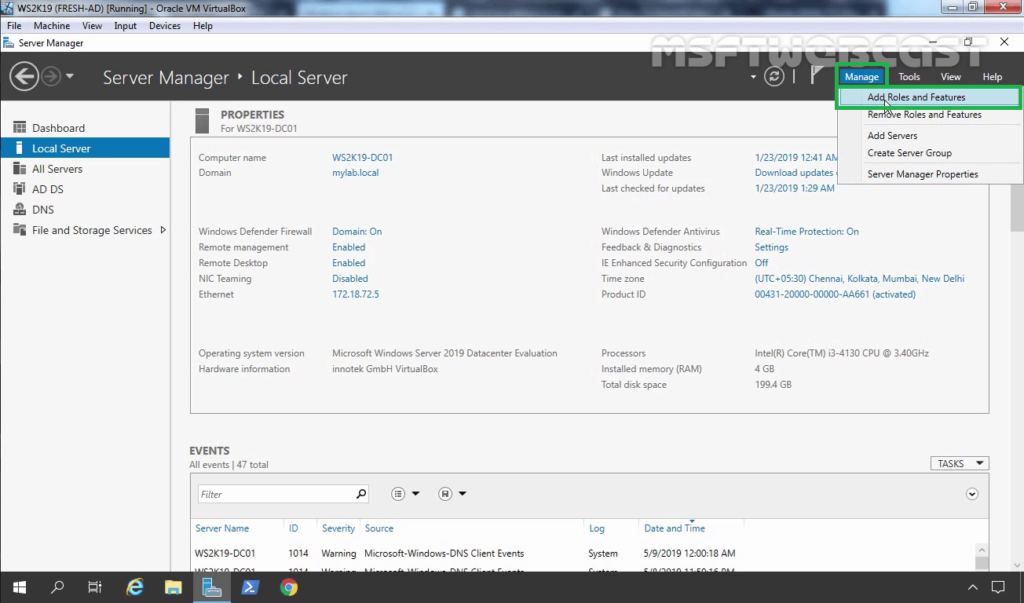
1. Open Server Manager. Click on Tools and select Add Role and Features.
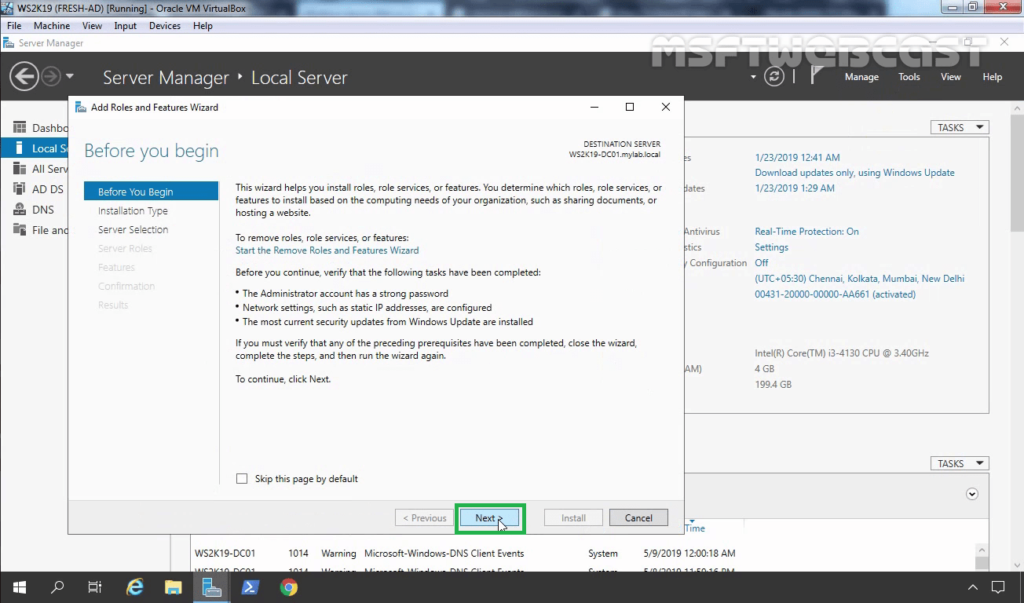
2. On the Before you begin page, click Next.
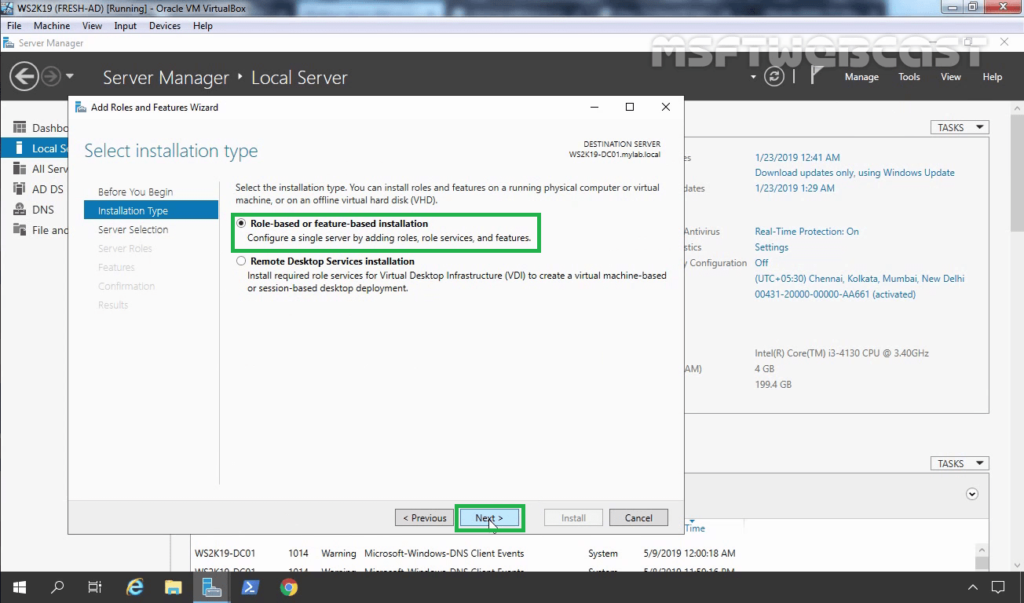
3. Select Role-based or feature-based installation and click Next.
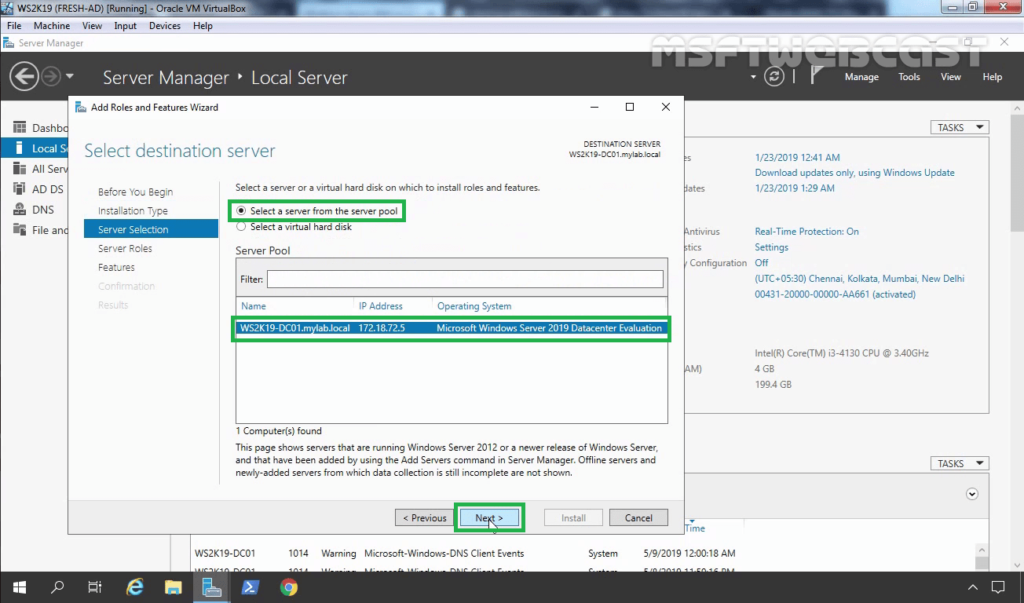
4. Select a server from the server pool on which you want to install the Network File System for Server role service, click Next.
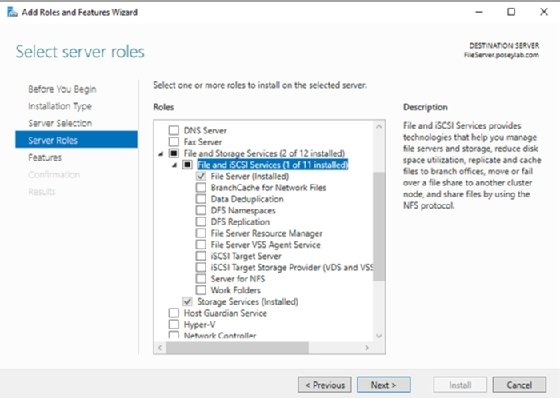
5. On select server roles page, expand File and Storage Services, expand File and iSCSI Services. Select Server for NFS checkbox.
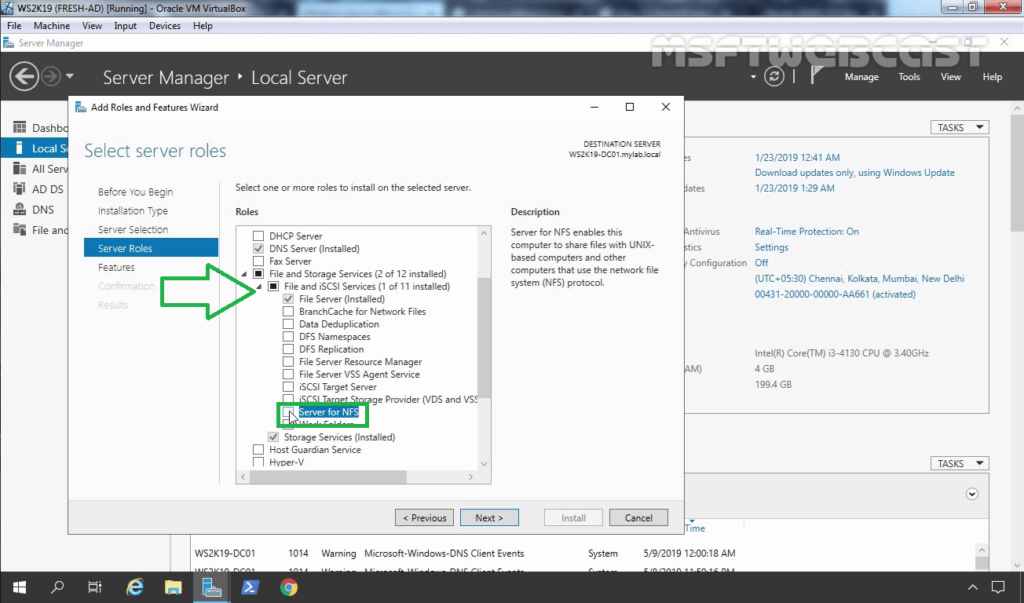
6. A new window will pop up, click on Add Features to include required features and management tools needed by the NFS server.
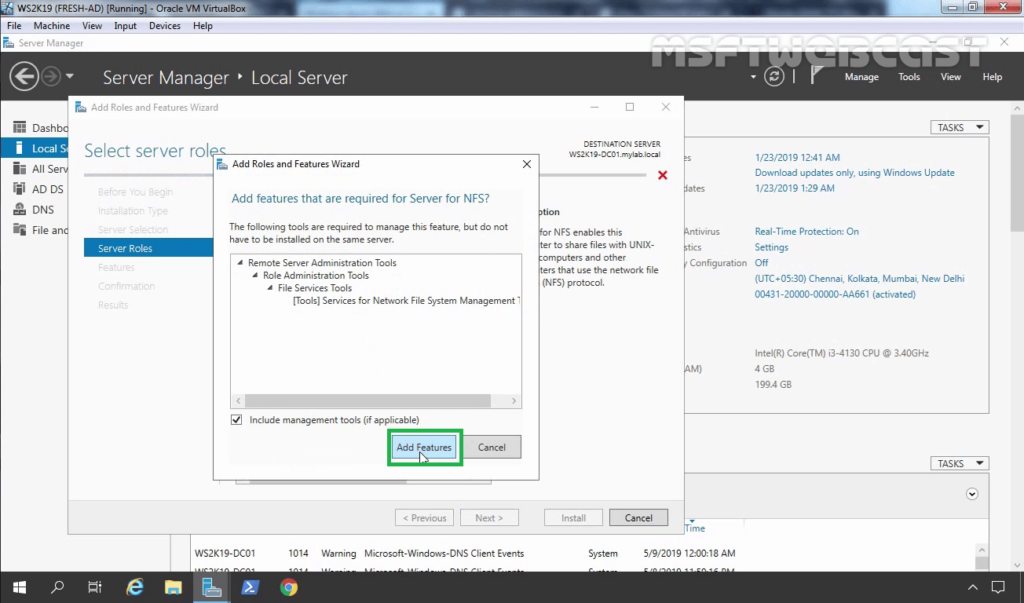
7. Make sure that the Server for NFS role service is selected. Click Next.
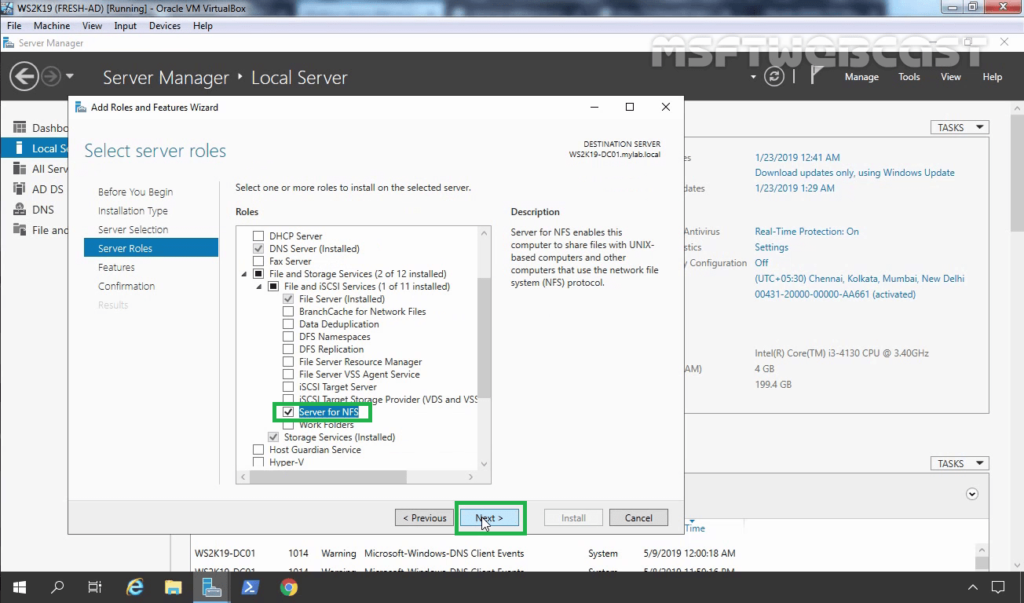
8. On select features, click Next.
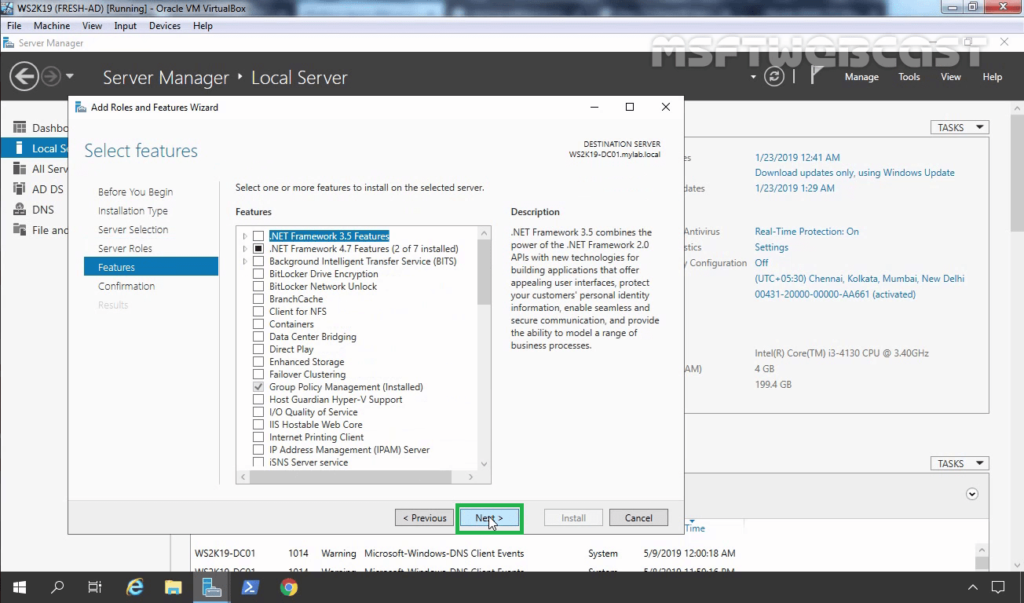
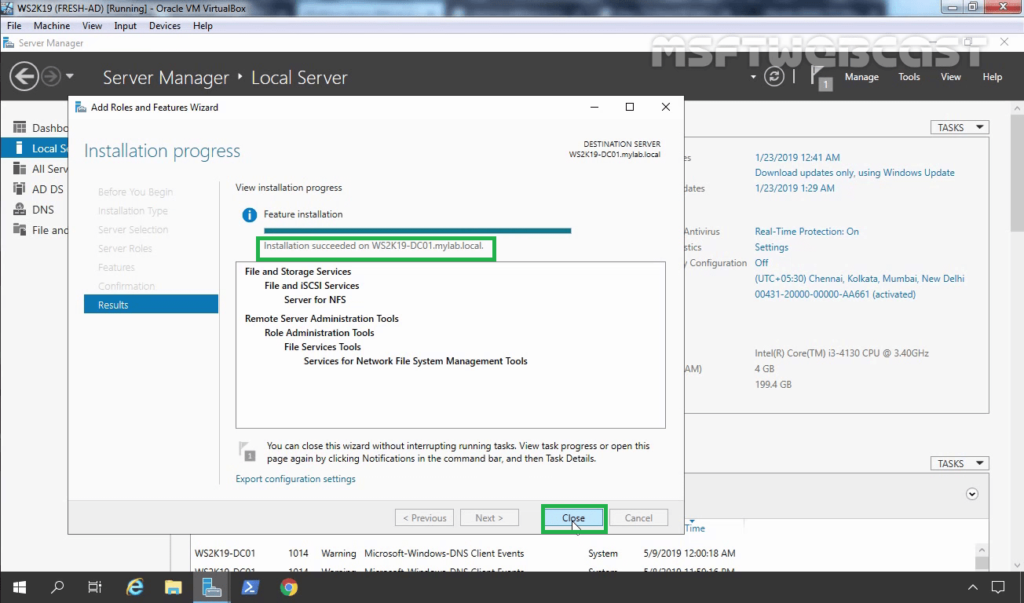
9. Click Install and complete the installation process.
10. Click Close to finish the installation.
How to Create an NFS Shared Folder on Server 2019:
After installing the Server for NFS on Windows Server 2019, the next step is to create an NFS shared folder by using the File and Storage Services console.
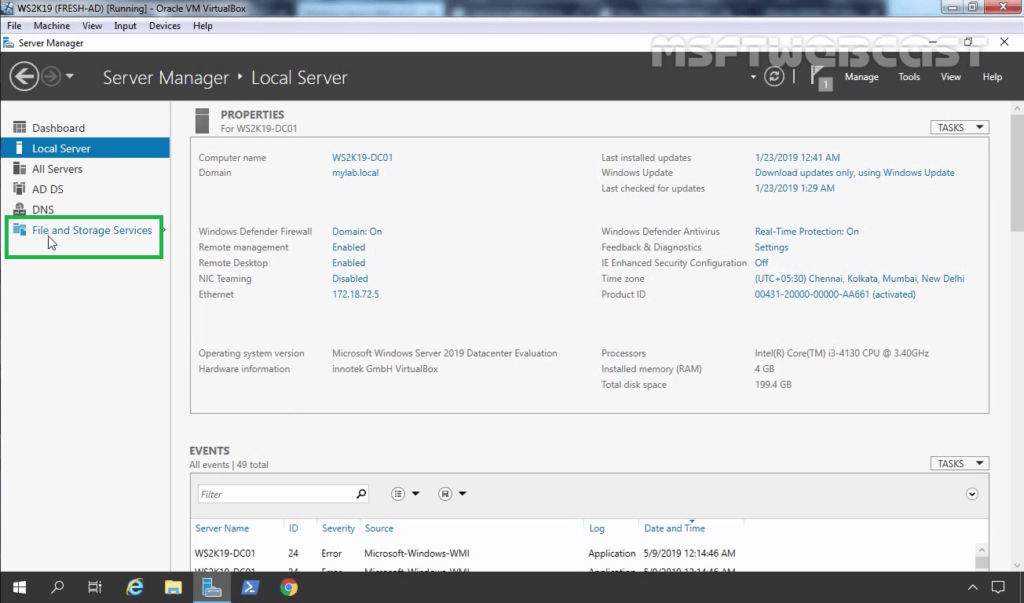
11. On the Server Manager Console, click on File and Storage Services.
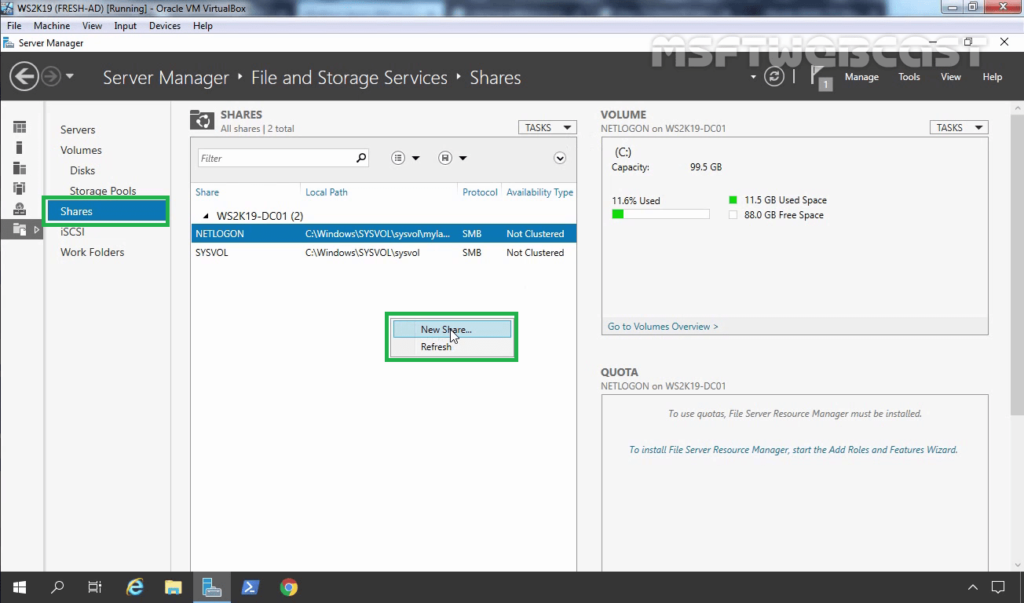
12. Click on Shares. Right-click in the empty area and select New Share.
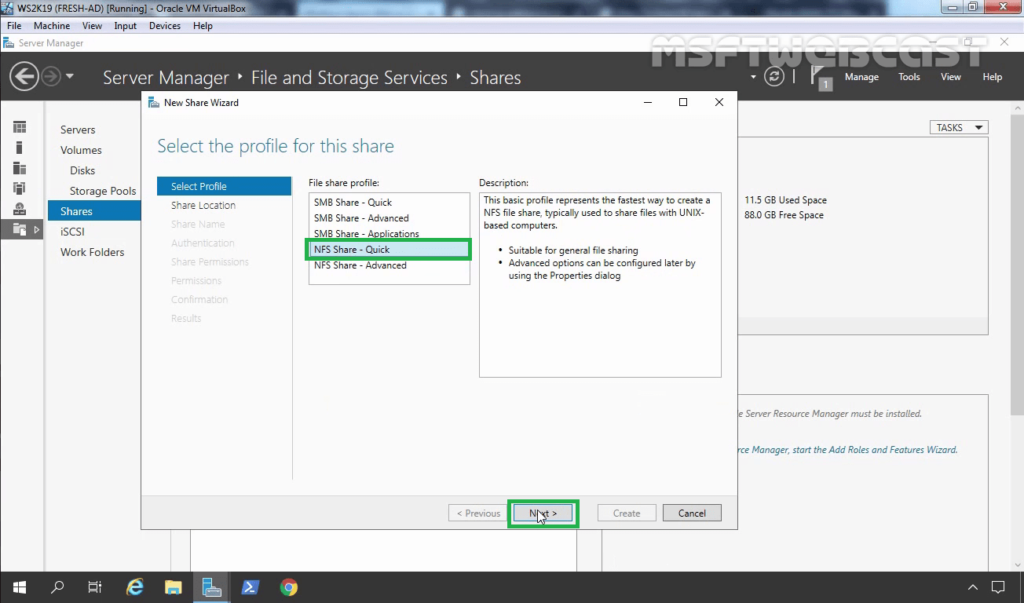
13. On Select the profile for this share, select NFS Share – Quick profile. Click Next.
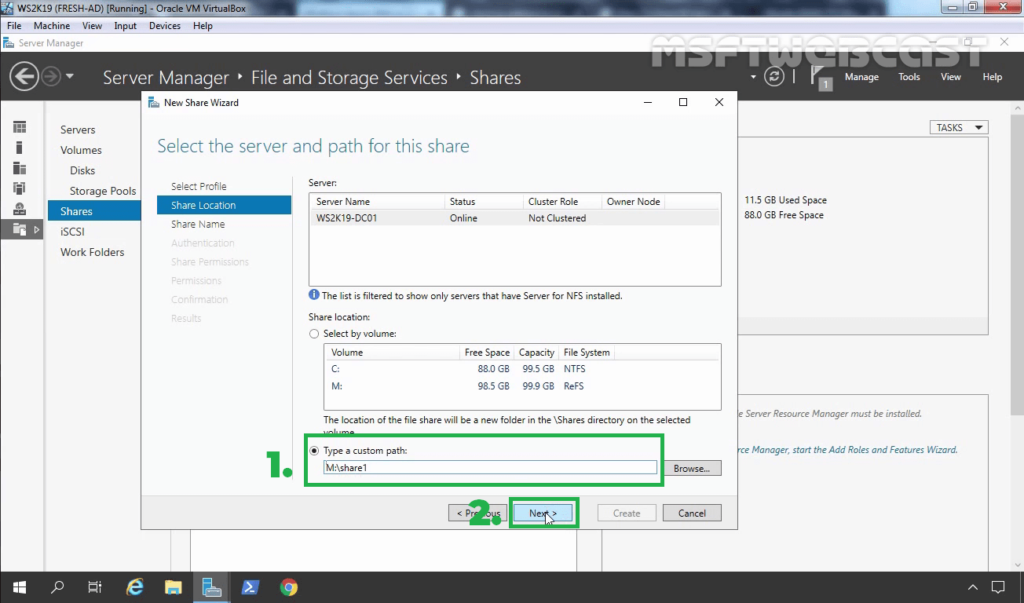
14. To configure a specific folder as NFS shared folder, select the checkbox Type a custom path and type the path for the specific folder you’d like to set as a shared folder. Click Next.
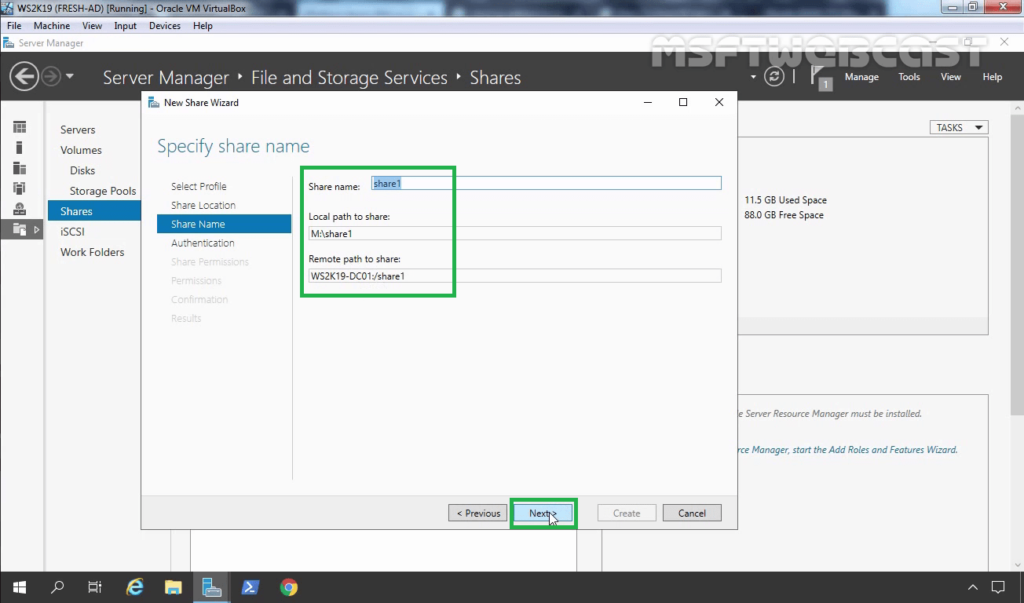
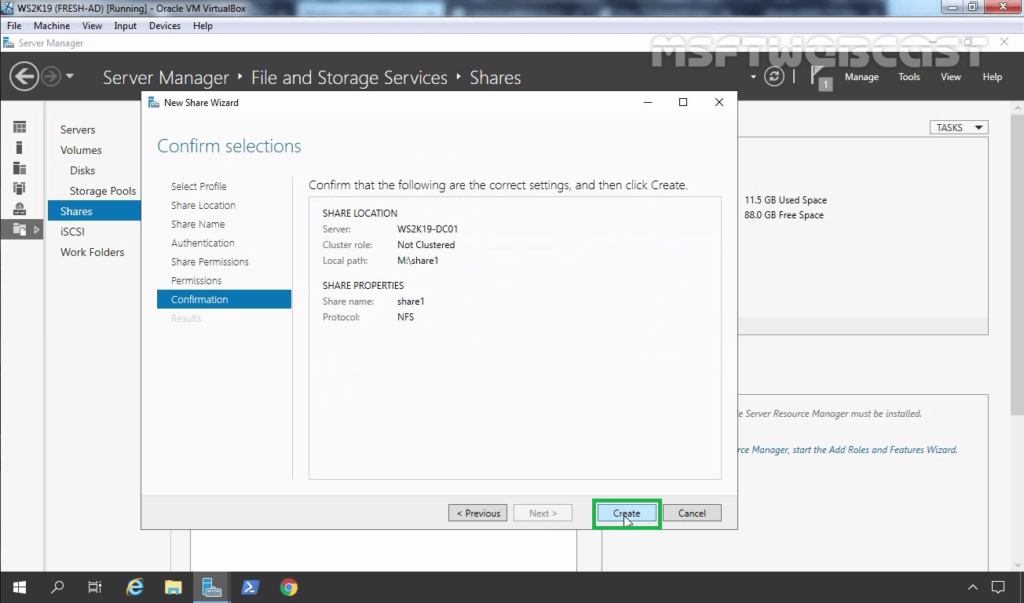
15. Verify share name, local path and remote path for NFS shared folder. Click Next.
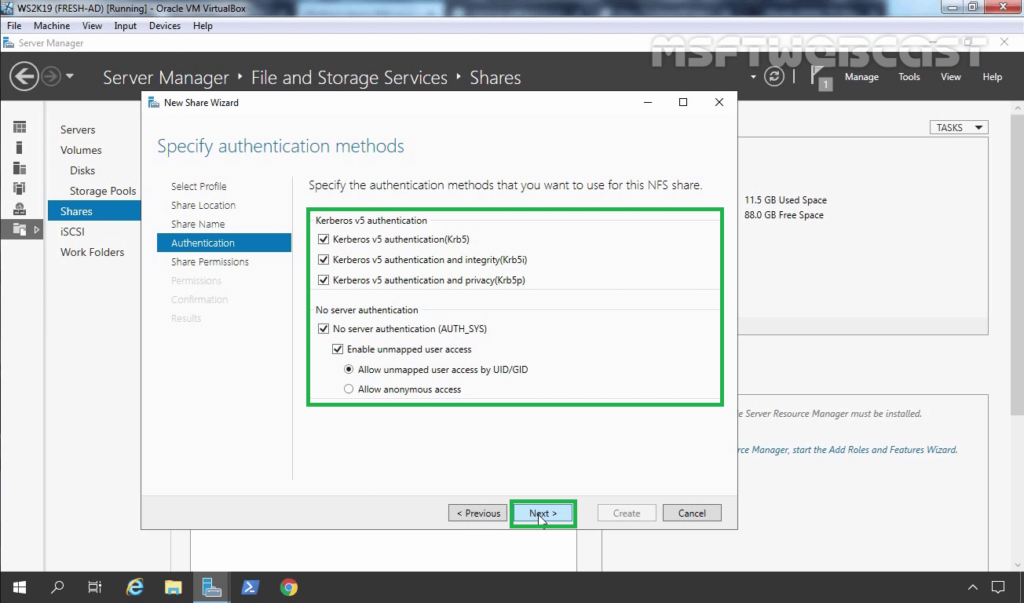
16. Specify the Authentication methods as per your requirement.
17. To set up the NFS share permissions, click Add button.
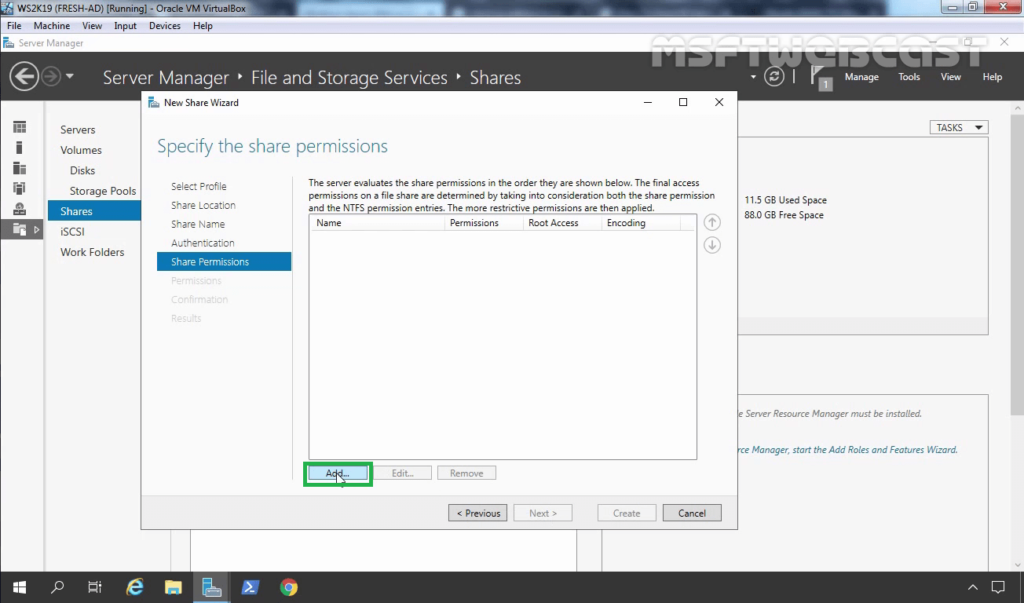
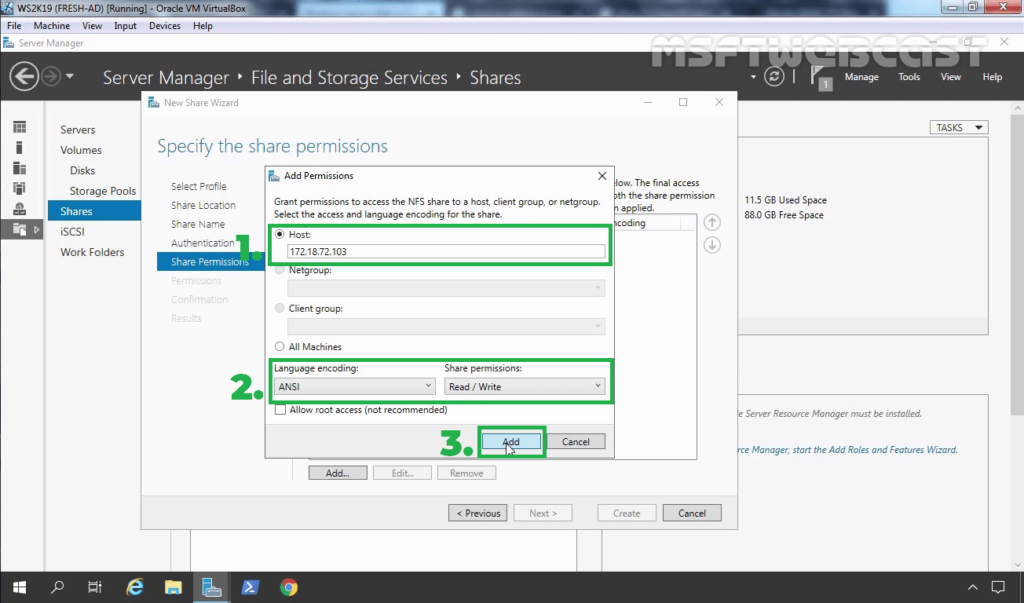
18. Specify the Hosts you’d like and assign the access permissions from the drop-down menu.
- Host: 172.18.72.103 (IP address of Ubuntu VM)
- Share Permissions: Read/Write
19. Click on Add.
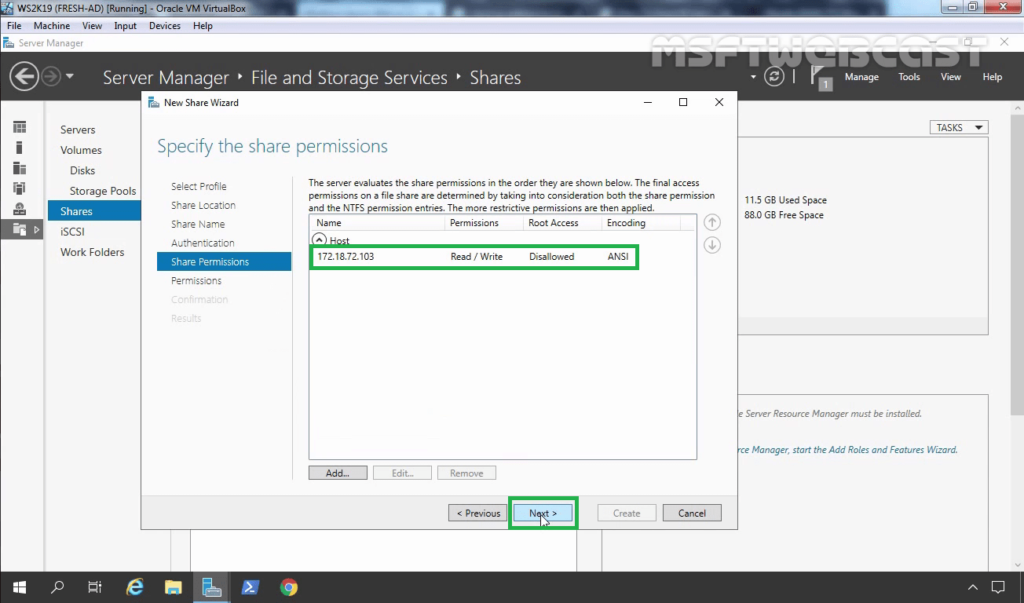
20. Using the same steps, you can add permission for other Hosts as well. Click Next.
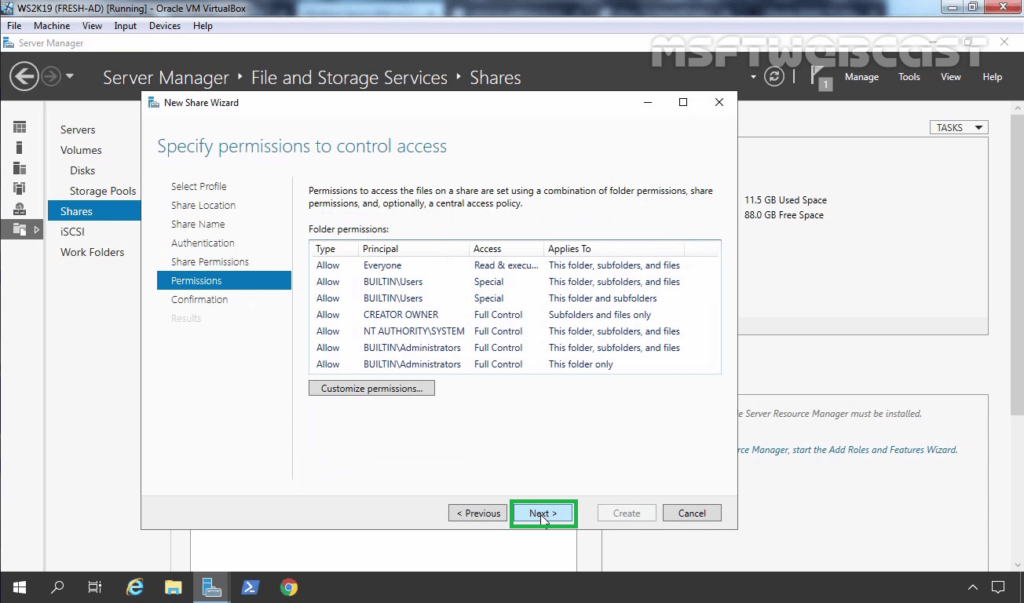
21. Specify NTFS permission. As we are just testing NFS sharing, we are going with default permission. Click Next.
22. Review the selections, click on the Create button.
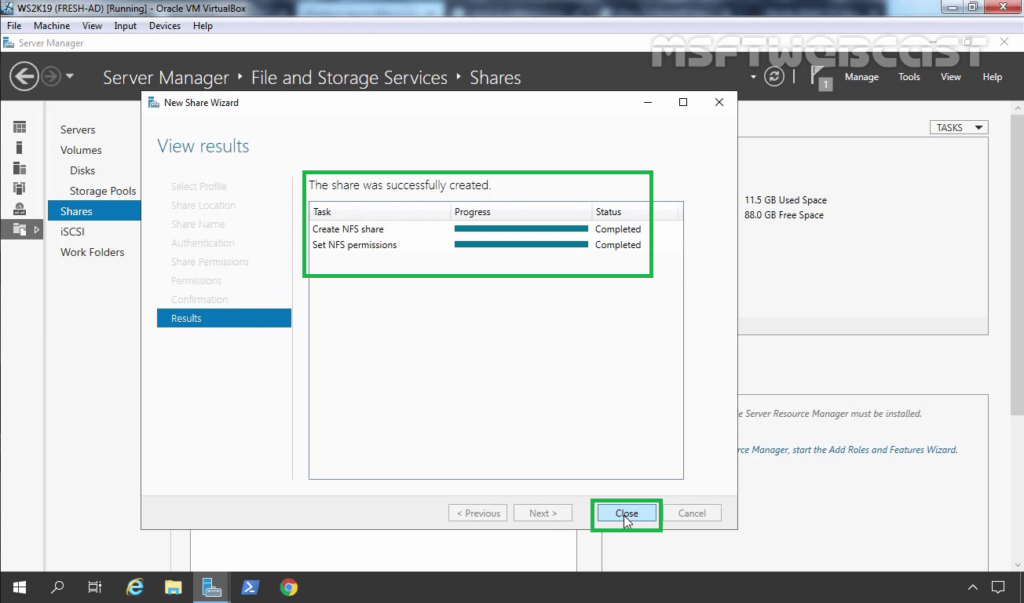
23. Click on the close button after verifying the successful creation of the NFS shared folder.
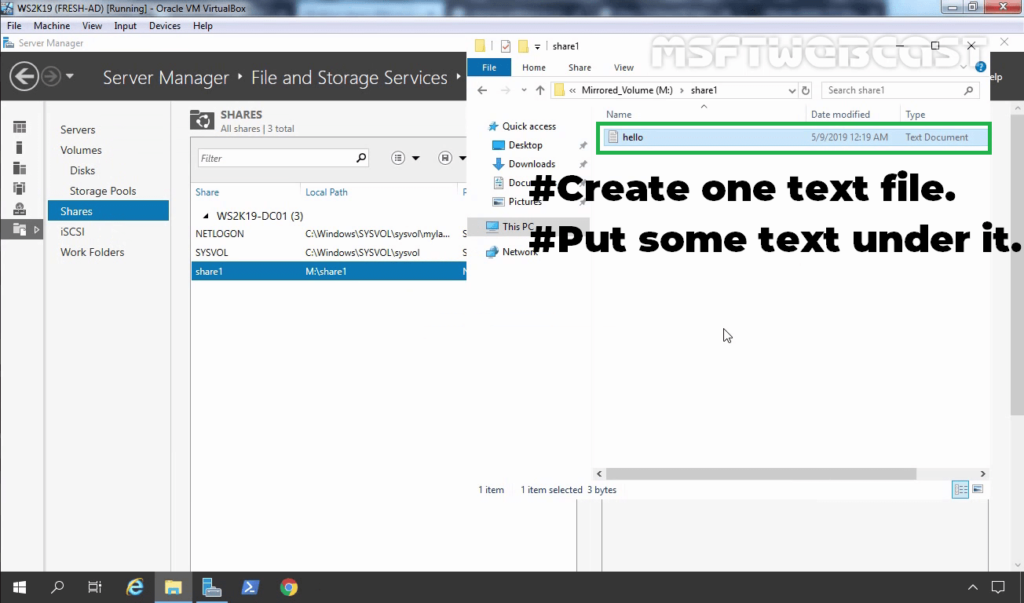
24. Verify the NFS shared folder under the shares list. Access the local path of the NFS shared folder. Create one text file and put some text under it.
Mount the NFS shared Folder on Linux Client (Ubuntu Machine):
25. On the Ubuntu machine, verify the local IP address and network connectivity with the NFS server.
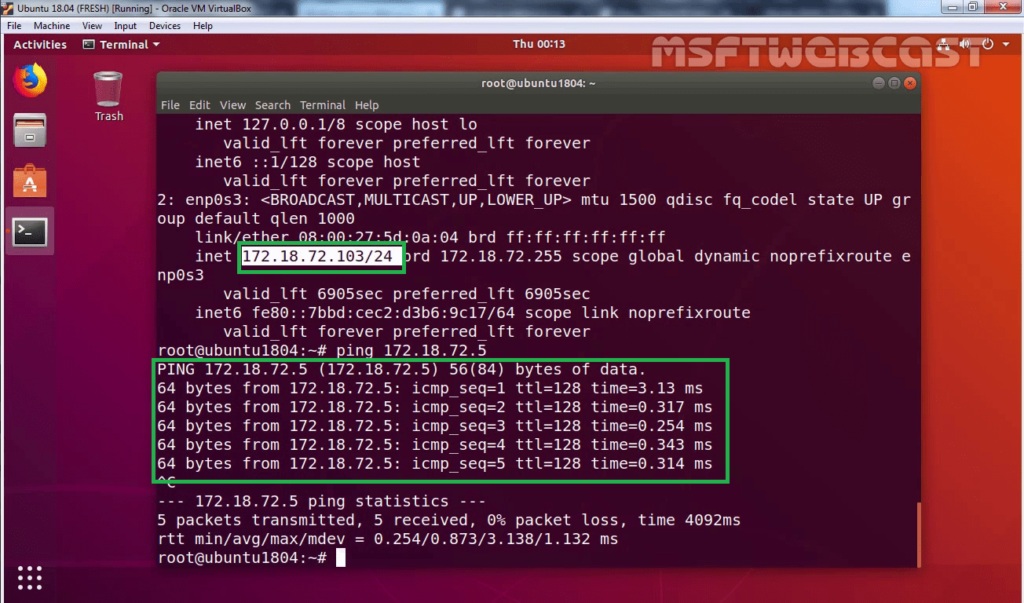
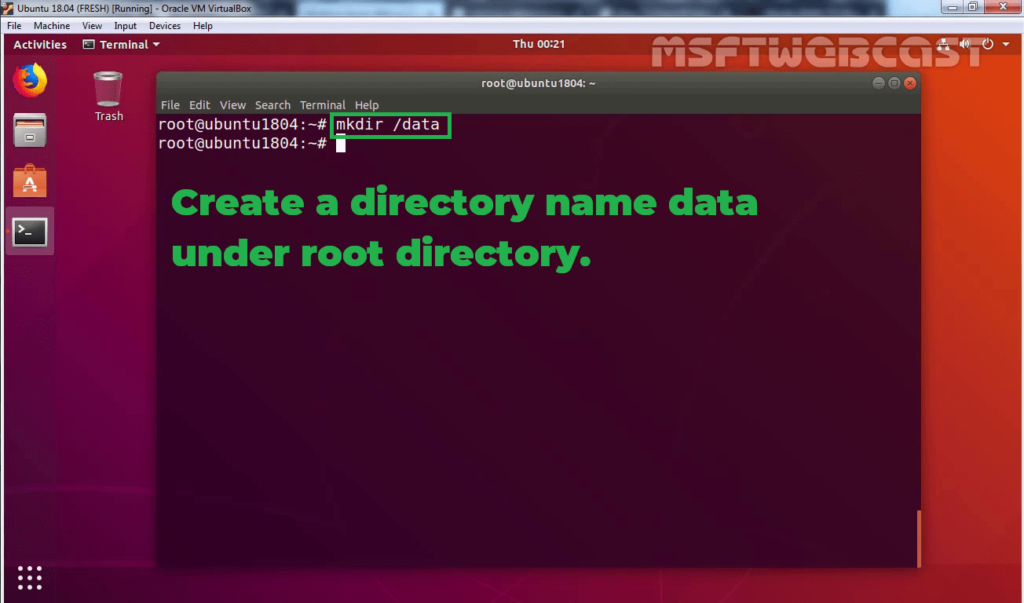
26. To mount an NFS shared folder on a Linux machine, open terminal. Type command: mkdir /data
This command will create one directory name data under the root directory.
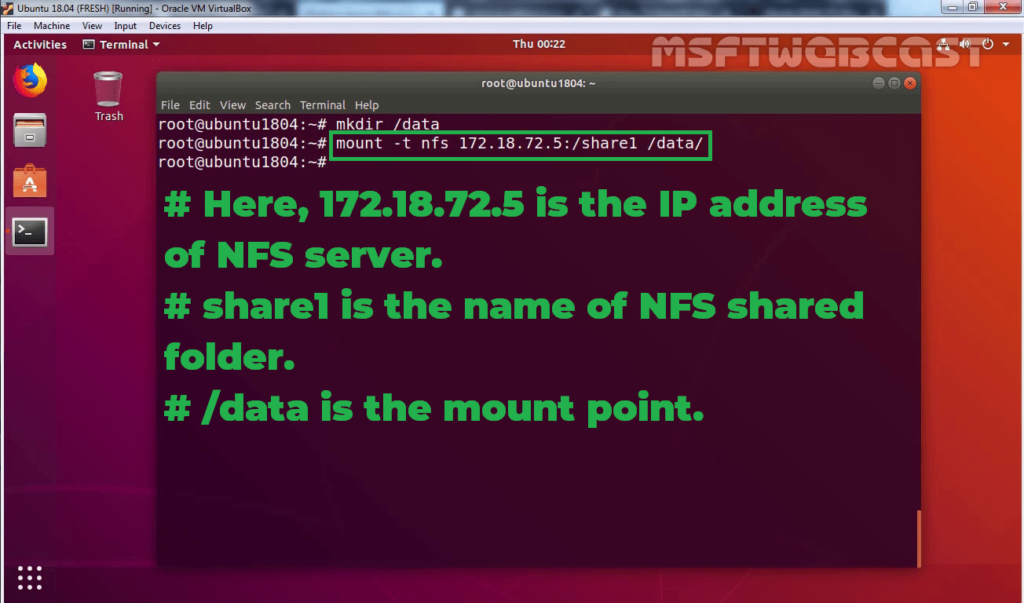
27. Type command:
Syntax: mount -t nfs <NFS-Server-IP>/<NFS-Shared-Folder-Name> /<Mount-Point>
For example, to mount an NFS shared folder named share1 of the NFS server that is configured with IP address 172.18.72.5, the folder should be mapped on the /data mount point.
In our case command will look like:
mount –t nfs 172.18.72.5:/share1 /data
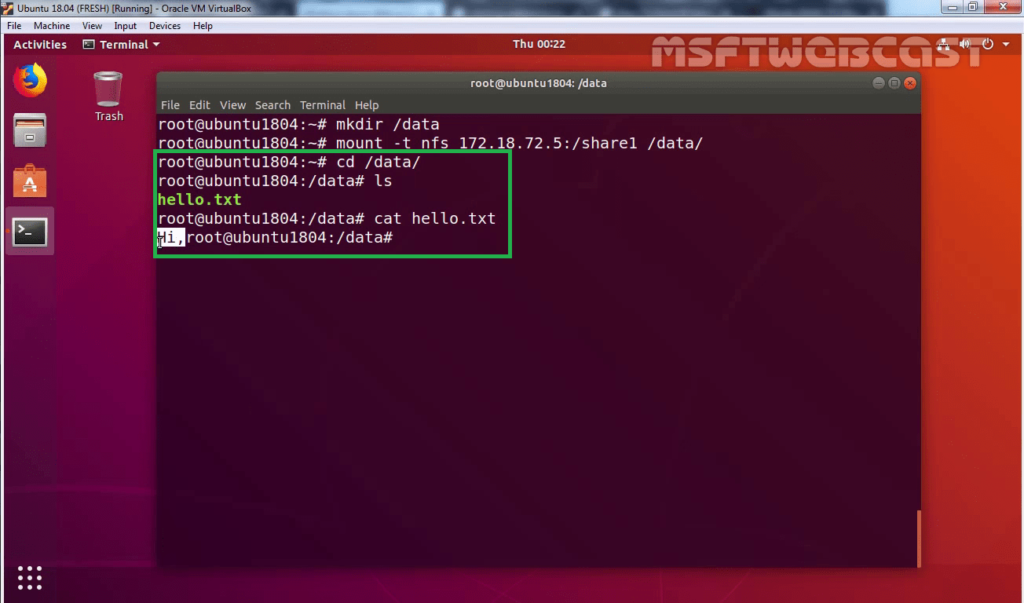
28. Verify the content of the text file which we have created earlier on the NFS server.
In this blog post, we have learned the steps on how to install and configure NFS in Windows Server 2019.
I hope, you enjoyed it. Thank you for reading.
Video Guide: Installing and Configuring NFS Server role in Windows Server 2019
Post Views: 3,855
Windows file servers remain a steadfast occupant of the data center, despite the fact that many workloads have shifted to the cloud.
The advances in the recent versions of Windows Server make on-premises file servers an attractive option versus comparable cloud services. Organizations that use Windows Server 2019 file servers benefit from data deduplication for increased space savings, and higher levels of security and performance from refinements to the Server Message Block (SMB) protocol. When you deploy a new Windows Server, Microsoft’s guidelines steer you to the proper settings for better protection, as well as reliability to ensure the best possible end-user experience.
Keep the installation lean
As you deploy a Windows Server 2019 file server, it is likely that you will need to install additional components. However, it is important to avoid adding roles or features the server doesn’t need to do its job. For example, a dedicated Windows file server should have Hyper-V server role.
When you install unnecessary features or multiple roles, it increases the server’s footprint, which can reduce file server performance. Also, when more code runs on a system, this increases the attack surface to make the server less secure. As a best practice, you should install only necessary components for a file server to operate.
Run a scan to maintain Windows Server 2019 file server best practices
You should periodically run the Best Practices Analyzer on your Windows files servers. This tool, which has been part of the OS since Windows Server 2008 R2, compares your file server’s configuration against Microsoft’s established best practices.
There are two main reasons why this routine checkup is important. First, as Microsoft’s best practices for Windows servers evolve and the company updates the utility to reflect those changes. Regular scans validate your file server configuration. Not every issue is severe enough to mandate a change but could show an area where an adjustment might improve performance or reliability.
Second, configuration drift often occurs through the course of Windows Server management, particularly in environments with a large IT team. The Best Practices Analyzer detects modifications to settings that violate best practices.
To run a best practices scan on a Windows Server 2019 file server, open Server Manager and select the File and Storage Services tab. Next, scroll to the Best Practices Analyzer and choose the Start BPA Scan option from the Tasks menu.
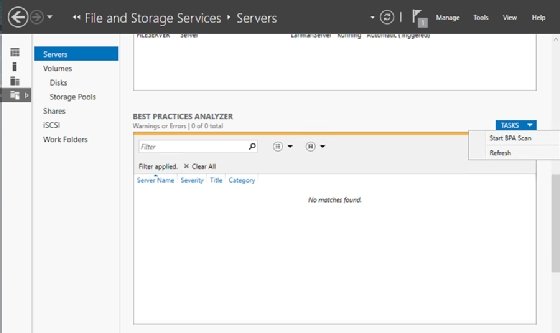
The Best Practices Analyzer will scrutinize the file server role and generate a list with a severity level for each issue that includes information and potential remediation actions.
Consider the required versions of SMB
Consider which version of SMB needs to run on the Windows file server. There are three different versions of the SMB protocol, but most organizations won’t need to run all three versions.
There are times Microsoft’s Windows Server 2019 file server best practices recommendations are not accurate. This is when it helps to use your institutional knowledge as a Windows administrator. For example, the Best Practices Analyzer might give you bad advice with the SMB configuration. Windows Server 2019 disables SMB 1.0 by default, but the Best Practices Analyzer recommends you enable it, as shown in Figure 3.
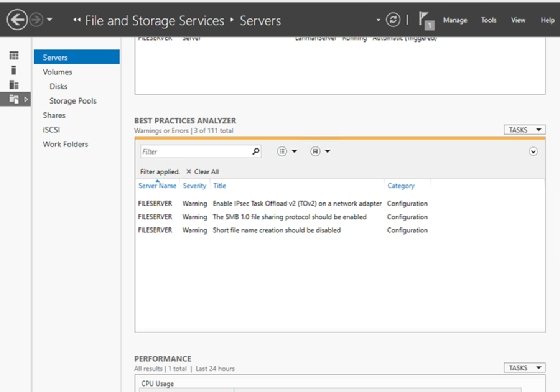
The SMB 1.0 protocol helps with older Windows systems’ backward compatibility, but SMB 1.0 is also very insecure. That being the case, it’s best to ignore the Best Practices Analyzer’s advice and leave SMB 1.0 disabled, unless you have compelling reason to use it.
If possible, use the Resilient File System
Many organizations have historically avoided the Resilient File System (ReFS) in favor of the NT File System (NTFS), and for good reason. The ReFS was developed for data resiliency, but the 1.1 version released with Windows Server 2012 was extremely limited in its capabilities compared to NTFS. Many NTFS features did not exist in ReFS, such as the ability to boot the system.
Microsoft continues to develop ReFS and, now, most of the NTFS features exist in ReFS. ReFS version 3.4 in Windows Server 2019 is far more feature-rich than the 1.1 version, but there are still some areas where it is lacking. For instance, ReFS does not support file system compression, encryption, disk quotas or DOS-compatible 8.3 filenames.
If you can live without these features, there are significant benefits to ReFS. It is far more scalable than NTFS and supports volume sizes up to 35 PB. ReFS includes several features to protect the integrity of the data on the volume. Windows Server 2019 has a proactive error correction feature that periodically scans ReFS volumes and automatically repairs corrupt data.
Use Distributed File System in large organizations
The Distributed File System (DFS) in Windows gives a way to create a single namespace that encompasses multiple file servers. This makes it easier for users to find data without needing to know which server holds the files. DFS can make multiple data replicas and silently redirect user requests to the file server that is closest to the user.
A DFS namespace can incorporate more than just Windows file servers. You can add any file server that supports SMB file shares to a DFS namespace, which can be helpful in organizations with both Windows file servers and network-attached storage appliances.
Use the File Server Resource Manager to enforce compliance
Lastly, you should use the File Server Resource Manager (FSRM) to control the file server. FSRM is a Windows Server role used to enforce quota on folders on the file server and generate reports on storage usage to name a few features.
FSRM also has the added benefit of a file screening function that prevents users from storing certain filetypes on the file server. You determine how the system responds when a user tries to save a type of file, such as an executable. In this age of ransomware, it’s another method at your disposal to prevent an attacker from encrypting all your files.
Window Server Edition 2016 and 2019 have new features, which have made it possible to use storage migration capabilities for storing data.
The migration service helps in keeping inventory when moving from one platform to another.
This article will try to explain what is new in the storage systems of Windows Server 2016, Windows Server 2019, and other semiannual releases.
We will start by highlighting some of the key features added in the two server systems.
Managing Storage with Windows Admin Center
The Windows Admin Center is a new feature that runs on Windows Server 2019 and some latest versions of Windows.
It is the central location where an App handles the server functions, clusters, and hyper-converged infrastructure containing storage locations.
The Admin Center does this as part of the new server configurations.
Storage Migration Service
The Storage Migration Service is the latest technology that makes it easy to move servers from old to new server versions.
All the events take place via a graphical interface that displays data on the servers and transfers data and configurations to the new servers; thereafter, it optimally moves old server identities to the new ones, ensuring the settings for apps and users are matched.
Storage Spaces Direct Improvements (Available in Server 2019 only)
Several improvements have been made to Storage Spaces Direct in Server 2019, though they are not available in Windows Server, Semi-Annual channel.
Here are some of the improvements:
1. Deduplication and Compression of ReFS Volume
You will be able to store up to 10X more data on the same storage space using deduplication and compression of the ReFS system.
You only need to turn on this feature, using a single click, on the Windows Admin Center.
The increase in storage sizes, with an option to compress data, amplifies the saving rates.
Furthermore, the multi-threaded post processing feature assists in keeping performance impact low.
However, it supports a volume of up to 64TB and with each file reaching 1TB.
2. Native Support for Persistent Memory
Windows Server 2019 comes with native support for persistent memory. This allows you to speed up performance for the continuous creation of memory modules, including the Intel Optane DC PM and NVDIMM-N.
You can use persistent memory as your cache to accelerate the active working set or use it as an extra space needed to facilitate low latency.
Of course, you can manage persistent memory the same way you can manage any other storage device in Windows Admin Center or PowerShell.
3. Nested Resiliency for Two-Node Hyper-Converged Infrastructure on the Edges
The all new software resiliency option, inspired by RAID 5 + 1, helps in surviving two hardware failures.
The nested resiliency for the two-node Storage Spaces Direct cluster offers continuous accessible storage for programs and virtual machines, even when one server node fails.
4. Two-Server Cluster Using USB Flash Drive as a Witness
You an use a low-cost USB flash plugged into your router to act as a witness between two servers in a cluster.
If the server is down, the USB will know which of the servers has more data.
5. Improved Windows Admin Center
The opportunity to manage and monitor Storage Spaces Direct with the newly built dashboard lets you create, delete, open, and expand volumes, with a few clicks.
You can follow performances of IOPS and IO latency, from the entire clusters to the individual hard disks and SSDs.
6. Increased Performance Logs Visibility
You can use the built-in history feature to see your server’s resource utilization and performance capabilities.
It has more than 50 counters that automatically collect memory, computation, storage and network data, and store them in the cluster for a full year.
This feature works without the need to install or configure anything.
7. Scale up to 4PB for Every Cluster
The Windows Server 2019 Storage Spaces Direct feature supports up to 4 petabytes (PB) (4,000 terabytes).
This way, you can get to the level of multi-petabyte scale, which makes sense in media servers for backup and archiving purposes.
Other capacity guides are increased as well; for instance, you can create volumes reaching 64, and not 32.
More so, the clusters can be stitched together into a set to make the scaling that fits within one storage namespace.
8. Accelerated Parity is now 2X Faster
You can now create Storage Spaces Direct Volumes that are part mirror and part parity.
For example, you can mix RAID-1 and RAID -5/6 to harness the advantages of both.
In Windows Server 2019, the performance of mirror accelerated parity is twice that of Windows Server 2016, due to optimizations.
9. Drive Latency Outline Detection
Using proactive monitoring and the built-in outlier detection, which is an inspiration from Microsoft Azure, you can know which drives have abnormal latency.
You can see the failing drives that have been labeled automatically in the PowerShell and Windows Admin Center.
10. Manual Delimiting of Volume Allocations to Increase Fault Tolerance
In Storage Spaces Direct, the Admin can now manually change the limit of volume allocations.
Delimiting is usually done to increase fault tolerance in specific circumstances that consider management complexities.
Storage Replica
The Storage Replica has the following improvements:
1. Introduction of Storage Replica in Windows Server, Standard Edition
It is now possible to use Storage Replica with Windows Server, Standard Edition, as well as the Datacenter editions.
Running Storage Replica on Windows Server, Standard Edition has the following weaknesses:
- Storage replica can replicate a single volume and not an unlimited volume number
- Volume varies with some taking up to 2TB, instead of taking an unlimited size
2. Storage Replica Log Performance Improvements
The Storage Replica comes with improvements that enhance the tracking of logs.
To get the increased performance, all members of the replication group must run Windows Server 2019.
3. Test Failover Improvements
You can mount a temporary snapshot of the replicated storage on destination server for testing or backing up purposes.
4. Windows Admin Center Support
Support for the graphical management of replication is made possible via the Server Manager Tool.
This involves server-to-server replication, cluster-to-cluster, and stretch cluster replication.
5. Miscellaneous Improvements
Storage Replica also has the following improvements:
- Changes to asynchronous stretch cluster behaviors for automatic failover to take place.
- Multiple bug fixes
SMB
SMB1 and Guest Authentication Removal
Windows Server does not install the SMB1 client and server by default, while, at the same time, the ability to authenticate guests in SMB2 if off by default.
SMB2/SMB3 Security and Compatibility
More options for security and applications compatibility were added, including disabling opLocks in SMB2+ for old applications.
This also covers the need for signing encryption on every connection from the client.
Data Deduplication
Data Deduplication Supports ReFS
You’ll not need to choose between the advantages of a modern file system with ReFS and Data Deduplication.
Anytime you enable Data Deduplication, enabling ReFS is also possible now.
Data Port API for Optimized Ingress/egress to Deduplicated Volumes
As a developer, you’ll now enjoy the advantages of data deduplication and possibilities of storing data in an efficient manner
File Server Resource Manager
The Windows Server 2019 can prevent the File Resources Manager service from creating a change (USN) journal on storage volumes.
This is to create and conserve more space on every volume; however, it will disable real-time classification.
This is the same effect that takes place in Windows Storage Server, Version 1803.
What’s New in Storage in Windows Server, Version 1709
Server Version 1709 is the first Windows Server release with a Semi-Annual Channel, which is a channel that is fully supported in production for 18 months, with a new version coming in every six months.
Storage Replica
Disaster recovery and protection is an added function of the Storage Replica, which is now expanded to include:
- Test Failover
You now have an option of mounting the destination storage through a test failover.
You can also mount the snapshots temporarily for both testing and backup purposes.
- Windows Admin Center Support
Thee is support for the graphical applications that are managing replications. You can access it via the Server Manager Tool.
Storage Replica also has the following improvements:
- Changes to asynchronous cluster behaviors to enable automatic failover
- Multiple bug fixes
What’s New in Storage in Windows Server 2016
1. Storage Spaces Direct
The Storage Spaces Direct feature facilitates the availability and scalability of storage using servers with local storage.
This implies that it’s now possible to deploy and manage software that control storage systems, unlocking the use of new classes of storage devices.
These devices include SATA, SSD, and NVMe disks. Achieving such storage capabilities may not be possible using clustered Storage Spaces with Shared Disks.
What Value Does this Change Add?
Storage Spaces Direct allows service providers and enterprises to use industry standard servers with local storage.
The idea is to build highly available and scalable software-defined storage.
The use of servers with local storage decreases complexity, as it increases scalability and allows the use of storage devices such as SATA solid state disks. This lowers the cost of flash storage or NVMe sold state Disks
Storage Spaces Direct Removes the need to have a shared SAS fabric, which simplifies deployment and configuration.
This means that the server uses the network as the storage fabric while leveraging the SMB3 and SMB Direct (RDMA) for both high speed and low latency, as well as good use of the processing unit.
Adding more servers to the configuration increases storage capacity and input and output performance.
The Windows Server 2016 Storage Spaces Direct works differently, as explained below.
2. Storage Replica
It enables the storage, block-level stretching of failover clusters between sites, as well as the synchronous replication between servers.
Synchronous replication enables mirroring of data in physical sites with consistent volumes to ensure no data is lost at the file system level.
Asynchronous replication may increase the possibility of data loss.
What Value Does this Change Add?
It provides a single vendor disaster recovery solution for both planned and unplanned power loss situations.
You can use SMB3 transport and gain from proven performance, scalability, and reliability.
It will help you to:
- Stretch Windows failover clusters further
- Use Microsoft end-to-end software for storage and clustering, such as Hyper-V, Scale-Out File Server, Storage Replica, Storage Spaces, ReFS/ NTFS, and deduplication
It helps in reducing complexity costs by:
- Being hardware agnostic with no specific requirements for storage configurations like DAS or SAN
- Allowing for the storage of commodities and network technologies
- Featuring easy graphical management interface for nodes and clusters through failover cluster manager
- Including comprehensive and large scale scripting options through the Windows PowerShell
- Helping in the reduction of downtimes and enhancing large scale productivity
- Providing supportability and performance metrics and diagnostic capabilities
What Works Differently
The functionality is new in Windows Server 2016
3. Storage Quality of Service
In Windows Server 2016, you can use the Storage Quality of Service (QoS) feature as a central monitor for end-to-end storage performance and developing management policies using Hyper-V and CSV clusters.
What Value Does this Change Add?
You can change the QoS policies in a CSV and assign one or more virtual disks on Hyper-V machines.
The storage automatically adjusts itself to meet the fluctuating policies and workloads.
This way, each policy can give a minimum reserve or create a maximum to be used when collecting data.
For example, a single virtual hard disk, a tenant, a service or a virtual machine can be used.
You can use Windows PowerShell or WMI to perform the following:
- Create policies on CSV cluster
- Assign the policies to virtual hard disks
- Enumerate policies on the CSV clusters
- Monitor flow performance and status of the policies
If you have several virtual hard disks sharing the same policy and performance is shared to meet the demands within the policy’s minimum and maximum settings, it means that the policy can manage virtual hard disks and a single or multiple virtual machines that constitute a service owned by a tenant.
What Works Differently
This is a new feature in Windows Server 2016.
The management of minimum reserves and monitoring the flow of all virtual disks over a cluster using a single command and central policy-based management are not possible in the previous Server releases.
4. Data Deduplication
Function |
New or Updated |
Description |
Support large volumes |
Updated | Before Windows Server 2016, you had to specify sizes. Anything above 10TB did not qualify for deduplication. Server 2016 supports deduplication sizes of up to 64TB |
Large file support |
Updated | Before Windows Server 2016, files with 1TB could not deduplicate. Server 2016 supports deduplication of files up to 1TB. |
Nano Server Support |
New | Deduplication is available and fully supported for Server 2016 |
Simple Backup Support |
New | Windows Server 2012 R2 supported Virtual backups using the Microsoft’s Data Protection Manager. Windows Server 2016 simple backup is possible and is seamless |
Cluster OS Rolling Upgrades Support |
New | Deduplication supports Cluster OS Rolling Upgrade and is available in Windows Server 2016 |
5. SMB Hardening Improvements for SYSVOL and NETLOGON Connections
Windows 10 and Windows Server 2016 client connections to the Active Directory Domain Service, the SYSVOL, and NETLOGON now all share domain controllers that require SMB signing and authentication via Kerberos.
What Value Does this Change Add?
It reduces the possibility of man-in-the-middle attacks
What Works Differently?
If the SMB and mutual authentication are not available, Windows 10 or Server 2016 will not access the domain-based Group Policy Scripts.
It is also good to note that the registry values of the settings are not present by default; the hardening rules will apply until a new policy change comes in through Group Policy or any relevant registry values.
6. Work Folders Improvements
The added changes to notifications are there when the Work Folder server is running on Windows Server 2016, and the Work Folder is on a client running Windows 10.
What Value Does this Change Add?
In Windows Server 2012 R2, when the changes in files are synchronized to the Work Folder, clients will get notified of the impending changes and wait for at least 10 minutes for the update to materialize.
When running Windows Server 2016, the Work Folders will immediately notify the Windows 10 client, and the synchronization changes take effect immediately.
What Works Differently
This is a new feature in Windows 2016.
For this feature to work, the client accessing the Work Folders must be a Windows 10.
In case you are using older clients, or if the Work Folder is on Windows Server 2012 R2, the client will poll every 10 minutes for any new changes.
7. ReFS Improvements
The ReFS (Resilient File System) offers support for large scale data storage allocation with varying workloads, reliability, resiliency, and scalability.
What Values Does this Change Add?
ReFS brings in the following improvements:
- Implementing new storage tiers that help in delivering fast performance and increased capacity
- Multipling resiliency on the same virtual disk through mirroring and parity tiers
- Enhancing responsiveness to drifting working sets
- Introducing a block of cloning and improvements to VM operations such as vhdx checkpoint merge operations
- Helping in the recovery of leaked storage and keeping them from being corrupted
What Works Differently?
These functionalities are new in Windows Server 2016.
Conclusion
With so many features available in Windows Server 2019, this article covered the fully supported features.
At the time of writing this post, some features were partially supported in earlier versions but are getting full support in the latest Server versions.
From this read, you can see that Windows Server 2019 is a good upgrade experience.