Get started for free
Please select your product experience:
Description
Microsoft Hyper-V Server is a free product that delivers enterprise-class virtualization for your datacenter and hybrid cloud. Microsoft Hyper-V Server 2019 provides new and enhanced features that can help you deliver the scale and performance needs of your mission-critical workloads.
The Windows hypervisor technology in Microsoft Hyper-V Server 2019 is the same as what’s in the Microsoft Hyper-V role on Windows Server 2019. It is a stand-alone product that contains only the Windows hypervisor, a Windows Server driver model, and virtualization components. It provides a simple and reliable virtualization solution to help you improve your server utilization and reduce costs.
Languages
- Chinese (Simplified), Chinese (Traditional), English, French, German, Italian, Japanese, Korean, Portuguese (Brazil), Russian, Spanish
Editions
- Microsoft Hyper-V Server 2019 | 64-bit ISO
Prerequisites
Prior to installing Hyper-V Server 2019, follow these steps:
- Review Hyper-V Server 2019 system requirements.
- Register, then download and install full-featured software.
- Receive emails with resources to guide you through your deployment.
Installation Guidelines
- Upon installation you will be prompted to activate.
- A product key is not required.
Resources
Supporting products
-
Windows Server is the platform for building an infrastructure of connected applications, networks, and web services, from the workgroup to the data center. It bridges on-premises environments with Azure, adding additional layers of security while helping you modernize your applications and infrastructure.
Get started with Windows Server: 2022 | 2019 | 2016 | 2012 R2
-
Windows Server Essentials edition is a cloud-connected first server designed for small businesses with up to 25 users and 50 devices. If you are considering installing any version of Windows Server Essentials, we would encourage you to consider Microsoft 365.
Get started with Windows Server Essentials: 2019 | 2016 | 2012 R2
Learn more about Microsoft 365 for business -
Hyper-V Server provides a simple and reliable virtualization solution to help organizations improve their server utilization and reduce costs. The latest release of Hyper-V Server provides new and enhanced features that can help you deliver the scale and performance needs of your mission-critical workloads.
Get started with Hyper-V Server: 2019 | 2016 | 2012 R2 | 2012
-
Windows Admin Center is a locally deployed, browser-based app for managing Windows servers, clusters, hyper-converged infrastructure, as well as Windows 10 PCs. Giving you full control over all aspects of your server infrastructure, Windows Admin Center is particularly useful for managing servers on private networks that are not connected to the Internet
Get started with Windows Admin Center
Please select your Hyper-V Server 2019 download
|
English |
ISO download 64-bit edition |
|---|---|
|
German |
ISO download 64-bit edition |
|
Spanish |
ISO download 64-bit edition |
|
French |
ISO download 64-bit edition |
|
Italian |
ISO download 64-bit edition |
|
Japanese |
ISO download 64-bit edition |
|
Korean |
ISO download 64-bit edition |
|
Portuguese (Brazil) |
ISO download 64-bit edition |
|
Russian |
ISO download 64-bit edition |
|
Chinese Simplified |
ISO download 64-bit edition |
|
Chinese Traditional |
ISO download 64-bit edition |
Prerequisites
Prior to installing Hyper-V Server 2019, follow these steps:
- Review Hyper-V Server 2019 system requirements.
- Register, then download and install full-featured software.
- Receive emails with resources to guide you through your deployment.
Installation Guidelines
- Upon installation you will be prompted to activate.
- A product key is not required.
Resources
Product Resources | Hyper-V on Windows Server technical documentation
Community | Microsoft Tech Community: Windows Server > Virtualization
Getting Started Guides | Get started with Hyper-V on Windows Server
Getting Started Guides | Plan for Hyper-V on Windows Server
Многие пользователи ждали этого. После выпуска Windows Server 2019 в октябре 2018 года вы смогли загрузить Windows Server 2019 Standard, Datacenter и Essentials. Сегодня вы также можете загрузить Microsoft Hyper-V Server 2019. Это бесплатная версия Hyper-V, которую вы можете найти в Windows Server 2019. Она включает в себя все замечательные функции виртуализации Hyper-V, такие как Datacenter Edition. Это особенно интересно, если вам не нужно лицензировать виртуальные машины Windows Server, и идеально подходит для запуска виртуальных машин Linux или виртуальных машин VDI.
Microsoft предоставила новый Hyper-V Server 2019 для загрузки. В отличие от другого программного обеспечения в Центре оценки Microsoft (Evaluation Center), продукт не имеет ограничений по времени использования.
Он представляет собой ядро сервера, которое не содержит задач и функций, не связанных с виртуализацией. Так как это не моя «область», я оставлю это Microsoft. Microsoft описывает это так:
Microsoft Hyper-V Server является бесплатным продуктом, обеспечивающим виртуализацию корпоративного класса для вашего центра обработки данных и гибридного облака. Microsoft Hyper-V Server 2019 предоставляет новые и расширенные функции, которые помогут вам удовлетворить потребности в масштабируемости и производительности для ваших критически важных рабочих нагрузок.
Технология низкоуровневой оболочки Windows, Microsoft Hyper-V Server 2019, предоставляет такие же возможности, что и Microsoft Hyper-V в Windows Server 2019. Это отдельный продукт, который содержит только низкоуровневую оболочку Windows, модель драйверов Windows Server и компоненты виртуализации. Он предоставляет простое и надежное решение по виртуализации, которое повышает эффективность использования серверов и снижает затраты.
Языки
Английский, испанский, итальянский, китайский, корейский, немецкий, португальский, русский, французский, японский
Выпуски
Microsoft Hyper-V Server 2019 | 64-bit ISO
После установки вам будет предложено активировать продукт. Ключ продукта не требуется.
Информация и загрузка:
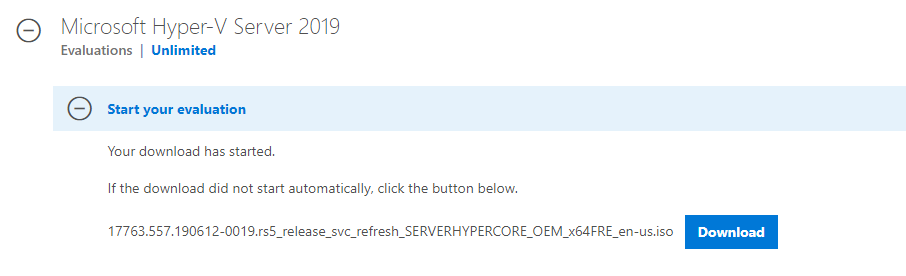
Вы можете загрузить Microsoft Hyper-V Server 2019 ISO:
- microsoft.com/evaluate-hyper-v-server-2019
- 17763.557.190612-0019.rs5_release_svc_refresh_SERVERHYPERCORE_OEM_x64FRE_ru-ru.iso
- 17763.557.190612-0019.rs5_release_svc_refresh_SERVERHYPERCORE_OEM_x64FRE_en-us.ISO
- Другие языки: pastebin
Windows Hyper-V Server — это бесплатная серверная версия гипервизора от Microsoft, которую можно использовать для запуска виртуальных машин. В этой статье мы рассмотрим, как установить и настроить версию Windows Hyper-V Server 2019 (инструкция также применима и к Hyper-V Server 2016).
Содержание:
- Что нового в Hyper-V Server 2019?
- Установка Hyper-V Server 2019/2016
- Утилита Sconfig: базовая настройка Hyper-V Server 2019/2016
- Удаленное управление Hyper-V Server 2019/2016
- Настройка Hyper-V Server 2019 с помощью PowerShell
Microsoft анонсировала, что не будет выпускать отдельную версию Hyper-V Server 2022. Связано с тем, что сейчас они сфокусированы на другом стратегическим продуктов Azure Stack HCI.
Hyper-V Server 2019 подходит специально для тех, кто не хочет платить за систему аппаратной виртуализации. В нем доступны все функции Hyper-V и при этом он абсолютно бесплатный. Основные преимущества Windows Hyper-V Server:
- Поддержка всех популярных ОС – совместим со всеми операционными системами. Поддержка Hyper-V присутствует во всех Windows системах, в ядре всех современных систем Linux и FreeBSD;
- Поддерживаются много способов бекапа виртуальных машин — простые скрипты, бесплатные программы, платные версии популярных программ для бекапа;
- Несмотря на то, что в Hyper-V Server отсутствует графический интерфейс управления Windows Server, вы можете управлять им удаленно через стандартную консоль управления гипервизором Hyper-V Manager или веб консоль Windows Admin Center;
- В основе Hyper-V Server популярная платформа Windows Server, с которой привычно и просто работать;
- Hyper-V можно установить на псевдоRAID – например, RAID контроллер Intel, программный RAID Windows;
- Не нужно лицензировать гипервизор – подходит для запуска VDI и виртуальных машин с Linux;
- Нетребовательность к железу – x64 процессор с поддержкой аппаратную виртуализацию (у Intel — Intel-VT или VMX, у AMD — AMD-V (SVM ) и трансляцию адресов второго уровня SLAT (Intel EPT или AMD RV). Эти опции процессора должны быть включены в BIOS/UEFI/nested host. Полные системные требования можно найти на сайте Microsoft;
- Рекомендуется устанавливать на хосты с минимум 4 Гб памяти.
Не нужно путать полноценный Windows Server 2016/2019/2022 с установленной ролью Hyper-V с Free Hyper-V Server 2019/2016. Это разные продукты.
Также отметим, что использование бесплатного гипервизора не освобождает вас от обязанности лицензировать виртуальные машин. Вы можете запустить неограниченное количество ВМ с opensource ОС типа Linux, но виртуальные машины с Windows придется лицензировать. Десктопные редакции Windows лицензируются с помощью ключа продукта. Если вы используете Windows Server в качестве гостевой ОС, его нужно лицензировать по физическим ядрам вашего хоста. Подробнее о лицензировании Windows Server при запуске в среде виртуализации смотрите здесь.
Что нового в Hyper-V Server 2019?
Вкратце пробежимся по объявленным новшествам в Hyper-V Server 2019:
- Появилась поддержка Shielded Virtual Machines для Linux;
- Версия VM конфигурации 9.0 (поддержка гибернации);
- Поддержка дедупликации для ReFS;
- Core App Compatibility – возможность запуска дополнительных графических панелей управления в консоли сервера Hyper-V;
- Поддержка 2-node Hyper-V cluster, кросс-доменной миграция кластеров.
Установка Hyper-V Server 2019/2016
Скачать ISO образ гипервизора Hyper-V Server 2019 можно https://www.microsoft.com/en-us/evalcenter/evaluate-hyper-v-server-2019.

После нажатия на кнопку “Continue” откроется небольшая форма регистрации для ввода ваших данных. Заполняете, затем выбираете язык устанавливаемой системы. Настоятельно рекомендую выбрать английский. И ждете, когда закончится скачивание образа Hyper- V. Размер .iso файла около 3 ГБ.
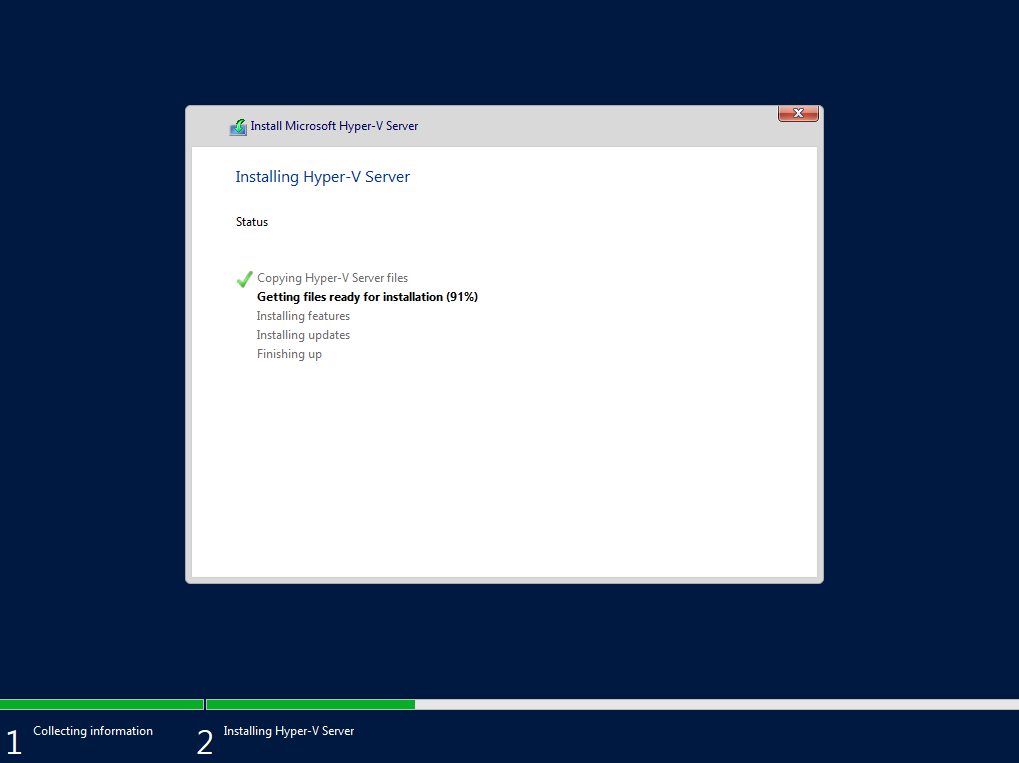
Установка Microsoft Hyper-V Server идентична установки Windows 10/11 на компьютер. Просто загрузите ваш сервер (компьютер) с установочной USB флешки с установочным образом Microsoft Hyper-V Server (для записи ISO образа на USB накопитель проще всего использовать утилиту Rufus) и следуйте инструкциям мастера установки ОС.
Утилита Sconfig: базовая настройка Hyper-V Server 2019/2016
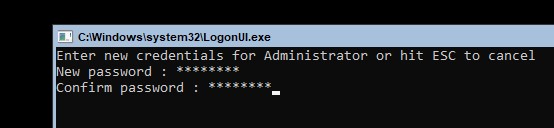
После завершения установки Hyper-V Server потребует задать пароль администратора.
После этого перед вами откроется консоль гипервизора.
Обратите внимание, что у Hyper-V Server нет привычного графического интерфейса Windows. Большинство настроек сервера придется выполнять через командную строку.
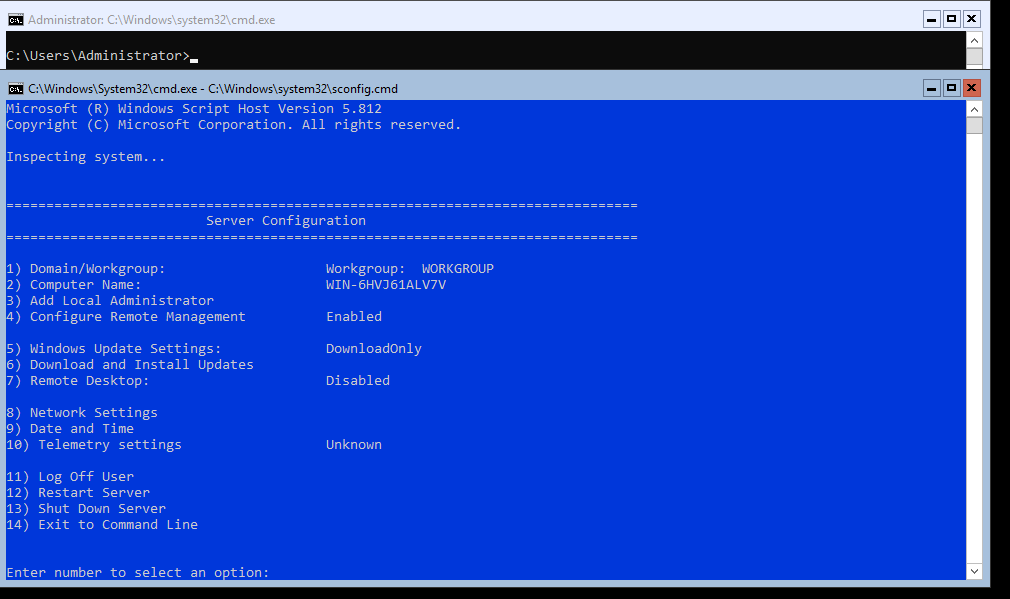
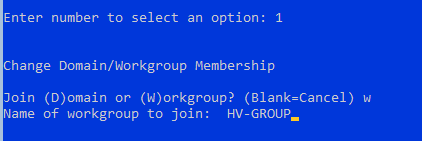
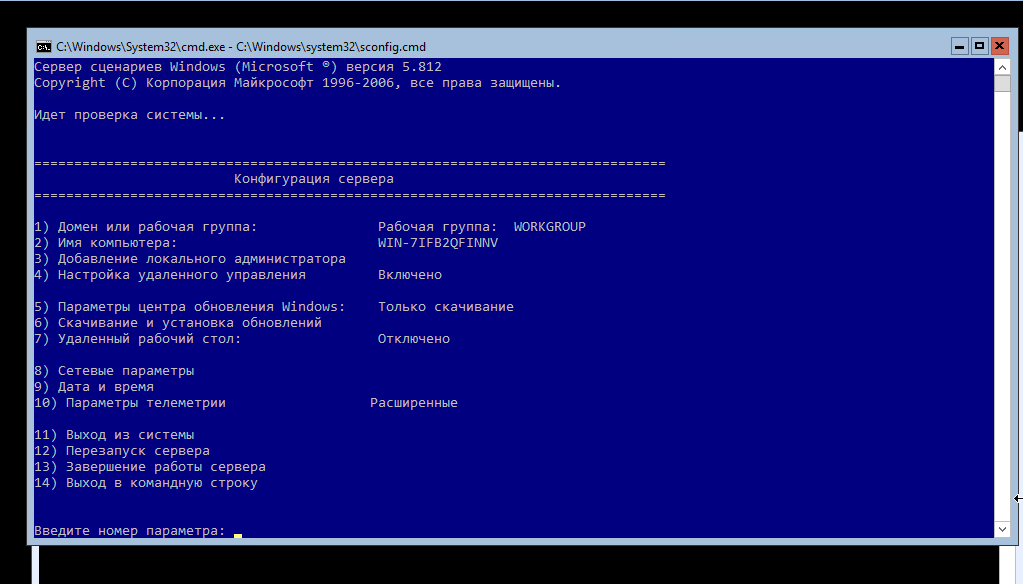
На рабочем столе два окна – стандартная командная строка и окно скрипта sconfig.cmd. С помощью данного скрипта можно выполнить первоначальную настройку сервера Hyper-V. В строке “Enter number to select an option:” введите номер пункта меню, с которым будете работать.
- Первый пункт меню позволяет ввести сервер в домен AD или в рабочую группу;

- Затем задайте имя хоста (сервера);
- Добавьте локального администратора (дополнительную учетную запись, помимо встроенного administrator). Обратите внимание, что при вводе пароля курсор остается на одном месте, тем не менее, пароль и его подтверждение успешно вносятся в систему;
- Включите удаленный доступ к серверу. Это позволить управлять им с помощью Server Manager, консолей MMC, PowerShell, проверить доступность с помощью ping или tracert;
- Настройте Windows Update. Выберите один из трех режимов:
- Automatic (автоматическая загрузка и установка обновлений)
- DownloadOnly (только загрузка без установки)
- Manual (решение о загрузке и установке обновлений принимает администратор)
- Загрузите и установите последние обновления Windows;
- Включите RDP доступ с или без NLA (Network Level Authentication);
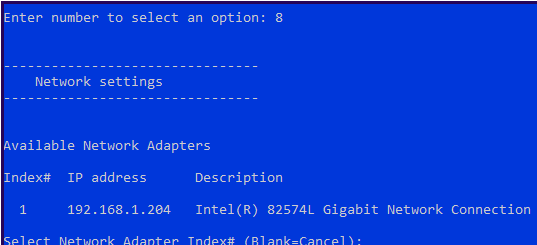
- Настройки параметры сетевых адаптеров. По умолчанию сервер получает адрес от DHCP. Обычно тут стоит указать статический IP адрес;

- Установите дату и время системы;
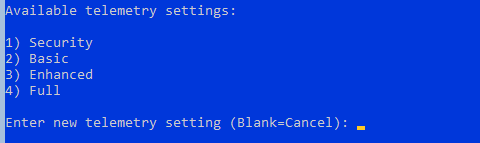
- Настройте телеметрию. Полностью ее отключить система не позволит. Выберите режим, который вам больше нравится
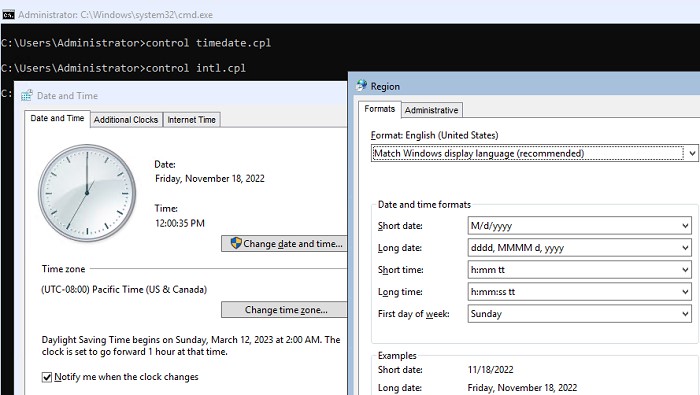
Дату, время и часовой пояс можно также настроить с помощью команды:
control timedate.cpl
Региональные параметры:
control intl.cpl
При этом открываются стандартные консоли Windows.
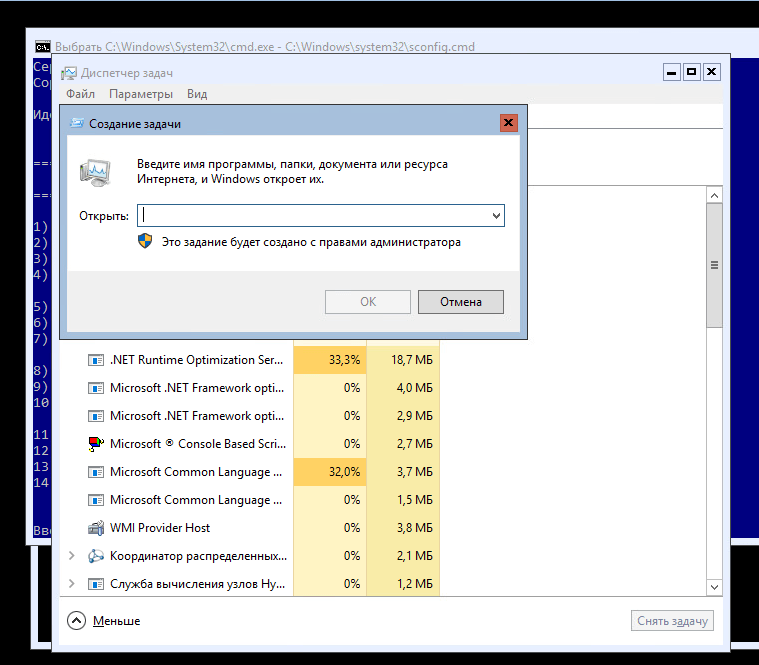
Внимание! Если вы закрыли все окна и оказались перед черным экраном, то нажмите Ctrl+Shift+Esc, чтобы запустить диспетчер задач данное сочетание клавиш работает в том числе и в RDP-сессии). С помощью Task Manager вы можете запустить командную строку или утилиту конфигурации Hyper-V (нажмите File -> Run Task ->
cmd.exe
или
sconfig.cmd
).
Удаленное управление Hyper-V Server 2019/2016
Для удобного управления Free Hyper-V Server 2019 из графического интерфейса вы можете использовать:
- Веб консоль Windows Admin Center (см. статью Windows Admin Center: веб-интерфейс управления серверами Windows Server);
- Стандартную консоль Hyper-V Manager – можно установить, как на Windows Server, так и на десктопных версиях Windows 10/11.
Для работы с Hyper-V Server 2016/2019 вам потребуется ПК с операционной системой Windows 10 версий Pro или Enteprise х64.
Удаленное управление Hyper-V Server с помощью Hyper-V Manager
Рассмотрим, как удаленно подключиться к хосту Hyper-V сервер с другого компьютера с помощью консоли Hyper-V Manager. В этой статье мы подразумеваем, что у вас сервер Hyper-V и компьютер с Windows 10 находятся в одной рабочей группе (WORKGROUP).
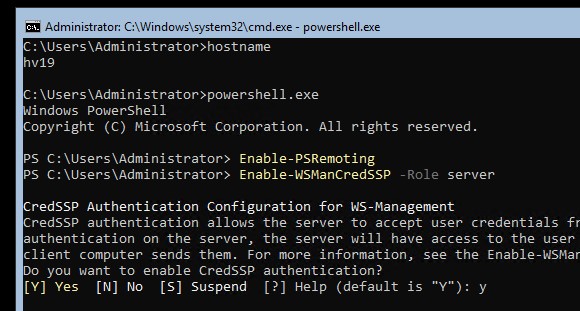
Cначала выполните настройки на сервере Hyper-V. Запустите консоль PowerShell (powershell.exe) и выполните следующие команды:
Enable-PSRemoting
Enable-WSManCredSSP -Role server
Утвердительно отвечаете на все вопросы, при этом будет настроен автоматический запуск службы WinRM и созданы разрешающие правила в брандмауэре.
Теперь переходит к настройке клиентского компьютера с Win 10.
Сервер Hyper-V должен быть доступен по своему сетевому имени, в доменной сети ему должна соответствовать A-запись на DNS-сервере. В рабочей группе такую запись потребуется нужно создать вручную на локальном DNS, либо добавить нужную запись в файл hosts (C:WindowsSystem32driversetchosts) клиентской машины. В нашем случае она выглядит следующим образом:
192.168.13.55 hv19
Можно добавить запись в файл hosts с помощью PowerShell:
Add-Content -Path "C:WindowsSystem32driversetchosts" -Value "192.168.13.55 hv19"
Добавьте Hyper-V сервер в доверенные узлы:
Set-Item WSMan:localhostClientTrustedHosts -Value "hv19"
Если учетная запись, под которой вы работаете на клиентском ПК, отличается от учетных данных администратора Hyper-V, нужно явно сохранить учетные данные для соединений с сервером в диспетчер учетных записей Windows командой:
cmdkey /add:hv19 /user:Administrator /pass:MyPa$$word
Проверьте используемый профиль сети на клиенте Windows 10. Если используется тип сети Public, ее нужно сменить на Private:
Get-NetConnectionProfile|select InterfaceAlias,NetworkCategory

Set-NetConnectionProfile -InterfaceAlias "EthernetLAN2" -NetworkCategory Private
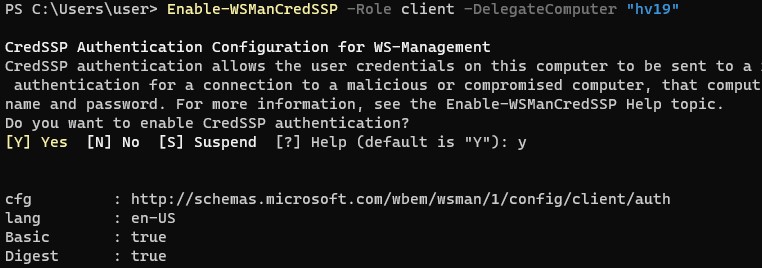
Выполите команду:
Enable-WSManCredSSP -Role client -DelegateComputer "hv19"
Теперь выполните команду
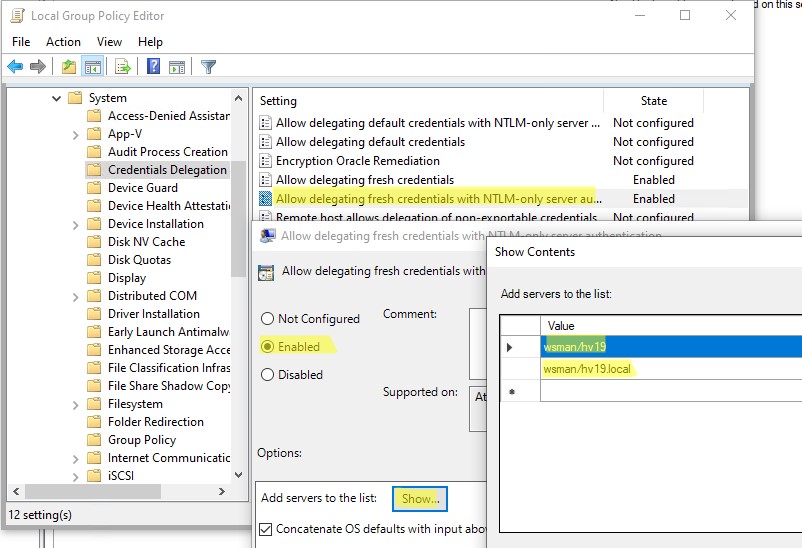
gpedit.msc
чтобы открыть редактор локальной GPO.
- Перейдите в раздел Local Computer Policy -> Computer Configuration -> Administrative Templates -> System -> Credentials Delegation;
- Включите параметр Allow Delegating Fresh Credentials with NTLM-only Server Authentication.
- Затем нажмите кнопку Show и добавьте два значения
wsman/hv19
и
wsman/hv19.local - Закройте консоль редактора и обновите настройки локальной групповой политики командой
gpupdate /force
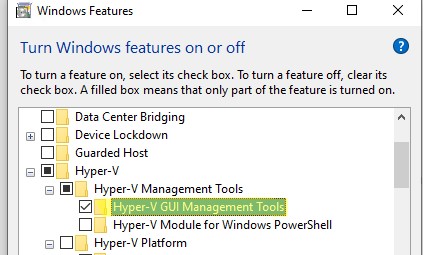
Теперь нужно установить в Windows консоль Диспетчер Hyper-V. Откройте оснастку Programs and Features и перейдите в Turn Windows Features on or off. В открывшемся окне найдите пункт Hyper-V и отметьте для установки Hyper-V GUI Management Tools.
Или вы можете установить клиент Hyper-V Manager с помощью PowerShell:
Enable-WindowsOptionalFeature -Online –FeatureName Microsoft-Hyper-V-Management-Clients
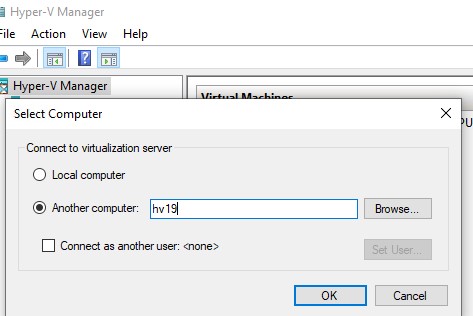
Запустите оснастку Hyper-V Manager (
virtmgmt.msc
), щелкните правой кнопкой по Hyper-V Manager и выберите Connect to Server. Укажите имя вашего сервера Hyper-V.
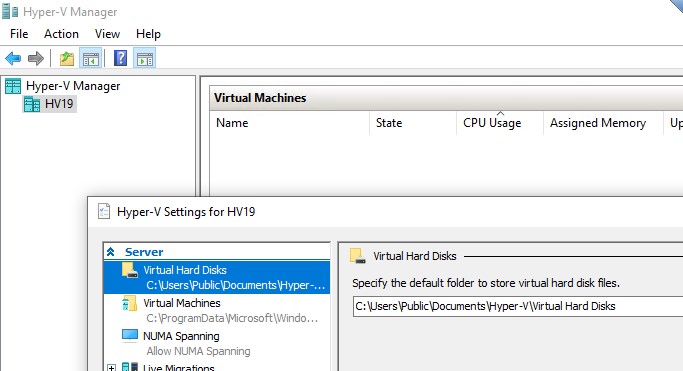
Теперь вы можете управлять настройками Hyper-V Server, создавать виртуальный машины и управлять ими из графической консоли.
Управление Hyper-V с помощью Windows Admin Center
Для удаленного управления хостом Hyper-V можно использовать Windows Admin Center (WAC). WAC это веб консоли и дашбоард для полноценного управления Windows Server, Server Core и Hyper-V Server.
На стороне Hyper-V нужно включить разрешающие правила для SMB подключений в Windows Defender Firewall:
Set-NetFirewallRule -DisplayGroup "File and Printer Sharing" -Enabled true -PassThru
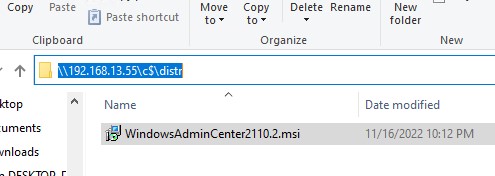
Теперь нужно скачать (https://aka.ms/WACDownload) и установить агент Windows Admin Center на ваш хост Hyper-V. Скачайте WindowsAdminCenter2110.2.msi на любом компьютере Windows с доступом в интернет. Можно скопировать установочный MSI файл на Hyper-V сервер через подключение к административной шаре C$. Для этого выполните команду:
Win+R ->
\192.168.13.55C$
и введите пароль администратора Hyper-V
Создайте папку и скопируйте в нее MSI файл.
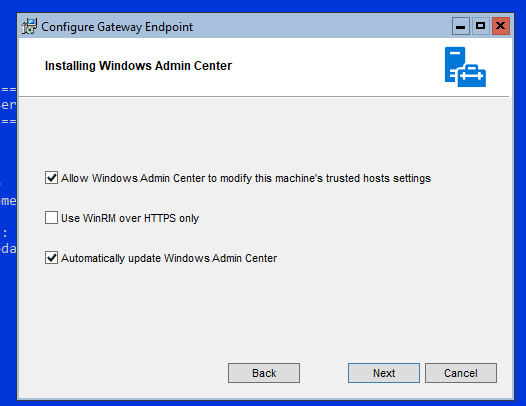
Теперь запустите установку WAC из консоли Hyper-V:
c:distrWindowsAdminCenter2110.2.msi
Установите WAC с настройками по-умолчанию.
После окончания установки вы можете подключиться к вашему Hyper-V Server из браузера, простой перейдите по адресу
https:\192.168.13.55:443
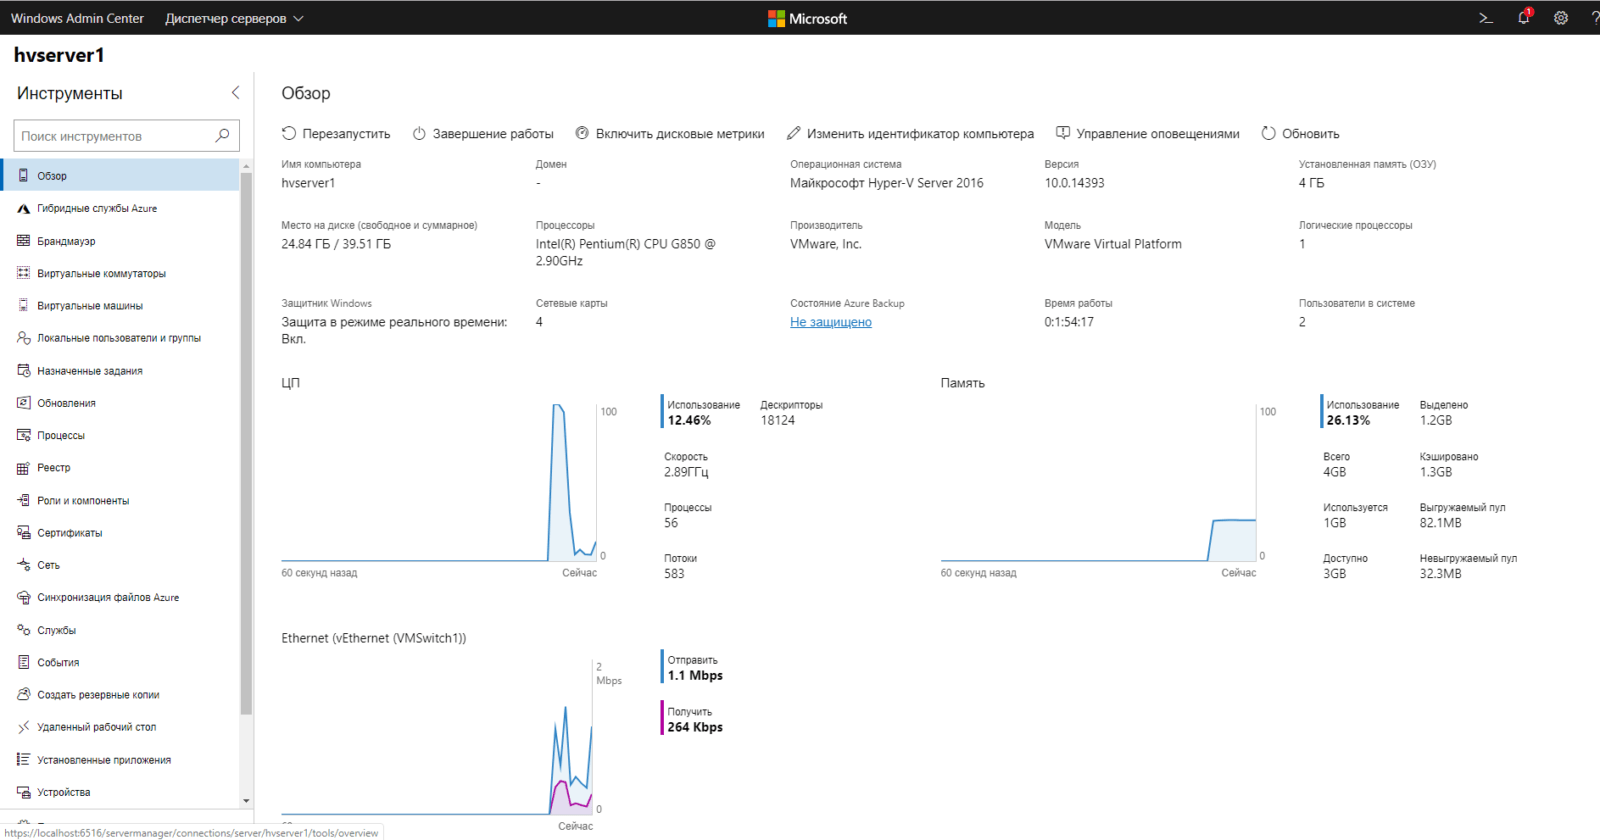
Перед вами откроется дашбоард вашего Hyper-V Server хоста. Вы увидите базовую информацию о сервере, используемых ресурсах и т.д.
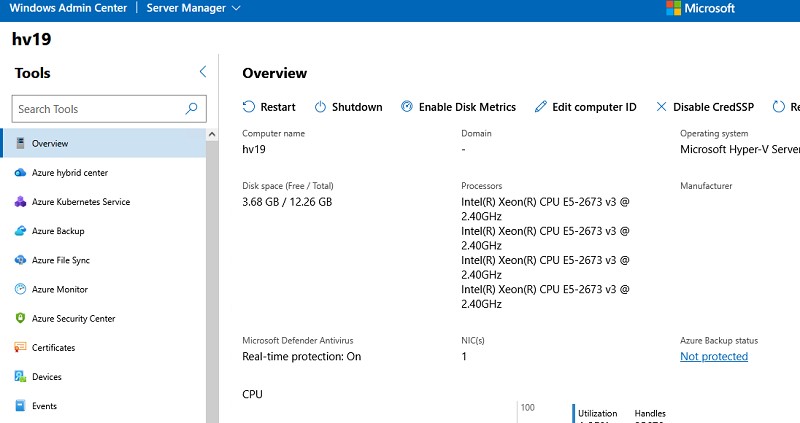
Настройки хоста Hyper-V можно задать в разделе WAC -> Settings -> Hyper-V Host Settings. Доступны следующие разделы:
- General
- Enhanced Session Mode
- NUMA Spanning
- Live Migration
- Storage Migration

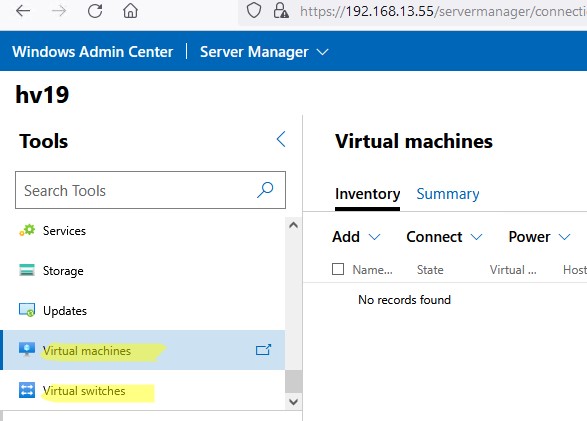
Для управления Hyper-V вы будете преимущественно использовать две секции в консоли WAC:
- Virtual Switches – нужно создать как минимум один виртуальный коммутатор, чтобы предоставить сетевой доступ для ВМ;
- Virtual Machines – в этом разделе вы можете создать, настроить, включить/выключить, импортировать/экспортировать виртуальную машину Hyper-V.
Далее я рассмотрю некоторые способы управления Hyper-V Server из PowerShell
Настройка Hyper-V Server 2019 с помощью PowerShell
Для настройки сервера рекомендую использовать PowerShell. В модуле Module Hyper-V доступно более 238 командлетов для управления сервером Hyper-V.
Get-Command –Module Hyper-V | Measure-Object
Настройте автоматический запуск консоли PowerShell (вместо cmd.exe) при входе в систему.
New-ItemProperty -path HKLM:SOFTWAREMicrosoftWindowsCurrentVersionrun -Name PowerShell -Value "cmd /c start /max C:Windowssystem32WindowsPowerShellv1.0powershell.exe -noExit" -Type string
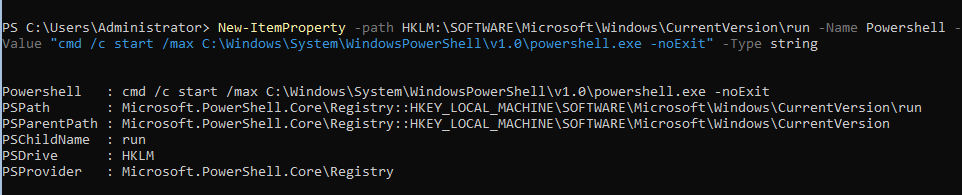
Теперь при входе в сеанс будет запускаться окно PowerShell.
Настройка параметров сети Hyper-V Server 2019 из PowerShell
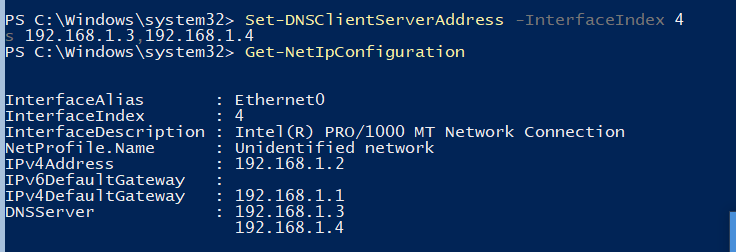
Если вы не настраивали сетевые параметры в окне sconfig.cmd, то настройте их через PowerShell. С помощью командлета Get-NetIPConfiguration можно увидеть текущую конфигурацию IP сетевых интерфейсов.
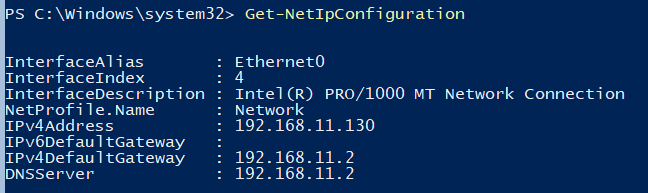
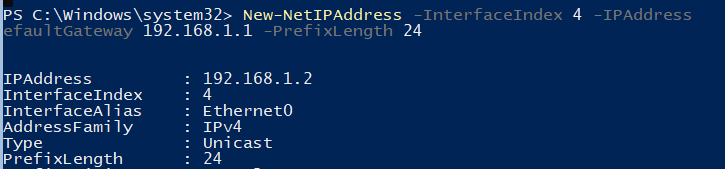
Через PowerShell назначьте статический IP адрес, маску сети, шлюз по умолчанию и адреса DNS серверов. Индекс (InterfaceIndex) сетевого адаптера берем из вывода предыдущего командлета.
New-NetIPAddress -InterfaceIndex 4 -IPAddress 192.168.1.2 -DefaultGateway 192.168.1.1 -PrefixLength 24
Set-DnsClientServerAddress -InterfaceIndex 4 -ServerAddresses 192.168.1.3,192.168.1.4
Для настройки IPV6 смотрим имя интерфейса командлетом Get-NetAdapter из PowerShell модуля управления сетью NetTCPIP:

Проверьте текущую настройку IPv6 следующей командой:
Get-NetAdapterBinding -InterfaceDescription "Intel(R) PRO/1000 MT Network Connection" | Where-Object -Property DisplayName -Match IPv6 | Format-Table –AutoSize

Отключить IPV6 можно так:
Disable-NetAdapterBinding -InterfaceDescription " Intel(R) PRO/1000 MT Network Connection " -ComponentID ms_tcpip6
Настройка правил Windows Defender Firewall для управления Hyper-V Server 2019
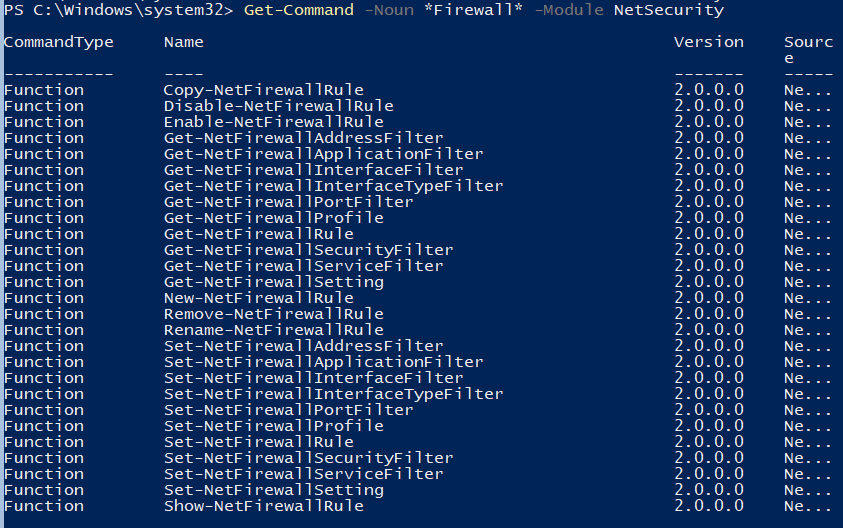
Просмотреть список командлетов для управления файерволом Windows можно с помощью Get-Command.
Get-Command -Noun *Firewall* -Module NetSecurity
Для полноценного удаленного управления сервером выполните последовательно следующие команды для включения разрешающих правил Windows Firewall из PoSh:
Enable-NetFireWallRule -DisplayName "Windows Management Instrumentation (DCOM-In)"
Enable-NetFireWallRule -DisplayGroup "Remote Event Log Management"
Enable-NetFireWallRule -DisplayGroup "Remote Service Management"
Enable-NetFireWallRule -DisplayGroup "Remote Volume Management"
Enable-NetFireWallRule -DisplayGroup "Windows Defender Firewall Remote Management"
Enable-NetFireWallRule -DisplayGroup "Remote Scheduled Tasks Management"
Создание дискового хранилища для виртуальных машин
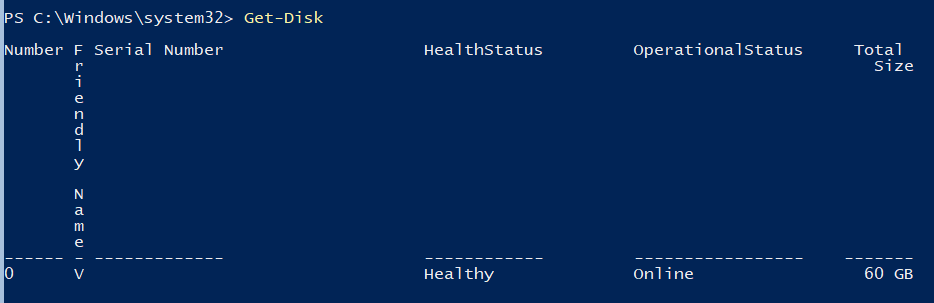
Для хранения данных (файлов виртуальных машин и дистрибутивов) будем использовать отдельный раздел на физическом диске. Просмотрите список физических дисков на сервере.
Get-Disk
Создайте новый раздел на диске максимально возможного размера и назначьте ему букву D. Используйте DiskNumber из Get-Disk.
New-Partition -DiskNumber 0 -DriveLetter D –UseMaximumSize
После этого отформатируйте раздел в NTFS и укажите его метку.
Format-Volume -DriveLetter D -FileSystem NTFS -NewFileSystemLabel "HVStore"
Подробнее о командлетах управления дисками и разделами из PowerShell здесь.
Создайте каталог, где будете хранить настройки и файлы дисков виртуальных машин. Командлет New-Item позволяет создавать вложенные пути:
New-Item -Path "D:Hyper-VVirtual Hard Disks" -Type Directory
Создайте папку D:Distrib для хранения установоых ISO образов ОС:
New-Item -Path D:Distr -ItemType Directory
Для создания общей сетевой папки (шары) используйте командлет New-SmbShare, с помощью которого предоставьте полный доступ по сети для группы локальных администраторов сервера:
New-SmbShare -Path D:Distr -Name Distr -Description "OS Distributives" -FullAccess "BUILTINAdministrators"
Более подробно о базовой настройке Hyper-V Server и Windows Server Core из командой строки рассказано в этой статье.
Настройка параметров хоста в Hyper-V Server 2016/2019
Откроем параметры сервера командой:
Get-VMHost | Format-List

Пути виртуальных машин и виртуальных дисков находятся на одном разделе с операционной системой, что неправильно. Пропишите путь к созданным ранее папкам с помощью команды:
Set-VMHost -VirtualMachinePath D:Hyper-V -VirtualHardDiskPath 'D:Hyper-VVirtual Hard Disks'
Создание виртуального коммутатора Hyper-V
Создайте External Switch, который привязывается к сетевой карте Hyper-V Server и организует взаимодействие ВМ с физической сетью.
Проверьте поддержку SR-IOV (Single-Root Input/Output (I/O) Virtualization):
Get-NetAdapterSriov
Получите список подключенных сетевых адаптеров:
Get-NetAdapter | Where-Object -PropertyStatus –eqUp
Привяжите виртуальный свитч к сетевому адаптеру и при наличии SR-IOV включите его поддержку.
Внимание! Включить или отключить поддержку SR-IOV после создания свитча будет невозможно, для изменения этого параметра необходимо будет пересоздавать коммутатор.
New-VMSwitch -Name "Extenal_network" -NetAdapterName "Ethernet 2" -EnableIov 1
Проверить настройки виртуального коммутатора можно с помощью командлетов:
Get-VMSwitch
Get-NetIPConfiguration –Detailed
На этом первоначальная настройка Hyper-V Server 2016/2019 закончена. Можно переходить к созданию и настройке виртуальных машин.
Более подробно команды PowerShell для управления Hyper-V и виртуальными машинами описаны в этой статье.
Hyper V Server Free, установка и первоначальная настройка.
В сегодняшней статье я хочу рассказать об установке и настройке бесплатного гипервизора первого уровня(bare-metal) Hyper V Server от Microsoft.
Hyper-V Server является бесплатным продуктом от компании Microsoft и представляет из себя платформу виртуализации, устанавливаемую непосредственно на «железо»(не путать с ролью Hyper-V, которую можно установить на Windows). Скачать его можно на сайте https://www.microsoft.com/en-us/evalcenter/evaluate-hyper-v-server-2019
Не буду распространяться о достоинствах и недостатках, скажу только, что в отличие от бесплатного гипервизора ESXi, имеющего много ограничений в сравнении с платными версиями, Hyper-V Server имеет ограничение, выражающееся в отсутствии графического интерфейса и некоторые сложности в настройке. Хотя, вряд ли это можно считать существенными недостатками, ведь для управления серверами Hyper-V есть достаточно средств, в том числе и бесплатные от самой Microsoft.
Думаю, достаточно прелюдий, давайте приступим к установке.
Установка Hyper-V Server.
Установка Hyper-V Server ничем не отличается от установки Windows с графическим интерфейсом, как и установка Server Core, поэтому описывать ее еще раз я не буду.
Скажу только, что после установки вы не увидите привычный графический интерфейс. Вместо этого, будут доступны интерфейс командной строки, Powershell и утилита настройки сервера sconfig.
Итак, после установки, вам предложат сменить пароль для учетной записи Администратора, и снова, как и при установке Server Core откроется мастер настройки сервера sconfig.
К этому мастеру вы всегда можете вернуться, набрав в командной строке sconfig. Если вы закрыли все окна, открыть консоль Powershell или CMD можно из диспетчера задач, запустив его нажатием Ctrl+Shift+Esc, в меню «Файл» выбрать «Создать новую задачу» и, в открывшемся окне ввести название программы, которую хотите запустить( например powershell, cmd или notepad).
Но, вернемся к настройке. В меню sconfig все понятно, там можно сменить имя компьютера, добавить его в домен или рабочую группу, изменить сетевые настройки и т.д. Просто введите нужный пункт меню и нажмите Enter.
Я изменю имя сервера, создам еще одну учетку с правами администратора, разрешу удаленное управление(в том числе ping), удаленный доступ по RDP и настрою статический IP-адрес. Также, рекомендую скачать и установить доступные обновления. И создайте соответствующую запись на вашем ДНС-сервере или пропишите соответствие имени и IP-адреса сервера в файле hosts на машине, с которой будете управлять гипервизором.
После этого, можно подключиться к серверу по RDP. Но, подключившись к удаленному рабочему столу, мы увидим те же самые CMD и Powershell.
Для более удобного управления сервером у Microsoft есть бесплатный инструмент Windows Admin Center. Узнать о нем подробнее и скачать его можно по ссылке: https://docs.microsoft.com/ru-ru/windows-server/manage/windows-admin-center/understand/windows-admin-center
Также, управлять сервером можно с помощью Диспетчера серверов, входящего в «комплектацию» серверных операционных систем Windows Server, либо в пакет для удаленного администрирования RSAT.
Так вот, сейчас, при попытке добавить наш сервер для управления в Windows Admin Center, мы получим ошибку:
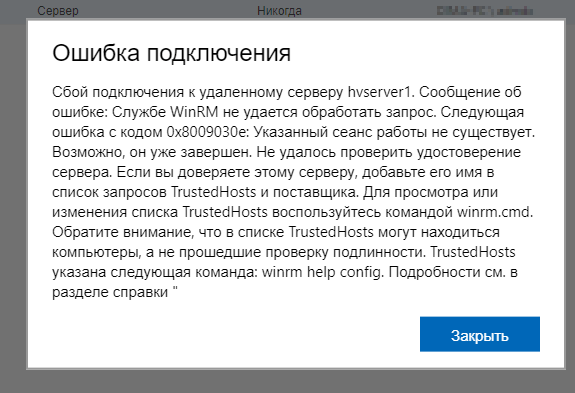
Для ее устранения нужно на клиентском компьютере, с которого производится управление сервером выполнить команду:
|
Set-Item WSMan:localhostClientTrustedHosts -Value «hvserver1» -Concatenate |
Она добавит сервер с именем «hvserver1» в список доверенных хостов на вашем клиентском компьютере. Ключ -Concatenate означает, что список нужно дополнить, а не перезаписать содержащиеся там записи.
Настройка правил файрволла на сервере:
Настройка файрволла для русскоязычной ОС:
|
Enable-NetFireWallRule -DisplayName «Инструментарий управления Windows (DCOM — входящий трафик)» Enable-NetFireWallRule -DisplayGroup «Удаленное управление журналом событий» Enable-NetFireWallRule -DisplayGroup «Удаленное управление Windows» Enable-NetFireWallRule -DisplayGroup «Удаленное управление томами» Enable-NetFireWallRule -DisplayGroup «Удаленное управление брандмауэром Windows» Enable-NetFireWallRule -DisplayGroup «Удаленное управление назначенными задачами» |
Настройка файрволла для англоязычной ОС:
|
Enable-NetFireWallRule -DisplayName «Windows Management Instrumentation (DCOM-In)» Enable-NetFireWallRule -DisplayGroup «Remote Event Log Management» Enable-NetFireWallRule -DisplayGroup «Remote Service Management» Enable-NetFireWallRule -DisplayGroup «Remote Volume Management» Enable-NetFireWallRule -DisplayGroup «Windows Firewall Remote Management» Enable-NetFireWallRule -DisplayGroup «Remote Scheduled Tasks Management» |
Разрешить удаленное управление дисками можно и так:
|
Enable-NetFirewallRule -name RVM-RPCSS-In-TCP,RVM-VDSLDR-In-TCP,RVM-VDS-In-TCP |
Отключить файрвол полностью можно командой:
|
Set-NetFirewallProfile -Profile Domain, Public, Private -Enabled False |
Разрешим удаленное управление:
и передачу учетных данных:
|
Enable-WSManCredSSP -Role server |
Будет создано правило файрвола для прослушивателя WinRM. Внимание, этот пункт завершится с ошибкой если любая из сетевых карточек имеет тип сети «публичная». Если у вас при настройке вышла такая ошибка, измените профиль этой сети командлетом Set-NetConnectionProfile и после этого запустите Enable-PSRemoting снова. Если вам нужна сетевая карточка с профилем «Публичная сеть» запустите Enable-PSRemoting с параметром -SkipNetworkProfileCheck в этом случае будут созданы правила файрвола, разрешающие доступ из общедоступных сетей в той же локальной подсети. Подробнее про PSRemoting можно прочитать здесь: https://docs.microsoft.com/en-us/powershell/module/microsoft.powershell.core/enable-psremoting?view=powershell-6
Проверить прослушивается ли порт WinRM можно командой:
также, может быть полезной команда:
|
winrm e winrm/config/listener |
Если подключение к Hyper V Server производится с компьютера, находящегося в другой локальной сети, и сервер является членом домена, проверьте разрешено ли политиками удаленное управление из этой сети. В политиках этот параметр находится по пути Конфигурация компьютера->Административные шаблоны->Компоненты Windows->Удаленное управление Windows->Служба удаленного управления Windows. Параметр Разрешить удаленное администрирование сервера средствами WinRM.
На клиентском компьютере можно выполнить команду, добавляющую учетные данные для подключения к серверу(если используются разные учетные данные).
|
cmdkey /add:HVSERVER1 /user:Администратор /pass:MyPa$$word |
и разрешим передачу учетных данных:
|
Enable-WSManCredSSP -Role client -DelegateComputer «hvserver1» |
Также, возможно, потребуется сделать следующее:
Через командную строку или команду Выполнить (Win + R) запустите оснастку dcomcnfg, в ней разверните дерево Службы компонентов — Компьютеры — Мой компьютер. После чего по щелчку правой кнопки мыши выберите Свойства и перейдите на закладку Безопасность COM — Права доступа — Изменить ограничения и в открывшемся окне установите для пользователя АНОНИМНЫЙ ВХОД права Удаленный доступ.
После этого можно будет подключиться к серверу с помощью Windows Admin Center и добавить сервер в Диспетчер серверов.
Настройка сети.
Настройку сети можно произвести из Windows Admin Center и в Диспетчере серверов. Правда, доступны не все настройки. Но тут на помощь всегда может прийти Powershell.
Например, настройку объединения сетевых карт можно сделать в Диспетчере серверов или в Powershell:
|
New-NetLbfoTeam -Name NicTeam -TeamMembers Ethernet0,Ethernet1 -TeamingMode SwitchIndependent -LoadBalancingAlgorithm Dynamic |
Изменить режим работы объединенного интерфейса можно при помощи командлета Set-NetLbfoTeam
|
Set-NetLbfoTeam -Name «NicTeam» -TeamingMode LACP |
Создать виртуальный коммутатор на основе созданного объединенного интерфейса:
|
New-VMSwitch -Name VMSwitch1 -NetAdapterName «NicTeam» -AllowManagementOS $true -Confirm:$false |
Настроить на нем IP-адрес:
|
New-NetIPAddress -InterfaceAlias «vEthernet (VMSwitch1)» -IPAddress 192.168.1.40 -PrefixLength 24 -DefaultGateway 192.168.1.1 |
Настроить днс-серверы:
|
Set-DnsClientServerAddress -InterfaceAlias «vEthernet (VMSwitch1)» -ServerAddresses 192.168.1.1,192.168.1.2 |
Вот еще несколько команд, которые могут пригодиться при настройке сети:
|
1 2 3 4 5 6 7 8 9 10 11 12 13 14 15 16 17 18 19 |
Get-NetLbfoTeam Set-NetLbfoTeam -Name «NicTeam» -TeamingMode Lacp Remove-NetLbfoTeamNic -Team «Team-name» -VlanID «VLAN» Get-NetAdapter Rename-NetAdapter -Name «OldName» -NewName «NicTeam» Get-NetIPConfiguration Set-NetIPAddress -InterfaceAlias «vEthernet (VMSwitch1)» -IPAddress 192.168.1.70 -PrefixLength 24 Set-VMNetworkAdapterVlan -ManagementOS -Access -VlanId 100 Get-VM | Get-VMNetworkAdapter | Disconnect-VMNetworkAdapter Get-VMSwitch | Remove-VMSwitch -Force |
Ну и наконец управлять виртуальными машинами можно с помощью стандартной оснастки Hyper-V, которая доступна в составе компонентов Windows, если не ошибаюсь, с 8 версии(естественно, не Home редакции).
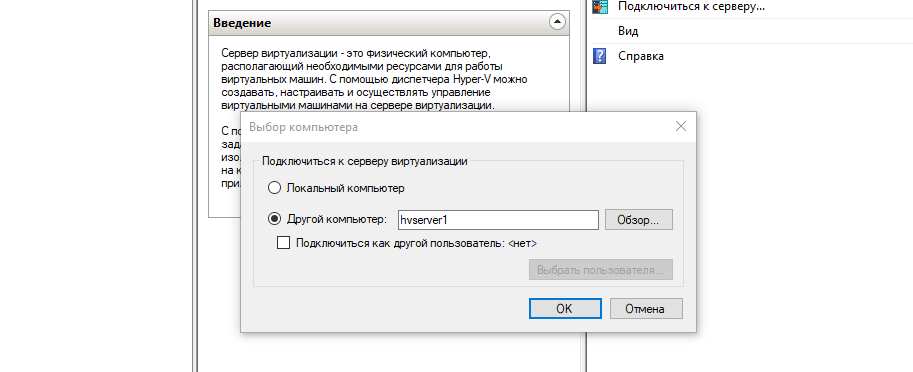
Для управления Hyper V Server, запустите оснастку Hyper-V и выберите «Подключиться к серверу».
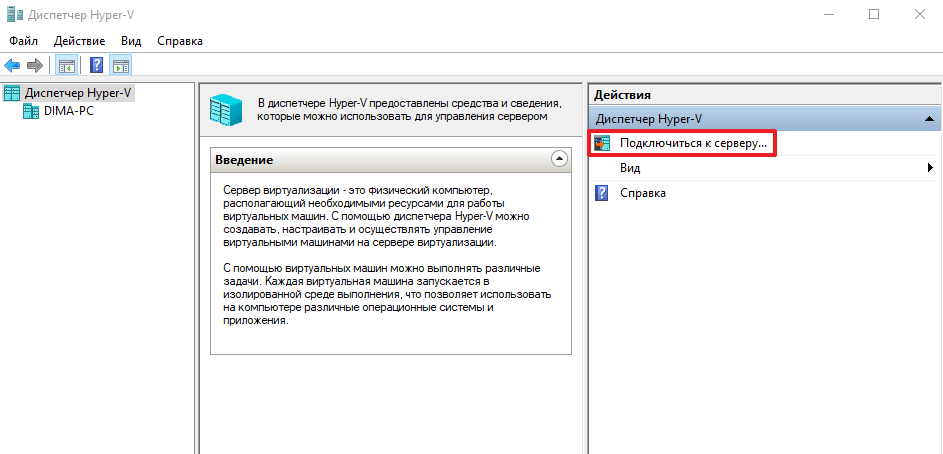
В открывшемся окне выберите «Другой компьютер» и укажите имя Hyper-V Server. Если вы указали ранее учетные данные для управления сервером командой cmdkey, то просто нажмите ОК. Если нет, то выберите «Подключиться как другой пользователь» и укажите имя пользователя и пароль.
После подключения, вы сможете управлять виртуальными машинами и параметрами Hyper-V.
Хост с Hyper-V Server также может быть добавлен в Virtual Machine Manager.
Maintaining a server is impossible with normal computers running a normal OS, hence a special operating system that can handle the load is required. This led Microsoft to come up with Windows Server OSes. Server OSes are specially built to run servers with high capacity. These OSes have been playing a very important role in providing users with advanced server capabilities that were not available on normal Windows OSes.
The server OS comes with a specialized set of features that allows users to run servers with ease. The serer OSes Microsoft develops is pretty handy and are very much capable of running servers with efficiency. Hop on to learn more about Server 2019 OS released by Microsoft.

Windows Server 2019 OS is one of the best released by Microsoft. The OS has brought in many new features making it a good one. Microsoft has put in a lot of effort to make the OS a viable option for running powerful servers. The OS has some cool features like improved security, Windows Admin Center, user interface improvements, network protection and much more.
The OS is one of the finest breakthrough OSes ever made, helping many small and medium-sized businesses to grow through the use of technology. Microsoft has been doing a fabulous job of developing OSes and other pieces of software considering the market requirements and the technological trends, to make their stand in the tech market.

License / Product Key
Installer ISO
File Size
2.2GB / 4.6GB
Language
English
Developer
Microsoft Inc.
Recommended Post:- Windows XP ISO: Windows XP free Download (32 & 64 bit)
Productive Features of Windows Server 2019
These are some of the most important features of windows server 2019 that were introduced:
Windows Admin Center
With Windows Admin Center feature is great for managing servers and clusters in the user’s environment. The user can work with hybrid solutions and streamline hyper-converged clusters. With the Windows Admin Center, the server OS can be controlled with a centralized system.
Low Extra Delay Background Transport(LEDBT)
The LEDBT feature allows large IT environments to maintain constant bandwidth even when large updates are being sent. It is a control provider that allocates bandwidth to users and ensures that the bandwidth is not wasted when the network is not used.
Hypertext Transfer Protocol(HTTP)/2
This HTTP 2 ensures that the users get an uninterrupted browsing experience. Connection failures will be minimized in case they arise and deployment has been made much simpler.
Desktop Experience
The Desktop Experience will allow users to implement a standard graphical user interface on the server. With the support of this feature, new software components will be added that will assist the server to carry out functions.

System Insights
With the system insight feature, users can get local analytical capabilities to analyse their system’s data. With the data analysed, they can understand the working of the system.
Advanced Threat Protection(ATP)
Malicious files and processes will be handled by ATP’s sensors and actions will be taken. The Windows Defender ATP Exploit Guard is designed to prevent any dangerous intruders from attacking the host. This is a useful security feature that can help protect the user’s server from malicious attacks.
Attack Surface Reduction(ASR)
This blocks any malicious file that is suspicious of infecting the host. With such features, the overall security of the server is enhanced.
Windows Defenders Network Protection
Networking is a major function of a server OS and for better networking, the OS needs to have network protection. Windows Defender SmartScreen will block threats from infiltrating the system b safeguarding the internet connection.
Exploit Protection
The exploitation of vulnerabilities in the server is a major threat and to counteract these threats features like exploit protection are enabled. Windows Server 2019 comes with exploit protection features that prevent vulnerabilities.
Controlled folder access
Data that needs to be highly protected will be stored in controlled folders that are provided with high security, with this feature exploiting these data will become very difficult.
Encrypted Networks
Encryption is a golden word in the world of networking, mostly every data that gets transmitted over the network is encrypted and this provides users privacy and the data cannot be exploited by unauthorised sources. Windows Server 2019 allows encryption of networks efficiently using the aid of DTLS(Datagram Transport Layer Security) making the network safe for data transmission.
Firewall auditing
Flows that have been processed by the firewall under SDN will be recorded and the logs will be stored for future analysis.
Virtual network peering
Two virtual networks can be connected and displayed as one. With this, communication can be done privately between the networks without the aid of a public gateway. Resources from each of the networks can now communicate freely with each other.
Egress mattering
With Egress metering the data used can be tracked with ease, allowing users to make payments accordingly.
Storage Replica
The storage replica feature offers users features like increasing reliability downtime, reducing cost and complexity by failover cluster manager, and providing single vendor disaster recovery solutions.
Surviving Hardware Failure
The OS provides users with features that enable users to run the server efficiently even with a failed node.
Quality of Service
The storage performance of the OS has been significantly improved, it can be monitored, and management policies can also be created. With respect to the situation of the storage, automatic readjustments will happen. The QoS helps by using PowerShell, policies can be created and listed out on a cluster shared volume, single policy can be used to manage many virtual hard disks of a Hyper-V.

Method to Install Windows Server 2019
- Create a bootable drive using the ISO file of the OS.
- Now, insert the bootable drive into the system and restart the computer then, when the system is restarting, press the appropriate key on the keyboard, enter the boot mode, here select the bootable drive to boot in from.
- Now, the computer will lead you to the OS installer wizard once the system restarts.
- Now, follow the steps in the wizard and install the OS on your system
Hyper-V 2019
Now, proceeding with Hyper-V; it is a hardware virtualization software developed by Microsoft. Hyper-V allows you to run the software on a computer called a virtual machine. The virtual machine is capable of running a whole OS as it is computer hardware. The virtual machine in fact is a simulation environment that allows users to run OSes. Virtual machines can be run or operated over the main OS that runs the computer. Virtual machines can be perfectly used for testing and other non-mainstream purposes.
So, the Hyper-V developed by Microsoft has powerful features allowing you to run several different OS using it. Well, when it comes to servers, virtual machines are very useful for integrating the systems and providing access to sub-computers.
There are several features of Hyper-V making it a very useful tool for Windows users, some of the users are:
- Establish and expand a private cloud environment.
- Hardware can be used more efficiently.
- Improve business continuity.
- Expand VDIs(virtual desktop environments).
- Testing and development are made easy.
Well, these are the general benefits or features of using Hyper-V, and today, we are focussing on Hyper-V 2019 and its features, so focussing on Hyper-V 2019 we can say that it is a super-lite version of the massive Windows Server OS 2019 optimized to run on Hyper-V host.
The features of the Hyper-V 2019 are further discussed to make things a bit more clear.
Features of Hyper-V 2019
Here are the common features of Hyper-V 2019 that have improved its usability and other factors providing users with a better user experience.
Two-node Cluster
The two-node cluster feature allows users to create a two-node cluster including a Hyper-V cluster, using a flash drive. This system is beneficial because if one node accidentally fails, the file share witness can provide a vote in order to reach a quorum in the cluster.
Improvement with Storage
Storage has always been a big thing when it comes to servers. Servers run on massive storage devices and the OS has to be equipped with powerful features to support a vast storage
The storage has gotten significant improvements, and they are the server can scale up to 4 petabytes(PB) of raw storage capacity per cluster. It supports a volume up to 64 TB. these massive feature improvements were possible with the updates to native support for persistent memory, nested resiliency, two-node infrastructure and mirror-accelerated parity and certain other minor improvements.
ReFS Deduplication
Duplicates and replicas are always a big problem for storage and managing these duplicate data entries can be difficult, but with the ReFS deduplication the OS regulates the duplicate data and they are removed keeping only the original data, saving lots of storage space.
Windows Admin Center
With Windows Admin Center feature is great for managing servers and clusters in the user’s environment. The user can work with hybrid solutions and streamline hyper-converged clusters. With the Windows Admin Center, the server OS can be controlled with a centralized system.
Shielded Virtual Machine
The shielded virtual machines are purposed for the protection of Gen 2 Hyper-V Virtual machines against unauthorized access. This security feature enhances the security of the whole server making the system a bit safer. With the shielded virtual machine you can troubleshoot network issues also. Moreover, the shielded virtual machine can be run remotely from a branch office in a case where the primary server cannot be reached.
Container Advancements
Different containers can be run on the same host without trouble. The feature increases the reliability of containers.
So, these are the major improvements and features of Hyper-V 2019. These features are pretty useful and add up more power to Hyper-V making it more reliable and efficient.
Microsoft has finally released their free “standalone” Hyper-V Server 2019. it was over 7 months waiting for Hyper-V users to finally get the hands on this new release. It is because the previous release of Hyper-V 2019 free has been taken down due to media problems (now resolved).
Microsoft advised the users who downloaded that original release to remove it and do a clean install of the new version released recently. The product is now available for download at Microsoft evaluation center.
Some information to point out for non-virtualization admins. Hyper-V Server is a standalone product which only includes roles related to virtualization. It is free and includes the same hypervisor technology in the Hyper-V role on Windows Server 2019.
However, there is no user interface (UI) as in the Windows server version. Only a command line prompt. For remote management you can use Free Windows admin center (WAC) which is a separate download.

Manage HyperV 2019 with Windows Admin Center
As such, good use case for Free hypervisor such as Microsoft Hyper-V 2019 Free is to run VMs which don’t need to license Windows Server or a Virtual desktop infrastructure (VDI) based on Linux VMs.
The new release of Hyper-V 2019 Free version brings some new features and improvements, but also there are some add-ons for Windows Server, such as a Windows Admin Center (WAC) and some apps compatibility for stay consistent with existing Microsoft Management Console (MMC).
One of the new improvements in Hyper-V 2019 is the introduction of shielded virtual machines (VMs) for Linux. Previously this feature was available for Windows VM only, but the importance of Linux with Microsoft clears any doubts about their future strategy. They’re embracing Linux since a while and recently I saw some stats showing that the number of Linux VMs in Azure surpassed the Windows VMs.
Some additional new features were also In. We can mention the updating to VM hardware version 9.0 has some improvements or hibernation support.
What’s the latest hardware version in Hyper-V 2019 free?
You might be wondering why Microsoft did not include the latest virtual hardware 9.1? The virtual hardware 9.1 is only available for Windows Server 2019 v.1903, Windows 10, with the Hyper-V role activated.
Possibly because the 9.1 is just a minor update to virtual hardware version 9.0 and does not include any new features.
The v9.0 Introduced hibernation, allow additional processor features for Perfmon or automatically expose simultaneous multithreading configuration for VMs running on hosts using the Core Scheduler.
Improvements in Hyper-V 2019
Hyper-V Server 2019 has also some improvements on the REFS filesystem as it benefits from the general improvements done within the Windows Server 2019. So those improvements are particularly interesting as Microsoft now supports data deduplication with Resilient File System (ReFS).
Other improvements which might be interesting to point out are cross-domain cluster migration allowing you to move server clusters between domains in Microsoft Active Directory (AD).
One newer feature which is the possibility to use a file share witness on a system that is not member of an Active Directory. It can be an isolated system, in Workgroup.
Remote Management
You’ll be certainly wanting to manage Hyper-V 2019 Free remotely. Most likely like with VMware, you can remotely connect to the host, but you must use a free tool called Windows Admin Center (WAC). If you haven’t heard of WAC you’re really missing out.
The tool can be used for managing regular physical windows servers, or VMs. The possibility to manage Hyper-V 2019 Free makes this suitable for remote management but does not have the granularity of Hyper-V manager.
It is a browser-based app for managing servers, clusters, hyper-converged infrastructure, and Windows 10 PCs. It comes at no additional cost and it is ready to use in production.
WAC is an MSI which installs on a Windows system and uses browser-based tools to give you access to the remote host’s configuration after you add one. You can add as many remote hosts/VMs as you like. You can then monitor or configure the remote host, networking or VMs.
You can start/stop VMs, but also create a new VMs and do other VM related tasks.

Create New VMs with Windows Admin Center
Additionally, you can use Remote Server Administration Tools (RSAT) or PowerShell.
Windows Hyper-V manager, which is part of the Windows Server 2019 can be used as a standard for remote Hyper-V servers.
In WAC, you can import VM and export VM, which allows you to transfer VMs (by copy) in and out of the system. You cannot export to remote Hyper-V server though as this is limited to local folder only.
Hyper-V Export is giving you an option of exporting a selected VM, including its virtual hard disk files, VM configuration files, and Hyper-V snapshots, to a single file. The VM can be in running state or stopped.
Hyper-V Import allows you to recover selected VMs which you previously exported from a set of configuration files. Hyper-V VMs can be imported to a source Hyper-V host or a new one. When doing a Hyper-V Import, the VM gets registered with the Hyper-V host automatically.
Installation of Hyper-V, any changes?
Not really, you can still download Microsoft Hyper-V Server 2019 as an .iso file for free. You can download the ISO in the Microsoft Evaluation Center.
As being said, the Windows licensing prevents you to run Windows VMs without proper license. As such, if you don’t want to pay for license, the free Hyper-V Server can be used for free to run Linux VMs, servers or desktops.
For admins willing to buy the license, you must buy the required virtualization rights via the Standard or Datacenter Edition.
Upgrades are not possible with Hyper-V server Free version. Microsoft supports an in-place upgrade from Windows Server 2012 R2 or 2016 to 2019 only.
This sets you for some downtime, because most likely, you’ll have to stop your VMs, migrate theme elsewhere and do a clean install of your host with the Hyper-V 2019 free.
This is really shame as VMware on the other hand, the ESXi Free is much more flexible and allows you to upgrade from older release, via ISO or via Internet. Additionally, it carries web-based console, so you don’t need to install any software and manage ESXi directly via web browser by connecting to the ESXi host directly.
VSAN from StarWind is software-defined storage (SDS) solution created with restricted budgets and maximum output in mind. It pulls close to 100% of IOPS from existing hardware, ensures high uptime and fault tolerance starting with just two nodes. StarWind VSAN is hypervisor and hardware agnostic, allowing you to forget about hardware restrictions and crazy expensive physical shared storage.
Build your infrastructure with off-the-shelf hardware, scale however you like, increase return on investment (ROI) and enjoy Enterprise-grade virtualization features and benefits at SMB price today!
Final Words
Some user said that Hyper-V 2019 Free version is dead, and Microsoft does not really care about this release. I must say that this is not true, and that Microsoft is changing.
While their principal effort goes to Windows Server, and paid versions, they still maintain Hyper-V 2019 Free version as well. They know that if they stop doing that, their free users base would disappear completely in favor of VMware.
Microsoft Hyper-V 2019 is a good candidate for running Linux Server or desktop VMs.
- How to use a persistent memory disk in a Hyper-V virtual machine
- Enable Azure File Sync from Windows Admin Center