Contents
- 1 Description
- 2 Prerequisites
- 2.1 IPv6 stack usage
- 2.2 Trusts and Windows Server 2003 R2
- 3 Assumptions
- 4 Install and configure IPA server
- 4.1 Make sure all packages are up to date
- 4.2 Install required packages
- 4.3 Configure host name
- 4.4 Install IPA server
- 4.5 Login as admin
- 4.6 Make sure IPA users are available to the system services
- 4.7 Configure IPA server for cross-forest trusts
- 5 Cross-forest trust checklist
- 5.1 Date/time settings
- 5.2 Firewall configuration
- 5.2.1 On AD DC
- 5.2.2 On IPA server
- 5.2.2.1 Firewalld
- 5.2.2.2 iptables
- 5.3 DNS configuration
- 5.3.1 Conditional DNS forwarders
- 5.3.2 If AD is subdomain of IPA
- 5.3.3 If IPA is subdomain of AD
- 5.3.4 Verify DNS configuration
- 6 Establish and verify cross-forest trust
- 6.1 Add trust with AD domain
- 6.1.1 When AD administrator credentials are available
- 6.1.2 When AD administrator credentials aren’t available
- 6.2 Edit /etc/krb5.conf
- 6.3 Allow access for users from AD domain to protected resources
- 6.3.1 Create external and POSIX groups for trusted domain users
- 6.3.2 Add trusted domain users to the external group
- 6.3.3 Add external group to POSIX group
- 6.1 Add trust with AD domain
- 7 Test cross-forest trust
- 7.1 Using SSH
- 7.2 Using Samba shares
- 7.3 Using Kerberized web applications
- 8 Debugging trust
- 8.1 General debugging guidelines
- 8.2 Failures due to exhausted DNA range on replica
Description
This page explains how to setup and configure cross-forest trust between an IPA domain and an AD (Active Directory) domain.
Prerequisites
- FreeIPA 3.3.3 or later is recommended
- Windows Server 2008 R2 or later with configured AD DC and DNS installed locally on the DC
If you need to install and configure AD DC for testing purposes, you can follow article Setting up Active Directory domain for testing purposes.
IPv6 stack usage
Recommended way for contemporary networking applications is to only open IPv6 sockets for listening because IPv4 and IPv6 share the same port range locally. FreeIPA uses Samba as part of its Active Directory integration and Samba requires enabled IPv6 stack on the machine.
Adding ipv6.disable=1 to the kernel command line disables the whole IPv6 stack
Adding ipv6.disable_ipv6=1 will keep the IPv6 stack functional but will not assign IPv6 addresses to any of your network devices. This is recommended approach for cases when you don’t use IPv6 networking.
Creating and adding to for example /etc/sysctl.d/ipv6.conf will avoid assigning IPv6 addresses to a specific network interface
 # Disable IPv6
 net.ipv6.conf.all.disable_ipv6 = 1
 net.ipv6.conf.<interface0>.disable_ipv6 = 1
where interface0 is your specialized interface.
Note that all we are requiring is that IPv6 stack is enabled at the kernel level and this is recommended way to develop networking applications for a long time already.
Trusts and Windows Server 2003 R2
![]()
Microsoft Windows Server 2003 extended support ended
Please note, that Microsoft Windows Server 2003 extended support ended already. The trust setup procedure below will only work up to FreeIPA 4.2. FreeIPA 4.3 new installations won’t have RC4 and DES support required to make the Trust working on Microsoft Windows Server 2003 (details in #4740).
As noted above, the requirement for trusts is Windows Server 2008 R2. While cross-forest trusts were added to forest functional level Windows Server 2003, there are additional requirements imposed by use of AES encryption types which require domain functional level Windows Server 2008. It is possible to establish a trust between a FreeIPA server and Windows Server 2003 R2, with limited functionality with only RC4 and DES encryption types. Next paragraph describes the actions needed in order to do this. Please note, however, that this is unsupported, highly experimental and of very limited value because of the weak encryption types for trusted domain objects which can be reasonably easy cracked with current advances in technology.
In order to establish a trust between a FreeIPA server and a Windows Server 2003 R2, you need to raise the forest functional level to Windows Server 2003. To do this, open ‘Active Directory Domains and Trusts’ snap-in and right-click on ‘Active Directory Domains and Trusts’ root in the left pane. Then select ‘Raise forest functional level …’ and use ‘Windows Server 2003’ as the level to raise.
Make sure you perform this action before establishing a trust with the ‘ipa trust-add’ command. The rest of the setup is identical to that of Windows Server 2008 R2.
Assumptions
- IPA server IP address: ipa_ip_address (e.g. 10.16.78.61)
- IPA server hostname: ipa_hostname (e.g. ipaserver.ipadomain.example.com)
- IPA domain: ipa_domain (e.g. ipadomain.example.com)
- IPA NetBIOS: ipa_netbios (e.g. IPADOMAIN)
- IPA Kerberos realm, IPA_DOMAIN, is equal to IPA domain (e.g. IPADOMAIN.EXAMPLE.COM and ipadomain.example.com)
- AD DC IP address: ad_ip_address (e.g. 10.16.79.150)
- AD DC hostname: ad_hostname (e.g. adserver)
- AD domain: ad_domain (e.g. addomain.example.com)
- AD NetBIOS: ad_netbios (e.g. ADDOMAIN)
- AD admins group SID: ad_admins_sid (e.g. S-1-5-21-16904141-148189700-2149043814-512)
NOTE: AD domain and IPA domain must be different, this is very basic requirement for any Active Directory cross-forest trust.
NOTE: italicized text should be replaced with real values. E.g. if IPA domain is ipadomain.example.com, and the IP address of IPA server is 10.16.78.61, the command:
C:> dnscmd 127.0.0.1 /ZoneAdd ipa_domain /Forwarder ipa_ip_address
should look like this:
C:> dnscmd 127.0.0.1 /ZoneAdd ipadomain.example.com /Forwarder 10.16.78.61
NOTE: NetBIOS name is the leading component of the domain name. E.g. if the domain name is ipadomain.example.com, the NetBIOS name is IPADOMAIN. NetBIOS namespace is flat, there should be no conflicts between all NetBIOS names. NetBIOS names of the IPA domain and AD domain must be different. In addtion, NetBIOS names of the IPA server and AD DC server must be different.
Install and configure IPA server
Make sure all packages are up to date
# yum update -y
Install required packages
# yum install -y "*ipa-server" "*ipa-server-trust-ad" bind bind-dyndb-ldap
Configure host name
# hostnamectl set-hostname ipa_hostname
Install IPA server
# ipa-server-install -a mypassword1 -p mypassword2 --domain=ipa_domain --realm=IPA_DOMAIN --setup-dns --no-forwarders -U
Login as admin
To obtain a ticket-granting ticket, run the follwing command:
# kinit admin
The password is your admin user’s password (from -a option in the ipa-server-install comand).
Make sure IPA users are available to the system services
# id admin
# getent passwd admin
Both above commands should return information about the admin user. If above commands fail, restart the sssd service (service sssd restart), and try them again.
Configure IPA server for cross-forest trusts
# ipa-adtrust-install --netbios-name=ipa_netbios -a mypassword1
When planning access of AD users to IPA clients, make sure to run ipa-adtrust-install on every IPA master these IPA clients will be connecting to.
Cross-forest trust checklist
Before establishing a cross-forest trust, some additional configuration must be performed.
Date/time settings
Make sure both timezone settings and date/time settings on both servers match.
Firewall configuration
On AD DC
Windows Firewall configuration (to be added).
On IPA server
IPA uses the following ports to communicate with its services:
TCP ports: 80, 88, 443, 389, 636, 88, 464, 53, 135, 138, 139, 445, 1024-1300
UDP ports: 88, 464, 53, 123, 138, 139, 389, 445
These ports must be open and available; they cannot be in use by another service or blocked by a firewall. Especially ports 88/udp, 88/tcp, 389/udp are important to keep open on IPA servers to allow AD clients to obtain cross-realm ticket granting tickets or otherwise single sign-on between AD clients and IPA services will not work.
Ports 135, 1024-1300 are needed to get DCE RPC end-point mapper to work. End-point mapper is a key component to accessLSA and SAMR pipes which are used to establish trust and access authentication and identity information in Active Directory.
Previously we recommended that you should make sure that IPA LDAP server is not reachable by AD DC by closing down TCP ports 389 and 636 for AD DC. Our current tests lead to the assumption that this is not necessary anymore. During the early development stage we tried to create a trust between IPA and AD with both IPA and AD tools. It turned out that the AD tools expect an AD like LDAP schema and layout to create a trust. Since the IPA LDAP server does not meet those requirements it is not possible to create a trust between IPA and AD with AD tools only with the ‘ipa trust-add’ command. By blocking the LDAP ports for the AD DC we tried to force the AD tools to fall back to other means to get the needed information with no success. But we kept the recommendation to block those ports because it was not clear at this time if AD will check the LDAP layout of a trust partner during normal operation as well. Since we have not observed those request the recommendation can be dropped.
Below are instructions on how to configure the firewall using iptables.
Firewalld
Fedora 18 introduced a new firewall manager: firewalld. However, firewalld does not yet support allowing and blocking services for specific hosts. For this reason, we recommend disabling firewalld, enabling iptables and using the sample configuration listed in section #iptables.
To disable firewalld:
# chkconfig firewalld off
# service firewalld stop
To enable iptables:
# yum install -y iptables-services
# chkconfig iptables on
Make sure iptables configuration file is located at /etc/sysconfig/iptables and contains the desired configuration, and then (re)start the iptables service:
# service iptables restart
iptables
Make sure that iptables is configured to start whenever the system is booted:
# chkconfig iptables on
iptables configuration file is /etc/sysconfig/iptables. Taking into account the rules that must be applied in order for IPA to work properly, here is a sample configuration.
*filter
:INPUT ACCEPT [0:0]
:FORWARD ACCEPT [0:0]
:OUTPUT ACCEPT [0:0]
-A INPUT -m state --state ESTABLISHED,RELATED -j ACCEPT
-A INPUT -p icmp -j ACCEPT
-A INPUT -i lo -j ACCEPT
-A INPUT -m state --state NEW -m tcp -p tcp --dport 22 -j ACCEPT
# -A INPUT -s ad_ip_address -p tcp -m multiport --dports 389,636 -m state --state NEW,ESTABLISHED -j REJECT
-A INPUT -p tcp -m multiport --dports 80,88,443,389,636,88,464,53,138,139,445 -m state --state NEW,ESTABLISHED -j ACCEPT
-A INPUT -p udp -m multiport --dports 88,464,53,123,138,139,389,445 -m state --state NEW,ESTABLISHED -j ACCEPT
-A INPUT -p udp -j REJECT
-A INPUT -p tcp -j REJECT
-A FORWARD -j REJECT --reject-with icmp-host-prohibited
COMMIT
Please note that the line containing «ad_ip_address» is not needed anymore (see comments above). If you still want to use it please make sure you replace ad_ip_address in the above configuration, with the IP address of AD DC.
Any changes to the iptables configuration file will require a restart of the iptables service:
# service iptables restart
DNS configuration
NOTE: Any changes to /etc/resolv.conf file will require a restart of krb5kdc, sssd and httpd services.
Both AD and IPA domains need to be visible to each other. In normal DNS configuration, no changes are required. When the testing DNS domains are not part of shared DNS tree visible to both IPA and AD, customer DNS zone forwarders can be created:
Conditional DNS forwarders
On AD DC, add conditional forwarder for IPA domain:
C:> dnscmd 127.0.0.1 /ZoneAdd ipa_domain /Forwarder ipa_ip_address
On IPA server, add conditional forwarder for AD domain. The command in IPA version 3 and 4 are different.
- IPA v3.x:
# ipa dnszone-add ad_domain --name-server=ad_hostname.ad_domain --admin-email='hostmaster@ad_domain' --force --forwarder=ad_ip_address --forward-policy=only --ip-address=ad_ip_address
- IPA v4.x:
# ipa dnsforwardzone-add ad_domain --forwarder=ad_ip_address --forward-policy=only
If AD is subdomain of IPA
If the AD domain is a subdomain of the IPA domain (e.g. AD domain is addomain.ipadomain.example.com and IPA domain is ipadomain.example.com), configure DNS as follows.
On IPA server, add an A record and a NS record for the AD domain:
# ipa dnsrecord-add ipa_domain ad_hostname.ad_netbios --a-ip-address=ad_ip_address
# ipa dnsrecord-add ipa_domain ad_netbios --ns-hostname=ad_hostname.ad_netbios
On AD DC, there two options.
The first one is to configure a global forwarder to forward DNS queries to the IPA domain:
C:> dnscmd 127.0.0.1 /ResetForwarders ipa_ip_address /Slave
The second option is to configure a DNS zone for master-slave replication. The data for this zone will then be periodically copied from master (IPA server) to slave (AD server).
To do this, first explicitly allow the transfer of the zone on IPA server:
# ipa dnszone-mod ipa_domain --allow-transfer=ad_ip_address
And second, add the DNS zone for the IPA domain on the AD DC:
C:> dnscmd 127 0.0.1 /ZoneAdd ipa_domain /Secondary ipa_ip_address
If IPA is subdomain of AD
If the IPA domain is a subdomain of the AD domain (e.g. IPA domain is ipadomain.addomain.example.com and AD domain is addomain.example.com), configure DNS as follows.
On AD DC, add an A record and a NS record for the IPA domain:
C:> dnscmd 127.0.0.1 /RecordAdd ad_domain ipa_hostname.ipa_domain A ipa_ip_address
C:> dnscmd 127.0.0.1 /RecordAdd ad_domain ipa_domain NS ipa_hostname.ipa_domain
Verify DNS configuration
To make sure both AD and IPA servers can see each other, check if SRV records are being properly resolved.
On AD DC:
C:> nslookup
> set type=srv
> _ldap._tcp.ad_domain
> _ldap._tcp.ipa_domain
> quit
On IPA server:
# dig SRV _ldap._tcp.ipa_domain
# dig SRV _ldap._tcp.ad_domain
Establish and verify cross-forest trust
Add trust with AD domain
When AD administrator credentials are available
# ipa trust-add --type=ad ad_domain --admin Administrator --password
Enter the Administrator’s password when prompted. If everything was set up correctly, a trust with AD domain will be established.
The user account used when creating a trust (the argument to the --admin option in the ipa trust-add command) must be a member of the Domain Admins group.
At this point IPA will create one-way forest trust on IPA side, will create one-way forest trust on AD side, and initiate validation of the trust from AD side. For two-way trust one needs to add --two-way=true option.
Note that there is currently an issue in creating a one-way trust to Active Directory with a shared secret instead of using administrative credentials. This is due to lack of privileges to kick off a trust validation from AD side in such situation. The issue is being tracked in this bug.
The ipa trust-add command uses the following method calls on the AD server:
CreateTrustedDomainEx2to create the trust between the two domainsQueryTrustedDomainInfoByNameto check if the trust is already addedSetInformationTrustedDomainto tell the AD server that the IPA server can handle AES encryption
When AD administrator credentials aren’t available
# ipa trust-add --type=ad "ad_domain" --trust-secret
Enter the trust shared secret when prompted. At this point IPA will create two-way forest trust on IPA side. Second leg of the trust need to be created manually and validated on AD side. Following GIF sequence shows how trust with shared secret is created:

Once trust leg on AD side is established, one needs to retrieve the list of trusted forest domains from AD side. This is done using following command:
# ipa trust-fetch-domains "ad_domain"
With this command running successfuly, IPA will get information about trusted domains and will create all needed identity ranges for them.
Use «trustdomain-find» to see list of the trusted domains from a trusted forest:
# ipa trustdomain-find "ad_domain"
Edit /etc/krb5.conf
Many applications ask Kerberos library to verify that Kerberos principal can be mapped to some POSIX account. Additionally, there are some applications that perform additional check by asking the OS for the canonical name of the POSIX account returned by Kerberos library. Note that OpenSSH compares the name of principal unchanged but SSSD low-cases the realm part, thus real user name is Administrator@realm, not administrator@realm, when trying to logon with Kerberos ticket over SSH.
We have several factors in play here:
- Kerberos principals use form name@REALM where REALM has to be upper case in Linux
- SSSD provides POSIX accounts to AD users always fully qualified (name@domain)
- SSSD normalizes all POSIX accounts to lower case (name@domain) on requests which involve returning POSIX account names.
Thus, we need to define rules for mapping Kerberos principals to system user names. If MIT Kerberos 1.12+ is in use and SSSD 1.12.1+ is in use, you can skip the rest of this section because they implement a localauth plugin that automatically does this translation and is set up by ipa-client-install.
If no SSSD support for localauth plugin is available, we need to specify auth_to_local rules that map REALM to a low-cased version. auth_to_local rules are needed to map a successfully authenticated Kerberos principal to some existing POSIX account.
For the time being, a manual configuration of /etc/krb5.conf on the IPA server is needed, to allow Kerberos authentication.
Add these two lines to /etc/krb5.conf on every machine that is going to see AD users:
[realms]
IPA_DOMAIN = {
....
  auth_to_local = RULE:[1:$1@$0](^.*@AD_DOMAIN$)s/@AD_DOMAIN/@ad_domain/
  auth_to_local = DEFAULT
}
Restart KDC and sssd
# service krb5kdc restart
# service sssd restart
Allow access for users from AD domain to protected resources
Before users from trusted domain can access protected resources in the IPA realm, they have to be explicitly mapped to the IPA groups. The mapping is performed in two steps:
- Add users and groups from trusted domain to an external group in IPA. External group serves as a container to reference trusted domain users and groups by their security identifiers
- Map external group to an existing POSIX group in IPA. This POSIX group will be assigned proper group id (gid) that will be used as default group for all incoming trusted domain users mapped to this group
Create external and POSIX groups for trusted domain users
Create external group in IPA for trusted domain admins:
# ipa group-add --desc='ad_domain admins external map' ad_admins_external --external
Create POSIX group for external ad_admins_external group:
# ipa group-add --desc='ad_domain admins' ad_admins
Add trusted domain users to the external group
# ipa group-add-member ad_admins_external --external 'ad_netbiosDomain Admins'
When asked for member user and member group, just leave it blank and hit Enter.
NOTE: Since arguments in above command contain backslashes, whitespace, etc, make sure to either use non-interpolation quotes (‘) or to escape any specials characters with a backslash ().
Add external group to POSIX group
Allow members of ad_admins_external group to be associated with ad_admins POSIX group:
# ipa group-add-member ad_admins --groups ad_admins_external
Test cross-forest trust
Using SSH
AD users should now be able to login into IPA domain via SSH. putty SSH client for Windows (http://the.earth.li/~sgtatham/putty/latest/x86/putty.exe) can be used to test this. When trying to connect to the IPA domain, make sure you use ad_user@ad_domain as username. Note that ad_domain must be lower-case. Also, make sure you preserve the case of the username, i.e. if username is Administrator, log in as Administrator@ad_domain, not administrator@ad_domain.
Using Samba shares
To create a Samba share on IPA server:
# net conf setparm 'share' 'comment' 'Trust test share'
# net conf setparm 'share' 'read only' 'no'
# net conf setparm 'share' 'valid users' 'ad_admins_sid'
# net conf setparm 'share' 'path' '/path/to/share'
NOTE: To obtain the SID (Security Identifier) of the AD admins group, run:
# wbinfo -n 'ad_netbiosDomain Admins'
It is a string that looks like this: S-1-5-21-16904141-148189700-2149043814-512. wbinfo executable is contained in samba-winbind-clients package which is optional to FreeIPA.
To access the share from a Windows machine:
- Start -> right click on Network -> Map Network Drive
- ‘Drive’: choose a drive letter for the share
- ‘Folder’: \ipa_hostname.ipa_domainshare
- The share should now be mounted under the drive letter that you chose
NOTE: This method can be used for testing purposes only, as file sharing is not yet supported in RHEL 6.4.
Using Kerberized web applications
If you need to install and configure a web application for the purposes of testing Kerberos authentication, MediaWiki can be used.
To add Kerberos authentication to an existing web application, the following Apache configuration is needed:
<Location "/mywebapp">
   AuthType Kerberos
   AuthName "IPA Kerberos authentication"
   KrbMethodNegotiate on
   KrbMethodK5Passwd on
   KrbServiceName HTTP
   KrbAuthRealms IPA_DOMAIN
   Krb5Keytab /etc/httpd/conf/ipa.keytab
   KrbSaveCredentials off
   Require valid-user
</Location>
Make sure you replace IPA_DOMAIN in the above configuration with your actual IPA domain (in caps) and to restart the apache service:
# service httpd restart
Debugging trust
General debugging guidelines
What you can do is following (assumes Fedora 20+ or RHEL 7+):
- Check that IPv6 module is not disabled on the Linux side as Samba and CLDAP module in IPA require it. See instructions above.
- Check firewall rules: AD DCs should be able to contact IdM smbd over 138/139/445 TCP and UDP ports, 389 UDP port.
- Stop smb and winbind services on IdM server
systemctl stop smb winbind
- Set log level to increased debug so that packets smbd/winbindd receive get printed fully in the logs:
net conf setparm global 'log level' 100
- Set log level to increased debug so that communication done by IPA when establishing trust is printed fully in the logs. Change /usr/share/ipa/smb.conf.empty:
    [global]
    log level = 100
- Remove old /var/log/samba/log.*
- Start smb and winbind services
systemctl start smb winbind
- Re-add trust
ipa trust-add <forest roo> ...
- If trust-add command was used with shared secret instead of explicit AD administrator credentials, after validation was performed from AD side, run
ipa trust-fetch-domains <forest root>
- Package following logs and attach them to a bug or send directly to a member of FreeIPA development team who requested the logs. Please do not send logs to the public mailing lists — logs are often quite large and would contain information specific to your AD deployment that general public shouldn’t have access to. The logs we are interested in are following:
    /var/log/httpd/error_log
    /var/log/samba/log.*
Failures due to exhausted DNA range on replica
It may happen that the trust-add command fails with the generic ipa: ERROR: communication with CIFS server was unsuccessful message displayed in the console and Apache error log containing the following message:
<SNIP>
s4_tevent: Run immediate event "tstream_smbXcli_np_readv_trans_next": 0x7f6e603b7f60
s4_tevent: Schedule immediate event "tevent_req_trigger": 0x7f6e603b6be0
s4_tevent: Run immediate event "tevent_req_trigger": 0x7f6e603b6be0
s4_tevent: Destroying timer event 0x7f6e6038db50 "dcerpc_timeout_handler"
s4_tevent: Schedule immediate event "tevent_req_trigger": 0x7f6e603b7d20
s4_tevent: Run immediate event "tevent_req_trigger": 0x7f6e603b7d20
     lsa_CreateTrustedDomainEx2: struct lsa_CreateTrustedDomainEx2
        out: struct lsa_CreateTrustedDomainEx2
            trustdom_handle          : *
                trustdom_handle: struct policy_handle
                    handle_type              : 0x00000000 (0)
                    uuid                     : 00000000-0000-0000-0000-000000000000
            result                   : NT_STATUS_UNSUCCESSFUL
rpc reply data:
[0000] 00 00 00 00 00 00 00 00   00 00 00 00 00 00 00 00   ........ ........
[0010] 00 00 00 00 01 00 00 C0                             ........
[Thu Dec 01 11:23:21.424668 2016] [wsgi:error] [pid 50403] ipa: INFO: [jsonserver_session] admin@IPA.REALM: trust_add/1(u'ad.realm', realm_admin=u'Administrator', realm_passwd=u'********', bidirectional=True, version=u'2.215'): RemoteRetrieveError
This error may be caused by exhaustion of DNA range on replica caused e.g. by hastily decommissioning malfunctioning master without transferring remaining posix ID ranges to replicas. During trust setup Trusted Domain Object with allocated UID/GID must be created on FreeIPA server. Since UID/GID allocation fails, the whole trust creation process ends with error.
You may search for dnaRemainingValues attribute in cn=posix-ids,cn=dna,cn=ipa,cn=etc,$SUFFIX subtree to confirm this:
#  ldapsearch -Y EXTERNAL -H 'ldapi://%2Fvar%2Frun%2Fslapd-IPA-REALM.socket' -b 'cn=posix-ids,cn=dna,cn=ipa,cn=etc,dc=ipa,dc=realm' '(objectClass=dnaSharedConfig)' dnaRemainingValues
SASL/EXTERNAL authentication started
SASL username: gidNumber=0+uidNumber=0,cn=peercred,cn=external,cn=auth
SASL SSF: 0
# extended LDIF
#
# LDAPv3
# base <cn=posix-ids,cn=dna,cn=ipa,cn=etc,dc=dom-204,dc=ipa,dc=realm> with scope subtree
# filter: (objectClass=dnaSharedConfig)
# requesting: dnaRemainingValues
#

# replica.ipa.realm + 389, posix-ids, dna, ipa, etc, ipa.realm
dn: dnaHostname=replica.ipa.realm+dnaPortNum=389,cn=posix-
 ids,cn=dna,cn=ipa,cn=etc,dc=ipa,dc=realm
dnaRemainingValues: 0 <-- no UIDs/GIDs left

# search result
search: 2
result: 0 Success

# numResponses: 2
# numEntries: 1
If this is the case, then follow this guide to re-create POSIX ranges on the replica. Then try to re-establish trust; it should complete successfuly now.
В IT-инфраструктуре HOSTKEY для хранения учетных данных и контроля доступа традиционно использовался FreeIPA. Когда появилась необходимость управлять офисными компьютерами с Windows и оборудованием Cisco Systems, пришлось задуматься об интеграции с Active Directory. Рассказываем, как она была реализована в нашей локальной сети.
Для решения задачи можно интегрировать клиентов Linux непосредственно в домен Active Directory и управлять ими с контроллера домена. Второй вариант — интеграция, основанная на синхронизации данных или доверии домена (AD trust). В этом случае учетные записи пользователей с ранее определенными атрибутами реплицируются в другой службе каталогов и становятся доступными для клиентов на Linux.
Недостатки AD trust
Хотя на AD trust тратятся значительные ресурсы разработчиков, это решение имеет существенные минусы и подходит компаниям, инфраструктура которых изначально основана на Active Directory. Мы же работали с FreeIPA, поэтому внедрение требовало значительных трудозатрат: фактически всю систему управления учетными записями пользователей пришлось бы создавать заново.
Второй минус — необходимость постоянной поддержки серверов с AD и FreeIPA,так как при падении связи между ними сервер с FreeIPA становится бесполезен и нарушается работа всей компании. Авторизация — чувствительный участок, который должен быть максимально отказоустойчивым. AD trust в подобной ситуации — дополнительная точка отказа.
Плюсы и минусы Windows sync
Вариант с механизмом Windows sync из FreeIPA предполагает полную синхронизацию всех учетных данных по протоколу LDAP. При этом FreeIPA и Active Directory остаются автономными решениями, и в случае повреждения любого сервера откажут только подключенные к нему сервисы, а не вся инфраструктура. Пользователь работает через одно окно с FreeIPA: например, в нем можно изменить пароль учетной записи одновременно для основанной на Windows и на Linux инфраструктуре.
Мы остановились на этом варианте, но решили его доработать, поскольку Windows sync не предназначен для управления группами.
К сожалению, механизм синхронизации Windows sync во FreeIPA не считается приоритетным и не развивается, особенно в вопросах управления группами. Нам же группы были необходимы, чтобы организовать структуру персонала по отделам или в ином произвольном порядке. Такой подход позволяет прописывать правила и политики на группу, а не на каждого пользователя в отдельности, что значительно упрощает управление учетными записями и доступом к данным, а также доставку ПО. Другое преимущество групп — они могут быть вложенными.
Например, структура отдела DEVOPS у нас состоит из следующих подгрупп, для каждой из которых определены наборы прав и политик, а также необходимых для работы сервисов:
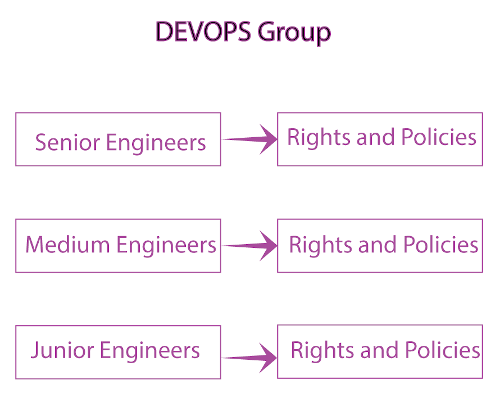
Созданную учетную запись сотрудника мы добавляем в определенную подгруппу, например в младших инженеров. В итоге новый пользователь оказывается в целом наборе групп: пользователи Rocket.Chat, Jira и т. д. Он автоматически получает доступ ко всем прописанным для подгруппы сервисам. Такую схему нетрудно построить и путем создания полностью аналогичных групп во FreeIPA и AD, но администрировать их придется вручную. Минусы очевидны: будет тратиться время на выполнение рутинных задач, а также (и это главное) возникнут потенциальные угрозы безопасности инфраструктуры. Например, простая смена прав доступа может привести к сбоям в производственном процессе из-за ошибок ручной настройки.
Решение
Нам была необходима автоматическая синхронизация, которую пришлось реализовать самостоятельно на основе module manage-freeipa. В итоге был написан скрипт, который получает информацию о группах во FreeIPA, включая вложенные подгруппы, и переносит ее в AD. Приводим пошаговое описание алгоритма:
1. Импорт модуля module manage-freeipa.
2. После импорта модуля мы подключаемся к серверу с помощью заранее добавленных учетных данных:
$IPAURL = "freeipa_URL"
$IPAUSER = "USER"
$IPAPASS = "PASSWORD"
$ADOUUSERS = "*OU=users,OU=ipa,DC=win,DC=EXAMPLE,DC=COM"
$ADOUGROUPS = "*OU=groups,OU=ipa,DC=win,DC=EXAMPLE,DC=COM"
3. Затем в AD запрашиваем список групп из OU:
$OU = Get-ADOrganizationalUnit -SearchBase "OU=groups,OU=ipa,DC=win,DC=EXAMPLE,DC=COM" -Filter *4. Фильтруем группу trust admins, которая не участвует в синхронизации данных между FreeIPA и AD:
$groupsAD = $OU | ForEach-Object {Get-ADGroup -SearchBase $_.DistinguishedName -Filter *} | Where {$_.name -notlike "trust admins"}5. Получаем список всех групп в FreeIPA, за исключением trust admins и групп, которые используются исключительно в управляемой FreeIPA инфраструктуре. Выбор осуществляется только по полю cn:
$groupsIPA = Find-IPAGroup | Where {$_.dn -notlike "cn=invapi*" -and $_.dn -notlike "cn=jira*" -and $_.dn -notlike "cn=trust admins*"} | Select-Object -Property cn6.Существует ряд групп, которые есть только в AD, мы ищем их и убираем из общего списка:
$groupsOnlyAD = $groupsAD.name | ?{$groupsIPA.cn -notcontains $_}
$listGroupsAD = $groupsAD.Name | ?{$groupsOnlyAD -notcontains $_}
7. Берем список из FreeIPA и отсекаем все группы, которые есть в AD. В итоге остается только список новых групп, которые есть в FreeIPA, но отсутствуют в AD:
$listAddGroups = $groupsIPA.cn | ?{$groupsAD.Name -notcontains $_}8. Далее идет команда на добавление этих групп в AD:
$listAddGroups | ForEach-Object {New-ADGroup $_ -path 'OU=groups,OU=ipa,DC=win,DC=EXAMPLE,DC=COM' -GroupScope Global -PassThru -Verbose}9. Затем идет цикл операций для каждой группы AD, которая есть в списке $ListGroupsAD.
9.1. Получаем список пользователей — участников группы в AD:
$listGroupsAD |
ForEach { $Groupname = $_
$listGroupMembersUsersAD = Get-ADGroupMember $Groupname | Where {$_.distinguishedName -like $ADOUUSERS} | select SamAccountName
9.2. Получаем список подгрупп участников группы в AD:
$listGroupMembersGroupsAD = Get-ADGroupMember $Groupname | Where {$_.distinguishedName -like $ADOUGROUPS} | select SamAccountName 9.3. Получаем список пользователей этой группы во FreeIPA:
$listGroupMemberUserIPA = Invoke-FreeIPAAPIgroup_show -group_name $Groupname | Select-Object -Property member_user9.4. Получаем список подгрупп этой группы во FreeIPA:
$listGroupMemberGroupIPA = Invoke-FreeIPAAPIgroup_show -group_name $Groupname | Select-Object -Property member_group9.5. Списки подгрупп и пользователей в FreeIPA и AD сравниваются (список пользователей FreeIPA вычитается из списка пользователей из AD и наоборот). Формируются списки пользователей и подгрупп на добавление и удаление:
$delListMembers = $listGroupMembersUsersAD.SamAccountName | ?{$listGroupMemberUserIPA.member_user -notcontains $_}
$delListGroups = $listGroupMembersGroupsAD.SamAccountName | ?{$listGroupMemberGroupIPA.member_group -notcontains $_}
$addListMembers = $listGroupMemberUserIPA.member_user| ?{$listGroupMembersUsersAD.SamAccountName -notcontains $_}
$addListGroups = $listGroupMemberGroupIPA.member_group | ?{$listGroupMembersGroupsAD.SamAccountName -notcontains $_}
9.6. Далее идет проверка, есть ли кто-то в списке на удаление пользователей и подгрупп: если никого нет, следующий шаг пропускается:
if (! ([string]::isnullorempty($delListMembers)))
{
$delListMembers | ForEach-Object {Remove-ADGroupMember $Groupname $_ -Confirm:$false}
}
if (! ([string]::isnullorempty($delListGroups)))
{
$delListGroups | ForEach-Object {Remove-ADGroupMember $Groupname $_ -Confirm:$false}
}
9.7. Такая же проверка выполняется на добавление пользователей и подгрупп:
if (! ([string]::isnullorempty($addListGroups))){
$addListGroups | ForEach-Object { Add-AdGroupMember -Identity $Groupname -members $_ }
}
if (! ([string]::isnullorempty($addListMembers)))
9.8. Перед добавлением пользователя в группу в AD необходимо проверить, есть ли он в AD. Весь цикл операций пункта 9 выполняется для каждой группы списка $listGroupsAD, полученного в пункте 6. После завершения происходит отключение сессии от сервера FreeIPA:
$addListMembers |
ForEach-Object { try
{
Get-ADUser -Identity $_
Add-AdGroupMember -Identity $Groupname -members $_
}
catch {}
}
}
}
Disconnect-IPA
Скрипт запускается планировщиком заданий каждые 15 минут.
Выводы
Скрипт значительно упростил управление учетными записями пользователей и введение новых сотрудников в рабочий процесс, а также повысил общую безопасность внутренней IT-инфраструктуры компании HOSTKEY. Дальше мы планируем настроить интеграцию FreeIPA с Active Directory напрямую через API без прокладки в виде module manage-freeipa. Это придется сделать по соображениям безопасности, поскольку последний раз модуль обновлялся два года назад. Существует риск, что он будет заброшен разработчиками.
А здесь можно прочесть, как реализовать проксирование административной панели FreeIPA через HAProxy.
А специальный промокод «Я С ХАБРА» откроет врата щедрости: назовите его консультанту на сайте при размещении заказа — и получите дополнительную скидку. Платить можно как всегда в рублях с НДС российской компании или в евро — компании в Нидерландах.
The need to trust freeipa identity management with active directory is very interesting. It permits to centralize the user management leaving in freeipa the authorization process. Very useful for system administrator to have to manage one only user account.
In this context this article explains how to integrate Freeipa with Active Directory describing all the kerberos packets involved in the process.
The reference architectures involved in this article are:
This scenario happens when the windows user connects with username and password:

Freeipa Active Directory Trust
This scenario happens when the windows user connects via kerberos ticket:

Freeipa Active Directory Trust
As you can see the authentication process is managed by Active directory by AS exchange messages; in the first picture the ssh login to linux client is by password; in the second with the TGT trust ticket obtained by AD, the windows client asks to Freeipa Server the service ticket for authenticating to ssh service without password: single sign on authentication. For who are new to kerberos protocol can be useful to read this article: https://www.securityandit.com/network/kerberos-understanding/.
The goal is to create an environment where every user is stored in active directory and the authorization process is performed by freeipa. Every user should be able to:
- Login to client linux by ssh if freeipa administrator permit it.
- Sudo enabled if freeipa administrator permit it.
- Changing password directly on linux system.
Let’s start with Freeipa Server Installation
Freeipa Server Installation with Active Directory Trust
The freeipa documentation available at http://www.freeipa.org/page/Active_Directory_trust_setup is very clear even if something is missing. I will follow this documentation for installing and configuring the freeipa server 4.2 trusted with Active directory Server 2012.
For Windows 2012 I installed the iso downloaded from https://www.microsoft.com/en-us/evalcenter/evaluate-windows-server-2012-r2. I installed and configured an active directory instance: I don’t explain how to do because in internet there are a lot of articles about that.
Before starting, the meaning of trust between Freeipa and Windows must be cleared. The trust is only one way: it means that the configuration permits the users from AD domain to access to freeipa domain resources and not viceversa.
Windows domain users like stefano.gristina@kali.it can be authenticated to linux domain resources with a principal like host/clientipa.linux.kali.it@LINUX.KALI.IT because the Ticket Granting Ticket Trust released by active directory is signed by a secret key shared with freeipa KDC during trust operation. This ticket is used for obtaining service ticket.
After this introduction, let’s to show the realms, the domains and the ip address involved in my laboratory.
| System Operating | Realm | Domain | Netbios Name | IP |
| Windows 2012 | KALI.IT | kali.it | KALI | 192.168.1.50 |
| Linux Centos 7.2 | LINUX.KALI.IT | linux.kali.it | LINUX | Freeipa Server 192.168.1.51 Freeipa Client 192.168.1.52 |
The active directory forest with root domain kali.it is trusted with the forest root freeipa domain that is linux.kali.it. In this scenario the freeipa domain is a subdomain of window domain.
The freeipa server is 4.2, it doesn’t use anymore old cipher like DES and RC4: it means that the trust will not work with old windows server 2003.
Let’s start with the installation with the first packages to install on freeipa server:
[root@ipaserver etc]# vi hosts | grep ipa
192.168.1.51 ipaserver.linux.kali.it ipaserver
[root@ipaserver ~]# yum install -y “*ipa-server” “*ipa-server-trust-ad” bind bind-dyndb-ldap ipa-server-dns
Next the ipa-server is installed and configured:
[root@ipaserver ~]# ipa-server-install –domain=linux.kali.it –realm=LINUX.KALI.IT –setup-dns –no-forwarders
The log file for this installation can be found in /var/log/ipaserver-install.log
==============================================================================
This program will set up the IPA Server.
This includes:
* Configure a stand-alone CA (dogtag) for certificate management
* Configure the Network Time Daemon (ntpd)
* Create and configure an instance of Directory Server
* Create and configure a Kerberos Key Distribution Center (KDC)
* Configure Apache (httpd)
* Configure DNS (bind)
To accept the default shown in brackets, press the Enter key.
Enter the fully qualified domain name of the computer
on which you’re setting up server software. Using the form
<hostname>.<domainname>
Example: master.example.com.
Server host name [ipaserver.linux.kali.it]:
Warning: skipping DNS resolution of host ipaserver.linux.kali.it
Certain directory server operations require an administrative user.
This user is referred to as the Directory Manager and has full access
to the Directory for system management tasks and will be added to the
instance of directory server created for IPA.
The password must be at least 8 characters long.
Directory Manager password:
Password (confirm):
The IPA server requires an administrative user, named ‘admin’.
This user is a regular system account used for IPA server administration.
IPA admin password:
Password (confirm):
Existing BIND configuration detected, overwrite? [no]: yes
Do you want to configure the reverse zone? [yes]:
Please specify the reverse zone name [1.168.192.in-addr.arpa.]:
Using reverse zone(s) 1.168.192.in-addr.arpa.
The IPA Master Server will be configured with:
Hostname: ipaserver.linux.kali.it
IP address(es): 192.168.1.51
Domain name: linux.kali.it
Realm name: LINUX.KALI.IT
BIND DNS server will be configured to serve IPA domain with:
Forwarders: No forwarders
Reverse zone(s): 1.168.192.in-addr.arpa.
Continue to configure the system with these values? [no]: yes
Support for trusted domain is enabled setting a netbios name for linux domain. This is a prerequisite because active directory expects from remote side a netbios name.
[root@ipaserver ~]# ipa-adtrust-install –netbios-name=LINUX.KALI.IT
The log file for this installation can be found in /var/log/ipaserver-install.log
==============================================================================
This program will setup components needed to establish trust to AD domains for
the IPA Server.
This includes:
* Configure Samba
* Add trust related objects to IPA LDAP server
To accept the default shown in brackets, press the Enter key.
Do you want to enable support for trusted domains in Schema Compatibility plugin?
This will allow clients older than SSSD 1.9 and non-Linux clients to work with trusted users.
Enable trusted domains support in slapi-nis? [no]:
Configuring cross-realm trusts for IPA server requires password for user ‘admin’.
This user is a regular system account used for IPA server administration.
admin password:
Illegal NetBIOS name [LINUX.KALI.IT].
Up to 15 characters and only uppercase ASCII letter and digits are allowed.
Enter the NetBIOS name for the IPA domain.
Only up to 15 uppercase ASCII letters and digits are allowed.
Example: EXAMPLE.
NetBIOS domain name [EXAMPLE]: LINUX
WARNING: 3 existing users or groups do not have a SID identifier assigned.
Installer can run a task to have ipa-sidgen Directory Server plugin generate
the SID identifier for all these users. Please note, the in case of a high
number of users and groups, the operation might lead to high replication
traffic and performance degradation. Refer to ipa-adtrust-install(1) man page
for details.
Do you want to run the ipa-sidgen task? [no]:
Let’s configure now DNS forwarder on freeipa server. Remember to configure as resolve name server the ipa server ip address for all linux systems.
[root@ipaserver ~]# ipa dnsforwardzone-add kali.it –forwarder=192.168.1.50 –forward-policy=only
Server will check DNS forwarder(s).
This may take some time, please wait …
Zone name: kali.it.
Active zone: TRUE
Zone forwarders: 192.168.1.50
Forward policy: only
Install required packages
[root@ipaserver ~]# dig SRV _ldap._tcp.kali.it
; <<>> DiG 9.9.4-RedHat-9.9.4-29.el7_2.3 <<>> SRV _ldap._tcp.kali.it
;; global options: +cmd
;; Got answer:
;; ->>HEADER<<- opcode: QUERY, status: NOERROR, id: 48313
;; flags: qr aa rd ra; QUERY: 1, ANSWER: 1, AUTHORITY: 0, ADDITIONAL: 2
;; OPT PSEUDOSECTION:
; EDNS: version: 0, flags:; udp: 4000
;; QUESTION SECTION:
;_ldap._tcp.kali.it. IN SRV
;; ANSWER SECTION:
_ldap._tcp.kali.it. 600 IN SRV 0 100 389 win-irb94ovlapt.kali.it.
;; ADDITIONAL SECTION:
win-irb94ovlapt.kali.it. 1200 IN A 192.168.1.50
;; Query time: 431 msec
;; SERVER: 192.168.1.50#53(192.168.1.50)
;; WHEN: Fri Jun 03 23:53:42 CEST 2016
;; MSG SIZE rcvd: 106
[root@ipaserver ~]# dig SRV _kerberos._tcp.kali.it
; <<>> DiG 9.9.4-RedHat-9.9.4-29.el7_2.3 <<>> SRV _kerberos._tcp.kali.it
;; global options: +cmd
;; Got answer:
;; ->>HEADER<<- opcode: QUERY, status: NOERROR, id: 33747
;; flags: qr aa rd ra; QUERY: 1, ANSWER: 1, AUTHORITY: 0, ADDITIONAL: 2
;; OPT PSEUDOSECTION:
; EDNS: version: 0, flags:; udp: 4000
;; QUESTION SECTION:
;_kerberos._tcp.kali.it. IN SRV
;; ANSWER SECTION:
_kerberos._tcp.kali.it. 600 IN SRV 0 100 88 win-irb94ovlapt.kali.it.
;; ADDITIONAL SECTION:
win-irb94ovlapt.kali.it. 1200 IN A 192.168.1.50
;; Query time: 57 msec
;; SERVER: 192.168.1.50#53(192.168.1.50)
;; WHEN: Fri Jun 03 23:54:23 CEST 2016
;; MSG SIZE rcvd: 110
As showed above, the SRV query is forwarded to AD (win-irb94ovlapt.kali.it) and it’s returned the reference of kerberos (port 88) and ldap services (port 389). In this way the sssd client is able to know how to contact the active directory services
The same thing in active directory:
C:>dnscmd 127.0.0.1 /RecordAdd kali.it linux.kali.it. NS ipaserver.linux.kali.it
C:>dnscmd 127.0.0.1 /RecordAdd kali.it ipaserver.linux.kali.it A 192.168.1.51
C:>dnscmd 127.0.0.1 /ZoneAdd linux.kali.it. /Forwarder 192.168.1.51
DNS query from AD is ok:

Active Directory dns forwarders
Before enabling the trust we resolve a issue that would not permit to restart freeipa:
[root@ipaserver ~]# systemctl status ipa
â— ipa.service – Identity, Policy, Audit
Loaded: loaded (/usr/lib/systemd/system/ipa.service; enabled; vendor preset: disabled)
Active: failed (Result: exit-code) since Sat 2016-06-04 03:26:17 CEST; 5min ago
Process: 3915 ExecStart=/usr/sbin/ipactl start (code=exited, status=1/FAILURE)
Main PID: 3915 (code=exited, status=1/FAILURE)
Jun 04 03:26:16 ipaserver.linux.kali.it ipactl[3915]: Starting kadmin Service
Jun 04 03:26:16 ipaserver.linux.kali.it ipactl[3915]: Starting named Service
Jun 04 03:26:16 ipaserver.linux.kali.it ipactl[3915]: Starting ipa_memcached Service
Jun 04 03:26:16 ipaserver.linux.kali.it ipactl[3915]: Starting httpd Service
Jun 04 03:26:16 ipaserver.linux.kali.it ipactl[3915]: Starting pki-tomcatd Service
Jun 04 03:26:16 ipaserver.linux.kali.it ipactl[3915]: Starting smb Service
Jun 04 03:26:17 ipaserver.linux.kali.it systemd[1]: ipa.service: main process exited, code=exited, status=1/FAILURE
Jun 04 03:26:17 ipaserver.linux.kali.it systemd[1]: Failed to start Identity, Policy, Audit.
Jun 04 03:26:17 ipaserver.linux.kali.it systemd[1]: Unit ipa.service entered failed state.
Jun 04 03:26:17 ipaserver.linux.kali.it systemd[1]: ipa.service failed.
[root@ipaserver ~]#systemctl restart ipa
From another shell, before that freeipa goes down a samba service principal must be created and the keytab imported on ipaserver.
[root@ipaserver ~]# kinit admin
Password for admin@LINUX.KALI.IT:
[root@ipaserver run]# ipa service-add cifs/ipaserver.linux.kali.it@LINUX.KALI.IT –force
———————————————————-
Added service “cifs/ipaserver.linux.kali.it@LINUX.KALI.IT”
———————————————————-
Principal: cifs/ipaserver.linux.kali.it@LINUX.KALI.IT
Managed by: ipaserver.linux.kali.it
[root@ipaserver run]# ipa-getkeytab -s ipaserver.linux.kali.it -p cifs/ipaserver.linux.kali.it@LINUX.KALI.IT -k /etc/samba/samba.keytab
Keytab successfully retrieved and stored in: /etc/samba/samba.keytab
Now it’s time, with AD Administrator credential, to enable the trust beewten freeipa and active directory.
[root@ipaserver ~]# ipa trust-add –type=ad kali.it –admin Administrator –password
Active Directory domain administrator’s password:
————————————————
Added Active Directory trust for realm “kali.it”
————————————————
Realm name: kali.it
Domain NetBIOS name: KALI
Domain Security Identifier: S-1-5-21-3730397366-1172298099-1548305149
SID blacklist incoming: S-1-5-20, S-1-5-3, S-1-5-2, S-1-5-1, S-1-5-7, S-1-5-6, S-1-5-5, S-1-5-4, S-1-5-9, S-1-5-8, S-1-5-17,
S-1-5-16, S-1-5-15, S-1-5-14, S-1-5-13, S-1-5-12, S-1-5-11, S-1-5-10, S-1-3, S-1-2, S-1-1, S-1-0,
S-1-5-19, S-1-5-18
SID blacklist outgoing: S-1-5-20, S-1-5-3, S-1-5-2, S-1-5-1, S-1-5-7, S-1-5-6, S-1-5-5, S-1-5-4, S-1-5-9, S-1-5-8, S-1-5-17,
S-1-5-16, S-1-5-15, S-1-5-14, S-1-5-13, S-1-5-12, S-1-5-11, S-1-5-10, S-1-3, S-1-2, S-1-1, S-1-0,
S-1-5-19, S-1-5-18
Trust direction: Trusting forest
Trust type: Active Directory domain
Trust status: Established and verified
[root@ipaserver ~]#
In Active Directory:

Freeipa Active Directory Trust
Add these lines in /etc/krb5.conf and restart kadmin and sssd.
[root@ipaserver ~]# vi /etc/krb5.conf
dns_lookup_realm = true
dns_lookup_kdc = true
[realms]
auth_to_local = RULE:[1:$1@$0](^.*@KALI.IT)s/@KALI.IT/@kali.it/
auth_to_local = DEFAULT
[root@ipaserver ~]# systemctl restart sssd
[root@ipaserver ~]# systemctl restart kadmin
The last step to do is to create external group mapped to posix freeipa group: it permit to give to right grant to external group. Following the active directory domain admin group is mapped to ad_admins group that belongs to admins user. In this case every domain admin windows has the some grant of admin freeipa:
[root@ipaserver ~]# ipa group-add –desc=’ad_domain admins external map’ ad_admins_external –external
——————————–
Added group “ad_admins_external”
——————————–
Group name: ad_admins_external
Description: ad_domain admins external map
[root@ipaserver ~]# ipa group-add –desc=’ad_domain admins’ ad_admins
———————–
Added group “ad_admins”
———————–
Group name: ad_admins
Description: ad_domain admins
GID: 5400004
[root@ipaserver ~]# ipa group-add-member ad_admins_external –external ‘KALIDomain Admins’
[member user]:
[member group]:
Group name: ad_admins_external
Description: ad_domain admins external map
External member: S-1-5-21-3730397366-1172298099-1548305149-512
————————-
Number of members added 1
————————-
[root@ipaserver ~]# ipa group-add –desc=’ad_domain admins’ ad_admins
[root@ipaserver ~]# ipa group-add-member ad_admins –groups ad_admins_external
Group name: ad_admins
Description: ad_domain admins
GID: 5400004
Member groups: ad_admins_external
————————-
Number of members added 1
————————-
[root@ipaserver ~]# ipa group-add-member admins –groups ad_admins
Group name: admins
Description: Account administrators group
GID: 5400000
Member users: admin
Member groups: ad_admins
Indirect Member groups: ad_admins_external
————————-
Number of members added 1
If everything has been done fine, it will be possible to login by ssh to ipaserver with a windows user without credentials. Remember to align the date on Windows and Linux system to equal value.
[root@ipaserver ~]# kinit Administrator@KALI.IT
Password for Administrator@KALI.IT:
[root@ipaserver ~]# klist
Ticket cache: KEYRING:persistent:0:0
Default principal: Administrator@KALI.IT
Valid starting Expires Service principal
06/04/2016 07:42:34 06/04/2016 17:42:34 krbt
[root@ipaserver ~]# ssh -l Administrator@kali.it ipaserver.linux.kali.it
Could not chdir to home directory /home/kali.it/administrator: No such file or directory
-sh-4.2$ exit
logout
Connection to ipaserver.linux.kali.it closed.
[root@ipaserver ~]# klist
Ticket cache: KEYRING:persistent:0:0
Default principal: Administrator@KALI.IT
Valid starting Expires Service principal
06/04/2016 07:43:08 06/04/2016 17:42:34 host/ipaserver.linux.kali.it@LINUX.KALI.IT
renew until 06/05/2016 07:42:31
06/04/2016 07:43:22 06/04/2016 17:42:34 krbtgt/LINUX.KALI.IT@KALI.IT
renew until 06/05/2016 07:42:31
06/04/2016 07:42:34 06/04/2016 17:42:34 krbtgt/KALI.IT@KALI.IT
renew until 06/05/2016 07:42:31
[root@ipaserver ~]#
Perfect: the ssh login completed without password. The sssd using the windows TGT obtained by kinit asks a new TGT for linux domain. The AD releases to sssd a TGT signed with a secret key shared with KDC freeipa. With this ticket the sssd asks with success a service ticket for host/ipaserver.linux.kali.it@LINUX.KALI.IT to KDC Linux
These kerberos transactions will be explained better after client freeipa installation and configuration.
Freeipa Client Installation
The freeipa client is installed on centos 7 linux machine. After installing and configuring it, it’s possible to login by ssh with windows credential or using service ticket obtained from a windows user authenticated to a windows client.
The first thing to do, after installing ipa client, is to configure it.
[root@ipaclient etc]#more hosts |grep ipa
192.168.1.52 ipaclient.linux.kali.it ipaclient
192.168.1.51 ipaserver.linux.kali.it
[root@ipaclient etc]#more resolver.conf
192.168.1.51 ipaserver.linux.kali.it
[root@ipaclient etc]# yum -y install ipa-client
[root@ipaclient ~]# ipa-client-install –hostname=ipaclient.linux.kali.it –server=ipaserver.linux.kali.it –domain=linux.kali.it –realm=LINUX.KALI.IT –enable-dns-updates –mkhomedir
Autodiscovery of servers for failover cannot work with this configuration.
If you proceed with the installation, services will be configured to always access the discovered server for all operations and will not fail over to other servers in case of failure.
Proceed with fixed values and no DNS discovery? [no]: yes
Client hostname: ipaclient.linux.kali.it
Realm: LINUX.KALI.IT
DNS Domain: linux.kali.it
IPA Server: ipaserver.linux.kali.it
BaseDN: dc=linux,dc=kali,dc=it
The sssd configuration must be changed in this way (in bolt the new configurations):
[root@ipaclient sssd]# vi sssd.conf
[domain/linux.kali.it]
override_shell=/bin/bash
homedir_substring = /home
cache_credentials = True
krb5_store_password_if_offline = True
ipa_domain = linux.kali.it
id_provider = ipa
auth_provider = ipa
access_provider = ipa
ipa_hostname = ipaclient.linux.kali.it
chpass_provider = ipa
dyndns_update = True
ipa_server = _srv_, ipaserver.linux.kali.it
dyndns_iface = enp0s3
ldap_tls_cacert = /etc/ipa/ca.crt
sudo_provider = ldap
ldap_uri = ldap://ipaserver.linux.kali.it
ldap_sudo_search_base = ou=sudoers,dc=lx,dc=kali,dc=it
ldap_sasl_mech = GSSAPI
ldap_sasl_authid = host/ipclient.linux.kali.it
ldap_sasl_realm = LINUX.KALI.IT
krb5_server = ipaserver.linux.kali.it
[sssd]
services = nss, sudo, pam, ssh,pac
config_file_version = 2
domains = linux.kali.it
In the krb5.conf the following line need to add inside realms section:
auth_to_local = RULE:[1:$1@$0](^.*@KALI.IT)s/@KALI.IT/@kali.it/
The dns_lookup must be true: it force the sssd to find by dns query the active directory services
dns_lookup_realm = true
dns_lookup_kdc = true
Check in the nsswitch.conf the presence of the following line:
sudoers: files sss
Now the sssd and ssh can be started:
[root@ipaclient etc]# systemctl restart sssd
[root@ipaclient etc]# systemctl restart ssh
If everything has been done fine, the ssh kerberos authentication to ipaclient from freeipa client or windows client must be completed with success.
Below the ssh connection is done by ipaserver. The user used is windows administrator that has the right grant to access to any system because the domain admins belong to freeipa admin.
[root@ipaserver ~]# kinit Administrator@KALI.IT
Password for Administrator@KALI.IT:
kinit: Preauthentication failed while getting initial credentials
[root@ipaserver ~]# kinit Administrator@KALI.IT
Password for Administrator@KALI.IT:
[root@ipaserver ~]# klist
Ticket cache: KEYRING:persistent:0:0
Default principal: Administrator@KALI.IT
Valid starting Expires Service principal
06/04/2016 10:44:34 06/04/2016 20:44:34 krbtgt/KALI.IT@KALI.IT
renew until 06/05/2016 10:44:33
[root@ipaserver ~]# ssh -l Administrator@kali.it ipaclient.linux.kali.it
Last login: Sat Jun 4 10:40:58 2016 from ipaserver.linux.kali.it
[administrator@kali.it@ipaclient ~]$ id
uid=97200500(administrator@kali.it) gid=97200500(administrator@kali.it) groups=97200500(administrator@kali.it),5400000(admins),5400004(ad_admins),97200512(domain admins@kali.it),97200513(domain users@kali.it),97200518(schema admins@kali.it),97200519(enterprise admins@kali.it),97200520(proprietari autori criteri di gruppo@kali.it)
[administrator@kali.it@ipaclient ~]$ pwd
/home/kali.it/administrator
[administrator@kali.it@ipaclient ~]$ exit
logout
Connection to ipaclient.linux.kali.it closed.
[root@ipaserver ~]# klist
Ticket cache: KEYRING:persistent:0:0
Default principal: Administrator@KALI.IT
Valid starting Expires Service principal
06/04/2016 10:42:04 06/04/2016 20:44:34 host/ipaclient.linux.kali.it@LINUX.KALI.IT
renew until 06/05/2016 10:44:33
06/04/2016 10:44:43 06/04/2016 20:44:34 krbtgt/LINUX.KALI.IT@KALI.IT
renew until 06/05/2016 10:44:33
06/04/2016 10:44:34 06/04/2016 20:44:34 krbtgt/KALI.IT@KALI.IT
renew until 06/05/2016 10:44:33
The freeipa client installation and configuration is completed. In the next paragraph an real life example is showed: a windows user with sudo grant connects to linux system and from here changes his password in active directory.
Freeipa and windows user with sudo grant
The trust beewteen active directory and freeipa has been completed. A windows user from windows system can login remoteley by ssh to linux world using kerberos authenticating.
For our case the administrator user is used for the tests. As done above, the domain admins belong to admin freeipa group: it has the grant for login to all linux systems.
After installing winscp on windows system, we tried successfully the ssh kerberos authentication:
winscp kerberos authentication

winscp active directory trust

We could do the same login by a normal domain users. The important thing is to create on freeipa the right mapping beewteen domain users and freeipa group and give to this freeipa group the right grant for accessing to linux system. All that can be done by GUI freeipa.
Next the Administrator windows user is able to change his password correctly on linux system:
[administrator@kali.it@ipaclient ~]$ passwd
Changing password for user administrator@kali.it.
Current Password:
New password:
Retype new password:
passwd: all authentication tokens updated successfully.
[administrator@kali.it@ipaclient ~]$ kinit Administrator@KALI.IT
Password for Administrator@KALI.IT:
[administrator@kali.it@ipaclient ~]$ klist
Ticket cache: KEYRING:persistent:97200500:krb_ccache_Q2NIGAo
Default principal: Administrator@KALI.IT
Valid starting Expires Service principal
06/09/2016 08:43:02 06/09/2016 18:43:02 krbtgt/KALI.IT@KALI.IT
renew until 06/10/2016 08:42:58
[administrator@kali.it@ipaclient ~]$
Configuring a sudo policy on freeipa for ad_admins, it’s possible to get root permission by sudo command.
Configure the sudo rule on freeipa by GUI clicking on add button in Policy/Sudo sheet.

ssh kerberos authentication
Let’s try now the “sudo su -” command:
[root@ipaserver ~]# kinit Administrator@KALI.IT
Password for Administrator@KALI.IT:
[root@ipaserver ~]# ssh -l Administrator@kali.it ipaclient.linux.kali.it
Last login: Thu Jun 9 09:03:11 2016 from ipaserver.linux.kali.it
[administrator@kali.it@ipaclient ~]$ id
uid=97200500(administrator@kali.it) gid=97200500(administrator@kali.it) groups=97200500(administrator@kali.it),5400000(admins),5400004(ad_admins),5400005(ad_users),97200512(domain admins@kali.it),97200513(domain users@kali.it),97200518(schema admins@kali.it),97200519(enterprise admins@kali.it),97200520(proprietari autori criteri di gruppo@kali.it)
[administrator@kali.it@ipaclient ~]$ pwd
/home/kali.it/administrator
[administrator@kali.it@ipaclient ~]$ sudo su –
Last login: Thu Jun 9 09:33:35 CEST 2016 from 192.168.1.5 on pts/1
[root@ipaclient ~]#
Following the kerberos packet exchanged between linux system with active directory kerberos and with freeipa kdc:

freeipa active directory
- AS/REQ is sent from linux sytem to active directory kerberos. The ad kerebros ip address is detected by dns: a srv query like _kerberos._udp.kali.it.
- The AD returns in AS REP a TGT that is used next for a service ticket to host/ipaclient.linux.kali.it@LINUX.KALI.IT. The TGT_REQ for this service ticket is always sent to AD.
- The AD returns in TGT_REP a new ticket signed with a key shared with freeipa during trust procedure.
- With the ticket above, the linux client can ask to freepa KDC the service ticket for host/ipaclient.linux.kali.it@LINUX.KALI.IT.
The important thing to understand is that: Active directory manages the authentication, freeipa the authorization. That’s all.
Conclusions
The freeipa trust with active directory is very interesting for a company. The access to linux system is centralized in active directory and freeipa has the responsability for the authorization process.
It’s possible to have more freeipa server replicated with more linux domains under a principal domain that is in trusted with windows. In this way every organizational unit with its domain (uk.linux.kali.it, fr.linux.kali.it, etc..) is trusted with active directory domain root kali.it.
The freeipa is the right and best solution for who wants to have an identity management like active directory for linux world. Use it and you will save time for managing the linux authentication and authorization process.
Doesn’t hesitate to contact me for any problem during freeipa trust installation and configuration.
1.1 Отключение проверки DNSSEC.
Для этого нужно отредактировать 2 параметра в файле
/etc/named.conf
Задайте им следующие значения:
dnssec-enable no;
dnssec-validation no;
Перезагрузите сервер или службу IPA командой:
systemctl restart ipa
На время настройки сервиса переведите selinux в режим уведомлений. Для этого измените содержимое конфигурационного файла:
nano /etc/selinux/config
Заменив текст SELINUX=enforcing на SELINUX=permissive
Выполните:
setenforce 0
Более подробно см.ссылку
Не забудьте включить selinux после завершения настройки.
1.2 Отредактируйте /etc/hosts.
Впишите туда адрес сервера MS AD и его хостнейм.
10.81.81.174 dc.ipa.ipamurom dc
1.3 Настройка времени
На всех серверах и рабочих станциях время должно быть синхронизировано.
nano /etc/chrony.conf
Удалите все остальные строки, начинающиеся на server.
Вставьте следующие строки в файл:
server ntp1.stratum2.ru iburst
server ntp2.stratum2.ru iburst
server ntp3.stratum2.ru iburst
Укажите подсеть:
allow 10.81.81.0/24
Перезапустите сервис chronyd:
systemctl restart chronyd
Проверка:
chronyc sources
1.4 Настройка зоны перенаправления на IPA сервере
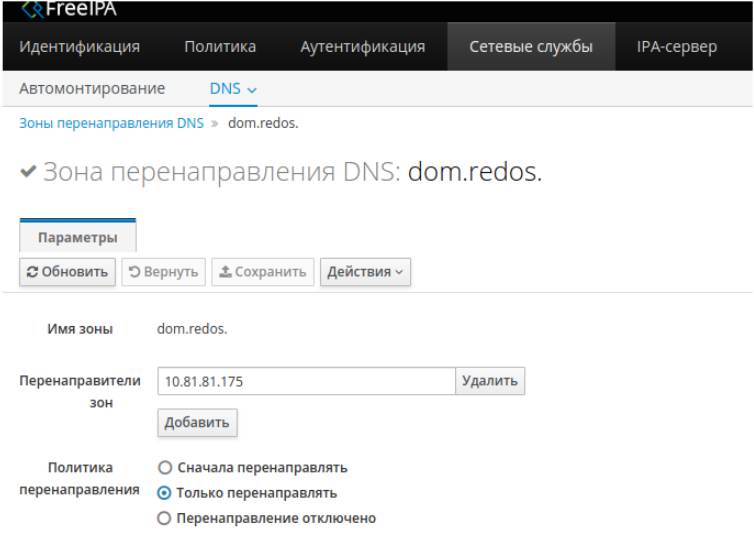
На сервере IPA добавьте условный сервер пересылки (зону пересылки dns) для домена Windows AD:
#kinit admin
#ipa dnsforwardzone-add dom.redos --forwarder=10.81.81.175 --forward-policy=only
здесь 10.81.81.175 — windows server;
dom.redos — имя домена windows.
C помощью web GUI в параметрах DNS-сервера IPA укажите ip-адрес перенаправителя, им должен быть сервер Window.
У вас должно получится примерно следующее:

Проверьте, резолвится ли сервер MS AD. Воспользуйтесь командой:
# nslookup dc.win.redos
Server:      10.81.81.175
Address:     10.81.81.175#53
Non-authoritative answer:
Name:  dc.ipa.ipamurom
Address:  10.81.81.174
Вам должен вернуться адрес вашей MS AD.
Так же проверьте SRV записи.
# dig SRV _ldap._tcp.ipa_domain
# dig SRV _ldap._tcp.ad_domain
1.5 Переустановка samba-dc
Для корректной работы Ipa сервера и ms ad требуется версия samba-dc 4.9.1-3.
Скачать данную версию можно по ссылке из облака: https://share.red-soft.ru/index.php/s/tgLJdCYrzcScdXJ.
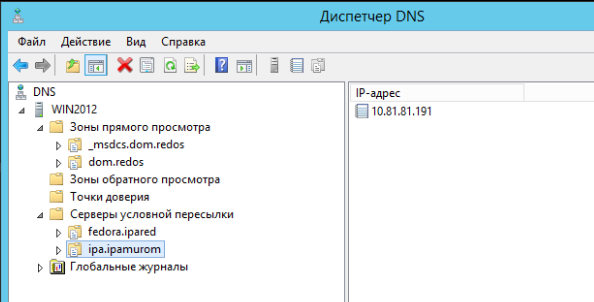
2 Настройка DNS на сервере Windows
Вам нужно сделать так, что бы доменом IPA сервера управлял DNS IPA.
В случае разных доменов создайте сервер условной пересылки.
- Откройте Диспетчер DNS и перейдите на вкладку «Серверы условной пересылки».
- В контекстном меню выберите «Создать сервер условной пересылки».
- Впишите DNS домен сервера IPA и его ip адрес.
- Выберите «Все DNS серверы в этом лесу» и нажмите ОК.
- Ниже приведен примерный результат:
Также это можно сделать с помощью команды:
dnscmd 127.0.0.1 /ZoneAdd ipa.ipamurom /Forwarder 10.81.81.191

Кроме этого необходимо добавить глобальный «Сервер пересылки» в свойствах dns-сервера windows. Для этого в диспетчере DNS нажмите правой клавиши мыши на сервере DNS (SERV) и в выпадающем меню выберите «Свойства«, перейдите на вкладку «Сервер пересылки«, нажмите на кнопку «Изменить» и в открывшемся окне введите ip-адрес сервера IPA.
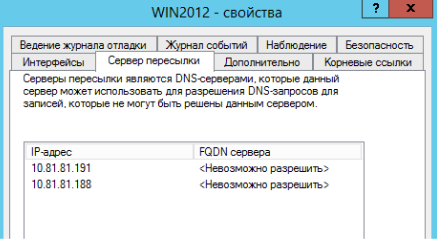
Также это можно сделать с помощью команды:
dnscmd 127.0.0.1 /ResetForwarders 10.81.81.191 /Slave
Проверьте конфигурацию DNS на сервере Windows.
Чтобы убедиться, что сервер AD может корректно видеть IPA, проверьте, правильно ли разрешены записи SRV.
C:> nslookup
> set type=srv
> _ldap._tcp.ad_domain
> _ldap._tcp.ipa_domain
> quit
3 Добавьте доверительные отношения между доменами
3.1 Сконфигурируйте сервер IPA для доверительных отношений с AD.
# ipa-adtrust-install
Отвечайте на все вопросы скрипта положительно (yes).
При доступе пользователей AD к IPA-клиентам обязательно запустите ipa-adtrust-install на каждом IPA-сервере, к которому будут подключаться клиенты IPA.
3.2 Добавьте доверительные отношения.
#ipa trust-add --type=ad dom.redos --range-type ipa-ad-trust --admin admin--password --two-way TRUE
При появлении запроса введите пароль администратора. Если все будет настроено правильно, будет установлено доверие к домену AD.
Важно!
Учетная запись пользователя, используемая при создании доверия (аргумент опции —admin команды ipa trust-add), должна быть членом группы Domain Admins. Имя учетной записи должно быть на английском языке.
На этом этапе IPA создаст одностороннее доверие к лесу на стороне IPA, создаст одностороннее доверие к лесу на стороне AD и инициирует проверку доверия с AD-стороны. Для двустороннего доверия нужно добавить опцию --two-way=true.
3.3 После того, как установлена доверительное отношение на стороне AD, необходимо получить список доверенных доменов леса со стороны AD. Это делается с помощью следующей команды:
# ipa trust-fetch-domains "ad_domain"
При успехе IPA получит информацию о доверенных доменах и создаст для них все необходимые идентификаторы.
Используйте «trustdomain-find», чтобы просмотреть список доверенных доменов из доверенного леса:
# ipa trustdomain-find "ad_domain"
3.4 Создать внешнюю группу, сопоставленную с группой posix freeipa: это позволит предоставить право внешней группе. Затем active directory группа администраторов домена сопоставляется с группой ad_admins, которая принадлежит пользователю admins. В этом случае каждый администратор домена windows имеет некоторый грант администратора freeipa:
ipa group-add --desc='ad domain external map' ad_admins_external --external
ipa group-add --desc='ad domain users' ad_admins
ipa group-add-member ad_admins_external --external 'WIN.REDOSАдминистраторы домена'
ipa group-add-member ad_admins --groups ad_admins_external
Если вы нашли ошибку, пожалуйста, выделите текст и нажмите Ctrl+Enter.
Many companies use Active Directory for centrally managing existing systems, but if you mix in Linux systems, you have to take care of a few things, such as different forms of integration. We show you how to connect the FreeIPA identity management framework as an interface to an Active Directory domain.
A directory service usually provides a wealth of information on top of the classic user and group accounts, including machine and service accounts, security rules, and possibly DNS information and other data that administrators would like to store centrally to deliver to clients in the domain.
Such data can, of course, be stored either in an Active Directory (AD) or in any other directory service, although it is not irrelevant which clients then have access to the data. For example, an AD provides more of a native interface for Windows clients than for POSIX clients. This in turn affects how well the client integration works and what data these clients can retrieve, evaluate, and implement from the directory service.
Therefore, it is very importance that you define from the beginning which data should be available to Linux clients from Windows AD. Do you just want to authenticate AD users to access resources on a Linux system, or should they also be able to evaluate appropriate security rules for access to the resources? Where should these security rules be stored? The AD may provide the corresponding functions, but the solutions provided are oriented more toward Windows clients than Linux systems.
Ultimately, you have two types of integration. First is the option to integrate Linux clients directly in a Windows domain and manage them using an AD domain controller. The second option is a kind of indirect integration based on data synchronization or domain trust. With data synchronization, user accounts with previously defined attributes are replicated in a different directory service, which then makes these account available to Linux clients. However, I won’t delve into the implementation of this any further at this point because this type of indirect integration has a load of disadvantages. Instead I’ll just point out the available literature on the subject [1].
Direct vs. Indirect Integration
Winbind, which comes from the Samba project, is often used in an open source environment for direct integration. The manual configuration of the necessary PAM and NSS modules, which are required for access to the LDAP and Kerberos server of a Windows domain controller, is also performed by some administrators. However, these days, the System Security Services Daemon (SSSD) [2] is used most of the time in such scenarios. This approach, together with the software [3], is the simplest way to integrate Linux clients directly into an existing Windows domain and therefore to manage them using the existing Windows tools. Proprietary tools also exist for this task: The authentication services available from Dell and originally developed by Quest will certainly be well known to a few administrators.
Direct integration requires that only a single identity store, the Active Directory, exists and is therefore the only source from which user information can be queried. This is often a requirement of various compliance regulations. However, it is the security-relevant information related to user and group accounts managed using a Windows AD that is insufficiently available to Linux clients. Just think about configuration data for sudo, SELinux Role-based Access Control (RBAC) policies, or other infrastructure-related data (e.g., for operating an automounter).
This kind of data can only be stored in a Windows AD to a very limited extent and very laboriously, which means that distributing the necessary configuration data for the indirect integration of Linux clients then needs be accomplished with the use of other management tools, such as Puppet, Foreman, Chef, or similar tools.
This approach certainly scales sufficiently for a manageable number of client systems, but it definitely is not a satisfactory solution in large environments. In such cases, you would be better off going for indirect integration based on a Kerberos trust. Here, I present an example setup based on the FreeIPA identity management framework [4].
Trust Relationships Allow Data Transfer
A domain trust is a trust relationship established between two or more domains. Such a trust relationship can, for example, be set up where domains are located in a common AD structure (forest). Here, users from one domain can be authenticated by a domain controller (DC) from the other domain. Two-way and transitive trust relationships between the domains that Windows sets up by default are responsible for this. Either Kerberos V5 or NTLM are used as protocols for this, although Kerberos is the default for Active Directory domains.
The FreeIPA open source identity management framework also provides a Kerberos realm and can present it to a Windows AD as part of a separate Kerberos structure. In turn, Windows is able to establish a trust relationship with such a Kerberos realm – even if it does not belong to a Windows domain. In this case, I am talking about a cross-realm trust. Windows users then have the option to access resources on a Linux system, which is part of the Kerberos realm with which a trust relationship was established. Because FreeIPA doesn’t currently provide a global catalog server, it is effectively a one-way trust, meaning that users can’t access resources from the Windows domain from the FreeIPA.
The Windows account is still just saved on the Windows domain controller. The Windows domain controller also authenticates this account. Unlike the integration of Linux on the basis of data synchronization, no additional software needs to be installed on the domain controllers.
The fact that there is a trust relationship between the Windows realm and the FreeIPA realm means that, for starters, all accounts managed by the DC can natively access Linux resources in the FreeIPA realm. This also applies to Windows accounts from other domains for which there are transitive trusts relationships. Access can also be limited, of course, but more on that later.
FreeIPA (via PAM, NSS, and various helper applications) provides a native interface for Linux and other Unix clients, so it is the perfect tool for holding other domain-relevant data in a central location and making the Linux and Unix clients available, as required. The security-related policies mentioned at the beginning of the articles are included in this, as well as SSH user and host keys, SELinux user mappings, and other data. Only the authentication of users of the AD domain occurs via the AD trust. The FreeIPA framework makes all other data available to its own client systems.
Own DNS Zones Required
A few preparations need to be made first. Both the AD and FreeIPA need standalone DNS zones because both environments store information about the Kerberos infrastructure used in SRV and TXT records in the DNS. Whether you splash out on a completely independent DNS zone for FreeIPA or whether you set it up below the existing DNS zone in the AD domain doesn’t matter for now. In any case, you should make sure the zone has a proper delegation. In test environments, you can also work with corresponding forwarders. In the following example, the DNS zone of the AD domain is coe.muc.redhat.com
. The FreeIPA environment receives a sub-zone called linux.coe.muc.redhat.com
. This is managed via the BIND DNS server integrated in FreeIPA.
Furthermore, I assume that you already have an existing FreeIPA installation. If you don’t, you can set one up using:
ipa-server-install
To use the latest features, you need to install version 4.1 of FreeIPA and version 1.12 of the client service SSSD. The setup presented here works with older versions but requires a bit more manual work here and there. A Windows Server 2008 R2 or later is required on the Windows side.
| Данная страница находится в разработке. Эта страница ещё не закончена. Информация, представленная здесь, может оказаться неполной или неверной. |
Примечание: В примере для создания доверительных отношений будут использоваться следующие данные:
- Домен FreeIPA — example.test
- Сервер FreeIPA — ipa.example.test (192.168.0.113)
- NetBIOS имя IPA домена: EXAMPLE
- Домен AD — test.alt
- Сервер AD — dc1.test.alt (192.168.0.122)
- NetBIOS имя AD домена: TEST
FreeIPA использует Samba для интеграции в Active Directory. Для работы Samba необходим работающий стек IPv6.
Настройка DNS
Перед подключением FreeIPA и Active Directory (AD) к доверию необходимо убедиться, что серверы видят друг друга и правильно разрешают доменные имена. В этом сценарии описывается настройка DNS для разрешения доменных имен между:
- основной сервер FreeIPA, использующий интегрированный сервер DNS и CA;
- контроллер домена AD.
Для настройки DNS необходимо:
- настроить зоны DNS на сервере FreeIPA;
- настроить условную переадресацию DNS в AD;
- проверить правильности конфигурации DNS.
Настройка зоны перенаправления DNS на сервере FreeIPA
С помощью зон перенаправления DNS (forward zone) DNS-запросы для определенной зоны можно перенаправлять на другой DNS-сервер. Например, можно перенаправлять DNS-запросы для домена AD на DNS-сервер AD.
Настройка зоны перенаправления в веб-интерфейсе FreeIPA:
- Перейти на вкладку «Сетевые службы».
- В выпадающем меню выбрать «DNS» «Зоны перенаправления DNS»:
- Нажать кнопку «Добавить».
- В диалоговом окне «Добавить зону перенаправления DNS» добавить имя зоны.
- В строке «Перенаправители зон» нажать кнопку «Добавить».
- В поле «Перенаправители зон» добавить IP-адрес сервера, для которого создается новая зона перенаправления:
- Нажать кнопку «Добавить». Зона перенаправления DNS будет добавлена:
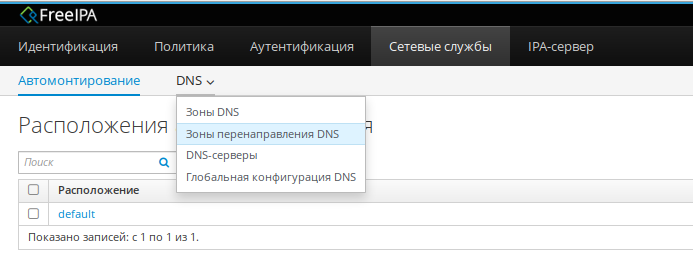
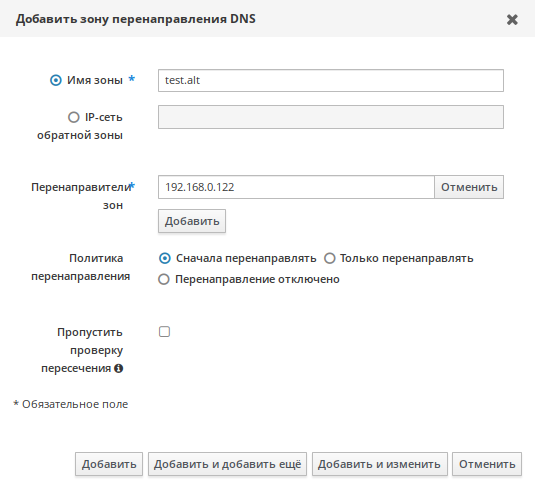
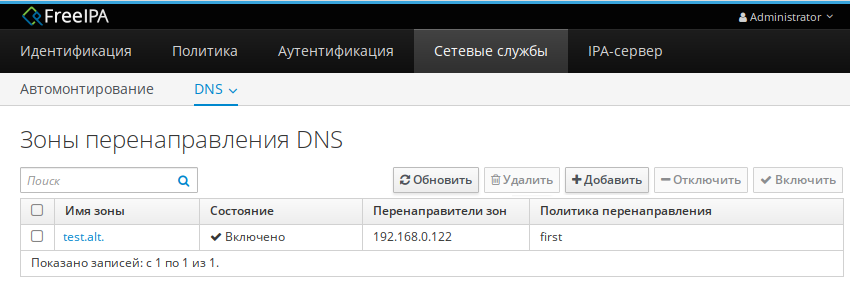
Создание зоны переадресации DNS для домена AD в командной строке (следует указать IP-адрес удаленного DNS-сервера с параметром —forwarder):
# kinit admin
# ipa dnsforwardzone-add test.alt --forwarder=192.168.0.122 --forward-policy=first
Сервер проверит DNS-перенаправитель (перенаправители).
Это может занять некоторое время; пожалуйста, подождите...
Имя зоны: test.alt.
Активная зона: TRUE
Перенаправители зон: 192.168.0.122
Политика перенаправления: first
Примечание: Если при добавлении зоны перенаправления появляется предупреждение об ошибке проверки DNSSEC, это означает что удалённый DNS-сервер не использует DNSSEC. Рекомендуется включить DNSSEC на удаленном DNS-сервере.
Если включить проверку DNSSEC на удаленном DNS-сервере нельзя, можно отключить DNSSEC на сервере FreeIPA. Для этого в файле /etc/bind/ipa-options-ext.conf следует привести параметр dnssec-validation к виду:
И перезапустить службу DNS:
# systemctl restart bind.service
Проверка настройки:
# dig dc1.test.alt +noall +answer
dc1.test.alt.       709 IN  A   192.168.0.122
Настройка переадресации DNS в AD
В этом разделе описывается, как настроить переадресацию DNS в Active Directory для сервера FreeIPA.
Samba DC
Если используется dns_backend BIND9_DLZ добавить в файл /etc/bind/options.conf строки:
zone "example.test" {
    type forward;
    forwarders { 192.168.0.113; };
};
Перезапустить службу DNS:
# systemctl restart bind.service
Windows Server с AD
На AD сервере создать сервер условной пересылки для зоны IPA домена.
В графическом интерфейсе:
- Открыть «Диспетчер DNS» («DNS Manager»).
- В разделе «Серверы условной пересылки» («Conditional Forwarders») добавить новый сервер пересылки указав FQDN и IP-адрес сервера FreeIPA:
- Сохранить настройки.
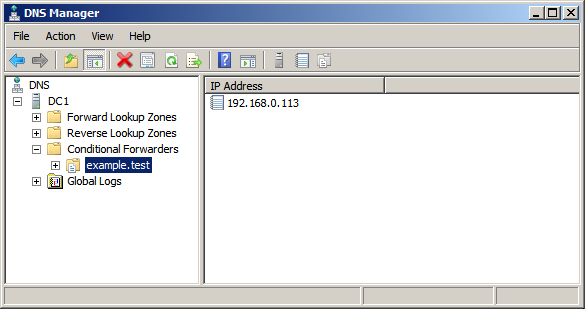
В командной строке:
C:> dnscmd 127.0.0.1 /ZoneAdd example.test /Forwarder 192.168.0.113
DNS Server 127.0.0.1 created zone example.test:

Command completed successfully
Проверка конфигурации DNS
Перед настройкой доверия необходимо убедиться, что серверы FreeIPA и AD могут разрешать себя и друг друга.
На сервере FreeIPA
Проверить наличие записей для работы сервисов IPA на DNS-сервере IPA.
- Запись отвечающая за работу сервисов Kerberos через UDP и LDAP через TCP:
-
# dig +short -t SRV _kerberos._udp.example.test
0 100 88 ipa.example.test.
dig +short -t SRV _ldap._tcp.example.test
0 100 389 ipa.example.test.
- В выводе команд должен быть отображен список всех серверов IPA.
-
- Запись отвечающая за имя Kerberos realm IPA домена:
-
# dig +short -t TXT _kerberos.example.test
"EXAMPLE.TEST"
-
- Наличие записей для работы сервисов AD на DNS-сервере IPA:
-
# dig +short -t SRV _kerberos._tcp.dc._msdcs.test.alt
0 100 88 dc.test.alt.
# dig +short -t SRV _ldap._tcp.dc._msdcs.test.alt
0 100 389 dc.test.alt.
-
Примечание: Если два первых шага не вернули все ожидаемые записи, обновите конфигурацию DNS, добавив недостающие записи.
Если в среде IPA используется встроенный DNS-сервер:
# ipa dns-update-system-records
Если в среде IPA не используется встроенный DNS-сервер. На сервере FreeIPA экспортировать записи DNS в файл:
# ipa dns-update-system-records --dry-run --out dns_records_file.nsupdate
Отправить запрос на обновление DNS на DNS-сервер с помощью утилиты nsupdate и файла dns_records_file.nsupdate.
На сервере AD
- На сервере AD запустить утилиту nslookup.exe для поиска служебных записей:
-
C:>nslookup.exe
> set type=SRV
-
- Введите доменное имя для служебных записей Kerberos через UDP и LDAP через TCP:
-
 > _kerberos._udp.example.test
_kerberos._udp.example.test       SRV service location:
    priority                = 0
    weight                  = 100
    port                    = 88
    svr hostname            = ipa.example.test
ipa.example.test internet address = 192.168.0.113
> _ldap._tcp.example.test
_ldap._tcp.example.test       SRV service location:
    priority                = 0
    weight                  = 100
    port                    = 389
    svr hostname            = ipa.example.test
ipa.example.test internet address = 192.168.0.113
-
- Запись отвечающая за имя Kerberos realm IPA домена:
-
C:>nslookup.exe
> set type=TXT
> _kerberos.example.test
_kerberos.example.test        text =

    "EXAMPLE.TEST"
-
Подготовка сервера FreeIPA к доверию
Установить необходимые пакеты:
# apt-get install freeipa-server-trust-ad
Прежде чем устанавливать доверительные отношения с AD, следует подготовить домен FreeIPA с помощью утилиты ipa-adtrust-install.
Сконфигурировать сервер FreeIPA для доверительных отношений с AD:
# ipa-adtrust-install
The log file for this installation can be found in /var/log/ipaserver-adtrust-install.log
==============================================================================
This program will setup components needed to establish trust to AD domains for
the IPA Server.

This includes:
  * Configure Samba
  * Add trust related objects to IPA LDAP server

To accept the default shown in brackets, press the Enter key.

Configuring cross-realm trusts for IPA server requires password for user 'admin'.
This user is a regular system account used for IPA server administration.

admin password:
Записи DNS создаются автоматически, если FreeIPA был установлен с интегрированным DNS-сервером. Если FreeIPA установлен без встроенного DNS-сервера, ipa-adtrust-install выведет список служебных записей, которые нужно вручную добавить в DNS.
Далее скрипт сообщает, что файл /etc/samba/smb.conf уже существует и будет переписан:
WARNING: The smb.conf already exists. Running ipa-adtrust-install will break your existing samba configuration.
Do you wish to continue? [no]: yes
Скрипт спросит необходимо ли конфигурировать slapi-nis плагин для поддержки работы старых клиентов (SSSD < 1.9) с пользователем из доверенного домена:
Do you want to enable support for trusted domains in Schema Compatibility plugin?
This will allow clients older than SSSD 1.9 and non-Linux clients to work with trusted users.

Enable trusted domains support in slapi-nis? [no]: yes
При появлении запроса NetBIOS введите имя NetBIOS для домена FreeIPA или нажмите Enter, чтобы принять предложенное имя:
Trust is configured but no NetBIOS domain name found, setting it now.
Enter the NetBIOS name for the IPA domain.
Only up to 15 uppercase ASCII letters, digits and dashes are allowed.
Example: EXAMPLE.

NetBIOS domain name [EXAMPLE]:
Далее будет предложено запустить задачу генерации SID, чтобы создать SID для всех существующих пользователей:
Do you want to run the ipa-sidgen task? [no]: yes
Это ресурсоемкая задача, поэтому, если у вас много пользователей, можно запустить ее в другое время.
Done configuring CIFS.
=============================================================================
Setup complete

You must make sure these network ports are open:
    TCP Ports:
      * 135: epmap
      * 138: netbios-dgm
      * 139: netbios-ssn
      * 445: microsoft-ds
      * 1024..1300: epmap listener range
      * 3268: msft-gc
    UDP Ports:
      * 138: netbios-dgm
      * 139: netbios-ssn
      * 389: (C)LDAP
      * 445: microsoft-ds

See the ipa-adtrust-install(1) man page for more details
Перезапустить ipa:
# ipactl restart
Restarting Directory Service
Restarting krb5kdc Service
Restarting kadmin Service
Restarting named Service
Restarting httpd Service
Restarting ipa-custodia Service
Restarting pki-tomcatd Service
Restarting smb Service
Restarting winbind Service
Restarting ipa-otpd Service
Restarting ipa-dnskeysyncd Service
ipa: INFO: The ipactl command was successful
Используйте утилиту smbclient, чтобы убедиться, что Samba отвечает на аутентификацию Kerberos со стороны FreeIPA:
# smbclient -L ipa.example.test -k
lpcfg_do_global_parameter: WARNING: The "domain logons" option is deprecated

    Sharename       Type      Comment
    ---------       ----      -------
    IPC$            IPC       IPC Service (Samba 4.14.10)
…
Настройка доверия
Сервер FreeIPA позволяет настроить три типа соглашений о доверии:
- одностороннее доверие — вариант по умолчанию. Одностороннее доверие позволяет пользователям и группам AD получать доступ к ресурсам в FreeIPA, но не наоборот. Домен FreeIPA доверяет лесу AD, но лес AD не доверяет домену FreeIPA;
- двустороннее доверие — позволяет пользователям и группам AD получать доступ к ресурсам в FreeIPA. Обратите внимание, что эта функция двустороннего доверия не позволяет пользователям IdM входить в системы Windows, а двустороннее доверие в IdM не дает пользователям никаких дополнительных прав по сравнению с решением одностороннего доверия в AD. Чтобы создать двустороннее доверие в команду следует добавить параметр —two-way=true;
- внешнее доверие — доверительные отношения между FreeIPA и доменом AD в разных лесах. В то время как доверие леса всегда требует установления доверия между FreeIPA и корневым доменом леса Active Directory, внешнее доверие может быть установлено от FreeIPA к домену в лесу. Рекомендуется только в том случае, если невозможно установить доверие леса между корневыми доменами леса по административным или организационным причинам. Чтобы создать внешнее доверие в команду следует добавить параметр —external=true.
В командной строке
Добавление двунаправленных доверительных отношений леса (Forest Trust) с AD:
# kinit admin
# ipa trust-add --type=ad test.alt --admin Administrator --password --two-way=true
Пароль администратора домена Active Directory:
…
При появлении запроса следует ввести пароль администратора домена Active Directory.
Внимание! Учетная запись пользователя, используемая при создании доверия (аргумент опции
—admin
), должна быть членом группы Domain Admins. Имя учетной записи должно быть на английском языке.
Чтобы увидеть список всех доверенных доменов из леса используйте следующую команду:
# ipa trustdomain-find test.alt
  Имя домена: test.alt
  Имя домена NetBIOS: TEST
  Идентификатор безопасности домена: S-1-5-21-90931260-536030259-1550036695
  Домен включён: True
---------------------------------
Количество возвращённых записей 1
---------------------------------
В веб-интерфейсе
- В веб-интерфейсе перейти на вкладку IPA-сервер.
- Выбрать пункт меню «Отношения доверия»→«Отношения доверия»:
- Нажать кнопку «Добавить».
- В диалоговом окне «Добавить отношение доверия» ввести имя домена Active Directory. В поля «Учетная запись» и «Пароль» указать учетные данные администратора AD:
- (Необязательно) Отметить пункт «Двустороннее отношение доверия», если нужно разрешить пользователям и группам AD доступ к ресурсам в FreeIPA. Однако двустороннее доверие в FreeIPA не дает пользователям никаких дополнительных прав по сравнению с односторонним доверием в AD. Оба решения считаются одинаково безопасными из-за настроек фильтрации SID доверия между лесами по умолчанию.
- (Необязательно) Отметить «Внешнее отношение доверия», если настраивается доверие с доменом AD, который не является корневым доменом леса AD.
- (Необязательно) По умолчанию сценарий установки доверия пытается определить соответствующий тип диапазона идентификаторов. Также можно явно задать тип диапазона идентификаторов.
- Нажать кнопку «Добавить».
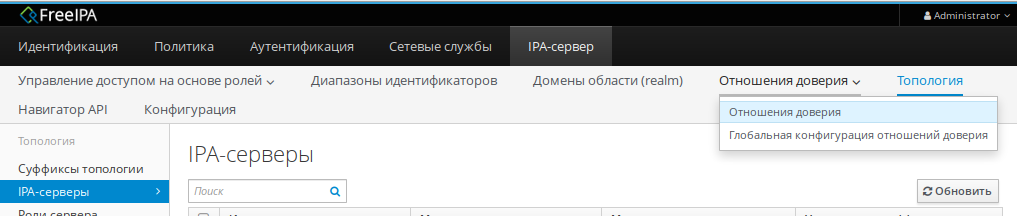
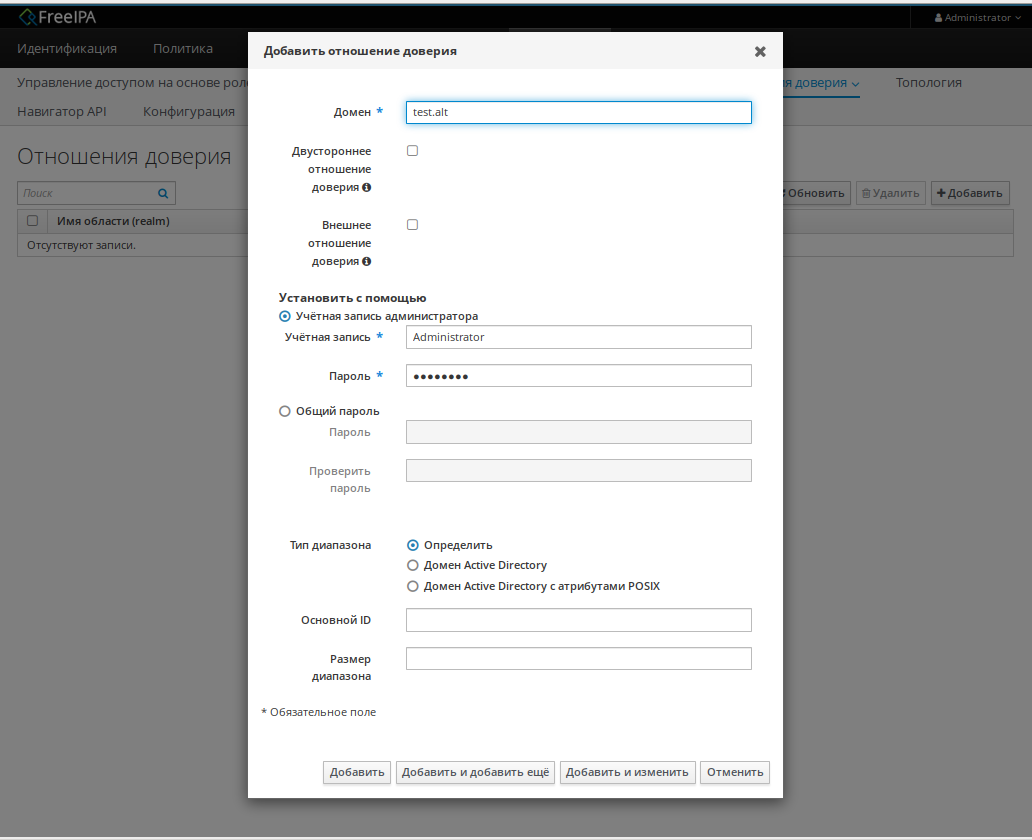
Если доверие было успешно добавлено, сообщение об этом появится во всплывающем окне.
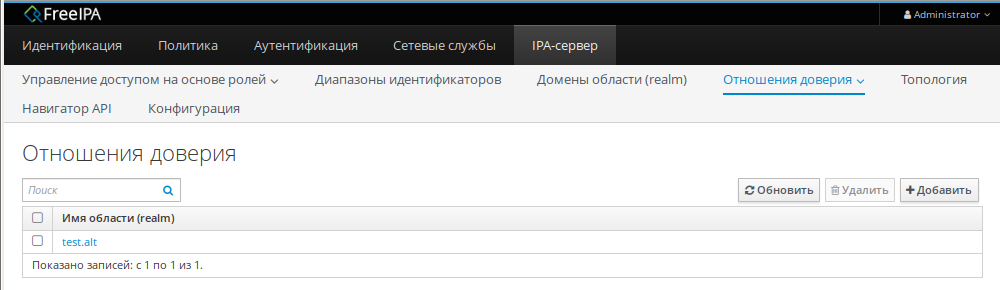
Проверка конфигурации Kerberos
Для проверки конфигурации Kerberos, следует проверить, возможно ли получить билет для пользователя FreeIPA и может ли пользователь FreeIPA запрашивать служебные билеты.
Запросить билет для пользователя AD:
kinit ivanov@test.alt
Password for ivanov@test.alt:
Запросить службу билетов в домене FreeIPA:
# kvno -S host ipa.example.test
host/ipa.example.test@EXAMPLE.TEST: kvno = 2
Если билет службы AD предоставлен, в списке билетов будет отображаться билет на предоставление билетов между областями (TGT) — krbtgt/IPA.DOMAIN@AD.DOMAIN:
klist
Ticket cache: KEYRING:persistent:0:krb_ccache_gyp3KvL
Default principal: ivanov@TEST.ALT

Valid starting       Expires              Service principal
07.02.2022 12:11:13  07.02.2022 22:10:36  host/ipa.example.test@EXAMPLE.TEST
	renew until 07.02.2022 12:12:14
07.02.2022 12:12:14  07.02.2022 22:10:36  krbtgt/EXAMPLE.TEST@TEST.ALT
	renew until 07.02.2022 12:12:14
07.02.2022 12:10:36  07.02.2022 22:10:36  krbtgt/TEST.ALT@TEST.ALT
	renew until 08.02.2022 12:10:32
Проверка конфигурации доверия в FreeIPA
Проверка наличия записей для работы сервисов IPA на DNS-сервере IPA:
- Запись отвечающая за работу сервисов Kerberos через UDP и LDAP через TCP:
-
# dig +short -t SRV _kerberos._udp.dc._msdcs.example.test 0 100 88 ipa.example.test. -
# dig +short -t SRV _ldap._tcp.dc._msdcs.example.test 0 100 389 ipa.example.test. - В выводе этих команд должны быть перечислены все серверы FreeIPA, на которых была выполнена ipa-adtrust-install.
-
- Запись отвечающая за имя Kerberos realm IPA домена:
-
dig +short -t TXT _kerberos.example.test
"EXAMPLE.TEST"
-
Проверка наличия записей для работы сервисов AD на DNS-сервере IPA.
- Запись отвечающая за работу сервисов Kerberos через UDP и LDAP через TCP:
-
# dig +short -t SRV _kerberos._udp.dc._msdcs.test.alt 0 100 88 dc.test.alt. -
# dig +short -t SRV _ldap._tcp.dc._msdcs.test.alt
0 100 389 dc.test.alt.
-
Внимание! Если запись _kerberos._udp.dc._msdcs.test.alt. не доступна проверьте _kerberos._tcp.dc._msdcs.test.alt.
Проверка конфигурации доверия в AD
Примечание: Необходимо войти в систему с правами администратора.
- После выполнения команды ipa-adtrust-install должны появится записи отвечающие за работу сервисов MS DC Kerberos через UDP и LDAP через TCP:
-
 C:>nslookup.exe
> set type=SRV
> _kerberos._udp.dc._msdcs.example.test.
_kerberos._udp.dc._msdcs.example.test        SRV service location:
    priority = 0
    weight = 100
    port = 88
    svr hostname = ipa.example.test
> _ldap._tcp.dc._msdcs.example.test.
_ldap._tcp.dc._msdcs.example.test        SRV service location:
    priority = 0
    weight = 100
    port = 389
    svr hostname = ipa.example.test
ipa.example.test internet address = 192.168.0.113
-
- Проверить наличие записей для работы сервисов AD на DNS-сервере AD. Запись отвечающая за работу сервисов Kerberos через UDP и LDAP через TCP:
-
 C:>nslookup.exe
> set type=SRV
> _kerberos._udp.dc._msdcs.test.alt.
_kerberos._udp.dc._msdcs.test.alt.    SRV service location:
    priority = 0
    weight = 100
    port = 88
    svr hostname = dc1.test.alt.
dc1.domc.testc internet address = 192.168.0.122
> _ldap._tcp.dc._msdcs.test.alt.
_ldap._tcp.dc._msdcs.test.alt.    SRV service location:
    priority = 0
    weight = 100
    port = 389
    svr hostname = dc1.dtest.alt.
dc1.domc.testc internet address = 192.168.0.122
-
Проверка пользователей доверенного домена
Провериnm имеет ли доступ к пользователям из доверенного домена рабочие станции IPA.
На рабочей станции IPA выполнить команду:
# getent passwd ivanov@test.alt
ivanov@test.alt:*:348001105:348001105:Иван Иванов:/home/test.alt/ivanov:
Где ivanov это пользователь из AD домена. Назначить оболочку входа для пользователей из доверенного домена можно добавив на сервере IPA в файл /etc/sssd/sssd.conf следующую строчку:
[domain/example.test]
...
default_shell = /bin/bash
...
Вывод команды должен стать таким:
# systemctl restart sssd
# getent passwd ivanov@test.alt
ivanov@test.alt:*:348001105:348001105:Иван Иванов:/home/test.alt/ivanov:/bin/bash
Удаление доверия
В этом разделе описывается, как удалить доверие FreeIPA/AD на стороне FreeIPA.
В командной строке
- Удалить конфигурацию доверия из FreeIPA:
- Удалить объект доверия из конфигурации Active Directory.
- Проверка удаления доверия:
-
# ipa trust-show test.alt
ipa: ERROR: test.alt: отношение доверия не найден
-
В веб-интерфейсе
- В веб-интерфейсе перейти на вкладку IPA-сервер.
- Выбрать пункт меню «Отношения доверия»→«Отношения доверия».
- Выбрать объект доверия, которое требуется удалить.
- Нажать кнопку «Удалить»:
- В диалоговом окне «Удалить отношения доверия» нажать кнопку «Удалить»:
- Удалить объект доверия из конфигурации Active Directory.

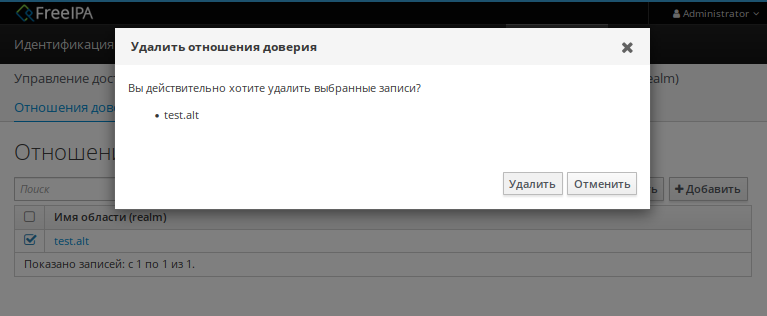
Если доверие было успешно удалено, сообщение об этом появится во всплывающем окне.
To solve the problem, you can integrate Linux clients directly into an Active Directory domain and manage them from a domain controller. The second option is integration based on data synchronization or domain trust (AD trust). In this case, user accounts with previously defined attributes are replicated to another directory service and made available to Linux clients.
Rent dedicated and virtual servers with instant deployment in reliable TIER III class data centers in the Netherlands and the USA. Free protection against DDoS attacks included, and your server will be ready for work in as little as 15 minutes. 24/7 Customer Support.
The disadvantages of AD trust
Although considerable developer resources are spent on AD trust, this solution has significant disadvantages and is only really suitable for companies whose infrastructure was originally based on Active Directory. We had been working with FreeIPA, so the implementation would require a lot of work: in fact our whole system for managing our user accounts would have to be remade from scratch.
The second disadvantage is the need for constant support for servers with AD and FreeIPA because if the connection between them fails, the server with FreeIPA becomes useless and the work of the whole company would then be disrupted. Authorization is a sensitive area which must be as fault-tolerant as possible. AD trust in this case is an additional risk of failure.
The pros and cons of Windows sync
The option with the Windows sync mechanism from FreeIPA assumes a complete synchronization of all credentials via LDAP protocol. At the same time, FreeIPA and Active Directory remain standalone solutions, and if any server is damaged, only the services connected to it will fail, not the whole infrastructure. The user works through a single window with FreeIPA. That means, for example, that it is possible to change the password of an account simultaneously for both Windows-based and Linux-based infrastructure.
We settled on this option, but we decided to refine it because Windows sync is not designed for group management.
Unfortunately, the Windows sync mechanism in FreeIPA is not prioritized and is not well developed, especially when it comes to group management. We needed groups in order to organize our staff structure by department, or in any other order. This approach allows rules and policies to be written for each group, rather than per individual user, which greatly simplifies account and data access management, as well as software delivery. Another advantage of groups is that they can be nested.
For example, our DEVOPS department structure consists of the following subgroups, each of which has defined sets of rights and policies, as well as the services they need to work:

We add the created employee account to a certain subgroup, e.g. junior engineers. As a result, the new user ends up in a whole set of groups: Rocket.Chat users, Jira users, etc. He or she automatically gets access to all the services prescribed for the subgroup. It would not be hard to build this scheme by creating fully analogous groups in FreeIPA and AD, but you would have to administer them manually. The disadvantages are obvious: a lot of time will be wasted on routine tasks, and (and this is the most important thing) there will be potential threats to infrastructure security. For example, a simple change of access rights can lead to disruptions in the production process as a result of manual configuration errors.
The solution
We needed automatic synchronization, which we had to implement ourselves based on module manage-freeipa. As a result, we wrote a script which gathers information about the groups in FreeIPA, including nested subgroups, and transfers it to AD. Here is a step-by-step description of the algorithm:
1. Import the manage-freeipa module.
2. After importing the module, we connected to the server using the previously added credentials:
$IPAURL = "freeipa_URL"
$IPAUSER = "USER"
$IPAPASS = "PASSWORD"
$ADOUUSERS = "*OU=users,OU=ipa,DC=win,DC=EXAMPLE,DC=COM"
$ADOUGROUPS = "*OU=groups,OU=ipa,DC=win,DC=EXAMPLE,DC=COM"
3. Then in AD we request a list of OU groups:
$OU = Get-ADOrganizationalUnit -SearchBase "OU=groups,OU=ipa,DC=win,DC=EXAMPLE,DC=COM" -Filter *4. Filter the trust admins group, which I not included in the data synchronization between FreeIPA and AD:
$groupsAD = $OU | ForEach-Object {Get-ADGroup -SearchBase $_.DistinguishedName -Filter *} | Where {$_.name -notlike "trust admins"}5. We get a list of all groups in FreeIPA, except for trust admins and groups that are used exclusively in the FreeIPA managed infrastructure. The selection is based on the cn field only:
$groupsIPA = Find-IPAGroup | Where {$_.dn -notlike "cn=invapi*" -and $_.dn -notlike "cn=jira*" -and $_.dn -notlike "cn=trust admins*"} | Select-Object -Property cn6. There are a number of groups that are only in AD, we look for them and remove them from the general list:
$groupsOnlyAD = $groupsAD.name | ?{$groupsIPA.cn -notcontains $_}
$listGroupsAD = $groupsAD.Name | ?{$groupsOnlyAD -notcontains $_}
7. Take the list from FreeIPA and remove all the groups that are in AD. This leaves only the list of new groups that are in FreeIPA but not in AD:
$listAddGroups = $groupsIPA.cn | ?{$groupsAD.Name -notcontains $_}8. Next comes the command to add these groups to AD:
$listAddGroups | ForEach-Object {New-ADGroup $_ -path 'OU=groups,OU=ipa,DC=win,DC=EXAMPLE,DC=COM' -GroupScope Global -PassThru -Verbose}
9. Then there is a cycle of operations for each AD group that is in the $ListGroupsAD list.
9.1. We get a user list – group members in AD:
$listGroupsAD |
ForEach { $Groupname = $_
$listGroupMembersUsersAD = Get-ADGroupMember $Groupname | Where {$_.distinguishedName -like $ADOUUSERS} | select SamAccountName
9.2. We get a list of subgroups of group members in AD:
$listGroupMembersGroupsAD = Get-ADGroupMember $Groupname | Where {$_.distinguishedName -like $ADOUGROUPS} | select SamAccountName9.3. We get the list of the users in this group in FreeIPA:
$listGroupMemberUserIPA = Invoke-FreeIPAAPIgroup_show -group_name $Groupname | Select-Object -Property member_user9.4. We get the list of subgroups in this group in FreeIPA:
$listGroupMemberGroupIPA = Invoke-FreeIPAAPIgroup_show -group_name $Groupname | Select-Object -Property member_group9.5 The lists of subgroups and users in FreeIPA and AD are compared (the list of FreeIPA users is subtracted from the list of AD users and vice versa). Lists of users and subgroups to be added or removed are created:
$delListMembers = $listGroupMembersUsersAD.SamAccountName | ?{$listGroupMemberUserIPA.member_user -notcontains $_}
$delListGroups = $listGroupMembersGroupsAD.SamAccountName | ?{$listGroupMemberGroupIPA.member_group -notcontains $_}
$addListMembers = $listGroupMemberUserIPA.member_user| ?{$listGroupMembersUsersAD.SamAccountName -notcontains $_}
$addListGroups = $listGroupMemberGroupIPA.member_group | ?{$listGroupMembersGroupsAD.SamAccountName -notcontains $_}
9.6 The next step is to check if there is someone on the list of users and subgroups to remove: if there is no one, the next step is skipped:
if (! ([string]::isnullorempty($delListMembers)))
{
$delListMembers | ForEach-Object {Remove-ADGroupMember $Groupname $_ -Confirm:$false}
}
if (! ([string]::isnullorempty($delListGroups)))
{
$delListGroups | ForEach-Object {Remove-ADGroupMember $Groupname $_ -Confirm:$false}
}
9.7 The same check is done for adding users and subgroups:
if (! ([string]::isnullorempty($addListGroups))){
$addListGroups | ForEach-Object { Add-AdGroupMember -Identity $Groupname -members $_ }
}
if (! ([string]::isnullorempty($addListMembers)))
{
9.8 Before adding a user to a group in AD, you must verify that the user is in AD. The entire cycle of step 9 is performed for each group in the $listGroupsAD list obtained in step 6. When the session is complete, it disconnects from the FreeIPA server:
$addListMembers |
ForEach-Object { try
{
Get-ADUser -Identity $_
Add-AdGroupMember -Identity $Groupname -members $_
}
catch {}
}
}
}
Disconnect-IPA
The script is run by the job scheduler every 15 minutes.
Conclusions
The script has greatly simplified user account management and new employee onboarding, as well as improved the overall security of HOSTKEY’s internal IT infrastructure. Next, we plan to configure FreeIPA integration with Active Directory directly through our API without module manage-freeipa. This will have to be done for security reasons anyway because the last time the module was updated was two years ago and there is a risk that support will be discontinued by the developers.
Rent dedicated and virtual servers with instant deployment in reliable TIER III class data centers in the Netherlands and the USA. Free protection against DDoS attacks included, and your server will be ready for work in as little as 15 minutes. 24/7 Customer Support.
Hello everybody, in this post we go to explication the process of how do trust relationships between Windows AD and Linux with FreeIPA
For their we to learn how to has the installation of packet software of FreeIPA in a operative system Centos for to trust with a domain of Windows Active Directory and to do a trust relationship between the two domains.
I hope that my control of english is good for that the documentation is correct, well let’s start with the documentation.
To get started we do the next steps in the server linux in the to make the trust relationship with the windows (We must have the Windows Active Directory started and configured).
The next image is the scenary that we go to work.

-
-
- node-1.linux.example.com: 10.45.10.101
- server1.example.com: 10.45.10.103
-
Prepare stage
To get started we go to enable the direction IPv6 and to apply the changes, also of disable selinux (The recomended is define a rules of SELinux once that all is installed fo a best security, but in this post isn’t contemplate that configuration) for do the test and installation of packet nano for to edit the files with nano.
yum update -y && yum install -y nanoyum update -y && yum install -y nano
nano /etc/selinux/config
SELINUX=disabled
nano /etc/default/grub
GRUB_CMDLINE_LINUX="no_timer_check console=tty0 console=ttyS0,115200n8 net.ifnames=0 ipv6.disable=0 biosdevname=0 elevator=noop crashkernel=auto"
grub2-mkconfig -o /boot/grub2/grub.cfg
shutdown -r now
Installation of packages and configuration of domain
When already to apply the previous changes, we go to install the packages that it are need for the configuration of FreeIPA.
yum update -y
yum install -y "*ipa-server" "*ipa-server-trust-ad" bind bind-dyndb-ldap ipa-server-dns
After, we edit the file hosts, hostname and resolv.conf for to indicate the host of windows for that can to connect with that server.
nano /etc/hosts
10.45.10.101        node-1.linux.example.com         node-1
10.45.10.103        server1.example.com              server1
nano /etc/hostname
  node-1.linux.example.com
hostnamectl
nano /etc/resolv.conf
  nameserver    10.45.10.103
  #nameserver   10.0.2.3
When already to finish of edited the files previous, start to create the domain with the parameters of configuration for that is correctly the create of domain of AD.
ipa-server-install -a asd.1234 -p asd.1234 --domain=linux.example.com --realm=LINUX.EXAMPLE.COM --setup-dns --no-forwarders -U
The option -a and -p are the password defined for administrator, the option –domain is defining the name of domain, the option –realm is defining the realm name for kerberos, the option –setup-dns is for the server DNS was started and was configured and for last the option –no-forwarders is for that not define the server forwarder.
Then to create the Realm name for this server.
ipa-adtrust-install --netbios-name=LINUX -a asd.1234
The option –netbios-name is for indicate the name of netbios that this server have to assing and the option -a indicate the password of admin for that can to apply the changes
Once that is configured, we request the ticket to kerberos with the admin user and to check how this user exist in the server and we can used.
# kinit admin
    Password for admin@LINUX.EXAMPLE.COM:
# getent passwd admin
    admin:*:1028400000:1028400000:Administrator:/home/admin:/bin/bash
Immediately we change the server DNS for to do request to DNS of server of windows and after we create the registry of forwarder manually with the command ipa dnsforwardzone-add (In this command we indicate the direction ip of windows server).
nano /etc/resolv.conf
   nameserver         10.45.10.103
   #nameserver      127.0.0.1
ipa dnsforwardzone-add example.com --forwarder=10.45.10.103 --forward-policy=only
Configured DNS of Windows Server 2012
When were indicated the DNS forwarder in linux, we go indicate the next changes in the server of windows for to modify the DNS registry and that to indicate the server of linux (This changes are indicated with commands in the powershell and the direction ip is of node-1 that is the linux server).
dnscmd   127.0.0.1   /RecordAdd   example.com        node-1.linux.example.com  A        10.45.10.101
dnscmd   127.0.0.1   /RecordAdd   example.com        linux.example.com.        NS       node-1.linux.example.com
dnscmd   127.0.0.1   /ZoneAdd     linux.example.com. /Forwarder                10.45.10.101
Configuration of netbios and check in DNS registry
Immediately we come back to declare the name of netbios for so to confirm that the changes in the registry DNS of windows are correct.
ipa-adtrust-install --netbios-name=LINUX -a asd.1234
After we come back to request the ticket of kerberos and to add the next registry in DNS.
[root@node-1]# kinit admin
  Password for admin@LINUX.EXAMPLE.COM:
ipa dnsforwardzone-add example.com --forwarder=10.45.10.103 --forward-policy=only
We check the request of DNS in both of them servers.
Windows nslookup
PS C:UsersAdministrador.SERVER1> nslookup
DNS request timed out.
timeout was 2 seconds.
Servidor predeterminado: UnKnown
Address: ::1

> set type=srv
> _ldap._tcp.example.com
Servidor: UnKnown
Address: ::1

_ldap._tcp.example.com SRV service location:
priority = 0
weight = 100
port = 389
svr hostname = server1.example.com
server1.example.com internet address = 10.45.10.103
> _ldap._tcp.linux.example.com
Servidor: UnKnown
Address: ::1

Respuesta no autoritativa:
_ldap._tcp.linux.example.com SRV service location:
priority = 0
weight = 100
port = 389
svr hostname = node-1.linux.example.com

node-1.linux.example.com internet address = 10.45.10.101
> _kerberos._tcp.example.com
Servidor: UnKnown
Address: ::1

_kerberos._tcp.example.com SRV service location:
priority = 0
weight = 100
port = 88
svr hostname = server1.example.com
server1.example.com internet address = 10.45.10.103
> _kerberos._tcp.linux.example.com
Servidor: UnKnown
Address: ::1

Respuesta no autoritativa:
_kerberos._tcp.linux.example.com SRV service location:
priority = 0
weight = 100
port = 88
svr hostname = node-1.linux.example.com

node-1.linux.example.com internet address = 10.45.10.101
> quit
Linux Dig
[root@node-1]# dig SRV _ldap._tcp.linux.example.com
; <<>> DiG 9.9.4-RedHat-9.9.4-73.el7_6 <<>> SRV _ldap._tcp.linux.example.com
;; global options: +cmd
;; Got answer:
;; ->>HEADER<<- opcode: QUERY, status: NOERROR, id: 14544
;; flags: qr rd ra; QUERY: 1, ANSWER: 1, AUTHORITY: 0, ADDITIONAL: 2

;; OPT PSEUDOSECTION:
; EDNS: version: 0, flags:; udp: 4000
;; QUESTION SECTION:
;_ldap._tcp.linux.example.com. IN SRV

;; ANSWER SECTION:
_ldap._tcp.linux.example.com. 73134 IN SRV 0 100 389 node-1.linux.example.com.

;; ADDITIONAL SECTION:
node-1.linux.example.com. 973 IN A 10.45.10.101

;; Query time: 1 msec
;; SERVER: 10.45.10.103#53(10.45.10.103)
;; WHEN: jue may 23 11:59:22 UTC 2019
;; MSG SIZE rcvd: 117


[root@node-1]# dig SRV _ldap._tcp.example.com
; <<>> DiG 9.9.4-RedHat-9.9.4-73.el7_6 <<>> SRV _ldap._tcp.example.com
;; global options: +cmd
;; Got answer:
;; ->>HEADER<<- opcode: QUERY, status: NOERROR, id: 47045
;; flags: qr aa rd ra; QUERY: 1, ANSWER: 1, AUTHORITY: 0, ADDITIONAL: 2

;; OPT PSEUDOSECTION:
; EDNS: version: 0, flags:; udp: 4000
;; QUESTION SECTION:
;_ldap._tcp.example.com. IN SRV

;; ANSWER SECTION:
_ldap._tcp.example.com. 600 IN SRV 0 100 389 server1.example.com.

;; ADDITIONAL SECTION:
server1.example.com. 3600 IN A 10.45.10.103

;; Query time: 1 msec
;; SERVER: 10.45.10.103#53(10.45.10.103)
;; WHEN: jue may 23 11:59:55 UTC 2019
;; MSG SIZE rcvd: 106


[root@node-1]# dig SRV _kerberos._tcp.linux.example.com
; <<>> DiG 9.9.4-RedHat-9.9.4-73.el7_6 <<>> SRV _kerberos._tcp.linux.example.com
;; global options: +cmd
;; Got answer:
;; ->>HEADER<<- opcode: QUERY, status: NOERROR, id: 43053
;; flags: qr rd ra; QUERY: 1, ANSWER: 1, AUTHORITY: 0, ADDITIONAL: 2

;; OPT PSEUDOSECTION:
; EDNS: version: 0, flags:; udp: 4000
;; QUESTION SECTION:
;_kerberos._tcp.linux.example.com. IN SRV

;; ANSWER SECTION:
_kerberos._tcp.linux.example.com. 86150 IN SRV 0 100 88 node-1.linux.example.com.

;; ADDITIONAL SECTION:
node-1.linux.example.com. 899 IN A 10.45.10.101

;; Query time: 1 msec
;; SERVER: 10.45.10.103#53(10.45.10.103)
;; WHEN: jue may 23 12:00:35 UTC 2019
;; MSG SIZE rcvd: 121


[root@node-1]# dig SRV _kerberos._tcp.example.com
; <<>> DiG 9.9.4-RedHat-9.9.4-73.el7_6 <<>> SRV _kerberos._tcp.example.com
;; global options: +cmd
;; Got answer:
;; ->>HEADER<<- opcode: QUERY, status: NOERROR, id: 31164
;; flags: qr aa rd ra; QUERY: 1, ANSWER: 1, AUTHORITY: 0, ADDITIONAL: 2

;; OPT PSEUDOSECTION:
; EDNS: version: 0, flags:; udp: 4000
;; QUESTION SECTION:
;_kerberos._tcp.example.com. IN SRV

;; ANSWER SECTION:
_kerberos._tcp.example.com. 600 IN SRV 0 100 88 server1.example.com.

;; ADDITIONAL SECTION:
server1.example.com. 3600 IN A 10.45.10.103

;; Query time: 1 msec
;; SERVER: 10.45.10.103#53(10.45.10.103)
;; WHEN: jue may 23 12:10:59 UTC 2019
;; MSG SIZE rcvd: 110
Create Trust Relationship between the two nodes
For to do the trust relationship we have that request the ticket of kerberos for then enter command of ipa and to make this trust relationship.
[root@node-1]# kinit admin
Password for admin@LINUX.EXAMPLE.COM:
ipa trust-add --type=ad example.com --admin Administrador --password
The user that we have to indicate is the administration user of active directory of windows and your password.
Check login with a user from server
For to check the connection between the nodes we go to install the package of freeipa-client for that be possible the connection remote.
yum install freeipa-client
When the package is installed enter the next command that it permit to create the directory for user.
ipa-client-install --mkhomedir
Then edit the configuration file of kerberos for indicate the next lines for the auth local.
nano /etc/krb5.conf
[realms]
IPA_DOMAIN = {
....
auth_to_local = RULE:[1:$1@$0](^.*@EXAMPLE.COM$)s/@EXAMPLE.COM/@example.com/
auth_to_local = DEFAULT
}
After restart the services for to apply the changes.
service krb5kdc restart
service sssd restart
The last step to do is to create external group mapped to posix freeipa group: it permit to give to right grant to external group.
Following the active directory domain admin group is mapped to ad_admins group that belongs to admins user. In this case every domain admin windows has the some grant of admin freeipa.
ipa group-add --desc='ad_domain admins external map' ad_admins_external --external
ipa group-add --desc='ad_domain admins' ad_admins
ipa group-add-member ad_admins_external --external 'EXAMPLE.COMDomain Admins'
ipa group-add-member ad_admins --groups ad_admins_external
ipa group-add-member admins --groups ad_admins
When already we have the group of administrator maked, we request a ticket to kerberos for that we can login and after we connect through of ssh.
[root@node-1]# kinit administrador@example.com
Password for administrador@example.com:
[root@node-1]# ssh -l Administrador@example.com node-1.linux.example.com
Password:
Could not chdir to home directory /home/example.com/administrador: No such file or directory
-sh-4.2$ id
uid=125400500(administrador@example.com) gid=125400500(administrador@example.com) groups=125400500(administrador@example.com),125400512(admins. del dominio@example.com),125400513(usuarios del dominio@example.com),125400518(administradores de esquema@example.com),125400519(administradores de empresas@example.com),125400520(propietarios del creador de directivas de grupo@example.com)
-sh-4.2$
Connection from client
For to connect the client linux (in our case is a Centos 7) with our server linux with ipa, we have that install the package of client of freeipa and modify the next parameters that is describe to continuation.
yum update && yum -y install freeipa-client nano
We modify the file hosts for to indicate the host of server, also of modify the file resolv.conf for indicate the server DNS that in our case is the node-1.
nano /etc/hosts
10.45.10.101     node-1.linux.example.com     node-1
10.45.10.102     node-2.linux.example.com     node-2
nano /etc/resolv.conf
# Generated by NetworkManager
nameserver     10.45.10.101
Once change the files previous, we go to configure the files of kerberos, nsswitch and SSSD for connect with the server.
nano /etc/sssd/sssd.conf

[domain/linux.example.com]
override_shell = /bin/bash
homedir_substring = /home
cache_credentials = True
krb5_store_password_if_offline = True
ipa_domain = linux.example.com
id_provider = ipa
auth_provider = ipa
access_provider = ipa
ipa_hostname = node-2.linux.example.com
chpass_provider = ipa
dyndns_update = True
ipa_server = _srv_, node-1.linux.example.com
dyndns_iface = enp0s3
ldap_tls_cacert = /etc/ipa/ca.crt
sudo_provider = ldap
ldap_uri = ldap://node-1.linux.example.com
ldap_sudo_search_base = ou=sudoers,dc=lx,dc=owaas,dc=com
ldap_sasl_mech = GSSAPI
ldap_sasl_authid = host/node-2.linux.example.com
ldap_sasl_realm = LINUX.EXAMPLE.COM
krb5_server = node-1.linux.example.com

[sssd]
services = nss, sudo, pam, ssh, pac
config_file_version = 2
domains = linux.example.com

[nss]
homedir_substring = /home
nano /etc/krb5.conf

# Configuration snippets may be placed in this directory as well
includedir /etc/krb5.conf.d/

[logging]
default = FILE:/var/log/krb5libs.log
kdc = FILE:/var/log/krb5kdc.log
admin_server = FILE:/var/log/kadmind.log

[libdefaults]
dns_lookup_realm = true
dns_lookup_kdc = true
ticket_lifetime = 24h
renew_lifetime = 7d
forwardable = true
rdns = false
pkinit_anchors = /etc/pki/tls/certs/ca-bundle.crt
default_realm = LINUX.EXAMPLE.COM
default_ccache_name = KEYRING:persistent:%{uid}

[realms]
LINUX.EXAMPLE.COM = {
kdc = node-1.linux.example.com:88
master_kdc = node-1.linux.example.com:88
admin_server = node-1.linux.example.com:749
kpasswd_server = node-1.linux.example.com:464
default_domain = linux.example.com
pkinit_anchors = FILE:/var/lib/ipa-client/pki/kdc-ca-bundle.pem
pkinit_pool = FILE:/var/lib/ipa-client/pki/ca-bundle.pem
auth_to_local = RULE:[1:$1@$0](^.*@LINUX.EXAMPLE.COM)s/@LINUX.EXAMPLE.COM/@linux.example.com/
}

EXAMPLE.COM = {
kdc = server1.example.com
master_kdc = server1.example.com
admin_server = server1.example.com
kpasswd_server = server1.example.com
default_domain = example.com
pkinit_anchors = FILE:/var/lib/ipa-client/pki/kdc-ca-bundle.pem
pkinit_pool = FILE:/var/lib/ipa-client/pki/ca-bundle.pem
auth_to_local = RULE:[1:$1@$0](^.*@EXAMPLE.COM)s/@EXAMPLE.COM/@example.com/
}

[domain_realm]
.linux.example.com = LINUX.EXAMPLE.COM
linux.example.com = LINUX.EXAMPLE.COM
.example.com = EXAMPLE.COM
example.com = EXAMPLE.COM
nano /etc/nsswitch.conf
sudoers: files sss
When already modify the files of configuration, we introduce the next command for to generate the configuration of connection with the server.
ipa-client-install --hostname=node-2.linux.example.com --server=node-1.linux.example.com --domain=linux.example.com --realm=LINUX.EXAMPLE.COM --enable-dns-updates --mkhomedir
After we go to request to ticket with kerberos and we access through of ssh.
kinit Administrator@LINUX.EXAMPLE.COM
ssh administrador@node-1.linux.example.com
Creation of users through of IPA
If we want do creation of users for the linux server and so we can login with they, we have that to use the IPA software and introduce the next command.
[root@node-1]# ipa user-add
Nombre: kiki
Apellido: lopez
Ingreso de usuario [klopez]: kiki
----------------------------------
Ha sido agregado el usuario "kiki"
----------------------------------
Ingreso de usuario: kiki
Nombre: kiki
Apellido: lopez
Nombre y apellidos: kiki lopez
Mostrar nombre: kiki lopez
Iniciales: kl
Directorio principal: /home/kiki
GECOS: kiki lopez
Shell de ingreso: /bin/sh
Nombre principal: kiki@LINUX.EXAMPLE.COM
Principal alias: kiki@LINUX.EXAMPLE.COM
Dirección de correo electrónico: kiki@linux.example.com
UID: 739800005
GID: 739800005
Contraseña: False
Miembros de los grupos: ipausers
Claves Kerberos disponibles: False
When already were created the user, we can search this user with the next command.
[root@node-1]# ipa user-find --all
-----------------------
2 usuarios coincidentes
-----------------------
dn: uid=admin,cn=users,cn=accounts,dc=linux,dc=example,dc=com
Ingreso de usuario: admin
Apellido: Administrator
Nombre y apellidos: Administrator
Directorio principal: /home/admin
GECOS: Administrator
Shell de ingreso: /bin/bash
Principal alias: admin@LINUX.EXAMPLE.COM
User password expiration: 20190820095407Z
UID: 739800000
GID: 739800000
Cuenta inhabilitada : False
Preserved user: False
Miembros de los grupos: admins, trust admins
ipantsecurityidentifier: S-1-5-21-279540569-3104714431-3835305791-500
ipauniqueid: f107fd58-7c76-11e9-a3a9-525400261060
krbextradata: AAI/HOVccm9vdC9hZG1pbkBMSU5VWC5FWEFNUExFLkNPTQA=
krblastfailedauth: 20190522110226Z
krblastpwdchange: 20190522095407Z
krbloginfailedcount: 0
objectclass: top, person, posixaccount, krbprincipalaux, krbticketpolicyaux, inetuser, ipaobject, ipasshuser, ipaSshGroupOfPubKeys,
ipaNTUserAttrs

dn: uid=kiki,cn=users,cn=accounts,dc=linux,dc=example,dc=com
Ingreso de usuario: kiki
Nombre: kiki
Apellido: lopez
Nombre y apellidos: kiki lopez
Mostrar nombre: kiki lopez
Iniciales: kl
Directorio principal: /home/kiki
GECOS: kiki lopez
Shell de ingreso: /bin/sh
Nombre principal: kiki@LINUX.EXAMPLE.COM
Principal alias: kiki@LINUX.EXAMPLE.COM
Dirección de correo electrónico: kiki@linux.example.com
UID: 739800005
GID: 739800005
Cuenta inhabilitada : False
Preserved user: False
Miembros de los grupos: ipausers
ipantsecurityidentifier: S-1-5-21-279540569-3104714431-3835305791-1005
ipauniqueid: 86d8b2c0-7c8e-11e9-9b40-525400261060
mepmanagedentry: cn=kiki,cn=groups,cn=accounts,dc=linux,dc=example,dc=com
objectclass: top, person, organizationalperson, inetorgperson, inetuser, posixaccount, krbprincipalaux, krbticketpolicyaux, ipaobject,
ipasshuser, ipaSshGroupOfPubKeys, mepOriginEntry, ipantuserattrs
--------------------------------
Cantidad de entradas devueltas 2
--------------------------------
But when we create the user is not defined a password, so that we can not to do login with this user, so that we go to assign a password to this user.
[root@node-1]# ipa user-mod kiki --password
Contraseña:
Ingrese Contraseña nuevamente para verificar:
------------------------------------
Ha sido modificado el usuario "kiki"
------------------------------------
Ingreso de usuario: kiki
Nombre: kiki
Apellido: lopez
Directorio principal: /home/kiki
Shell de ingreso: /bin/sh
Nombre principal: kiki@LINUX.EXAMPLE.COM
Principal alias: kiki@LINUX.EXAMPLE.COM
Dirección de correo electrónico: kiki@linux.example.com
UID: 739800005
GID: 739800005
Cuenta inhabilitada : False
Contraseña: True
Miembros de los grupos: ipausers
Claves Kerberos disponibles: True
Once that we define the password, we go to node-2 that is a client node and we login with that user and we check that with that user can do login correctly.
[root@node-2]# kinit kiki@LINUX.EXAMPLE.COM
Password for kiki@LINUX.EXAMPLE.COM:

[root@node-2]# ssh kiki@node-1.linux.example.com
Last login: Wed May 22 12:41:10 2019 from 10.45.10.102
-sh-4.2$ logout
When already we check that can login correctly, we will have the trust relationship between windows AD and linux configurated correctly.
Исходные настройки
Предполагается, что к началу настройки доверительных отношений выполнены следующие условия:
- Имеется домен Active Directory (AD), с настроенным и работающим контроллером домена:
- С условным названием домена windomain.ad;
- Соответственно, с именем NETBIOS WINDOMAIN;
- Имеется выделенный сервер контроллера домена:
- С условным названием winserver;
- С фиксированным IP-адресом (далее <IP-адрес_контроллера_AD>);
-
Под управленим Windows Server 2008 R2 или другого сервера Windows, поддерживающего роль контроллера домена;
В данном примере использовался английский вариант сервера. Если вы используете русский вариант сервера — не забудьте перевести названия групп AD.
-
Администратор сервера AD имеет имя , и его пароль известен;
Команда ipa trust-add не поддерживает кириллицу в учетной записи администратора AD
Если для администратора домена AD создаётся дополнительная учётная запись, то эта запись не просто должна быть добавлена в группу Domain Admins, а эта группа должна быть выбрана основной, иначе может возникать ошибка доступа CIFS 3221225506.
- Имеется сервер FreeIPA с доменом FreeIPA:
- С условным названием ipadomain.ipa;
- Соответственно, с именем NETBIOS IPADOMAIN;
- Имеется выделенный сервер FreeIPA:
- ;
- С условным названием ipaserver;
- С фиксированным IP-адресом (далее <IP-адрес_сервера_FreeIPA>);
- Администратор сервера FreeIPA имеет имя admin и его пароль известен;
-
Серверы winserver и ipaserver находятся в одной сети, и на всех серверах успешно выполняются команды
ping <IP-адрес_сервера_FreeIPA>
и
ping <IP-адрес_контроллера_AD>
При использовании для серверов AD и FreeIPA виртуальных машин выделить каждой виртуальной машине не менее, чем 2 процессора и 2ГБ оперативной памяти.
Предполагается, что к началу настройки доверительных отношений службы FreeIPA уже установлены и запущены. Если нет, то настройка и запуск выполняются командами:
sudo apt install astra-freeipa-server
sudo astra-freeipa-server -d ipadomain.ipa -o
Перед началом настройки не забудьте убедиться, что часы на компьютерах синхронизированы, и при необходимости, выполните синхронизацию.
Полномочия администратора
Получаем полномочия домена, и, заодно, проверяем работоспособность служб FreeIPA.
kinit admin
id admin
getent passwd admin
На маломощной (виртуальной) машине после её перезагрузки может понадобиться до минуты для полного запуска служб FreeIPA и нормального выполнения вышеуказанных команд.
Включение службы доверительных отношений
После установки службы доверительных отношений чтение конфигурации samba на сервере будет доступно только суперпользователю. Обращения к Samba от имени простых пользователей, выполняемые на сервере, работать не будут.
Включаем службу доверительных отношений во FreeIPA командой
sudo ipa-adtrust-install
На все вопросы ответить «да» («y»), несмотря на то, что по умолчанию там «нет».
администратора домена IPA.
Проверить правильность автоматического определения доменного имени, и нажать Enter.
Еще раз ответить «y».
Настройка и проверка перенаправления DNS
Добавление зоны перенаправления осуществляется командой:
ipa dnsforwardzone-add windomain.ad —forwarder=<IP-адрес_контроллера_AD> —forward-policy=only
Проверки успешного выполнения команды:
Проверка #1, сервер должен быть доступен:
ping -c 3 winserver.windomain.ad
Проверка #2, служба должна быть доступна:
dig SRV _ldap._tcp.ipadomain.ipa
Проверка #3, служба должна быть доступна:
dig SRV _ldap._tcp.windomain.ad
Проверка #4, работоспособность службы samba
Использование ключа -k налагает обязательное условие:
команда должна выполняться из сессии (от имени) пользователя, на которого был полчен билет Kerberos. При этом, как указано выше, обращения к samba от имени непривилегированных пользователей не работают.
Например, если из сессии локального пользователя localadmin получить билет kinit admin@ipadomain.ipa, а потом попробовать выполнить команду smbclient с опцией -k, результатом будет ошибка доступа, так как localadmin не имеет билета Kerberos.
Если команда выполняется от имени пользователя admin@ipadomain.ipa (доменного администратора) — опять будет ошибка, так как пользовватель admin не является суперпользователем.
При этом на других (клиентских) компьютерах привилегии суперпользователя для выполнения обращений к samba не требуются.
Последовательность действия для проверки:
- Получить принципал admin (администратора домена) для суперпользователя;
- Войти в сессию пользователя admin, что позволит использовать принципал admin;
- Выполнить команду с правами суперпользователя, чтобы получить доступ к конфигурации samba.
Последовательность команд для сессии локального администратора (команды должны выполнятся в единой сессии):
sudo login admin
kinit
Последовательность команд для сессии доменного администратора (admin):
sudo kinit
sudo smbclient -k -L ipaserver.ipadomain.ipa
Далее аналогично (из login-сессии локального администратора или из сессии администратора домена с использованием sudo) должна выполняться команда установления доверительных отношений.
Устанавливаем одностороннее доверительное отношение, т.е. одностороннее доверие к Active Directory, при котором:
- Область FreeIPA доверяет лесу доменов Active Directory, используя механизм доверительных отношений между деревьями доменов AD;
- Дерево доменов AD не доверяет области FreeIPA;
- Пользователи дерева доменов AD получают доступ к ресурсам области FreeIPA.
Команда установления доверительных отношений должна выполняться на сервере (сервере-реплике) FreeIPA либо из сессии локального администратора, либо из сессии доменного администратора с использованием sudo (см. выше пример проверки доступа к samba):
ipa trust-add —type=ad <имя_домена_Windows_AD> —admin <имя_администратора_домена_Windows_AD>
в ходе выполнения команды потребуется ввести пароль администратора домена Windows AD.
Получение списка доверенных доменов:
ipa trust-fetch-domains <имя_домена_Windows_AD>
Проверка, домен должен быть найден:
ipa trustdomain-find <имя_домена_Windows_AD>
Добавление групп пользователей
-
Для англоязычного варианта сервера:
ipa group-add —desc=’ad domain external map’ ad_admins_external —external
ipa group-add —desc=’ad domain users’ ad_admins
ipa group-add-member ad_admins_external —external ‘windomain.adDomain Admins’
(на запросы «member_user» и «member_group» просто нажать «ввод»)
ipa group-add-member ad_admins —groups ad_admins_external -
Для русскоязычного варианта сервера:
ipa group-add —desc=’ad domain external map’ ad_admins_external —external
ipa group-add —desc=’ad domain users’ ad_admins
ipa group-add-member ad_admins_external —external ‘windomain.adАдминистраторы домена‘
(на запросы «member_user» и «member_group» просто нажать «ввод»)
ipa group-add-member ad_admins —groups ad_admins_external
Получение идентификатора безопасности пользователей AD
на сервере AD командой из оболочки CMD (но не из оболочки PowerShell!):
c:> wmic useraccount get name,sid
на сервере IPA:
ipa group-show ad_admins_external —raw
Добавление разделяемого каталога
Добавление разделяемого каталога /share_dir, доступного для пользователей AD под именем «share_name»:
sudo mkdir /share_dir
sudo net conf setparm ‘share_name’ ‘comment’ ‘Trust test share’
sudo net conf setparm ‘share_name’ ‘read only’ ‘no’
sudo net conf setparm ‘share_name’ ‘valid users’ «a_sid»
sudo net conf setparm ‘share_name’ ‘path’ ‘/share_dir’
Проверить, что ресурс добавлен, можно командой:
smbclient -k -L ipaserver.ipadomain.ipa
После добавления можно проверить, что ресурс доступен с сервера AD winserver.
Авторизация пользователей AD
После установления доверительных отношений между доменами пользователи AD получают возможность авторизоваться и входить на рабочие станции в домене под управлением FreeIPA, пользуясь своими идентификаторами, присвоенными в домене AD.
При этом, идентификатор пользователя должен быть указан в виде <идентификатор_пользователя_AD>@<имя_домена>, где имя домена должно быть указано строчными буквами, например, winuser@windomain.ad.
С учетом того, что пользователи Windows привыкли к тому, что Windows во многих случаях не различает строчные и заглавные буквы, можно выполнить дополнительные настройки рабочей станции, позволяющие указывать имя домена AD также и заглавными буквами. Для этого на рабочей станции, на которой будет осуществляться авторизация, добавить в файл /etc/krb5.conf в секцию [realms] два параметра:
[realms]
IPADOMAIN.IPA = {
…..
auth_to_local = RULE:[1:$1@$0](^.*@WINDOMAIN.AD$)s/@WINDOMAIN.AD/@windomain.ad/
auth_to_local = DEFAULT
…..
}
Далее, можно будет входить на эту рабочую станцию с указанием идентификатора пользователя в виде <идентификатор_пользователя_AD>@<ИМЯ_ДОМЕНА_AD>,
где <ИМЯ_ДОМЕНА_AD> может быть написано либо строчными, либо заглавными буквами, например, winuser@WINDOMAIN.AD.