На панели задач Windows нажмите кнопку Диспетчер серверов. На начальном экране щелкните Диспетчер серверов.
Как открыть диспетчер серверов в Windows 2019?
Запустить диспетчер серверов из командной строки
- Нажмите «Enter», появится SConfig.
- ServerManager выглядит так:
- Нажмите «Enter», и появится Диспетчер серверов.
Как переустановить диспетчер сервера?
Как переустановить диспетчер серверов и отключить диспетчер серверов при запуске для всех пользователей и пользователя, вошедшего в систему
- Часть 1. Переустановите диспетчер сервера: вам нужно будет запустить PowerShell от имени администратора, как показано ниже.
- Часть 2 — Отключение диспетчера сервера при запуске для пользователя, вошедшего в систему: запустите диспетчер сервера и нажмите «Управление».
Как открыть диспетчер сервера PowerShell?
Нажмите CTRL + ALT + DELETE, нажмите «Пуск» Диспетчер задач, нажмите «Подробнее»> «Файл»> «Выполнить», а затем введите cmd.exe. (Введите Powershell.exe, чтобы открыть командные окна PowerShell.) Или вы можете выйти, а затем снова войти.
Как открыть панель управления из диспетчера сервера?
Панель управления доступом
- Нажмите кнопку Пуск.
- В меню «Пуск» выберите «Все приложения».
- Щелкните Система Windows, а затем щелкните Панель управления.
Как переустановить ServerManager EXE?
Получить диспетчер сервера можно следующим образом:
- Откройте проводник.
- Browse to c:WindowsWinSxSmsil_microsoft-windows-servermanager-shell_31bf3856ad364e35_10. 0.13393. 2156_none_1e17b8faa40737.
- Скопируйте приложение ServerManager.exe.
- Откройте другой браузер на C: WindowsSystem32.
- Вставьте ServerManager.exe в новое место.
Как я могу открыть сервер?
Как подключить компьютер к серверу
- Откройте проводник и выберите этот компьютер.
- Выберите Подключить сетевой диск на панели инструментов.
- Выберите раскрывающееся меню «Диск» и выберите букву, которую нужно назначить серверу.
- Заполните поле Folder IP-адресом или именем хоста сервера, к которому вы хотите получить доступ.
Что умеет менеджер серверов?
Диспетчер серверов позволяет администраторы для управления локальными и удаленными серверами без необходимости физического доступа к серверам или включения подключений по протоколу удаленного рабочего стола. Microsoft представила эту функцию в Windows Server 2008, чтобы дать администраторам возможность устанавливать, настраивать и управлять ролями и функциями сервера.
Как устанавливается новая роль на сервере?
Добавление и удаление ролей и компонентов в Windows Server
- Чтобы открыть Диспетчер серверов, щелкните значок Диспетчер серверов на панели задач или выберите Диспетчер серверов в меню «Пуск».
- Нажмите «Управление» в правом верхнем углу экрана и нажмите «Добавить роли и компоненты», чтобы открыть мастер.
Как запустить диспетчер задач из командной строки?
Вы можете вызвать его, открыв меню «Пуск» (щелкнув значок Windows) и нажав кнопку «Выполнить», или нажав комбинацию клавиш [Windows] + [R]. Введите команду «taskmgr» и нажмите «ОК». чтобы сразу открыть диспетчер задач.
Какая команда управляет режимом сервера?
Запустите сервер из командной строки Windows
- Откройте командную строку Windows. Щелкните Пуск> Программы> Стандартные> Командная строка.
- Измените каталоги на папку RUN вашей установки Service Manager. Например:…
- Введите следующую команду: sm -httpPort: 13080 -httpsPort: 13081. …
- Нажмите Ввод.
Чтобы добавить сервер / клиент для управления с помощью инструмента Server Manager, который можно найти на любом более новом сервере Windows, выполните следующие действия:
- Щелкните правой кнопкой мыши «Все серверы» и выберите «Добавить серверы».
- Введите имя сервера на вкладке «Active Directory» или «DNS», затем нажмите «Найти».
Где находится панель управления в Win 10?
Нажмите Windows + X или щелкните правой кнопкой мыши нижний левый угол, чтобы открыть меню быстрого доступа, а затем выберите в нем Панель управления. Способ 3: перейти в панель управления через панель настроек.
Что такое команда «Выполнить» для панели управления?
Окна-I. Это открывает меню настроек панели чудо-кнопок в правом углу экрана, с, да, панель управления в качестве одной из опций. 3. Windows-R, чтобы открыть окно командной строки и войти в Панель управления.
Не так давно Microsoft выпустила очень интересный инструмент Диспетчер серверов (Remote Server Administration Tools). Данный пакет дал возможность системным администраторам наглядно видеть состояние всех Windows серверов и запущенных на них сервисов.
В интернете существует огромное количество статей про данный инструмент и причина для появления ещё одной, очевидно должна быть не тривиальной. И такая причина есть – это возможность мониторинга и управления серверами с ноутбука или компьютера, которые не входят в один домен с администрируемыми серверами, что может быть очень актуально, например, для приходящего сисадмина.
Установка
Прежде чем переходить к основному вопросу нашей статьи кратко разберём один из вариантов установки.
Для начала нужно скачать с сайта Microsoft соответствующий вашей операционной системе установочный пакет. Для Windows 10 для этого пройдите по следующей ссылке, выберите язык, после чего вам будет доступен список доступных пакетов для выбранного вами языка:

Обратите внимание, здесь вам нужно выбрать тип операционной системы x64 или x86, а также версию установленной ОС Windows. Версию ОС Windows можно узнать, выполнив, например, команду winver в командной строке Windows:
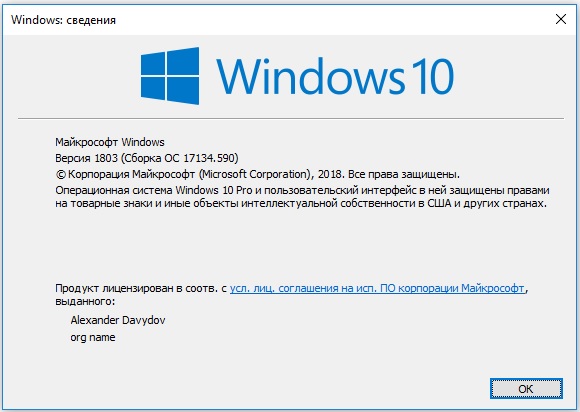
А моём случае это версия 1803, а так как у меня установлена 64-ёх разрядная версия, я буду скачивать установочный пакет WindowsTH-RSAT_WS_1803-x64.msu.
После установки данного пакета открываем папку C:WindowsSystem32 и запускаем приложение ServerManager.exe

При необходимости вы можете создать ярлык для данного приложения на рабочем столе или закрепить его на Панели задач.
Добавление серверов в «Диспетчер серверов»
Для добавления серверов, которым мы хотим управлять открываем Управление -> Добавление серверов.
В открывшемся окне нам нужна вкладка DNS (ну или вы можете создать текстовый файл со списком IP-адресов ваших серверов и воспользоваться вкладкой Импорт). Вводим в строке поиска IP-адрес или имя нашего сервера, жмём лупу и добавляем нужный сервер в список:

После того, как все сервера добавлены в список жмём ОК:

Если серверы находятся в вашем домене и у вас есть права Администратора, то на этом настройку Диспетчера серверов можно заканчивать.
Если же серверы находятся в неродном для вашего ПК домене, придётся выполнить ещё ряд настроек.
Настройка доступа к серверам
Если после добавления серверов на странице «Все серверы» вы видите следующую картину:

То вам необходимо выполнить следующие действия:
- Убедиться, что пользователь, который осуществляет доступ к серверам обладает правами Администратора данных серверов или домена, при необходимости установить в настройках подключения соответствующего пользователя.
- Если ваш ПК и серверы находятся в разных доменах необходимо прописать все управляемы серверы в списке доверенных хостов вашего ПК.
Определяем пользователя
Для того, чтобы определить или изменить пользователя, кликаем правой кнопкой мыши на соответствующем сервере на странице «Все серверы» Диспетчера серверов и выбираем пункт меню «Управлять как…».
В открывшемся окне вводим полное имя пользователя включая домен, например admin@mytestdomen.ru и его пароль.
Добавляем серверы в список доверенных хостов
Для добавления сервера в список доверенных хостов, необходимо открыть командную строку с правами администратора, после чего выполнить в ней следующий запрос:
winrm set winrm/config/client @{TrustedHosts = «10.0.0.10»}
Где 10.0.0.10 – IP-адрес добавляемого сервера, вместо которого можно использовать имя соответствующего сервера, например sr-ad1.mytestdomen.ru
После чего в списке серверов у вас произойдут примерно такие изменения:

Но при попытке добавить следующий сервер, вы столкнётесь с тем, что запись предыдущего сервера будет затираться и активным будет оставаться только последний. Чтобы этого избежать необходимо запустить в командной строке команду, которая добавить в список доверенных хостов все необходимые нам сервера сразу. Для это перечисляем все наши серверы через запятую, примерно так:
winrm set winrm/config/client @{TrustedHosts = «10.0.0.10, 10.0.0.11, 10.0.0.12, 10.0.0.13»}
Если вы всё сделали верно наслаждаемся возможностью управлять серверами со своего рабочего ноутбука.
Надеюсь, данная статья была вам полезна.
| title | description | ms.topic | ms.assetid | ms.author | author | manager | ms.date |
|---|---|---|---|---|---|---|---|
|
Manage the Local Server and the Server Manager Console |
Learn how to manage both the local server and remote servers that are running Windows Server 2008 and newer releases of the Windows Server operating system. |
article |
eeb32f65-d588-4ed5-82ba-1ca37f517139 |
jgerend |
JasonGerend |
mtillman |
10/16/2017 |
Manage the Local Server and the Server Manager Console
Applies to: Windows Server 2022, Windows Server 2019, Windows Server 2016, Windows Server 2012 R2, Windows Server 2012
In Windows Server, Server Manager lets you manage both the local server (if you are running Server Manager on Windows Server, and not on a Windows-based client operating system) and remote servers that are running Windows Server 2008 and newer releases of the Windows Server operating system.
The Local Server page in Server Manager displays server properties, events, service and performance counter data, and Best Practices Analyzer (BPA) results for the local server. Event, service, BPA, and performance tiles function as they do on role and server group pages. For more information about configuring the data that is displayed in these tiles, see View and Configure Performance, Event, and Service Data and Run Best Practices Analyzer Scans and Manage Scan Results.
Menu commands and settings in the Server Manager console heading bars apply globally to all servers in your server pool, and let you use Server Manager to manage the entire server pool.
This topic contains the following sections.
-
Shut down the local server
-
Configure Server Manager properties
-
Manage the Server Manager console
-
Customize tools that are displayed in the Tools menu
-
Manage roles on role home pages
Shut down the local server
The Tasks menu in the local server Properties tile lets you start a Windows PowerShell session on the local server, open the computer Management mmc snap-in, or open mmc snap-ins for roles or features that are installed on the local server. You can also shut down the local server by using the Shut Down Local Server command in this Tasks menu. The Shut Down Local Server command is also available for the local server in the Servers tile on the All Servers page, or on any role or group page in which the local server is represented.
Shutting down the local server by using this method, unlike shutting down Windows Server 2016 from the start screen, opens the Shut Down Windows dialog box, which lets you specify reasons for shutdown in the shutdown Event Tracker area.
[!NOTE]
Only members of the Administrators group can shut down or restart a server. Standard users cannot shut down or restart a server. Clicking the Shut Down Local Server command logs standard users off server sessions. This matches the experience of a standard user running the Alt+F4 shutdown command from the server desktop.
Configure Server Manager properties
You can view or change the following settings in the Properties tile on the Local Server page. To change a setting’s value, click the hypertext value of the setting.
[!NOTE]
Typically, the properties displayed in the Local Server Properties tile can only be changed on the local server. You cannot change the local server properties from a remote computer by using Server Manager because the Properties tile can only get information about the local computer, not remote computers.Because many properties displayed in the Properties tile are controlled by tools that are not part of Server Manager (Control Panel, for example), changes to Properties settings are not always displayed in the Properties tile immediately. By default, data in the Properties tile is refreshed every two minutes. To refresh Properties tile data immediately, click Refresh in the Server Manager address bar.
| Setting | Description |
|---|---|
| computer name | Displays the computer friendly name, and opens the System Properties dialog box, which lets you change the server’s name, domain membership, and other system settings such as user profiles. |
| Domain (or Workgroup, if the server is not joined to a domain) | Displays the domain or workgroup of which the server is a member. Opens the System Properties dialog box, which lets you change the server’s name, domain membership, and other system settings such as user profiles. |
| Windows Firewall | Displays Windows Firewall status for the local server. Opens Control PanelSystem and SecurityWindows Firewall. For more information about configuring Windows Firewall, see Windows Firewall with Advanced Security and IPsec. |
| remote management | Displays Server Manager and Windows PowerShell remote management status. Opens the Configure remote Management dialog box. For more information about remote management, see Configure remote Management in Server Manager. |
| Remote Desktop | Shows whether users can connect to the server remotely by using Remote Desktop sessions. Opens the remote tab of the System Properties dialog box. |
| NIC Teaming | Shows whether the local server is participating in NIC teaming. Opens the NIC Teaming dialog box, and lets you join the local server to a NIC team if desired. For more information about NIC Teaming, see the NIC Teaming white paper. |
| Ethernet | Displays the networking status of the server. Opens Control PanelNetwork and InternetNetwork Connections. |
| Operating system version | This read-only field displays the version number of the Windows operating system that the local server is running. |
| Hardware information | This read-only field displays the manufacturer and model name and number of the server hardware. |
| Last installed updates | Displays the day and time that Windows updates were last installed. Opens Control PanelSystem and SecurityWindows Update. |
| Windows Update | Displays Windows Update settings for the local server. Opens Control PanelSystem and SecurityWindows Update. |
| Last checked for updates | Displays the day and time that the server last checked for available Windows updates. Opens Control PanelSystem and SecurityWindows Update. |
| Windows Error Reporting | Displays Windows Error Reporting opt-in status. Opens the Windows Error Reporting Configuration dialog box. For more information about Windows Error Reporting, its benefits, privacy statements, and opt-in settings, see Windows Error Reporting. |
| Customer Experience Improvement Program | Displays Windows Customer Experience Improvement Program opt-in status. Opens the Customer Experience Improvement Program Configuration dialog box. For more information about Windows Customer Experience Improvement Program, its benefits, and opt-in settings, see Windows Customer Experience Improvement Program. |
| Internet Explorer (IE) Enhanced Security Configuration | Shows whether IE Enhanced Security Configuration (also known as IE hardening or IE ESC) is turned on or off. Opens the Internet Explorer Enhanced Security Configuration dialog box. IE Enhanced Security Configuration is a security measure for servers that prevents web pages from opening in Internet Explorer. For more information about IE Enhanced Security Configuration, its benefits, and settings, see Internet Explorer: Enhanced Security Configuration. |
| time zone | Displays the local server’s time zone. Opens the date and time dialog box. |
| Product ID | Displays the Windows activation status and product ID number (if Windows has been activated) of the Windows Server 2016 operating system. This is not the same number as the Windows product key. Opens the Windows Activation dialog box. |
| Processors | This read-only field displays manufacturer, model name, and speed information about the local server’s processors. |
| Installed memory (RAM) | This read-only field displays the amount of available RAM, in gigabytes. |
| Total disk space | This read-only field displays the amount of available disk space, in gigabytes. |
Manage the Server Manager console
Global settings that apply to the entire Server Manager console, and to all remote servers that have been added to the Server Manager server pool, are found in the heading bars at the top of the Server Manager console window.
add servers to Server Manager
The command that opens the add Servers dialog box, and lets you add remote physical or virtual servers to the Server Manager server pool, is in the Manage menu of the Server Manager console. For detailed information about how to add servers, see add Servers to Server Manager.
Refresh data that is displayed in Server Manager
You can configure the refresh interval for data that is displayed in Server Manager on the Server Manager Properties dialog box, which you open from the Manage menu.
To configure the refresh interval in Server Manager
-
On the Manage menu in the Server Manager console, click Server Manager Properties.
-
In the Server Manager Properties dialog box, specify a time period, in minutes, for the amount of elapsed time you want between refreshes of the data that is displayed in Server Manager. The default is 10 minutes. Click OK when you are finished.
Refresh limitations
Refresh applies globally to data from all servers that you have added to the Server Manager server pool. You cannot refresh data or configure different refresh intervals for individual servers, roles, or groups.
When servers that are in a cluster are added to Server Manager, whether they are physical computers or virtual machines, the first refresh of data can fail, or display data only for the host server for clustered objects. Subsequent refreshes show accurate data for physical or virtual servers in a server cluster.
Data that is displayed in role home pages in Server Manager for Remote Desktop Services, IP address Management, and File and Storage Services does not refresh automatically. Refresh data that is displayed in these pages manually, by pressing F5 or clicking Refresh in the Server Manager console heading while you are on those pages.
add or remove roles or features
The commands that open the add Roles and Features Wizard and remove Roles and Features Wizard, and let you add or remove roles, role services, and features to servers in your server pool, are in the Manage menu of the Server Manager console, and the Tasks menu of the Roles and Features tile on role or group pages. For detailed information about how to add or remove roles or features, see Install or Uninstall Roles, Role Services, or Features.
In Server Manager, role and feature data is displayed in the base language of the system, also called the system default GUI language, or the language selected during installation of the operating system.
create server groups
The command that opens the create Server Group dialog box, and lets you create custom groups of servers, is in the Manage menu of the Server Manager console. For detailed information about how to create server groups, see create and Manage Server Groups.
Prevent Server Manager from opening automatically at logon
The Do not start Server Manager automatically at logon check box in the Server Manager Properties dialog box controls whether Server Manager opens automatically at logon for members of the Administrators group on a local server. This setting does not affect Server Manager behavior when it is running on Windows 10 as part of Remote Server Administration Tools. For more information about configuring this setting, see Server Manager.
Zoom in or out
To zoom in or out on your view of the Server Manager console, you can either use the Zoom commands on the View menu, or press Ctrl+Plus (+) to zoom in and Ctrl+Minus (-) to zoom out.
Customize tools that are displayed in the Tools menu
The Tools menu in Server Manager includes soft links to shortcuts in the Administrative Tools folder in Control Panel/System and Security. The Administrative Tools folder contains a list of shortcuts or LNK files to available management tools, such as mmc snap-ins. Server Manager populates the Tools menu with links to those shortcuts, and copies the folder structure of the Administrative Tools folder to the Tools menu. By default, tools in the Administrative Tools folder are arranged in a flat list, sorted by type and by name. In the Server ManagerTools menu, items are sorted only by name, not by type.
To customize the Tools menu, copy tool or script shortcuts that you want to use to the Administrative Tools folder. You can also organize your shortcuts in folders, which create cascading menus in the Tools menu. additionally, if you want to restrict access to the custom tools on the Tools menu, you can set user access rights on both your custom tool folders in Administrative Tools, or directly on the original tool or script files.
We recommend against reorganizing system and administrative tools, and any management tools associated with roles and features that are installed on the local server. Moving role and feature management tools can prevent successful uninstallation of those management tools, when necessary. After uninstallation of a role or feature, a nonfunctional link to a tool whose shortcut has been moved might remain in the Tools menu. If you reinstall the role, a duplicate link to the same tool is created in the Tools menu, but one of the links will not work.
Role and feature tools that are installed as part of Remote Server Administration Tools on a Windows client-based computer can be organized into custom folders, however. Uninstalling the parent role or feature has no effect on the tool shortcuts that are available on a remote computer that is running Windows 10.
The following procedure describes how to create an example folder called MyTools, and move shortcuts for two Windows PowerShell scripts into the folder that are then accessible from the Server Manager Tools menu.
To customize the Tools menu by adding shortcuts in Administrative Tools
-
create a new folder called MyTools in a convenient location.
[!NOTE]
Because of restrictive access rights on the Administrative Tools folder, you are not allowed to create a new folder directly in the Administrative Tools folder; you must create a new folder elsewhere (such as on the Desktop), and then copy the new folder to the Administrative Tools folder. -
move or copy MyTools to Control Panel/System and Security/Administrative Tools. By default, you must be a member of the Administrators group on the computer to make changes to the Administrative Tools folder.
-
if you do not need to restrict user access rights to your custom tool shortcuts, go on to step 6. Otherwise, right-click either the tool file (or the MyTools folder), and then click Properties.
-
On the Security tab of the file’s Properties dialog box, click edit.
-
for users for whom you want to restrict tool access, clear check boxes for Read & execute, Read, and Write permissions. These permissions are inherited by the tool shortcut n the Administrative Tools folder.
if you edit access rights for a user while the user is using Server Manager (or while Server Manager is open), then your changes are not shown in the Tools menu until the user restarts Server Manager.
[!NOTE]
if you restrict access to an entire folder that you have copied to Administrative Tools, restricted users can see neither the folder nor its contents in the Server ManagerTools menu.edit permissions for the folder in the Administrative Tools folder. Because hidden files and folders in Administrative Tools are always displayed in the Server ManagerTools menu, do not use the Hidden setting on a file or folder’s Properties dialog box to restrict user access to your custom tool shortcuts.
Deny permissions always overwrite Allow permissions.
-
Right-click the original tool, script, or executable file for which you want to add entries on the Tools menu, and then click create shortcut.
-
move the shortcut to the MyTools folder in Administrative Tools.
-
Refresh or restart Server Manager, if necessary, to see your custom tool shortcut in the Tools menu.
Manage roles on role home pages
After you add servers to the Server Manager server pool, and Server Manager collects inventory data about servers in your pool, Server Manager adds pages to the navigation pane for roles that are discovered on managed servers. The Servers tile on role pages lists managed servers that are running the role. By default, Events, Best Practices Analyzer, Services, and Performance tiles display data for all servers that are running the role; selecting specific servers in the Servers tile limits the scope of events, services, performance counters, and BPA results to selected servers only. Management tools are typically available in the Server Manager console Tools menu, after a role or feature has been installed or discovered on a managed server. You can also right-click server entries in the Servers tile for a role or group, and then start the management tool that you want to use.
In Windows Server 2016, the following roles and feature have management tools that are integrated into Server Manager console as pages.
-
File and Storage Services. File and Storage Services pages include custom tiles and commands for managing volumes, shares, iSCSI virtual disks, and storage pools. When you open the File and Storage Services role home page in Server Manager, a retracting pane opens that displays custom management pages for File and Storage Services. For more information about deploying and managing File and Storage Services, see File and Storage Services.
-
Remote Desktop Services. Remote Desktop Services pages include custom tiles and commands for managing sessions, licenses, gateways, and virtual desktops. For more information about deploying and managing Remote Desktop Services, see Remote Desktop Services (rdS).
-
IP address Management (IPAM). The IPAM role page includes a custom Welcome tile containing links to common IPAM configuration and management tasks, including a wizard for provisioning an IPAM server. The IPAM home page also includes tiles for viewing the managed network, configuration summary, and scheduled tasks.
There are some limitations to IPAM management in Server Manager. Unlike typical role and group pages, IPAM has no Servers, Events, Performance, Best Practices Analyzer, or Services tiles. There is no Best Practices Analyzer model available for IPAM; Best Practices Analyzer scans on IPAM are not supported. To access servers in your server pool that are running IPAM, create a custom group of those servers that are running IPAM, and access the server list from the Servers tile on the custom group page. Alternatively, access IPAM servers from the Servers tile on the All Servers group page.
Dashboard thumbnails also display limited rows for IPAM, compared to thumbnails for other roles and groups. By clicking the IPAM thumbnail rows, you can view events, performance data, and manageability status alerts for servers that are running IPAM. IPAM-related services can be managed from pages for server groups that contain IPAM servers, such as the page for the All Servers group.
for more information about deploying and managing IPAM, see IP address Management (IPAM).
See Also
Server Manager
add Servers to Server Manager
create and Manage Server Groups
View and Configure Performance, Event, and Service Data
File and Storage Services
Remote Desktop Services (rdS)
IP address Management (IPAM)

Службы iis windows 7 от А до Я
Службы iis windows 7 от А до Я
Добрый день уважаемые читатели и гости блога pyatilistnik.org, в прошлый раз я вам рассказал, как производится настройка сервера на Windows Server 2016, сегодня же я хочу отойти от серверных платформ и поговорить про дополнительные возможности десктопных систем, а именно про службы iis windows 7, мы рассмотрим вопрос как их устанавливать и как администрировать. Уверен вам пригодятся знания о данной возможности.
Службы iis windows 7
И так, не многие пользователи операционной системы Windows 7, знают, что их любимая операционная система, по мимо стандартных функций, имеет еще и дополнительные и вполне может стать сервером на котором можно запускать свои сайты, для этого в ее состав входит такой компонент, как Internet Information Services или просто IIS. С ним я вас уже знакомил уважаемые читатели в своих постах:
Так, что если у вас более новая система, то вам подойдут выше описанные ссылки, еще хочу отметить, что для того, чтобы на своем компьютере запускать различные сайты, вы можете воспользоваться простым и бесплатным комплексом, под названием Denwer, но это так лирическое отступление.
Для установки диспетчера iis windows 7 есть два варианта:
- Через компоненты
- Через powershell
Добавление компонента Internet Information Services
Делать мы будем это через панель управления, для этого откройте пуск и выберите пункт «Панель управления»
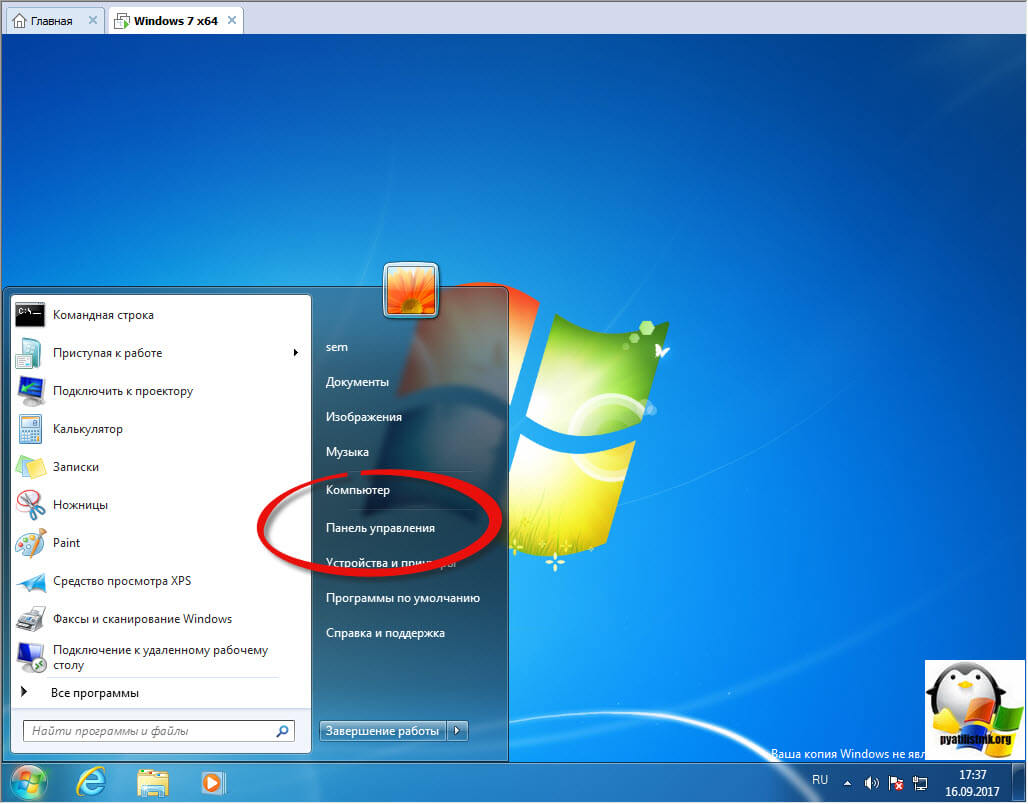
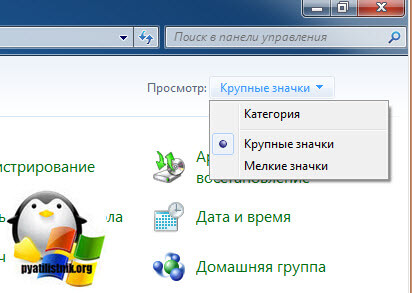
Для удобства выберите отображение крупных значков.
Найдите пункт «Программы и компоненты»
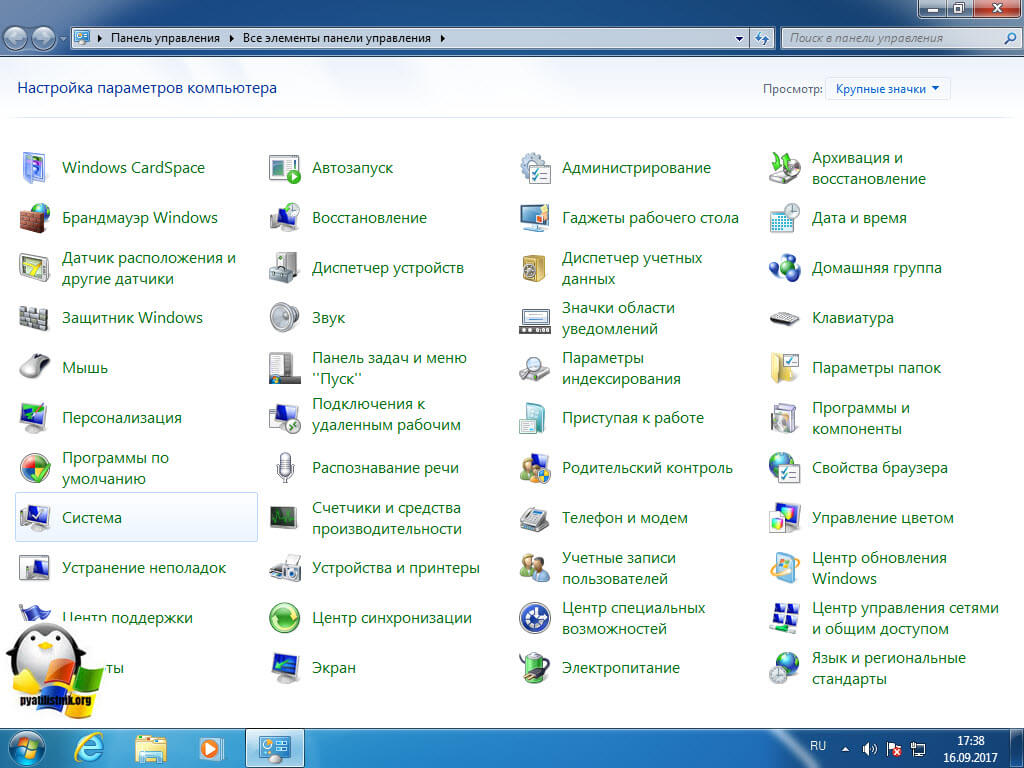
Теперь, чтобы включить службы iis windows 7, нужно запустить компонент, делается это через соответствующее меню, оно у меня отмечено красным овалом.
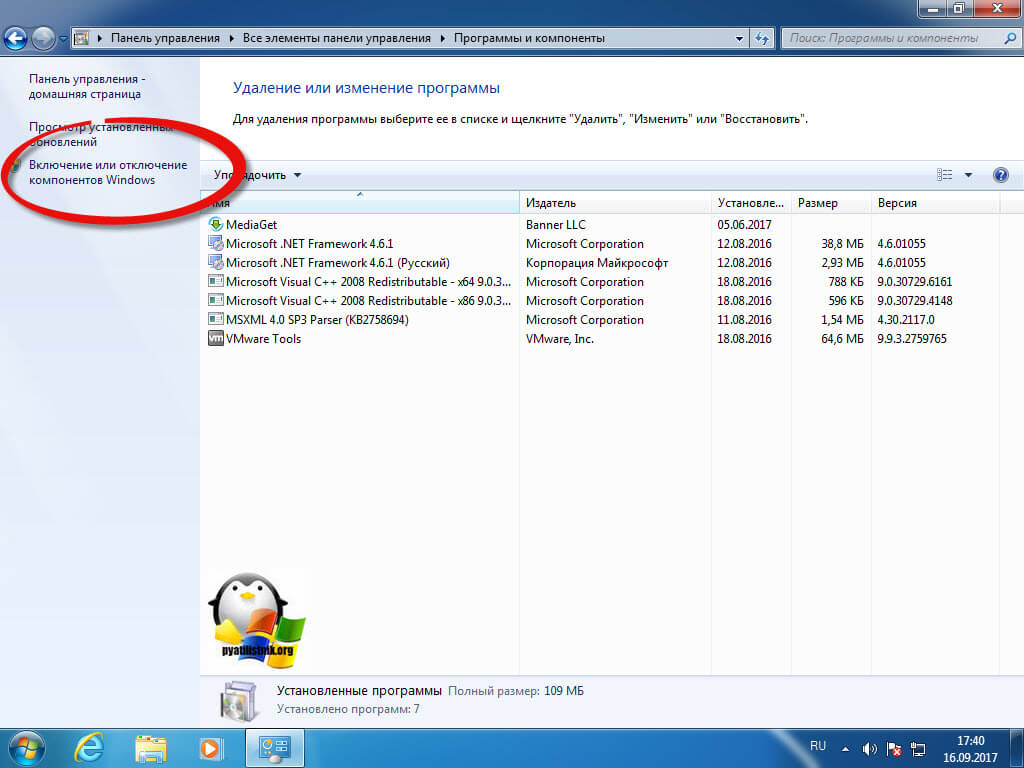
Выставляем галку на против Службы IIS, обратите внимание, что там будет добавлено, очень много разных компонентов:
- Безопасность
- Компоненты разработки приложений
- Функции повышения быстродействия
- Средства управления веб-сайтом
- Общие функции HTTP

Нажимаем ок и производится инсталляция данного компонента, это может занять некоторое время, по завершении, вам не потребуется перезагрузка.

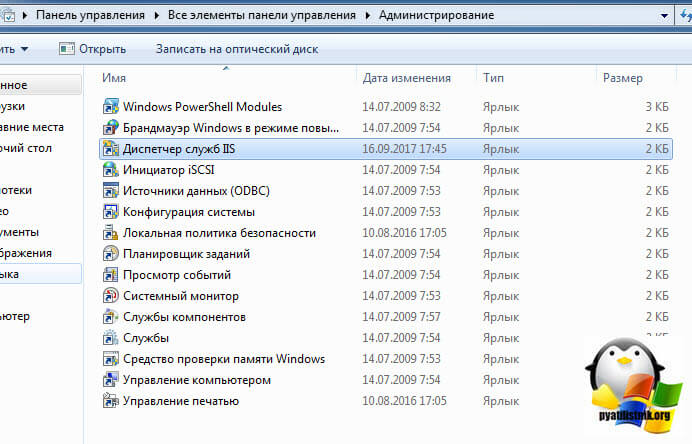
Найти диспетчер IIS можно в панели управления по пути «Панель управленияВсе элементы панели управленияАдминистрирование»
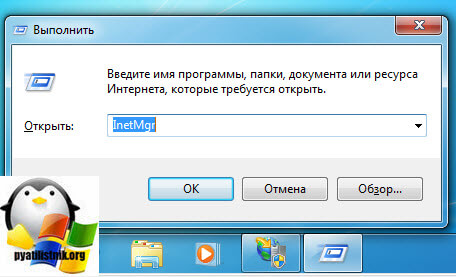
Либо же вы можете одновременно нажать клавиши Win и R и ввести inetMgr
Откроется все тот же диспетчер по построению сайтов.На этом все, но я вам советую почитать как создавать сайты в Internet Information Services.

Добавление компонента через powershell
Тут все просто откройте оснастку powershell и введите команду:
Источник
Запуск утилиты Server Manager
Основные сведения
Просмотр свойств компьютера
Резюме
Требования для работы с Server Manager и Windows NT Diagnostics
Ниже перечислены требования для работы с Windows NT Diagnostics и Server Manager.
§ С программой Windows NT Diagnostics может работать любой пользователь, так как эта программа не содержит средств изменения конфигурации системы. Однако некоторые ее возможности доступны только членам групп Administrators (Администраторы), Server Operators (Операторы сервера) и Power Users (Опытные пользователи).
§ Для работы с Server Manager необходимо быть членом группы Administrators (Администраторы), Server Operators (Операторы сервера) или Power Users (Опытные пользователи) на компьютере, мониторинг которого Вы собираетесь выполнять.
Членам группы Server Operators (Операторы сервера) контроллера домена автоматически присваиваются полномочия оператора сервера на любом контроллере этого домена.
Несколько функций Server Manager доступны только группе Administrators (Администраторы). Когда ими пытаются воспользоваться члены групп Server Operators (Операторы сервера). Account Operators (Операторы учетных записей) или Power Users (Опытные пользователи), на экране появляется сообщение о том, что доступ запрещен.
§ Инструментальное средство Windows NT Server — Server Manager — предназначено для оценки степени загруженности сервера.
§ Диагностическое инструментальное средство Windows NT Workstation и Windows NT Server — Windows NT Diagnostics (Winmsd.exe) — позволяет всем пользователям просматривать и печатать информацию о конфигурации локального или удаленного компьютера.
§ Для работы с Server Manager необходимо быть членом группы Administrators (Администраторы), Server Operators (Операторы сервера) или Power Users (Опытные пользователи) на компьютере, мониторинг которого Вы собираетесь выполнить.
Программа Server Manager позволяет получить информацию о ресурсах системы. Эти сведения полезны при определении числа пользователей, подключенных в данный момент к компьютеру, и объема используемых общих ресурсов. На этом занятии Вы освоите процедуру просмотра свойств локального и удаленного компьютеров.
Программа Server Manager позволяет просматривать свойства компьютера.
1. Зарегистрируйтесь в системе по учетной записи Administrator.
2. В меню Start (Пуск) последовательно выберите пункты Programs (Программы), Administrative Tools (Администрирование) и щелкните пункт Server Manager.
В окне программы Server Manager появится следующая информация о текущем домене:
§ имя компьютера, а также название и версия операционной системы, под управлением которой он работает (если компьютер выключен, то номер операционной системы не указывается);
§ значок, обозначающий роль компьютера в сети: главный контроллер домена, резервный контроллер домена, сервер или клиент на базе Windows NT Workstation или другой операционной системы;
§ если компьютер выключен, его значок закрыт серой сеткой;
§ описание, указанное на этапе установки операционной системы.
. Чтобы вывести информацию о компьютерах другого домена, в меню Computer (Компьютер) выберите пункт Select Domain (Выбрать домен), введите имя домена и нажмите кнопку OK. Чтобы посмотреть компьютеры только определенного типа (компьютеры домена, компьютеры под управлением Windows NT, только серверы и т.д.), выберите соответствующий режим в меню View (Вид).
Дата добавления: 2014-01-04 ; Просмотров: 1228 ; Нарушение авторских прав?
Нам важно ваше мнение! Был ли полезен опубликованный материал? Да | Нет
Источник
ИТ База знаний
Полезно
— Узнать IP — адрес компьютера в интернете
— Онлайн генератор устойчивых паролей
— Онлайн калькулятор подсетей
— Калькулятор инсталляции IP — АТС Asterisk
— Руководство администратора FreePBX на русском языке
— Руководство администратора Cisco UCM/CME на русском языке
— Руководство администратора по Linux/Unix
Навигация
Серверные решения
Телефония
FreePBX и Asterisk
Настройка программных телефонов
Корпоративные сети
Протоколы и стандарты
Популярное и похожее
Пошаговый ввод в домен Windows 10
Поднимаем контроллер домена на Windows 2008 R2
Основные команды cmd в Windows
От Windows NT 3.1 до Windows Server 2019 — путь развития системы
Как сгенерировать ключ SSH в Windows
10 крутых вещей, которые можно сделать с помощью Windows PowerShell
Batch: автоматический перенос файлов в Windows
Snom 710

Еженедельный дайджест
Установка и настройка диспетчера ресурсов файлового сервера (File Server Resource Manager) в Windows Server 2016
С помощью диспетчера ресурсов файлового сервера можно запретить пользователям сохранять файлы на сетевом диске с определенным разрешением или определенного размера, устанавливать квоты, настраивать мониторинг.
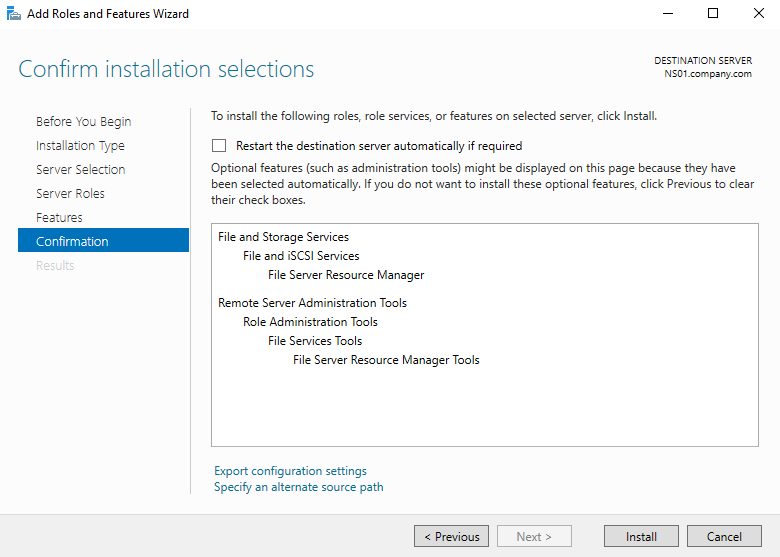
Первоначально для работы необходимо установить роли File Server, File Server Resource Manager и средства управления (Tools). Отмечаем эти компоненты в мастере установки в Server Manager и нажимаем Install.
Их можно установить гораздо быстрее, используя PowerShell. Запускаем PowerShell и вводим команду, которая установит сразу все необходимое:

Вначале нужно определиться с типами файлов, которые будут блокироваться. Минус в том, что правила используют расширения файлов, и если пользователь изменит расширение файла, то ограничение уже не отработает.
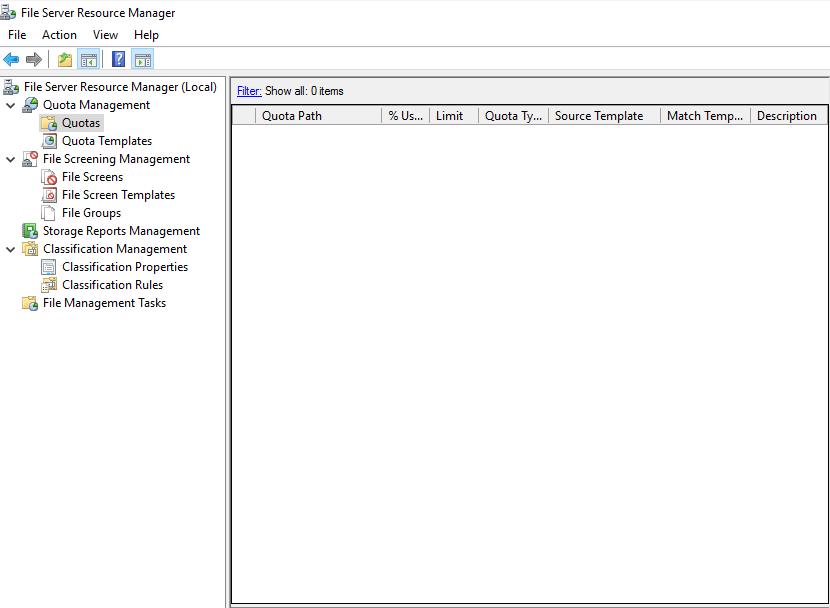
Нажимаем Win+R (Выполнить) вводим fsrm.msc и нажимаем Enter. Откроется оснастка File Server Resource Manager. Также ее можно запустить из Server Manager.
Преднастроенные (по-умолчанию) типы файлов находятся в группе File Screening Management — File Group.

В свойствах имеется возможность добавлять свои расширения файлов.
Знак * перед расширением — это знак, означающий, что любое имя файла с этими расширениями может быть заблокировано. Также могут быть разрешены или запрещены сами файлы, на основе содержимого самого имени, а не только расширения.
В группе File Screen Templates находятся готовые шаблоны, которые можно использовать или изменять.
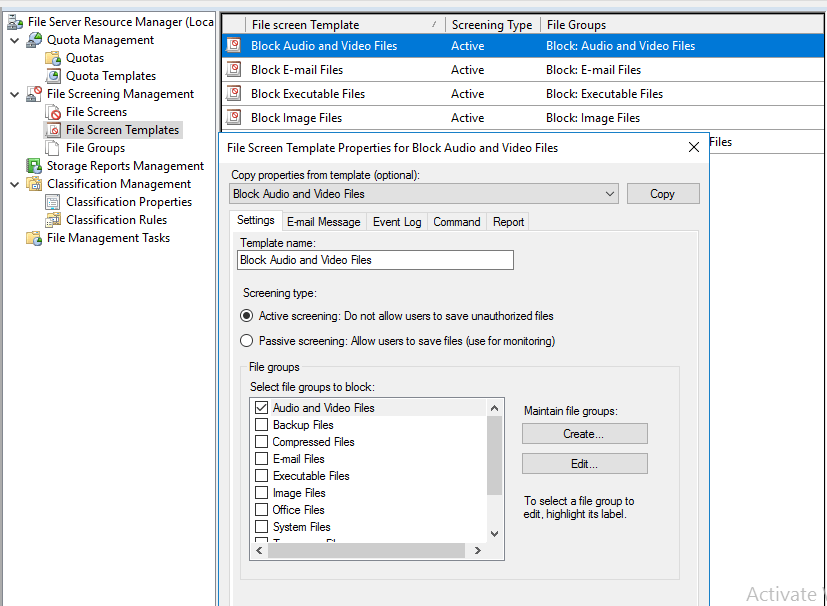
В шаблоне Block Audio and Video Files включен (Active screening) активный мониторинг, т.е. он не позволит пользователю сохранить файлы, в то время как пассивный мониторинг (Passive screening) будет только мониторить и позволять сохранять файлы.
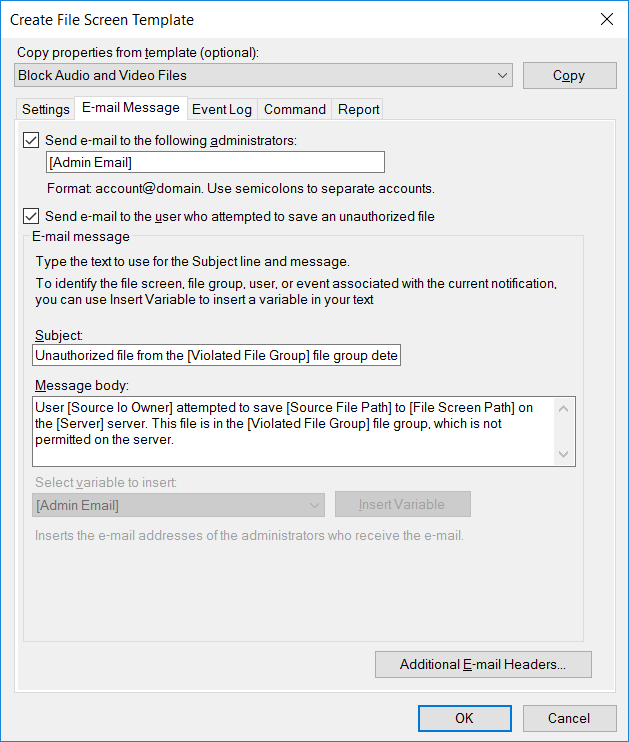
В Свойствах шаблонов имеются дополнительные вкладки для настройки уведомлений на электронную почту, которое получит пользователь, попытавшийся сохранить заблокированный файл. Это весьма полезная функция, если сотрудник не ознакомлен с правилами работы с сетевыми ресурсами. Сразу же можно отправить письмо в службу технической поддержки. При включении этой опции вы увидите предупреждение, т.к. у вас должен быть настроен SMTP-сервер.
В теме письма можно написать, почему нельзя сохранять тот или иной тип файлов.
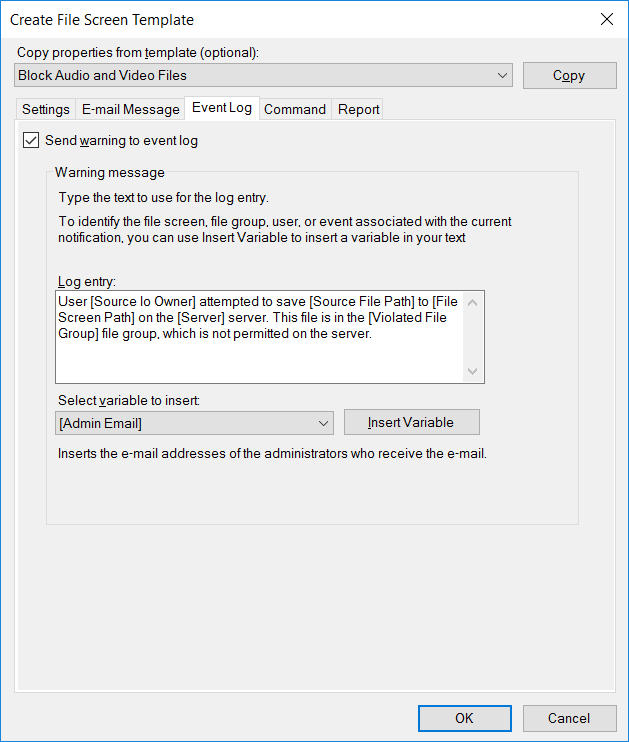
На вкладке Event Log можно настроить регистрацию и запись события при попытке сохранить файл. Можно использовать переменные, которые будут автоматически подставляться в сообщение.
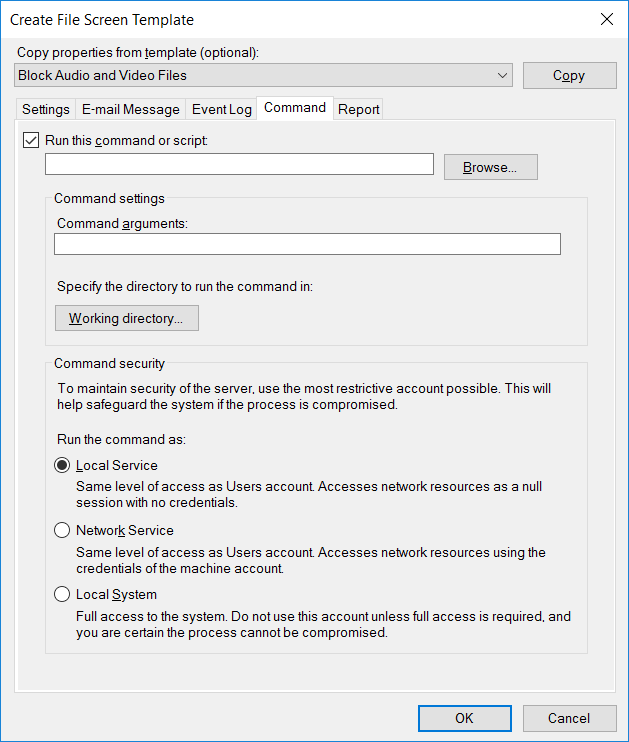
Вкладка Command позволяет указать программу или скрипт, который запустится при попытке сохранить неразрешенный файл. Можно указать уровень привилегий, с которыми будет запускаться программа или скрипт, т.к. у разных учетных данных могут быть различные права.
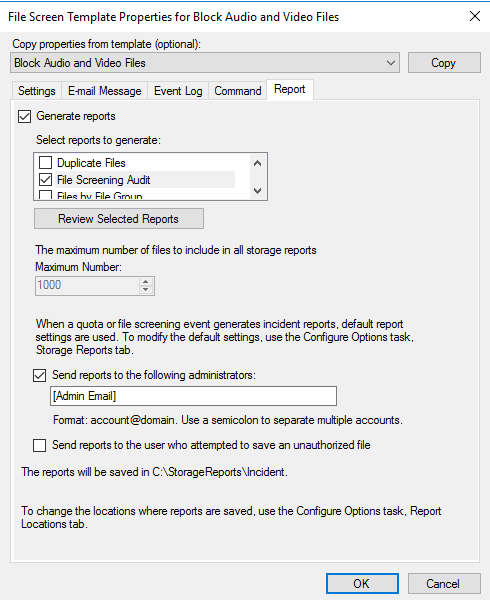
Последняя вкладка Reports. Отчет может быть автоматически сгенерирован и отправлен по электронной почте администраторам или пользователю, пытающемуся сохранить неавторизованный файл.
Создадим блокировку файлов мультимедиа. Шаблон по-умолчанию для этих файлов уже имеется.
Перейдем в File Screening Management — File Screens и выберем Create File Screen.
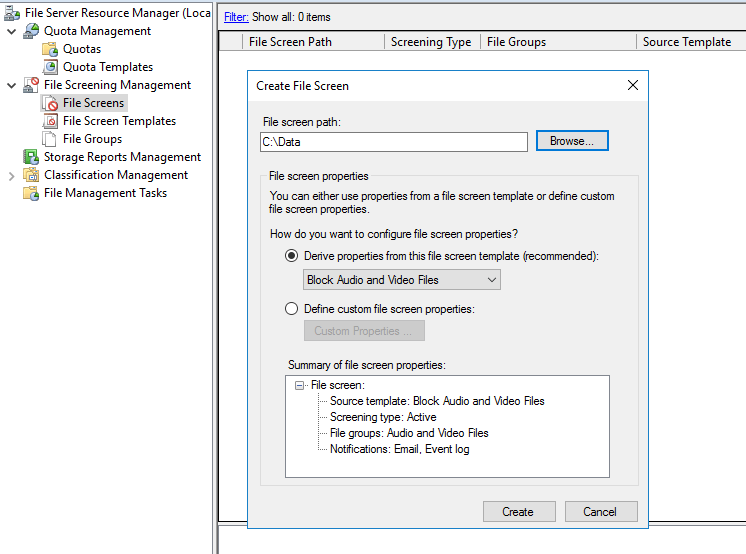
Сначала нужно указать каталог, к которому будет применяться блокировка. Выбрать шаблон (Block Audio and Video Files). Нажать Create.
Настройка будет применяться ко всему содержимому указанного каталога.
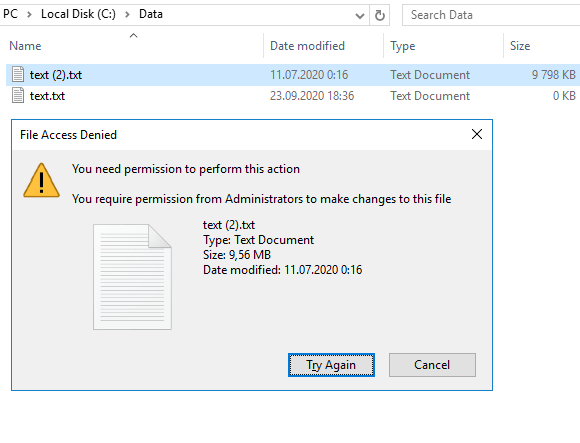
Так как в шаблоне блокировки установлено расширение *.mp3 создать или изменить файл в указанной директории не получится. Система покажет сообщение «File Access Denied«.
В группе Quotas Management Quota Templates существуют преднастроенные шаблоны квот. Эти шаблоны обладают такими же свойствами, как и шаблоны блокировки. Отправка предупреждения на почту, запись в лог, выполнение команды и отчет.
Создадим жесткую квоту в 100 MB, т.е. запись в папку будет ограничена при достижении объема в 100 MB.
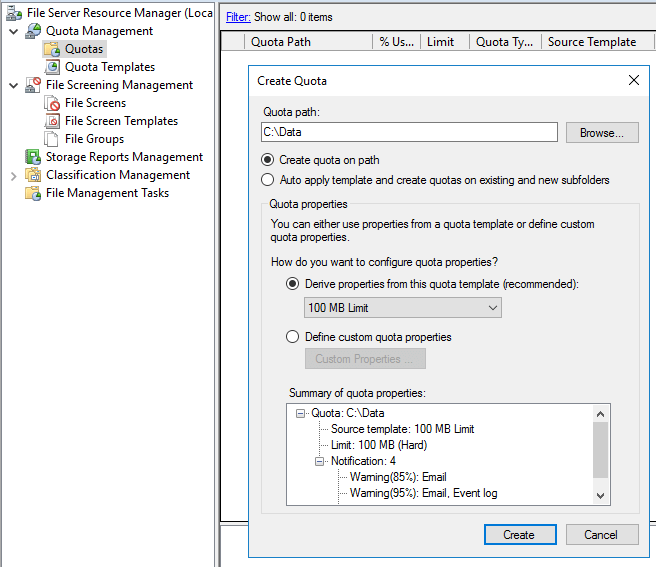
При сохранении больше 100 MB получим сообщение, что нет свободного места.
Было полезно?
Почему?
😪 Мы тщательно прорабатываем каждый фидбек и отвечаем по итогам анализа. Напишите, пожалуйста, как мы сможем улучшить эту статью.
😍 Полезные IT – статьи от экспертов раз в неделю у вас в почте. Укажите свою дату рождения и мы не забудем поздравить вас.
Источник
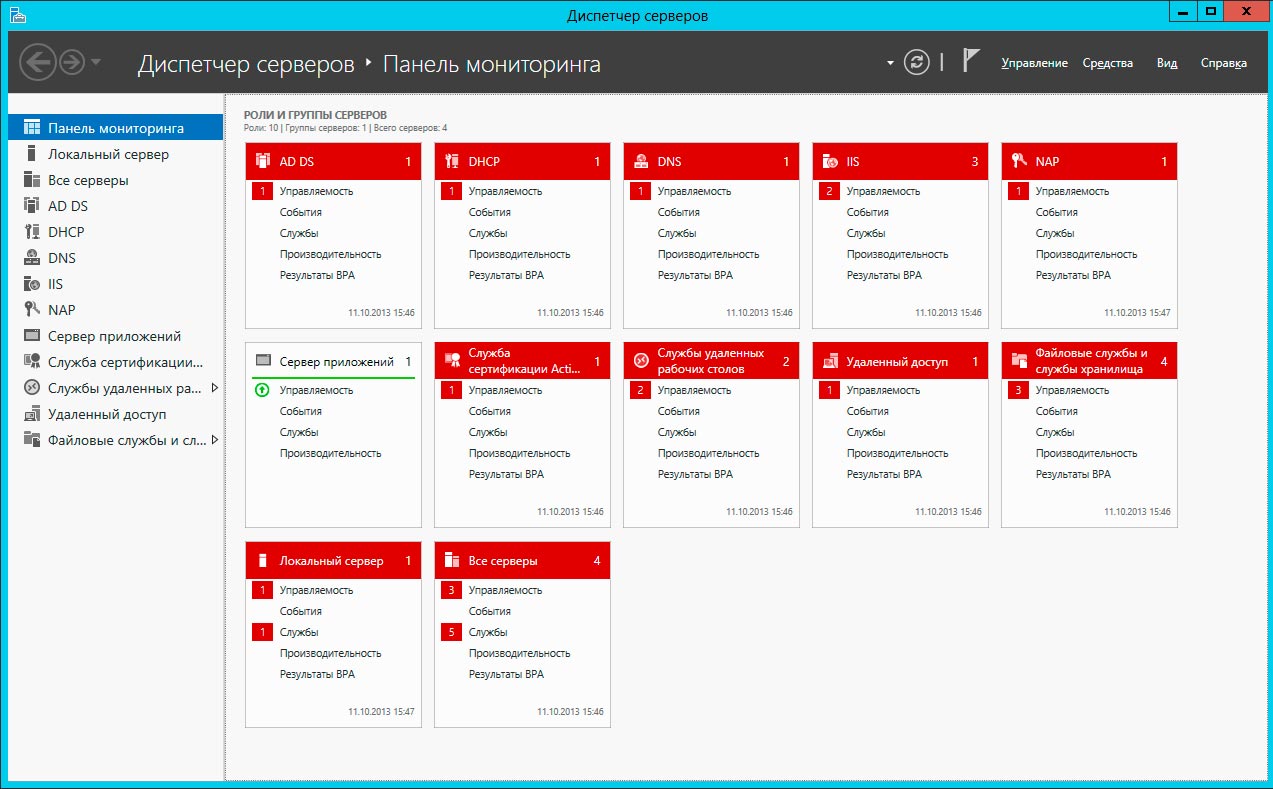
В Windows Server 2012 появилось централизованное управление всеми ролями и службами на одном и более сервере из единой системы управления — Диспетчере Серверов (Server Manager) входящей в комплект Средства удаленного администрирования сервера. В серверной ОС диспетчер серверов предустановлен, но в клиентских Windows 8 и выше, не зависимо от редакции, это средство отсутствует.

Диспетчер серверов выглядит следующим образом. Ошибки запуска или в работе служб, ожидание перезагрузки и другие важные моменты выделены красным цветом.
Для установки Диспетчера Серверов требуется скачать Средства удаленного администрирования сервера для Windows 8 (Remote Server Administration Tools) с официального сайта Microsoft — http://www.microsoft.com/ru-ru/download/details.aspx?id=28972
Запуск производится из %windir%system32ServerManager.exe или по ярлыку из меню пуск.
Для добавления Windows Server 2012 к Диспетчеру Серверов нужно на сервере (или группе серверов) настроить разрешения подключения к WinRM (Windows Remote Management).
|
winrm quickconfig winrm e winrm/config/listener winrm get winrm/config winrm set winrm/config/service/auth @{Basic=«true»} winrm set winrm/config/service @{AllowUnencrypted=«true»} winrm set winrm/config/service @{TrustedHosts=«host1, host2, host3»} winrm set winrm/config/client/auth @{Basic=«true»} winrm set winrm/config/client @{AllowUnencrypted=«true»} winrm set winrm/config/client @{TrustedHosts=«host1, host2, host3»} |
Basic=»true» — разрешение подключения к сервису посредством базовой аутентификации строчными логином и паролем.
AllowUnencrypted=»true» — разрешить нешифрованные подключения.
TrustedHosts=»host1, host2, host3″ — доверенные хосты, допущенные к подключению. Сюда следует вписать ip и желательно DNS-имена.
В Брандмауэре должно присутствовать разрешение подключения к портам 5985 для http и 5986 для https.
Проверить подключение и решить проблемы в следствии которых не происходит подключение можно командой:
|
winrm identify -r:http://winrm_server:5985 -auth:basic -u:user_name -p:password -encoding:utf-8 |
Рассказать:
- Введение
- Удаленное администрирование серверов в Windows 10 — доступные средства
- Доступные инструменты
- Настройка доступных инструментов
- Запуск диспетчера серверов
- Профессиональные советы
- Известные ошибки
- Заключение
Ранние версии Windows Server имели графический интерфейс, похожий на другие аналогичные клиенты. Это упрощало администрирование, поскольку пользователю не нужно было изучать два разных интерфейса. Для удаленного администрирования нужно было подключиться к серверу с помощью удаленного рабочего стола. Однако информация сеанса терялась по завершении сеанса RDP. С переходом к версиям Windows Server без GUI-интерфейса возникла необходимость удаленного управления сервером без входа или выхода из сеанса RDP. Пакет, включающий в себя средства удаленного администрирования сервера (RSAT), был создан специально для решения этой проблемы.
В этой статье мы рассмотрим, что представляют собой инструменты RSAT в Windows 10, а также запустим «Диспетчер серверов» и попытаемся подключиться к удаленному серверу.
RSAT позволяет администраторам запускать инструменты на удаленном сервере для управления его функциями, ролями и службами. Windows 10 имеет встроенную поддержку RSAT. Ниже представлены различные возможности установки RSAT:
- Установлен по умолчанию в Windows Server 2016, Windows Server 2012, Windows Server 2012 R2 и более ранних версиях;
- Может быть загружен и установлен как автономный пакет обновлений на клиентах под управлением Windows 10 Professional, Windows 10 Enterprise и Windows 10 Education;
- Невозможно установить на клиентах под управлением Windows 10 Home или любой ARM-версии;
- Невозможно установить на любой из серверных версий операционной системы;
- Поддерживается удаленное администрирование Windows Server Core или минимального интерфейса Windows Server 2016, Windows Server 2012 R2 и в некоторых случаях Windows Server 2012.
Матрицу поддержки RSAT на платформе Windows 10 можно найти здесь. Ключевым моментом является то, что инструменты Hyper-V не являются частью RSAT для Windows 10, в отличие от более ранних версий. Hyper-V поставляется как часть Windows 10 и может использоваться без установки RSAT. Другие инструменты, которые недоступны в данном релизе:
- Утилиты администрирования BitLocker Drive Encryption;
- Direct Access;
- Routing and Remote Access;
- Remote Desktop Services;
- Windows PowerShell cmdlets for Cluster Aware Updating;
- Windows PowerShell cmdlets for Best Practices Analyzer.
Начнем с установки RSAT для Windows 10. Как уже было сказано, RSAT доступен только для Windows 10 Professional, Enterprise и Education. Он может работать как на 86-разрядной, так и на 64-разрядной версии Windows 10. Обратите внимание, что предыдущие версии RSAT следует удалить до установки актуальной версии. Чтобы получить доступ к версиям Windows Server 2012 и Windows Server 2008 и управлять ими, необходимы дополнительные обновления для этой версии RSAT. Также обратите внимание, что на удаленном сервере должно быть включено дистанционное управление Windows PowerShell и «Диспетчер серверов».
Средства удаленного администрирования активированы по умолчанию в Windows Server 2016, 2012 R2 и 2012. Следующие шаги были выполнены на устройстве с установленной операционной системой Windows 10 Enterprise x64, работающей в VMWare. Вы должны повторить их в собственной системе.
- Загрузите файл настройки RSAT:

- Необходимо выбрать программу установки, соответствующую используемой архитектуре. В данном случае это 64-разрядная система, поэтому мы загрузим файл WindowsTH-KB2693643-x64.msu;
- Дважды кликните по файлу установщика, чтобы начать инсталляцию. Примите условия лицензии и дождитесь окончания установки;
- В более ранних версиях Windows после установки пакета RSAT приходилось вручную активировать эти инструменты. Но в Windows 10 эти инструменты доступны для использования сразу после завершения установки. Флажок рядом с инструментами RSAT установлен. Это означает, что мы можем продолжать:

- Теперь перейдите в Панель управления — Система и безопасность — Администрирование, чтобы найти все установленные инструменты RSAT:

Чтобы удалить пакет RSAT:
- Перейдите в Панель управления — Программы — Удалить программу;
- Нажмите «Просмотр установленных обновлений»;
- Кликните правой кнопкой мыши по элементу «Обновление для Microsoft Windows (KB2693643)» и выберите пункт «Удалить»;
- Подтвердите действие, нажав кнопку «Да»:

Чтобы удалить определенные инструменты из пакета средств удаленного администрирования сервера:
- Перейдите в Панель управления — Программы — Программы и компоненты и нажмите «Включить компоненты Windows»;
- Снимите флажки напротив тех инструментов, которые вы хотите удалить:

Инструменты, включенные в пакет RSAT, не могут использоваться для управления локальным компьютером. В диспетчере серверов должен быть указан удаленный сервер. Большинство инструментов RSAT интегрированы в диспетчер серверов, поэтому рекомендуется сначала добавить в него пулы серверов перед развертыванием этих инструментов. Чтобы запустить диспетчер серверов:
- Откройте меню «Пуск», и кликните по элементу «Диспетчер серверов». Или кликните по полю поиска Cortana в панели задач и начните вводить «Диспетчер серверов». Вы должны увидеть соответствующую строку в Cortana. Нажмите на эту строку, чтобы запустить «Диспетчер серверов»:

- Откроется панель управления диспетчера серверов:

- В ней можно добавлять удаленные серверы и назначать роли для них;
- Если ПК является частью домена, можно выполнить поиск серверов в Active Directory вашей организации, или ввести IP-адрес по своему выбору. Также можно импортировать адреса серверов из файла;
- В меню «Инструменты» перечислены все инструменты RSAT, доступные для удаленного администрирования сети.
Иногда приходится работать на различных клиентах, и нужно иметь возможность управлять удаленным сервером с них. Но повторная настройка может занять много времени. Если версии диспетчера серверов на различных клиентах аналогичны, можно скопировать файлы из указанных ниже мест на исходном клиенте в те же места на новом клиенте. Таким образом, при последующем запуске диспетчера серверов на новом клиенте вы найдете конфигурацию, заданную на предыдущем клиенте.
Скопируйте файлы из следующих расположений:
%appdata%MicrosoftWindowsServerManagerServerList.xml
%appdata%LocalMicrosoft_CorporationServerManager.exe_StrongName_GUID6.2.0.0user.config
Помните, что версии диспетчера серверов на исходном и новом клиентах должны быть идентичны.
В настоящее время RSAT поддерживает только локализацию EN-US. Если вы инсталлируете RSAT на машине, для которой задан регион, отличный от EN-US, установка будет выполнена, но в диалоговом окне «Включение и выключение компонентов Windows» вы не увидите ни одного из инструментов. Чтобы решить эту проблему, установите языковый пакет EN-US. После того, как настроите инструменты в диалоговом окне «Включение и отключение компонентов Windows», можно вновь задать свой регион и язык.
В этой статье мы привели краткое руководство по работе с пакетом RSAT и Диспетчером серверов для Windows 10 удаленного администрирования. RSAT устанавливается и настраивается очень просто. Он позволяет эффективно администрировать удаленный сервер. «Диспетчер серверов» включает в себя большое количество различных функций, для полного рассмотрения которых требуется отдельное руководство.
Отказ от использования графического интерфейса на серверах является желательным, поскольку это минимизирует различные риски, а также разгружает ЦП и ОЗУ.