Fix the Windows cannot find javaw.exe using the solutions below
by Matthew Adams
Matthew is a freelancer who has produced a variety of articles on various topics related to technology. His main focus is the Windows OS and all the things… read more
Updated on December 13, 2022
Reviewed by
Vlad Turiceanu

Passionate about technology, Windows, and everything that has a power button, he spent most of his time developing new skills and learning more about the tech world. Coming… read more
- Facing the error Windows cannot find javaw.exe is frustrating when trying to launch Java programs.
- To quickly solve it, you can perform a quick malware scan or reinstall Java.
- You can also try to add the Javaw.exe path to the Environment Variable Path.
- Find below step-by-step instructions on how to carry out all these methods.
XINSTALL BY CLICKING THE DOWNLOAD FILE
This software will repair common computer errors, protect you from file loss, malware, hardware failure and optimize your PC for maximum performance. Fix PC issues and remove viruses now in 3 easy steps:
- Download Restoro PC Repair Tool that comes with Patented Technologies (patent available here).
- Click Start Scan to find Windows issues that could be causing PC problems.
- Click Repair All to fix issues affecting your computer’s security and performance
- Restoro has been downloaded by 0 readers this month.
Javaw.exe is a process that launches Java programs (jar files included). However, a Windows cannot find javaw.exe error message can pop up for some users when they try to launch Java software.
The full error message states: Windows cannot find javaw.exe. Make sure you typed the name correctly, and then try again. These are some of the best fixes for that error message.
What is javaw.exe?
Javaw.exe is a process that is part of the Java Runtime Environment (JRE). In essence, the javaw.exe command is the same as java.exe, but javaw.exe does not have an associated console window.
Basically, it’s a non-essential system process that is opened by other programs. We wouldn’t recommend ending or deleting it unless it causes problems.
What to do if javaw.exe is missing on Windows 10?
1. Scan for malware
If you already use Eset Internet Security, open the main window and follow these simple steps:
1. Select Computer scan from the ribbon on the left.
2. Click on the Scan your computer button and wait for the process to complete.
3. When the scan is finished, you will get a report showing the number of scanned, infected, and cleaned objects.
Alternatively, if you do not have Eset Internet Security on your computer, you can still do a full computer scan with its free scanner. You can download it for free and it will thoroughly scan your computer just as we showed in the steps below. You can only run this utility once, but it can be a quick fix if you don’t use an antivirus already.
The reason we recommend Eset Internet Security is because it uses multi-layered protection while being very lightweight. This type of technology ensures faster detection rates so there are higher chances that threats will be blocked or removed before they get a chance to impact your system.
Eset also has good data protection features that protect against any data leaks. It includes specific security features for safer online purchases.
Some PC issues are hard to tackle, especially when it comes to corrupted repositories or missing Windows files. If you are having troubles fixing an error, your system may be partially broken.
We recommend installing Restoro, a tool that will scan your machine and identify what the fault is.
Click here to download and start repairing.
Additional features include parental controls, webcam and microphone protection, and a dedicated anti-malware utility.
If you don’t have it on your device already, we recommend giving it a try. Eset offers 30-day free trials for all versions of its software, so you don’t need to make an investment if you are not satisfied with the product.

Eset Internet Security
Guard your devices with advanced multi-layered protection that keeps all threats at bay.
2. Add the Javaw.exe Path to the Environment Variable Path
- Press the Windows key + R to launch Run.
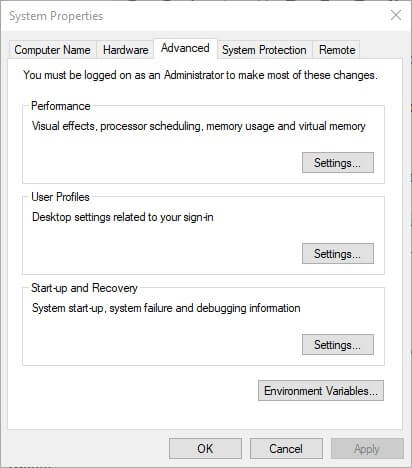
- Input sysdm.cpl in Run and click OK to open the window shown directly below.

- Select the Advanced tab.
- Press the Environment Variables button to open the window in the snapshot below.

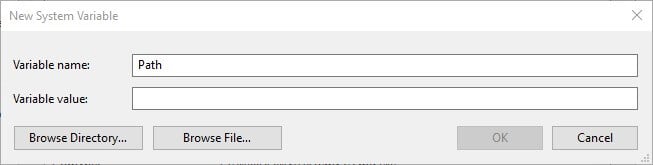
- Click the New button under System variables to open a New System Variable window.
- Enter Path in the Variable name text box.

- Then, input the exact path of your javaw.exe file. The default javaw.exe path would be something like
C:Program files(x86)javajre7binorC:Program files(x86)javajre8binon 64-bit Windows platforms. - If you’re not sure what path to enter, press the Windows key + Q hotkey to open Cortana. Then enter java in the search box.

- Right-click javaw and select Open file location.
- Thereafter, File Explorer will open the folder that includes javaw.exe. Enter the folder path open in File Explorer into the Variable value text box on the New System Variable window.
- Press the OK button on the New System Variable window.
- Click OK on the Environment Variables window.


The javaw.exe error often arises because Windows can’t find the Java program. So, adding the exact javaw.exe path to system variables often fixes the Windows cannot find javaw.exe error.
Follow the guidelines above to add a new javaw.exe system variable path.
3. Reinstall Java
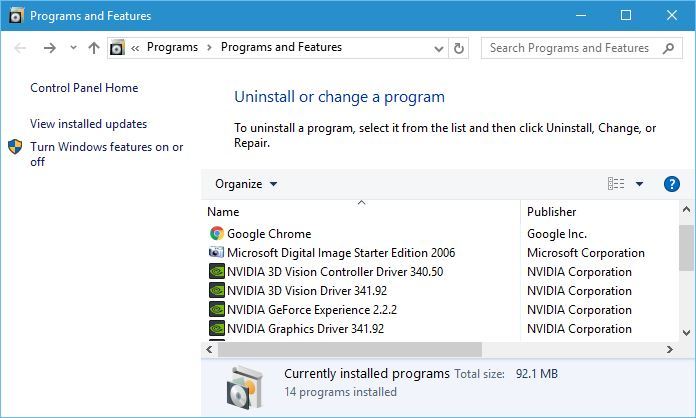
- Reinstalling Java might also fix the javaw.exe error for users with antiquated Java versions. To reinstall Java, enter appwiz.cpl in Run and click OK.

- Select Java and click Uninstall.
- Select the Yes option on the dialog box that opens.
- Restart Windows after uninstalling Java.
- Download Java installer.
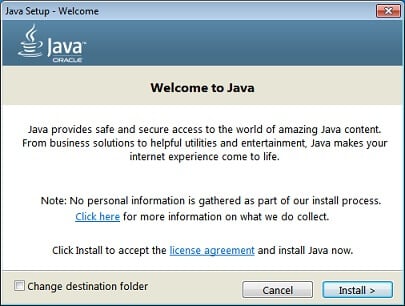
- Click the Java installer file to open the setup window below.

- Press the Install button on that window.
Those are three resolutions that will probably resolve the Windows cannot find javaw.exe error for most users. You may then open your Java program with the javaw.exe error fixed.
Don’t hesitate to follow the topic on our website and check out this Java section too.
If you want to keep up with everything related to this topic, check out our Java section. You can find additional recommendations, fixes, and also.
- Windows cannot find: Fix this error for good [Full Guide]
- WHEA Internal Error: Fix it Using These 9 Quick Methods
Solving glitches is our specialty, so bookmark our Windows 10 Errors Hub if you need assistance with other PC-related problems.
Since your goal is getting this result as quickly as possible, apply the same solutions when dealing with:
- javaw.exe not found – Users describe that they keep seeing the same message on their computer. Since it cannot find a working Java installation, we can only recommend reinstalling it.
- Windows cannot find javaw.exe ASDM – There are times when users may not even get the ASDM Launcher login box. Assuming you’re no stranger to this error, quickly scanning your device is a wise move.
![]()
Newsletter
Fix the Windows cannot find javaw.exe using the solutions below
by Matthew Adams
Matthew is a freelancer who has produced a variety of articles on various topics related to technology. His main focus is the Windows OS and all the things… read more
Updated on December 13, 2022
Reviewed by
Vlad Turiceanu
Passionate about technology, Windows, and everything that has a power button, he spent most of his time developing new skills and learning more about the tech world. Coming… read more
- Facing the error Windows cannot find javaw.exe is frustrating when trying to launch Java programs.
- To quickly solve it, you can perform a quick malware scan or reinstall Java.
- You can also try to add the Javaw.exe path to the Environment Variable Path.
- Find below step-by-step instructions on how to carry out all these methods.
XINSTALL BY CLICKING THE DOWNLOAD FILE
This software will repair common computer errors, protect you from file loss, malware, hardware failure and optimize your PC for maximum performance. Fix PC issues and remove viruses now in 3 easy steps:
- Download Restoro PC Repair Tool that comes with Patented Technologies (patent available here).
- Click Start Scan to find Windows issues that could be causing PC problems.
- Click Repair All to fix issues affecting your computer’s security and performance
- Restoro has been downloaded by 0 readers this month.
Javaw.exe is a process that launches Java programs (jar files included). However, a Windows cannot find javaw.exe error message can pop up for some users when they try to launch Java software.
The full error message states: Windows cannot find javaw.exe. Make sure you typed the name correctly, and then try again. These are some of the best fixes for that error message.
What is javaw.exe?
Javaw.exe is a process that is part of the Java Runtime Environment (JRE). In essence, the javaw.exe command is the same as java.exe, but javaw.exe does not have an associated console window.
Basically, it’s a non-essential system process that is opened by other programs. We wouldn’t recommend ending or deleting it unless it causes problems.
What to do if javaw.exe is missing on Windows 10?
1. Scan for malware
If you already use Eset Internet Security, open the main window and follow these simple steps:
1. Select Computer scan from the ribbon on the left.
2. Click on the Scan your computer button and wait for the process to complete.
3. When the scan is finished, you will get a report showing the number of scanned, infected, and cleaned objects.
Alternatively, if you do not have Eset Internet Security on your computer, you can still do a full computer scan with its free scanner. You can download it for free and it will thoroughly scan your computer just as we showed in the steps below. You can only run this utility once, but it can be a quick fix if you don’t use an antivirus already.
The reason we recommend Eset Internet Security is because it uses multi-layered protection while being very lightweight. This type of technology ensures faster detection rates so there are higher chances that threats will be blocked or removed before they get a chance to impact your system.
Eset also has good data protection features that protect against any data leaks. It includes specific security features for safer online purchases.
Some PC issues are hard to tackle, especially when it comes to corrupted repositories or missing Windows files. If you are having troubles fixing an error, your system may be partially broken.
We recommend installing Restoro, a tool that will scan your machine and identify what the fault is.
Click here to download and start repairing.
Additional features include parental controls, webcam and microphone protection, and a dedicated anti-malware utility.
If you don’t have it on your device already, we recommend giving it a try. Eset offers 30-day free trials for all versions of its software, so you don’t need to make an investment if you are not satisfied with the product.
Eset Internet Security
Guard your devices with advanced multi-layered protection that keeps all threats at bay.
2. Add the Javaw.exe Path to the Environment Variable Path
- Press the Windows key + R to launch Run.
- Input sysdm.cpl in Run and click OK to open the window shown directly below.
- Select the Advanced tab.
- Press the Environment Variables button to open the window in the snapshot below.
- Click the New button under System variables to open a New System Variable window.
- Enter Path in the Variable name text box.
- Then, input the exact path of your javaw.exe file. The default javaw.exe path would be something like
C:Program files(x86)javajre7binorC:Program files(x86)javajre8binon 64-bit Windows platforms. - If you’re not sure what path to enter, press the Windows key + Q hotkey to open Cortana. Then enter java in the search box.
- Right-click javaw and select Open file location.
- Thereafter, File Explorer will open the folder that includes javaw.exe. Enter the folder path open in File Explorer into the Variable value text box on the New System Variable window.
- Press the OK button on the New System Variable window.
- Click OK on the Environment Variables window.
The javaw.exe error often arises because Windows can’t find the Java program. So, adding the exact javaw.exe path to system variables often fixes the Windows cannot find javaw.exe error.
Follow the guidelines above to add a new javaw.exe system variable path.
3. Reinstall Java
- Reinstalling Java might also fix the javaw.exe error for users with antiquated Java versions. To reinstall Java, enter appwiz.cpl in Run and click OK.
- Select Java and click Uninstall.
- Select the Yes option on the dialog box that opens.
- Restart Windows after uninstalling Java.
- Download Java installer.
- Click the Java installer file to open the setup window below.
- Press the Install button on that window.
Those are three resolutions that will probably resolve the Windows cannot find javaw.exe error for most users. You may then open your Java program with the javaw.exe error fixed.
Don’t hesitate to follow the topic on our website and check out this Java section too.
If you want to keep up with everything related to this topic, check out our Java section. You can find additional recommendations, fixes, and also.
- Windows cannot find: Fix this error for good [Full Guide]
- WHEA Internal Error: Fix it Using These 9 Quick Methods
- Windows Update Error 80200053: 4 Quick Fixes
- Your Computer Could Not Connect to Another Console Session [Fixed]
Solving glitches is our specialty, so bookmark our Windows 10 Errors Hub if you need assistance with other PC-related problems.
Since your goal is getting this result as quickly as possible, apply the same solutions when dealing with:
- javaw.exe not found – Users describe that they keep seeing the same message on their computer. Since it cannot find a working Java installation, we can only recommend reinstalling it.
- Windows cannot find javaw.exe ASDM – There are times when users may not even get the ASDM Launcher login box. Assuming you’re no stranger to this error, quickly scanning your device is a wise move.
![]()
Newsletter
For the sake of completeness, let me mention that there are some places (on a Windows PC) to look for javaw.exe in case it is not found in the path:
(Still Reimeus’ suggestion should be your first attempt.)
1.
Java usually stores it’s location in Registry, under the following key:
HKLMSoftwareJavaSoftJava Runtime Environement<CurrentVersion>JavaHome
2.
Newer versions of JRE/JDK, seem to also place a copy of javaw.exe in ‘C:WindowsSystem32’, so one might want to check there too (although chances are, if it is there, it will be found in the path as well).
3.
Of course there are the «usual» install locations:
- ‘C:Program FilesJavajre*bin’
- ‘C:Program FilesJavajdk*bin’
- ‘C:Program Files (x86)Javajre*bin’
- ‘C:Program Files (x86)Javajdk*bin’
[Note, that for older versions of Windows (XP, Vista(?)), this will only help on english versions of the OS. Fortunately, on later version of Windows «Program Files» will point to the directory regardless of its «display name» (which is language-specific).]
A little while back, I wrote this piece of code to check for javaw.exe in the aforementioned places. Maybe someone finds it useful:
static protected String findJavaw() {
    Path pathToJavaw = null;
    Path temp;

    /* Check in Registry: HKLMSoftwareJavaSoftJava Runtime Environement<CurrentVersion>JavaHome */
    String keyNode = "HKLM\Software\JavaSoft\Java Runtime Environment";
    List<String> output = new ArrayList<>();
    executeCommand(new String[] {"REG", "QUERY", """ + keyNode + """,
                                 "/v", "CurrentVersion"},
                   output);
    Pattern pattern = Pattern.compile("\s*CurrentVersion\s+\S+\s+(.*)$");
    for (String line : output) {
        Matcher matcher = pattern.matcher(line);
        if (matcher.find()) {
            keyNode += "\" + matcher.group(1);
            List<String> output2 = new ArrayList<>();
            executeCommand(
                    new String[] {"REG", "QUERY", """ + keyNode + """,
                                  "/v", "JavaHome"},
                    output2);
            Pattern pattern2
                    = Pattern.compile("\s*JavaHome\s+\S+\s+(.*)$");
            for (String line2 : output2) {
                Matcher matcher2 = pattern2.matcher(line2);
                if (matcher2.find()) {
                    pathToJavaw = Paths.get(matcher2.group(1), "bin",
                                            "javaw.exe");
                    break;
                }
            }
            break;
        }
    }
    try {
        if (Files.exists(pathToJavaw)) {
            return pathToJavaw.toString();
        }
    } catch (Exception ignored) {}

    /* Check in 'C:WindowsSystem32' */
    pathToJavaw = Paths.get("C:\Windows\System32\javaw.exe");
    try {
        if (Files.exists(pathToJavaw)) {
            return pathToJavaw.toString();
        }
    } catch (Exception ignored) {}

    /* Check in 'C:Program FilesJavajre*' */
    pathToJavaw = null;
    temp = Paths.get("C:\Program Files\Java");
    if (Files.exists(temp)) {
        try (DirectoryStream<Path> dirStream
                = Files.newDirectoryStream(temp, "jre*")) {
            for (Path path : dirStream) {
                temp = Paths.get(path.toString(), "bin", "javaw.exe");
                if (Files.exists(temp)) {
                    pathToJavaw = temp;
                    // Don't "break", in order to find the latest JRE version
                }
            }
            if (pathToJavaw != null) {
                return pathToJavaw.toString();
            }
        } catch (Exception ignored) {}
    }

    /* Check in 'C:Program Files (x86)Javajre*' */
    pathToJavaw = null;
    temp = Paths.get("C:\Program Files (x86)\Java");
    if (Files.exists(temp)) {
        try (DirectoryStream<Path> dirStream
                = Files.newDirectoryStream(temp, "jre*")) {
            for (Path path : dirStream) {
                temp = Paths.get(path.toString(), "bin", "javaw.exe");
                if (Files.exists(temp)) {
                    pathToJavaw = temp;
                    // Don't "break", in order to find the latest JRE version
                }
            }
            if (pathToJavaw != null) {
                return pathToJavaw.toString();
            }
        } catch (Exception ignored) {}
    }

    /* Check in 'C:Program FilesJavajdk*' */
    pathToJavaw = null;
    temp = Paths.get("C:\Program Files\Java");
    if (Files.exists(temp)) {
        try (DirectoryStream<Path> dirStream
                = Files.newDirectoryStream(temp, "jdk*")) {
            for (Path path : dirStream) {
                temp = Paths.get(path.toString(), "jre", "bin", "javaw.exe");
                if (Files.exists(temp)) {
                    pathToJavaw = temp;
                    // Don't "break", in order to find the latest JDK version
                }
            }
            if (pathToJavaw != null) {
                return pathToJavaw.toString();
            }
        } catch (Exception ignored) {}
    }

    /* Check in 'C:Program Files (x86)Javajdk*' */
    pathToJavaw = null;
    temp = Paths.get("C:\Program Files (x86)\Java");
    if (Files.exists(temp)) {
        try (DirectoryStream<Path> dirStream
                = Files.newDirectoryStream(temp, "jdk*")) {
            for (Path path : dirStream) {
                temp = Paths.get(path.toString(), "jre", "bin", "javaw.exe");
                if (Files.exists(temp)) {
                    pathToJavaw = temp;
                    // Don't "break", in order to find the latest JDK version
                }
            }
            if (pathToJavaw != null) {
                return pathToJavaw.toString();
            }
        } catch (Exception ignored) {}
    }

    return "javaw.exe";   // Let's just hope it is in the path :)
}
Для начала, javaw.exe — это исполняемый файл, который принадлежит платформе Java и реализует важную функцию, связанную со службами Java. Он также известен как Java Web Start Launcher. На самом деле этот процесс не является важным для Windows, однако различные сбои могут привести к неисправностям и ошибкам приложений, запущенных на платформе Java. После неудачного запуска программы на основе Java вы увидите всплывающее сообщение
«Windows не может найти файл javaw.exe. Убедитесь, что вы правильно ввели имя, а затем повторите попытку ».
По всей видимости, проблема означает, что файл javaw.exe отсутствует или поврежден. Иногда такие нарушения могут быть вызваны вмешательством вручную или вредоносным ПО, которое может изменить настройки. Поэтому мы подготовили несколько методов, которые помогут легко решить проблему и продолжить использование программного обеспечения Java без ошибок.

Скачать средство восстановления Windows
Скачать средство восстановления Windows

Существуют специальные утилиты для восстановления Windows, которые могут решить проблемы, связанные с повреждением реестра, неисправностью файловой системы, нестабильностью драйверов Windows. Мы рекомендуем вам использовать Advanced System Repair Pro, чтобы исправить ошибку «Windows не может найти javaw.exe» в Windows 10.
1. Переустановите или обновите Java.
Один из самых простых способов решить ошибку «Windows не может найти javaw.exe» — это обновить или переустановить Java. Этот способ гарантирует, что вы установите чистую и последнюю версию Java, которую можно загрузить с официального сайта. Это не займет много времени, вы можете воспользоваться прилегающими инструкциями ниже:
- Нажмите Windows + R сочетание клавиш, затем вставьте
appwiz.cpltoи нажмите OK. - В открывшемся списке приложений найдите и щелкните правой кнопкой мыши по Java. Потом выберите Удалить.
- Следуйте инструкциям на экране, чтобы завершить удаление.
- Перезагрузите компьютер.
- После этого перейдите на Официальный сайт Java и загрузите последнюю версию для своей системы.
- Откройте загруженный файл и нажмите Установить.
- Наконец, когда Java переустановлена, вы можете попробовать открыть конфликтующие приложения.
2. Добавьте путь к Javaw.exe в Путь переменной среды.
Поскольку Windows утверждает, что ей не удалось найти путь к файлу javaw.exe, мы можем попытаться указать путь к файлу вручную. В редких случаях Windows не может определить местоположение файла, в результате чего его необходимо указывать вручную. Для этого выполните следующие шаги:
- Щелкните правой кнопкой мыши по Этот компьютер, а затем выберите Свойства.
- В открывшемся окне выберите вкладку Дополнительные параметры системы и нажмите внизу кнопку Переменные среды.
- После этого нажмите Новинки под Системные переменные.
- Как только появится строка Новая системная переменная окно появилось, введите Path в Имя переменной текстовое окно.
- Затем в Значение переменной текстовом поле, вставьте путь к местоположению Java. Если вы не уверены, где он находится, вы можете сделать следующее:
- Тип
javawво вкладку поиска рядом с Меню Пуск кнопку. - Щелкните правой кнопкой мыши и выберите Открыть расположение файла.
- Затем вы увидите путь к Java, который вы можете скопировать и вставить в Значение переменной текстовое поле.
- По завершении нажмите OK для сохранения изменений.
Надеемся, Windows перестанет сталкиваться с проблемой нахождения пути к программам и, наконец, запустит нужные приложения без сбоев.
3. Сканирование на наличие вредоносных программ.
Как показывает статистика, вредоносное ПО сейчас считается одной из самых частых причин многих проблем на устройствах. После проникновения он может изменять системные настройки, поэтому повреждает различные файлы, что может привести к многочисленным ошибкам. Ошибка «Windows не может найти javaw.exe» не является исключением и может появляться из-за наличия вредоносного ПО. Вот почему мы рекомендуем использовать Norton Antivirus для сканирования вашего устройства на наличие потенциальных угроз. Norton Antivirus — это высококачественная антивирусная программа, которая обнаруживает вредоносное ПО, вызывающее системные проблемы. Вместо того, чтобы покупать программу, сначала вы можете попробовать бесплатную пробную версию. Периодическое сканирование вашего устройства очень важно, чтобы быть в курсе вашей системы и предотвратить ненужные вмешательства, которые могут поставить ваше устройство под угрозу.
Скачать антивирус Нортон
4. Запустите проверку системных файлов (SFC).
Особенно после удаления вредоносных программ, которые могут изменить и повредить некоторые настройки, Windows предлагает встроенную функцию, которая может сканировать ваше устройство на наличие ошибок и автоматически исправлять их. Для этого выполните следующее:
- Откройте приложение Командная строка , введя
cmdво вкладку поиска рядом с Меню Пуск кнопку. - В появившейся консоли введите
sfc /scannowкоманду и нажмите Enter. - После того, как Windows просканирует ошибки и исправит их, перезагрузите компьютер.
Это наиболее актуальные решения, которые можно применить для устранения ошибки «Windows не может найти javaw.exe». Большинство шагов, упомянутых в этом руководстве, также эффективны при решении аналогичных проблем, поскольку большинство ошибок обычно связаны с внутренними нарушениями системы, устаревшим или поврежденным программным обеспечением. Также есть некоторые утилиты, которые могут автоматически обнаруживать отсутствующие или поврежденные компоненты и впоследствии восстанавливать их. Однако мы настаиваем на загрузке таких инструментов только с официальных / заслуживающих доверия сайтов, чтобы избежать поддельных предложений, которые могут включать трояны, вирусы, программы-вымогатели и другие потенциально опасные программы, которые могут навредить вашим данным.
На чтение 7 мин. Просмотров 19.7k. Опубликовано 03.09.2019
Многие веб-сайты используют Java для предоставления вам определенных функций. Помимо веб-сайтов, Java и Java-приложения могут также запускаться на вашем ПК локально.
Java-приложения сохраняются в виде jar-файлов, но многие пользователи сообщают, что jar-файлы не открываются в Windows 10. Хотя это может быть большой проблемой, но есть способ ее исправить!
Содержание
- Файлы JAR не открываются в Windows 10 – как мы можем это исправить?
- Исправлено – файлы Jar не открываются в Windows 10
- Загрузите этот инструмент, мы настоятельно рекомендуем
Файлы JAR не открываются в Windows 10 – как мы можем это исправить?
Исправлено – файлы Jar не открываются в Windows 10
Решение 1. Переустановите или обновите Java Runtime Environment .
Если вы не можете запустить jar-файлы на ПК с Windows 10, возможно, вам придется переустановить Java Runtime Environment. Для этого выполните следующие действия:
- Нажмите Windows Key + I , чтобы открыть приложение «Настройки».
-
Когда откроется Приложение настроек , перейдите в раздел Система . Теперь выберите Приложения и функции на левой панели.

- Найдите Java в списке и выберите вариант Удалить .

После этого перейдите на веб-сайт Java и загрузите последнюю версию программного обеспечения.
После установки проверьте, решена ли проблема. Имейте в виду, что удаление предыдущей установки Java не обязательно, поэтому вы можете пропустить этот шаг и просто установить последнюю версию поверх.
Java также будет автоматически проверять наличие обновлений, и если обновления будут доступны, вы получите уведомление.
Чтобы обновить Java, просто нажмите на уведомление и выберите параметр Обновить . Теперь следуйте инструкциям для завершения обновления.
Загрузите этот инструмент, мы настоятельно рекомендуем
Вы можете открывать файлы .jar и другие сотни различных форматов с помощью одного приложения. FileViewer Plus 3 – это универсальный просмотрщик файлов для Windows, который может открывать и отображать более 300 различных типов файлов. Вы также можете редактировать текстовые и графические файлы. Скачайте его бесплатно с официального сайта или купите по доступной цене.
- Загрузить сейчас FileViewer Plus 3
Решение 2. Установите сопоставление файлов
Файлы Jar не могут быть запущены на вашем компьютере, если у вас нет соответствующих ассоциаций. Например, файлы JAR могут быть связаны для запуска с другими приложениями, или они могут полностью не иметь ассоциации файлов.
Если ситуация последняя, вы не сможете запускать jar-файлы на вашем ПК. Однако вы можете легко решить эту проблему, изменив сопоставление файлов для файлов JAR. Для этого выполните следующие действия:
-
Откройте Настройки приложения . Перейдите в Систему> Приложения по умолчанию .
-
Прокрутите страницу до конца и выберите Выбор приложений по умолчанию по типу файла .
-
Найдите тип файла .jar и выберите приложение по умолчанию.


Этот метод предлагает ограниченные возможности, и вы можете выбирать только приложения, распознаваемые Windows 10. К счастью, есть другой способ, который вы можете попробовать. Чтобы изменить ассоциации файлов, выполните следующие действия:
-
Нажмите Windows Key + X , чтобы открыть меню Win + X, и выберите Панель управления из списка.
-
Когда откроется Панель управления , выберите Программы по умолчанию .
-
Нажмите Связать тип файла или протокол с программой .
-
Найдите файл .jar в списке и дважды щелкните его.
-
Появится список предлагаемых приложений. Нажмите Другие приложения .
-
Прокрутите весь путь вниз и выберите Найдите другое приложение на этом ПК .
- Найдите файл javaw.exe . По умолчанию приложение должно находиться в папке Program Files. Выберите приложение и выберите его по умолчанию для файлов .jar.
- Необязательно: Некоторые пользователи рекомендуют изменить параметры javaw.exe . Для этого просто найдите файл и создайте его ярлык. Нажмите его правой кнопкой мыши и перейдите в Свойства . Теперь найдите файл Target и добавьте –jar «% 1»% . Обязательно выберите этот недавно созданный ярлык в Шаг 7 .


Вы также можете изменить сопоставление файлов, щелкнув правой кнопкой мыши файл JAR и выбрав Открыть с помощью> Выбрать другое приложение . После этого выполните шаги с 5 по 8, описанные выше.

Обнаружены проблемы с ассоциацией файлов Windows? Не беспокойтесь, мы вернулись с этим руководством!
Решение 3 – используйте Jarfix
Если вы не можете открыть файлы JAR в Windows 10, вы можете решить проблему с помощью Jarfix. Как упоминалось ранее, эти типы проблем могут возникать из-за ассоциации файлов, но вы можете легко исправить их с помощью этого простого приложения.
Для этого выполните следующие действия:
- Скачать Jarfix.
- Запустите приложение и следуйте инструкциям на экране. Имейте в виду, что вам нужно запустить это приложение от имени администратора, чтобы оно работало должным образом.
После использования этого приложения вы сможете запускать файлы JAR в Windows 10 без каких-либо проблем.
Решение 4. Создайте файл .bat
По словам пользователей, вы можете запускать JAR-файлы в Windows 10 с помощью этого простого обходного пути. Это решение требует, чтобы вы создали файл .bat и использовали его каждый раз, когда хотите запустить определенный файл JAR.
Процесс довольно прост, и вы можете сделать это, выполнив следующие действия:
-
Найдите свой файл JAR. В этой же папке создайте новый файл Блокнот . Для этого щелкните правой кнопкой мыши пустое место в каталоге и выберите Создать> Текстовый документ .
-
Когда откроется Блокнот , введите java -jar filename.jar . Обязательно замените filename.jar на фактическое имя файла.
-
Перейдите в Файл> Сохранить как .
-
Установите для Сохранить как тип значение Все файлы . Теперь введите желаемое имя для файла. Помните, что вам нужно иметь .bat в качестве расширения, иначе решение не сработает. Сохраните файл в том же месте, где находится ваш jar-файл.


После этого найдите файл .bat и дважды щелкните по нему. Ваш файл JAR откроется. Имейте в виду, что вам нужно повторять этот процесс для каждого файла JAR, который вы хотите запустить на вашем компьютере.
Кроме того, обязательно сохраните файл .bat в том же месте, где находится файл JAR.
Решение 5. Переместите файл JAR в корневой каталог и запустите его с помощью командной строки .
По словам пользователей, вы можете запускать JAR-файлы в Windows 10 просто с помощью командной строки. Для этого найдите файл jar и переместите его в корневой каталог, например, C .
После этого вам необходимо выполнить следующие шаги:
-
Нажмите Windows Key + X и выберите в меню Командная строка (Администратор) .
-
Когда откроется Командная строка , введите следующие команды:
- компакт-диск
-
java -jar filename.jar


После этого ваш файл jar должен открыться без проблем. Помните, что вам не нужно перемещать файл JAR в корневой каталог, но благодаря этому вы сможете быстрее получить доступ к файлу.
Если вы решите не перемещать файл, вам нужно использовать команду cd , чтобы перейти в каталог, где находится файл jar.
Кроме того, вы можете ввести java -jar и указать путь к файлу jar. Это не лучшее решение, но это надежный обходной путь, поэтому не стесняйтесь его пробовать.
Работа в командной строке будет похожа на прогулку по парку после прочтения нашего руководства!
Решение 6 – используйте JAR Runner
JAR Runner – еще одно бесплатное приложение, которое может помочь вам открыть файлы JAR в Windows 10. Просто скачайте и установите этот инструмент и перетащите файл JAR в файл JAR Runner .exe.
Кроме того, вы также можете открыть JAR-файлы с помощью JAR Runner. Это простое и бесплатное приложение, поэтому обязательно скачайте JAR Runner.
Решение 7. Проверьте правильность вашего расширения .
Если вы не можете открыть загруженный файл JAR, вам необходимо проверить его расширение. Некоторые веб-браузеры могут не сохранять файлы JAR должным образом, поэтому вам нужно проверить их расширение.
Для этого выполните следующие действия:
- Найдите проблемный файл JAR в проводнике.
-
Перейдите в меню Вид и выберите Расширения имен файлов .
- Теперь проверьте, имеет ли ваш файл jar расширение .jar в конце. Если нет, переименуйте файл и измените расширение на .jar .
- После этого попробуйте снова запустить файл.

Если эта проблема не устранена, вы можете проверить свой браузер.Иногда он может загружать файлы JAR неправильно и может вызвать эту проблему.
Чтобы исправить это, обязательно используйте другой браузер для загрузки файла и проверьте, решает ли это проблему.
Файлы JAR, не открывающиеся в Windows 10, могут быть большой проблемой, особенно если вы часто используете приложения Java. Тем не менее, вы сможете решить проблему, просто воспользовавшись одним из наших решений!
Дайте нам знать, если один из них работал для вас в комментариях ниже!
Узнайте, как запускать jar-файлы, как эксперт, с нашим полным руководством!
Примечание редактора . Это сообщение было первоначально опубликовано в апреле 2017 года и было обновлено и обновлено для обеспечения свежести, точности и полноты. Мы хотим быть уверены, что в нашем списке представлены лучшие продукты, которые будут соответствовать вашим потребностям.
C: Users Имя пользователя AppData LocalLow Sun Java Deployment кэш
папка в формате JAR. Вы можете установить уровень сжатия для этих файлов JAR и даже установить сумму, которая будет выделена для хранения этих файлов.
Вы можете просмотреть файлы, нажав кнопку Просмотр . 
Чтобы удалить эти временные файлы JAR Java, нажмите Удалить файлы . Теперь вы можете выбрать, какие файлы вы хотите удалить, и нажмите кнопку ОК.
Чтобы очистить кэш Java с помощью командной строки, откройте окна командной строки, введите следующую команду и нажмите Enter:
Мы склонны игнорировать обновление нашей Java. Но очень важно, чтобы мы всегда были уверены, что вы используете последнюю версию Java, поскольку уязвимости в Java часто используются для компрометации вашего компьютера. Последняя версия Java содержит важные улучшения для повышения безопасности, производительности и стабильности приложений Java, которые работают на вашем компьютере. Всякий раз, когда дыры в безопасности обнаруживаются, они исправляются, и поэтому обязательно убедитесь, что у вас установлена последняя версия java, поскольку она включает исправления уязвимостей.
Вы можете настроить параметры обновления Java, нажав на вкладку Обновить .
Убедитесь, что Автоматически проверять наличие обновлений . Нажав на кнопку Дополнительно , вы сможете установить частоту проверок обновлений.
Кстати, я заметил, что прошло много времени с тех пор, как я обновил Java. Поэтому я нажал на Обновить сейчас , чтобы начать процесс обновления. Это запустит процесс juscheck.exe , который проверит наличие обновлений и, соответственно, проинформирует вас.
Нажав на кнопку «Установить», вы начнете процесс обновления. По завершении нажмите «Закрыть».
Вкладка Java позволяет просматривать и управлять версиями и настройками среды выполнения Java для приложений и апплетов Java.
Вкладка Безопасность позволяет просматривать типы сертификатов, позволяющие идентифицировать себя.
На вкладке Дополнительно можно настроить другие параметры.
Хранение старых и неподдерживаемых версий Java в вашей системе представляет серьезную угрозу безопасности.
Более старые версии SunJava (до JRE 6 с обновлением 7) действительно сохранялись при установке обновлений и должны быть удалены, так как более старые версии SunJava очень уязвимы для Winfixer/Vundo. С 2005 года вплоть до обновления в конце прошлого года до обновления 10 JRE 6 для SunMicrosystems и Sun Microsystems, чтобы автообновление SunJava удаляло предыдущие (уязвимые) версии программы. Обновления от JRE 6 Update 10 forward находятся в автономной папке «jre6», которая перезаписывается, если установлена новая JRE. Даже при использовании самой последней версии SunJava, если на вашем компьютере все еще находятся более ранние, уязвимые версии, они уязвимы для заражения.К сожалению, простое использование программ «Установка и удаление программ» для удаления старых версий неэффективно.
Мы предлагаем вам попробовать JavaRa. После обновления Java до его последней версии сегодня я запустил JavaRa и использовал его для удаления старых версий Java.

Он обнаружил две старые версии на моем компьютере, которые я затем удалил.

ПРИМЕЧАНИЕ. Мой коллега по MVP и мод Corrine TWCF добавляет: JavaRa не была обновлена для поддержки удаления JRE 7 и, по-видимому, фактически имеет проблемы после JRE 6u32. Он перешел на SingularLabs.com. Кроме того, Пол Маклейн больше не поддерживает JavaRa, а Фриде Фрис все еще поддерживает.
Java Скачать
Вы можете скачать и установить Java для Windows вручную с Java.com здесь.
Надеюсь, вы узнали что-то новое здесь, в этом посте. Если у вас есть что добавить, пожалуйста, сделайте это в разделе комментариев.
9 Installation of the JDK and the JRE on Microsoft Windows Platforms
System Requirements for Installing the JDK and the JRE on 64-Bit Windows Platform
The JDK and the JRE have minimum processor, disk space, and memory requirements for 64-bit Windows platform.
Before installing the JDK or the JRE on your 64-bit Windows platform, you must verify that it meets the following minimum processor, disk space, and memory requirements.
Both the JDK and JRE require at minimum a Pentium 2 266 MHz processor.
Disk Space Requirements
For JDK 10 , you are given the option of installing the following features:
Public Java Runtime Environment
When you install 64-bit JDK, then 64-bit public JRE also gets installed. The following table provides the disk requirements for the installed features:
| JDK | Installed Image |
|---|---|
| Development Tools: 64-bit platform | 500 MB |
| Source Code | 54.2 MB |
| JRE | Installed Image |
|---|---|
| Public Java Runtime Environment | 200 MB |
| Java Update | 2 MB |
On Windows 64-bit operating systems, the Java runtime requires a minimum of 128 MB of memory.
The minimum physical RAM is required to run graphically based applications. More RAM is recommended for applets running within a browser using the Java Plug-in. Running with less memory may cause disk swapping, which has a severe effect on performance. Very large programs may require more RAM for adequate performance.
JDK and JRE Installation Instruction Notation for Windows
For any text in this document that contains the following notation, you must substitute the appropriate update version number:
If you are downloading the JDK installer for 64-bit systems for update 10 Interim 0, Update 2, and Patch 1, then the file name jdk- 10 . interim.update.patch _windows-x64_bin.exe becomes jdk- 10 .0.2.1_windows-x64_bin.exe .
If you are downloading the JRE installer for 64-bit systems for update 10 Interim 0, Update 2, and Patch 1, then the file name jre- 10 . interim.update.patch _windows-x64_bin.exe becomes jre- 10 .0.2.1_windows-x64_bin.exe .
JDK Installation Instructions for Windows
You run a self-installing executable file to unpack and install the JDK on Windows computers.
Install JDK on Windows computers by performing the actions described in the following topics:
Downloading the JDK Installer
In a browser, go to the Java SE Development Kit 10 Downloads page and click Accept License Agreement . Under the Download menu, click the Download link that corresponds to the .exe for your version of Windows.
Download the file jdk- 10 . interim.update.patch _windows-x64_bin.exe .
Verify the successful completion of file download by comparing the file size on the download page and your local drive.
Running the JDK Installer
- Start the JDK 10 installer by double-clicking the installer’s icon or file name in the download location.
- Follow the instructions provided by the Installation wizard.
Installing the JDK Silently
Instead of double-clicking or opening the JDK installer, you can perform a silent, noninteractive, JDK installation by using command-line arguments.
The following table lists example installation scenarios and the commands required to perform them. The notation jdk stands for the downloaded installer file base name, such as jdk- 10 _windows-x64_bin.exe .
| Installation Scenario | Command |
|---|---|
| Install JDK and public JRE in silent mode. | |
| Install development tools and source code in silent mode but not the public JRE. | |
| Install development tools, source code, and the public JRE in silent mode. | |
| Install the public JRE in the specified directory C:test in silent mode. |
Setting the PATH Environment Variable
It is useful to set the PATH variable permanently for JDK 10 so that it is persistent after rebooting.
The PATH variable is set automatically for the JRE. This topic only applies to the JDK.
If you do not set the PATH variable, then you must specify the full path to the executable file every time that you run it. For example:
- Select Control Panel and then System .
- Click Advanced and then Environment Variables .
- Add the location of the bin folder of the JDK installation to the PATH variable in System Variables .
The PATH environment variable is a series of directories separated by semicolons (;) and is not case-sensitive. Microsoft Windows looks for programs in the PATH directories in order, from left to right.
You should only have one bin directory for a JDK in the path at a time. Those following the first instance are ignored.
If you are not sure where to add the JDK path, append it.
The new path takes effect in each new command window that you open after setting the PATH variable.
The following is a typical value for the PATH variable:
JRE Installation Instructions for Windows
When installing JRE on Windows computers, you must select the JRE installer that is appropriate for your Windows system.
The 64-bit Windows operating systems come with a 64-bit Internet Explorer (IE) browser as the standard (default) for viewing web pages.
Install JRE on Windows computers by performing the actions described in the following topics:
JRE Proxy Settings and Authentication
To use the Windows Online Installer, you must be connected to the internet.
If you are running behind a proxy server, then you must have your proxy settings correctly configured. If they are not configured, or are incorrectly configured, then the installer will terminate with the following message:
The installer cannot proceed with the current Internet Connection settings.
Please visit the following website for more information.
If you see this message, check your proxy settings:
In the Control Panel , double-click Internet Options , select the Connections tab, and click the LAN Settings .
If you do not know what the correct settings should be, check with your internet provider or system administrator.
Downloading the JRE Installer
The JRE Installer is located on the Java SE Runtime Environment 10 Downloads page.
- In a browser, go to the Java SE Runtime Environment 10 Downloads page.
The following JRE installers are available for you to download:
Windows Offline: jre- 10 . interim.update.patch _windows-x64_bin.exe
Windows Tar: jre- 10 . interim.update.patch _windows-x64_bin.tar.gz
The Windows Offline installer and Windows installer contains everything that is required to install the JRE.
The Microsoft Windows Installer (MSI) Enterprise JRE Installer is also available, which enables you to install the JRE across your enterprise. It requires a commercial license for use in production.
Running the JRE Installer
- Start the JRE 10 Installer by double-clicking the installer’s icon or file name in the download location.
- Follow the instructions provided by the Installation wizard.
The private JRE installed with the JDK is not registered. To register the JRE, you must set the PATH environment variable to point to JAVA_HOME bin , where JAVA_HOME is the location where you installed the private JRE . See Setting the PATH Environment Variable.
By default, the Java Access Bridge is disabled. To enable it, see Enabling and Testing Java Access Bridge in the Java Platform, Standard Edition Java Accessibility Guide .
To access essential Java information and functions in Microsoft Windows 7 and Windows 10 machines, after installation, click the Start menu and then select Java . The Java directory provides access to Help, Check for Updates, and Configure Java.
The Microsoft Windows 8 and Windows 8.1 do not have a Start menu. However, the Java information is available in the following Start directory: %ALLUSERSPROFILE%MicrosoftWindowsStart MenuPrograms .
Windows Registry Settings
The installation program for the Microsoft Windows version of the Java SE Runtime Environment uses the registry to store path and version information.
It creates the following registry keys:
This key contains the string CurrentVersion , with a value that is the highest installed version on the system.
JavaHome : the full path name of the directory in which the JRE is installed
RuntimeLib : the full path name of the Java runtime DLL
HKEY_LOCAL_MACHINESoftwareJavaSoftJava Web Start
This key is created for Java Web Start.
If there are two versions of JDK or JRE installed on a system, one with the new version-string format introduced in JDK 10 , and the other with the older version format, then there will be two different CurrentVersion registry key values. For example, if JDK 1.8.0 and JDK 10 are installed, then the following registry keys are created:
«HKEY_LOCAL_MACHINESOFTWAREJavaSoftJava Development Kit» for JDK 1.8.0 and «HKEY_LOCAL_MACHINESOFTWAREJavaSoftJDK» for JDK 10 .
The registry layout for this example is:
The @CurrentVersion is a registry string in the «JDK» or «Java Development Kit» key.
For the same example, if the JRE is installed, then the registry layout is:
The @CurrentVersion is a registry string in the «JRE» or «Java Runtime Environment» key.
Beginning to Use the JDK
Use the Java item in the Windows Start menu to access essential Java information and functions, including Help, API documentation, the Java Control Panel, checking for updates, and Java Mission Control.
Java Start Menu Installed by JDK
During JDK install, Java menu items are added to the Windows Start menu to provide easy access to Java resources and a Java Development Kit folder is created in the Windows Start menu, which contains the following items:
Reference Documentation : Opens the Online API documentation web page.
Java Mission Control : Opens the Java Mission Control profiling and diagnostics tools suite.
Java Mission Control is a commercial feature available to users with a Java SE Advanced license.
During JDK installation and uninstallation processes, the appropriate start menu items are updated so that they are associated with the latest JDK version on the system
The Windows 7 and Windows 10 have a Start menu; however, the menu is not available in Windows 8 and Windows 8.1. The JDK and Java information in Windows 8 and Windows 8.1 is available in the following Start directory: %ALLUSERSPROFILE%MicrosoftWindowsStart MenuPrograms .
Java Start Menu Installed by JRE
During JRE installation, Java menu items are added to the Windows Start menu to provide easy access to Java resources and a Java folder is created in the Windows Start menu, which contains the following items:
About Java : Opens the Java Control Panel with focus on the General tab. The tab displays the latest JRE version installed on the system.
Check for Updates : Opens the Java Control Panel with focus on the Update tab
Configure Java : Opens the Java Control Panel with focus on the General tab
Get Help : Opens the Java Help Center
Visit Java.com : Opens the Java Download page
During JRE installation and uninstallation processes, the appropriate start menu items are updated so that they are associated with the latest JRE version on the system.
The Windows 7 and Windows 10 have Start menu, however the menu is not available in Windows 8 and Windows 8.1. The JRE and Java information in Windows 8 and Windows 8.1 is available in the following Start directory: %ALLUSERSPROFILE%MicrosoftWindowsStart MenuPrograms .
Java Web Start
Java Web Start is an application-deployment technology that gives you the power to run full-featured applications with a single click from your web browser.
With Java Web Start, you can download and run applications, such as a complete spreadsheet program or an internet chat client, without going through complicated installation procedures. With Java Web Start, you run applications simply by clicking a web page link. If the application is not present on your computer, Java Web Start automatically downloads all necessary files. It then caches the files on your computer so that the application is always ready to be run anytime that you want — either from an icon on your desktop or from the browser link. No matter which method you use to run the application, the most current, available version of the application is always presented to you.
Upgrading from Previous Versions
If you have a previous version of Java Web Start, do not uninstall it. Uninstalling it will cause the download cache to be cleared, and all previously installed Java Web Start application data will have to be downloaded again. The new version will write over previous installations and automatically update browsers to use the new version. The configuration files and the program files folder used by Java Web Start have changed, but all your settings will remain intact after the upgrade because Java Web Start will translate your settings to the new form.
The only way to uninstall Java Web Start is to uninstall the JDK or JRE. Uninstalling the JDK or JRE will not, however, remove the cache for previous versions of Java Web Start. Previous releases have separate uninstallation instructions for Java Web Start.
You may see a misleading message if you do the following:
Download and cache a Java Web Start application with the JDK or JRE.
Remove the JDK or JRE using Add or Remove Programs from the Windows Control Panel .
Remove the Java Web Start application using Add or Remove Programs .
When you remove the application, you see an Uninstaller Error dialog box saying:
An error occurred while trying to remove Java-Application: name App. It may have already been uninstalled. Would you like to remove Java-Application: name App from the Add or Remove program list?
If you say Yes to this, then you will see another Uninstaller Error dialog box saying:
You do not have sufficient access to remove Java-Application: name App from the Add or Remove Program list. Please contact your system administrator.
The message is displayed when you have removed the Java Web Start application while uninstallating the JDK or JRE, but this is not reflected in the Add or Remove Programs . Refresh the Add or Remove Programs by pressing F5 or reopen the panel.
To avoid seeing the misleading message, either press F5 or reopen the dialog box. Any Java Web Start application that was downloaded and cached with the JDK or JRE will no longer appear in the list of currently installed programs.
Java Plug-in
Java Plug-in technology, included as part of the JRE, establishes a connection between popular browsers and the Java platform. This connection enables applets on websites to be run within a browser on the desktop.
The Java Plug-in is automatically enabled for supported web browsers during installation of the JRE. No user intervention is necessary.
In Java SE 10 , the version of the Java Plug-in that is available in versions of the JRE prior to Java SE 6 Update 10 has been deprecated. However, this earlier version of the Java Plug-in is still shipped with Java SE 10 for compatibility purposes but is no longer fully supported. It will be removed in a future release.
Option to Disable the JRE Out-of-Date Warning
When the installed JRE falls below the security baseline or passes its built-in expiration date, an additional warning is shown to users to update their installed JRE to the latest version. For businesses that manage the update process centrally, users attempting to update their JRE individually, may cause problems.
A deployment property, deployment.expiration.check.enabled is available that can be used to disable the JRE out of date warning. To suppress this specific warning message, add the following entry in the deployment properties file:
To disable automatic updates, on the Update tab of the Java Control Panel, deselect the Check for Updates Automatically check box.
Uninstalling the JDK on Windows
Uninstalling the JRE on Windows
Use either of the following ways to uninstall JRE:
Go to Add/Remove Programs utility in the Microsoft Windows Control Panel and uninstall the older versions of JRE.
Remove JRE using the online Java Uninstall Tool.
The Java Removal Tool is integrated with the JRE installer. After JRE 10 is installed, the Java Removal Tool provides the list of outdated Java versions in the system and helps you to remove them.
The Java Uninstall tool will not run if your system administrator specified a deployment rule set in your organization.
A deployment rule set enables enterprises to manage their Java desktop environment directly and continue using legacy business applications in an environment of ever-tightening Java applet and Java Web Start application security policies. A deployment rule set enables administrators to specify rules for applets and Java Web Start applications; these rules may specify that a specific JRE version must be used. Consequently, the Java Uninstall tool will not run if it detects a deployment rule set to ensure that no required JREs are uninstalled.
See Deployment Rule Set in the Java Platform, Standard Edition Deployment Guide .
JDK Installation Troubleshooting
The following sections provide tips for working around problems that are sometimes seen during or while following installation instructions.
System Error During Decompression
If you see the error message system error during decompression , then you might not have enough space on the disk that contains your TEMP directory.
Program Cannot Be Run in DOS Mode
If you see the error message This program cannot be run in DOS mode , then do the following:
Open the MS-DOS shell or command prompt window.
Right-click the title bar.
Select the Program tab.
Ensure that the item Prevent MS-DOS-based programs from detecting Windows is not selected.
Select OK again.
Exit the MS-DOS shell.
Restart your computer.
Source Files in Notepad
In Microsoft Windows, when you create a new file in Microsoft Notepad and then save it for the first time, Notepad usually adds the .txt extension to the file name. Therefore, a file that you name Test.java is actually saved as Test.java.txt . Note that you cannot see the .txt extension unless you turn on the viewing of file extensions (in Microsoft Windows Explorer, deselect Hide file extensions for known file types under Folder Options ). To prevent the .txt extension, enclose the file name in quotation marks, such as «Test.java» when entering information in the Save As dialog box.
Characters That Are Not Part of the System Code Page
It is possible to name directories using characters that are not part of the system locale’s code page. If such a directory is part of the installation path, then generic error 1722 occurs, and installation is not completed. Error 1722 is a Windows installer error code. It indicates that the installation process has failed. The exact reason for this error is not known at this time.
To prevent this problem, ensure that the user and system locales are identical, and that the installation path contains only characters that are part of the system locale’s code page. User and system locales can be set in the Regional Options or Regional Settings control panel.
The associated bug number is 4895647.
Windows Online Installation and Java Update FAQ
These are frequently asked questions about JDK 10 and JRE 10 online installation and Java updates on Windows computers.
1. I downloaded the installer and it is less than 1 megabyte. Why is it so small?
The Windows Online Installer for the JRE will download more installer files. Using this installer helps users to avoid downloading unnecessary files.
2. I had the Java Control Panel open for Java Update and the About tab showed the version of the JRE installed in my computer. Then I ran Java Update, and the version of the JRE that the Java Control Panel is showing has not changed. Why is this?
You need to close and restart the Java Control Panel to get the updated Control Panel.
3. Netscape/Mozilla is not working correctly with Java Plug-in. Why?
First, close all the browsers sessions. If this does not work, reboot the system and try again.
4. I try to install on the D: drive and Java Update is still installing files onto the C: drive. Why?
Regardless of whether an alternate target directory was selected, Java Update needs to install some files on the Windows system drive.
5. How can I uninstall the Java Update version that I just installed?
If you want to uninstall the JRE, then use the Add/Remove Programs utility in the Microsoft Windows . Select the Control Panel and then Add/Remove Programs .
6. After the JRE bootstrap installer is downloaded and executed, why does the message «This installer cannot proceed with the current Internet Connection settings of your system. In your Windows Control Panel, please check Internet Options -> Connections to make sure the settings and proxy information are correct.» appear?
The JRE bootstrap installer uses the system Internet Connection settings to connect to the web for downloading extra files. If you are behind a firewall and require proxy settings, then ensure that the proxy settings in Internet Options/Internet Properties are set up properly (select Start , then Control Panel , then Internet Options/Internet Properties , then Connections , and then LAN Settings ). If you can browse the external web (for example, outside the firewall) with Internet Explorer, then your proxy settings are properly set up. The installer does not understand the proxy settings specified in Netscape/Mozilla.
7. I found the jusched.exe process running in the background of my system after installing JRE. Is there a way to shut it down?
The jusched.exe is the scheduler process of Java Update. This process runs automatically. To shut in the Java Control Panel on the Update tab, deselect the Check for Updates Automatically check box.
8. When I click the Update Now button from the Java Control Panel, it complains about the system being «offline.» What does that mean?
Java Update can be run only if the system is connected to the network. A system that is not connected to the network is referred to as being offline. When the Update Now is clicked, it will check the online/offline status of your system. If your computer does not have internet access, then the error message is displayed. Check that your system is currently connected to the internet and try again.
9. I followed the instructions to install a specific version of the JRE. After the installation, a message is displayed from system tray saying an update is available for download. What should I do?
The message is part of the Java Auto Update mechanism, which detects at user login time if a newer version of the JRE is available for download. In the system tray, click the Java Update icon to download and install the update.
10. I encountered the error «This installation package could not be opened. Contact the application vendor to verify that this is a valid Windows Installer package.» when running the Java SE installer.
There are several possible reasons for this error to be displayed; a few are listed:
Network connection fails.
Download manager software interrupts the download process.
Another application, such as an antivirus application, may interrupt the installation process.
To address these problems, ensure that the third-party downloader applications are turned off and the network connection is configured properly. Also, if a proxy is in use, then ensure that the proxy authentication is turned off.
11. I encountered the error «Error 1722. There is a problem with this Windows installer package. A program run as part of the setup did not finish as expected. Contact your support personnel or package vendor.»
See Error 1722: Problem with Windows Installer Package. If you encounter any other errors or issues, then you can access Java Help Center, which contains solutions for issues that you might encounter when downloading and installing Java on your system. In particular, you can search for solutions by error number. Searching for «Error 1722» returns a solution to this issue.
. как установить Java на Windows?
Во многих моих тренингах так или иначе используется Java, либо как язык программирования для разработки автотестов, либо как виртуальная машина для запуска приложений, написанных на Java — инструментов тестирования, сред разработки, и даже клиент системы видеоконференций GotoWebinar требует наличия Java.
Поэтому я решил описать процедуру установки Java для операционной системы Windows и последующей настройки системы, потому что, к сожалению, недостаточно просто “запустить инсталлятор и всегда нажимать кнопку Next”.
1. Где взять Java?
2. Какую версию выбрать?
Разумеется, последнюю доступную (на момент написания инструкции это Java 8).
Выбирая из 32-битной и 64-битной версий, берите 64-битную, если ваша операционная система это позволяет, потому что у неё менее строгие ограничения по памяти, доступной исполняемым Java-приложениям.
3. Что устанавливать, JRE или JDK?
Java Runtime Environment, или JRE — это виртуальная машина, позволяющая запускать приложения, написанные на языке программирования Java.
Java Development Kit, или JDK — это набор инструментов, для разработки программ на языке программирования Java (компилятор, архиватор, генератор документации и прочие). JRE разумеется тоже входит в дистрибутив JDK.
Правило очень простое: если вы собираетесь что-нибудь писать на языке программирования Java, значит вам потребуется JDK. А если только запускать готовые программы — тогда достаточно JRE.
4. Установка Java
Вот тут, действительно, всё просто — нужно запустить инсталлятор и следовать указаниям визарда. Можно просто всё время нажимать кнопку Next.
5. Настройка переменных окружения
К сожалению, инсталлятор Java не выполняет настройку переменных окружения, поэтому придётся сделать это вручную после установки.
Во-первых, необходимо установить переменную JAVA_HOME , которая должна указывать на директорию, в которую установлена Java. Многие программы используют эту переменную, чтобы определить, где находится Java.
Во-вторых, надо в переменную PATH добавить путь к директории %JAVA_HOME%bin . Эта переменная указывает операционной системе список директорий, в которых нужно искать исполняемые файлы, и чтобы можно было запускать Java из консоли, переменная PATH должна быть правильно настроена.
Для установки переменных окружения сначала нужно открыть свойства компьютера, либо использовав сочетание клавиш Win-Pause, либо через меню “Пуск”:
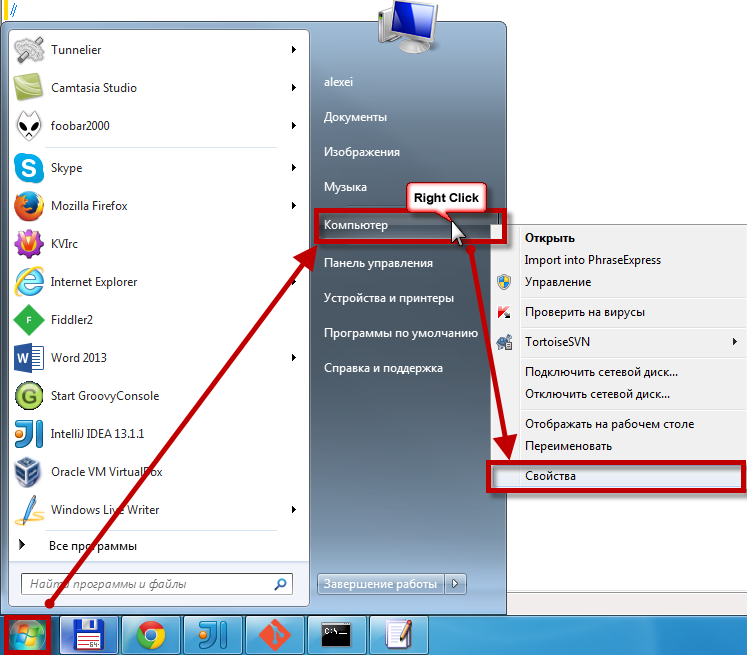
Затем нужно выбрать “Дополнительные параметры системы”, в открывшемся диалоге перейти на вкладку “Дополнительно” и нажать кнопку “Переменные среды”, после чего появится диалог настройки переменных окружения.
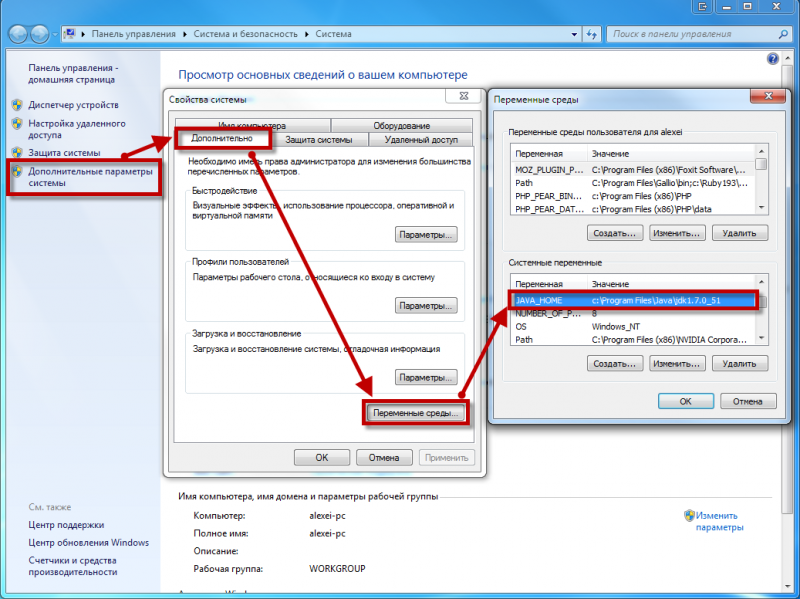
Если у вас уже есть переменная окружения JAVA_HOME — надо её отредактировать, если нет — создать новую. В качестве значения нужно указать путь к директории, куда установлена Java, то есть, например c:Program FilesJavajdk1.8.0_25 , если вы установили JDK, либо c:Program FilesJavajre1.8.0_25 , если вы установили только JRE.
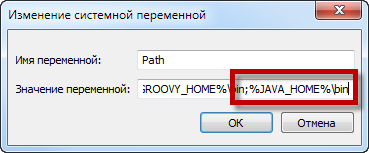
После того, как вы установили значение переменной JAVA_HOME , необходимо отредактировать значение переменной PATH, добавив туда путь к директории, где находятся исполняемые файлы Java, то есть %JAVA_HOME%bin
И сохранить всё это, закрыв все открытые диалоги в обратном порядке кнопками OK.
Обратите внимание, что если вы устанавливаете JDK, то в названии директории указывается номер версии, поэтому впоследствии, когда вы решите установить более новую версию, не забудьте поменять значение переменной окружения JAVA_HOME .
После того, как вы изменили переменные окружения, новые значения будут действительны только для новых запускаемых программ, уже запущенные программы не узнают о том, что переменные окружения поменялись. Поэтому если вы, например, пытались запустить Java из консоли и у вас не получилось из-за неправильных настроек переменной PATH , вам придётся перезапустить консоль после того, как вы поменяли значение переменной.
6. Удаление лишних файлов
Запустите консоль ( cmd ) и выполните в ней команду where java .
В результате вы должны увидеть путь к исполняемому файлу java.exe , который операционная система должна успешно обнаружить в том месте, куда вы установили Java. Если файл не нашёлся — значит неправильно настроена переменная PATH и нужно вернуться к предыдущему пункту.
Однако иногда бывает и наоборот, находятся «лишние» исполняемые файлы:
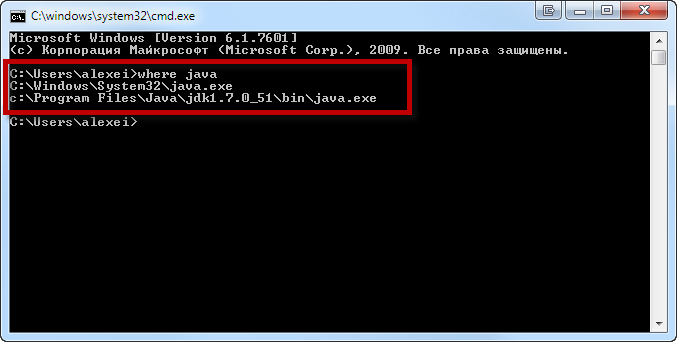
Происходит это из-за того, что инсталлятор Java вместо того, чтобы правильно настроить переменные окружения, пытается положить исполняемые файлы в директорию C:Windowssystem32
Это не очень хорошо — засоряется системная директория, может возникнуть рассогласование версий Java (в разных директориях разные версии). Поэтому надо удалить из каталога C:Windowssystem32 исполняемые файлы java.exe , javaw.exe и javaws.exe , если они там обнаружатся.
Вот и всё, теперь можно пользоваться Java. Только не забывайте о том, что после установки новой версии надо будет обновить переменную окружения JAVA_HOME !

Автор: Алексей Баранцев
Если вам понравилась эта статья, вы можете поделиться ею в социальных сетях (кнопочки ниже), а потом вернуться на главную страницу блога и почитать другие мои статьи.
Ну а если вы не согласны с чем-то или хотите что-нибудь дополнить – оставьте комментарий ниже, может быть это послужит поводом для написания новой интересной статьи.
9 Installation of the JDK and the JRE on Microsoft Windows Platforms
System Requirements for Installing the JDK and the JRE on 64-Bit Windows Platform
The JDK and the JRE have minimum processor, disk space, and memory requirements for 64-bit Windows platform.
Before installing the JDK or the JRE on your 64-bit Windows platform, you must verify that it meets the following minimum processor, disk space, and memory requirements.
Both the JDK and JRE require at minimum a Pentium 2 266 MHz processor.
Disk Space Requirements
For JDK 10 , you are given the option of installing the following features:
Public Java Runtime Environment
When you install 64-bit JDK, then 64-bit public JRE also gets installed. The following table provides the disk requirements for the installed features:
| JDK | Installed Image |
|---|---|
| Development Tools: 64-bit platform | 500 MB |
| Source Code | 54.2 MB |
| JRE | Installed Image |
|---|---|
| Public Java Runtime Environment | 200 MB |
| Java Update | 2 MB |
On Windows 64-bit operating systems, the Java runtime requires a minimum of 128 MB of memory.
The minimum physical RAM is required to run graphically based applications. More RAM is recommended for applets running within a browser using the Java Plug-in. Running with less memory may cause disk swapping, which has a severe effect on performance. Very large programs may require more RAM for adequate performance.
JDK and JRE Installation Instruction Notation for Windows
For any text in this document that contains the following notation, you must substitute the appropriate update version number:
If you are downloading the JDK installer for 64-bit systems for update 10 Interim 0, Update 2, and Patch 1, then the file name jdk- 10 . interim.update.patch _windows-x64_bin.exe becomes jdk- 10 .0.2.1_windows-x64_bin.exe .
If you are downloading the JRE installer for 64-bit systems for update 10 Interim 0, Update 2, and Patch 1, then the file name jre- 10 . interim.update.patch _windows-x64_bin.exe becomes jre- 10 .0.2.1_windows-x64_bin.exe .
JDK Installation Instructions for Windows
You run a self-installing executable file to unpack and install the JDK on Windows computers.
Install JDK on Windows computers by performing the actions described in the following topics:
Downloading the JDK Installer
In a browser, go to the Java SE Development Kit 10 Downloads page and click Accept License Agreement . Under the Download menu, click the Download link that corresponds to the .exe for your version of Windows.
Download the file jdk- 10 . interim.update.patch _windows-x64_bin.exe .
Verify the successful completion of file download by comparing the file size on the download page and your local drive.
Running the JDK Installer
- Start the JDK 10 installer by double-clicking the installer’s icon or file name in the download location.
- Follow the instructions provided by the Installation wizard.
Installing the JDK Silently
Instead of double-clicking or opening the JDK installer, you can perform a silent, noninteractive, JDK installation by using command-line arguments.
The following table lists example installation scenarios and the commands required to perform them. The notation jdk stands for the downloaded installer file base name, such as jdk- 10 _windows-x64_bin.exe .
| Installation Scenario | Command |
|---|---|
| Install JDK and public JRE in silent mode. | |
| Install development tools and source code in silent mode but not the public JRE. | |
| Install development tools, source code, and the public JRE in silent mode. | |
| Install the public JRE in the specified directory C:test in silent mode. |
Setting the PATH Environment Variable
It is useful to set the PATH variable permanently for JDK 10 so that it is persistent after rebooting.
The PATH variable is set automatically for the JRE. This topic only applies to the JDK.
If you do not set the PATH variable, then you must specify the full path to the executable file every time that you run it. For example:
- Select Control Panel and then System .
- Click Advanced and then Environment Variables .
- Add the location of the bin folder of the JDK installation to the PATH variable in System Variables .
The PATH environment variable is a series of directories separated by semicolons (;) and is not case-sensitive. Microsoft Windows looks for programs in the PATH directories in order, from left to right.
You should only have one bin directory for a JDK in the path at a time. Those following the first instance are ignored.
If you are not sure where to add the JDK path, append it.
The new path takes effect in each new command window that you open after setting the PATH variable.
The following is a typical value for the PATH variable:
JRE Installation Instructions for Windows
When installing JRE on Windows computers, you must select the JRE installer that is appropriate for your Windows system.
The 64-bit Windows operating systems come with a 64-bit Internet Explorer (IE) browser as the standard (default) for viewing web pages.
Install JRE on Windows computers by performing the actions described in the following topics:
JRE Proxy Settings and Authentication
To use the Windows Online Installer, you must be connected to the internet.
If you are running behind a proxy server, then you must have your proxy settings correctly configured. If they are not configured, or are incorrectly configured, then the installer will terminate with the following message:
The installer cannot proceed with the current Internet Connection settings.
Please visit the following website for more information.
If you see this message, check your proxy settings:
In the Control Panel , double-click Internet Options , select the Connections tab, and click the LAN Settings .
If you do not know what the correct settings should be, check with your internet provider or system administrator.
Downloading the JRE Installer
The JRE Installer is located on the Java SE Runtime Environment 10 Downloads page.
- In a browser, go to the Java SE Runtime Environment 10 Downloads page.
The following JRE installers are available for you to download:
Windows Offline: jre- 10 . interim.update.patch _windows-x64_bin.exe
Windows Tar: jre- 10 . interim.update.patch _windows-x64_bin.tar.gz
The Windows Offline installer and Windows installer contains everything that is required to install the JRE.
The Microsoft Windows Installer (MSI) Enterprise JRE Installer is also available, which enables you to install the JRE across your enterprise. It requires a commercial license for use in production.
Running the JRE Installer
- Start the JRE 10 Installer by double-clicking the installer’s icon or file name in the download location.
- Follow the instructions provided by the Installation wizard.
The private JRE installed with the JDK is not registered. To register the JRE, you must set the PATH environment variable to point to JAVA_HOME bin , where JAVA_HOME is the location where you installed the private JRE . See Setting the PATH Environment Variable.
By default, the Java Access Bridge is disabled. To enable it, see Enabling and Testing Java Access Bridge in the Java Platform, Standard Edition Java Accessibility Guide .
To access essential Java information and functions in Microsoft Windows 7 and Windows 10 machines, after installation, click the Start menu and then select Java . The Java directory provides access to Help, Check for Updates, and Configure Java.
The Microsoft Windows 8 and Windows 8.1 do not have a Start menu. However, the Java information is available in the following Start directory: %ALLUSERSPROFILE%MicrosoftWindowsStart MenuPrograms .
Windows Registry Settings
The installation program for the Microsoft Windows version of the Java SE Runtime Environment uses the registry to store path and version information.
It creates the following registry keys:
This key contains the string CurrentVersion , with a value that is the highest installed version on the system.
JavaHome : the full path name of the directory in which the JRE is installed
RuntimeLib : the full path name of the Java runtime DLL
HKEY_LOCAL_MACHINESoftwareJavaSoftJava Web Start
This key is created for Java Web Start.
If there are two versions of JDK or JRE installed on a system, one with the new version-string format introduced in JDK 10 , and the other with the older version format, then there will be two different CurrentVersion registry key values. For example, if JDK 1.8.0 and JDK 10 are installed, then the following registry keys are created:
«HKEY_LOCAL_MACHINESOFTWAREJavaSoftJava Development Kit» for JDK 1.8.0 and «HKEY_LOCAL_MACHINESOFTWAREJavaSoftJDK» for JDK 10 .
The registry layout for this example is:
The @CurrentVersion is a registry string in the «JDK» or «Java Development Kit» key.
For the same example, if the JRE is installed, then the registry layout is:
The @CurrentVersion is a registry string in the «JRE» or «Java Runtime Environment» key.
Beginning to Use the JDK
Use the Java item in the Windows Start menu to access essential Java information and functions, including Help, API documentation, the Java Control Panel, checking for updates, and Java Mission Control.
Java Start Menu Installed by JDK
During JDK install, Java menu items are added to the Windows Start menu to provide easy access to Java resources and a Java Development Kit folder is created in the Windows Start menu, which contains the following items:
Reference Documentation : Opens the Online API documentation web page.
Java Mission Control : Opens the Java Mission Control profiling and diagnostics tools suite.
Java Mission Control is a commercial feature available to users with a Java SE Advanced license.
During JDK installation and uninstallation processes, the appropriate start menu items are updated so that they are associated with the latest JDK version on the system
The Windows 7 and Windows 10 have a Start menu; however, the menu is not available in Windows 8 and Windows 8.1. The JDK and Java information in Windows 8 and Windows 8.1 is available in the following Start directory: %ALLUSERSPROFILE%MicrosoftWindowsStart MenuPrograms .
Java Start Menu Installed by JRE
During JRE installation, Java menu items are added to the Windows Start menu to provide easy access to Java resources and a Java folder is created in the Windows Start menu, which contains the following items:
About Java : Opens the Java Control Panel with focus on the General tab. The tab displays the latest JRE version installed on the system.
Check for Updates : Opens the Java Control Panel with focus on the Update tab
Configure Java : Opens the Java Control Panel with focus on the General tab
Get Help : Opens the Java Help Center
Visit Java.com : Opens the Java Download page
During JRE installation and uninstallation processes, the appropriate start menu items are updated so that they are associated with the latest JRE version on the system.
The Windows 7 and Windows 10 have Start menu, however the menu is not available in Windows 8 and Windows 8.1. The JRE and Java information in Windows 8 and Windows 8.1 is available in the following Start directory: %ALLUSERSPROFILE%MicrosoftWindowsStart MenuPrograms .
Java Web Start
Java Web Start is an application-deployment technology that gives you the power to run full-featured applications with a single click from your web browser.
With Java Web Start, you can download and run applications, such as a complete spreadsheet program or an internet chat client, without going through complicated installation procedures. With Java Web Start, you run applications simply by clicking a web page link. If the application is not present on your computer, Java Web Start automatically downloads all necessary files. It then caches the files on your computer so that the application is always ready to be run anytime that you want — either from an icon on your desktop or from the browser link. No matter which method you use to run the application, the most current, available version of the application is always presented to you.
Upgrading from Previous Versions
If you have a previous version of Java Web Start, do not uninstall it. Uninstalling it will cause the download cache to be cleared, and all previously installed Java Web Start application data will have to be downloaded again. The new version will write over previous installations and automatically update browsers to use the new version. The configuration files and the program files folder used by Java Web Start have changed, but all your settings will remain intact after the upgrade because Java Web Start will translate your settings to the new form.
The only way to uninstall Java Web Start is to uninstall the JDK or JRE. Uninstalling the JDK or JRE will not, however, remove the cache for previous versions of Java Web Start. Previous releases have separate uninstallation instructions for Java Web Start.
You may see a misleading message if you do the following:
Download and cache a Java Web Start application with the JDK or JRE.
Remove the JDK or JRE using Add or Remove Programs from the Windows Control Panel .
Remove the Java Web Start application using Add or Remove Programs .
When you remove the application, you see an Uninstaller Error dialog box saying:
An error occurred while trying to remove Java-Application: name App. It may have already been uninstalled. Would you like to remove Java-Application: name App from the Add or Remove program list?
If you say Yes to this, then you will see another Uninstaller Error dialog box saying:
You do not have sufficient access to remove Java-Application: name App from the Add or Remove Program list. Please contact your system administrator.
The message is displayed when you have removed the Java Web Start application while uninstallating the JDK or JRE, but this is not reflected in the Add or Remove Programs . Refresh the Add or Remove Programs by pressing F5 or reopen the panel.
To avoid seeing the misleading message, either press F5 or reopen the dialog box. Any Java Web Start application that was downloaded and cached with the JDK or JRE will no longer appear in the list of currently installed programs.
Java Plug-in
Java Plug-in technology, included as part of the JRE, establishes a connection between popular browsers and the Java platform. This connection enables applets on websites to be run within a browser on the desktop.
The Java Plug-in is automatically enabled for supported web browsers during installation of the JRE. No user intervention is necessary.
In Java SE 10 , the version of the Java Plug-in that is available in versions of the JRE prior to Java SE 6 Update 10 has been deprecated. However, this earlier version of the Java Plug-in is still shipped with Java SE 10 for compatibility purposes but is no longer fully supported. It will be removed in a future release.
Option to Disable the JRE Out-of-Date Warning
When the installed JRE falls below the security baseline or passes its built-in expiration date, an additional warning is shown to users to update their installed JRE to the latest version. For businesses that manage the update process centrally, users attempting to update their JRE individually, may cause problems.
A deployment property, deployment.expiration.check.enabled is available that can be used to disable the JRE out of date warning. To suppress this specific warning message, add the following entry in the deployment properties file:
To disable automatic updates, on the Update tab of the Java Control Panel, deselect the Check for Updates Automatically check box.
Uninstalling the JDK on Windows
Uninstalling the JRE on Windows
Use either of the following ways to uninstall JRE:
Go to Add/Remove Programs utility in the Microsoft Windows Control Panel and uninstall the older versions of JRE.
Remove JRE using the online Java Uninstall Tool.
The Java Removal Tool is integrated with the JRE installer. After JRE 10 is installed, the Java Removal Tool provides the list of outdated Java versions in the system and helps you to remove them.
The Java Uninstall tool will not run if your system administrator specified a deployment rule set in your organization.
A deployment rule set enables enterprises to manage their Java desktop environment directly and continue using legacy business applications in an environment of ever-tightening Java applet and Java Web Start application security policies. A deployment rule set enables administrators to specify rules for applets and Java Web Start applications; these rules may specify that a specific JRE version must be used. Consequently, the Java Uninstall tool will not run if it detects a deployment rule set to ensure that no required JREs are uninstalled.
See Deployment Rule Set in the Java Platform, Standard Edition Deployment Guide .
JDK Installation Troubleshooting
The following sections provide tips for working around problems that are sometimes seen during or while following installation instructions.
System Error During Decompression
If you see the error message system error during decompression , then you might not have enough space on the disk that contains your TEMP directory.
Program Cannot Be Run in DOS Mode
If you see the error message This program cannot be run in DOS mode , then do the following:
Open the MS-DOS shell or command prompt window.
Right-click the title bar.
Select the Program tab.
Ensure that the item Prevent MS-DOS-based programs from detecting Windows is not selected.
Select OK again.
Exit the MS-DOS shell.
Restart your computer.
Source Files in Notepad
In Microsoft Windows, when you create a new file in Microsoft Notepad and then save it for the first time, Notepad usually adds the .txt extension to the file name. Therefore, a file that you name Test.java is actually saved as Test.java.txt . Note that you cannot see the .txt extension unless you turn on the viewing of file extensions (in Microsoft Windows Explorer, deselect Hide file extensions for known file types under Folder Options ). To prevent the .txt extension, enclose the file name in quotation marks, such as «Test.java» when entering information in the Save As dialog box.
Characters That Are Not Part of the System Code Page
It is possible to name directories using characters that are not part of the system locale’s code page. If such a directory is part of the installation path, then generic error 1722 occurs, and installation is not completed. Error 1722 is a Windows installer error code. It indicates that the installation process has failed. The exact reason for this error is not known at this time.
To prevent this problem, ensure that the user and system locales are identical, and that the installation path contains only characters that are part of the system locale’s code page. User and system locales can be set in the Regional Options or Regional Settings control panel.
The associated bug number is 4895647.
Windows Online Installation and Java Update FAQ
These are frequently asked questions about JDK 10 and JRE 10 online installation and Java updates on Windows computers.
1. I downloaded the installer and it is less than 1 megabyte. Why is it so small?
The Windows Online Installer for the JRE will download more installer files. Using this installer helps users to avoid downloading unnecessary files.
2. I had the Java Control Panel open for Java Update and the About tab showed the version of the JRE installed in my computer. Then I ran Java Update, and the version of the JRE that the Java Control Panel is showing has not changed. Why is this?
You need to close and restart the Java Control Panel to get the updated Control Panel.
3. Netscape/Mozilla is not working correctly with Java Plug-in. Why?
First, close all the browsers sessions. If this does not work, reboot the system and try again.
4. I try to install on the D: drive and Java Update is still installing files onto the C: drive. Why?
Regardless of whether an alternate target directory was selected, Java Update needs to install some files on the Windows system drive.
5. How can I uninstall the Java Update version that I just installed?
If you want to uninstall the JRE, then use the Add/Remove Programs utility in the Microsoft Windows . Select the Control Panel and then Add/Remove Programs .
6. After the JRE bootstrap installer is downloaded and executed, why does the message «This installer cannot proceed with the current Internet Connection settings of your system. In your Windows Control Panel, please check Internet Options -> Connections to make sure the settings and proxy information are correct.» appear?
The JRE bootstrap installer uses the system Internet Connection settings to connect to the web for downloading extra files. If you are behind a firewall and require proxy settings, then ensure that the proxy settings in Internet Options/Internet Properties are set up properly (select Start , then Control Panel , then Internet Options/Internet Properties , then Connections , and then LAN Settings ). If you can browse the external web (for example, outside the firewall) with Internet Explorer, then your proxy settings are properly set up. The installer does not understand the proxy settings specified in Netscape/Mozilla.
7. I found the jusched.exe process running in the background of my system after installing JRE. Is there a way to shut it down?
The jusched.exe is the scheduler process of Java Update. This process runs automatically. To shut in the Java Control Panel on the Update tab, deselect the Check for Updates Automatically check box.
8. When I click the Update Now button from the Java Control Panel, it complains about the system being «offline.» What does that mean?
Java Update can be run only if the system is connected to the network. A system that is not connected to the network is referred to as being offline. When the Update Now is clicked, it will check the online/offline status of your system. If your computer does not have internet access, then the error message is displayed. Check that your system is currently connected to the internet and try again.
9. I followed the instructions to install a specific version of the JRE. After the installation, a message is displayed from system tray saying an update is available for download. What should I do?
The message is part of the Java Auto Update mechanism, which detects at user login time if a newer version of the JRE is available for download. In the system tray, click the Java Update icon to download and install the update.
10. I encountered the error «This installation package could not be opened. Contact the application vendor to verify that this is a valid Windows Installer package.» when running the Java SE installer.
There are several possible reasons for this error to be displayed; a few are listed:
Network connection fails.
Download manager software interrupts the download process.
Another application, such as an antivirus application, may interrupt the installation process.
To address these problems, ensure that the third-party downloader applications are turned off and the network connection is configured properly. Also, if a proxy is in use, then ensure that the proxy authentication is turned off.
11. I encountered the error «Error 1722. There is a problem with this Windows installer package. A program run as part of the setup did not finish as expected. Contact your support personnel or package vendor.»
See Error 1722: Problem with Windows Installer Package. If you encounter any other errors or issues, then you can access Java Help Center, which contains solutions for issues that you might encounter when downloading and installing Java on your system. In particular, you can search for solutions by error number. Searching for «Error 1722» returns a solution to this issue.
Понимать и управлять настройками Java в Windows 10/8/7
Adobe Flash и Java – это две загрузки, которые большинство из нас установили на наших компьютерах с Windows, поскольку они дают нам больше возможностей для работы в Интернете и просмотра веб-страниц. Мы уже видели, как управлять настройками Adobe Flash .
Сегодня мы узнаем о настройках Java в Windows 10/8/7.
Что такое Java
Java – это язык программирования и вычислительная платформа, которая поддерживает самые современные программы, включая утилиты, игры и бизнес-приложения. Он позволяет играть в онлайн-игры, общаться с людьми по всему миру, просматривать изображения в 3D и многое другое.
Панель управления Java
Программное обеспечение Java или среда выполнения Java также называются средой выполнения Java, средой выполнения, средой выполнения, JRE, виртуальной машиной Java и т. Д. Им можно управлять из панели управления Java. Чтобы получить доступ к панели управления Java, откройте панель управления и нажмите «Java». Здесь вы сможете получить информацию о номере версии, а также просмотреть файлы.

Удалить временные файлы Java
Когда вы просматриваете Интернет, всякий раз, когда ваш браузер использует Java, файлы Java хранятся в специальных папках для более быстрого выполнения в дальнейшем.
Чтобы просмотреть местоположение папки и другие сведения, нажмите кнопку Настройки .

По умолчанию эти временные файлы Java хранятся в
C: Users Имя пользователя AppData LocalLow Sun Java Deployment кэш
папка в формате JAR. Вы можете установить уровень сжатия для этих файлов JAR и даже установить сумму, которая будет выделена для хранения этих файлов.
Вы можете просмотреть файлы, нажав кнопку Просмотр .
Чтобы удалить эти временные файлы JAR Java, нажмите Удалить файлы . Теперь вы можете выбрать, какие файлы вы хотите удалить, и нажмите кнопку ОК.
Очистить кеш Java с помощью командной строки
Чтобы очистить кэш Java с помощью командной строки, откройте окна командной строки, введите следующую команду и нажмите Enter:
Обновление Java
Мы склонны игнорировать обновление нашей Java. Но очень важно, чтобы мы всегда были уверены, что вы используете последнюю версию Java, поскольку уязвимости в Java часто используются для компрометации вашего компьютера. Последняя версия Java содержит важные улучшения для повышения безопасности, производительности и стабильности приложений Java, которые работают на вашем компьютере. Всякий раз, когда дыры в безопасности обнаруживаются, они исправляются, и поэтому обязательно убедитесь, что у вас установлена последняя версия java, поскольку она включает исправления уязвимостей.
Вы можете настроить параметры обновления Java, нажав на вкладку Обновить .
Убедитесь, что Автоматически проверять наличие обновлений . Нажав на кнопку Дополнительно , вы сможете установить частоту проверок обновлений.
Кстати, я заметил, что прошло много времени с тех пор, как я обновил Java. Поэтому я нажал на Обновить сейчас , чтобы начать процесс обновления. Это запустит процесс juscheck.exe , который проверит наличие обновлений и, соответственно, проинформирует вас.
Нажав на кнопку «Установить», вы начнете процесс обновления. По завершении нажмите «Закрыть».
Другие настройки Java
Вкладка Java позволяет просматривать и управлять версиями и настройками среды выполнения Java для приложений и апплетов Java.
Вкладка Безопасность позволяет просматривать типы сертификатов, позволяющие идентифицировать себя.
На вкладке Дополнительно можно настроить другие параметры.
Удалить старые версии Java
Хранение старых и неподдерживаемых версий Java в вашей системе представляет серьезную угрозу безопасности.
Более старые версии SunJava (до JRE 6 с обновлением 7) действительно сохранялись при установке обновлений и должны быть удалены, так как более старые версии SunJava очень уязвимы для Winfixer/Vundo. С 2005 года вплоть до обновления в конце прошлого года до обновления 10 JRE 6 для SunMicrosystems и Sun Microsystems, чтобы автообновление SunJava удаляло предыдущие (уязвимые) версии программы. Обновления от JRE 6 Update 10 forward находятся в автономной папке «jre6», которая перезаписывается, если установлена новая JRE. Даже при использовании самой последней версии SunJava, если на вашем компьютере все еще находятся более ранние, уязвимые версии, они уязвимы для заражения.К сожалению, простое использование программ «Установка и удаление программ» для удаления старых версий неэффективно.
Мы предлагаем вам попробовать JavaRa. После обновления Java до его последней версии сегодня я запустил JavaRa и использовал его для удаления старых версий Java.
Он обнаружил две старые версии на моем компьютере, которые я затем удалил.
ПРИМЕЧАНИЕ. Мой коллега по MVP и мод Corrine TWCF добавляет: JavaRa не была обновлена для поддержки удаления JRE 7 и, по-видимому, фактически имеет проблемы после JRE 6u32. Он перешел на SingularLabs.com. Кроме того, Пол Маклейн больше не поддерживает JavaRa, а Фриде Фрис все еще поддерживает.
Java Скачать
Вы можете скачать и установить Java для Windows вручную с Java.com здесь.
Надеюсь, вы узнали что-то новое здесь, в этом посте. Если у вас есть что добавить, пожалуйста, сделайте это в разделе комментариев.


