Содержание
- . как установить Java на Windows?
- 1. Где взять Java?
- 2. Какую версию выбрать?
- 3. Что устанавливать, JRE или JDK?
- 4. Установка Java
- 5. Настройка переменных окружения
- 6. Удаление лишних файлов
- Автор: Алексей Баранцев
- Как найти, где JDK установлен на моем компьютере Windows?
- ОТВЕТЫ
- Ответ 1
- Ответ 2
- Ответ 3
- Ответ 4
- Ответ 5
- Ответ 6
- Ответ 7
- Ответ 8
- Ответ 9
- Ответ 10
- Ответ 11
- Ответ 12
- Ответ 13
- Ответ 14
- Ответ 15
- Ответ 16
- Ответ 17
- Как проверить, установлена ли Java
- 1. Обзор
- 2. Командная строка
- 3. Если Путь Не Задан
- 3.1. Windows 10
- 3.2. Mac OS X
- 3.3. *Никс
- 4. Другие Инструменты Командной Строки
- 4.1. Windows, где команда
- 4.2. Mac OS X и *nix, которые и где
- 5. Заключение
- Как проверить версию Java?
- Где находится Java на ПК
- Как узнать версию Java на компьютере
- Проверка на Windows
- Проверка на Mac
- Проверка на Linux
- Как проверить версию Java онлайн
- Проверка Java в браузере
- Как установить JAVA_HOME в Windows 10
- Настройка JAVA_HOME в Windows 10
- Установите переменную среды JAVA_HOME и обновите системный путь
- Проверьте настройки конфигурации JAVA_HOME, используя CMD
. как установить Java на Windows?
Эта инструкция устарела, используйте вместо неё более новую
Во многих моих тренингах так или иначе используется Java, либо как язык программирования для разработки автотестов, либо как виртуальная машина для запуска приложений, написанных на Java — инструментов тестирования, сред разработки, и даже клиент системы видеоконференций GotoWebinar требует наличия Java.
Поэтому я решил описать процедуру установки Java для операционной системы Windows и последующей настройки системы, потому что, к сожалению, недостаточно просто “запустить инсталлятор и всегда нажимать кнопку Next”.
1. Где взять Java?
2. Какую версию выбрать?
Разумеется, последнюю доступную (на момент написания инструкции это Java 8).
Выбирая из 32-битной и 64-битной версий, берите 64-битную, если ваша операционная система это позволяет, потому что у неё менее строгие ограничения по памяти, доступной исполняемым Java-приложениям.
3. Что устанавливать, JRE или JDK?
Java Runtime Environment, или JRE — это виртуальная машина, позволяющая запускать приложения, написанные на языке программирования Java.
Java Development Kit, или JDK — это набор инструментов, для разработки программ на языке программирования Java (компилятор, архиватор, генератор документации и прочие). JRE разумеется тоже входит в дистрибутив JDK.
Правило очень простое: если вы собираетесь что-нибудь писать на языке программирования Java, значит вам потребуется JDK. А если только запускать готовые программы — тогда достаточно JRE.
4. Установка Java
Вот тут, действительно, всё просто — нужно запустить инсталлятор и следовать указаниям визарда. Можно просто всё время нажимать кнопку Next.
5. Настройка переменных окружения
К сожалению, инсталлятор Java не выполняет настройку переменных окружения, поэтому придётся сделать это вручную после установки.
Для установки переменных окружения сначала нужно открыть свойства компьютера, либо использовав сочетание клавиш Win-Pause, либо через меню “Пуск”:

Затем нужно выбрать “Дополнительные параметры системы”, в открывшемся диалоге перейти на вкладку “Дополнительно” и нажать кнопку “Переменные среды”, после чего появится диалог настройки переменных окружения.


И сохранить всё это, закрыв все открытые диалоги в обратном порядке кнопками OK.
6. Удаление лишних файлов
Однако иногда бывает и наоборот, находятся «лишние» исполняемые файлы:

Происходит это из-за того, что инсталлятор Java вместо того, чтобы правильно настроить переменные окружения, пытается положить исполняемые файлы в директорию C:Windowssystem32

Автор: Алексей Баранцев
Если вам понравилась эта статья, вы можете поделиться ею в социальных сетях (кнопочки ниже), а потом вернуться на главную страницу блога и почитать другие мои статьи.
Ну а если вы не согласны с чем-то или хотите что-нибудь дополнить – оставьте комментарий ниже, может быть это послужит поводом для написания новой интересной статьи.
Источник
Как найти, где JDK установлен на моем компьютере Windows?
Мне нужно знать, где находится JDK на моей машине.
ОТВЕТЫ
Ответ 1
Если вы используете Linux/Unix/Mac OS X:
Должно вывести точное местоположение.
Если вы используете Windows:
Ответ 2
Windows > Пуск > cmd >
Если у вас установлен JDK, отображается Путь,
например: C:Program FilesJavajdk1.6.0_30binjavac.exe
Ответ 3
В Windows в командной строке
Ответ 4
Установщик Java помещает несколько файлов в папку% WinDir%System32 (java.exe, javaws.exe и некоторые другие). Когда вы вводите java.exe в командной строке или создаете процесс без полного пути, Windows запускает их как последнее средство, если они отсутствуют в папках% PATH%.
Вы можете найти все версии Java, установленные в реестре. Взгляните на HKLMSOFTWAREJavaSoftJava Runtime Environment и HKLMSOFTWAREWow6432NodeJavaSoftJava Runtime Environment для 32-разрядной Java на 64-битной Windows.
Вот как сама Java обнаруживает разные версии. И поэтому и 32-битная, и 64-битная версия могут сосуществовать и прекрасно работать, не мешая.
Ответ 5
В окнах по умолчанию: C:Program FilesJavajdk1.6.0_14 (где числа могут отличаться, поскольку они являются версией).
Ответ 6
Обычная и простая на платформах Windows:
, где java
Ответ 7
Пакет script ниже распечатает существующую стандартную JRE. Его можно легко изменить, чтобы найти версию JDK, установленную путем замены Java Runtime Environment Java Development Kit.
Ответ 8
Подробнее о Windows. переменная java.home не всегда совпадает с местом запуска исполняемого бина.
Один из способов поиска местоположения двоичного файла java.exe, добавьте следующую строку в код PeterMmm, чтобы программа продолжалась дольше:
Скомпилируйте и запустите его, затем найдите местоположение изображения java.exe. Например. в Windows 7 откройте диспетчер задач, найдите запись java.exe, щелкните правой кнопкой мыши и выберите «открыть местоположение файла», это откроет точное местоположение двоичного файла Java. В этом случае это будет System32.
Ответ 9
В командной строке Windows просто введите:
Или, если вам не нравится командная среда, вы можете проверить ее:
Меню «Пуск» > «Компьютер» > «Свойства системы» > «Дополнительные свойства системы». Затем откройте вкладку «Дополнительно» > «Переменные среды» и в системной переменной попытайтесь найти JAVA_HOME.

Ответ 10
Запустите эту программу из командной строки:
Ответ 11
В Windows вы можете использовать
чтобы напечатать полный путь каждого «java.exe» на вашем диске C:, независимо от того, находятся ли они в вашей переменной среды PATH.
Ответ 12
Пробовали ли вы просматривать%% PATH%. Это то, что Windows использует для поиска любого исполняемого файла.
Ответ 13
Просто выполните команду set в командной строке. Затем вы увидите все переменные окружения, которые вы установили.
Или если в Unix вы можете упростить его:
Ответ 14
Это конкретная ОС. В Unix:
отобразит путь к исполняемому файлу. Я не знаю эквивалента Windows, но там обычно есть папка bin для установки JDK в системе PATH :
Ответ 15
Ни один из этих ответов не подходит для Linux, если вы ищете дом, который включает в себя поддиры, такие как: bin, docs, include, jre, lib и т.д.
В Ubuntu для openjdk1.8.0 это находится в: /usr/lib/jvm/java-1.8.0-openjdk-amd64
Ответ 16
Один вкладыш Powershell:
Ответ 17
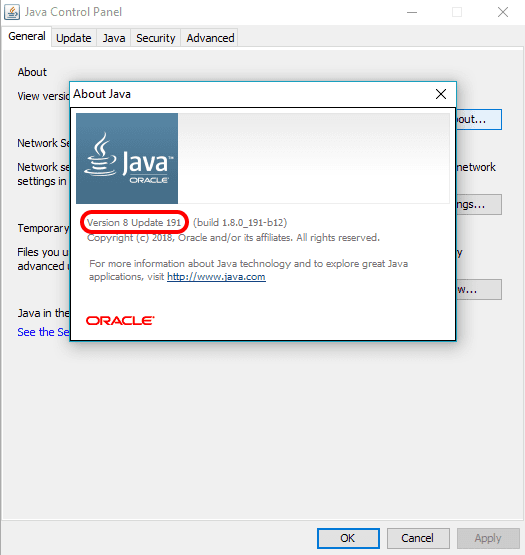
В Windows 10 вы можете узнать путь, выбрав «Панель управления» > «Java». На панели, которая отображается, вы можете найти путь, как показано на скриншоте ниже. В панели управления Java перейдите на вкладку «Java», а затем нажмите кнопку «Просмотр» в разделе «Просмотр и управление версиями и настройками Java Runtime для приложений и апплетов Java».
Это должно работать на Windows 7 и, возможно, на других последних версиях Windows.
Источник
Как проверить, установлена ли Java
Узнайте, как узнать, установлена ли Java на компьютере с Windows 10, Mac OS X или Linux/Unix, даже если она не находится в ПУТИ.
1. Обзор
В этом коротком уроке мы рассмотрим несколько способов определить, установлена ли Java на компьютере.
2. Командная строка
Во-первых, давайте откроем командное окно или терминал и введем:
Если Java установлена и путь настроен правильно, наш вывод будет похож на:
В противном случае мы увидим сообщение об ошибке, подобное приведенному ниже, и нам нужно будет проверить в другом месте:
Точные сообщения, которые мы видим, будут варьироваться в зависимости от используемой операционной системы и установленной версии Java.
3. Если Путь Не Задан
Переход в командную строку и ввод java-версия может точно сказать нам, установлена ли Java. Однако, если мы увидим сообщение об ошибке, Java все равно может быть установлена – нам просто нужно будет продолжить расследование.
Кроме того, JAVA_HOME должен указывать на JDK, и другие приложения, использующие функции JDK, такие как Maven, используют его.
Итак, давайте рассмотрим альтернативные способы поиска Java на случай, если командная строка нас подвела.
3.1. Windows 10
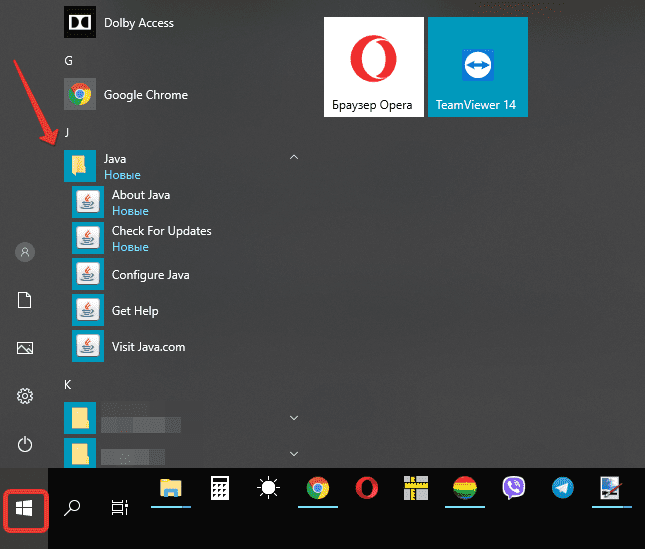
В Windows мы можем найти его в списке приложений:
Мы также можем посмотреть на установленные программы и функции:
3.2. Mac OS X
Чтобы узнать, установлена ли Java 7 или выше на Mac, мы можем:
Для более ранних версий Java нам потребуется:
3.3. *Никс
В дистрибутиве на базе Debian мы можем использовать команду aptitude search :
4. Другие Инструменты Командной Строки
В дополнение к java-версии, есть некоторые другие инструменты командной строки, которые мы можем использовать, чтобы узнать о нашей установке Java.
4.1. Windows, где команда
И наш результат будет выглядеть примерно так:
4.2. Mac OS X и *nix, которые и где
В системе *nix или на Mac в приложении терминала мы можем использовать команду which :
Вывод говорит нам, где находится команда Java:
Теперь давайте воспользуемся командой whereis :
Команда whereis также дает нам путь к вашей установке Java:
5. Заключение
В этой короткой статье мы обсудили, как узнать, установлена ли Java на компьютере с Windows 10, Mac OS X или Linux/Unix, даже если она не находится в ПУТИ.
Мы также рассмотрели несколько полезных команд для поиска нашей установки Java.
Источник
Как проверить версию Java?
Для работы приложений, программ и некоторых сайтов требуется Джава. Обновления и доработки утилиты заставляют пользователей загружать новые версии так часто, что за названиями и номерами уже не следят. Поэтому актуальна проверка Java, несколько способов которой узнаете далее.
Где находится Java на ПК
Чаще всего знать, где находится Java, требуется пользователям ОС Windows 10, 8, 7 и XP. На выбор предоставлено два варианта поиска.
Первый способ:
Второй способ:
Пользователям Mac OS, чтобы проверить Джава, стоит воспользоваться следующей инструкцией:
Как узнать версию Java на компьютере
Проверить номер Джавы необходимо, когда стороннее приложение рекомендует использовать последнюю версию утилиты. Чтобы узнать, какая версия Java установлена, обратимся к инструкциям для интегрированных ОС.
Проверка на Windows
Узнать версию Java на компьютере с установленной ОС Windows можно двумя способами. Первый вариант проверить утилиту:
Быстрый способ: ввести код java –version в командную строку, которая вызывается нажатием комбинации горячих клавиш Win + R.
Второй вариант, как проверить Java на Windows 7, 8, 10:
Проверка на Mac
Для проверки версии программы Java на технике от Apple скачивается среда разработки JDK. Утилита активирует командную строку, в которой ведется работа.
Чтобы ответить на вопрос, как узнать версию ПО, достаточно проверить номер JDK. Для этого в командной строке вводится код java –version. Полученный ответ предоставляется в таком формате: «1.7.0_55».
Проверка на Linux
Пользователям Linux можно проверить версию утилиты тем же способом, что и владельцам компьютеров Apple. В командную строку вписывается java –version.
Если номер модификации ниже, чем 1.6, то не обойтись без дополнительной установки вспомогательного ПО через YaST.
Видео: Как узнать, какая версия Java установлена на компьютере с ОС Windows.
Как проверить версию Java онлайн
Это можно сделать через официальный сайт разработчиков. Для этого кликните по кнопке ниже или выполните инструкцию:
Если проверять онлайн, сайт сравнит новую программу с установленной и предложит загрузить обновление Джава на компьютер. Поэтому такой способ рациональнее, чем через «Панель управления».
Проверка Java в браузере
Чтобы проверить, включена ли Java в браузере, зайдите в его настройки. В разных обозревателях путь к Джаве отличается:
Для Chrome недоступно использование NPAPI, что исключает Джава из работы браузера. В Opera также не используется утилита.
Источник
Как установить JAVA_HOME в Windows 10
Эти сторонние программы используют переменные окружения, которые указывают на каталог JDK или JRE. Проще говоря, это позволяет программам легко находить исполняемый файл каталога, такой как javac, на компьютере. Если вы не используете эти сторонние программы, пользователям может быть необязательно устанавливать JAVA_Home в вашей системе. В этой статье мы подробно объясним, как установить JAVA_HOME в качестве переменной среды в Windows 10.
Настройка JAVA_HOME в Windows 10
Установите переменную среды JAVA_HOME и обновите системный путь
После установки перейдите в меню Пуск и введите Дополнительные параметры системы.
Нажмите Просмотреть дополнительные настройки системы в списке, чтобы открыть Свойства системы.

В окне «Переменная среды» нажмите кнопку Создать под системной переменной.
В системной переменной Изменить укажите имя переменной в виде JAVA_HOME и значение переменной в качестве пути к каталогу JDK.
Теперь вернитесь в окно переменной среды и выберите путь в системной переменной.
Проверьте настройки конфигурации JAVA_HOME, используя CMD
Введите echo% JAVA_HOME% и нажмите Enter. Это должно напечатать каталог JDK, на который указывает JAVA_HOME. Вместо этого, если вы видите пробел, это означает, что вы не смогли настроить переменную среды.
Если нет, то будет напечатано сообщение о том, что javac не распознается как внутренняя или внешняя команда. Это означает, что переменная пути установлена неправильно.
Источник
- Найдите местоположение Java с помощью команды
where java - Найдите местоположение Java с помощью команды
set JAVA_HOME - Найдите местоположение Java с помощью команды
dir /b /s java.exe - Найдите местоположение Java с помощью команды
gcm -All javaв Windows PowerShell

Сегодня мы увидим, как узнать, где находится Java в Windows. Для этого есть несколько способов и команд; мы проверим различные команды, которые возвращают окна местоположения Java.
Найдите местоположение Java с помощью команды where java
Наиболее часто используемая команда для получения текущего местоположения Java в Windows — это where java. Это команда Windows, которая работает так же, как команда whereis в операционной системе Linux. Команда where используется для отображения местоположения исполняемого файла. Обычно используется шаблон поиска.
Как показано ниже, когда мы запускаем команду where java в командной строке Windows, она возвращает местоположение java.exe.
Выход:
C:User.jdksopenjdk-15.0.1binjava.exe
Найдите местоположение Java с помощью команды set JAVA_HOME
Следующий способ узнать местоположение Java в Windows — использовать команду установить JAVA_HOME. В Windows путь к Java или JDK хранится в переменных среды. Местоположение хранится в переменной с именем PATH, списке каталогов, которые можно использовать для прямого доступа к определенным программам, таким как Java, без записи всего пути.
Мы можем установить путь к Java командой set JAVA_HOME, а затем указать путь. Но если значение уже установлено, он вернет путь, установленный к переменной JAVA_HOME. Это завершает нашу задачу, поскольку это каталог, в котором находится Java.
C:UsersRupam Saini>set JAVA_HOME
Выход:
JAVA_HOME=C:UsersRupam Saini.jdksopenjdk-15.0.1
Найдите местоположение Java с помощью команды dir /b /s java.exe
Команда dir показывает все папки и подпапки в текущем местоположении. Мы можем использовать эту команду для получения местоположения Java, поскольку на одном компьютере с Windows может быть более одного исполняемого файла Java, поскольку некоторые программы используют свою собственную среду Java.
Мы используем команду dir с тремя параметрами, первым из которых является /b, который отображает только путь к каталогу без каких-либо дополнительных деталей. Напротив, параметр /s перечисляет все вхождения указанного файла в текущем каталоге и подкаталогах и, наконец, имя выполнения java.exe.
C:User>dir /b /s java.exe
Выход:
C:User.jdksopenjdk-15.0.1binjava.exe
C:UserAppDataLocalJetBrainsIntelliJ IDEA Community Edition 2020.3jbrbinjava.exe
Найдите местоположение Java с помощью команды gcm -All java в Windows PowerShell
Во всех примерах в этом руководстве мы используем традиционную командную строку, но для этого метода требуется Windows PowerShell, командная строка, но с расширенными возможностями. В PowerShell мы используем команду gcm, сокращенно от get-command. Он возвращает все команды в машине.
Мы используем gcm с двумя параметрами; первый — -All, который показывает все экземпляры команды на текущей машине, а второй параметр — это имя команды. В нашем случае имя команды java. В свою очередь, он выводит некоторые сведения о команде, такие как тип команды, имя исполняемого файла, выполняемого по команде, версия и источник исполняемого файла. Источник — это место, где находится Java.
PS C:User> gcm -All java
Выход:
CommandType     Name                                               Version    Source
-----------     ----                                               -------    ------
Application     java.exe                                           15.0.1.0   C:User.jdksopenjdk-15...
Для работы приложений, программ и некоторых сайтов требуется Джава. Обновления и доработки утилиты заставляют пользователей загружать новые версии так часто, что за названиями и номерами уже не следят. Поэтому актуальна проверка Java, несколько способов которой узнаете далее.
Чаще всего знать, где находится Java, требуется пользователям ОС Windows 10, 8, 7 и XP. На выбор предоставлено два варианта поиска.
Первый способ:
- Откройте меню «Пуск». Обладателям Windows 10 на этом шаге откроется список программ по алфавиту, в котором легко найти Джаву и развернуть меню.

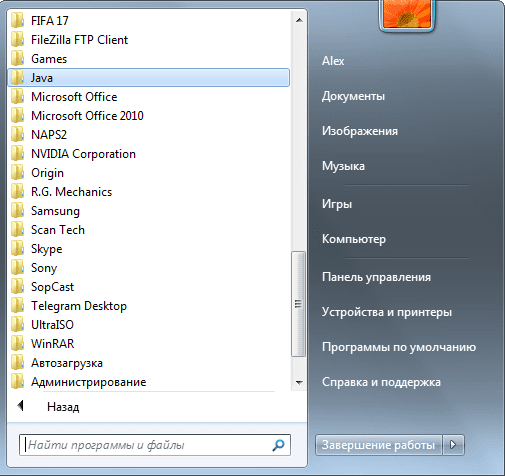
- Для других версий ОС нажмите «Все программы».
- В появившемся списке найдете папку с приложением.

- Далее выбирайте иконку в зависимости от того, что нужно проверить.
Второй способ:
- Откройте меню «Пуск».
- Запустите «Панель управления».
- Найдите Джава.

- Откроется окно для управления утилитой.

Пользователям Mac OS, чтобы проверить Джава, стоит воспользоваться следующей инструкцией:
- Нажмите на значок Apple в углу экрана.
- Перейдите в «Системные настройки».
- Щелкните на значок Джавы.
Владельцам ПК с установленной ОС Linux требуется ввести в командную строку код readlink -f $(which java). Это поможет открыть директорию с утилитой.
Не нашли Джаву на своем ПК, скачайте ее с нашего сайта.
Как узнать версию Java на компьютере
Проверить номер Джавы необходимо, когда стороннее приложение рекомендует использовать последнюю версию утилиты. Чтобы узнать, какая версия Java установлена, обратимся к инструкциям для интегрированных ОС.
Проверка на Windows
Узнать версию Java на компьютере с установленной ОС Windows можно двумя способами. Первый вариант проверить утилиту:
- Зайдите в панель управления Джавы по инструкции, изложенной выше.
- В первой вкладке выберите пункт About.

- В появившемся окне можно проверить номер приложения.


Быстрый способ: ввести код java –version в командную строку, которая вызывается нажатием комбинации горячих клавиш Win + R.
Второй вариант, как проверить Java на Windows 7, 8, 10:
- Зайдите в меню «Пуск».
- В поисковой строке наберите: «Установка и удаление программ».
- Сделайте одиночный клик по предложенному варианту с точным совпадением названия.
- Найдите Джава, чтобы проверить версию ПО.


Проверка на Mac
Для проверки версии программы Java на технике от Apple скачивается среда разработки JDK. Утилита активирует командную строку, в которой ведется работа.
Чтобы ответить на вопрос, как узнать версию ПО, достаточно проверить номер JDK. Для этого в командной строке вводится код java –version. Полученный ответ предоставляется в таком формате: «1.7.0_55».
Проверка на Linux
Пользователям Linux можно проверить версию утилиты тем же способом, что и владельцам компьютеров Apple. В командную строку вписывается java –version.
Если номер модификации ниже, чем 1.6, то не обойтись без дополнительной установки вспомогательного ПО через YaST.
Видео: Как узнать, какая версия Java установлена на компьютере с ОС Windows.
Как проверить версию Java онлайн
Это можно сделать через официальный сайт разработчиков. Для этого кликните по кнопке ниже или выполните инструкцию:
- На главной странице платформы найдите длинную гиперссылку, как на скриншоте.

- Нажмите кнопку для проверки.

- Итогом станет сообщение, содержащее строку с пометкой «Java version».


Если проверять онлайн, сайт сравнит новую программу с установленной и предложит загрузить обновление Джава на компьютер. Поэтому такой способ рациональнее, чем через «Панель управления».
Проверка Java в браузере
Чтобы проверить, включена ли Java в браузере, зайдите в его настройки. В разных обозревателях путь к Джаве отличается:
- Internet Explorer: «Сервис» – «Параметры обозревателя» – «Безопасность» – «Другой». Найти пункт о сценариях Джавы и выбрать «Включить».
- Mozilla Firefox: «Сервис» – «Дополнения» – «Плагины» – «Java». Остается убедиться, что модуль включен или стоит флажок на строке «Активировать всегда».
- Safari: «Параметры» – «Безопасность» – «Allow Plug-ins» – «Manage Website Settings». Выберите «Разрешить» в выпадающем списке на элементе Джава.
Для Chrome недоступно использование NPAPI, что исключает Джава из работы браузера. В Opera также не используется утилита.
Загрузка…
Эта инструкция устарела, используйте вместо неё более новую
Во многих моих тренингах так или иначе используется Java, либо как язык программирования для разработки автотестов, либо как виртуальная машина для запуска приложений, написанных на Java — инструментов тестирования, сред разработки, и даже клиент системы видеоконференций GotoWebinar требует наличия Java.
Поэтому я решил описать процедуру установки Java для операционной системы Windows и последующей настройки системы, потому что, к сожалению, недостаточно просто “запустить инсталлятор и всегда нажимать кнопку Next”.
1. Где взять Java?
2. Какую версию выбрать?
Разумеется, последнюю доступную (на момент написания инструкции это Java 8).
Выбирая из 32-битной и 64-битной версий, берите 64-битную, если ваша операционная система это позволяет, потому что у неё менее строгие ограничения по памяти, доступной исполняемым Java-приложениям.
3. Что устанавливать, JRE или JDK?
Java Runtime Environment, или JRE — это виртуальная машина, позволяющая запускать приложения, написанные на языке программирования Java.
Java Development Kit, или JDK — это набор инструментов, для разработки программ на языке программирования Java (компилятор, архиватор, генератор документации и прочие). JRE разумеется тоже входит в дистрибутив JDK.
Правило очень простое: если вы собираетесь что-нибудь писать на языке программирования Java, значит вам потребуется JDK. А если только запускать готовые программы — тогда достаточно JRE.
4. Установка Java
Вот тут, действительно, всё просто — нужно запустить инсталлятор и следовать указаниям визарда. Можно просто всё время нажимать кнопку Next.
5. Настройка переменных окружения
К сожалению, инсталлятор Java не выполняет настройку переменных окружения, поэтому придётся сделать это вручную после установки.
Для установки переменных окружения сначала нужно открыть свойства компьютера, либо использовав сочетание клавиш Win-Pause, либо через меню “Пуск”:
Затем нужно выбрать “Дополнительные параметры системы”, в открывшемся диалоге перейти на вкладку “Дополнительно” и нажать кнопку “Переменные среды”, после чего появится диалог настройки переменных окружения.
И сохранить всё это, закрыв все открытые диалоги в обратном порядке кнопками OK.
6. Удаление лишних файлов
Однако иногда бывает и наоборот, находятся «лишние» исполняемые файлы:
Происходит это из-за того, что инсталлятор Java вместо того, чтобы правильно настроить переменные окружения, пытается положить исполняемые файлы в директорию C:Windowssystem32
Автор: Алексей Баранцев
Если вам понравилась эта статья, вы можете поделиться ею в социальных сетях (кнопочки ниже), а потом вернуться на главную страницу блога и почитать другие мои статьи.
Ну а если вы не согласны с чем-то или хотите что-нибудь дополнить – оставьте комментарий ниже, может быть это послужит поводом для написания новой интересной статьи.
Источник
Как найти, где JDK установлен на моем компьютере Windows?
Мне нужно знать, где находится JDK на моей машине.
ОТВЕТЫ
Ответ 1
Если вы используете Linux/Unix/Mac OS X:
Должно вывести точное местоположение.
Если вы используете Windows:
Ответ 2
Windows > Пуск > cmd >
Если у вас установлен JDK, отображается Путь,
например: C:Program FilesJavajdk1.6.0_30binjavac.exe
Ответ 3
В Windows в командной строке
Ответ 4
Установщик Java помещает несколько файлов в папку% WinDir%System32 (java.exe, javaws.exe и некоторые другие). Когда вы вводите java.exe в командной строке или создаете процесс без полного пути, Windows запускает их как последнее средство, если они отсутствуют в папках% PATH%.
Вы можете найти все версии Java, установленные в реестре. Взгляните на HKLMSOFTWAREJavaSoftJava Runtime Environment и HKLMSOFTWAREWow6432NodeJavaSoftJava Runtime Environment для 32-разрядной Java на 64-битной Windows.
Вот как сама Java обнаруживает разные версии. И поэтому и 32-битная, и 64-битная версия могут сосуществовать и прекрасно работать, не мешая.
Ответ 5
В окнах по умолчанию: C:Program FilesJavajdk1.6.0_14 (где числа могут отличаться, поскольку они являются версией).
Ответ 6
Обычная и простая на платформах Windows:
, где java
Ответ 7
Пакет script ниже распечатает существующую стандартную JRE. Его можно легко изменить, чтобы найти версию JDK, установленную путем замены Java Runtime Environment Java Development Kit.
Ответ 8
Подробнее о Windows. переменная java.home не всегда совпадает с местом запуска исполняемого бина.
Один из способов поиска местоположения двоичного файла java.exe, добавьте следующую строку в код PeterMmm, чтобы программа продолжалась дольше:
Скомпилируйте и запустите его, затем найдите местоположение изображения java.exe. Например. в Windows 7 откройте диспетчер задач, найдите запись java.exe, щелкните правой кнопкой мыши и выберите «открыть местоположение файла», это откроет точное местоположение двоичного файла Java. В этом случае это будет System32.
Ответ 9
В командной строке Windows просто введите:
Или, если вам не нравится командная среда, вы можете проверить ее:
Меню «Пуск» > «Компьютер» > «Свойства системы» > «Дополнительные свойства системы». Затем откройте вкладку «Дополнительно» > «Переменные среды» и в системной переменной попытайтесь найти JAVA_HOME.
Ответ 10
Запустите эту программу из командной строки:
Ответ 11
В Windows вы можете использовать
чтобы напечатать полный путь каждого «java.exe» на вашем диске C:, независимо от того, находятся ли они в вашей переменной среды PATH.
Ответ 12
Пробовали ли вы просматривать%% PATH%. Это то, что Windows использует для поиска любого исполняемого файла.
Ответ 13
Просто выполните команду set в командной строке. Затем вы увидите все переменные окружения, которые вы установили.
Или если в Unix вы можете упростить его:
Ответ 14
Это конкретная ОС. В Unix:
отобразит путь к исполняемому файлу. Я не знаю эквивалента Windows, но там обычно есть папка bin для установки JDK в системе PATH :
Ответ 15
Ни один из этих ответов не подходит для Linux, если вы ищете дом, который включает в себя поддиры, такие как: bin, docs, include, jre, lib и т.д.
В Ubuntu для openjdk1.8.0 это находится в: /usr/lib/jvm/java-1.8.0-openjdk-amd64
Ответ 16
Один вкладыш Powershell:
Ответ 17
В Windows 10 вы можете узнать путь, выбрав «Панель управления» > «Java». На панели, которая отображается, вы можете найти путь, как показано на скриншоте ниже. В панели управления Java перейдите на вкладку «Java», а затем нажмите кнопку «Просмотр» в разделе «Просмотр и управление версиями и настройками Java Runtime для приложений и апплетов Java».
Это должно работать на Windows 7 и, возможно, на других последних версиях Windows.
Источник
Как проверить версию Java?
Для работы приложений, программ и некоторых сайтов требуется Джава. Обновления и доработки утилиты заставляют пользователей загружать новые версии так часто, что за названиями и номерами уже не следят. Поэтому актуальна проверка Java, несколько способов которой узнаете далее.
Где находится Java на ПК
Чаще всего знать, где находится Java, требуется пользователям ОС Windows 10, 8, 7 и XP. На выбор предоставлено два варианта поиска.
Первый способ:
Второй способ:
Пользователям Mac OS, чтобы проверить Джава, стоит воспользоваться следующей инструкцией:
Как узнать версию Java на компьютере
Проверить номер Джавы необходимо, когда стороннее приложение рекомендует использовать последнюю версию утилиты. Чтобы узнать, какая версия Java установлена, обратимся к инструкциям для интегрированных ОС.
Проверка на Windows
Узнать версию Java на компьютере с установленной ОС Windows можно двумя способами. Первый вариант проверить утилиту:
Быстрый способ: ввести код java –version в командную строку, которая вызывается нажатием комбинации горячих клавиш Win + R.
Второй вариант, как проверить Java на Windows 7, 8, 10:
Проверка на Mac
Для проверки версии программы Java на технике от Apple скачивается среда разработки JDK. Утилита активирует командную строку, в которой ведется работа.
Чтобы ответить на вопрос, как узнать версию ПО, достаточно проверить номер JDK. Для этого в командной строке вводится код java –version. Полученный ответ предоставляется в таком формате: «1.7.0_55».
Проверка на Linux
Пользователям Linux можно проверить версию утилиты тем же способом, что и владельцам компьютеров Apple. В командную строку вписывается java –version.
Если номер модификации ниже, чем 1.6, то не обойтись без дополнительной установки вспомогательного ПО через YaST.
Видео: Как узнать, какая версия Java установлена на компьютере с ОС Windows.
Как проверить версию Java онлайн
Это можно сделать через официальный сайт разработчиков. Для этого кликните по кнопке ниже или выполните инструкцию:
Если проверять онлайн, сайт сравнит новую программу с установленной и предложит загрузить обновление Джава на компьютер. Поэтому такой способ рациональнее, чем через «Панель управления».
Проверка Java в браузере
Чтобы проверить, включена ли Java в браузере, зайдите в его настройки. В разных обозревателях путь к Джаве отличается:
Для Chrome недоступно использование NPAPI, что исключает Джава из работы браузера. В Opera также не используется утилита.
Источник
Как проверить, установлена ли Java
Узнайте, как узнать, установлена ли Java на компьютере с Windows 10, Mac OS X или Linux/Unix, даже если она не находится в ПУТИ.
1. Обзор
В этом коротком уроке мы рассмотрим несколько способов определить, установлена ли Java на компьютере.
2. Командная строка
Во-первых, давайте откроем командное окно или терминал и введем:
Если Java установлена и путь настроен правильно, наш вывод будет похож на:
В противном случае мы увидим сообщение об ошибке, подобное приведенному ниже, и нам нужно будет проверить в другом месте:
Точные сообщения, которые мы видим, будут варьироваться в зависимости от используемой операционной системы и установленной версии Java.
3. Если Путь Не Задан
Переход в командную строку и ввод java-версия может точно сказать нам, установлена ли Java. Однако, если мы увидим сообщение об ошибке, Java все равно может быть установлена – нам просто нужно будет продолжить расследование.
Кроме того, JAVA_HOME должен указывать на JDK, и другие приложения, использующие функции JDK, такие как Maven, используют его.
Итак, давайте рассмотрим альтернативные способы поиска Java на случай, если командная строка нас подвела.
3.1. Windows 10
В Windows мы можем найти его в списке приложений:
Мы также можем посмотреть на установленные программы и функции:
3.2. Mac OS X
Чтобы узнать, установлена ли Java 7 или выше на Mac, мы можем:
Для более ранних версий Java нам потребуется:
3.3. *Никс
В дистрибутиве на базе Debian мы можем использовать команду aptitude search :
4. Другие Инструменты Командной Строки
В дополнение к java-версии, есть некоторые другие инструменты командной строки, которые мы можем использовать, чтобы узнать о нашей установке Java.
4.1. Windows, где команда
И наш результат будет выглядеть примерно так:
4.2. Mac OS X и *nix, которые и где
В системе *nix или на Mac в приложении терминала мы можем использовать команду which :
Вывод говорит нам, где находится команда Java:
Теперь давайте воспользуемся командой whereis :
Команда whereis также дает нам путь к вашей установке Java:
5. Заключение
В этой короткой статье мы обсудили, как узнать, установлена ли Java на компьютере с Windows 10, Mac OS X или Linux/Unix, даже если она не находится в ПУТИ.
Мы также рассмотрели несколько полезных команд для поиска нашей установки Java.
Источник
Установка Java JDK (Java Development Kit) в Windows 10
Java Development Kit (сокр. JDK) – комплект разработки приложений для работы с языком программирования java. Включает в себя: интерпретатор, облегченный интерпретатор jre, компилятор, отладчик, java библиотеки классов, программу сбора документации, диcассемблер, программу архивации и сжатия jar.
Устанавливать Java JDK будем в 3 этапа:
1. Загрузка с сайта пакета JDK (Java Development Kit)
Переходим на сайт Oracle по ссылке и выбираем JDK (Download)

На следующей странице нужно согласится с условиями и загрузить пакет соответствующий нашей ОС. В моём случае это 64-разрядная Windows 10.

2. Установка JDK (Java Development Kit)
Запускаем установщик с правами администратора и устанавливаем всё по умолчанию, ничего не меняя в процессе.

3. Настройка переменных окружения
Инсталлятор Java не выполняет настройку переменных окружения, поэтому придётся нам это делать вручную после установки.
JAVA_HOME – переменная, указывающая на директорию, в которую установлена Java. Программы её используют чтобы определить, где установлена Java.
Для этого комбинацией клавиш Win+R открываем окно “Выполнить“. Набираем команду: “control /name microsoft.system“ без кавычек.

Затем нужно выбрать “Дополнительные параметры системы” и в открывшемся окне “Свойства системы” нажимаем кнопку “Переменные среды“. Если Вы ничего не меняли при установке JDK, то путь будет таким: “C: Program Files Java jdkНомерВерсии”.

Далее необходимо отредактировать значение переменной PATH, добавив туда путь к директории, где находятся исполняемые файлы Java, то есть

4. Тест конфигурации
Открываем командную строку и вводим:
Выводит директорию где установлено Java JDK.
Выведет версию java-компилятора, если переменная PATH установлена правильно.

Насколько полезным был этот пост?
Нажмите на звезду, чтобы оценить!
Средний рейтинг 4.8 / 5. Голосов: 604
Пока оценок нет! Будьте первым, поставь свою оценку этому посту.
Мы сожалеем, что этот пост не был полезен для вас!
Давайте улучшим этот пост!
Расскажите, как мы можем улучшить этот пост?
Источник
C: Users Имя пользователя AppData LocalLow Sun Java Deployment кэш
папка в формате JAR. Вы можете установить уровень сжатия для этих файлов JAR и даже установить сумму, которая будет выделена для хранения этих файлов.
Вы можете просмотреть файлы, нажав кнопку Просмотр . 
Чтобы удалить эти временные файлы JAR Java, нажмите Удалить файлы . Теперь вы можете выбрать, какие файлы вы хотите удалить, и нажмите кнопку ОК.
Чтобы очистить кэш Java с помощью командной строки, откройте окна командной строки, введите следующую команду и нажмите Enter:
Мы склонны игнорировать обновление нашей Java. Но очень важно, чтобы мы всегда были уверены, что вы используете последнюю версию Java, поскольку уязвимости в Java часто используются для компрометации вашего компьютера. Последняя версия Java содержит важные улучшения для повышения безопасности, производительности и стабильности приложений Java, которые работают на вашем компьютере. Всякий раз, когда дыры в безопасности обнаруживаются, они исправляются, и поэтому обязательно убедитесь, что у вас установлена последняя версия java, поскольку она включает исправления уязвимостей.
Вы можете настроить параметры обновления Java, нажав на вкладку Обновить .
Убедитесь, что Автоматически проверять наличие обновлений . Нажав на кнопку Дополнительно , вы сможете установить частоту проверок обновлений.
Кстати, я заметил, что прошло много времени с тех пор, как я обновил Java. Поэтому я нажал на Обновить сейчас , чтобы начать процесс обновления. Это запустит процесс juscheck.exe , который проверит наличие обновлений и, соответственно, проинформирует вас.
Нажав на кнопку «Установить», вы начнете процесс обновления. По завершении нажмите «Закрыть».
Вкладка Java позволяет просматривать и управлять версиями и настройками среды выполнения Java для приложений и апплетов Java.
Вкладка Безопасность позволяет просматривать типы сертификатов, позволяющие идентифицировать себя.
На вкладке Дополнительно можно настроить другие параметры.
Хранение старых и неподдерживаемых версий Java в вашей системе представляет серьезную угрозу безопасности.
Более старые версии SunJava (до JRE 6 с обновлением 7) действительно сохранялись при установке обновлений и должны быть удалены, так как более старые версии SunJava очень уязвимы для Winfixer/Vundo. С 2005 года вплоть до обновления в конце прошлого года до обновления 10 JRE 6 для SunMicrosystems и Sun Microsystems, чтобы автообновление SunJava удаляло предыдущие (уязвимые) версии программы. Обновления от JRE 6 Update 10 forward находятся в автономной папке «jre6», которая перезаписывается, если установлена новая JRE. Даже при использовании самой последней версии SunJava, если на вашем компьютере все еще находятся более ранние, уязвимые версии, они уязвимы для заражения.К сожалению, простое использование программ «Установка и удаление программ» для удаления старых версий неэффективно.
Мы предлагаем вам попробовать JavaRa. После обновления Java до его последней версии сегодня я запустил JavaRa и использовал его для удаления старых версий Java.

Он обнаружил две старые версии на моем компьютере, которые я затем удалил.

ПРИМЕЧАНИЕ. Мой коллега по MVP и мод Corrine TWCF добавляет: JavaRa не была обновлена для поддержки удаления JRE 7 и, по-видимому, фактически имеет проблемы после JRE 6u32. Он перешел на SingularLabs.com. Кроме того, Пол Маклейн больше не поддерживает JavaRa, а Фриде Фрис все еще поддерживает.
Java Скачать
Вы можете скачать и установить Java для Windows вручную с Java.com здесь.
Надеюсь, вы узнали что-то новое здесь, в этом посте. Если у вас есть что добавить, пожалуйста, сделайте это в разделе комментариев.
9 Installation of the JDK and the JRE on Microsoft Windows Platforms
System Requirements for Installing the JDK and the JRE on 64-Bit Windows Platform
The JDK and the JRE have minimum processor, disk space, and memory requirements for 64-bit Windows platform.
Before installing the JDK or the JRE on your 64-bit Windows platform, you must verify that it meets the following minimum processor, disk space, and memory requirements.
Both the JDK and JRE require at minimum a Pentium 2 266 MHz processor.
Disk Space Requirements
For JDK 10 , you are given the option of installing the following features:
Public Java Runtime Environment
When you install 64-bit JDK, then 64-bit public JRE also gets installed. The following table provides the disk requirements for the installed features:
| JDK | Installed Image |
|---|---|
| Development Tools: 64-bit platform | 500 MB |
| Source Code | 54.2 MB |
| JRE | Installed Image |
|---|---|
| Public Java Runtime Environment | 200 MB |
| Java Update | 2 MB |
On Windows 64-bit operating systems, the Java runtime requires a minimum of 128 MB of memory.
The minimum physical RAM is required to run graphically based applications. More RAM is recommended for applets running within a browser using the Java Plug-in. Running with less memory may cause disk swapping, which has a severe effect on performance. Very large programs may require more RAM for adequate performance.
JDK and JRE Installation Instruction Notation for Windows
For any text in this document that contains the following notation, you must substitute the appropriate update version number:
If you are downloading the JDK installer for 64-bit systems for update 10 Interim 0, Update 2, and Patch 1, then the file name jdk- 10 . interim.update.patch _windows-x64_bin.exe becomes jdk- 10 .0.2.1_windows-x64_bin.exe .
If you are downloading the JRE installer for 64-bit systems for update 10 Interim 0, Update 2, and Patch 1, then the file name jre- 10 . interim.update.patch _windows-x64_bin.exe becomes jre- 10 .0.2.1_windows-x64_bin.exe .
JDK Installation Instructions for Windows
You run a self-installing executable file to unpack and install the JDK on Windows computers.
Install JDK on Windows computers by performing the actions described in the following topics:
Downloading the JDK Installer
In a browser, go to the Java SE Development Kit 10 Downloads page and click Accept License Agreement . Under the Download menu, click the Download link that corresponds to the .exe for your version of Windows.
Download the file jdk- 10 . interim.update.patch _windows-x64_bin.exe .
Verify the successful completion of file download by comparing the file size on the download page and your local drive.
Running the JDK Installer
- Start the JDK 10 installer by double-clicking the installer’s icon or file name in the download location.
- Follow the instructions provided by the Installation wizard.
Installing the JDK Silently
Instead of double-clicking or opening the JDK installer, you can perform a silent, noninteractive, JDK installation by using command-line arguments.
The following table lists example installation scenarios and the commands required to perform them. The notation jdk stands for the downloaded installer file base name, such as jdk- 10 _windows-x64_bin.exe .
| Installation Scenario | Command |
|---|---|
| Install JDK and public JRE in silent mode. | |
| Install development tools and source code in silent mode but not the public JRE. | |
| Install development tools, source code, and the public JRE in silent mode. | |
| Install the public JRE in the specified directory C:test in silent mode. |
Setting the PATH Environment Variable
It is useful to set the PATH variable permanently for JDK 10 so that it is persistent after rebooting.
The PATH variable is set automatically for the JRE. This topic only applies to the JDK.
If you do not set the PATH variable, then you must specify the full path to the executable file every time that you run it. For example:
- Select Control Panel and then System .
- Click Advanced and then Environment Variables .
- Add the location of the bin folder of the JDK installation to the PATH variable in System Variables .
The PATH environment variable is a series of directories separated by semicolons (;) and is not case-sensitive. Microsoft Windows looks for programs in the PATH directories in order, from left to right.
You should only have one bin directory for a JDK in the path at a time. Those following the first instance are ignored.
If you are not sure where to add the JDK path, append it.
The new path takes effect in each new command window that you open after setting the PATH variable.
The following is a typical value for the PATH variable:
JRE Installation Instructions for Windows
When installing JRE on Windows computers, you must select the JRE installer that is appropriate for your Windows system.
The 64-bit Windows operating systems come with a 64-bit Internet Explorer (IE) browser as the standard (default) for viewing web pages.
Install JRE on Windows computers by performing the actions described in the following topics:
JRE Proxy Settings and Authentication
To use the Windows Online Installer, you must be connected to the internet.
If you are running behind a proxy server, then you must have your proxy settings correctly configured. If they are not configured, or are incorrectly configured, then the installer will terminate with the following message:
The installer cannot proceed with the current Internet Connection settings.
Please visit the following website for more information.
If you see this message, check your proxy settings:
In the Control Panel , double-click Internet Options , select the Connections tab, and click the LAN Settings .
If you do not know what the correct settings should be, check with your internet provider or system administrator.
Downloading the JRE Installer
The JRE Installer is located on the Java SE Runtime Environment 10 Downloads page.
- In a browser, go to the Java SE Runtime Environment 10 Downloads page.
The following JRE installers are available for you to download:
Windows Offline: jre- 10 . interim.update.patch _windows-x64_bin.exe
Windows Tar: jre- 10 . interim.update.patch _windows-x64_bin.tar.gz
The Windows Offline installer and Windows installer contains everything that is required to install the JRE.
The Microsoft Windows Installer (MSI) Enterprise JRE Installer is also available, which enables you to install the JRE across your enterprise. It requires a commercial license for use in production.
Running the JRE Installer
- Start the JRE 10 Installer by double-clicking the installer’s icon or file name in the download location.
- Follow the instructions provided by the Installation wizard.
The private JRE installed with the JDK is not registered. To register the JRE, you must set the PATH environment variable to point to JAVA_HOME bin , where JAVA_HOME is the location where you installed the private JRE . See Setting the PATH Environment Variable.
By default, the Java Access Bridge is disabled. To enable it, see Enabling and Testing Java Access Bridge in the Java Platform, Standard Edition Java Accessibility Guide .
To access essential Java information and functions in Microsoft Windows 7 and Windows 10 machines, after installation, click the Start menu and then select Java . The Java directory provides access to Help, Check for Updates, and Configure Java.
The Microsoft Windows 8 and Windows 8.1 do not have a Start menu. However, the Java information is available in the following Start directory: %ALLUSERSPROFILE%MicrosoftWindowsStart MenuPrograms .
Windows Registry Settings
The installation program for the Microsoft Windows version of the Java SE Runtime Environment uses the registry to store path and version information.
It creates the following registry keys:
This key contains the string CurrentVersion , with a value that is the highest installed version on the system.
JavaHome : the full path name of the directory in which the JRE is installed
RuntimeLib : the full path name of the Java runtime DLL
HKEY_LOCAL_MACHINESoftwareJavaSoftJava Web Start
This key is created for Java Web Start.
If there are two versions of JDK or JRE installed on a system, one with the new version-string format introduced in JDK 10 , and the other with the older version format, then there will be two different CurrentVersion registry key values. For example, if JDK 1.8.0 and JDK 10 are installed, then the following registry keys are created:
«HKEY_LOCAL_MACHINESOFTWAREJavaSoftJava Development Kit» for JDK 1.8.0 and «HKEY_LOCAL_MACHINESOFTWAREJavaSoftJDK» for JDK 10 .
The registry layout for this example is:
The @CurrentVersion is a registry string in the «JDK» or «Java Development Kit» key.
For the same example, if the JRE is installed, then the registry layout is:
The @CurrentVersion is a registry string in the «JRE» or «Java Runtime Environment» key.
Beginning to Use the JDK
Use the Java item in the Windows Start menu to access essential Java information and functions, including Help, API documentation, the Java Control Panel, checking for updates, and Java Mission Control.
Java Start Menu Installed by JDK
During JDK install, Java menu items are added to the Windows Start menu to provide easy access to Java resources and a Java Development Kit folder is created in the Windows Start menu, which contains the following items:
Reference Documentation : Opens the Online API documentation web page.
Java Mission Control : Opens the Java Mission Control profiling and diagnostics tools suite.
Java Mission Control is a commercial feature available to users with a Java SE Advanced license.
During JDK installation and uninstallation processes, the appropriate start menu items are updated so that they are associated with the latest JDK version on the system
The Windows 7 and Windows 10 have a Start menu; however, the menu is not available in Windows 8 and Windows 8.1. The JDK and Java information in Windows 8 and Windows 8.1 is available in the following Start directory: %ALLUSERSPROFILE%MicrosoftWindowsStart MenuPrograms .
Java Start Menu Installed by JRE
During JRE installation, Java menu items are added to the Windows Start menu to provide easy access to Java resources and a Java folder is created in the Windows Start menu, which contains the following items:
About Java : Opens the Java Control Panel with focus on the General tab. The tab displays the latest JRE version installed on the system.
Check for Updates : Opens the Java Control Panel with focus on the Update tab
Configure Java : Opens the Java Control Panel with focus on the General tab
Get Help : Opens the Java Help Center
Visit Java.com : Opens the Java Download page
During JRE installation and uninstallation processes, the appropriate start menu items are updated so that they are associated with the latest JRE version on the system.
The Windows 7 and Windows 10 have Start menu, however the menu is not available in Windows 8 and Windows 8.1. The JRE and Java information in Windows 8 and Windows 8.1 is available in the following Start directory: %ALLUSERSPROFILE%MicrosoftWindowsStart MenuPrograms .
Java Web Start
Java Web Start is an application-deployment technology that gives you the power to run full-featured applications with a single click from your web browser.
With Java Web Start, you can download and run applications, such as a complete spreadsheet program or an internet chat client, without going through complicated installation procedures. With Java Web Start, you run applications simply by clicking a web page link. If the application is not present on your computer, Java Web Start automatically downloads all necessary files. It then caches the files on your computer so that the application is always ready to be run anytime that you want — either from an icon on your desktop or from the browser link. No matter which method you use to run the application, the most current, available version of the application is always presented to you.
Upgrading from Previous Versions
If you have a previous version of Java Web Start, do not uninstall it. Uninstalling it will cause the download cache to be cleared, and all previously installed Java Web Start application data will have to be downloaded again. The new version will write over previous installations and automatically update browsers to use the new version. The configuration files and the program files folder used by Java Web Start have changed, but all your settings will remain intact after the upgrade because Java Web Start will translate your settings to the new form.
The only way to uninstall Java Web Start is to uninstall the JDK or JRE. Uninstalling the JDK or JRE will not, however, remove the cache for previous versions of Java Web Start. Previous releases have separate uninstallation instructions for Java Web Start.
You may see a misleading message if you do the following:
Download and cache a Java Web Start application with the JDK or JRE.
Remove the JDK or JRE using Add or Remove Programs from the Windows Control Panel .
Remove the Java Web Start application using Add or Remove Programs .
When you remove the application, you see an Uninstaller Error dialog box saying:
An error occurred while trying to remove Java-Application: name App. It may have already been uninstalled. Would you like to remove Java-Application: name App from the Add or Remove program list?
If you say Yes to this, then you will see another Uninstaller Error dialog box saying:
You do not have sufficient access to remove Java-Application: name App from the Add or Remove Program list. Please contact your system administrator.
The message is displayed when you have removed the Java Web Start application while uninstallating the JDK or JRE, but this is not reflected in the Add or Remove Programs . Refresh the Add or Remove Programs by pressing F5 or reopen the panel.
To avoid seeing the misleading message, either press F5 or reopen the dialog box. Any Java Web Start application that was downloaded and cached with the JDK or JRE will no longer appear in the list of currently installed programs.
Java Plug-in
Java Plug-in technology, included as part of the JRE, establishes a connection between popular browsers and the Java platform. This connection enables applets on websites to be run within a browser on the desktop.
The Java Plug-in is automatically enabled for supported web browsers during installation of the JRE. No user intervention is necessary.
In Java SE 10 , the version of the Java Plug-in that is available in versions of the JRE prior to Java SE 6 Update 10 has been deprecated. However, this earlier version of the Java Plug-in is still shipped with Java SE 10 for compatibility purposes but is no longer fully supported. It will be removed in a future release.
Option to Disable the JRE Out-of-Date Warning
When the installed JRE falls below the security baseline or passes its built-in expiration date, an additional warning is shown to users to update their installed JRE to the latest version. For businesses that manage the update process centrally, users attempting to update their JRE individually, may cause problems.
A deployment property, deployment.expiration.check.enabled is available that can be used to disable the JRE out of date warning. To suppress this specific warning message, add the following entry in the deployment properties file:
To disable automatic updates, on the Update tab of the Java Control Panel, deselect the Check for Updates Automatically check box.
Uninstalling the JDK on Windows
Uninstalling the JRE on Windows
Use either of the following ways to uninstall JRE:
Go to Add/Remove Programs utility in the Microsoft Windows Control Panel and uninstall the older versions of JRE.
Remove JRE using the online Java Uninstall Tool.
The Java Removal Tool is integrated with the JRE installer. After JRE 10 is installed, the Java Removal Tool provides the list of outdated Java versions in the system and helps you to remove them.
The Java Uninstall tool will not run if your system administrator specified a deployment rule set in your organization.
A deployment rule set enables enterprises to manage their Java desktop environment directly and continue using legacy business applications in an environment of ever-tightening Java applet and Java Web Start application security policies. A deployment rule set enables administrators to specify rules for applets and Java Web Start applications; these rules may specify that a specific JRE version must be used. Consequently, the Java Uninstall tool will not run if it detects a deployment rule set to ensure that no required JREs are uninstalled.
See Deployment Rule Set in the Java Platform, Standard Edition Deployment Guide .
JDK Installation Troubleshooting
The following sections provide tips for working around problems that are sometimes seen during or while following installation instructions.
System Error During Decompression
If you see the error message system error during decompression , then you might not have enough space on the disk that contains your TEMP directory.
Program Cannot Be Run in DOS Mode
If you see the error message This program cannot be run in DOS mode , then do the following:
Open the MS-DOS shell or command prompt window.
Right-click the title bar.
Select the Program tab.
Ensure that the item Prevent MS-DOS-based programs from detecting Windows is not selected.
Select OK again.
Exit the MS-DOS shell.
Restart your computer.
Source Files in Notepad
In Microsoft Windows, when you create a new file in Microsoft Notepad and then save it for the first time, Notepad usually adds the .txt extension to the file name. Therefore, a file that you name Test.java is actually saved as Test.java.txt . Note that you cannot see the .txt extension unless you turn on the viewing of file extensions (in Microsoft Windows Explorer, deselect Hide file extensions for known file types under Folder Options ). To prevent the .txt extension, enclose the file name in quotation marks, such as «Test.java» when entering information in the Save As dialog box.
Characters That Are Not Part of the System Code Page
It is possible to name directories using characters that are not part of the system locale’s code page. If such a directory is part of the installation path, then generic error 1722 occurs, and installation is not completed. Error 1722 is a Windows installer error code. It indicates that the installation process has failed. The exact reason for this error is not known at this time.
To prevent this problem, ensure that the user and system locales are identical, and that the installation path contains only characters that are part of the system locale’s code page. User and system locales can be set in the Regional Options or Regional Settings control panel.
The associated bug number is 4895647.
Windows Online Installation and Java Update FAQ
These are frequently asked questions about JDK 10 and JRE 10 online installation and Java updates on Windows computers.
1. I downloaded the installer and it is less than 1 megabyte. Why is it so small?
The Windows Online Installer for the JRE will download more installer files. Using this installer helps users to avoid downloading unnecessary files.
2. I had the Java Control Panel open for Java Update and the About tab showed the version of the JRE installed in my computer. Then I ran Java Update, and the version of the JRE that the Java Control Panel is showing has not changed. Why is this?
You need to close and restart the Java Control Panel to get the updated Control Panel.
3. Netscape/Mozilla is not working correctly with Java Plug-in. Why?
First, close all the browsers sessions. If this does not work, reboot the system and try again.
4. I try to install on the D: drive and Java Update is still installing files onto the C: drive. Why?
Regardless of whether an alternate target directory was selected, Java Update needs to install some files on the Windows system drive.
5. How can I uninstall the Java Update version that I just installed?
If you want to uninstall the JRE, then use the Add/Remove Programs utility in the Microsoft Windows . Select the Control Panel and then Add/Remove Programs .
6. After the JRE bootstrap installer is downloaded and executed, why does the message «This installer cannot proceed with the current Internet Connection settings of your system. In your Windows Control Panel, please check Internet Options -> Connections to make sure the settings and proxy information are correct.» appear?
The JRE bootstrap installer uses the system Internet Connection settings to connect to the web for downloading extra files. If you are behind a firewall and require proxy settings, then ensure that the proxy settings in Internet Options/Internet Properties are set up properly (select Start , then Control Panel , then Internet Options/Internet Properties , then Connections , and then LAN Settings ). If you can browse the external web (for example, outside the firewall) with Internet Explorer, then your proxy settings are properly set up. The installer does not understand the proxy settings specified in Netscape/Mozilla.
7. I found the jusched.exe process running in the background of my system after installing JRE. Is there a way to shut it down?
The jusched.exe is the scheduler process of Java Update. This process runs automatically. To shut in the Java Control Panel on the Update tab, deselect the Check for Updates Automatically check box.
8. When I click the Update Now button from the Java Control Panel, it complains about the system being «offline.» What does that mean?
Java Update can be run only if the system is connected to the network. A system that is not connected to the network is referred to as being offline. When the Update Now is clicked, it will check the online/offline status of your system. If your computer does not have internet access, then the error message is displayed. Check that your system is currently connected to the internet and try again.
9. I followed the instructions to install a specific version of the JRE. After the installation, a message is displayed from system tray saying an update is available for download. What should I do?
The message is part of the Java Auto Update mechanism, which detects at user login time if a newer version of the JRE is available for download. In the system tray, click the Java Update icon to download and install the update.
10. I encountered the error «This installation package could not be opened. Contact the application vendor to verify that this is a valid Windows Installer package.» when running the Java SE installer.
There are several possible reasons for this error to be displayed; a few are listed:
Network connection fails.
Download manager software interrupts the download process.
Another application, such as an antivirus application, may interrupt the installation process.
To address these problems, ensure that the third-party downloader applications are turned off and the network connection is configured properly. Also, if a proxy is in use, then ensure that the proxy authentication is turned off.
11. I encountered the error «Error 1722. There is a problem with this Windows installer package. A program run as part of the setup did not finish as expected. Contact your support personnel or package vendor.»
See Error 1722: Problem with Windows Installer Package. If you encounter any other errors or issues, then you can access Java Help Center, which contains solutions for issues that you might encounter when downloading and installing Java on your system. In particular, you can search for solutions by error number. Searching for «Error 1722» returns a solution to this issue.
. как установить Java на Windows?
Во многих моих тренингах так или иначе используется Java, либо как язык программирования для разработки автотестов, либо как виртуальная машина для запуска приложений, написанных на Java — инструментов тестирования, сред разработки, и даже клиент системы видеоконференций GotoWebinar требует наличия Java.
Поэтому я решил описать процедуру установки Java для операционной системы Windows и последующей настройки системы, потому что, к сожалению, недостаточно просто “запустить инсталлятор и всегда нажимать кнопку Next”.
1. Где взять Java?
2. Какую версию выбрать?
Разумеется, последнюю доступную (на момент написания инструкции это Java 8).
Выбирая из 32-битной и 64-битной версий, берите 64-битную, если ваша операционная система это позволяет, потому что у неё менее строгие ограничения по памяти, доступной исполняемым Java-приложениям.
3. Что устанавливать, JRE или JDK?
Java Runtime Environment, или JRE — это виртуальная машина, позволяющая запускать приложения, написанные на языке программирования Java.
Java Development Kit, или JDK — это набор инструментов, для разработки программ на языке программирования Java (компилятор, архиватор, генератор документации и прочие). JRE разумеется тоже входит в дистрибутив JDK.
Правило очень простое: если вы собираетесь что-нибудь писать на языке программирования Java, значит вам потребуется JDK. А если только запускать готовые программы — тогда достаточно JRE.
4. Установка Java
Вот тут, действительно, всё просто — нужно запустить инсталлятор и следовать указаниям визарда. Можно просто всё время нажимать кнопку Next.
5. Настройка переменных окружения
К сожалению, инсталлятор Java не выполняет настройку переменных окружения, поэтому придётся сделать это вручную после установки.
Во-первых, необходимо установить переменную JAVA_HOME , которая должна указывать на директорию, в которую установлена Java. Многие программы используют эту переменную, чтобы определить, где находится Java.
Во-вторых, надо в переменную PATH добавить путь к директории %JAVA_HOME%bin . Эта переменная указывает операционной системе список директорий, в которых нужно искать исполняемые файлы, и чтобы можно было запускать Java из консоли, переменная PATH должна быть правильно настроена.
Для установки переменных окружения сначала нужно открыть свойства компьютера, либо использовав сочетание клавиш Win-Pause, либо через меню “Пуск”:
Затем нужно выбрать “Дополнительные параметры системы”, в открывшемся диалоге перейти на вкладку “Дополнительно” и нажать кнопку “Переменные среды”, после чего появится диалог настройки переменных окружения.
Если у вас уже есть переменная окружения JAVA_HOME — надо её отредактировать, если нет — создать новую. В качестве значения нужно указать путь к директории, куда установлена Java, то есть, например c:Program FilesJavajdk1.8.0_25 , если вы установили JDK, либо c:Program FilesJavajre1.8.0_25 , если вы установили только JRE.
После того, как вы установили значение переменной JAVA_HOME , необходимо отредактировать значение переменной PATH, добавив туда путь к директории, где находятся исполняемые файлы Java, то есть %JAVA_HOME%bin
И сохранить всё это, закрыв все открытые диалоги в обратном порядке кнопками OK.
Обратите внимание, что если вы устанавливаете JDK, то в названии директории указывается номер версии, поэтому впоследствии, когда вы решите установить более новую версию, не забудьте поменять значение переменной окружения JAVA_HOME .
После того, как вы изменили переменные окружения, новые значения будут действительны только для новых запускаемых программ, уже запущенные программы не узнают о том, что переменные окружения поменялись. Поэтому если вы, например, пытались запустить Java из консоли и у вас не получилось из-за неправильных настроек переменной PATH , вам придётся перезапустить консоль после того, как вы поменяли значение переменной.
6. Удаление лишних файлов
Запустите консоль ( cmd ) и выполните в ней команду where java .
В результате вы должны увидеть путь к исполняемому файлу java.exe , который операционная система должна успешно обнаружить в том месте, куда вы установили Java. Если файл не нашёлся — значит неправильно настроена переменная PATH и нужно вернуться к предыдущему пункту.
Однако иногда бывает и наоборот, находятся «лишние» исполняемые файлы:
Происходит это из-за того, что инсталлятор Java вместо того, чтобы правильно настроить переменные окружения, пытается положить исполняемые файлы в директорию C:Windowssystem32
Это не очень хорошо — засоряется системная директория, может возникнуть рассогласование версий Java (в разных директориях разные версии). Поэтому надо удалить из каталога C:Windowssystem32 исполняемые файлы java.exe , javaw.exe и javaws.exe , если они там обнаружатся.
Вот и всё, теперь можно пользоваться Java. Только не забывайте о том, что после установки новой версии надо будет обновить переменную окружения JAVA_HOME !
Автор: Алексей Баранцев
Если вам понравилась эта статья, вы можете поделиться ею в социальных сетях (кнопочки ниже), а потом вернуться на главную страницу блога и почитать другие мои статьи.
Ну а если вы не согласны с чем-то или хотите что-нибудь дополнить – оставьте комментарий ниже, может быть это послужит поводом для написания новой интересной статьи.
9 Installation of the JDK and the JRE on Microsoft Windows Platforms
System Requirements for Installing the JDK and the JRE on 64-Bit Windows Platform
The JDK and the JRE have minimum processor, disk space, and memory requirements for 64-bit Windows platform.
Before installing the JDK or the JRE on your 64-bit Windows platform, you must verify that it meets the following minimum processor, disk space, and memory requirements.
Both the JDK and JRE require at minimum a Pentium 2 266 MHz processor.
Disk Space Requirements
For JDK 10 , you are given the option of installing the following features:
Public Java Runtime Environment
When you install 64-bit JDK, then 64-bit public JRE also gets installed. The following table provides the disk requirements for the installed features:
| JDK | Installed Image |
|---|---|
| Development Tools: 64-bit platform | 500 MB |
| Source Code | 54.2 MB |
| JRE | Installed Image |
|---|---|
| Public Java Runtime Environment | 200 MB |
| Java Update | 2 MB |
On Windows 64-bit operating systems, the Java runtime requires a minimum of 128 MB of memory.
The minimum physical RAM is required to run graphically based applications. More RAM is recommended for applets running within a browser using the Java Plug-in. Running with less memory may cause disk swapping, which has a severe effect on performance. Very large programs may require more RAM for adequate performance.
JDK and JRE Installation Instruction Notation for Windows
For any text in this document that contains the following notation, you must substitute the appropriate update version number:
If you are downloading the JDK installer for 64-bit systems for update 10 Interim 0, Update 2, and Patch 1, then the file name jdk- 10 . interim.update.patch _windows-x64_bin.exe becomes jdk- 10 .0.2.1_windows-x64_bin.exe .
If you are downloading the JRE installer for 64-bit systems for update 10 Interim 0, Update 2, and Patch 1, then the file name jre- 10 . interim.update.patch _windows-x64_bin.exe becomes jre- 10 .0.2.1_windows-x64_bin.exe .
JDK Installation Instructions for Windows
You run a self-installing executable file to unpack and install the JDK on Windows computers.
Install JDK on Windows computers by performing the actions described in the following topics:
Downloading the JDK Installer
In a browser, go to the Java SE Development Kit 10 Downloads page and click Accept License Agreement . Under the Download menu, click the Download link that corresponds to the .exe for your version of Windows.
Download the file jdk- 10 . interim.update.patch _windows-x64_bin.exe .
Verify the successful completion of file download by comparing the file size on the download page and your local drive.
Running the JDK Installer
- Start the JDK 10 installer by double-clicking the installer’s icon or file name in the download location.
- Follow the instructions provided by the Installation wizard.
Installing the JDK Silently
Instead of double-clicking or opening the JDK installer, you can perform a silent, noninteractive, JDK installation by using command-line arguments.
The following table lists example installation scenarios and the commands required to perform them. The notation jdk stands for the downloaded installer file base name, such as jdk- 10 _windows-x64_bin.exe .
| Installation Scenario | Command |
|---|---|
| Install JDK and public JRE in silent mode. | |
| Install development tools and source code in silent mode but not the public JRE. | |
| Install development tools, source code, and the public JRE in silent mode. | |
| Install the public JRE in the specified directory C:test in silent mode. |
Setting the PATH Environment Variable
It is useful to set the PATH variable permanently for JDK 10 so that it is persistent after rebooting.
The PATH variable is set automatically for the JRE. This topic only applies to the JDK.
If you do not set the PATH variable, then you must specify the full path to the executable file every time that you run it. For example:
- Select Control Panel and then System .
- Click Advanced and then Environment Variables .
- Add the location of the bin folder of the JDK installation to the PATH variable in System Variables .
The PATH environment variable is a series of directories separated by semicolons (;) and is not case-sensitive. Microsoft Windows looks for programs in the PATH directories in order, from left to right.
You should only have one bin directory for a JDK in the path at a time. Those following the first instance are ignored.
If you are not sure where to add the JDK path, append it.
The new path takes effect in each new command window that you open after setting the PATH variable.
The following is a typical value for the PATH variable:
JRE Installation Instructions for Windows
When installing JRE on Windows computers, you must select the JRE installer that is appropriate for your Windows system.
The 64-bit Windows operating systems come with a 64-bit Internet Explorer (IE) browser as the standard (default) for viewing web pages.
Install JRE on Windows computers by performing the actions described in the following topics:
JRE Proxy Settings and Authentication
To use the Windows Online Installer, you must be connected to the internet.
If you are running behind a proxy server, then you must have your proxy settings correctly configured. If they are not configured, or are incorrectly configured, then the installer will terminate with the following message:
The installer cannot proceed with the current Internet Connection settings.
Please visit the following website for more information.
If you see this message, check your proxy settings:
In the Control Panel , double-click Internet Options , select the Connections tab, and click the LAN Settings .
If you do not know what the correct settings should be, check with your internet provider or system administrator.
Downloading the JRE Installer
The JRE Installer is located on the Java SE Runtime Environment 10 Downloads page.
- In a browser, go to the Java SE Runtime Environment 10 Downloads page.
The following JRE installers are available for you to download:
Windows Offline: jre- 10 . interim.update.patch _windows-x64_bin.exe
Windows Tar: jre- 10 . interim.update.patch _windows-x64_bin.tar.gz
The Windows Offline installer and Windows installer contains everything that is required to install the JRE.
The Microsoft Windows Installer (MSI) Enterprise JRE Installer is also available, which enables you to install the JRE across your enterprise. It requires a commercial license for use in production.
Running the JRE Installer
- Start the JRE 10 Installer by double-clicking the installer’s icon or file name in the download location.
- Follow the instructions provided by the Installation wizard.
The private JRE installed with the JDK is not registered. To register the JRE, you must set the PATH environment variable to point to JAVA_HOME bin , where JAVA_HOME is the location where you installed the private JRE . See Setting the PATH Environment Variable.
By default, the Java Access Bridge is disabled. To enable it, see Enabling and Testing Java Access Bridge in the Java Platform, Standard Edition Java Accessibility Guide .
To access essential Java information and functions in Microsoft Windows 7 and Windows 10 machines, after installation, click the Start menu and then select Java . The Java directory provides access to Help, Check for Updates, and Configure Java.
The Microsoft Windows 8 and Windows 8.1 do not have a Start menu. However, the Java information is available in the following Start directory: %ALLUSERSPROFILE%MicrosoftWindowsStart MenuPrograms .
Windows Registry Settings
The installation program for the Microsoft Windows version of the Java SE Runtime Environment uses the registry to store path and version information.
It creates the following registry keys:
This key contains the string CurrentVersion , with a value that is the highest installed version on the system.
JavaHome : the full path name of the directory in which the JRE is installed
RuntimeLib : the full path name of the Java runtime DLL
HKEY_LOCAL_MACHINESoftwareJavaSoftJava Web Start
This key is created for Java Web Start.
If there are two versions of JDK or JRE installed on a system, one with the new version-string format introduced in JDK 10 , and the other with the older version format, then there will be two different CurrentVersion registry key values. For example, if JDK 1.8.0 and JDK 10 are installed, then the following registry keys are created:
«HKEY_LOCAL_MACHINESOFTWAREJavaSoftJava Development Kit» for JDK 1.8.0 and «HKEY_LOCAL_MACHINESOFTWAREJavaSoftJDK» for JDK 10 .
The registry layout for this example is:
The @CurrentVersion is a registry string in the «JDK» or «Java Development Kit» key.
For the same example, if the JRE is installed, then the registry layout is:
The @CurrentVersion is a registry string in the «JRE» or «Java Runtime Environment» key.
Beginning to Use the JDK
Use the Java item in the Windows Start menu to access essential Java information and functions, including Help, API documentation, the Java Control Panel, checking for updates, and Java Mission Control.
Java Start Menu Installed by JDK
During JDK install, Java menu items are added to the Windows Start menu to provide easy access to Java resources and a Java Development Kit folder is created in the Windows Start menu, which contains the following items:
Reference Documentation : Opens the Online API documentation web page.
Java Mission Control : Opens the Java Mission Control profiling and diagnostics tools suite.
Java Mission Control is a commercial feature available to users with a Java SE Advanced license.
During JDK installation and uninstallation processes, the appropriate start menu items are updated so that they are associated with the latest JDK version on the system
The Windows 7 and Windows 10 have a Start menu; however, the menu is not available in Windows 8 and Windows 8.1. The JDK and Java information in Windows 8 and Windows 8.1 is available in the following Start directory: %ALLUSERSPROFILE%MicrosoftWindowsStart MenuPrograms .
Java Start Menu Installed by JRE
During JRE installation, Java menu items are added to the Windows Start menu to provide easy access to Java resources and a Java folder is created in the Windows Start menu, which contains the following items:
About Java : Opens the Java Control Panel with focus on the General tab. The tab displays the latest JRE version installed on the system.
Check for Updates : Opens the Java Control Panel with focus on the Update tab
Configure Java : Opens the Java Control Panel with focus on the General tab
Get Help : Opens the Java Help Center
Visit Java.com : Opens the Java Download page
During JRE installation and uninstallation processes, the appropriate start menu items are updated so that they are associated with the latest JRE version on the system.
The Windows 7 and Windows 10 have Start menu, however the menu is not available in Windows 8 and Windows 8.1. The JRE and Java information in Windows 8 and Windows 8.1 is available in the following Start directory: %ALLUSERSPROFILE%MicrosoftWindowsStart MenuPrograms .
Java Web Start
Java Web Start is an application-deployment technology that gives you the power to run full-featured applications with a single click from your web browser.
With Java Web Start, you can download and run applications, such as a complete spreadsheet program or an internet chat client, without going through complicated installation procedures. With Java Web Start, you run applications simply by clicking a web page link. If the application is not present on your computer, Java Web Start automatically downloads all necessary files. It then caches the files on your computer so that the application is always ready to be run anytime that you want — either from an icon on your desktop or from the browser link. No matter which method you use to run the application, the most current, available version of the application is always presented to you.
Upgrading from Previous Versions
If you have a previous version of Java Web Start, do not uninstall it. Uninstalling it will cause the download cache to be cleared, and all previously installed Java Web Start application data will have to be downloaded again. The new version will write over previous installations and automatically update browsers to use the new version. The configuration files and the program files folder used by Java Web Start have changed, but all your settings will remain intact after the upgrade because Java Web Start will translate your settings to the new form.
The only way to uninstall Java Web Start is to uninstall the JDK or JRE. Uninstalling the JDK or JRE will not, however, remove the cache for previous versions of Java Web Start. Previous releases have separate uninstallation instructions for Java Web Start.
You may see a misleading message if you do the following:
Download and cache a Java Web Start application with the JDK or JRE.
Remove the JDK or JRE using Add or Remove Programs from the Windows Control Panel .
Remove the Java Web Start application using Add or Remove Programs .
When you remove the application, you see an Uninstaller Error dialog box saying:
An error occurred while trying to remove Java-Application: name App. It may have already been uninstalled. Would you like to remove Java-Application: name App from the Add or Remove program list?
If you say Yes to this, then you will see another Uninstaller Error dialog box saying:
You do not have sufficient access to remove Java-Application: name App from the Add or Remove Program list. Please contact your system administrator.
The message is displayed when you have removed the Java Web Start application while uninstallating the JDK or JRE, but this is not reflected in the Add or Remove Programs . Refresh the Add or Remove Programs by pressing F5 or reopen the panel.
To avoid seeing the misleading message, either press F5 or reopen the dialog box. Any Java Web Start application that was downloaded and cached with the JDK or JRE will no longer appear in the list of currently installed programs.
Java Plug-in
Java Plug-in technology, included as part of the JRE, establishes a connection between popular browsers and the Java platform. This connection enables applets on websites to be run within a browser on the desktop.
The Java Plug-in is automatically enabled for supported web browsers during installation of the JRE. No user intervention is necessary.
In Java SE 10 , the version of the Java Plug-in that is available in versions of the JRE prior to Java SE 6 Update 10 has been deprecated. However, this earlier version of the Java Plug-in is still shipped with Java SE 10 for compatibility purposes but is no longer fully supported. It will be removed in a future release.
Option to Disable the JRE Out-of-Date Warning
When the installed JRE falls below the security baseline or passes its built-in expiration date, an additional warning is shown to users to update their installed JRE to the latest version. For businesses that manage the update process centrally, users attempting to update their JRE individually, may cause problems.
A deployment property, deployment.expiration.check.enabled is available that can be used to disable the JRE out of date warning. To suppress this specific warning message, add the following entry in the deployment properties file:
To disable automatic updates, on the Update tab of the Java Control Panel, deselect the Check for Updates Automatically check box.
Uninstalling the JDK on Windows
Uninstalling the JRE on Windows
Use either of the following ways to uninstall JRE:
Go to Add/Remove Programs utility in the Microsoft Windows Control Panel and uninstall the older versions of JRE.
Remove JRE using the online Java Uninstall Tool.
The Java Removal Tool is integrated with the JRE installer. After JRE 10 is installed, the Java Removal Tool provides the list of outdated Java versions in the system and helps you to remove them.
The Java Uninstall tool will not run if your system administrator specified a deployment rule set in your organization.
A deployment rule set enables enterprises to manage their Java desktop environment directly and continue using legacy business applications in an environment of ever-tightening Java applet and Java Web Start application security policies. A deployment rule set enables administrators to specify rules for applets and Java Web Start applications; these rules may specify that a specific JRE version must be used. Consequently, the Java Uninstall tool will not run if it detects a deployment rule set to ensure that no required JREs are uninstalled.
See Deployment Rule Set in the Java Platform, Standard Edition Deployment Guide .
JDK Installation Troubleshooting
The following sections provide tips for working around problems that are sometimes seen during or while following installation instructions.
System Error During Decompression
If you see the error message system error during decompression , then you might not have enough space on the disk that contains your TEMP directory.
Program Cannot Be Run in DOS Mode
If you see the error message This program cannot be run in DOS mode , then do the following:
Open the MS-DOS shell or command prompt window.
Right-click the title bar.
Select the Program tab.
Ensure that the item Prevent MS-DOS-based programs from detecting Windows is not selected.
Select OK again.
Exit the MS-DOS shell.
Restart your computer.
Source Files in Notepad
In Microsoft Windows, when you create a new file in Microsoft Notepad and then save it for the first time, Notepad usually adds the .txt extension to the file name. Therefore, a file that you name Test.java is actually saved as Test.java.txt . Note that you cannot see the .txt extension unless you turn on the viewing of file extensions (in Microsoft Windows Explorer, deselect Hide file extensions for known file types under Folder Options ). To prevent the .txt extension, enclose the file name in quotation marks, such as «Test.java» when entering information in the Save As dialog box.
Characters That Are Not Part of the System Code Page
It is possible to name directories using characters that are not part of the system locale’s code page. If such a directory is part of the installation path, then generic error 1722 occurs, and installation is not completed. Error 1722 is a Windows installer error code. It indicates that the installation process has failed. The exact reason for this error is not known at this time.
To prevent this problem, ensure that the user and system locales are identical, and that the installation path contains only characters that are part of the system locale’s code page. User and system locales can be set in the Regional Options or Regional Settings control panel.
The associated bug number is 4895647.
Windows Online Installation and Java Update FAQ
These are frequently asked questions about JDK 10 and JRE 10 online installation and Java updates on Windows computers.
1. I downloaded the installer and it is less than 1 megabyte. Why is it so small?
The Windows Online Installer for the JRE will download more installer files. Using this installer helps users to avoid downloading unnecessary files.
2. I had the Java Control Panel open for Java Update and the About tab showed the version of the JRE installed in my computer. Then I ran Java Update, and the version of the JRE that the Java Control Panel is showing has not changed. Why is this?
You need to close and restart the Java Control Panel to get the updated Control Panel.
3. Netscape/Mozilla is not working correctly with Java Plug-in. Why?
First, close all the browsers sessions. If this does not work, reboot the system and try again.
4. I try to install on the D: drive and Java Update is still installing files onto the C: drive. Why?
Regardless of whether an alternate target directory was selected, Java Update needs to install some files on the Windows system drive.
5. How can I uninstall the Java Update version that I just installed?
If you want to uninstall the JRE, then use the Add/Remove Programs utility in the Microsoft Windows . Select the Control Panel and then Add/Remove Programs .
6. After the JRE bootstrap installer is downloaded and executed, why does the message «This installer cannot proceed with the current Internet Connection settings of your system. In your Windows Control Panel, please check Internet Options -> Connections to make sure the settings and proxy information are correct.» appear?
The JRE bootstrap installer uses the system Internet Connection settings to connect to the web for downloading extra files. If you are behind a firewall and require proxy settings, then ensure that the proxy settings in Internet Options/Internet Properties are set up properly (select Start , then Control Panel , then Internet Options/Internet Properties , then Connections , and then LAN Settings ). If you can browse the external web (for example, outside the firewall) with Internet Explorer, then your proxy settings are properly set up. The installer does not understand the proxy settings specified in Netscape/Mozilla.
7. I found the jusched.exe process running in the background of my system after installing JRE. Is there a way to shut it down?
The jusched.exe is the scheduler process of Java Update. This process runs automatically. To shut in the Java Control Panel on the Update tab, deselect the Check for Updates Automatically check box.
8. When I click the Update Now button from the Java Control Panel, it complains about the system being «offline.» What does that mean?
Java Update can be run only if the system is connected to the network. A system that is not connected to the network is referred to as being offline. When the Update Now is clicked, it will check the online/offline status of your system. If your computer does not have internet access, then the error message is displayed. Check that your system is currently connected to the internet and try again.
9. I followed the instructions to install a specific version of the JRE. After the installation, a message is displayed from system tray saying an update is available for download. What should I do?
The message is part of the Java Auto Update mechanism, which detects at user login time if a newer version of the JRE is available for download. In the system tray, click the Java Update icon to download and install the update.
10. I encountered the error «This installation package could not be opened. Contact the application vendor to verify that this is a valid Windows Installer package.» when running the Java SE installer.
There are several possible reasons for this error to be displayed; a few are listed:
Network connection fails.
Download manager software interrupts the download process.
Another application, such as an antivirus application, may interrupt the installation process.
To address these problems, ensure that the third-party downloader applications are turned off and the network connection is configured properly. Also, if a proxy is in use, then ensure that the proxy authentication is turned off.
11. I encountered the error «Error 1722. There is a problem with this Windows installer package. A program run as part of the setup did not finish as expected. Contact your support personnel or package vendor.»
See Error 1722: Problem with Windows Installer Package. If you encounter any other errors or issues, then you can access Java Help Center, which contains solutions for issues that you might encounter when downloading and installing Java on your system. In particular, you can search for solutions by error number. Searching for «Error 1722» returns a solution to this issue.
Понимать и управлять настройками Java в Windows 10/8/7
Adobe Flash и Java – это две загрузки, которые большинство из нас установили на наших компьютерах с Windows, поскольку они дают нам больше возможностей для работы в Интернете и просмотра веб-страниц. Мы уже видели, как управлять настройками Adobe Flash .
Сегодня мы узнаем о настройках Java в Windows 10/8/7.
Что такое Java
Java – это язык программирования и вычислительная платформа, которая поддерживает самые современные программы, включая утилиты, игры и бизнес-приложения. Он позволяет играть в онлайн-игры, общаться с людьми по всему миру, просматривать изображения в 3D и многое другое.
Панель управления Java
Программное обеспечение Java или среда выполнения Java также называются средой выполнения Java, средой выполнения, средой выполнения, JRE, виртуальной машиной Java и т. Д. Им можно управлять из панели управления Java. Чтобы получить доступ к панели управления Java, откройте панель управления и нажмите «Java». Здесь вы сможете получить информацию о номере версии, а также просмотреть файлы.

Удалить временные файлы Java
Когда вы просматриваете Интернет, всякий раз, когда ваш браузер использует Java, файлы Java хранятся в специальных папках для более быстрого выполнения в дальнейшем.
Чтобы просмотреть местоположение папки и другие сведения, нажмите кнопку Настройки .

По умолчанию эти временные файлы Java хранятся в
C: Users Имя пользователя AppData LocalLow Sun Java Deployment кэш
папка в формате JAR. Вы можете установить уровень сжатия для этих файлов JAR и даже установить сумму, которая будет выделена для хранения этих файлов.
Вы можете просмотреть файлы, нажав кнопку Просмотр .
Чтобы удалить эти временные файлы JAR Java, нажмите Удалить файлы . Теперь вы можете выбрать, какие файлы вы хотите удалить, и нажмите кнопку ОК.
Очистить кеш Java с помощью командной строки
Чтобы очистить кэш Java с помощью командной строки, откройте окна командной строки, введите следующую команду и нажмите Enter:
Обновление Java
Мы склонны игнорировать обновление нашей Java. Но очень важно, чтобы мы всегда были уверены, что вы используете последнюю версию Java, поскольку уязвимости в Java часто используются для компрометации вашего компьютера. Последняя версия Java содержит важные улучшения для повышения безопасности, производительности и стабильности приложений Java, которые работают на вашем компьютере. Всякий раз, когда дыры в безопасности обнаруживаются, они исправляются, и поэтому обязательно убедитесь, что у вас установлена последняя версия java, поскольку она включает исправления уязвимостей.
Вы можете настроить параметры обновления Java, нажав на вкладку Обновить .
Убедитесь, что Автоматически проверять наличие обновлений . Нажав на кнопку Дополнительно , вы сможете установить частоту проверок обновлений.
Кстати, я заметил, что прошло много времени с тех пор, как я обновил Java. Поэтому я нажал на Обновить сейчас , чтобы начать процесс обновления. Это запустит процесс juscheck.exe , который проверит наличие обновлений и, соответственно, проинформирует вас.
Нажав на кнопку «Установить», вы начнете процесс обновления. По завершении нажмите «Закрыть».
Другие настройки Java
Вкладка Java позволяет просматривать и управлять версиями и настройками среды выполнения Java для приложений и апплетов Java.
Вкладка Безопасность позволяет просматривать типы сертификатов, позволяющие идентифицировать себя.
На вкладке Дополнительно можно настроить другие параметры.
Удалить старые версии Java
Хранение старых и неподдерживаемых версий Java в вашей системе представляет серьезную угрозу безопасности.
Более старые версии SunJava (до JRE 6 с обновлением 7) действительно сохранялись при установке обновлений и должны быть удалены, так как более старые версии SunJava очень уязвимы для Winfixer/Vundo. С 2005 года вплоть до обновления в конце прошлого года до обновления 10 JRE 6 для SunMicrosystems и Sun Microsystems, чтобы автообновление SunJava удаляло предыдущие (уязвимые) версии программы. Обновления от JRE 6 Update 10 forward находятся в автономной папке «jre6», которая перезаписывается, если установлена новая JRE. Даже при использовании самой последней версии SunJava, если на вашем компьютере все еще находятся более ранние, уязвимые версии, они уязвимы для заражения.К сожалению, простое использование программ «Установка и удаление программ» для удаления старых версий неэффективно.
Мы предлагаем вам попробовать JavaRa. После обновления Java до его последней версии сегодня я запустил JavaRa и использовал его для удаления старых версий Java.
Он обнаружил две старые версии на моем компьютере, которые я затем удалил.
ПРИМЕЧАНИЕ. Мой коллега по MVP и мод Corrine TWCF добавляет: JavaRa не была обновлена для поддержки удаления JRE 7 и, по-видимому, фактически имеет проблемы после JRE 6u32. Он перешел на SingularLabs.com. Кроме того, Пол Маклейн больше не поддерживает JavaRa, а Фриде Фрис все еще поддерживает.
Java Скачать
Вы можете скачать и установить Java для Windows вручную с Java.com здесь.
Надеюсь, вы узнали что-то новое здесь, в этом посте. Если у вас есть что добавить, пожалуйста, сделайте это в разделе комментариев.


I need to know where JDK is located on my machine.
On running Java -version in cmd, it shows the version as ‘1.6.xx’.
To find the location of this SDK on my machine I tried using echo %JAVA_HOME% but it is only showing ‘JAVA_HOME’ (as there is no ‘JAVA_PATH’ var set in my environment variables).
![]()
asked Jan 13, 2011 at 14:26
![]()
3
If you are using Linux/Unix/Mac OS X:
Try this:
$ which java
Should output the exact location.
After that, you can set JAVA_HOME environment variable yourself.
In my computer (Mac OS X — Snow Leopard):
$ which java
/usr/bin/java
$ ls -l /usr/bin/java
lrwxr-xr-x  1 root  wheel  74 Nov  7 07:59 /usr/bin/java -> /System/Library/Frameworks/JavaVM.framework/Versions/Current/Commands/java
If you are using Windows:
c:> for %i in (java.exe) do @echo. %~$PATH:i
answered Jan 13, 2011 at 14:28
![]()
Pablo Santa CruzPablo Santa Cruz
174k32 gold badges239 silver badges291 bronze badges
7
Windows > Start > cmd >
C:> for %i in (javac.exe) do @echo. %~$PATH:i
If you have a JDK installed, the Path is displayed,
for example: C:Program FilesJavajdk1.6.0_30binjavac.exe
answered May 9, 2012 at 16:29
![]()
grokstergrokster
5,7511 gold badge36 silver badges22 bronze badges
5
In Windows at the command prompt
where javac
answered Jul 25, 2013 at 12:02
![]()
NanoBennettNanoBennett
1,6821 gold badge12 silver badges13 bronze badges
5
Command line:
Run where java on Command Prompt.

GUI:
On Windows 10 you can find out the path by going to Control Panel > Programs > Java. In the panel that shows up, you can find the path as demonstrated in the screenshot below. In the Java Control Panel, go to the ‘Java’ tab and then click the ‘View’ button under the description ‘View and manage Java Runtime versions and settings for Java applications and applets.’
This should work on Windows 7 and possibly other recent versions of Windows.

answered Jul 26, 2017 at 18:46
![]()
smartexpertsmartexpert
2,4773 gold badges24 silver badges40 bronze badges
4
In windows the default is: C:Program FilesJavajdk1.6.0_14 (where the numbers may differ, as they’re the version).
answered Oct 24, 2013 at 21:24
![]()
Ronen RabinoviciRonen Rabinovici
8,3843 gold badges34 silver badges46 bronze badges
3
Java installer puts several files into %WinDir%System32 folder (java.exe, javaws.exe and some others). When you type java.exe in command line or create process without full path, Windows runs these as last resort if they are missing in %PATH% folders.
You can lookup all versions of Java installed in registry. Take a look at HKLMSOFTWAREJavaSoftJava Runtime Environment and HKLMSOFTWAREWow6432NodeJavaSoftJava Runtime Environment for 32-bit java on 64 bit Windows.
This is how java itself finds out different versions installed. And this is why both 32-bit and 64-bit version can co-exist and works fine without interfering.
answered Feb 1, 2012 at 10:48
![]()
Plain and simple on Windows platforms:
where java
answered Jan 25, 2014 at 16:33
![]()
luccaaluccaa
2973 silver badges2 bronze badges
1
Under Windows, you can use
C:>dir /b /s java.exe
to print the full path of each and every «java.exe» on your C: drive, regardless of whether they are on your PATH environment variable.
answered Nov 24, 2015 at 17:03
![]()
0
The batch script below will print out the existing default JRE. It can be easily modified to find the JDK version installed by replacing the Java Runtime Environment with Java Development Kit.
@echo off

setlocal

::- Get the Java Version
set KEY="HKLMSOFTWAREJavaSoftJava Runtime Environment"
set VALUE=CurrentVersion
reg query %KEY% /v %VALUE% 2>nul || (
    echo JRE not installed
    exit /b 1
)
set JRE_VERSION=
for /f "tokens=2,*" %%a in ('reg query %KEY% /v %VALUE% ^| findstr %VALUE%') do (
    set JRE_VERSION=%%b
)

echo JRE VERSION: %JRE_VERSION%

::- Get the JavaHome
set KEY="HKLMSOFTWAREJavaSoftJava Runtime Environment%JRE_VERSION%"
set VALUE=JavaHome
reg query %KEY% /v %VALUE% 2>nul || (
    echo JavaHome not installed
    exit /b 1
)

set JAVAHOME=
for /f "tokens=2,*" %%a in ('reg query %KEY% /v %VALUE% ^| findstr %VALUE%') do (
    set JAVAHOME=%%b
)

echo JavaHome: %JAVAHOME%

endlocal
answered Aug 11, 2014 at 18:21
![]()
munsinghmunsingh
3172 silver badges9 bronze badges
In a Windows command prompt, just type:
set java_home
Or, if you don’t like the command environment, you can check it from:
Start menu > Computer > System Properties > Advanced System Properties. Then open Advanced tab > Environment Variables and in system variable try to find JAVA_HOME.

![]()
answered Mar 16, 2014 at 11:36
![]()
JohannJohann
26.3k39 gold badges156 silver badges263 bronze badges
1
Powershell one liner:
$p='HKLM:SOFTWAREJavaSoftJava Development Kit'; $v=(gp $p).CurrentVersion; (gp $p/$v).JavaHome
answered Jun 17, 2017 at 8:15
![]()
majkinetormajkinetor
8,6229 gold badges51 silver badges72 bronze badges
1
In Windows PowerShell you can use the Get-Command function to see where Java is installed:
Get-Command -All java
Or
gcm -All java
The -All part makes sure to show all places it appears in the Path lookup. Below is example output.
PS C:> gcm -All java

CommandType     Name                                               Version    Source
-----------     ----                                               -------    ------
Application     java.exe                                           8.0.202.8  C:Program Files (x86)Common FilesOracleJavajav...
Application     java.exe                                           8.0.131... C:ProgramDataOracleJavajavapathjava.exe
answered Nov 9, 2020 at 17:32
![]()
Scott HScott H
2,52424 silver badges28 bronze badges
Run this program from commandline:
// File: Main.java
public class Main {

    public static void main(String[] args) {
       System.out.println(System.getProperty("java.home"));
    }

}


$ javac Main.java
$ java Main
answered Jan 13, 2011 at 14:29
![]()
PeterMmmPeterMmm
23.9k13 gold badges71 silver badges111 bronze badges
2
More on Windows… variable java.home is not always the same location as the binary that is run.
As Denis The Menace says, the installer puts Java files into Program Files, but also java.exe into System32. With nothing Java related on the path java -version can still work. However when PeterMmm’s program is run it reports the value of Program Files as java.home, this is not wrong (Java is installed there) but the actual binary being run is located in System32.
One way to hunt down the location of the java.exe binary, add the following line to PeterMmm’s code to keep the program running a while longer:
try{Thread.sleep(60000);}catch(Exception e) {}
Compile and run it, then hunt down the location of the java.exe image. E.g. in Windows 7 open the task manager, find the java.exe entry, right click and select ‘open file location’, this opens the exact location of the Java binary. In this case it would be System32.
answered Oct 24, 2012 at 10:23
![]()
Moika TurnsMoika Turns
6379 silver badges17 bronze badges
Have you tried looking at your %PATH% variable. That’s what Windows uses to find any executable.
answered Jan 13, 2011 at 14:28
![]()
sblundysblundy
60.3k22 gold badges120 silver badges123 bronze badges
1
Just execute the set command in your command line. Then you see all the environments variables you have set.
Or if on Unix you can simplify it:
$ set | grep "JAVA_HOME"
answered Jan 13, 2011 at 14:31
1
This is OS specific. On Unix:
which java
will display the path to the executable. I don’t know of a Windows equivalent, but there you typically have the bin folder of the JDK installation in the system PATH:
echo %PATH%
answered Jan 13, 2011 at 14:30
![]()
Michael BorgwardtMichael Borgwardt
340k77 gold badges477 silver badges713 bronze badges
2
On macOS, run:
cd /tmp && echo 'public class Main {public static void main(String[] args) {System.out.println(System.getProperty("java.home"));}}' > Main.java && javac Main.java && java Main
On my machine, this prints:
/Library/Java/JavaVirtualMachines/jdk-9.0.4.jdk/Contents/Home
Note that running which java does not show the JDK location, because the java command is instead part of JavaVM.framework, which wraps the real JDK:
$ which java
/usr/bin/java
/private/tmp
$ ls -l /usr/bin/java
lrwxr-xr-x  1 root  wheel  74 14 Nov 17:37 /usr/bin/java -> /System/Library/Frameworks/JavaVM.framework/Versions/Current/Commands/java
answered Jan 18, 2018 at 13:58
![]()
jameshfisherjameshfisher
32.1k30 gold badges110 silver badges162 bronze badges
None of these answers are correct for Linux if you are looking for the home that includes the subdirs such as: bin, docs, include, jre, lib, etc.
On Ubuntu for openjdk1.8.0, this is in:
/usr/lib/jvm/java-1.8.0-openjdk-amd64
and you may prefer to use that for JAVA_HOME since you will be able to find headers if you build JNI source files. While it’s true which java will provide the binary path, it is not the true JDK home.
answered Jan 27, 2016 at 1:33
![]()
EntangledLoopsEntangledLoops
1,9101 gold badge23 silver badges35 bronze badges
I have improved munsingh’s answer above by testing for the registry key in 64-bit and 32-bit registries, if needed:
::- Test for the registry location
SET VALUE=CurrentVersion
SET KEY_1="HKLMSOFTWAREJavaSoftJava Development Kit"
SET KEY_2=HKLMSOFTWAREJavaSoftJDK
SET REG_1=reg.exe
SET REG_2="C:Windowssysnativereg.exe"
SET REG_3="C:Windowssyswow64reg.exe"

SET KEY=%KEY_1%
SET REG=%REG_1%
%REG% QUERY %KEY% /v %VALUE% 2>nul
IF %ERRORLEVEL% EQU 0 GOTO _set_value

SET KEY=%KEY_2%
SET REG=%REG_1%
%REG% QUERY %KEY% /v %VALUE% 2>nul
IF %ERRORLEVEL% EQU 0 GOTO _set_value

::- %REG_2% is for 64-bit installations, using "C:Windowssysnative"
SET KEY=%KEY_1%
SET REG=%REG_2%
%REG% QUERY %KEY% /v %VALUE% 2>nul
IF %ERRORLEVEL% EQU 0 GOTO _set_value

SET KEY=%KEY_2%
SET REG=%REG_2%
%REG% QUERY %KEY% /v %VALUE% 2>nul
IF %ERRORLEVEL% EQU 0 GOTO _set_value

::- %REG_3% is for 32-bit installations on a 64-bit system, using "C:Windowssyswow64"
SET KEY=%KEY_1%
SET REG=%REG_3%
%REG% QUERY %KEY% /v %VALUE% 2>nul
IF %ERRORLEVEL% EQU 0 GOTO _set_value

SET KEY=%KEY_2%
SET REG=%REG_3%
%REG% QUERY %KEY% /v %VALUE% 2>nul
IF %ERRORLEVEL% EQU 0 GOTO _set_value

:_set_value
FOR /F "tokens=2,*" %%a IN ('%REG% QUERY %KEY% /v %VALUE%') DO (
    SET JDK_VERSION=%%b
)
SET KEY=%KEY%%JDK_VERSION%
SET VALUE=JavaHome
FOR /F "tokens=2,*" %%a IN ('%REG% QUERY %KEY% /v %VALUE%') DO (
    SET JAVAHOME=%%b
)
ECHO "%JAVAHOME%"
::- SETX JAVA_HOME "%JAVAHOME%"
reference for access to the 64-bit registry
answered Mar 28, 2018 at 17:51
![]()
JohnP2JohnP2
1,82118 silver badges17 bronze badges
Maybe the above methods work… I tried some and didn’t for me. What did was this :
Run this in terminal :
/usr/libexec/java_home
answered Oct 17, 2020 at 3:13
![]()
Mudit VermaMudit Verma
3442 silver badges6 bronze badges
Simple method (Windows):
Open an application using java.
press ctrl + shift + esc
Right click on OpenJDK platform binary. Click open file location.
Then it will show java/javaw.exe then go to the top where it shows the folder and click on the jdk then right copy the path, boom. (Wont work for apps using bundled jre paths/runtimes, because it will show path to the bundled runtime)
![]()
Dharman♦
29.3k21 gold badges79 silver badges131 bronze badges
answered Oct 3, 2021 at 5:59
![]()
in Windows cmd:
set "JAVA_HOME"
answered Dec 25, 2014 at 17:42
![]()
HusamHusam
132 bronze badges
0
#!/bin/bash

if [[ $(which ${JAVA_HOME}/bin/java) ]]; then
    exe="${JAVA_HOME}/bin/java"
elif [[ $(which java) ]]; then
    exe="java"
else
    echo "Java environment is not detected."
    exit 1
fi

${exe} -version
For windows:
@echo off
if "%JAVA_HOME%" == "" goto nojavahome

echo Using JAVA_HOME            :   %JAVA_HOME%

"%JAVA_HOME%/bin/java.exe" -version
goto exit

:nojavahome
echo The JAVA_HOME environment variable is not defined correctly
echo This environment variable is needed to run this program.
goto exit

:exit
This link might help to explain how to find java executable from bash: http://srcode.org/2014/05/07/detect-java-executable/
answered May 8, 2014 at 7:01
2
Script for 32/64 bit Windows.
@echo off

setlocal enabledelayedexpansion

::- Get the Java Version
set KEY="HKLMSOFTWAREJavaSoftJava Runtime Environment"
set KEY64="HKLMSOFTWAREWOW6432NodeJavaSoftJava Runtime Environment"
set VALUE=CurrentVersion
reg query %KEY% /v %VALUE% 2>nul || (
    set KEY=!KEY64!
    reg query !KEY! /v %VALUE% 2>nul || (
    echo JRE not installed
    exit /b 1
)
)

set JRE_VERSION=
for /f "tokens=2,*" %%a in ('reg query %KEY% /v %VALUE% ^| findstr %VALUE%') do (
    set JRE_VERSION=%%b
)

echo JRE VERSION: %JRE_VERSION%

::- Get the JavaHome
set KEY="HKLMSOFTWAREJavaSoftJava Runtime Environment%JRE_VERSION%"
set KEY64="HKLMSOFTWAREWOW6432NodeJavaSoftJava Runtime Environment%JRE_VERSION%"
set VALUE=JavaHome
reg query %KEY% /v %VALUE% 2>nul || (
    set KEY=!KEY64!
    reg query !KEY! /v %VALUE% 2>nul || (
    echo JavaHome not installed
    exit /b 1
)
)

set JAVAHOME=
for /f "tokens=2,*" %%a in ('reg query %KEY% /v %VALUE% ^| findstr %VALUE%') do (
    set JAVAHOME=%%b
)

echo JavaHome: %JAVAHOME%

endlocal
answered Mar 26, 2019 at 23:23
![]()
RudixxRudixx
1051 gold badge1 silver badge6 bronze badges
3.1. Windows 10
- В строке поиска введите Панель управления.
- Нажмите Программы.
- Если значок Java присутствует, значит, Java установлена.
- Если нет, щелкните «Программы и компоненты» и найдите установленные версии Java в J.
13 сред. 2020 г.
Как узнать, установлена ли Java?
Откройте командную строку и введите «java –version». Если отображается номер установленной версии.
Установлена ли Java в Windows 10?
Есть несколько способов, которые мы можем использовать для проверки версии Java в Windows 10. В основном, когда мы говорим «Версия Java», мы имеем в виду версию JRE. Вывод означает, что Java правильно установлена на нашем компьютере с Windows 10.
Как узнать, где установлена Java в Windows?
Откройте окно командной строки (Win⊞ + R, введите cmd, нажмите Enter). Введите команду echo% JAVA_HOME%. Это должно вывести путь к вашей папке установки Java. В противном случае ваша переменная JAVA_HOME была установлена неправильно.
Какая последняя версия Java?
Последняя версия Java — Java 16 или JDK 16, выпущенная 16 марта 2021 года (следуйте этой статье, чтобы проверить версию Java на своем компьютере). JDK 17 находится в процессе сборки с ранним доступом и станет следующим JDK LTS (долгосрочная поддержка).
Безопасно ли устанавливать Java?
Допустимый подключаемый модуль java безопасен для установки, но некоторые веб-сайты используют поддельные всплывающие окна, чтобы заставить вас загрузить программное обеспечение, которое на самом деле не является java. Вы можете скачать Java с http://java.com/en/.
Мне нужно, чтобы на моем компьютере была установлена Java?
Когда-то Java была абсолютно необходима, если вы хотели использовать свой компьютер практически для всего. Сегодня в этом меньше необходимости. Все большее число экспертов по безопасности рекомендуют не устанавливать Java, если у вас ее еще нет, и, возможно, даже избавиться от нее, если она у вас установлена.
Как установить Java?
Загрузить и установить
- Перейдите на страницу загрузки вручную.
- Щелкните Windows Online.
- Появится диалоговое окно «Загрузка файла», предлагающее запустить или сохранить файл загрузки. Чтобы запустить установщик, нажмите «Выполнить». Чтобы сохранить файл для последующей установки, нажмите «Сохранить». Выберите расположение папки и сохраните файл в своей локальной системе.
Где находится Java в панели управления?
Windows 10
- Щелкните правой кнопкой мыши кнопку «Пуск» и выберите пункт «Панель управления».
- В Панели управления Windows щелкните «Программы».
- Щелкните значок Java, чтобы открыть панель управления Java.
Почему я не могу установить Java в Windows 10?
Временно отключите стороннюю программу безопасности (если вы ее установили). Если вы установили стороннюю программу безопасности, я прошу вас связаться с ее технической поддержкой, чтобы временно отключить программу, а затем попробуйте загрузить и установить Java и проверить проблему.
Какие браузеры по-прежнему поддерживают Java?
Но есть Internet Explorer, который по-прежнему поддерживает Java-апплет. Итак, на сегодняшний день Internet Explorer — единственный браузер, поддерживающий Java-апплет.
Какая последняя версия Java для Windows 10?
Java 9 — последняя версия, поэтому перейдите по этой ссылке и примите лицензионное соглашение. Затем щелкните ссылку для загрузки Windows, как показано на изображении ниже, и сохраните файл. Примечание. Если вы пытаетесь установить Java 8 или более раннюю версию, вам необходимо знать, какая у вас Windows 10 — 32-разрядная или 64-разрядная.
Как узнать, установлена ли JRE в Windows?
Ответ
- Откройте командную строку. Следуйте по меню «Пуск»> «Программы»> «Стандартные»> «Командная строка».
- Введите: java -version и нажмите Enter на клавиатуре. Результат: сообщение, подобное приведенному ниже, указывает, что Java установлена и вы готовы использовать MITSIS через среду выполнения Java.
3 сред. 2020 г.
Как установить Java в Windows?
Загрузить и установить
- Перейдите на страницу загрузки вручную.
- Щелкните Windows Online.
- Появится диалоговое окно «Загрузка файла», предлагающее запустить или сохранить файл загрузки. Чтобы запустить установщик, нажмите «Выполнить». Чтобы сохранить файл для последующей установки, нажмите «Сохранить». Выберите расположение папки и сохраните файл в своей локальной системе.
Как запустить Java из командной строки?
Как запустить Java-программу
- Откройте окно командной строки и перейдите в каталог, в котором вы сохранили java-программу (MyFirstJavaProgram. Java). …
- Введите ‘javac MyFirstJavaProgram. java ‘и нажмите Enter, чтобы скомпилировать код. …
- Теперь введите java MyFirstJavaProgram, чтобы запустить вашу программу.
- Вы сможете увидеть результат, напечатанный в окне.
19 ян. 2018 г.