| title | description | ms.custom | ms.date | ms.topic | ms.devlang | author | ms.author | manager | ms.technology | dev_langs | ms.workload |
|---|---|---|---|---|---|---|---|---|---|---|---|
|
Create a Windows Forms app with C# |
Learn how to create a Windows Forms app in Visual Studio with C#, step-by-step. |
vs-acquisition, get-started |
1/24/2023 |
tutorial |
CSharp |
anandmeg |
meghaanand |
jmartens |
vs-ide-general |
CSharp |
multiple |
Create a Windows Forms app in Visual Studio with C#
[!INCLUDE Visual Studio]
In this tutorial, you’ll create a simple C# application that has a Windows-based user interface (UI).
::: moniker range=»vs-2019″
If you haven’t already installed Visual Studio, go to the Visual Studio downloads page to install it for free.
[!NOTE]
Some of the screenshots in this tutorial use the dark theme. If you aren’t using the dark theme but would like to, see the Personalize the Visual Studio IDE and Editor page to learn how.
::: moniker-end
::: moniker range=»vs-2022″
If you haven’t already installed Visual Studio, go to the Visual Studio 2022 downloads page to install it for free.
::: moniker-end
Create a project
First, you’ll create a C# application project. The project type comes with all the template files you’ll need, before you’ve even added anything.
::: moniker range=»vs-2019″
-
Open Visual Studio.
-
On the start window, choose Create a new project.

-
On the Create a new project window, choose the Windows Forms App (.NET Framework) template for C#.
(If you prefer, you can refine your search to quickly get to the template you want. For example, enter or type Windows Forms App in the search box. Next, choose C# from the Language list, and then choose Windows from the Platform list.)
[!NOTE]
If you do not see the Windows Forms App (.NET Framework) template, you can install it from the Create a new project window. In the Not finding what you’re looking for? message, choose the Install more tools and features link.Next, in the Visual Studio Installer, choose the .NET desktop development workload.
After that, choose the Modify button in the Visual Studio Installer. You might be prompted to save your work; if so, do so. Next, choose Continue to install the workload. Then, return to step 2 in this «Create a project» procedure.
-
In the Configure your new project window, type or enter HelloWorld in the Project name box. Then, choose Create.
Visual Studio opens your new project.


::: moniker-end
::: moniker range=»>=vs-2022″
-
Open Visual Studio.
-
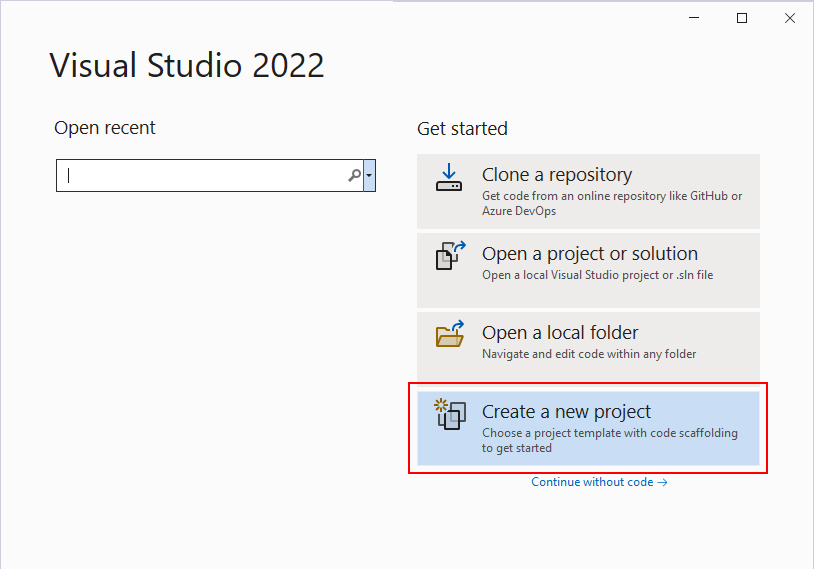
On the start window, select Create a new project.
:::image type=»content» source=»media/vs-2022/create-new-project-dark-theme.png» alt-text=»Screenshot to show the Create a new project window.»:::
-
On the Create a new project window, select the Windows Forms App (.NET Framework) template for C#.
(If you prefer, you can refine your search to quickly get to the template you want. For example, enter or type Windows Forms App in the search box. Next, select C# from the Language list, and then select Windows from the Platform list.)
:::image type=»content» source=»media/vs-2022/csharp-winform-create-a-new-project.png» alt-text=»Screenshot to select the C# template for the Windows Forms App (.NET Framework).»:::
[!NOTE]
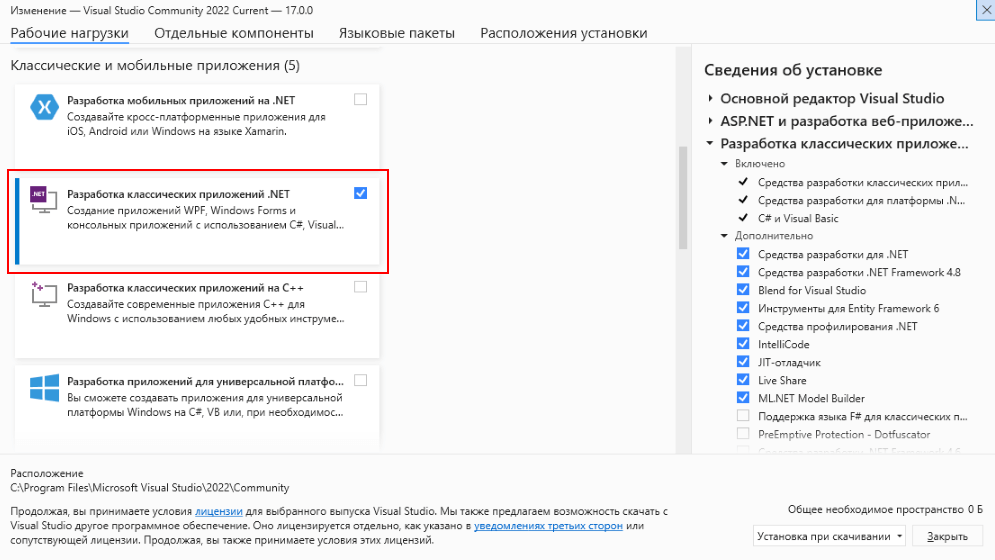
If you do not see the Windows Forms App (.NET Framework) template, you can install it from the Create a new project window. In the Not finding what you’re looking for? message, select the Install more tools and features link.:::image type=»content» source=»../get-started/media/vs-2019/not-finding-what-looking-for.png» alt-text=»Screenshot to show the The ‘Install more tools and features’ link from the ‘Not finding what you’re looking for’ message in the ‘Create a new project’ window.»:::
Next, in the Visual Studio Installer, select the .NET desktop development workload.
:::image type=»content» source=»media/vs-2022/install-dot-net-desktop-env.png» alt-text=»Screenshot to show the .NET Core workload in the Visual Studio Installer.»:::
After that, select the Modify button in the Visual Studio Installer. You might be prompted to save your work; if so, do so. Next, select Continue to install the workload. Then, return to step 2 in this «Create a project» procedure.
-
In the Configure your new project window, type or enter HelloWorld in the Project name box. Then, select Create.
:::image type=»content» source=»media/vs-2022/csharp-winform-configure-new-project.png» alt-text=»Screenshot to show the ‘Configure your new project’ window and name your project ‘HelloWorld’.»:::
Visual Studio opens your new project.
Create the application
After you select your C# project template and name your file, Visual Studio opens a form for you. A form is a Windows user interface. We’ll create a «Hello World» application by adding controls to the form, and then we’ll run the app.
Add a button to the form
-
Select Toolbox to open the Toolbox fly-out window.
:::image type=»content» source=»media/vs-2022/csharp-winform-hello-world-project-toolbox.png» alt-text=»Screenshot to select the Toolbox to open the Toolbox window.»:::
(If you don’t see the Toolbox fly-out option, you can open it from the menu bar. To do so, View > Toolbox. Or, press Ctrl+Alt+X.)
-
Expand Common Controls and select the Pin icon to dock the Toolbox window.
:::image type=»content» source=»media/vs-2022/csharp-winform-toolbox-flyout-pin.png» alt-text=»Screenshot to select the Pin icon to pin the Toolbox window to the IDE.»:::
-
Select the Button control and then drag it onto the form.
:::image type=»content» source=»media/vs-2022/csharp-winform-add-button-on-form.png» alt-text=»Screenshot to add a button to the form.»:::
-
In the Properties window, locate Text, change the name from button1 to
Click this, and then press Enter.:::image type=»content» source=»media/vs-2022/csharp-winform-button-properties-text.png» alt-text=»Screenshot to add text to the button on the form by using the Properties window.»:::
(If you don’t see the Properties window, you can open it from the menu bar. To do so, select View > Properties Window. Or, press F4.)
-
In the Design section of the Properties window, change the name from button1 to
btnClickThis, and then press Enter.:::image type=»content» source=»media/vs-2022/csharp-winform-button-properties-design-name.png» alt-text=»Screenshot to add a function to the button on the form by using the Properties window.»:::
[!NOTE]
If you’ve alphabetized the list in the Properties window, button1 appears in the (DataBindings) section, instead.
Add a label to the form
Now that we’ve added a button control to create an action, let’s add a label control to send text to.
-
Select the Label control from the Toolbox window, and then drag it onto the form and drop it beneath the Click this button.
-
In either the Design section or the (DataBindings) section of the Properties window, change the name of label1 to
lblHelloWorld, and then press Enter.
Add code to the form
-
In the Form1.cs [Design] window, double-click the Click this button to open the Form1.cs window.
(Alternatively, you can expand Form1.cs in Solution Explorer, and then choose Form1.)
-
In the Form1.cs window, after the private void line, type or enter
lblHelloWorld.Text = "Hello World!";as shown in the following screenshot::::image type=»content» source=»media/vs-2022/csharp-winform-button-click-code.png» alt-text=»Screenshot to add code to the form»:::
Run the application
-
Select the Start button to run the application.
:::image type=»content» source=»media/vs-2022/csharp-winform-visual-studio-start-run-program.png» alt-text=»Screenshot to select Start to debug and run the app.»:::
Several things will happen. In the Visual Studio IDE, the Diagnostics Tools window will open, and an Output window will open, too. But outside of the IDE, a Form1 dialog box appears. It will include your Click this button and text that says label1.
-
Select the Click this button in the Form1 dialog box. Notice that the label1 text changes to Hello World!.
:::image type=»content» source=»media/vs-2022/csharp-winform-form.png» alt-text=»Screenshot to show a Form1 dialog box that includes label1 text.»:::
-
Close the Form1 dialog box to stop running the app.
::: moniker-end
::: moniker range=»<=vs-2019″
Create the application
After you select your C# project template and name your file, Visual Studio opens a form for you. A form is a Windows user interface. We’ll create a «Hello World» application by adding controls to the form, and then we’ll run the app.
Add a button to the form
-
Choose Toolbox to open the Toolbox fly-out window.
(If you don’t see the Toolbox fly-out option, you can open it from the menu bar. To do so, View > Toolbox. Or, press Ctrl+Alt+X.)
-
Choose the Pin icon to dock the Toolbox window.
-
Choose the Button control and then drag it onto the form.
-
In the Properties window, locate Text, change the name from Button1 to
Click this, and then press Enter.(If you don’t see the Properties window, you can open it from the menu bar. To do so, choose View > Properties Window. Or, press F4.)
-
In the Design section of the Properties window, change the name from Button1 to
btnClickThis, and then press Enter.[!NOTE]
If you’ve alphabetized the list in the Properties window, Button1 appears in the (DataBindings) section, instead.


Add a label to the form
Now that we’ve added a button control to create an action, let’s add a label control to send text to.
-
Select the Label control from the Toolbox window, and then drag it onto the form and drop it beneath the Click this button.
-
In either the Design section or the (DataBindings) section of the Properties window, change the name of Label1 to
lblHelloWorld, and then press Enter.
Add code to the form
-
In the Form1.cs [Design] window, double-click the Click this button to open the Form1.cs window.
(Alternatively, you can expand Form1.cs in Solution Explorer, and then choose View Code(or press F7) from the right-click menu on Form1.cs.)
-
In the Form1.cs window, after the private void line, type or enter
lblHelloWorld.Text = "Hello World!";as shown in the following screenshot:

Run the application
-
Choose the Start button to run the application.
Several things will happen. In the Visual Studio IDE, the Diagnostics Tools window will open, and an Output window will open, too. But outside of the IDE, a Form1 dialog box appears. It will include your Click this button and text that says Label1.
-
Choose the Click this button in the Form1 dialog box. Notice that the Label1 text changes to Hello World!.
-
Close the Form1 dialog box to stop running the app.


::: moniker-end
Next steps
Congratulations on completing this tutorial. To learn more, continue with the following tutorial:
[!div class=»nextstepaction»]
Tutorial: Create a picture viewer
See also
- More C# tutorials
- Visual Basic tutorials
- C++ tutorials
Последнее обновление: 11.11.2022
Для создания графических приложений на C# можно использовать .NET CLI, но также можно
использовать бесплатную и полнофункциональную среду разработки — Visual Studio Community 2022, которая в ряде случаев облегчает проектирование
приложения. Так, загрузим установщик Visual Studio по адресу:
https://www.visualstudio.com/en-us/downloads.

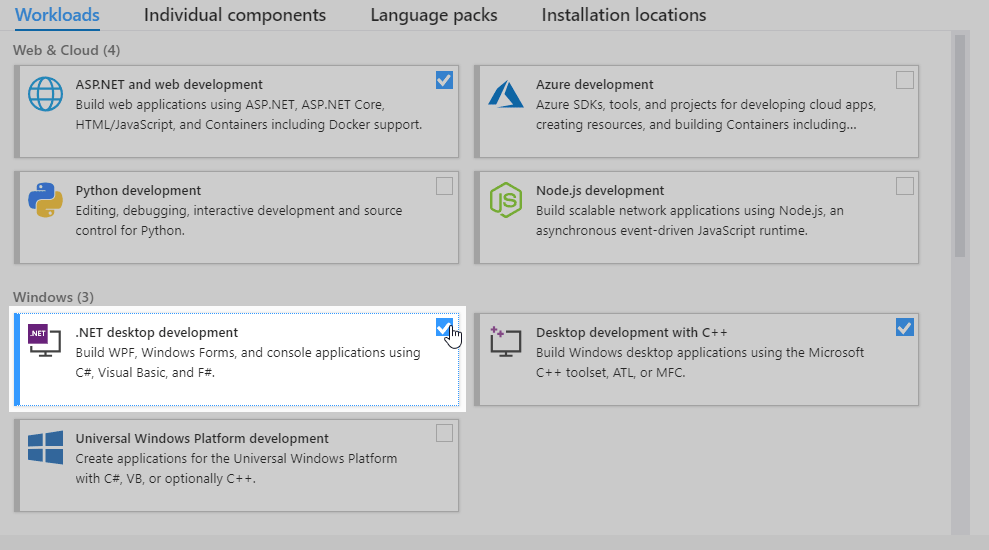
Чтобы добавить в Visual Studio поддержку проектов для Windows Forms и C# и .NET 7, в программе установки среди рабочих нагрузок нужно
выбрать только пункт Разработка классических приложений .NET. Можно выбрать и больше опций или вообще все опции, однако стоит
учитывать свободный размер на жестком диске — чем больше опций будет выбрано, соответственно тем больше места на диске будет занято.
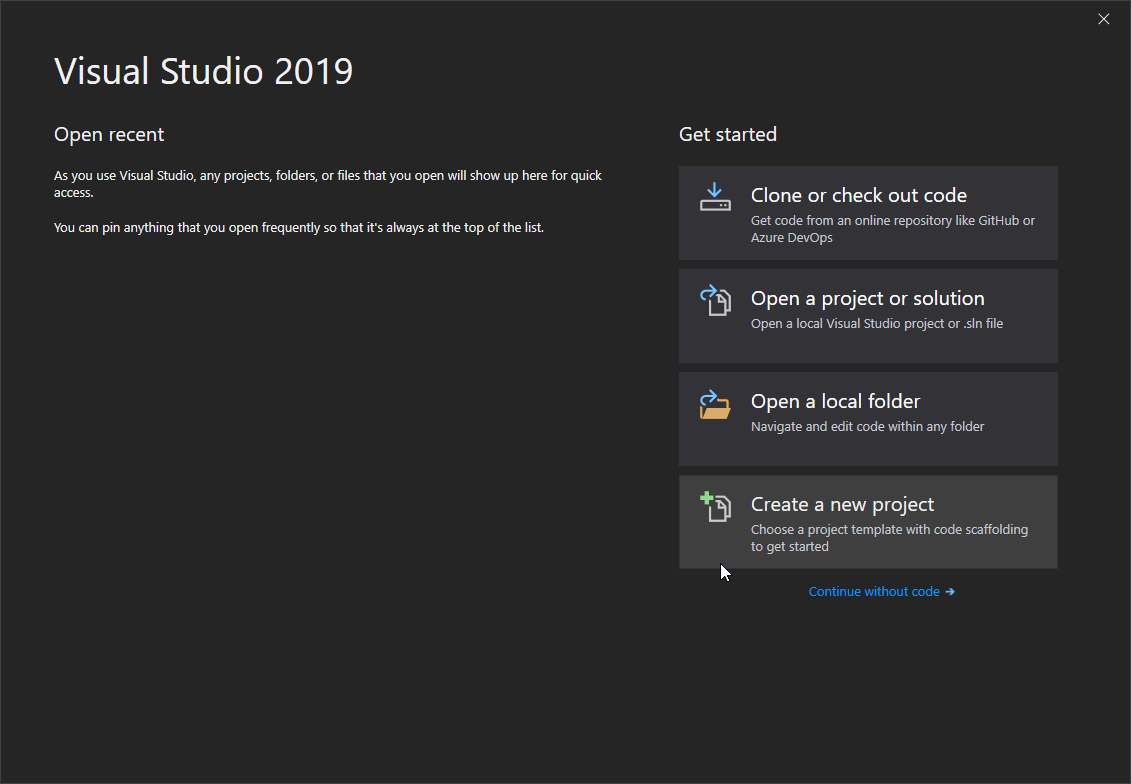
После установки среды и всех ее компонентов, запустим Visual Studio и создадим проект графического приложения.
На стартовом экране выберем Create a new project (Создать новый проект)
На следующем окне в качестве типа проекта выберем Windows Forms App:

Стоит отметить, что среди шаблонов можно увидеть еще тип Windows Forms App (.NET Framework) — его НЕ надо выбирать, необходим именно тип
Windows Forms App.
Далее на следующем этапе нам будет предложено указать имя проекта и каталог, где будет располагаться проект.
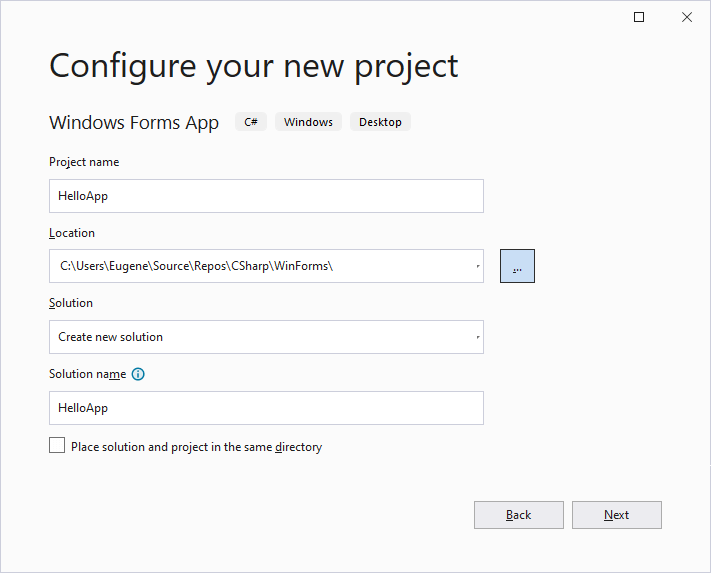
В поле Project Name дадим проекту какое-либо название. В моем случае это HelloApp.
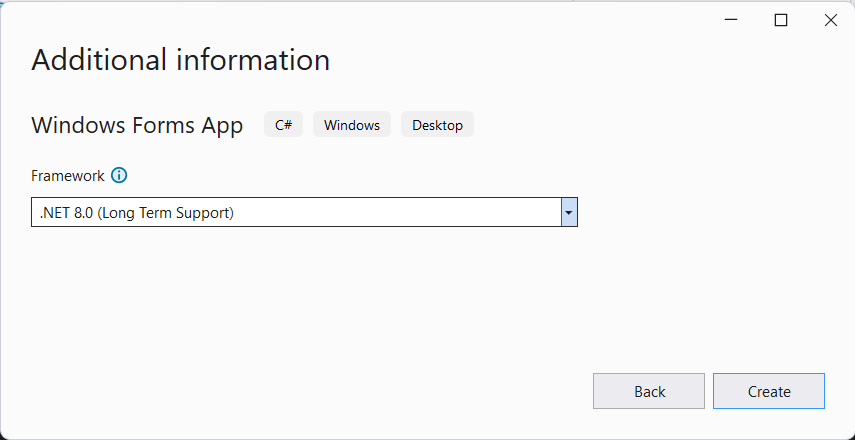
На следующем окне Visual Studio предложит нам выбрать версию .NET, которая будет использоваться для проекта. Выберем последнюю на данный момент версию — .NET 7.0 и нажмен на кнопку Create (Создать) для создания проекта.
После этого Visual Studio откроет наш проект с созданными по умолчанию файлами:
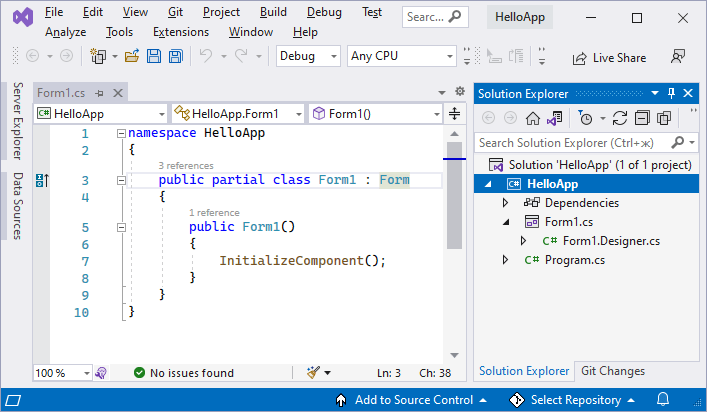
Справа находится окно Solution Explorer, в котором можно увидеть структуру нашего проекта. Практически этот тот же проект, который создается с
помощью .NET CLI:
-
Dependencies — это узел содержит сборки dll, которые добавлены в проект по умолчанию.
Эти сборки как раз содержат классы библиотеки .NET, которые будет использовать C# -
Form1.Designer.cs: он содержит определение компонентов формы, добавленных
на форму в графическом дизайнере -
Далее идет файл единственной в проекте формы — Form1.cs, который по умолчанию открыт в центральном окне.
-
Program.cs определяет точку входа в приложение
Запуск приложения
Чтобы запустить приложение в режиме отладки, нажмем на клавишу F5 или на зеленую стрелочку на панели Visual Studio.
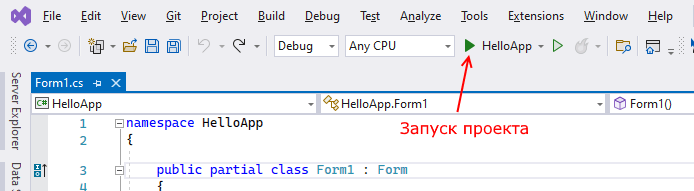
После этого запустится пустая форма Form1 по умолчанию.

После запуска приложения студия компилирует его в файл с расширением exe. Найти данный файл можно, зайдя в папку проекта и далее в каталог
binDebugnet7.0-windows
Рассмотрев вкратце создание проекта графического приложения, мы можем перейти к обзору основных компонентов и начнем мы с форм.
На чтение 7 мин Просмотров 2.8к. Опубликовано 07.04.2022
Освойте Microsoft Visual Studio и разрабатывайте собственные приложения с помощью Windows Forms практически без написания кода.
Windows Forms — это платформа, доступная в Visual Studio, которая позволяет создавать настольные приложения с помощью графического пользовательского интерфейса. Это позволяет вам щелкать и перетаскивать виджеты, такие как кнопки или метки, прямо на холст и управлять свойствами каждого виджета, такими как размер шрифта, цвет или граница.
В этой статье простой конвертер градусов Цельсия в градусы Фаренгейта будет использоваться в качестве примера для изучения основ настройки приложения Windows Form. В этом руководстве используется Visual Studio 2019 Community Edition.
Содержание
- Как создать проект Windows Forms в Visual Studio
- Как добавить элементы на холст проекта
- Как обрабатывать события и писать код в коде программной части
- Как запускать и отлаживать программу Windows Forms
- Отладка программы Windows Forms
- Запуск программы с помощью исполняемого файла
- Добавление дополнительных элементов в форму Windows
Как создать проект Windows Forms в Visual Studio
Сначала создайте проект в Visual Studio.
- Откройте Visual Studio и выберите Создать новый проект.
- Visual Studio предоставит вам список шаблонов проектов, из которых вы можете выбрать.
- Чтобы создать приложение Windows Forms, найдите приложение Windows Formи выберите его из списка шаблонов. Как только это будет выбрано, нажмите » Далее».

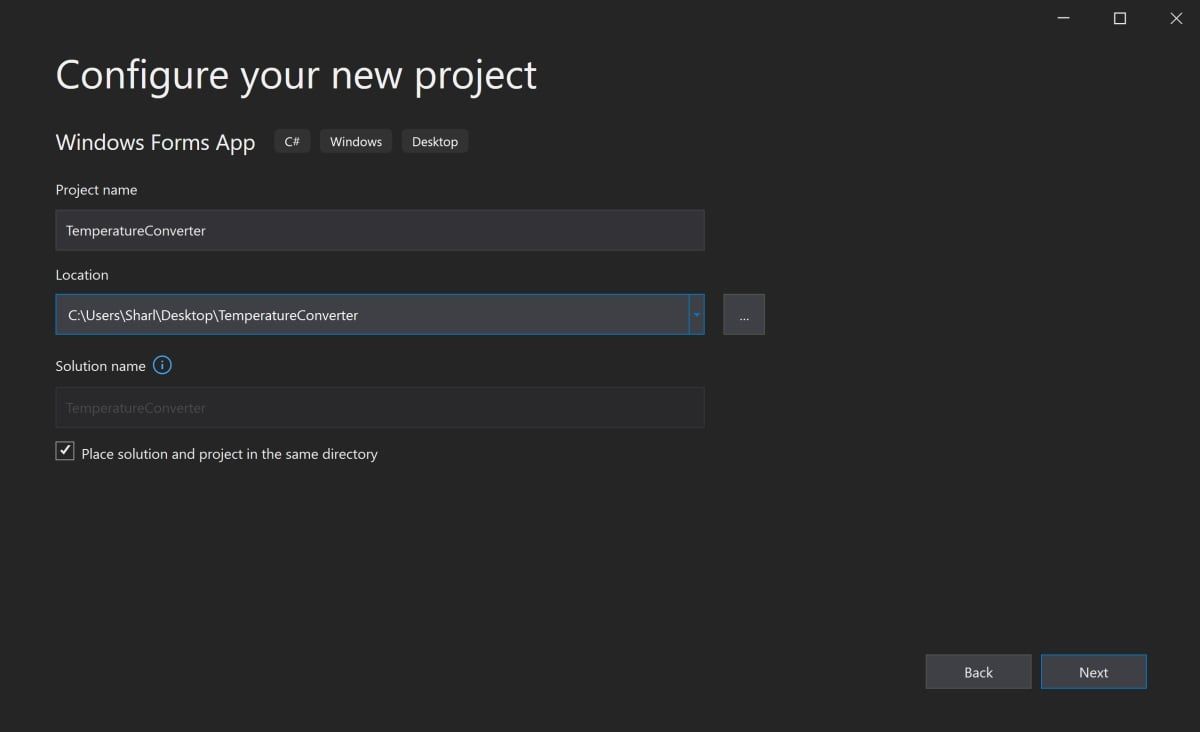
- Добавьте имя и местоположение для проекта и нажмите » Далее». Расположение — это каталог, в котором будут храниться файлы кода.
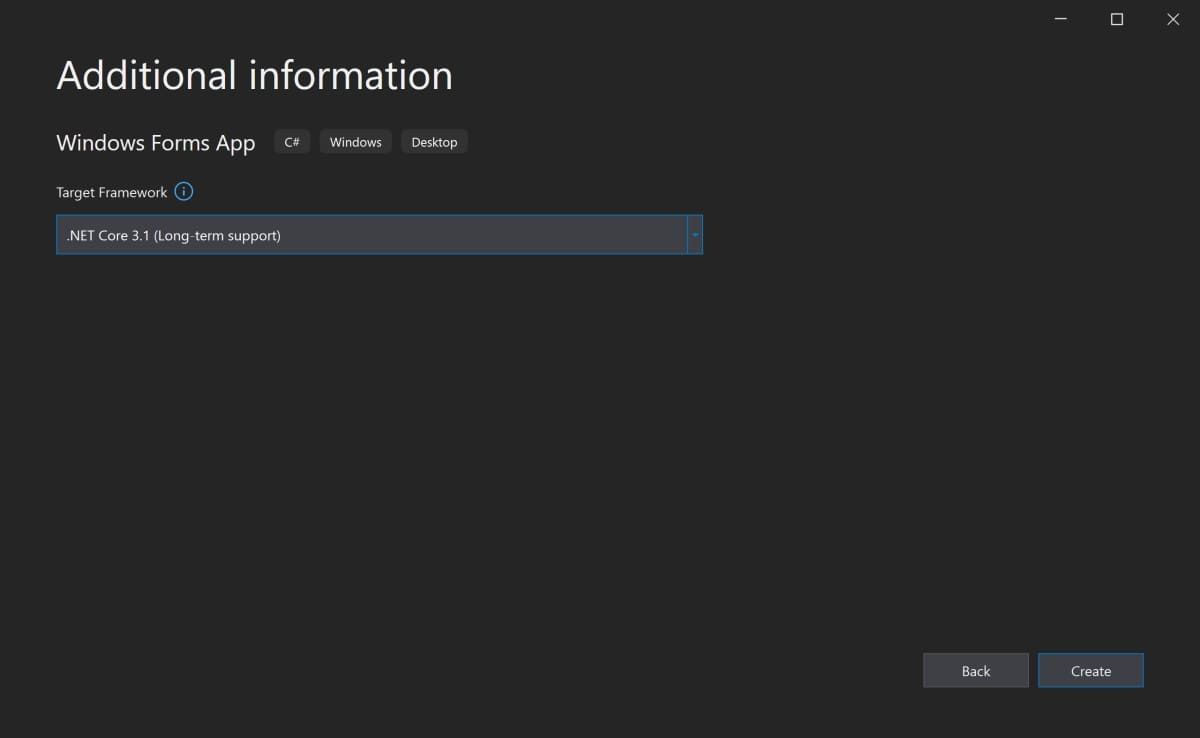
- На следующем экране сохраните выбор по умолчанию.NET Core 3.1.
- Щелкните Создать.
- Когда Visual Studio завершит создание проекта, он откроется.


Как добавить элементы на холст проекта
Холст — это белая область, расположенная в верхнем левом углу экрана. Нажмите и перетащите точки в нижней, правой или нижней правой части холста, чтобы изменить его размер, если это необходимо.
Чтобы создать пользовательский интерфейс приложения, добавьте на холст такие виджеты, как кнопки или текстовые поля.
- Откройте вкладку «Вид» в верхней части окна и выберите » Панель инструментов «.

- Это добавит панель инструментов в левую часть приложения. Выберите значок булавкив правом верхнем углу панели инструментов, чтобы закрепить его там навсегда.
- Здесь вы можете перетащить любой виджет из панели инструментов на холст. Выделите кнопку на панели инструментов и перетащите ее на холст.

- Перетащите на холст еще два текстовых поля вместе с тремя метками (две метки для каждого текстового поля и одна метка для заголовка в верхней части приложения).

- Каждый виджет на холсте имеет связанные с ним свойства. Выделите виджет, чтобы отобразить окно свойствв правом нижнем углу Visual Studio, в котором перечислены все свойства этого виджета. Эти свойства могут включать текст, имя, размер шрифта, границу или выравнивание выделенного виджета.
- На данный момент текст этих виджетов по-прежнему говорит label1, label2или button1. Выберите виджет label1и отредактируйте свойство Text в окне свойств, указав «Цельсий в Фаренгейт». Измените размер шрифта на 22pt.

- Аналогичным образом отредактируйте свойства других виджетов на холсте, чтобы они были следующими:


|
Виджет |
Имущество |
Новое значение |
| метка2 | Текст | Цельсия |
| этикетка3 | Текст | по Фаренгейту |
| кнопка | Текст | Рассчитать |
| Текстовое поле Фаренгейта | Только для чтения | Истинный |
Как обрабатывать события и писать код в коде программной части
Виджеты на холсте можно привязывать к событиям. События могут включать в себя такие вещи, как нажатие кнопки, изменение текста внутри текстового поля или выбор определенного переключателя. Когда происходят эти события, это может привести к срабатыванию части кода в программном коде.
C# — это язык, используемый при создании Windows Forms. Если вы еще не использовали C#, есть много практических причин для изучения программирования на C#.
Для этого конкретного приложения добавьте событие к кнопке » Рассчитать «, чтобы инициировать выполнение части кода при нажатии этой кнопки.
1. Дважды щелкните кнопку » Рассчитать«, чтобы автоматически открыть Form1.cs с новым методом Event:
private void calculateButton_Click(object sender, EventArgs e)
2. Здесь вы добавите код, который будет выполнять расчет градусов Цельсия по Фаренгейту и отображать результат в текстовом поле Фаренгейта. Для этого вам нужно иметь возможность прочитать значение из текстового поля Цельсия и изменить текстовое поле Фаренгейта, чтобы отобразить результат.
3. Вернитесь на холст и повторно отредактируйте свойства, как показано ранее. На этот раз отредактируйте свойство Nameдля текстовых полей Цельсия и Фаренгейта. Эти имена можно использовать для ссылки на текстовые поля в коде.
| Виджет | Имущество | Новое значение |
| Текстовое поле Цельсия | Имя | ЦельсияTextBox |
| Текстовое поле Фаренгейта | Имя | по ФаренгейтуTextBox |
4. Вернитесь к функции calculateButton_Click в Form1.cs.
5. Теперь на текстовое поле Celsius можно ссылаться в коде, используя имя «celsiusTextBox». Введенное пользователем значение Цельсия сохраняется в его свойстве Text. Однако, поскольку это строка, разберите ее на двойную, чтобы включить ее в будущие расчеты по Фаренгейту.
 private void calculateButton_Click(object sender, EventArgs e)
{
    // Get the value that the user entered in the Celsius Text Box
   double celsiusValue = Double.Parse(celsiusTextBox.Text);
}
6. Переменная celsiusValue теперь хранит значение, введенное пользователем в текстовом поле Celsius. Формула для преобразования градусов Цельсия в градусы Фаренгейта: (celsiusValue * 9 / 5) + 32.Таким образом, результат теперь можно рассчитать и сохранить в текстовом поле Фаренгейта.
private void calculateButton_Click(object sender, EventArgs e)
{
// Get the value that the user entered in the Celsius Text Box
double celsiusValue = Double.Parse(celsiusTextBox.Text);
// Apply the calculation
double result = (celsiusValue * 9 / 5) + 32;
// Store the result in the Fahrenheit Textbox
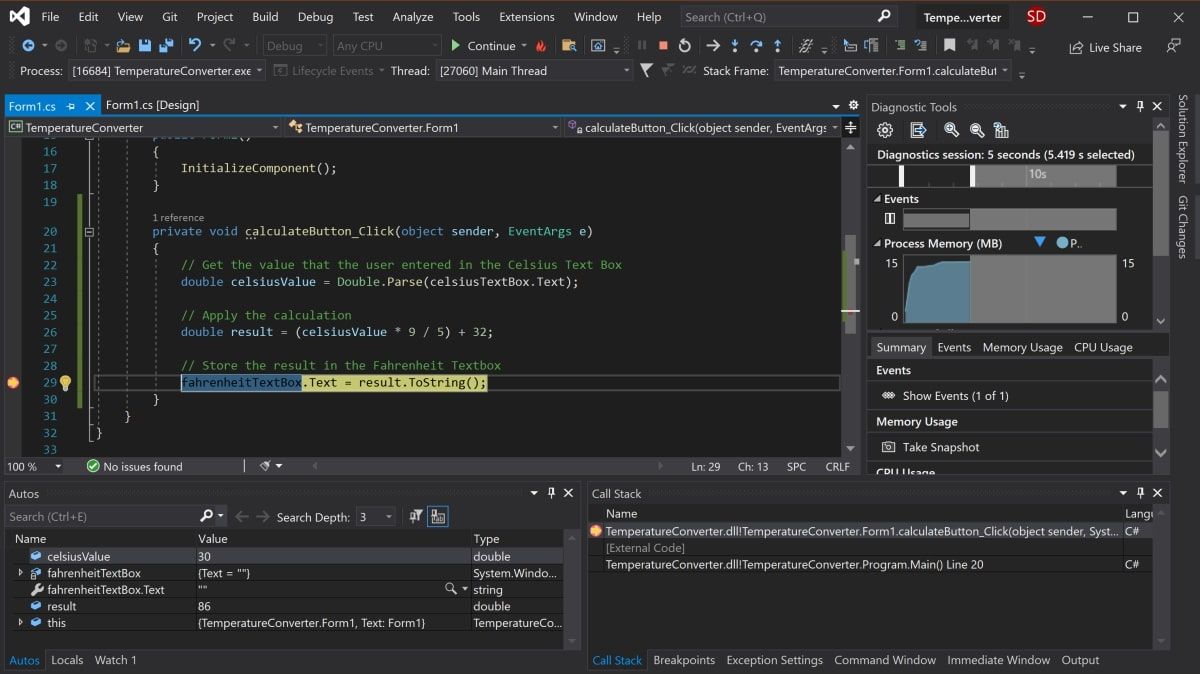
fahrenheitTextBox.Text = result.ToString();
}
Как запускать и отлаживать программу Windows Forms
Запуск программы Windows Forms в Visual Studio
Теперь, когда пользовательский интерфейс и логика кода настроены, запустите программу, чтобы увидеть, как она работает.
1. Чтобы запустить программу, выберите зеленую стрелку вверху панели инструментов в Visual Studio. 
2. После загрузки проекта добавьте значение в текстовое поле Цельсия и нажмите кнопку » Рассчитать». Это добавит результат в текстовое поле по Фаренгейту. 
3 Если программа размыта во время выполнения, вероятно, ваше приложение не поддерживает DPI. Это может вызвать проблемы с масштабированием и разрешением, поэтому его необходимо включить.
4. Щелкните правой кнопкой мыши проект TemperatureConverterв обозревателе решений. Выберите Добавить, затем выберите Новый элемент.
5. Найдите файл манифеста приложения и нажмите » Добавить «. 
6. Скопируйте следующий код в новый файл app.manifest как дочерний элемент тега сборки (если код уже сгенерирован, просто раскомментируйте его).
<application xmlns=»urn:schemas-microsoft-com:asm.v3″>
<windowsSettings>
<dpiAware xmlns=»http://schemas.microsoft.com/SMI/2005/WindowsSettings«>true</dpiAware>
<longPathAware xmlns=»http://schemas.microsoft.com/SMI/2016/WindowsSettings«>true</longPathAware>
</windowsSettings>
</application>
7. Чтобы это изменение вступило в силу, перезапустите программу. Нажмите красную кнопку остановки в верхней части панели инструментов, затем снова нажмите зеленую кнопку воспроизведения.
Отладка программы Windows Forms
Вы можете отладить программу, если логика вашего приложения Windows Forms не работает должным образом.
- Вернитесь к функции calculateButton_Click в Form1.cs и щелкните в любом месте серой полосы в крайнем левом углу экрана. Это добавит точку останова, которая обозначена красным кружком.
- Нажмите кнопку «Рассчитать» еще раз, чтобы запустить этот метод. Программа приостановится, когда достигнет точки останова, чтобы показать все значения, хранящиеся в переменных в этой точке.
- Чтобы продолжить работу программы, нажмите зеленую стрелку » Продолжить» в верхней части панели инструментов.

Запуск программы с помощью исполняемого файла
Если вы не хотите запускать свою программу через Visual Studio, используйте автономный исполняемый файл для программы. Это автоматически генерируется.
Перейдите к исполняемому файлу, который можно найти здесь:
<your-project-folder>/bin/Debug/netcoreapp3.1/TemperatureConverter.exe
Нажмите на исполняемый файл, чтобы запустить программу напрямую.
Добавление дополнительных элементов в форму Windows
Надеюсь, теперь у вас есть общее представление об основной структуре приложения Windows Form. Вы можете продолжить изучение дополнительных функций Windows Forms, поэкспериментировав с новыми виджетами и углубившись в другие различные события, которые можно обрабатывать.
Как только вы лучше познакомитесь с Windows Forms, вы сможете приступить к созданию более сложных приложений. Вы также можете изучить многие другие способы создания приложений на рабочем столе Windows.
This article is intended for beginners and will demonstrate how to create a Windows Forms / WinForms project using Visual Studio 2019 Community Edition, which is a free version of Visual Studio. The WinForms application created by Visual Studio will contain only a main form with no controls. Then in the future article, we will make this application a bit more interesting and useful.
Before we start creating a Visual Studio project, we need to make sure that the Visual Studio we have installed in our system is able to create WinForms projects.
What about creating a WinForms Project using Visual Studio Code?
I’m a big fan of Visual Studio Code and I did wonder if it’s possible to create WinForms project with it. Visual Studio 2019 added the Windows Forms support to the .NET Core 3.0 Framework, so maybe it will be possible in the future, but at the moment, the answer is No as there is no VS Code extension available and there is no support for the WinForms designer.
Making sure the .NET desktop development workload is installed for Visual Studio
It is assumed you have installed the Visual Studio Community 2019 in your system and that you have selected the «.NET desktop development» workload during the installation.
If you need to install Visual Studio Community Edition, make sure that during the installation, you select the .NET desktop development workload as we are going to create a WinForms project using the standard .NET Framework.
Note: Starting by Visual Studio 2019, the WinForms support was added to the .NET Core 3.0, so if you have ASP.NET and Web development workload installed, you can make the Windows Forms projects using .NET Core framework. Be aware that there are some breaking changes from the classic WinForms .NET Framework.
Click image to enlarge
Modifying the existing Visual Studio installation
If you already have Visual Studio installed, but you are unsure if a desktop application workload is installed or not, go to the next step to create a new project in VS. If you will see WinForms templates available, you are good to go.
If WinForms templates are missing, no problem, you should be able to easily add them by modifying the Visual Studio installation using these steps:
- Go to Settings > Apps (in Windows 7, go to Control Panel > Programs & Features).
- From the list of apps, find the Visual Studio Community app.
- Click the Modify button.
- After clicking on Modify, the installation window should appear as shown on the image shown earlier. You need to add a checkbox for the «.NET desktop development» workload. Note that this workload might take up to 5GB of HDD space, depending on what is missing.
Now, let’s create a WinForms project in VS.
Creating a WinForms Project in the Visual Studio
The steps to create a new WinForms project are as follows:
- Start the Visual Studio. After a while, the following window should show up:

Click image to enlarge
On the left side, you will have a list of the recently used project’s and on the right side, you will have several buttons to get started. Click on the «Create new project«.
-
This brings us to the window shown below, where we choose the template we want to use for our new project. On the left side we will have a list of the recently used templates and on the right side, we will have a list of all available templates.
We want to create a WinForms project, so inside the search field, type «winforms«. Now, only the WinForms related templates should be listed:
Click image to enlarge
Select the «Windows Forms App (.NET Framework)» template. You might see two of them, one for C# and one for Visual Basic. We will use C#, so select that one and click «Next«.
Note: If you want to check out all the templates in your Visual Studio that are available for the the desktop projects, select «Desktop» under the «Project type» drop-down menu.
What if WinForms template is missing in Visual Studio?
if you are unable to find the WinForms template, it usually means that during the Visual Studio installation, the .NET desktop development workload was not selected. Not to worry though, we can easily add additional packages by modifying the existing installation. Just follow the steps in the first section of this article.
-
Now that we selected the WinForms template, the «Configure your new project» window will appear:

Click image to enlarge
Here, we can choose our Project name and Location of the project. I’ll name it «MyWindowsFormsApp«. Notice that your solution name will also be set to the same name. We can change the solution name to something different, but solutions are used to group different projects together and, in our case, we only have one, so we can leave it as it is.
Leave the .NET Framework as it is and click on «Create» button.

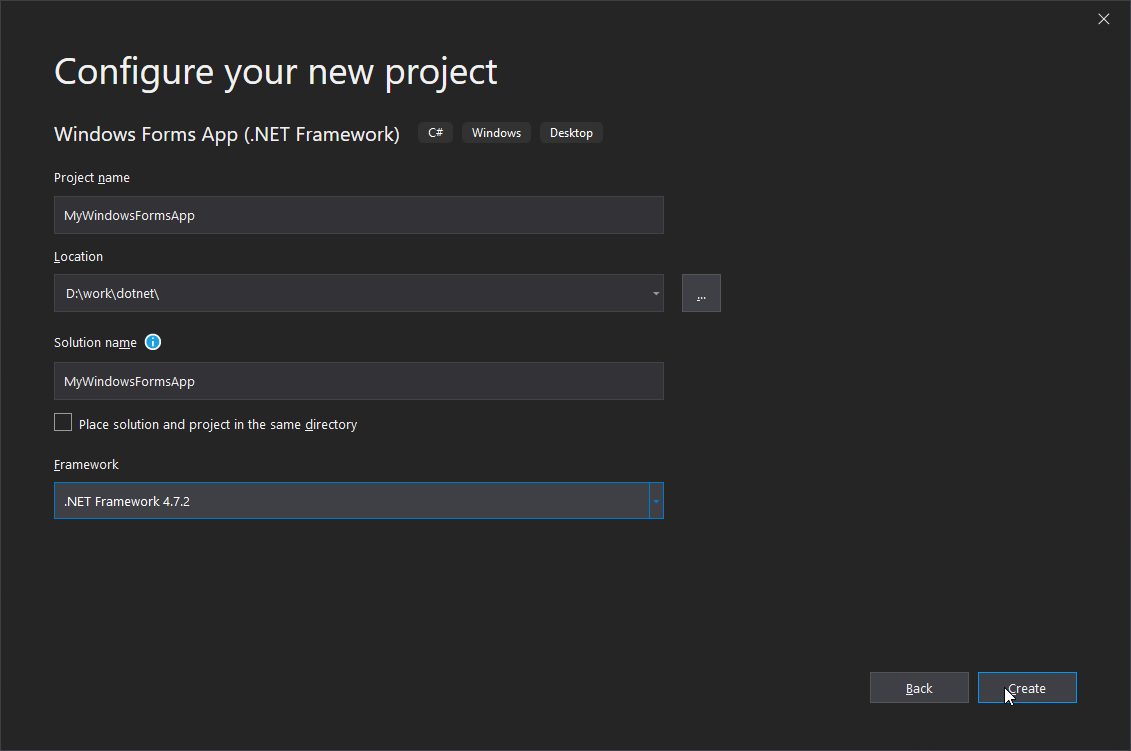
After some processing, the Visual Studio should create a new Windows Forms project and it should look something like this:
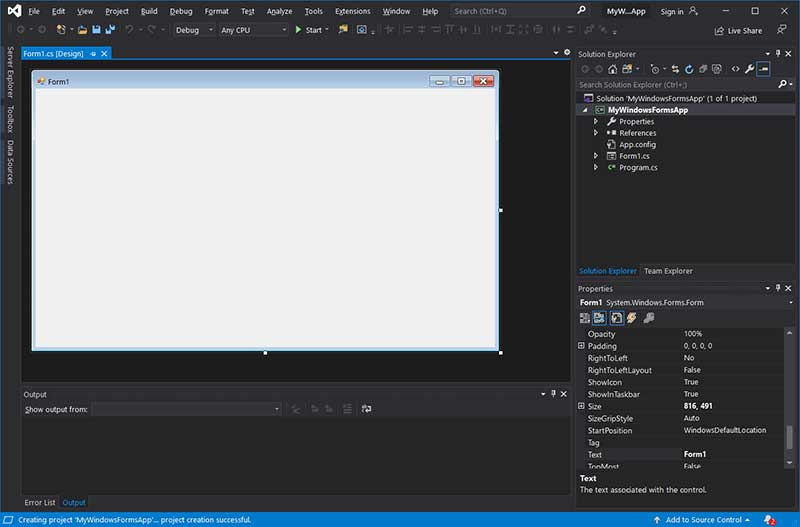
Click image to enlarge
Now, let’s quickly explore the opened project in VS.
Exploring the created WinForms project in Visual Studio
As you can see from the image above, we have an open tab named Form1.cs [Design] containing the main form of the project. The [Design] in the name tells us the Form1.cs is opened in «Designer mode», so we can drag & drop other controls to the Form and setting properties to those controls or the form itself.
The WinForms project created by Visual Studio auto-generates enough code for us to start the desktop application. We build and run the project in different ways:
- By clicking on the green «Start» button located in the Visual Studio Toolbar section.
- By pressing F5.
- From the menu by going to Debug > Start Debugging.
The running project will consist of our main form as shown below.
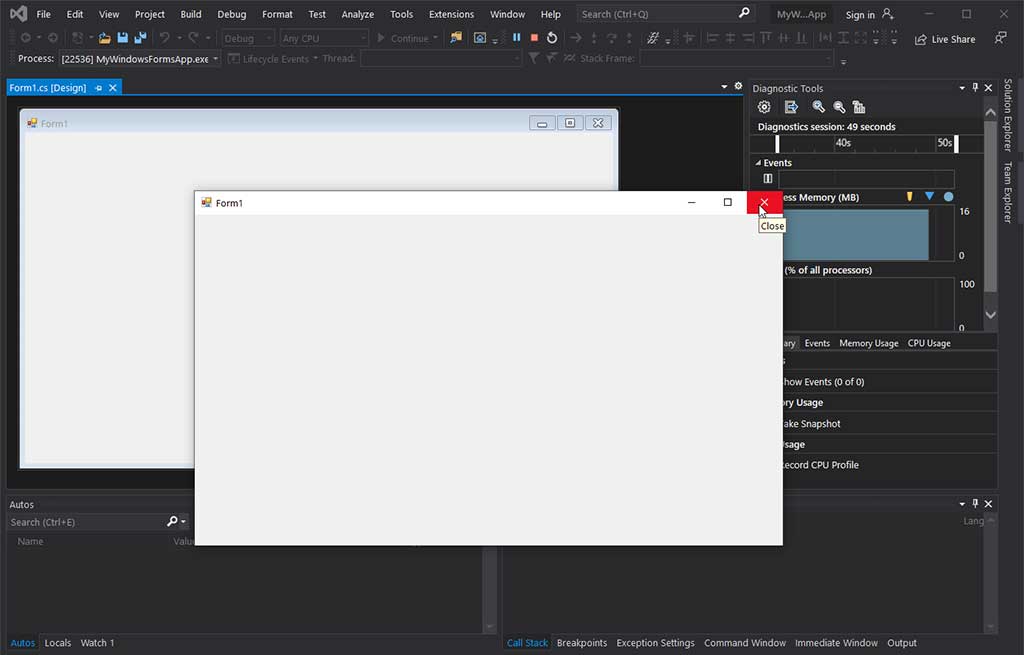
Click image to enlarge
By clicking on the red X close button on the top right corner of the Form1 windows, the application will close.
In the future article we will learn how to add additional WinForms controls into the main form and make the desktop application a bit more functional by adding a button to it that will display a pop-up window when clicked.
Conclusion
In this article we learned how to create WinForms project using Visual Studio and what to do when the WinForms templates are missing in Visual Studio. After the WinForms template was chosen, we configured a project by giving it a name and the location of the project. Finally, with the Windows Forms project in VS successfully created, we learned how to build and run it in three different ways.
Windows Forms is a framework available in Visual Studio that allows you to build desktop applications with the assistance of a graphical user interface. This allows you to click and drag widgets such as buttons or labels directly onto a canvas, and manipulate the properties of each widget such as its font-size, color or border.
In this article, a simple Celsius to Fahrenheit Converter will be used as an example to go through the basics of how to set up a Windows Form Application. Visual Studio 2019 Community Edition is the edition used for this tutorial.
How to Create the Windows Forms Project in Visual Studio
First, create the project in Visual Studio.
- Open Visual Studio and select Create a New Project.
- Visual Studio will provide you with a list of project templates you can choose from.
- To create a Windows Forms Application, search for Windows Form App and select it from the list of templates. Once this is selected, click on Next.

If the Windows Form App option is not available on the list, modify your installed version of Visual Studio. In Visual Studio Installer, add the .NET desktop development workload for Desktop and Mobile, and re-launch Visual Studio.
- Add a name and location for the project, and click on Next. The location is the directory where the code files will be stored.

- On the next screen, keep the default selection of .NET Core 3.1.
- Click Create.

- Once Visual Studio has finished creating the project, the project will open.


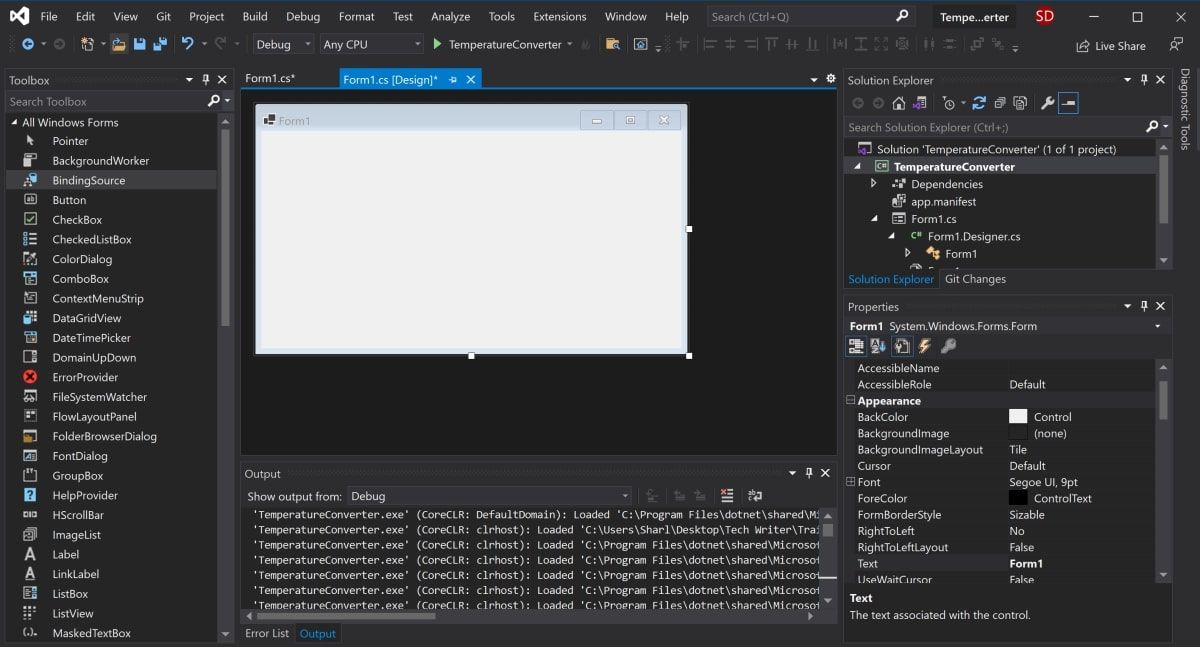
How to Add Elements to the Project Canvas
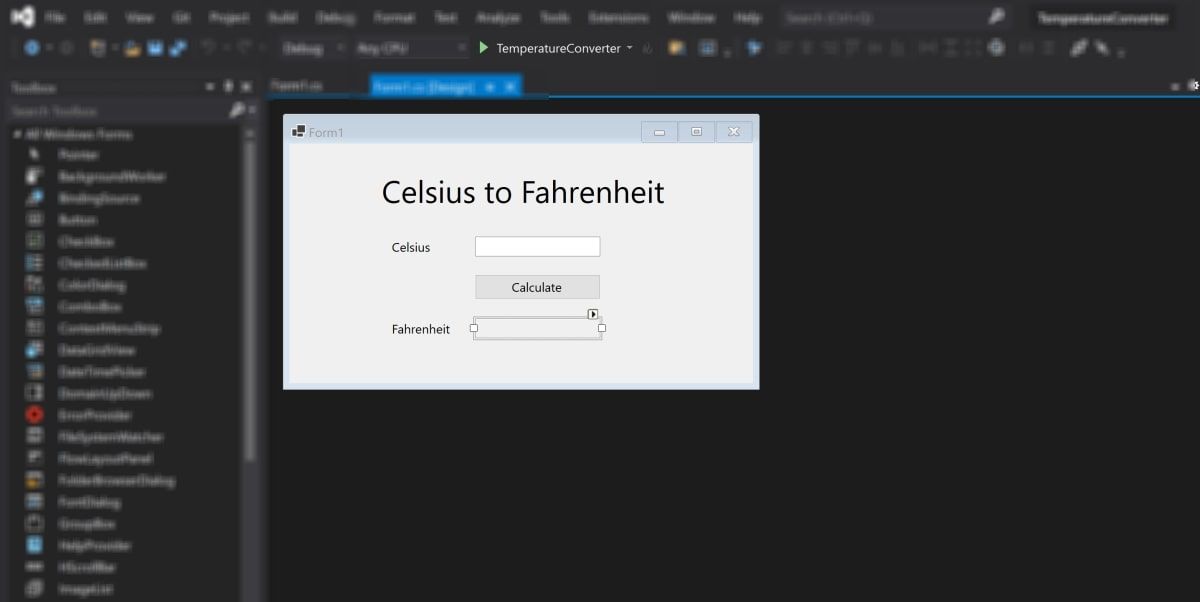
The canvas is the white area located at the top-left of the screen. Click and drag the points on the bottom, right, or bottom-right of the canvas to resize it if needed.
To create the UI of the application, add widgets such as buttons or text boxes onto the canvas.
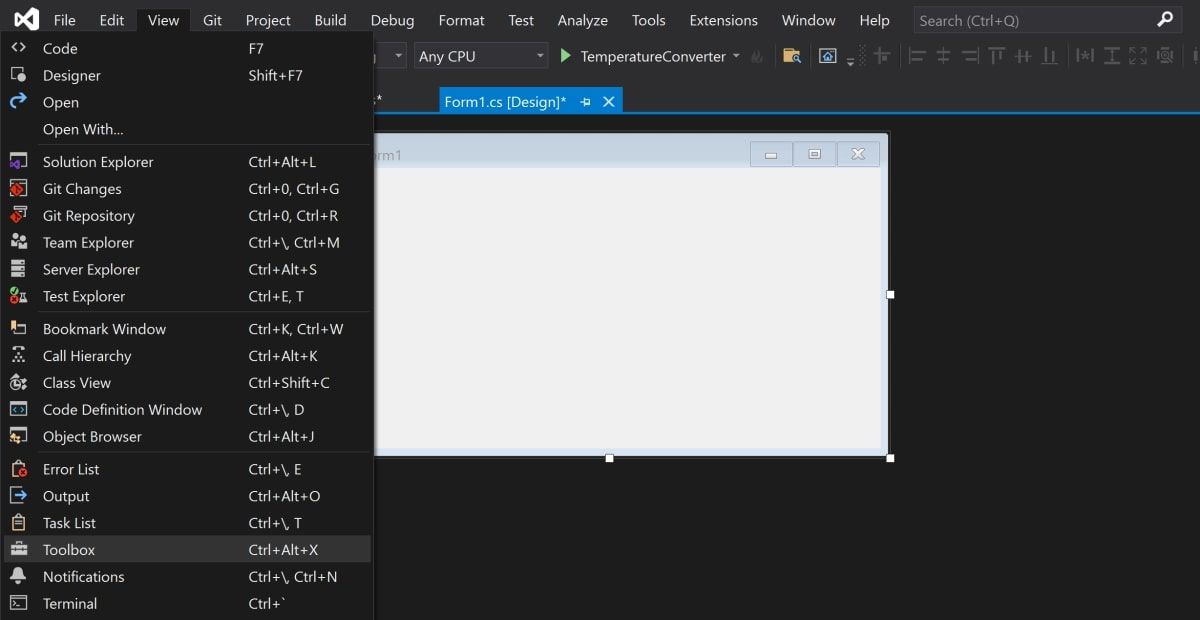
- Open the View Tab at the top of the window, and select Toolbox.

- This will add a toolbox to the left side of the application. Select the pin icon in the top-right of the toolbox to pin it there permanently.
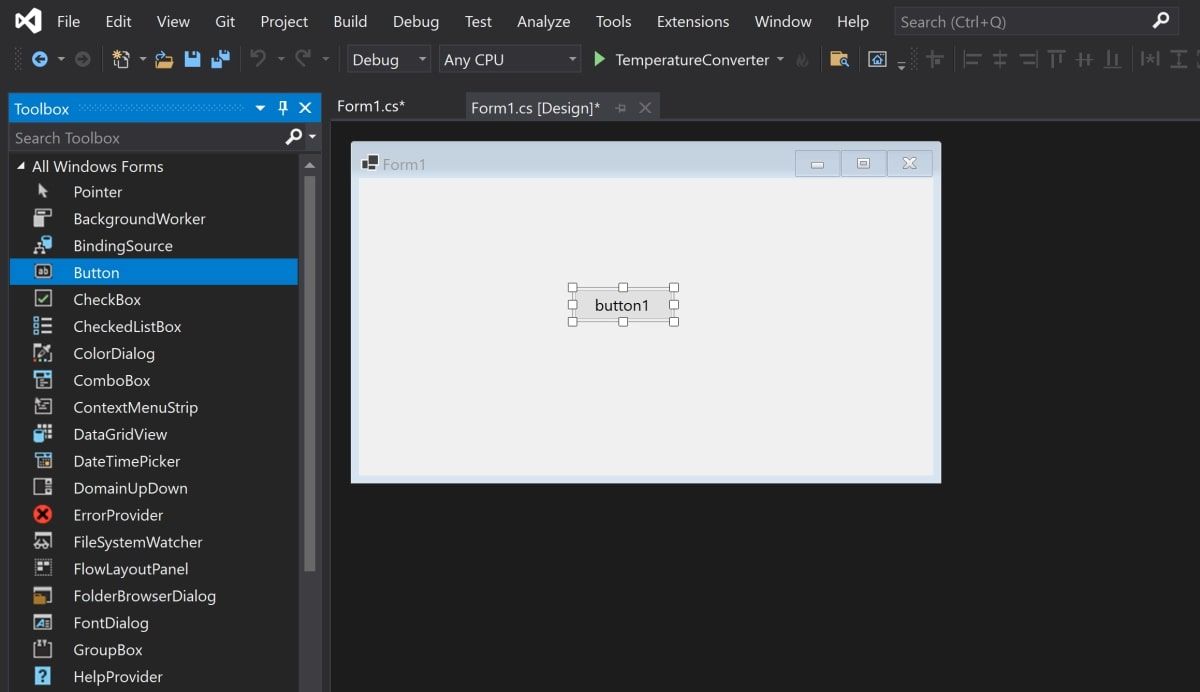
- This is where you can drag any widget from the toolbox onto the canvas. Highlight a button from the toolbox, and drag it onto the canvas.

- Drag two more text boxes onto the canvas, along with three labels (two labels for each text box, and one label for the title at the top of the application).

- Every widget on the canvas has properties associated with them. Highlight a widget to display the Properties window in the bottom-right of Visual Studio, which lists all the properties that widget has. These properties can include the text, name, font size, border, or alignment of the highlighted widget.
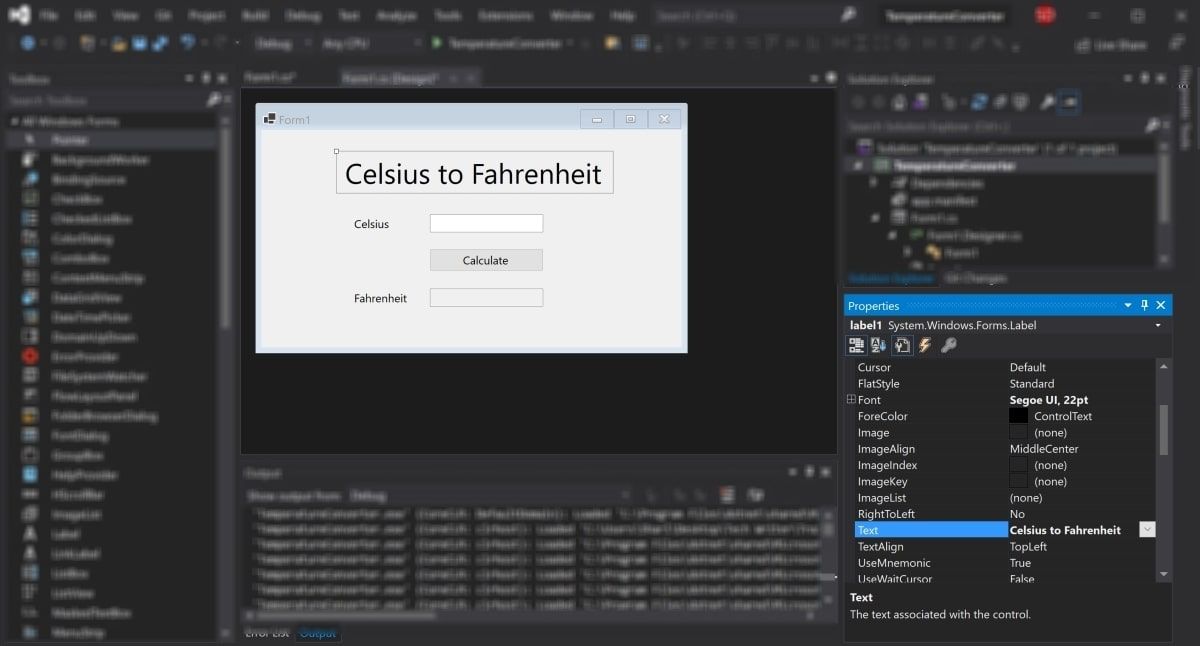
- At the moment, the text on these widgets still say label1, label2, or button1. Select the label1 widget and edit the Text property in the properties window to say «Celsius to Fahrenheit». Change the font size to be 22pt.

- Similarly, edit the properties of the other widgets on the canvas to be the following:
Widget
Property
New Value
label2
Text
Celsius
label3
Text
Fahrenheit
button
Text
Calculate
Fahrenheit text box
ReadOnly
True

How to Handle Events and Write Code in the Code-Behind
Widgets on the canvas can be tied to events. Events can include things like clicking on a button, changing the text inside a text box, or selecting a particular radio button. When these events happen, it can cause a section of code in the Code-Behind to trigger.
C# is the language used when creating Windows Forms. If you haven’t already used C#, there are many practical reasons to learn C# programming.
For this particular application, add an event to the Calculate button, to trigger a section of code to run when this button is pressed.
- Double-click the Calculate button to automatically open Form1.cs with a new Event method:
private void calculateButton_Click(object sender, EventArgs e) - This is where you will add the code that will perform the Celsius to Fahrenheit calculation, and display the result in the Fahrenheit text box. To do this, you need to be able to read the value from the Celsius text box, and modify the Fahrenheit text box to display the result.
- Go back to the canvas, and re-edit the properties as shown before. This time, edit the Name property for both the Celsius and Fahrenheit text boxes. These names can be used to reference the text boxes in the code.
Widget
Property
New Value
Celsius Text Box
Name
celsiusTextBox
Fahrenheit Text Box
Name
fahrenheitTextBox
- Go back to the calculateButton_Click function in Form1.cs.
- Now, the Celsius text box can be referred to in the code using the name «celsiusTextBox». The Celsius value the user entered is stored in its Text property. However, since it’s a string, parse this into a double in order to include it in the future Fahrenheit calculations.
private void calculateButton_Click(object sender, EventArgs e)
{
// Get the value that the user entered in the Celsius Text Box
double celsiusValue = Double.Parse(celsiusTextBox.Text);
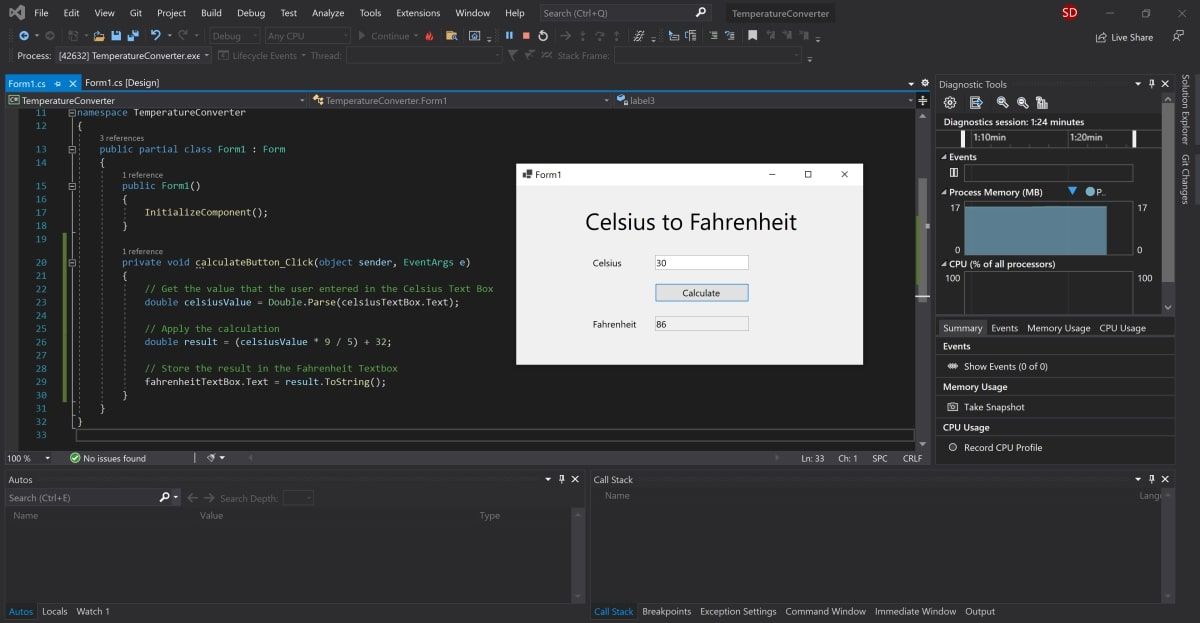
} - The celsiusValue variable now stores the value that the user entered in the Celsius Text Box. The formula for converting Celsius to Fahrenheit is (celsiusValue * 9 / 5) + 32. Therefore, the result can now be calculated and stored in the Fahrenheit Text Box.
private void calculateButton_Click(object sender, EventArgs e)
{
// Get the value that the user entered in the Celsius Text Box
double celsiusValue = Double.Parse(celsiusTextBox.Text);// Apply the calculation
double result = (celsiusValue * 9 / 5) + 32;// Store the result in the Fahrenheit Textbox
fahrenheitTextBox.Text = result.ToString();
}
How to Run and Debug the Windows Forms Program
Running the Windows Forms Program in Visual Studio
Now that the UI and code logic is set up, run the program to see it working.
- To run the program, select the green arrow at the top of the toolbar in Visual Studio.

- Once the project has loaded, add a value into the Celsius text box and press the Calculate button. This will add the result into the Fahrenheit text box.

- If the program is blurry at runtime, it is likely your application is not DPI aware. This can cause scaling and resolution issues, so this will need to be enabled. You can also read more about configuring display scaling on Windows 10 for High-DPI monitors.
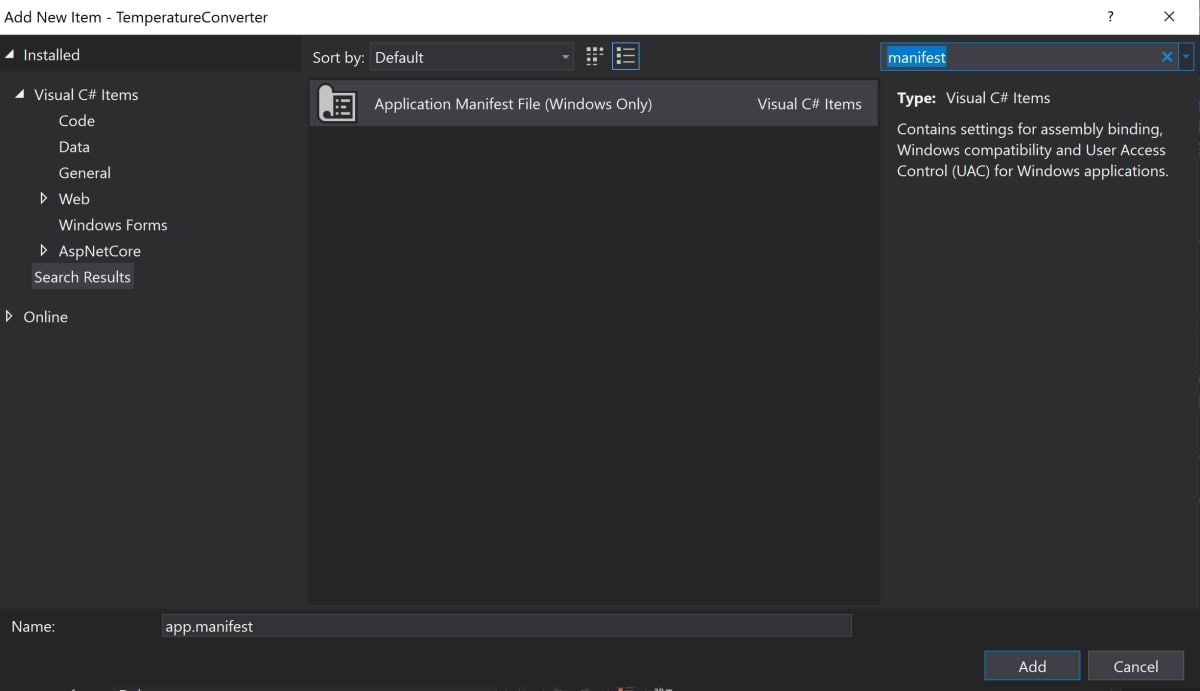
- Right-click on the TemperatureConverter Project in the Solutions Explorer. Select Add, then select New Item.
- Search for the Application Manifest File, and click Add.

- Copy the following code into the new app.manifest file, as a child of the assembly tag (if the code is already generated, just un-comment it).
 <application xmlns="urn:schemas-microsoft-com:asm.v3">
 <windowsSettings>
   <dpiAware xmlns="http://schemas.microsoft.com/SMI/2005/WindowsSettings">true</dpiAware>
   <longPathAware xmlns="http://schemas.microsoft.com/SMI/2016/WindowsSettings">true</longPathAware>
 </windowsSettings>
</application> - For this change to take effect, re-run the program. Select the red stop button at the top of the toolbar, then select the green play button again.
Debugging the Windows Forms Program
You may want to debug the program if the logic of your Windows Forms application is not working as expected.
- Navigate back to the calculateButton_Click function in Form1.cs and click anywhere on the gray bar in the far-left of the screen. This will add a breakpoint, which is indicated by a red circle.
- Press the «Calculate» button again to trigger this method to execute. The program will pause when it hits the breakpoint to show all the values stored in the variables at that point.
- To continue the program, click the green Continue arrow at the top of the toolbar.

Running the Program Using an Executable File
If you don’t want to run your program through Visual Studio, use the standalone executable file for the program. This is automatically generated.
- Navigate to the executable file, which can be found here:
<your-project-folder>/bin/Debug/netcoreapp3.1/TemperatureConverter.exe - Click on the executable file to directly run the program.
Adding More to Your Windows Form
Hopefully you now have a basic understanding of the basic structure of a Windows Form Application. You can continue exploring additional Windows Forms features by experimenting with new widgets, and taking a deeper dive into the other various events that can be handled.
Once you are more familiar with Windows Forms, you can start creating more complex applications. You can also explore many of the other ways you can create applications on Windows desktop.
Содержание
- Шаг 1. Создание проекта приложения Windows Forms
- Откройте Visual Studio 2017.
- Открытие Visual Studio
- Сведения о проекте приложения Windows Forms
- Дальнейшие действия
- Step 1: Create a Windows Forms App project
- Open Visual Studio 2017
- Open Visual Studio
- About the Windows Forms App project
- Next steps
- Предварительные требования
- Создание приложения WinForms
- Важные элементы среды Visual Studio
- Добавление элементов управления на форму
- Обработка событий
- Запустите приложение
- Создание приложения Windows Forms на Visual Basic в Visual Studio
- Создание проекта
- Создание приложения
- Добавление кнопки на форму
- Добавление метки на форму
- Добавление кода на форму
- Запуск приложения
- Следующие шаги
- Создание приложения Windows Forms на C# в Visual Studio
- Создание проекта
- Создание приложения
- Добавление кнопки на форму
- Добавление метки на форму
- Добавление кода на форму
- Запуск приложения
- Следующие шаги
Шаг 1. Создание проекта приложения Windows Forms
Первый шаг в создании программы для просмотра изображений — это создание проекта приложения Windows Forms.
Откройте Visual Studio 2017.
В строке меню выберите Файл > Создать > Проект. Диалоговое окно должно выглядеть так же, как на следующем снимке экрана.

Диалоговое окно _ _»Новый проект»
В левой части диалогового окна Новый проект выберите Visual C# или Visual Basic, а затем — Классическое приложение Windows.
В списке шаблонов проектов выберите Приложение Windows Forms (.NET Framework). Назовите новую форму PictureViewer и нажмите кнопку ОК.

Дополнительные сведения см. в разделе Установка Visual Studio.
Открытие Visual Studio
На начальном экране выберите Создать проект.

В поле поиска окна Создание проекта введите Windows Forms. Затем в списке Тип проекта выберите Рабочий стол.
Применив фильтр Тип проекта, выберите шаблон Приложение Windows Forms (.NET Framework) для C# или Visual Basic и нажмите кнопку Далее.

Если шаблон Приложение Windows Forms (.NET Framework) отсутствует, его можно установить из окна Создание проекта. В сообщении Не нашли то, что искали? выберите ссылку Установка других средств и компонентов.


Затем нажмите кнопку Изменить в Visual Studio Installer. Вам может быть предложено сохранить результаты работы; в таком случае сделайте это. Выберите Продолжить, чтобы установить рабочую нагрузку.
В поле Имя проекта окна Настроить новый проект введите PictureViewer. Затем нажмите Создать.
Visual Studio создает решение для приложения. Решение играет роль контейнера для всех проектов и файлов, необходимых приложению. Более подробно эти термины поясняются далее в этом учебнике.
Сведения о проекте приложения Windows Forms
Среда разработки содержит три окна: главное окно, Обозреватель решений и окно Свойства.
Если какое-либо из этих окон отсутствует, можно восстановить макет окон по умолчанию. В строке меню выберите Окно > Сброс макета окна.
Можно также отобразить окна с помощью команд меню. В строке меню выберите Вид > Окно «Свойства» или Обозреватель решений.
Если открыты какие-либо другие окна, закройте их с помощью кнопки Закрыть (x) в верхнем правом углу.
Если выбрать файл, содержимое в окне Свойства изменится. Если открыть файл кода (с расширением .cs в C# и .vb в Visual Basic), откроется сам файл кода или конструктор для него. Конструктор — это визуальная поверхность, на которую можно добавлять элементы управления, такие как кнопки и списки. При работе с формами Visual Studio такая поверхность называется конструктор Windows Forms.
Окно «Свойства». В этом окне производится изменение свойств элементов, выбранных в других окнах. Например, выбрав форму Form1, можно изменить ее название путем задания свойства Text, а также изменить цвет фона путем задания свойства Backcolor.
В верхней строке в обозревателе решений отображается текст Решение «PictureViewer» (1 проект). Это означает, что Visual Studio автоматически создала для вас решение. Решение может содержать несколько проектов, но пока что вы будете работать с решениями, которые содержат только один проект.
В строке меню выберите Файл > Сохранить все.
Другой вариант — нажать кнопку Сохранить все на панели инструментов, как показано на рисунке ниже.
Visual Studio автоматически заполняет имя папки и имя проекта, а затем сохраняет проект в папке проектов.
Дальнейшие действия
Источник
Step 1: Create a Windows Forms App project
When you create a picture viewer, the first step is to create a Windows Forms App project.
Open Visual Studio 2017
On the menu bar, choose File > New > Project. The dialog box should look similar to the following screenshot.

New project dialog box
On the left side of the New Project dialog box, choose either Visual C# or Visual Basic, and then choose Windows Desktop.
In the project templates list, choose Windows Forms App (.NET Framework). Name the new form PictureViewer, and then choose the OK button.
If you don’t see the Windows Forms App (.NET Framework) template, use the Visual Studio Installer to install the .NET desktop development workload.

For more information, see the Install Visual Studio page.
Open Visual Studio
On the start window, choose Create a new project.

On the Create a new project window, enter or type Windows Forms in the search box. Next, choose Desktop from the Project type list.
After you apply the Project type filter, choose the Windows Forms App (.NET Framework) template for either C# or Visual Basic, and then choose Next.

If you don’t see the Windows Forms App (.NET Framework) template, you can install it from the Create a new project window. In the Not finding what you’re looking for? message, choose the Install more tools and features link.

Next, in the Visual Studio Installer, choose the .NET desktop development workload.

After that, choose the Modify button in the Visual Studio Installer. You might be prompted to save your work; if so, do so. Next, choose Continue to install the workload.
In the Configure your new project window, type or enter PictureViewer in the Project name box. Then, choose Create.
Visual Studio creates a solution for your app. A solution acts as a container for all of the projects and files needed by your app. These terms will be explained in more detail later in this tutorial.
About the Windows Forms App project
The development environment contains three windows: a main window, Solution Explorer, and the Properties window.
If any of these windows are missing, you can restore the default window layout. On the menu bar, choose Window > Reset Window Layout.
You can also display windows by using menu commands. On the menu bar, choose View > Properties Window or Solution Explorer.
If any other windows are open, close them by choosing the Close (x) button in their upper-right corners.
If you choose a file, the contents of the Properties window changes. If you open a code file (which ends in .cs in C# and .vb in Visual Basic), the code file or a designer for the code file appears. A designer is a visual surface onto which you can add controls such as buttons and lists. For Visual Studio forms, the designer is called the Windows Forms Designer.
Properties window In this window, you can change the properties of items that you choose in the other windows. For example, if you choose Form1, you can change its title by setting the Text property, and you can change the background color by setting the Backcolor property.
The top line in Solution Explorer shows Solution ‘PictureViewer’ (1 project), which means that Visual Studio created a solution for you. A solution can contain more than one project, but for now, you’ll work with solutions that contain only one project.
On the menu bar, choose File > Save All.
As an alternative, choose the Save All button on the toolbar, which the following image shows.
Visual Studio automatically fills in the folder name and the project name and then saves the project in your projects folder.
Next steps
To go to the next tutorial step, see Step 2: Run your app.
To return to the overview topic, see Tutorial 1: Create a picture viewer.
Источник
Из этого краткого руководства вы узнаете, как создать новое приложение Windows Forms (WinForms) с помощью Visual Studio. После создания первоначального приложения вы научитесь добавлять элементы управления и обрабатывать события. По завершении работы с этим руководством у вас будет простое приложение, добавляющее имена в список.
В этом руководстве описано следующее:
Предварительные требования
Создание приложения WinForms
Первым шагом в создании нового приложения является запуск Visual Studio и создание приложения на основе шаблона.
Запустите Visual Studio.
Выберите Создать новый проект.

В раскрывающемся списке язык кода выберите C# или Visual Basic.
В списке шаблонов выберите Приложение Windows Forms (.NET) и затем щелкните Далее.

В окне Настроить новый проект задайте в качестве имени проекта значение Names и щелкните Создать.
Вы также можете сохранить проект в другую папку, изменив параметр Расположение.

После создания приложения Visual Studio должен открыть панель конструктора для формы по умолчанию Form1. Если конструктор форм не отображается, дважды щелкните форму в области Обозреватель решений, чтобы открыть окно конструктора.
Важные элементы среды Visual Studio
Поддержка WinForms в Visual Studio состоит из четырех важных компонентов, с которыми вы будете взаимодействовать при создании приложения.

Все файлы проекта, код, формы и ресурсы отображаются в этой области.
На этой панели отображаются параметры свойств, которые можно настроить в зависимости от выбранного элемента. Например, если выбрать элемент в Обозревателе решений, отобразятся параметры свойств, связанные с файлом. Если выбрать объект в конструкторе, отобразятся параметры элемента управления или формы.
Это конструктор для формы. Он является интерактивным, и на него можно перетаскивать объекты из панели элементов. Выбирая и перемещая элементы в конструкторе, можно визуально создавать пользовательский интерфейс для приложения.
Панель элементов содержит все элементы управления, которые можно добавить на форму. Чтобы добавить элемент управления на текущую форму, дважды щелкните элемент управления или перетащите его.
Добавление элементов управления на форму
Открыв конструктор форм Form1, используйте панель Область элементов, чтобы добавить на форму следующие элементы управления:
Вы можете расположить и изменить размер элементов управления в соответствии со следующими настройками. Либо визуально перенесите их, чтобы они соответствовали следующему снимку экрана, либо щелкните каждый элемент управления и настройте параметры в области Свойства. Можно также щелкнуть область заголовка формы, чтобы выбрать форму.
| Объект | Параметр | Значение |
|---|---|---|
| Form | Текст | Names |
| Размер | 268, 180 | |
| Label | Расположение | 12, 9 |
| Текст | Names | |
| Listbox | Имя | lstNames |
| Расположение | 12, 27 | |
| Размер | 120, 94 | |
| текстовое поле; | Имя | txtName |
| Расположение | 138, 26 | |
| Размер | 100, 23 | |
| Button | Имя | btnAdd |
| Расположение | 138, 55 | |
| Размер | 100, 23 | |
| Текст | Add Name |
Вы должны получить в конструкторе форму, которая выглядит следующим образом.

Обработка событий
Теперь, когда в форме есть все элементы управления, необходимо обрабатывать события элементов управления, чтобы реагировать на вводимые пользователем данные. Открыв конструктор форм, выполните следующие действия.
Выберите в форме элемент управления «Кнопка».
Найдите событие Click и дважды щелкните его, чтобы создать обработчик событий.
Это действие добавляет следующий код в форму:
Запустите приложение
Теперь, когда у нас есть код события, можно запустить приложение, нажав клавишу F5 или выбрав пункт меню Отладка > Начать отладку. Отобразится форма, и вы можете ввести имя в текстовое поле, а затем добавить его, нажав кнопку.
Источник
Создание приложения Windows Forms на Visual Basic в Visual Studio
В рамках этого краткого знакомства с возможностями интегрированной среды разработки Visual Studio (IDE) вы создадите простое приложение на Visual Basic с пользовательским интерфейсом на основе Windows.
Установите Visual Studio бесплатно со страницы скачиваемых материалов Visual Studio, если еще не сделали этого.
Установите Visual Studio бесплатно со страницы скачиваемых материалов Visual Studio, если еще не сделали этого.
На некоторых снимках экрана в этом учебнике используется темная тема. Если вы не используете темную тему, но хотите переключиться на нее, см. страницу Персонализация интегрированной среды разработки и редактора Visual Studio.
Установите Visual Studio 2022 бесплатно со страницы скачиваемых материалов Visual Studio 2022, если еще не сделали этого.
На некоторых снимках экрана в этом учебнике используется темная тема. Если вы не используете темную тему, но хотите переключиться на нее, см. страницу Персонализация интегрированной среды разработки и редактора Visual Studio.
Создание проекта
Сначала вы создадите проект приложения Visual Basic. Для этого типа проекта уже имеются все нужные файлы шаблонов, что избавляет вас от лишней работы.
Откройте Visual Studio 2017.
В верхней строке меню последовательно выберите Файл > Создать > Проект.
Запустите Visual Studio.
На начальном экране выберите Создать проект.
В окне Создать проект выберите шаблон Приложение Windows Forms (.NET Framework) для Visual Basic.
(При желании вы можете уточнить условия поиска, чтобы быстро перейти к нужному шаблону. Например, введите Приложение Windows Forms в поле поиска. Затем выберите Visual Basic в списке языков и Windows в списке платформ.)

Если шаблон Приложение Windows Forms (.NET Framework) отсутствует, его можно установить из окна Создание проекта. В сообщении Не нашли то, что искали? выберите ссылку Установка других средств и компонентов.
Затем нажмите кнопку Изменить в Visual Studio Installer. Вам может быть предложено сохранить результаты работы; в таком случае сделайте это. Выберите Продолжить, чтобы установить рабочую нагрузку. После этого вернитесь к шагу 2 в процедуре Создание проекта.
В поле Имя проекта окна Настроить новый проект введите HelloWorld. Затем нажмите Создать.

Новый проект открывается в Visual Studio.
Создание приложения
Когда вы выберете шаблон проекта Visual Basic и зададите имя файла, Visual Studio открывает форму. Форма является пользовательским интерфейсом Windows. Мы создадим приложение Hello World, добавив элементы управления на форму, а затем запустим его.
Добавление кнопки на форму
Щелкните Панель элементов, чтобы открыть всплывающее окно «Панель элементов».

(Если параметр для всплывающего окна Панель элементов отсутствует, его можно открыть в строке меню. Для этого выберите Вид > Панель элементов. Либо нажмите клавиши CTRL+ALT+X.)
Щелкните значок Закрепить, чтобы закрепить окно Панель элементов.

Щелкните элемент управления Кнопка и перетащите его на форму.
В разделе Внешний вид (или Шрифты) окна Свойства введите Click this и нажмите клавишу ВВОД.
(Если окно Свойства не отображается, его можно открыть в строке меню.) Для этого щелкните Вид > Окно свойств. Или нажмите клавишу F4.)
Добавление метки на форму
Теперь, когда мы добавили элемент управления »Кнопка» для создания действия, давайте добавим элемент управления «Метка», куда можно отправлять текст.
Выберите элемент управления Метка в окне Панель элементов, а затем перетащите его на форму и расположите под кнопкой Нажмите это.
В разделе Проект или (DataBindings) окна Свойства измените имя Label1 на lblHelloWorld и нажмите клавишу ВВОД.
Добавление кода на форму
В окне Form1.vb [Design] дважды щелкните кнопку Нажмите это, чтобы открыть окно Form1.vb.
(Кроме того, можно развернуть узел Form1.vb в обозревателе решений, а затем выбрать Form1.)

Запуск приложения
Нажмите кнопку Запустить, чтобы запустить приложение.

Будет выполнено несколько операций. В интегрированной среде разработки Visual Studio откроются окна Средства диагностики и Вывод. Кроме того, вне этой среды откроется диалоговое окно Form1. Оно будет содержать вашу кнопку Нажмите это и текст Label1.

Закройте диалоговое окно Form1, чтобы завершить работу приложения.
Следующие шаги
Для получения дополнительных сведений перейдите к следующему руководству:
Источник
Создание приложения Windows Forms на C# в Visual Studio
В рамках этого краткого знакомства с возможностями интегрированной среды разработки Visual Studio (IDE) вы создадите простое приложение на C# с пользовательским интерфейсом на основе Windows.
Установите Visual Studio бесплатно со страницы скачиваемых материалов Visual Studio, если еще не сделали этого.
Установите Visual Studio бесплатно со страницы скачиваемых материалов Visual Studio, если еще не сделали этого.
На некоторых снимках экрана в этом учебнике используется темная тема. Если вы не используете темную тему, но хотите переключиться на нее, см. страницу Персонализация интегрированной среды разработки и редактора Visual Studio.
Установите Visual Studio 2022 бесплатно со страницы скачиваемых материалов Visual Studio 2022, если еще не сделали этого.
На некоторых снимках экрана в этом учебнике используется темная тема. Если вы не используете темную тему, но хотите переключиться на нее, см. страницу Персонализация интегрированной среды разработки и редактора Visual Studio.
Создание проекта
Сначала вы создадите проект приложения на C#. Для этого типа проекта уже имеются все нужные файлы шаблонов, что избавляет вас от лишней работы.
Откройте Visual Studio 2017.
В верхней строке меню последовательно выберите Файл > Создать > Проект.
Запустите Visual Studio.
На начальном экране выберите Создать проект.
В окне Создать проект выберите шаблон Приложение Windows Forms (.NET Framework) для C#.
(При желании вы можете уточнить условия поиска, чтобы быстро перейти к нужному шаблону. Например, введите Приложение Windows Forms в поле поиска. Затем выберите C# в списке языков и Windows в списке платформ.)

Если шаблон Приложение Windows Forms (.NET Framework) отсутствует, его можно установить из окна Создание проекта. В сообщении Не нашли то, что искали? выберите ссылку Установка других средств и компонентов.
Затем нажмите кнопку Изменить в Visual Studio Installer. Вам может быть предложено сохранить результаты работы; в таком случае сделайте это. Выберите Продолжить, чтобы установить рабочую нагрузку. После этого вернитесь к шагу 2 в процедуре Создание проекта.
В поле Имя проекта окна Настроить новый проект введите HelloWorld. Затем нажмите Создать.

Новый проект открывается в Visual Studio.
Создание приложения
Когда вы выберете шаблон проекта C# и зададите имя файла, Visual Studio открывает форму. Форма является пользовательским интерфейсом Windows. Мы создадим приложение Hello World, добавив элементы управления на форму, а затем запустим его.
Добавление кнопки на форму
Щелкните Панель элементов, чтобы открыть всплывающее окно «Панель элементов».

(Если параметр для всплывающего окна Панель элементов отсутствует, его можно открыть в строке меню. Для этого выберите Вид > Панель элементов. Либо нажмите клавиши CTRL+ALT+X.)
Щелкните значок Закрепить, чтобы закрепить окно Панель элементов.
Выберите элемент управления Кнопка и перетащите его на форму.
(Если окно Свойства не отображается, его можно открыть в строке меню.) Для этого выберите Вид > Окно свойств. Или нажмите клавишу F4.)
Добавление метки на форму
Теперь, когда мы добавили элемент управления »Кнопка» для создания действия, давайте добавим элемент управления «Метка», куда можно отправлять текст.
Выберите элемент управления Метка в окне Панель элементов, а затем перетащите его на форму и расположите под кнопкой Нажмите это.
В разделе Проект или (DataBindings) окна Свойства измените имя Label1 на lblHelloWorld и нажмите клавишу ВВОД.
Добавление кода на форму
В окне Form1.cs [Проект] дважды щелкните кнопку Нажмите это, чтобы открыть окно Form1.cs.
(Кроме того, можно развернуть узел Form1.cs в обозревателе решений, а затем выбрать Form1.)

Запуск приложения
Нажмите кнопку Запустить, чтобы запустить приложение.
Будет выполнено несколько операций. В интегрированной среде разработки Visual Studio откроются окна Средства диагностики и Вывод. Кроме того, вне этой среды откроется диалоговое окно Form1. Оно будет содержать вашу кнопку Нажмите это и текст Label1.
Закройте диалоговое окно Form1, чтобы завершить работу приложения.
Следующие шаги
Для получения дополнительных сведений перейдите к следующему руководству:
Источник
При создании нового проекта в Visual Studio для языка программирования C++ в мастере нет пункта Windows Forms. Но, безусловно, язык C++ поддерживает .NET и, соответственно, Windows Forms. Из этой статьи Вы узнаете, как создать в Visual Studio проект Windows Form на C++.
Сначала необходимо создать новый проект в Visual Studio.
Создание нового проекта C++ в Visual Studio
Запустите Visual Studio. Нажмите «Файл» → «Создать» → «Проект…». Или нажмите сочетание клавиш Ctrl + Shift + N на клавиатуре.

В появившемся окне «Создать проект» слева выберите группу «Visual C++», а в ней пункт «CLR». Щелкните по «Пустой проект CLR», введите имя проекта и нажмите кнопку «OK».

Таким образом мы создали новый проект на языке программирования C++ в Visual Studio.
Добавление Windows Forms в проект C++
Теперь в созданный проект на C++ добавим форму Windows Forms.
Для этого щелкните в «Обозревателе решений» на названии проекта правой кнопкой мыши, выберите пункт «Добавить» и затем «Создать элемент…». Либо просто нажмите на клавиатуре сочетание клавиш Ctrl + Shift + A.

Загрузится окно «Добавление нового элемента». В нём щёлкните левой кнопкой мыши по группе UI в выберите элемент «Форма Windows Forms — Visual C++». Можете изменить имя создаваемой формы. По завершении нажмите кнопку «Добавить».

Далее откройте файл исходного кода «MyForm.cpp» (если вы изменяли название формы, то файл будет иметь другое имя). В него добавьте следующий текст:
|
using namespace System; using namespace System::Windows::Forms; [STAThread] void main(array<String^>^ arg) { Application::EnableVisualStyles(); Application::SetCompatibleTextRenderingDefault(false); WinFormsTest::MyForm form; //WinFormsTest — имя вашего проекта Application::Run(%form); } |
Если Вы указали имя проекта отличное от WinFormsTest, то, соответственно, в коде укажите введённое Вами имя.
Сохраните изменения в файле.
Теперь необходимо произвести ряд настроек проекта в Visual Studio. Приступим.
Щёлкните по названию проекта в «Обозревателе решений» правой кнопкой мыши и затем нажмите кнопку «Свойства». Либо сразу нажмите сочетание клавиш Alt + Enter.

В «Странице свойств» проекта слева выберите группу «Компоновщик» → «Система». В раскрывающемся списке «Подсистема» укажите Windows и нажмите кнопку «Применить».

Далее в разделе «Дополнительно» группы «Компоновщик» в качестве «Точки входа» укажите функцию main (напишите словом). Щелкните кнопку «Применить», а затем «ОК».

На этом настройка и создание проекта Windows Forms на C++ завершены! Чтобы просмотреть результат — запустите проект на выполнение (клавиша F5).

Видеоурок создания проекта WinForms C++