About SSH key passphrases
You can access and write data in repositories on GitHub.com using SSH (Secure Shell Protocol). When you connect via SSH, you authenticate using a private key file on your local machine. For more information, see «About SSH.»
When you generate an SSH key, you can add a passphrase to further secure the key. Whenever you use the key, you must enter the passphrase. If your key has a passphrase and you don’t want to enter the passphrase every time you use the key, you can add your key to the SSH agent. The SSH agent manages your SSH keys and remembers your passphrase.
If you don’t already have an SSH key, you must generate a new SSH key to use for authentication. If you’re unsure whether you already have an SSH key, you can check for existing keys. For more information, see «Checking for existing SSH keys.»
If you want to use a hardware security key to authenticate to GitHub, you must generate a new SSH key for your hardware security key. You must connect your hardware security key to your computer when you authenticate with the key pair. For more information, see the OpenSSH 8.2 release notes.
Generating a new SSH key
You can generate a new SSH key on your local machine. After you generate the key, you can add the key to your account on GitHub.com to enable authentication for Git operations over SSH.
Note: GitHub improved security by dropping older, insecure key types on March 15, 2022.
As of that date, DSA keys (ssh-dss) are no longer supported. You cannot add new DSA keys to your personal account on GitHub.com.
RSA keys (ssh-rsa) with a valid_after before November 2, 2021 may continue to use any signature algorithm. RSA keys generated after that date must use a SHA-2 signature algorithm. Some older clients may need to be upgraded in order to use SHA-2 signatures.
-
Open TerminalTerminalGit Bash.
-
Paste the text below, substituting in your GitHub email address.
$ ssh-keygen -t ed25519 -C "your_email@example.com"Note: If you are using a legacy system that doesn’t support the Ed25519 algorithm, use:
$ ssh-keygen -t rsa -b 4096 -C "your_email@example.com"This creates a new SSH key, using the provided email as a label.
> Generating public/private ALGORITHM key pair.When you’re prompted to «Enter a file in which to save the key», you can press Enter to accept the default file location. Please note that if you created SSH keys previously, ssh-keygen may ask you to rewrite another key, in which case we recommend creating a custom-named SSH key. To do so, type the default file location and replace id_ssh_keyname with your custom key name.
> Enter a file in which to save the key (/Users/YOU/.ssh/id_ALGORITHM: [Press enter]> Enter a file in which to save the key (/c/Users/YOU/.ssh/id_ALGORITHM):[Press enter]> Enter a file in which to save the key (/home/YOU/.ssh/ALGORITHM):[Press enter] -
At the prompt, type a secure passphrase. For more information, see «Working with SSH key passphrases.»
> Enter passphrase (empty for no passphrase): [Type a passphrase]
> Enter same passphrase again: [Type passphrase again]
Adding your SSH key to the ssh-agent
Before adding a new SSH key to the ssh-agent to manage your keys, you should have checked for existing SSH keys and generated a new SSH key. When adding your SSH key to the agent, use the default macOS ssh-add command, and not an application installed by macports, homebrew, or some other external source.
-
Start the ssh-agent in the background.
$ eval "$(ssh-agent -s)"
> Agent pid 59566
Depending on your environment, you may need to use a different command. For example, you may need to use root access by running
sudo -s -Hbefore starting the ssh-agent, or you may need to useexec ssh-agent bashorexec ssh-agent zshto run the ssh-agent. -
If you’re using macOS Sierra 10.12.2 or later, you will need to modify your
~/.ssh/configfile to automatically load keys into the ssh-agent and store passphrases in your keychain.-
First, check to see if your
~/.ssh/configfile exists in the default location.$ open ~/.ssh/config > The file /Users/YOU/.ssh/config does not exist. -
If the file doesn’t exist, create the file.
$ touch ~/.ssh/config -
Open your
~/.ssh/configfile, then modify the file to contain the following lines. If your SSH key file has a different name or path than the example code, modify the filename or path to match your current setup.Host *.github.com AddKeysToAgent yes UseKeychain yes IdentityFile ~/.ssh/id_ed25519Notes:
-
If you chose not to add a passphrase to your key, you should omit the
UseKeychainline. -
If you see a
Bad configuration option: usekeychainerror, add an additional line to the configuration’s’Host *.github.comsection.Host *.github.com IgnoreUnknown UseKeychain
-
-
-
Add your SSH private key to the ssh-agent and store your passphrase in the keychain. If you created your key with a different name, or if you are adding an existing key that has a different name, replace id_ed25519 in the command with the name of your private key file.
$ ssh-add --apple-use-keychain ~/.ssh/id_ed25519Note: The
--apple-use-keychainoption stores the passphrase in your keychain for you when you add an SSH key to the ssh-agent. If you chose not to add a passphrase to your key, run the command without the--apple-use-keychainoption.The
--apple-use-keychainoption is in Apple’s standard version ofssh-add. In MacOS versions prior to Monterey (12.0), the--apple-use-keychainand--apple-load-keychainflags used the syntax-Kand-A, respectively.If you don’t have Apple’s standard version of
ssh-addinstalled, you may receive an error. For more information, see «Error: ssh-add: illegal option — K.» -
Add the SSH key to your account on GitHub. For more information, see «Adding a new SSH key to your GitHub account.»
If you have GitHub Desktop installed, you can use it to clone repositories and not deal with SSH keys.
-
Ensure the ssh-agent is running. You can use the «Auto-launching the ssh-agent» instructions in «Working with SSH key passphrases», or start it manually:
# start the ssh-agent in the background $ eval "$(ssh-agent -s)" > Agent pid 59566 -
Add your SSH private key to the ssh-agent. If you created your key with a different name, or if you are adding an existing key that has a different name, replace id_ed25519 in the command with the name of your private key file.
$ ssh-add ~/.ssh/id_ed25519 -
Add the SSH key to your account on GitHub. For more information, see «Adding a new SSH key to your GitHub account.»
-
Start the ssh-agent in the background.
$ eval "$(ssh-agent -s)"
> Agent pid 59566
Depending on your environment, you may need to use a different command. For example, you may need to use root access by running
sudo -s -Hbefore starting the ssh-agent, or you may need to useexec ssh-agent bashorexec ssh-agent zshto run the ssh-agent. -
Add your SSH private key to the ssh-agent. If you created your key with a different name, or if you are adding an existing key that has a different name, replace id_ed25519 in the command with the name of your private key file.
$ ssh-add ~/.ssh/id_ed25519 -
Add the SSH key to your account on GitHub. For more information, see «Adding a new SSH key to your GitHub account.»
Generating a new SSH key for a hardware security key
If you are using macOS or Linux, you may need to update your SSH client or install a new SSH client prior to generating a new SSH key. For more information, see «Error: Unknown key type.»
-
Insert your hardware security key into your computer.
-
Open TerminalTerminalGit Bash.
-
Paste the text below, substituting in the email address for your account on GitHub.
$ ssh-keygen -t ed25519-sk -C "YOUR_EMAIL"Note: If the command fails and you receive the error
invalid formatorfeature not supported,you may be using a hardware security key that does not support the Ed25519 algorithm. Enter the following command instead.$ ssh-keygen -t ecdsa-sk -C "your_email@example.com" -
When you are prompted, touch the button on your hardware security key.
-
When you are prompted to «Enter a file in which to save the key,» press Enter to accept the default file location.
> Enter a file in which to save the key (/Users/YOU/.ssh/id_ed25519_sk): [Press enter]> Enter a file in which to save the key (/c/Users/YOU/.ssh/id_ed25519_sk):[Press enter]> Enter a file in which to save the key (/home/YOU/.ssh/id_ed25519_sk):[Press enter] -
When you are prompted to type a passphrase, press Enter.
> Enter passphrase (empty for no passphrase): [Type a passphrase] > Enter same passphrase again: [Type passphrase again] -
Add the SSH key to your account on GitHub. For more information, see «Adding a new SSH key to your GitHub account.»
4.3 Git на сервере — Генерация открытого SSH ключа
Генерация открытого SSH ключа
Как отмечалось ранее, многие Git-серверы используют аутентификацию по открытым SSH-ключам.
Для того чтобы предоставить открытый ключ, каждый пользователь в системе должен его сгенерировать, если только этого уже не было сделано ранее.
Этот процесс аналогичен во всех операционных системах.
Сначала вам стоит убедиться, что у вас ещё нет ключа.
По умолчанию пользовательские SSH ключи сохраняются в каталоге ~/.ssh домашнем каталоге пользователя.
Вы можете легко проверить наличие ключа перейдя в этот каталог и посмотрев его содержимое:
$ cd ~/.ssh
$ ls
authorized_keys2  id_dsa       known_hosts
config            id_dsa.pub
Ищите файл с именем id_dsa или id_rsa и соответствующий ему файл с расширением .pub.
Файл с расширением .pub — это ваш открытый ключ, а второй файл — ваш приватный ключ.
Если указанные файлы у вас отсутствуют (или даже нет каталога .ssh), вы можете создать их используя программу ssh-keygen, которая входит в состав пакета SSH в системах Linux/Mac, а для Windows поставляется вместе с Git:
$ ssh-keygen -o
Generating public/private rsa key pair.
Enter file in which to save the key (/home/schacon/.ssh/id_rsa):
Created directory '/home/schacon/.ssh'.
Enter passphrase (empty for no passphrase):
Enter same passphrase again:
Your identification has been saved in /home/schacon/.ssh/id_rsa.
Your public key has been saved in /home/schacon/.ssh/id_rsa.pub.
The key fingerprint is:
d0:82:24:8e:d7:f1:bb:9b:33:53:96:93:49:da:9b:e3 schacon@mylaptop.local
Сначала программа попросит указать расположение файла для сохранения ключа (.ssh/id_rsa), затем дважды ввести пароль для шифрования.
Если вы не хотите вводить пароль каждый раз при использовании ключа, то можете оставить его пустым или использовать программу ssh-agent.
Если вы решили использовать пароль для приватного ключа, то настоятельно рекомендуется использовать опцию -o, которая позволяет сохранить ключ в формате, более устойчивом ко взлому методом подбора, чем стандартный формат.
Теперь каждый пользователь должен отправить свой открытый ключ вам или тому, кто администрирует Git-сервер (подразумевается, что ваш SSH-сервер уже настроен на работу с открытыми ключами).
Для этого достаточно скопировать содержимое файла с расширением .pub и отправить его по электронной почте.
Открытый ключ выглядит примерно так:
$ cat ~/.ssh/id_rsa.pub
ssh-rsa AAAAB3NzaC1yc2EAAAABIwAAAQEAklOUpkDHrfHY17SbrmTIpNLTGK9Tjom/BWDSU
GPl+nafzlHDTYW7hdI4yZ5ew18JH4JW9jbhUFrviQzM7xlELEVf4h9lFX5QVkbPppSwg0cda3
Pbv7kOdJ/MTyBlWXFCR+HAo3FXRitBqxiX1nKhXpHAZsMciLq8V6RjsNAQwdsdMFvSlVK/7XA
t3FaoJoAsncM1Q9x5+3V0Ww68/eIFmb1zuUFljQJKprrX88XypNDvjYNby6vw/Pb0rwert/En
mZ+AW4OZPnTPI89ZPmVMLuayrD2cE86Z/il8b+gw3r3+1nKatmIkjn2so1d01QraTlMqVSsbx
NrRFi9wrf+M7Q== schacon@mylaptop.local
Более подробное руководство по созданию SSH-ключей и конфигурации клиента на различных системах вы можете найти в руководстве GitHub.
Инструменты
Git SSH Windows — пошаговое руководство
Дата размещения статьи 08/12/2019 👁26098
Git SSH Windows — пошаговое руководство
Настроим пошагово Git SSH для Windows 10. Это позволит вам выполнять команды git без ввода пароля от своей учетной записи GitHub.
Порядок действий:
- Генерация ключа SSH.
- Добавление SSH-ключа в ssh-agent.
- Добавление ключа SSH в учетную запись GitHub.
Генерация ключа SSH
Откройте bash/терминал. Добавьте следующий текст, подставив свой адрес электронной почты GitHub.
ssh-keygen -t rsa -b 4096 -C "ваша@почта.com"Будет создан ключ ssh, используя e-mail в качестве метки.
Когда вам будет предложено «Введите файл, в котором вы хотите сохранить ключ», нажмите Enter. Это установит в местоположение по умолчанию.
Enter a file in which to save the key (/c/Users/you/.ssh/id_rsa):[Press enter]
Далее введите безопасную фразу-пароль дважды или просто нажмите Enter.
Enter passphrase (empty for no passphrase): [Type a passphrase]
Enter same passphrase again: [Type passphrase again]
Добавление SSH-ключа в ssh-agent
Чтобы запустить ssh-агент введите следующую команду.
На экране отобразится похожая строка.
Agent pid 31724
Добавим свой закрытый ключ SSH в ssh-agent. Если вы создали свой ключ с другим именем (или добавляете существующий ключ с другим именем), замените в команде id_rsa на имя вашего файла закрытого (приватного) ключа.
Ключ будет успешно добавлен в ssh-агент.
Добавление ключа SSH в учетную запись GitHub
Мы сгенерировали у себя на компьютере закрытый ключ SSH и добавили его в ssh-агент. Теперь нам необходимо добавить SSH ключ в учетную запись GitHub.
Сейчас нам необходимо скопировать SSH ключ в буфер обмена.
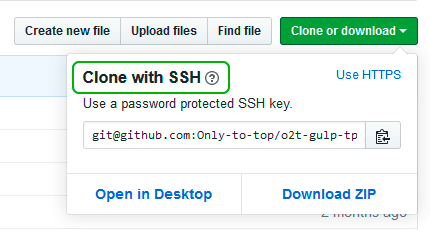
Способов есть несколько, но я же вам предлагаю следующее решения для Windows 10: введите команду ниже.
Прямо в терминале вы увидите содержимое необходимого файла с ключем. Скопируйте его в буфер.
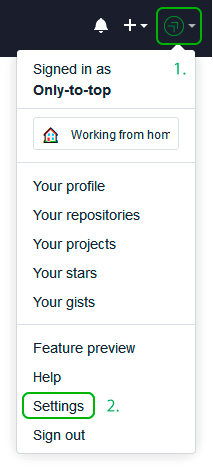
Теперь зайдите на вашу страницу GitHub » Settings.
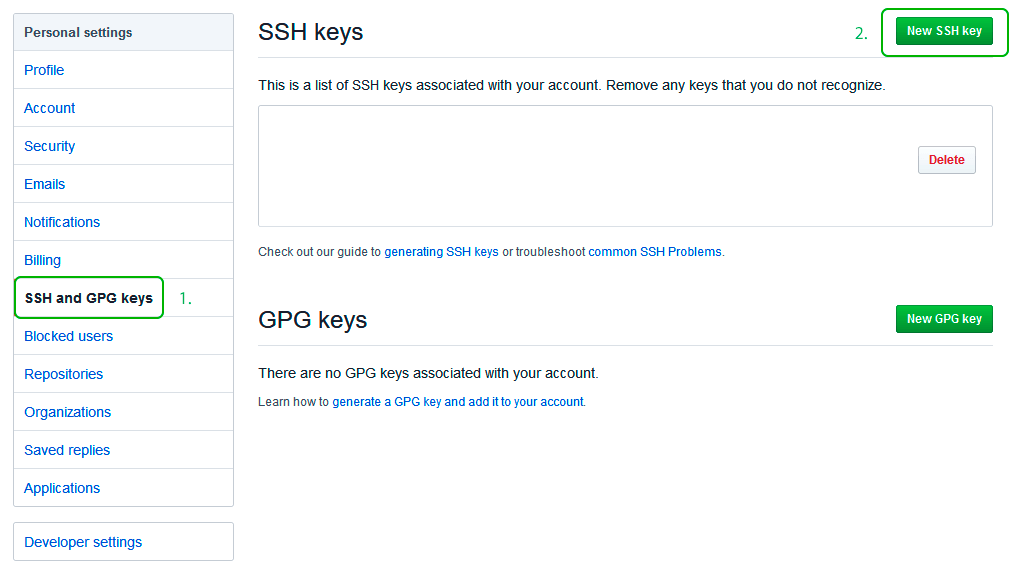
Перейдите во вкладку SSH and GPG keys и нажмите на кнопку New SSH key для добавления SSH ключа в вашу учетную запись GitHub.
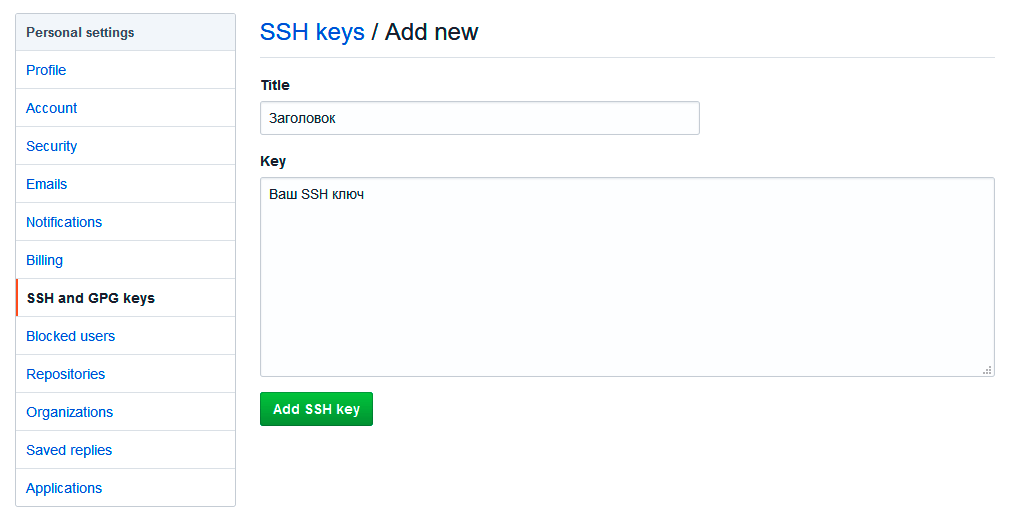
В поле Title добавьте заголовок для данного ключа. Например, если вы захотите настроить SSH доступ на нескольких устройствах, то вы будите понимать какой ключ принадлежит какому устройству.
В поле Key добавьте свой ssh-ключ, который вы скопировали в буфер обмена на предыдущем шаге.
Нажмите Add SSH key.
Для подтверждения вам потребуется ввести свой пароль от учетной записи GitHub.
На этом настройка SSH для вашего устройства завершена, теперь вы можете работать с git без ввода пароля от своей учетной записи.
Если вам понравилась данная статья, можете прочитать как настроить моментальную загрузку сайта на хостинг и синхронизацию файлов.
JavaScript: Window Location Checkbox Checked — Проверка Состояния Чекбокса ✔️
Надеюсь, вам понравилась данная информация. Если вам интересна тема web-разработки,
то можете следить за выходом новых статей в Telegram.
- Настройка Gulp Babel
- Микроразметка сайта
- Как перенести сайт WordPress на хостинг
- Настройте показ всего текста во время загрузки веб-шрифтов
- Сниппеты в VS Code
- Не удается проверить так как не задан исполняемый PHP-файл
Question: How do I generate ssh private and public keys (to be used in GitHub/GitLab) using command line.
The command below generates the error
sh.exe": syntax error near unexpected token '('
I am using Windows XP.
$ ssh-keygen -t rsa -C "xxxx@gmail.com"
Generating public/private rsa key pair.
Enter file in which to save the key (/c/Users/xxxx/.ssh/id_rsa):
Enter passphrase (empty for no passphrase):
Enter same passphrase again:
Your identification has been saved in /c/Users/xxxx/.ssh/id_rsa.
Your public key has been saved in /c/Users/xxxx/.ssh/id_rsa.pub.
The key fingerprint is:
01:0f:f4:3b:ca:85:d6:17:a1:7d:f0:68:9d:f0:a2:db xxxx@gmail.com
![]()
asked Sep 30, 2010 at 8:01
![]()
1
The command to run is only
ssh-keygen -t rsa -C "you@example.com"
All the rest beginning with line 2 of your script is the output of ssh-keygen.
And replace you@example.com with your email address.
Have a look at the manual for ssh-keygen to look for additional options. You should probably use a longer key by adding -b 4096 to the option list.
answered Sep 30, 2010 at 8:08
![]()
ResiduumResiduum
11.9k7 gold badges39 silver badges70 bronze badges
6
Here is the command
ssh-keygen -t rsa -b 4096 -C "[your github's email]"
# Creates a new ssh key
# Generating public/private rsa key pair.
This will generate a key for you. You have to copy that and insert into your Github’s account (just one time).
Steps how to do It
![]()
answered May 6, 2016 at 14:54
![]()
1
Step 1: Generate Your SSH Key
$ ssh-keygen -t rsa -b 4096 -C "example@example.com"
Step 2: Use the Key
$ eval $(ssh-agent -s)
Then add the key we just generated. If you selected a different path than the default, be sure to replace that path in the command.
ssh-add ~/.ssh/id_rsa
Step 3: Add the SSH Key on GitHub
clip < ~/.ssh/id_rsa.pub
if clip not found then add the next command
cat ~/.ssh/id_rsa.pub
Finally Result something like on your cmd
ssh-rsa AAAAB3NzaC1yc2EAAAAD173Oe1kp0Ojnsn7sRWt/XT5nFH3CSTv6VWyxq4YUJ4ZykWa5opyiAJmvtjxOMCmVTuX2r1T4Livn0foHGt7+66FJXrXUQgyJ4RXanufb3bAekxbFPg3S6Gyr2kk+I3TYWcFsLLwjU0VVJwodQkpyygAUzhomx9OQ0FMpfkQa5VrZnaSLjjtNOUSAaq30e7JWYxtoVih2HfVkcmqc53QjY4T3Xb0cmLZF3EmwCeB66dgJtpTNMvM54ceD30INsaMFNqG8XjbJtGUCHYEIR5l/LI20K5F25BRTnCzRV9dB5FUJ8taVMGRHJob9PDUdxpA2HEJYilm8ZbLbRmKJtU+H91WNCG6pvy9Yf9MREkOZQHcWIuAsH8uJvTTbqm1eAY2g34FjarRdqZIpvdxkrErDHqh4k42owNEmHjSaAw53Y8M54fjBdFHTjGDqHBamlKcIzQbin/czFq1a+pgopIANDhZjWZNvMiTak7BjVrVOciKD3Pa/KKy03nSEfEGExLbFEi1Q8QEGd6idtUAjL7fyVPWatRwCnOvGLMPTk73m7t0IAYTm4n7dO0S5OeWTUPTT+8vIfFCmE9OT2aJDIpZY1+f8Q== youremail@gmail.com
copy from your cmd and go to your GitHub account
setting find ssh and gpg keys
answered Jul 14, 2021 at 7:47
![]()
Naved KhanNaved Khan
1,52114 silver badges13 bronze badges
Solution: ssh-keygen -t rsa
Explanation : ssh-keygen is a tool for creating new authentication key pairs for SSH. Such key pairs are used for automating logins, single sign-on, and for authenticating hosts
(for example cloning project from your private repo on Github straight to your aws machine).
Options: You can perform more complicated operations and using flags in order to generate a tailor-made key according to your use case, extended functionality are more powerful and secured. The basic flags are: bits (Large integers making the the RSA key be less vulnerable and hard to crack), passphrase (similar to password) , type (dsa/ecdsa/ed25519/rsa) , comment for the specific ssh token (email or user name) and output key (default store on ~/.ssh/ path)
Synopsis: ssh-keygen [-q] [-b bits] [-t dsa | ecdsa | ed25519 | rsa] [-N new_passphrase] [-C comment] [-f output_keyfile]
Example:
ssh-keygen -b 4096 -t rsa -n "tHiSiaPasSWoRd" -c "johnDoe@gmail.com" -f ~/.ssh/id_rsa
answered May 24, 2020 at 18:20
![]()
avivamgavivamg
10.9k1 gold badge62 silver badges51 bronze badges
Generate SSH key using below command
ssh-keygen -trsa -C user@xyz.com
just hit enter to apply the default value for all the inputs it asks
the output will be
Generating public/private rsa key pair.
Enter file in which to save the key (/home/user/.ssh/id_rsa):
/home/user/.ssh/id_rsa already exists.
Overwrite (y/n)? y
Enter passphrase (empty for no passphrase):
Enter same passphrase again:
Your identification has been saved in /home/user/.ssh/id_rsa
Your public key has been saved in /home/user/.ssh/id_rsa.pub
The key fingerprint is:
SHA256:xxxxxxxxxxxxxxxxxxxxxxxxxxxxxxxxxxxxxxxxxxxxxxx user@xyz.com
The key's randomart image is:
+---[RSA xxxx]----+
| ..++xX*Ox        |
| x..xx/+.x. + .   |
|.. +..*+xx x +    |
|... +x+o x.       |
|x.. + +..x        |
|xx.. x            |
|...               |
|x x               |
|x  x.             |
+----[SHA256]------+
just use the cat command to log the ssh key file contents on the terminal(use your own path here).
cat /home/user/.ssh/id_rsa.pub
the output will be
ssh-rsa xxxxxxxxxxxxxxxxxxxxxxxxxxxxxxxxxxxxxxxxxxxxxxxxxxxxxxxxxxxxxxxxxxxxxxxxxxxxxxxxxxxxxxxxxxxxxxxxxxxxxxxxxxxxxxxxxxxxxxxxxxxxxxxxxxxxxxxxxxxxxxxxxxxxxxxxxxxxxxxxxxxxxxxxxxxxxxxxxxxxxxxxxxxxxxxxxxxxxxxxxxxxxxxxxxxxxxxxxxxxxxxxxxxxxxxxxxxxxxxxxxxxxxxxxxxxxxxxxxxxxxxxxxxxxxxxxxxxxxxxxxxxxxxxxxxxxxxxxxxxxxxxxxxxxxxxxxxx user@xyz.com
copy the contents and go to your github account go to settings under Account settings>SSH and GPG keys click on New SSH key, provide the name you wish and paste the copied contents in the value and save. that’s it you are ready to commit your changes without using username, password every time.
answered Dec 3, 2021 at 17:12
![]()
Akhil SAkhil S
77510 silver badges15 bronze badges
Just apply two commands :
ssh-keygen -t rsa -b 4096
cat ~/.ssh/id_rsa.pub
Copy ssh key and paste on browser
answered Jun 2, 2022 at 8:20
![]()
SSH-ключ — это учетные данные для доступа по сетевому протоколу Secure Shell (SSH). С помощью этого аутентифицированного и зашифрованного безопасного сетевого протокола обеспечивается удаленная связь между машинами, находящимися в незащищенной открытой сети. Протокол SSH используется для удаленной передачи файлов, управления сетью и удаленного доступа к операционной системе. Кроме того, аббревиатурой SSH описывают набор инструментов, используемых для взаимодействия по протоколу SSH.
SSH использует пару ключей, чтобы инициировать безопасное квитирование установления связи между удаленными сторонами. Пара состоит из открытого и закрытого ключей. Эти названия могут сбить с толку, поскольку оба элемента называются ключами. Лучше рассматривать открытый ключ как «замок», а закрытый ключ — как «ключ». Вы выдаете удаленным сторонам «замок» для шифрования или «запирания» данных. Затем эти данные открываются с помощью закрытого ключа, который вы храните в надежном месте.
Создание SSH-ключа
SSH-ключи генерируются с помощью криптографических алгоритмов с открытым ключом (чаще всего имеют в виду RSA и DSA). Если говорить в общих чертах, SSH-ключи генерируются с помощью математической формулы, которая содержит два простых числа и случайную начальную переменную для вывода открытого и закрытого ключей. С помощью этой односторонней формулы можно получить открытый ключ из закрытого, но не наоборот.
Создать SSH-ключи можно с помощью инструмента генерации ключей. В набор инструментов командной строки SSH входит утилита keygen. Кроме того, большинство хостинг-провайдеров git предлагают руководства по созданию SSH-ключа.
Создание SSH-ключа на Mac и Linux
В операционных системах OS X и Linux доступны комплексные современные приложения-терминалы, которые поставляются с предустановленным набором инструментов SSH. Создание SSH-ключа проходит одинаково в обеих операционных системах.
1. Чтобы начать создание ключа, выполните следующую команду.
ssh-keygen -t rsa -b 4096 -C "your_email@example.com"Эта команда создаст новый SSH-ключ, используя адрес электронной почты в качестве метки.
2. Затем вам будет предложено указать файл, где будет сохранен ключ.
Укажите расположение файла или нажмите клавишу «Ввод», чтобы принять расположение по умолчанию.
> Enter a file in which to save the key (/Users/you/.ssh/id_rsa): [Press enter]3. Далее вас попросят ввести секретную фразу.
Она добавит еще один уровень безопасности к SSH и будет требоваться при каждом использовании ключа SSH. Если злоумышленник получит доступ к компьютеру, на котором хранятся закрытые ключи, он также сможет получить доступ к любым системам, использующим эти ключи. Секретная фраза защитит от этого сценария.
> Enter passphrase (empty for no passphrase): [Type a passphrase]
> Enter same passphrase again: [Type passphrase again]
На этом этапе новый SSH-ключ будет создан в файле, местоположение которого было указано ранее.
4. Добавьте новый SSH-ключ в ssh-agent.
ssh-agent — это еще одна программа, входящая в набор инструментов SSH. В ней хранятся закрытые ключи, поэтому ее можно рассматривать как брелок. Кроме того, она обрабатывает запросы на подпись SSH-запросов с помощью закрытых ключей, чтобы такие ключи всегда передавались безопасно.
Перед добавлением нового SSH-ключа в ssh-agent убедитесь, что программа запущена выполнив следующую команду:
$ eval "$(ssh-agent -s)"
> Agent pid 59566
После запуска ssh-agent добавьте новый SSH-ключ в локальный агент SSH с помощью следующей команды.
ssh-add -K /Users/you/.ssh/id_rsaТеперь новый SSH-ключ зарегистрирован и готов к использованию.
Создание SSH-ключа в Windows
В средах Windows нет стандартной unix-оболочки, поэтому для полноценной работы с инструментом keygen вам потребуется установить сторонние программы оболочки. Самый простой вариант для этих целей — решение Git Bash. После его установки вы сможете выполнять в оболочке Git Bash те же действия, что в Linux и Mac.
Подсистема Linux для Windows
Современные среды Windows предлагают подсистему Linux для Windows с полноценной оболочкой. Если вам доступна эта подсистема, вы можете выполнить в ней те же шаги, которые были описаны выше для Linux и Mac.
Резюме
SSH-ключи позволяют аутентифицировать безопасные соединения. Следуя этому руководству, вы сможете создать SSH-ключ и начать им пользоваться. В системе Git можно применять SSH-ключи вместо традиционной аутентификации по паролю при отправке или передаче данных в удаленные репозитории. Современные решения для размещения Git, такие как Bitbucket, поддерживают аутентификацию по SSH-ключу.
A SSH key is considered an access credential for the secure shell (SSH) network protocol. It is an encrypted and authenticated secure network protocol, applied for remote communication between machines operating on an unsecured network.
This snippet will help you to find the kbd class=»highlighted»>SSH key on your PC if it exists, generate a new SSH key and learn how to add it to your ssh-agent or your GitHub/Bitbucket account.
You can do that by following the steps below. Type ls -al ~/.ssh so as to see your ssh keys:
By default, the filename of the public key is one of the following:
  id_ecdsa.pub
  id_ed25519.pub
  id_rsa.pub
If you don’t have an SSH key, you should create it. Now let’s generate a new SSH key step by step.
Type the command below, using your GitHub’s account email:
ssh-keygen -t rsa -b 4096 -C "[your github's email]"After running this command, you will be offered to set the SSH key path, but we recommend you to use its default value by pressing the «Enter» button.
> Enter a file in which to save the key (/Users/you/.ssh/id_rsa): [Press enter]
After that it will offer you to insert a passphrase to protect your SSH key.
> Enter passphrase (empty for no passphrase): [Type a passphrase]
> Enter same passphrase again: [Type passphrase again]
Now, when you already have an SSH key, you can add it into the ssh-agent.
- Be sure ssh-agent is enabled:
- Add your SSH key to the ssh-agent.
If you changed the default path while generating an SSH key, now you need to mention that path instead of ~/.ssh/id_rsa.
Usually, repositories are private, and the developers are required to write a username and a password to take any actions related to the remote repository. Adding your SSH key to the GitHub/Bitbucket account helps the system to identify you and your are not asked to write your username and password each time.
Open your terminal and type the command below:
Now, it will print the SSH key in the terminal, so you can copy it.
How to Add SSH Key to the GitHub Account
- Log into your GitHub’s account. In the top right corner of any page, click your profile photo, then click Settings.
- In the user settings sidebar, click on SSH and GPG keys.
- Click on the New SSH key button.
- Type the title and your SSH key, and press the Add SSH key button.
How to Add SSH Key to the Bitbucket Account
- Log into your Bitbucket’s account. In the left bottom corner of any page, click your profile photo, then click Personal Settings.
- In the Personal settings sidebar, click on SSH keys.
- Click on the Add key button.
- Type the title and your Add key, and press the Add key button.
Now you have added your PC’s SSH key to your GitHub’s/Bitbucket’s account.
SSH keys are an access credential used in SSH protocol (Secure Shell) which is a network protocol that helps to login from one computer to another securely, as well as to manage networks, operating systems, and configurations. If you use Git and want to clone anything from remote repositories, you have to choose one of these two ways: HTTPS or SSH. If you use HTTPS, you have to type your account access every time you communicate with the remote repository, or change your configs and fill your account data (access). Another modern way is to use the SSH authentication method. It is used in many Version Control Systems to have command line access into your servers, etc. SSH key pairs can be used for authentication instead of passwords. Each key pair consists of a private key and a corresponding public key. When you use SSH key for Git, you inform Git that this PC is authenticated for that GitHub account, and it will never ask you about any access again because you have already given it your SSH key.

![]()
Welcome to my first official guide on Dev.to. Today I want to explain how you can setup SSH and Git on your Windows 10 computer.
Note: This is not about 100% securing your keys but about how to generate keys for use with GitHub.
Thanks to garethdd for his constructive feedback.
What is SSH?
SSH stands for Secure Shell and is an awesome way to authenticate yourself on remote servers (for example the Github server) without typing in a password everytime.
SSH works via two keys, the Private Key and the Public Key. While the private key should always stay private and safe, the public key can be shared around the internet without any problems.
The private key allows you to get access to servers that have your public key registered, so your access can only be stolen if the attacker somehow gets your Secret Key so keep it safe!
SSH should be preinstalled on new Windows 10 machines.
What is Git?
Git is a free version management tool that helps you to versionize your code and potentially save it on a remote server (for example Github, Gitlab or Bitbucket).
You can install Git from here:
https://git-scm.com/download/win
You can also install Git via chocolatey:
Create a SSH Key
The first step is to generate a new SSH key. Use cmd or Powershell and run the following command:
ssh-keygen -t rsa -b 4096 -C "your_email@example.com"
You can but don’t need to give it a passphrase since you should never share your secret key around but using one will secure your keys. Keep in mind that everybody can have as many private keys as they want.
This generates a new private SSH key with rsa encryption and 4096 bits. It also generates a public key from the secret key which you can share around.
There will be a new folder and files in your Windows user folder.
In general you can create as many keys as you want. The id_rsa key is the default key generated by ssh and will be automatically be used by your ssh-agent if you don’t tell it to use another key.
What is an ssh-agent?
An ssh-agent is the agent process used to actually authenticate yourself with ssh. There are a few out there (PuTTY with Pageant for example) but for this example we’ll use the ssh-agent provided by the native and default Windows 10 ssh-agent.
If you want to you can use PuTTY and Pageant to make your keys even more secure. Read this post on Digital Ocean for more information.
If you want to change the key used by your ssh-agent, you must first start the service. The service will be disabled on Windows 10 by default. Search for Services and open the Services settings and look for the «OpenSSH Authentication Agent» and Activate it:

Now you will be able to access the ssh-agent from your console via ssh-agent.
For this example we’re going to try to load another key called example into our agent and use it instead of the id_rsa key. To do this you can run the following command:
Now you will have both keys available for this session.
Register your SSH Key on Github
The next step is to register your generated SSH key on Github. For that, run the following command:
type C:Usersyour_user_name.sshid_rsa.pub
and copy the output string into your clipboard. Now go to your Github keys settings and add a new SSH key with your public key and save it.
Congratulations! You now are able to get and push code to Github without any password!
Note: There should also be a C:Usersyour_user_name.sshid_rsa file. This is your private key, don’t share this around!
Setup Github in your Shell
Now it’s time to setup Git on your machine. After installing it from the link above, open a new cmd or Powershell window. Now we need to set your public Git name and Git email address. This will always be public when pushing code.
Luckily Github gives you a privatized email address for use. Go to https://github.com/settings/emails and you will find a @users.noreply.github.com email address for your account. Copy this email address.
Next register your name and email in Git:
git config --global user.name "Your Name"
git config --global user.email your_email@users.noreply.github.com
Congratulations! Now all your Commits will be registered as being commited from your Github user.
Signing your GitHub commits (Optional Step)
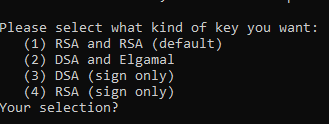
To sign your commits you first must install the GPG command line tools. After you installed the GPG toolkit, you can run the following command to generate a new gpg key:
This will ask you what kind of key you want. Go for RSA and RSA.
Now you need to enter a bit length. The recommendation is 4096 bits.
After that you can specify a expiration length or if the key should never expire. Pick as you want. Expiring keys are more secure in general because you have to renew them every now and then.
Now enter your personal informations to verifying your identity with your gpg key.
When you’re done you will be asked for a passphrase. Give it a secure passphrase and you will be done with your gpg-key generation.
After that you will be able to find your key in your users .gnupg folder as specified in the success message.
If you want to list your gpg keys, simply run
// short version
gpg --list-secret-keys

// long version
gpg --list-secret-keys --keyid-format LONG
Your GPG key you can share with Github is the key coming after sec rsa4096/ so for example in
/Users/hubot/.gnupg/secring.gpg
------------------------------------
sec   4096R/3AA5C34371567BD2 2016-03-10 [expires: 2017-03-10]
uid                          Hubot
ssb   4096R/42B317FD4BA89E7A 2016-03-10
the gpg key would be 3AA5C34371567BD2
To get your public key block, simply run
gpg --armor --export YOUR_GPG_KEY
which will output your public GPG Key Block. Copy it and paste it to your GitHub Account here.
From now on your commits will be signed when commited.
Use Git
Now you’re ready to actually use Git. From now you can clone repositories via git clone or push new code to Github. Here is a quick reference:
# Clone a repository to the current directory
git clone [REPOSITORY_CLONE_URL]

# Create a new commit with a message
git commit -m "Your commit message"

# Add files to the commit
git add .
git add ./filename.ext

# Push your commits to Github
git push origin master
git push origin [YOUR_BRANCH_NAME]

# Reset your repo to the last version
git reset --hard

# Create a new branch
git checkout -b [YOUR_BRANCH_NAME]

# Switch branches
git checkout [YOUR_BRANCH_NAME]
git checkout master

# Reset a single file
git checkout ./filename.ext
Conclusion
Thanks for reading this post. I hope it helped you with the setup. If you need help or have questions let me know!