Am I missing something? Is this the correct way to build a self-signed certificate?
It’s easy to create a self-signed certificate. You just use the openssl req command. It can be tricky to create one that can be consumed by the largest selection of clients, like browsers and command line tools.
It’s difficult because the browsers have their own set of requirements, and they are more restrictive than the IETF. The requirements used by browsers are documented at the CA/Browser Forums (see references below). The restrictions arise in two key areas: (1) trust anchors, and (2) DNS names.
Modern browsers (like the warez we’re using in 2014/2015) want a certificate that chains back to a trust anchor, and they want DNS names to be presented in particular ways in the certificate. And browsers are actively moving against self-signed server certificates.
Some browsers don’t exactly make it easy to import a self-signed server certificate. In fact, you can’t with some browsers, like Android’s browser. So the complete solution is to become your own authority.
In the absence of becoming your own authority, you have to get the DNS names right to give the certificate the greatest chance of success. But I would encourage you to become your own authority. It’s easy to become your own authority, and it will sidestep all the trust issues (who better to trust than yourself?).
This is probably not the site you are looking for!
The site’s security certificate is not trusted!
This is because browsers use a predefined list of trust anchors to validate server certificates. A self-signed certificate does not chain back to a trusted anchor.
The best way to avoid this is:
- Create your own authority (i.e., become a CA)
- Create a certificate signing request (CSR) for the server
- Sign the server’s CSR with your CA key
- Install the server certificate on the server
- Install the CA certificate on the client
Step 1 — Create your own authority just means to create a self-signed certificate with CA: true and proper key usage. That means the Subject and Issuer are the same entity, CA is set to true in Basic Constraints (it should also be marked as critical), key usage is keyCertSign and crlSign (if you are using CRLs), and the Subject Key Identifier (SKI) is the same as the Authority Key Identifier (AKI).
To become your own certificate authority, see *How do you sign a certificate signing request with your certification authority? on Stack Overflow. Then, import your CA into the Trust Store used by the browser.
Steps 2 — 4 are roughly what you do now for a public facing server when you enlist the services of a CA like Startcom or CAcert. Steps 1 and 5 allows you to avoid the third-party authority, and act as your own authority (who better to trust than yourself?).
The next best way to avoid the browser warning is to trust the server’s certificate. But some browsers, like Android’s default browser, do not let you do it. So it will never work on the platform.
The issue of browsers (and other similar user agents) not trusting self-signed certificates is going to be a big problem in the Internet of Things (IoT). For example, what is going to happen when you connect to your thermostat or refrigerator to program it? The answer is, nothing good as far as the user experience is concerned.
The W3C’s WebAppSec Working Group is starting to look at the issue. See, for example, Proposal: Marking HTTP As Non-Secure.
How to create a self-signed certificate with OpenSSL
The commands below and the configuration file create a self-signed certificate (it also shows you how to create a signing request). They differ from other answers in one respect: the DNS names used for the self signed certificate are in the Subject Alternate Name (SAN), and not the Common Name (CN).
The DNS names are placed in the SAN through the configuration file with the line subjectAltName = @alternate_names (there’s no way to do it through the command line). Then there’s an alternate_names section in the configuration file (you should tune this to suit your taste):
[ alternate_names ]

DNS.1       = example.com
DNS.2       = www.example.com
DNS.3       = mail.example.com
DNS.4       = ftp.example.com

# Add these if you need them. But usually you don't want them or
#   need them in production. You may need them for development.
# DNS.5       = localhost
# DNS.6       = localhost.localdomain
# IP.1        = 127.0.0.1
# IP.2        = ::1
It’s important to put DNS name in the SAN and not the CN, because both the IETF and the CA/Browser Forums specify the practice. They also specify that DNS names in the CN are deprecated (but not prohibited). If you put a DNS name in the CN, then it must be included in the SAN under the CA/B policies. So you can’t avoid using the Subject Alternate Name.
If you don’t do put DNS names in the SAN, then the certificate will fail to validate under a browser and other user agents which follow the CA/Browser Forum guidelines.
Related: browsers follow the CA/Browser Forum policies; and not the IETF policies. That’s one of the reasons a certificate created with OpenSSL (which generally follows the IETF) sometimes does not validate under a browser (browsers follow the CA/B). They are different standards, they have different issuing policies and different validation requirements.
Create a self signed certificate (notice the addition of -x509 option):
openssl req -config example-com.conf -new -x509 -sha256 -newkey rsa:2048 -nodes
    -keyout example-com.key.pem -days 365 -out example-com.cert.pem
Create a signing request (notice the lack of -x509 option):
openssl req -config example-com.conf -new -sha256 -newkey rsa:2048 -nodes
    -keyout example-com.key.pem -days 365 -out example-com.req.pem
Print a self-signed certificate:
openssl x509 -in example-com.cert.pem -text -noout
Print a signing request:
openssl req -in example-com.req.pem -text -noout
Configuration file (passed via -config option)
[ req ]
default_bits        = 2048
default_keyfile     = server-key.pem
distinguished_name  = subject
req_extensions      = req_ext
x509_extensions     = x509_ext
string_mask         = utf8only

# The Subject DN can be formed using X501 or RFC 4514 (see RFC 4519 for a description).
#   Its sort of a mashup. For example, RFC 4514 does not provide emailAddress.
[ subject ]
countryName         = Country Name (2 letter code)
countryName_default     = US

stateOrProvinceName     = State or Province Name (full name)
stateOrProvinceName_default = NY

localityName            = Locality Name (eg, city)
localityName_default        = New York

organizationName         = Organization Name (eg, company)
organizationName_default    = Example, LLC

# Use a friendly name here because it's presented to the user. The server's DNS
#   names are placed in Subject Alternate Names. Plus, DNS names here is deprecated
#   by both IETF and CA/Browser Forums. If you place a DNS name here, then you
#   must include the DNS name in the SAN too (otherwise, Chrome and others that
#   strictly follow the CA/Browser Baseline Requirements will fail).
commonName          = Common Name (e.g. server FQDN or YOUR name)
commonName_default      = Example Company

emailAddress            = Email Address
emailAddress_default        = test@example.com

# Section x509_ext is used when generating a self-signed certificate. I.e., openssl req -x509 ...
[ x509_ext ]

subjectKeyIdentifier        = hash
authorityKeyIdentifier    = keyid,issuer

# You only need digitalSignature below. *If* you don't allow
#   RSA Key transport (i.e., you use ephemeral cipher suites), then
#   omit keyEncipherment because that's key transport.
basicConstraints        = CA:FALSE
keyUsage            = digitalSignature, keyEncipherment
subjectAltName          = @alternate_names
nsComment           = "OpenSSL Generated Certificate"

# RFC 5280, Section 4.2.1.12 makes EKU optional
#   CA/Browser Baseline Requirements, Appendix (B)(3)(G) makes me confused
#   In either case, you probably only need serverAuth.
# extendedKeyUsage    = serverAuth, clientAuth

# Section req_ext is used when generating a certificate signing request. I.e., openssl req ...
[ req_ext ]

subjectKeyIdentifier        = hash

basicConstraints        = CA:FALSE
keyUsage            = digitalSignature, keyEncipherment
subjectAltName          = @alternate_names
nsComment           = "OpenSSL Generated Certificate"

# RFC 5280, Section 4.2.1.12 makes EKU optional
#   CA/Browser Baseline Requirements, Appendix (B)(3)(G) makes me confused
#   In either case, you probably only need serverAuth.
# extendedKeyUsage    = serverAuth, clientAuth

[ alternate_names ]

DNS.1       = example.com
DNS.2       = www.example.com
DNS.3       = mail.example.com
DNS.4       = ftp.example.com

# Add these if you need them. But usually you don't want them or
#   need them in production. You may need them for development.
# DNS.5       = localhost
# DNS.6       = localhost.localdomain
# DNS.7       = 127.0.0.1

# IPv6 localhost
# DNS.8     = ::1
You may need to do the following for Chrome. Otherwise Chrome may complain a Common Name is invalid (ERR_CERT_COMMON_NAME_INVALID). I’m not sure what the relationship is between an IP address in the SAN and a CN in this instance.
# IPv4 localhost
# IP.1       = 127.0.0.1

# IPv6 localhost
# IP.2     = ::1
There are other rules concerning the handling of DNS names in X.509/PKIX certificates. Refer to these documents for the rules:
- RFC 5280, Internet X.509 Public Key Infrastructure Certificate and Certificate Revocation List (CRL) Profile
- RFC 6125, Representation and Verification of Domain-Based Application Service Identity within Internet Public Key Infrastructure Using X.509 (PKIX) Certificates in the Context of Transport Layer Security (TLS)
- RFC 6797, Appendix A, HTTP Strict Transport Security (HSTS)
- RFC 7469, Public Key Pinning Extension for HTTP
- CA/Browser Forum Baseline Requirements
- CA/Browser Forum Extended Validation Guidelines
RFC 6797 and RFC 7469 are listed, because they are more restrictive than the other RFCs and CA/B documents. RFCs 6797 and 7469 do not allow an IP address, either.
- Introduction
- Task
- How it works
- Accepted formats
- OpenSSL: Create a public/private key file pair
- OpenSSL: Create a certificate
- PuTTYgen: Create a public/private key file pair
- More information
Introduction
Iguana only supports OpenSSL SSH-2 private keys and certificates in PEM format, these must not be password protected. Iguana accepts the older “Traditional” (or “SSLeay”) PKCS#5 format (as defined in RFC2890) or in the newer PKCS#8 format (as defined in RFC5958).
Task [top]
How to create self-certified SSL certificate and public/private key files.
Accepted formats [top]
If you are in hurry (and don’t need explanations), then you can just skip this section.
However if you are having a problem with Iguana not accepting your private key, then you should open the key file in a text editor and check if it matches one of two accepted formats.
Iguana will accept these two PKCS formats:
Note: Iguana will not accept SSH format defined in RFC4716, even though the format looks similar:

OpenSSL: Create a public/private key file pair [top]
This section shows you how to create a public/private key file using OpenSSL.
To generate a public/private key file on a Windows system:
- You will need to have OpenSSL installed.
- Create a new directory on your C drive and give it an appropriate name (i.e., Test).
- Open a Command Prompt window and go to the new directory. For example:
C:>cd Test

C:Test>
- Type the path of the OpenSSL install directory, followed by the RSA key algorithm. For example:
C:Test>c:opensslbinopenssl genrsa -out privkey.pem 4096
Loading 'screen' into random state - done
Generating RSA private key, 4096 bit long modulus
.................................+++
...........................................+++
e is 65537 (0x10001)
- Then run this command to split the generated file into separate private and public key files
C:Test>c:opensslbinopenssl rsa -in privkey.pem -out pubkey.pem -pubout -outform PEM
To generate a public/private key file on a POSIX system:
- Use the ssh-keygen utility which is included as part of most POSIX systems.
- Create a new directory and give it an appropriate name (i.e., Test).
- Open a Command Prompt window and go to the new directory. For example:
cd Test
- Use the rsa option to create a public private key pair (using your email as a comment):
ssh-keygen -t rsa -b 4096 -C "your_email@example.com" -m PEMTip: Iguana requires PEM format keys. The ssh-keygen utility recently changed to using the (more secure) openssh private key format by default – whereas previously the default was PEM format. To generate PEM format we added the “-m PEM” option to the old command.
The public & private key files are saved in the new directory you created earlier. An example of a private key file is shown below:
-----BEGIN RSA PRIVATE KEY-----
MIIEpgIBAAKCAQEA6pwxy6uJ33RbkrsR0qNLzOD28gmAiwbp9bleH3UHb50Epa2i
20EDEseOAfsCQoGD+H9hS3vToZZTWeeYuE1qXyrva5i+aqubjQbxBFArjSShBEBr
XrFmo+nFZsRRIzmXWtwo+Usu/fPEr/KQ45Q7uL6gb0q87LEiBF8uoI6vqSu7gXkp
JWFoJWJ048HUthfyMLgmrarCuwH6fpdO0eqHxJ4/cvm0tBBM+/i2/fc5ruHvsADS
JklflvK3ybKVxjHdghqejBIPk3tTQm5fg7uRu7SAMdKqe8VeIpP/ujXawF28gynh
tZfBDuUACIAUg3gjj243HAmBDNezRfHmFpYlbwIDAQABAoIBAQCP4/p6gxwNi+z6
Inf866B66OMscX2AR15JEkbTHlDQOMp33vYKaWY8J15Ggq/RIGRTjbSbujeDXJKE
ipHVP83kzo2HPWhUPioqJb6+uXjsmTGUTPpNWpqsH52tuOxWoWTeGjebJmyM3uyc
STZqDilO1sPJXlpfBQjrC4GqgbjlFLugOKX4VviGvECcvsThL+7F+SKRJ6lekea2
LXK5Cj1W5w2/Kke62+rnZTUrbGGxm9Flxuy0PVSA/S0KI3fCE1bCi7NTXRstOAAz
vZCyb7Z0gI29/0c2lyDTd6J3jxGEEpDQ37FB4pbWnUkX0ZVbMy6Y2VTeBZE0R3O4
SY6/ZIv5AoGBAP26AT9/u2XwKduIb2YtG5W6cX37FmBwzI5pditi0k4ngG21f9xo
oye/c3BUoyF9TQ3jgWObZSPYocljJ8rzEkdfHJ8QhCYlVTmdInRjVRffgKOrHDjF
9FNK1ggXGLVwGmMbUUeIKXQRw4tKfPpLG0Qcgilx3y69aYHSP6qMVfcTAoGBAOy2
Vy5xzjq6U8RL1I1FncArJgB94ae0H2PkPYgmQnFCI87vuG7pv3wZvTK8P0RtFVtB
3n+CJZFVby1eTcqHPJkcmeeED323bCftMNW7tf/a7CBaH56k3dqh4h4v6+0P4pyo
sqldHb3bqTsvc5o7KWTXDH+lx9zKlsuVDHR1rVe1AoGBAMFK3b6JSbN8BfdX9j3p
6VTkx6dJDKAF7uAjWcHts/eUQlPR7Il2Ma2LPZ966xgNRBFrm1vNu3xWgdJRNrR2
/xreS4imZXZGBKoymlf+gIoCXBbTuVlK/TojDfD1334B3ChaXE5ZXfMtwUGxSorH
gwsdiM+YD4WlCOa8zIHaDXd/AoGBAJN7B9ZoEZWFgatLk6JxPVf9ii/EPlO+ZdBW
4/9v1vW5v5WuxbpU6HjpkHeL0d9QF35EC9xlugJSuHILz2vf1mGO8FTOcthg74Hw
xfxkd4BxZazCefDdx1vwgHFOai/JNedlM+tRmLYxpb66UcxGEARD+AWPxHZLwqgU
tS3aI6YBAoGBAKrnyHc3RN/kgyLvyngJUMuqDrbr2sS7TMm0fDoezunv6e7mtG6+
GExKDefmpvxmk2vsFU7feQSqiNBicDgOaiV8G1byvA3SauGmNhtRAXpgQMzAaJDI
vT86Y0QyLeoUNcW+i8FNqEBpJiWqHnCe3FI6WmF+ISDP6MNHmjLJRG84
-----END RSA PRIVATE KEY-----
You can copy the key from above. This key is to be used for testing purposes only.
Note: In this example, the 4096 parameter to the openssl genrsa command indicates that the generated key is 4096 bits long. A key that is 4096 bits or longer is considered more secure. A shorter key will be less secure, but will require less computation to use.
OpenSSL: Create a certificate [top]
This section shows you how to create a self-signed certificate file using OpenSSL.
Note: Iguana offers support for x509 compatible certificates in pem format, certificates must not be password protected.
To generate a self-signed certificate file on a Windows system:
- You will need to have OpenSSL installed.
- Open a command prompt window and go to the directory you created earlier for the public/private key file. For example:
C:>cd Test

C:Test>
- Enter the path of the OpenSSL install directory, followed by the self-signed certificate algorithm. For example:
C:Test>c:opensslbinopenssl req -new -x509 -key privkey.pem -out cacert.pem -days 1095 - Follow the instructions that appear in the screen. For example:
You are about to be asked to enter information that will be incorporated
into your certificate request.
What you are about to enter is what is called a Distinguished Name or a DN.
There are quite a few fields but you can leave some blank
For some fields there will be a default value,
If you enter '.', the field will be left blank.
-----
Country Name (2 letter code) [AU]:CA
State or Province Name (full name) [Some-State]:Ontario
Locality Name (eg, city) []:Toronto
Organization Name (eg, company) [Internet Widgits Pty Ltd]:iNTERFACEWARE
Organizational Unit Name (eg, section) []:
Common Name (eg, YOUR name) []:
Email Address []:
To generate a self-signed certificate file on a POSIX system:
- You will need to have OpenSSL installed.
- Open a command prompt window and go to the directory you created earlier for the public/private key file. For example:
cd Test
- Enter the path of the OpenSSL install directory, followed by the self-signed certificate algorithm. For example:
/<path to openssl>/openssl/bin/openssl req -new -x509 -key privkey.pem -out cacert.pem -days 1095 - Follow the instructions that appear in the screen. For example:
You are about to be asked to enter information that will be incorporated
into your certificate request.
What you are about to enter is what is called a Distinguished Name or a DN.
There are quite a few fields but you can leave some blank
For some fields there will be a default value,
If you enter '.', the field will be left blank.
-----
Country Name (2 letter code) [AU]:CA
State or Province Name (full name) [Some-State]:Ontario
Locality Name (eg, city) []:Toronto
Organization Name (eg, company) [Internet Widgits Pty Ltd]:iNTERFACEWARE
Organizational Unit Name (eg, section) []:
Common Name (eg, YOUR name) []:
Email Address []:
The self-signed certificate file is created and saved in the directory you specified earlier. An example of the certificate format is shown below:
-----BEGIN CERTIFICATE-----
MIIDwTCCAqmgAwIBAgIJALZW4cduwiJ0MA0GCSqGSIb3DQEBBQUAMEkxCzAJBgNV
BAYTAkNBMRAwDgYDVQQIEwdPbnRhcmlvMRAwDgYDVQQHEwdUb3JvbnRvMRYwFAYD
VQQKEw1pTlRFUkZBQ0VXQVJFMB4XDTA4MTIxNjE1MjMzNFoXDTExMTIxNjE1MjMz
NFowSTELMAkGA1UEBhMCQ0ExEDAOBgNVBAgTB09udGFyaW8xEDAOBgNVBAcTB1Rv
cm9udG8xFjAUBgNVBAoTDWlOVEVSRkFDRVdBUkUwggEiMA0GCSqGSIb3DQEBAQUA
A4IBDwAwggEKAoIBAQDqnDHLq4nfdFuSuxHSo0vM4PbyCYCLBun1uV4fdQdvnQSl
raLbQQMSx44B+wJCgYP4f2FLe9OhllNZ55i4TWpfKu9rmL5qq5uNBvEEUCuNJKEE
QGtesWaj6cVmxFEjOZda3Cj5Sy7988Sv8pDjlDu4vqBvSrzssSIEXy6gjq+pK7uB
eSklYWglYnTjwdS2F/IwuCatqsK7Afp+l07R6ofEnj9y+bS0EEz7+Lb99zmu4e+w
ANImSV+W8rfJspXGMd2CGp6MEg+Te1NCbl+Du5G7tIAx0qp7xV4ik/+6NdrAXbyD
KeG1l8EO5QAIgBSDeCOPbjccCYEM17NF8eYWliVvAgMBAAGjgaswgagwHQYDVR0O
BBYEFGD7SIq57+klnVi8TF7ypr9PpDC/MHkGA1UdIwRyMHCAFGD7SIq57+klnVi8
TF7ypr9PpDC/oU2kSzBJMQswCQYDVQQGEwJDQTEQMA4GA1UECBMHT250YXJpbzEQ
MA4GA1UEBxMHVG9yb250bzEWMBQGA1UEChMNaU5URVJGQUNFV0FSRYIJALZW4cdu
wiJ0MAwGA1UdEwQFMAMBAf8wDQYJKoZIhvcNAQEFBQADggEBAOg+0M8BTZNT6CNT
7GFVxtDYGGAFiQEpmbcJlLdFsH5snxbH8OvVp5RkpaQlFesyX2LldnJbSEyKH5Tz
YxCqAUIw1awBvsl7QNW8/O3Cv9iDtCL02aBDB4VH4bUF6HD3TMjntYC7Hax8JiL0
RW8RXBezgy260A/mP/EupdWs2n+HKe5z3BSMdVXJDTc8m9R9D3bvtP0IzvQQIPpr
uHBP3u9tAigAE/BofSWi68uCLyZQnIQnHtak2seFf8N1r3cHrPu7GBgodBDdlXNw
7s2wsTAeyDGcmhbJF/nzGqdKhnvOFrsBdiWPKCcECD2oGj/ISNoXimqdmhQfjvn2
mzG7Jpk=
-----END CERTIFICATE-----
You can copy the certificate from above. This certificate is to be used for testing purposes only.
Note: Remember that this newly created certificate file should be used for test purposes only. Normally, you would need to create a certificate request and send it to a certificate authority (CA). The CA would then sign the certificate and give it back to you upon payment, thus providing you with authentication according to their outlined policies.
PuTTYgen: Create a public/private key file pair [top]
These instructions use screenshots from Windows 7, but the process is the same in other Windows versions.
To generate a public/private key file:
- Open puttygen.exe by double clicking on it:
The standard install of puttygen.exe is in C:Program FilesPuTTY — but it is a standalone executable and can be run from anywhere.
- Click the Generate button, and move the mouse around to generate randomness:
PuTTYgen defaults to the desired RSA (SSH-2 RSA) key.

- Use Conversions>Export OpenSSL key to export the private key as a “Traditional fortmat” OpenSSL SSH-2 file:
Other key formats like the “ssh.com” export format is not compatible with Iguana.
- Copy the OpenSSH format key for use with Github, Bitbucket and other Git hosts:
Make sure to scroll down to ensure you get the whole key.


How it works [top]
In order to enable HTTPS support for use with Iguana, you must first generate valid public key/private key certificates. These digital certificates are used to authenticate the sender. Keys are typically generated in pairs, with one being public and the other being private. The private key must be kept secret to ensure security. It is used to encrypt outgoing messages and decrypt incoming messages. A public key is the one that is released to the public. It allows anyone to use it for encrypting messages to be sent to the user, as well as for decrypting messages received from the user.
f you use OpenSSL to generate certificates, the private key will contain public key information, therefore the public key does not have to be generated separately. You will need to have OpenSSL installed on your machine. You can download OpenSSL for Windows or Linux from: http://www.openssl.org.
On Windows you can use the PuTTYgen program to generate public and private keys, however it does not generate certificates. You can download PuTTYgen for Windows: http://www.chiark.greenend.org.uk/~sgtatham/putty/download.html.
In addition to having a public/private key certificate, you must also obtain a certificate file from a certificate authority (CA), such as Verisign, which issues digital certificates for use by other parties. There are many commercial CAs that charge for their services, while other institutions may have their own CAs. To ensure that the web server (with HTTPS support enabled) functions as expected, you can create a self-signed certificate for use during the initial testing phase.
More information [top]
- Using SSL security, certificates and verify peer etc
- Download PuTTYgen
- PuTTYgen program
- Iguana 6.1 SSL Enhancements
- How do I work with secure SSL web services?
- Verisign
- OpenSSL
Creating a new key, with a self-signed root CA
This should only be done once, in a clean directory. The key and certificate is needed for each app.
1. Generate root CA (private key and public key).
The -des3 option forces it to use a password. You don’t want someone hijacking your root CA and signing stuff.
openssl genrsa -des3 -out rootCA.key 2048
openssl req -x509 -new -nodes -key rootCA.key -days 1024 -out rootCA.pem -config "/c/program files (x86)/git/ssl/openssl.cnf"
2. Add CA key to machine.
https://msdn.microsoft.com/en-us/library/ms733813%28v=vs.110%29.aspx
Section: Installing a Certificate in the Trusted Root Certification Authorities Store
Create a new certificate
1. Create both a certificate signing request and a key.
Need to use an app-specific config file here, where «CN=localhost.ssl»
openssl req -in openssl.cnf -nodes -newkey rsa:2048 -sha224 -config openssl.cnf -keyout server.key -out server.csr
2. Create a new certificate
This also generates a rootCA.srl file, which I assume is only needed the first time, but is definitely needed.
openssl x509 -req -in server.csr -sha224 -extfile openssl.cnf -CA rootCA.pem -CAkey rootCA.key -CAcreateserial -days 1024 -out server.crt
3. Make off with your new files (server.key, server.csr, server.crt).
Renew a certificate
###1. Check if the certificate is expired
openssl x509 -in server.crt -noout -enddate
2. Create a certificate signing request from the existing key
openssl x509 -in server.crt -signkey server.key -x509toreq -out new.csr
2. Create a certificate
openssl x509 -req -days 365 -in server.csr -signkey server.key -out new.crt
3. Verify the new certificate (should end with OK)
openssl verify new.crt
4. Replace the old certificate with the new one, and delete the csr
mv new.crt server.crt && rm new.csr
Helpful Resources
- http://datacenteroverlords.com/2012/03/01/creating-your-own-ssl-certificate-authority/
- https://msdn.microsoft.com/en-us/library/ms733813%28v=vs.110%29.aspx
- https://gist.github.com/calvinmetcalf/753d6ac78004f36735de
Introduction
Initially developed by Netscape in 1994 to support the internet’s e-commerce capabilities, Secure Socket Layer (SSL) has come a long way. Amidst all the cyber attacks, SSL certificates have become a regular necessity for any live website.
Even though Secure Socket Layer (SSL) and Transport Socket Layer (TLS) have become quite ubiquitous, we will take a brief moment to explain what they do and how they do it.
Do not skip the OpenSSL Tutorial section.
What is an SSL Certificate? How Does SSL Work?
A Secure Socket Layer (SSL) certificate is a security protocol which secures data between two computers by using encryption.
Note: Simply put, an SSL certificate is a data file that digitally ties a Cryptographic Key to a server or domain and an organization’s name and location.
Typically, SSL certificates are used on web pages that transmit and receive end-user sensitive data, such as Social Security Number, credit card details, home address or password. Online payment forms are a good example and usually encrypt the aforementioned delicate information using 128 or 256-bit SSL technology.
SSL certificates ensure the identity of a remote computer, most commonly a server, but also confirms your computer’s identity to the remote computer to establish a safe connection. Keeping the internet safe has always been a two-way street and thanks to SSL encryption, the server «shakes hands» with your personal computer and both sides know with whom they are communicating.
What’s the Difference Between TLS and SSL?
There is none. Transport Layer Security (TLS) is an updated version of Secure Socket Layer (SSL). Even though most secure connections are via TLS protocols, people keep calling it SSL. In this case, it’s safe to say that old habits do die hard.
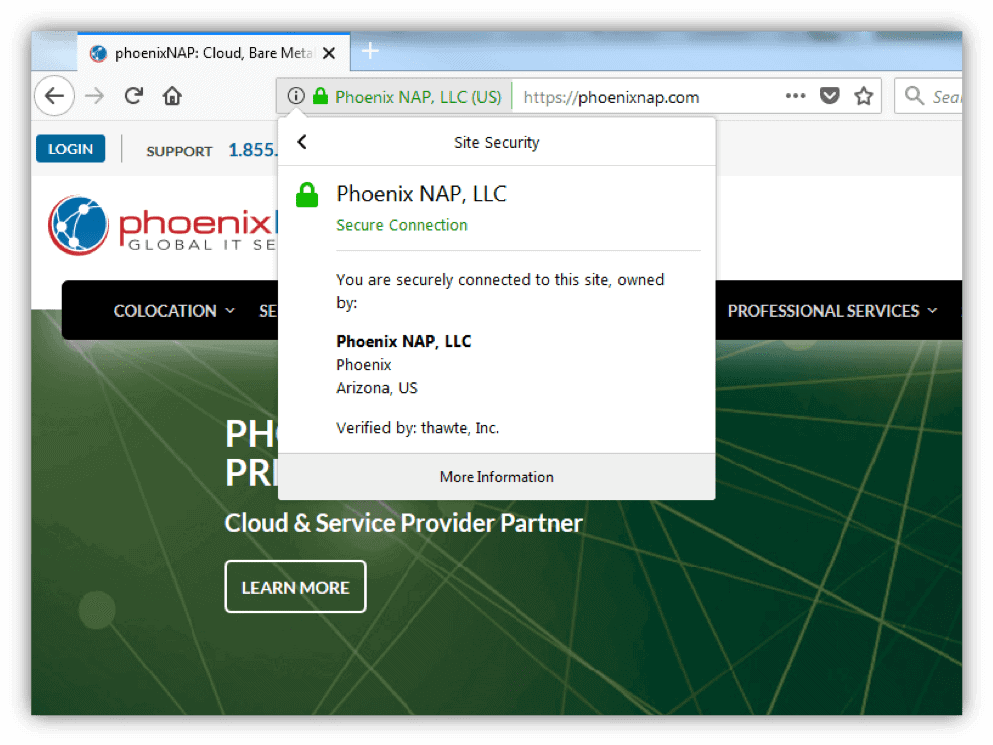
How Can I Know Whether a Web Page is Secured With SSL?
As an internet user, you have probably noticed a padlock and the site info bar turning green in your web browser, as well as the https connection protocol.
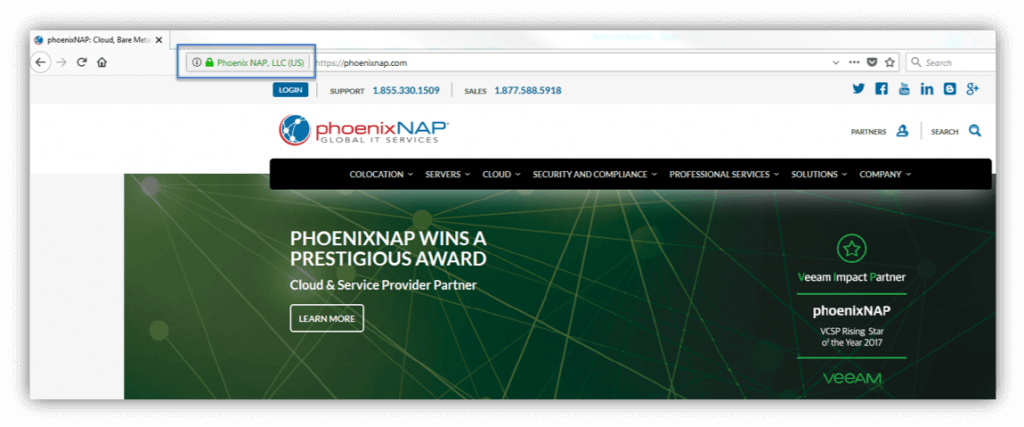
That’s your browser letting you know that a website is secured using SSL encryption. Clicking the site info bar will provide additional details about the connection as well as insight into the SSL certificate itself.
Why Do I Need an SSL Certificate?
Let’s take a real-life example.
You’re an e-commerce site owner who just leased a server with phoenixNAP and launched a couple of new e-commerce stores. You want your visitors to feel safe when visiting your e-store and, above all, not feel hesitant to log in and make a purchase.
An SSL certificate and HTTPS connection instills consumer confidence. The e-commerce industry is tied closely to consumer trust, and we might even say that your business depends on your customers feeling safe during the entire buying experience.
Besides the obvious security reasons, an SSL certificate increases your site’s SEO and Google Ranking and builds customer trust, consequently improving overall conversion rates.
If that is not enough to make you consider getting an SSL certificate for your domain, Google is sure to persuade you. Namely, starting from July 2018 Google flags each website without SSL as unsafe.
Where Can I Get an SSL Certificate?
SSL certificates are verified and issued by a Certificate Authority (CA). You apply by generating a CSR with a key pair on your server that would, ideally, hold the SSL certificate. The CSR contains crucial organization details which the CA verifies.
- Generate a CSR and key pair locally on your server. The key pair consists of a public and private key.
- Send the CSR and public key to a CA who will verify your legal identity and whether you own and control the domain submitted in the application. The Certificate Authority runs a check on your organization and validates if the organization is registered at the location provided in the CSR and whether the domain exists.
- When verified, the organization receives a copy of their SSL certificate including business details as well as the public key. The organization can now install the certificate on their server.
- When a CA issues the certificate, it binds to a certificate authority’s «trusted root» certificate. Root certificates are embedded into each browser and connected to individually issued certificates to establish an HTTPS connection.
Note: It is not uncommon for popular browsers to distrust all certificates issued by a single Certificate Authority. For example, Google Chrome has distrusted Symantec root certificates, due to Symantec breaching industry policies on several occasions. This means that all certificates rooted at Symantec have become invalid, no matter what their «valid through» date is.
SSL Certificate Types
Make sure that you choose a CA that supports the certificate type you need. For your convenience, below is a description of each certificate type:
Single Domain SSL Certificate
This type is meant to be used for a single domain and offers no support for subdomains. For example, if the certificate is to be used for www.phoenixnap.com, it will not support any other domain name.
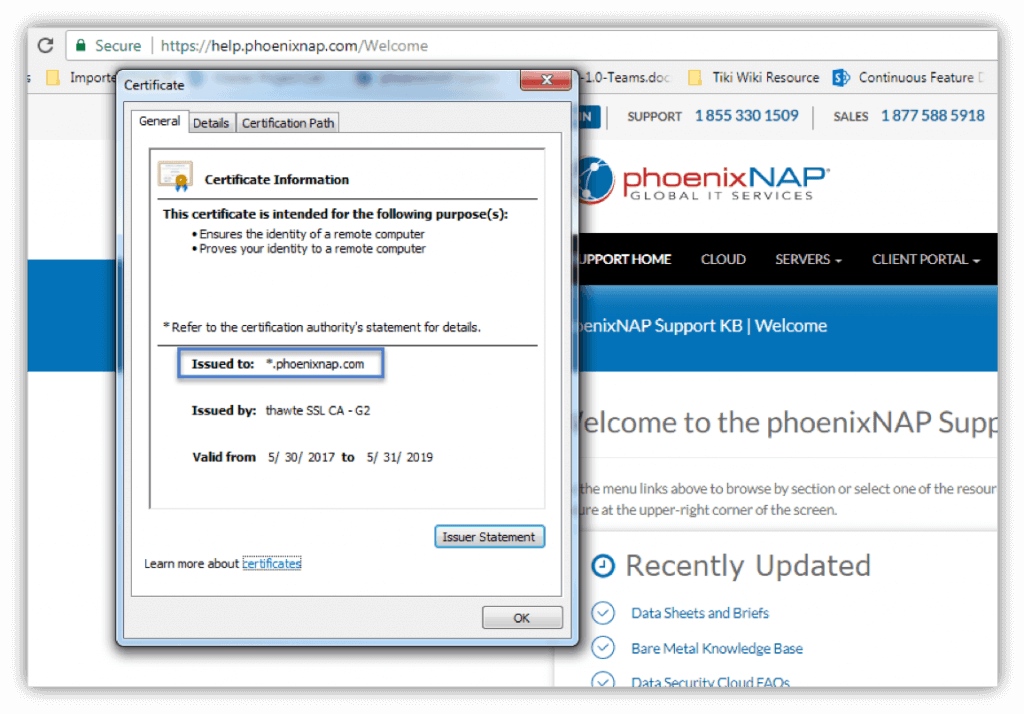
Multiple Domain (SAN/UC Certificates)
Multiple domain certificates are used for numerous domains and subdomains. Besides the FQDN, you can add support for other (sub)domains by adding them to the Subject Alternative Name Field. For example, a SAN certificate can include the domain www.phoenixnap.com, its subdomain help.phoenixnap.com as well as another domain (e.g., www.examplesite.com).
Wildcard Certificate
Wildcard certificates can be used for a domain, including all of its subdomains. The main difference is that instead of it being issued for a specific FQDN, wildcard certificates are used for a wide range of subdomains. For example, a wildcard certificate issued to *.phoenixnap.com could be used for a wide range of subdomains under the main www.phoenixnap.com domain, as seen in the image below.
SSL Certificate Validation Levels
CAs have diversified certificate validation levels in response to a growing demand for certificates. Some organizations use SSL just for encryption, while others want to show their customers that they are a trusted company. Different needs have resulted in different certificate validation levels.
Domain Validation (DV SSL)
This type of SSL certificate is ideal for securing blogs, social media apps, and personal websites. The certificate authority does not guarantee for an organization’s identity, and only domain ownership is verified.
Extended Validation (EV SSL)
The certificate authority verifies domain ownership and conducts a thorough investigation of the organization associated with the EV certificate. Strict rules are followed when reviewing an extended validation request, and the CA has to verify the following:
- The identity of the organization matches official records.
- The physical, legal and operation existence of the entity.
- The organization has exclusive rights to use the domain specified in the SSL certificate.
- The organization has appropriately authorized the issuance of the EV SSL certificate.
Create SSL Certificate
How to generate a certificate signing request solely depends on the platform you’re using and the particular tool of choice.
We will be generating a CSR using OpenSSL.
OpenSSL is a widely-used tool for working with CSR files and SSL certificates and is available for download on the official OpenSSL website. It is an open-source implementation tool for SSL/TLS and is used on about 65% of all active internet servers, making it the unofficial industry standard.
Debian and Ubuntu
dpkg -l |grep opensslIf the OpenSSL packet is installed, it will return the following result:
ii libgnutls-openssl27:amd64   2.12.23-12ubuntu2.4   amd64   GNU TLS library - OpenSSL wrapper

ii openssl   1.0.1f-1ubuntu2.16   amd64   Secure Sockets Layer toolkit - cryptographic utility
If you do not see such a result, run the following command to install OpenSSL:
apt-get install opensslRed Hat or CentOS
Red Hat (release 7.0 and later) should come with a preinstalled limited version of OpenSSL. It offers only limited support for IDEA, RC5, and MDC2, so you may want to install the missing features. To read more about this, see OpenSSL’s documentation.
To check whether OpenSSL is installed on a yum server (e.g., Red Hat or CentOS), run the following command:
rpm -qa | grep -i opensslThis command should return the following result:
openssl-1.0.1e-48.el6_8.1.x86_64
openssl-devel-1.0.1e-48.el6_8.1.x86_64
openssl-1.0.1e-48.el6_8.1.i686
If your output format differs, it means that OpenSSL is not installed on your server. Run the following command to install OpenSSL:
yum install openssl openssl-develWhat’s a Certificate Signing Request (CSR)?
A certificate signing request (CSR) contains the most vital information about your organization and domain.
Usually, you would generate a CSR and key pair locally on the server where the SSL certificate will be installed. However, that is not a strict rule. You can generate a CSR and key pair on one server and install the certificate on another. However, that makes things more complicated. We shall cover that scenario as well.
Note: A certificate signing request (CSR) is an encrypted block of text that includes your organization’s information, such as country, email address, fully qualified domain name, etc. It is sent to the Certificate Authority when applying for an SSL certificate.
Secure Socket Layer (SSL) uses two long strings of randomly generated numbers, which are known as private and public keys. A public key is available to the public domain as it is a part of your SSL certificate and is made known to your server.
The private key must correspond to the CSR it was generated with and, ultimately, it needs to match the certificate created from the CSR. If the private key is missing, it could mean that the SSL certificate is not installed on the same server which generated the Certificate Signing Request.
A CSR usually contains the following information:
| Parameter | Description | Example Value |
| Common Name or FQDN | FQDN is the fully qualified domain name of your website. It must be the same as what users type in the web browser. | www.phoenixnap.com |
| Organization Name (e.g., company) | The full legal name of your organization, including suffixes such as LLC, Corp, etc. | PhoenixNAP, LLC |
| Organizational Unit Name | The division in your organization that deals with this certificate. | NOC |
| Locality Name (e.g., city) | The city in which your organization is located. | Phoenix |
| State/Region/Province (full name) | The state or region in which your organization is located. | Arizona |
| Country Code (2 letter code) | The country in which your organization is located. Always entered as a two-letter ISO code. | U.S. |
| Email Address | Email address used to contact the site’s webmaster. | [email protected] |
| Public Key | An automatically-created key that’s generated with the CSR and goes into the certificate. | An encoded text block similar to the private key. See an example of a private key below. |
Please note there are certain naming conventions to be considered. Organization Name and Organizational Unit Name must not contain the following characters: < > ~ ! @ # $ % ^ * / ( ) ?.,&
How to Generate a CSR
Certificate signing requests (CSR) are generated with a pair of keys – a public and private key. Only the public key is sent to a Certificate Authority and included in the SSL certificate, and it works together with your private key to encrypt the connection. Anyone can have access to your public key, and it verifies that the SSL certificate is authentic.
A private key is a block of encoded text which, together with the certificate, verifies the secure connection between two machines. It must not be publicly accessed, and it shouldn’t be sent to the CA.
The integrity of a certificate relies on the fact that only you know the private key. If ever compromised or lost, re-key your certificate with a new private key as soon as possible. Most CAs do not charge you for this service.
Note: Most key pairs are 2048-bits. Even though 4096-bits key pairs are more secure, they slow down SSL handshakes and put a strain on server processors. Due to this, most websites still use 2048-bit key pairs.
Option 1: Generate a CSR
The first thing to do would be to generate a 2048-bit RSA key pair locally. This pair will contain both your private and public key. You can use Java key tool or some other tool, but we will be working with OpenSSL.
To generate a public and private key with a certificate signing request (CSR), run the following OpenSSL command:
openssl req -out certificatesigningrequest.csr -new -newkey rsa:2048 -nodes -keyout privatekey.keyOnce you have generated a CSR with a key pair, it is challenging to see what information it contains as it will not be in a human-readable format. You can easily decode the CSR on your server using the following OpenSSL command:
openssl req -in server.csr -noout -textIt is advised to decode the CSR and verify that it contains the right information about your organization before it’s sent off to a certificate authority. There are a lot of CSR decoders on the web that can help you do the same just by copy-pasting the content of your CSR file.
For your convenience, we have listed two (2) online CSR decoder tools:
- SSL Shopper
- Red Kestrel
Note: A certificate signing request generated with OpenSSL will always have the .csr file format.
Option 2: Generate a CSR for an Existing Private Key
It is recommended to issue a new private key whenever you are generating a CSR. If, for any reason, you need to generate a certificate signing request for an existing private key, use the following OpenSSL command:
openssl req -out CSR.csr -key privateKey.key -newOption 3: Generate a CSR for an Existing Certificate and Private Key
openssl x509 -x509toreq -in certificate.crt -out CSR.csr -signkey privateKey.keyOne unlikely scenario in which this may come in handy is if you need to renew your existing certificate, but neither you nor your certificate authority have the original CSR. This will extract information about your domain and organization from the SSL certificate and use it to create a new CSR, thus saving you time.
Option 4: Generate a Self-Signed Certificate
A self-signed certificate is usually used for test and development environments and on an intranet. Let’s generate a self-signed certificate using the following OpenSSL command:
openssl req -newkey rsa:2048 -nodes -keyout domain.key -x509 -days 365 -out domain.crtThe -days parameter is set to 365, meaning that the certificate is valid for the next 365 days. The -x509 parameter indicates that this will be a self-signed certificate. A temporary CSR is generated, and it is used only to gather the necessary information.
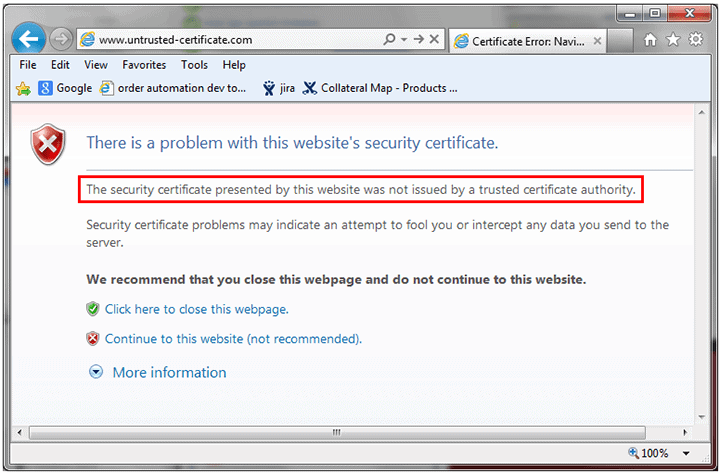
Certificate Authorities do not verify self-signed certificates. Thus, they are not as secure as verified certificates. If a CA has not signed the certificate, every major browser will display an «untrusted certificate» error message, like the one seen in the image below.
If you do not want to protect your private key with a password, you can add the -nodes parameter.
Option 5: Generate a Self-Signed Certificate from an Existing Private Key and CSR
If you already have a CSR and private and need to generate a self-signed certificate, use the following command:
openssl x509 -signkey domain.key -in domain.csr -req -days 365 -out domain.crtThe -days parameter is set to 365, meaning that the certificate is valid for the next 365 days.
How to Copy the Contents of a CSR File
Open the directory in which your CSR file is located. Type the following command:
sudo cat domain.csrReplace domain with the FQDN parameter of your CSR. This command will display the content of the CSR file. Copy all the content, starting from «BEGIN CERTIFICATE REQUEST» and ending with «END CERTIFICATE REQUEST».
Certificate Renewal – Don’t Reuse Old CSRs
Just because some web servers allow using old CSRs for certificate renewal doesn’t mean you should use them. As a security precaution, always generate a new CSR and private key when you are renewing a certificate. Clinging to the same private key is a road paved with security vulnerabilities.
Also, it is recommended to renew an SSL certificate before the expiration date. Otherwise, a new certificate purchase will be required.
How to Verify Your CSR, SSL Certificate, and Key
As we have already mentioned, it would be wise to check the information provided in the CSR before applying for a certificate. Use the following commands to verify your certificate signing request, SSL certificate, and key:
CSR
openssl req -text -noout -verify -in server.csrThis command will verify the CSR and display the data provided in the request.
Key
The following command will verify the key and its validity:
openssl rsa -in server.key -checkSSL Certificate
When you need to check a certificate, its expiration date and who signed it, use the following OpenSSL command:
openssl x509 -in server.crt -text -nooutPrivate Key
A private key is encoded and created in a Base-64 based PEM format which is not human-readable. You can open it with any text editor, but all you will see is a few dozen lines of what seem to be random symbols enclosed with opening and closing headings. See below an example of a private key:
-----BEGIN RSA PRIVATE KEY-----
MIICXAIBAAKBgQCVqGpH2S7F0CbEmQBgmbiDiOOGxhVwlG+yY/6OBQoPKcx4Jv2h
vLz7r54ngjaIqnqRNP7ljKjFLp5zhnAu9GsdwXbgLPtrmMSB+MVFHTJvKjQ+eY9p
dWA3NbQusM9uf8dArm+3VrZxNHQbVGXOIAPNHTO08cZHMSqIDQ6OvLma7wIDAQAB
AoGAbxKPzsNh826JV2A253svdnAibeSWBPgl7kBIrR8QWDCtkH9fvqpVmHa+6pO5
5bShQyQSCkxa9f2jnBorKK4+0K412TBM/SG6Zjw+DsZd6VuoZ7P027msTWQrMBxg
Hjgs7FSFtj76HQ0OZxFeZ8BkIYq0w+7VQYAPBWEPSqCRQAECQQDv09M4PyRVWSQM
S8Rmf/jBWmRnY1gPPEOZDOiSWJqIBZUBznvOPOOQSH6B+vee/q5edQA2OIaDgNmn
AurEtUaRAkEAn7/65w+Tewr89mOM0RKMVpFpwNfGYAj3kT1mFEYDq+iNWdcSE6xE
2H0w3YEbDsSayxc36efFnmr//4ljt4iJfwJAa1pOeicJhIracAaaa6dtGl/0AbOe
f3NibugwUxIGWkzlXmGnWbI3yyYoOta0cR9fvjhxV9QFomfTBcdwf40FgQJAH3MG
DBMO77w8DK2QfWBvbGN4NFTGYwWg52D1Bay68E759OPYVTMm4o/S3Oib0Q53gt/x
TAUq7IMYHtCHZwxkNQJBAORwE+6qVIv/ZSP2tHLYf8DGOhEBJtQcVjE7PfUjAbH5
lr++9qUfv0S13gXj5weio5dzgEXwWdX2YSL/asz5DhU=
-----END RSA PRIVATE KEY-----
In most cases, you won’t need to import the private key code into the server’s filesystem, as it will be created in the background while you generate the CSR and then saved onto the server automatically. During SSL certificate installation, the system fetches the key.
Verify Whether a Certificate and Private Key Match
To verify, you need to print out md5 checksums and compare them. Execute the following command:
openssl x509 -noout -modulus -in server.crt| openssl md5openssl rsa -noout -modulus -in server.key| openssl md5Troubleshooting SSL Issues
The System Doesn’t Fetch the Private Key Automatically
Some systems do not automate the procedure of fetching a private key. Furthermore, if you need to install an existing certificate on another server, you obviously cannot expect that it will fetch the private key. The main difficulty here is how to find the exact location of the key. How you can retrieve the key depends on the server OS in use and whether a command line interface or a web-hosting control panel of a particular type was used for CSR generation.
I Need to Locate My Previously Installed Private Key
If the case is that your certificate has already been installed, follow the steps below which will help you locate your private key on popular operating systems.
Nginx
You should be able to find the location of your server’s private key in your domain’s virtual host file.
Navigate to the site’s root server location (usually, it’s /var/www/directory) and open the site’s main configuration file. Look for the ssl_certificate_key directive that will supply the file path of the private key.
If you cannot find the ssl_certificate_key directive, it might be that there’s a separate configuration file for SSL details. Look for something descriptive, such as ssl.conf.
Apache
When using the OpenSSL library on Apache, the private key is saved to /usr/local/ssl by default. Run openssl version -a, a OpenSSL command which identifies which version of OpenSSL you’re running.
The output will display the directory which holds the private key. See the example output below:
OpenSSL 1.0.2g  1 Dec 2016

built on: reproducible build, date unspecified

platform: debian-amd64

options: bn(64,64) rc4(16x,int) des(idx,cisc,16,int) blowfish(idx)

compiler: cc -I. -I.. -I../include -fPIC -DOPENSSL_PIC -DOPENSSL_THREADS -

D_REENTRANT -DDSO_DLFCN -DHAVE_DLFCN_H -m64 -DL_ENDIAN -g -O2 -fstack-protector-

strong -Wformat -Werror=format-security -Wdate-time -D_FORTIFY_SOURCE=2 -Wl,-

Bsymbolic-functions -Wl,-z,relro -Wa,--noexecstack -Wall -DMD32_REG_T=int -

DOPENSSL_IA32_SSE2 -DOPENSSL_BN_ASM_MONT -DOPENSSL_BN_ASM_MONT5 -

DOPENSSL_BN_ASM_GF2m -DSHA1_ASM -DSHA256_ASM -DSHA512_ASM -DMD5_ASM -DAES_ASM -

DVPAES_ASM -DBSAES_ASM -DWHIRLPOOL_ASM -DGHASH_ASM -DECP_NISTZ256_ASM

OPENSSLDIR: "/usr/lib/ssl"
The last line OPENSSLDIR defines the file path. In the example provided, it is the default location /usr/lib/ssl.
If you didn’t generate the CSR with OpenSSL, you need to find and access your main Apache configuration file, which is apache2.conf or httpd.conf. The SSLCertficateKeyFile directive will specify the file path of the private key.
Windows (IIS)
On servers running Windows Internet Information Services, the operating system saves the private key in a hidden folder, much like any regular Windows OS stores critical system data.
However, by exporting a .pfx file, you can fetch the private key and certificate(s). To do so follow the steps below:
- Open the Microsoft Management Console (MMC).
- Located under Console Root, expand the Certificates (Local Computer) tree.
- Your certificate is either located in the Personal or Web Hosting folder. Find the certificate you are looking for. You can identify each certificate by its Common Name (Domain).
- Right-click the certificate you wish to export, and then select All Tasks > Export.
- Follow the guided wizard to export the .pfx file.
You have what you need if you want to save a backup or install the certificate on another Windows server.
If you need to install the certificate on another server that’s not running Windows (e.g., Apache) you need to convert the .pfx file and separate the .key and .crt/.cer files. You can do so with OpenSSL.
How to Move an SSL Certificate from a Windows Server to Non-Windows server?
In order to move a certificate from a Windows server to a non-Windows server, you need to extract the private key from a .pfx file using OpenSSL.
- After you have downloaded the .pfx file as described in the section above, run the following OpenSSL command to extract the private key from the file:
openssl pkcs12 -in mypfxfile.pfx -out privatekey.txt -nodesWhere mypfxfile.pfx is your Windows server certificates backup.
- This command will create a privatekey.txt output file. Use a text editor to open the file, and you will see the private key at the top of the list in the standard format:
-----BEGIN RSA PRIVATE KEY-----
(Encrypted Text Block)
-----END RSA PRIVATE KEY------ Copy the private key, including the «BEGIN» and «END» tags, and paste it into a new text file. Save the text file as Your_Domain_Name.key.
I Can’t Find My Private Key
If you can’t find the private key, look for clues. One thing to note is whether the server is providing a working HTTPS connection. If that is the case, then the private key is accessible to the server and is most likely somewhere on the server.
The logical step would be to search for a .key file. In some cases, OpenSSL stores the .key file to the same directory from where the OpenSSL -req command was run.
If you tried everything and still can’t find the .key file, there is a slight possibility that the key is lost. Don’t panic, the smart thing to do would be to generate a new CSR and reissue the certificate. Make sure to remember the location of the private key this time.
OpenSSL Commands for Converting CSRs
If you are working with Apache servers, certificate signing requests (CSRs) and keys are stored in PEM format. But what if you want to transfer CSRs to a Tomcat or Windows IIS server? Well, you would have to convert a standard PEM file to a PFX file. The following commands will help you do exactly that.
Note: Use the -nodes parameter when you don’t want to encrypt the .key file. If you do not use this parameter, you will need to provide a password.
Convert a PEM CSR and private key to PKCS12 (.pfx .p12)
FKCS12 files are used to export/import certificates in Windows IIS.
openssl pkcs12 -inkey domain.key -in domain.crt -export -out domain.pfxThis will take the private key and the CSR and convert it into a single .pfx file. You can set up an export passphrase, but you can leave that blank. Please note that by joining certificate character strings end-to-end in a single PEM file, you can export a chain of certificates to a .pfx file format.
Convert a PKCS12 to PEM CSR
openssl pkcs12 -in domain.pfx -nodes -out domain.combined.crtIf the .pfx file contains a chain of certificates, the .crt PEM file will have multiple items as well.
Convert PEM to DER
DER is a binary format usually used with Java. To convert an ASCII PEM file to DER, use the following OpenSSL command:
openssl x509 -in domain.crt -outform der -out domain.derConvert DER to PEM
If you need to convert a .der file to PEM, use the following OpenSSL command:
openssl x509 -inform der -in domain.der -out domain.crtEncrypt an Unencrypted Private Key
The following OpenSSL command will take an unencrypted private key and encrypt it with the passphrase you define.
openssl rsa -des3 -in unencrypted.key -out encrypted.keyDefine the passphrase to encrypt the private key.
Decrypt an Encrypted Private Key
The following OpenSSL command will take an encrypted private key and decrypt it.
openssl rsa -in encrypted.key -out decrypted.keyWhen prompted, enter the passphrase to decrypt the private key.
Conclusion
After this tutorial guide should know how to generate a certificate signing request using OpenSSL, as well as troubleshoot most common errors.
Make sure to verify each certificate authority and the types of certificates available to make an educated purchase.
Use a command-line tool or third-party software
by Tashreef Shareef
Tashreef Shareef is a software developer turned tech writer. He discovered his interest in technology after reading a tech magazine accidentally. Now he writes about everything tech from… read more
Updated on October 5, 2022
Reviewed by
Vlad Turiceanu

Passionate about technology, Windows, and everything that has a power button, he spent most of his time developing new skills and learning more about the tech world. Coming… read more
- The process of adding an SSL certificate to your website is pretty straightforward, and this guide will help.
- We also discuss the 3 most efficient ways to either purchase an SSL certificate, use an open-source SSL, or create your own.
- One of the best ways to generate a self-signed certificate in Windows 10 is to do so via a command line.

XINSTALL BY CLICKING THE DOWNLOAD FILE
This software will keep your drivers up and running, thus keeping you safe from common computer errors and hardware failure. Check all your drivers now in 3 easy steps:
- Download DriverFix (verified download file).
- Click Start Scan to find all problematic drivers.
- Click Update Drivers to get new versions and avoid system malfunctionings.
- DriverFix has been downloaded by 0 readers this month.
Adding an SSL certificate to your website is a straightforward process. You can either purchase a third-party SSL certificate and renew it on a yearly basis or use an open-source SSL certificate and create a corn job to renew it every month.
However, for development and testing, you can explore the possibility of creating a self-signed SSL certificate in Windows.
Creating a self-signed certificate is an excellent alternative to purchasing and renewing a yearly certification for testing purposes. You can make use of OpenSSL to generate a self-signed certificate for this purpose.
In this article, we explore how to create a self-signed certificate in Windows 10. The later part of the article also explores how to deploy the self-signed certificate to client machines.
Quick Tip:
Although you can save some money if you create a self-signed certificate, it may lead to a permanent block of your website for some users. This is caused by the certificate error message and in most cases cannot be undone.
Besides that, the process is time-consuming and really not worth your time which also has a certain cost. We strongly recommend using a 3rd party SSL service provider.

GoDaddy SSL Certificates
GoDaddy is one of the best web hosting providers that also offers affordable SSL certificates.
How can I generate a self-signed certificate in Windows 10?
1. Use OpenSSL to create a self-signed certificate
1.1 Install OpenSSL

- Download the latest OpenSSL windows installer from a third-party source.
- Run the installer. OpenSSL requires Microsoft Visual C++ to run. The installer will prompt you to install Visual C++ if it is already not installed.
- Click Yes to install.
- Run the OpenSSL installer again and select the installation directory.
- Click Next.
- Open a command prompt and type OpenSSL to get OpenSSL prompt.
1.2 Create a public/private key file pair
- Make sure you have OpenSSL installed.
- Open Command Prompt and create a new directory on your C drive:
C: >cd Test - Now go to the new directory:
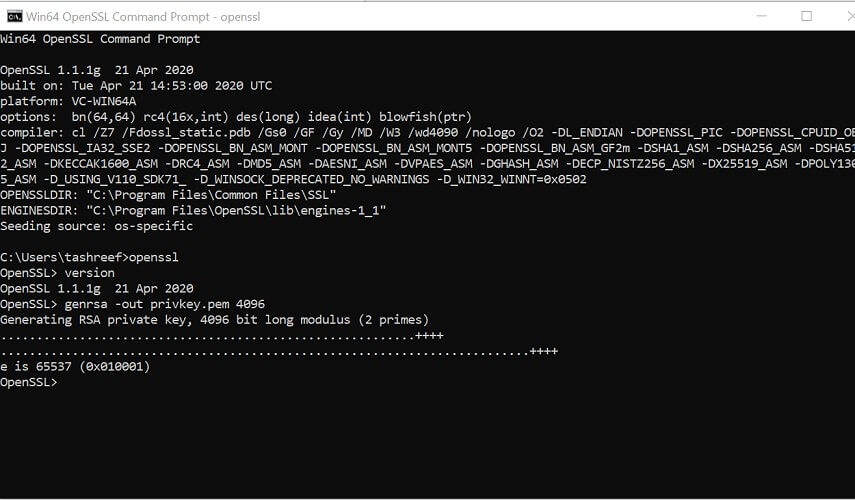
C: Test> - Now you need to type the path of the OpenSSL install directory followed by the RSA key algorithm.
C: Test>c:opensslbinopenssl genrsa -out privkey.pem 4096 - Run the following command to split the generated file into separate private and public key files:
C: Test>c:opensslbinopenssl ssh-keygen -t rsa -b 4096 -f privkey.pem
Once you have the public/private key generated, follow the next set of steps to create a self-signed certificate file on a Windows system.
1.3 Generate a self-signed certificate
- Open a Command Prompt window.
- Go to the directory that you created earlier for the public/private key file.
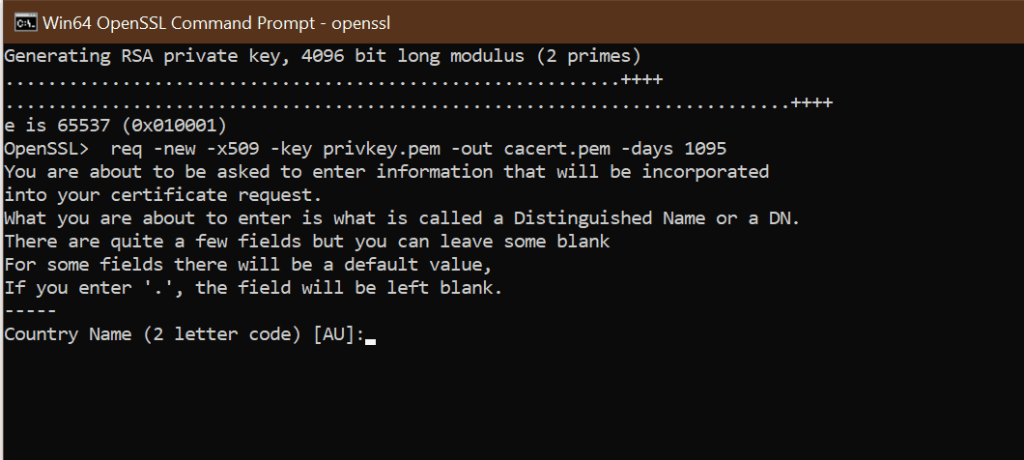
C: Test> - Enter the path of the OpenSSL install directory, followed by the self-signed certificate algorithm:
C: Test>c:opensslbinopenssl req -new -x509 -key privkey.pem -out cacert.pem -days 1095
- Follow the on-screen instruction.
- You need to enter information about your organization, region, and contact details to create a self-signed certificate.
If you would rather use PowerShell to create a self-signed certificate, follow the next set of steps instead.
2. Generate a Self-Signed Certificate on Windows using PowerShell
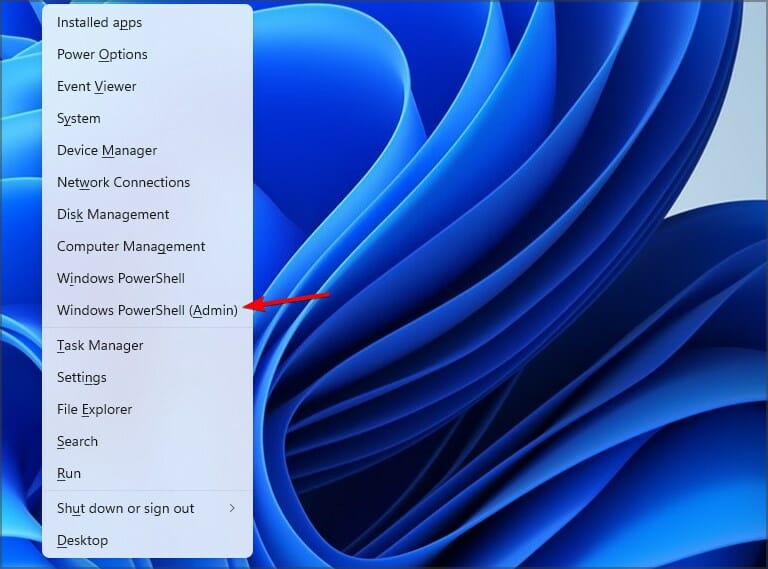
1. Press the Windows key, and type Powershell in the search box. Right-click on the PowerShell app and select Run as Administrator.
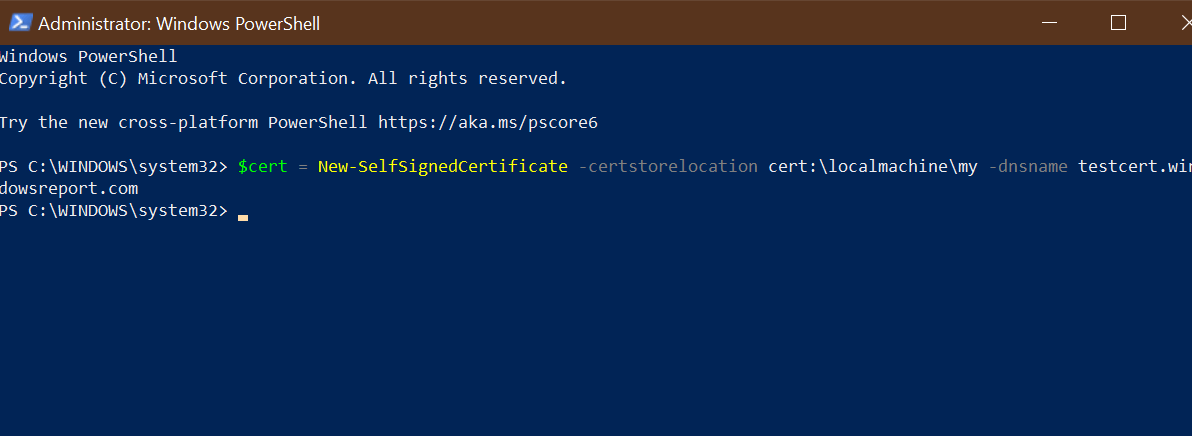
2. Run the New-SelfsignedCertificate command, as shown below:$cert = New-SelfSignedCertificate -certstorelocation cert:localmachinemy -dnsname testcert.windowsreport.com
Some PC issues are hard to tackle, especially when it comes to corrupted repositories or missing Windows files. If you are having troubles fixing an error, your system may be partially broken.
We recommend installing Restoro, a tool that will scan your machine and identify what the fault is.
Click here to download and start repairing.
3. This will add the certificate to the locater store on your PC. Replace testcert.windowsreport.com with your domain name in the above command.
4. Next, create a password for your export file:$pwd = ConvertTo-SecureString -String ‘password!’ -Force -AsPlainText
5. Replace Password with your own password.
6. Enter the following command to export the self-signed certificate:$path = 'cert:localMachinemy' + $cert.thumbprint Export-PfxCertificate -cert $path -FilePath c:tempcert.pfx -Password $pwd
7. In the above command replace c:temp with the directory where you want to export the file.
8. You can import the exported file and deploy it for your project.
Another great option to generate a self-signed certificate on Windows 10 is to use a command-line tool such as Powershell.
With it, you don’t need to download any third-party software. You just need to input the appropriate command line in Powershell, and the tool will do the job for you.
How to add my self-signed certificate into the curls ca file on Windows 10?

- Once you have created a self-signed certificate and installed it, you may want cURL to trust the certificate as well.
- The later versions of cURL don’t include a trusted listed a .pem file. You can download the .pem file and type the following command in the php.ini file.
curl.cainfo = "C:xamppphpcacert.pem" - Once done, you need to get cURL to trust your self-signed certificate. To do this, open your server.crt file. The file is created when you created your self-signed certificate.
- Copy all the content of the server.crt file and then add it to the cacert.pem file.
Creating a self-signed certificate using OpenSSL can be done using the Command Prompt or PowerShell. Being able to create your self-signed certificate allows you to create a temporary certificate for in-development projects that require an SSL certificate.
We hope you managed to generate a self-signed certificate on your Windows 10 PC. Let us know in the comments section which method you prefer to use.
Still having issues? Fix them with this tool:
SPONSORED
If the advices above haven’t solved your issue, your PC may experience deeper Windows problems. We recommend downloading this PC Repair tool (rated Great on TrustPilot.com) to easily address them. After installation, simply click the Start Scan button and then press on Repair All.
![]()
Newsletter
Learn how to use the most common OpenSSL commands
OpenSSL is an open-source command line tool that is commonly used to generate private keys, create CSRs, install your SSL/TLS certificate, and identify certificate information. We designed this quick reference guide to help you understand the most common OpenSSL commands and how to use them.
This guide is not meant to be comprehensive. If you’re looking for a more in-depth and comprehensive look at OpenSSL, we recommend you check out the OpenSSL Cookbook by Ivan Ristić.
Guide Notes: Ubuntu 16.04.3 LTS was the system used to write this guide.
Some command examples use a ‘‘ (backslash) to create a line break to make them easier to understand.
If you don’t have the time to get into the nitty-gritty of OpenSSL commands and CSR generation, or you want to save some time, check out our OpenSSL CSR Wizard.
Checking Your OpenSSL Version
Identifying which version of OpenSSL you are using is an important first step when preparing to generate a private key or CSR. Your version of OpenSSL dictates which cryptographic algorithms can be used when generating keys as well as which protocols are supported. For example, OpenSSL version 1.0.1 was the first version to support TLS 1.1 and TLS 1.2. Knowing which version of OpenSSL you are using is also important when getting help troubleshooting problems you may run into.
Use the following command to identify which version of OpenSSL you are running:
openssl version -a
In this command, the -a switch displays complete version information, including:
- The version number and version release date (OpenSSL 1.0.2g 1 Mar 2016).
- The options that were built with the library (options).
- The directory where certificates and private keys are stored (OPENSSLDIR).
Using the openssl version -a command, the following output was generated:
OpenSSL 1.0.2g  1 Mar 2016
built on: reproducible build, date unspecified
platform: debian-amd64
options:  bn(64,64) rc4(16x,int) des(idx,cisc,16,int) blowfish(idx)
compiler: cc -I. -I.. -I../include  -fPIC -DOPENSSL_PIC -DOPENSSL_THREADS -
D_REENTRANT -DDSO_DLFCN -DHAVE_DLFCN_H -m64 -DL_ENDIAN -g -O2 -fstack-protector-
strong -Wformat -Werror=format-security -Wdate-time -D_FORTIFY_SOURCE=2 -Wl,-
Bsymbolic-functions -Wl,-z,relro -Wa,--noexecstack -Wall -DMD32_REG_T=int -
DOPENSSL_IA32_SSE2 -DOPENSSL_BN_ASM_MONT -DOPENSSL_BN_ASM_MONT5 -
DOPENSSL_BN_ASM_GF2m -DSHA1_ASM -DSHA256_ASM -DSHA512_ASM -DMD5_ASM -DAES_ASM -
DVPAES_ASM -DBSAES_ASM -DWHIRLPOOL_ASM -DGHASH_ASM -DECP_NISTZ256_ASM
OPENSSLDIR: "/usr/lib/ssl"
OpenSSL and CSR Creation
The first step to obtaining an SSL certificate is using OpenSSL to create a certificate signing request (CSR) that can be sent to a Certificate Authority (CA) (e.g., DigiCert). The CSR contains the common name(s) you want your certificate to secure, information about your company, and your public key. In order for a CSR to be created, it needs to have a private key from which the public key is extracted. This can be done by using an existing private key or generating a new private key.
Security Note: Because of the security issues associated with using an existing private key, and because it’s very easy and entirely free to create a private key, we recommend you generate a brand new private key whenever you create a CSR.
Deciding on Key Generation Options
When generating a key, you have to decide three things: the key algorithm, the key size, and whether to use a passphrase.
Key Algorithm
For the key algorithm, you need to take into account its compatibility. For this reason, we recommend you use RSA. However, if you have a specific need to use another algorithm (such as ECDSA), you can use that too, but be aware of the compatibility issues you might run into.
Note: This guide only covers generating keys using the RSA algorithm.
Key Size
For the key size, you need to select a bit length of at least 2048 when using RSA and 256 when using ECDSA; these are the smallest key sizes allowed for SSL certificates. Unless you need to use a larger key size, we recommend sticking with 2048 with RSA and 256 with ECDSA.
Note: In older versions of OpenSSL, if no key size is specified, the default key size of 512 is used. Any key size lower than 2048 is considered unsecure and should never be used.
Passphrase
For the passphrase, you need to decide whether you want to use one. If used, the private key will be encrypted using the specified encryption method, and it will be impossible to use without the passphrase. Because there are pros and cons with both options, it’s important you understand the implications of using or not using a passphrase. In this guide, we will not be using a passphrase in our examples.
Generating Your Private Key
After deciding on a key algorithm, key size, and whether to use a passphrase, you are ready to generate your private key.
Use the following command to generate your private key using the RSA algorithm:
openssl genrsa -out yourdomain.key 2048
This command generates a private key in your current directory named yourdomain.key (-out yourdomain.key) using the RSA algorithm (genrsa) with a key length of 2048 bits (2048). The generated key is created using the OpenSSL format called PEM.
Use the following command to view the raw, encoded contents (PEM format) of the private key:
cat yourdomain.key
Even though the contents of the file might look like a random chunk of text, it actually contains important information about the key.
Use the following command to decode the private key and view its contents:
openssl rsa -text -in yourdomain.key -noout
The -noout switch omits the output of the encoded version of the private key.
Extracting Your Public Key
The private key file contains both the private key and the public key. You can extract your public key from your private key file if needed.
Use the following command to extract your public key:
openssl rsa -in yourdomain.key -pubout -out yourdomain_public.key
Creating Your CSR
After generating your private key, you are ready to create your CSR. The CSR is created using the PEM format and contains the public key portion of the private key as well as information about you (or your company).
Use the following command to create a CSR using your newly generated private key:
openssl req -new -key yourdomain.key -out yourdomain.csr
After entering the command, you will be asked series of questions. Your answers to these questions will be embedded in the CSR. Answer the questions as described below:
| Country Name (2 letter code) | The two-letter country code where your company is legally located. |
| State or Province Name (full name) | The state/province where your company is legally located. |
| Locality Name (e.g., city) | The city where your company is legally located. |
| Organization Name (e.g., company) | Your company’s legally registered name (e.g., YourCompany, Inc.). |
| Organizational Unit Name (e.g., section) | The name of your department within the organization. (You can leave this option blank; simply press Enter.) |
| Common Name (e.g., server FQDN) | The fully-qualified domain name (FQDN) (e.g., www.example.com). |
| Email Address | Your email address. (You can leave this option blank; simply press Enter.) |
| A challenge password | Leave this option blank (simply press Enter). |
| An optional company name | Leave this option blank (simply press Enter). |
Some of the above CSR questions have default values that will be used if you leave the answer blank and press Enter. These default values are pulled from the OpenSSL configuration file located in the OPENSSLDIR (see Checking Your OpenSSL Version). If you want to leave a question blank without using the default value, type a «.» (period) and press Enter.
Using the -subj Switch
Another option when creating a CSR is to provide all the necessary information within the command itself by using the -subj switch.
Use the following command to disable question prompts when generating a CSR:
openssl req -new -key yourdomain.key -out yourdomain.csr
-subj "/C=US/ST=Utah/L=Lehi/O=Your Company, Inc./OU=IT/CN=yourdomain.com"
This command uses your private key file (-key yourdomain.key) to create a new CSR (-out yourdomain.csr) and disables question prompts by providing the CSR information (-subj).
Creating Your CSR with One Command
Instead of generating a private key and then creating a CSR in two separate steps, you can actually perform both tasks at once.
Use the following command to create both the private key and CSR:
openssl req -new
-newkey rsa:2048 -nodes -keyout yourdomain.key
-out yourdomain.csr
-subj "/C=US/ST=Utah/L=Lehi/O=Your Company, Inc./OU=IT/CN=yourdomain.com"
This command generates a new private key (-newkey) using the RSA algorithm with a 2048-bit key length (rsa:2048) without using a passphrase (-nodes) and then creates the key file with a name of yourdomain.key (-keyout yourdomain.key).
The command then generates the CSR with a filename of yourdomain.csr (-out yourdomain.csr) and the information for the CSR is supplied (-subj).
Note: While it is possible to add a subject alternative name (SAN) to a CSR using OpenSSL, the process is a bit complicated and involved. If you do need to add a SAN to your certificate, this can easily be done by adding them to the order form when purchasing your DigiCert certificate.
Verifying CSR Information
After creating your CSR using your private key, we recommend verifying that the information contained in the CSR is correct and that the file hasn’t been modified or corrupted.
Use the following command to view the information in your CSR before submitting it to a CA (e.g., DigiCert):
openssl req -text -in yourdomain.csr -noout -verify
The -noout switch omits the output of the encoded version of the CSR. The -verify switch checks the signature of the file to make sure it hasn’t been modified.
Running this command provides you with the following output:
verify OK
Certificate Request:
    Data:
        Version: 0 (0x0)
        Subject: C=US, ST=Utah, L=Lehi, O=Your Company, Inc., OU=IT, CN=yourdomain.com
        Subject Public Key Info:
            Public Key Algorithm: rsaEncryption
                Public-Key: (2048 bit)
                Modulus:
                    00:bb:31:71:40:81:2c:8e:fb:89:25:7c:0e:cb:76:
                    [...17 lines removed]
                Exponent: 65537 (0x10001)
        Attributes:
            a0:00
    Signature Algorithm: sha256WithRSAEncryption
         0b:9b:23:b5:1f:8d:c9:cd:59:bf:b7:e5:11:ab:f0:e8:b9:f6:
         [...14 lines removed]
On the first line of the above output, you can see that the CSR was verified (verify OK). On the fourth line, the Subject: field contains the information you provided when you created the CSR. Make sure this information is correct.
If any of the information is wrong, you will need to create an entirely new CSR to fix the errors. This is because CSR files are digitally signed, meaning if even a single character is changed in the file it will be rejected by the CA.
Sending the CSR to the CA
When you are ready to send the CSR to the CA (e.g., DigiCert), you need to do so using the PEM format—the raw, encoded text of the CSR that you see when opening it in a text editor.
Use the following command to view the raw output of the CSR:
cat yourdomain.csr
You must copy the entire contents of the output (including the ——BEGIN CERTIFICATE REQUEST—— and ——END CERTIFICATE REQUEST—— lines) and paste it into your DigiCert order form.
Viewing Certificate Information
After receiving your certificate from the CA (e.g., DigiCert), we recommend making sure the information in the certificate is correct and matches your private key. You do this by using the x509 command.
Use the following command to view the contents of your certificate:
openssl x509 -text -in yourdomain.crt -noout
Verifying Your Keys Match
To verify the public and private keys match, extract the public key from each file and generate a hash output for it. All three files should share the same public key and the same hash value.
Use the following commands to generate a hash of each file’s public key:
openssl pkey -pubout -in .private.key | openssl sha256
openssl req -pubkey -in .request.csr -noout | openssl sha256
openssl x509 -pubkey -in .certificate.crt -noout | openssl sha256
Note: The above commands should be entered one by one to generate three separate outputs.
Each command will output (stdin)= followed by a string of characters. If the output of each command matches, then the keys for each file are the same. However, if there is any mismatch, then the keys are not the same and the certificate cannot be installed.
Key mismatch errors are typically caused by installing a certificate on a machine different from the one used to generate the CSR. If you run into a key mismatch error, you need to do one of the following:
- Transfer the private key from the machine used to generate the CSR to the one you are trying to install the certificate on.
- Install the certificate on the machine with the private key.
- Generate an entirely new key and create a new CSR on the machine that will use the certificate.
Converting Certificate Formats
By default, OpenSSL generates keys and CSRs using the PEM format. However, there might be occasions where you need to convert your key or certificate into a different format in order to export it to another system.
PEM to PKCS#12
The PKCS#12 format is an archival file that stores both the certificate and the private key. This format is useful for migrating certificates and keys from one system to another as it contains all the necessary files. PKCS#12 files use either the .pfx or .p12 file extension.
Use the following command to convert your PEM key and certificate into the PKCS#12 format (i.e., a single .pfx file):
openssl pkcs12 -export -name "yourdomain-digicert-(expiration date)"
-out yourdomain.pfx -inkey yourdomain.key -in yourdomain.crt
Note: After you enter the command, you will be asked to provide a password to encrypt the file. Because the PKCS#12 format is often used for system migration, we recommend encrypting the file using a very strong password.
This command combines your private key (-inkey yourdomain.key) and your certificate (-in yourdomain.crt) into a single .pfx file (-out yourdomain.pfx) with a friendly name (-name «yourdomain-digicert-(expiration date)»), where the expiration date is the date that the certificate expires.
PKCS#12 to PEM
Because the PKCS#12 format contains both the certificate and private key, you need to use two separate commands to convert a .pfx file back into the PEM format.
Use the following command to extract the private key from a PKCS#12 (.pfx) file and convert it into a PEM encoded private key:
openssl pkcs12 -in yourdomain.pfx -nocerts -out yourdomain.key -nodes
Use the following command to extract the certificate from a PKCS#12 (.pfx) file and convert it into a PEM encoded certificate:
openssl pkcs12 -in yourdomain.pfx -nokeys -clcerts -out yourdomain.crt
Note: You will need to provide the password used to encrypt the .pfx file in order to convert the key and certificate into the PEM format.
PEM to DER
The DER format uses ASN.1 encoding to store certificate or key information. Similar to the PEM format, DER stores key and certificate information in two separate files and typically uses the same file extensions (i.e., .key, .crt, and .csr). The file extension .der was used in the below examples for clarity.
Use the following command to convert a PEM encoded certificate into a DER encoded certificate:
openssl x509 -inform PEM -in yourdomain.crt -outform DER -out yourdomain.der
Use the following command to convert a PEM encoded private key into a DER encoded private key:
openssl rsa -inform PEM -in yourdomain.key -outform DER -out yourdomain_key.der
DER to PEM
Use the following command to convert a DER encoded certificate into a PEM encoded certificate:
openssl x509 -inform DER -in yourdomain.der -outform PEM -out yourdomain.crt
Use the following command to convert a DER encoded private key into a PEM encoded private key:
openssl rsa -inform DER -in yourdomain_key.der -outform PEM -out yourdomain.key
Generating SSL certificates can be a daunting task, one filled with frustration and sorrow. But it doesn’t have to be that way! If you have Windows 10 and OpenSSL along with a little help from this tutorial, you will be well on your way.
Not a reader? Watch this related video tutorial!
Not seeing the video? Make sure your ad blocker is disabled.
In this article, you’re going to learn how to install OpenSSL on Windows 10. Once installed, you’ll then generate SSL certificates, troubleshoot and debug certificates, and convert between formats.
Let’s begin mastering OpenSSL on Windows 10 with PowerShell!
Related: Managing Certs with Windows Certificate Manager and PowerShell
Prerequisites
In this article, you are going to learn using a hands-on approach. While OpenSSL historically is a Linux OS utility, you can use it with Windows OS as well.
- A Windows system with Local Administrator rights – The tutorial will be using Windows 10
- Windows PowerShell 5.1 (comes with Windows) or PowerShell 7
- Chocolatey – A package manager for Windows installed.
- PowerShell ISE, Visual Studio Code or any text editor of your choice
All screenshots in this guide were taken from Windows 10 build 1909 and PowerShell 7.
Installing OpenSSL on Windows 10 with PowerShell and Chocolatey
Assuming you have installed Chocolatey using the installation instructions, your first task is to install OpenSSL on Windows 10. To do this, open up your PowerShell console and run choco install OpenSSL.Lightas shown below.

That’s it! You’ve now installed OpenSSL with PowerShell.
Set up a Working Directory
This tutorial will be creating a few certificates to learn from. To ensure all of the work you do here is confined to a single folder you can clean up later, go ahead and create one.
This tutorial will store all certificates and related files in the C:certs folder. You can create a folder with PowerShell by running the below command.
New-Item -ItemType Directory -Path C:certsNow it’s time to configure OpenSSL.
Configuring OpenSSL
By default, OpenSSL on Windows 10 does not come with a configuration file. This is intentional because there are a lot of configuration options that you can customize. For the purposes of this guide, you are going to use a sample configuration that you can customize later to best suit your security requirements.
Open up PowerShell and run the below command. This command downloads a sample configuration file from MIT and saves it as openssl.cnf in the current working directory.
You can now open up the openssl.cnf file and you should see something that looks like below.
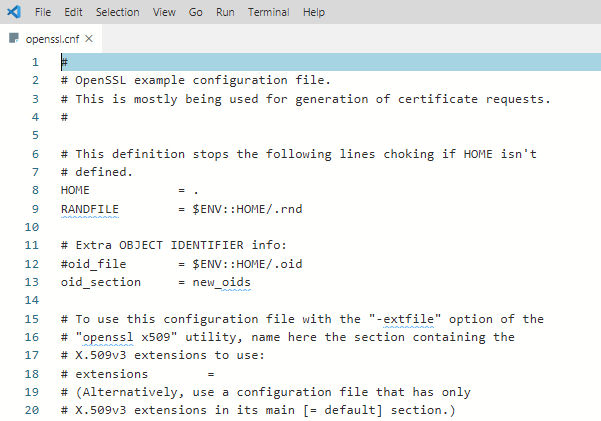
The downloaded configuration will work as-is for now. Do not use the defaults in a production environment!
Update PowerShell Profile Environment Variables
To make things go smoothly, you should modify your PowerShell profile on Windows 10. Setting up some environment variables allows you to easily switch between different versions of OpenSSL that you may have installed.
I suggest adding two environment variables to your PowerShell profile called path and OPENSSL_CONF. You will update the PATH environment variable to ensure you can run the openssl binary in any location while on the command line.
Below you’ll see a way to create a PowerShell profile if you don’t already have one. This command appends the OpenSSL binary path to your PATH and assign the configuration file path to OPENSSL_CONF.
# Add environment variables to PowerShell profile
# Test for a profile, if not found create one!
if (-not (Test-Path $profile) ) {
    New-Item -Path $profile -ItemType File -Force
}

# Edit profile to add these lines
'$env:path = "$env:path;C:Program FilesOpenSSLbin"' | Out-File $profile -Append
'$env:OPENSSL_CONF = "C:certsopenssl.cnf"' | Out-File $profile -Append
To use the environment variables, reload your profile typing . $profile or just close and reopen PowerShell.
Now you can easily invoke the openssl binary wherever you are in PowerShell as shown below.
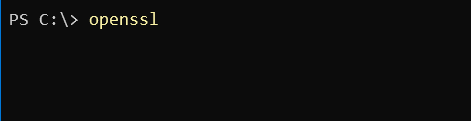
Using OpenSSL on Windows 10 to Generate a CSR & Private Key
Before you can create an SSL certificate, you must generate a certifiate-signing request (CSR). A CSR is an encoded file that provides you with a way to share your public key with a certificate authority (CA). This file contains identifying information, a signature algorithm, and a digital signature. Let’s create your first CSR and private key.
Related: Your Guide to X509 Certificates for Mortals
To create a CSR, run the below command. OpenSSL will then prompt you to enter some identifying information as you can see in the following demonstration.
openssl req -new -out MyFirst.csr
Once complete, you will have a valid CSR and private key which can be used to issue an SSL certificate to you.
The configuration file defaults can be edited further to streamline this process should you not want to enter data every time you generate a CSR.
You can read more about the available CSR options and view sample configurations in the man pages. OpenSSL also has an active GitHub repository with examples too.
Generating RSA Key Pairs
You can also create RSA key pairs (public/private) with OpenSSL. To do so, first, create a private key using the genrsa sub-command as shown below.
When you run the command below, OpenSSL on Windows 10 will generate a RSA private key with a key length of 2048 bits. This key is generated almost immediately on modern hardware. The resulting key is output in the working directory
# generate a private key using maximum key size of 2048
# key sizes can be 512, 758, 1024, 1536 or 2048.
openssl genrsa -out rsa.private 2048
Next, generate a public key using the private key that you just created using the rsa sub-command. The syntax below will create a public key called rsa.public in the working directory from the rsa.private private key.
# generate a public key using the private key
openssl rsa -in rsa.private -out rsa.public -pubout -outform PEM
Generating a Self-Signed Certificate
On occasion you may need to generate a self-signed certificate. Self-signed certificates are fine to use for lab use but not a secure practice to use in a production environment.
Let’s create a self-signed certificate before moving onto the next task. To do so, enter the command below to create an X509 SSL certificate. This certificate will use SHA256 cryptography that will be valid for 365 days using an RSA key length of 2048 bits. The certificate will be saved to the working directory.
openssl req -x509 -sha256 -nodes -days 365 -newkey rsa:2048 -keyout privateKey.key -out certificate.crtYou are now ready to import the certificate into a browser or server.
Validating CSRs, Certificates, and Keys with OpenSSL
Checking the information in a CSR, private key, certificate, or PKCS#12 can save you time troubleshooting SSL errors. Sometimes a wrong key may have been used to create a certificate, for example. You may have the wrong identifying information in the certificate.
Let’s start by checking a CSR using the req command and some parameters:
openssl req -text -noout -verify -in .MyFirst.csr
Details such as country name, organizational name, and the email address you entered when creating the CSR at the beginning of this guide, should match precisely.
You can also check a certificate using the x509 sub-command with a couple of parameters:
openssl x509 -in .certificate.crt -text -noout | more
Converting Certificates with OpenSSL
There are occasions where an application does not use a particular certificate format. You can run into this issue with an application called HAproxy, for example that requires a PEM certificate when you may have a DER-formatted certificate (.crt .cer .der).
To demonstrate converting a certificate, let’s convert the self-signed certificate created earlier in a DER format (certificate.crt) to PEM. Use the code in the following code snippet to do so.
This command below uses the x509 sub-command with the parameter of -inform which should match the format of the -in file followed by the -out format.
openssl x509 -inform der -in .certificate.crt -out .certificate.pemYou can also reverse the order if you’d like to the DER format from PEM too as shown below.
openssl x509 -outform der -in .certificate.pem -out .certificate.derAnd last but not least, you can convert PKCS#12 to PEM and PEM to PKCS#12. This is a file type that contain private keys and certificates. To convert to PEM format, use the pkcs12 sub-command.
openssl pkcs12 -in .SomeKeyStore.pfx -out .SomeKeyStore.pem -nodesYou can convert a PEM certificate and private key to PKCS#12 format as well using -export with a few additional options. Below you are exporting a PKCS#12 formatted certificate using your private key by using SomeCertificate.crt as the input source. Using the -certfile option value MyCACert.crt allows you to validate SomeCertificate.crt.
openssl pkcs12 -export -out SomeCertificate.pfx -inkey SomePrivateKey.key -in SomeCertificate.crt -certfile MyCACert.crtTroubleshooting & Debugging
Now that you can create & convert CSR’s, certificates, and key pairs, it’s time to learn how to troubleshoot and debug them. OpenSSL comes with commands that make it a breeze to troubleshoot problems.
OpenSSL also allows you to check certificates for file integrity and test for possible data corruption. Using an MD5 checksum, you can use the following code examples to test certificates, keys and CSR’s:
# Certificates
openssl x509 -noout -modulus -in .certificate.crt | openssl md5

# Public / Private Keys
openssl rsa -noout -modulus -in .privateKey.key | openssl md5

# Certificate Server Request
openssl req -noout -modulus -in .MyFirst.csr | openssl md5

# Check an external SSL connection
openssl s_client -connect www.google.com:443
Once you have the original hash, you can then compare that original hash with a current hash to verify the certificate hasn’t been modified or corrupted.
Here’s a sample of what that code looks like when run in PowerShell:

Summary
In this article, you have learned how to install and configure OpenSSL on Windows 10, create a CSR, key pair, and SSL certificate. You have also learned how to convert between different certificate formats and do some basic troubleshooting using built-in sub-commands.
Additional Resources
- OpenSSL config man page
- OpenSSL commands
- Online SSL Checker
- Automating IIS SSL Certificate Installation with PowerShell
- How to Create Self-Signed Certificates with PowerShell