1. Overview
SSH, the secure shell, is often used to access remote Linux systems. But its authentication mechanism, where a private local key is paired with a public remote key, is used to secure all kinds of online services, from GitHub and Launchpad to Linux running on Microsoft’s Azure cloud.
Generating these keys from Linux is easy, and thanks to Ubuntu on WSL, you can follow the same process from Windows 10. But even without Ubuntu, SSH keys can also be generated with the free and open source OpenSSH client built into Windows 10 or with PuTTY for Windows 8.1 and earlier.
Over the following few steps, we’ll guide you through the process of generating SSH keys using Ubuntu on WSL, OpenSSH, and PuTTY.
Requirements
All you need is a PC running Windows and one of the following installed:
- Ubuntu on WSL for Windows 10
- The OpenSSH client built into Windows 10
- The
puttygen.exeexecutable from PuTTY for Windows 7 or 8.1
If you don’t already have Ubuntu on WSL, take a look at our Install Ubuntu on WSL tutorial.
Originally authored by Graham Morrison.
2. Passphrase considerations
When creating the SSH key pair, as shown in the following steps, you can choose to either lock your private key with a passphrase or use no passphrase at all.
Adding a passphrase requires the same passphrase to be entered whenever the key pair is used. Not adding a passphrase removes this requirement. For this reason, creating a key pair without a passphrase is more convenient and potentially essential for certain scripts and automation tasks. But it’s also less secure.
If a third-party gains access to a private key without a passphrase they will be able to access all connections and services using the public key.
A good compromise between convenience and security is to generate a separate key pair for each service or connection you want to use, adding a passphrase only for critical services. If you suspect a key has been compromised, simply generate a new pair for that service and remove the less secure key.
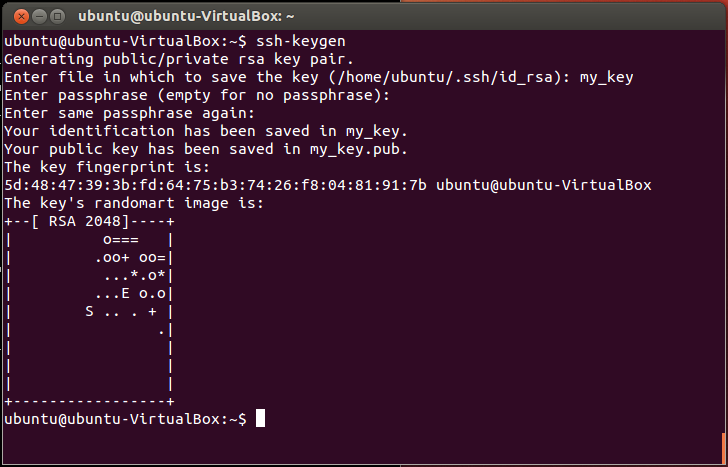
3. Key generation with Ubuntu on WSL
Launch Ubuntu on WSL from the start menu and make sure SSH is installed by entering following command at the command prompt:
sudo apt install openssh-client
The key generation process is identical to the process on a native Linux or Ubuntu installation. With SSH installed, run the SSH key generator by typing the following:
ssh-keygen -t rsa

You will be asked two questions. The first asks where to save the key, and you can press return to accept the default value. The second question asks for the passphrase. As discussed, entering a passphrase will require you to use the same passphrase whenever the key is accessed.
However, the passphrase isn’t a requirement, and pressing return (twice) will generate a key pair without one. Consequently, you won’t be asked for a passphrase when using your key.
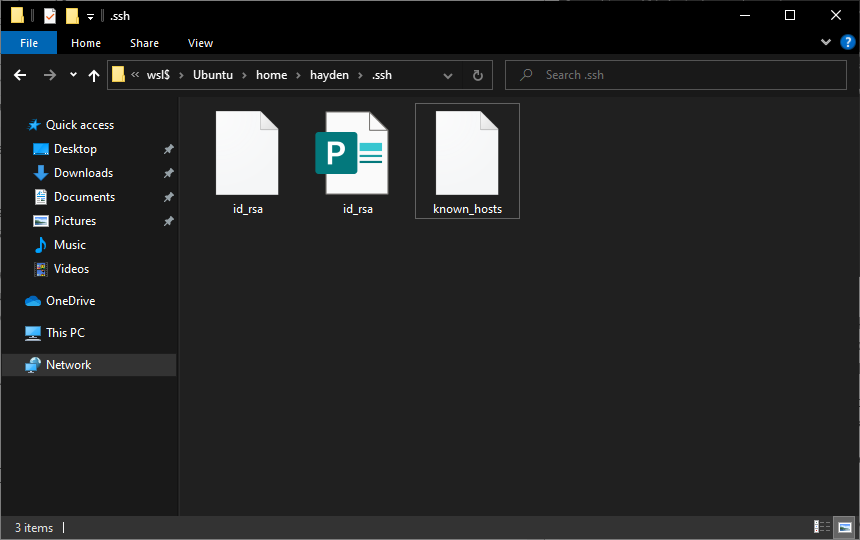
When the process has finished, the private key and the public key can be found in the ~/.ssh directory accessible from the Ubuntu terminal, or the following folder from Windows file manager:
\wsl$\Ubuntuhome<username>.ssh
4. Key generation with OpenSSH
Recent versions of Windows 10 include the OpenSSH client by default, but if yours does not or you’re unsure, follow these steps:
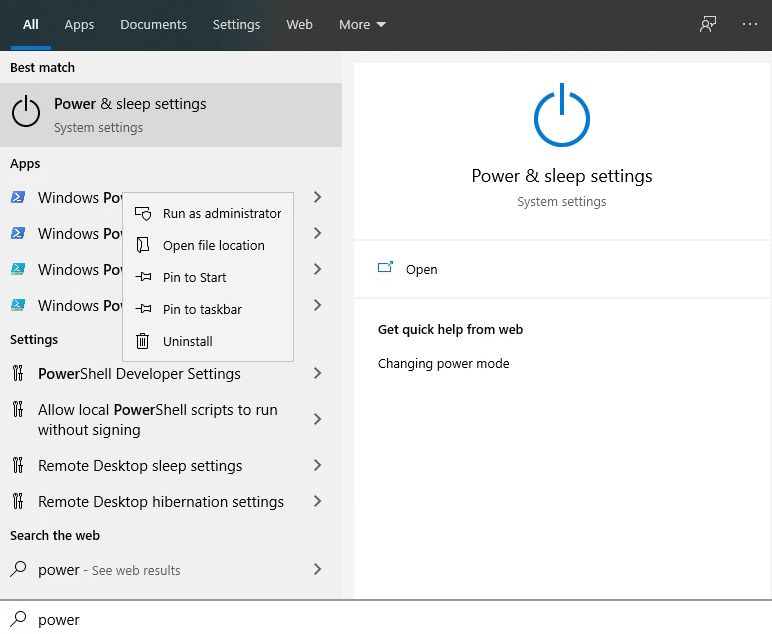
Open Settings and then navigate to Apps > Apps and Features > Optional Features:


Scan this list to see if OpenSSH client is already installed. If not, at the top of the page select Add a feature, then, to install the OpenSSH client, locate OpenSSH Client and click Install
Once the installation completes, return to Apps > Apps and Features > Optional Features and you should see the OpenSSH component(s) listed:

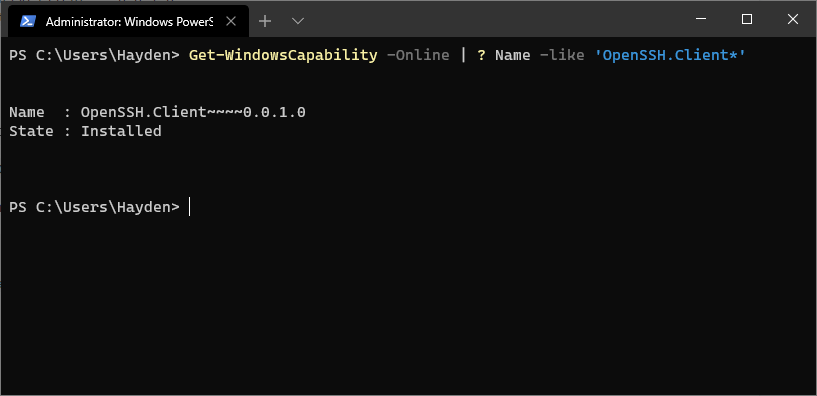
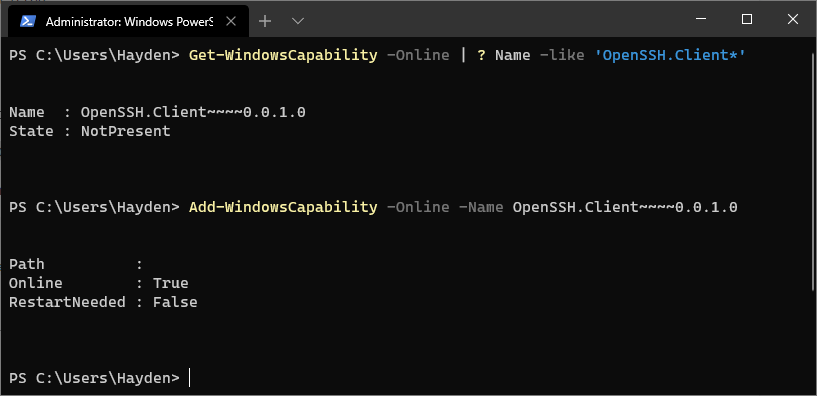
You can optionally install the OpenSSH client using PowerShell, first launch ‘Windows PowerShell’ as an Administrator. To check the status of the OpenSSH client type the command:
Get-WindowsCapability -Online | ? Name -like 'OpenSSH.Client*'
This should return:
Name  : OpenSSH.Client~~~~0.0.1.0
State : Installed
If OpenSSH client is listed as “NotPresent” you can install by typing:
Add-WindowsCapability -Online -Name OpenSSH.Client~~~~0.0.1.0
The command should return:
Path          :
Online        : True
RestartNeeded : False
Finally, to generate your keys, launch ‘Windows PowerShell’ as an Administrator, and type:
ssh-keygen

5. Key generation with Putty
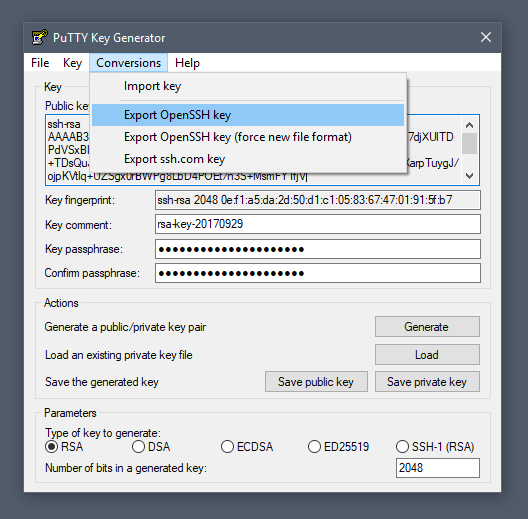
To generate a key pair with the PuTTY key generator, simply run puttygen.exe and click the Generate button in the window that appears.
You will be asked to move the mouse and press keys to improve the random number generation at the heart of SSH security. After this, the raw contents of the public key will be displayed alongside its fingerprint and a timestamp comment.
Two important fields, Key passphrase and Confirm passphrase, allow you to enter a passphrase to protect the private key.
Finally, you will need to export both the private and public keys separately:
- to export the private key, select Export OpenSSH key from the Conversions menu
- to export the public key, click Save public key from the main window
Public keys typically use the .pub suffix. By convention, the private key is usually called id_rsa and the public key id_rsa.pub, but this isn’t a requirement. It’s common to have many keys with more descriptive filenames, for instance.
6. Getting help
Congratulations! You have just generated a SSH key pair from Windows 10. You can now add the public key to those services you wish to authenticate.
If you need more details on using SSH keys, take a look at the Ubuntu community documentation, and if you get stuck, help is always at hand:
- Ask Ubuntu
- Ubuntu Forums
- IRC-based support
Was this tutorial useful?
Thank you for your feedback.
Введение
Использование SSH-ключей — простой и надежный способ обеспечения безопасности соединения с сервером. В отличие от пароля, взломать SSH-ключ практически невозможно. Сгенерировать SSH-ключ очень просто.
SSH-ключ для Linux/MacOS
Откройте терминал и выполните команду:
$ ssh-keygen -t rsaНа консоль будет выведен следующий диалог:
Enter file in which to save the key (/home/user/.ssh/id_rsa):Нажмите на клавишу Enter. Далее система предложит ввести кодовую фразу для дополнительной защиты SSH-подключения:
Enter passphrase (empty for no passphrase):Этот шаг можно пропустить. При ответе на этот и следующий вопрос просто нажмите клавишу Enter.
После этого ключ будет создан, а на консоль будет выведено следующее сообщение:
Your identification has been saved in /home/user/.ssh/id_rsa.
Your public key has been saved in /home/user/.ssh/id_rsa.pub.
The key fingerprint is:
476:b2:a8:7f:08:b4:c0:af:81:25:7e:21:48:01:0e:98 user@localhostThe key's randomart image is:
+--[ RSA 2048]----+
|+.o. |
|ooE |
|oo |
|o.+.. |
|.+.+.. S . |
|....+ o + |
| .o .... |
| . .. . |
| .... |
+-----------------+
Далее выполните в терминале команду:
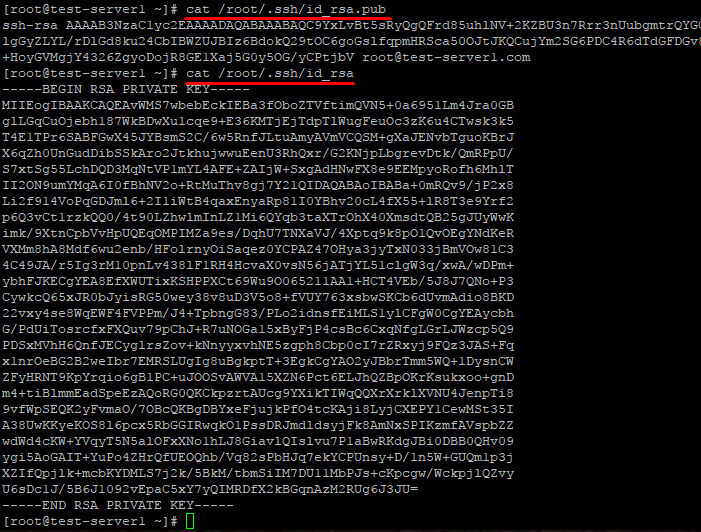
$ cat ~/.ssh/id_rsa.pubНа консоль будет выведен ключ. Скопируйте его и вставьте в соответствующее поле:
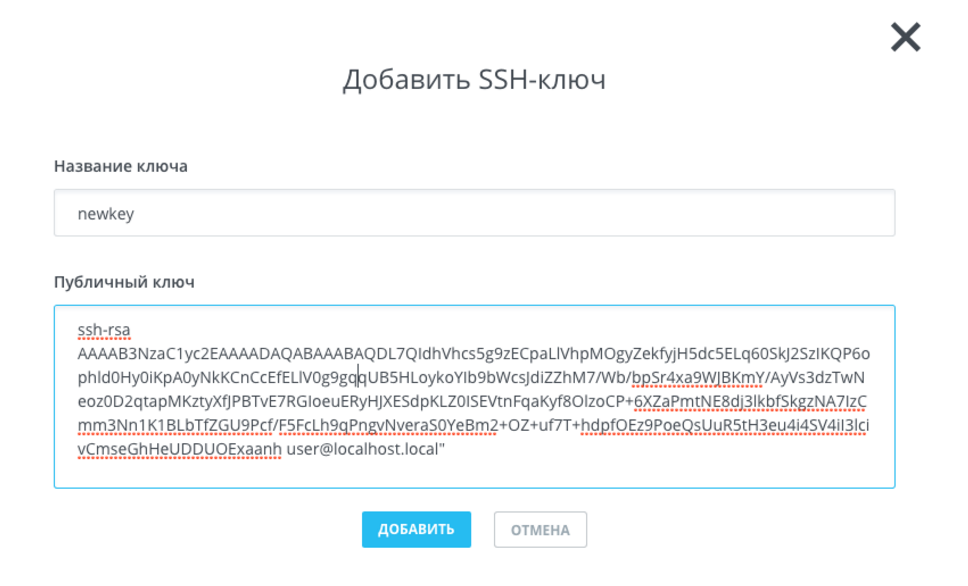
Нажмите на кнопку «Добавить».
Добавив ключ, выполните в терминале команду:
$ ssh root@[IP-адрес сервера]После этого соединение с сервером будет установлено. Вводить пароль при этом не потребуется.
SSH-ключ для Windows
В OC Windows подключение к удаленным серверам по SSH возможно, например, с помощью клиента Putty. Скачать его можно здесь (ссылка взята с официального сайта). Putty не требует установки — чтобы начать с ним работать, достаточно просто распаковать скачанный архив.
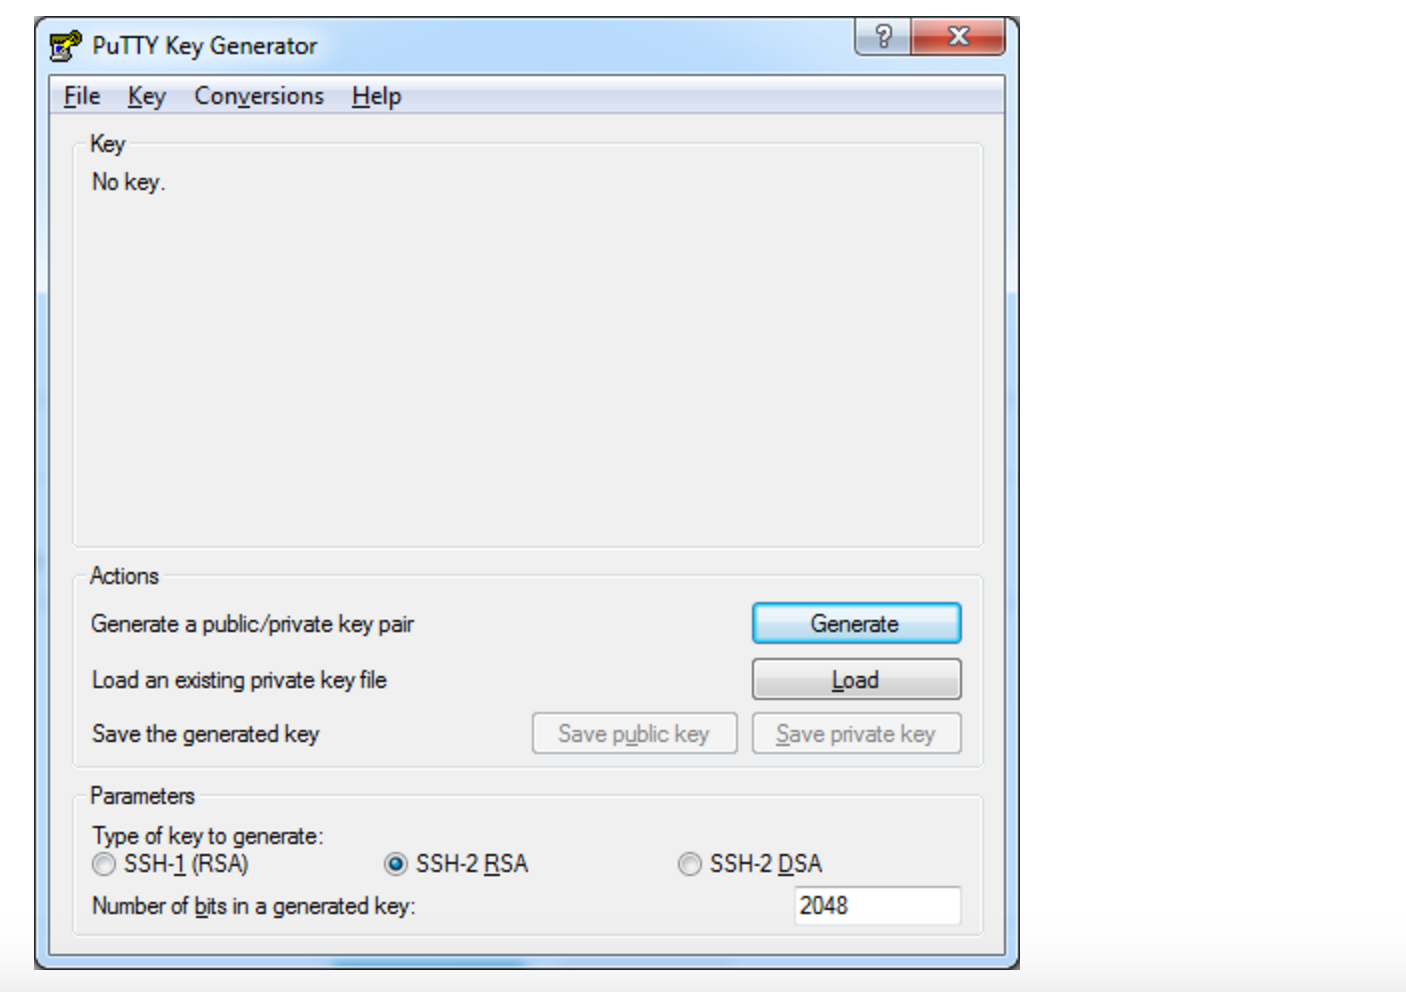
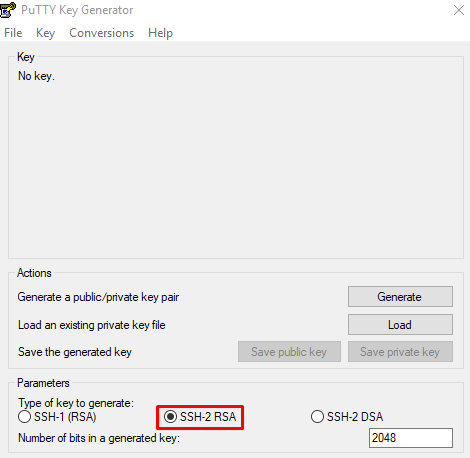
По завершении распаковки запустите файл puttygen.exe.
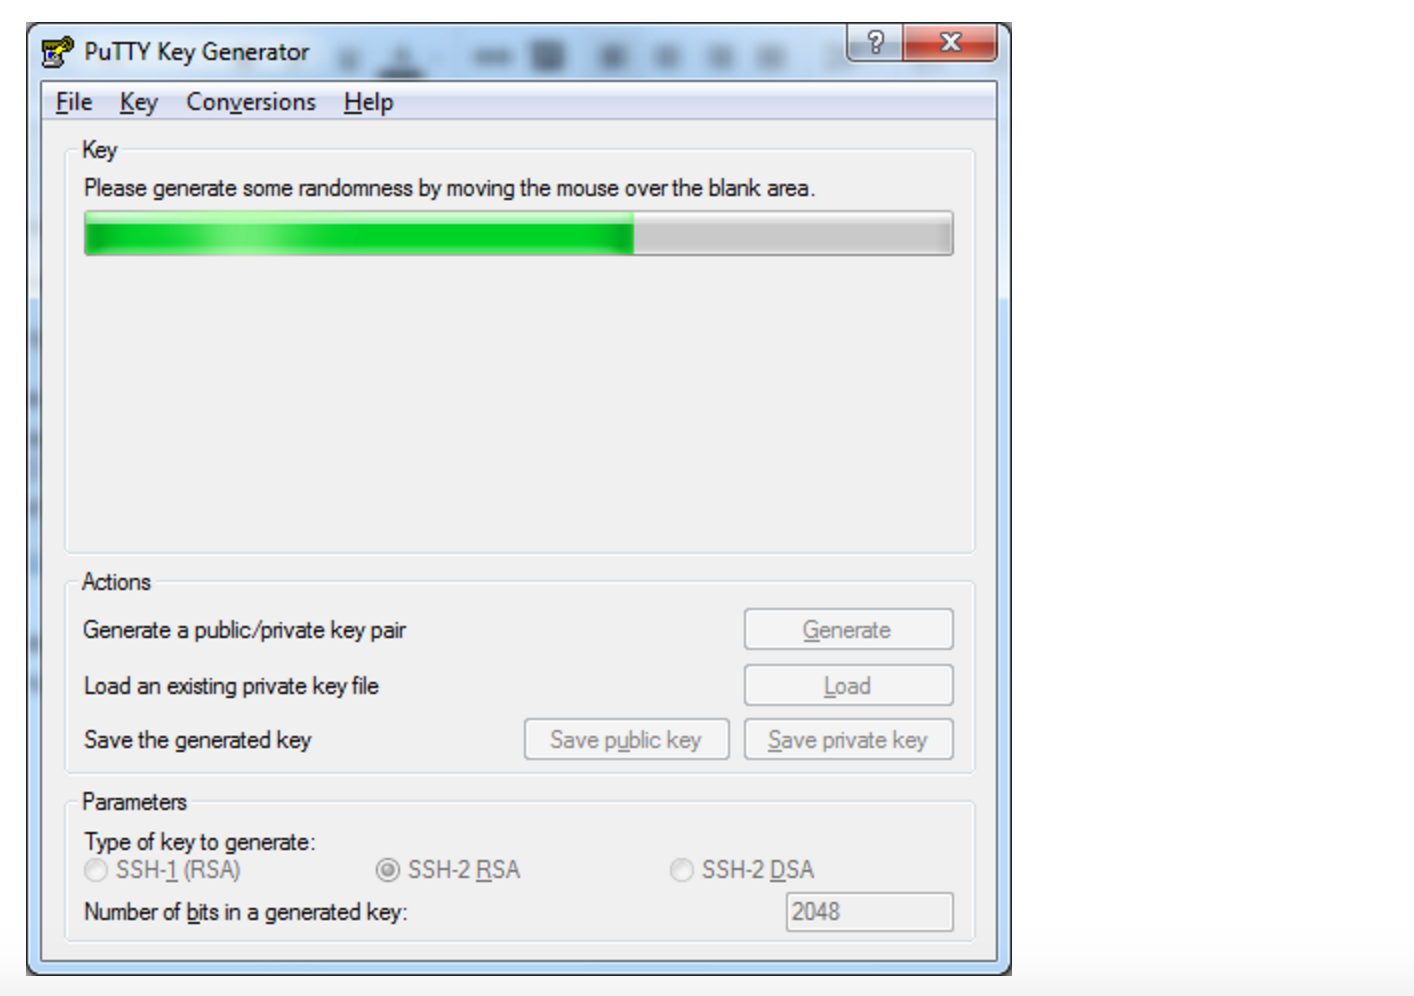
Выберите тип ключа SSH-2 RSA и длину 2048 бит, а затем нажмите на кнопку Generate:
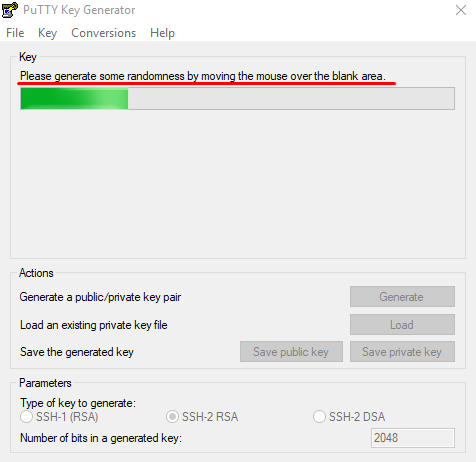
Во время генерации водите курсором в пустой области окна (это нужно для создания псевдослучайности):
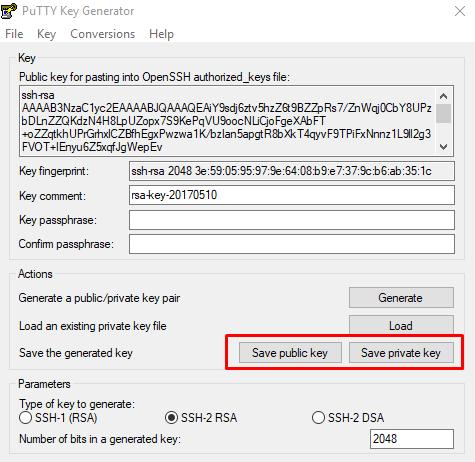
Сохраните сгенерированную пару ключей на локальной машине (кнопки Save public key и Save private key).
Скопируйте сгененированный ключ и вставьте его в соответствующее поле.
Заключение
В этой инструкции мы рассмотрели, как создать шифрованный протокол для связи с сервером: сгенерировали SSH-ключ для Linux/MacOS и Windows. Теперь вы можете входить в систему без пароля учетной записи.
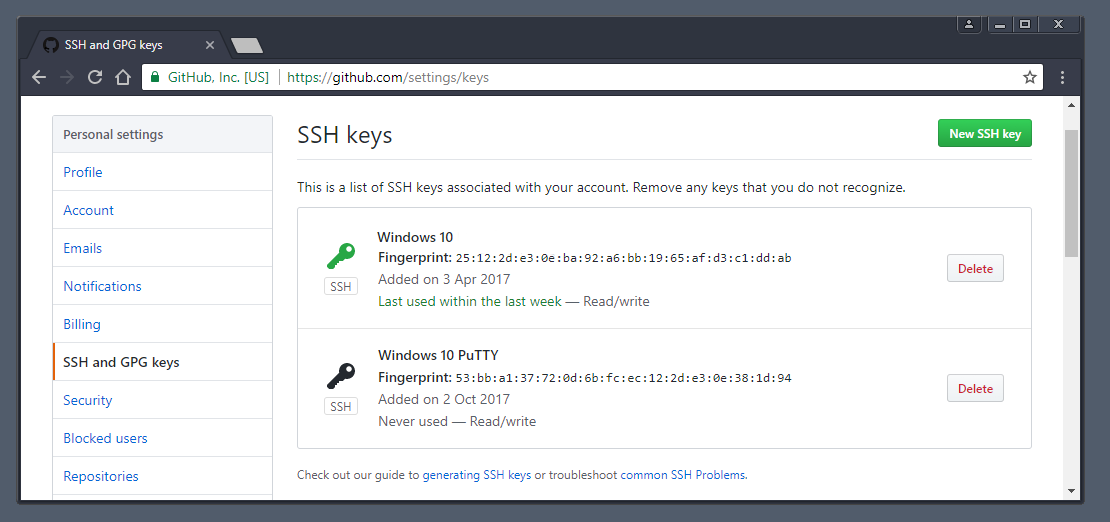
About SSH key passphrases
You can access and write data in repositories on GitHub.com using SSH (Secure Shell Protocol). When you connect via SSH, you authenticate using a private key file on your local machine. For more information, see «About SSH.»
When you generate an SSH key, you can add a passphrase to further secure the key. Whenever you use the key, you must enter the passphrase. If your key has a passphrase and you don’t want to enter the passphrase every time you use the key, you can add your key to the SSH agent. The SSH agent manages your SSH keys and remembers your passphrase.
If you don’t already have an SSH key, you must generate a new SSH key to use for authentication. If you’re unsure whether you already have an SSH key, you can check for existing keys. For more information, see «Checking for existing SSH keys.»
If you want to use a hardware security key to authenticate to GitHub, you must generate a new SSH key for your hardware security key. You must connect your hardware security key to your computer when you authenticate with the key pair. For more information, see the OpenSSH 8.2 release notes.
Generating a new SSH key
You can generate a new SSH key on your local machine. After you generate the key, you can add the key to your account on GitHub.com to enable authentication for Git operations over SSH.
Note: GitHub improved security by dropping older, insecure key types on March 15, 2022.
As of that date, DSA keys (ssh-dss) are no longer supported. You cannot add new DSA keys to your personal account on GitHub.com.
RSA keys (ssh-rsa) with a valid_after before November 2, 2021 may continue to use any signature algorithm. RSA keys generated after that date must use a SHA-2 signature algorithm. Some older clients may need to be upgraded in order to use SHA-2 signatures.
-
Open TerminalTerminalGit Bash.
-
Paste the text below, substituting in your GitHub email address.
$ ssh-keygen -t ed25519 -C "your_email@example.com"Note: If you are using a legacy system that doesn’t support the Ed25519 algorithm, use:
$ ssh-keygen -t rsa -b 4096 -C "your_email@example.com"This creates a new SSH key, using the provided email as a label.
> Generating public/private ALGORITHM key pair.When you’re prompted to «Enter a file in which to save the key», you can press Enter to accept the default file location. Please note that if you created SSH keys previously, ssh-keygen may ask you to rewrite another key, in which case we recommend creating a custom-named SSH key. To do so, type the default file location and replace id_ssh_keyname with your custom key name.
> Enter a file in which to save the key (/Users/YOU/.ssh/id_ALGORITHM: [Press enter]> Enter a file in which to save the key (/c/Users/YOU/.ssh/id_ALGORITHM):[Press enter]> Enter a file in which to save the key (/home/YOU/.ssh/ALGORITHM):[Press enter] -
At the prompt, type a secure passphrase. For more information, see «Working with SSH key passphrases.»
> Enter passphrase (empty for no passphrase): [Type a passphrase]
> Enter same passphrase again: [Type passphrase again]
Adding your SSH key to the ssh-agent
Before adding a new SSH key to the ssh-agent to manage your keys, you should have checked for existing SSH keys and generated a new SSH key. When adding your SSH key to the agent, use the default macOS ssh-add command, and not an application installed by macports, homebrew, or some other external source.
-
Start the ssh-agent in the background.
$ eval "$(ssh-agent -s)"
> Agent pid 59566
Depending on your environment, you may need to use a different command. For example, you may need to use root access by running
sudo -s -Hbefore starting the ssh-agent, or you may need to useexec ssh-agent bashorexec ssh-agent zshto run the ssh-agent. -
If you’re using macOS Sierra 10.12.2 or later, you will need to modify your
~/.ssh/configfile to automatically load keys into the ssh-agent and store passphrases in your keychain.-
First, check to see if your
~/.ssh/configfile exists in the default location.$ open ~/.ssh/config > The file /Users/YOU/.ssh/config does not exist. -
If the file doesn’t exist, create the file.
$ touch ~/.ssh/config -
Open your
~/.ssh/configfile, then modify the file to contain the following lines. If your SSH key file has a different name or path than the example code, modify the filename or path to match your current setup.Host *.github.com AddKeysToAgent yes UseKeychain yes IdentityFile ~/.ssh/id_ed25519Notes:
-
If you chose not to add a passphrase to your key, you should omit the
UseKeychainline. -
If you see a
Bad configuration option: usekeychainerror, add an additional line to the configuration’s’Host *.github.comsection.Host *.github.com IgnoreUnknown UseKeychain
-
-
-
Add your SSH private key to the ssh-agent and store your passphrase in the keychain. If you created your key with a different name, or if you are adding an existing key that has a different name, replace id_ed25519 in the command with the name of your private key file.
$ ssh-add --apple-use-keychain ~/.ssh/id_ed25519Note: The
--apple-use-keychainoption stores the passphrase in your keychain for you when you add an SSH key to the ssh-agent. If you chose not to add a passphrase to your key, run the command without the--apple-use-keychainoption.The
--apple-use-keychainoption is in Apple’s standard version ofssh-add. In MacOS versions prior to Monterey (12.0), the--apple-use-keychainand--apple-load-keychainflags used the syntax-Kand-A, respectively.If you don’t have Apple’s standard version of
ssh-addinstalled, you may receive an error. For more information, see «Error: ssh-add: illegal option — K.» -
Add the SSH key to your account on GitHub. For more information, see «Adding a new SSH key to your GitHub account.»
If you have GitHub Desktop installed, you can use it to clone repositories and not deal with SSH keys.
-
Ensure the ssh-agent is running. You can use the «Auto-launching the ssh-agent» instructions in «Working with SSH key passphrases», or start it manually:
# start the ssh-agent in the background $ eval "$(ssh-agent -s)" > Agent pid 59566 -
Add your SSH private key to the ssh-agent. If you created your key with a different name, or if you are adding an existing key that has a different name, replace id_ed25519 in the command with the name of your private key file.
$ ssh-add ~/.ssh/id_ed25519 -
Add the SSH key to your account on GitHub. For more information, see «Adding a new SSH key to your GitHub account.»
-
Start the ssh-agent in the background.
$ eval "$(ssh-agent -s)"
> Agent pid 59566
Depending on your environment, you may need to use a different command. For example, you may need to use root access by running
sudo -s -Hbefore starting the ssh-agent, or you may need to useexec ssh-agent bashorexec ssh-agent zshto run the ssh-agent. -
Add your SSH private key to the ssh-agent. If you created your key with a different name, or if you are adding an existing key that has a different name, replace id_ed25519 in the command with the name of your private key file.
$ ssh-add ~/.ssh/id_ed25519 -
Add the SSH key to your account on GitHub. For more information, see «Adding a new SSH key to your GitHub account.»
Generating a new SSH key for a hardware security key
If you are using macOS or Linux, you may need to update your SSH client or install a new SSH client prior to generating a new SSH key. For more information, see «Error: Unknown key type.»
-
Insert your hardware security key into your computer.
-
Open TerminalTerminalGit Bash.
-
Paste the text below, substituting in the email address for your account on GitHub.
$ ssh-keygen -t ed25519-sk -C "YOUR_EMAIL"Note: If the command fails and you receive the error
invalid formatorfeature not supported,you may be using a hardware security key that does not support the Ed25519 algorithm. Enter the following command instead.$ ssh-keygen -t ecdsa-sk -C "your_email@example.com" -
When you are prompted, touch the button on your hardware security key.
-
When you are prompted to «Enter a file in which to save the key,» press Enter to accept the default file location.
> Enter a file in which to save the key (/Users/YOU/.ssh/id_ed25519_sk): [Press enter]> Enter a file in which to save the key (/c/Users/YOU/.ssh/id_ed25519_sk):[Press enter]> Enter a file in which to save the key (/home/YOU/.ssh/id_ed25519_sk):[Press enter] -
When you are prompted to type a passphrase, press Enter.
> Enter passphrase (empty for no passphrase): [Type a passphrase] > Enter same passphrase again: [Type passphrase again] -
Add the SSH key to your account on GitHub. For more information, see «Adding a new SSH key to your GitHub account.»
This page is about the OpenSSH version of ssh-keygen. For Tectia SSH, see here. If you wish to generate keys for PuTTY, see PuTTYgen on Windows or PuTTYgen on Linux.

What Is ssh-keygen?
Ssh-keygen is a tool for creating new authentication key pairs for SSH. Such key pairs are used for automating logins, single sign-on, and for authenticating hosts.
SSH Keys and Public Key Authentication
The SSH protocol uses public key cryptography for authenticating hosts and users. The authentication keys, called SSH keys, are created using the keygen program.
SSH introduced public key authentication as a more secure alternative to the older .rhosts authentication. It improved security by avoiding the need to have password stored in files, and eliminated the possibility of a compromised server stealing the user’s password.
However, SSH keys are authentication credentials just like passwords. Thus, they must be managed somewhat analogously to user names and passwords. They should have a proper termination process so that keys are removed when no longer needed.
Creating an SSH Key Pair for User Authentication
The simplest way to generate a key pair is to run ssh-keygen without arguments. In this case, it will prompt for the file in which to store keys. Here’s an example:
klar (11:39) ~>ssh-keygen Generating public/private rsa key pair. Enter file in which to save the key (/home/ylo/.ssh/id_rsa):Enter passphrase (empty for no passphrase): Enter same passphrase again:Your identification has been saved in /home/ylo/.ssh/id_rsa.Your public key has been saved in /home/ylo/.ssh/id_rsa.pub.The key fingerprint is: SHA256:Up6KjbnEV4Hgfo75YM393QdQsK3Z0aTNBz0DoirrW+c ylo@klarThe key's randomart image is:+---[RSA 2048]----+ | . ..oo..| | . . . . .o.X.| | . . o. ..+ B| | . o.o .+ ..| | ..o.S o.. | | . %o= . | | @.B... . || o.=. o. . . .| | .oo E. . .. | +----[SHA256]-----+ klar (11:40) ~>First, the tool asked where to save the file. SSH keys for user authentication are usually stored in the user’s .ssh directory under the home directory. However, in enterprise environments, the location is often different. The default key file name depends on the algorithm, in this case id_rsa when using the default RSA algorithm. It could also be, for example, id_dsa or id_ecdsa.
Then it asks to enter a passphrase. The passphrase is used for encrypting the key, so that it cannot be used even if someone obtains the private key file. The passphrase should be cryptographically strong. Our online random password generator is one possible tool for generating strong passphrases.
Choosing an Algorithm and Key Size
SSH supports several public key algorithms for authentication keys. These include:
-
rsa— an old algorithm based on the difficulty of factoring large numbers. A key size of at least 2048 bits is recommended for RSA; 4096 bits is better. RSA is getting old and significant advances are being made in factoring. Choosing a different algorithm may be advisable. It is quite possible the RSA algorithm will become practically breakable in the foreseeable future. All SSH clients support this algorithm. -
dsa— an old US government Digital Signature Algorithm. It is based on the difficulty of computing discrete logarithms. A key size of 1024 would normally be used with it. DSA in its original form is no longer recommended. -
ecdsa— a new Digital Signature Algorithm standarized by the US government, using elliptic curves. This is probably a good algorithm for current applications. Only three key sizes are supported: 256, 384, and 521 (sic!) bits. We would recommend always using it with 521 bits, since the keys are still small and probably more secure than the smaller keys (even though they should be safe as well). Most SSH clients now support this algorithm. -
ed25519— this is a new algorithm added in OpenSSH. Support for it in clients is not yet universal. Thus its use in general purpose applications may not yet be advisable.
The algorithm is selected using the -t option and key size using the -b option. The following commands illustrate:
ssh-keygen -t rsa -b 4096ssh-keygen -t dsa
ssh-keygen -t ecdsa -b 521
ssh-keygen -t ed25519
Specifying the File Name
Normally, the tool prompts for the file in which to store the key. However, it can also be specified on the command line using the -f <filename> option.
ssh-keygen -f ~/tatu-key-ecdsa -t ecdsa -b 521Copying the Public Key to the Server
To use public key authentication, the public key must be copied to a server and installed in an authorized_keys file. This can be conveniently done using the ssh-copy-id tool. Like this:
ssh-copy-id -i ~/.ssh/tatu-key-ecdsa user@hostOnce the public key has been configured on the server, the server will allow any connecting user that has the private key to log in. During the login process, the client proves possession of the private key by digitally signing the key exchange.
Adding the Key to SSH Agent
ssh-agent is a program that can hold a user’s private key, so that the private key passphrase only needs to be supplied once. A connection to the agent can also be forwarded when logging into a server, allowing SSH commands on the server to use the agent running on the user’s desktop.
For more information on using and configuring the SSH agent, see the ssh-agent page.
Creating Host Keys
The tool is also used for creating host authentication keys. Host keys are stored in the /etc/ssh/ directory.
Host keys are just ordinary SSH key pairs. Each host can have one host key for each algorithm. The host keys are almost always stored in the following files:
/etc/ssh/ssh_host_dsa_key /etc/ssh/ssh_host_ecdsa_key /etc/ssh/ssh_host_ed25519_key /etc/ssh/ssh_host_rsa_keyThe host keys are usually automatically generated when an SSH server is installed. They can be regenerated at any time. However, if host keys are changed, clients may warn about changed keys. Changed keys are also reported when someone tries to perform a man-in-the-middle attack. Thus it is not advisable to train your users to blindly accept them. Changing the keys is thus either best done using an SSH key management tool that also changes them on clients, or using certificates.
Using X.509 Certificates for Host Authentication
OpenSSH does not support X.509 certificates. Tectia SSH does support them. X.509 certificates are widely used in larger organizations for making it easy to change host keys on a period basis while avoiding unnecessary warnings from clients. They also allow using strict host key checking, which means that the clients will outright refuse a connection if the host key has changed.
Using OpenSSH’s Proprietary Certificates
OpenSSH has its own proprietary certificate format, which can be used for signing host certificates or user certificates. For user authentication, the lack of highly secure certificate authorities combined with the inability to audit who can access a server by inspecting the server makes us recommend against using OpenSSH certificates for user authentication.
However, OpenSSH certificates can be very useful for server authentication and can achieve similar benefits as the standard X.509 certificates. However, they need their own infrastructure for certificate issuance.
Key Management Requires Attention
It is easy to create and configure new SSH keys. In the default configuration, OpenSSH allows any user to configure new keys. The keys are permanent access credentials that remain valid even after the user’s account has been deleted.
In organizations with more than a few dozen users, SSH keys easily accumulate on servers and service accounts over the years. We have seen enterprises with several million keys granting access to their production servers. It only takes one leaked, stolen, or misconfigured key to gain access.
In any larger organization, use of SSH key management solutions is almost necessary. SSH keys should also be moved to root-owned locations with proper provisioning and termination processes. For more information, see how to manage SSH keys. A widely used SSH key management tool for OpenSSH is Universal SSH Key Manager.
Practically all cybersecurity regulatory frameworks require managing who can access what. SSH keys grant access, and fall under this requirement. This, organizations under compliance mandates are required to implement proper management processes for the keys. NIST IR 7966 is a good starting point.
Make Sure There Is Enough Randomness
It is important to ensure there is enough unpredictable entropy in the system when SSH keys are generated. There have been incidents when thousands of devices on the Internet have shared the same host key when they were improperly configured to generate the key without proper randomness.
General Purpose Systems
On general purpose computers, randomness for SSH key generation is usually not a problem. It may be something of an issue when initially installing the SSH server and generating host keys, and only people building new Linux distributions or SSH installation packages generally need to worry about it.
Our recommendation is to collect randomness during the whole installation of the operating system, save that randomness in a random seed file. Then boot the system, collect some more randomness during the boot, mix in the saved randomness from the seed file, and only then generate the host keys. This maximizes the use of the available randomness. And make sure the random seed file is periodically updated, in particular make sure that it is updated after generating the SSH host keys.
Many modern general-purpose CPUs also have hardware random number generators. This helps a lot with this problem. The best practice is to collect some entropy in other ways, still keep it in a random seed file, and mix in some entropy from the hardware random number generator. This way, even if one of them is compromised somehow, the other source of randomness should keep the keys secure.
Embedded Devices and Internet of Things
Available entropy can be a real problem on small IoT devices that don’t have much other activity on the system. They may just not have the mechanical randomness from disk drive mechanical movement timings, user-caused interrupts, or network traffic. Furthermore, embedded devices often run on low-end processors that may not have a hardware random number generator.
The availability of entropy is also critically important when such devices generate keys for HTTPS.
Our recommendation is that such devices should have a hardware random number generator. If the CPU does not have one, it should be built onto the motherboard. The cost is rather small.
Command and Option Summary
Here’s a summary of commonly used options to the keygen tool:
-b “Bits” This option specifies the number of bits in the key. The regulations that govern the use case for SSH may require a specific key length to be used. In general, 2048 bits is considered to be sufficient for RSA keys.
-e “Export” This option allows reformatting of existing keys between the OpenSSH key file format and the format documented in RFC 4716, “SSH Public Key File Format”.
-p “Change the passphrase” This option allows changing the passphrase of a private key file with [-P old_passphrase] and [-N new_passphrase], [-f keyfile].
-t “Type” This option specifies the type of key to be created. Commonly used values are: — rsa for RSA keys — dsa for DSA keys — ecdsa for elliptic curve DSA keys
-i «Input» When ssh-keygen is required to access an existing key, this option designates the file.
-f «File» Specifies name of the file in which to store the created key.
-N «New» Provides a new passphrase for the key.
-P «Passphrase» Provides the (old) passphrase when reading a key.
-c «Comment» Changes the comment for a keyfile.
-p Change the passphrase of a private key file.
-q Silence ssh-keygen.
-v Verbose mode.
-l «Fingerprint» Print the fingerprint of the specified public key.
-B «Bubble babble» Shows a «bubble babble» (Tectia format) fingerprint of a keyfile.
-F Search for a specified hostname in a known_hosts file.
-R Remove all keys belonging to a hostname from a known_hosts file.
-y Read a private OpenSSH format file and print an OpenSSH public key to stdout.
This only listed the most commonly used options. For full usage, including the more exotic and special-purpose options, use the man ssh-keygen command.
Подключение к серверу при помощи SSH-ключа — простой и надёжный способ защиты сетевых соединений. Ключ позволяет идентифицировать клиента при подключению к серверу без использования пароля. При этом взломать такой ключ почти невозможно, ведь SSH-ключ представляет собой комбинацию из открытой и закрытой части ключа. Открытый ключ хранится на сервере и доступен всем, кто пытается подключиться к устройству. Закрытый есть только у пользователя, поскольку этого требуют правила безопасности.
Метод подключения по SSH-протоколу часто используется ИТ-специалистами, поскольку он не только надёжен, но и даёт массу новых возможностей. Об этом мы рассказывали в статьях «SSH-туннели» и «5 рекомендаций по защите SSH-подключений». Как быстро и просто сгенерировать SSH-ключ? Рассказываем.
SSH-ключ для Windows
Для пользователей Windows предлагается несколько вариантов SSH-подключения к серверу, но наиболее популярным способом считается использование маленького клиента Putty. Его можно скачать с официального сайта в виде инсталлятора и portable-версии. Скачайте клиент, установите/распакуйте его, после чего запустите найденный файл puttygen.exe.
В первом окне клиент покажет, что SSH-ключ отсутствует и предложит его сгенерировать. Выберите нужный тип или оставьте все настройки по умолчанию, тогда клиент будет генерировать SSH длиной 2048 бит. Нажмите Generate.

Putty предложит вам подёргать мышкой или понажимать на клавиши. Это необходимо, чтобы методом псевдослучайных чисел сгенерировать пару из открытого и закрытого ключа.

Клиент покажет, что ключи сгенерированы. Сохраните их ключи на устройстве, используя кнопки Save public key и Save private key.

После этого можно вставить сгенерированный ключ в соответствующее поле для подключения к серверу. Важно действовать именно в такой последовательности, чтобы обезопасить себя от неприятных сюрпризов вроде потери ключа.
Получить консультацию об облачных сервисахЗаказать звонок
SSH-ключ для Linux
Пользователи Linux могут сгенерировать ключ командой ssh-keygen. Даже если не указывать никаких параметров, всё сохранится так, как надо. В консоли можно использовать не только указанную команду, но и её расширенные версии. Например, существуют такие команды генерации ключей:
- RSA SSH с 4096-битным закрытым ключом —
ssh-keygen -t rsa -b 4096 -C "RSA 4096 bit Keys" - DSA SSH с 2048-битным закрытым ключом —
ssh-keygen -t dsa -b 1024 -C "DSA 1024 bit Keys" - ECDSA SSH с 521-битным закрытым ключом —
ssh-keygen -t ecdsa -b 521 -C "ECDSA 521 bit Keys" - SSH ed25519 (новый алгоритм, добавленный в OpenSSH) —
ssh-keygen -t ed25519
Рекомендуем генерировать пару RSA ключей, их чрезвычайно трудно ломать, и потому они рекомендуются по умолчанию. Приватный (секретный) ключ будет храниться в файле ~/.ssh/id_rsa, а публичный находится в файле ~/.ssh/id_rsa.pub. Оба файла расположены в вашей домашней директории.
После команды $ ssh-keygen -t rsa консоль покажет следующий диалог:
Enter file in which to save the key (/home/user/.ssh/id_rsa):
Увидев эту надпись, нажмите Enter. Так вы сохраните файлы в директориях, заданных по умолчанию. На следующем этапе система предложит задать пароль для дополнительной защиты SSH-подключения.
- > Enter passphrase (empty for no passphrase): [Type a passphrase]
> Enter same passphrase again: [Type passphrase again]
Можете указать, можете пропустить, нажав Enter.
Ключ создан, а на консоли появится сообщение:

Командой $ cat ~/.ssh/id_rsa.pub выведите ключи на экран. Это будет выглядеть примерно так:

Вставьте скопированные ключи в нужные поля. После этого командой $ ssh root@[IP-адрес сервера] проверьте, установилось ли соединение с сервером.
Index
Becoming An SSH Superstar
- Step 1: Prepare Windows by enabling Windows Subsystem for Linux
- Step 2: Install Ubuntu
- Step 3: Allow Ubuntu to Finish Installing / Create Username and Password
- Step 4: Create Your SSH Key Pair
- Step 5: Copy Your Public Key To Your Clipboard
- Step 6: Add Your Public Key To Your GridPane Settings
- Step 7: Push Your Public Key To Your Server
- Step 8: Connect To Your Server
To get the most out of the GridPane platform, you’ll often find the need to use SSH to log into your server and use our GPCLI (GridPane Command Line Interface) commands. GPCLI a powerful set of tools which allow you customize not only your server but your WordPress installations as well.
For security reasons, SSH access is only available with the use of an SSH key and is restricted to the root user.
WARNING: The Peter Parker Principle applies here!
With great power comes great responsibility.
Not familiar with Spider-Man? In simple terms – the root user can do anything including deleting and breaking everything. Just a few bad keystrokes and everything can go away. Be careful with the commands you use and never share your Private SSH Key with anyone.
Note: this only works with Windows 10 build 16125 or later. If your system is up to date, you’ll be fine. If you aren’t sure, follow these steps to check your build.
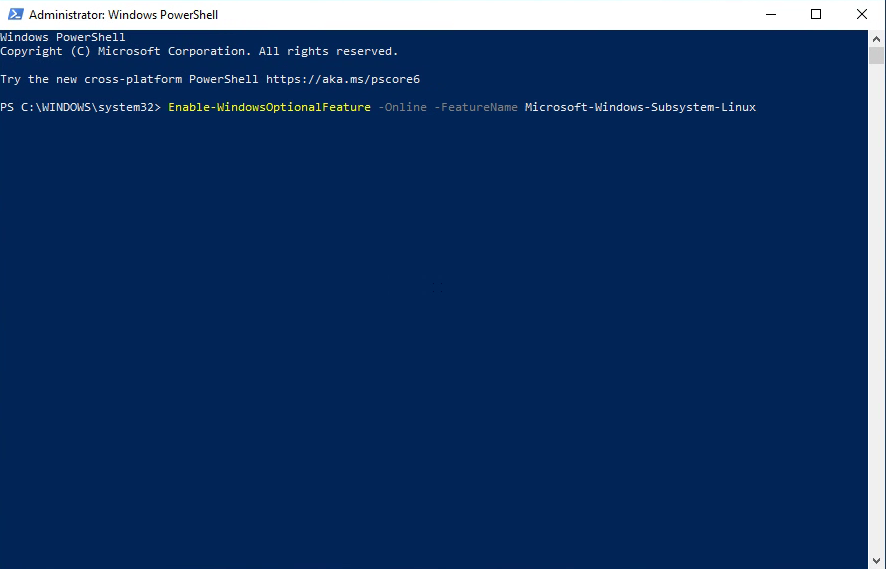
Step 1: Prepare Windows by enabling Windows Subsystem for Linux
Go to your start menu and type in “power” to find Windows PowerShell. Right click on it and select “Run as administrator”.
When Windows PowerShell launches, paste in the following command:
Enable-WindowsOptionalFeature -Online -FeatureName Microsoft-Windows-Subsystem-Linux
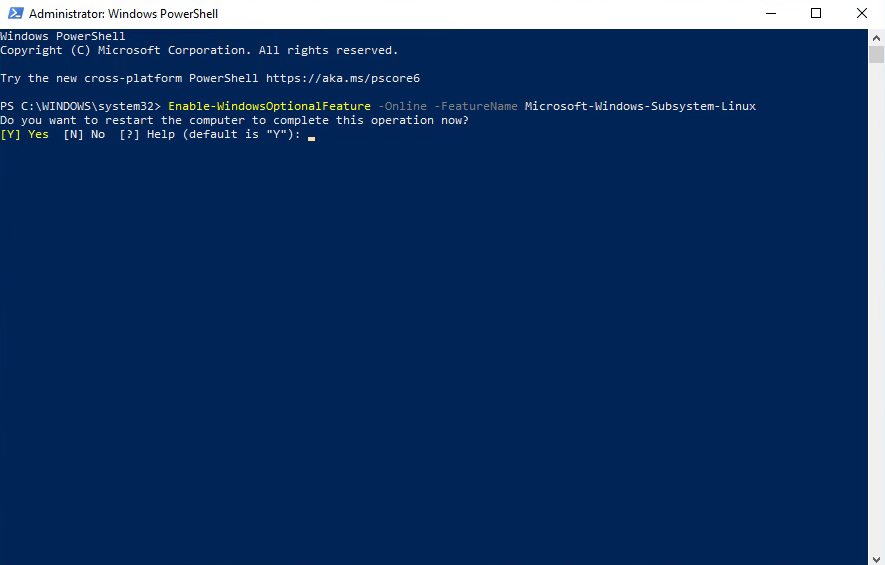
It may take a moment for the installer to start, but a series of commands will flash on your screen before you’re asked if you want to restart your computer. Type Y and press enter.
Option 2: After taking all these great screenshots, I discovered another way to do this as well.
- Open Control Panel
- Click Programs
- Click Turn Windows Features On or Off
- Check Windows Subsystem for Linux
- Restart
back to top ▲
Step 2: Install Ubuntu
Head to this link to get Ubuntu free from the Microsoft Store.
https://www.microsoft.com/en-us/p/ubuntu/9nblggh4msv6
Alternatively, you can search “Ubuntu” from the Microsoft Store after launching it from the start menu. Choosing Ubuntu (without a version number) will always install the latest stable release.
back to top ▲
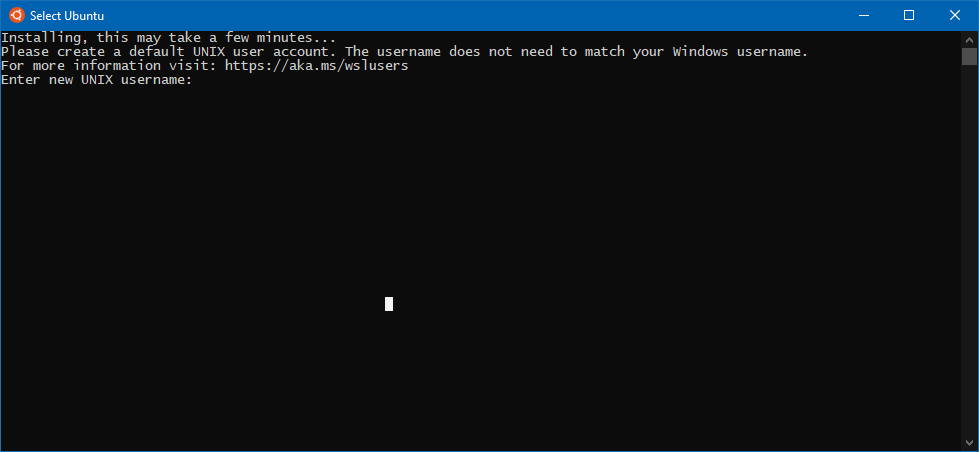
Step 3: Allow Ubuntu to Finish Installing / Create Username and Password
When the Ubuntu window launches, the program will take a moment to finish installing after which it will prompt for a username and then a password. Once complete, you’ll return to a prompt ready to create your SSH key. The whole process looks like this:
back to top ▲
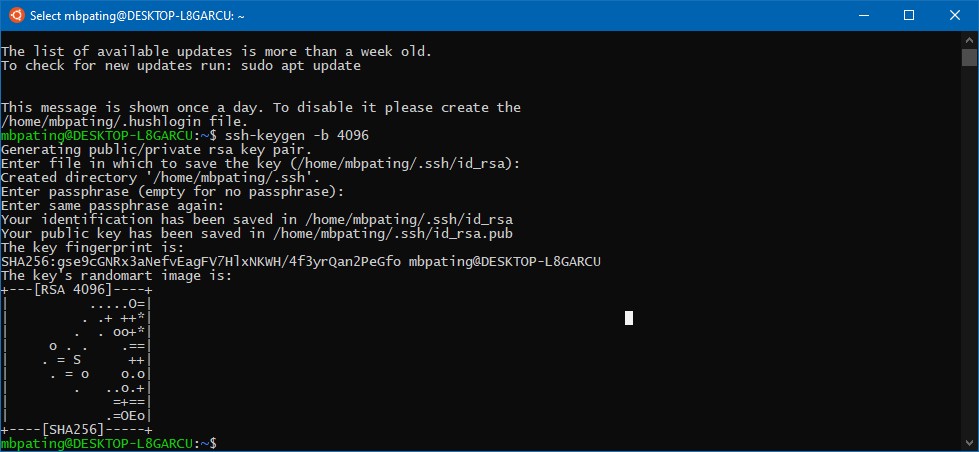
Step 4: Create Your SSH Key Pair
Type the following command at the prompt then press enter.
ssh-keygen -b 4096
When prompted for the file in which to save the key, press enter. The default location will be created.
(Optional, but recommended) Enter a passphrase when prompted.
Repeat the passphrase for confirmation.
Congratulations! You now have an SSH key. The whole process will look like this:
What does all this mean?
The key generating process has created two files.
id_rsa (this is your private key, do not lose or give this to anybody!)
id_rsa.pub (this is your public key, you copy this to servers or give to others to place onto servers for you to authenticate against using your private key)
These are both stored in /home/yourusername/.ssh/
Within Windows, you can find this location by going to
C:Users%USERNAME%AppDataLocalPackagesCanonicalGroupLimited.UbuntuonWindows_79rhkp1fndgscLocalState
ootfs
back to top ▲
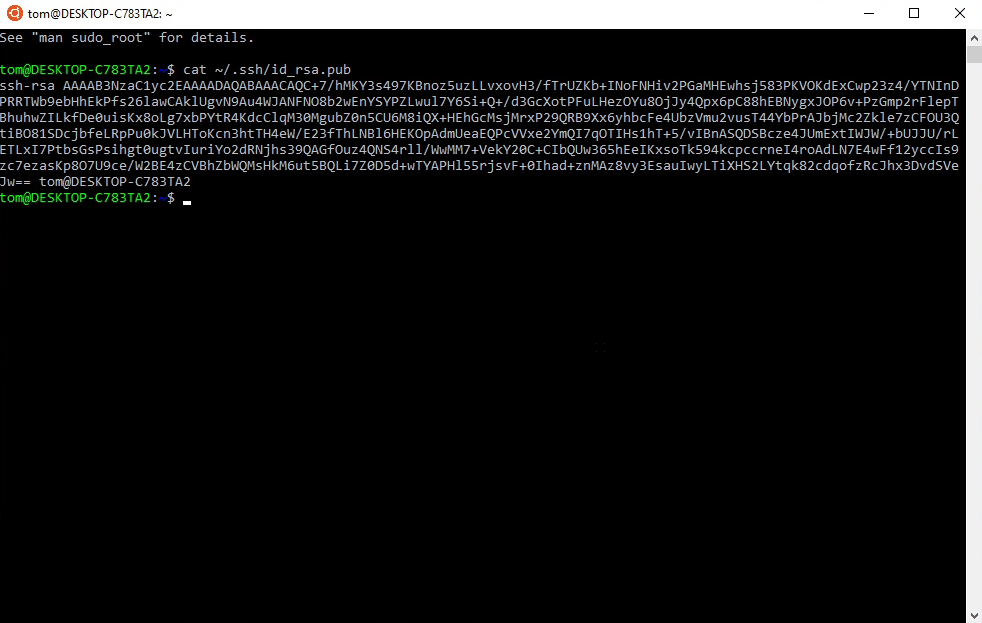
Step 5: Copy Your Public Key To Your Clipboard
You could go to the path listed above and copy the contents of your public key, but it’s much easier to just open the file from within Ubuntu and copy from there.
Change directories by using the following command
cd ~/.ssh
Now you’re in the .ssh directory where your keys are stored. Use the cat command to view the contents of the public key file like this:
cat id_rsa.pub
Moving to the directory wasn’t neccessary, but it is good practice if you’re unfamiliar with working in a terminal window. The public key contents can be displayed from anywhere by typing the following:
cat ~/.ssh/id_rsa.pub
The output will look similar to this
back to top ▲
Step 6: Add Your Public Key To Your GridPane Settings
Highlight the output of the previous command and press enter. This copies the data to your clipboard. You may find it useful to paste this into a Notepad document while you log into your GridPane account.
Once logged in, click on your name to display the dropdown menu.
- Select “Your Settings”
- Click on “SSH Keys” in the left menu
- Give your key a name
- Paste the public key into the large text field
- Click the green “Add Key” button
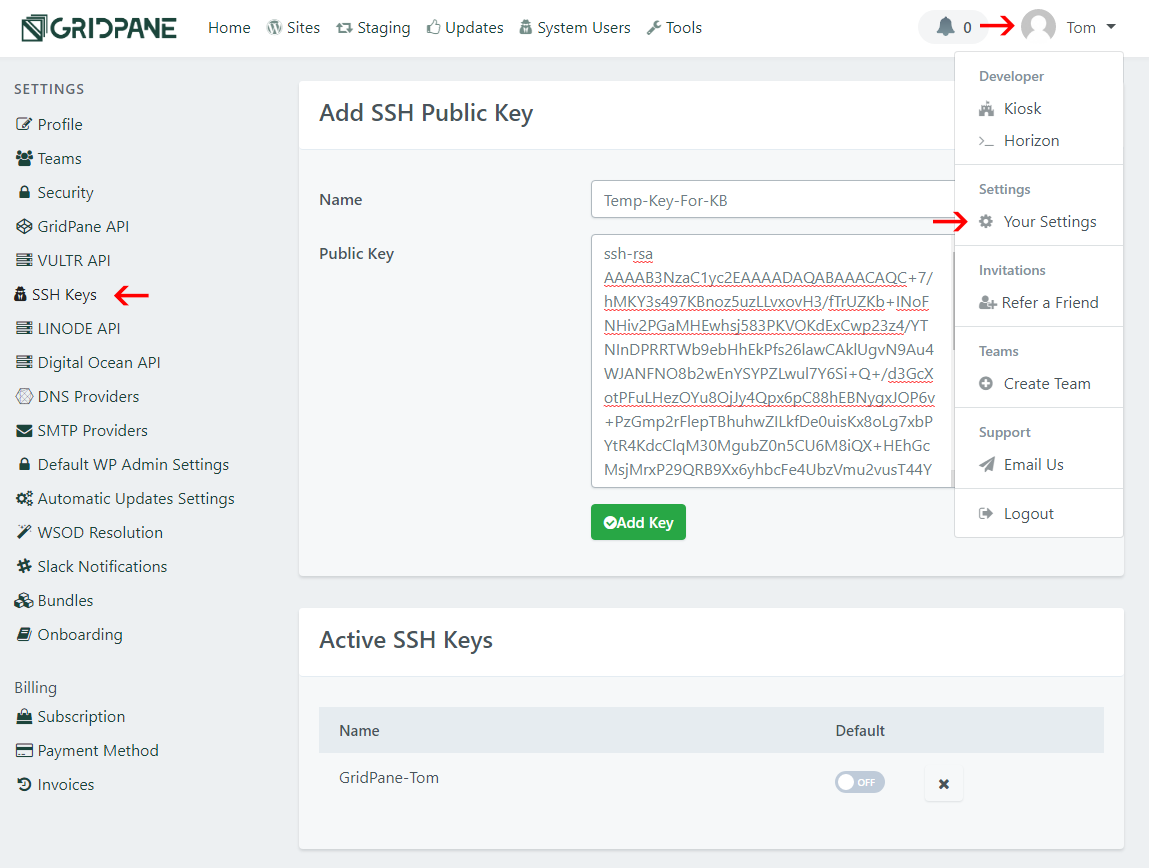
If you do this all correctly, your new key will appear below in the Active SSH Keys list.
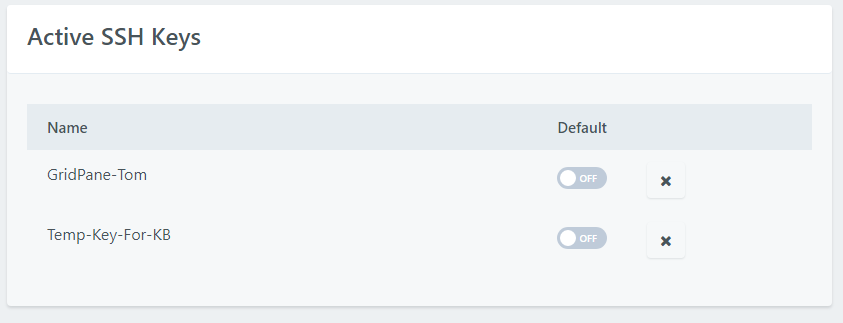
back to top ▲
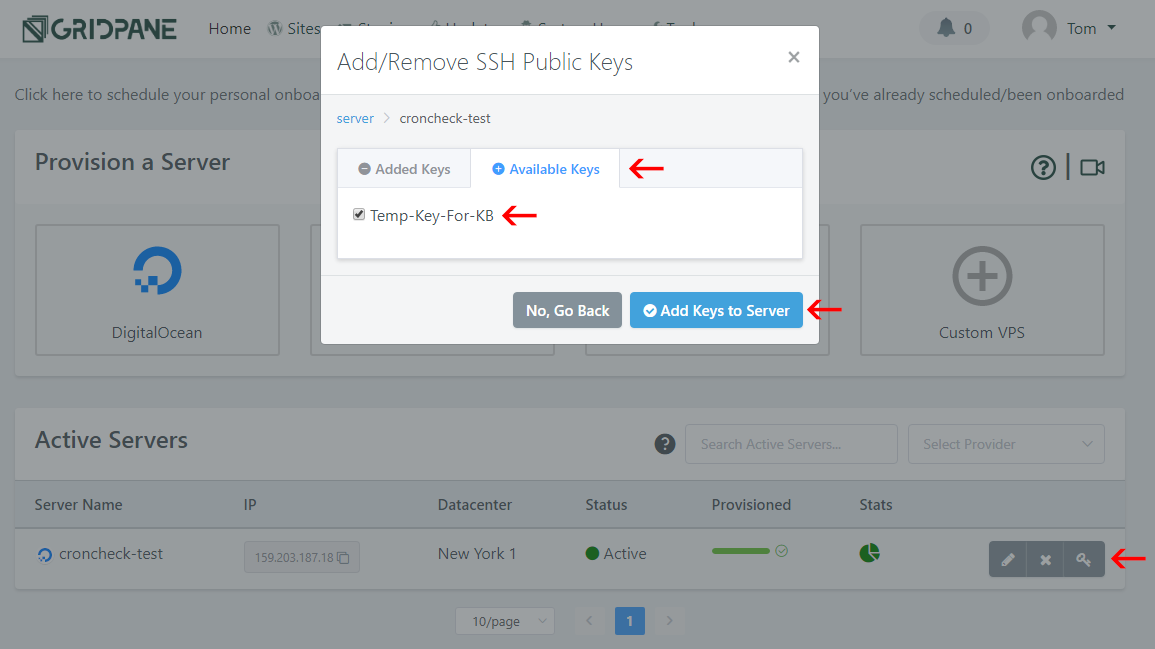
Step 7: Push Your Public Key To Your Server
Go to your dashboard page containing your servers. Now that you have an SSH key added to your account, a key icon will appear next to each server on the right. Click it to view the Add/Remove SSH Public Keys modal window. Click Available Keys, select your key, then Add Keys to Server.
You can easily remove keys by switching to the Added Keys window and reversing this process.
back to top ▲
Step 8: Connect To Your Server
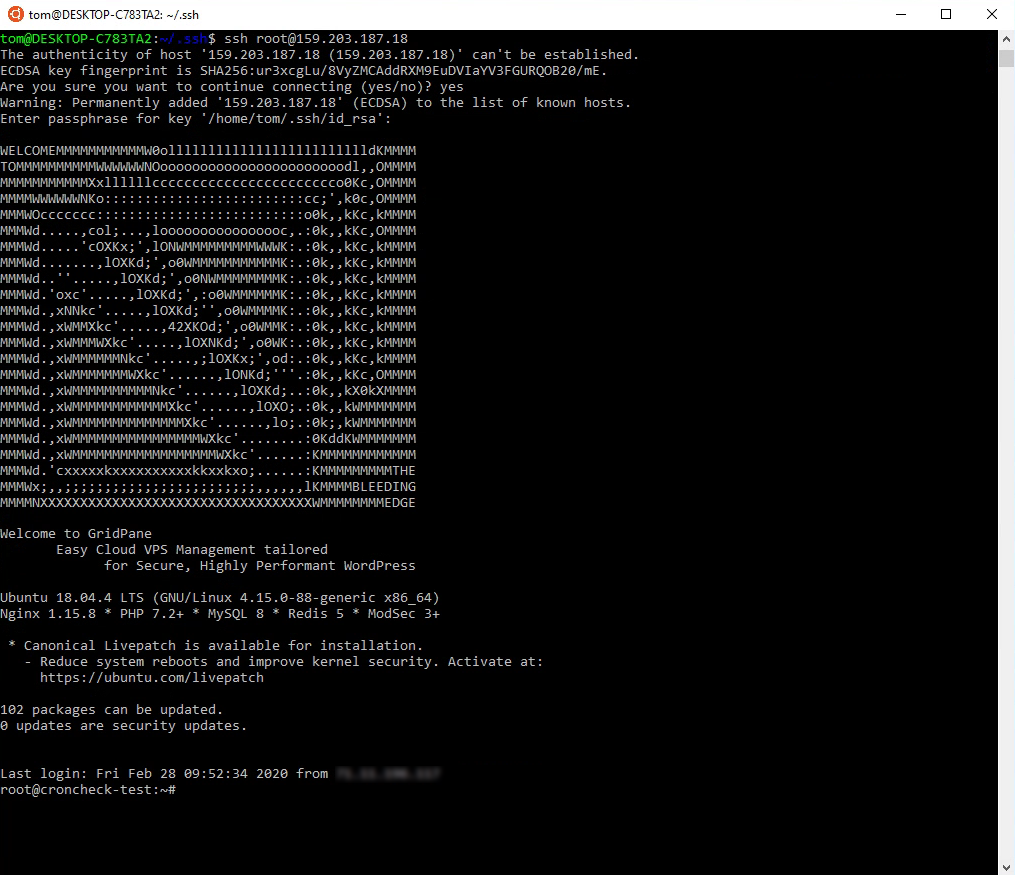
Back in Ubuntu, connect to your server with the following command:
ssh root@ipaddress
For my example, this is
ssh root@159.203.187.18
Wait, root? But I did not name my key root! That doesn’t matter. Every key, regardless of name, that is added to your GridPane Active SSH Keys is a root key.
If this is your first time connecting to this server, you will be asked if you want to continue connecting and add this IP address to your list of known hosts. Type yes.
If you have a passphrase associated with your SSH key, you will be asked for it at this time. Type it in and press enter.
If the private key on your machine matches the public key on the server, you will be authenticated and connect to the server.
The whole process looks like this:
That’s it! It may look complicated, but once you have Ubuntu installed it’s about a five minute process. If you have trouble with this, reach out to support and we’ll be happy to help you.
back to top ▲
An SSH key allows you to log into your server without a password. This guide describes creating SSH keys using a Linux, Mac, or Windows workstation in OpenSSH format, suitable for use with Vultr server instances.
Create an SSH Key with OpenSSH
OpenSSH is standard and should be present on macOS and most Linux distributions. We also have installation instructions for Windows 10 users. Follow these steps to create an SSH key with the OpenSSH utilities.
-
Generate your key with
ssh-keygen, substituting your email address.$ ssh-keygen -t ed25519 -C "your_email@example.com"Note: If you use a legacy system that doesn’t support the Ed25519 algorithm, use:
ssh-keygen -t rsa -b 4096 -C "your_email@example.com"By default, the keys are stored in the ~/.ssh directory. Most SSH clients automatically use these default filenames:
Algorithm: ED25519 (preferred)
-
Public key: id_ed25519.pub
-
Private key: id_ed25519
Algorithm: RSA (at least 2048-bit key size)
-
Public key: id_rsa.pub
-
Private key: id_rsa
Algorithm: DSA (deprecated)
-
Public key: id_dsa.pub
-
Private key: id_dsa
Algorithm: ECDSA
-
Public key: id_ecdsa.pub
-
Private key: id_ecdsa
-
-
Press ENTER to save the key in the default location.
Generating public/private ed25519 key pair. Enter file in which to save the key (/Users/example/.ssh/id_ed25519): -
You may enter a passphrase for your key. We recommend using a passphrase, but you can press ENTER to bypass this prompt. If you use a passphrase, you will enter it each time you use the key unless you also use ssh-agent.
Enter passphrase (empty for no passphrase): Enter same passphrase again: -
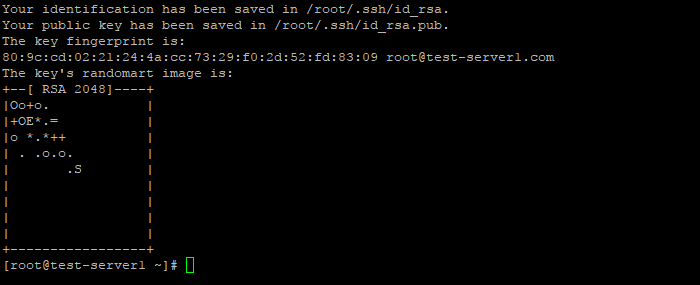
Your key is generated and saved.
Your identification has been saved in /Users/example/.ssh/id_ed25519. Your public key has been saved in /Users/example/.ssh/id_ed25519.pub. The key fingerprint is: SHA256:qx6prR4Zo+VU7Fl8yivXzzzzzzzzJ/9NRnPbrC20w7g example@example.com The key's randomart image is: +--[ED25519 256]--+ | | | o . | | o B o + . | | B + + o + | | = = S o o o | | = + = O + + | | . + B B = * . | | = O + o | | .+o=.. E . | +----[SHA256]-----+ -
Make a backup of the private key. The key cannot be recovered if lost.
-
Before connecting to an existing server with your SSH key, you’ll need to add the public key to the
authorized_keysfile. You can also add the public key to your Vultr account.
Install OpenSSH on Windows 10
The OpenSSH client is an installable component for Windows 10 1809.
-
Launch Settings then go to Apps > Apps and Features > Manage Optional Features.
-
Scan this list to see if OpenSSH Client is already installed. If not, then click Add a feature.
-
Locate OpenSSH Client, then click Install.
-
Optionally, you can also install OpenSSH Client with PowerShell.
Once you’ve installed OpenSSH, follow the instructions above to create your SSH key.
Create an SSH Key on Windows with PuTTYgen
PuTTYgen is part of the PuTTY suite of utilities. It is available for all versions of Windows.
-
Download the latest version of the PuTTY utilities. We recommend the MSI Windows Installer package.
-
Install the package and run PuTTYgen.
-
At the bottom of the program window, select
EdDSAfor the key type. -
In the lower-right corner, set «Curve to use for generating this key» to
Ed25519 (255 bits). -
Click the Generate button. Then, move the mouse in the blank area to generate some random data.
-
Enter a Key comment to make the key easier to identify later.
-
The private key must be kept secure from unauthorized use. We recommend entering a Key passphrase to protect the SSH key.
-
Click Save private key and store it securely. It is not possible to recover this file if it is lost. This file is your public/private key pair in PuTTY format. You can re-import this file with PuTTYgen in the future to export or convert the format of your public key.
-
Click Conversions > Export OpenSSH key. Save this file and store it securely. This file is your private SSH key in OpenSSH format. You may need this file if you use an SSH client other than PuTTY.
-
Select the text in the Public key for pasting into OpenSSH authorized_keys file box and save it to a file. This is your public key in OpenSSH format. If you want to add this key to your Vultr account, you’ll also copy and paste this into the Customer Portal.
Recover a Lost Public Key
If you have access to the private key, you can recover the public key with OpenSSH.
Pass ssh-keygen the -y option and the path to the private key with the -f option. When ssh-keygen regenerates the public SSH key, you can redirect the output to a file of your choice.
For example, to regenerate the public key for ~/example_key and send the output to ~/example_key.pub:
$ ssh-keygen -y -f ~/example_key > ~/example_key.pub
If a password is set for the key, you will be prompted to enter it.
Change the Key’s Passphrase
You can change the passphrase on a private key with the -p option and pass the key name with the -f option.
$ ssh-keygen -p -f ~/example_key
Enter your old and new passphrase (twice) at the prompts.
View the Key’s Fingerprint
Print the key’s SHA256 fingerprint with the -l option, and pass the key name with the -f option.
$ ssh-keygen -l -f example_key
The output is something like this:
3072 SHA256:pqdEtfbmIRwqTk9PpApa7DMvAxqCA577vJ/FcgyUM0Q root@localhost (RSA).
Transfer a Key to Your Server
OpenSSH includes a utility to transfer a key to your server. When using this utility, you must authenticate to your server using SSH.
Specify the public key to be transferred with the -i option. Replace the example with your username and the server’s IP address.
$ ssh-copy-id -i ~/.ssh/example_key.pub example_user@192.0.2.123
You will be prompted to authenticate with your server and transfer the key to the remote server’s authorized_keys file.
About SSH Key Formats
OpenSSH 6.5 introduced ED25519 keys in 2014, and they are available on most operating systems. It’s believed that ED25519 keys are more secure than RSA, with better performance. If you use an RSA key, the US National Institute of Science and Technology recommends a key size of at least 2048 bits.
More Information
For more information about managing SSH keys, see our other guides:
-
Deploy a New Server with an SSH Key
-
How to Add and Delete SSH Keys
-
Connect to a Server Using an SSH Key
-
Use an SSH Key for Non-root Users
SSH-ключи используются для идентификации клиента при подключении к серверу по SSH-протоколу. Используйте этот способ вместо аутентификации по паролю.
SSH-ключи представляют собой пару — закрытый и открытый ключ. Закрытый должен храниться в закрытом доступе у клиента, открытый отправляется на сервер и размещается в файле authorized_keys.
- Создание SSH-ключей в Linux на примере CentOS
- Создание SSH-ключей в Windows с PuTTYgen
- Отключение аутентификации по паролю
Создание SSH-ключей в Linux на примере CentOS
На клиентской стороне должен быть установлен пакет ssh (openssh). На серверах FirstVDS с шаблонами по умолчанию необходимое ПО уже установлено.
yum -y install openssh-server openssh-clients
На клиентском компьютере в командной строке выполните команду генерации ключей:
ssh-keygen

Введите путь файла, в который будут помещены ключи. Каталог по умолчанию указан в скобках, в примере /домашний_каталог/.ssh/id_rsa. Если хотите оставить расположение по умолчанию, нажмите Enter.
Пароль (passphrase) используется для ограничения доступа к закрытому ключу. Пароль усложнит использование ключа третьими лицами в случае утраты. Если не хотите использовать секретную фразу, нажмите Enter без заполнения строки.
Успешно сгенерировав пару ключей, вы увидите уведомление:
Открытый ключ хранится в файле /домашний_каталог/.ssh/id_rsa.pub, закрытый — /домашний_каталог/.ssh/id_rsa.
Скопируйте открытый ключ на сервер в файл /домашний_каталог/.ssh/authorized_keys. Одной строкой:
cat ~/.ssh/id_rsa.pub | ssh root@ip-адрес-сервера 'cat >> ~/.ssh/authorized_keys'
Или откройте этот файл на сервере редактором vi и вставьте строку с открытым ключом после ssh-rsa.

Ещё один способ скопировать ключ в authorized_keys — команда echo, которая помещает строку в конец файла.
echo ssh-rsa строка-публичного-ключа >> /root/.ssh/authorized_keys

Теперь можно отключить на сервере аутентификацию по паролю и использовать только SSH-ключи.
Создание SSH-ключей на Windows с PuTTYgen
Если вы используете ОС Windows, то подключиться по SSH к вашему (Linux) серверу можно через PuTTY или OpenSSH. Генерация ключей в этом случае выполняется также при помощи этих программ. В примере мы используем клиент PuTTY.
Запустите приложение PuTTYgen, которое устанавливается вместе с PuTTY.

Выберите тип ключа SSH2-RSA и нажмите Generate.
В процессе генерации ключей несколько раз произвольно проведите мышкой по экрану приложения для создания случайных величин, используемых для ключей.
После завершения создания ключей открытый ключ выводится на экран, закрытый хранится в памяти приложения. Чтобы сохранить эти ключи нажмите Save public key и Save private key. Укажите расположение файлов с ключами.
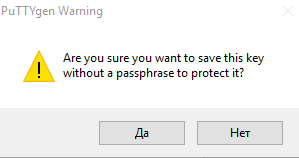
При сохранении закрытого ключа, если не заполнено поле Key passphrase, появится запрос «Хотите ли вы сохранить ключ без секретной фразы?»
Теперь открытый ключ необходимо скопировать на сервер в файл authorized_keys. Используйте WinSCP или другой клиент для работы с файлами на удалённом Linux-сервере. Вы можете скопировать файл с открытым ключом целиком на сервер, чтоб его копия хранилась в папке .ssh
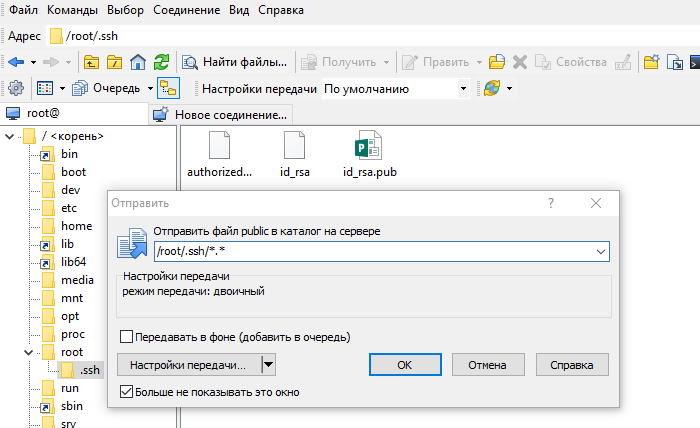
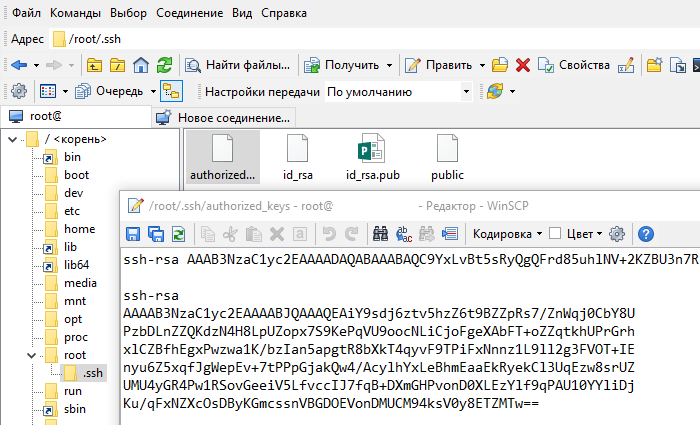
Откройте файл authorized_keys через WinSCP и файл, в который вы сохранили открытый ключ (public), на локальном компьютере текстовым редактором. Скопируйте значение ключа, сохраните и закройте файл в WinSCP.
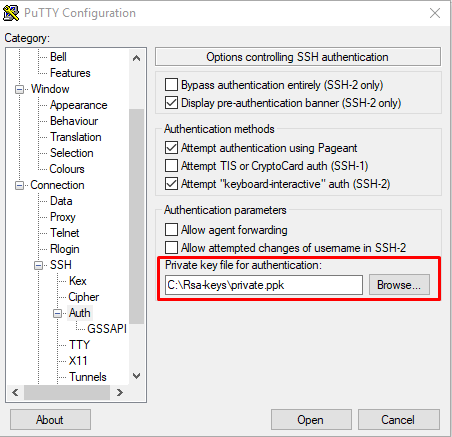
При запуске PuTTY укажите путь к закрытому ключу на локальном компьютере. Для этого во вкладке Connections → Auth выберите необходимый путь.
Теперь можно отключить на сервере аутентификацию по паролю и использовать только SSH-ключи.
Отключение аутентификации по паролю
Подключитесь к серверу по SSH, используя пароль, и откройте файл sshd_config для редактирования.
vi /etc/ssh/sshd_config
Убедитесь, что указан правильный путь к открытым ключам SSH, поставьте значение параметра PasswordAuthentication no.
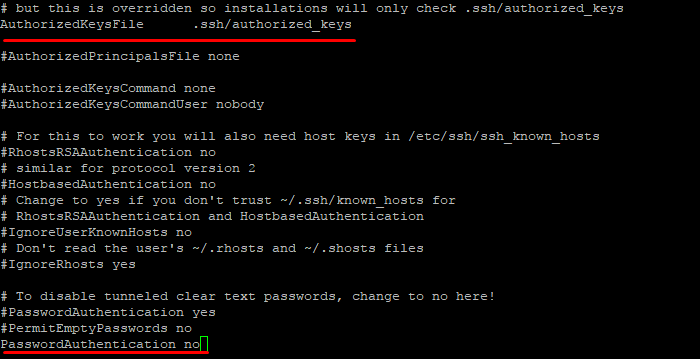
Перезапустите службу sshd.
service sshd restart

Подключитесь к серверу по SSH без использования пароля. Например, запустите PuTTY, проверьте, что во вкладке Connections -> Auth содержится путь к закрытому ключу и откройте подключение.

В случае успешной аутентификации по SSH-ключу вы получите доступ к командной строке сервера и сообщение вида Authenticating with public key «rsa-key-20170510», где rsa-key-20170510 — имя применённого закрытого ключа, указанное вами в файле authorized_keys.
Этот материал был полезен?
Рассмотрим создание SSH-ключей в Linux и Windows для подключения к серверу под управлением ОС Linux.
Использование SSH-ключей не только позволяет подключаться к серверу без пароля, но и повышает уровень безопасности сервера. Причина проста — пароль можно подобрать, а вот на подбор ключа могут уйти десятилетия. Ключ состоит из двух частей — открытой и закрытой. Именно открытый ключ передается на сервер, а закрытый ключ остается на ПК клиента. Если вы опасаетесь за безопасность ключа, его можно защитить парольной фразой при генерации.
Создание ключей выполняется командой
ssh-keygen -t rsa
На что стоит обратить внимание.
OpenSSH поддерживает генерацию нескольких типов ключей:
- dsa
- ecdsa
- ed25519
- rsa
- rsa1
Последнее время, надежность DSA-ключей ставится под сомнение и рекомендуют использовать RSA-ключи.
Если отсутствует каталог “.ssh” в каталоге вашей учетной записи (это скрытый каталог), то он будет создан. Так было не всегда и возможно его придется создать вручную. passphrase — парольная фраза для защиты ключа. Если не желаете её задавать, тогда просто нажимаете Enter. Далее вводится подтверждение этой фразы, либо также Enter. В результате выполнения команды, будет показан слепок ключа и его псевдографическое изображение. Открытый ключ располагается по пути /home/administrator/.ssh/id_rsa.pub. Закрытый — /home/administrator/.ssh/id_rsa.
Рассмотрим создание ключа через утилиту PuTTY-Gen.
Скачаем ее с официального сайта, выбрав соответствующую разрядность своей операционной системы (не серверной).


В открывшемся окне проверяем значение переключателя “Type of key to generate”, должно быть RSA, кликаем по кнопке Generate.
В обновленном окне программа нас просит выполнять случайные движения мышью в пустом поле программы. Таким образом программа получит случайные данные и создаст ключи.

Должен получиться примерно такой результат:

Копируем текст открытого ключа из поля “Public key for pasting into OpenSSH authorized_keys file:” временно в любой текстовый файл. Сохраняем закрытый ключ нажав соответствующую кнопку. При необходимости указываем парольную фразу.
Открытый ключ должен начинаться с ssh-rsa.
Добавление ключа.
Для успешного подключения к серверу следует прописать полученный открытый ключ в файл authorized_keys расположенном на сервере по пути:
/home/<имя_пользователя>/.ssh
В данном случае, имя пользователя administrator.
В *nix-подобный операционных системах экспорт открытого ключа на сервер выполняется командой:
cat ~/.ssh/id_dsa.pub | ssh -l remonet_user_name 10.10.0.1 "cat >> .ssh/authorized_keys"
remote_user_name — имя пользователя на удаленном сервере, под которым и будет происходить дальнейшее подключение.
10.10.0.1 — адрес сервера, в нашем случае, взят для примера. После выполнения команды, потребуется ввести пароль и более этого делать не придется., при попытках подключения с этого ПК.
Аverage rating : 5
Оценок: 2
191028
Санкт-Петербург
Литейный пр., д. 26, Лит. А
+7 (812) 403-06-99
![]()
700
300
ООО «ИТГЛОБАЛКОМ ЛАБС»
191028
Санкт-Петербург
Литейный пр., д. 26, Лит. А
+7 (812) 403-06-99
![]()
700
300
ООО «ИТГЛОБАЛКОМ ЛАБС»
![]()
700
300