This guide details the Windows 10 development workspace setup that I’ve been using so far. This document will most likely change as I try new things out, but do let me know if there are any inaccuracies.
IMPORTANT: Some lines may contain values that aren’t directly copy-pastable (I’ve stubbed variables in with {}), so be sure to read it before executing.
The benefits of this approach:
- Code and bash profile are shared across Windows, WSL, and VM(s)
- Development dependencies are installed within a VM, so the host machine is protected from potential pitfalls with environment setup
- VMs can be easily replaced or used to serve specific projects
Virtual Machine downloads (run in background)
Install Virtualbox:
VirtualBox
Get the latest Ubuntu server image (or, any other image you’d prefer):
Ubuntu Server (Mine is 16.04)
Install Windows Subsystem for Linux (WSL)
Windows Subsystem for Linux
Install ConEmu
Install ConEmu.
For quick access, use the Windows Powershell (WIN + R) and run the following command:
ConEmu64.exe -run {bash}
You may also want to update the Paste behaviour (under Keys & Macro in settings) to use Multi lines, otherwise you will lose line breaks when pasting. (should be default now)
EDIT: since WSL2, you may need to apply this workaround in settings
WSL setup
Passwordless sudo for current user:
echo "$(whoami) ALL=(ALL) NOPASSWD: ALL" | sudo EDITOR='tee -a' visudo
Shared directories:
Create the main directory that you want to share across the VM, WSL, and Windows.
I recommend creating a directory on your desktop (called shared in this instance) and linking as follows:
export SHARED_DIR_NAME={name of your shared dir, e.g. shared}
sudo ln -s /mnt/c/Users/{your user name, e.g. Paul}/Desktop/$SHARED_DIR_NAME /var/
cd /var/$SHARED_DIR_NAME
mkdir code sandbox
I like to have a code directory for projects, and sandbox for random hacks. It’s also a good idea to have directories for other project paths here, such as $GOPATH or jenkins server data.
Note: it’s important that the original files exist in Windows, since editing Linux files with Windows tools can often lead to corrupt files. The opposite (ie. editing Windows files with Linux) is relatively protected, though in some cases you may need to restart bash (restart LxssManager service in Task Manager > Services) or your machine if you’re left with files left in a weird state.
Shared profile settings:
Create a new file, /var/$SHARED_DIR_NAME/.shared_rc with the following contents:
#!/bin/bash
export SHARED_DIR=$(dirname "${BASH_SOURCE[0]}")

# Feel free to change these to something more applicable
alias cdz="cd $SHARED_DIR"
alias cds="cd $SHARED_DIR/sandbox"
alias cdc="cd $SHARED_DIR/code"

alias publickey='cat ~/.ssh/id_rsa.pub'

if [ -d /mnt/c ]; then
  # this runs in WSL
  # some navigation aliases specific to WSL
  # alias cdd="cd /mnt/c/Users/{YOUR USERNAME}/Desktop"
  alias cdm="cd /mnt/c"
  # add some aliases for tools you might want to use
  # alias sublime='/mnt/c/Program Files/Sublime Text 2/sublime_text.exe'
  # clipboard piping, with an example:
  alias clip='/mnt/c/Windows/System32/clip.exe'
  alias publickey='cat ~/.ssh/id_rsa.pub | clip && echo "Copied to clip."'
  function exp {
    explorer.exe $1
  }
  # TODO: add SSH aliases
else
  alias publickey='cat ~/.ssh/id_rsa.pub'
  # this runs elsewhere, e.g. Ubuntu VM
fi

function load_bookmark {
  export BOOKMARK=$(cat $SHARED_DIR/.bookmark 2> /dev/null || echo -n "~")
}

function bookmark {
  echo "$(pwd)" > $SHARED_DIR/.bookmark
  . $SHARED_DIR/.shared_rc
}

load_bookmark
alias cdf="cd $BOOKMARK"

# Edit profile settings, and source it
alias bashrc='vim ~/.bashrc && . ~/.bashrc'
alias sharedrc="vim $SHARED_DIR/.shared_rc && . ~/.bashrc"
Now, make sure that ~/.bashrc sources our new shared_rc file, and we source bashrc:
echo ". /var/$SHARED_DIR_NAME/.shared_rc" >> ~/.bashrc
. ~/.bashrc
It’s highly recommended to take a read of the aliases that this file sets up, and modify as necessary.
SSH (just press enter for each prompt):
ssh-keygen
Virtual Machines (repeatable)
Create a new Ubuntu 64-bit virtual machine. 2GB+ of memory should be fine (you can change this later as well), I used an 8GB dynamically allocated virtual hard disk for storage but this is also up to you.
You will be prompted to select an installation disk, which will be the Ubuntu Server ISO file downloaded earlier. Proceed with the install, and generally just use the defaults (note that some answers require moving the cursor to yes).
Allow SSH from host:
Note that you can’t copy-paste in the VM right now, so let’s just set up SSH from your WSL (you need to manually type the following commands).
sudo apt-get install openssh-server # may not need this unless you chose the 'do it myself' option for installing packages
ssh-keygen
Expose VM ports to the host:
From VirtualBox’s menu, click: Machine > Settings > Network > Advanced > Port Forwarding
And add the following mappings
Name      Protocol  Host IP     Host Port   Guest IP Guest      Port
SSH       TCP       127.0.0.1   6666        {LEAVE THIS BLANK}  22
runserver TCP       0.0.0.0     8000        {LEAVE THIS BLANK}  8000
Note the second «runserver» config is useful for running servers, and allowing external hosts to communicate with your VM. Probably not a good idea to do this for SSH though.
Remember to add this mapping for each port that you want to expose to the host, e.g. 3306 for MySQL.
From here on, you should move back to ConEmu and add the following alias to sharedrc by running the new sharedrc command:
# can add -X option for display forwarding, but isn't necessary
alias dev='ssh {VM username, e.g. dev}@localhost -p 6666'
You can then SSH into the VM with the dev command, so at this point you should get out of the VM window (minimize it) and use the previous host terminal (so you can copy paste).
Quality of life stuff
Get passwordless sudo and passwordless SSH.
Passwordless sudo (run on VM):
echo "$(whoami) ALL=(ALL) NOPASSWD: ALL" | sudo EDITOR='tee -a' visudo
Passwordless SSH (run on host):
publickey # this is a shortcut I made to copy your SSH key into your clipboard
dev # go into the VM
vim ~/.ssh/authorized_keys # paste in your publickey and save
Set up the shared directory inside the virtual machine:
From VirtualBox’s menu for the running VM, click the following: Devices > Insert Guest Additions CD image
Then run in the VM:
sudo mkdir /media/cdrom
sudo mount /dev/cdrom /media/cdrom
sudo /media/cdrom/VBoxLinuxAdditions.run # as long as this doesn't fail with errors, it's okay if any of previous two fail
Now, add the shared folder: Machine > Settings > Shared Folders > Add folder icon. Only check the «Make Permanent» option.
Mount the shared folder:
export SHARED_DIR_NAME={shared dir name}
sudo mkdir /mnt/$SHARED_DIR_NAME
echo "$SHARED_DIR_NAME /mnt/$SHARED_DIR_NAME vboxsf rw,uid=1000,comment=systemd.automount 0 0" | sudo tee -a /etc/fstab
sudo mount -a
sudo ln -s /mnt/$SHARED_DIR_NAME /var/
Note: comment=systemd.automount 0 0 is necessary since the machine will try mounting before VBox makes it available (you will see an error line when you boot up the VM). This comment is a workaround so that we lazy-mount with systemd later on during boot-up.
Import the shared bash profile:
echo ". /var/$SHARED_DIR_NAME/.shared_rc" >> ~/.bashrc
. ~/.bashrc
You should now create a snapshot of the VM as a backup.
Extras!
Configuring Git:
Use the alias publickey that was added to .shared_rc in the steps above to quickly copy the contents of ~/.ssh/id_rsa.pub (WSL only), or otherwise output it so you can copy it yourself.
You will want to add this key to your GitHub/BitBucket/SomeRepoService account.
Make sure you set up your Git identity as well.
git config --global user.email "your@email.com"
git config --global user.name "Your Name"
Running GUI applications in WSL using an XServer (make sure you run these in WSL, not a VM):
Install vcXsrv or XMing
Install x11 related libraries:
sudo apt-get install xfce4 x11-utils
For WSL, add the following to bash profile (using either bashrc or sharedrc commands):
export DISPLAY="localhost:0"
You should now see a clock when running
xclock
Run VM on boot:
Right click the machine in VirtualBox and save a shortcut to the desktop.
In powershell (WIN + R):
shell:startup
And drop the shortcut in the startup directory.
Django with MySQL setup:
In VM:
Install packages:
sudo apt-get install mysql-server libmysqlclient-dev
sudo pip3 install mysqlclient
Allow remote access from other hosts (change bind-address to 0.0.0.0 from 127.0.0.1):
sudo vim /etc/mysql/mysql.conf.d/mysqld.cnf
sudo systemctl restart mysql
Again, add a port forwarding rule for port 3306 in the Network settings.
If you want to create a Windows 10 development virtual machine (VM) on your Windows 10 device, Microsoft Hyper-V with the quick start gallery has you covered. So in this blog, we are going to have a look at how you can create a Windows 10 development virtual machine VM) on Windows 10. These are some easy and simple steps to automatically download and create your Windows 10 dev VM.
Microsoft offers a Windows 10 development VM which includes a preinstalled version of Windows 10 with Windows 10 SDK, Visual Studio 2019 (with the UWP, .NET desktop, and Azure workflows enabled and also includes the Windows Template Studio extension), Visual Studio Code, the Windows Subsystem for Linux, Developer mode enabled, and much more.
If you are running Windows 10 on you laptop, you can easily do all of this using Hyper-V and build-in tools. If you want to run this development virtual machine on different virtualization software options like VMware, VirtualBox, and Parallels, check out my links below.
If you want to learn more about how Hyper-V can empower developers, check out my blog post Hyper-V for Developers.
Create a Windows 10 development virtual machine using Hyper-V
To get started you will need to enable Hyper-V on your Windows 10 machine. The Hyper-V feature has a couple of prerequisites:
- Windows 10 Enterprise, Pro, or Education
- 64-bit Processor with Second Level Address Translation (SLAT).
- CPU support for VM Monitor Mode Extension (VT-c on Intel CPUs).
- Minimum of 4 GB memory.
The Hyper-V role cannot be installed on Windows 10 Home. Upgrade from Windows 10 Home edition to Windows 10 Pro by opening up Settings > Update and Security > Activation.
For more information and troubleshooting, see Windows 10 Hyper-V System Requirements.
To enabled Hyper-V on Windows 10 open up PowerShell as Administrator and run the following command:
Enable-WindowsOptionalFeature -Online -FeatureName Microsoft-Hyper-V -AllAfter that your computer will ask you to reboot.
Now you can open the Hyper-V Manager from the startmenu and on the right you can click on “Quick Create…“.
Here you can find a couple of free images you can use like Ubuntu Hyper-V Images and more. It also includes the Windows 10 dev environment VM. Select the Windows 10 dev VM and click on Create Virtual Machine. This will download the image and create the virtual machine.
After the VM is successfully created, you can start the VM by clicking Connect, or first edit the settings.
Since Windows 10 is running inside a virtual machine, by default you will be using the Windows Subsystem for Linux version 1. If you want to use the WSL 2 (Windows Subsystem for Linux 2) inside the Windows 10 dev virtual machine, you will need to enable nested virtualization on your Hyper-V machine.
Run this command as Administrator in PowerShell on the Windows 10 machine (not inside the virtual machine).
Set-VMProcessor -VMName "Windows 10 dev environment" -ExposeVirtualizationExtensions $true
Set-VMNetworkAdapter -VMName "Windows 10 dev environment" -MacAddressSpoofing On
You will need to run these commands while the virtual machine is still turned off.
Now you can start using your Windows 10 development virtual machine. With enhanced session mode on, you can also easily copy-paste files between the Windows 10 host and the VM.
Create a Windows 10 development virtual machine on VMware, VirtualBox, or Parallels
If you want to run your Windows 10 dev VM on VMware, VirtualBox, or Parallels, you can download images on the following website.
Conclusion
I hope this blog post was helpful. If you have any questions, feel free to leave a comment below. If you want to learn more about how Hyper-V can empower developers, check out my blog post Hyper-V for Developers.
Tags: Development VM, Hyper-V, Microsoft, Virtual Machine, Virtualization, Visual Studio, Visual Studio Code, VM, Windows, Windows 10. Developer Last modified: June 2, 2021
About the Author / Thomas Maurer

Thomas works as a Senior Cloud Advocate at Microsoft. He engages with the community and customers around the world to share his knowledge and collect feedback to improve the Azure cloud platform. Prior joining the Azure engineering team, Thomas was a Lead Architect and Microsoft MVP, to help architect, implement and promote Microsoft cloud technology.
If you want to know more about Thomas, check out his blog: www.thomasmaurer.ch and Twitter: www.twitter.com/thomasmaurer
You probably know that you can download free developer tools for Windows 10 up at the Windows Dev Center here.
Visual Studio Community IS effectively the Pro SKU and is free for Open Source. You may even have a «Take Home» license at your work since the paid version of VS is licensed per-user, not per-machine, so ask your boss if you can install it at home and get the same pro tools you use at work.
BUT, did you know (I did not!) that you can download a free time-boxed Windows 10 Development environment for your Mac, Windows, or Linux machine as a virtual machine?
That means, there’s a pre-configured VM for VMWare or Hyper-V or VirtualBox or Parallels up at https://developer.microsoft.com/en-us/windows/downloads/virtual-machines/ right now. This has been super useful when I wanted to get a build running fast on a system to test something or get started TODAY.
This evaluation virtual machine includes:
- Windows 10, version 2004 (10.0.19041.0)
- Windows 10 SDK, version 2004 (10.0.19041.0)
- Visual Studio 2019 with the UWP, .NET desktop, and Azure workflows enabled and also includes the Windows Template Studio extension
- Visual Studio Code
- Windows Subsystem for Linux enabled with Ubuntu installed
- Developer mode enabled
These are for eval or quick testing and expire regularly, so check back to get another if you need to. (BTW there are also free VMs for testing IE11 or Edge Legacy but we don’t talk about those.)

Again, VS Code is free for Windows, Mac, and Linux, and VS itself is free for Windows and Mac so you may not need these VMs, but knowing there are Windows developer VMs available free for eval is a super useful way to bootstrap development on any machine. Enjoy!
Sponsor: Have what it takes to code securely? Select from dozens of complimentary interactive secure coding labs, test your skills, and earn a badge. Learn more!
About Scott
Scott Hanselman is a former professor, former Chief Architect in finance, now speaker, consultant, father, diabetic, and Microsoft employee. He is a failed stand-up comic, a cornrower, and a book author.
![]()
![]()
![]()
About Newsletter
Hosting By


![]()
This is the start of a series of posts detailing how to setup Windows as a proper developer environment. This post is meant to help beginners like me.
Ingredients:
- Windows Terminal (terminal for Windows by Microsoft)
- Neovim (terminal text editor)
- Powershell (new Powershell by Microsoft)
- Oh My Posh (prompt engine)
- Git for Windows (version control system)
- Scoop (command-line package installer)
- Powershell Modules (PSReadLine, posh-git, oh-my-posh, PSFzf, Terminal Icons)
Installing Windows Terminal and Winget
-
To get started install
Microsoft Terminalfrom the Microsoft Store. -
If you’re on Windows 10, install
App Installerfrom the Microsoft Store or follow the instructions on the Winget-cli github repo.
Windows Package Manager Client
This repository contains the source code for the Windows Package Manager Client.

If you are new to the Windows Package Manager, you might want to Explore the Windows Package Manager tool. The packages available to the client are in the Windows Package Manager Community Repository.
Installing The Client
The client requires Windows 10 1809 (build 17763) or later at this time. Windows Server 2019 is not supported as the Microsoft Store is not available nor are updated dependencies. It may be possible to install on Windows Server 2022, this should be considered experimental (not supported), and requires dependencies to be manually installed as well.
Microsoft Store [Recommended]
The client is distributed within the App Installer package.
Development Releases
There are two methods to get development releases:
- Install a Windows 10 or Windows 11 Insider build.
- Join the Windows Package Manager Insider program by signing…
Install Patched Nerd Font
- Go to the Nerd Fonts website and download the patched font you like. Extract the zip file and install the fonts.
Configure Windows Terminal
- Open Windows Terminal and go to Settings from the dropdown menu.

-
In settings, go to the Defaults profile and click the Appearance option in the Additional Settings.
-
In Appearance, change the color scheme to
One Half Darkas it looks the cleanest and the font to the patched nerd font you just installed. I will use Hack NF.
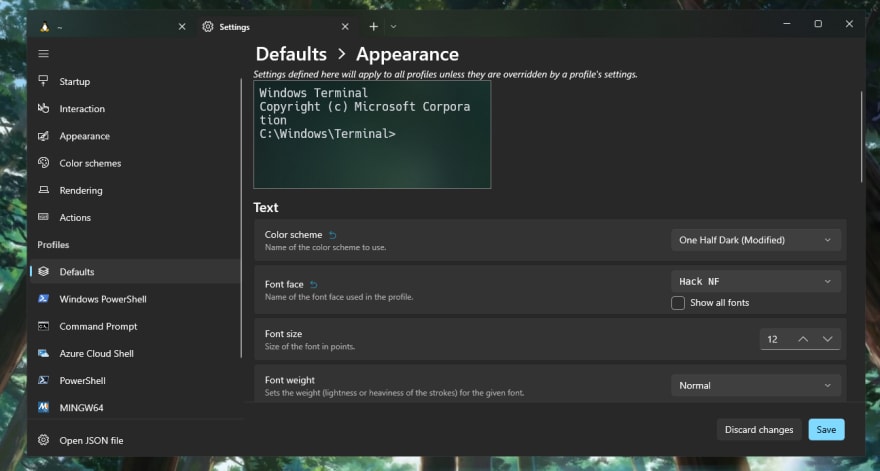
- Scroll down and enable Acrylic Material and Transparency if you desire a pretty looking terminal.

Install Powershell
-
Microsoft released a new version of Powershell in the Microsoft Store and on their GitHub repo which is miles better than what we have right now.
-
To install the new and improved Powershell, enter the following lines in a new terminal tab.
winget install Microsoft.PowerShell
Enter fullscreen mode
Exit fullscreen mode
Change default shell
-
Go back to the settings tab in Windows Terminal.
-
In the startup tab on the left side, change the default profile to Powershell (not Windows Powershell)
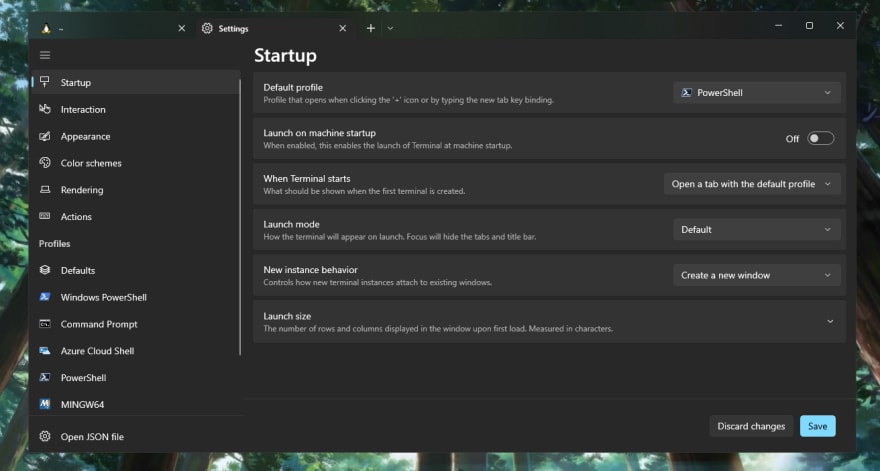
- Reload Windows Terminal to confirm the changes.
Install Scoop (command-line package installer)
- To install Scoop, type the following lines taken from the Scoop website.
iwr -useb get.scoop.sh | iex
Enter fullscreen mode
Exit fullscreen mode
- To check if Scoop is properly installed, we will install a few packages
- sudo — elevating commands without opening terminal with administrator privileges
- jq — command-line json processor
- curl — command-line tool for transferring data
- To install them type,
scoop install sudo jq curl
Enter fullscreen mode
Exit fullscreen mode
- If the packages are installed correctly, then congratulations. If not, then refer to their documentation to fix the issue.
Install Git for Windows
-
Git is free and open source software for distributed version control: tracking changes in any set of files, usually used for coordinating work among programmers collaboratively developing source code during software development.
-
To install Git, type the following lines
winget install -e --id Git.Git
Enter fullscreen mode
Exit fullscreen mode
Install Neovim
-
This tutorial is going to use Neovim to edit configuration files of different packages and programs. You can use something else if you like.
-
To install Neovim, type the following lines,
scoop install neovim
Enter fullscreen mode
Exit fullscreen mode
Configure Powershell
-
To configure Powershell, we will create a .ps1 file where we will save our settings.
-
Use the following commands to make a .ps1 file
# Change working directory to home directory
cd $home

# Make .config directory
mkdir .config

# Create a config file
echo "" > .config/Microsoft_profile.ps1

# In this tutorial, I will name the config file
# Microsoft_profile.ps1 but you can name it anything
# you want
Enter fullscreen mode
Exit fullscreen mode
- Open neovim and add the following to the config file
nvim .config/powershell/Microsoft_profile.ps1
Enter fullscreen mode
Exit fullscreen mode
Inside the file, add the following lines
# Set Encoding to UTF-8
[console]::InputEncoding = [console]::OutputEncoding = New-Object System.Text.UTF8Encoding

# Aliases (add more according to your preference)
Set-Alias -Name vim -Value nvim
Set-Alias ll dir
Set-Alias g git
Set-Alias grep findstr
Enter fullscreen mode
Exit fullscreen mode
- Update $PROFILE for Current User
nvim $PROFILE.CurrentUserHost
Enter fullscreen mode
Exit fullscreen mode
Inside the file, add the following lines
$env:USERPROFILE.configpowershellMicrosoft_profile.ps1
Enter fullscreen mode
Exit fullscreen mode
- Open a new Powershell to confirm the changes
Install Oh My Posh (prompt engine for Powershell)
- To install Oh My Posh, enter the following lines
sudo wget https://github.com/JanDeDobbeleer/oh-my-posh/releases/latest/download/posh-linux-amd64 -O /usr/local/bin/oh-my-posh
sudo chmod +x /usr/local/bin/oh-my-posh
Enter fullscreen mode
Exit fullscreen mode
- Make new file for Oh My Posh theme
# You can name the theme file anything you want
echo "" > .config/powershell/theme1.omp.json
Enter fullscreen mode
Exit fullscreen mode
- Add the following code to the file,
{
  "$schema": "https://raw.githubusercontent.com/JanDeDobbeleer/oh-my-posh/main/themes/schema.json",
  "blocks": [
    {
      "alignment": "left",
      "segments": [
        {
          "background": "#0077c2",
          "foreground": "#ffffff",
          "leading_diamond": "u256du2500ue0b6",
          "style": "diamond",
          "template": " {{ .Name }} ",
          "type": "shell"
        },
        {
          "background": "#ef5350",
          "foreground": "#FFFB38",
          "properties": {
            "root_icon": "uf292"
          },
          "style": "diamond",
          "template": "<parentBackground>ue0b0</> uf0e7 ",
          "type": "root"
        },
        {
          "background": "#444444",
          "foreground": "#E4E4E4",
          "powerline_symbol": "ue0b0",
          "properties": {
            "style": "full"
          },
          "style": "powerline",
          "template": " {{ .Path }} ",
          "type": "path"
        },
        {
          "background": "#FFFB38",
          "background_templates": [
            "{{ if or (.Working.Changed) (.Staging.Changed) }}#ffeb95{{ end }}",
            "{{ if and (gt .Ahead 0) (gt .Behind 0) }}#c5e478{{ end }}",
            "{{ if gt .Ahead 0 }}#C792EA{{ end }}",
            "{{ if gt .Behind 0 }}#C792EA{{ end }}"
          ],
          "foreground": "#011627",
          "powerline_symbol": "ue0b0",
          "properties": {
            "branch_icon": "ue725 ",
            "fetch_status": true,
            "fetch_upstream_icon": true
          },
          "style": "powerline",
          "template": " {{ .HEAD }} {{ if .Working.Changed }}{{ .Working.String }}{{ end }}{{ if and (.Working.Changed) (.Staging.Changed) }} |{{ end }}{{ if .Staging.Changed }}<#ef5350> uf046 {{ .Staging.String }}</>{{ end }} ",
          "type": "git"
        }
      ],
      "type": "prompt"
    },
    {
      "alignment": "right",
      "segments": [
        {
          "background": "#303030",
          "foreground": "#3C873A",
          "leading_diamond": " ue0b6",
          "properties": {
            "fetch_package_manager": true,
            "npm_icon": " <#cc3a3a>ue5fa</> ",
            "yarn_icon": " <#348cba>uf61a</>"
          },
          "style": "diamond",
          "template": "ue718 {{ if .PackageManagerIcon }}{{ .PackageManagerIcon }} {{ end }}{{ .Full }}",
          "trailing_diamond": "ue0b4",
          "type": "node"
        },
        {
          "background": "#40c4ff",
          "foreground": "#ffffff",
          "invert_powerline": true,
          "leading_diamond": " ue0b6",
          "style": "diamond",
          "template": " uf5ef {{ .CurrentDate | date .Format }} ",
          "trailing_diamond": "ue0b4",
          "type": "time"
        }
      ],
      "type": "prompt"
    },
    {
      "alignment": "left",
      "newline": true,
      "segments": [
        {
          "foreground": "#21c7c7",
          "style": "plain",
          "template": "u2570u2500",
          "type": "text"
        },
        {
          "foreground": "#e0f8ff",
          "foreground_templates": [
            "{{ if gt .Code 0 }}#ef5350{{ end }}"
          ],
          "properties": {
            "always_enabled": true
          },
          "style": "plain",
          "template": "u276f ",
          "type": "exit"
        }
      ],
      "type": "prompt"
    }
  ],
  "version": 2
}
Enter fullscreen mode
Exit fullscreen mode
- This will create the theme file with the following theme,
- To load the theme, add the following to
.config/powershell/Microsoft_profile.ps1
Import-Module post-git
$omp_config = Join-Path $PSScriptRoot ".theme1.omp.json"
oh-my-posh --init --shell pwsh --config $omp_config | Invoke-Expression
Enter fullscreen mode
Exit fullscreen mode
- Install NodeJS to check if right bubbles are working
# Install Node Version Manager (NVM)
scoop install nvm

# Install LTS Version of NodeJS
nvm install 14.16.10

# Use LTS Version of NodeJS
nvm use 14.16.10

# Make temporary folder for testing
mkdir example && cd example

# Initialize npm for checking right bubbles
npm init -y
Enter fullscreen mode
Exit fullscreen mode
- Following the above commands, the right bubbles should be working for you.
Terminal Icons, zoxide, PSReadLine, PSFzf — Powershell Modules
- Enter the following commands to install module for Terminal Icons (make ll command a little prettier), zoxide (directory jumping), PSReadLine (autocomplete)
Install-Module -Name Terminal-Icons -Repository PSGallery -Force
Install-Module -Name z -Force
Install-Module -Name PSReadLine -AllowPreRelease -Scope CurrentUser -Force -SkipPublisherCheck
Install-Module -Name PSFzf -Scope CurrentUser -Force

# Requirement for PSFzf Module
scoop install fzf
Enter fullscreen mode
Exit fullscreen mode
-
Restart Terminal
-
Add the following lines to powershell config to import the modules
# Terminal Icons
Import-Module -Name Terminal-Icons

# PSReadLine
Set-PSReadLineOption -EditMode Emacs
Set-PSReadLineOption -BellStyle None
Set-PSReadLineKeyHandler -Chord 'Ctrl+d' -Function DeleteChar
Set-PSReadLineOption -PredictionSource History

# PSFzf
Import-Module -Name PSFzf
Set-PsFzfOption -PSReadlineChordProvider 'Ctrl+f' -PSReadlineChordReverseHistory 'Ctrl+r'

# Add utility command 'which'
function which ($command) {
  Get-Command -Name $command -ErrorAction SilentlyContinue
    Select-Object -ExpandProperty Path -ErrorAction SilentlyContinue
}
Enter fullscreen mode
Exit fullscreen mode
Thus, we have configured Powershell and Windows Terminal to make Windows a proper developer environment. In the next part of the series we will configure Windows Subsystem for Linux (WSL) and make it our main developer environment and use Powershell to interact with Windows whenever necessary.
Setting up Windows 10 For Development
Windows 10 is one of the most flexible and robust development platform ever given. Windows Core and UAP has enabled developers to build experiences once and then target it to any device which runs
Windows 10 be it a Xbox or Desktop.
In this article I will talk in depth about how one can setup their own dev environment. Platform without facing much of a hassle.
Lets begin our journey with a clean build of Windows 10 . I am using Windows 10 Insider Pro Preview Build 10074.
 ·
·
For all the people who are new to development and are very new to Windows 10. Its will be very helpful to go through the Architecture of Windows 10 before , before getting hands dirty with setting
up dev build.
People who are very familiar with App Dev and Web Dev on Windows 8/8.1 . Here is how you set up VS 2015 Community RC.
Installing Visual Studios 2015 Community RC
·
People who don’t have VS 2015. It’s a easy task and and requires patience while you are doing it for the first time.
1. Start off by downloading VS2015 Community RC from [https://www.visualstudio.com/en-us/downloads/visual-studio-2015-downloads-vs.aspx]
2.It will download an exe file named [vs_community.exe]
3. When you are trying to install select “Custom in setup, and then select the
Universal Windows Apps Development Tools.”
4.Then it will complete installing , this might take 4-5 hrs depending on your network speed and the system.
5. You will get this after the installation is done.
·
People who have already installed
Visual Studio 2015RC Community without custom can still get to the same page in a jiffy by downloading the tools and updating the
Windows SDK
1. People can follow this link [https://dev.windows.com/en-US/downloads/install-dev-tools-visual-studio-2015]
2. Click on Add Tools and you guys will get an exe file downloaded.
3. On Executing the .exe file you will get the following screen and after its completion you will be all set to go.

 Enabling
the Windows 10 Developer option.When you try to open any new project Windows 10 , you will be prompting you
to enable your device with a dialog. (You also need your device to be enabled to use the designers and debug your app.)
You need to follow these following steps sequentially when you are enabling the developer mode.
1.Open a cmd prompt with administrator privileges.

2.Run Gpedit.msc.

3.Go to Local Computer Policy > Computer Configuration > Administrative Templates > Windows Components > App Package Deployment
4.Edit the policies to enable the following:
◦Allow all trusted apps to install (Enables your device for sideloading apps)
◦Allows development of Windows Store apps and installing them from an integrated development environment (IDE) (Enables your device for development from Visual Studio)

5. Reboot your machine.
After you are done with all the steps you will now be able to build apps and leverage the power of Windows Universal (UAP) . To mark the successful completion of the process you will have the following screen when you open Visual Studio 2015RC .
I will be writing more about the Application Dev taking in the whole power of UAP and much more in the forthcoming articles.
Hi, guys? Long time, huh? Hope you are all doing great! and you are all safe and sound. Today i would like to help you create a dev/hacking environment in Windows 10. So let’s get right into it.
First you’ll need to make sure you have a Windows 10, updated to 10th May 202 version(Windows 10, Version 2004, Build 19041 or higher).
Now i would like you to install the Windows Subsystem for Linux v1 and 2.
Here’s the installation:
WSL1
Before installing any Linux distributions on Windows, you must enable the “Windows Subsystem for Linux” optional feature.
Open PowerShell as Administrator and run:
dism.exe /online /enable-feature /featurename:Microsoft-Windows-Subsystem-Linux /all /norestart
To only install WSL 1, you should now restart your machine and move on to Install your Linux distribution of choice, otherwise wait to restart and move on to update to WSL 2. Read more about Comparing WSL 2 and WSL 1.
WSL2
To update to WSL 2, you must meet the following criteria:
- Running Windows 10, updated to version 2004, Build 19041 or higher.
- Check your Windows version by selecting the Windows logo key + R, type winver, select OK. (Or enter the
vercommand in Windows Command Prompt). Please update to the latest Windows version if your build is lower than 19041. Get Windows Update Assistant.
Enable the ‘Virtual Machine Platform’ optional component
Before installing WSL 2, you must enable the “Virtual Machine Platform” optional feature.
Open PowerShell as Administrator and run: PowerShell
dism.exe /online /enable-feature /featurename:VirtualMachinePlatform /all /norestart
Restart your machine to complete the WSL install and update to WSL 2.
Set WSL 2 as your default version
Run the following command in PowerShell to set WSL 2 as the default version when installing a new Linux distribution: PowerShell
wsl --set-default-version 2
You might see this message after running that command: WSL 2 requires an update to its kernel component. For information please visit https://aka.ms/wsl2kernel. Please follow the link (https://aka.ms/wsl2kernel) and install the MSI from that page on our documentation to install a Linux kernel on your machine for WSL 2 to use. Once you have the kernel installed, please run the command again and it should complete successfully without showing the message.
Note
The update from WSL 1 to WSL 2 may take several minutes to complete depending on the size of your targeted distribution. If you are running an older (legacy) installation of WSL 1 from Windows 10 Anniversary Update or Creators Update, you may encounter an update error. Follow these instructions to uninstall and remove any legacy distributions.
If wsl --set-default-version results as an invalid command, enter wsl --help. If the --set-default-version is not listed, it means that your OS doesn’t support it and you need to update to version 2004, Build 19041 or higher.
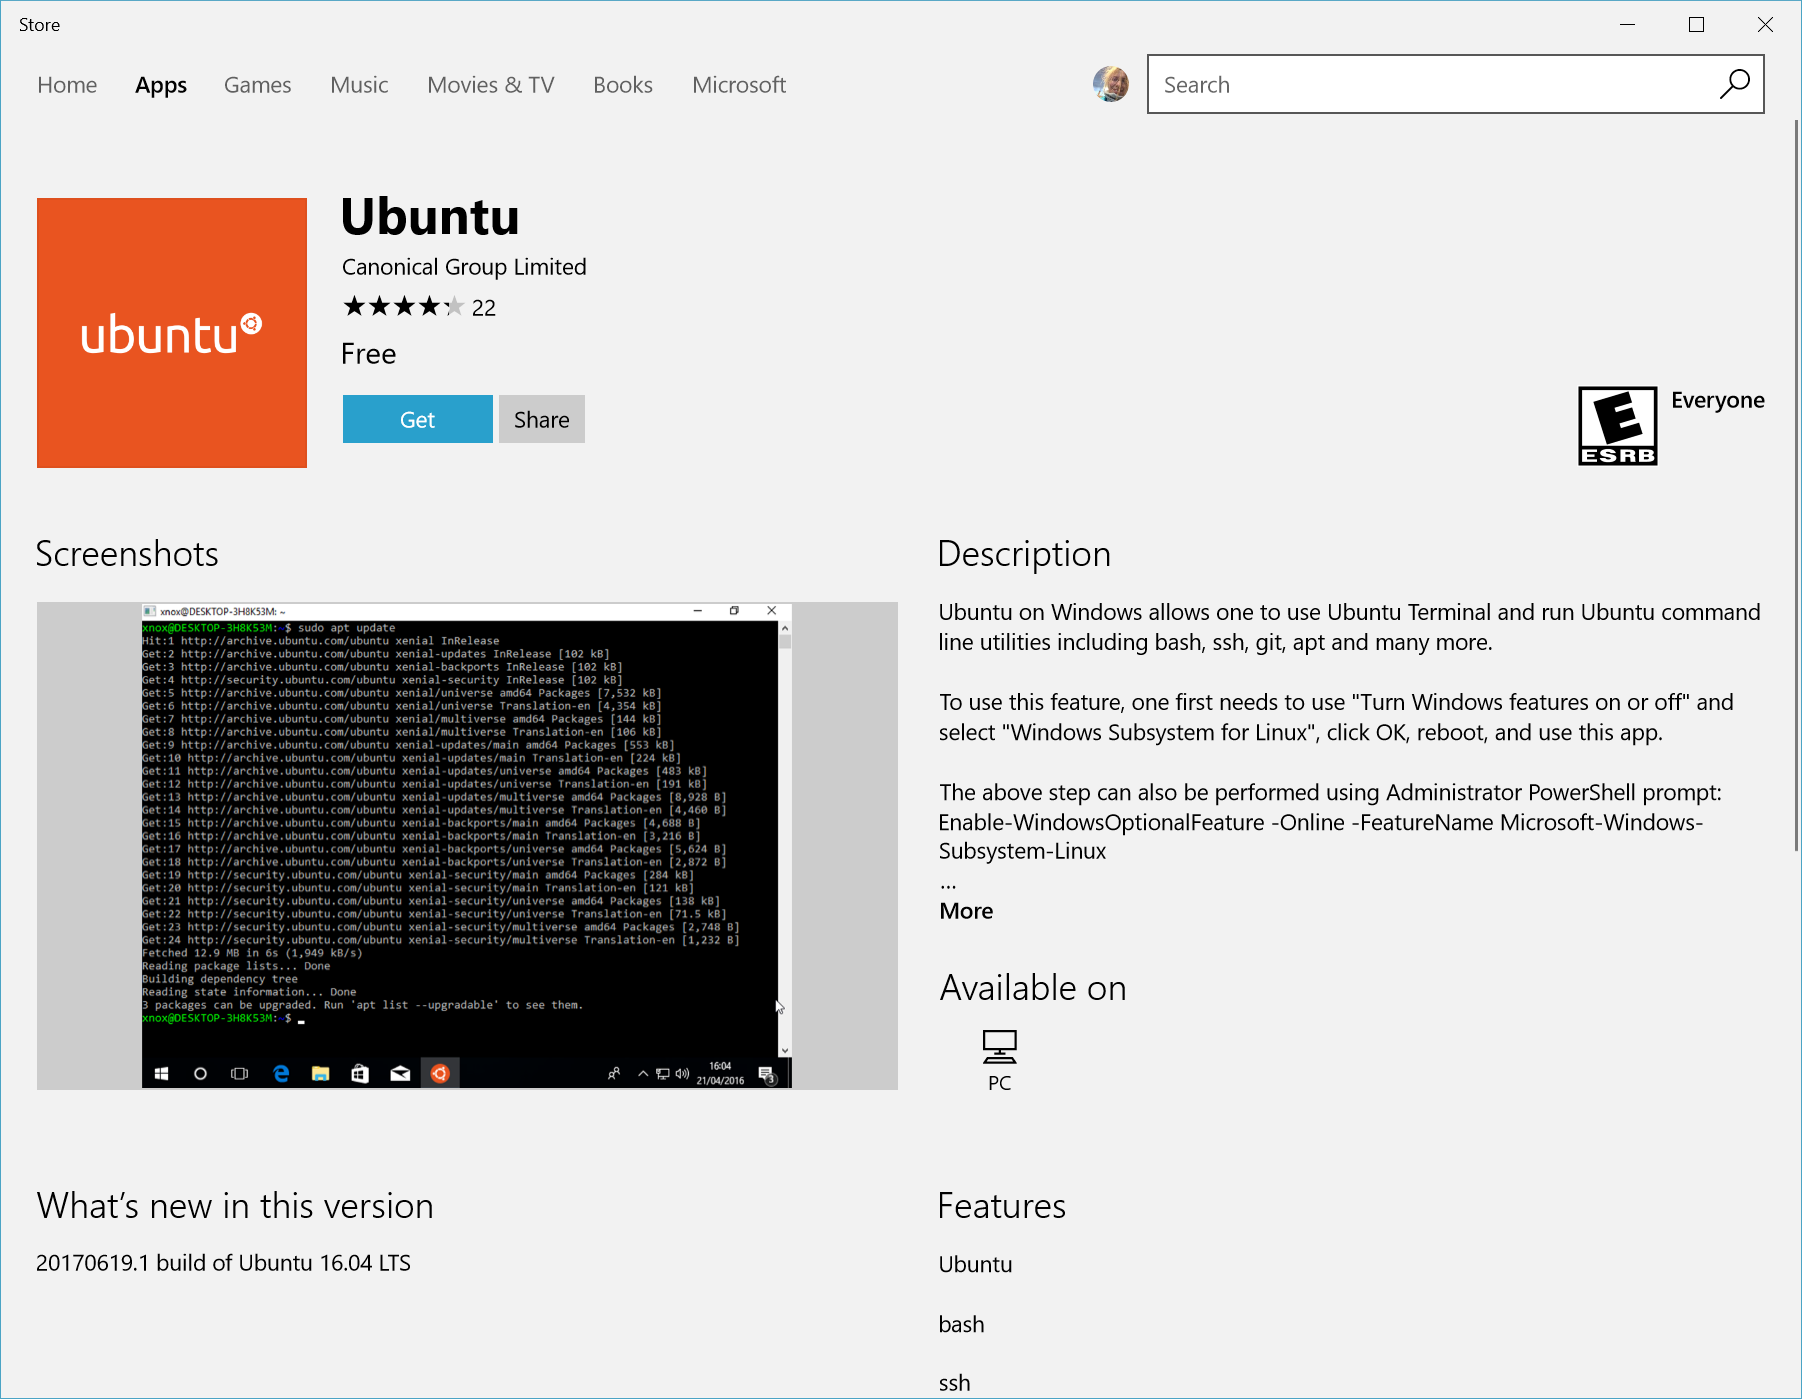
Install your Linux distribution of choice
- Open the Microsoft Store and select your favorite Linux distribution.
 The following links will open the Microsoft store page for each distribution:
- Ubuntu 16.04 LTS
- Ubuntu 18.04 LTS
- Ubuntu 20.04 LTS
- openSUSE Leap 15.1
- SUSE Linux Enterprise Server 12 SP5
- SUSE Linux Enterprise Server 15 SP1
- Kali Linux
- Debian GNU/Linux
- Fedora Remix for WSL
- Pengwin
- Pengwin Enterprise
- Alpine WSL
 The following links will open the Microsoft store page for each distribution:
For a development environment i recommend Ubuntu and for Hacking i recommend Kali Linux. But feel free to choose any you like. Linux is linux and we will be working mostly on the terminal.
- From the distribution’s page, select “Get”.
Set up a new distribution
The first time you launch a newly installed Linux distribution, a console window will open and you’ll be asked to wait for a minute or two for files to de-compress and be stored on your PC. All future launches should take less than a second.
You will then need to create a user account and password for your new Linux distribution.

Set your distribution version to WSL 1 or WSL 2
You can check the WSL version assigned to each of the Linux distributions you have installed by opening the PowerShell command line and entering the command (only available in Windows Build 19041 or higher): wsl -l -v PowerShell
To set a distribution to be backed by either version of WSL please run: PowerShell
wsl --set-version <distribution name> <versionNumber>
Make sure to replace <distribution name> with the actual name of your distribution and <versionNumber> with the number ‘1’ or ‘2’. You can change back to WSL 1 at anytime by running the same command as above but replacing the ‘2’ with a ‘1’.
Additionally, if you want to make WSL 2 your default architecture you can do so with this command: PowerShell
wsl --set-default-version 2
This will set the version of any new distribution installed to WSL 2.
Now we need a good terminal emulator application to manage the OS you’ve installed. I recommend Hyper and Windows Terminal. I use Hyper.
If you are a beginner go over here to learn about basic terminal commands: Terminal Commands.
That’s the end of part 1. Part 2: Coming Soon