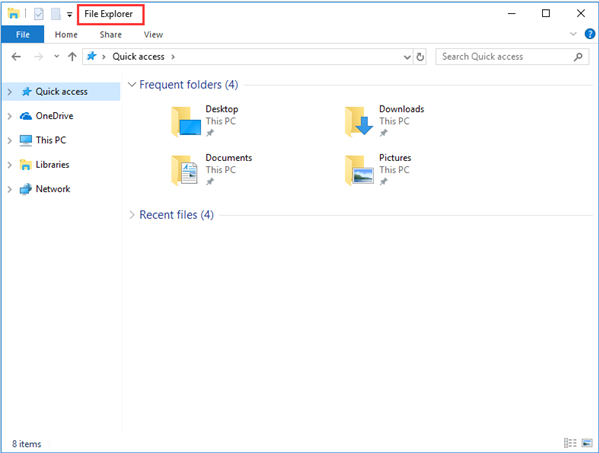
To open File Explorer, select Windows logo key + E or go to Start and type File Explorer in the search box. Select File Explorer in the results.
Top topics
Here are answers to a few common questions about File Explorer:
-
How can I open File Explorer and find the Windows 11 features?
-
How can I share files in File Explorer?
-
Where are my documents in Windows?
-
How does OneDrive work in Windows?
-
How can I see hidden files and folders?
To open File Explorer, select Windows logo key + E or go to Start and type File Explorer in the search box. Select File Explorer in the results.
Top topics
Here are answers to a few common questions about File Explorer:
-
Where are my documents in Windows?
-
How does OneDrive work in Windows?
-
How do I customize Quick access?
-
How do I import photos and videos from my phone to my PC?
If you’re looking for something else, check out similar topics on support.microsoft.com.
How to make the best use of File Explorer? In this post, you will get the best help with File Explorer in Windows 10 in all aspects such as the Keyboard Shortcut, the Quick Access, the Hard Drive Management, and more.
File Explorer, formerly known as Windows Explorer, is a file manager first appeared since Windows 95. It provides a graphical user interface and easy access to the management of files saved on the whole computer, such as the desktop, the library, the system partition, and even change their properties.
Almost all Windows users open File Explorer to manage their files. With this in mind, we feel there is a need to show you Windows 10 file explorer help.
How to Access Windows 10 File Explorer
The first Windows 10 File Explorer help is how to open File Explorer. There are multiple ways to access Windows File Explorer, to summarize:
- From This PC. When your computer is on, you will find an icon named This PC on the desktop. By double-clicking on it, you will get the interface of File Explorer.
- From the Taskbar. Normally, when your PC is turned on, you are able to launch some programs from the taskbar, provided that they are already locked prior to this operation.
- From Cortana. Each Windows 10 edition comes with intelligent assistance Cortana. If you neither have This PC on the desktop or File Explore on the taskbar, you can type File Explorer in the Cortana search box and then find it from the best match. Since you are here, you can pin it to the Windows Start menu or the taskbar.
- From Start menu. By clicking the Windows Start menu, you can easily find an item called File Explorer.
- From Power User Task Menu. Press the Windows logo key and X together to load the Power User menu, then File Explorer should be listed there.
- From Shortcut key. By pressing the Windows logo key and E together, the File Explorer will appear immediately.
When you are in Windows 10 File Explorer, you will see the five categories from the left action panel, and they are Quick access, OneDrive, This PC, Libraries, and Network.
Check out how to open File Explorer with multiple approaches!Click to Tweet
Best Features in Windows 10 File Explorer
Despite File Explore in Windows 10 provides users with multiple useful features, you might be wondering if there is any Windows 10 file explorer tutorial that helps you go through all the tricks easily. Here are the top features that are popular among the users.
- Home Tab: It located on the top left corner of the file explorer, the new home tab makes most of the tasks and commands easier than before and it copying a file or be it deleting it, and you can perform it via the home tab. In Windows 10, whenever you tap Windows + E, you’ll be taken to the Home tab
- Share Tab: You can find the share tab on the top left corner in the file explorer, and this tab allows you to share plenty of files and folders wherever you want via just one tap. For sharing a file, you can also convert the files into the zip format as well as burn them with the help of the share tab
- View Tab: you can preview the pictures and documents by clicking the Preview pane; you can change the file preview from small icon showing details to large icons showing title
- Quick Access: It is one of the most helpful features of the latest file explorer, and with this feature, you can visit files and folders which you have frequently visited. There are mainly two different sections in this feature of frequent folders and recent files
- OneDrive: Windows Explorer in Windows 8.1 allows you to save files directly to OneDrive but you cannot sync the files in OneDrive with your PC or local system. The new file explorer has overcome this drawback. You can now not only save the files to OneDrive but at the same time sync them with the system
File Explorer Windows 10 Keyboard Shortcuts
Here is the guide for File Explorer Windows 10 Keyboard Shortcuts. If you are much addicted to your keyboard, then it is good for you to keep these keyboard shortcuts in mind. Here we list some useful Windows File Explorer keyboard shortcuts:
| Alt + D | Go to the address bar |
| Alt + Enter | Display the Properties of the selected file or folder. |
| Alt + Left Arrow Key | Go back One Folder in history. |
| Alt + Right Arrow Key | Go forward One Folder in history. |
| Alt + P | Show/Hide the Preview pane. |
| Ctrl + D | Move file or folder to Recycle Bin. |
| Ctrl + E | Go to the search box. |
| Ctrl + E | Activate the Search bar in File Explorer. |
| Ctrl + F | Go to the search box. |
| Ctrl + Mouse Wheel up or Down | Increase or Decrease the size of Icons in File Explorer. |
| Ctrl + N | Open a new File Explorer window. |
| Ctrl + Shift + E | Display all folders above the selected folder. |
| Ctrl + Shift + N: | Create a new folder. |
| Ctrl + W | Close the current File Explorer window. |
| F11 | Maximize or minimize the active window. |
| Home | Display the top item in the active window. |
| Num Lock + Asterisk (*) | Display all subfolders under the selected folder. |
| Num Lock + Minus (-) | Collapse the selected folder. |
| Num Lock + Plus (+) | Display the contents of the selected folder. |
| Shift + Delete | Permanently delete file or folder. |
We hope these keyboard shortcuts let all of you get help with file explorer in Windows 10.
Enable/Disable Quick Access to the Main Screen
As everything has two sides, while many users speak highly of Quick Access, some users feel it is troublesome to switch to This PC each time when they open File Explore. In fact, it is rather to customize what you see at the first sight when you open Windows File Explorer.
Step 1. Click File and then Change folder and search options.

Step 2. In the next pop-up window, drop down the box of Open File Explorer to. Right there you will find two options and they are Quick Access and This PC. Just select the one you prefer and then you will see what you want next time when you open File Explorer.
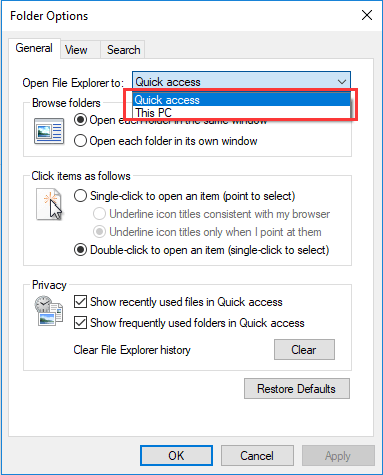
Note: Should you choose Quick Access, please make sure the two options under Privacy is enabled.
Pin the Frequently Used to Quick Access
Quick Access is located in the first place of the left panel which shows you the most frequently used folders and the recent files created/modified. For those who have a vast number of files/folders saved on the computer, it is wise to find the target files from Quick Access.
However, if the files you want do not appear, you can pin to Quick Access. Here is how you can do this:
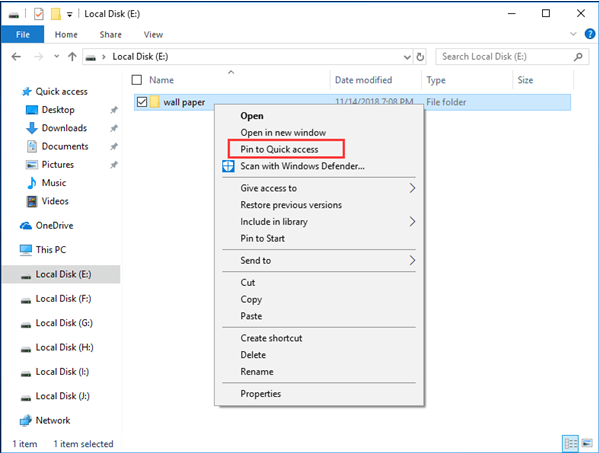
Right-click the target file/folder. From the context menu, select Pin to Quick access as the following picture shows. (Tip: to remove, just select Unpin from Quick Access.)
Tip: If someday you need to remove a file from Quick Access, just select that files and choose Remove from Quick access from the context menu.
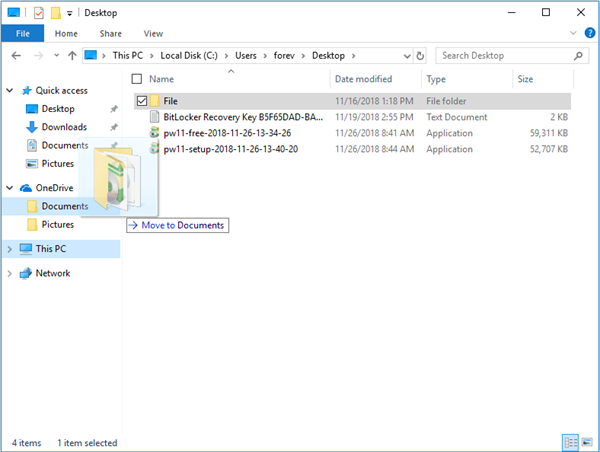
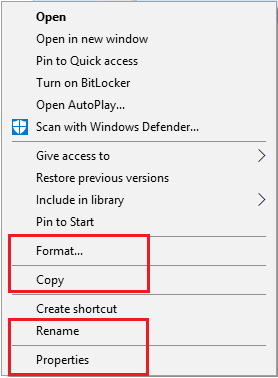
Manage Hard Drive in This PC
By entering This PC, you are able to view all FAT and NTFS partitions that have drive letters. And it is also possible to perform something basic to manage hard drive partitions. Specifically speaking, you can copy, format, rename the displayed partitions and view its properties.
Usually, when it comes to disk partition management, most Windows users go for Disk Management or they turn to third-party software for help. And in most cases, the latter one such as MiniTool Partition Wizard is deeply trusted.
Simply put, MiniTool Partition Wizard makes it easier to repartition hard drive, to convert file system, to convert partition style, to change cluster size, to manage dynamic disks, and more, which is much powerful than the Windows tools. Till now, more than tens of millions of users get their issue resolved by using this all-in-one partition manager.
Go to the product page to get the details if you are interested or you may just download the free edition to have a try first.
Free Download
File Explorer Windows 10 Not Working after Right Click
Despite that File Explorer is frequently used every day, sometimes you will find File Explorer Windows 10 not working. One of the most typical issues is that File Explorer crashes/hangs after right click.
If you are bothered by the same issue, you may just follow the simple guideline below to get help with file explorer in Windows 10.
Fix 1 — Using CMD to Fix File Explorer Crash
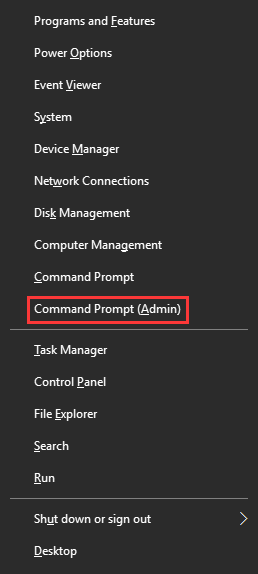
Step 1. Press Windows key and X at the same time to launch the power user menu, then choose Command Prompt (Admin) option from the list of choice. If it does not appear, do this in the Cortana search box.
Step 2. In the command line window, type netsh and hit Enter. Then continually type winstock reset and hit Enter.
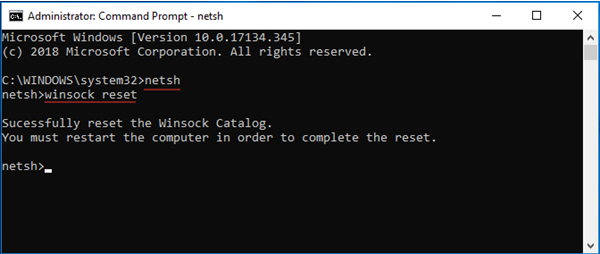
Step 3. Now restart your computer and check if the issue is resolved.
Fix 2 – Uninstall Update
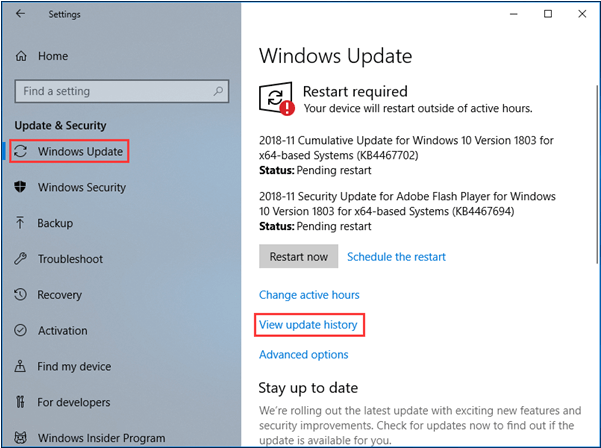
Step 1. Follow the path: Start button -> Settings -> Update & security. Then one the left pane, choose Windows Update, and on the right pane, choose View update history.
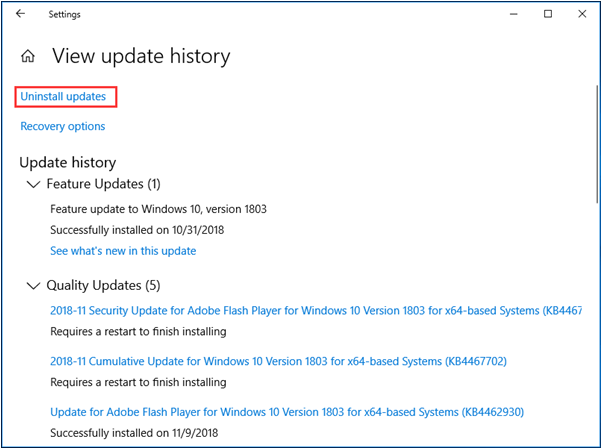
Step 2. Click Uninstall updates. Then in the new window, check if there is an update item named KB3081449 or KB3081448. If you can find one, right-click on it and choose Uninstall.
Step 3. Restart your computer and then check out if the File Explorer Windows 10 not working issue has been removed.
Here are the solutions to Windows 10 File Explorer not working after right click. Those who are getting stuck with this issue may just have a try.Click to Tweet
Final Words
Reading here, guess you have a better understanding of Windows 10 file explorer tutorial. Hope that your problem with Windows 10 File Explorer is solved. In the coming days, you should find it easier to work with Windows 10.
If you have any suggestions on getting help with File Explorer Windows 10, you can leave us comments or send an email to [email protected] in the following area to help more users. Thanks in advance.
A number of new Windows 10 users keep searching for ‘how to get help with File Explorer in Windows 10.’ This is because Windows 10 now doesn’t have built-in help for File Explorer, like Windows 7.
So, because Microsoft makes users search the web for ‘how to get help with File Explorer in Windows 10,’ here you’ll learn all you need to know about using File Explorer in Windows 10.
What is File Explorer?

File Explorer is an essential application and component of your Windows 10 Operating System. File Explorer was formerly known as Windows Explorer in the previous Windows versions. It provides a targeted graphical user interface to navigate, browse, and access all the Windows drives, folders, and files in a user’s computer.
Your computer has a lot of files and folders stored in different locations. In Windows 10, File Explorer helps you to quickly and easily access the stored files and folders that you may be searching for without breaking a sweat.
Some new users wonder, ‘where are my documents stored in Windows 10?’ To find your documents in Windows 10, you may need to open File Explorer.
If you’re wondering how you can access, open and use of Windows File Explorer in Windows 10 continue reading this post. You’ll also learn and know about some cool features and shortcuts that can make your work easy.
How to Access Windows 10 File Explorer
There are a number of ways you can use to access File Explorer in Windows 10.
Method #1: Windows Start
The most common way is to access it through the Windows Start Menu using the following path:
- Click Windows Start and type File Explorer.
- Select File Explorer in the results.
Method #2: Power User Task Menu
You can also access File Explorer through the Power User Task Menu:
- Right-click Windows Start
- Select File Explorer in the list of items.
Alternatively, press the Windows logo key + X together to load the Power User menu, then select File Explorer in the list of items.
Method #3: Taskbar
You can also access File Explorer through the Windows 10 Taskbar. but this will need that you have the program already locked on the taskbar prior to this operation.
Method #4: Keyboard Shortcut Key
The easiest method to access the File is through the Windows Keyboard shortcuts. You just need to press the Windows Key + E together and you’ll go straight to the File Explorer.
Basics of Windows 10 File Explorer Interface
If you’ve previously used Windows Explorer in Windows 7, you’ll not have any difficulty in using “File Explorer” in Windows 10. Microsoft basically renamed the application. However, File Explorer does have some new pleasant features.
Once you open File Explorer in Windows 10, you’ll see five categories of items from the left pane. These are (in order):
- Quick access
- OneDrive
- This PC
- Libraries
- Network
Quick Access on Windows 10 replaces “Favorites” on Windows 7. Like ‘Favorites’ it allows you to drag and drop folders and to “pin” them for easy future access. In addition, Windows 10 automatically adds your recently used folders to this area.
Besides, Windows 10 also allows you to customize Quick Access. For example, to remove a folder from Quick Access, right-click on it, and then select “Unpin From Quick Access.”
This PC in File Explorer in Windows 10 replaces “My Computer” on Windows 7. This component contains shortcuts to the PC’s user data folders as well as other drives, such as DVD drives and USB drives.
OneDrive is an additional component in File Explorer that was missing in Windows Explorer. It enables you to sync your files to the cloud. It gives users an important back up to their files and folders.
Basics of the File Explorer Ribbon in Windows 10

When you open File Explorer, you’ll see the ribbon at the top. Basically, the File Explorer ribbon works in a similar way to the ribbon in Microsoft Office applications such as Word and Excel, but with a few differences. In the File Explorer ribbon, you’ll see three command tabs, located in the top-left corner, such as:
- Home: this is the tab that you land on whenever you tap Windows + E to access File Explorer. This is a tab in File Explore that makes most of the tasks and commands easier to access. The tasks that you can perform through the home tab include copying, pasting, deleting, or renaming a file as well as opening a new folder and folder properties.
- Share: this tab allows you to share files and folders. It offers such functionalities as emailing, zipping, and printing files. Through the share tab, you also get the option to burn your file to disc and share them on your local network.
- View: This tab is very important in File Explorer. It has options for controlling the appearance and assorting of files in File Explorer. You can also preview your documents and pictures if you click the Preview pane or even change the file preview e..g from small icons showing details to large icons showing titles. You also have the option to choose to hide or show filename extensions. If you click the “Hidden items” checkbox you’ll be able to show hidden files.
Here’s a trick!
If you need more space in your File Explorer browsing window, you can collapse (minimize) the ribbon. To do so, click the arrow at the top right corner of File Explorer or press Ctrl+F1.
Even when the ribbon is collapsed, you can still click the tabs — Home, Share, or View. When you click any of the tabs, the ribbon will appear temporarily.
If you prefer seeing the ribbon all the time, you can expand it or leave it expanded by default.
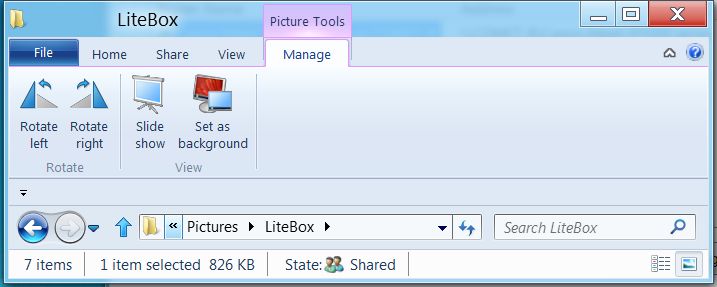
Sometimes, the Manage tab will appear on the ribbon of File Explorer. But this occurs with contextually appropriate commands. For instance, you’ll see it when you select a picture, where you’ll also see the “Picture Tools” tab.
How to pin ‘frequently used commands’ on File Explorers

At the top left corner of the File Explorer window, you’ll see a drop-dop arrow. If you place your cursor on that arrow, it will display a message saying “Customize Quick Access Toolbar.” this drop-down arrow is the Quick Access Toolbar.
Through the Quick Access Toolbar, you get convenient access to the commands you frequently use. And you can add or remove the command to the Quick Access.
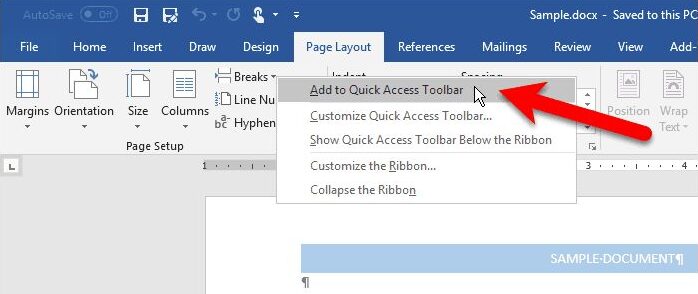
To add a particular command to the Quick Access, right-click it on the ribbon and select “Add to Quick Access Toolbar.”
If you want more space for commands, you’ll right-click anywhere on the ribbon or tab bar above it and then select “Show the Quick Access Toolbar Below the Ribbon.” This will turn it into a more standard toolbar.
How to change settings in File Explorer
You can change the settings of File Explorer. In the File Explorer Window:
- Go to the Ribbon
- Click the “View” tab
- Click the “Options” icon.
- Click on the ‘Change folder and search options’ prompt.
- Follow the on-screen instructions to select the settings that you want.
This is one of the improvements in File Explorers.
Useful Keyboard Shortcuts for File Explorer Windows 10

File Explorer has a number of useful keyboard shortcuts to help you finish tasks faster. As we promised, here’s a list of some of the useful keyboard shortcuts:
- Windows +E: Open File Explorer in Windows 10.
- Alt + D: got to the address bar
- Alt + Enter: Display the selected file or folder’s Properties.
- Alt + P: Hide/Show the Preview pane.
- Ctrl + D: Move file/folder to Recycle Bin.
- Ctrl + E: Go to the search box/Activate File Explorer Search bar.
- Ctrl + N: Open a new File Explorer window (works only File Explorer).
- Ctrl + W: Close the current File Explorer window.
- Ctrl + F1: collapse (minimize) the File Explorer ribbon.
- Ctrl+F, Ctrl + E, or F3: Focus the Search box to quickly start typing a search.
- Ctrl + Mousewheel Up or Down: zoom in out to change the size of files and folder icons.
- Ctrl + Shift + N: Create a new folder
- Ctrl+L, Alt + D, or F4: Focus the address (location) bar to quickly start typing a folder address.
- Backspace or Alt + Left arrow: View the previous folder (go back.)
- Alt + Right arrow: View the next folder (go forward.)
- Alt + Up arrow: View the folder the current folder is in.
- F11: Maximize the File Explorer window (shrink the window).
To find a complete guide of keyboard shortcuts, visit Microsoft’s website.
How to Sync files with OneDrive in Windows 10
OneDrive is one of the new built-in features of Windows 10 connected with File Explorer. To use OneDrive you need a Microsoft account. You’ll then be able to synchronize files online and into the cloud. OneDrive works similarly to Dropbox, iCloud, and Google Drive.
To start working with OneDrive:
- Click “OneDrive” in File Explorer.
- You’ll be prompted to sign in to OneDrive. You need to have a Microsoft account. If you dont have it, it is important that you create one. If you don’t want to create one, you can just upload files to OneDrive and they’ll all be uploaded to Microsoft’s servers.
- Once the files are uploaded you can access them in the OneDrive folder. Still, it is important to have an account because you’ll need to you sign in to the Microsoft account.
Key Points in OneDrive Setup
When setting up One Drive, you’ll see two screens in the OneDrive Setup that your need to watch for:
- Go to This is your OneDrive folder screen, and click Next to accept your OneDrive files’ default folder location. You can change the folder location if you select Change location.
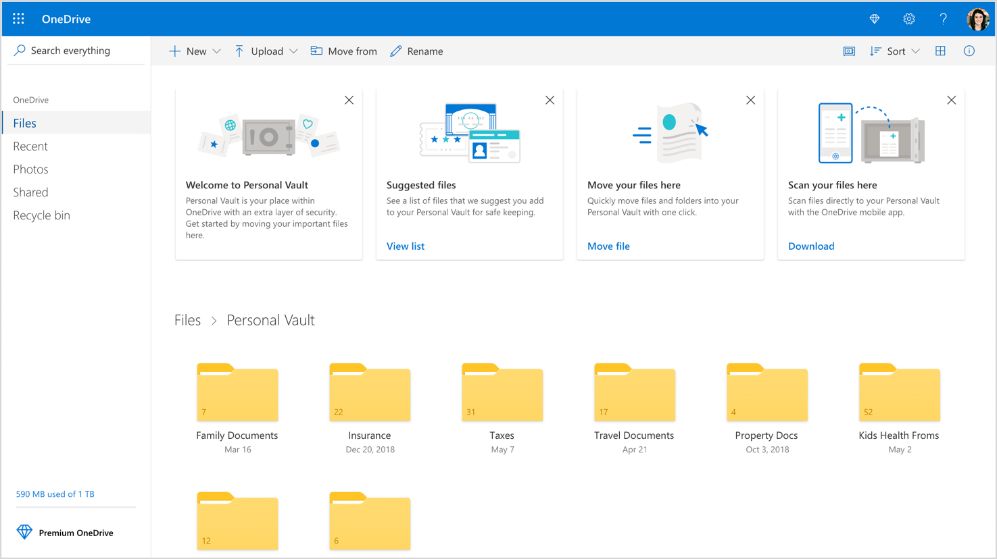
- Go to the All your files, ready and on-demand screen, and see marked files as — always available, online-only, and locally available. You can access all the files in your drive by accessing the Files On-Demand. Select Next.
What if File Explorer Won’t Start or Open
Sometimes, the File Explorer in Windows 10 may stop working. Many users have noted this behaviour when they right-click File Explorer. There are a few things you can do to fix File Explorer not working after right-clicking:
- Restart your computer: restarting your computer should always the first thing you do when you experience a crash on File Explorer.
- Command prompt (winstock reset): press Wins key + X together > Click Command prompt (Admin) > in the elevated command prompt type netsh and press Enter > again type winstock reset and press Enter. Wait for the process to complete then restart your PC and check if the issue is resolved.
- Check for Windows Updates: press the Windows Start key> go to Settings > Update & Security > Windows Update . once in the Windows Update, select Check for updates. Wait for the available updates to download hen install them and restart your device.
Wrapping Up
We believe this article was informative and helpful to Photoshop Error: Scratch disks are full. For more information about how to repair Windows errors, please return to our website. In addition, you’ll get better deals on Microsoft Office software, along with helpful guides and articles.
Would you like to receive promotions, deals, and discounts to get our products for the best price? Don’t forget to subscribe to our newsletter by entering your email address below! Receive the latest technology news in your inbox and be the first to read our tips to become more productive.
Read Next
> How to access and use Steam screenshot folder on Windows 10
> How to Get and Use Our Ultimate Affiliate Toolkit
> How to Optimize Your Outlook Inbox in 5 Easy Steps
Download PC Repair Tool to quickly find & fix Windows errors automatically
If you are facing problems and wondering how to get Help with File Explorer in Windows 11/10, then this post lists some helpful How-To links as well as built-in support options, as well as Help Desk, Support or Community forums, and website options, where you can get help.

Useful links to help you get started:
This post will show you how to Open & Use File Explorer.
Once you feel comfortable, you may want to go a step further using these Explorer Tips and Tricks.
Be a keyboard ninja with the help of these Explorer keyboard shortcuts and use them to work faster and better in Explorer!
Once you have got the hang of it, feel free to customize Explorer and make changes to the layout, view, navigation pane, and the size of the files and folders, etc. Using Ultimate Windows Tweaker will make things easy.
These posts will help you if your Explorer crashes or freezes – maybe when you right-click to open Context Menu, resize or snap a window, crashes in a Video folder or simply won’t open! Apart from troubleshooting these issues individually, using the Windows File and Folder Troubleshooter is likely to help you too.
If you still need Support, then the Help options available to you for Explorer are:
1] Use TWC Search bar
Search for your problem citing the specific problem you get or the error you receive using our TWC Search. Chances are high; you will see something helpful. If not, you may request us to develop a tutorial. If we can, we will do it.
2] Use the Contact Support app
Use the built-in Contact Support app to chat with Microsoft. Using it, you will be able to chat online with a Microsoft Answer Tech support staff. Using the app, you can also arrange a call-back.
3] Use Microsoft Answers Forum
You could use the Microsoft Answers Forums, where Microsoft Support staff and MVPs will try and help you.
You could also check out the services of Microsoft Answer Desk, a live paid Tech Support site, to chat with a Microsoft support executive.
4] Request Email, Chat or Phone support
You can also contact Microsoft Support by email and chat. If a Customer Service Agent is online and available for chat here, you will see a message to this effect. If not, you will see Instant Chat: Customer Service Agents are OFFLINE message, on the right side. You may then try and visit this page for Chat support. Use this form to email Microsoft. They will contact you back via email.
You can contact Microsoft Customer Support at Phone Number 1 800-642-7676 or at microsoft.com/contactus.
5] Other ways
There are more ways to contact Microsoft Support via phone, etc., including for OEM support.
Read next: How to Get Help in Windows 11/10.

Anand Khanse is the Admin of TheWindowsClub.com, a 10-year Microsoft MVP (2006-16) & a Windows Insider MVP (2016-2022). Please read the entire post & the comments first, create a System Restore Point before making any changes to your system & be careful about any 3rd-party offers while installing freeware.
The Get help with File Explorer in Windows 10 page typically opens when the user hits the F1 key while in a File Explorer window. This is not exclusive to Windows 10 or Microsoft for that matter, as a lot of 3rd party apps (Chrome, Word, Excel, etc.) use this key as a quick help & support button.
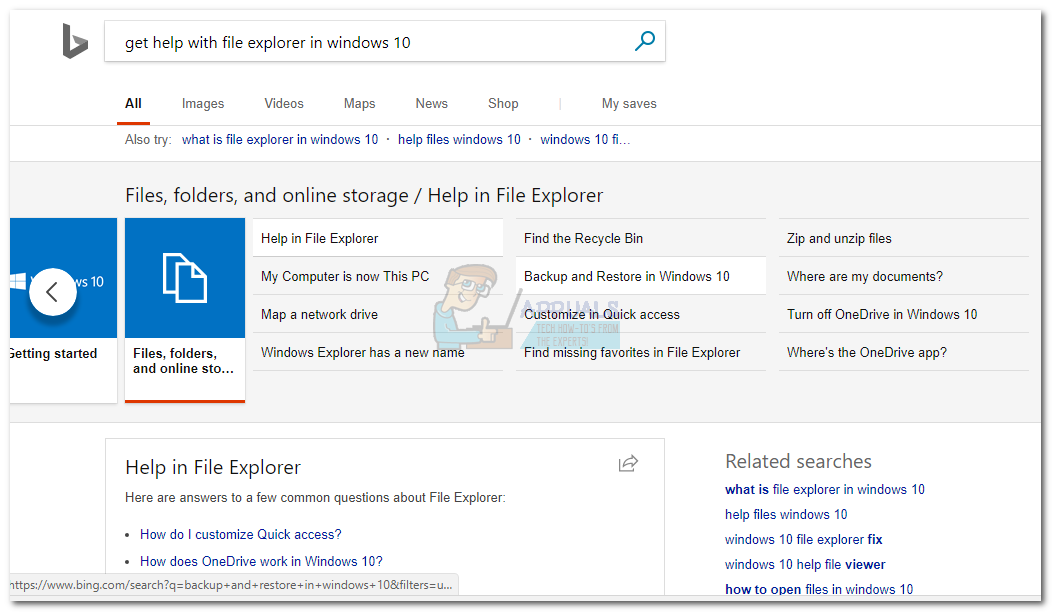
Some users have reported that their PC will sometimes automatically open a browser window with a Bing search of ” How do I get help in Windows 10“. Others have complained that their PC ends up opening 15-20 different tabs of the same page – this is not Windows 10 normal behavior. While this can simply be a case of a stuck F1 key, there are browser hijackers that are capable of doing these types of things. However, most of the time this issue will turn out to be a keyboard issue.
Besides the standard behavior, there are cases where this Help hotkey will glitch out and open a browser tab every time F1 is pressed, not just in File Explorer. This can quickly become extremely annoying if you want to use the F1 key for something else.
If you’re sick of getting these annoying help/support pop-ups, turn to our methods below that have successfully helped users eliminate the issue. Start with the first method and work your way down until you find a fix that works for you.
Method 1: Investigating the keyboard
Since most of the time, this issue is caused by a faulty keyboard or a stuck F1 key, you should start by making sure that’s not the case. If you have the means, try switching your keyboard to another one and see if the behavior repeats. If you’re using a laptop, try to connect an external keyboard. This should bypass the stuck F1 key on your password.
Keep in mind that if the connection cables under your keyboard become dislodged, it could end up sending multiple interrupted signals that will end up opening multiple “How to get help in Windows 10” windows.
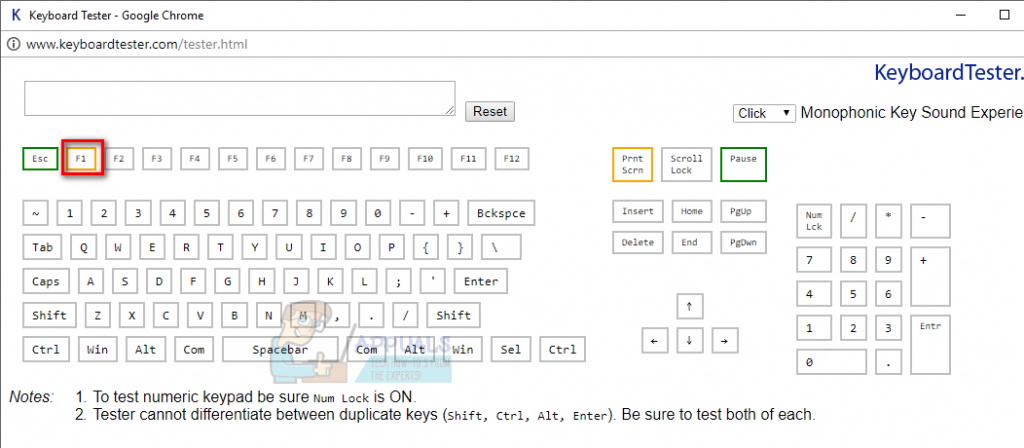
Before you determine that your keyboard isn’t the culprit, use this online tool (here) to check if the F1 key is not pressed automatically by a faulty keyboard. Simply click on Launch the Tester and observe if the F1 key is highlighting without you touching anything.
If that is an issue, you can plug out the current keyboard and plug-in another keyboard to check if the issue is resolved. On a laptop, you can temporarily disable the built-in keyboard.
Method 2: Scanning for Malware
Let’s start by making sure that the pop-ups aren’t caused by a browser hijacker. A browser hijacker is a type of malware that modifies the browser settings without the user’s permission. These are typically used to inject unwanted advertising. Because browser hijackers reside in a grey area (legally speaking), not all of them will get identified by a normal virus scan.
In any case, start by doing a full scan with Windows Defender. To do this, double-click on the Windows Defender icon in your taskbar (bottom-right corner).
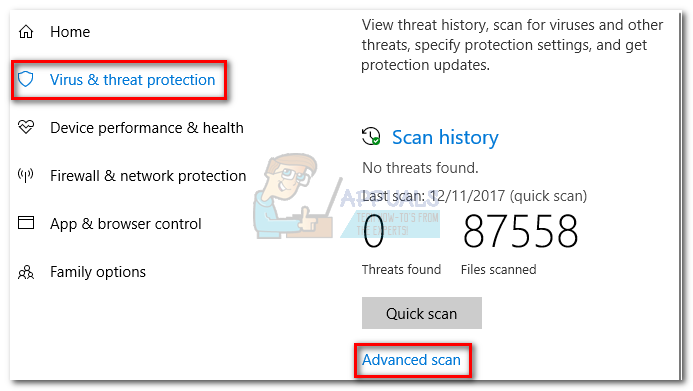
 In Windows Defender, click on Virus & threat protection and click on Advanced Scan. Then, select the Full scan and hit the Scan now button.
Note: Keep in mind that this process can take over an hour, depending on your hard drive size.
When the process is finished, check to see if any malware has been identified. If Windows Defender successfully identified and removed the malware, reboot your PC and see if the random pop-ups are gone. If you’re having the same issue, you can also try running a scan with Malwarebytes before moving to the next method.
Method 3: Disable helppane.exe
If the methods above haven’t made the unexpected help pop-ups to go away, you can try disabling the helppane executable. This might seem drastic and you will lose the help functionality via the F1 key. But if your system has glitched and is opening the same help tab in every application, this will help in stopping that behavior. Here’s what you need to do:
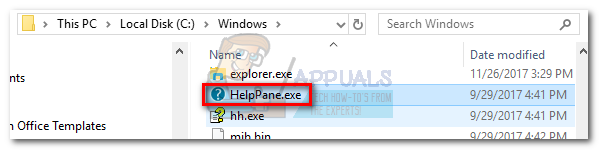
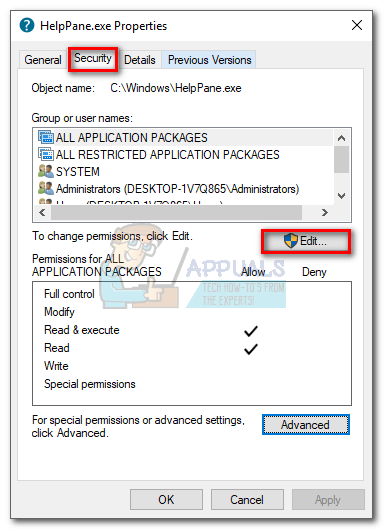
- Go to C:/Windows and locate helppane.exe. Then, right-click on it and hit Properties.

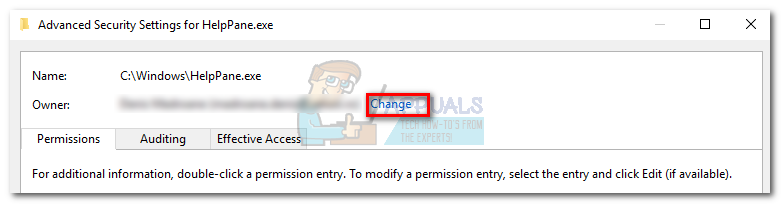
- Select the Security tab and click on the Advanced button.

- Now look at the top of the window and click Change next to where it says, Owner.

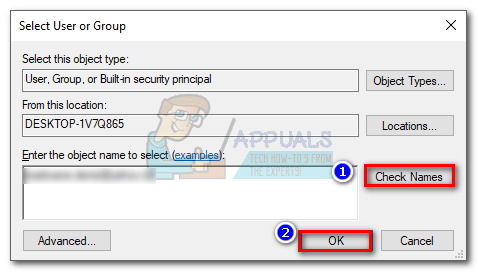
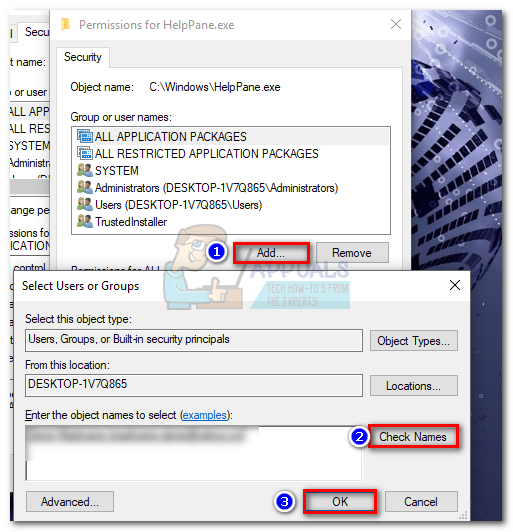
- In the box under Enter the object name to select, type in your Windows username. If you’re using a Microsoft account, type in the email associated with it. Click the Check Names button, then hit Ok to close this window, then hit Apply to close the Advanced Security Settings for HelpPane.exe window.

- Go back to HelpPane.exe’s Properties, select the Security tab and click the Edit button next to change permissions, click Edit.
- Click the Add button, then insert your Windows username or email like we previously did in Step 4. Then hit Check Names and Ok to close the window.

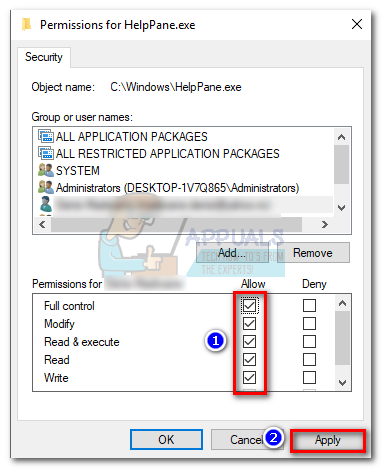
- Next, give yourself full control over the HelpPane executable by checking all the boxes under Allow. Hit Apply to confirm.

- Then, right-click on HelpPane.exe and rename it to something else. When prompted to provide administrator privileges, hit Yes to confirm.


That’s it. Now the Help tab triggered by the F1 key will no longer bother you. If for some reason you want the help functionality back, simply rename the HelpPane executable to what it was before.
If for some reason, the methods above have been unsuccessful, or if you’re reluctant to modify the permissions using Method 3, you can also consider using SharpKeys. This software is capable of disabling the F1 button entirely. But doing so will defeat the purpose of using the F1 key for another activity.
Method 4: Use Safe Mode or Try Clean Boot Windows
There can be a 3rd party app that can cause the current behavior of the F1 key. To rule that out, either clean boot windows or use Safe mode. Using Safe mode/Clean boot, you will be able to boot your computer without any third-party applications running. From there, you can start enabling the applications again manually and determine which was causing the problem,
- Use Windows Safe Mode or clean boot Windows.
- Now, check if F1 key functionality is normal. If so, then try to find out the problematic application in your installed applications in the control panel.
- After idenfiying the application, uninstall/disable it for good.

Kevin Arrows
Kevin is a dynamic and self-motivated information technology professional, with a Thorough knowledge of all facets pertaining to network infrastructure design, implementation and administration. Superior record of delivering simultaneous large-scale mission critical projects on time and under budget.
File Explorer comes inbuilt with Windows OS, which is necessary to access Files on drives. Earlier it was known as Windows Explorer, and after some upgrades over the years, it renamed as File Explorer. Without File explorer, we can not do anything much on Windows PC. And earlier this week, when I opened File Explorer, I found a problem. It redirects me to a web page where it searches for term Get Help with File Explorer in Windows 10 automatically.
And luckily, I found out why this weird error occurred. The solution was too easy, and I decided to share it with you because it is a common error that anyone can face. So if you have this issue, then you are in the right place. Also, if you want to know how to Get Help with File Explorer in Windows 10, then here you will learn about it. Also, we are going to Post some FAQs that will solve most of the questions.
Content:
- Fix Get Help with File Explorer in Windows 10
- How to Get Help with File Explorer in Windows 10
- FAQs about File Explorer
- How to customize Quick access
- How OneDrive works in Windows 10
- Where are my Libraries
- File Explorer Shortcut keys on Windows 10
So if you want to know about any specific topic from these three, then directly jump to the topic. I hope you will get what you are looking for.
Fix Get Help with File Explorer in Windows 10
So as I told you that I already encountered this error. And the problem was that one function key in keyboard was stuck, so when I open File explorer, it directly leads me to the default browser. Let’s get first to start fixing this error.
1) Check for Sticky and Stuck Keys
Whenever you encounter this error, first check your keyboard that every key is working fine. And make sure none of the keys are stuck. The F1 function key is the shortcut to open Get Help with File Explorer in Windows 10, so most importantly, check the F1 key. This could be a very serious problem. Like if you are Starting your PC and then it will directly open boot option. So make sure to fix it as soon as possible to get rid of these problems.
How to Check Keyboard is Working Properly or Not
- Go to keyboardtester.com.
- And then click on Launch the Tester.
- A new window will open with a keyboard structure.

- Then press any key it will appear as Green. But if you are haven’t pressed any key and still, any key is in green, then it means that key is stuck. It might be an F1 key in your case.

How to Solve Keyboard Key Stuck Problem
- Download and Install MapKeboard (you can use other software which can disable any specific key).
- Open MapKeyboard and click on the key you want to disable.

- After clicking the specific key. From the left bottom in ‘Remap selected key‘ section, select Disabled instead of that key.
- Then click ‘Save layout’ and reboot your PC.
- Or you can repair the Stuck key.

If you are using a Laptop keyboard and it’s not working. Then try How to Fix Laptop’s Keyboard is Not Working.
2) Remove Malware
The problem may be caused due to infected by some malware that always tries to open something on your browser. So this could be very dangerous for your data on the drive or browsers. So make sure to remove malware to not go to search Get Help with File Explorer in Windows 10. This way, you can also solve other malware issues. You can check top malware removal tools that you can use. Make sure to stay safe from Threats.
Procedure to Remove Malware from Windows Defender

- Go to Settings on your Windows 10.
- Then select Update & security. Under Update & Security, go to Windows Defender.
- Now click on Open Windows Defender Security Center.
- Under Security open Virus & Threat protection and click on Advance scan.
- Now select Full scan after that Click on Scan Now.
- Wait for completion, and then it will provide a full result.
Check the result and see if it cleared all the threats. Then Restart your PC, and you will see no error like automatically search get Help with File Explorer in Windows 10. So these are the two solutions to fix the error. If you still have the same problem, then comment down below, we will try to fix it.
Also read | How to Remove Shortcut Virus from Pendrive Permanently
How to Get Help with File Explorer in Windows 10
Now here I will tell you two ways on how you can go to Get Help with File Explorer in Windows 10 and get help regarding all the File Explorer stuff. This is so easy and useful, so let’s jump straight to the topic.
1) Using F1 Function Key
If you want to get help about File Explorer on Windows 10 then you can follow these following steps:
- Open File Explorer on your Windows 10.
- Then press the F1 Function key to search Get Help with File Explorer in Windows 10.
- Then you will find everything regarding File Explorer.
F1 is the key used to open the help page in most of the App and software. So if you want to go to the help page, just open it and press the F1 key.
2) Using Help Icon
Other than the F1 key, you can use the help icon from file explorer to open Get Help with File Explorer in Windows 10 page. Here is how to access the Help icon:
- Open File Explorer on PC.
- Then look at Top right corner below the cross icon, you will see an icon with a question mark.
- That icon is for help, so press on the icon and access the page.
- Now you can get any help with File Explorer on Windows 10.
Also Read | How to Speed up your Slow Running PC
FAQs about File Explorer
If you want help regarding File Explorer than check out this section. Here we have covered most frequently asked questions by users. If you read this section, then you don’t need to go to the help page.
1) How to customize Quick access
Quick Access is a feature that you find on File Explorer. It contains all the file location which you can access without going to that location. Just click on any of the Folder or files listed on Quick Access and boom you are there in seconds. It is very useful when you regularly access to any file location.
You can also open these locations directly from the Taskbar. Just Right-click on File Explorer icon in the taskbar and click on any Quick Access location.
How to Add any location to Quick Access
Let’s take an example like we want to add a program file folder to Quick Access. Follow the steps to get it quick.

- Go to the location of the folder that you want to add to Quick Access.
- Then Right-click on that folder and select Pin to Quick Access.
- Now it will appear under the Quick Access.
How to Remove any location to Quick Access
To remove any pinned location from Quick Access, follow the following steps:

- From the Left side under Quick Access, select any folder.
- Then right-click on it and click on Unpin from Quick Access.
- That’s it.
This is how you can customize Quick Access in File Explorer.
2) How OneDrive works in Windows 10
OneDrive is a Microsoft service that stores data on Cloud, which can be further accessed through any computer. Microsoft had added these features for the ease of their customer. It is handy to use in File Explorer. You can apply any action like copy, paste, delete, etc.

First of all, make sure that you are login in OneDrive. Then after you can access the One Drive. When you sign in to OneDrive, it will list all the folders and files that you uploaded on it. Then you can modify your data directly from the File Explorer.
How to Add Data on OneDrive
- Select and copy a folder or file you want to upload in OneDrive.
- Then paste on a folder in OneDrive or directly to the OneDrive.
- You can also drag and drop the file and folder.
- Now you can access these folders and files from anywhere you log in.
How to Remove data from OneDrive
- Go to OneDrive location in File Explorer.
- And select any folder or file you want to delete.
- Then delete the file and folder.
Remember the file or folder you add on OneDrive location. You can access it without the Internet if it gets loaded once.
3) Where are my Libraries
By default, Libraries are not in Navigation Panel. So you need to make it visible on the Navigation Pane to access Libraries.

- Open File Explorer and go to View Tab.
- Then click on the navigation pane.
- And then click show Libraries.
- Now in Navigation Pane Libraries will be added.
- Expand it and access it.
4) File Explorer Shortcut keys on Windows 10
These are the shortcuts that you can use on File Explorer in Windows 10.
- F1 – To search Get Help with File Explorer in Windows 10
- F11 – Maximize or minimize the active window
- Alt + D – Select the address bar
- Alt + P – Display the preview panel
- Alt + Enter – Open the Properties dialog box for the selected item
- Alt + Right arrow – View the next folder
- Alt + Up arrow – View the folder that the folder was in
- Alt + Left arrow – View the previous folder
- Ctrl + E – Select the search box
- Ctrl + F – Select the search box
- Ctrl + N – Open a new window
- Ctrl + W – Close the active window
- Ctrl + mouse scroll wheel – Change the size and appearance of file and folder icons
- Ctrl + Shift + E – Display all folders above the selected folder
- Ctrl + Shift + N – Create a new folder
- Num Lock + Asterisk (*) – Display all subfolders under the selected folder
- Num Lock + Plus (+) – Display the contents of the selected folder
- Num Lock + Minus (-) – Collapse the selected folder
- Backspace – View the previous folder
- Right arrow – Display the current selection (if it’s collapsed), or select the first subfolder
- Left arrow – Collapse the current selection (if it’s expanded), or select the folder that the folder was in
- End – Display the bottom of the active window
- Home – Display the top of the active window
Conclusion:
This is all about Get Help with File Explorer in Windows 10. So if you were looking for any of the three-part that we mentioned, I hope you are satisfied with it. That’s all in this post if you have any problem regarding Android, Windows then you can ask on the comment or use facebook.
Содержание
- Fix: Get help with File Explorer in Windows 10
- Method 1: Investigating the keyboard
- Method 2: Scanning for Malware
- Method 3: Disable helppane.exe
- Method 4: Use Safe Mode or Try Clean Boot Windows
- Fixed: Get Help With File Explorer in Windows 10 [2020 Updated]
- The most effective method to Use the Ribbon
- Step by step instructions to Change File Explorer’s Settings
- Helpful Keyboard Shortcuts
- The most effective method to Access Network Drives
- Guidelines to Use OneDrive
- Tutorial: Get Help with File Explorer in Windows 10 or 11
- Navigation
- What is File Explorer?
- How to launch File Explorer in Windows 10 or 11?
- How to get Help with File Explorer in Windows 10 or Windows 11
- Use the Ribbon
- Quick Access
- Backup files
- Use the OneDrive
- Shortcuts in File Explorer
- How to fix File Explorer not working?
- Method 1: Update your system
- Method 2. Check Corrupted files
- Method 3. Extend the C drive
- Conclusion
- How To Get Help With File Explorer In Windows 10?
- What Is File Explorer In Windows 10
- Share this Image On Your Site
- 1.Traditional Windows Explorer Vs. Windows 10 File Explorer
- Disable Quick Access in File Explorer on Windows 10
- 2.Windows 10 File Explorer Customization
- How do I customize QUICK ACCESS?
- How does OneDrive work in Windows 10?:
- Navigation Pane:
- Show/Hide Hidden Items Setting:
- 3. Get help with File Explorer in Windows 10 by using keyboard shortcuts
- 4. Windows 10 Issues And Fixes:
- File explorer not responding Windows 10
- Below are the steps by step instructions on how to troubleshoot the “Not Responding” issue.
- 5. Windows Navigation Pane Missing
- 6. Windows 10 Search Bar Not Working
- 7. Windows 10 File Explorer Hangs When Right Clicks?
Fix: Get help with File Explorer in Windows 10
The Get help with File Explorer in Windows 10 page typically opens when the user hits the F1 key while in a File Explorer window. This is not exclusive to Windows 10 or Microsoft for that matter, as a lot of 3rd party apps (Chrome, Word, Excel, etc.) use this key as a quick help & support button.
Some users have reported that their PC will sometimes automatically open a browser window with a Bing search of ” How do I get help in Windows 10“. Others have complained that their PC ends up opening 15-20 different tabs of the same page – this is not Windows 10 normal behavior. While this can simply be a case of a stuck F1 key, there are browser hijackers that are capable of doing these types of things. However, most of the time this issue will turn out to be a keyboard issue.
Besides the standard behavior, there are cases where this Help hotkey will glitch out and open a browser tab every time F1 is pressed, not just in File Explorer. This can quickly become extremely annoying if you want to use the F1 key for something else.
If you’re sick of getting these annoying help/support pop-ups, turn to our methods below that have successfully helped users eliminate the issue. Start with the first method and work your way down until you find a fix that works for you.
Method 1: Investigating the keyboard
Since most of the time, this issue is caused by a faulty keyboard or a stuck F1 key, you should start by making sure that’s not the case. If you have the means, try switching your keyboard to another one and see if the behavior repeats. If you’re using a laptop, try to connect an external keyboard. This should bypass the stuck F1 key on your password.
Keep in mind that if the connection cables under your keyboard become dislodged, it could end up sending multiple interrupted signals that will end up opening multiple “How to get help in Windows 10” windows.
Before you determine that your keyboard isn’t the culprit, use this online tool (here) to check if the F1 key is not pressed automatically by a faulty keyboard. Simply click on Launch the Tester and observe if the F1 key is highlighting without you touching anything.
If that is an issue, you can plug out the current keyboard and plug-in another keyboard to check if the issue is resolved. On a laptop, you can temporarily disable the built-in keyboard.
Method 2: Scanning for Malware
Let’s start by making sure that the pop-ups aren’t caused by a browser hijacker. A browser hijacker is a type of malware that modifies the browser settings without the user’s permission. These are typically used to inject unwanted advertising. Because browser hijackers reside in a grey area (legally speaking), not all of them will get identified by a normal virus scan.
In any case, start by doing a full scan with Windows Defender. To do this, double-click on the Windows Defender icon in your taskbar (bottom-right corner). In Windows Defender, click on Virus & threat protection and click on Advanced Scan. Then, select the Full scan and hit the Scan now button.
Note: Keep in mind that this process can take over an hour, depending on your hard drive size.
When the process is finished, check to see if any malware has been identified. If Windows Defender successfully identified and removed the malware, reboot your PC and see if the random pop-ups are gone. If you’re having the same issue, you can also try running a scan with Malwarebytes before moving to the next method.
Method 3: Disable helppane.exe
If the methods above haven’t made the unexpected help pop-ups to go away, you can try disabling the helppane executable. This might seem drastic and you will lose the help functionality via the F1 key. But if your system has glitched and is opening the same help tab in every application, this will help in stopping that behavior. Here’s what you need to do:
That’s it. Now the Help tab triggered by the F1 key will no longer bother you. If for some reason you want the help functionality back, simply rename the HelpPane executable to what it was before.
If for some reason, the methods above have been unsuccessful, or if you’re reluctant to modify the permissions using Method 3, you can also consider using SharpKeys. This software is capable of disabling the F1 button entirely. But doing so will defeat the purpose of using the F1 key for another activity.
Method 4: Use Safe Mode or Try Clean Boot Windows
There can be a 3rd party app that can cause the current behavior of the F1 key. To rule that out, either clean boot windows or use Safe mode. Using Safe mode/Clean boot, you will be able to boot your computer without any third-party applications running. From there, you can start enabling the applications again manually and determine which was causing the problem,
Источник
Fixed: Get Help With File Explorer in Windows 10 [2020 Updated]
Windows 10 never again has worked in help for File Explorer. Microsoft makes you look at the web for data, so this is what you have to think about utilizing Windows 10’s record director. File Explorer has some new highlights, including a lace interface and implicit Microsoft OneDrive for matching up your records to the cloud.
The “Brisk Access” region in the sidebar replaces “Top picks” on Windows 10. You can move envelopes to the Quick Access zone to “pin” them for simple access later on. Windows 10 will naturally add your as of late utilized organizers to this region, as well. You can redo Quick Access from the alternatives window.
The “This PC” segment replaces the “My Computer” thing on Windows 7. It contains easy routes to client information envelopes on your PC just as different drives, for example, USB drives and DVD drives.
The most effective method to Use the Ribbon
The strip in File Explorer works simply like the lace in Microsoft Office applications like Word and Excel. There are a couple of various ways you can utilize it. If you’d preferably observe the strip constantly, you can grow it. The Share tab offers choices for messaging, compressing, and printing documents, just as consuming them to circle and sharing them on the nearby system.
In the View tab; You can empower a see or subtleties sheet to see more data about a choice to document, pick whether you need huge record symbols or a thick record rundown, and sort records by any criteria you like.
Step by step instructions to Change File Explorer’s Settings
To change File Explorer’s settings, click the “View” tab on the lace and snap the “Alternatives” symbol. It has a couple of new alternatives—for instance, you can control whether File Explorer opens to the Quick Access or This PC perspective, or whether it naturally shows as of late and regularly utilized organizers in the Quick Access see.
Helpful Keyboard Shortcuts
Document Explorer is pressed with valuable console easy routes to assist you with achieving undertakings quicker.
The most effective method to Access Network Drives
Windows 10 never again incorporates the HomeGroup highlight, so you can’t utilize that to share documents and envelopes between your PCs no problem at all. You can either utilize OneDrive or utilize the good old document and organizer sharing system alternatives. Instructions to Back Up and Restore Your Files
It’s not only for making and reestablishing immense reinforcements—File History can naturally back up various forms of your documents, and you can utilize File Explorer to reestablish those past renditions no problem at all. Empower “Naturally back up my documents.” In the settings.
After you’ve set it up, you can choose a record or organizer, click “Home” on the strip, and snap the “History” catch to see and reestablish more established variants of that document or envelope.
Guidelines to Use OneDrive
OneDrive is united with File Explorer on Windows 10. It synchronizes records web utilizing the Microsoft account you sign in to Windows 10 with. It works in addition to Dropbox, Google Drive, and Apple’s iCloud Drive.
To begin, click the “OneDrive” elective in File Explorer’s sidebar. You’ll be prompted to sign in to OneDrive, if focal. On the off chance that you aren’t, you can essentially put records in OneDrive. They’ll be moved to Microsoft’s servers. You can locate a functional pace the OneDrive envelope on different PCs you sign into the proportionate Microsoft account with, through OneDrive applications on your telephone, and on the OneDrive site.
The “Status” field in the OneDrive window shows you the status of each record. A blue cloud picture shows the record is dealt with on OneDrive on the web yet will ordinarily be downloaded when you open it. A green checkmark shows the report is dealt with both on OneDrive and your present PC.
You can control OneDrive’s settings from the OneDrive warning region (framework plate) picture. Snap the cloud-molded OneDrive picture in the notification zone at the base right corner of your screen—if you don’t see it, you likely need to tap the little up shock to the opposite side of the pictures to discover it. Snap “More” and snap “Settings” to locate OneDrive’s different settings, where you can control which organizers are synchronized, the proportion of your trade and download data move limit OneDrive uses, and different settings.
Источник
Tutorial: Get Help with File Explorer in Windows 10 or 11
File Explorer is a necessary tool in Windows 10/11 to view and manage your files and folders. This article will teach you how to get the best help with File Explorer in Windows 10/11.

By Bryce  / Last Updated September 30, 2022
Navigation
What is File Explorer?
File Explorer also called Windows Explorer in the earlier Windows version, is a crucial tool in Windows 10. Usually we use it to view files and folder every day, but actually, Windows inserted various features helping you to well manage your data. Refer to this article, it helps you to access it and illustrate you how to get help with File Explorer in Windows 10.
How to launch File Explorer in Windows 10 or 11?
There are many methods to open the File Explorer in Windows. Here we list the most common way.
Keyboard shortcut: By pressing the “Win + E” key, the File Explorer will be opened up.
The PC icon : On the Desktop, double-click the “This PC” icon or right-click it and hit “Open”, and you will see this tool.
The Start menu: Click the “Start” on the left bottom, and click “This PC” or go “Windows System” > “This PC” to open it.
вњЌTip: If you find File Explorer icon missing from Start menu, follow these instructions:
1. Click “Start” > “Setting” > “Personalization”.
2. Click “Start” on the left-side panel, and click “Choose which folders appear on Start”
3. Turn on the File Explorer button. Then you will see the File Explorer icon in the Start menu.
Th e Cortana search : Microsoft build in Cortana virtual asssistant, click the Cortana search box, and type “file explorer” on it, and press Enter. Then File Explorer will be opened.
Power User Task: Press “Win + X” to open Power User Task, and click “File Explorer”.
How to get Help with File Explorer in Windows 10 or Windows 11
Now I believe you have known how to open File Explorer. In the next part, we will walk you through the main features of File Explorer in Windows 10 or Windows 11.
Use the Ribbon
Ribbon is like a guiding box demonstrating some simple operation you can execute in a click or serveral steps. When you open File Explorer, you can see the Ribbob on the top of it. If it is there, Press keys «Ctrl + F1» simultaneously.В There are 3 tabs in Ribbon: Home, Share, View.В Here are some information about these tabs.

1. “Home” tab provides some basic functions and information for you like pinning to quick access, creating a new folder, copy, delete, select, properties, etc.
For example, you may want to copy or move a file or folder to another place, like you may want to get your files on a USB drive, or move your photos on your computer. You can click the file or folder to choose it, and click the «Move to»В orВ «Copy to«, and choose destination folder to move or duplicate a file or folder.
вњЌNote:В
1.В you should know that «Move to» will delete the iriginal document, while «Copy to» will make a copy of the seleted file on another place.
2. If you want to copy a file, you can open the destination folder and the original folderВ simultaneously, and click and drag the file or folder to the folder where you want to put the file.
2. “Share” tab gives the options to share files with your friends. By clicking E-mailing, faxing, printing, cloning icon, you can choose different way to share your data with others. Just choose one of these way, and follow its prompts.
3. With the “View” tab, you can adjust the appearance of the File Explorer. This tab allows you to decide the size of icons and to sort files or folder in different way. And you can also hide selected items if you don’t want it to be viewed by others. Besides, With “view” tab, you can preview pictures, Word files and determine the arrangement of files.
Quick Access
Quick Access is also a great function you can get help with File Explorer in Windows 10. With this function, you can access any folders with just one click. Here is how to use it.
Step 1. Open the File Explorer, and navigate to the folder you want to pin to Quick Access.
Step 2. Right-click the folder or select the “Home” tab, and click “Pin to Quick access”. Then it would be added to Quick Access. Next time, you want to access this folder, you can just click the folder under the Quick access. Then the folder will be opened immediately.

✍Tip: If you want to remove it from Quick access one day, you can right-click the folder under the Quick access and select “Unpin from Quick access”.
Backup files
In Windows 10 system, you can back up or store your files with File History. It will automatically backup your files, and you can restore the file to any previous version as you wish.
Firstly, you need to go “Setting” > “Update& Security” > “Backup” and enable “Automatically back up my files”.
Then, if you need an old version of any files, you can click the “History” icon to restore previous version of the file as long as it is backup by File History.

Use the OneDrive
OneDrive is an online hosting service provided by Microsoft. Like other cloud drives, Google Drive, Dropbox. Once you upload files and folders to OneDrive, you can access those files and folders from any other devices that installed OneDrive. If you have some data you don’t want to lose, it can also be a backup tool. Then let’s see how to use the OneDrive.
Step 1. Open the File Explorer and drag the files to the OneDrive in the left sidebar.

Step 2. Then you will be prompted to get a Microsoft account. After that, the files will be uploaded to OneDrive. When it is finished, you can access any files in the OneDrive with your Microsoft account via OneDrive App or OneDrive website.
вњЌNote: You can right-click the cloud-like OneDrive icon at the bottom right corner of your screen to change specific settings, such as notifications and account settings.
Shortcuts in File Explorer
In addition, in order to work efficiently, here we list some shortcuts to help you better utilize the File Explorer in Windows 10:
Shift + Delete –delete a file or folder
Ctrl + D – delete file or folder to recycle bin
Ctrl + E – go to the search box
Ctrl + N – Open a new File Explorer window
Ctrl + W – Close the current File Explorer window
Alt + P – Show/Hide the preview pane
Alt + Enter – Display the Properties dialog box for the selected file or folder
Alt + Right arrow – View the folders
Alt + D – go to the address bar
Ctrl + middle mouse bottom– change the size of each file in the current window.
Ctrl + Shift + E – Display all folders above the selected folder
Ctrl + Shift + N – Create a new folder
How to fix File Explorer not working?
File Explorer is very helpful for the daily use, but you may encounter the typical issue that the file explorer is not working or not responding. And you can follow the steps to fix this issue.
Method 1: Update your system
Step 1. Go “Start” > “Setting” > “Update & Security” > “Windows Update”, and click “Check for updates”.

Step 2. Then you will know if your system is the latest version, if it is not, please update it to the latest.
Method 2. Check Corrupted files
The “File Explorer not responding” issue is probably caused by file corruption. You can check if there are some corrupted files with Command Prompt.
Step 1. Press “Win + R”, and type “cmd” on the Run box to open Command Prompt.
Step 2. Type “sfc/scannow” and press Enter.

Step 3. After the scan, this command will fix corrupted files automatically. It takes just a few minutes.
Method 3. Extend the C drive
You may not store plenty of files on C drive if you want your computer to run smoothly. However, over time, the C drive is getting full, which would affect the running of the computer, so the File Explorer would become not working or responding. Then you can extend the C drive with third party software to solve it.
AOMEI Partition Assistant Professional is a good measure for you to extend your system drive to improve the performance of your computer. With just a few steps, you can allocate free space from another drive to C drive. Besides, it is also a hard drive manager. If you want to format, wipe, create partition, split partition, which are not supported by File Explorer, this tool can also help you.
Download the Demo version and see how it works.
Step 1. Open the AOMEI Partition Assistant, and right-click the partition that has enough space, and choose “Allocate Free Space”.

Step 2. Here you can set the allocated size as you wish to C drive, and click “OK”.

Step 3. Click the “Apply” in the main interface to start allocating free space to C drive.

Besides, AOMEI Partition Assistant has other functions that can improve computer performance so that the issue probably can be fixed, such as, migrating Windows 10 to SSD and aligning partition.
Conclusion
Now, I believe you have a rough understanding of File Explorer. You can add this webpage to your bookmark so as to you can read it at any time.
If you have any question about File Explorer, you can leave a comment, or if you have other tricks to utilize File Explorer, you can also share to other users.
Источник
How To Get Help With File Explorer In Windows 10?
Last Update April 29th, 2020 If you want to get help with File Explorer in Windows 10 and customize file explorer in Windows 10, then you are at the right place.
For those of you who are getting confused with the name “File Explorer “, I will clear your confusion right away.
The File Explorer in Windows 10 is the new version of Windows Explorer that used to be in the previous Windows Versions. It’s a Windows Explorer update. So now whenever you hear File Explorer, its the same thing as Windows Explorer but will lot of different useful features.
In the past, we were using Windows Explorer with Windows Operating Systems. But from Windows 8 OS, that Windows Explorer got a new name and some beneficial features that I will cover in just a second, Read on...

Getting help with File Explorer in Windows 10 is a piece of cake. The new File Explorer provides lots of different ways by which you can get help easily and quickly.
In this guide, we will cover the new features that are integrated into Windows 10 File Explorer and how to use them effectively. We will also solve some common issues faced by users when using Windows 10 File Explorer.
First thing first, let’s make a checklist of what we are going to learn from this guide.
☑ We will first compare the traditional Windows Explorer with the all-new File Explorer
☑ Learn how to get help with File Explorer in Windows 10 by customization.
☑ Then we will learn some Keyboard Shortcuts for Windows 10 File Explorer
☑ Windows 10 issues and fixes: Windows 10 File Explorer not responding issue
So are you ready to learn how to get help with File Explorer in Windows 10? I guess yes. Let’s start…
What Is File Explorer In Windows 10
In short, the File Explorer is a File Management feature of Windows 10. It is used to browse files and folders on your computer.
File Explorer as the Graphic User Interface (GUI) helps the user to perform various operations within the computer system without any technicality. Anyone with zero technical knowledge can easily browse through the computer using the Windows 10 file management system.
Now let’s see what changes made on the new File Explorer Vs. Windows Explorer is.

1.Traditional Windows Explorer Vs. Windows 10 File Explorer
↪ Quick Access: When we open Windows Explorer on our Windows 7 or older operating systems it opens with system drives BUT in Windows File Explorer it defaults to “Quick Access” which is a good thing as you can configure the “Quick Access” window with the folders that you constantly use, no matter where they are in the drives.
↪ OneDrive: A cloud storage application by Microsoft is added to the left pane in Windows 10 File Explorer that is not there in Windows 7 or older versions.
↪ “Home” “Share” “View”: menus are smartly integrated on the top with a lot more options to choose from, which is not present in the Windows Explorer.
↪ Navigation Pane: All the Panes, Layout, Current View, Show/Hide options are smartly integrated under the View tab to make the navigation more smooth.
↪ Flat UI: File explorer got a flat lite look as compared to the traditional Windows Explorer.
↪ The Favorite menu on the left in Windows Explorer is changed with the “Quick Access” menu.
↪ If you want Windows to take you to “My Pc” and not to “Quick Access” when you open File Explorer, you can change easily change it. Just follow the instructions below.
Disable Quick Access in File Explorer on Windows 10

There are many other Pros in File Explorer in Windows 10, but I kept it short to introduce you to it.
Now let’s go to the next point where we will learn about How to get help with File Explorer in Windows 10 by customizing it.
2.Windows 10 File Explorer Customization
How do I customize QUICK ACCESS?
Windows 10 File Explorer Customization is very easy to do, let’s see how to customize Quick Access.
We all have folders that we access many times throughout our time on our computer/laptop.
“Quick Access” feature makes it easy for you to add any number of the folder from any location on your drives to the “Quick Access” window, you can also remove the folders that you don’t want to be shown on the “Quick Access” window by just a mouse click.
To pin any folder to your “Quick Access” window just right click on the folder and click “Pin to Quick Access” or to remove already pinned folders just right click and then click “Unpin from Quick Access“. See below screen snap:


If you want to disable quick access Windows 10 you need to go to:
File > Change Folder And Search Option > Under the general tab > Privacy > And uncheck the 2 options there and then click ok.
How does OneDrive work in Windows 10?:
OneDrive Windows 10 is a cloud storage application where you can store your important files and folders directly from your computer and then can access it anywhere in the world.
If you heard about Google Drive, then OneDrive is the same thing. To use free cloud storage application, you need to sign up for a Microsoft account.
Once you are signed up, you can use your OneDrive as you like or can directly sign in if you already have one.
Note: You will get only 5GB free cloud storage from One Drive and if you want to upgrade there are options to do so.
Navigation Pane:
You can also customize your navigation pane from the VIEW tab on the top.
 As can be seen, on the above screenshot you can use other options to customize as per your need. You can also press the F1 key on your keyboard to get help with File Explorer or any separate Window that you are on.
When you press the F1 key, a new window will open with Bing search engine that will show websites results that are helpful in solving your doubts and queries.
So you see that it’s very easy to Get help with File Explorer in Windows 10.
Show/Hide Hidden Items Setting:
The new Windows 10 File Explorer has highlighted some frequently used settings in its VIEW tab. One of the heavily used settings is Hidden Items setting.
Now, to show or hide Hidden Files, you do not have to go deep in the Folder Options. You can now quickly show or hide hidden items on your Windows 10 system with just a click.
To do this navigate to File Explorer >> View Tab >> Check/Uncheck Hidden Items

3. Get help with File Explorer in Windows 10 by using keyboard shortcuts
4. Windows 10 Issues And Fixes:
File explorer not responding Windows 10
If you are facing Windows 10 File Explorer problem like it goes to “File Explorer Not Responding” mode or you see “Windows has stopped working” or Windows 10 File Explorer not responding on right click then I have a solution for you that you can try.
I faced the similar Windows File Explorer not responding issue a week ago when I was using Windows 10 File Explorer.
My Windows 10 File Explorer crashes repeatedly, and after lots of research I came up with the solution that worked for me like a charm.
You can also try this Windows 10 File Explorer fix to solve your problem. In my case, there was an old software on my computer that was causing the issue.
Below are the steps by step instructions on how to troubleshoot the “Not Responding” issue.
Step 1. Download & Install CCleaner software (Free), this tool will clean up Windows 10
Step 2. Now launch it and click on the TOOLS option
Step 3. Now go to STARTUP and disable all software that shows up.
Now once you did that, start the software one by one and see if Windows 10 File Explorer is crashing or not.
If after enabling a software File Explorer goes in “Not Responding” or crashes that means that particular software is having the issue.
Just uninstall that software if it’s not essential to you or try downloading the free copy of that software and install again.
In case, the above solution does not work for you then install Microsoft Fix It for Windows 10 and run it on your computer.
5. Windows Navigation Pane Missing
When you go to File Explorer in Windows 10, and you noticed that there is no navigation pane on the left side of the screen, then do not worry.
Just click on the “VIEW” tab that is located at the top of the File Explorer and then click on Navigation pane as shown below.

Now you will be able to see Navigation pane in File Explorer.
6. Windows 10 Search Bar Not Working
If the search box not working in Windows 10 File Explorer, then there is a setting in File Explorer in Windows 10 that can be done to make the search function.
The main reason Windows search not working is that option is not enabled. Just follow the below path to enable search in Windows 10 File Explorer.
Go to File on the top left >> Click Change Folder and Search Options >> Click the Search Tab >> Check the box Don’t use the index when searching in file folders for system files(searches might take longer) >> Apply >> Ok.
Now Windows 10 Search bar should work.
7. Windows 10 File Explorer Hangs When Right Clicks?
Many of you may be facing the issue of File Explorer crashing after right-clicking on it. To solve this issue with the Windows 10 File Explorer follow the below steps:


The command execution will complete n few seconds.
Once its completed, restart your computer.
Also Read: How To Get Help In Windows 10? Step-By-Step-Tutorial
Источник
In the computer, the file Explorer handles the upmost position. In other words, we can say that without File Explorer, a computer is nothing. When we upgraded to Windows 10, the Windows Explorer name changed to File Explorer. Through File Explorer, you can have quick access, and also you can manage the hard drive. The file explorer has a graphical interface, and it provides you the entrance to the computer, the system partition, and the library change in their properties.
The users choose to open the File explorer only to manage the files. The first point you should know how you can open the files explorer in Windows 10. It is the first step to learn more about how you can get help with file explorer in Windows 10.
How to open File Explorer
To get help with file explorer in windows 10, get to know how you can open the file explorer. It is your choice what seems more suitable for you. We will tell you all the ways through which you can have access to File Explorer. To open the interface of File Explorer, see the options below.
This PC: Double-click on the This PC icon. When you open your computer, you will see the icon on the desktop’s left top side.
Taskbar: Next, you can open the File Explorer through Taskbar. With the help of Taskbar, you will be launching a few programs.
Cortana: Cortana is available on every window with a different name. In windows 10, you need to write File Explorer in the Cortana in the search box. The file explorer window will be open to you. You can use Cortana if you are unable to open This PC and Taskbar.
Start menu: The start menu is the easiest way to open File Explorer. Open the start menu and find the item named File Explorer.
Shortcut-key: In a computer, the shortcut key is the famous one to open anything directly. You only need to know about it. To open the File Explorer, you need to Press Windows Key + E.
After opening the file explorer, you need to know how you can get help with File Explorer. Please read the full article to find out about it.
In File Explorer, you get to know the 5 different categories on the left side: OneDrive, This PC, Quick access,Libraries, and Network.
How to Use Ribbon
We use ribbon mostly in Microsoft office. But we get to see Ribbon in File explorer as well. If you don’t want to see it, you can hide it too, and it is all your choice. On the File Explorer ribbon, we see the three options: Home, share, view. You can see these tabs temporarily. In any case, you want ribbon for a long time, and you have to press Ctrl + F1. To get help with file explorer in windows 10, you can take access to ribbon.
The Home tab provides options like Copy, Paste, Delete Rename, and many more.
The share tab provides you options such as zipping, emailing, and other printing files.
Next, the view tab gives you the options of how you want to see the icons of File Explorer. It is your choice. You want it large, medium, or small. It also offers how you want to sort the files. You can see the show or hide items without opening any folder option screen in the View tab.
Sometimes you can see the Manage tab, and that tab comes when you select anything. Like if you choose pictures, the pictures tool will appear and give you the options like if you want to rotate your image or make it your PC background.
Pin Frequently by using commands.
On the left side, you see the Quick Access option. In quick access, you get to know the command which you use more often. If you want to add any command to the Quick Access toolbar, you need to right-tap on the ribbon and select the Add to quick access toolbar.
If you want see more space for commands, you can right-click on the ribbon and select the quick access toolbar below the ribbon option.
How to use OneDrive
The OneDrive is the option you get to see on the left side of the File Explorer window. OneDrive is similar to Google Drive and Dropbox. It is used to synchronize the files online by using your Microsoft account.
To get help with file explorer in windows 10, you can access the OneDrive; you need to sign in to your account or move the files to the folder. After moving the files into the OneDrive folder, it will upload to the Microsoft servers. When you log in to your Microsoft account, you will get the same files you have stored in the OneDrive folder. It is your choice you want to open OneDrive on your mobile phone or any other device. If you log in to your Microsoft account, you will get the same files.
How to access network Drives
The network drives are another option you get to see on the left side of the file explorer window. The folders and media server shared on the local network directly appear on the Network drives.

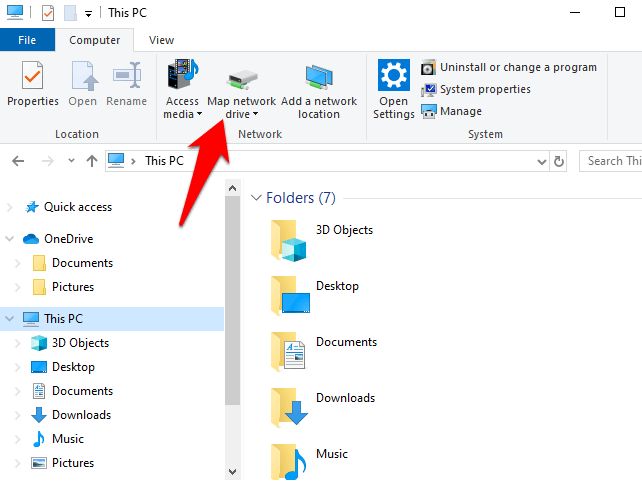
Windows 10 doesn’t have a HomeGroup feature; because of that, you only can use OneDrive or can use the folder sharing network options. In any case, you need to map a network drive; you need to go to the This PC option. On the ribbon of This PC, you have to select the Map network drive option. Select the option and connect your device.
Use Keyboard shortcuts
To get help with File Explorer in Windows 10, you can get to know about the keyboard shortcuts you can use. In File Explorer, if you want to complete the task immediately, you can use the Shortcut keys.
- Windows + E: Open the File Explorer.
- Ctrl + N: Open the new file explorer window.
- Ctrl + W: Close the File Explorer.
- Ctrl + Shift + N: Create a new folder.
- Ctrl + F: Open the search box.
- Ctrl + L: Open the location bar.
- F11: Maximize the File explorer window.
Get Help With File Explorer In Windows 10 – Conclusion
That is how you can get help with File Explorer in Windows 10. We have listed down the steps which we have tried personally
Also Read
- Set Up Windows Hello On Windows 10
- Change Printer Status From Offline To Online In Windows 10
- Best Free Themes for Windows 10
- Remove Programs In Windows 10