Git has its native environment within the terminal. All the new features are updated first at the command line, and only there is the full power of Git. But plain text isn’t the simplest choice for all tasks; sometimes some users are much more comfortable with a point-and-click interface, a visual representation is what they need.
Note: There’s nothing these graphical clients can do that the command-line client can’t; the command-line is still where you’ll have the most power and control when working with your repositories.
Working with GUI
Git GUI is Tcl/Tk based graphical user interface to Git. It focuses on allowing users to make changes to their repository by making new commits, amending existing ones, creating branches, performing local merges, and fetching/pushing to remote repositories.
The first thing we need to do is install Git on Windows; you can do so with the following steps:
Step 1: Download and install the latest version of Git for Windows.
Step 2: Use the default options for each step in the installation.
Step 3: Remove Git Bash Desktop Icon.
Step 4: Go to Start > All Programs > Git > Git GUI and make a Desktop Shortcut.
Getting started with Git GUI
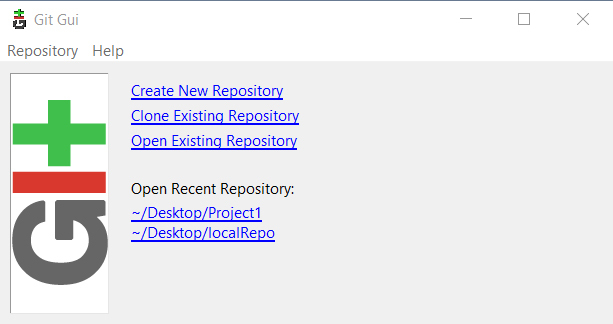
Step 1: Create Remote Repository
Now, we need a Git repository, and we’ll create a new remote repository on Github.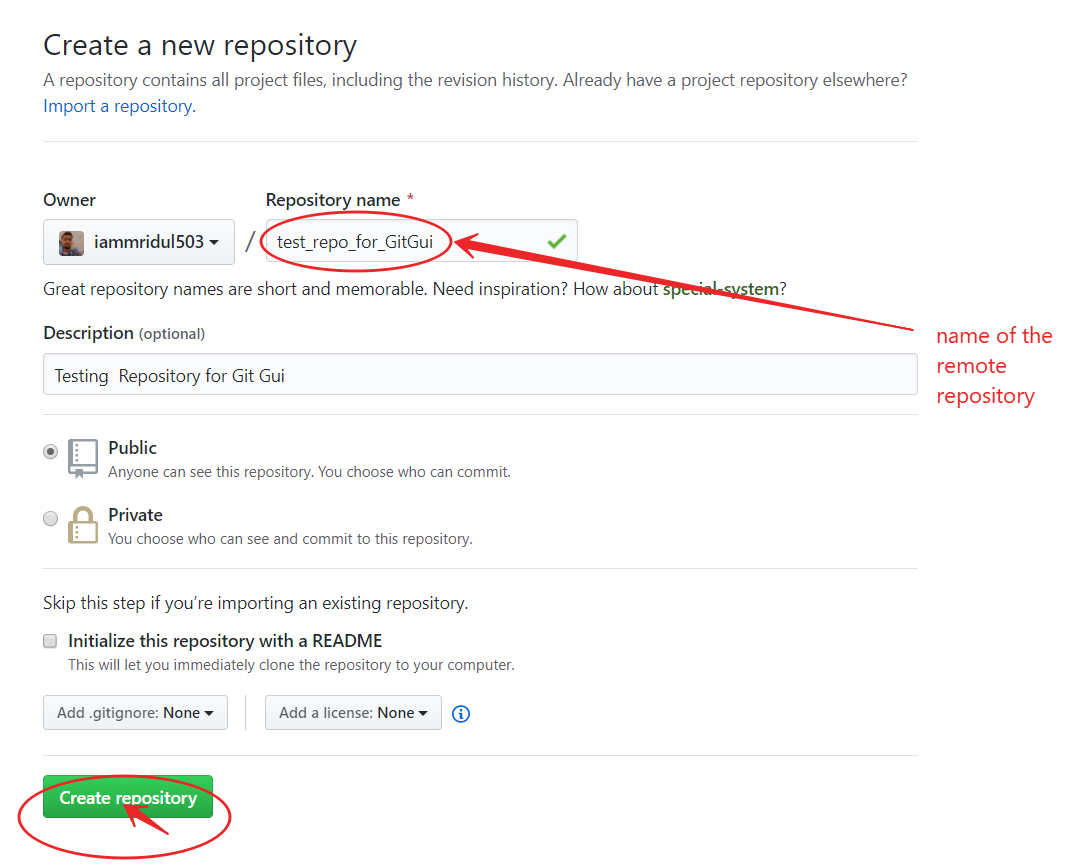
Step 2: Create a Local Repository
For creating a local repository: in our Git GUI, click on “Create New Repository”.
Select the location you wish to store your repository in. It is important to note that the selected repository location
MUST NOT exist.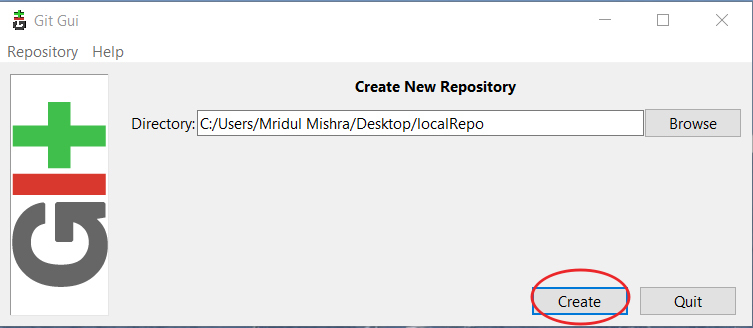
In order for this new repository to be initialized, you must first create a file, any file, in your local repo.Then, you must Commit and Push to the remote Git repository location.
Step 3: Clone a Remote Repository to a Local Repository
In order to clone a repository, click on the “Clone Existing Repository” link in the Git GUI window. An existing repository is one that is already initialized and/or has commits pushed to it.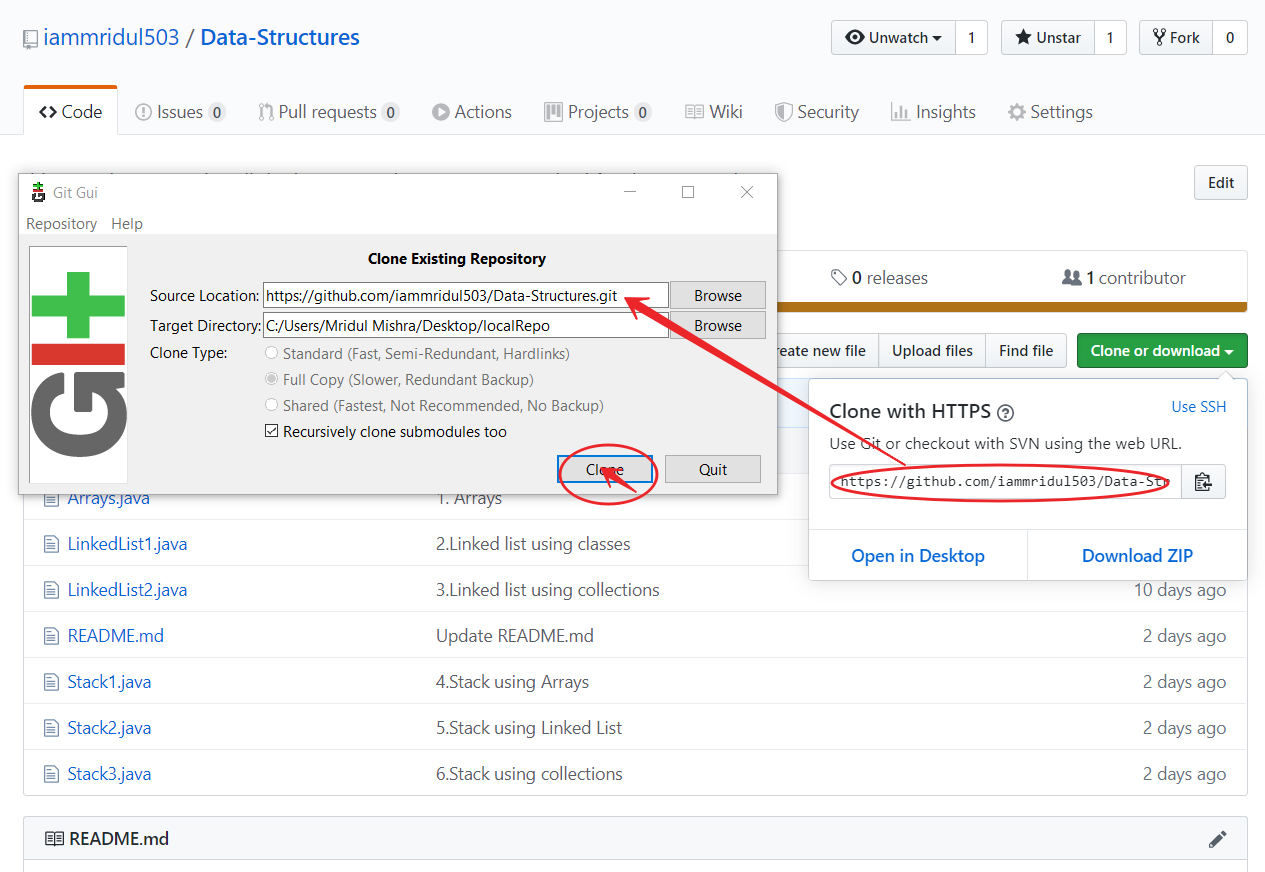
Note: In the Source Location field, fill in the Git remote repository location. The target directory works as same in the case of creating a local repository. Git will attempt to create it, and it will fail if it already exists.
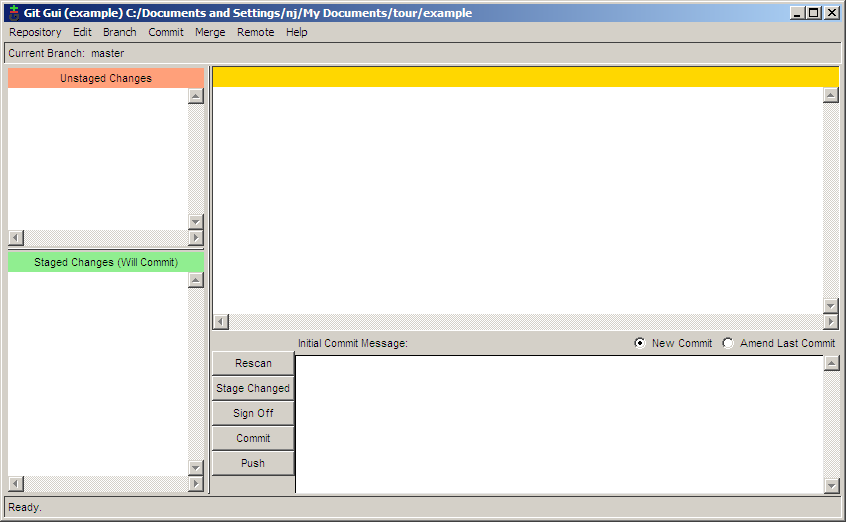
Working with the GUI Client
The Git GUI makes it easier to perform Git-related tasks, such as staging changes, commits, and pushes.
Staged Changes
When we move files to a Git directory, you will see all the files in the “Unstaged Changes” window. This basically means that new files have been added, removed, updated, etc. When we click the “Stage Changed” button, it will attempt to add all the new files to the Git index.

Git Equivalent Command:
git add file_name
git status
Commits
After we’ve staged your changes, we need to commit them to your local repository. Type a Commit Message that makes sense to the changes that were made. When we are done, press the Commit button.
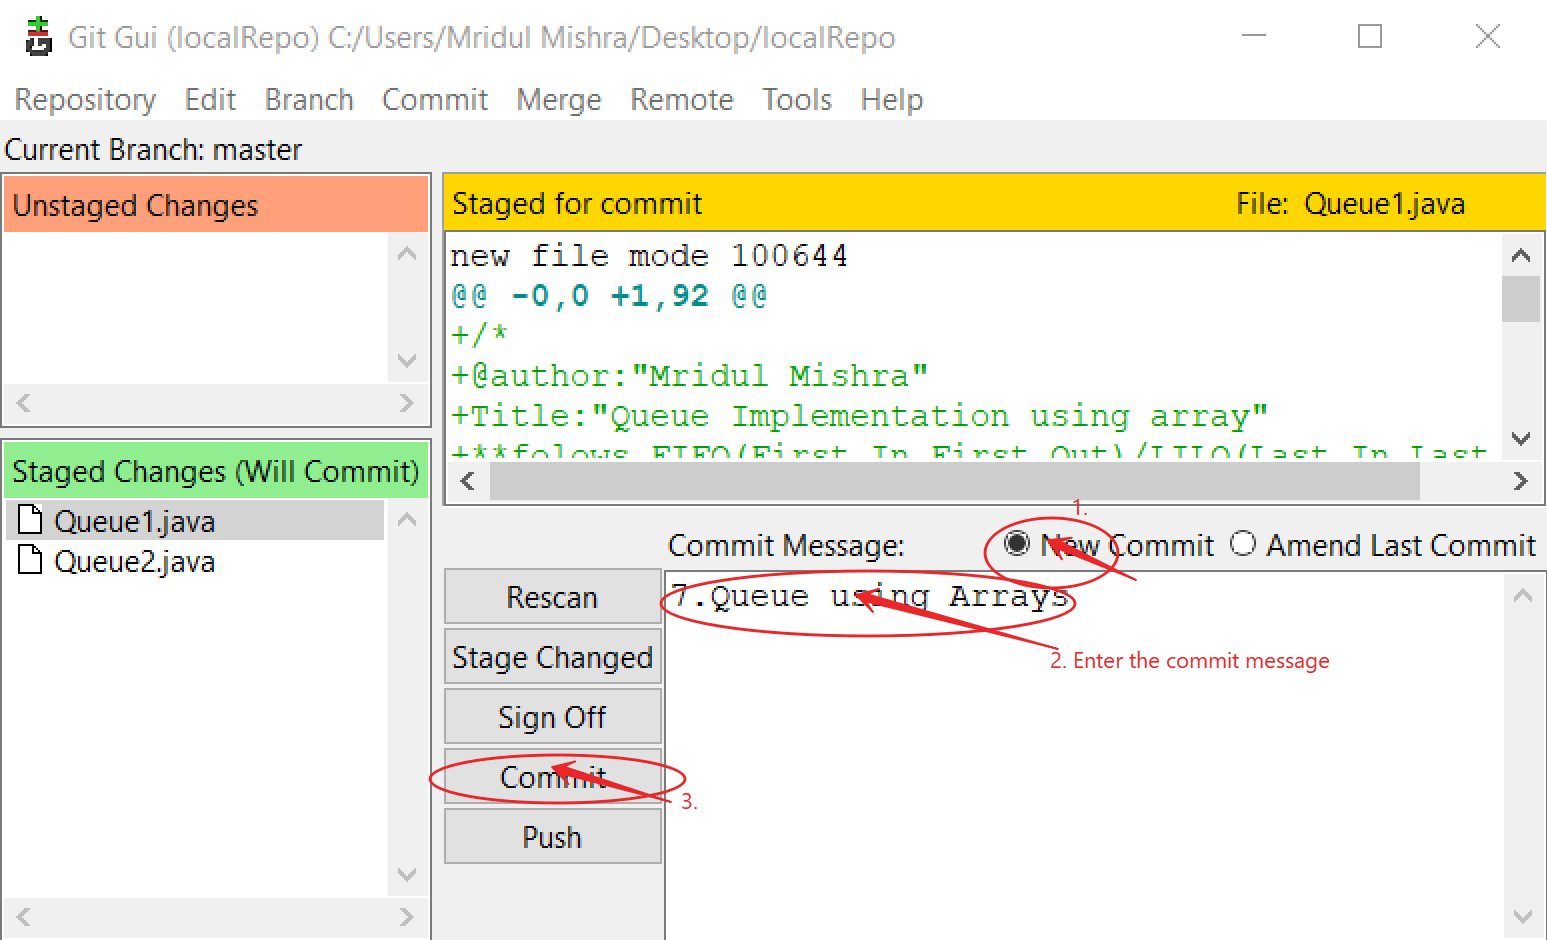
Git Equivalent Command:
git commit -m "message"
Pushing
After we have committed all the codes in the local repository, we need to push these changes to our remote repository on GitHub. Without pushing the changes, others would not be able to access the code.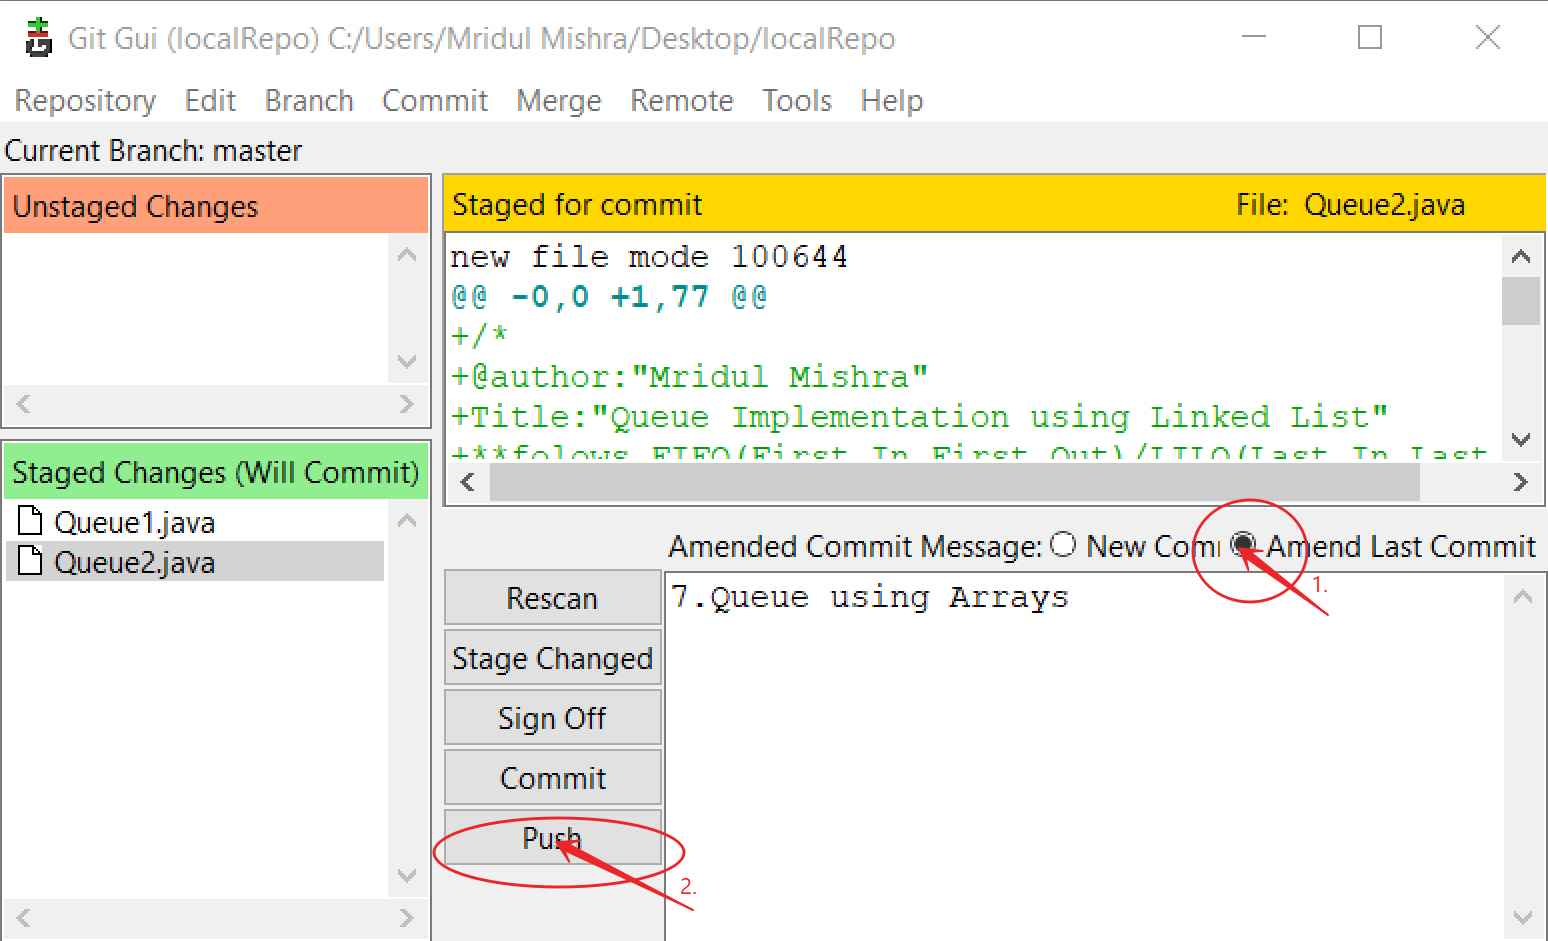
Before we can proceed to push, we need set up a location to push to. Most folks refer to this location as “origin”. In Git, “origin” is a shorthand name for the remote repository that a project was originally cloned from. More precisely, it is used instead of that original repository’s URL – and thereby makes referencing much easier.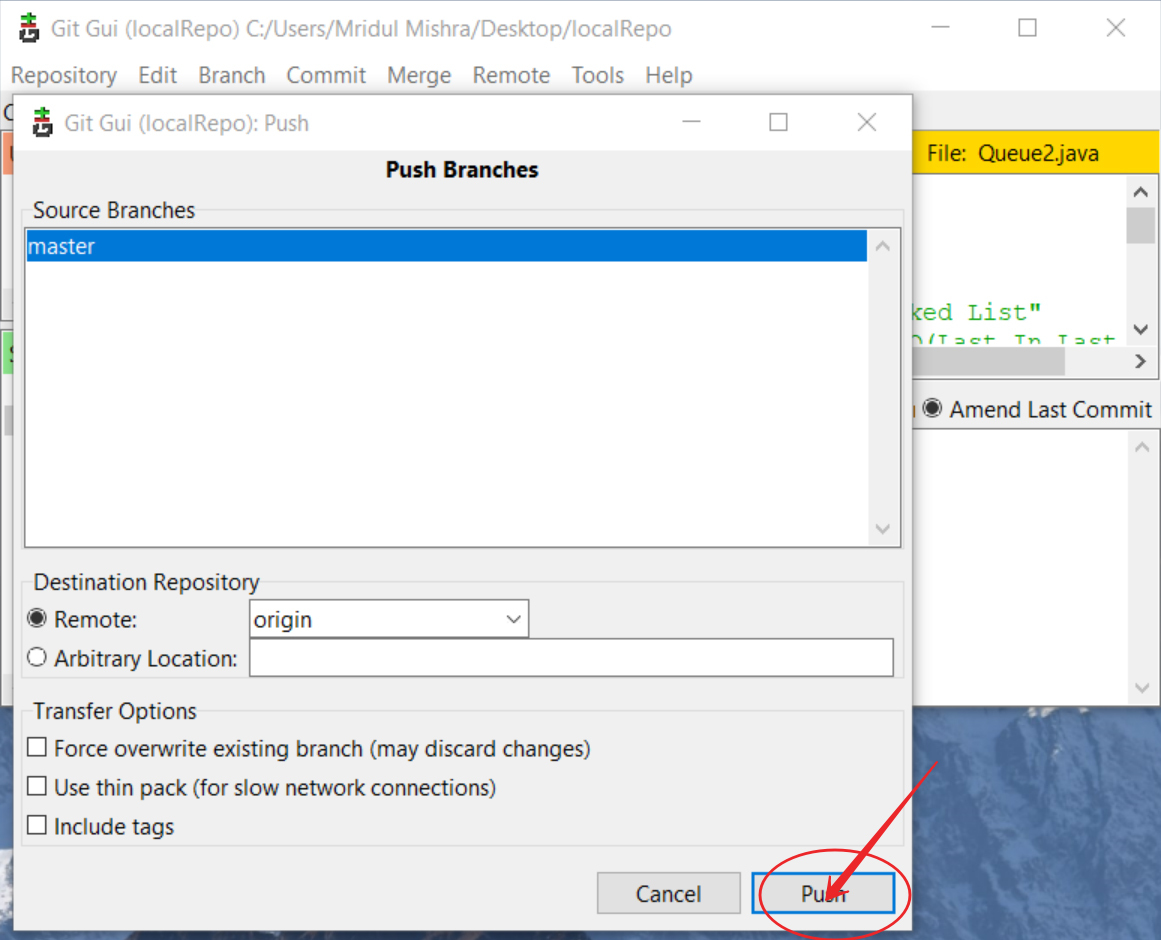

Git Equivalent Command:
git push -u origin master
This way GUI makes it a lot easier to work with GIT for the users that do not prefer the command line.
Git has its native environment within the terminal. All the new features are updated first at the command line, and only there is the full power of Git. But plain text isn’t the simplest choice for all tasks; sometimes some users are much more comfortable with a point-and-click interface, a visual representation is what they need.
Note: There’s nothing these graphical clients can do that the command-line client can’t; the command-line is still where you’ll have the most power and control when working with your repositories.
Working with GUI
Git GUI is Tcl/Tk based graphical user interface to Git. It focuses on allowing users to make changes to their repository by making new commits, amending existing ones, creating branches, performing local merges, and fetching/pushing to remote repositories.
The first thing we need to do is install Git on Windows; you can do so with the following steps:
Step 1: Download and install the latest version of Git for Windows.
Step 2: Use the default options for each step in the installation.
Step 3: Remove Git Bash Desktop Icon.
Step 4: Go to Start > All Programs > Git > Git GUI and make a Desktop Shortcut.
Getting started with Git GUI
Step 1: Create Remote Repository
Now, we need a Git repository, and we’ll create a new remote repository on Github.
Step 2: Create a Local Repository
For creating a local repository: in our Git GUI, click on “Create New Repository”.
Select the location you wish to store your repository in. It is important to note that the selected repository location
MUST NOT exist.
In order for this new repository to be initialized, you must first create a file, any file, in your local repo.Then, you must Commit and Push to the remote Git repository location.
Step 3: Clone a Remote Repository to a Local Repository
In order to clone a repository, click on the “Clone Existing Repository” link in the Git GUI window. An existing repository is one that is already initialized and/or has commits pushed to it.
Note: In the Source Location field, fill in the Git remote repository location. The target directory works as same in the case of creating a local repository. Git will attempt to create it, and it will fail if it already exists.
Working with the GUI Client
The Git GUI makes it easier to perform Git-related tasks, such as staging changes, commits, and pushes.
Staged Changes
When we move files to a Git directory, you will see all the files in the “Unstaged Changes” window. This basically means that new files have been added, removed, updated, etc. When we click the “Stage Changed” button, it will attempt to add all the new files to the Git index.
Git Equivalent Command:
git add file_name
git status
Commits
After we’ve staged your changes, we need to commit them to your local repository. Type a Commit Message that makes sense to the changes that were made. When we are done, press the Commit button.
Git Equivalent Command:
git commit -m "message"
Pushing
After we have committed all the codes in the local repository, we need to push these changes to our remote repository on GitHub. Without pushing the changes, others would not be able to access the code.
Before we can proceed to push, we need set up a location to push to. Most folks refer to this location as “origin”. In Git, “origin” is a shorthand name for the remote repository that a project was originally cloned from. More precisely, it is used instead of that original repository’s URL – and thereby makes referencing much easier.
Git Equivalent Command:
git push -u origin master
This way GUI makes it a lot easier to work with GIT for the users that do not prefer the command line.
Если вы прочитали всю книгу, то много узнали об использовании Git в командной строке.
Вы можете работать с локальными файлами, синхронизировать свой репозиторий с чужими по сети и эффективно работать с другими людьми.
Но это ещё не всё; Git обычно используется как часть большей экосистемы и терминал это не всегда лучший способ работы с ним.
Рассмотрим несколько других окружений где Git может быть полезен и как другие приложения (включая ваши) работают с ним.
Графические интерфейсы
Родная среда обитания Git — это терминал.
Новые функции изначально доступны только там и лишь терминал поможет вам полностью контролировать всю мощь Git.
Но текстовый интерфейс — не лучший выбор для всех задач; иногда графическое представление более предпочтительно, а некоторые пользователи чувствуют себя комфортней, орудуя мышкой.
Также стоит понимать, что разные интерфейсы служат разным целям.
Некоторые Git клиенты ограничиваются лишь той функциональностью, которую их автор считает наиболее востребованной или эффективной.
Учитывая это, ни один из представленных ниже инструментов не может быть «лучше» остальных: они просто предназначены для решения разных задач.
Также стоит помнить, что всё, что можно сделать с помощью графического интерфейса, может быть выполнено и из консоли; командная строка по прежнему является местом, где у вас больше всего возможностей и контроля над вашими репозиториями.
gitk и git-gui
Установив Git, вы также получаете два графических инструмента: gitk и git-gui.
gitk — это графический просмотрщик истории.
Что-то типа улучшенных git log и git grep.
Это тот инструмент, который вы будете использовать для поиска событий или визуализации истории.
Проще всего вызвать Gitk из командной строки:
Просто перейдите в каталог с репозиторием и наберите:
Gitk принимает много различных опций, большинство из которых транслируются в используемый git log.
Возможно, наиболее полезная опция — --all, которая указывает Gitk выводить коммиты, доступные из любой ссылки, а не только HEAD.
Интерфейс Gitk выглядит так:
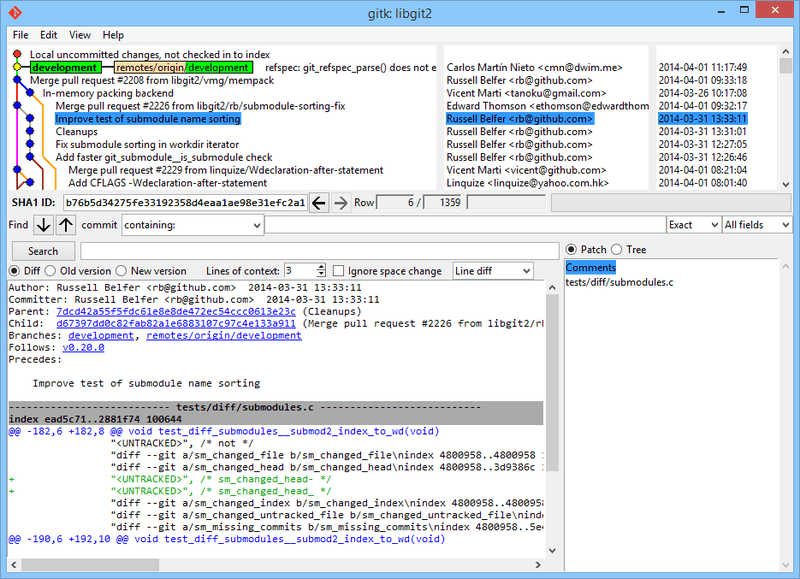
Рисунок 151. gitk— инструмент для просмотра истории
Интерфейс на картинке похож на вывод git log --graph; каждая точка соответствует коммиту, линии отражают родство коммитов, а ссылки изображены цветными прямоугольниками.
Жёлтая точка обозначает HEAD, а красная — изменения, которые попадут в следующий коммит.
В нижней части расположены элементы интерфейса для просмотра выделенного коммита: слева показаны изменения и комментарий, а справа — общая информация по изменённым файлам.
В центре расположены элементы для поиска по истории.
git-gui, в отличие от gitk — это инструмент редактирования отдельных коммитов.
Его тоже очень просто вызвать из консоли:
И его интерфейс выглядит так:
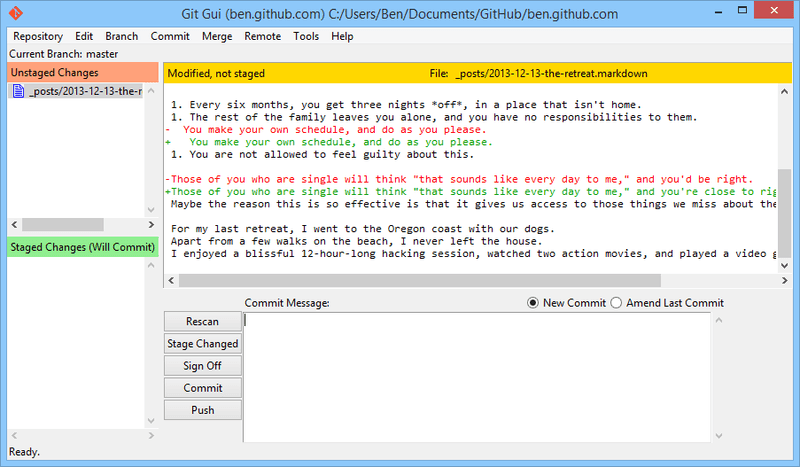
Рисунок 152. git gui — инструмент редактирования коммитов
Слева находится область редактирования Git индекса: изменения в рабочем каталоге наверху, добавленные в индекс изменения — снизу.
Вы можете перемещать файлы целиком между двумя состояниями, кликая на иконки, или же вы можете просмотреть изменения в конкретном файле, кликнув по нему.
Справа вверху расположена область просмотра изменений выделенного файла.
Можно добавлять отдельные кусочки или строки в индекс из контекстного меню в этой области.
Справа снизу находится область для ввода сообщения коммита и несколько кнопок.
Введите сообщение и нажмите кнопку «Commit» чтобы выполнить коммит.
Также можно изменить предыдущий коммит, выбрав радиокнопку «Amend», что приведёт к обновлению индекса содержимым предыдущего коммита.
После этого вы можете как обычно добавлять или удалять файлы из индекса, изменить сообщение коммита и, нажав кнопку «Commit» создать новый коммит, заменив им предыдущий.
gitk и git-gui — это примеры инструментов, ориентированных на задачи.
Каждый из них наиболее подходит для решения определённой задачи (просмотр истории или создание коммитов соответственно) и не поддерживает дополнительные функции Git, ненужные для её решения.
GitHub для Mac и Windows
Компания GitHub выпустила два инструмента, ориентированных на рабочий процесс, а не на конкретные задачи: один для Windows, второй — для Mac.
Эти клиенты — хороший пример процесс-ориентированного ПО: вместо предоставления доступа ко всей функциональности Git, они концентрируются на небольшом наборе фич, работающих вместе для достижения цели.
Выглядят они примерно так:
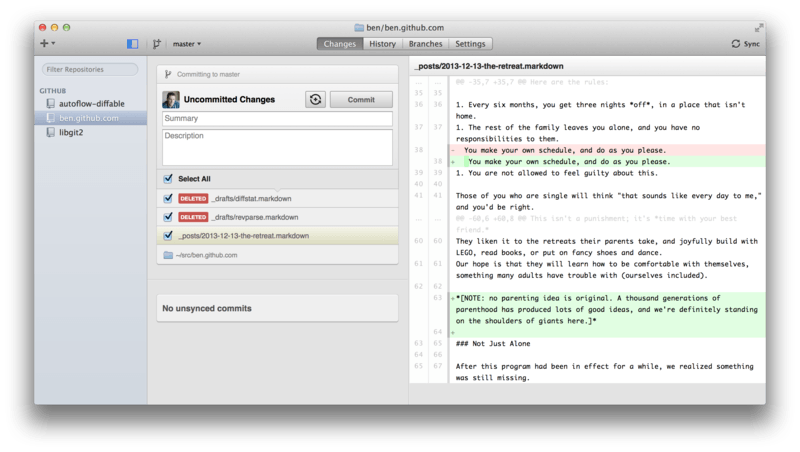
Рисунок 153. GitHub для Mac
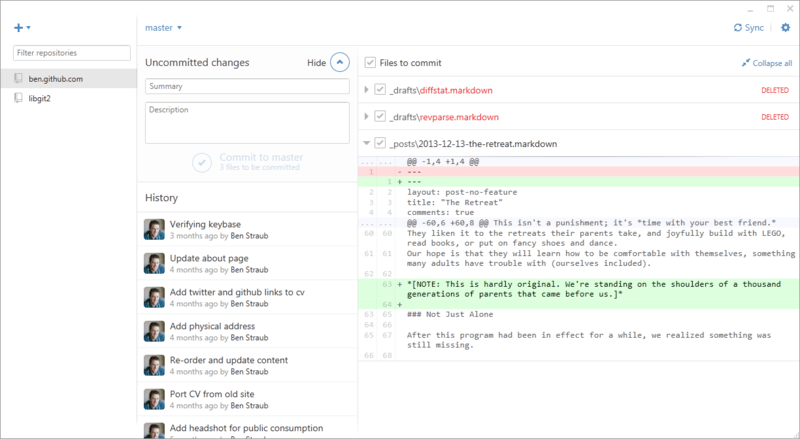
Рисунок 154. GitHub для Windows
Они спроектированы по одному шаблону, поэтому мы будет рассматривать их как один продукт в этой главе.
Мы не будем разбирать по косточкам эти инструменты (в конце-концов у них есть документация), а лишь быстренько взглянем на экран изменений (место, где вы будете зависать больше всего).
-
Слева расположен список отслеживаемых репозиториев; можно добавить репозиторий (клонировав его, либо указав путь к существующей копии) нажатием кнопки
+над списком. -
В центре экрана расположена область редактирования коммита: тут можно ввести сообщение коммита и выбрать файлы для включение в него.
(На Windows, история коммитов расположена под этой областью, на Mac это отдельная вкладка.) -
Справа — просмотр изменений: что изменилось в рабочем каталоге, какие изменения войдут в коммит.
-
И стоит обратить внимание на кнопку «Sync» справа вверху, которая используется для синхронизации по сети.
|
Примечание |
Необязательно регистрироваться на GitHub, чтобы работать с этими инструментами. |
Установка
GitHub для Windows можно скачать на https://windows.github.com, а для Mac — на https://mac.github.com.
При первом запуске обе программы проведут первоначальную настройку Git, например, сконфигурируют ваше имя и email, а также установят разумные значения по умолчанию для распространённых опций типа CRLF-поведение и хранилище паролей.
Оба инструмента поддерживают автообновление в фоне — это означает, что у вас всегда будет последняя версия.
Это также относится к поставляемому в комплекте с ними Git — вам никогда не придётся обновлять его вручную.
На Windows вы также получаете ярлык для запуска PowerShell с Posh-Git, который мы рассмотрим далее в этой главе.
Следующий шаг — скормить программе парочку репозиториев для работы.
Клиент для GitHub показывает список репозиториев, доступных вам на GitHub, и вы можете клонировать любой в один клик.
Если же у вас уже есть клонированный репозиторий, просто перетяните его из окна Finder (или Windows Explorer) в окно клиента GitHub, и он будет включён в список репозиториев слева.
Рекомендуемый рабочий процесс
После установки GitHub клиент можно использовать для решения кучи стандартных задач.
Рекомендуемый ниже подход к работе иногда называют «GitHub Flow».
Мы рассмотрели этот рабочий процесс в разделе Рабочий процесс с использованием GitHub главы 6, но вкратце, важны два момента: (а) вы коммитите в отдельные ветки и (б) вы регулярно забираете изменения с удалённого репозитория.
Управление ветками слегка различается на Mac и Windows.
В Mac версии для создания ветки есть кнопка вверху окна:

Рисунок 155. Кнопка создания ветки на Mac
На Windows создание ветки происходит путём ввода её имени в переключатель веток:
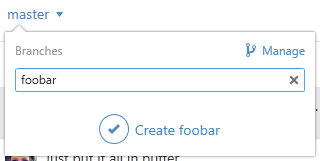
Рисунок 156. Создание ветки в Windows
После создания ветки добавление коммитов в неё довольно тривиально.
Измените что-нибудь в рабочем каталоге и, переключившись в окно клиента GitHub, вы увидите свои изменения.
Введите сообщение коммита, выберете файлы для включения в коммит и нажмите кнопку «Commit» (ctrl-enter или ⌘-enter).
Взаимодействие с удалёнными репозиториями происходит в первую очередь посредством кнопки «Sync».
В Git есть отдельные команды для отправки изменений на сервер, слияния изменений воедино и перемещения веток друг относительно друга, но клиент GitHub совмещает все эти команды в одну.
Вот что происходит когда вы жмёте «Sync»:
-
git pull --rebase.
Если эта команда выполнится с ошибкой, будет выполненоgit pull --no-rebase. -
git push.
Это довольно привычный, но рутинный процесс при работе по «GitHub Flow», совмещение команд воедино действительно экономит время.
Заключение
Перечисленные инструменты отлично решают поставленные перед ними задачи.
С их помощью разработчики (и не только) могут начать совместную работу над проектами в считанные минуты, причём с настроенным рабочим процессом.
Но если вы придерживаетесь иных подходов к использованию Git, или если вам нужно больше контроля над происходящим, мы рекомендуем вам присмотреться к другим клиентам, а то и вовсе к командной строке.
Другие инструменты
Часть 2
Что такое Git и зачем он нужен?
Git — это консольная утилита, для отслеживания и ведения истории изменения файлов, в вашем проекте. Чаще всего его используют для кода, но можно и для других файлов. Например, для картинок — полезно для дизайнеров.
С помощью Git-a вы можете откатить свой проект до более старой версии, сравнивать, анализировать или сливать свои изменения в репозиторий.
Репозиторием называют хранилище вашего кода и историю его изменений. Git работает локально и все ваши репозитории хранятся в определенных папках на жестком диске.
Так же ваши репозитории можно хранить и в интернете. Обычно для этого используют три сервиса:
-
GitHub
-
Bitbucket
-
GitLab
Каждая точка сохранения вашего проекта носит название коммит (commit). У каждого commit-a есть hash (уникальный id) и комментарий. Из таких commit-ов собирается ветка. Ветка — это история изменений. У каждой ветки есть свое название. Репозиторий может содержать в себе несколько веток, которые создаются из других веток или вливаются в них.
Как работает
Если посмотреть на картинку, то становиться чуть проще с пониманием. Каждый кружок, это commit. Стрелочки показывают направление, из какого commit сделан следующий. Например C3 сделан из С2 и т. д. Все эти commit находятся в ветке под названием main. Это основная ветка, чаще всего ее называют master . Прямоугольник main* показывает в каком commit мы сейчас находимся, проще говоря указатель.

В итоге получается очень простой граф, состоящий из одной ветки (main) и четырех commit. Все это может превратиться в более сложный граф, состоящий из нескольких веток, которые сливаются в одну.

Об этом мы поговорим в следующих статьях. Для начала разберем работу с одной веткой.
Установка
Основой интерфейс для работы с Git-ом является консоль/терминал. Это не совсем удобно, тем более для новичков, поэтому предлагаю поставить дополнительную программу с графическим интерфейсом (кнопками, графиками и т.д.). О них я расскажу чуть позже.
Но для начала, все же установим сам Git.
-
Windows. Проходим по этой ссылке, выбираем под вашу ОС (32 или 64 битную), скачиваем и устанавливаем.
-
Для Mac OS. Открываем терминал и пишем:
#Если установлен Homebrew
brew install git

#Если нет, то вводим эту команду.
git --version
#После этого появится окно, где предложит установить Command Line Tools (CLT).
#Соглашаемся и ждем установки. Вместе с CLT установиться и git-
Linux. Открываем терминал и вводим следующую команду.
# Debian или Ubuntu
sudo apt install git

# CentOS
sudo yum install git
Настройка
Вы установили себе Git и можете им пользоваться. Давайте теперь его настроим, чтобы когда вы создавали commit, указывался автор, кто его создал.
Открываем терминал (Linux и MacOS) или консоль (Windows) и вводим следующие команды.
#Установим имя для вашего пользователя
#Вместо <ваше_имя> можно ввести, например, Grisha_Popov
#Кавычки оставляем
git config --global user.name "<ваше_имя>"

#Теперь установим email. Принцип тот же.
git config --global user.email "<адрес_почты@email.com>"
Создание репозитория
Теперь вы готовы к работе с Git локально на компьютере.
Создадим наш первый репозиторий. Для этого пройдите в папку вашего проекта.
#Для Linux и MacOS путь может выглядеть так /Users/UserName/Desktop/MyProject
#Для Windows например С://MyProject
cd <путь_к_вашему_проекту>

#Инициализация/создание репозитория
git init
Теперь Git отслеживает изменения файлов вашего проекта. Но, так как вы только создали репозиторий в нем нет вашего кода. Для этого необходимо создать commit.
#Добавим все файлы проекта в нам будующий commit
git add .
#Или так
git add --all

#Если хотим добавить конкретный файл то можно так
git add <имя_файла>

#Теперь создаем commit. Обязательно указываем комментарий.
#И не забываем про кавычки
git commit -m "<комментарий>"
Отлично. Вы создали свой первый репозиторий и заполнили его первым commit.
Процесс работы с Git
Не стоит после каждого изменения файла делать commit. Чаще всего их создают, когда:
-
Создан новый функционал
-
Добавлен новый блок на верстке
-
Исправлены ошибки по коду
-
Вы завершили рабочий день и хотите сохранить код
Это поможет держать вашу ветки в чистоте и порядке. Тем самым, вы будете видеть историю изменений по каждому нововведению в вашем проекте, а не по каждому файлу.
Визуальный интерфейс
Как я и говорил ранее, существуют дополнительные программы для облегчения использования Git. Некоторые текстовые редакторы или полноценные среды разработки уже включают в себя вспомогательный интерфейс для работы с ним.
Но существуют и отдельные программы по работе с Git. Могу посоветовать эти:
-
GitHub Desktop
-
Sourcetree
-
GitKraken
Я не буду рассказывать как они работают. Предлагаю разобраться с этим самостоятельно.
Создаем свой первый проект и выкладываем на GitHub
Давайте разберемся как это сделать, с помощью среды разработки Visual Studio Code (VS Code).
Перед началом предлагаю зарегистрироваться на GitHub.
Создайте папку, где будет храниться ваш проект. Если такая папка уже есть, то создавать новую не надо.
После открываем VS Code .

-
Установите себе дополнительно анализаторы кода для JavaScript и PHP
-
Откройте вашу папку, которую создали ранее
После этого у вас появится вот такой интерфейс
-
Здесь будут располагаться все файлы вашего проекта
-
Здесь можно работать с Git-ом
-
Кнопка для создания нового файла
-
Кнопка для создания новой папки
Если ваш проект пустой, как у меня, то создайте новый файл и назовите его
index.html. После этого откроется окно редактирование этого файла. Напишите в нем!и нажмите кнопкуTab. Автоматически должен сгенерироваться скелет пустой HTML страницы. Не забудьте нажатьctrl+sчтобы файл сохранился.
Давайте теперь перейдем во вкладу для работы с Git-ом.
Откроется вот такое окно:
-
Кнопка для публикации нашего проекта на GitHub
-
После нажатия на кнопку
1, появится всплывающее окно. Нужно выбрать второй вариант или там где присутствует фраза...public repository
Если вы хотите создать локальный репозиторий и опубликовать код в другой сервис, то необходимо нажать на кнопку
Initialize Repository. После этого, вручную выбрать сервис куда публиковать.
После того, как выбрали «Опубликовать на GitHub публичный репозиторий» (пункт 2), программа предложит вам выбрать файлы, которые будут входить в первый commit. Проставляем галочки у всех файлов, если не проставлены и жмем ОК . Вас перекинет на сайт GitHub, где нужно будет подтвердить вход в аккаунт.
Вы создали и опубликовали репозиторий на GitHub.
Теперь сделаем изменения в коде и попробуем их снова опубликовать. Перейдите во вкладку с файлами, отредактируйте какой-нибудь файл, не забудьте нажать crtl+s (Windows) или cmd+s (MacOS), чтобы сохранить файл. Вернитесь обратно во вкладу управления Git.
Если посмотреть на значок вкладки Git, то можно увидеть цифру 1 в синем кружке. Она означает, сколько файлов у нас изменено и незакоммичено. Давайте его закоммитим и опубликуем:
-
Кнопка для просмотра изменений в файле. Необязательно нажимать, указал для справки
-
Добавляем наш файл для будущего commit
-
Пишем комментарий
-
Создаем commit
-
Отправляем наш commit в GitHub
Поздравляю, вы научились создавать commit и отправлять его в GitHub!
Итог
Это первая вводная статья по утилите Git. Здесь мы рассмотрели:
-
Как его устанавливать
-
Как его настраивать
-
Как инициализировать репозиторий и создать commit через консоль
-
Как на примере VS Code, опубликовать свой код на GitHub
Забегая вперед, советую вам погуглить, как работают следующие команды:
git help # справка по всем командам
git clone
git status
git branch
git checkout
git merge
git remote
git fetch
git push
git pull
P.S. Для облегчения обучения, оставлю вам ссылку на бесплатный тренажер по Git.
https://learngitbranching.js.org/
В телеграмм канале Step by Step , я публикую еще больше материала и провожу обучающие стримы, для всех желающих.
Getting started with Git can be a daunting task, especially if you are not at home in the command line. Fortunately, Git is a mature and widely used tool so there is a lot of reference and “How do I…?” material available. One aspect less commonly covered is using Git with some of the numerous Git GUIs available. This article will get you up and running with a basic understanding of Git concepts and how to manage your Git workflow with Git Gui, TortoiseGit, and Visual Studio Code.
Why use a GUI?
Git is a powerful, robust tool that runs on the command line by default. Using a GUI offers a more discoverable interface and some people prefer the aesthetics of GUIs over the CLI. For developers focused on writing code and using Git to collaborate with their team or contribute to OSS projects a GUI can be a pleasant tool that will comfortably handle the necessary tasks. Once you learn Git concepts you don’t necessarily need to memorize the specific steps to accomplish tasks – GUIs make it easier to discover (or rediscover!) how to accomplish a task when you know what your task is.

Git concepts
If you aren’t already familiar with software version control this short article is a good introduction.
The Git commit tree
Git stores changes in a series of commits. Every commit is identified by a unique hash. One thing that can be confusing to newcomers is that the arrows in Git tree diagrams point backwards. While the chronological flow for commits A then B then C looks like:
A → B → C
The commits are stored with parent references, not child references. A has no knowledge of B or C; B records that A is its parent and C records that B is its parent. This gives us a commit tree like:
A ← B ← C
File concepts in Git
- Working Tree: all of the files in the file system in your project folder. Git may ignore some files depending on the configuration in the .gitignore file.
- Staging Area: the “commit” command only commits files that have been added to staging. File diffs can be viewed between working tree content and staged content.
- Repository: the Git repository contains all commits and other Git data.
You add files to the working tree simply by adding them to your file system. Git’s “add” command, or Git Gui’s “Stage to Commit” action adds changes to the staging area. Git’s “commit” command adds changes to the repository.
Getting started
The first step is to create a Git repository. We’ll start with TortoiseGit for this task since its context menu is integrated into Windows Explorer.
Tip: The Tortoise VCS clients have quite a lineage going back to TortoiseSVN and even TortoiseCVS. If you have used those you’ll be right at home with TortoiseGit.
Create a new folder to start an empty project. Open the folder’s context menu and click “Git Create repository here”. This will add a “.git” folder to store Git’s data. At this point the repository is empty, the staging area is empty, all your project is in the working tree only and Git is not tracking anything. You can open Git Gui by clicking “Git GUI Here” in the folder’s context menu.
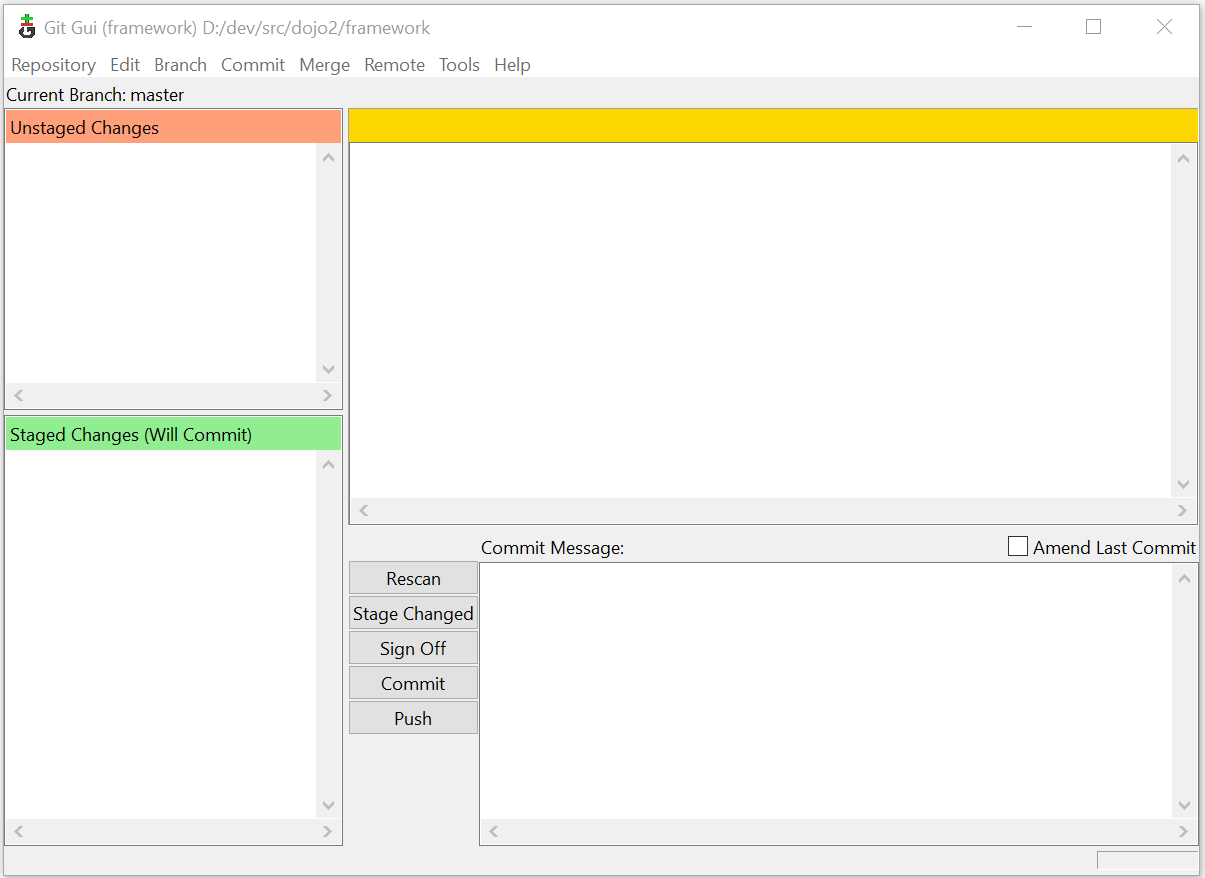
- Top-left shows unstaged changes (which at this point is all files)
- Bottom-left shows staged changes (empty)
- Top-right shows the diff for the selected file
- Bottom-right is where you can enter a commit message
Now add a plain text file to your project folder and click the “Rescan” button in Git Gui. The file will show up in the top-left pane. The “Stage Changed” button will add all changed files to the staging area.
Tip: You can add individual files from the menu: Commit → Stage to commit.
Click “Stage Changed” to add your new file to the staging area and you will see it move from the top-left pane to the bottom-left pane. Now edit the file and save changes, then rescan again. The file now shows up in both the unstaged and staged panes. Clicking the file in the staged pane will show a diff on the right of the file contents when you staged it. Clicking the file in the unstaged pane will show the additional changes you made after staging it.
Tip: This can be useful for incrementally tracking changes while you code – even if you are not ready to make a commit, you can stage your changes and then do experimental code changes. You can see a diff of your changes so you know exactly what you changed and you can even back out your unstaged changes (Commit → Revert changes) while preserving your staged changes.
Let’s go ahead and make our first commit – rescan and click “Stage Changed”. Now enter a commit message in the lower right pane and click “Commit”. At this point the panes on the left are empty indicating that the working tree and the repository are in sync. If you delete all files (but not the “.git” folder!) in your working tree you can still restore them from the Git repository (which is stored in the”.git” folder).
If you make a commit and realize you want to make another small change and want to include that in the commit you can check the “Amend Last Commit” checkbox above the commit message. Be cautious with this feature as it rewrites history. Git history is the record of what was changed in each commit and what parent each commit has. Git is very good at enabling multiple developers to collaborate on a project and synchronize changes, but when you rewrite history this can affect other people and complicate things. If you have not shared your commit with anyone you can safely amend commits. Once you share a commit with others (e.g. by pushing to GitHub) then rewriting history (amend, rebase) will affect them as well.
Sharing your work
There are various ways of sharing Git repositories, some of the most popular are GitHub and GitLab. To share your repository on GitHub you will need a GitHub account and you need to create a new empty repository on GitHub. To connect your local repository with GitHub you will configure a new remote. In Git Gui this is done from the menu: Remote → Add. The location is the URL with “.git” appended to it. For example the Dojo repository is at https://github.com/dojo/framework and its Git location is https://github.com/dojo/framework.git. The name is arbitrary, but it is a common practice to name the primary remote “origin”. You can add more remotes, for example the primary remote would be under your organization and each developer might create “forks” (GitHub copies) of the project in their GitHub account. You would need a remote for “origin”, another remote for your own fork, and if you want to work with branches from other developers you would need a remote for them.
Tip: Git Gui makes it easy to add remotes, but if you want to manage them in more detail you can do so in TortoiseGit: choose “Git Sync” from the context menu and click the “Manage” button to the right of “Remote URL” at the top.
With a remote configured you can now upload your Git repository to GitHub with Git’s “push” command. In Git Gui the “Push” button is just below the “Commit” button. TortoiseGit gives you a little more control over how you push with its dialog in “Git Sync”. After successfully pushing your repository to GitHub you will be able to browse your files on GitHub.
Cloning and pulling from GitHub
We’ve just covered creating a local repository and pushing it to GitHub. What if you want to copy a repository from GitHub locally? Open the context menu of the folder that will be the project’s parent and click “Git Clone”. In the URL field enter the Git URL (e.g. https://github.com/dojo/framework.git). Everything else can be left as-is, but you can rename the folder if you want (by default the dojo/framework repo would be cloned into the “framework” folder, but you can change the name).
With a GitHub repository created, a local repository created, and the GitHub repository configured as a remote you can synchronize the two using the Pull and Push buttons in TortoiseGit’s “Git Sync” window. Pull will download changes from GitHub to your local repository; push will upload changes to GitHub.
Play well with others
Adding new features to a project is commonly done within a branch. A branch is a named group of commits. A Git repository starts with a single branch, typically named “master” or “main”. Branches can be temporary, where a feature is developed in a branch and eventually integrated into the main branch, or they can be long-lived to maintain multiple versions of a project. Let’s create a feature branch from “master” in Git Gui:
- Click Branch → Create
- Give your branch a name
- For “Starting Revision” accept the default of “Local branch: master”
- Click “Create”
That’s it! You are now on a new branch. Any commits you make will be in the branch, not in “master”. Git Gui displays the name of the current branch just below the menu bar. You can now make some commits and push your branch to GitHub using TortoiseGit: choose “Git Sync” from the context menu, then click the Push button. Work can continue in parallel on the main branch and feature branches, and when a feature branch is complete and ready to be integrated you create a pull request in GitHub.
Rebasing a feature branch
Often when you are working on a feature branch work from other developers will be completed and merged into the main branch. Ideally work is broken up and scheduled in a way that minimizes conflicts, but they are inevitable.
One common workflow when integrating feature branches is to create a merge commit. A merge commit says “I added all these commits from this branch to master”, and potentially includes extra changes to resolve any conflicts. A merge workflow may be useful if you want your Git history to record who made what commits when, in what branch, and when they were merged. However, this type of history can be large and confusing. Many projects instead benefit from a history that records “this feature was added at this time by this person”.
Tip: A clean history makes finding out which commit broke (or fixed!) something with “git bisect” easier.
The recommended workflow to achieve a simple linear history is to use squash and rebase. Squashing a PR squashes all the PR’s commits into a single commit that is added to master directly (no extra merge commit). Rebasing is a method of resolving conflicts within a branch by rewriting the branch’s history. For a branch with commits C, D, and E, rebasing would change the commits (and assign new hashes) – this is why we say it “rewrites history”. The actual history is you created commits C, D, and E. When you rebase you change the history to record that you created commits C’, D’, and E’. The rebase commits will be identical if there are no conflicts, but will have a new parent. If there are conflicts you will have to resolve them during the rebase.
When should I rebase?
- If master has been updated with new code that you want to use in your branch
- If your PR has conflicts and cannot be merged
How to rebase
- Edit a file in your project to have 3 lines of text, save & commit to master
- Create a branch, edit line 3, save & commit
- Check out master, edit line 1, save & commit
- Check out your branch and look in the file – the most recent change to line 1 in master will not be present
- In Git Gui click Repository → Visualize <branch>’s History
- This shows the commit history, click on a commit to see the SHA1 hash – note down the hash for your last commit
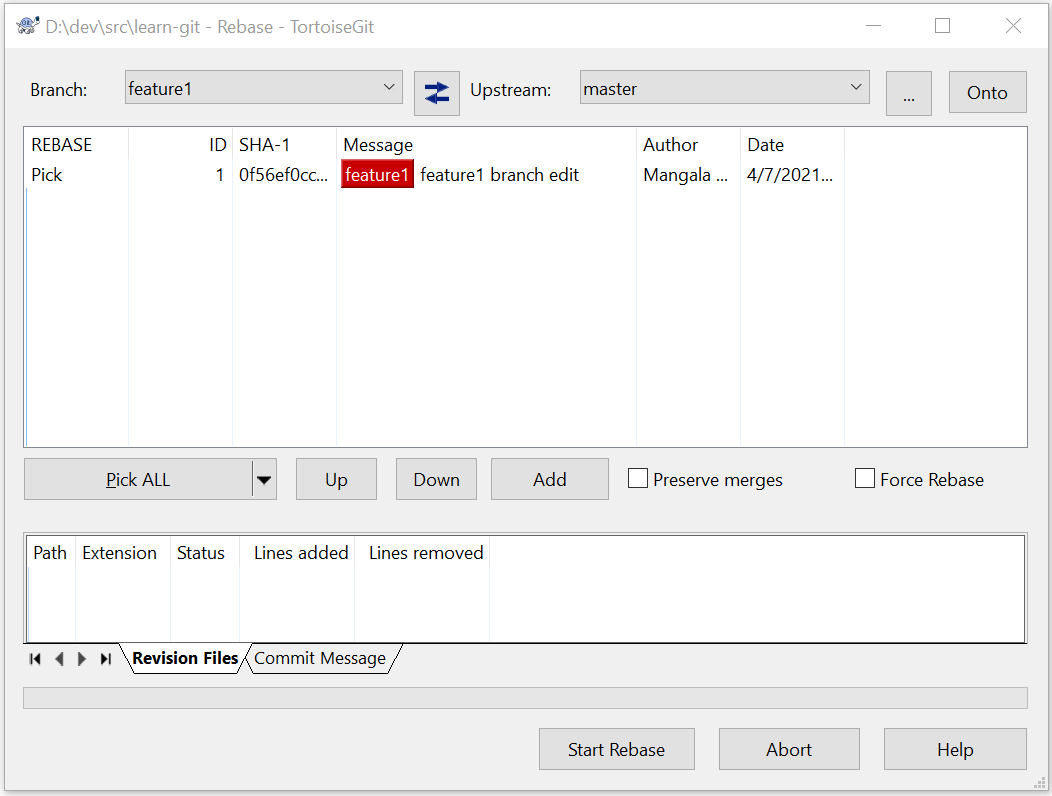
- Choose “Rebase” from TortoiseGit’s context menu
- Top left will show your branch
- In the top right set “Upstream” to “master”
- Click “Start Rebase” and “Done”
- Look at the branch history again – the commit to master has been inserted into the branch’s history, and your latest commit in the branch has a new hash
- History has been rewritten!
This was a simple rebase with no conflicts, let’s go through the process again with a conflict. You can continue with the same branch:
- Check out master, set line 1 to be “the first line of text”, save & commit
- Check out your branch, edit line 1 to be “the first line of (branch edit) text”, save & commit
- Check out master, set line 1 to be “the (master edit) first line of text”, save & commit
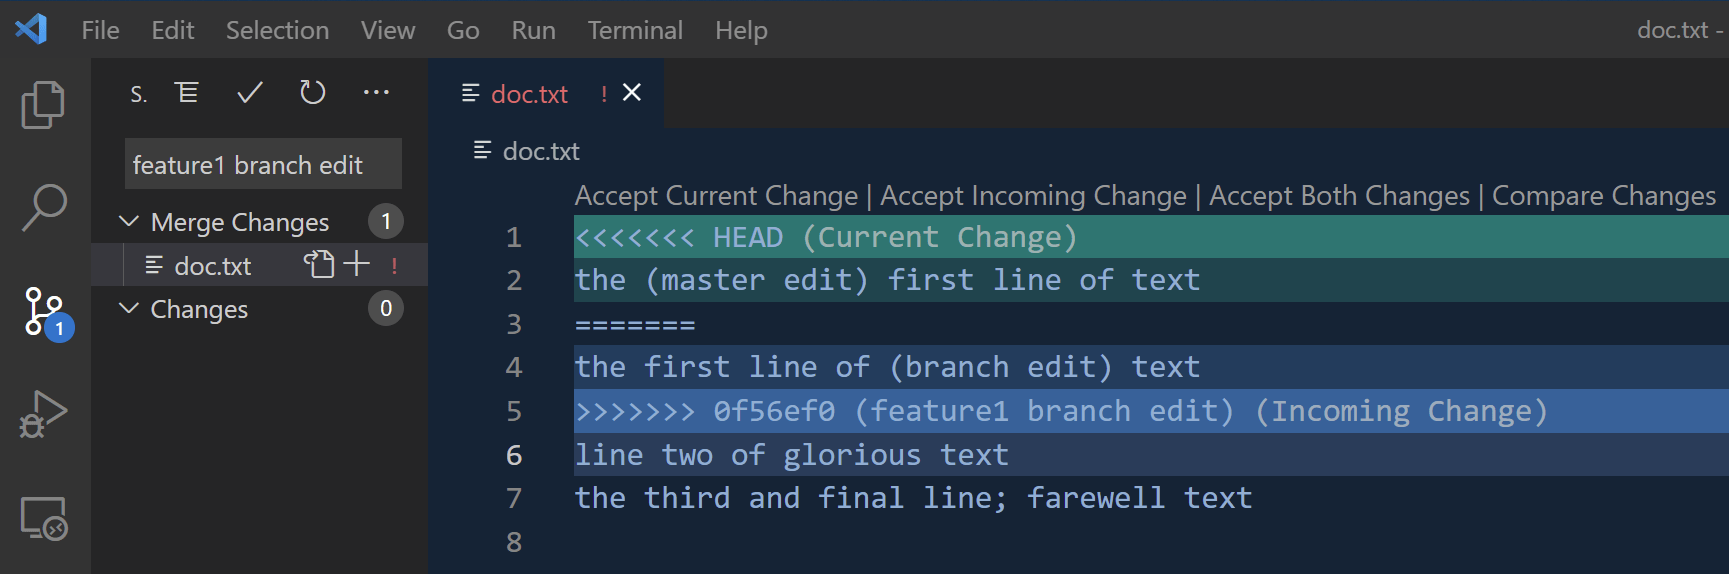
- Now when you rebase your branch on master the process halts indicating there is a conflict. VS Code provides a good UI for resolving conflicts, so open the project in VS Code and click the “Source Control” icon on the left.
- The left pane shows your files in two categories:
- Merge Changes: files with conflicts that cannot be automatically resolved (you need to fix these)
- Changes: files with no conflicts that can automatically be rebased (you don’t need to do anything)
- Open your file. VS Code will highlight conflicting lines, showing both versions of the line. “Current Change” is the value in the commit you are rebasing on (master). “Incoming Change” is the value in the commit in your branch. If one or the other is correct you can simply click “Accept Current/Incoming Change” in VS Code. If you need to manually edit the value you can click “Accept Both Changes” and edit the file as needed. When the conflict is resolved save the file and click the “Stage Changes” (➕) icon next to the file name.
- Back in TortoiseGit’s rebase dialog you can click “Resolved” in the file’s context menu and click “Commit” to finish rebasing.
As PRs are merged and the main branch is updated you may have to rebase your feature branch repeatedly to receive updates while continuing to work in your branch. If the updates to main do not affect your code there’s no need to rebase and incorporate them. When you create a PR on GitHub as long as there are no conflicts a squash merge will automatically squash and rebase all the commits in your PR into a single commit maintaining a linear history on master.
One challenge with rebasing is that the rebase process is performed for every commit in your branch. If you have a lot of commits, and a lot of noise in your change history (let’s do this, no that, hmmm, something else) then rebasing can be a bit of a waste of time resolving conflicts in commits that aren’t even relevant to the current state of the code. In this case you may benefit from squashing your whole branch to a single commit in a new branch. Then you move development to the new branch and when you rebase you are only dealing with a single commit.
Tip: Selective staging
Git Gui makes selective staging of individual lines very easy. Suppose you edited a file, made some changes and are ready to commit. But you have some debug statements, or unrelated feature changes in the file that you don’t want to commit. Looking at the diff in Git Gui you can select individual lines and click “Stage Line for Commit” – be sure to do this in pairs, as the diffing is done by line, not by word. When anything in a line is changed the diff records:
- Line x was removed (displays old content in red with a minus sign at the beginning)
- Line x was inserted (displays new content in green with a plus sign at the beginning)
So to stage a change to a single word in a line you have to stage both the removal and the insertion, which are displayed as two separate lines in the diff. If you only want to stage a few lines you can easily select them from the diff and stage them. Conversely, if you have a lot of changes and only want to exclude a few lines you can stage the whole file, then in the staged diff click “Unstage Line From Commit” for the relevant lines.
Git back to work
You now have a good foundation of Git principles and basic to intermediate tasks in some common Git GUIs to be able to get back to focusing on writing code while maintaining good collaboration practices. Some further items to learn about are cherry picking commits, squashing branches, and Git’s “bisect” command.
Введение
В этой инструкции покажем, как установить Git на Windows, и поможем выбрать правильные параметры при установке. Затем создадим репозиторий и зафиксируем в нем изменения. Все это поможет вам сделать первые шаги в освоении Git.
Git — это одна из самых популярных систем контроля версий (VCS). Такие системы помогают разработчикам хранить и версионировать исходный код приложений, настройки систем и другие текстовые файлы. И хотя ничего не мешает использовать VCS в других областях, чаще всего они применяются именно в IT.
Каждое состояние файлов в Git можно зафиксировать (сделать коммит), причем это навсегда останется в истории репозитория. Поэтому можно в любой момент посмотреть историю изменений файлов, сравнить различные версии и отменить отдельные изменения.
Также Git упрощает ведение параллельной разработки несколькими членами команды. Для этого используется ветвление. Условно можно сказать, что в Git-репозитории есть одна основная ветка, в которой хранится текущая стабильная версия исходного кода. Когда разработчик хочет изменить этот код, он «откалывает» себе отдельную ветку от основной и работает в ней. Когда работа закончена, он «вливает» изменения в основную ветку, чтобы его доработками смогли воспользоваться другие члены команды.
На самом деле все это описание довольно грубое, и по работе с Git можно написать не одну статью. На официальном сайте Git есть бесплатная электронная книга, в том числе она переведена на русский язык. А в этой статье мы сосредоточимся на установке Git в Windows и его первоначальной настройке.
Установка Git в Windows
Переходим на официальный сайт Git, в раздел загрузок. Мы увидим несколько вариантов установки: разные разрядности, портативная версия и даже установка из исходников. Мы выберем Standalone-версию, для этого проще всего нажать ссылку Click here to download, она всегда ведет на самую актуальную версию. Запускаем скачанный файл.
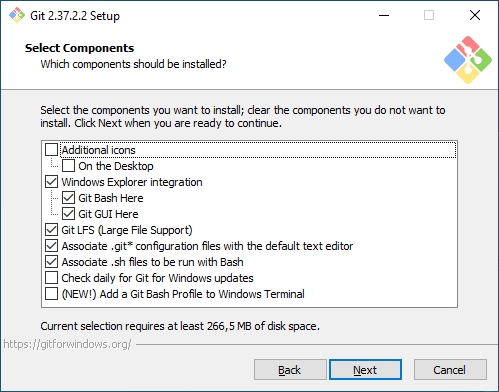
Выбор компонентов. Первый экран — выбор компонентов для установки. Если вам нужны дополнительные иконки на рабочем столе, или если вы хотите, чтобы Git ежедневно проверял наличие новой версии, — отметьте соответствующие опции. Остальные параметры лучше оставить по умолчанию.
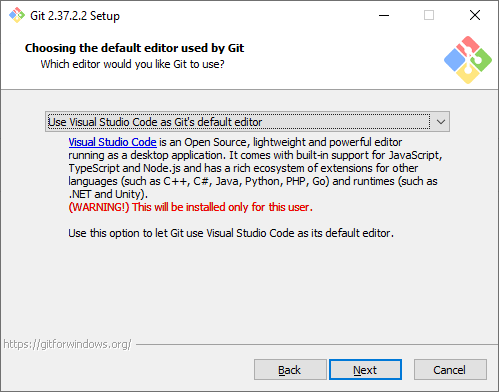
Текстовый редактор по умолчанию. Необходимо выбрать редактор, который будет использовать Git — например, когда вы будете писать сообщение для коммита. Это не обязательно должен быть редактор, в котором вы планируете писать исходный код.
По умолчанию в установщике выбран Vim — консольный текстовый редактор, который для многих может показаться сложным в освоении. Если вы не знакомы с Vim и при этом хотите именно консольный редактор — выберите nano. Если у вас уже установлен какой-нибудь текстовый редактор — выбирайте его. Мы для примера будем использовать VSCode.
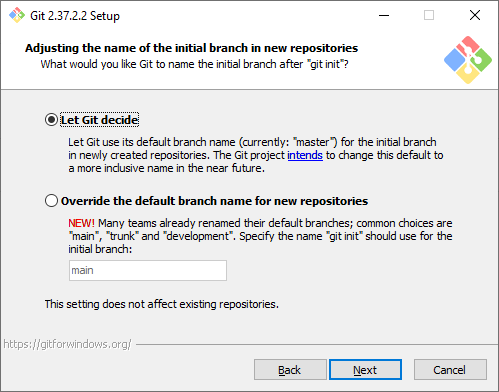
Название первой ветки. Тут нужно выбрать, как Git будет называть первую ветку в каждом репозитории. Раньше такая ветка всегда называлась master, но со временем это стало напоминать о временах рабства, и многие проекты и компании стали переименовывать ветки в своих репозиториях. Поэтому разработчики Git добавили эту опцию, чтобы название первой ветки можно было изменить. Мы будем придерживаться старого поведения и оставим название master.
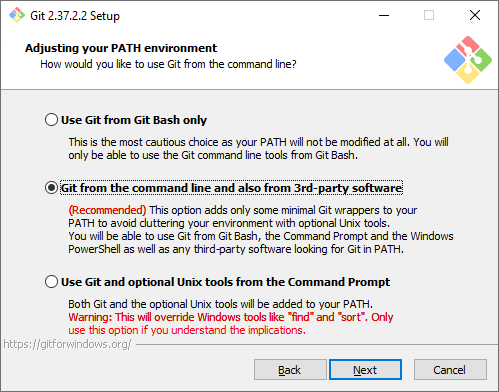
Способ использования Git. Первая опция сделает Git доступным только из командной строки Git Bash. Это не очень удобно, потому что не позволит пользоваться Git-ом из других оболочек или интегрировать его с редактором кода. Вторая опция самая оптимальная (ее мы и выберем) — она позволяет работать с Git-ом из разных оболочек и интегрировать его с другими приложениями. Третья опция кроме установки Git также «перезапишет» некоторые системные команды Windows аналогами из Unix, и эту опцию нужно выбирать только если вы точно понимаете, что делаете.
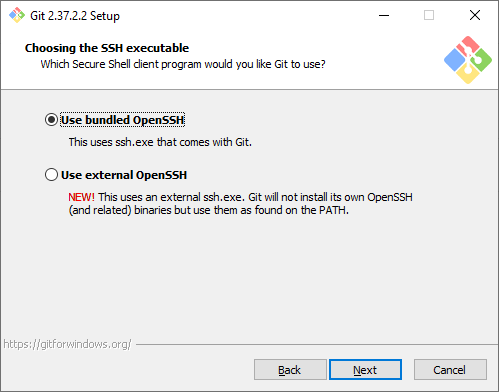
Выбор SSH-клиента. Изначально Git поставлялся со встроенным SSH-клиентом, но недавно появилась опция, где можно использовать внешний клиент. Если у вас уже что-то установлено на компьютере — можете выбрать вторую опцию. Мы же остановимся на первой, так как предварительно ничего не устанавливали.
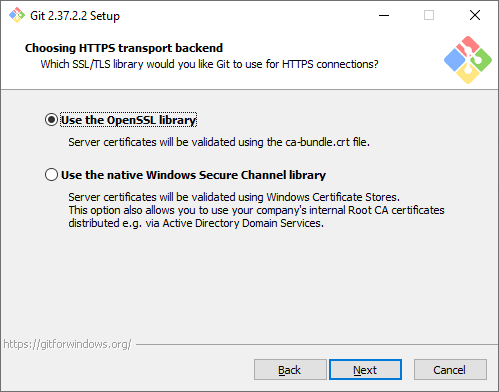
Выбор SSL/TLS библиотеки. По умолчанию Git будет использовать свою OpenSSL библиотеку с заранее определенным списком корневых сертификатов. Обычно этого достаточно, но если вам нужно работать со внутренними репозиториям внутри компании, которые используют самоподписанные сертификаты, выберите вторую опцию. Тогда Git будет использовать библиотеку и сертификаты из вашей операционной системы.
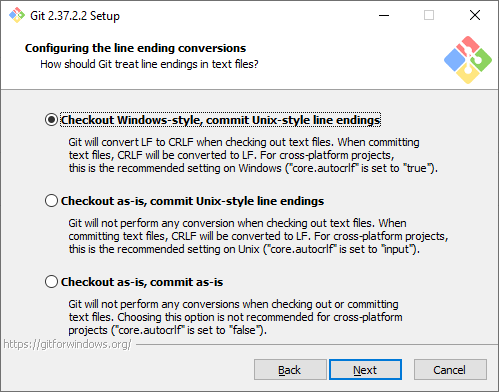
Символы перевода строки. Существует два основных способа формирования конца строки в файлах — CRLF и LF. Первый используется в Windows, второй — в Unix-like системах. Первая опция позволяет извлекать файлы из репозитория в Windows-стиле, при этом отправлять файлы в репозиторий в Unix-стиле. Мы рекомендуем использовать этот вариант, потому что он лучше всего подходит для кросс-платформенной команды, когда над одним кодом могут работать разработчики на разных ОС.
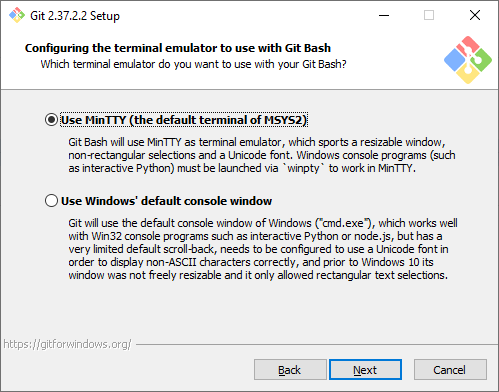
Эмулятор терминала. Эмулятор, который будет использоваться в командной строке Git Bash. MinTTY — удобный вариант, поэтому он выбран по умолчанию. Встроенный эмулятор CMD не очень удобен, у него есть некоторые ограничения, поэтому выбирайте его, только если делаете это осознанно.
Стратегия git pull. Первая опция будет пытаться обновить историю коммитов без создания коммитов слияния. Это самый оптимальный и часто используемый вариант, оставим его.

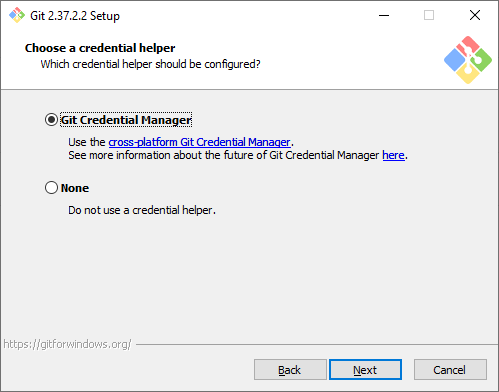
Credential Manager. Установка этого параметра позволит Git запоминать логины и пароли для подключения к удаленным репозиториям (например, GitHub, GitLab или корпоративное хранилище) и не вводить их постоянно.
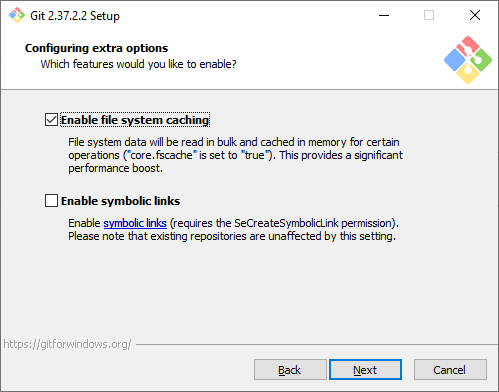
Дополнительные настройки. Кэширование позволит ускорить работу Git, эту опцию рекомендуем оставить. А вот символические ссылки нам не нужны.
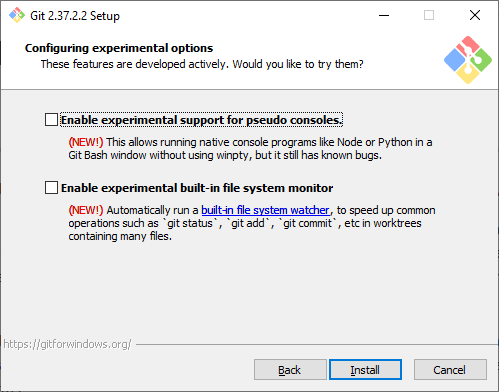
Экспериментальные настройки. Эти опции еще не переведены в стабильную стадию, поэтому их использование рекомендуется, только если вы точно понимаете, что делаете. Мы не будем ничего отмечать.
Git установлен и готов к работе.
Установка в различные дистрибутивы Linux
Также коротко покажем, как можно установить Git в различные дистрибутивы Linux. Как правило, самостоятельно скачивать ничего не нужно, достаточно воспользоваться встроенным в дистрибутив пакетным менеджером.
Debian
pt-get install gitUbuntu
add-apt-repository ppa:git-core/ppa # apt update; apt install gitFedora 21
yum install gitFedora 22+
dnf install gitGentoo
emerge --ask --verbose dev-vcs/gitArch Linux
man -S gitOpenSUSE
ypper install gitMageia
rpmi gitFreeBSD
pkg install gitOpenBSD
g_add gitRHEL, CentOS, Oracle Linux и др.
Как правило, пакетный установит довольно старую версию Git, поэтому рекомендуется собирать Git из исходных кодов, или воспользоваться сторонним репозиторием IUS Community.
Первоначальная настройка и создание репозитория
Перед началом работы с Git нужно указать свое имя и email, которые в дальнейшем будут записываться в историю изменений при каждом коммите. В будущем это позволит понять, кто именно внес те или иные изменения.
Откроем любое из приложений — Git Bash или Git CMD. Первое — это командная строка в стиле Linux, второе — командная строка в стиле Windows. Выбирайте то, что вам ближе. Мы выберем Git Bash и выполним две команды:
git config --global user.email "git-user@selectel.ru"
git config --global user.name "Selectel Git User"
Теперь Git полностью готов к работе. Давайте создадим репозиторий и зафиксируем в нем первое изменение (сделаем коммит). Для начала создадим каталог для будущего репозитория и сразу перейдем в него:
mkdir first-repo && cd first-repoСоздаем новый репозиторий в этом каталоге:
git initУвидим ответ:
Initialized empty Git repository in C:/Users/git_user/first-repo/.git/.Это означает, что в директории создан новый репозиторий. Далее создадим текстовый файл, назовем его README.md, и напишем в нем любой текст. Но сам по себе этот файл не попадет в следующий коммит. Мы должны проиндексировать изменения, то есть явно сказать Git-у, что этот файл нужно учитывать в следующем коммите:
git add README.mdДалее введем команду:
git commitОткроется текстовый редактор, который мы выбирали на этапе установки Git. Тут нам нужно ввести комментарий для коммита, то есть кратко описать изменение, которое мы сделали. Мы напишем такой комментарий:
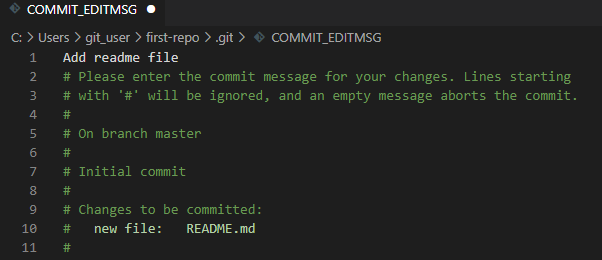
Обратите внимание, что Git автоматически добавил небольшую подсказку в это окно. При этом она не войдет в коммит, потому что в начале строки стоит символ решетки, и Git проигнорирует ее. Но она может быть полезна для дополнительной проверки: мы видим название текущей ветки и список файлов, которые войдут в коммит.
Сохраним файл и закроем редактор. Увидим примерно следующее сообщение:
[master (root-commit) 2b8f7a5] Add readme file
 1 file changed, 3 insertions(+)
 create mode 100644 README.md
Мы успешно сделали первый коммит.
Работа с Git в визуальном интерфейсе
Сам по себе Git — это утилита командной строки. Но не всем может быть удобно запоминать и писать команды в терминале, поэтому часто разработчики пользуются графическим интерфейсом. Есть несколько вариантов:
- Встроенный GUI. В базовой установке Git есть две простые утилиты: gitk и git gui. Но у них довольно старый интерфейс и пользоваться ими не всегда удобно.
- Отдельные графические утилиты. Они могут быть понятны и красивы, но неудобны тем, что код нужно писать в одной программе, а для работы с Git нужно переключаться в другую. Примеры таких программ: GitKraken, Sourcetree, GitAtomic. Большой список таких клиентов есть на официальном сайте Git.
- Встроенные в IDE или текстовый редактор. В большинстве популярных редакторов кода или IDE уже есть поддержка Git. Как правило, ничего дополнительно настраивать не нужно. Мы рассмотрим именно такой вариант на примере редактора VSCode.
Откроем директорию с репозиторием в редакторе VSCode. Внесите любое изменение в файл README.md и сохраните изменения. Обратите внимание, что в левой части редактора кое-что изменилось:
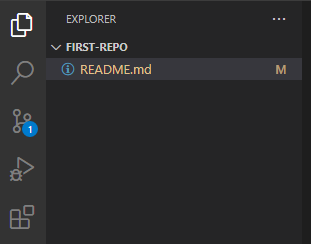
- Файл README.md подсветился желтым цветом, а рядом с ним появилась буква M (означает Modified — изменен).
- На панели Source Code появилась цифра 1, означающая, что есть одно изменение, которое можно зафиксировать.
Перейдем на панель Source Code. Слева находится список файлов, которые были изменены. Если кликнем на файл, то увидим какие именно изменения мы внесли: в этом случае добавили новую строчку This is the second commit.

Теперь давайте зафиксируем наши изменения. Рядом с названием файла нажмем на «плюс», чтобы проиндексировать его. Это аналогично команде git add, которую мы выполняли ранее. Затем в поле Message внесем комментарий и нажмем кнопку Commit. Это аналогично команде git commit.
Поздравляем, вы сделали уже два коммита в свой репозиторий!
Заключение
Итак, мы рассмотрели процесс установки Git под Windows, рассказали об основных параметрах установки и последующей настройки. Увидели, как репозиторий и внести в него первый коммит. Познакомились с работой в командной строке и с помощью графического интерфейса.
I recently started to use GIT as source code management system, and because i’m not made for commands written in console-like windows, i was looking for a guide on how to install and use the GIT Gui for Windows.
I found this guide written by nathanj here and i think it’s one of the easiest tutorials that i found on the web. You can find it here or on nathanj site.
An Illustrated Guide to Git on Windows
Table of Contents
- About
- Downloading PuTTY
- Installing Git
- Creating a Repository
- Committing
- Branching
- Merging
- Viewing History
- Pushing to a Remote Server
- Pulling from a Remote Server
- Conclusion
About
Note: This guide was written in early 2009. Some parts of it may be out of date. Good luck!
Using the instructions in this document, you can quickly and easily install git on Windows. In this guide, I will create a repository, make several commits, create a branch, merge a branch, search the commit history, push to a remote server, and pull from a remote server. The majority of this will be done using GUI tools.
Although this guide is targeted for use on Windows, the git gui tool works the same on all platforms. Because of this, git users on other platforms may find useful information here as well.
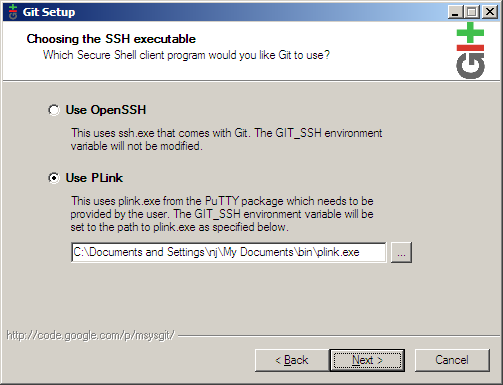
Downloading PuTTY
Although you can use the SSH program that comes with git, I prefer to use the PuTTY Agent to keep track of my SSH keys. If
you don’t already have them, download putty.exe, plink.exe, pageant.exe, and puttygen.exe from the PuTTY
web site.
Later in this guide, we will use these programs for securely pushing our changes to a remote server.
Installing Git
First, download msysgit.
This download is a single executable which installs the entire git system. While going through the installer, you will want to check the options to add Windows Explorer integration when you right click on a folder.
Because we will be using PuTTY as our SSH client, choose Use PLink and fill in the path to the downloaded plink.exe executable.
Continue clicking Next until the installation is complete.
Creating a Repository
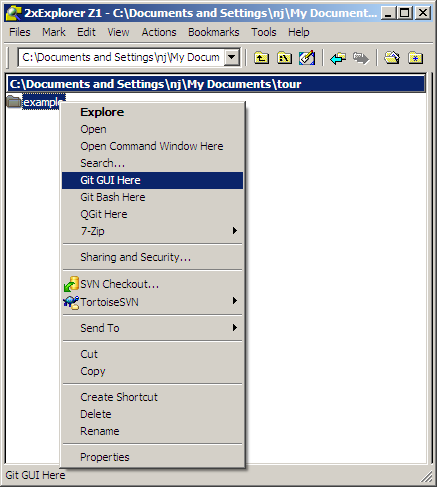
To create a repository, first create the folder you want the project to live under. Next, right click on the folder and choose Git GUI Here. Because there is no git repository in this folder yet, you will be presented with the git gui startup dialog.
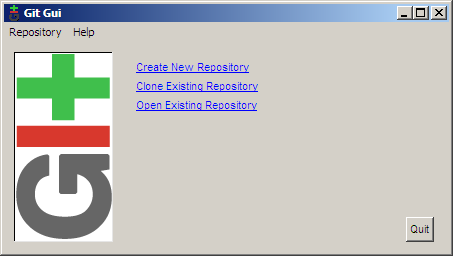
Choosing Create New Repository brings us to the next dialog.
Fill in the path to your new directory and click Create. You will then be presented with the main interface of git gui, which
is what will be shown from now on when you right click on your folder and click Git GUI Here.
Now that the repository has been set up, you will need to tell git who you are so that commit messages will have the correct author. To do this, choose Edit ? Options.
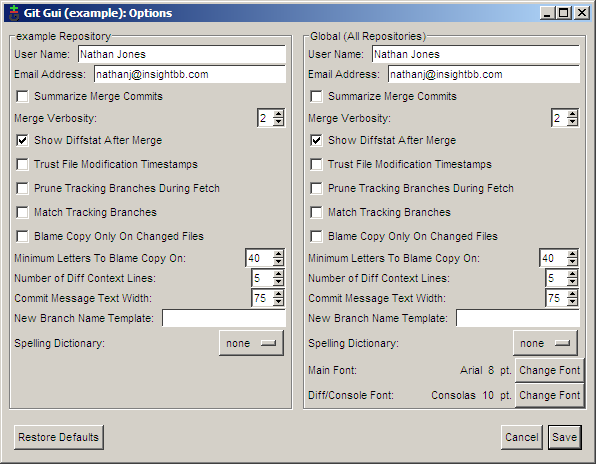
In the options dialog, there are two versions of each preference. On the left side of the dialog are options that you want for this repository only, while the right side contains the global options which apply to all repositories. The defaults for these options are sensible so just fill in the user name and email for now. If you have a favorite font, you may want to set it now as well.
Committing
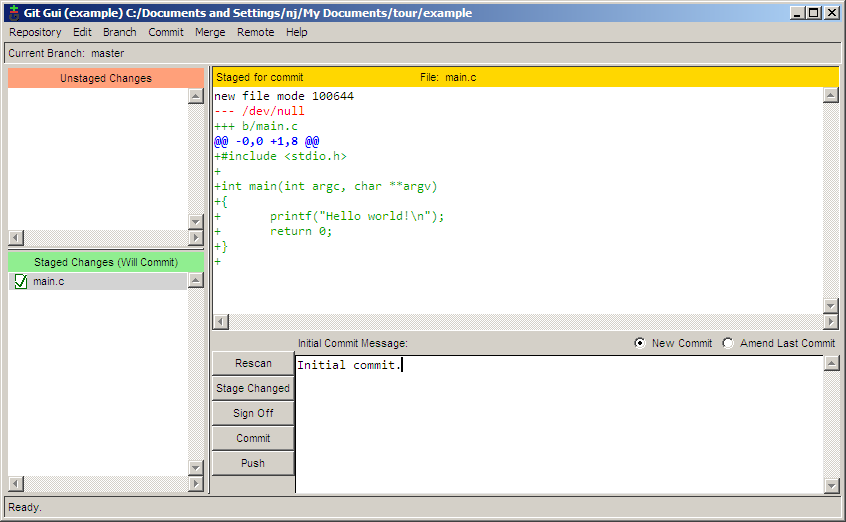
Now that the repository has been created, it is time to create something to commit. For this example, I created a file called main.c with the following content:
#include

int main(int argc, char **argv)
{
	printf("Hello world!n");
	return 0;
}
Clicking the Rescan button in the git gui will cause it to search out new, modified, and deleted files in the directory. In the next screenshot, git gui has found our new file (amazing, I know).
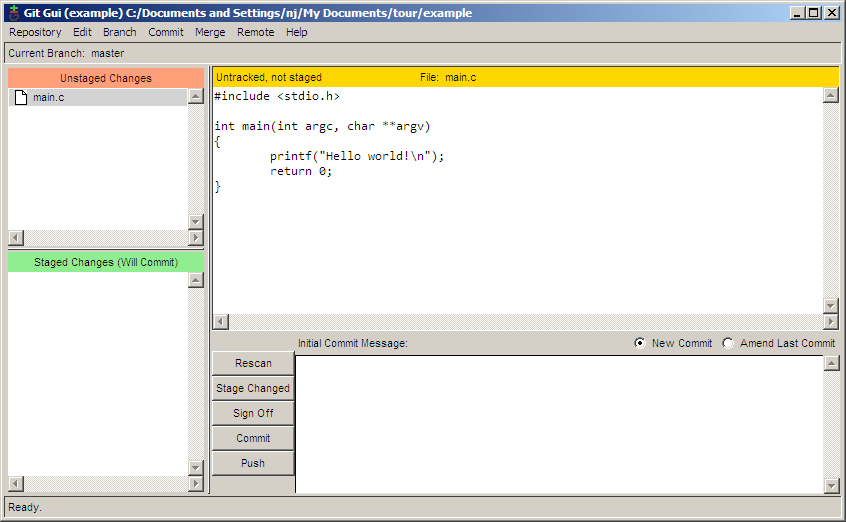
To add the file for committing, click the icon to the left of the filename. The file will be moved from the Unstaged Changes pane to the Staged Changes pane. Now we can add a commit message and commit the change with the Commit button.
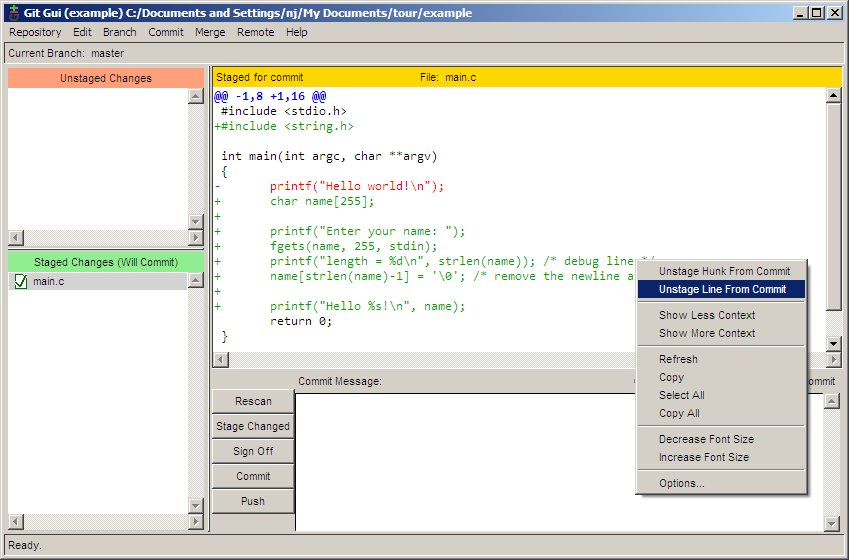
Saying hello to the world is all well and good, but I would like my program to be more personal. Let’s have it say hello to the user. Here’s my code for that:
#include
#include

int main(int argc, char **argv)
{
	char name[255];

	printf("Enter your name: ");
	fgets(name, 255, stdin);
	printf("length = %dn", strlen(name)); /* debug line */
	name[strlen(name)-1] = ''; /* remove the newline at the end */

	printf("Hello %s!n", name);
	return 0;
}
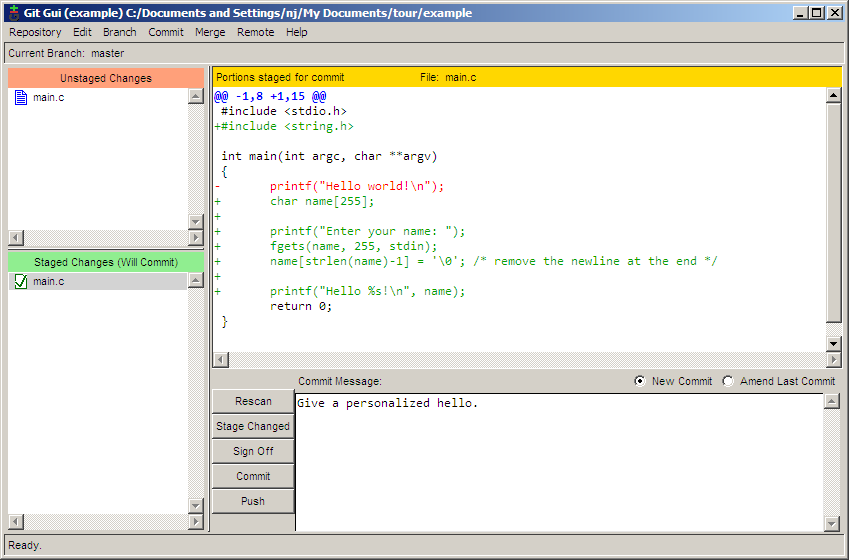
I had some trouble figuring out why a newline was printed after the user’s name, so I added a debugging line to help me track it down. I would like to commit this patch without the debug line, but I want to keep the line in my working copy to continue debugging. With git gui, this is no problem. First, click Rescan to scan for the modified file. Next, click the icon to the left of the filename to stage all modifications for commit. Then, right click on the debug line and chose Unstage Line From Commit.
Now, the debug line has been unstaged, while the rest of the changes have been staged. From here, it is just a matter of filling in the commit message and clicking Commit.
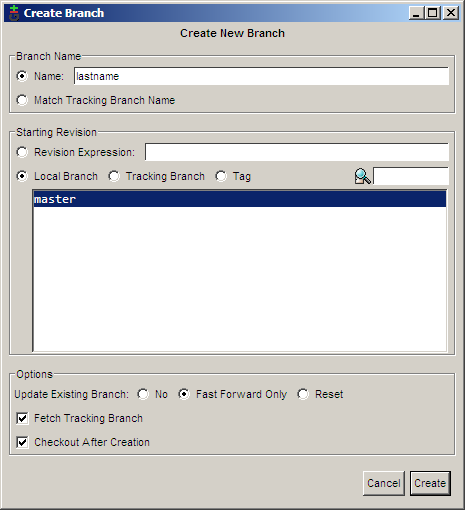
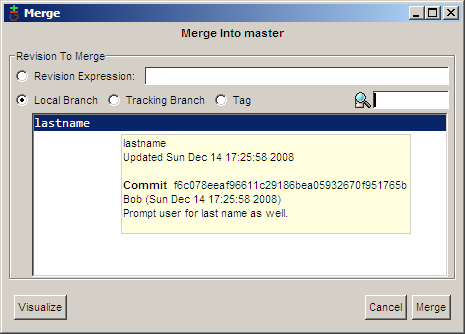
Branching
Now let’s say that we want to start adding new features for our next big version of the program. But, we also want to keep a stable, maintenance version of the program to fix bugs on. To do this, we will create a branch for our new development. To create a new branch in git gui, choose Branch ? Create. The big feature that I would like to add is to ask the user for their last name, so I am calling this branch lastname. The default options in the Create Branch dialog are all fine, so just enter the name and click Create.
Now that I am on the lastname branch, I can make my new modifications:
#include
#include

int main(int argc, char **argv)
{
	char first[255], last[255];

	printf("Enter your first name: ");
	fgets(first, 255, stdin);
	first[strlen(first)-1] = ''; /* remove the newline at the end */

	printf("Now enter your last name: ");
	gets(last); /* buffer overflow? what's that? */

	printf("Hello %s %s!n", first, last);
 	return 0;
}
And then I can commit the change. Note here that I am committing using a different name. This is to show off something later. Normally you would always use the same name when committing.
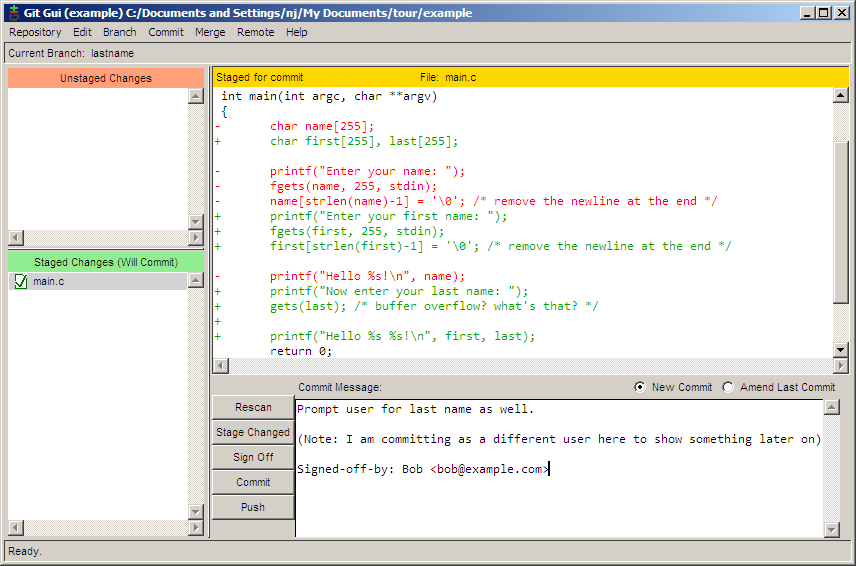
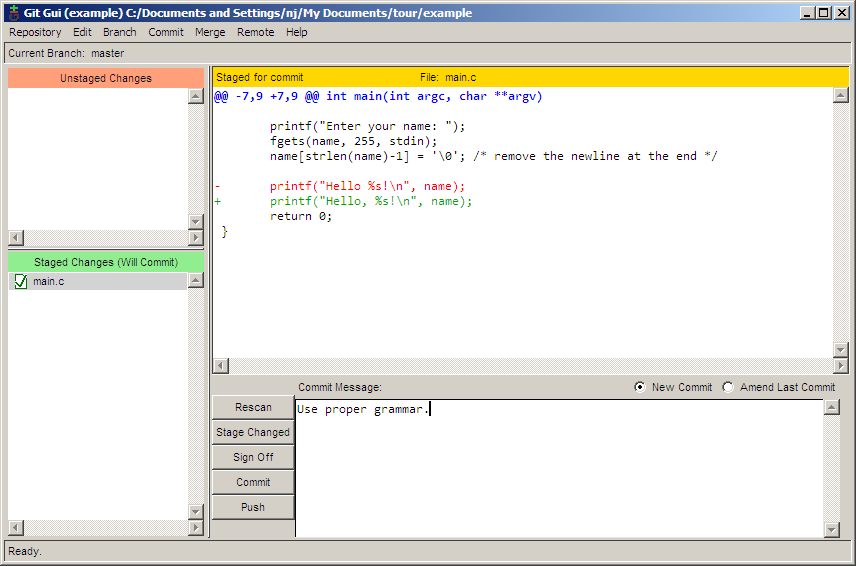
Meanwhile, a user informs us that not displaying a comma when directly addressing someone is a serious bug. In order to make
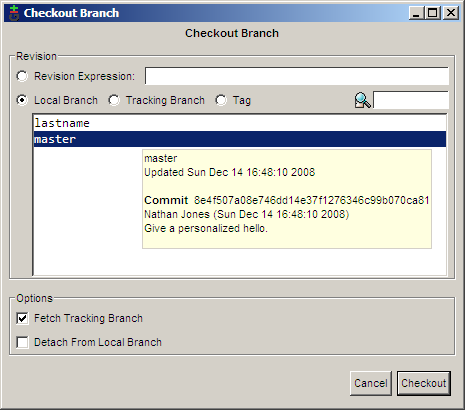
this bug fix on our stable branch, we must first switch back to it. This is done using Branch ? Checkout.
Now we can fix our major bug.
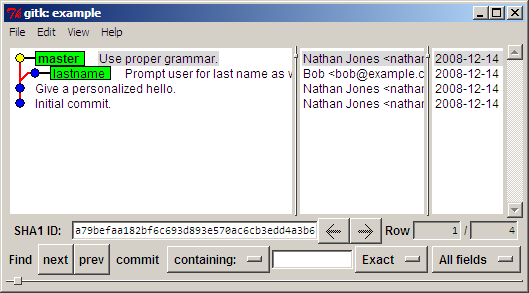
If we choose Repository ? Visualize All Branch History, we can see how our history is shaping up.
Merging
After days of work, we decide that our lastname branch is stable enough to be merged into the master branch. To perform the merge, use Merge ? Local Merge.
Because the two different commits made two different
modifications to the same line, a conflict occurs.
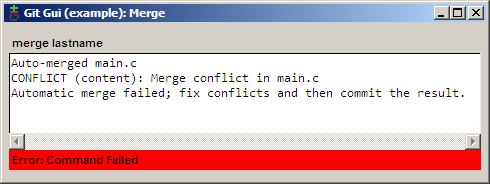
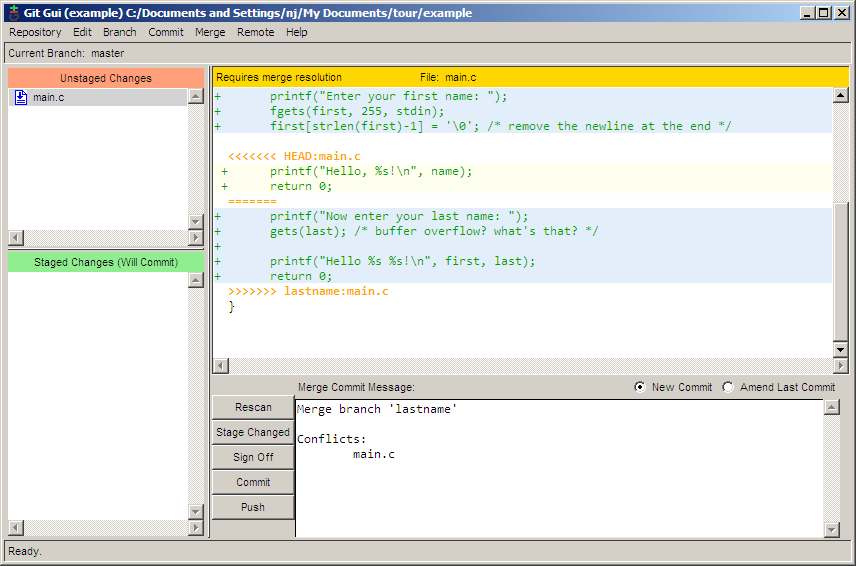
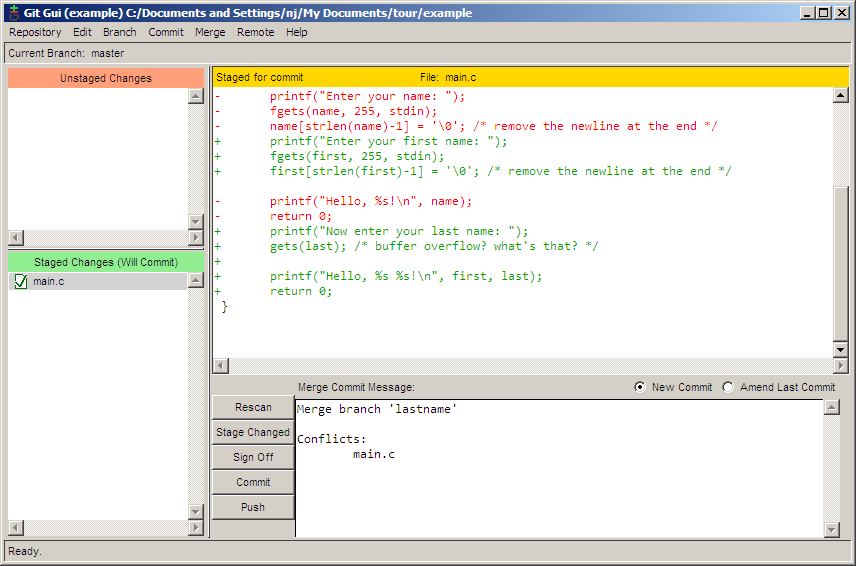
This conflict can be resolved using any text editor. After resolving the conflict, stage the changes by clicking the file icon and then commit the merge by clicking the Commit button.
Viewing History
The main.c file is starting to get a bit big, so I decided to move the user prompting portion of the code into its own function. While I was at it, I decided to move the function into a separate file. The repository now contains the files main.c, askname.c, and askname.h.
/* main.c */
#include

#include "askname.h"

int main(int argc, char **argv)
{
	char first[255], last[255];

	askname(first, last);

	printf("Hello, %s %s!n", first, last);
 	return 0;
}

/* askname.c */
#include
#include

void askname(char *first, char *last)
{
	printf("Enter your first name: ");
	fgets(first, 255, stdin);
	first[strlen(first)-1] = ''; /* remove the newline at the end */

	printf("Now enter your last name: ");
	gets(last); /* buffer overflow? what's that? */
}

/* askname.h */
void askname(char *first, char *last);
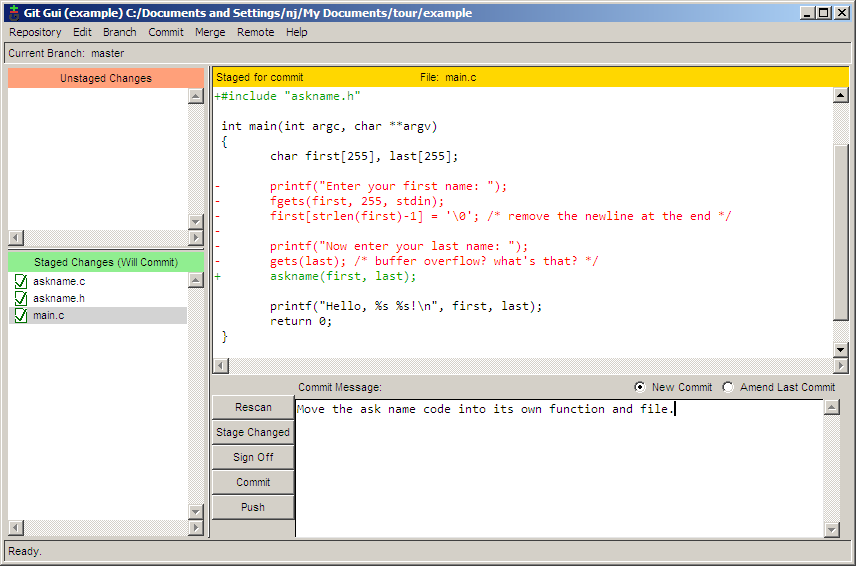
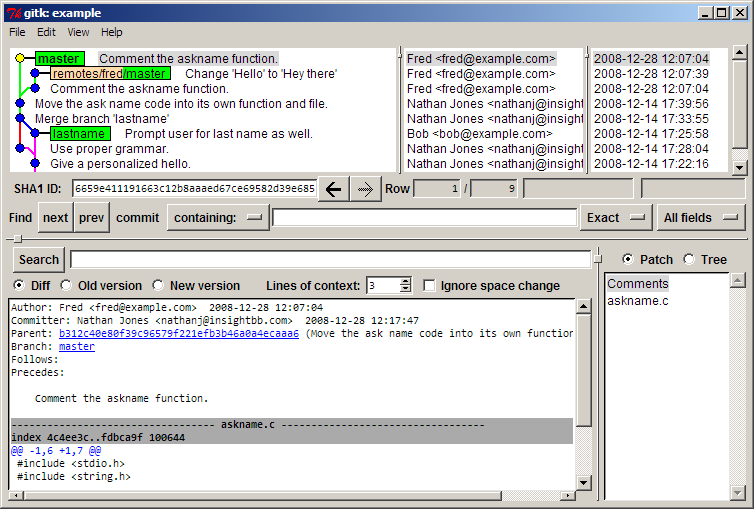
The history of the repository can be viewed and searched by choosing Repository ? Visualize All Branch History.
In the next screenshot, I am trying to find which commit added the last variable by searching for all commits which added or removed the word last. Commits which match the search are bolded, making it quick and easy to spot the desired commit.
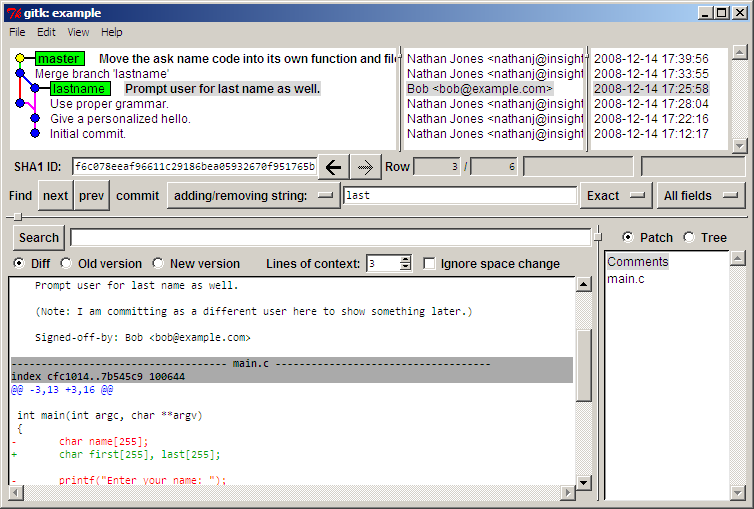
A few days later, someone looks through our code and sees that the gets function could cause a buffer overflow. Being the type to point fingers, this person decides to run a git blame to see who last modified this line of code. The problem is that Bob is the one who committed the line, but I was the one who last touched it when I moved the line into a different file. Obviously, I am not to blame (of course). Is git smart enough to figure this out? Yes, it is.
To run a blame, select Repository ? Browse master’s Files. From the tree that pops up, double click on the file with the line in question which in this case is askname.c.
Hovering the mouse over the line in question shows a tooltip message that tells us all we need to know.
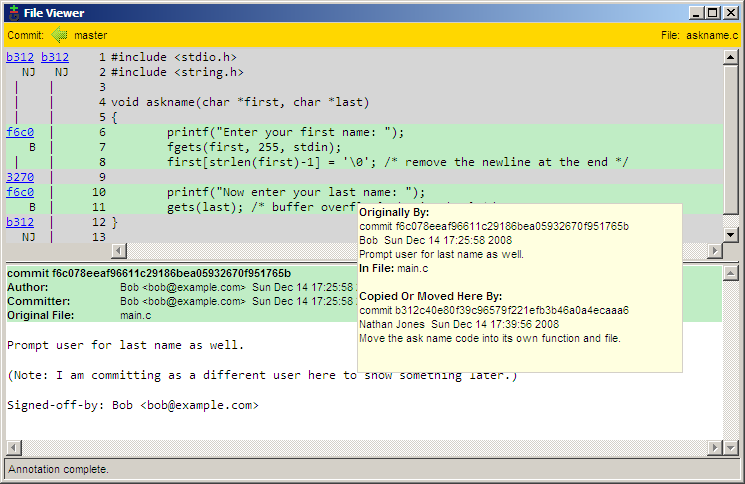
Here we can see that the line was last modified by Bob in commit f6c0, and then I moved it to its new location in commit b312.
Pushing to a Remote Server
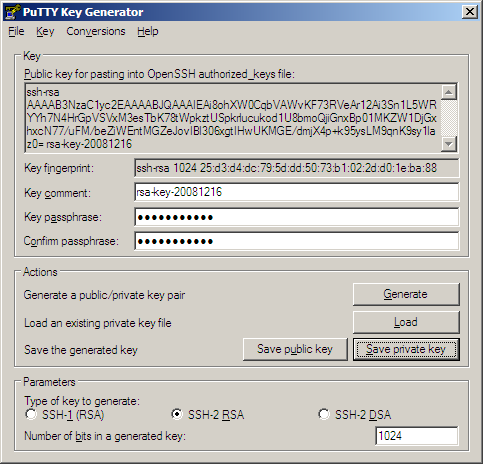
Before pushing to a remote server, you must first create a SSH public and private key pair. By using SSH, you will be able to securely authenticate to the server that you are who you say you are. Creating the key pair is a simple process. Begin by running the puttygen.exe program downloaded earlier. Next, click the Generate button to generate the keys. After processing for a few seconds, click the Save private key button to save your new private key. Copy the public key to the clipboard in preparation for the next step. I would recommend not clicking the Save public key button because the saved file is in a non-standard
format; trying to use it with other software might be problematic.
Now that the keys are generated, the remote servers need to know about it. If you would like to use github to host your code, just
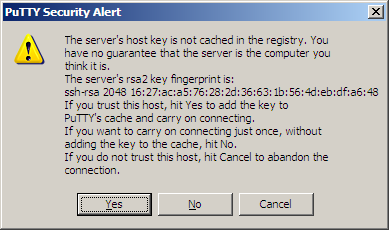
go to your account page and paste in the public key.
Now github has our public key, but we do not yet have github’s. To remedy this, launch putty.exe, connect to github.com, and click Yes to accept github’s public key. You can safely close the login window that opens up after accepting the key.
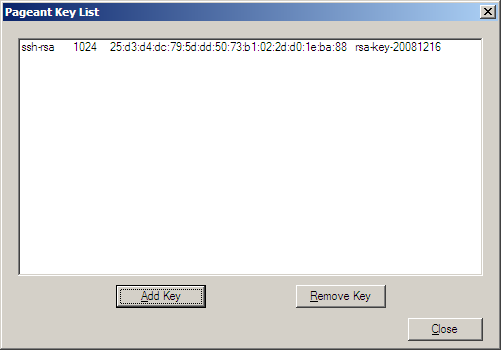
We need our private key to be loaded up to use with our public key, so launch pageant.exe. This program will create an icon in your system tray. Double clicking on the icon will open up a window into which the private key can be added. Once the private key is added, the agent will sit in the background and provide authentication when needed.
Now that our client and server can authenticate each other, it is time to push! Remote ? Push will open up the push dialog. Typing in the commit address for the project and clicking Push will send the changes on their way.
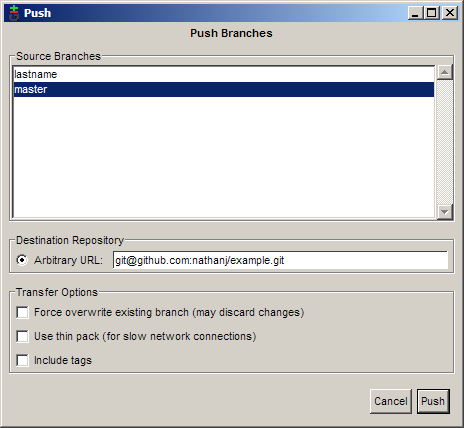
Of course, typing in the remote url would become quite annoying if we had to do it with every push. Instead, git allows us to alias the long urls using remotes. Git gui currently does not have a way to add a remote, so the command line must be used. Right click on the repository folder and choose Git Bash Here.
In the prompt, enter the following command:
git remote add github git@github.com:nathanj/example.git
Note: After adding a remote, close and reopen git gui for it to recognize the new remote.
Now the remote github is aliased to the url git@github.com:nathanj/example.git. When viewing the push dialog in git gui, a convenient drop down list of remotes is shown.
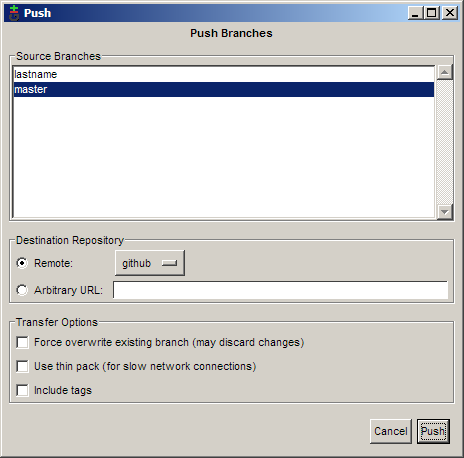
Pulling from a Remote Server
Because our code is so useful, dozens of people have downloaded and now use our program. One person in particular, Fred, has decided to fork our project and add his own commits.
Now that he’s added his code, he would like us to pull those commits from him into our repository. To do this, first create another remote.
git remote add fred ssh://fred@192.168.2.67/home/fred/example
Now we can fetch Fred’s changes using Remote ? Fetch
from ? fred.

After the fetch, Fred’s commits have now been added to our local repository under the remotes/fred/master branch. We can use gitk to visualize the changes that Fred has made.
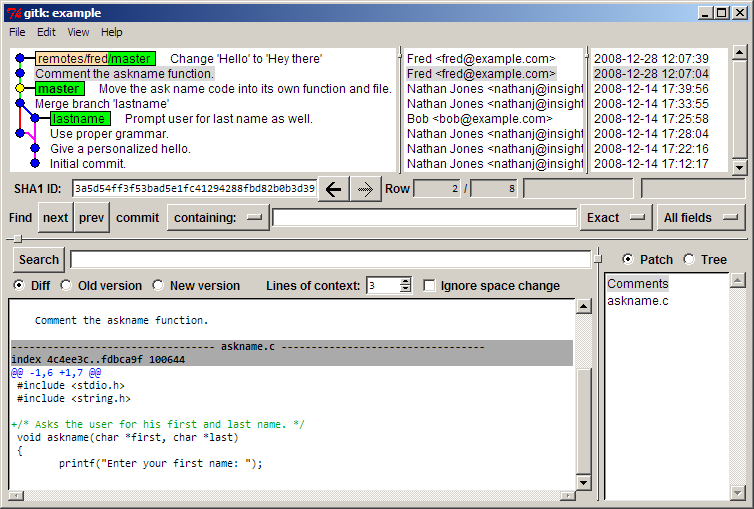
If we like all of Fred’s changes, we could do a normal merge as before. In this case though, I like one of his commits but not the other. To only merge one of his commits, right click on the commit and choose Cherry-pick this commit. The commit will then be merged into the current branch.
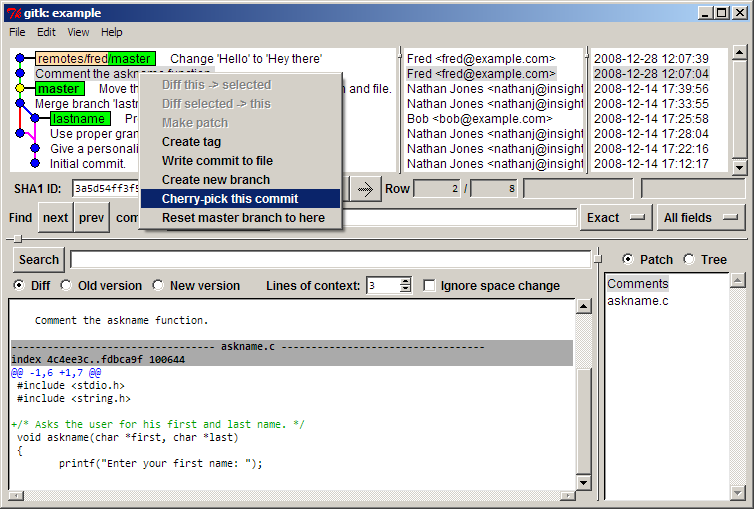
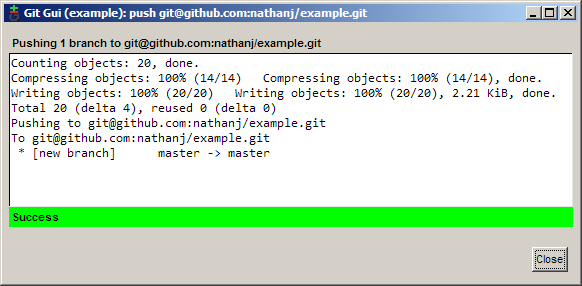
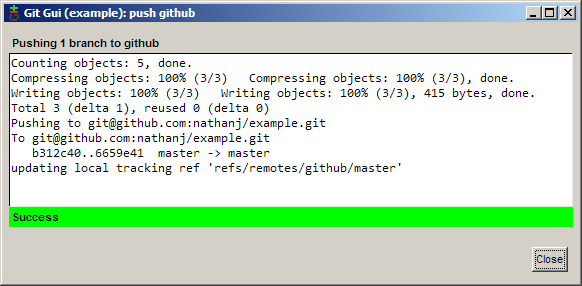
We can now push a final time to send Fred’s patch to our
github tree for everyone to see and use.
Conclusion
In this guide, I have shown how to do many common tasks in git using GUI tools. I hope that this guide has shown that it is not only possible but easy to use git on Windows without having to use the Windows shell for most operations.
1. Git (произн. «гит») — распределённая система управления версиями
файлов. Проект был создан Линусом Торвальдсом для управления разработкой ядра
Linux.
Git использовался для таких больших проектов, как ядро Linux, Android, Drupal,
Wine, Chromium, PHP, NASM и некоторые дистрибутивы Linux.
2. Создание репозитория при помощи Git Gui.
2.1. Для того чтобы создать новый репозиторий, запускаем Git Gui и выбираем
пункт «Создать новый репозиторий»:
 |
| Выбор пункта “Создать новый репозиторий” |
2.2. Далее выбираем каталог с проектом:
 |
| Выбор каталога с проектом |
2.3. И нажимаем кнопку «Создать»:
 |
| Создание репозитория |
2.4. Откроется окно работы с проектом:
 |
| Работа с проектом в Git Gui |
2.5. В каталоге проекта создастся подкаталог .git:
 |
| Подкаталог .git в каталоге проекта |
2.6. Теперь при запуске Git Gui можно будет выбирать существующий репозиторий,
только что созданный нами:
 |
| Выбор существующего репозитория в Git Gui |
3. Полезные ссылки:
— Книга про Git
— Git, шпаргалка
Посты по теме :
- Debian.Утилиты для жестких дисков (hdd). 1 часть
- VirtualBox и Debian. Настройка общих папок
- Debian. Start, stop, restart сервера Apache2
Git has come a long way since its introduction, and has become significantly easier to work with in a Windows environment. In this tutorial, we are going to get setup with Git on Windows.
This article was written with the GUI in mind. I will NOT go over the command line usage, because there are many resources that already teach that aspect of Git. I made this for the true Windows users, the GUI ninjas. If you are like me and prefer a GUI over the command line, then this is the tutorial for you!
Step 1: Install Git
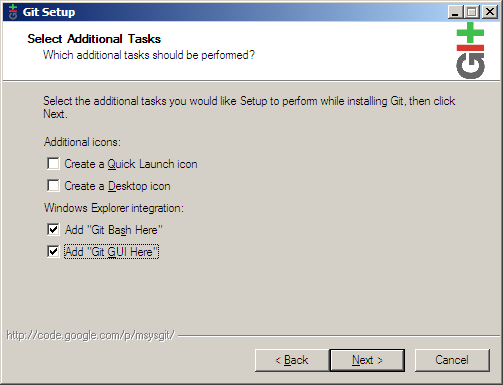
The first thing we need to do is install Git on Windows; you can do so with the following steps:
- Download and install the latest version of Git for Windows
- Use the default options for each step in the installation
- Remove Git Bash Desktop Icon
- Go to Start > All Programs > Git > Git GUI and make a Desktop Shortcut
Strangely, the last step seemed a bit confusing if you don’t have Windows Search enabled. You can also pin Git GUI to the taskbar and/or the Start Menu.
It is important that you use all the default settings because they are supported by all major repository vendors such as Github, Bitbucket, and Beanstalk.
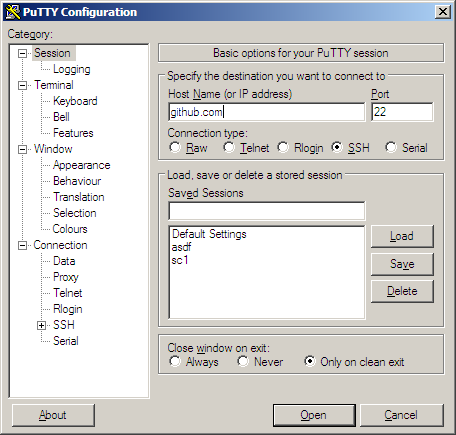
Step 2: Setup SSH Keys
Compared to Git Bash, setting up a SSH Key for your computer is relatively easy. Simply open Git GUI.


Now click on Show SSH Key under the Help Menu.


It’s possible that there is already a SSH key on your system; it’s best to remove or backup the key if you do not know where it came from. To do so, simply remove all files within: C:Users<username>.ssh. Be sure to replace <username> with your Windows username.
You can generate a SSH key by clicking on the Generate Key button. When you do so, you will need to supply a passphrase for security purposes. Remember this passphrase; you will need to use it later.
Setup SSH Key with Hosted Git Repository
Github is not the only hosted Git repository available. It is, however, the most popular solution, and we’ll use it as an example.
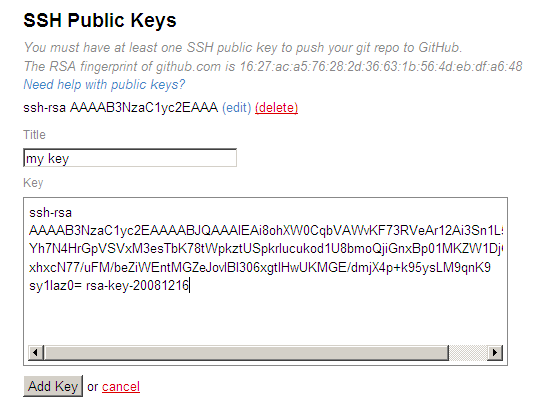
The SSH key you created allows you to push your changes to a hosted repository. So, in order to push changes from your computer, Github needs to know your public SSH key. That is easily accessible; simply click the «Copy to Clipboard» button.
Next, you need to provide your hosted repo service with your public SSH key. Similar to Github, most of these sites usually have a tab, called «SSH Keys». Click the tab and add your SSH key to the website.


The Title field is just a label to identify the SSH key; it is for your purposes only. For example, «WindowsPc», «Macbook», «Linux». Just make sure it accurately describes what device the SSH key is assigned to.
Step 3: Getting Started with Git
Next, we need a Git repository, and we’ll create a new remote repository on Github.
Create a Remote Repository
When creating a remote repo, Github offers to initialize the repository for you. This is a nice option, but for the purpose of learning how to setup for alternative websites, we will not check the initialize box.


Create a Local Repository
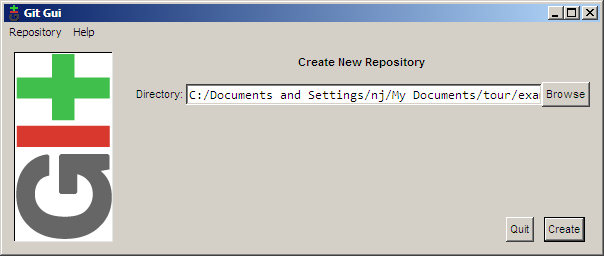
Now, we’ll create a local repository. In our Git GUI, click on «Create New Repository».
Select the location you wish to store your repository in. It is important to note that the selected repository location MUST NOT exist. So select the location you wish, and append the name of the folder you want the repository to be in, like this:


In order for this new repository to be initialized, you must first create a file, any file, in your local repo. Then, you must Commit and Push to the remote Git repository location. We’ll review committing and pushing in Step 4; I recommend you skip ahead if you do not wish to clone a repository. Your remote Git location should look like similar to this: git@github.com:Username/repository-name.git.
Clone a Remote Repository to a Local Repository
As I noted before, Github can provide you with an already initialized repository, and you can get started a lot faster than you normally would. In order to clone a repository, click on the «Clone Existing Repository» link in the Git GUI window. An existing repository is one that is already initialized and/or has commits pushed to it.
In the Source Location field, fill in the Git remote repository location. The Target Directory field works much like how I showed you how to create a repository earlier. Short version: select the location and append the folder you want the files to be in. Git will attempt to create it, and it will fail if it already exists.


There you go; now you should be all set to work locally.
Step 4: Working with the GUI Client
The Git GUI makes it easier to perform Git-related tasks, such as staging changes, commits, and pushes.
Stage Changed
When you move files to a Git directory, you will see all the files in the «Unstaged Changes» window. This basically means that new files have been added, removed, updated, etc. You can click on the «Rescan» button in order to see any new changes that may have occurred.


When you click the «Stage Changed» button, it will attempt to add all the new files to the Git index.


Commits:
After you’ve staged your changes, you then need to commit them to your local repository. Type a Commit Message that makes sense to the changes that were made. When you are done, press the Commit button.


Pushing
Before others can access our new code, we need to push these changes to our hosted repository. Without pushing the changes, others would not be able to access the code.
Before we can proceed to push, we need set up a location to push to. Most folks refer to this location as «origin». If you wish, you can select an option in the «Further Actions» area, but in my experience, doing nothing will benefit you the most. You can always clone or push later.


After adding the remote origin, you can simply press the Push button. It will ask you where you want to push to; most likely «origin» will be pre-selected (and it may be your only option). So simply click on the Push button again.


Next, you will be bombarded with window after window. But don’t worry, this only happens the first time. Simply follow the instructions given to you.


Git will ask you the passphrase of your SSH Key.


Don’t panic if you see more then one request of your passphrase. It is completely normal! You don’t have to worry as long as you are not told the passphrase was incorrect. Seeing multiple requests for your passphrase usually only occurs once per SSH key.
In the event that your push was complete, you should be greeted with a window similar to this:


Before I let you go, here’s a list of fantastic resources for continuing your Git learning.
- Git Essentials (Tuts+ Premium Course)
- Github — Unlimited Free Public Repositories
- Bitbucket — Unlimited Free Public and Private Repositories
- Beanstalk — Private Git with Great FTP Deployments
- DeployHq — Deploy any Git repo over FTP
- Easy Version-Control With Git
- Terminal, Git, and GitHub for the Rest of Us
Did you find this post useful?