Advertisement
Brief
Window scaling in TCP conveys the sender of data that the receiver can receiver x number of bytes from the sender. In other words the sender can send x number of bytes to the receiver without waiting for acknowledgment from it. Today will discuss how to enable and disable the TCP window Scaling option in Windows 10 operating system.
Configuring from the windows registry setting is no longer used because in Windows 10 TCPIP parameters are deprecated.
Ads
Please refer for more information here
Path to the registry on earlier versions of Windows 10 is:
HKEY_LOCAL_MACHINESystemCurrentControlSetServicesTcpipParametersEnable Window 10 TCP Window Scaling
- The below output from Windows 10 operating system provides us with a default configuration of window scaling. From the output, the field “Receive Window Auto-Tuning Level” indicates that the TCP Window Scaling option enabled.
C:WINDOWSsystem32> netsh interface tcp show global
Querying active state...
TCP Global Parameters
----------------------------------------------
Receive-Side Scaling State : enabled
Receive Window Auto-Tuning Level : normal >>>>>>>>>>>> Its enabled
Add-On Congestion Control Provider : default
ECN Capability : disabled
RFC 1323 Timestamps : disabled
Initial RTO : 1000
Receive Segment Coalescing State : enabled
Non Sack Rtt Resiliency : disabled
Max SYN Retransmissions : 4
Fast Open : enabled
Fast Open Fallback : enabled
HyStart : enabled
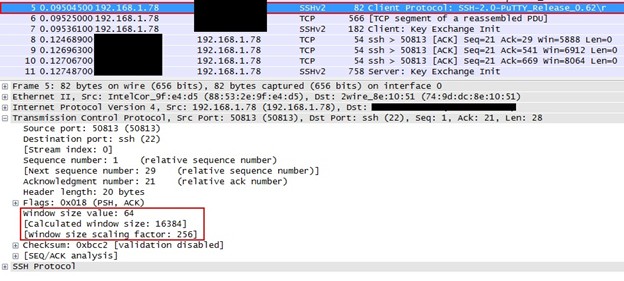
Pacing Profile : off2. Sample Wireshark snapshot below indicates that the SYN packet from Windows 10 client to Server is sending the SYN segment that includes the Window Scale option. This option here is set to 8 bits. These 8 bits cover a decimal number of 256 and multiplied by the actual Window size value field.

Disable Window 10 TCP Window Scaling
3. To disable the window scaling on Windows 10, open Window PowerShell and run the command “netsh interface TCP set global autotuninglevel=disable”
C:WINDOWSsystem32> netsh interface tcp set global autotuninglevel=disable
Ok.

C:WINDOWSsystem32> netsh interface tcp show global
Querying active state...

TCP Global Parameters
----------------------------------------------
Receive-Side Scaling State          : enabled
Receive Window Auto-Tuning Level    : disabled     >>>>>>>>>>>>>> Diasabled
Add-On Congestion Control Provider  : default
ECN Capability                      : disabled
RFC 1323 Timestamps                 : disabled
Initial RTO                         : 1000
Receive Segment Coalescing State    : enabled
Non Sack Rtt Resiliency             : disabled
Max SYN Retransmissions             : 4
Fast Open                           : enabled
Fast Open Fallback                  : enabled
HyStart                             : enabled
Pacing Profile                      : off
4. When disabling Window Scale, we can see in the Wireshark that local client is not sending Window scale option in SYN segment.

4,730
Advertisement
Какие параметры влияют на производительность приложений? Часть 1. TCP Window Size
Самый простой способ понять значение термина размер TCP окна (TCP Window Size), это представить разговор двух человек. Один человек говорит, а второй кивает головой или говорит да, тем самым подтверждая, что он понял, а по сути, получил все слова, которые ему были сказаны. После этого разговор продолжается. Если мы встречаем особо говорливого человека, то наша голова быстро загружается, и мы начинаем терять нить разговора или переспрашивать нашего собеседника. Тоже самое происходит и в Матрице — в мире цифр и машин.
Размер TCP окна (TCP Window Size) – количество октетов (начиная с номера подтверждения), которое принимающая сторона готова принять в настоящий момент без подтверждения. На стадии установления соединения рабочая станция и сервер обмениваются значениями максимального размера TCP окна (TCP Window Size), которые присутствуют в пакете и эти значения можно легко увидеть, воспользовавшись захватом трафика.
Например, если размер окна получателя равен 16384 байта, то отправитель может отправить 16384 байта без остановки. Принимая во внимание, что максимальная длина сегмента (MSS) может быть 1460 байт, то отправитель сможет передать данный объем в 12 фреймах, и затем будет ждать подтверждение доставки от получателя и информации по обновлению размера окна. Если процесс прошел без ошибок, то размер окна может быть увеличен. Таким образом, реализуется размер скользящего окна в стеке протокола TCP.

В зависимости от состояния каналов связи, размер окна может быть больше или меньше. Каналы связи могут быть высокоскоростными (большая пропускная способность) и протяженными (большая задержка и возможно потери), поэтому при небольшом размере TCP окна мы будем вынуждены отправлять один или несколько фреймов и ждать подтверждения от получателя, затем процесс повторяется. Таким образом, наши приложения будут неэффективно использовать доступную полосу пропускания. Пакетов будет много, но реального полезного трафика будет передано не много. Чтобы получить максимальную пропускную способность, необходимо использовать оптимально установленный размер передающего и принимающего окна для канала, который вы используете.
Для расчёта максимального размера окна (т.е. максимальный объем данных, которые могут передаваться одним пользователем другому в канале связи) рассчитывается по формуле:
Полоса пропускания (бит/сек) * RTT (круговое время передачи по сети) = размер окна в битах
Таким образом, если ваши два офиса соединяет канал связи в 10 Мбит/сек и круговое время составляет 85 миллисекунд, то воспользовавшись данной формулой, мы получим значение окна равное:
10 000 000 * 0,085 / 8 = 106250 байт
Размер поля Window в заголовке TCP составляет 16 бит; это означает, что узел TCP может указать максимальный размер TCP окна 65535 байт. Таким образом, максимальная пропускная способность составляет:
65535 * 8 / 0,085 = 6,2 Мбит/сек
т.е. чуть больше 50% от реально доступной полосы пропускания канала.
В современных версиях операционных систем можно увеличить размер окна TCP Window Size и включить динамическое изменение окна в зависимости от состояния канала связи. В предложении RFC 1323 дано определение масштабирования окон, позволяющего получателю указывать размер окна больше 65535 байт, что позволит применять большие размеры окон и высокоскоростные каналы передачи. Параметр TCP Window Scale указывает коэффициент масштабирования окна, который в сочетании с 16-битным полем Window в заголовке TCP может увеличивать размер окна приема до максимального значения, составляющего примерно 1 ГБ. Параметр Window Scale отправляется только в сегментах синхронизации (SYN) при установке соединения. На нашем скриншоте из WireShark он составляет 256. Устройства, общающиеся друг с другом, могут указывать разные коэффициенты масштабирования для TCP окон.
Таким образом, активировав масштабирование окон TCP и уменьшив круговое время передачи по сети, мы сможем повысить эффективность использования доступной полосы пропускания и как следствие скорость работы приложений. А проверить это можно захватив пакеты, и посмотреть о каких значениях размера окна и коэффициенте масштабирования договорились устройства в момент установки соединения. Это динамическое увеличение и уменьшение размера окна является непрерывным процессом в TCP и определяет оптимальный размер окна для каждого сеанса. В очень эффективных сетях размеры окна могут стать очень большими, потому что данные не теряются. В сетях, где сетевая инфраструктура перегружена, размер окна, вероятно, останется маленьким.
См. также:
- Какие параметры влияют на производительность приложений? Часть 2. Полоса пропускания и использование канала связи
- 5 недостатков Wireshark: в чём бесплатный сниффер проигрывает коммерческим аналогам?
- Какие функциональные возможности должны быть у решения для мониторинга производительности сети?

- Remove From My Forums
-
Question
-
Hi all,
GlobalMaxTcpWindowSize, TcpWindowSize , registry entries are not tacking effect. Always default window size is coming as 64K in windows 10 RS3 with auto tunning normal. Is there any option where we can set to change default window size?
A.David Preetham
All replies
-
Hi,
Thank you for posting here.
Based on my search, the windows maximum size is 64k, TCP uses a receive window that is four times the size of the maximum TCP segment size (MSS) negotiated during connection setup, up to a maximum size of 64 KB.
You can try to set the HKLMSYSTEMCurrentControlSetServicesTcpipParametersInterfaces
interface-name value to control the size.the range is 0x0–0x3FFFFFFF ( bytes ) .
For more information, please see the following link
https://technet.microsoft.com/en-us/library/cc938219.aspx?f=255&MSPPError=-2147217396
Best Regards,
Hart
Please remember to click «Mark as Answer» the responses that resolved your issue, and to click «Unmark as Answer» if not. This can be beneficial to other community members reading this thread. If you have any compliments or complaints
to MSDN Support, feel free to contact MSDNFSF@microsoft.com. -
How to know above setting is taking effect ? is there anyway i can query? above setting i have tried..
A.David Preetham
I think my problem is easy to explain: I need to increase TCP Window size on a Windows 10 machine but i’m unable to.
I’ve create a SFTP Server on a Windows 10 machine and I access to it via other PC in another location on the same city. Both locations have optic fiber connections with simetric 600 megabits/s.
Using both machines on same lan I get 48 megabytes per second, but when moving to wan (over the optic fiber) it top at 8,5 — 10 megabytes/s.
Accoding to my calculations it happends becouse the latency between both coneections and tcp window size is configured at 64k.
On previous Windows version it can be changed via registry but now it doesn’t work. Now it’s supposed to be changed using autotuning level, I’ve change it from normal to highly restricted and even experimental using SG TCP Optimizer but speed is the same.
Thanks for reading
EDIT: According to this link:
https://docs.microsoft.com/en-us/troubleshoot/windows-server/networking/description-tcp-features
I’ve create the key «Tcp1323Opts» on the registry, under «HKEY_LOCAL_MACHINESystemCurrentControlSetServicesTcpipParameters» and then assign value «3 to it.
Now when I open a PowerShell window and run:
«netsh interface tcp show global»
I get that RFC1323 is enabled and before was disabled, so the creation of the new key in the registry is ok. The problem is the speed is the same.
I didn’t know if I had to create this key in the computer where SFTP is installed or the one who send data, so I created the key on both.
I think I have to set an scale factor or scale value acoording to the link, but I don’t know where to assign it.
I feel I’m near of the solution but I need some help.
Regards
Consider a single TCP (Reno) connection that uses a 10 Mbps link.
Assume this link does not buffer data and that the receiver’s receive buffer is much larger than the congestion window.
Let each TCP segment be of size 1500 bytes and the two-way propagation delay of the connection between sender and receiver be 200 msec.
Also, assume that the TCP connection is always in congestion avoidance phase (ignore slow start).
What is the maximum window size in segments that this TCP connection can achieve?
So we know the throughput of the connection and the delay,
I think we can should be able to manipulate the following formula so that we are able to find the Window Size.
Throughput = Window Size / RTT
Throughput * RTT = Window Size
10 Mbps * 200 msec = Window Size
I am not sure if this is correct. I am having a hard time finding anything else that relates in finding Window Size other than this formula.
asked Mar 6, 2011 at 2:22
![]()
2
The Maximum windows size in terms of segments can be up to 2^30/ MSS, where MSS is the maximum segment size. The 2^30 = (2^16*2^14) comes through this as Michael mentioned you in his answer. If your network bandwidth and delay product exceeds than the TCP receiver window size than the window scaling option is enabled for the TCP connection and most OS support this features. The scaling supports up to 14-bit multiplicative shift for the window size. You can read following for the better explanation:
http://en.wikipedia.org/wiki/TCP_window_scale_option
http://www.ietf.org/rfc/rfc1323.txt
answered Apr 30, 2014 at 4:24
![]()
user976754user976754
3611 gold badge4 silver badges18 bronze badges
I think what you are asking is how data can I get end to end on the wire. In that case you are close. Throughput*RTT [units: B/S * S] is how much the wire holds. Ignoring PMTU, packet overhead, hardware encoding, etc. then Throughput*RTT/PacketSize would give you the estimate. But hold on, I used RTT. My receive window is really about how much can fit on the wire in one direction so divide that in half.
If your implementation doesn’t support window scaling then min that with 2^16. If it does then you min it with 2^30.
answered Mar 9, 2011 at 5:32
![]()
A packets will be dropped if the maximum sending rate exceeds link capacity
(max window size*size of 1 segment) / RTT = link capacity
(max window size * 1500*8) / 200*10^-3 = 10 * 10^-6
you can solve this for max window size.
We divide by the RTT because after this time an ACK will be received so the sender can send more segments without the need to increase the window size.
answered Jan 2, 2016 at 20:26
![]()
Are you seeing poor network performance but with link utilization that’s well below 100%? You might have an issue with your TCP window size. Here’s how—and why—to fix that.
The TCP/IP protocol
The TCP/IP protocol sometimes shows its age.
It was invented in an era when networks were very slow and packet loss was high. So one of the main considerations in early protocol design was reliability.
The Transmission Control Protocol (TCP) has built-in mechanisms for reliability that include validating a checksum on every packet, as well as detection and retransmission of dropped or out-of-order packets.
These features were invented when WAN bandwidth of 56Kbps was fast and packet drop rates of 1% were not uncommon.
Today’s broadband networks are many orders of magnitude faster, as well as vastly more reliable. So it shouldn’t come as a surprise that the bulletproof reliability mechanisms designed into the protocol sometimes cause problems. One of them has to do with a feature called TCP windowing.
What’s a TCP window?
A key reliability feature of TCP is the acknowledgement (ACK) packet. Device A sends a bunch of data to device B. Then device B validates all the packet-level checksums and sends an ACK packet that says everything was received correctly.
If everything isn’t received, some or all of the data needs to be retransmitted. Each device maintains a buffer of all the data just in case it needs to send it again. Receiving the ACK packet means the device can flush that old data out of the buffer.
The TCP window is the maximum number of bytes that can be sent before the ACK must be received.
If the network is unreliable, it’s better to keep the window small. This way you don’t have to retransmit as much data if there’s a problem. But if the network is reliable, then the window can be quite large.
One of the most clever features of TCP is the concept of a sliding window. Devices can change the window size dynamically, making it smaller when there’s congestion and bigger when things are clear.
Each device sends the other a suggested window size that says how much data it wants to receive before getting an acknowledgement. You can even have different window sizes for the two traffic directions in the same conversation.
Where TCP windowing goes wrong
TCP windowing is a very clever mechanism. But consider what happens on a network with very high latency and high bandwidth.
You can easily transmit an entire window’s worth of data before the first packet is even received at the other end. Then the sender stops and waits for the acknowledgement. Eventually the receiver receives the last packet in the burst and sends an acknowledgement—a single packet that has to cross the network—taking the same amount of time again.
Each device can only send packets in these relatively short bursts. Then it must wait for the acknowledgement from the other end.
The average amount of data getting through the network is a small fraction of the total bandwidth. In modern networks, drop rates are so low, this slow transmission rate isn’t justified. All it does is drag down network performance
How to fix TCP windowing
The TCP window size is controlled by the end devices, not by the routers, switches, or firewalls that happen to be in the middle. The devices actively and dynamically negotiate the window size throughout the session.
But as I mentioned earlier, the TCP mechanism was designed for network bandwidth that’s orders of magnitude slower than what we have today. So some implementations still enforce a maximum window size of 64KB. You can get around this by enabling TCP windows scaling, which allows windows of up to 1GB.
Windows scaling was introduced in RFC 1323 to solve the problem of TCP windowing on fast, reliable networks. It’s available as an option in any modern TCP implementation. The only question is whether it’s been enabled properly.
In all recent Microsoft Windows implementations, windows scaling is enabled by default. You ‘ll find places on the Internet telling you to change registry values to increase your window size, but depending on the Windows version you’re using, these changes will have no effect. The values may no longer even exist. Bottom line, you don’t need to fix TCP windowing in Windows, either clients or servers.
On Linux systems, you can check that full TCP window scaling is enabled by looking at the value in /proc/sys/net/ipv4/tcp_window_scaling.
On Cisco devices, you can adjust the the window size using the global configuration command, “ip tcp window-size”. This command only affects sessions to the Cisco device itself. Network devices generally won’t change the parameters for sessions that merely pass through them.
TCP Window Scaling Auto Tuning May Slow Down Network Performance in Windows
TCP receive window size (RWIN) is the amount of received data (in bytes) that can be buffered during a connection. According to Wikipedia, the sending host can send only up to that amount of data before it must wait for an acknowledgment and window update from the receiving host. When a receiver advertises the window size of 0, the sender stops sending data and starts the persist timer. The persist timer is used to protect TCP from the dead lock situation. The dead lock situation could be when the new window size update from the receiver is lost and the receiver has no more data to send while the sender is waiting for the new window size update. When the persist timer expires the TCP sender sends a small packet so that the receivers ACKs the packet with the new window size and TCP can recover from such situations.
The TCP window size field controls the flow of data and is limited to between 2 and 65,535 bytes, and cannot be expanded anymore. Thus, a scaling factor is used to get a larger TCP receive window size to achieve more efficient use of high bandwidth networks. The TCP window scale option is used to increase the maximum window size from 65,535 bytes to 1 Gigabyte. Scaling up to larger TCP congestion window sizes is a part of what is necessary for TCP Tuning. The window scale option is used only during the TCP 3-way handshake. The window scale value represents the number of bits to left-shift the 16-bit window size field, and can be set from 0 (no shift) to 14.
When dealing with slow network performance in Windows operating systems such as Windows 7 and Windows Vista, the problem may be due to the above mentioned TCP Window Scaling option, where many older routers and and packet firewalls do not properly implement TCP Window Scaling, and rewrite the window scaling factor during a transmission, and causing sending and receiving sides to assume different TCP window sizes. The situation causes malfunction Internet connection, non-stable traffic that is very slow, or network connection that is only available intermittently. In Windows, the connection may appear to start working again for no reason after a while. If “Diagnose Problem” is selected, an error message will display “Cannot communicate with primary DNS server.”
Beside, Windows enhances further TCP window scaling with auto tuning feature, where TCP stack in Windows system will auto tune and adjust the RWIN size to increase the percentage of full-sized TCP segments that are used during bulk data transmission based on the network scenario it encountered. And thus it’s no longer possible to specify a custom size for the TCP/IP Receive Window (RWIN) size with the inclusion of new auto tuning feature, unless the application it self uses SO_RCVBUF. However, the TCP auto tuning feature may get things wrong sometimes. Instead of optimal true receive window size, incompatible and out of range RWIN size may be used.
By default, Windows in normal auto tuning level will use RWIN size of 256 bytes with a scale factor of 8. This value is not suitable for all routers and servers which does not support TCP scale factor, and continue to communicate with 65536 bytes (64kB). 64kB is the fixed default TCP receive buffer, and through autotuning it can scale up to 16 MB. For Windows system, users can change the behavior and the way Windows automatically tune the RWIN, by using “netsh” command to set the value for “autotuninglevel” parameter.
To change the value for Receive Window Auto-Tuning Level parameter in Windows, run an administrator command prompt, and then type in one of the following commands, depending on your preference how you want Windows to use the RWIN size.
netsh interface tcp set global autotuninglevel=disabled
Disable the autotunning feature in Windows completely, and fit and lock the RWIN receive window to default value 65536 bytes.
netsh interface tcp set global autotuninglevel=highlyrestricted
Allow for the receive window to grow beyond the default value, but do so very conservatively. In this mode, Windows will by default use RWIN of 16,384 bytes with a scale factor of 2.
netsh interface tcp set global autotuninglevel=restricted
Allow for the receive window to grow beyond the default value, but limit such growth in some scenarios.
netsh interface tcp set global autotuninglevel=normal
Allow for the receive window to grow to accommodate almost all scenarios. The default setting in Windows. Specifying this command mean you want to turn back on AutoTuning feature.
netsh interface tcp set global autotuninglevel=experimental
Allow for the receive window to grow to accommodate extreme scenarios. Note The experimental value can decrease performance in common scenarios. This value should be used only for research purposes.
Users should try out the various possible configurations for the Windows TCP RWIN Auto Tuning Level in order to get the best value that improve network performance and increase download speed.
About the Author: LK

Page load link
Loading…

Here at Cloudflare we’re constantly working on improving our service. Our engineers are looking at hundreds of parameters of our traffic, making sure that we get better all the time.
One of the core numbers we keep a close eye on is HTTP request latency, which is important for many of our products. We regard latency spikes as bugs to be fixed. One example is the 2017 story of «Why does one NGINX worker take all the load?», where we optimized our TCP Accept queues to improve overall latency of TCP sockets waiting for accept().
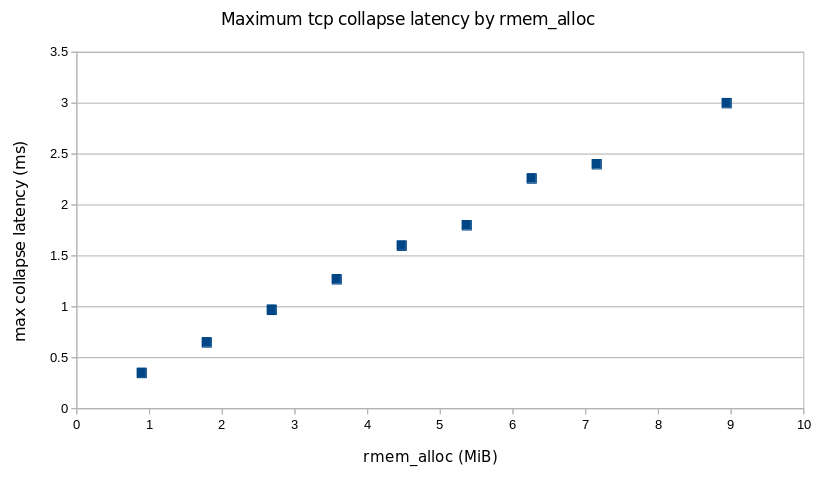
Performance tuning is a holistic endeavor, and we monitor and continuously improve a range of other performance metrics as well, including throughput. Sometimes, tradeoffs have to be made. Such a case occurred in 2015, when a latency spike was discovered in our processing of HTTP requests. The solution at the time was to set tcp_rmem to 4 MiB, which minimizes the amount of time the kernel spends on TCP collapse processing. It was this collapse processing that was causing the latency spikes. Later in this post we discuss TCP collapse processing in more detail.
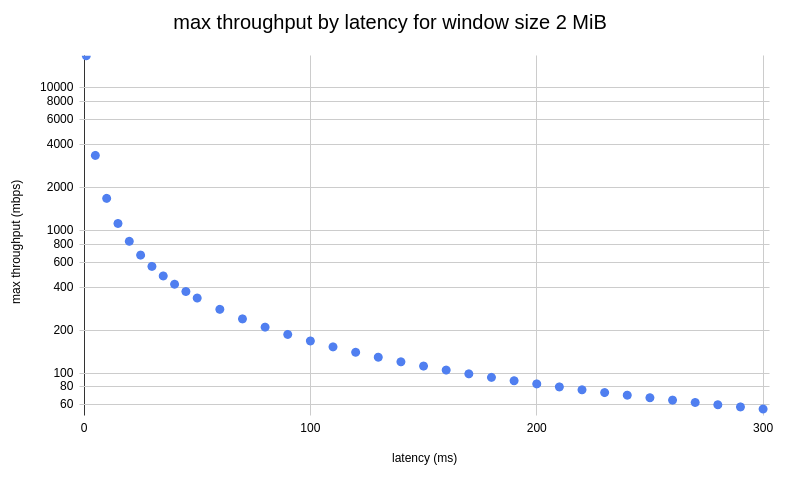
The tradeoff is that using a low value for tcp_rmem limits TCP throughput over high latency links. The following graph shows the maximum throughput as a function of network latency for a window size of 2 MiB. Note that the 2 MiB corresponds to a tcp_rmem value of 4 MiB due to the tcp_adv_win_scale setting in effect at the time.
For the Cloudflare products then in existence, this was not a major problem, as connections terminate and content is served from nearby servers due to our BGP anycast routing.
Since then, we have added new products, such as Magic WAN, WARP, Spectrum, Gateway, and others. These represent new types of use cases and traffic flows.
For example, imagine you’re a typical Magic WAN customer. You have connected all of your worldwide offices together using the Cloudflare global network. While Time to First Byte still matters, Magic WAN office-to-office traffic also needs good throughput. For example, a lot of traffic over these corporate connections will be file sharing using protocols such as SMB. These are elephant flows over long fat networks. Throughput is the metric every eyeball watches as they are downloading files.
We need to continue to provide world-class low latency while simultaneously providing high throughput over high-latency connections.
Before we begin, let’s introduce the players in our game.
TCP receive window is the maximum number of unacknowledged user payload bytes the sender should transmit (bytes-in-flight) at any point in time. The size of the receive window can and does go up and down during the course of a TCP session. It is a mechanism whereby the receiver can tell the sender to stop sending if the sent packets cannot be successfully received because the receive buffers are full. It is this receive window that often limits throughput over high-latency networks.
net.ipv4.tcp_adv_win_scale is a (non-intuitive) number used to account for the overhead needed by Linux to process packets. The receive window is specified in terms of user payload bytes. Linux needs additional memory beyond that to track other data associated with packets it is processing.
The value of the receive window changes during the lifetime of a TCP session, depending on a number of factors. The maximum value that the receive window can be is limited by the amount of free memory available in the receive buffer, according to this table:
| tcp_adv_win_scale | TCP window size |
|---|---|
| 4 | 15/16 * available memory in receive buffer |
| 3 | ⅞ * available memory in receive buffer |
| 2 | ¾ * available memory in receive buffer |
| 1 | ½ * available memory in receive buffer |
| 0 | available memory in receive buffer |
| -1 | ½ * available memory in receive buffer |
| -2 | ¼ * available memory in receive buffer |
| -3 | ⅛ * available memory in receive buffer |
We can intuitively (and correctly) understand that the amount of available memory in the receive buffer is the difference between the used memory and the maximum limit. But what is the maximum size a receive buffer can be? The answer is sk_rcvbuf.
sk_rcvbuf is a per-socket field that specifies the maximum amount of memory that a receive buffer can allocate. This can be set programmatically with the socket option SO_RCVBUF. This can sometimes be useful to do, for localhost TCP sessions, for example, but in general the use of SO_RCVBUF is not recommended.
So how is sk_rcvbuf set? The most appropriate value for that depends on the latency of the TCP session and other factors. This makes it difficult for L7 applications to know how to set these values correctly, as they will be different for every TCP session. The solution to this problem is Linux autotuning.
Linux autotuning
Linux autotuning is logic in the Linux kernel that adjusts the buffer size limits and the receive window based on actual packet processing. It takes into consideration a number of things including TCP session RTT, L7 read rates, and the amount of available host memory.
Autotuning can sometimes seem mysterious, but it is actually fairly straightforward.
The central idea is that Linux can track the rate at which the local application is reading data off of the receive queue. It also knows the session RTT. Because Linux knows these things, it can automatically increase the buffers and receive window until it reaches the point at which the application layer or network bottleneck links are the constraint on throughput (and not host buffer settings). At the same time, autotuning prevents slow local readers from having excessively large receive queues. The way autotuning does that is by limiting the receive window and its corresponding receive buffer to an appropriate size for each socket.
The values set by autotuning can be seen via the Linux “ss” command from the iproute package (e.g. “ss -tmi”). The relevant output fields from that command are:
Recv-Q is the number of user payload bytes not yet read by the local application.
rcv_ssthresh is the window clamp, a.k.a. the maximum receive window size. This value is not known to the sender. The sender receives only the current window size, via the TCP header field. A closely-related field in the kernel, tp->window_clamp, is the maximum window size allowable based on the amount of available memory. rcv_ssthresh is the receiver-side slow-start threshold value.
skmem_r is the actual amount of memory that is allocated, which includes not only user payload (Recv-Q) but also additional memory needed by Linux to process the packet (packet metadata). This is known within the kernel as sk_rmem_alloc.
Note that there are other buffers associated with a socket, so skmem_r does not represent the total memory that a socket might have allocated. Those other buffers are not involved in the issues presented in this post.
skmem_rb is the maximum amount of memory that could be allocated by the socket for the receive buffer. This is higher than rcv_ssthresh to account for memory needed for packet processing that is not packet data. Autotuning can increase this value (up to tcp_rmem max) based on how fast the L7 application is able to read data from the socket and the RTT of the session. This is known within the kernel as sk_rcvbuf.
rcv_space is the high water mark of the rate of the local application reading from the receive buffer during any RTT. This is used internally within the kernel to adjust sk_rcvbuf.
Earlier we mentioned a setting called tcp_rmem. net.ipv4.tcp_rmem consists of three values, but in this document we are always referring to the third value (except where noted). It is a global setting that specifies the maximum amount of memory that any TCP receive buffer can allocate, i.e. the maximum permissible value that autotuning can use for sk_rcvbuf. This is essentially just a failsafe for autotuning, and under normal circumstances should play only a minor role in TCP memory management.
It’s worth mentioning that receive buffer memory is not preallocated. Memory is allocated based on actual packets arriving and sitting in the receive queue. It’s also important to realize that filling up a receive queue is not one of the criteria that autotuning uses to increase sk_rcvbuf. Indeed, preventing this type of excessive buffering (bufferbloat) is one of the benefits of autotuning.
What’s the problem?
The problem is that we must have a large TCP receive window for high BDP sessions. This is directly at odds with the latency spike problem mentioned above.
Something has to give. The laws of physics (speed of light in glass, etc.) dictate that we must use large window sizes. There is no way to get around that. So we are forced to solve the latency spikes differently.
A brief recap of the latency spike problem
Sometimes a TCP session will fill up its receive buffers. When that happens, the Linux kernel will attempt to reduce the amount of memory the receive queue is using by performing what amounts to a “defragmentation” of memory. This is called collapsing the queue. Collapsing the queue takes time, which is what drives up HTTP request latency.
We do not want to spend time collapsing TCP queues.
Why do receive queues fill up to the point where they hit the maximum memory limit? The usual situation is when the local application starts out reading data from the receive queue at one rate (triggering autotuning to raise the max receive window), followed by the local application slowing down its reading from the receive queue. This is valid behavior, and we need to handle it correctly.
Selecting sysctl values
Before exploring solutions, let’s first decide what we need as the maximum TCP window size.
As we have seen above in the discussion about BDP, the window size is determined based upon the RTT and desired throughput of the connection.
Because Linux autotuning will adjust correctly for sessions with lower RTTs and bottleneck links with lower throughput, all we need to be concerned about are the maximums.
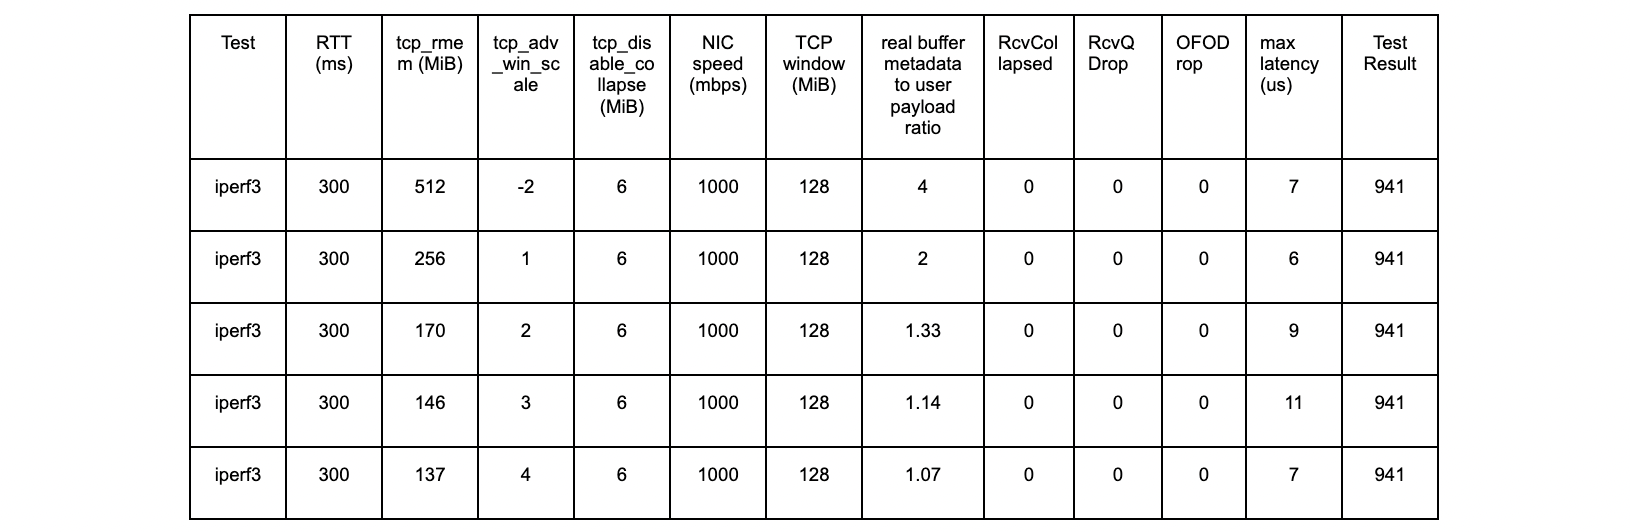
For latency, we have chosen 300 ms as the maximum expected latency, as that is the measured latency between our Zurich and Sydney facilities. It seems reasonable enough as a worst-case latency under normal circumstances.
For throughput, although we have very fast and modern hardware on the Cloudflare global network, we don’t expect a single TCP session to saturate the hardware. We have arbitrarily chosen 3500 mbps as the highest supported throughput for our highest latency TCP sessions.
The calculation for those numbers results in a BDP of 131MB, which we round to the more aesthetic value of 128 MiB.
Recall that allocation of TCP memory includes metadata overhead in addition to packet data. The ratio of actual amount of memory allocated to user payload size varies, depending on NIC driver settings, packet size, and other factors. For full-sized packets on some of our hardware, we have measured average allocations up to 3 times the packet data size. In order to reduce the frequency of TCP collapse on our servers, we set tcp_adv_win_scale to -2. From the table above, we know that the max window size will be ¼ of the max buffer space.
We end up with the following sysctl values:
net.ipv4.tcp_rmem = 8192 262144 536870912
net.ipv4.tcp_wmem = 4096 16384 536870912
net.ipv4.tcp_adv_win_scale = -2
A tcp_rmem of 512MiB and tcp_adv_win_scale of -2 results in a maximum window size that autotuning can set of 128 MiB, our desired value.
Disabling TCP collapse
Patient: Doctor, it hurts when we collapse the TCP receive queue.
Doctor: Then don’t do that!
Generally speaking, when a packet arrives at a buffer when the buffer is full, the packet gets dropped. In the case of these receive buffers, Linux tries to “save the packet” when the buffer is full by collapsing the receive queue. Frequently this is successful, but it is not guaranteed to be, and it takes time.
There are no problems created by immediately just dropping the packet instead of trying to save it. The receive queue is full anyway, so the local receiver application still has data to read. The sender’s congestion control will notice the drop and/or ZeroWindow and will respond appropriately. Everything will continue working as designed.
At present, there is no setting provided by Linux to disable the TCP collapse. We developed an in-house patch to the kernel to disable the TCP collapse logic.
Kernel patch – Attempt #1
The kernel patch for our first attempt was straightforward. At the top of tcp_try_rmem_schedule(), if the memory allocation fails, we simply return (after pred_flag = 0 and tcp_sack_reset()), thus completely skipping the tcp_collapse and related logic.
It didn’t work.
Although we eliminated the latency spikes while using large buffer limits, we did not observe the throughput we expected.
One of the realizations we made as we investigated the situation was that standard network benchmarking tools such as iperf3 and similar do not expose the problem we are trying to solve. iperf3 does not fill the receive queue. Linux autotuning does not open the TCP window large enough. Autotuning is working perfectly for our well-behaved benchmarking program.
We need application-layer software that is slightly less well-behaved, one that exercises the autotuning logic under test. So we wrote one.
Anomalies were seen during our “Attempt #1” that negatively impacted throughput. The anomalies were seen only under certain specific conditions, and we realized we needed a better benchmarking tool to detect and measure the performance impact of those anomalies.
This tool has turned into an invaluable resource during the development of this patch and raised confidence in our solution.
It consists of two Python programs. The reader opens a TCP session to the daemon, at which point the daemon starts sending user payload as fast as it can, and never stops sending.
The reader, on the other hand, starts and stops reading in a way to open up the TCP receive window wide open and then repeatedly causes the buffers to fill up completely. More specifically, the reader implemented this logic:
- reads as fast as it can, for five seconds
- this is called fast mode
- opens up the window
- calculates 5% of the high watermark of the bytes reader during any previous one second
- for each second of the next 15 seconds:
- this is called slow mode
- reads that 5% number of bytes, then stops reading
- sleeps for the remainder of that particular second
- most of the second consists of no reading at all
- steps 1-3 are repeated in a loop three times, so the entire run is 60 seconds
This has the effect of highlighting any issues in the handling of packets when the buffers repeatedly hit the limit.
Revisiting default Linux behavior
Taking a step back, let’s look at the default Linux behavior. The following is kernel v5.15.16.
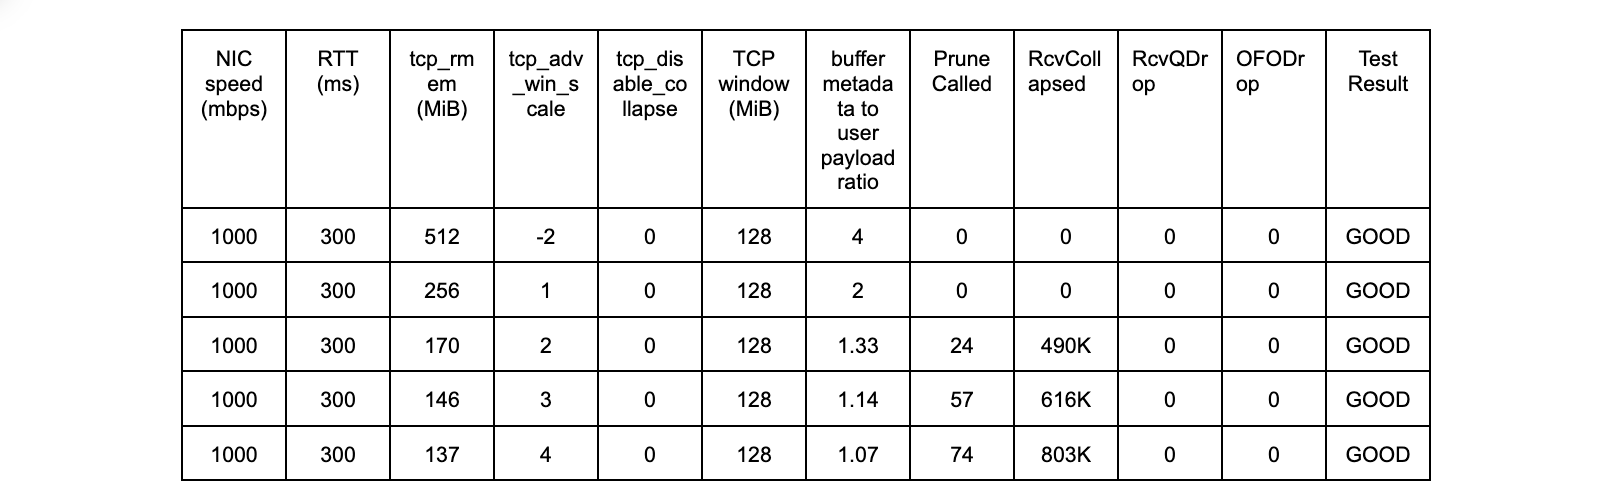
The Linux kernel is effective at freeing up space in order to make room for incoming packets when the receive buffer memory limit is hit. As documented previously, the cost for saving these packets (i.e. not dropping them) is latency.
However, the latency spikes, in milliseconds, for tcp_try_rmem_schedule(), are:
tcp_rmem 170 MiB, tcp_adv_win_scale +2 (170p2):
@ms:
[0]       27093 |@@@@@@@@@@@@@@@@@@@@@@@@@@@@@@@@@@@@@@@@@@@@@@@@@@@@
[1]           0 |
[2, 4)        0 |
[4, 8)        0 |
[8, 16)       0 |
[16, 32)      0 |
[32, 64)     16 |
tcp_rmem 146 MiB, tcp_adv_win_scale +3 (146p3):
@ms:
(..., 16)  25984 |@@@@@@@@@@@@@@@@@@@@@@@@@@@@@@@@@@@@@@@@@@@@@@@@@@@@
[16, 20)       0 |
[20, 24)       0 |
[24, 28)       0 |
[28, 32)       0 |
[32, 36)       0 |
[36, 40)       0 |
[40, 44)       1 |
[44, 48)       6 |
[48, 52)       6 |
[52, 56)       3 |
tcp_rmem 137 MiB, tcp_adv_win_scale +4 (137p4):
@ms:
(..., 16)  37222 |@@@@@@@@@@@@@@@@@@@@@@@@@@@@@@@@@@@@@@@@@@@@@@@@@@@@
[16, 20)       0 |
[20, 24)       0 |
[24, 28)       0 |
[28, 32)       0 |
[32, 36)       0 |
[36, 40)       1 |
[40, 44)       8 |
[44, 48)       2 |
These are the latency spikes we cannot have on the Cloudflare global network.
Kernel patch – Attempt #2
So the “something” that was not working in Attempt #1 was that the receive queue memory limit was hit early on as the flow was just ramping up (when the values for sk_rmem_alloc and sk_rcvbuf were small, ~800KB). This occurred at about the two second mark for 137p4 test (about 2.25 seconds for 170p2).
In hindsight, we should have noticed that tcp_prune_queue() actually raises sk_rcvbuf when it can. So we modified the patch in response to that, added a guard to allow the collapse to execute when sk_rmem_alloc is less than the threshold value.
net.ipv4.tcp_collapse_max_bytes = 6291456
The next section discusses how we arrived at this value for tcp_collapse_max_bytes.
The patch is available here.
The results with the new patch are as follows:
oscil – 300ms tests

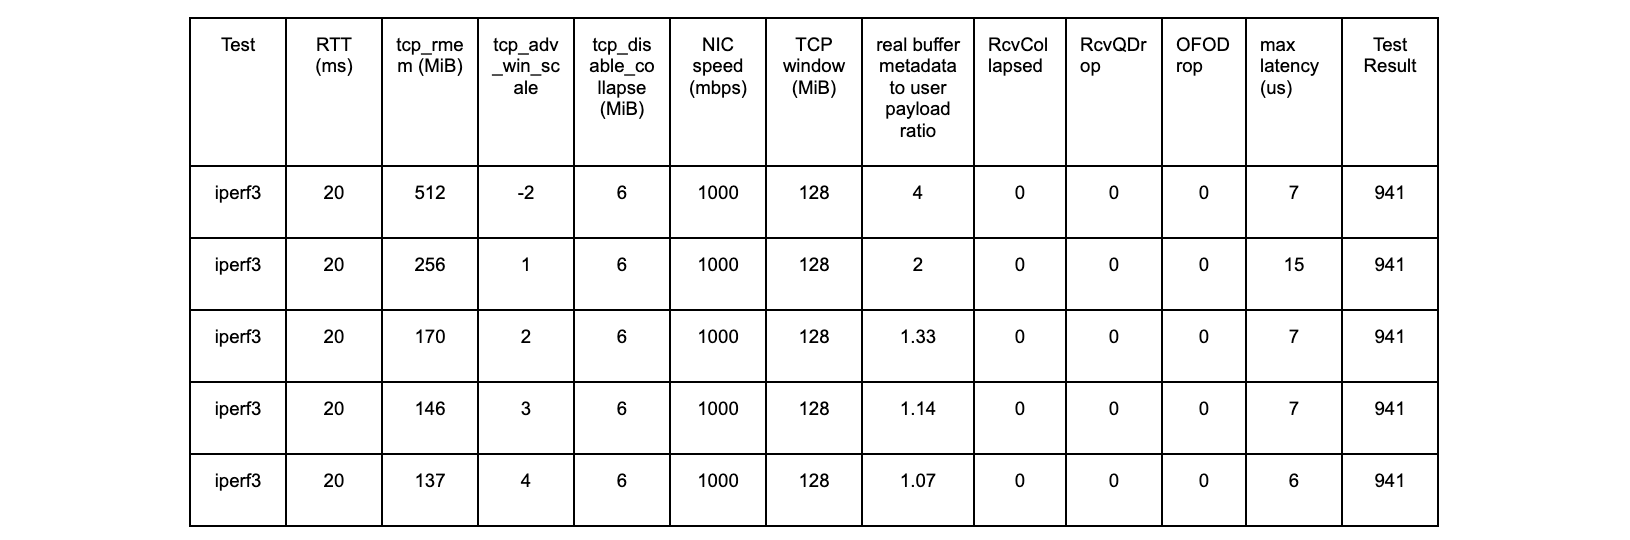
oscil – 20ms tests
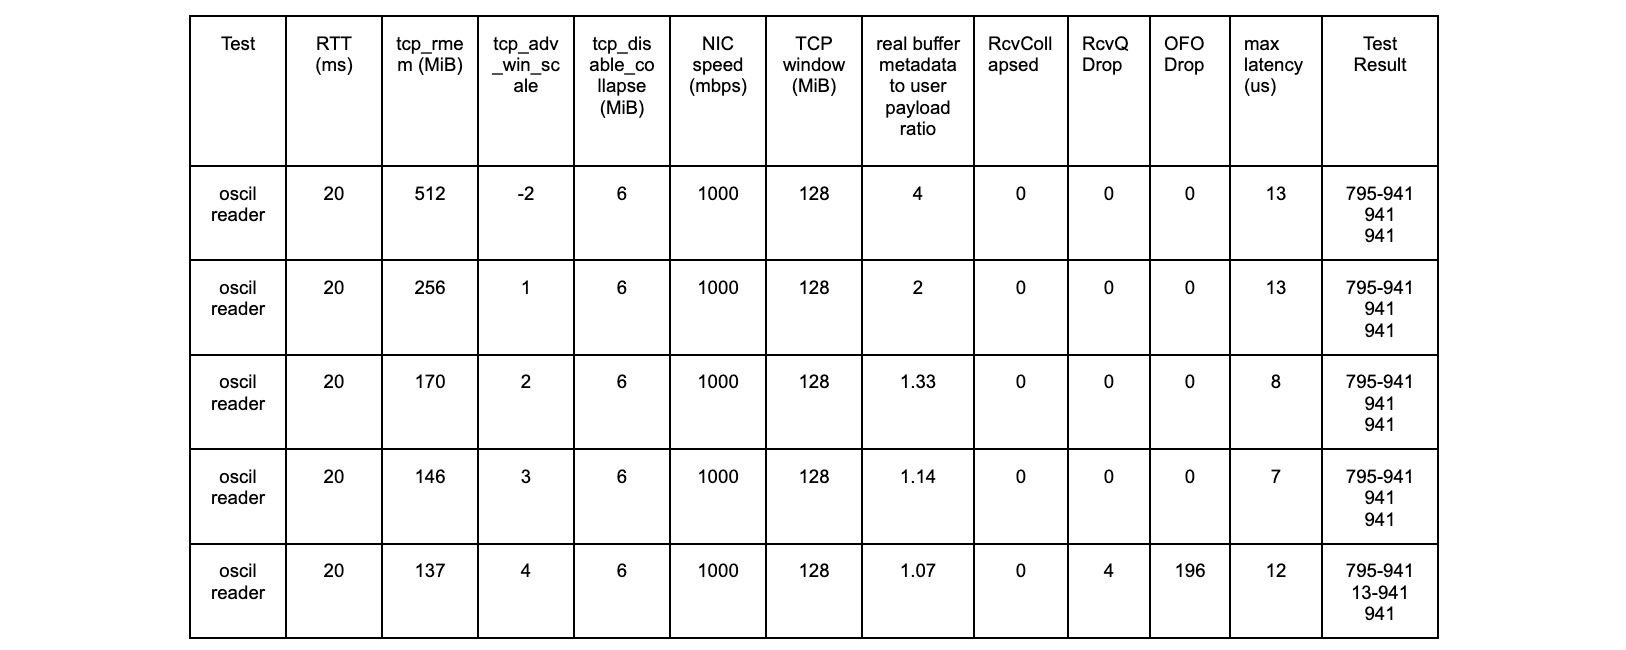
oscil – 0ms tests

iperf3 – 300 ms tests
iperf3 – 20 ms tests
iperf3 – 0ms tests
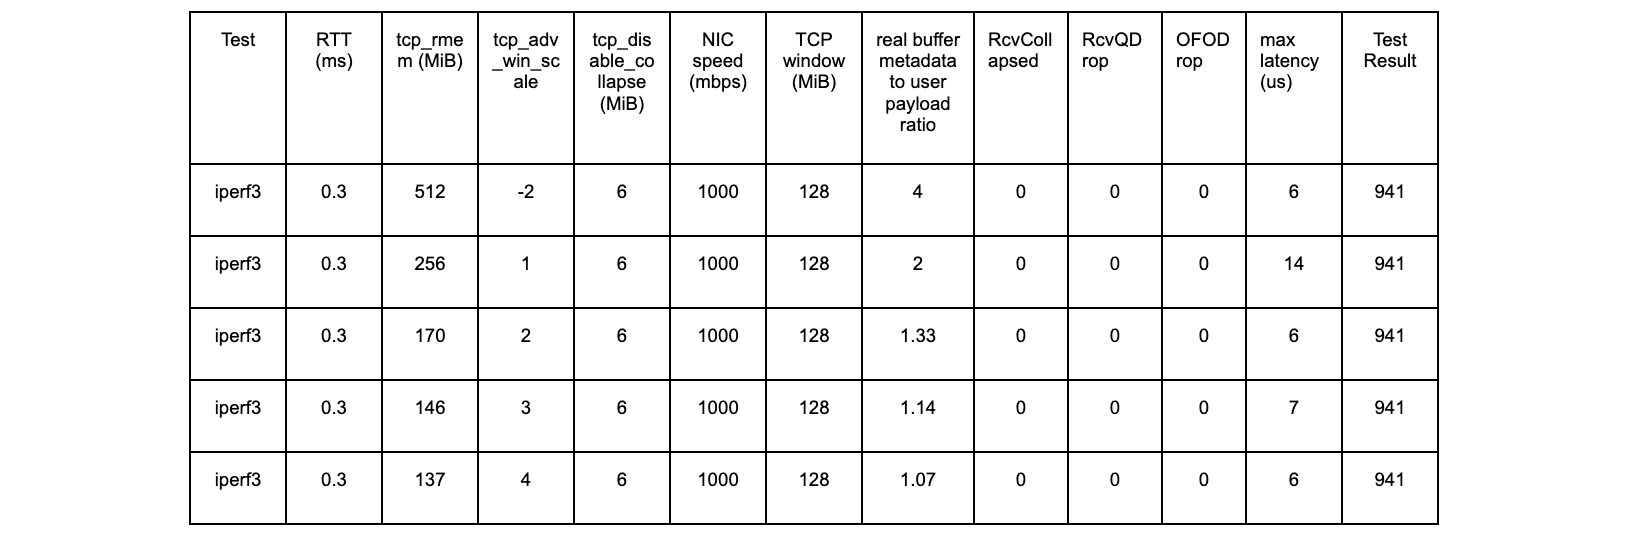
All tests are successful.
Setting tcp_collapse_max_bytes
In order to determine this setting, we need to understand what the biggest queue we can collapse without incurring unacceptable latency.
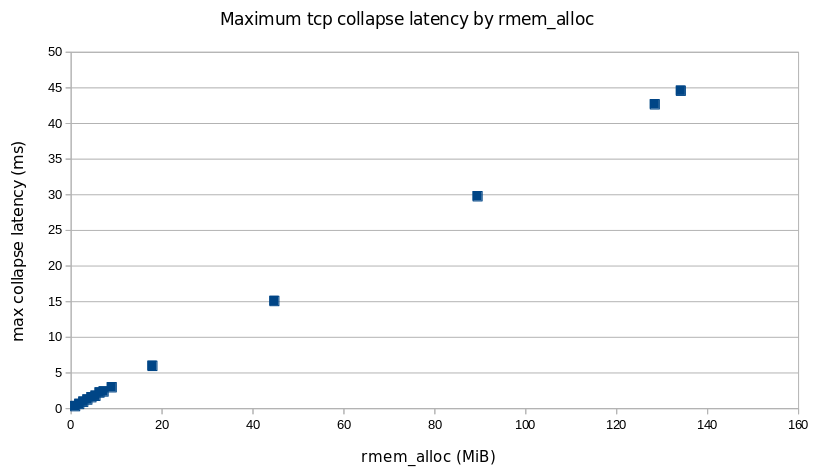
Using 6 MiB should result in a maximum latency of no more than 2 ms.
Cloudflare production network results
Current production settings (“Old”)
net.ipv4.tcp_rmem = 8192 2097152 16777216
net.ipv4.tcp_wmem = 4096 16384 33554432
net.ipv4.tcp_adv_win_scale = -2
net.ipv4.tcp_collapse_max_bytes = 0
net.ipv4.tcp_notsent_lowat = 4294967295
tcp_collapse_max_bytes of 0 means that the custom feature is disabled and that the vanilla kernel logic is used for TCP collapse processing.
New settings under test (“New”)
net.ipv4.tcp_rmem = 8192 262144 536870912
net.ipv4.tcp_wmem = 4096 16384 536870912
net.ipv4.tcp_adv_win_scale = -2
net.ipv4.tcp_collapse_max_bytes = 6291456
net.ipv4.tcp_notsent_lowat = 131072
The tcp_notsent_lowat setting is discussed in the last section of this post.
The middle value of tcp_rmem was changed as a result of separate work that found that Linux autotuning was setting receive buffers too high for localhost sessions. This updated setting reduces TCP memory usage for those sessions, but does not change anything about the type of TCP sessions that is the focus of this post.
For the following benchmarks, we used non-Cloudflare host machines in Iowa, US, and Melbourne, Australia performing data transfers to the Cloudflare data center in Marseille, France. In Marseille, we have some hosts configured with the existing production settings, and others with the system settings described in this post. Software used is perf3 version 3.9, kernel 5.15.32.
Throughput results
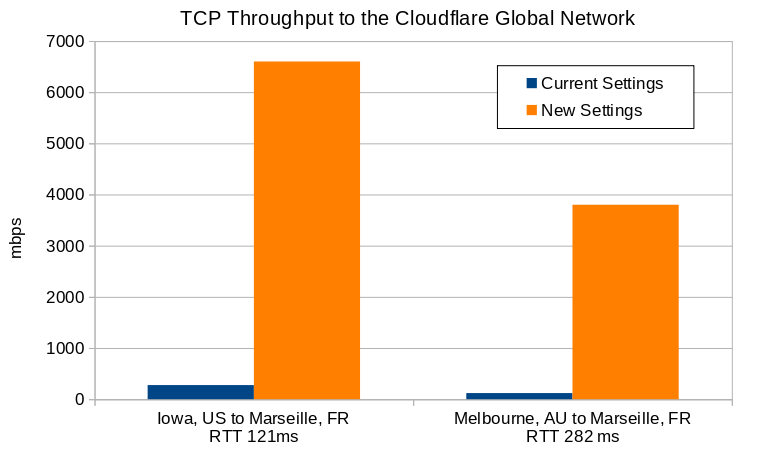
| RTT (ms) | Throughput with Current Settings (mbps) | Throughput with New Settings (mbps) | Increase Factor | |
|---|---|---|---|---|
| Iowa to Marseille | 121 | 276 | 6600 | 24x |
| Melbourne to Marseille | 282 | 120 | 3800 | 32x |
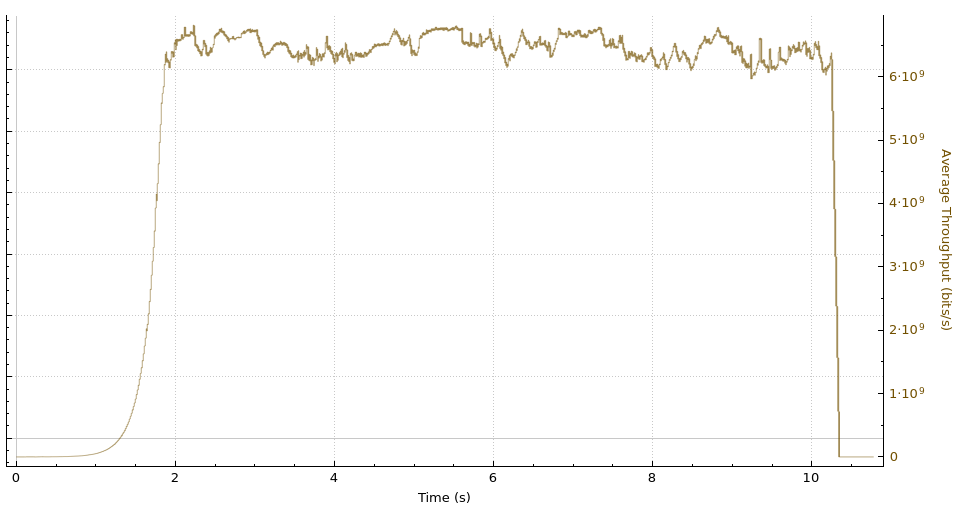
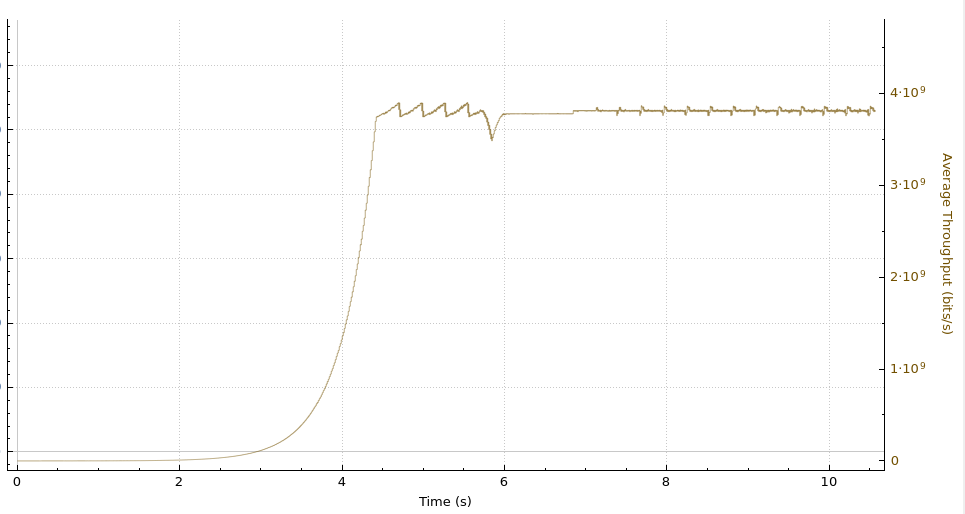
Iowa-Marseille throughput
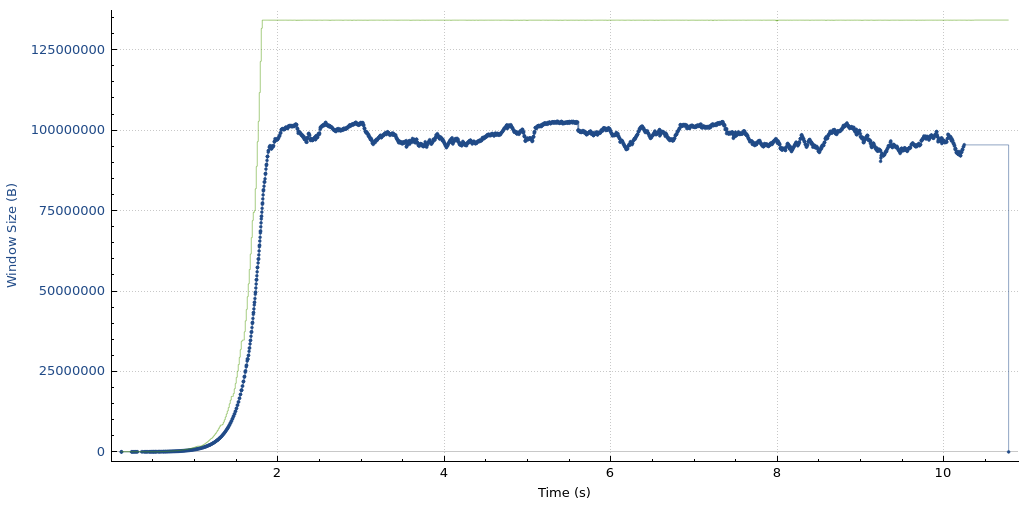
Iowa-Marseille receive window and bytes-in-flight
Melbourne-Marseille throughput
Melbourne-Marseille receive window and bytes-in-flight
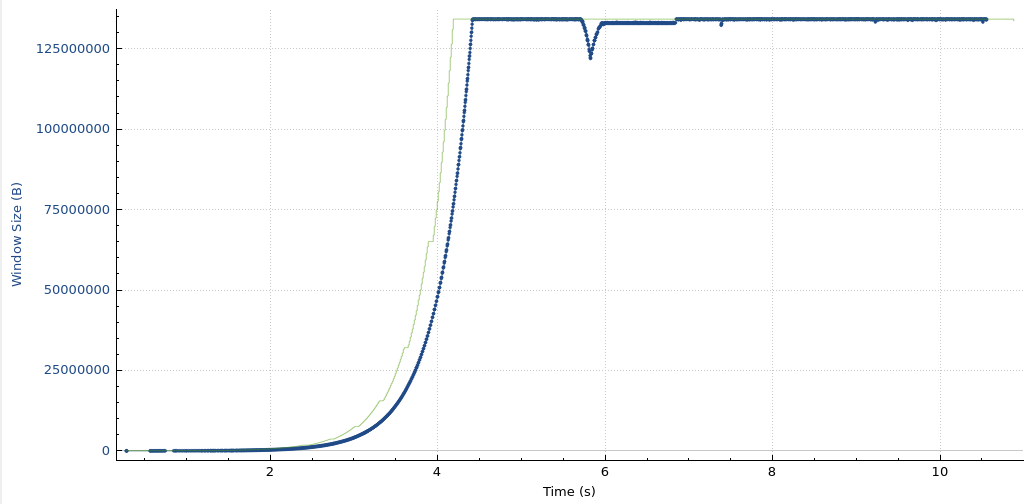
Even with the new settings in place, the Melbourne to Marseille performance is limited by the receive window on the Cloudflare host. This means that further adjustments to these settings yield even higher throughput.
Latency results
The Y-axis on these charts are the 99th percentile time for TCP collapse in seconds.
Cloudflare hosts in Marseille running the current production settings
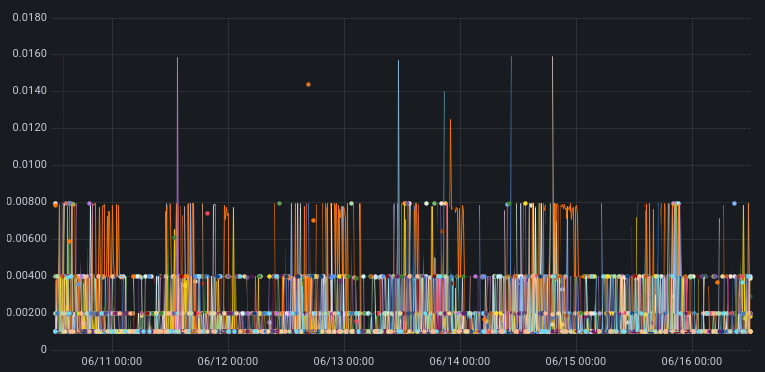
Cloudflare hosts in Marseille running the new settings

The takeaway in looking at these graphs is that maximum TCP collapse time for the new settings is no worse than with the current production settings. This is the desired result.
Send Buffers
What we have shown so far is that the receiver side seems to be working well, but what about the sender side?
As part of this work, we are setting tcp_wmem max to 512 MiB. For oscillating reader flows, this can cause the send buffer to become quite large. This represents bufferbloat and wasted kernel memory, both things that nobody likes or wants.
Fortunately, there is already a solution: tcp_notsent_lowat. This setting limits the size of unsent bytes in the write queue. More details can be found at https://lwn.net/Articles/560082.
The results are significant:
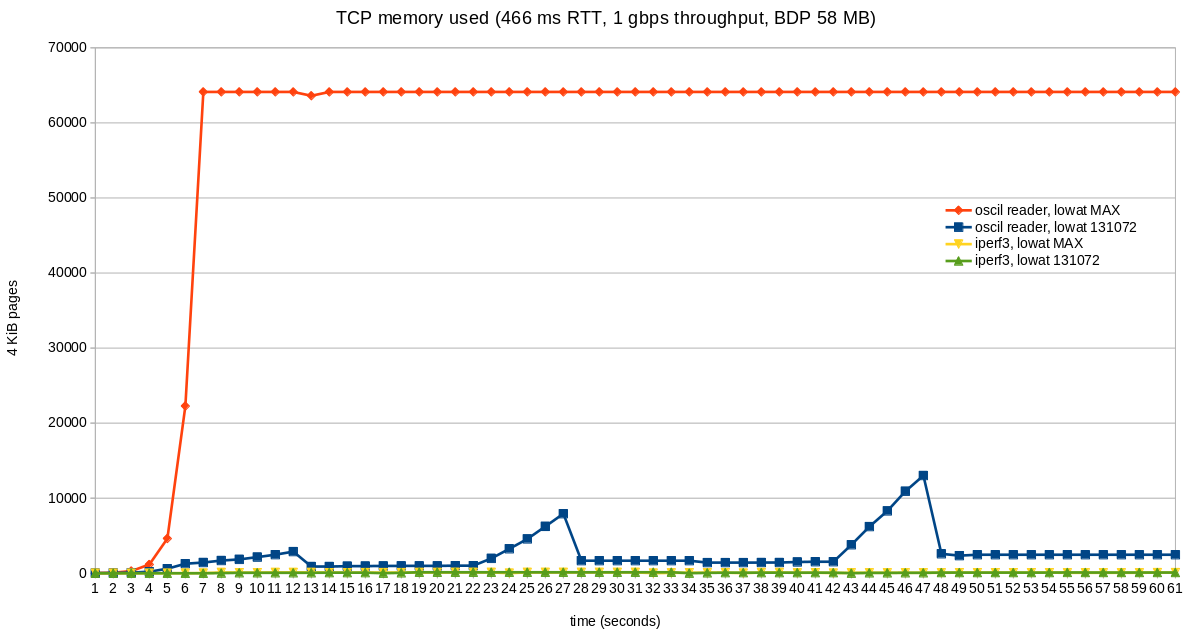
The RTT for these tests was 466ms. Throughput is not negatively affected. Throughput is at full wire speed in all cases (1 Gbps). Memory usage is as reported by /proc/net/sockstat, TCP mem.
Our web servers already set tcp_notsent_lowat to 131072 for its sockets. All other senders are using 4 GiB, the default value. We are changing the sysctl so that 131072 is in effect for all senders running on the server.
Conclusion
The goal of this work is to open the throughput floodgates for high BDP connections while simultaneously ensuring very low HTTP request latency.
We have accomplished that goal.
…
We protect entire corporate networks, help customers build Internet-scale applications efficiently, accelerate any website or Internet application, ward off DDoS attacks, keep hackers at bay, and can help you on your journey to Zero Trust.
Visit 1.1.1.1 from any device to get started with our free app that makes your Internet faster and safer.To learn more about our mission to help build a better Internet, start here. If you’re looking for a new career direction, check out our open positions.