- Index
- » Installation GLPI sur Windows
- » Installing GLPI on Windows Server 2016 and IIS 10
Pages: 1
#1 2018-01-25 22:54:23
- machadomall
- Member

- From: Brazil, Brasilia, DF
- Registered: 2011-10-30
- Posts: 207

Installing GLPI on Windows Server 2016 and IIS 10
Hello,
GLPI Installation Tutorial on Windows Server 2016 and IIS 10
https://www.alfabech.com/2018/01/instal … er_91.html
Hugs.
Márcio Machado
Brasília-DF / Brasil
#2 2018-07-09 16:26:08
- sbourgeois
- Member
- Registered: 2018-03-07
- Posts: 8
Re: Installing GLPI on Windows Server 2016 and IIS 10
Bonjour,
le lien ne fonctionne plus.
Cdt,
#3 2018-07-09 16:35:02
- sbourgeois
- Member
- Registered: 2018-03-07
- Posts: 8
Re: Installing GLPI on Windows Server 2016 and IIS 10
Quelqu’un aurait la documentation à me transmettre?
#4 2018-08-07 22:26:18
- ms-sec
- Member
- Registered: 2018-08-07
- Posts: 9
Re: Installing GLPI on Windows Server 2016 and IIS 10
voici ma version, j’espère que cela t’aidera : https://ms-sec.fr/?p=2759
#5 2018-09-04 02:15:08
- allenrobin
- Member
- Registered: 2018-09-04
- Posts: 1
Re: Installing GLPI on Windows Server 2016 and IIS 10
Users may get trouble in such installation process on Windows Server 2016. It provides all the necessary factors which will be fruitful for all them. You may get the solution from https://chathelp.org/canon-printer-support/ to know in well advance.
Last edited by allenrobin (2018-09-04 02:18:04)
#6 2018-10-03 11:25:06
- Marmolejo987
- Member
- Registered: 2018-09-11
- Posts: 1
Re: Installing GLPI on Windows Server 2016 and IIS 10
I am having a problem in installing GlPI on a server.
Whenever I install GLPI, the images are not displayed at the time of verification. After installation I started login but a login erro occured.
In addition, the logo GLPI with the colors are displayed well, but once I click on connection I have more CSS and the link of the image «warning» is front / pics / warning.png. While there is no pics directory in the front folder. Please help me to solve this problem. https://mobdro.ooo
#7 2018-10-16 14:01:03
- rammychan
- Member
- From: Dallas, TX, USa
- Registered: 2018-10-16
- Posts: 1
Re: Installing GLPI on Windows Server 2016 and IIS 10
Download glpi 9.1 from github glpi-project/glpi/releases
Give rights to GLPI folder to
IUSR
IIS_USRS
Authenticated users
Open IIS manager create site from folder c:inetpubwwwrootglpi
Activate php extensions
Define Default document index.php in default document
Authentification disable anonymous et enable windows authentification
Open heidisql
Select database
Create glpi database with root user and keepass password
Give rights from anywhere to glpi database
Open a browser
Go to http://localhost/glpi
Last edited by rammychan (2018-10-16 14:03:36)
Install GLPI
Proceed as follow:
- Choose a version,
- Download the archive,
- Install


Choose a version
Note
It is hightly recommended you choose the latest stable release for a production usage.
GLPI follows a semantic versioning scheme, on 3 digits. The first one is the major release, the second the minor and the third the fix release.
Major releases may come with important incompatibilities as well as new features; minor versions may bring new features as well, but stay perfectly compatible inside a major version.
Fixes releases will only fix reported issues without adding anything new.
Download
Warning
On GitHub, there are always two archives named Source code which should not be used.
Go to the download section of the GLPI website (or get archive directly from Github release) and choose the glpi-{version}.tgz archive.
Installation
GLPI installation itself is composed of three steps:
- Uncompress the archive in your website;
- Give your webserver write access to the
filesandconfigdirectories; - :doc:`launch installation wizard <wizard>` (or use the :ref:`command line installation script <cdline_install>`).
Once these three steps have been completed the application is ready to be used.
If you need to set advanced configuration, like SSL connection parameters, please refer to :doc:`advanced configuration <advanced-configuration>`.
Files and directories locations
Like many other web applications, GLPI can be installed by just copying the whole directory to any web server. However, this may be less secure.
Warning
Every file accessible directly from a web server must be considered unsafe!
GLPI stores some data in the files directory, the database access configuration is stored in the config directory, etc. Even if GLPI provides some ways to prevent files from being accessed by the webserver directly, best practise is to store data outside of the web root. That way, sensitive files cannot be accessed directly from the web server.
There are a few configuration directives you may use to achieve that (directives that are used in provided downstream packages):
GLPI_CONFIG_DIR: set path to the configuration directory;GLPI_VAR_DIR: set path to thefilesdirectory;GLPI_LOG_DIR: set path to logs files.
Note
There are many other configuration directives available, the ones we talked about are the main to take into account for a more secure installation.
Directories choice is entirely up to you; the following example will follow the FHS recommendations.
Our GLPI instance will be installed in /var/www/glpi, a specific virtual host in the web server configuration will reflect this path.
GLPI configuration will be stored in /etc/glpi, just copy the contents of the config directory to this place. GLPI requires read rights on this directory to work; and write rights during the installation process.
GLPI data will be stored in /var/lib/glpi, just copy the contents of the files directory to this place. GLPI requires read and write rights on this directory.
GLPI logs files will be stored in /var/log/glpi, there is nothing to copy here, just create the directory. GLPI requires read and write access on this directory.
Following this instructions, we’ll create a inc/downstream.php file into GLPI directory with the following contents:
<?php
define('GLPI_CONFIG_DIR', '/etc/glpi/');

if (file_exists(GLPI_CONFIG_DIR . '/local_define.php')) {
   require_once GLPI_CONFIG_DIR . '/local_define.php';
}
Warning
GLPI packages will certainly provide a inc/downstream.php file. This one must not be edited!
GLPI looks for a local_define.php file in its own config directory. If you want to use one from new config directory, you have to load it.
Then, create a file in /etc/glpi/local_define.php with the following contents:
<?php
define('GLPI_VAR_DIR', '/var/lib/glpi');
define('GLPI_LOG_DIR', '/var/log/glpi');
Note
.. versionadded:: 9.2.2
For GLPI prior to 9.2.2, the GLPI_VAR_DIR constant did not exist and it was required to set all paths separately:
<?php
define('GLPI_VAR_DIR', '/var/lib/glpi');
define('GLPI_DOC_DIR',        GLPI_VAR_DIR);
define('GLPI_CRON_DIR',       GLPI_VAR_DIR . '/_cron');
define('GLPI_DUMP_DIR',       GLPI_VAR_DIR . '/_dumps');
define('GLPI_GRAPH_DIR',      GLPI_VAR_DIR . '/_graphs');
define('GLPI_LOCK_DIR',       GLPI_VAR_DIR . '/_lock');
define('GLPI_PICTURE_DIR',    GLPI_VAR_DIR . '/_pictures');
define('GLPI_PLUGIN_DOC_DIR', GLPI_VAR_DIR . '/_plugins');
define('GLPI_RSS_DIR',        GLPI_VAR_DIR . '/_rss');
define('GLPI_SESSION_DIR',    GLPI_VAR_DIR . '/_sessions');
define('GLPI_TMP_DIR',        GLPI_VAR_DIR . '/_tmp');
define('GLPI_UPLOAD_DIR',     GLPI_VAR_DIR . '/_uploads');
define('GLPI_CACHE_DIR',      GLPI_VAR_DIR . '/_cache');

define('GLPI_LOG_DIR', '/var/log/glpi');

Of course, it is always possible to redefine any of those paths if needed.
Post installation
Once GLPI has been installed, you’re almost done.
An extra step would be to secure (or remove) installation directory. As an example, you can consider adding the following to your Apache virtual host configuration (or in the glpi/install/.htaccess file):
<IfModule mod_authz_core.c>
    Require local
</IfModule>
<IfModule !mod_authz_core.c>
    order deny, allow
    deny from all
    allow from 127.0.0.1
    allow from ::1
</IfModule>
ErrorDocument 403 "<p><b>Restricted area.</b><br />Only local access allowed.<br />Check your configuration or contact your administrator.</p>"
With this example, the install directory access will be limited to localhost only and will display an error message otherwise. Of course, you may have to adapt this to your needs; refer to your web server’s documentation.
-

-
March 31 2010, 10:49
- IT
- Cancel
Установка проблем не вызывает. Установить можно как на Linux так и Windows систему. Для Windows существует несколько вариантов: установить и сконфигурировать Apache сервер, либо интегрировать PHP процессор в IIS, либо самый простой вариант установить XAMPP. Последние версии XAMPP содержат все необходимое, включая MySQL и необходимые дополнительные библиотеки. Затем необходимо скачать дистрибутив GLPI. Распаковать в директорию [ДИРРЕКТОРИЯ УСТАНОВКА XAMPP]htdocs. Запустить веб браузер и ввести в адресной строке http://имя сервера/glpi
Процесс установки:
Выбора языка;

Подтверждения лицензионного соглашения;
Проверка совместимости;

Настройка подключения к базе данных. При установке XAMPP параметры подлючения к MySQL следующие: Сервер MySQL – localhost, Пользователь MySQL – root, пароль к MySQL – оставляем пустой. 
Далее нам необходимо установить подключение с существующей базой данных или создать новую базу данных, скорее всего вам понадобится именно этот параметр.

Жмем продолжить и получаем окно «Установка завершена»
После нажатия на кнопку «Запустить GLPI» WEB браузер перенаправит вас на оно Аутентификации. 
По умолчанию имя пользователя и пароль будут «glpi».
Интерфейс
По умолчанию домашняя страница системы отображает информацию о заявках, планирование, заметки и договора.

В верхней части располагается меню и несколько полезных кнопок. 
Закладки — можно настроить под себя. При добавлении в закладки сохраняется текущее состояние фильтра. 
Также их можно сделать доступными другим пользователям – Сделать общей
Быстрый доступ.
Следующие две клавиши используются в большинстве форм. ![]() просмотр свойств объекта (правильное название — Раскрываемый список),
просмотр свойств объекта (правильное название — Раскрываемый список),![]() добавление нового объекта (Раскрываемый список). Ниже представленна форма отображаемая при добавлении объекта (в данном случае Местонахождение).
добавление нового объекта (Раскрываемый список). Ниже представленна форма отображаемая при добавлении объекта (в данном случае Местонахождение). 
Все Раскрываемые списки располагаются – Установки -> Раскрываемые списки. 
Основные компонетнты для работы с данными

Строитель запросов позволяет задавать очень сложные критерии для поиска. И в совокупности с возможностью групповых операций дает очень мощный инструмент для манипулирования данными.
Друге статьи
GLPI. Инвентаризация ИТ ресурсов и не только.
GLPI. Интеграция с Active Directory и электронной почтой.
Ссылки
Инвентаризация компьютерной и оргтехники
Инвентаризация компьютерной и оргтехники. OCS Inventory
GLPI: Экспорт в PDF по русски
Наш канал в Telegram
После того как мы установили и настроили менеджер IT-инфраструктуры — GLPI, необходимо собрать информацию о ПК сети. Для этого нам понадобится плагин fusioninventory.
Скачиваем плагин с официального сайта Fusioninventory — http://fusioninventory.org:
wget https://github.com/fusioninventory/fusioninventory-for-glpi/releases/download/glpi090%2B1.3/fusioninventory-for-glpi_0.90.1.3.tar.gz
Распаковываем и помещаем в директорию /plugins, у меня это /var/www/support.itsch.ru/plugins:
ls /var/www/support.itsch.ru/plugins
fusioninventory remove.txt
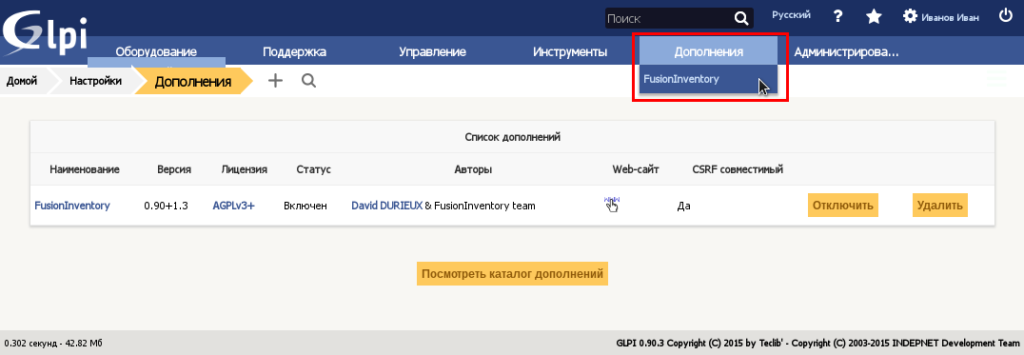
Заходим в систему GLPI и переходим в раздел «Настройки» — «Дополнения»

И выполняем установку дополнения:

И включаем плагин:

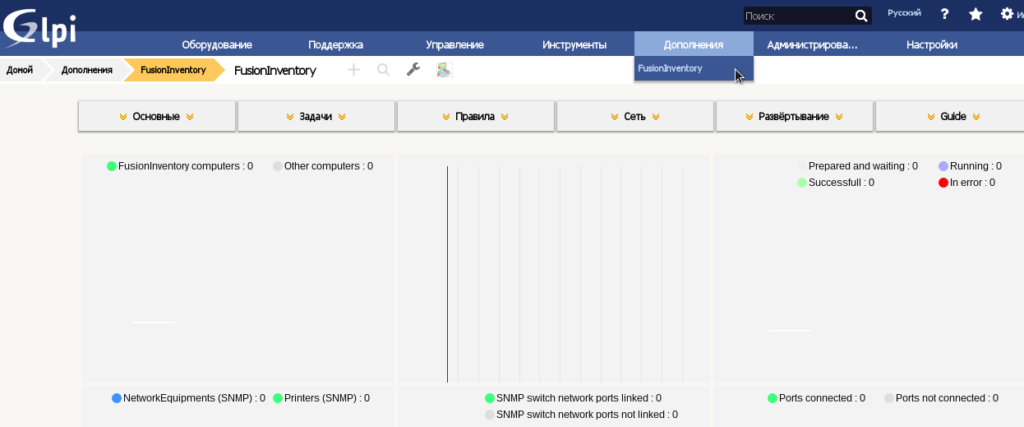
После включения в главном меню появиться раздел «Дополнения» — «FusionInventory»:

Переходим в раздел «Организация» и указываем ссылку на менеджер IT-инфраструктуры. В нашем случае это http://support.itsch.ru:

Переходим «Дополнения» — «FusionInventory»:
Следующий этап — это установка клиента на ПК в локальной сети.
Для Ubuntu / Debian:
# apt-cache search FusionInventory
fusiondirectory-plugin-fusioninventory — FusionInventory plugin for FusionDirectory
fusiondirectory-plugin-fusioninventory-schema — LDAP schema for FusionDirectory fusioninventory plugin
fusioninventory-agent — Hardware and software inventory tool (client)
fusioninventory-agent-task-deploy — Software deployment support for FusionInventory
fusioninventory-agent-task-esx — ESX and ESXi inventory
fusioninventory-agent-task-network — Network device discovery for FusionInventory Agent
libfusioninventory-agent-task-deploy-perl — transitional dummy package
libfusioninventory-agent-task-esx-perl — transitional dummy package
libfusioninventory-agent-task-netinventory-perl — transitional dummy package
libfusioninventory-agent-task-network-perl — transitional dummy package
libfusioninventory-agent-task-snmpquery-perl — transitional dummy package
# apt-get install fusioninventory-agent
После установки редактируем конфигурационный файл:
mcedit /etc/fusioninventory/agent.cfg
Находим строку server = http://server.domain.com/glpi/plugins/fusioninventory
и меняем на: server = http://support.itsch.ru/plugins/fusioninventory , не забудьте раскомментировать строку. Сохраняем изменения и перезапускаем fusioninventory-agent:
service fusioninventory-agent restart
Для Windows:
Скачиваем агента: http://forge.fusioninventory.org/projects/fusioninventory-agent-windows-installer/files. Так как система на ПК оказалась 32-битная, то скачиваем fusioninventory-agent_windows-x86_2.3.17.exe и производим стандартную процедуру установки приложения:

Соглашаемся с лицензионным соглашением:

Выбираем настройки по умолчанию:

Указываем директорию для установки приложения:

Указываем url плагина на сервере. В нашем случае это http://support.itsch.ru/plugins/fusioninventory :

Наблюдаем процедуру копирования файлов:

Завершаем процесс установки:

Переходим в Главное меню и запускаем агента на исполнение:


Переходим в интерфейс менеджера IT-инфраструктуры (GLPI). «Оборудование» — «Компьютеры» и констатируем, что первый ПК у нас уже в системе:
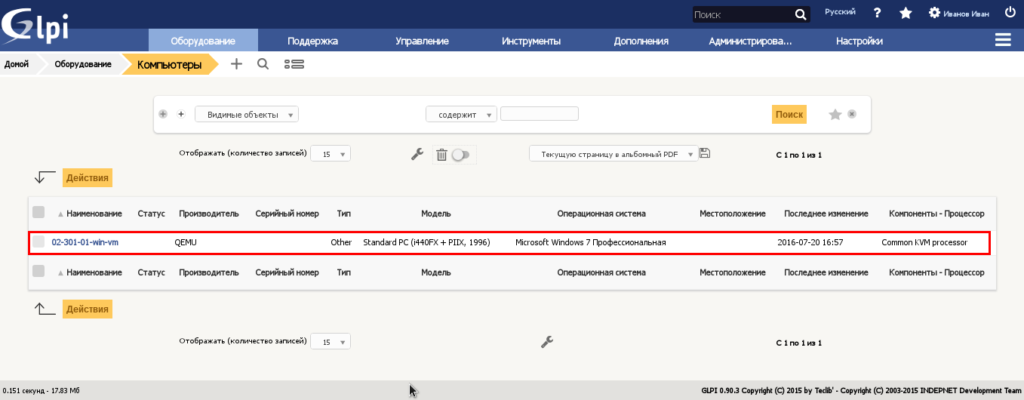
И так со всеми ПК в сети.
Интересная статья? Поделитесь ей с друзьями!
Шаг 1.
Устанавливаем XAMPP (Apache & MySQL) в С:
С помощью Contrlol Panel запускаем как сервис
Шаг 2.
Скачиваем последнюю версию GLPI отсюда. Распаковываем архив glpi.
Папку glpi копируем в С:xampphtdocs
Шаг 3.
Устанавливаем glpi
Для этого в браузере набираем
http://localhost/glpi/install/install.php
В процессе установки будет необходимо добавить новую базу данных через специальный мастер.
Имя базы: glpi_db (по-сути любое)
Пользователь: root
Пароль: без пароля.
Шаг 4.
По-умолчанию XAMPP не разрешат доступ из локальной сети.
Чтобы получить доступ к веб-морде с компьютера с IP-адресом 192.168.1.9 надо подправить файл httpd-xampp.conf (C:xamppapacheconfextrahttpd-xampp.conf). Также доступ к этому файлу можно получить из панели управления xampp.
В конце файла надо добавить
<LocationMatch «^/(?i:(?:xampp|licenses|phpmyadmin|webalizer|server-status|server-info))»>
Order deny,allow
Deny from all
Allow from ::1 192.168.1.9
ErrorDocument 403 /error/HTTP_XAMPP_FORBIDDEN.html.var
Теперь можем получить доступ к glpi по адресу http://192.168.1.12/glpi/index.php