Version 2.2.37
GUI
- Upgrade to PyQt5 v5.15.7
- Changed Windows Terminal telnet console profile from OS X to windows ref: issue #3193
Server
- Fix link communication issues on Windows with uBridge
- Fix StreamWriter doesn’t have the wait_closed() method in Python3.6. Fixes #2170
- Install built-in appliances when no previous version has been detected. Fixes #2168
- Update documentation to install gns3-server. Fixes #2124
- Give udhcpc executable right. Fixes #2159
Version 2.2.36
GUI
- Add Trusted Platform Module (TPM) support for Qemu VMs
- Add «on_close» setting to appliance schema. Fixes GNS3/gns3-server#2148
- Add default ‘ide’ disk interface when manually creating Qemu VM template. Fixes #3360
- Fix zoom factor is multiplied when loading projects. Fixes #3408
- Remove deprecated PuTTY option in preferences. Ref #3415
Server
- Install web-ui v2.2.36
- Add Trusted Platform Module (TPM) support for Qemu VMs
- Require Dynamips 0.2.23 and bind Dynamips hypervisor on 127.0.0.1
- Delete the built-in appliance directory before installing updated files
- Use a stock BusyBox for the Docker integration
- Overwrite built-in appliance files when starting a more recent version of the server
- Fix reset console. Fixes #1619
- Only use importlib_resources for Python <= 3.9. Fixes #2147
- Support when the user field defined in Docker container is an ID. Fixes #2134
Version 3.0.0 alpha 3
GUI
- Catch timeout error while updating appliance files
- Fix RecursionError with invalid credentials. Fixes #3374
- Allow raw images by default. Fixes GNS3/gns3-server#2097
- Remove deprecated PuTTY option in preferences. Ref #3415
- Fix «variables»: [] in project file leads to unlimited increase of empty name/value pairs in GUI. Fixes #3397
- Ignore local revision when comparing versions.
- Make version PEP 440 compliant
- Support for Python 3.11
- Replace deprecated distro.linux_distribution() call
- Add a fix for the CVE-2007-4559
Server
- Add web-ui v3.0.0a3
- Add config option to change the server name. Ref #2149
- Option to disable image discovery and do not scan parent directory
- Allow raw images by default. Fixes GNS3/gns3-server#2097
- Fix bug when creating Dynamips router with chassis setting
- Stricter checks to create/update an Ethernet switch and add tests
- Fix schema for removing WICs from Cisco routers. Fixes #3392
- Fix issues with VMnet interface on macOS >= 11.0. Ref #3381
- Use importlib_resources instead of pkg_resources and install built-in appliances in config dir.
- Fix console vnc don’t use configured ports in some case. Fixes #2111
- Add missing VMware settings in gns3_server.conf
- Make version PEP 440 compliant
- Support for Python 3.11
- Allow for more dependency versions at patch level
- Replace deprecated distro.linux_distribution() call
- Update gns3.service.systemd
- Fix some issues with HTTP notification streams
- gns3.service.openrc: make openrc script posix compliant
- fix: use exact match to find interface in windows to avoid get wrong interface
Version 2.2.35.1
Re-release of Web-Ui v2.2.35
Version 2.2.35
GUI
- Fix «variables»: [] in project file leads to unlimited increase of empty name/value pairs in GUI. Fixes #3397
- Make version PEP 440 compliant
- Support for Python 3.11
- Upgrade PyQt to 5.15.7 and pywin32 to v305
- Allow for more dependency versions at patch level
- Replace deprecated distro.linux_distribution() call
- Add a fix for the CVE-2007-4559
Server
- Release web-ui v2.2.35
- Fix issues with VMnet interface on macOS >= 11.0. Ref #3381
- Use importlib_resources instead of pkg_resources and install built-in appliances in config dir.
- Fix console vnc don’t use configured ports in some case. Fixes #2111
- Add missing VMware settings in gns3_server.conf
- Make version PEP 440 compliant
- Support for Python 3.11
- Allow for more dependency versions at patch level
- Replace deprecated distro.linux_distribution() call
- Update gns3.service.systemd
- gns3.service.openrc: make openrc script posix compliant
- fix: use exact match to find interface in windows to avoid get wrong interface
Version 3.0.0 alpha 2
GUI
- Add missing ‘sys’ module. Ref #3373
- Upgrade dev dependencies
- Dot not allow «no border» style for line items
- Use «none» for solid line style in drawing items
- Implement new option (Delete All) to contextual menu in «Console» dock. Fixes #3325
- Fix editing Docker container config generates exception and empty config. Fixes #3371
- Fix 2560×1440 resolution for Docker container
- Fix cannot detect images by default when trying to upload them in the Image Manager. Fixes #3367
- Fix unable to set VNC console resolution. Fixes #3365
Server
- Add web-ui v3.0.0a2
- Upgrade FastAPI to v0.82.0
- API endpoint to get the locked status of a project
- Global project lock and unlock
- Update appliance files
- Require name for custom adapters. Fixes #2098
- Allow empty adapter slots for Dynamips templates. Ref #3373
- Use original $PATH in init.sh for Docker containers. Ref #2069
Version 2.2.34
GUI
- Upgrade dev dependencies
- Implement new option (Delete All) to contextual menu in «Console» dock. Fixes #3325
- Fix 2560×1440 resolution for Docker container
Server
- Use original $PATH in init.sh for Docker containers. Ref #2069
- Support pytest-asyncio 0.19.0
- Upgrade dev dependencies and fix issues after upgrading to pytest-aiohttp v1.0.4
- Update compute.py to automatically reconnect to remote compute
Version 3.0.0 alpha 1
GUI
- Set default symbol theme to «Affinity-square-blue»
- Fix creating a custom Ethernet switch template
- Update decorative symbols (for Wizards etc.)
- Use generic symbol names
- Set raw image param when uploading an image from the appliance wizard
- Checks for valid hostname on server side for Dynamips, IOU, Qemu and Docker nodes
- Support compression levels
- Add zstandard compression
- Remove Qemu binary requirement
- Use controller API to list images
- Use new API endpoints to create/resize Qemu disk images.
- Image management dialog
- Drop Python 3.6 support and require Python >= 3.7
- Improvements when connecting and updating computes
- Use current directory when searching for images. Fixes #3198
- Refactor server settings and wizard
- Disable local server and GNS3 VM preferences
- Image uploading to controller and project export
- HTTP client refactoring
- Handle empty compute_id in preferences. Ref #3265
- Remove direct upload to compute
- Send JWT token in query string when connecting to websocket. Ref GNS3/gns3-server#1992
- Remove traceng code
- Option to delete orphaned image files from disk when template is removed. Fixes #3249
- Remove Qemu legacy networking code
- Isolate and unisolate support. Fixes #3190
- Support authentication using JWT tokens
- Providing the path to create a project is now deprecated.
- Client to use version 3 of the API.
- Change Qemu disk descriptions. Fixes #3035
- Edit only text mode config files
- Hide config import/export when configFiles attribute is empty
- Qemu disk interfaces must be set to «none» by default. Ref #3035
- Do not allow image to be configured on Qemu VM secondary slave disk if create config disk option is enabled.
- Add explicit option to automatically create or not the config disk. Off by default.
- Auxiliary console support for Qemu. Ref #2873 Improvements for auxiliary console support for Docker and Dynamips.
- Support to reset all console connections. Ref GNS3/gns3-server#1619
- Support to reset links. Fixes GNS3/gns3-server#1620
- Fix bug when recent files cannot be seen in the new project dialog.
- Wait for the controller to be online before allowing actions like creating or opening a project. Fixes #2907
- Show progress dialog immediately when connecting to server. Ref #2907
- QEMU config disk — enable QEMU config import/export
- Add total RAM, CPUs and disk size to servers summary as well as disk usage in percent. Fixes GNS3/gns3-server#1532
- Resource constraints for Docker VMs.
- Support for «usage» for «Cloud» nodes. Fixes #2887 Allow «usage» for all builtin nodes (not exposed in Ui).
- Markdown support in project Readme. Fixes #2550 #2289 Allow project README to be edited from «File->Edit project». Fixes #2829
Server
- Bundle gns3-web-ui v3.0.0a1
- Use default symbol theme if none is provided when loading appliances
- Allow default symbol theme to be configured in config file
- Optionally allow Qemu raw images
- Ignore image detection for IOU user libraries in image directory
- Don’t show optional token param in API docs
- Fix check for 32-bit in ELF header
- Checks for valid hostname on server side for Dynamips, IOU, Qemu and Docker nodes
- Only check files (not directories) when looking for new images on file system.
- Support user defined loader/libraries to run IOU
- Make ‘vendor_url’ and ‘maintainer_email’ optional for template validation.
- Allow auth token to be passed as a URL param
- HTTP middleware create issues when streaming project archive
- Add zstandard compression support for project export
- Make sure that the temporary image file is removed after uploading an image
- Do not cache to md5sum file in some situations
- Detect new images added to the default image directory. * Images can be present before the server starts or while it is running * Images are recorded in the database
- Support delete Qemu disk image from API Return the real disk image name in the ‘hdx_disk_image_backed’ property for Qemu VMs
- Handle creating Qemu disk images and resizing
- Finish to clean up local setting usage. Ref #1460
- «Local» command line parameter is only for stopping a server that has been started by the desktop GUI
- Fix AsyncSession handling after breaking changes in FastAPI 0.74.0 See https://github.com/tiangolo/fastapi/releases/tag/0.74.0 for details.
- Detect image type instead of requesting it from user
- Drop Python 3.6 support and require Python >= 3.7
- Drop Windows support
- Add connect endpoint for computes Param to connect to compute after creation Report compute unauthorized HTTP errors to client
- Replace CORS origins by origin regex
- Change default config settings
- Update Docker image for tests
- Fix calls to static methods in server.py
- Do not require the local server param to open a .gns3 file. Fixes #2421 Ref #1460
- Do not automatically install appliance after uploading image
- Ignore OSError when closing websocket
- Allow empty compute_id. Ref #1657
- Secure controller to compute communication using HTTP basic authentication
- Secure websocket endpoints
- Fix issue when updating a template
- Allocate compute when compute_id is unset
- Return the current controller hostname/IP from any compute
- Remove Qemu legacy networking support
- Add a custom version to an appliance
- Appliance management refactoring: * Install an appliance based on selected version * Each template have unique name and version * Allow to download an appliance file
- Finalize image management refactoring and auto install appliance if possible
- Sqlite doesn’t allow BigInteger to be used as an primary key with autoincrement
- Add isolate and unisolate endpoints. Ref #3190
- Small db tables adjustments
- Add index for «name» field in role table
- Allow images to be stored in subdirs and used by templates.
- Option to prune images when deleting template.
- Associate images when creating or updating a template.
- Add prune images endpoint. Use many-to-many relationship between images and templates.
- Check if user has the right to add a permission
- Only use the necessary HTTP methods for default permissions
- Add /permissions/prune to delete orphaned permissions
- Check a permission matches an existing route before it is allowed to be created.
- Remove busybox and copy system busybox in setup.py
- Save image size + start to automatic template creation based on image checksum.
- Upgrade dependencies
- Fix «-machine accel=tcg» check
- Allow logged in user to change some of its data. Administrators can lock users using the
is_activefield. - Symbols endpoints (except upload) don’t require authentication.
- Update to the udhcpc wrapper script. Ref #1890
- Fix link style merge
- Start refactoring for images management
- Allow controller to be reloaded using the API. Fixes #1743
- Use a stock BusyBox for the Docker Integration
- Move «/{project_id}/templates/{template_id}» endpoint.
- Add last login info for users.
- Change RBAC field names from builtin to is_builtin
- Add user permissions + RBAC tests.
- Add description for user permission.
- Save/restore appliances Etag.
- Allow to set the initial super admin username / password in server config file. Ref #1857
- Require authentication for get_user_memberships endpoint.
- Change method to prevent forbidden directory traversal. Ref #1894
- Add user groups support.
- Add delete cascade on foreign keys for appliance table
- Enable SQL foreign key support for SQLite
- Add missing CORS origins.
- Show topology path when check topology schema fails.
- Protect controller notification endpoints. Ref #1888 (WebSocket endpoint is not secured, it takes an optional token).
- Use uuid5 to create new compute_id. Fixes #1641 #1887
- Protect the API and add alternative authentication endpoint.
- Secure users API and handle manual password recovery.
- Add default super admin account in controller db.
- Complete type annotations for API endpoints.
- Detect the app is exiting and avoid reconnecting to computes.
- Move schemas between compute and controller subpackages
- Remove traceng code.
- Move error responses to API routers.
- Wait for local compute to be started. Don’t reconnect to local compute when server is being stopped.
- Rename ssl and auth configuration file settings. Add enable SSL config validator. Strict configuration file validation: any error will prevent the server to start. Core server logic moved to a Server class.
- Generate new config for each test. Fixes tests.
- Use Pydantic to validate the server config file.
- Add symbol dimensions endpoint and SSL support for packet capture with remote HTTPS server.
- Save computes to database
- Generate a new list in template schema defaults.
- Generate JWT secret key if none is configured in the config file. Change location of the database.
- User authentication with tests.
- Refactor tests and start work on database integration.
- Move endpoints to routes & preparations to use a database.
- Providing the path to create a project is now deprecated.
- Add back script to create a self-signed SSL certificate.
- Make sure all HTTP exceptions return JSON with a «message» field instead of «detail»
- Make Swagger Ui the default for API documentation
- Move to version 3 of the REST API. Rename packet capture endpoints.
- Use pydantic for data validation (instead of jsonschema) Fix/improve various pydantic schema models.
- Automate API documentation publishing.
- Publish API documentation generated by FastAPI.
- Overwrite uvicorn loggers.
- Do not automatically connect to local compute.
- Add HTTP client to reuse the aiohttp session …
Version 2.2.33.1
GUI
- Match GNS3 server version
Server
- Add missing file for web-ui v2.2.33
Version 2.2.33
GUI
- Upgrade sentry-sdk and psutil
- Check that node names for Qemu and Docker are valid
- Backport reset all console connections. Fixes #2072
- Add more video resolutions to Docker containers using VNC. Fixes #3329
- Add python_requires=»>=3.4″ in setup.py. Fixes #3326
- Only allow post release corrective versions of GUI and server to interact
- Allow minor versions of GUI and server to interact
- Update VirtViewer path. Fixes #3334
Server
- Release web-ui v2.2.33
- Upgrade sentry-sdk and psutil
- Remove parameter «Name» not useful to create a Docker container
- Support to reset all console connections. Ref GNS3/gns3-server#1619
- Config option to disable built-in templates
- Add hostname entry to sample network config for Docker nodes. Fixes #2039
- Run Xtigervnc with MIT-SHM extension disabled for Docker VNC console support. Fixes #2071
- Added OpenRC init script
GNS3 is one of the greatest network simulators. GNS3 stands for Graphical Network Simulator. It helps to learn and design networks. In this article, you can download gns3 for Windows / Linux and macOS.
If you are a beginner and don’t have any idea to download and install gns3 in your operating system, then don’t worry, I’ll explain to you the process of downloading and installing gns3. So, let’s start.

Image Source: gns3.com
Overview – GNS3 [Graphical Network Simulator]
GNS3 stands for Graphical Network Simulator. GNS3 is a Network Simulator that lets you run virtual network devices like Routers, Switch, and Firewalls.
Since it’s an open-source tool, so you can easily run different appliances belonging to different vendors. So, you can easily practice with different products to build your carrier in networking.
GNS3 is also a cross-platform network simulator, so you can easily download and install it on Windows, Linux, and macOS-based systems.
In case, if you are a networking student and preparing for any of the Cisco Certifications, i.e. CCNA, CCNP, or CCIE, you defiantly try it out. You will get an amazing experience of virtualization.
Another best thing is that newer versions of GNS3 support QCOW files, which means you can run KVM virtual machines directly on it. So, you can able to run virtual firewalls directly on it. I am also using Firewalls, i.e. Palo Alto, Cisco ASA, and FortiGate within the GNS3.
The GUI of the GNS3 network simulator is straightforward to use. By default, you will get some pre-defined device templates. However, to use different virtual products (i.e., Cisco/Juniper Routers, Switches, Firewalls) on GNS3, you just need to get a binary image of the devices. GNS3 supports virtual routers and switches in the IOU (IOS on Unix) and IOS (Internetworking Operating System) formats.
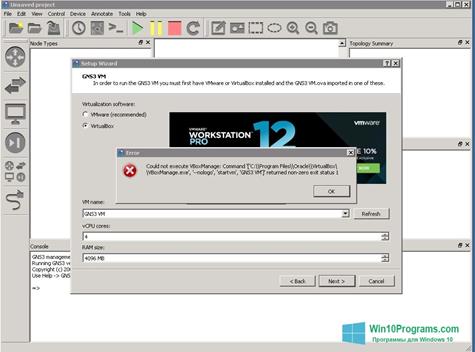
In GNS3, you have a facility called, u-bridge, which can be used to connect any GNS3 appliance with other virtualization applications such as VMWare Workstation and Virtual Box. So, in case, if you need to connect your Routers or Switches with any operating systems, you can connect.
Benefits of using GNS3
I am a network security engineer, and today I also using the GNS3 network simulator. The beauty of this application is that you can integrate any new application and learn it very efficiently. Since, it allows me to run firewalls such as Palo Alto, and FortiGate; I used the same tool to solve my technical issues. Some of the benefits of os using GNS3 are given below:
- GNS3 is an open-source application, so it is available to everyone.
- It’s also a cross-platform application, so you can download and install it on Windows, Linux, and macOS.
- Apart from Cisco, you can also import other vendors’ devices such as Juniper, Palo Alto, Fortinet, etc.
- When needed, we can easily integrate the GNS3 virtual devices such as Router to the other virtualization platform, i.e VMWare, Virtual Box, etc.
- GNS3 is helpful for Network and Network Security certifications such as CCNA, CCNP, CCIE, PCNSE, etc.
- The GUI of the GNS3 is very easy to use, so you can easily drag and drop installed templates. So, you can easily build new topologies and learn protocols such as OSPF, EIGRP, STP, etc.
Download GNS3 for Windows
The GNS3 network simulator is completely free for all types of operating systems. But, as you already know, the GNS3 can only be available for 64-bit Windows systems.
Since it is an open-source simulator, so you can download it from GitHub. However, if you want to download it from the official gns3 website, you need to signup on to gns3.com. Currently, the latest version of GNS3 is 2.2.16.
Note: GNS3 is a Free and Open Source software under GPL v3 licensing!
Before downloading the GNS3 network simulator, let’s go through the minimum and recommended requirements of the system.
Requirements to run GNS3 – The Graphical Network Simulator
Minimum Requirements
Operating System: Windows 7, Windows 8 & Windows 10 (64 bit), Linux Distro – Debian/Ubuntu-based Linux Operating Systems (Ubuntu, Mint, Debian) & macOS
Processor: 2 or more Logical cores – AMD-V / RVI Series or Intel VT-X / EPT – virtualization extensions present and enabled in the BIOS. More resources allow for larger simulation
Memory: 4 GB RAM
Storage: 1 GB available space (Windows Installation is < 200MB
Recommended Requirements
Operating System: Windows 7, Windows 8 & Windows 10 (64 bit), Linux Distro – Debian/Ubuntu-based Linux Operating Systems (Ubuntu, Mint, Debian) & macOS
Processor: 4 or more Logical cores – AMD-V / RVI Series or Intel VT-X / EPT – virtualization extensions present and enabled in the BIOS. More resources allow for larger simulation
Memory: 8/16 GB RAM
Storage: SSD – 35 GB available space
Download Now – Download GNS3 for Windows 64 bit
However, during the installation process, you need to ask to install other tools, like Wireshark. But, you can run the GNS3 without installing them. However, it’s always recommended to install all recommended tools during the GNS3 installation process. You can download Wireshark from here.
Download GNS3 for macOS
The GNS3 can also be downloaded for the MAC Operating System. The .dmg file of the gns3, may you already know is very easy to install and can be directly downloaded from the below link.
Download Now – Download GNS3 for macOS
But, make sure you also install several other tools like Wireshark, putty as well. This will allow you to take complete benefits of the GNS3 and obviously, you can enhance your skills as well.
Download GNS3 for the Linux Operating system
In Linux, you can directly download GNS3 using your terminal application. However, the complete process can be achieved by the repository. If you don’t know about the repository, then don’t worry, the installation process is as easy as in Windows Operating System. You need to follow the following steps to download and install GNS3 on Linux Systems such as Ubuntu, Mint, Debian, etc.
During the installation, the setup will ask you to download and install other applications such as Wireshark. You can skip the installation of such applications, but the recommendation is you should always install such applications.
You will also notice that the setup will ask for several types of permissions, you need to allow it accordingly. Now, just follow the following steps to download and install gns3 in Linux ( Ubuntu, Mint, etc.).
- First, open your terminal: For the GNS3 installation, you have to open your terminal. Either you can search Terminal in installed programs, or you can press the Alt+Ctrl+T shortcut key.
- Now, type following commands to install GNS3 GUI (Graphical User Interface) and GNS3 Server :
sudo apt-get updatesudo add-apt-repository ppa:gns3/ppasudo apt-get updatesudo apt-get install gns3-gui - If you want some additional support for GNS3 IOU, you need to run additional commands as given below:
sudo dpkg – – add-architecture i386sudo apt-get updatesudo apt-get install gns3-iou
If you need the installation help of IOS & IOU, don’t worry, just read the full article, and you will defiantly get an idea about IOU & IOS used in GNS3.
Download GNS3 VM Images (VMWare & Virtual Box)
At the time of development, GNS3 is built for UNIX-based systems like various Linux (Debian/RPM) and Unix systems. But in later versions, it started providing support for Microsoft Windows.
Today, you can run it on Windows. But, for better performance, you must have to integrate GNS3 VM with GNS3 so that it can run smoothly and gives the best performance to you.
Here, you can download GNS3 VM for VMWare, Virtual, VMWare ESXi, and Microsoft Hyper-V. You can set up the GNS3 Virtual Machine as per your setup. Just download it and build your first lab today.
- Download GNS3 VM Image for VMWare Workstation
- File Name: GNS3.VM.VMware.Workstation.2.2.16.zip
- Download GNS3 VM Image for Virtual Box
- File Name: GNS3.VM.VirtualBox.2.2.16.zip
- Download GNS3 VM Image for VMware ESXi
- File Name: GNS3.VM.VMware.ESXI.2.2.16.zip
- Download GNS3 VM Image for Microsoft Hyper-V
- File Name: GNS3.VM.Hyper-V.2.2.16.zip
Do you Need a GNS3 VM on Linux Machine?
If you are using GNS3 Network Simulator in your Linux machine, you do not need to install and configure an additional Virtual Machine for GNS3. But you can! The main purpose of GNS3 VM is to give Unix Based IOU support to Microsoft Windows. But, in Linux, by default, you have the full support of IOU (IOS on UNIX). So, you can continue your installation process with the above instruction.
But, If you are installing GNS3 on Windows, It’s recommended you should go for GNS3 VM. Because, with the help of GNS3 VM, you can improve the overall performance of the system. Also, with the help of GNS3 VM, you can run several Cisco IOS (Routers) and IOU (Premium Switches) in comparison to GNS3 Virtual Machine Installation.
Getting Started with GNS3 – Creating the First Project in GNS3
How to add Routers and Switches in GNS3
As we know GNS3 is an open-source Network Simulator that supports Dynamips (Dynamips is an emulator computer program that was written to emulate Cisco routers). So, with the help of Dynamips, we can import any router image which is with the .bin extension.
Steps to Importing an IOS Router Image :
- First of all open GNS3 Network Simulator
- Go to Edit >> Preference
- Go to IOS Router under Dynamips
- Click New and then select New Image
- Browse for an IOS Router Image
- Now, just give the name and import various Interfaces according to your needs.
Creating your first Network topology in GNS3
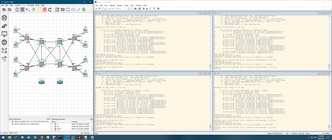
So far, we came to know what is GNS3 where we use GNS3. In this section, we will create our first Network Topology, with the help of Cisco 7200 Series Routers. For this, first, open GNS3 and create your First Project.

After, creating a new project. Now you just have to select your Network appliances present in the left-hand pane. In this lab, I’m just taking four Routers of the Cisco 7200 series. Now, by double-clicking, you got the CLI (Command Line Interface) of the router on your Terminal or Putty(A application to take the CLI of various devices). After that, you can configure their interface and various protocols. (i.e. Routing protocol or DHCP, DNS, etc.).

Getting Starting with Command Line Interface (CLI) in GNS3
In GNS3, after adding your first IOS (Internetwork Operating System) of the Router, you need to create a Topology as given in the above picture. Now, you need to start the appliance either by right-clicking on Network Device or clicking on the start button given below the Main Menu. After the starting of IOS, you just need to double-click to get the CLI (Command Line Interface) of that Device.

Basic Commands which can be used in GSN3
After getting the CLI of a Cisco router, you have to use commands on CLI so that you can configure your desired network topology and can work smoothly with this. Some basic commands for a Cisco Router are given below :
1. Changing the Hostname of a Router :
In GNS3, by default, the hostname of a Router is either R(1) or Router(1). When you take more than one router, the number (1) is increased by the number of routers you take. The below command can be used to change the hostname of a Router using CLI :
R1#configure terminal

R1(config)#hostname GNS3Network

GNS3Network(config)#end
2. To know Router Interfaces :
If you want to know the total number of interfaces in a router, just type the below command and you will get information about all interfaces.
show IP interface brief2. Assigning an IP address of an Interface :
We must have to assign an IP address to get communicate with other network devices like routers, Switches, and End devices. You can assign an IP address in configuration mode. You can follow the below command to assign an IP address of an Interface:
GNS3Network#configure terminal

GNS3Network(config)#interface FastEthernet 0/0

GNS3Network(config-if)#ip address 192.168.20.1 255.255.255.0

GNS3Network(config-if)#no shutdown
How to Download and use Cisco IOU Images in GNS3
Many times, we require to create a network topology with a layer 2 or a layer 3 switch. By default, GNS3 has an Unmanageable switch. We can’t configure them with the help of CLI. Therefore, we need Cisco IOU (IOS on Unix) to add Layer 2 or Layer 3 switches. The below steps will guide you to configure IOU Switch in GNS3 :
Importing a Cisco IOU Image in GNS3
First of all, you need a Cisco IOU Switch image with a Licence given by Cisco. To add the IOU switch, first, you need to import the IOU Switch image to GNS3. This can be done in the following steps :
- Open GNS3 Network Simulator
- Go to Edit >> Preference
- Click IOS on UNIX and Enter a valid License

Cisco IOU License Details - Go to IOU Devices under IOS on UNIX
- Click on New and browse for IOU Image

How to add cisco IOU in GNS3 - Now Just give a Name to this Switch and click on finish.


Creating the First Project with Cisco IOU
Now, time to create our first project with the help of the Cisco IOU. For, this, just create a simple project. Now, take a Cisco IOU, which is just imported, and make a topology with the help of that IOU Switch. Here, I’m just taking two switches and creating VLAN (Virtual LANs) on them.

Creating VLANs on Cisco IOU Switch
After the design of the Network topology with the help of Cisco IOU, now we try to create VLANs so that we can verify the working of these switches. As you can see, we can configure the VLAN using the default commands which are used in real cisco ios switches.
L2-Switch2#configure terminal

L2-Switch2(config)#hostname GNS3Network2

GNS3Network2(config)#vlan 10

GNS3Network2(config-vlan)#name GNS3_Network

GNS3Network2(config-vlan)#end

% Applying VLAN changes may take a few minutes. Please wait…

GNS3Network2#
Related Articles
- How to connect GNS3 Appliances to the Internet
- How to deploy the Palo Alto Firewall directly in GNS3
- Cisco Packet Tracer 7.3 Free Download (Offline Installers)
- How to deploy FortiGate Virtual Firewall in GNS3
- How to enable SSH on Ubuntu
- DORA Process in DHCP – Explained in detail
Summary
Here, you can always download the latest version of GNS3 for Windows, Linux, and macOS systems. If you getting any issues while downloading the GNS3, you can comment in the comment box.
Also, don’t forget to visit the official website of GNS3, i.e. gns3.com, and support the gns3 community. Make sure gns3network.com does not belong to gns3.com. This is a blog with the latest articles related to network and network security.
Don’t forget to share us on social media 🙂 !
Each software is released under license type that can be found on program pages as well as on search or category pages. Here are the most common license types:
Freeware
Freeware programs can be downloaded used free of charge and without any time limitations. Freeware products can be used free of charge for both personal and professional (commercial use).
Open Source
Open Source software is software with source code that anyone can inspect, modify or enhance. Programs released under this license can be used at no cost for both personal and commercial purposes. There are many different open source licenses but they all must comply with the Open Source Definition — in brief: the software can be freely used, modified and shared.
Free to Play
This license is commonly used for video games and it allows users to download and play the game for free. Basically, a product is offered Free to Play (Freemium) and the user can decide if he wants to pay the money (Premium) for additional features, services, virtual or physical goods that expand the functionality of the game. In some cases, ads may be show to the users.
Demo
Demo programs have a limited functionality for free, but charge for an advanced set of features or for the removal of advertisements from the program’s interfaces. In some cases, all the functionality is disabled until the license is purchased. Demos are usually not time-limited (like Trial software) but the functionality is limited.
Trial
Trial software allows the user to evaluate the software for a limited amount of time. After that trial period (usually 15 to 90 days) the user can decide whether to buy the software or not. Even though, most trial software products are only time-limited some also have feature limitations.
Paid
Usually commercial software or games are produced for sale or to serve a commercial purpose.

GNS3 для Windows 10 – утилита-симулятор сложносоставных сетей. Предоставляет пользователю макет, который симулирует аналог без необходимости установки соответствующего оборудования (маршрутизатор).
С помощью программного обеспечения пользователь получает возможность подключения виртуальной и реальной сетей. Возможен перехват данных при наличии соответствующего плагина. Поддержка VirtualBox обеспечивает возможность развертывания лаборатории для проведения тестирования. Рекомендуем скачать GNS3 для Windows 10 на русском языке без регистрации и смс с официального сайта.
Информация о программеСКАЧАТЬ БЕСПЛАТНО
- Лицензия: Бесплатная
- Разработчик: GNS
- Языки: русский, украинский, английский
- Устройства: пк, нетбук, ноутбук (Acer, ASUS, DELL, Lenovo, Samsung, Toshiba, HP, MSI)
- ОС: Windows 10 Домашняя, Профессиональная, Корпоративная, PRO, Enterprise, Education, Home Edition (обновления 1507, 1511, 1607, 1703, 1709, 1803, 1809)
- Разрядность: 32 bit, 64 bit, x86
- Версия: последняя 2023, без вирусов
Аналоги GNS3
 Daum PotPlayer
- QuickBinder
- Mozilla Sunbird
- Stamina
- Astroburn Lite
- Photo! Editor
 Daum PotPlayer
 QuickBinder
 Mozilla Sunbird
 Stamina
 Astroburn Lite
 Photo! Editor
Отзывы пользователей
Категории программ
- Программы для Windows 10
- Графические редакторы
- Видео конвертеры
- Разгон видеокарты
- Видеоредакторы
- Запись видео с веб-камеры
- Создание коллажей
- Антивирусы
- Чтение PDF
- Рисование
- Обновление драйверов
![]()
![]()
![]()
![]()
![]()
12.9 k
![]()
Создавайте и стройте виртуальные сети
![]()
![]()
GNS3 – это мощное бесплатное программное обеспечение, с помощью которого вы сможете создать свою виртуальную сеть, и вам не понадобится никакое аппаратное обеспечение. Просто подумайте схему, по которой… ![]()
Больше информации
| Лицензия | Бесплатно | |
|---|---|---|
| ОС | Windows |
| Раздел | Общие | |
|---|---|---|
| Язык | Pусский | |
| Автор | Galaxy Technologies, LLC | |
| Размер | 94.53 MB | |
| Загрузки | 12,922 | |
| Дата | 27 янв 2023 | |
| SHA256 | 9b13721e125a47102efbf457111d79840f5a4f2c65df885c2b90fb7c9aaed270 | |
| Почему это приложение опубликовано на Uptodown? |
(Больше информации) |
Приложения, рекомендуемые для вас
![]()
Надежный, универсальный и настраиваемый браузер
![]()
Общайтесь со всеми своими контактами в Telegram со своего рабочего стола
![]()
Видеозвонки и конференции с массой других возможностей
![]()
Автоматизация нажатий мышкой на компьютере
![]()
Общайся с друзьями через десктопную версию Whatsapp
![]()
Совершенный партнер для вашего нового iPod или iPhone
![]()
Создавайте собственную анимацию очень простым способом
![]()
Доступ к содержимому образов ISO
Похожие на GNS3
![]()
Объектно-ориентированный динамический язык программирования
![]()
Полнофункциональный текстовый редактор для программистов от GitHub
![]()
Многоплатформенный редактор кода для Microsoft
![]()
Динамическая среда для веб-разработки
![]()
Новая среда программирования для Android
![]()
Среда для программирования под Android
![]()
Среда IDE, адаптированная для программирования на динамических языках
![]()
Avocode
![]()
Новая среда программирования для Android
![]()
Emurasoft
![]()
Все, что нужно программисту от редактора
![]()
VLSoftware.net
![]()
Создавайте собственные игры для любых платформ
![]()
Инструмент для создания нелинейных интерактивных рассказов
![]()
Самая популярная среда разработки
![]()
Создавай приложения на HTML5 максимально просто
![]()
Also available for Mac

Design and simulate networks»
The name of this tool stands for graphical network simulator and is an exciting very powerful network simulator that can help you setup your network. This software is very effective and useful for those who are trying to set up a topology network or for those who are trying to use it to train. It contains a whole lot of features and capabilities that help you work on your network and grant you the flexibility that you need. Basically, this application helps you do is it graphically helps you stimulate networks and you can easy to design and configure virtual networks. It was designed to be used on Cisco desktop computers.
Build networks
It also works with Ccna Lab which means you can either be a network administrator or a network engineer. It is very easy to install and operate whatever you need to do already within the network explanation who is this software you will be able to run your network simulation is that having to buy a real network and learn the same way as you would if it was in real network.
It is known by a lot of engineers and its level of accuracy makes it the best choice for creating virtual networks, what it helps you do is to create an ios image within your network topology and this goes a long way in simulating real life network topology.
GNS3 is licensed as freeware for PC or laptop with Windows 32 bit and 64 bit operating system. It is in network testing category and is available to all software users as a free download.
| Share |
| Give a rating |
|
|
| Author |
|
GNS3
|
| Last Updated On |
| September 10, 2020 |
| Runs on |
| Windows 10 / Windows 8 / Windows 7 / Windows Vista / XP |
| Total downloads |
| 4,039 |
| License |
|
Free |
| File size |
| 54,52 MB |
| Filename |
|
GNS3-2.1.8-all-in-one.exe |

As you know, GNS3 is a graphical network simulator program that you can easily run devices such as Cisco Switch, Router, Firewall, or virtual machine.

How to Set Up GNS3 2.2 (2.2.18) on Windows 10
With GNS3 software, you can improve yourself by making network designs and become a system and network expert. Since this network simulator has been developed in accordance with the technology by its developers, it is good to always check for updates to get new features.
Although the working logic of this program is very similar to the Cisco Packet Tracer program, the biggest difference between them is that Cisco Router and Switch IOS images can be used more comprehensively and in detail. For example, Packet Tracer includes entry-level IOS commands, while other software offers advanced commands for more advanced projects.
With this simulator software, you can use the IOS images of real Cisco devices to make network designs on your computer, but the IOS image of each device may not work compatibly. However, it is a more advanced segment software compared to the Packet Tracer program because the IOS images in other software are insufficient and have limited features.
For those preparing for Cisco’s entry-level networking exams, the first program they should use is Packet Tracer. If more advanced and professional network designs and projects are planned to be developed, then it would be more appropriate to choose and use the Graphical Network program.
Before proceeding with the steps to install GNS3, you can download the latest version of the program by visiting this article or you can create a new account on the official website and download it to your computer.
Minimum System Requirements
- Operating System: It should be at least Windows 7 64.
- Processor: You must have at least a Dual-Core processor.
- RAM (Memory): 4 GB minimum is sufficient.
- Disk Space: A minimum of 1 GB is sufficient. However, more space may be needed for Cisco images.
Recommended System Requirements
- Operating System: Again, it should be at least Windows 7 64 Bit.
- Processor: 4 or more logical processors. Core i7 or i9 is recommended.
- RAM (Memory): 8 GB is sufficient, but if it is 16 GB, it will be more stable.
- Disk Space: Definitely using it with an SSD disk helps you get more performance. Also, you must have a minimum of 35 GB of free space.
In addition to the system requirements of the recommended GNS3 simulator program, you can enable the virtualization setting from the BIOS menu of your computer.
GNS3 Setup, Configuration, and Usage
Follow the steps below to install, configure and use GNS3, the most advanced network simulator program used to prepare for Cisco exams on your Windows 7, 8, 8.1, and Windows 10 computer.
Step 1
After creating a new account, log in and click the Free Download button on the homepage.

Step 2
Since you will install it on the Windows 10 operating system, click the Download button under the Windows platform option.

Step 3
When the download process starts on the Google Chrome web browser, you can see the program downloaded from the lower-left corner.

Step 4
After downloading the setup file, right-click on GNS3-all-in-one-regular.exe as in the image below, and then click Run as administrator.

Step 5
Click the Next button to start the installation in the Setup window and continue.

Step 6
Click the I Agree button to accept the license agreement for the Cisco network simulator program.

Step 7
Click Next to use the folder name configured by default in the Choose Start Menu Folder window.

Step 8
In the Choose Components window, check one of its new features, WebClient, and click on Next.

Step 9
In the Choose Install Location window, select where you want to set up the program and click Next.

Step 10
Wait while the Cisco simulator program is installed on your Windows 10 computer.

Step 11
One of the necessary applications for the simulator software during the installation phase is WinPcap. Click Next to install the WinPcap software.

Step 12
Accept the license agreement of the WinPcap software and continue the installation process.

Step 13
In the Installation Options window, if you want to run WinPcap when you restart your computer, check “Automatically start the WinPcap driver at boot time” and click Next.

Step 14
After completing the WinPcap installation, click the Finish button and continue the installation.

Step 15
Npcap needs to be installed separately for the software. In this step, continue by clicking the I Agree button to accept the Npcap license agreement.

Step 16
In the Installation Options window, continue with the option configured by default.

Step 17
In the Installation Options window, continue with the option configured by default.

Step 18
Click Finish to close the Npcap setup wizard.

Step 19
Finally, if the Wireshark package analysis program is not installed on your system, it will be downloaded and installed over the Internet.

Step 20
Likewise, wait for the Solar-PuTTY software to be downloaded and installed, which is necessary for managing network devices such as Routers or Switches.

Step 21
After installing Wireshark process, click the Accept button to accept the Solar-PuTTY license agreement.

Step 22
For Solar-PuTTY use, click Continue after typing in your email address.

Step 23
After the Start menu folder and desktop shortcuts created, and the Uninstall.exe copied to the corresponding location to uninstall it, click Next.

Step 24
If you want to use Solarwinds tools for free, you can select Yes. If you do not want it, select the No option and click Next.

Step 25
After successfully installing the program, click Finish to run the program.

Local Server Configuration Settings
After installing GNS3, click the desktop shortcut to run it and the Setup Wizard window will open to check the Local Server settings. In this window, you need to configure the Localhost connection and port.
Step 1
In the Setup Wizard window, select Run appliances on my local computer and click Next.

Step 2
In the Local Server Configuration window, check that the Host Binding setting is localhost, and also, if there is an application using the 3080 TCP port in your system, specify a different port number in this window.

Step 3
You can see that there is no problem to use Graphical Network Simulator on your system in the Local Server Status window.

Step 4
Check the server’s type, path, host status, and port number in the Summary window and click Finish.

Step 5
Finally, you can check the version of the program from Help / About.

Adding Router/Switch Router Image
After installing and running the Cisco simulator, you need to add an IOS image to the program. After adding and configuring the IOS images of Cisco network devices to GNS3, you will now be ready to do your projects. To add an IOS image, click on the image below and browse the related article!

Adding Routers to the Workspace and Connecting Two Routers Each Other
After adding the Router IOS image to the simulator program, you can see the device you added by clicking on Devices.
Step 1
Now, create a new project and add two c7200 Routers to the workspace.

Step 2
To connect the two routers, click on the cable-like vehicle and click once on R1 to view the empty ports. For example, connect one end of the network cable to the FastEthernet0/0 port of R1 and the other end to the FastEthernet0/0 interface of R2.

Step 3
After connecting the two Cisco Routers with the FastEthernet interface, run them by clicking the start button.

Step 4
You can open the CLI prompt by double-clicking on Router R1, or you can right-click and click Console from the displayed options.

Step 5
To give an IP address to the FastEthernet0/0 interface of the router R1 and to activate the port, follow the commands below.
R1(config)# interface fastethernet 0/0
R1(config-if)# ip address 192.168.1.1 255.255.255.0
R1(config-if)# no shutdown
To verify that the Fa0/0 port is open, execute the following command in the CLI:
R1# show ip interface brief
Step 6
Likewise, make the settings you have made on R1, also on R2.
R2(config)# interface fastethernet 0/0
R2(config-if)# ip address 192.168.1.2 255.255.255.0
R2(config-if)# no shutdown
Ping R1 via R2 to test the connection between the two routers.
R2# ping 192.168.1.1
How to Use SecureCRT Instead of Solar-PuTTY in GNS3
As you can see while installing GNS3, Solar-PuTTY is configured as a console application by default. However, if you do not want to use Solar-PuTTY software, you can use SecureCRT instead.
Install SecureCRT on your computer before changing the Console application.
Step 1
After installing SecureCRT, run GNS3 again and click Edit / Preferences. In the General Preferences window, click the Edit button under General / Console Applications.
Select SecureCRT in the Choose a predefined command section and change the location where the program is installed and click the OK button to save the setting.

Step 2
Double click on Router R1 and check if the SecureCRT console application is opened. SecureCRT works fine on GNS3 as shown below.

Video
Installing Older Versions
GNS3 Version
YouTube Video
Slide
Final Word
Using GNS3 on your Windows computer, you can create detailed network projects and study more specifically for Cisco exams. Thanks for following us!
Related Articles
♦ How to Use VPCS
♦ Cisco Switch Basic Configuration
♦ VMware Connection
♦ Adding a Cisco Router
♦ Router Interface Configuration