The Windows Build Tools
The GNU MCU Eclipse Windows Build Tools subproject (formerly GNU ARM Eclipse Windows Build Tools) is a Windows specific package, customised for the requirements of the Eclipse CDT managed build projects. It includes a recent version of GNU make and a recent version of BusyBox, which provides a convenient implementation for sh/rm/echo.
Prerequisites
The prerequisites are common to all binary builds. Please follow the instructions in the separate Prerequisites for building binaries page and return when ready.
Download the build scripts repo
The build script is available from GitHub and can be viewed online.
To download it, clone the gnu-mcu-eclipse/windows-build-tools Git repo, including submodules.
$ rm -rf ~/Downloads/windows-build-tools.git
$ git clone --recurse-submodules https://github.com/gnu-mcu-eclipse/windows-build-tools.git
  ~/Downloads/windows-build-tools.git
Check the script
The script creates a temporary build Work/build-tools folder in the user home. Although not recommended, if for any reasons you need to change this, you can redefine WORK_FOLDER_PATH variable before invoking the script.
Preload the Docker images
Docker does not require to explicitly download new images, but does this automatically at first use.
However, since the images used for this build are relatively large, it is recommended to load them explicitly before starting the build:
$ bash ~/Downloads/windows-build-tools.git/scripts/build.sh preload-images
The result should look similar to:
$ docker images
REPOSITORY          TAG                 IMAGE ID            CREATED             SIZE
ilegeul/centos32    6-xbb-v1            f695dd6cb46e        2 weeks ago         2.92GB
ilegeul/centos      6-xbb-v1            294dd5ee82f3        2 weeks ago         3.09GB
hello-world         latest              f2a91732366c        2 months ago        1.85kB
Prepare release
To prepare a new release, first determine the version (like 2.10) and update the scripts/VERSION file.
Update CHANGELOG.txt
Check windows-build-tools.git/CHANGELOG.txt and add the new release.
Build
The current platform for Windows production builds is an Ubuntu 17.10 VirtualBox image running on a macMini with 16 GB of RAM and a fast SSD.
Before starting a multi-platform build, check if Docker is started:
To build both the 32/64-bits Windows use --all; to build selectively, use --win64 or --win32.
$ bash ~/Downloads/windows-build-tools.git/scripts/build.sh
Several minutes later, the output of the build script is a set of 2 files and their SHA signatures, created in the deploy folder:
To copy the files from the build machine to the current development machine, open the deploy folder in a terminal and use scp:
$ scp * ilg@ilg-mbp.local:Downloads
Subsequent runs
Separate platform specific builds
Instead of --all, you can use any combination of:
clean
To remove most build files, use:
$ bash ~/Downloads/windows-build-tools.git/scripts/build.sh clean
To also remove the repository and the output files, use:
$ bash ~/Downloads/windows-build-tools.git/scripts/build.sh cleanall
For production builds it is recommended to completely remove the build folder.
—develop
For performance reasons, the actual build folders are internal to each Docker run, and are not persistent. This gives the best speed, but has the disadvantage that interrupted builds cannot be resumed.
For development builds, it is possible to define the build folders in the host file system, and resume an interrupted build.
—debug
For development builds, it is also possible to create everything with -g -O0 and be able to run debug sessions.
Interrupted builds
The Docker scripts run with root privileges. This is generally not a problem, since at the end of the script the output files are reassigned to the actual user.
However, for an interrupted build, this step is skipped, and files in the install folder will remain owned by root. Thus, before removing the build folder, it might be necessary to run a recursive chown.
Install
The procedure to install GNU MCU Eclipse Windows Build Tools is relatively straight forward, expanding a .zip archive on Windows.
A portable method is to use xpm:
$ xpm install @gnu-mcu-eclipse/windows-build-tools --global
More details are available on the How to install the Windows Build Tools? page.
After install, the package should create a structure like this (only the first two depth levels are shown):
xPacks/@gnu-mcu-eclipse/build-tools/2.11/.content/
├── README.md
├── bin
│   ├── busybox.exe
│   ├── echo.exe
│   ├── make.exe
│   ├── mkdir.exe
│   ├── rm.exe
│   └── sh.exe
└── gnu-mcu-eclipse
    ├── CHANGELOG.txt
    ├── licenses
    ├── patches
    └── scripts

5 directories, 8 files
No other files are installed in any system folders or other locations.
Uninstall
The binaries are distributed as portable archives; thus they do not need to run a setup and do not require an uninstall.
More build details
The build process is split into several scripts. The build starts on the host, with build.sh, which runs container-build.sh several times, once for each target, in one of the two docker containers. Both scripts include several other helper scripts. The entire process is quite complex, and an attempt to explain its functionality in a few words would not be realistic. Thus, the authoritative source of details remains the source code.
| ← | GNU MCU Eclipse ARM Embedded GCC v8.2.1-1.4 20190214 released | GNU MCU Eclipse OpenOCD v0.10.0-12 20190422 released | → |
Posted on April 22, 2019 by Liviu Ionescu.
Version 2.12 20190422 is a maintenance release of the GNU MCU Eclipse Windows Build Tools.
Binary files »
Content
The GNU MCU Eclipse Build Tools v2.12 package includes the version 4.2.1 of GNU make (built from MSYS2 source files), and version 1.31.0-git of BusyBox, which provides a convenient implementation for sh/rm/echo/mkdir.
Changes
Both the make and BusyBox sources were upgraded to the latest available.
Known problems
- none so far
Binaries
Only binaries for Windows are provided.
They were built with mingw-w64, and run on any reasonably
recent i686 and x86_64 Windows machines.
Instructions on how to install the binaries are available in the
How to install the Windows Build Tools?
page.
The build tools are also available as an
xPack
and can be conveniently installed with
xpm:
$ xpm install --global @gnu-mcu-eclipse/windows-build-tools
This installs the latest available version.
For better control and repeatability, the build scripts use Docker containers;
all files required during builds are available as a separate
gnu-mcu-eclipse/windows-build-tools
project.
Checksums
The SHA-256 hashes for the files are:
fb4c6a3a3a93f7ac5dbd88879b782b9b1c31c4b51273dc6c8c4299c23b3c4d98
gnu-mcu-eclipse-windows-build-tools-2.12-20190422-1053-win32.zip

a8fd184310ffb5bf91660fd09f5b230675ef121deb03722c49562edf4d03318f
gnu-mcu-eclipse-windows-build-tools-2.12-20190422-1053-win64.zip
Migrated to GitHub!
Starting with Sep 2015, new versions will be published as GitHub Releases.
DEPRECATED
This folder contains the Build Tools, required on Windows.
Version v2.x is the second major version of the Build Tools Windows setup.
The package installs the make & rm programs required for builds on
Windows platforms. The make.exe program is build from the source files available in
the MSYS2 project package. The sh/rm/echo are from the BusyBox
project. All programs are static and no DLLs are required.
Note: you need to uninstall the previous tools version and reinstall
the new version.
Warnings:
- v2.4 64-bits version does not exist
- v2.2 uses MSYS 32-bit DLLs, which might interfere with other DLLs
- v2.1 does not support parallel builds.
Contains the CodeSourcery make & rm programs required for builds on
Windows platforms; for convenience, they are packed as a Windows setup.
This is an archive with the original CodeSourcery make & rm programs
required for builds on Windows platforms.
The archive is incomplete, the DLLs required by echo.exe are missing.
Viruses
The new setup packages are build from sources on a GNU/Linux box, so it is very unlikely to be corrupted after being generated, and very unlikely for the public sources to contain any malware, but, as usual on Windows, a good anti-virus may help.
It has been a while since I published my ‘build my own DIY IDE’ (see “DIY Free Toolchain for Kinetis: Part 1 – GNU ARM Build Tools“). I have used that approaches in my classes successfully. Now a new semester is coming up, so time to update the instructions using the latest Eclipse IDE (Mars) and tools (GCC ARM Embedded (launchpad) with GNU ARM Eclipse).

Eclipse Mars Splash Screen
Outline
UPDATE: after writing that post, a few things have been changed.
The goal is to build a custom Eclipse IDE and toolchain which can be used to create/build/debug ARM Cortex M based devices. Compared to vendor provided tools like Freescale’s Kinetis Design Studio or NXP’s LPCXpresso it requires to download and install several packages. It only takes about 30 minutes to get it done, but at the end I have something which can be used as IDE for multiple vendors.
For the ones of you using the Freescale Kinetis Design Studio (KDS v3.0.0), it gives the following advantages:
- 64bit IDE. KDS uses 32bit Eclipse, I can use the 64bit Eclipse version which has better performance.
- Eclipse Mars (4.5) with new features. KDS v3.0.0 uses Luna (4.4).
- Eclipse CDT 8.7 with new multicore features. KDS v3.0.0 uses CDT 8.6
- GNU ARM Eclipse with better tool integration: I can use the latest GNU ARM Eclipse plugins.
I’m going to build my toolchain with the following parts:
- IDE: Eclipse IDE and C/C++ CDT tools from http://www.eclipse.org
- GNU ARM Plugins: GNU ARM Eclipse plugins from https://sourceforge.net/projects/gnuarmeclipse/
- Build tools: GCC ARM Embedded (launchpad) from https://launchpad.net/gcc-arm-embedded and
- Debugging: Segger J-Link and/or P&E Multilink
- Freescale only: Freescale New Project Wizard, Processor Expert and Kinetis SDK.
Go to http://www.eclipse.org and download ‘Eclipse IDE for C/C++ Developers’ for your operating system. At the time of this article, the latest release is ‘Mars’

Eclipse Download
Download the archive and extract it. E.g. on Windows you could put the files into a folder like
c:toolsIDE
💡 For Windows there are 32bit and 64bit versions. Initially I had issues to start the 64bit version my my 64bit Windows 7 because of the Java version installed by IT on my machine. The 32bit version worked fine. After IT updated the Java on my machine, the 64bit version was working properly too.
Then launch the eclipse executable (e.g. in c:toolsIDEeclipse) inside the eclipse folder.
Eclipse Mars Splash Screen
With this, we have the most of the IDE and for C/C++ development. What is missing in the default download is the ability to use GDB for debugging. To use Eclipse for GDB debugging, I have to install that support from this update site
http://download.eclipse.org/tools/cdt/releases/8.7
I use the menu Help > Install New Software and point to that site. From there, I select ‘C/C++ GDB Hardware Debugging’ and install it:
💡 For all Eclipse updates, I recommend to disable ‘Contact all update sites during install to find required software”, see “Workaround for “Installing Software has encountered a problem” in Eclipse“.

C and C++ GDB Hardware Debugging
💡 If you want to download the CDT package for offline installation or to store it for later re-installation, you can download it from here: https://www.eclipse.org/cdt/downloads.php
2. GNU ARM Eclipse Plugins
In order to use a toolchain and the debugger with nice settings panels, I need to install more plugins. The best plugins to my knowledge for GNU ARM development are the ‘GNU ARM Eclipse’ open source plugins by Liviu.
In Eclipse use the menu Help > Install New Software and point to the following update site:
http://gnuarmeclipse.sourceforge.net/updates
and install the plugins from there.

Installing Plugins from GNU ARM Eclipse
💡 If you want to download the plugins for off-line installation or later re-installation, you can download them from here: https://sourceforge.net/projects/gnuarmeclipse
3. GCC ARM Embedded Tool Chain
Go to https://launchpad.net/gcc-arm-embedded and download the toolchain (at the time of this writing it is 4.9-2015-q2). If you download the archive/zip, you simply can unpack the files somewhere, e.g. inside your IDE (c:toolsIDE) folder.
💡 At this time, ARM/launchpad only offers 32bit binaries of the GNU tools for Windows.
Otherwise run the setup which installs the tool chain on Windows (32bit path below) in
C:Program Files (x86)GNU Tools ARM Embedded4.9 2015q2

Installer for GNU Tools for ARM Embedded Processors
Now we compiler/assembler/linker and libraries, but we need other tools like make. I get them from here: https://sourceforge.net/projects/gnuarmeclipse/files/Build%20Tools/ and run the setup. You can use the default path:
💡 There are 32bit and 64bit installers/files for Windows. My screenshots below show the 32bit version, as I missed the fact that there is a 64bit version available too.

GNU ARM Eclipse Build Tools Setup
Inside Eclipse (menu Window > Preferences), using the GNU ARM Eclipse plugins I can point my workspace setting to the build tools and toolchain folder:

Workspace Tools Paths
4. Debugging with Segger and/or P&E
So far I have pretty much everything to build/debug projects for ARM. What is missing is debugging support.
Segger J-Link
To install support for Segger, go to the download page at https://www.segger.com/jlink-software.html and download the setup/package and run the installation process. You can go with the default installation path:

Segger J-Link Setup
In Eclipse, make sure that you point to that installation location (menu Window > Preferences):

Segger J-Link Location in Eclipse
P&E Support
To install support for the P&E Multilinks, point Eclipse (Help > Install New Software) to the following update site:
http://www.pemicro.com/eclipse/updates

GNU ARM PEMicro Interface Debugging Support
💡 If I need to store a snapshot of the P&E update site, then I can use the approach described in “Replicating an Eclipse Update Site for Offline Usage“.
After installation I have now support added for the P&E debug devices, including support for OpenSDA.
5. Kinetis New Project Wizard, Processor Expert and Kinetis SDK
This part only applies if using Freescale Kinetis devices. To install the Kinetis New Project Wizard and Processor Expert, I go to NXP.com and download the Processor Expert for Kinetis plugin package (registration required):

Processor Expert for Kinetis
That package contains several files:

Processor Expert for Kinetis package
Unpack them and install first the ‘freescale_updater.zip’ with Help > Install New Software:

Installing Freescale Updater
Then do the same using PEx_for_Kinetis_3.0.0.zip:

Processor Expert for Kinetis V3.0.0 installation
UPDATE:
There is an Update for Processor Expert V3.0.1 available which needs to be installed BEFORE installing the Kinetis SDK. You can use the following update site:
http://nxp.com/lgfiles/updates/Eclipse/KDS
The screenshot beow shows it on my system already installed:

Processor Expert for Kinetis V3.0.1
The Kinetis SDK (now v1.3) is available from http://www.freescale.com/ksdk for download (registration required). Run the setup, and by default it will install it into
C:FreescaleKSDK_1.3.0
on Windows. Inside that installation there is an update for Eclipse add support for the Kinetis SDK. Use again Help > Install New Software and install the following zip file:
C:FreescaleKSDK_1.2.0toolseclipse_updateKSDK_1.3.0_Eclipse_Update.zip
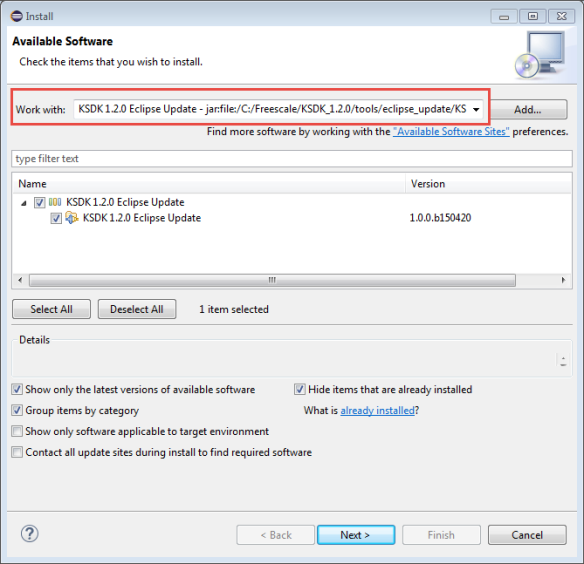
Kinetis SDK Eclipse Update (screenshot for Kinetis SDK V1.2.0)
This pretty much completes the setup for the Freescale parts.
There is one more thing: at the time of this writing, there is a Processor Expert V3.0.1 update available from NXP.com.

Processor Expert for Kinetis v3.0.1 update
Download that file, *unzip* it and update Eclipse with the zip file inside the downloaded package:

PEx for Kinetis V3.0.1
Now I have pretty much replicated what is in Kinetis Design Studio v3.0.0, but using my DYI Eclipse IDE :-).
EmbSysReg View
What is missing is a nice way to inspect the device peripheral registers. For this, install the EmbSysReg Viewer, see “Freescale CMSIS-SVD Register Files with Eclipse MARS and EmbSysRegView“.
Summary
With this, I have constructed my own DIY IDE to develop application for ARM Cortex based devices. It only requires to download and install a few standard packages. Best of all: I have all the packages available so I can repeat the installation again, or simply put my current IDE layout into an archive and use it on another machine.
Of course it does not stop here: I will add many more plugins: FreeRTOS kernel awareness, static source analysis, doxygen, version control system, …
Compared to distributions from vendors like Freescale (Kinetis Design Studio), I have full flexibility: I don’t have to wait for new releases to get a bleeding edge tool chain. While it takes a little time at the beginning to do such an IDE and tool chain setup, it is very valuable afterwards because I *understand* what I have, and where I have it. And knowing what I do is always a good thing :-).
Happy Do-It-Yourself-ing 🙂
Links
- GNU ARM Eclipse plugins on SourceForge: https://sourceforge.net/projects/gnuarmeclipse
- GNU ARM Eclipse build tools on SourceForge: https://sourceforge.net/projects/gnuarmeclipse/files/Build%20Tools/
- Eclipse download page: http://www.eclipse.org/downloads/
- CDT Offline download page: https://www.eclipse.org/cdt/downloads.php
- Segger J-Link download page: https://www.segger.com/jlink-software.html
- Freescale Processor Expert page: http://www.freescale.com/ProcessorExpert
- Previous article series how to build a DIY IDE: DIY Free Toolchain for Kinetis: Part 1 – GNU ARM Build Tools
It has been a while since I published my ‘build my own DIY IDE’ (see “DIY Free Toolchain for Kinetis: Part 1 – GNU ARM Build Tools“). I have used that approaches in my classes successfully. Now a new semester is coming up, so time to update the instructions using the latest Eclipse IDE (Mars) and tools (GCC ARM Embedded (launchpad) with GNU ARM Eclipse).
Eclipse Mars Splash Screen
Outline
The goal is to build a custom Eclipse IDE and toolchain which can be used to create/build/debug ARM Cortex M based devices. Compared to vendor provided tools like Freescale’s Kinetis Design Studio or NXP’s LPCXpresso it requires to download and install several packages. It only takes about 30 minutes to get it done, but at the end I have something which can be used as IDE for multiple vendors.
For the ones of you using the Freescale Kinetis Design Studio (KDS v3.0.0), it gives the following advantages:
- 64bit IDE. KDS uses 32bit Eclipse, I can use the 64bit Eclipse version which has better performance.
- Eclipse Mars (4.5) with new features. KDS v3.0.0 uses Luna (4.4).
- Eclipse CDT 8.7 with new multicore features. KDS v3.0.0 uses CDT 8.6
- GNU ARM Eclipse with better tool integration: I can use the latest GNU ARM Eclipse plugins (see this discussion).
I’m going to build my toolchain with the following parts:
- IDE: Eclipse IDE and C/C++ CDT tools from http://www.eclipse.org
- GNU ARM Plugins: GNU ARM Eclipse plugins fromhttps://sourceforge.net/projects/gnuarmeclipse/
- Build tools: GCC ARM Embedded (launchpad) from https://launchpad.net/gcc-arm-embedded and
- Debugging: Segger J-Link and/or P&E Multilink
- Freescale only: Freescale New Project Wizard, Processor Expert and Kinetis SDK.
Go to http://www.eclipse.org and download ‘Eclipse IDE for C/C++ Developers’ for your operating system. At the time of this article, the latest release is ‘Mars’
Eclipse Download
Download the archive and extract it. E.g. on Windows you could put the files into a folder like
c:toolsIDEFor Windows there are 32bit and 64bit versions. Initially I had issues to start the 64bit version my my 64bit Windows 7 because of the Java version installed by IT on my machine. The 32bit version worked fine. After IT updated the Java on my machine, the 64bit version was working properly too.
Then launch the eclipse executable (e.g. in c:toolsIDEeclipse) inside the eclipse folder.
Eclipse Mars Splash Screen
With this, we have the most of the IDE and for C/C++ development. What is missing in the default download is the ability to use GDB for debugging. To use Eclipse for GDB debugging, I have to install that support from this update site
http://download.eclipse.org/tools/cdt/releases/8.7I use the menu Help > Install New Software and point to that site. From there, I select ‘C/C++ GDB Hardware Debugging’ and install it:
For all Eclipse updates, I recommend to disable ‘Contact all update sites during install to find required software”, see “Workaround for “Installing Software has encountered a problem” in Eclipse“.
C and C++ GDB Hardware Debugging
If you want to download the CDT package for offline installation or to store it for later re-installation, you can download it from here:https://www.eclipse.org/cdt/downloads.php
2. GNU ARM Eclipse Plugins
In order to use a toolchain and the debugger with nice settings panels, I need to install more plugins. The best plugins to my knowledge for GNU ARM development are the ‘GNU ARM Eclipse’ open source plugins by Liviu.
In Eclipse use the menu Help > Install New Software and point to the following update site:
http://gnuarmeclipse.sourceforge.net/updatesand install the plugins from there.
Installing Plugins from GNU ARM Eclipse
If you want to download the plugins for off-line installation or later re-installation, you can download them from here:https://sourceforge.net/projects/gnuarmeclipse
3. GCC ARM Embedded Tool Chain
Go to https://launchpad.net/gcc-arm-embedded and download the toolchain (at the time of this writing it is 4.9-2015-q2). If you download the archive/zip, you simply can unpack the files somewhere, e.g. inside your IDE (c:toolsIDE) folder. Otherwise run the setup which installs the tool chain on Windows in
C:Program Files (x86)GNU Tools ARM Embedded4.9 2015q2
Installer for GNU Tools for ARM Embedded Processors
Now we compiler/assembler/linker and libraries, but we need other tools like make. I get them from here: https://sourceforge.net/projects/gnuarmeclipse/files/Build%20Tools/ and run the setup. You can use the default path:
There are 32bit and 64bit installers/files for Windows. My screenshots below show the 32bit version, as I missed the fact that there is a 64bit version available too.
GNU ARM Eclipse Build Tools Setup
Inside Eclipse (menu Window > Preferences), using the GNU ARM Eclipse plugins I can point my workspace setting to the build tools and toolchain folder:
Workspace Tools Paths
4. Debugging with Segger and/or P&E
So far I have pretty much everything to build/debug projects for ARM. What is missing is debugging support.
Segger J-Link
To install support for Segger, go to the download page at https://www.segger.com/jlink-software.html and download the setup/package and run the installation process. You can go with the default installation path:
Segger J-Link Setup
In Eclipse, make sure that you point to that installation location (menu Window > Preferences):
Segger J-Link Location in Eclipse
P&E Support
To install support for the P&E Multilinks, point Eclipse (Help > Install New Software) to the following update site:
http://www.pemicro.com/eclipse/updates
GNU ARM PEMicro Interface Debugging Support
If I need to store a snapshot of the P&E update site, then I can use the approach described in “Replicating an Eclipse Update Site for Offline Usage“.
After installation I have now support added for the P&E debug devices, including support for OpenSDA.
5. Kinetis New Project Wizard, Processor Expert and Kinetis SDK
This part only applies if using Freescale Kinetis devices. To install the Kinetis New Project Wizard and Processor Expert, I go to http://www.freescale.com/tools/embedded-software-and-tools/software-development-tools/processor-expert-and-embedded-components/software-suites/processor-expert-software-microcontroller-driver-suite:PE_DRIVER_SUITE?tid=PEH and download the Processor Expert for Kinetis plugin package (registration required):
Processor Expert for Kinetis
That package contains several files:
Processor Expert for Kinetis package
Unpack them and install first the ‘freescale_updater.zip’ with Help > Install New Software:
Installing Freescale Updater
Then do the same using PEx_for_Kinetis_3.0.0.zip:
Processor Expert for Kinetis V3.0.0 installation
The Kinetis SDK (now v1.3) is available from http://www.freescale.com/ksdk for download (registration required). Run the setup, and by default it will install it into
C:FreescaleKSDK_1.2.0on Windows. Inside that installation there is an update for Eclipse add support for the Kinetis SDK. Use again Help > Install New Software and install the following zip file:
C:FreescaleKSDK_1.2.0toolseclipse_updateKSDK_1.2.0_Eclipse_Update.zip
Kinetis SDK Eclipse Update
This pretty much completes the setup for the Freescale parts.
There is one more thing: at the time of this writing, there is a Processor Expert V3.0.1 update available from http://www.freescale.com/tools/embedded-software-and-tools/software-development-tools/processor-expert-and-embedded-components/software-suites/processor-expert-software-microcontroller-driver-suite:PE_DRIVER_SUITE?code=PE_DRIVER_SUITE&nodeId=015210BAF73F6BEC92&fpsp=1&tab=Design_Tools_Tab
Processor Expert for Kinetis v3.0.1 update
Download that file, *unzip* it and update Eclipse with the zip file inside the downloaded package:
PEx for Kinetis V3.0.1
Now I have pretty much replicated what is in Kinetis Design Studio v3.0.0, but using my DYI Eclipse IDE  .
.
Summary
With this, I have constructed my own DIY IDE to develop application for ARM Cortex based devices. It only requires to download and install a few standard packages. Best of all: I have all the packages available so I can repeat the installation again, or simply put my current IDE layout into an archive and use it on another machine.
Of course it does not stop here: I will add many more plugins: FreeRTOS kernel awareness, static source analysis, doxygen, version control system, …
Compared to distributions from vendors like Freescale (Kinetis Design Studio), I have full flexibility: I don’t have to wait for new releases to get a bleeding edge tool chain. While it takes a little time at the beginning to do such an IDE and tool chain setup, it is very valuable afterwards because I *understand* what I have, and where I have it. And knowing what I do is always a good thing .
Happy Do-It-Yourself-ing

By
in Software Design
17/06/2018
If you are into ARM microcontroller programming, you will notice the complexity of setting up a working environment and toolchain unless you are using a limited version of a non-free IDE like Keil MDK ARM or trial version of IAR Embedded Workbench but nothing is like using a totally free environment. GNU MCU Eclipse project is a life-saver at this point and here is how to setup your environment.
- 1 Downloads
- 2 Setup
- 3 Extras
Downloads
Download the following tools suitable for your OS/architecture.
- GNU ARM Embedded Toolchain (gcc-arm-none-eabi-7-2017-q4-major-win32.exe) Link.
- Java Runtime Engine (jre-8u171-windows-i586.exe) Link.
- Windows Build Tools (gnu-mcu-eclipse-build-tools-2.9-20170629-1013-win32-setup.exe) Link.
- OpenOCD (gnu-mcu-eclipse-openocd-0.10.0-5-20171110-1117-win32-setup.exe) Link.
- GNU MCU Eclipse IDE (20180419-1818-gnumcueclipse-4.3.3-oxygen-3a-win32.win32.x86.zip) Link.
Setup
Install the tools with respect to the order given above. Don’t forget to add GNU ARM toolchain to Path by checking the box at the end of the setup wizard. Extract IDE to a folder and run Eclipse. Only the following two settings are needed to be configured before you are ready to go.
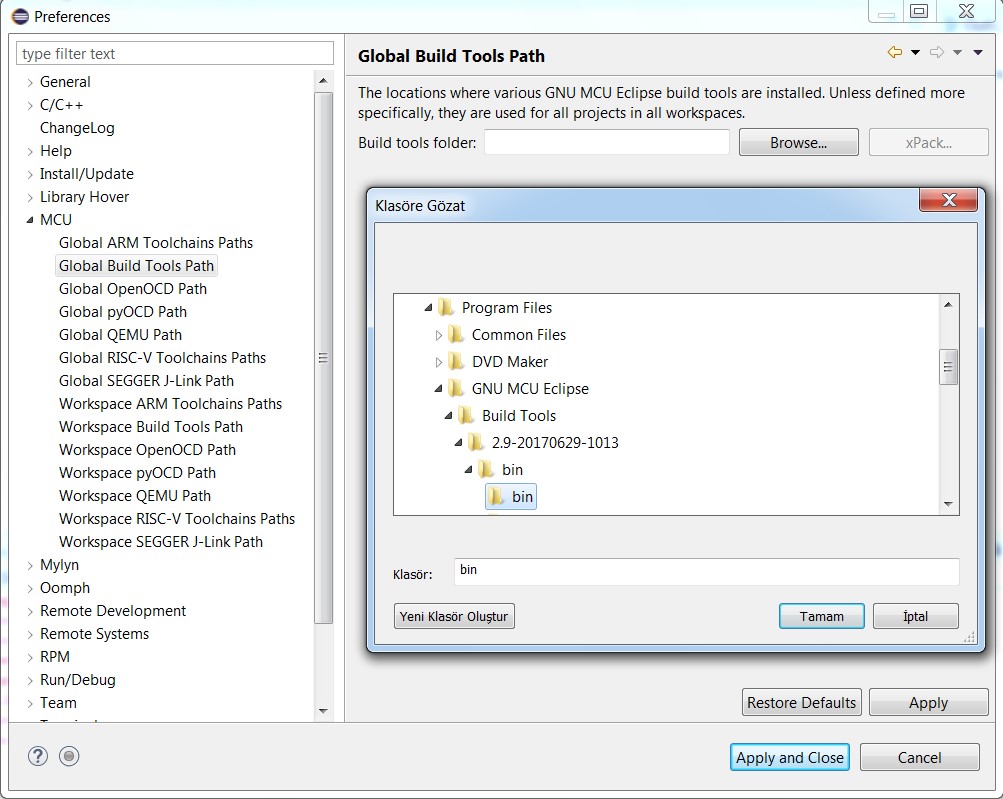
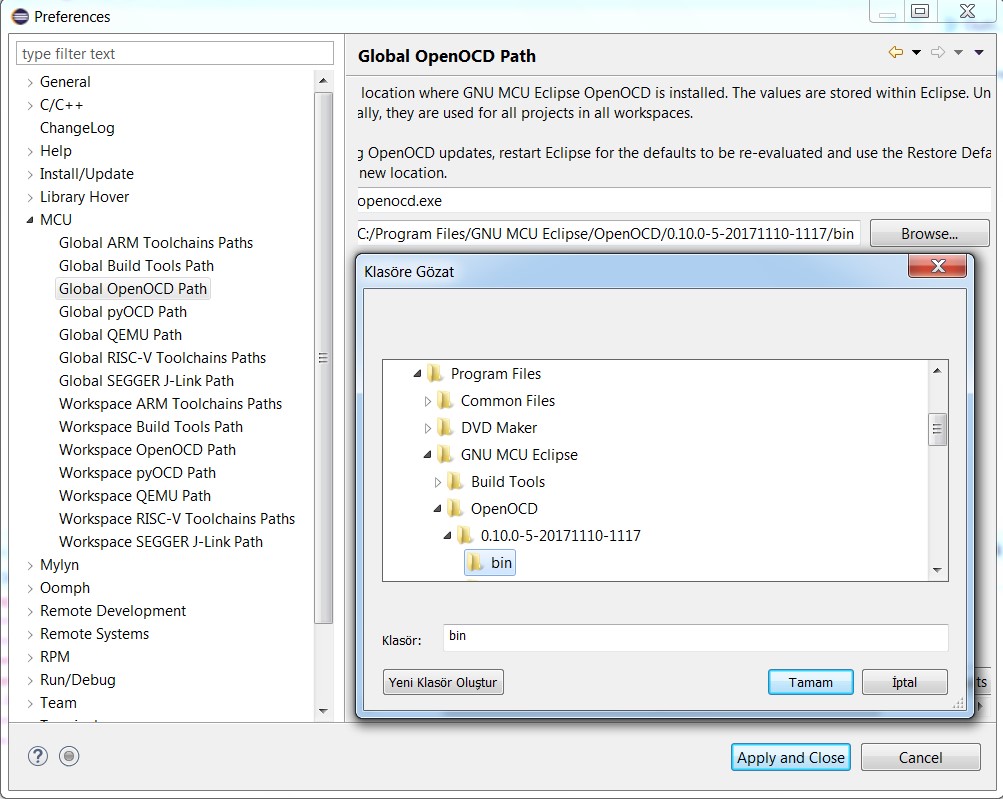 If you have any trouble with the toolchain, you also have to show its path likewise.
The above steps are necessary to get started but there are more thins that you can add to your environment. You should install drivers for your debugger/programmer for example.
In addition to these, I don’t blame you if you want to use QEMU for emulation or you can to visualize your registers while debugging by using EmbSysRegView or by installing microcontroller packs. Good luck.
Tags: eclipse, embedded software, gnu arm, gnu mcu eclipse
Primary tabs
- Overview(active tab)
- Downloads
- Who’s Involved
- Developer Resources
- Governance
- Contact Us
The Eclipse Embedded CDT (C/C++ Development Tools, formerly GNU MCU/ARM Eclipse) plug-ins allow to create, build, debug and in general to manage Arm & RISC-V projects (executables and static/shared libraries, in both 32 and 64-bit versions) with the Eclipse IDE.
The main features are:
- create/build/manage embedded Arm/RISC-V applications, using the managed project features of Eclipse CDT, i.e. without having to manually create and maintain makefiles
- provide ready to run templates for some Arm Cortex-M processors
- provide debugging support via JTAG/SWD
- provide a special view to examine and modify peripheral registers during debug sessions
Other features of the cross build plug-in are:
- supports a wide range of 32 and 64-bit toolchains
- provides extra build steps to generate the binary files required to write the controller flash memory
- supports the automatic discovery of system paths and macro definitions for accurate indexing and auto-completion
- provides common options for all toolchains
- provides fully configurable toolchain definitions
- provides advanced toolchain path management
- improved project portability
The xPack Project
The Eclipse plug-ins use a series of external tools, available from the separate xPack Project. Check the 3rd Party Tools sections for details on how to install the toolchains and the other tools.
The content of this open source project is received and distributed under the license(s) listed above. Some source code and binaries may be distributed under different terms. Specific license information is provided in file headers and in NOTICE files distributed with the project’s binaries.
Latest Releases:
From October 29th, 2020 to October 10th, 2022
Active Member Companies:
Member companies supporting this project over the last three months.
Contribution Activity:
Commits on this project (last 12 months).