Older Releases
![]()
GNURadio_3.10.1.1-0_win64_release
This is the release version of GNU Radio for Windows.
Size: 83.30 MB
Version: 3.10.1.1
Published: 1 April, 2022
SHA-256 checksum
c0e6e1eb4c807411f96add295904ff0c9aae109ec640f22baa07d120fcf38dea
GNURadio_3.10.1.1-0_win64_symbols
PDB files for debugging.
Size: 42.80MB
Version: 3.10.1.1
Published: 1 April, 2022
![]()
GNURadio_3.10.0-0_win64_release
This is the release version of GNU Radio for Windows.
Size: 83.29 MB
Version: 3.10.0
Published: 18 January, 2022
SHA-256 checksum
cdeb047ade57d7d242329b6c4baaa49044591b6c4a4ed2ff6ecd12010657e0d6
GNURadio_3.10.0-0_win64_symbols
PDB files for debugging.
Size: 44.56MB
Version: 3.10.0
Published: 18 January, 2022
![]()
GNURadio_3.9.3-0_win64_release
This is the release version of GNU Radio for Windows.
Size: 82.36 MB
Version: 3.9.3
Published: 22 October, 2021
SHA-256 checksum
5c1f054a8b99b317c28a703a3bd2337bac77674cde09d5360845f6e730281d4f
GNURadio_3.9.3-0_win64_symbols
PDB files for debugging.
Size: 103.16 MB
Version: 3.9.3
Published: 22 October, 2021
![]()
GNURadio_3.9.2-1_win64_release
This is the release version of GNU Radio for Windows.
Size: 82.31 MB
Version: 3.9.2
Published: 25 June, 2021
SHA-256 checksum
5ef7b85408500de4da8b8e3e47c6ab2bcf95e6d9c4fb9803ded6cc60eb654039
GNURadio_3.9.2-0_win64_symbols
PDB files for debugging.
Size: 99.55 MB
Version: 3.9.2
Published: 25 June, 2021
![]()
GNURadio_3.8.3-0_win64_release
This is the release version of GNU Radio for Windows.
Size: 59.97 MB
Version: 3.8.3
Published: 28 May, 2021
SHA-256 checksum
bf26ba0cfd8539b74a7e37c7d623a8b5f2581ef3848d14e519b096d9de039850
GNURadio_3.8.3-0_win64_symbols
PDB files for debugging.
Size: 28.85 MB
Version: 3.8.3
Published: 28 May, 2021
![]()
GNURadio_3.8.3.1-1_win64_release
This is the release version of GNU Radio for Windows.
Size: 59.98 MB
Version: 3.8.3.1
Published: 25 June, 2021
SHA-256 checksum
eb4a2e969ce869ef33d96b75e657d25d0a8eaa26b2718e6687686aca187aeac1
GNURadio_3.8.3.1-0_win64_symbols
PDB files for debugging.
Size: 28.69 MB
Version: 3.8.3.1
Published: 25 June, 2021
![]()
GNURadio_3.9.1-3_win64_release
This is the release version of GNU Radio for Windows.
Size: 81.74 MB
Version: 3.9.1
Published: 13 April, 2021
SHA-256 checksum
8c4d6641145c771e8ccb6e6cf8528eb22609430265b38135ccc9101168d290ee
GNURadio_3.9.1-0_win64_symbols
PDB files for debugging.
Size: 96.33 MB
Version: 3.9.1
Published: 13 April, 2021
![]()
GNURadio_3.9.0-0_win64_release
This is the release version of GNU Radio for Windows.
Size: 53.04 MB
Version: 3.9.0
Published: 20 January, 2021
SHA-256 checksum
0280aeefc4a1ba2707d4d13a08ba6f6e4594b0e37902b15e4c84197ff01af566
GNURadio_3.9.0-0_win64_symbols
PDB files for debugging.
Size: 98.22 MB
Version: 3.9.0
Published: 20 January, 2021
![]()
GNURadio_3.8.2-0_win64_release
This is the release version of GNU Radio for Windows.
Size: 59.30 MB
Version: 3.8.2
Published: 25 August, 2020
SHA-256 checksum
b9da954df3b0d1c1db336ae50e8dc9c294dc7f42202ce3949a6236b168129fed
GNURadio_3.8.2-0_win64_symbols
PDB files for debugging.
Size: 99.6 MB
Version: 3.8.2
Published: 25 August, 2020
![]()
GNURadio_3.8.1-0_win64_release
This is the release version of GNU Radio for Windows.
Size: 56.37 MB
Version: 3.8.1
Published: 22 April, 2020
SHA-256 checksum
9459b6b87c396e1ca99b0e55db1ea7b7e8e1eddb0b888b086b776e701e175847
GNURadio_3.8.1-0_win64_symbols
PDB files for debugging.
Size: 99.3 MB
Version: 3.8.1
Published: 22 April, 2020
![]()
GNURadio_3.8.0-0_win64_release
This is the release version of GNU Radio for Windows.
Size: 57.45 MB
Version: 3.8.0
Published: 30 September, 2019
SHA-256 checksum
c7f994bfcf23af1f2cfc58d5b53f89a0748feb3692a845b7238333e4ff481db0
GNURadio_3.8.0-0_win64_symbols
PDB files for debugging.
Size: 91.79 MB
Version: 3.8.0
Published: 1 October, 2019
Windows Installation[edit]
Binary Installers[edit]
There are a few different unofficial GNU Radio binary installers that are maintained by the community:
1) Radioconda installer. This binary installer tends to be the most up-to-date, but you should check the list of packages to see if it includes what you need. It utilizes the conda package/environment manager and provides easy access to thousands of Python and other packages that are not strictly related to GNU Radio. This also lets you stay up-to-date without having to re-install. Since this provides the same conda-forge packages available without the installer, the conda install guide might be useful for additional instructions, including how to build additional OOT modules from source.
After installing Radioconda you will get a «GNU Radio Companion» added to your start menu. Run this to start GNU Radio Companion, the graphical GNU Radio design tool.
2) Geof Nieboer’s installer hosted at gcndevelopment.com (recently unreachable in 2022-07, but reachable currently 2022-10-23). This is a binary installer for 64-bit Windows 7/8/10 that includes all dependencies for Windows, a custom python distro, commonly used SDR drivers, and several OOT blocks.
3) Pothos SDR development environment installer. This binary installer includes GNU Radio, Pothos, CubicSDK, and other tools. It has historically been updated about once or twice per year.
Current Windows Status[edit]
Installing core GNU Radio and USRP on Windows is becoming more routine. Many OoT modules may still require compiling locally. Please report any success or failures. Patches and enhancements are especially welcome!
Windows Porting Issues[edit]
Considerable effort has been put into making the GNU Radio code portable among various operating systems, but there are several reasons why it cannot be «simply» compiled and run under Windows:
- The build and install procedures are based on Linux scripts and tools
- Several third-party libraries are used, each with its own, often system-dependent, installation procedure
- Most GNU Radio applications must interface to hardware (e.g., a sound card or USRP) which require system-dependent drivers and installation procedures
- Because GNU Radio is written as an extension to Python, there are potential problems on Windows if different runtime libraries are used for GNU Radio and Python
The following sections show how these issues can be addressed.
Installation Options[edit]
GNU Radio is designed to be flexible. It has a number of modules, capabilities, and options that can be enabled or disabled to suit the needs of the user, and the user can add custom blocks or modules to the system.
To support this flexibility, it comes with a set of files and scripts to be used with GNU software build tools (sh, make, autoconf, automake, etc.). These tools use Linux-like commands and filenames that are not normally available on Windows systems.
Fortunately, we are not the first to face this problem, and several solutions exist. These are presented in order of increasing difficulty:
Building on Windows with Native Tools[edit]
Ettus Application note [1] describes how to build from source. Similar is a post at [2] for OOT modules.
Powershell scripts are now available at https://www.github.com/gnieboer/gnuradio_windows_build_scripts that fully automate the build process for GNURadio 3.7.9.2+. A few build dependencies are required (MSVC 2015, Git, Doxygen, CMake, Perl, Wix) but all are free. The script has two options:
- Build all dependencies from source (including python itself)
- Download a prebuilt custom dependency package and then build only GNURadio and a few OOT modules on top.
The binary installers described above are built with these scripts. They ensure that all dependencies are built with the same toolchain against the same runtime libraries, and handle the patches and configuration «tweaks» needed to build them on Windows.
If option 1 is desired, note that to build scipy, the non-free Intel Fortran compiler is required, gfortran cannot build objects that can link with MSVC C objects. If you do not have said compiler, the scripts will download pre-compiled wheels instead.
More information on the build process is available on the GitHub repo readme, and also at http://www.gcndevelopment.com/gnuradio.
GNURadio 3.6 has also been compiled on Windows using native tools as well (see http://voltronics.blogspot.com/2013/01/gnu-radio-windows-build-guide.html and https://lists.gnu.org/archive/html/discuss-gnuradio/2013-08/msg00284.html)
More helpful tips on dependency version information have been reported:
https://lists.gnu.org/archive/html/discuss-gnuradio/2013-12/msg00497.html
MinGW/MSYS[edit]
MinGW (http://www.mingw.org/) provides GNU compilers and Window-specific header files for compiling native Windows applications.
MSYS (http://www.mingw.org/msys.shtml) is a companion set of Linux-like commands, shell, and build tools.
MinGW does not include a Linux programming interface; programs should be smaller and faster than with Cygwin (in theory), but will require more Windows-specific code.
MSYS is intended primarily as a build environment, making it more compact than Cygwin.
Because there is no Linux API emulation, GNU Radio built with MinGW should be used with standard Windows versions of Python and the third-party libraries.
MinGW does not provide as much support as Cygwin for installing third-party libraries, but in many cases precompiled binaries are available.
For detailed installation instructions using MinGW and MSYS see Installing GNU Radio with MinGW.
Cygwin[edit]
Cygwin (http://www.cygwin.com/) is a Linux-like environment for Windows.
It provides the Linux-like shell, file naming, and build tools we need and also makes it easy to install many of the third-party libraries required by GNU Radio. It also provides a Linux programming interface (API); this is not required by GNU Radio, but it lets us use the better-tested Linux versions of some functions.
Because the Linux API uses its own C runtime library, it is best to use Cygwin versions of Python and the third-party libraries when building GNU Radio with Cygwin.
For detailed installation instructions using Cygwin see Installing GNU Radio with Cygwin.
Chocolatey[edit]
To quote from the [|https://chocolatey.org/ Chocolatey homepage]: Chocolatey NuGet is a Machine Package Manager, somewhat like apt-get, but built with Windows in mind..
There are packages for gnuradio (and its dependencies) available in a separate repository (currently the best known source is: https://github.com/ariovistus/chocolatey-packages)
To install, open an Administrative command line session and run:
iex ((new-object net.webclient).DownloadString('https://chocolatey.org/install.ps1'))
Now you need to install a source which has the recipes for gnuradio and dependents. The easiest method is to clone the chocolatey-packages from the github repository listed above (https://github.com/ariovistus/chocolatey-packages), then add the local source from within an Administrative command line session:
choco source add -name gnuradio -source C:<path-to>chocolatey-packages
Create the numpy package:
cd <path-to>chocolatey-packagenumpy
cpack
Create the gnuradio package:
cd <path-to>chocolatey-packagegnuradio
cpack
Now install the gnuradio package:
choco install gnuradio
Follow the command prompts.
WSL | Ubuntu[edit]
Enable WSL from windows features.
Install Ubuntu 20.04 (or newer) from Microsoft Store.
Using the Ubuntu terminal, install gnuradio as you would on linux [3]. If you want to develop GNU Radio’s core you will need to build GNU Radio from source.
WSL 1/2 (before WSLg)[edit]
Install additional package «libgtk-3-dev»
sudo apt install libgtk-3-dev
WSL 1 and 2 (before WSLg) do not have an X server for displaying graphical applications. Install an X server, either VcXsrv [4] or Xming [5] as WSL does not come with an X server. VcXsrv is recommended as it is open source and self-contained instead of being tied to Cygwin, whereas Xming «asks for donations» to the developer as a dubious «sale» for non-existent support.
Launch VcXsrv, making sure to select «Disable access control» option in the Extra settings so that any application can export to X11.
Edit bashrc to set up the display by adding the following lines at the bottom of the file.
WSL1:
 # X11 forwarding for Windows
 export DISPLAY=:0.0
 export LIBGL_ALWAYS_INDIRECT=1
WSL2:
 # X11 forwarding for Windows
 export DISPLAY=$(awk '/nameserver / {print $2; exit}' /etc/resolv.conf 2>/dev/null):0
 export LIBGL_ALWAYS_INDIRECT=1
Restart the Ubuntu terminal and run
gnuradio-companion
WSLg[edit]
Currently in early testing stages, the WSLg update contains a Wayland graphics server and X interface layer allowing graphical applications to run without extra setup.
From the Ubuntu terminal run
gnuradio-companion
Using an Azure VM[edit]
Another way to generate a GNU Radio environment if you’re using Windows, is to create an Azure Virtual Machine running Ubuntu Server 18.04 LTS.
If you already have an existing Azure account you can follow the instructions here[6] to create an Ubuntu VM using the Azure portal. Otherwise, you can sign up for an account here[7]. Azure provides free accounts for students[8] with a limited set of credits.
Once your VM is created you should be able to SSH into it, to install a desktop environment. Full instructions can be found here, but in summary:
Install xfce
 sudo apt-get update
 sudo apt-get -y install xfce4
Install xrdp as a remote desktop server
 sudo apt-get -y install xrdp
 sudo systemctl enable xrdp
Configure xrdp to use xfce
echo xfce4-session >~/.xsession
Restart the xrdp service
sudo service xrdp restart
You will need to create a local password for your Linux VM (on top of your existing SSH key), and open port 3389[9] on the VM.
Finally you can use a remote desktop client, such as Remote Desktop Connection to connect to your VM and follow the instructions for GNU Radio on Ubuntu found here[10].
Known Windows Build Issues[edit]
So far, we have workarounds for all reported problems:
- I got the following error after a clean install «This application failed to start because no Qt platform plugin could be initialized. Reinstalling the application may fix this problem.». I fixed this by finding qwindows.dll on my PC (for me it was in C:Program FilesGNURadio-3.8binplatforms), creating a new directory C:Program FilesGNURadio-3.8binpluginsplatforms, and copying the 4 DLLs to C:Program FilesGNURadio-3.8binpluginsplatforms (I had to create the «….pluginsplatforms» sub-directory). I’m sure there’s a more elegant fix, but this seems to work.
Содержание
- Software Defined Radio — как это работает? Часть 4
- Установка
- Начало работы
- Принимаем FM-радио
- Многоканальный прием
- Запись
- Запуск из командной строки
- Заключение
- WindowsInstall
- Contents
- Windows Installation [ edit ]
- Binary Installers [ edit ]
- Current Windows Status [ edit ]
- Windows Porting Issues [ edit ]
- Installation Options [ edit ]
- Building on Windows with Native Tools [ edit ]
- MinGW/MSYS [ edit ]
- Cygwin [ edit ]
- Chocolatey [ edit ]
- WSL | Ubuntu [ edit ]
- WSL 1/2 (before WSLg) [ edit ]
- WSLg [ edit ]
- Using an Azure VM [ edit ]
- Known Windows Build Issues [ edit ]
- GNU Radio on Windows
- Setting up the environment
- Installing the drivers
- Installing the Python dependencies
- Give it a try!
- Compiling GNU Radio
- Visual Studio 2010
- Prerequisites
- Boost 1.53
- libusb-1.0
- Qwt 6
- Ettus Research UHD
- FFTW 3.3
- Oil Runtime Compiler
- cppunit
- GNU Radio
- Gnu radio windows 10 установка
- About
Software Defined Radio — как это работает? Часть 4
В третьей части было рассказано, как получить доступ к SDR-приемнику посредством языка Python. Сейчас мы познакомимся с программой GNU Radio — системой, позволяющей создать достаточно сложную конфигурацию радиоустройства, не написав ни единой строчки кода.

Для примера рассмотрим задачу параллельного приема нескольких FM-станций на один приемник. В качестве приемника будем использовать все тот же RTL SDR V3.
Продолжение под катом.
Установка
Для начала работы GNU Radio необходимо установить, дистрибутив для Windows можно скачать здесь. Система эта кроссплатформенная, версии есть также под Linux и под OSX (вроде бы GNU Radio успешно запускали и на Raspberry Pi, но 100% гарантии дать не могу).
По сути, GNU Radio это целый фреймворк для цифровой обработки сигналов, в котором программа «собирается» из отдельных модулей. Есть большое количество уже готовых блоков, при желании также можно создавать свои собственные. Сами модули написаны на С++, а для взаимодействия блоков друг с другом используется Python. Желающие могут посмотреть на API более подробно, но на практике это, скорее всего, не пригодится — все действия можно делать визуально в программе GNU Radio Companion.
Система ориентирована на обработку потоков данных, так что каждый блок обычно имеет вход и выход. Далее, соединяя блоки в редакторе, мы получаем готовую систему. Сам интерфейс GNU Radio довольно простой, сложность состоит в понимании того, что делает тот или иной блок. Как говорилось ранее, низкоуровневая работа с SDR имеет высокий порог входа и требует некоторого знания в DSP и математике. Но мы рассмотрим простую задачу, для которой никаких специальных знаний не потребуется. Итак, приступим.
Начало работы
Запускаем GNU Radio Companion, создаем новый проект, тип проекта выбираем WX GUI, добавляем на экран и соединяем два блока, как показано на скриншоте.
Мы видим два типа блоков — Source (источник) и Sink (выход, «слив»). RTL-SDR — это наш приемник, FFT GUI — это виртуальный спектроанализатор.
Переменную Sample Rate устанавливаем в 2048000, это частота дискретизации нашего приемника. Частоту RTL-SDR оставляем по умолчанию равной 100МГц.
Запускаем проект — все работает, мы видим спектр FM-станций. Первая программа для GNU Radio готова!
Если мы посмотрим лог, то увидим такие строки.
Да, мы можем посмотреть файл top_block.py, который сгенерил нам GNU Radio Companion. Истинные джедаи могут писать непосредственно в Python, но требуемый код, как мы видим, довольно большой. Мы же создали его за 1 минуту.
Впрочем, если убрать громоздкую инициализацию, то мы увидим, что ключевых строк кода не так уж много.
Так что в принципе, это можно написать вручную. Но мышью оно все-таки быстрее. Хотя возможность поменять код иногда может пригодиться, если захочется добавить какую-то нестандартную логику.
Принимаем FM-радио
Теперь попробуем принять одну из станций. Как было видно из скриншотов, центральная частота приемника 100МГц и ширина полосы пропускания около 2МГц. На спектре мы видим две станции, на 100.1МГц и 100.7МГц соответственно.
Первым шагом необходимо перенести спектр станции в центр, сейчас он отстоит вправо на 100КГц. Для этого вспоминаем школьную формулу умножения косинусов — в результате будет две частоты, сумма и разность — нужная станция сдвинется в центр, что нам и нужно (а лишнее мы потом отфильтруем).
Создаем две переменные для хранения частоты freq_center=100000000 и freq_1=100100000, также добавляем генератор сигналов с частотой freq_center — freq_1.
Т.к. система построена на базе Python, то в полях ввода параметров мы можем использовать выражения, что достаточно удобно.
Схема в итоге должна выглядеть так:
Теперь необходимо добавить сразу несколько блоков — уменьшить тактовую частоту входного сигнала (она равна 2048КГц), отфильтровать сигнал, подать его на FM-декодер, затем еще раз уменьшить тактовую частоту до 48КГц.
Результат показан на картинке:
Считаем внимательно. Мы делим тактовую частоту 2048КГц в 4 раза блоком Rational Resampler (получаем 512КГц), затем после Low Pass фильтра стоит WBFM-декодер с децимацией 10 (получаем 51.2КГц). В принципе, этот сигнал уже можно подать на звуковую карту, но высота тона будет чуть отличаться. Еще раз меняем тактовую частоту в 48/51, в результате будет тактовая частота 48.2КГц, разницей уже можно пренебречь.
Второй важный момент — тип входов. С приемника поступает комплексный IQ-сигнал (входы-выходы синего цвета), с FM-декодера выходит вещественный сигнал — входы и выходы желтого цвета. Если перепутать, ничего не заработает. Подробнее уже было на Хабре, нам достаточно понять общий принцип.
В общем, запускаем, убеждаемся что все работает. Можно запустить программу и слушать радио. Мы пойдем дальше — у нас же все-таки Software Defined радио — добавим одновременный прием второй станции.
Многоканальный прием
Второй приемник добавляется любимым программистским методом — Ctrl+C/Ctrl+V. Добавляем переменную freq_2, копируем блоки и соединяем их точно также.
Результат вполне сюрреалистичный — две FM-станции можно слушать одновременно. Тем же самым методом (Ctrl+V) можно добавить и третью станцию.
Запись
Слушать две станции оригинально, но на практике мало полезно. Сделаем что-то более нужное, например добавим запись звука в отдельные файлы. Это может быть достаточно удобно — с одного физического приемника можно параллельно записывать несколько каналов.
Добавим к каждому выходу компонент File Sink, как показано на скриншоте.
Windows-версия почему-то требует абсолютные пути файлов, иначе запись не работает. Запускаем, убеждаемся что все нормально. Размер сохраняемых файлов довольно большой, т.к. по умолчанию записывается формат float. Запись в формате int оставлю читателям в качестве домашнего задания.
Получившиеся файлы можно открыть в Cool Edit и убедиться, что звук записался нормально.
Разумеется, число записываемых каналов можно увеличить, оно ограничено только полосой пропускания приемника и мощностью компьютера. Кроме File Sink можно использовать и UDP Sink, так что программу можно использовать для трансляции по сети.
Запуск из командной строки
И последнее. Если использовать программу автономно, например для многоканальной записи, то UI в принципе и не нужен. В верхнем левом блоке Options меняем параметр Run Options на No UI. Запускаем программу еще раз, убеждаемся что все работает. Теперь сохраняем сгенерированный файл top_block.py — мы можем просто запускать его из командной строки, например из bat-файла или из консоли.
Если кому интересно, сгенерированный файл сохранен под спойлером.
Удобно и то, что система является кросс-платформенной, и получившаяся программа может работать на Linux, Windows и OSX.
Заключение
Можно сказать, что GNU Radio достаточно сложная система, не в плане рисования блоков конечно, а в плане понимания того, как все это работает. Но какие-то несложные вещи сделать вполне посильно и интересно. GNU Radio также удобно использовать как «виртуальную лабораторию» для обучения — к любой части схемы можно подключить виртуальный осциллограф или спектроанализатор и посмотреть, как выглядит сигнал.
Если не будет каких-то отдельных пожеланий, тему SDR-приема наверно можно закрыть — все основные моменты уже рассмотрены, да и количество просмотров от первой к третьей части падает почти по экспоненте (хотя еще можно написать про передачу, но оно требует более дорогого «железа» для тестов чем RTL SDR). Надеюсь все же, что некоторое понимание того как это работает, у читателей осталось. Ну и всем удачных экспериментов.
Источник
WindowsInstall
Contents
Windows Installation [ edit ]
Binary Installers [ edit ]
There are a few different unofficial GNU Radio binary installers that are maintained by the community:
1) Geof Nieboer’s installer hosted at gcndevelopment.com. This is a binary installer for 64-bit Windows 7/8/10 that includes all dependencies for Windows, a custom python distro, commonly used SDR drivers, and several OOT blocks.
2) Radioconda installer. This binary installer tends to be the most up-to-date but currently includes fewer SDR drivers and OOT modules. It utilizes the conda package/environment manager and provides easy access to thousands of Python and other packages that are not strictly related to GNU Radio. This also lets you stay up-to-date without having to re-install. Since this provides the same conda-forge packages available without the installer, the conda install guide might be useful for additional instructions, including how to build OOT modules from source.
3) Pothos SDR development environment installer. This binary installer includes GNU Radio, Pothos, CubicSDK, and other tools. It has historically been updated about once or twice per year.
Current Windows Status [ edit ]
Installing core GNU Radio and USRP on Windows is becoming more routine. Many OoT modules may still require compiling locally. Please report any success or failures. Patches and enhancements are especially welcome!
Windows Porting Issues [ edit ]
Considerable effort has been put into making the GNU Radio code portable among various operating systems, but there are several reasons why it cannot be «simply» compiled and run under Windows:
The following sections show how these issues can be addressed.
Installation Options [ edit ]
GNU Radio is designed to be flexible. It has a number of modules, capabilities, and options that can be enabled or disabled to suit the needs of the user, and the user can add custom blocks or modules to the system.
To support this flexibility, it comes with a set of files and scripts to be used with GNU software build tools (sh, make, autoconf, automake, etc.). These tools use Linux-like commands and filenames that are not normally available on Windows systems.
Fortunately, we are not the first to face this problem, and several solutions exist. These are presented in order of increasing difficulty:
Building on Windows with Native Tools [ edit ]
Ettus Application note [1] describes how to build from source. Similar is a post at [2] for OOT modules.
Powershell scripts are now available at https://www.github.com/gnieboer/gnuradio_windows_build_scripts that fully automate the build process for GNURadio 3.7.9.2+. A few build dependencies are required (MSVC 2015, Git, Doxygen, CMake, Perl, Wix) but all are free. The script has two options:
The binary installers described above are built with these scripts. They ensure that all dependencies are built with the same toolchain against the same runtime libraries, and handle the patches and configuration «tweaks» needed to build them on Windows.
If option 1 is desired, note that to build scipy, the non-free Intel Fortran compiler is required, gfortran cannot build objects that can link with MSVC C objects. If you do not have said compiler, the scripts will download pre-compiled wheels instead.
More information on the build process is available on the GitHub repo readme, and also at http://www.gcndevelopment.com/gnuradio.
MinGW/MSYS [ edit ]
MinGW (http://www.mingw.org/) provides GNU compilers and Window-specific header files for compiling native Windows applications.
MSYS (http://www.mingw.org/msys.shtml) is a companion set of Linux-like commands, shell, and build tools.
MinGW does not include a Linux programming interface; programs should be smaller and faster than with Cygwin (in theory), but will require more Windows-specific code.
MSYS is intended primarily as a build environment, making it more compact than Cygwin.
Because there is no Linux API emulation, GNU Radio built with MinGW should be used with standard Windows versions of Python and the third-party libraries.
MinGW does not provide as much support as Cygwin for installing third-party libraries, but in many cases precompiled binaries are available.
For detailed installation instructions using MinGW and MSYS see Installing GNU Radio with MinGW.
Cygwin [ edit ]
Cygwin (http://www.cygwin.com/) is a Linux-like environment for Windows.
It provides the Linux-like shell, file naming, and build tools we need and also makes it easy to install many of the third-party libraries required by GNU Radio. It also provides a Linux programming interface (API); this is not required by GNU Radio, but it lets us use the better-tested Linux versions of some functions.
Because the Linux API uses its own C runtime library, it is best to use Cygwin versions of Python and the third-party libraries when building GNU Radio with Cygwin.
For detailed installation instructions using Cygwin see Installing GNU Radio with Cygwin.
Chocolatey [ edit ]
To quote from the [|https://chocolatey.org/ Chocolatey homepage]: Chocolatey NuGet is a Machine Package Manager, somewhat like apt-get, but built with Windows in mind..
There are packages for gnuradio (and its dependencies) available in a separate repository (currently the best known source is: https://github.com/ariovistus/chocolatey-packages)
To install, open an Administrative command line session and run:
Now you need to install a source which has the recipes for gnuradio and dependents. The easiest method is to clone the chocolatey-packages from the github repository listed above (https://github.com/ariovistus/chocolatey-packages), then add the local source from within an Administrative command line session:
Create the numpy package:
Create the gnuradio package:
Now install the gnuradio package:
Follow the command prompts.
WSL | Ubuntu [ edit ]
Enable WSL from windows features.
Install Ubuntu 20.04 (or newer) from Microsoft Store.
Using the Ubuntu terminal, install gnuradio as you would on linux [3]. If you want to develop GNU Radio’s core you will need to build GNU Radio from source.
WSL 1/2 (before WSLg) [ edit ]
Install additional package «libgtk-3-dev»
WSL 1 and 2 (before WSLg) do not have an X server for displaying graphical applications. Install an X server, either VcXsrv [4] or Xming [5] as WSL does not come with an X server. VcXsrv is recommended as it is open source and self-contained instead of being tied to Cygwin, whereas Xming «asks for donations» to the developer as a dubious «sale» for non-existent support.
Launch VcXsrv, making sure to select «Disable access control» option in the Extra settings so that any application can export to X11.
Edit bashrc to set up the display by adding the following lines at the bottom of the file.
Restart the Ubuntu terminal and run
WSLg [ edit ]
Currently in early testing stages, the WSLg update contains a Wayland graphics server and X interface layer allowing graphical applications to run without extra setup.
From the Ubuntu terminal run
Using an Azure VM [ edit ]
Another way to generate a GNU Radio environment if you’re using Windows, is to create an Azure Virtual Machine running Ubuntu Server 18.04 LTS.
If you already have an existing Azure account you can follow the instructions here[6] to create an Ubuntu VM using the Azure portal. Otherwise, you can sign up for an account here[7]. Azure provides free accounts for students[8] with a limited set of credits.
Once your VM is created you should be able to SSH into it, to install a desktop environment. Full instructions can be found here, but in summary: Install xfce
Install xrdp as a remote desktop server
Configure xrdp to use xfce
Restart the xrdp service
You will need to create a local password for your Linux VM (on top of your existing SSH key), and open port 3389[9] on the VM.
Finally you can use a remote desktop client, such as Remote Desktop Connection to connect to your VM and follow the instructions for GNU Radio on Ubuntu found here[10].
Known Windows Build Issues [ edit ]
So far, we have workarounds for all reported problems:
Источник
GNU Radio on Windows
Setting up the environment
Disclaimer: this build of GNU Radio is not completely portable.
Installing the drivers
If you have an USB-based device (USRP1, B100, RTL-SDR), you must install the WinUSB driver with http://sourceforge.net/projects/libwdi/files/zadig/zadig_v2.0.1.160.7z/download and possibly reboot.
Installing the Python dependencies
Depending on whether you prefer to employ 32-bit or 64-bit binaries, you will need a matching 32-bit or 64-bit Python 2.7 (http://www.python.org/download/releases/2.7.4/).
The required Python packages can be downloaded in large part from Christoph Gohlke’s excellent collection of packages: http://www.lfd.uci.edu/
If you use 64-bit binaries:
Give it a try!
Run uhd_usrp_probe.exe in a Command Prompt, it should detect your USRP and load the firmware (two tries may be necessary for USB devices), then try running uhd_fft.py or gnuradio-companion.py. A simple GRC example is to connect an RTLSDR Source or USRP Source to the classic WX GUI Waterfall Sink, then click Build => Generate and Execute.
If you get the message «KeyError: Options«, make sure global_blocks_path in your config.conf is setup correctly and if you compiled gnuradio yourself, also check that gr_prefs.cc was patched.
Compiling GNU Radio
Visual Studio 2010
This guide has been validated using Visual Studio 2010 Professional SP1 on Windows 7. Other versions of Visual Studio or MinGW could work as well, but there is no guarantee.
KB2519277 is only required on the Express edition (it restores the x64 compiler).
Prerequisites
This guide is based on specific versions of open-source software, for example boost 1.53.0. Choosing older or newer versions is not recommended and can lead to build failures.
This guide described the compilation of 64-bit binaries. The same procedure can be followed as well to build 32-bit binaries, with minor flags adjustments:
Install cmake, msysgit & Python 2.7 32-bit or 64-bit (they are required). When installing msysgit, choose «Run Git and included Unix tools from the Windows Command Prompt» and «Checkout as-is, commit as-is«.
Recommended but optional: 7-Zip, Notepad++, doxygen and graphviz
Here we compile GNU Radio in release mode with symbols: RelWithDebInfo. Compiling in Debug mode has been tried: it can lead to runtime errors and therefore is not recommended unless you want to debug the Debug mode 😉
Boost 1.53
libusb-1.0
WebKit, Qt3 and examples/demos are disabled since they are not required and take a very long time to compile. Also, adjust the number of parallel jobs (here,  according to how many CPU cores you have. Compilation on a quad-core CPU should take about 20 minutes. Individual examples can be compiled in this way:
If you use a non-Express edition of Visual Studio 2010, consider installing the Qt4 plugin: http://download.qt-project.org/official_releases/vsaddin/qt-vs-addin-1.1.11-opensource.exe
Qwt 6
Ettus Research UHD
gohlke/pythonlibs/ download and install Cheetah-2.4.4.win-amd64-py2.7.exe and docutils-0.10.win-amd64-py2.7.exe (or their 32-bit counterparts)
FFTW 3.3
libfftw (double precision) is used by IT++, while libfftwf (single precision) is used by GNU radio. Download http://www.fftw.org/fftw-3.3.3.tar.gz and ftp://ftp.fftw.org/pub/fftw/fftw-3.3-libs-visual-studio-2010.zip
Steps 3 to 5 are only required on the **Express** edition which lacks OpenMP.
Oil Runtime Compiler
Download http://code.entropywave.com/download/orc/orc-0.4.17.tar.gz, extract into C:src. Copy buildorcc.vcxproj and buildconfig.h into C:srcorc-0.4.17. Open it and compile the executable.
cppunit
Download http://sourceforge.net/projects/cppunit/files/cppunit/1.12.1/cppunit-1.12.1.tar.gz/download, extract into C:src. Open C:srccppunit-1.12.1examplesexamples.dsw, create a new platform x64 and compile cppunit (not cppunit_dll) in Release mode.
GNU Radio
Download and extract into C:src :
Please install the Python dependencies (see «Installing the Python dependencies» above).
To build the documentation (this is optional), install:
If you get the error is «Unable to find file ‘C:srcgnuradio-3.6.4.1gnuradio-coresrclibswiggnuradio_core_filer.i’«, work around it by copying (not renaming) gnuradio_core_filter.i to gnuradio_core_filer.i:
IT++ is not really required. It is mainly an standalone signal processing library which can provide alternatives to several of GNU Radio signal processing primitives.
Источник
Gnu radio windows 10 установка
GNURadio Windows Build Scripts v1.7
For more details on this effort, please see the support website
IF YOU JUST WANT TO USE GNURADIO ON WINDOWS, DON’T USE THESE SCRIPTS. use the binaries that are posted at the above site. The Linux way is to build from source, this is usually not helpful on Windows, so use the installers unless you just want to tinker, in which case enjoy!
The finished MSI includes:
Device Support: UHD, RTL-SDR, hackrf, airspy, airspyhf, BladeRF, osmoSDR, FCD, SoapySDR
GNURadio modules: 3.8.1.0 and 3.7.13.5 with all but gr-comedi modules built and included
OOT modules: gr-iqbal, gr-fosphor, gr-osmosdr, gr-acars, gr-adsb, gr-modtool, gr-air-modes, gr-ais, gr-ax25, gr-burst (incl. bitarray), gr-cdma, gr-display (incl. matplotlib), gr-eventstream, gr-inspector (incl. tensorflow), gr-lte, gr-mapper, gr-nacl, gr-paint (incl. PIL), gr-radar, gr-rds, gr-specest, OpenLTE, gr-gsm (not all modules available in gr 3.8)
Other Applications: gqrx
There are now two options for that for whatever your reason is, want to build these installers themselves. The newest and recommended option is to use an AWS EC2 instance with a custom AMI that has successfully built these scripts, to avoid configuration issues. I recommend a c5d.2xlarge because you must have the 200GB NVMe drive or larger.
The second option is to build your own machine:
The following tools must be installed:
Please note that Visual Studio 2017 is not yet supported.
Also, the complete build requires no less than 120 GB of free disk space.
Run the below from an elevated command prompt (the only command that requires elevation is the Set-ExecutionPolicy. If desired, the rest can be run from a user-privilege account)
Once complete, msi files can be found in the [root]/src-stage4-installer/dist subdirectories. The build can be tested after Step 7 by running run_grc.bat in the src-stage3/staged_install/[config]/bin subdirectory to
1- Ensure your anti-virus is off during installation. even Windows Defender. PyQt4 may fail to create manifest files as a result.
2- Right-click your powershell window, go to «Properties» and ensure QuickEdit and Insert Mode are NOT checked. Otherwise when you click on the window, execution may pause without any indication as to why, leading you to believe the build has hung.
3- This has been tested with a B200 UHD, a hackRF, and an RTL-SDR. Other device drivers have not been phyiscally verified to work. If you own one, please let me know if you had success.
4- In the event of issues, I highly recommend Dependency Walker or similar to troubleshoot what libraries are linked to what.
5- If your connection is spotty, you may get partially downloaded packages which cause build failures. To correct, DELETE the suspect package from the /packages directory so it will retry the download.
6- The following devices are NOT currently supported: FCD Pro+, RFSPACE, MiriSDR, SDRPlay, freeSRP
7- CMake 3.13 is the only version currently supported, though versions after 3.5 may be successful; older versions have been reported to have issues detecting the custom python install when at the BuildGNURadio step.
8- Zadig must be manually added to the /bin directory prior to MSI creation
About
Источник
Release v3.10.5.1
[3.10.5.1] — 2023-01-25
Some important blocks turned out to be broken in 3.10.5.0. This unscheduled release fixes those regressions and includes a small number of other cleanups and fixes. v3.10.5.1 is intended to be ABI compatible with v3.10.5.0. We’d still recommend rebuilding dependent packages, if possible.
Changed
Runtime
- Restore the ability to set a default block buffer size using the
buffer_sizeparameter in the config file. This was lost during refactoring in v3.9.
GRC
- Add Python snipped hook point at «init before blocks», right before blocks are instantiated.
gr-audio
- Remove support for OSX 10.3 and earlier.
gr-digital
- Make tags visible to subclasses of OFDM Frame Equalizer.
gr-dtv
- Correct constant in DVBS2 Modulator.
gr-fec
- Fix errors in Channel Construction AWGN
gr-iio
- Fix IIO blocks, which were broken due to a build-time dependency problem.
gr-network
- Fix crash in UDP Source when buffer overruns.
gr-qtgui
- Remove support for QWT 6.0 and earlier.
gr-uhd
- Add async message port to USRP Source and publish overflow notifications.
- Add bindings and example for RFNoC AddSub block.
Release v3.10.5.0
[3.10.5.0] — 2022-12-19
Runtime
- Python block have access to the block logger, as in C++
- Default log level changed to INFO (from OFF)
- Memory-based logger
gr.dictionary_logger_backend()added for log debugging - API Note: The Python block gateway is now completely implemented in the PyBind11 wrapper, in order to clean up Python dependencies. This is technically an API change, but should not have any external effect.
- PMT serialization of Complex32 vectors is now
REAL | IMAGon all platforms - Python IO signature replication (multiple ports specified by one signature) fixed
GRC
- Continue processing block connections after a connection error occurs
- Drawing/scaling fixes that improve user experience on HiDPI and Windows machines
Build system and packaging
- Many deprecation warnings fixed
- Make target link libraries PRIVATE wherever possible, removing unnecessary downstream dependencies
- Add Fedora 37 and drop Fedora 35 CI targets
- Conda re-rendered with more recent packages — thanks to Ryan Volz for making Conda an easy-to-use, cross-platform method of installing GNU Radio
- Debian and Fedora packaging specs are no longer included in the code base, since they were out of date, and are maintained by downstreams
Testing
- Code formatting rules for clang format updated to v14
- Removed all compiler warning suppression
- Enable Python block testing for Conda on macOS
- Many other improvements that make maintenance easier — thanks again to Clayton Smith. In the process of fixing tests, a number of latent bugs were fixed throughout the code.
gr-analog
- AGC3 performance and bug fixes
- Python has access to
control_loopparent class in PLL blocks - CTCSS detection of standard tones improved by fixing floating point comparison
gr-blocks
- Probe Signal cross platform reliability improved by better thread synchronization
gr-digital
- CRC32 and CRC16 blocks use little-endian order regardless of host order. This is a wire format change. The options were to have different endian machines unable to communicate, or older and newer versions unable to communicate. Note that there is a more general set of blocks (CRC Append and CRC Check) that are recommended for use wherever possible.
- Packet headers use consistent bit order across machines
- Floating point/rounding fix in constellation lookup table
gr-fec
- LDPC G matrix
nandkcan be access from Python - LDPC matrix output size calculation corrected
- CCSDS/Viterbi path metrics overflow fix
gr-network
- Improve UDP Source/Sink efficiency by removing a layer of buffering and using the GR circular buffer instead of the Boost equivalent
gr-qtgui
- Fixed Python code generation for Msg CheckBox, Digital Number Control, Toggle Button, Toggle Switch
gr-soapy
- Sources will generate
rx_time,rx_freqandrx_ratetags, as in UHD sources, where supported by the underlying Soapy driver
gr-uhd
- Re-enable
uhd.find_devices(), in addition touhd.find() - RFNoC: generate correct Python code when using clock/time source
- RFNoC: allow specification of adapter IDs for streamers
- RFNoC: enable setting of vlen and types for streamers
- RFNoC: streamers pay attention to stream args
- RFNoC: sync block controller with gr-ettus OOT
- RFNoC:
set_property()andget_property()added to the C++ and Python APIs - RFNoC: Python binds added for
rfnoc_block_generic
gr-zeromq
- Sinks will optionally block on full queue, providing backpressure. Previously, overflow data was dropped.
Release Candidate v3.10.5.0-rc1
Release v3.10.4.0
GNU Radio Release v3.10.4.0
[3.10.4.0] — 2022-09-16
Changed
Project Scope
- Replace
get_initial_sptr()calls withmake_block_sptr()calls. There were a number of places the incorrect function was being used.
Runtime
- Use correctly typed arguments to log messages to prevent build errors.
GRC
- Add xfce4-terminal and urxvt to the list of terminal emulators discovered during the build process.
- Suppress GUI hint errors that were being shown in the terminal window.
- Use integers for screenshot size (floats were causing Cairo errors).
Build system and packaging
- Reformat cmake files and make cmake formatting part of the workflow.
- Allow GNU Radio to be a part of other cmake-based projects.
- Correct linking to libiio and libad9361 on macOS.
- Update method for determining Python installation directory. This should work correctly now on (all?) distro releases.
gr-blocks
- New Block Interleaver/Deinterleaver interleaves blocks of symbols
- Correct calculation of
items_remainingin File Source, which allowsseek()to work correctly. - Add an example for Wavefile Sink
gr-digital
- Deprecate the CRC32 and CRC16 blocks, which will be removed in the future. There are more general CRC blocks which do the same thing (and more).
gr-filter
- Fix demo for PFB channelizer
gr-iio
- FMCOMMS2 Sink assumes CS16 data is scaled to 32768, rather than 2048.
- FMCOMMS2 returns the correct samples for the second channel in 2-channel mode.
gr-trellis
- Correct Python bindings for
trellis::metrics.
gr-qtgui
- Range widget can now output messages when value changes.
- Add C++ code generation for Time Sink
- Regenerate Python bindings for some blocks when necessary.
- Waterfall Sink correctly uses half spectrum for float input.
gr-uhd
- Add Python bindings for the UHD
find()functino.
gr-zeromq
- Support newer
get()and older/deprecatedgetsockopt()functions in cppzmq depending on availability.
Modtool
- Parse IO signatures with or without
gr::prefix.
Documentation
- Update certain file lists to keep build paths out of documentation.
Testing
- Update Conda recipe for Qt 5.15 and re-render CI support files.
- Add testing on Ubuntu 22.04.
- Link tests directly against spdlog with not linking to GR runtime.
- Ignore Python «missing whitespace after keywork» formatting error.
Release v3.9.8.0
GNU Radio Release v3.9.8.0
[3.9.8.0] — 2022-09-16
This is last quarterly release of GNU Radio 3.9. Version 3.10 is mostly compatible with 3.9, so we recommend that all users of 3.9 migrate to 3.10 when able.
Changed
Project Scope
- Replace
get_initial_sptr()calls withmake_block_sptr()calls. There were a number of places the incorrect function was being used.
GRC
- Add xfce4-terminal and urxvt to the list of terminal emulators discovered during the build process.
- Suppress GUI hint errors that were being shown in the terminal window.
- Use integers for screenshot size (floats were causing Cairo errors).
gr-blocks
- Correct calculation of
items_remainingin File Source, which allowsseek()to work correctly.
gr-filter
- Fix demo for PFB channelizer
gr-trellis
- Correct Python bindings for
trellis::metrics.
gr-uhd
- Add Python bindings for the UHD
find()functino.
Testing
- Ignore Python «missing whitespace after keywork» formatting error.
Release Candidate v3.10.4.0-rc1
Release Candidate v3.9.8.0-rc1
Release v3.10.3.0
Changed
Project Scope
- Continue replacement of Boost functionality with standard C++ continues, where practical, making the code more maintainable.
- Fix more flaky CI tests that were failing unnecessarily. This helps greatly with maintenance.
gnuradio-runtime
- Only catch Thrift transport exceptions
- Import PyQt5 before matplotlib to work around a bug
- Fix broken log format string in set_min_output_buffer
- Process system messages before others. This helps with orderly flowgraph termination.
- Custom buffers: add missing (simulated) data transfer to input/output_blocked_callback functions in host_buffer class
- Fix Mach-kernel timebase (numer and denom were reversed)
- Fix signed integer overflows in fixed-point table generation
GRC
- Add parentheses on arithmetic expressions to avoid operator precedence problems in templated code
- Fix create hier / missing top_block error
Build system and packaging
- CI: Add testing for Fedora 36, remove Fedora 34.
- cmake: Use platform-specific Python install schemes
- cmake: Always prefix git hash used as version with «g»
- cmake: Allow MPIR/MPLIB package find to fail gracefully
- cmake: Remove ‘REQUIRED’ flag for Volk
gr-blocks
- Fix rotator_cc scheduled phase increment updates
- Wavefile Sink: add support for Ogg Opus if libsndfile is >= 1.0.29
- Probe Signal: synchronize access to d_level to prevent race conditions
gr-digital
- Use memcmp for CRC comparisons to avoid alignment errors
gr-dtv
- Use unsigned integer for CRC calculation
- Fix use of uninitialized memory
- Fix initialization of L1Post struct
gr-filter
- Fix various bugs in Generic Filterbank
gr-iio
- Fix grc pluto sink attenuation callback
gr-qtgui
- Several sinks produce wrong error messages, when GUI Hint is used. Reorder params in yml files to fix.
gr-soapy
- Deactivate stream before closing. Some modules depend on this behavior.
gr-uhd
- Implement
get_gpio_attr()
Code generation tools
- C++ generation: Fix various template errors
Modtool
- gr_newmod: Fix copying python bindings to test dir on Windows
- gr_newmod: Make untagged conda package version less specific
- modtool: Add a conda recipe to the OOT template
- Make the pydoc_h.mako more clang compliant
Documentation
- Add shim Sphinx config for readthedocs
Authors
The following people contributed commits to this release. They are credited by the name used in commits. There are may people who contribute in other ways … discussions, reviews, bug reporting, testing, etc. We just don’t have an easy way to provide credit for all that valuable work.
- Adrian Suciu adrian.suciu@analog.com
- Bjoern Kerler info@revskills.de
- Clayton Smith argilo@gmail.com
- Daniel Estévez daniel@destevez.net
- David Sorber david.sorber@blacklynx.tech
- Igor Freire igor@blockstream.com
- Jeff Long willcode4@gmail.com
- Josh Morman jmorman@gnuradio.org
- maitbot
- Martin Braun martin@gnuradio.org
- Michael Roe
- Paul Atreides maud.dib1984@gmail.com
- Philipp Niedermayer eltos@outlook.de
- Ron Economos w6rz@comcast.net
- Ryan Volz ryan.volz@gmail.com
- Volker Schroer
- wakass
Release v3.9.7.0
Changed
Project Scope
- Fix more flaky CI tests that were failing unnecessarily. This helps greatly with maintenance.
gnuradio-runtime
- Only catch Thrift transport exceptions
- Import PyQt5 before matplotlib to work around a bug
- Process system messages before others. This helps with orderly flowgraph termination.
- Fix Mach-kernel timebase (numer and denom were reversed)
- Fix signed integer overflows in fixed-point table generation
GRC
- Fix create hier / missing top_block error
Build system and packaging
- CI: Add testing for Fedora 36, remove Fedora 34.
- cmake: Allow MPIR/MPLIB package find to fail gracefully
gr-blocks
- Fix rotator_cc scheduled phase increment updates
- Probe Signal: synchronize access to d_level to prevent race conditions
gr-digital
- Use memcmp for CRC comparisons to avoid alignment errors
gr-dtv
- Use unsigned integer for CRC calculation
- Fix use of uninitialized memory
- Fix initialization of L1Post struct
gr-filter
- Fix various bugs in Generic Filterbank
gr-qtgui
- Several sinks produce wrong error messages, when GUI Hint is used. Reorder params in yml files to fix.
gr-soapy
- Deactivate stream before closing. Some modules depend on this behavior.
gr-uhd
- Implement
get_gpio_attr()
Modtool
- gr_newmod: Fix copying python bindings to test dir on Windows
- Make the pydoc_h.mako more clang compliant
Authors
The following people contributed commits to this release. They are credited by the name used in commits. There are may people who contribute in other ways … discussions, reviews, bug reporting, testing, etc. We just don’t have an easy way to provide credit for all that valuable work.
- Bjoern Kerler info@revskills.de
- Clayton Smith argilo@gmail.com
- Igor Freire igor@blockstream.com
- Jeff Long willcode4@gmail.com
- maitbot
- Philipp Niedermayer eltos@outlook.de
- Ron Economos w6rz@comcast.net
- Ryan Volz ryan.volz@gmail.com
- Volker Schroer
- wakass
Release Candidate v3.10.3.0-rc1
[3.10.3.0-rc1] — 2022-06-09
Changed
Project Scope
- Continue replacement of Boost functionality with standard C++ continues, where practical, making the code more maintainable.
- Fix more flaky CI tests that were failing unnecessarily. This helps greatly with maintenance.
gnuradio-runtime
- Only catch Thrift transport exceptions
- Import PyQt5 before matplotlib to work around a bug
- Fix broken log format string in set_min_output_buffer
- Process system messages before others. This helps with orderly flowgraph termination.
- Custom buffers: add missing (simulated) data transfer to input/output_blocked_callback functions in host_buffer class
- Fix Mach-kernel timebase (numer and denom were reversed)
- Fix signed integer overflows in fixed-point table generation
GRC
- Add parentheses on arithmetic expressions to avoid operator precedence problems in templated code
- Fix create hier / missing top_block error
Build system and packaging
- CI: Add testing for Fedora 36, remove Fedora 34.
- cmake: Use platform-specific Python install schemes
- cmake: Always prefix git hash used as version with «g»
- cmake: Allow MPIR/MPLIB package find to fail gracefully
- cmake: Remove ‘REQUIRED’ flag for Volk
gr-blocks
- Fix rotator_cc scheduled phase increment updates
- Wavefile Sink: add support for Ogg Opus if libsndfile is >= 1.0.29
- Probe Signal: synchronize access to d_level to prevent race conditions
gr-digital
- Use memcmp for CRC comparisons to avoid alignment errors
gr-dtv
- Use unsigned integer for CRC calculation
- Fix use of uninitialized memory
- Fix initialization of L1Post struct
gr-filter
- Fix various bugs in Generic Filterbank
gr-iio
- Fix grc pluto sink attenuation callback
gr-qtgui
- Several sinks produce wrong error messages, when GUI Hint is used. Reorder params in yml files to fix.
gr-soapy
- Deactivate stream before closing. Some modules depend on this behavior.
gr-uhd
- Implement
get_gpio_attr()
Code generation tools
- C++ generation: Fix various template errors
Modtool
- gr_newmod: Fix copying python bindings to test dir on Windows
- gr_newmod: Make untagged conda package version less specific
- modtool: Add a conda recipe to the OOT template
- Make the pydoc_h.mako more clang compliant
Documentation
- Add shim Sphinx config for readthedocs
Authors
The following people contributed commits to this release. They are credited by the name used in commits. There are may people who contribute in other ways … discussions, reviews, bug reporting, testing, etc. We just don’t have an easy way to provide credit for all that valuable work.
- Adrian Suciu adrian.suciu@analog.com
- Bjoern Kerler info@revskills.de
- Clayton Smith argilo@gmail.com
- Daniel Estévez daniel@destevez.net
- David Sorber david.sorber@blacklynx.tech
- Igor Freire igor@blockstream.com
- Jeff Long willcode4@gmail.com
- Josh Morman jmorman@gnuradio.org
- maitbot
- Martin Braun martin@gnuradio.org
- Michael Roe
- Paul Atreides maud.dib1984@gmail.com
- Philipp Niedermayer eltos@outlook.de
- Ron Economos w6rz@comcast.net
- Ryan Volz ryan.volz@gmail.com
- Volker Schroer
- wakass
Попался мне тут в руки стик e4000, я решил его подключить. Но писать об этом слишком скучно, да и получается какая-то WindowsTM магия с рассказыванием про то как запустить GUI и нажать там парочку кнопок
Поэтому в статье по мимо подключения SDR Dongle E4000 ,приводится перевод терминов используемых в SDR , а также основные принципы работы GNU Radio.
Я не начинающий радиолюбитель, у меня нет в запасе какого-то опыта, поэтому если Вам что-то не понятно или не нравится пишите, подправим/дополним
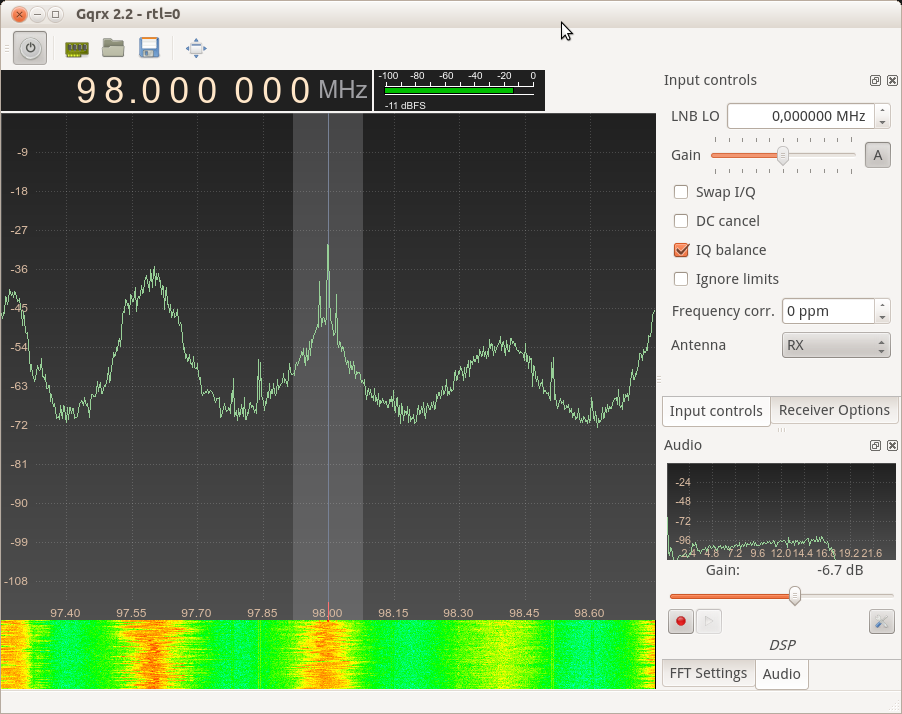
Table of Contents
- Быстрый старт для E4000
- Характеристики
- Установка
- Ham it up v1.2 upconverter
- Краткая справка по терминам
- Что ловить
- Базовые концепции GNU Radio
- Потоковые графы – and what they’re made of
- Элементы
- So what does GNU Radio do?
- Частота дискретизации
- Подробнее о блоках (и атомарности) #
- Метаданные
Быстрый старт для E4000
Характеристики
Elonics E4000 — 52 — 2200 MHz with a gap from 1100 MHz to 1250 MHz (varies)
Установка
Ну в общем под Ubuntu все просто нужно PPA,которое под GUI оболочку Gqrx, но туда включено GNU Radio https://launchpad.net/~gqrx/+archive/releases
Затем вставляем донгл запускаем Gqrx
sudo add-apt-repository ppa:gqrx/releases
sudo apt-get update
sudo apt-get install gqrx
# вставляем донгл
gqrx
Собственно, запустится GUI который изображен на скриншоте ,это GQRX отдельная разработка , GNU-Radio же позволяет собирать свои интерфейсы, но увы пока ничего качественного сразу не удается, да и это больше запутает. Ниже будут даны определения ,некоторым сокращениям. Также GQRX поддерживает HackRF BladeRF , но это софтина раскрывает лишь малую толику их потенциала.
Также, дальше стоит воспользоваться подробными инструкциями о том как работать с GNU Radio и донглом.
- http://superkuh.com/rtlsdr.html информация о чипе и его применении с кучей ссылок
- http://sdr.osmocom.org/trac/wiki/rtl-sdr использование драйвера
А именно проверка и удаление мешающего на 3.x ядрах модуля ядра dvb_usb_rtl28xxu ,если он есть конечно
lsmod | grep dvb_usb_rtl28xxu
sudo modprobe -r dvb_usb_rtl28xxu
Тестирование оборудования
Прослушивание указанной частоты из консоли
rtl_fm -f 96.3e6 -W -s 200000 -r 48000 - | aplay -r 48k -f S16_LE
Ham it up v1.2 upconverter
Немного о конверторе
http://habrahabr.ru/post/187946/
Конвертер Ham It Up v1.2 — RF Upconverter For Software Defined Radio высококачественный приемный КВ конвертер Hi-End КВ конвертер (RTLSDR/FUNCUBE)
- Предназначен для любого приемника УКВ с диапазоном 125 MHz to 155 MHz — например RTLSDR.
- Отлично подходит и проверен на ДВ-СВ и КВ в комплекте с RTL-SDR
- Питание от мини USB тип В или +5В .
- Диапазон принимаемых сигналов 100КГц до 50МГц.
- Имеет пассивный высокоуровневый смеситель Miniciruits ADE IP = +7дБм
- Хорошая фильтрация — ФНЧ — LO ДПФ — IF Output ДПФ
- Есть коммутация на обход, Вы можете одним переключением обойти этот КВ конвертер и вернуться к прослушиванию УКВ диапазона.
- ПРЕКРАСНО РАБОТАЕТ с HDSDR и SDRConsole v2
- Нужно сконфигурировать как UP CONVERTER IF — 125 M
Краткая справка по терминам

Чем меньше длинна волны тем больше частота.
У нас в отличии от «буржуев» все через длину волны выражается.
| Обозначение русское |
Диапазон частот |
Обозначение английское |
Диапазон частот |
Виды модуляции |
|---|---|---|---|---|
| Длинные волны(ДВ) | 148.5-283.5 кГц | Low frequency(LF) | 30 -300 kHz | AM, DRM |
| Средние волны(СВ) | 526,5-1606,5 кГц | Medium frequency(MF) | 300kHz-3MHz | AM, DRM |
| Короткие волны(КВ) | High frequency(HF) | 3-30MHz | AM, DRM | |
| КВ-1 | 3,95-4,00 МГц | |||
| КВ-2 | 5,90-6,20 МГц | |||
| КВ-3 | 7,20-7,45 МГц | |||
| КВ-4 | 9,40-9,90 МГц | |||
| КВ-5 | 11,60-12,10 МГц | |||
| КВ-6 | 13,57-13,87 МГц | |||
| КВ-7 | 15,10-15,80 МГц | |||
| КВ-8 | 17,48-17,90 МГц | |||
| КВ-9 | 18,90-19,02 МГц | |||
| КВ-10 | 21,45-21,85 МГц | |||
| КВ-11 | 25,67-26,10 МГц | |||
| Ультра короткие волны | ||||
| УКВ(Метровые) | Very High Frequency (VHF) | 30-300MHz | FM | |
| УКВ(дециметровые) | Ultra-high Frequency(UHF) | 300MHz-3GHz | ||
| L | 1-2GHz | |||
| S | 2-4GHz | |||
| УКВ(миллиметровые) | Super-high Frequency | 3GHz-30GHz | ||
| C | 4-8GHz | |||
| X | 8-12GHz | |||
| K_u | 12-18GHz | |||
| K | 18-26.5GHz | |||
| Extremely high frequency | 30-300GHz | |||
| K_a | 26.5-40GHz | |||
| Q | 30-50GHz | |||
| U | 40-60GHz | |||
| V | 50-75GHz | |||
| E | 60-90GHz | |||
| W | 75-110GHz | |||
| F | 90-140GHz | |||
| D | 110-170GHz | |||
Сокращения
| Русская аббревиатура |
Расшифровка | Английская аббревиатура |
|---|---|---|
| AM | Амплитудная модуляция | AM |
| ЧМ | Частотная модуляция | FM |
| ЛЧМ | Линейная ЧМ | Chirp |
| ФМ | Фазовая модуляция | PM |
| КАМ | Квадратурная АМ | QAM |
| Continuous wave(morse code) | CW | |
| CW Lower Sideband | CWL | |
| CW Upper Sideband | CWU | |
| Upper Sideband | USB | |
| Lower Sideband | LSB | |
| Спутниковый конвертер | LNB | |
| Цифровое(Аудио)радиовещание | DAB | |
| Набор технологий для DAB | DRM | |
Источники
- http://fyngyrz.com/sdrdxdoc/abbreviations.html англоязычный сборник сокращений
- http://habrahabr.ru/post/158161/ — Теория радиоволн: ликбез
- Wiki:Список видов модуляции, применяемых в любительской радиосвязи
- http://habrahabr.ru/post/158401/ — Software Defined Radio (SDR) Ликбез
- http://habrahabr.ru/post/158493/ — Теория радиоволн: аналоговая модуляция
Это очень простой вводный учебник к GNU Radio. Вам точно понадобится прочесть его , перед чтением чего нибудь ещё. Даже если вы об этом всем, по крайне мере бегло просмотрите, может вы что-то пропустили.
Потоковые графы – and what they’re made of
Прежде чем,мы к чему нибудь приступим, с начало на необходимо понять самые базовые концепции GNU Radio: Потоковые графы и блоки.
Потоковые графы это графы (из теории графов), по которым идут потоки данных. Множество приложений GNU Radio содержат, только потоковый граф и ничего более. Узлы этого графа называются блоками, а потоки данных текут по ребрам его.
Любая фактическая обработка сигнала производится блоками. В идеале каждый блок должен делать только одну работу, этот путь позволяет оставаться GNU Radio модульным и гибким. Блоки обычно пишутся на C++ (также можно писать их на Python); писать новые блоки не очень сложно.
Чтобы как то представить этот рассеянную по топику тему, давайте начнем с примера (все примеры были созданы с помощью GNU Radio companion (GRC) — графический интерфейс к GNU Radio).
Здесь, представлено три блока(прямоугольники). Данные перемещаются с лева на право в данном примере, это означает что они берут начало в аудио источнике проходят через фильтр низких частот и заканчивают свой путь записываясь в файл на жестком диске.
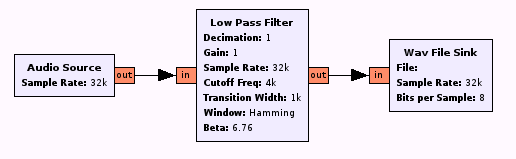
Блоки соединяются через порты. У первого блока нет входного порта, он создает образцы(sample). Такой блок, только с входным портом, называется Исток(source). В аналоговом стиле, последний блок , без выходного порта, называется Сток (sink).
Иногда это смущает: с точки зрения пользователя, аудио блок (также снимает образцы с звуковой карты) и является лишь частью обработчика. Когда мы говорим о Стоках и Истоках, это всегда означает с точки зрения потокового графа.
Так что же происходит здесь. Блок audio source подсоединен к драйверу звуковой карты и выводит аудио образцы. Это образцы дольше обрабатываются в фильтре низких частот. Наконец образцы(сэмплы), передаются в блок который записывает их в WAV файл.
Элементы
В основном, мы называем то что блок выводит — элементом. В предыдущем примере, один элемент это вещественное число представляло один сэмпл произведенный аудиодрайвером. Однако, элемент может быть представлен и в цифровом виде. Наиболее распространенный тип сэмплов это вещественные — real samples (как в примере выше), комплексные — complex samples (наиболее распространенные в software defined radio), целые — integer types и векторы — vectors этих скалярных типов.
Чтобы понять эту концепцию рассмотрим анализ БПФ (Быстрое Преобразование Фурье или FFT). Скажем так, мы хотим выполнить БПФ над сигналом, перед тем как сохранять его в файл. Конечно же нам необходимо некоторое количество сэмплов в одно время, чтобы вычислить БПФ; в отличие от фильтров , оно не работает с одним единственным образцом.
Вот как это работает:

Здесь появился, новый блок названный ‘Stream to vector’. Его особенность в том что выводимое им значение отличатся от того что поступает на вход. Этот блок берет 1024 сэмпла (т.е. 1024 элемента) и посылает их на вывод в виде одного вектора из 1024 сэмплов (т.е. это его элемент ). Комплексный вывод БПФ затем преобразуется как величина площади в реальный тип данных (обратите внимание как мы используем различные цвета портов для указания различных типов данных).
Так что помните: элемент может быть любым, сэмпл, набор битов, заданный коэффициент для фильтра или любой другой.
Резюме:
Вот что вы должны знать:
- Вся обработка сигнала в GNU Radio осуществляется через потоковые графы.
- Потоковый граф состоит из блоков. Блок совершает одну операцию по обработке сигнала,такую как фильтрация, добавление сигнала, превращение,декодирования, доступ к железу и множество других.
- Данные перемещаются между блоками в различных форматах, комплексные или вещественные , целые, числа с плавающей точкой или любой другой заданный вами тип.
- Каждый потоковый граф должен обладать по крайне мере одним Истоком и одним Стоком.
So what does GNU Radio do?
С начала, вот что вы делаете: вы проектируете потоковый граф, выбираете блоки и задаете соединения и сообщаете об этом всем GNU Radio. С GNU Radio вы сталкиваетесь дважды: сперва, оно поставляет вам множество блоков. После того как потоковый граф задан, оно выполняет граф вызывая блоки один за другим и проверяет что элементы передаются от одного блока к другому.
Частота дискретизации
Конечно, если вы читаете эту статью, вы знаете что такое частота дискретизации (если это не так, отправляйтесь к картинке чтобы понять это).
Давайте посмотрим на потоковые графы. В первом примере, аудио источник обладает фиксированной частотой дискретизации 32кб/с. Так как фильтр никак не меняет частоту дискретизации, эта частота используется на протяжении всего потокового графа.
Во втором примере, второй блок (stream to vector) создает элемент каждые 1024 элемента, поступающих на вход. Так что, частота с которой создаются эти элементы в 024 раза меньше, чем та с которой он потребляет элементы (то что на самом деле он производит столько же байт ,сколько и потребляет, здесь не имеет значения). Такой блок называется дециматором(decimator), потому что он прореживает частоту появления элементов. Блок создающих элементы с большей частотой чем та что поступает на вход называется интерполятором (interpolator). Если создание и потребление элементов происходит на одной частоте , это — sync block.
Теперь ,давайте вернемся ко второму примеру. Как уже упоминалось он обладает различными частотами дискретизации на всем потоковом графе. Но какая частота является базовой?
OK, приготовьтесь: нет такой вещи. До тех пор пока нет представления о внутреннем таймере железа который фиксирует частоту, частота дискретизации бессмысленна– только относительная частота (т.е. отношение частот входа к выходу. Ваш компьютер может обрабатывать сэмплы так быстро ,как он хочет (заметьте это может заставить ваш компьютер зависнуть, т.к. 100% ЦПУ будет занято обработкой вашего сигнала).
Вот другой пример:
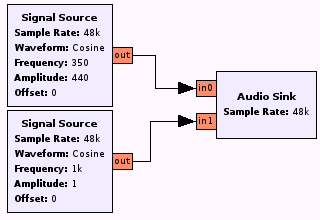
Прежде всего, что нового мы здесь видим здесь представлены один Сток и два Истока. Каждый порт представляет из себя один из каналов(левый и правый) звуковой карты, которые работают на фиксированной и разной частоте.
Подробнее о блоках (и атомарности) #
Давайте вернемся к блокам. Наибольшая часть GNU Radio это большое количество блоков.Когда вы начнете использовать GNU Radio, вы будете соединять блок за блоком. Рано или поздно Вам понадобится блок, который будет недоступен в GNU Radio, тогда вы лего можете написать его самостоятельно. Это не трудно.
Вопрос в том ,что вы поместите в этот блок? В идеале, блоки должны быть как можно более атомарными; каждый блок должен выполнять только одну работу — этот путь оставляет GNU Radio модульным и гибким. Однако ,иногда это просто не работает. Некоторые блоки , должны будут выполнять несколько заданий одновременно. Вы вероятно найдете компромисс между модульностью и производительностью.
Метаданные
Поток сэмплов может стать гораздо интересней ,если к нему подсоединить интерпретируемые метаданные, такие как время приема, центральная частота, частота дискретизации, или что нибудь специфичное для протокола передачи такие как идентификационная нода.
В GNU Radio, добавление метаданных к потоку осуществляется через механизм называемый метками stream tags. Метка это специфический объект которая соединена со определенным элементом (т.е. сэмплом). Это может быть скаляр любого типа, вектор, список ,словарь или то что укажет пользователь.
Сохраняя поток на диск, метаданные также будут сохранены (смотри также Metadata Documentation Page).
RTL-SDR сегодня очень популярная тема в сети. Существует множество информации, как использовать это недорогое устройство под Windows и Linux. В этой статье (перевод [1]) описан еще один интересный для экспериментатора способ использования RTL-SDR (приемников на основе чипов RTL28xxU) — создание FM-приемника из функциональных блоков системы GNU Radio Companion [10] (далее сокращенно GRC). Возможно это руководство поможет Вам при создании собственных вариантов приемников для других диапазонов и других сигналов. Непонятные термины и сокращения см. в разделе «Словарик» статьи [11].
[Шаг 1. Что такое RTL-SDR?]
Если Вас интересует только создание проекта GRC, то переходите сразу к шагу 5.
RTL-SDR это самый дешевый способ попробовать в работе приемник SDR (Software Defined Radio). Это новая технология, предлагающая основную обработку принимаемого сигнала (фильтрация, демодуляция и другие функции, которые ранее реализовывались чисто аппаратно) выполнять процессором компьютера PC. Некоторые реализации SDR устройств даже могут синтезировать передаваемый сигнал (устройства RTL-SDR этой функцией не обладают). Приемник RTL-SDR обычно позволяет прослушивать сигналы радиоэфира в диапазоне частот от 1 до 2000 МГц (крайние пределы зависят от особенностей реализации устройства).
Вот краткий перечень сигналов, которые может обработать приемник RTL-SDR:
— Обычные вещательные станции FM.
— Радиосвязь полиции.
— Радиосвязь воздушных диспетчеров, передача информации о положении самолетов и морских судов.
— Сигналы портативных передатчиков наподобие ключей от машины или двери гаража.
— Сигналы спутников GPS.
— Передачи МКС и другой космической связи с частотами ниже 2 ГГц.
— Сигналы аппаратуры радиоуправления моделями.
[Шаг 2. Где взять RTL-SDR?]
Самый простой и экономный метод — купить на AliExpress или eBay. Устройство RTL-SDR может стоить от $10 и выше, в зависимости от разновидности и комплектации. Лучше всего купить устройство RTL-SDR V3 на чипе RTL2832U в алюминиевом корпусе [2] (цена около $16 и выше). Более дешевый вариант приемника на основе чипа R820T (цена около $8). Поиск на сайтах AliExpress и eBay рационально проводить по наименованию чипа:

При выборе устройства обращайте внимание на варианты реализации устройства, они могут быть изготовлены на различных чипах, и от этого зависит качество приема и диапазон рабочих частот. Общие различия приемников рассмотрены в статье [3].
Очень многое зависит от качества приемной антенны. Обычно в комплект приемника входит короткая штыревая антенна, которая обеспечивает удовлетворительный прием местных радиостанций в диапазоне частот от 70 до 500 МГц. Для приема радиолюбительского обмена в диапазонах длин волн от 2м до 160м понадобится внешняя антенна соответствующего размера (например, см. [5]).
[Шаг 3. Что понадобится?]
Приемник RTL-SDR, антенна, соединительный кабель для передачи сигнала от антенны к приемнику, операционная система Linux. Автор [1] использовал приемники RTL2838 и Rafael Micro на чипах R820T под операционной системой Arch Linux.

[Шаг 4. Подключение аппаратуры и установка ПО]
Первое, что нужно сделать — подключить Ваше SDR-устройство к компьютеру, и определить, как оно определилось в системе (какой в нем используется чип). Для этого выполните на Linux команду dmesg | tail или journalctl. Ответ на команду dmesg может быть примерно таким (показана часть вывода dmesg со строками, относящиеся к тюнеру):
[ 4009.326338] usb 7-5: new high-speed USB device number 4 using ehci-pci
[ 4009.466712] usb 7-5: dvb_usb_v2: found a 'Realtek RTL2832U reference design' in warm state
[ 4009.531594] usb 7-5: dvb_usb_v2: will pass the complete MPEG2 transport stream to the software demuxer
[ 4009.531613] DVB: registering new adapter (Realtek RTL2832U reference design)
[ 4009.534554] usb 7-5: DVB: registering adapter 0 frontend 0 (Realtek RTL2832 (DVB-T))...
[ 4009.534627] r820t 4-001a: creating new instance
[ 4009.546177] r820t 4-001a: Rafael Micro r820t successfully identified
[ 4009.552681] Registered IR keymap rc-empty
[ 4009.552783] input: Realtek RTL2832U reference design as /devices/pci0000:00/0000:00:1d.7/usb7/7-5/rc/rc1/input20
[ 4009.552854] rc1: Realtek RTL2832U reference design as /devices/pci0000:00/0000:00:1d.7/usb7/7-5/rc/rc1
[ 4009.553275] input: MCE IR Keyboard/Mouse (dvb_usb_rtl28xxu) as /devices/virtual/input/input21
[ 4009.554466] rc rc1: lirc_dev: driver ir-lirc-codec (dvb_usb_rtl28xxu) registered at minor = 0
[ 4009.554474] usb 7-5: dvb_usb_v2: schedule remote query interval to 400 msecs
[ 4009.565930] usb 7-5: dvb_usb_v2: 'Realtek RTL2832U reference design' successfully initialized and connected
Автор [1] столкнулся с проблемой драйвера по умолчанию, которая приводила к зависанию операционной системы при отключении тюнера от USB. Проблема была решена запретом этого драйвера путем создания нового .conf файла в /etc/modprobe.d, где содержалась одна строка:
blacklist dvb_usb_rtl28xxu
После этого путь до файла было добавлен в переменную FILES в /etc/mkinitcpio.conf:
FILES="/etc/modprobe.d/blacklist.conf"
Далее был сгенерирован новый образ командой mkinitcpio -p linux, после перезапуска проблема исчезла (на других операционных системах та же процедура может совершенно отличаться).
Если операционная система правильно определила Ваш тюнер, то Вы можете установить пакеты, необходимые для использования RTL-SDR. Это пакеты rtl-sdr, sdrsharp-svn, gnuradio и gr-osmosdr-git.
rtl-sdr. Это основной драйвер, и он может быть установлен на Arch из community-репозитория (обратите внимание, что это делается с правами root):
Альтернативно есть git-версия доступная на AUR как rtl-sdr-git.
sdrsharp-svn. Этот пакет (доступный на AUR) содержит GUI-программу SDR#, она дает основной доступ к радиоприемнику RTL-SDR, и может использоваться для проверки. SDR# может декодировать сигналы AM, FM и другие виды модуляции, и эта программа хорошо подходит для первоначального знакомства с технологией SDR.

gnuradio. Наиболее мощный инструмент для SDR это программный пакет GNU Radio, и его графическая утилита GNU Radio Companion (GRC). Пакет gnuradio доступен на AUR под именем gnuradio. Пакет gnuradio также требует установки пакета gr-osmosdr-git из AUR, который нужен в GRC для использования тюнера RTL-SDR в качестве источника цифровых данных.
На других операционных системах Linux процедуры установки необходимых пакетов могут отличаться. На Ubuntu пакет rtl-sdr должен быть доступен из apt-get, и на Fedora он также должен быть в репозиториях по умолчанию. Хорошая инструкция по инсталляции gnuradio есть по ссылке [4].
Теперь можно применить программу SDR#, чтобы найти частоту станции FM с достаточно сильным и качественным сигналом. Запишите эту частоту, она понадобится для проверки, насколько хорошо работает Ваш самодельный приемник GNU Radio. Он должен работать не хуже, чем в программе SDR#.
[Шаг 5. Теоретическое введение в FM Radio]
Самое простое FM-радио состоит из нескольких элементов:
— Источник сигнала. В нашем случае это тюнер RTL-SDR (RTL-SDR Source).
— Фильтр (Low Pass Filter).
— Демодулятор WBFM (WBFM Receive).
— Вывод звука — звуковая карта нашего PC (Audio Sink).
Могут быть и другие элементы, в зависимости от входной и выходной частоты дискретизации. На рисунке ниже показаны основные используемые GRC-блоки.

Редактор GRC красным цветом показывает, что что-то не так. Блоки требуют соединений друг с другом, и их параметры также необходимо настроить. Все это будет проделано на следующих шагах.
[Шаг 6. RTL-SDR Source]
Здесь вместо RTL-SDR Source также может использоваться источник данных osmocom Source. Оба источника можно найти в категории Sources, находящейся в правой панели GRC.

Для источника нужно настроить частоту дискретизации (sample rate) на 2M. Это делается путем редактирования переменной samp_rate, и установки её значения в 2e6. Для источника также настраивается частота принимаемой радиостанции с помощью переменной freq. Имена переменных samp_rate и freq подставляются в соответствующие поля ввода диалога свойств источника сигнала.

[Шаг 7. Low Pass Filter]
Следующий шаг состоит в фильтрации частот кроме той, которую мы установили на предыдущем шаге. Эта задача выполняется блоком low pass filter (дословно переводится как фильтр низких частот, ФНЧ). Его можно найти в категории filters.

Частоту среза фильтра установите с помощью переменной cutoff со значением 100e3 (это стандартная полоса частот приема станции FM).
Параметр Transition Width обозначает длину спада характеристики фильтра. Автор [1] подобрал этот параметр опытным путем с помощью значения переменной transition, которая была установлена в 1M.
Для того, чтобы звуковая карта могла принять поступающий поток цифровых данных 2M, необходимо предварительно снизить частоту выборок до допустимого значения. Эта операция называется прореживанием выборок (децимация), и коэффициент прореживания устанавливается в поле Decimation диалога свойств фильтра, в этом примере как int(samp_rate/500e3). В результате получился коэффициент прореживания 4. Значение 500e3 было выбрано исходя из параметра Quadrature Rate демодулятора FM (который устанавливается на шаге 8), равного 500k. Частота выборок сигнала на выходе Low Pass Filter после децимации все еще достаточно высока, она будет дополнительно понижена впоследствии после дополнительных преобразований.

Соедините выход RTL-SDR Source со входом Low Pass Filter. Обратите внимание, что заголовок компонента RTL-SDR Source изменил цвет с красного на черный. Это означает, что блок RTL-SDR Source подключен корректно. У блока Low Pass Filter цвет заголовка пока не поменялся, потому что необходимо подключить его выход к получателю цифровых данных, что будет сделано на следующем шаге.
[Шаг 8. WBFM Receive]
Теперь нужно подключить к выходу Low Pass Filter демодулятор сигнала FM. Этот блок можно найти в разделе modulators, он называется WBFM Receive. Параметр Quadrature Rate, соответствующий частоте поступления входных выборок, был оставлен в значении по умолчанию 500k. Соедините выход Low Pass Filter со входом WBFM Receive.

[Шаг 9. Формирование звукового потока данных и регулирование громкости]
Эти две задачи могут быть выполнены блоками Rational Resampler (передискретизация с рациональным коэффициентом, находится в разделе resamplers) и Multiply Const (умножитель на константу, находится в разделе math operators).
Rational Resampler. Выборки данных с частотой 500k необходимо преобразовать в частоту выборок 48k, этот поток данных способен обработать любой драйвер звуковой карты PC. Преобразование частоты выборок (передискретизация) делается компонентом Rational Resampler, и это настраивается параметрами Interpolation (интерполяция, предварительное умножение со сглаживанием) и Decimation (прореживание). В нашем примере сначала делается децимация с коэффициентом 500 (деление частоты выборок на 500), и затем интерполяция с коэффициентом 48 (умножение частоты выборок на 48), в результате получается частота выборок сигнала 48k.

Multiply Const. В этом блоке параметр Constant может использоваться для регулирования громкости звука. Для этого создается переменная volume, которая будет связана с графическим элементом — ползунком регулирования «WX GUI Slider». Это позволит нам регулировать громкость звучания приемника после запуска программы GRC.

[Шаг 10. Audio Sink]
Последний шаг состоит в добавлении блока получателя звуковых данных Audio Sink (находится в разделе Audio). В нем нужно только установить необходимую частоту выборок сигнала (параметра Sample Rate). Это делается выбором 48k из выпадающего списка. Если по какой-то причине звуковая карта PC не предоставляет такого значения, то установите другое, и подберите соответствующие параметры блока Rational Resampler.

Во время тестов созданной схемы приемника было обнаружено, что децимация до 500k должна быть не на выходе блока фильтра, а на его входе. После этого демодулированный звук воспроизводится лучше.

Конечная рабочая схема FM-приемника:

Обратите внимание, что некоторые коннекторы GRC-блоков синие, а некоторые оранжевые. Синие относятся с комплексным данным (complex data, которые имеют реальную и мнимую составляющие). Оранжевые коннекторы показывают тип данных Float. В большинстве случаев система GRC может сама преобразовывать типы данных, однако иногда требуется явное преобразование.
Готовый GRC-проект приемника FM можно скачать по ссылке 190508FM-receiver.grc.
Этот проект был реализован на LInux Mint 18.3 Cinnamon 3.6.6. Пакет rtl-sdr был установлен через PyBOMBS [6].

В этом проекте добавлены компоненты отображения водопада (GUI Waterfall Sink), спектра частот (GUI Frequency Sink) и улучшена обработка стереосигнала FM:

Еще один проект, где автор также столкнулся с проблемой замены драйвера RTL-SDR:

В этом проекте использовался дополнительный блок Rational Resampler на входе фильтра, а также блок WX GUI FFT Sink:

Проект на скриншоте ниже реализован в GNU Radio Companion под Windows 10. Поначалу удавалось принимать с помехами одну или две радиостанции, и после того, как было подстроено усиление в блоке RTL-SDR Source на 50dBm, прием стал намного лучше.

Реализация проекта под Mac OS:

Еще одна минимальная реализация:

[AM приемник]
Этот проект простого приемника был повторен мной и немного переделан на основе информации по ссылкам [8, 9]. На схеме зеленым цветом добавлены пояснения на русском языке и основные взаимосвязи между компонентами приемника (к сожалению, такие комментарии нельзя добавлять в редакторе GRC).

Опции проекта. Блок содержит общие свойства — заголовок (Simple receiver AM), тип генерируемого исполняемого кода Python (WX GUI), размер окна запущенного проекта (1280,1024) и другие опции.
Частота оцифровки. Этот блок задает значение переменной samp_rate, которое по умолчанию используют все добавляемые в проект новые блоки, связанные с обработкой, отображением и выводом сигнала.
Настройка частоты. Эта группа блоков задает частоту настройки для блока приемника RTL-SDR Source. Частота настройки SDR-тюнера вычисляется по следующей формуле:
freq+offset_coarse+offset_fine+HamItUp_freq
Здесь переменная freq это основная частота настройки, задаваемая полем ввода WX GUI Text Box. Переменные offset_coarse и offset_fine задают грубую и точную подстройку частоты соответственно (эти переменные меняется движками-слайдерами WX GUI Slider). Переменная HamItUp_freq учитывает смещение частоты вверх на 125 МГц, которую создает аппаратный конвертер Ham It Up (производство Nooelec), подключенный между антенной и входом RF приемника RTL-SDR RTL2832U.
Усиление RF. Этот слайдер задает значение параметра усиления по радиочастоте блока RTL-SDR Source (SDR-приемник RTL2832U).
Управление полосой приема. В этой группе два блока — Low Pass Filter (фильтр низкой частоты), и WX GUI Slider (движок, которым можно настраивать полосу фильтра). Фильтр выполняет две важные функции — ограничивает полосу пропускания выходного тракта приемника (полоса регулируется слайдером в диапазоне от 2 до 40 кГц), а также выполняет прореживание выборок сигнала (децимацию) с коэффициентом 32. Децимация необходима для повышения производительности приемника — остальные блоки приемника будут обрабатывать только необходимую полосу частот.
Отображение сигналов. Эти блоки представляют собой визуальные компоненты, которые показывают спектр принимаемого сигнала. Серый верхний блок WX GUI FFT Sink графического спектра отключен и заменен на блок водопада WX GUI Waterfall Sink (водопад мне показался более удобным).
Передискретизация. С помощью блока Rational Resampler реализована подгонка частоты дискретизации сигнала 64 кГц на выходе фильтра Low Pass Filter (samp_rate/32 = 64 кГц) к стандартной частоте дискретизации звуковой карты компьютера 48 кГц (используется блоком вывода звука Audio Sink). Подгонка осуществляется с помощью интерполяции на 12 и децимации на 16, в результате получается частота 64 * 12 / 16 = 48 кГц.
АРУ. Блок AGC3 осуществляет автоматическую регулировку усиления приемника.
Детектор АМ. Блок AM Demod осуществляет демодуляцию амплитудно-модулированного сигнала.
Громкость звука. Блок слайдера и блок умножения на константу осуществляют управление громкостью звучания принимаемого сигнала.
Готовый GRC-проект приемника AM можно скачать по ссылке 190516AM-receiver.grc.
[Ссылки]
1. RTL-SDR FM Radio Receiver With GNU Radio Companion site:instructables.com.
2. RTL-SDR Blog V3 RTL2832U 1PPM TCXO HF BiasT SMA Software Defined Radio site:aliexpress.com.
3. rtl-sdr site:osmocom.org.
4. Installing GNU Radio site:gnuradio.org.
5. АНТЕННА БЕВЕРИДЖА практическая реализация.
6. HackRF и GNU Radio, быстрый старт.
7. GNU Radio + RTLSDR под Windows для начинающих site:youtube.com.
8. GNU Radio Companion, Part 2 HACKADAY site:youtube.com.
9. YOUR FIRST GNU RADIO RECEIVER WITH SDRPLAY site:hackaday.com.
10. GNU Radio Companion.
11. GNU Radio, краткий справочник.
Всем здравствуйте.
Решил поюзать HackRf в GNU Radio в Windows 10 . Прием ФМ-радиостанций без проблем.
Решил попробовать на передачу поработать. Взял первый пример по этой ссылке — https://itnan.ru/post.php?c=2&p=275168 . Правда не стал ставить блок Multiply Const . В итоге при старте мне GNU Radio выдает такое сообщение:
Код: Выделить всё
Generating: 'C:\Users\rashid\Desktop\top_block.py'

Executing: C:Python27python.exe -u C:UsersrashidDesktoptop_block.py

gr-osmosdr 0.1.5 (0.1.5) gnuradio 3.7.13.5
built-in sink types: uhd hackrf bladerf soapy redpitaya file
Traceback (most recent call last):
  File "C:UsersrashidDesktoptop_block.py", line 84, in <module>
    main()
  File "C:UsersrashidDesktoptop_block.py", line 78, in main
    tb = top_block_cls()
  File "C:UsersrashidDesktoptop_block.py", line 47, in __init__
    self.osmosdr_sink_0 = osmosdr.sink( args="numchan=" + str(1) + " " + 'hackrf=0' )
  File "C:Program FilesPothosSDRlibpython2.7site-packagesosmosdrosmosdr_swig.py", line 1153, in make
    return _osmosdr_swig.sink_make(*args, **kwargs)
RuntimeError: Failed to open HackRF device (-5) HackRF not found
Пробовал писать в блоке osmocom Sink и
и
. Ничего не помогает.
Как быть?

GNURadio также может работать в Windows.При установке GNURadio серия сценариев PowerShell будет автоматически загружена и встроена в исходный код. Затем это зависит от 64-битного собственного двоичного файла, который упакован в .msi с помощью Visual Studio 2015.

Если вы хотите узнать больше, см.Вот。
В пакет MSI входят:
Поддержка оборудования: UHD, RTL-SDR, hackrf, airspy, BladeRF, osmoSDR, FCD
Модуль GNURadio: была собрана версия 3.7.9.2, кроме gr-comedi.
Модули OOT: gr-iqbal, gr-fosphor, gr-osmosdr, gr-acars, gr-adsb, gr-modtool
Другие приложения: gqrx
Резюме
Необходимо установить следующие инструменты:
MS Visual Studio 2015 (Сообщество или выше)
Git For Windows
CMake
Doxygen
ActiveState Perl
Wix toolset for VS 2015
Чтобы получить этот набор вещей, вам потребуется не менее 60 ГБ на жестком диске.
Установить и собрать
Выполните следующую команду с высокими полномочиями, на самом деле только «Set-ExecutionPolicy» лицемерно, а остальные можно запускать с обычной учетной записью.

git clone http://www.github.com/gnieboer/GNURadio_Windows_Build_Scripts

cd GNURadio_Windows_Build_Scripts

powershell

Set-ExecutionPolicy Unrestricted

./~RUNME_FIRST.ps1
Журнал сборки находится в каталоге $ root / logs. Сценарий проверяет ключевое содержание каждого шага, но нет гарантии, что ошибки сборки могут быть обнаружены. Таким образом, вы можете использовать журнал для дальнейшей диагностики проблемы.
Когда установка будет завершена, вы увидите файл msi в подкаталоге [root] / src-stage4-installer / dist. Эту сборку можно протестировать, запустив run_grc.bat в подкаталоге src-stage3 / staged_install / [config] / bin после седьмого шага.
Меры предосторожности
Сценарий сгенерирует msi-файл Release, но его нельзя запустить на машине, отличной от AVX. Это связано с ошибкой VOLK. Решение здесь, просто измените одну строку кода в определенном файле.
1. Выключите антивирусное программное обеспечение во время установки, и Защитник Windows также должен быть выключен. PyQt4 может не создать файл манифеста из-за этого.
2. Щелкните правой кнопкой мыши на панели управления Windows и выберите «Свойства», чтобы увидеть, не были ли отменены режимы быстрого редактирования и вставки. В противном случае при нажатии на окно выполнение программы может зависнуть.
3. Данный набор тестировался под B200 UHD, hackRF и RTL-SDR. Другие устройства не были проверены. Если друг провел тест, не забудьте сообщить мне об этом.
4. Есть проблема, я настоятельно рекомендую Dependency Walker решить проблему зависимости библиотеки.
5. Если ваше соединение нестабильно, вы можете загрузить пакет, который может привести к сбою сборки.В этом случае вы можете удалить потенциально проблемный пакет из каталога / packages, и сценарий попытается загрузить его снова.
6. Теперь отладка сборки приведет к сбою сборки PyGTK и Wx, поэтому GRC будет недоступен. Сборка будет продолжена, но GNURadio включит эти функции, и сочетания клавиш во время процесса установки также потеряют свою силу. При этом gr-acars вылетит только при отладке сборки.
7. Эти устройства пока не поддерживают: FCD Pro +, RFSPACE, MiriSDR, SoapySDR.
8. Если вы устанавливаете MSVC по нестандартному пути при установке MSVC, это может привести к сбою обнаружения зависимостей.
9. Этот набор вещей теперь поддерживает только CMake 3.3. Считается, что CMake 3.5 имеет проблемы, когда на этапе сборки обнаруживаются пользовательские установки python.
10. Перед созданием MSI-файла Zadig необходимо вручную добавить в каталог / bin.
* Справочный источник:github