Google USB Drivers are required to connect Google Pixel or Nexus devices to Windows PC using a USB cable. You will need these drivers to transfer files or sync data on your Pixel/Nexus device, and especially when working with the Android ADB and Fastboot tools.
You can download the latest Google USB Drivers from here and follow the instructions on how to manually install them on your Windows PC. Furthermore, we have also provided instructions on how to modify the ‘android_winusb.inf‘ file included in the drivers to support other Android devices.
Normally, the said USB drivers come bundled with SDK Manager in the Android Studio IDE, which is constantly updated with the latest available drivers. But if you’re an average Android user, chances are that you might not have the IDE set up on your PC. That’s because it is used mostly by experienced developers and enthusiasts. In that case, you can use the standalone USB drivers, which as provided directly by Google for users who might face issues of Windows not recognizing their phone over a USB connection.
Google USB drivers also act as ‘Android ADB and Fastboot Drivers‘ that allow your computer to communicate with your Android device over the Android Bootloader Interface (Fastboot Mode) as well as Android Composite ADB Interface. So you can install them on your PC to use ADB (Android Debug Bridge) for debugging apps and ROMs, boot your device into Bootloader/Recovery modes, or use Fastboot to unlock the bootloader and flash factory images on your Pixel/Nexus device.
To sum up, the drivers are useful in various situations. With that in mind, go ahead to download the latest version of the USB Drivers from below and follow the instructions on how to install them on your Windows PC.
Table of Contents
- Download Google USB Drivers
- Direct Download
- Download via Android Studio
- How to Install Google USB Drivers
- On Windows 11 and Windows 10
- On Windows 7 and Windows 8/8.1
- How to Modify Google USB Drivers to Support Other Android Devices
- Step 1: Get the VID and PID of your Android Device
- Step 2: Modify ‘android_winusb.inf’ file
- Step 3: Install the Modified USB Drivers
Download Google USB Drivers
Now, there are two different ways/methods to download the USB driver on Windows. You can either download the Google USB Driver ZIP file manually. Or, you can use the SDK Manager in the Android Studio to download it.
The latter gives an added benefit, that is the SDK Manager will automatically notify you when a newer version is available. The former method, on the contrary, will require you to manually check if a newer driver version is available and download it again.
In our personal experience, downloading the ZIP package directly is easier than using the Android Studio. But the choice is solely up to you. We have covered both the methods below.
Note: If you’re using macOS or Linux, you would not need these drivers.
Direct Download
Just click on the link below to download the Google USB Driver ZIP file to your PC.
- Latest version: usb_driver_r13-windows.zip
- Previous versions:
- usb_driver_r12-windows.zip
- usb_driver_r11-windows.zip
- usb_driver_r10-windows.zip
Once downloaded, extract the ZIP file to a suitable location on your computer. The extracted ‘usb_drivers’ folder should contain the required ‘android_winusb.inf’ driver file.
Download via Android Studio
First of all, make sure that you have downloaded and installed the latest version of Android Studio on your Windows PC. Once you have it installed, follow the instructions below:
Android Studio will now download the Google USB drivers to ‘android_sdkextrasgoogleusb_driver‘ on your PC. Here ‘android_sdk‘ is the folder where the Android SDK is installed on your PC.
How to Install Google USB Drivers
The Google USB Drivers come in the form of an ‘android_winusb.inf‘ setup information file, rather than a Windows executable. So, you will need to manually install it on your Windows PC. The same steps can also be used to upgrade the existing drivers installed on your PC to the latest version available.
Now follow the installation guide below according to the Windows OS version you’re using. It’s quite easy and wouldn’t take more than a minute to install them.
On Windows 11 and Windows 10
To install Google Android USB Drivers on Windows 10, follow the instructions below.
- First, connect your Android device to the PC’s USB port.
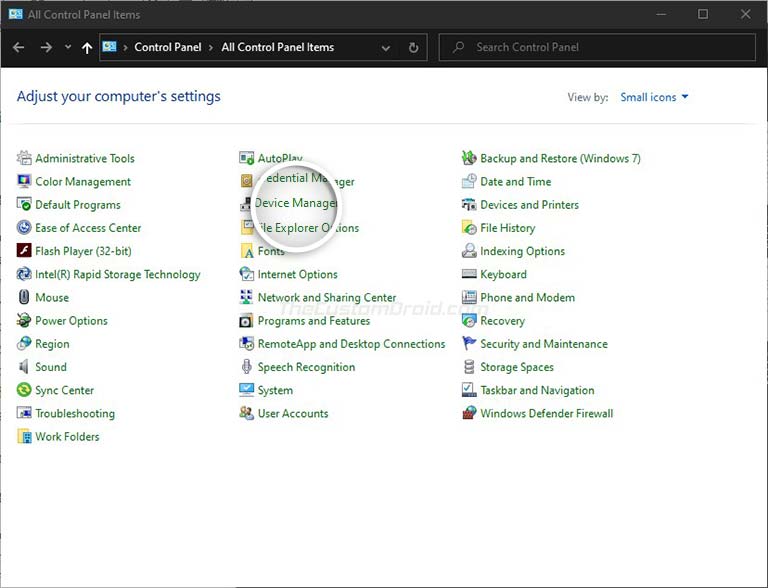
- Go to the ‘Control Panel‘ and click on ‘Device Manager‘.

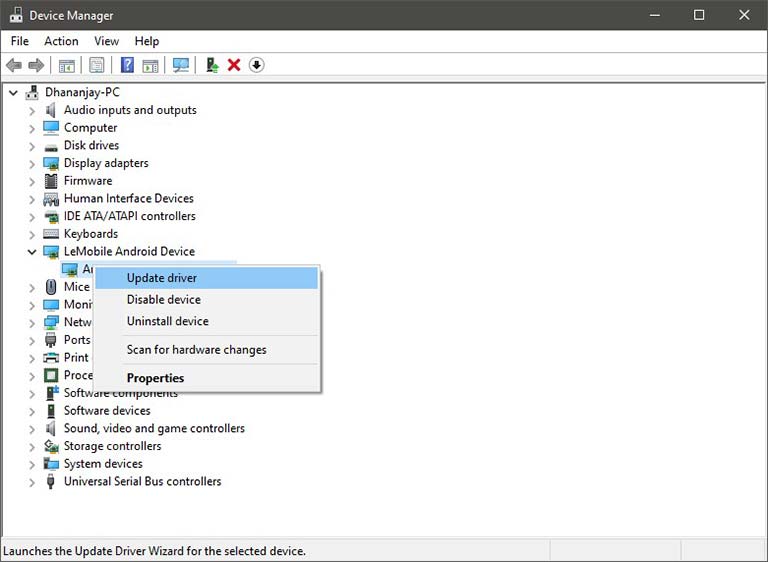
- Double-click on your device category to expand the list of connected devices.
- Right-click on your Android device’s name and click on ‘Update driver‘.

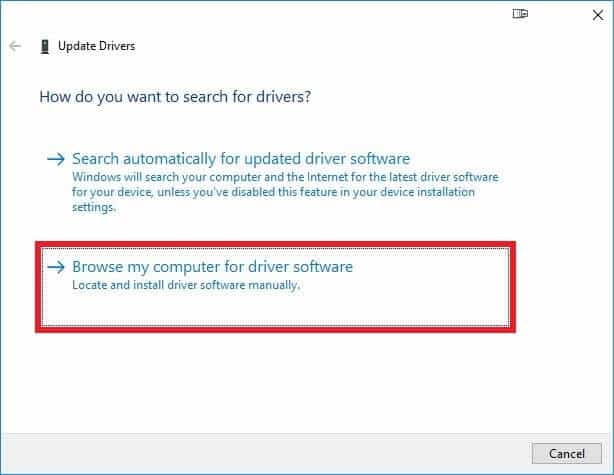
- Click on ‘Browse my computer for driver software‘ in the Hardware Update wizard.
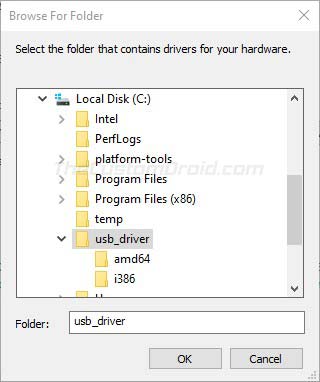
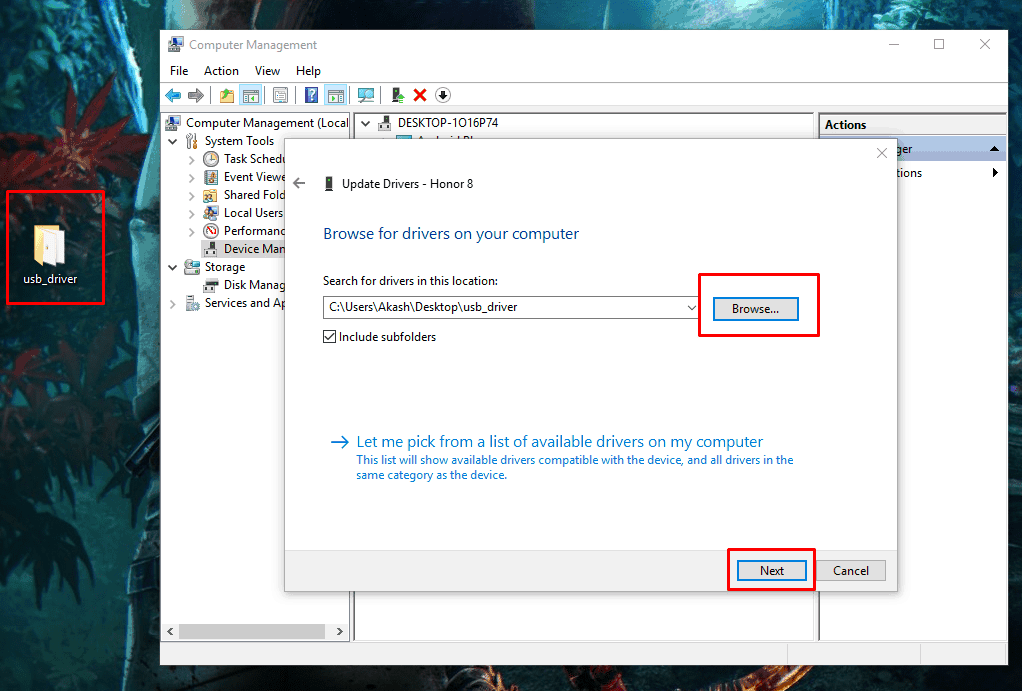
- Click ‘Browse‘ and select the ‘usb_driver‘ folder.
- For example: If you downloaded the drivers using Android Studio, the folder should be located in ‘android_sdkextrasgoogle’ on the PC. Or, if you downloaded the ZIP file, then just locate the extracted ‘usb_driver’ folder.

- For example: If you downloaded the drivers using Android Studio, the folder should be located in ‘android_sdkextrasgoogle’ on the PC. Or, if you downloaded the ZIP file, then just locate the extracted ‘usb_driver’ folder.
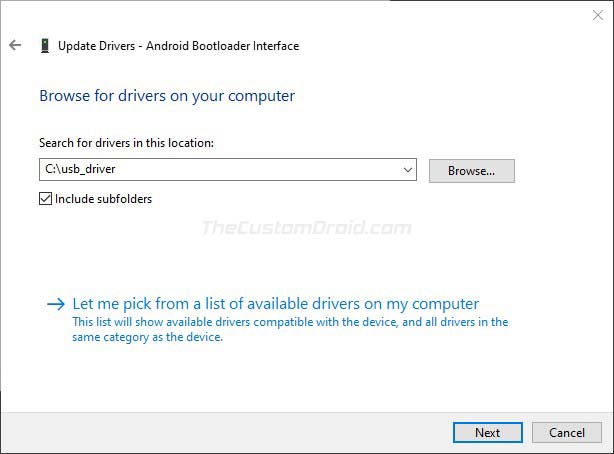
- Finally, click ‘Next‘ to install the drivers.

On Windows 7 and Windows 8/8.1
To install Google Android USB drivers on Windows 7, Windows 8, and Windows 8.1 PC, follow the instructions below.
- First, connect your Android device to the Windows PC’s USB port.
- Then right-click on ‘Computer‘ and select ‘Manage‘.
- Select Devices in the left pane.
- Double-click on ‘Other device‘ in the right pane to expand it.
- Right-click on the device name (e.g. Google Pixel) and select the ‘Update Driver‘ option.
- Click on ‘Browse my computer for driver software‘ in the Hardware Update wizard.
- Click ‘Browse‘ and locate the ‘usb_driver’ folder.
- Finally, click on ‘Next‘ to install the USB drivers.
You should now have the Google USB Drivers installed. Your Windows PC should now detect and recognize your Android device over the USB connection.
Important Note
If the drivers fail to install even after following the steps, OR the ADB/Fastboot commands do no work even if the drivers are installed, then it could be because you’re using a USB 3.0/3.1/3.2 port or an AMD based PC. This is an issue faced by a lot of users recently.
To fix it, simply try using a USB 2.0 port (If it’s not available, you can also use a USB 2.0 hub) on your PC. Also, try using an Intel-based PC for especially when using ADB/Fastboot tools.
How to Modify Google USB Drivers to Support Other Android Devices
Like we mentioned above, Google USB Drivers also work as ‘ADB Drivers’. But by default, they only support the Google Pixel and Nexus devices.
While Android OEMs do provide their own drivers, but it’s more often than they miss to include the required ADB USB drivers in them. In such cases, you can easily modify the ‘android_winusb.inf’ file in Google USB Drivers to support any other Android device to use the ADB and Fastboot tools.
In order for the drivers to support your non-Pixel/Nexus device, you will first need to acquire the Vendor ID (VID) and Product ID (PID) of your device. Once you have them, the second step is to edit the ‘android_winusb.inf’ file and add a new device section with the VID and PID of your own device. And finally, the third and last step is to install the modified drivers.
Sounds confusing? It’s quite simple actually. Just follow the step-by-step instructions below.
Step 1: Get the VID and PID of your Android Device
- First, connect your Android device to the PC using the USB cable.
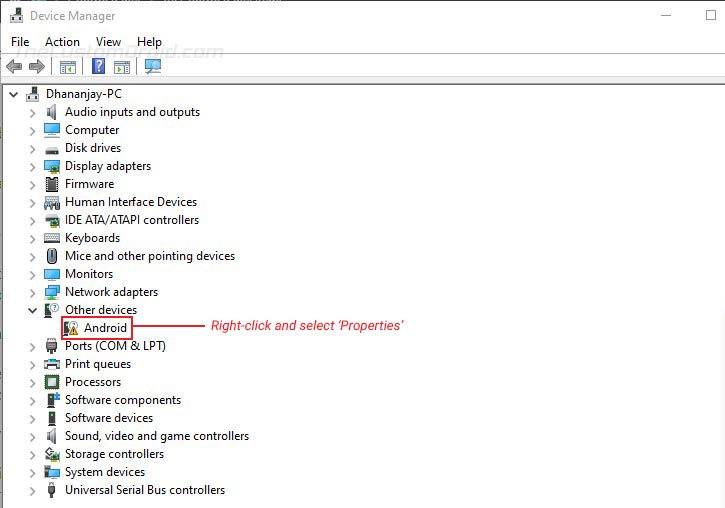
- Go to ‘Control Panel‘ > ‘Device Manager‘ on the PC.
- Locate your unrecognized Android device. An unrecognized device can normally be located under the ‘Universal Serial Bus controllers‘ OR ‘Other devices‘ sections in Device Manager. You would see a yellow-colored triangle warning icon beside the connected device.

- Right-click on the device name and click on ‘Properties‘.
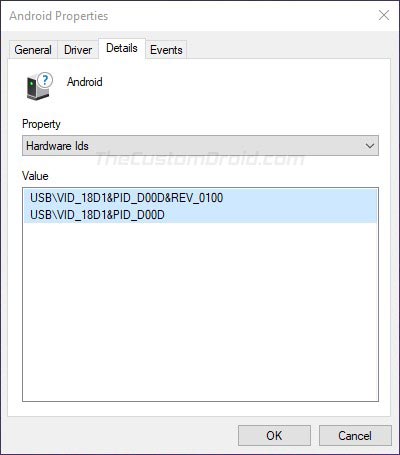
- Go to the ‘Details‘ tab and select ‘Hardware Ids‘ from the dropdown menu.

- You should now see the Vendor and Product IDs of your Android device.
Step 2: Modify ‘android_winusb.inf’ file
Now that you have the required IDs, you can modify/edit the ‘android_winusb.inf’ file to add your device to the supported list.
- First, locate the ‘usb_driver‘ folder on your PC. Inside the folder, you should have the ‘android_winusb.inf‘ file.
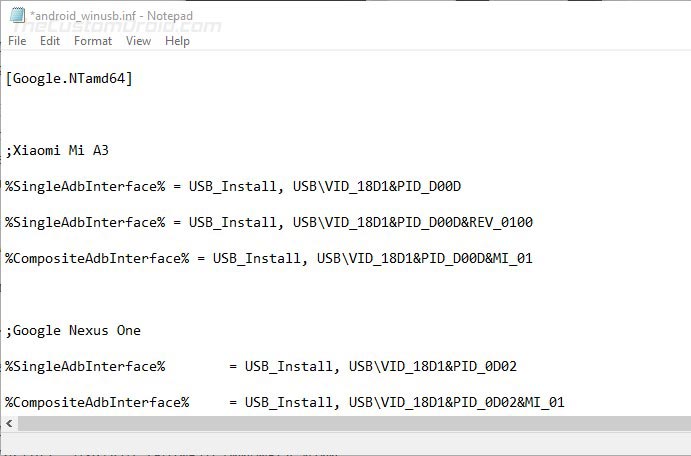
- Open the file using a text editor and locate the ‘[Google.NTx86]‘ section if your Windows PC is 32-bit (x86) or the ‘[Google.NTamd64]‘ section if your Windows PC is 64-bit (x64).
- In the said section, you will see a number of items with the following format:
;[device name]
%SingleAdbInterface% = USB_Install, USBVID_xxxx&PID_xxxx
%CompositeAdbInterface% = USB_Install, USBVID_xxxx&PID_xxxx&MI_xx
- You can copy the above lines into the respective section and edit it accordingly.
- The first thing to do is to replace the ‘[device name]‘ item with your actual device name (Nothing specific, it could be anything).
- Next, you have to add your device’s VID and PID values to the %SingleAdbInterface% and %CompositeAdbInterface% items.
- In case your device also has a REV_xxxx ID, you will need to add two lines for the %SingleAdbInterface% item. One without and another with the REV ID. The line with the REV ID should look like:
USBVID_xxxx&PID_xxxx&REV_xxxx
- For the %CompositeAdbInterface% item, you will further need to add ‘MI_01‘ ID towards the end. With the MI_01 ID, the line should look like:
USBVID_xxxx&PID_xxxx&MI_01
- In case your device also has a REV_xxxx ID, you will need to add two lines for the %SingleAdbInterface% item. One without and another with the REV ID. The line with the REV ID should look like:
- For example, my Xiaomi Mi A3 has a VID and PID as ‘USBVID_18D1&PID_D00D’ & ‘USBVID_18D1&PID_D00D&REV_0100’. In that case, the lines should look like the following:
;Xiaomi Mi A3
%SingleAdbInterface% = USB_Install, USBVID_18D1&PID_D00D
%SingleAdbInterface% = USB_Install, USBVID_18D1&PID_D00D&REV_0100
%CompositeAdbInterface% = USB_Install, USBVID_18D1&PID_D00D&MI_01

Once you have added the lines under the proper section (depending on your PC’s architecture), save the file and exit.
Step 3: Install the Modified USB Drivers
You have now successfully modified the Google USB Drivers to support your Android device. The last step is to install these modified drivers for your device.
Important information:
The android_winusb.inf file is signed by Google and making changes to it (although intentional, such as we did here) will directly affects its digital signature. Once the file has been modified, the “Driver Signature Enforcement” feature of Windows (11/10/8.1/8) will prevent you from installing the modified USB driver.
To bypass this, you will need to temporarily disable Driver Signature Verification by enabling Test Mode. How-to-Geek has a pretty good explanatory piece on how to do it using two different methods.
Thanks Hamid for pointing it out!
Now, to install the modified Google USB drivers: go to ‘Control Panel’ > ‘Device Manager’ and right-click on your device’s name. Then select ‘Update drivers’ to launch the Hardware Update wizard. Click on ‘Browse my computer for driver software’ and select ‘Browse’. Now locate the ‘usb_driver’ folder that contains the modified android_winusb.inf file and select it.
Finally, click ‘Next’ to install the modified drivers for your device. That’s it! Reboot your Windows computer and it should now recognize your Android device over ADB or Fastboot.
Installing the Google USB Drivers is the easiest solution to make your Windows PC successfully recognize your Android device. And while it should work for most other Android devices too, it’s not a hundred percent guaranteed. And if this happens, you may want to install your device’s OEM specific drivers from this page or by clicking your device manufacturer link below.
- Huawei
- Realme
- Samsung
- OnePlus
- LG
- Xiaomi
For low-level firmware flashing, you could also use MediaTek or Qualcomm USB drivers.
If you face any issues installing the drivers on your PC, feel free to ask us through the comments.
Drivers source: Google
Updated on Wednesday, November 2nd, 2022
These are instructions on how to manually install the Google ADB Driver on Windows Computer (including Windows XP, Vista, Windows 7, Windows 8, 8.1, and Windows 10).
Manually install Google ADB Driver
- Download and extract Google ADB Driver on your Windows Computer.
- Now, On using your Computer Keyboard Press Win + R key to launch Run Command.
- Once, the run command is launched, Type devmgmt.msc and Click on OK Button to launch Device Manager.
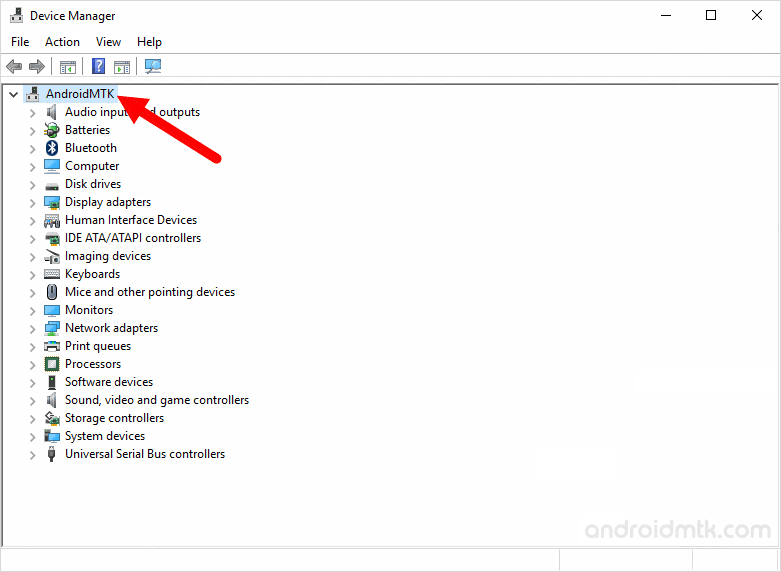
- Once, Device Manager is Launched, Click on your Computer Name.
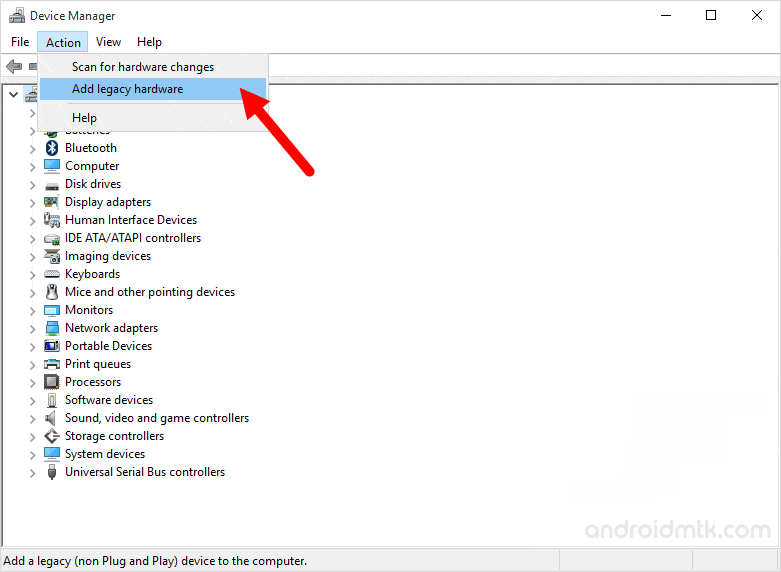
- Now, Click on Action Menu and Select Add Legacy Hardware.
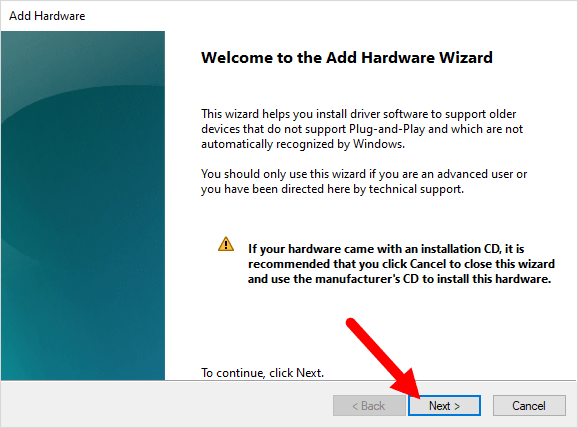
- In the Add Hardware Wizard > Click on Next to Continue.
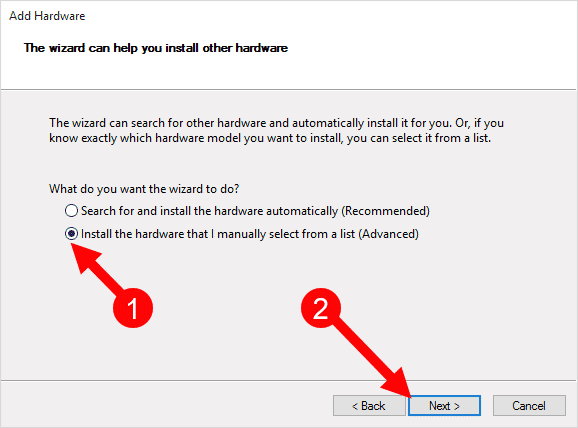
- Now, Select Install the hardware that I manually select from a list (Advanced) and click on Next to Continue.
- Now, under Common hardware types > select on show all devices and click Next to continue.
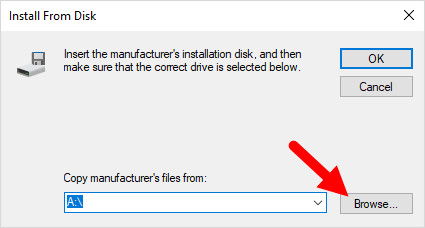
- Now, click on Have Disk and using the browse button locate the extracted Google ADB Driver (android_winusb.inf) that you have downloaded in Step#1.
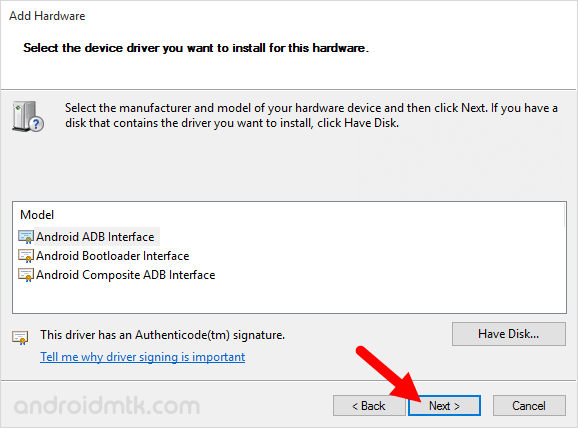
- Once, your driver is listed in the blank area, click on Next to continue.
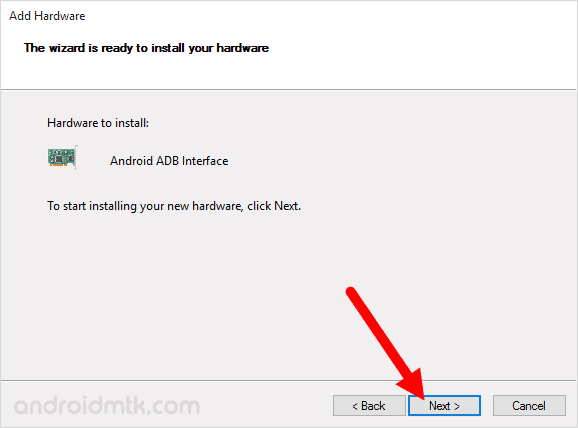
- Now, again Click on Next to continue.
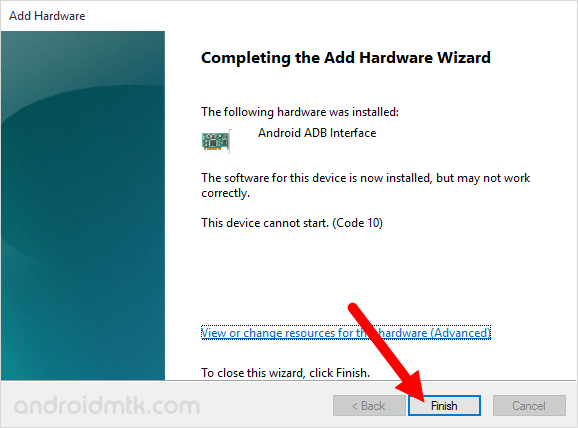
- Lastly, Click to finish the button to close the Add Hardware Wizard.


Above, you can see the ADB Driver is installed and listed in the Device Manager. Now, Restart the computer and you will be able to connect almost all the Android devices to the Windows Computer without facing any issue.
Notes
[*] You need to enable USB debugging on your Android Device to connect your device to the Computer. You can Enable USB Debugging on your Android device from the Settings > Developer Optionss.
[*] Google ADB driver is a Universal Driver which supports almost all the Android Device in the market.
[*] Credits: ADB Driver is officially provided by Google Inc. So Full credit goes to the Google Android Team for providing the Driver for free.
Home » USB Drivers » Download Google USB Driver (All Versions)
Are you using a Google Android smartphone or tablet? Are you searching for a way to connect your device to the computer? If yes is your answer to both of these questions, then you have reached the right place. Download Google USB driver from here, install it on your computer, and connect your Google Android device to a PC or laptop computer.
Google USB Driver, commonly known as Google ADB Driver, is a Windows driver that helps in connecting Android smartphones and tablets to a computer. You need to install this driver if you want to connect your Android device to a PC or laptop computer.
You can download all versions of this driver here, including its latest version.

Google USB Driver Features:
1) Supports Most Android Devices:
By installing this USB driver on the computer, you can connect most of the Google Android smartphones or tablets to the PC or laptop computer.
2) Supports ADB Debugging:
You can perform ADB debugging on Google and other Android devices by installing this driver on your Windows computer.
3) Supports All Windows Versions:
You can install this USB driver on computers running on all versions of Windows operating system including Windows XP, Windows Vista, Windows 7, Windows 8, Windows 8.1 and Windows 10 (32 bit and 64 bit).
Download Google USB Driver (All Versions):
Google_ADB_Driver – Latest Version
Points To Remember:
1) Google LLC has officially provided this USB driver. So, all credits must go to them.
2) If you are looking for a tutorial for installing this ADB driver, follow our guide on how to install ADB driver on Windows computer.
3) After installing this USB driver on your Windows computer, you can connect most of the Android smartphones and tablets to it successfully.
4) This USB driver is compatible with all versions of Windows operating systems.
5) If you are looking for an alternate USB driver to connect your device to a computer, then download and install Universal ADB Driver.
6) If you are not able to connect your Android device even after installing this driver on the computer, download and install the driver of your device from our USB drivers page.

Boopathy Sundaramoorthy is a tech and Android enthusiast working for RootMyDevice.com from 2018. He specializes in testing new Android rooting methods, and he shares his experiences here. He also provides stock ROM installation tutorials and custom recovery installation tutorials here.
Reader Interactions
Android USB Driver is most important to connect your device with the computer. If your smartphone doesn’t detect your computer then read the article below to fix USB problems. Download Google USB Drivers to connect a Pixel or Nexus Android device with a Windows PC. This Google USB driver package will help you to connect your Pixel or Nexus device which is on Android Debugging Mode. Here we share to download and install the latest version of Google USB Drivers on Windows 11, Windows 10, and Windows 7.
Google USB Drivers For Windows:
If you love to customize your Android device. If you have been with the Android family for a long then know that if you want to customize your device then need to install Custom Recovery like TWRP or need to Root your device. So before going through all those steps, first need to unlock the bootloader of your Android device. Android smartphone needs to be connected to a computer to unlock the bootloader. The Android device’s connection to the computer needs to be correct so that the communication between the two devices is properly. To confirm whether this connection is correct or not need to install proper Android USB Drivers on Windows.
Android USB Drivers For Windows:
Here we provide the latest Google USB Drivers for Windows and also guide you on how to install Google USB Driver on your computer so that the Android device can connect with the computer. This Google USB Driver ware was released for Google Pixel or Google Nexus smartphones. Google USB Driver package mainly works with Google Pixel or Google Nexus Phones but it actually works smoothly with most android devices.
If you have ever installed the OEM android driver on your computer, you are not able to detect your device then you should follow this guide. Through this complete guide, we have solved your phone’s ADB and Fastboot problems for detecting with the computer.
LATEST_USB_DRIVER_WINDOWS.ZIP
Install Google USB Driver on Windows 10:
- First, connect your Android device to the computer via USB cable.
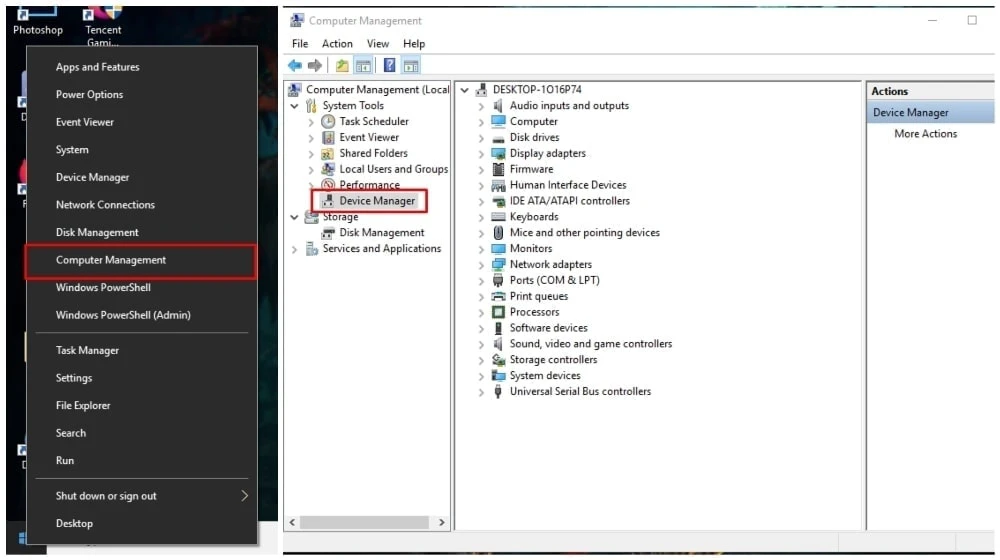
- Right-tap the bottom-left corner, or press Windows+X > Computer Management.
- After opening the Computer, Management clicks on Device Manager from the left panel.
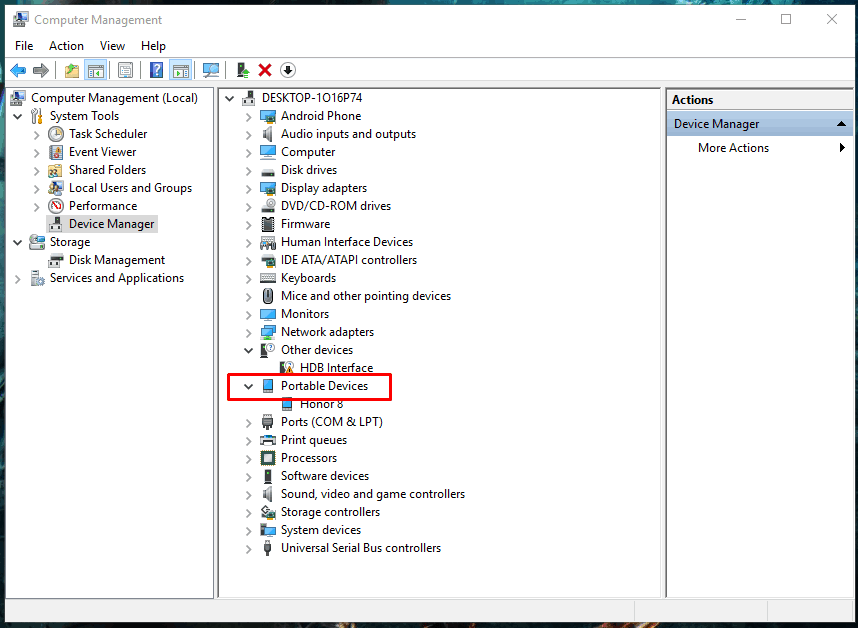
- In the Device Manager > locate and expand Portable Devices from the right panel.
- In Portable Devices, right-click on the device name, and then select Update Driver Software.
- A popup box will show now click on the “Browse my computer for driver software“.
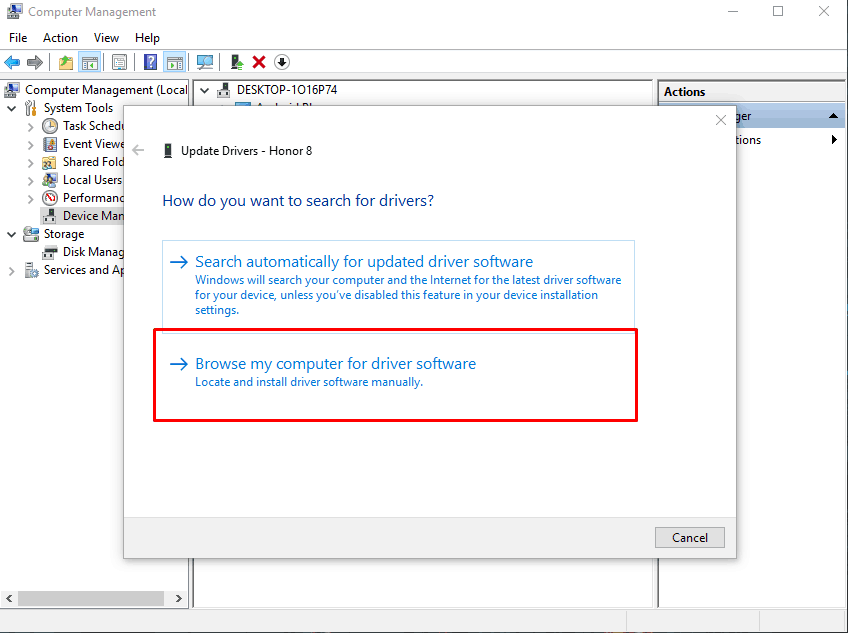
- Click on browse and then locate the Google USB Drivers folder that you download before.
- Now click Next to install the driver.
Install Google USB Driver on Windows 11/Windows 8:
- First, connect your Android device to the computer via USB cable.
- Right-tap the bottom-left corner, or press Windows+X > Computer Management.
- After opening the Computer, Management clicks on Device Manager from the left panel.
- In the Device Manager,> locate and expand “Other devices” from the right panel.
- In Portable Devices, right-click on the device name, and then select Update Driver Software.
- A popup box will show now click on the “Browse my computer for driver software“.
- Click on browse and then locate the USB driver folder that you download before.
- Now click Next to install the driver.
Note: The process more or less the same as Windows 10 driver install method, so if you face problem then see Windows 10 screenshot from the above method.
This was the entire guide to installing Google USB Drivers. Hope these instructions assist you well. If you consider contributing anything to this page, please feel free to write in the comment section below.
Заметка: Если вы используете macOS или Linux, эти драйверы вам не понадобятся.
Просто нажмите на ссылку ниже, чтобы загрузить ZIP-файл драйвера Google USB на свой компьютер.
После загрузки распакуйте ZIP-файл в подходящее место на вашем компьютере. Извлеченная папка usb_drivers должна содержать необходимый файл драйвера android_winusb.inf.
Прежде всего, убедитесь, что вы скачали и установили последняя версия Android Studio на вашем ПК с Windows. После установки следуйте приведенным ниже инструкциям:
Android Studio загрузит драйверы Google USB в папкуandroid_sdk extras google usb_driver ‘на вашем ПК. Здесь android_sdk — это папка, в которую на вашем компьютере установлен Android SDK.
Драйверы Google USB представлены в виде файла с информацией об установке android_winusb.inf, а не в виде исполняемого файла Windows. Итак, вам нужно будет вручную установить его на свой ПК с Windows. Те же действия можно использовать для обновления существующих драйверов, установленных на вашем ПК, до последней доступной версии.
Теперь следуйте приведенному ниже руководству по установке в соответствии с используемой версией ОС Windows. Это довольно просто и не займет больше минуты.
Чтобы установить USB-драйверы Google Android в Windows 10, следуйте приведенным ниже инструкциям.
Чтобы установить драйверы Google Android USB на ПК с Windows 7, Windows 8 и Windows 8.1, следуйте приведенным ниже инструкциям.
Теперь у вас должны быть установлены драйверы Google USB. Ваш ПК с Windows должен теперь обнаружить и распознать ваше устройство Android через USB-соединение.
Важная заметка
Если драйверы не устанавливаются даже после выполнения указанных действий, ИЛИ команды ADB / Fastboot не работают, даже если драйверы установлены, это может быть связано с тем, что вы используете порт USB 3.0 / 3.1 / 3.2 или компьютер на базе AMD. . Это проблема, с которой в последнее время сталкиваются многие пользователи.
Чтобы исправить это, просто попробуйте использовать порт USB 2.0 (если он недоступен, вы также можете использовать концентратор USB 2.0) на своем ПК. Кроме того, попробуйте использовать ПК на базе Intel, особенно при использовании инструментов ADB / Fastboot.
Как изменить драйверы Google USB для поддержки других устройств Android
Как мы уже упоминали выше, USB-драйверы Google также работают как «драйверы ADB». Но по умолчанию они поддерживают только устройства Google Pixel и Nexus.
Хотя OEM-производители Android предоставляют свои собственные драйверы, они чаще всего не включают в себя необходимые драйверы ADB USB. В таких случаях вы можете легко изменить файл android_winusb.inf в драйверах Google USB для поддержки использования инструментов ADB и Fastboot на любом другом устройстве Android.
Чтобы драйверы поддерживали ваше устройство, отличное от Pixel / Nexus, вам сначала необходимо получить идентификатор поставщика (VID) и идентификатор продукта (PID) вашего устройства. После того, как они у вас есть, второй шаг — отредактировать файл android_winusb.inf и добавить новый раздел устройства с VID и PID вашего собственного устройства. И, наконец, третий и последний шаг — установка модифицированных драйверов.
Это сбивает с толку? На самом деле это довольно просто. Просто следуйте пошаговым инструкциям ниже.
Шаг 1. Получите VID и PID вашего устройства Android
- Сначала подключите устройство Android к ПК с помощью кабеля USB.
- Перейти к ‘Панель управления‘>’Диспетчер устройств‘на ПК.
- Найдите свое нераспознанное устройство Android. Нераспознанное устройство обычно может быть расположено под знаком ‘Контроллеры универсальной последовательной шины‘ ИЛИ ’Другие устройства‘в диспетчере устройств. Вы бы увидели желтый треугольник предупреждающий значок рядом с подключенным устройством.
- Щелкните правой кнопкой мыши имя устройства и нажмите ‘Свойства‘.
- Перейти к ‘Деталивкладка и выберитеИдентификаторы оборудования‘из раскрывающегося меню.
- Теперь вы должны увидеть идентификаторы поставщика и продукта вашего устройства Android.
Шаг 2. Измените файл android_winusb.inf
Теперь, когда у вас есть необходимые идентификаторы, вы можете изменить / отредактировать файл android_winusb.inf, чтобы добавить свое устройство в список поддерживаемых.
- Сначала найдите «usb_driver‘на вашем компьютере. Внутри папки у вас должен быть значок ‘android_winusb.inf‘ файл.
- Откройте файл в текстовом редакторе и найдите значок[Google.NTx86]‘, если ваш компьютер с Windows 32-разрядный (x86) или’[Google.NTamd64]‘, если ваш компьютер с Windows 64-разрядный (x64).
- В указанном разделе вы увидите ряд элементов в следующем формате:
;[device name]
%SingleAdbInterface% = USB_Install, USBVID_xxxx&PID_xxxx
%CompositeAdbInterface% = USB_Install, USBVID_xxxx&PID_xxxx&MI_xx
- Вы можете скопировать приведенные выше строки в соответствующий раздел и отредактировать его соответствующим образом.
- Первое, что нужно сделать, это заменить символ ‘[device name]‘с фактическим именем вашего устройства (ничего конкретного, это может быть что угодно).
- Затем вам нужно добавить значения VID и PID вашего устройства в % SingleAdbInterface% а также % CompositeAdbInterface% Предметы.
- Если на вашем устройстве также есть REV_xxxx ID, вам нужно будет добавить две строки для элемента% SingleAdbInterface%. Один без, а другой с REV ID. Строка с REV ID должна выглядеть так:
USBVID_xxxx&PID_xxxx&REV_xxxx
- Для элемента% CompositeAdbInterface% вам дополнительно потребуется добавить ‘MI_01Идентификатор ближе к концу. С идентификатором MI_01 строка должна выглядеть так:
USBVID_xxxx&PID_xxxx&MI_01
- Если на вашем устройстве также есть REV_xxxx ID, вам нужно будет добавить две строки для элемента% SingleAdbInterface%. Один без, а другой с REV ID. Строка с REV ID должна выглядеть так:
- Например, мой Xiaomi Mi A3 имеет VID и PID как «USB VID_18D1 & PID_D00D» и «USB VID_18D1 & PID_D00D & REV_0100». В этом случае линии должны выглядеть следующим образом:
;Xiaomi Mi A3
%SingleAdbInterface% = USB_Install, USBVID_18D1&PID_D00D
%SingleAdbInterface% = USB_Install, USBVID_18D1&PID_D00D&REV_0100
%CompositeAdbInterface% = USB_Install, USBVID_18D1&PID_D00D&MI_01
После того, как вы добавили строки в соответствующий раздел (в зависимости от архитектуры вашего ПК), сохраните файл и выйдите.
Шаг 3. Установите модифицированные драйверы USB.
Вы успешно изменили драйверы Google USB для поддержки своего устройства Android. Последний шаг — установить эти модифицированные драйверы для вашего устройства.
Для этого перейдите в «Панель управления»> «Диспетчер устройств» и щелкните правой кнопкой мыши имя своего устройства. Затем выберите «Обновить драйверы», чтобы запустить мастер обновления оборудования. Просто нажмите «Найти на моем компьютере драйверы» и выберите «Обзор». Теперь найдите папку usb_driver, содержащую измененный файл android_winusb.inf, и выберите его.
Наконец, нажмите «Далее», чтобы установить модифицированные драйверы для вашего устройства. Это оно! Ваш ПК с Windows должен теперь распознать ваше устройство Android через ADB или Fastboot.
Установка драйверов Google USB — это самое простое решение, позволяющее вашему ПК с Windows успешно распознавать ваше устройство Android. И хотя он должен работать и для большинства других устройств Android, это не гарантируется на сто процентов. И если это произойдет, вы можете установить специальные драйверы OEM для вашего устройства с этой страницы или щелкнув ссылку производителя устройства ниже.
Для низкоуровневой прошивки вы также можете использовать USB-драйверы MediaTek или Qualcomm.
Если у вас возникнут проблемы с установкой драйверов на ваш компьютер, не стесняйтесь спрашивать нас в комментариях.
Источник драйверов: Google
В этом руководстве мы покажем вам шаги по установке драйверов интерфейса загрузчика Android от Google на ваш компьютер. Существует довольно много драйверов USB, о которых вы, возможно, слышали, и все они связаны с вашим устройством. Первый — это общие USB-драйверы для Android. Это наиболее частые и используются для выполнения некоторых из основных, но наиболее важных задач.
К ним относятся, например, передача файлов между вашим устройством и ПК, использование его в режиме PTP или совместное использование Wi-Fi вашего устройства с вашим ПК через режим USB-модема. Затем наступает очередь Android SDK Platform Tools. Этот инструмент официально предоставлен Google и содержит все необходимые двоичные файлы, необходимые для выполнения команд ADB и Fastboot.
Далее следуют USB-драйверы Qualcomm, которые устанавливаются на ваш компьютер, чтобы он мог взаимодействовать с вашим устройством в режиме EDL (режим аварийной загрузки). Эти драйверы применимы только к устройствам с базовыми наборами микросхем Qualcomm и используются, когда устройство жестко заблокировано. Итак, где же во всем этом подходят драйверы интерфейса загрузчика Android от Google? Что ж, давайте проверим.
[We also have a separate guide for Windows 11, you may check that out as well. The only difference between both these guides is the screenshots. The below steps are performed on a Windows 10 PC, whereas in the linked guide, you will find the screenshots from the Windows 11 PC. Everything else, including the process and instructions, are the same across both these guides].
Как только вы загрузите свое устройство в режим Fastboot или Bootloader (с помощью команды adb reboot bootloader или комбинации аппаратных клавиш), обычные USB-драйверы Android не пригодятся. Их роль заканчивается, как только устройство покидает загруженную ОС. Поэтому, когда ваше устройство загружено в режим Fastboot или Bootloader, вам понадобится помощь дополнительных драйверов.
И эти дополнительные драйверы представляют собой интерфейс загрузчика Android. В общем, всякий раз, когда устройство подключено к любому из двух вышеупомянутых режимов, ваш компьютер сможет идентифицировать его только тогда, когда он получит необходимые файлы драйверов, неотъемлемую часть которых играют драйверы интерфейса загрузчика Android от Google. Таким образом, вы получили бы отличные знания об использовании этих драйверов. Давайте теперь проверим шаги его установки. Следуйте вместе.
Как установить драйверы интерфейса загрузчика Android
- Начать с, скачать USB-драйвер Android и извлеките его в любое удобное место на вашем ПК.
- После извлечения вы должны получить папку usb_driver. Внутри него будет файл android_winusb.inf, который мы будем использовать здесь.
- Теперь подключите ваше устройство к ПК через USB-кабель.
- Используйте сочетания клавиш Windows + X и выберите в меню Диспетчер устройств.
- В нем перейдите в раздел «Другие устройства», и ваше устройство будет указано там с желтым восклицательным знаком. [If it’s not there, then don’t forget to check the Port or the Universal Serial Bus Controllers section as well].
- Щелкните его правой кнопкой мыши и выберите «Обновить драйверы».
- Затем нажмите «Выполнить поиск драйверов на моем компьютере».
- После этого выберите «Позвольте мне выбрать» из списка драйверов устройств на моем компьютере.
- Затем выберите «Показать все устройства» и нажмите «Далее».
- Теперь нажмите кнопку «Установить с диска», затем нажмите «Обзор».
- Перейдите в папку usb_driver, выберите файл android_winusb.inf и нажмите «Открыть» > «ОК».
- Для драйверов ADB выберите «Интерфейс Android ADB», тогда как для драйверов Fastboot выберите «Интерфейс загрузчика Android» и нажмите «Далее».
- Теперь вы получите предупреждение об обновлении драйвера, нажмите «ДА» и, наконец, нажмите «Установить».
- Теперь начнется процесс установки, и после его завершения вы будете уведомлены об этом.
- Теперь включите отладку по USB на вашем устройстве. Перейдите в «Настройки»> «О телефоне»> нажмите на номер сборки 7 раз> вернитесь в «Настройки»> «Система»> «Параметры разработчика»> «Включить отладку по USB».
- Как только это будет сделано, загрузите Android SDK Platform Tools на свой компьютер. Извлеките его, и вы должны получить папку с инструментами платформы.
- Перейдите в эту папку, введите CMD в ее адресной строке и нажмите Enter. Это запустит командную строку.
- Введите приведенную ниже команду в этом окне CMD, чтобы загрузить ваше устройство для авторизации устройств ADB connectionadb.
- Теперь вы получите приглашение на своем устройстве, нажмите «Разрешить».
- Теперь используйте приведенную ниже команду в окне CMD, чтобы загрузить ваше устройство в Fastboot/Bootloader Modeadb reboot bootloader.
- Теперь ваше устройство будет загружено в Fastboot. Чтобы проверить то же самое, введите приведенную ниже команду, и результатом будет идентификатор устройства, за которым следует ключевое слово fastboot: устройства fastboot.
Итак, все это было из этого руководства по установке драйверов интерфейса загрузчика Android от Google. Если у вас есть какие-либо вопросы относительно вышеупомянутых шагов, сообщите нам об этом в комментариях. Мы вернемся к вам с решением в ближайшее время.
Google USB Driver is a downloadable component in Android Studio and is available from Android SDK Manager. The Google USB Drivers are available for Windows OS and are not required for Mac; for Linux systems, there is a workaround to install them. Here you can download Google USB Driver Package for Windows 10, Windows 7, Windows 8, Windows 8.1, and Linux systems and find complete instructions on how to install them manually.
Google USB Driver doesn’t include ADB and Fastboot Drivers, you need to install them separately — follow the instruction here on how to install ADB and Fastboot Drivers. The Google Android USB Drivers helps in making two hardware devices (Android Device and PC) communicate/connect with each other.
If you already have installed Android Studio on your Windows PC, then chances are that you already have these drivers installed. These Android drivers are updated frequently adding compatibility for more and more Android devices. It is always a good idea to have the latest version of these drivers installed on the system.
Table of Contents
- 1 Download Google USB Drivers for Windows
- 1.1 Method 1: Download and install Google USB Driver Package manually on Windows 10/7/8/8.1
- 1.2 Method 2: Install Google USB Driver from Android SDK Manager (Android Studio)
- 2 Download Google USB Driver for Mac
- 3 Download Google USB Driver for Linux
Download Google USB Drivers for Windows
There are two methods to install Google Android USB Driver on a Windows PC. The drivers come bundled with Android Studio and are also available as a separate package, for the users who don’t want to install Android Studio for the purpose of installing these drivers.
Method 1: Download and install Google USB Driver Package manually on Windows 10/7/8/8.1
Step 1: Download the latest Google USB Driver Package (latest_usb_driver_windows.zip) from here.
Step 2: Extract the Zip package to obtain «android_winusb.inf » and other driver files.
Step 3: Connect your Android device to PC.
Step 4: Open «Device Manager» and look for your Android device. It will be listed under «Portable Devices» or under «Other devices«.
Step 5: Once you have found your device, select it and right click. From the list of options choose «Update driver» or «Update Driver Software«.
Step 6: Hardware Update wizard should launch. In the wizard choose «Browse my computer for driver software» -> «Browse» -> «Select the folder where you have extracted the drivers» -> «OK«.
Step 7: Click «Next» and follow the onscreen instructions to install the driver.
Method 2: Install Google USB Driver from Android SDK Manager (Android Studio)
Step 1: Download and Install Android Studio on your PC. [Link]
Step 2: Run Android Studio and click on «Tools» -> «SDK Manager«.
Step 3: Click on the «SDK Tools» tab and select «Google USB Driver» and click «OK«.
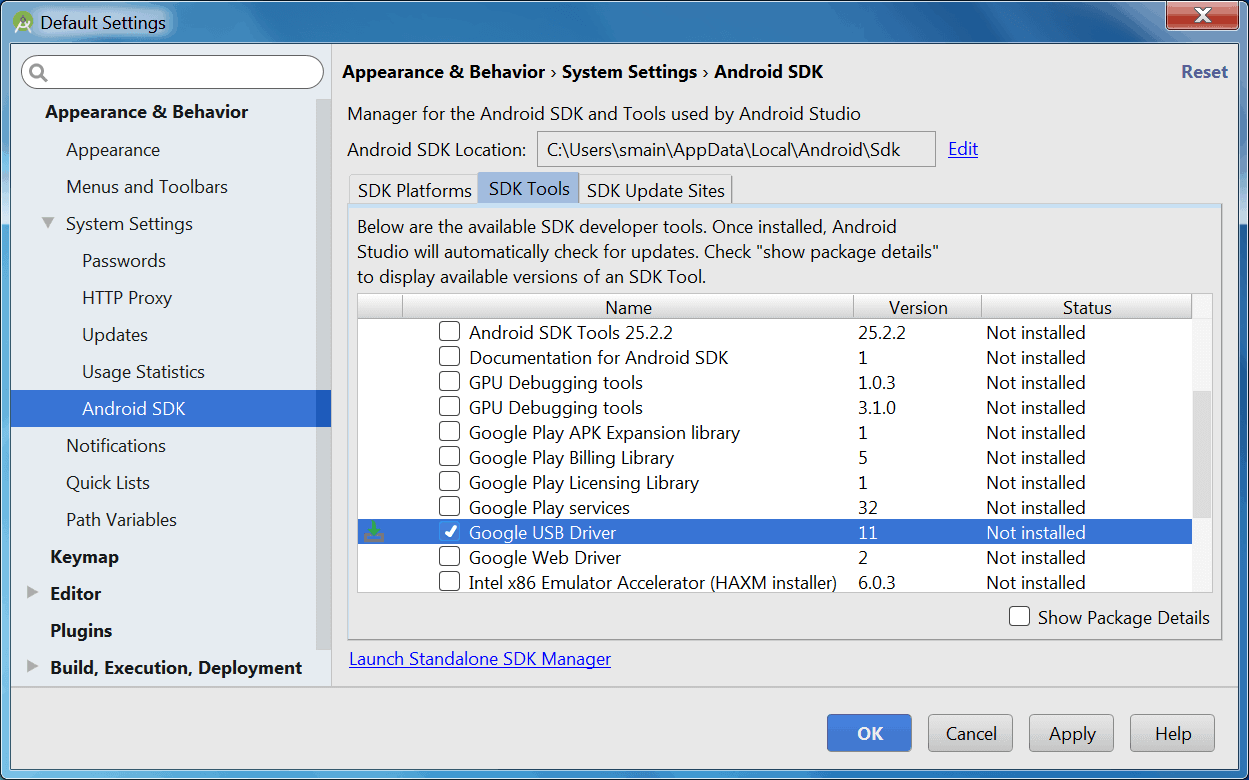
Step 4: The Google USB Driver Package should now download and install. When done, the driver files are downloaded into the android_sdkextrasgoogleusb_driver directory.
Download Google USB Driver for Mac
Mac OS doesn’t require the Google Android USB Drivers to be installed. They are readily available and no extra work is needed to make them work. Just connect your device to Mac and it will be detected automatically and you can start transferring Media and other files to and from Mac to Android device.
Download Google USB Driver for Linux
To install the Android drivers on Ubuntu Linux follow the instructions listed below.
Step 1: Open Settings app and enable USB Debugging from Developer Options on your device. If the Developer Options are missing, go to About Phone and tap on Build Number for 7-10 times.
Step 2: Once the USB Debugging option is enabled, connect the device to the Ubuntu Linux system.
Step 3: Run terminal and enter the below command
apt-get install android-tools-adb
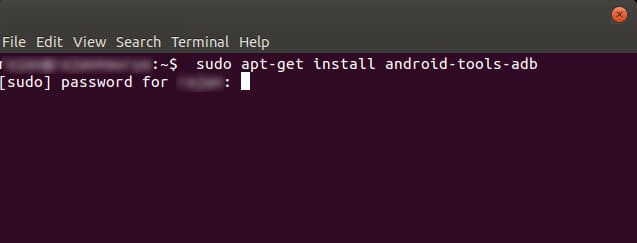
The above command will install ADB and Fastboot drivers along with Google USB Drivers on Ubuntu Linux.
This was the complete tutorial on how to install Google USB Driver on Windows, Linux, and Mac. If you have any queries, do let us know in the comment section.
👇👇Latest Video on YouTube 👇👇
‘;
}
?>
This page may contain affiliate links so we earn a commission. Please read our affiliate disclosure for more info.
Skip to content
После ряда обновлений Windows 10 установка драйвера для отладки Android приложений на реальном устройстве может оказаться невозможной, если использовать обычный способ. При попытке установить драйвер система сама выбирает нужный драйвер по своему усмотрению, а при установке для устройства драйвера от Google выдаёт сообщение об ошибке.
Однако есть несложный альтернативный метод.
Его суть в том, что в Windows 10 драйвер от Google можно установить без подключения устройства, что исключает ошибки, связанные с неверным автоматическим распознаванием.
Алгоритм действий:
- В диспетчере устройств выбрать «Установить старое устройство».
- Выбрать установку вручную.
- Выбрать пункт «Показать все устройства» и нажать кнопку «Далее».
- В открывшемся окне нажать кнопку «Установить с диска».
- В появившемся окне указываем путь к inf файлу драйвера и далее устанавливаем его как обычно.
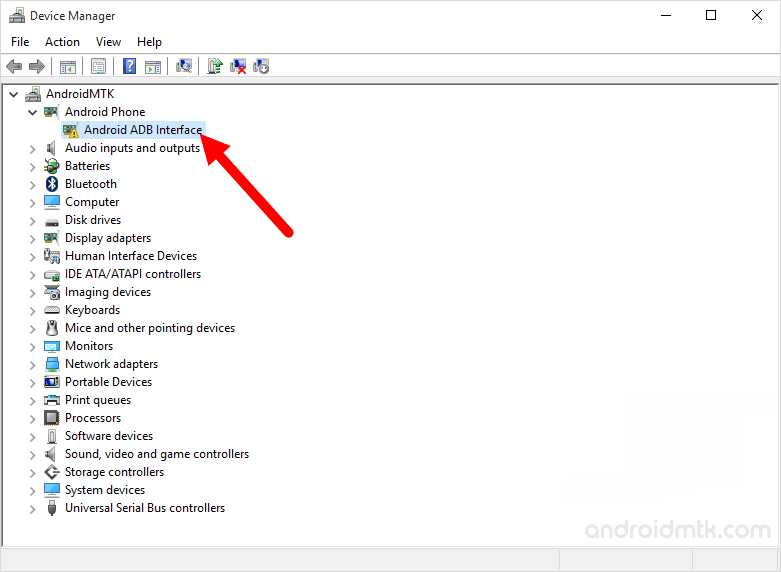
- По окончании установки в диспетчере появится неработающее устройство Android ADB Interface. Просто удалите его.
- Драйвер установлен. Теперь при подключении Android устройства можно выбрать для него драйвер в общем списке.
Установленный таким образом драйвер работает полностью корректно. Поэтому если при установке Google USB Driver в Windows 10 возникают сложности можно воспользоваться приведённым способом для решения данной проблемы.