Table of Contents
- Chapter 1 – Building Our Learning Environment
- Download Windows Server 2016
- What is Virtual Box?
- Downloading VirtualBox
- Installing VirtualBox
- What is a Virtual Machine?
- VirtualBox Overview
- Creating a VM in VirtualBox
- Creating a VirtualBox Host-only Network
- Chapter 2 – Windows Server 2016 Overview
- Installing Windows Server 2016
- Basic Windows Server 2016 Configuration
- Server Manager
- Roles & Features
- Roles
- Features
- Chapter 3 – Building a Windows Domain and Domain Controller
- What is a Windows Domain and Domain Controller?
- Adding the Active Directory Domain Services Role
- Chapter 4 – Joining a Windows 10 Workstation to Our Domain
- Downloading Windows 10
- Installing Windows 10
- Joining our Workstation to our Windows Domain
- Credits
Chapter 1 – Building Our Learning Environment
In this chapter we are going to accomplish a couple of important things:
- Download Windows Server 2016
Windows Server 2016 is an Operating System designed by Microsoft that supports enterprise-level management, data storage, applications, and communications. It is used by countless companies to operate their back-end IT operations.
Pretty much any big company that you can think of uses Windows Server in some way or another although there are alternatives such as Linux Operating systems.
- Download & Install Oracle VM VirtualBox
This program will be our Virtual Machine manager. In later lectures we will cover exactly what a VirtualMachine is and how you will use them. Once we download these two files and install VirtualBox we will be ready to move on
to the next section
Download Windows Server 2016
Now it’s time to download Windows Server 2016. Thankfully Microsoft offers a free trial version for 2016 that anyone can download for evaluation (or in our case, training) purposes. To download Windows Server 2016, open your preferred
web browser and navigate to technet.microsoft.com. Click the “Downloads” page on the navigation menu.

Make sure you select Windows Server 2016, and no the Windows Server 2016 Technical Preview 5:

Again, DO NOT DOWNLOAD Windows Server 2016 Technical Preview 5:

Click on Windows Server 2016 to show the download page. Before you can download Server 2016 you must register and sign in. Click on the “Sign In” button

Once you are brought to the sign-in page you either need to log in or click the “Create One” button to create a new account. Once you are logged in you will be brought back to the download page. Under Windows Server 2016, choose
the file type “ISO” and click “Register to continue”

Now you will be prompted to enter personal information such as your name, email address, etc. Enter in all the required information and click continue. The download will begin and now you just need to wait for the download to finish.
Make sure you know where you are downloading the file so you can access it later.

In the next lecture we are going to open VirtualBox and create the Virtual Machine that we will install Windows Server 2016. If you want to save time go ahead and start the next lecture while this download is running and that way
when the download is complete you will be ready to move on.
What is Virtual Box?
VirtualBox is a powerful x86 and AMD64/Intel64 virtualization product for enterprise as well as home use. Not only is VirtualBox an extremely feature rich, high-performance product for enterprise customers, it is also the only
professional solution that is freely available as Open Source Software under the terms of the GNU General Public License (GPL) version 2. For more information, visit
https://www.VirtualBox.org/wiki/VirtualBox.
Downloading VirtualBox
To download VirtualBox, navigate to
https://www.virtualbox.org/wiki/Downloads. Click on “x86/amd64” for Windows hosts (see screenshot below) or choose the correct option for your operating system.

Save the file to a location on your HDD that will be easy to access
Installing VirtualBox
Once the download completes, launch the downloaded installer file to being the installation. The setup wizard will appear. Click “Next” to start the install.

The following screen will prompt you to the select installation directory and the features you would like to install. If you would like to install VirtualBox in locations other than the default location click “Browse” to do so,
otherwise, click Next and continue.

The next screen will prompt you to select if you would like VirtualBox icons on your desktop or quick launch bar. This is user preference but make sure to leave to box check to register file extensions. Once you have made your
selections click “Next”.

Now you will be prompted that you will lose network connectivity briefly. Make sure that this will not affect anything you are working on before moving forward. Click “Yes” to move forward.

Now you are ready to install click “Install”. During the installation you will see several pop ups asking you to install different types of “device software.” Check the “Always trust software from ‘Oracle Corporation’” checkbox
and click “Install.”

Once the installation is complete all you need to do is leave the “Start Oracle VM VirtualBox 5.0.20 after installation” checkbox checked and click “Finish”.
What is a Virtual Machine?
Now we are going to learn the basics of VirtualBox and its capabilities. VirtualBox will operate our Virtual Machines (VMs) and the virtual network they will operate on. But first, let’s learn what a VM is. The short answer is
that a Virtual Machine is a software computer, or a computer within a computer. A computer that is stored on a physical computers hard-drive. You can use a VM just like you would use any computer or server. You can power it on, install Windows (or Linux),
browse the web, install server applications, connect it to internal and external networks, etc… You may ask why we would want to use a Virtual Machine instead of a physical server? Well, since the VM is stored on the hard disk drive (HDD) of a physical server,
we can copy, duplicate, delete, or move a VM at any time, meaning they are extremely portable and can be sent across the internet if need be. So if you need to transport a virtual server from Washington DC to Hawaii, that is no longer a time or cost issue.
Take a scenario where you need to repeatedly create several servers to perform service (File / Print server, Domain Controller, etc…) to various customer networks each week. You can utilize a Virtual Machine to make this task much faster by creating a single
VM and installing the OS (Operating System), all the required OS and third party updates and any necessary software. You can consider this a baseline VM. Now every time you need to deploy a new server you simply clone your baseline VM with a new name, make
any required tweaks to the VM and you’re ready to go. No more physically assembling a server and completing repetitive steps such as installing the OS, updates, software and boxing and shipping for every new server instance. Keep in mind cloning a virtual
machine is as simple as right-clicking and selecting clone. There are two terms that you must know in order to successfully work with VMs: Host and Guest. The Host is the computer that the Virtual Machine is installed on. The Guest is the VM the runs on the
Host. A Host can run several Guest VMs while a Guest VM generally only operates on one Host computer (unless the hosts are clustered, not covered in this course).

In this example we have a single Host that is running three Guest VMs. You can run as many VMs on the Host as long as the Host computer has physical resources to spare for the VM, meaning that you cannot create a VM that has more
RAM or processing power than your host computer has available. Generally, a VM will only have a fraction of the total storage capacity and processing power that it’s host computer has. For this reason, the host computer is usually a very powerful computer
that is designed to run several VMs at once. Since some of you will be running these VMs at home on your personal computer, you may need to keep some of the VMs powered off while others are turned on or keep the combined VMs processing power as low as possible.
VirtualBox Overview
Now let’s take a look at VirtualBox’s GUI. At the top we have our program options such as File, Group, and Help. Below that we have controls for managing our VMs; New, Settings, Discard, and Start. In the left pane we have a window
that displays all of our VMs and VM Groups. In the middle we have the settings of our VM and a live preview of the VM if it is powered on.

If you click the File dropdown on the menu, the first option you will see is preferences.

Click this option or press Crtl+G to open the preferences menu.

Here we can change several key configurations for VirtualBox. If you want to store your VMs on a drive other than your C drive, you can change the “Default Machine Folder” located under the General tab. Under the Input tab you
can view and change the keyboard shortcuts for both VirtualBox and Virtual Machines. It is worthwhile to look over these shortcuts and memorize those that will be useful to you. For example, Ctrl+F for full screen is a favorite of mine. The Update tab allows
you to specify the interval at which VirtualBox with check for updates. This only relates to VirtualBox and has no effect on Virtual Machine updates. These settings are perfectly fine left at default. If you prefer to use VirtualBox in a language other than
English, you can change those settings under the Language tab. The Display tab allows you to set the maximum screen size although I strongly recommend that you do not change this setting. The Network tab allows us to create and manage Virtual Networks for
either NAT (Network Address Translation) or Host-only Networks. Let me explain the difference between the two: For a reason I cannot understand VirtualBox decided to create a new network type called a “NAT Network”. This is very different from a “NAT” networking
adapter that can be selected on your VMs and you should know they are not the same. On your VMs you will have (among others) two distinct options, NAT and NAT Network. A “NAT Network” and “NAT Adapter” (these are two different things in VirtualBox) are the
easiest way to have internet access from a VM. Generally, neither of these adapters require any configuration from the Host Computer or Guest VM. Keep in mind that a VM that has a “NAT Network” adapter configured cannot communicate with its Host but can communicate
with other VMs on the same NAT network. While if a VM has a NAT Adapter configured, the VM will only be able to reach the internet and not the Host computer or other VMs on the Host computer. A Host-only network allows a VM to communicate with other VMs as
well as the Host computer. A Host-only network does not allow a VM to reach outside of the Host (no internet access). On our VMs we are going to use two networking adapters; a NAT adapter and Host-only adapter allowing us to have internet access as well as
an internal network that our Guest VMs can communicate with each other and the Host computer. The next tab is Extensions. Extension packs are offered by VirtualBox on their
download page and add support for USB 2.0 and 3.0, VirtualBox RDP and PXR boot for Intel Cards. You do not have to install any extension packs if you do not want to. The last option is for proxy settings.
I have no need for this and you probably don’t either, but if you are connected to the internet through a proxy you can enter that information here. Close the Preferences window by either clicking Cancel or the X at the top right hand corner of the screen.
The next feature we are going to talk about is the Import / Exporting Appliance settings.

These can be reached from the File menu on VirtualBox. When VirtualBox refers to “Appliance,” they mean VM. These two options allow you to import or export VMs at any time. This comes in handy when you want to move a VM from one
host to another. Next is the Virtual Media Manager. This tool allows you to manage your VM related files that are being used such as the virtual Hard Disk Drives (HDDs, which are the *.vdi files), mounted ISOs and floppy disks. If you need to detach a virtual
HDD from a VM you can select the file from the list and click “Release”.

There is also the Network Operations Manager which has nothing to do with VirtualBox networks but rather is used when VirtualBox is checking for updates. You may click the “Check for Updates” if you wish but by default VirtualBox
checks for you once every day. Lastly, If you VM warnings you may reset them by clicking the “Reset all Warnings” button.

Next we have the Machine option on the file menu. This is your menu for VM management. You can create, clone, group, modify, start or stop selected VMs from this menu. You may also create a Desktop shortcut on your desktop for
any select VM and you can view the logs of a VM for troubleshooting purposes. It is also worth noting you may click the “Add…” button to add a VM that has not been exported as an appliance yet. You may also clone a VM at any time using either a full clone
or a linked clone. A full clone copies both the VM and the HDD. A linked clone copies a VM but still builds on the original HDD file. Note that a linked clone only builds on top of the HDD file of the cloned machine, and does not actually modify the HDD for
the cloned machine as well.

There are three types of ways to start a VM; Normal, Headless and Detachable. A Normal start is when you launch a VM with a Window that must remain open in order for the VM to operate. A Headless start is when you power on a VM
without a Window. This is useful for Servers that you don’t need to interact with. A detachable start is experimental and is a mix of the two previous start methods.

In theory you should be able to detachably start a VM and a window will open. That window may be closed without powering off the VM by selecting “Continue running in the background.” Keep in mind this is experimental and not all
features work with this type of start (3D acceleration for example). I have been unable to successfully get this feature to work but it’s definitely worth a try. You may also view the files of a VM that is stored on your host computer by selecting the VM and
choosing “Machine > Show in Explorer.”

Creating a VM in VirtualBox
Now it is time to learn the detailed steps of creating a VM in VirtualBox. The objective of this lecture is to create a VirtualMachine that we will install and configure to be our first domain controller. A domain controller is
a Microsoft server that is responsible for security authentication within a Windows Domain – a domain controller can also manage computer and user accounts that are inside of it’s domain. You do can things like remotely deploy software to the computer, change
a user’s desktop background, configure scheduled tasks, Windows updates, and much, much more. The first thing we need to do is open VirtualBox. Next either select the “New” button at the top left-hand corner of the screen, select “Machine > New”, or press
Ctrl + N.

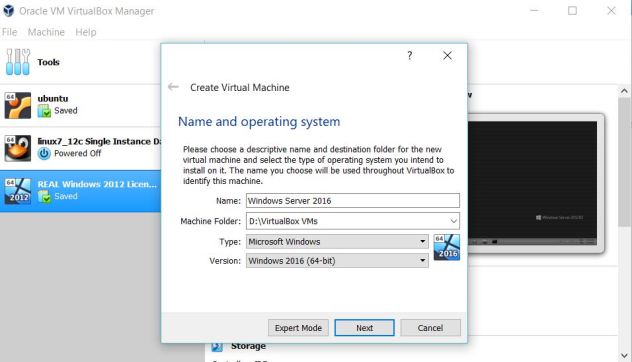
The Create Virtual Machine window will appear. Choose the “Expert Mode” button in the bottom part of the screen and wait for the window to reappear. Now you need to enter the VM name, type, version, memory size and whether or not
you want to create a hard disk.

I am going to put the name as “Windows Server 2016 – DC01”. Note that this is not actually the computer name, but the name that VirtualBox will use when storing the VM in its inventory. The “DC01” part stands for Domain Controller
01, meaning it is the first domain controller in our environment. Notice that I selected “Windows 2012 (64-bit)” as the version. This is because at the time of this writing Server 2016 was released less than a month ago and VirtualBox has not updated their
software to include this version. Do not worry if you only see Windows 2012 as the latest version as it will run the newer OS perfectly fine. I am going to specify 4 GB of Ram since my host computer has 16GB of RAM. I know some students have gotten away with
using much less than 4 GB so use as little as you can but you will certainly at least need 1 GB of RAM. Notice that you cannot allocate more RAM than what your physical system (the VM Host) has. Click “Create” and we are ready to move on to the next screen.

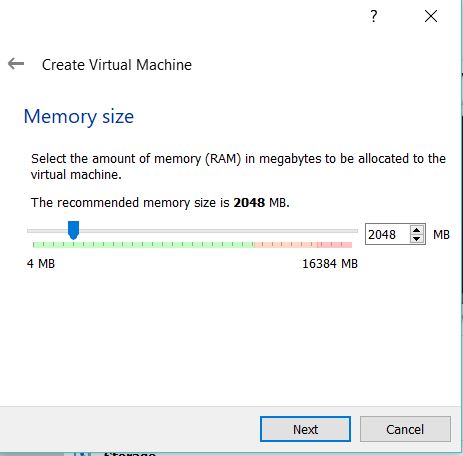
The next screen is asking us to create the virtual hard disk. The important thing is to move the size above 25gb. I strongly recommend that you use dynamically allocated for the method of storing the VM and moving the file size
up to at least 60 GB. Click “Create” and wait for the VM to be VM to be created. Now you can see the VM has been created and is listed in our inventory.

Now let’s learn how to edit the settings of a VM. You may do this by right-clicking the VM and choosing “Settings” or selecting the VM and pressing Crtl+S.


There are a lot of settings here so I am just going to point out what I believe are important. Under the General tab, select Advanced and change the “Shared Clipboard” and “Drag’n’Drop” to bi-directional. This will allow you to
copy / paste and drag and drop between your Host computer and your VM. Be warned, this feature does constantly fail in VirtualBox but it is extremely convenient when it is actually working.

If you would like to add an additional hard disk file, this can be done under the Storage tab by clicking on the

floppy disk with a plus sign icon and choosing “Add Hard Disk.” You may also add additional virtual disk drives if required, but that is not necessary for our purposes. To mount an ISO to the default virtual disk drive, select
the disc icon that reads “empty” and click the disk

dropdown on the right-hand side of the screen and select “Choose Virtual Optical Disk File”.

Next you need to navigate to and select the ISO file you wish to mount. If you have a physical CD that you would like to mount to the VM you can choose the “Host Drive” option instead of the virtual optical disk file. The network
tab allows us to configure VM network adapters as well as add subsequent networking adapters. Notice that the default option is the “NAT.” This is because a NAT adapter is the easiest to use when getting started.

Finally, we have the Shared Folders tab. This allows you to share files from your Host computer between your Guest VM without direct network connectivity. You may create a new shared folder and select a valid path on your Host
PC. Be sure to choose “Auto-mount” for convenience if you choose to use this.

Now you know how to create a VM and manage its properties.
Creating a VirtualBox Host-only Network
In order for our Guest VMs to communicate with other Guest VMs and our Host computer, we need to create a Host-only network. To do this, open VirtualBox and click on File > Preferences. Go under the Network tab and select “Host-only
Networks.” Select the plus button on the right-hand side of the screen to create a new network.

When you are prompted by user account control (UAC) select yes and wait for the network to be created.

VirtualBox is creating a new networking adapter for your VMs to use as a Host-only network. Once this is complete, you will see the new network listed under Host-only Networks. Select the network and choose the

edit icon.

You can see the network settings for our host-only network displayed here. Navigate to the DHCP Server tab and make sure “Enable Server” is un-checked (

), and navigate back to the Adapter Tab. Note that it automatically picks an IPv4 Address from an available subnet on your network but you are free to change this at any time. If you would like to change it to something else, you
need to verify that this network is not already in use on your network. More than likely it is not, but let’s check anyway to be sure. Open command prompt by hitting the Windows Key and searching for CMD. Once command prompt loads, enter the command “ipconfig”.
This will list all of your network adapter configurations.

If you have never viewed this information before, you need to look for each network adapters “IPv4 Address”. I have found two:


The first is my new VirtualBox Host-only network. The second is my Hosts IP that is handed out by my home network. Since I want to make my subnet similar to my host network, I am going to use the following address for my Host-only
network: 192.168.0.1. Close command prompt and return to the VirtualBox Host-only Network Details window. I will enter this IP into the IPv4 Address field and click “OK”.

Select OK on the VirtualBox Preferences window and select “Yes” when you are prompted by UAC. Now we need to connect our Guest VM to our newly created network. To do this open the settings of the VM and navigate to Network. Select
the Adapter 2 tab and check the “Enable Network Adapter” checkbox. Select “Host-only Adapter” from the “Attached to” drop-down list and make sure the name is the same as the network you just created (this will not be an issue if you only created one network).
Click OK to close the Settings window and wait for the settings to save. Now our VM is connected to the Host-only Network and all that will need to be done on the VM is configure its local VM network adapter settings when we install Windows.
Chapter 2 – Windows Server 2016 Overview
Installing Windows Server 2016
We are ready to install Windows Server on our VM. First we need to mount (or attach) the ISO we downloaded earlier to our VM and then we can launch the VM and begin the installation. Right click on the VM and choose settings. Select
the Storage tab and select the “Empty”

followed by the disk

dropdown list. Select “Choose Virtual Optical Disk File…”

Browse to the ISO file you want mount and select “Open”. Now you will see the ISO is mounted to the VM.

Now to begin the installation we simply need to power on the VM. Make sure the VM is selected and click the “Start”

button at the top of the VirtualBox window. In the beginning it will load the Windows files from the disk, this shouldn’t take more than a few minutes.

Once the files have been loaded you will be prompted to select your language and keyboard input method. I will the default options and click Next. On the next screen choose the “Install Now”. You will be brought to the OS installation
screen:

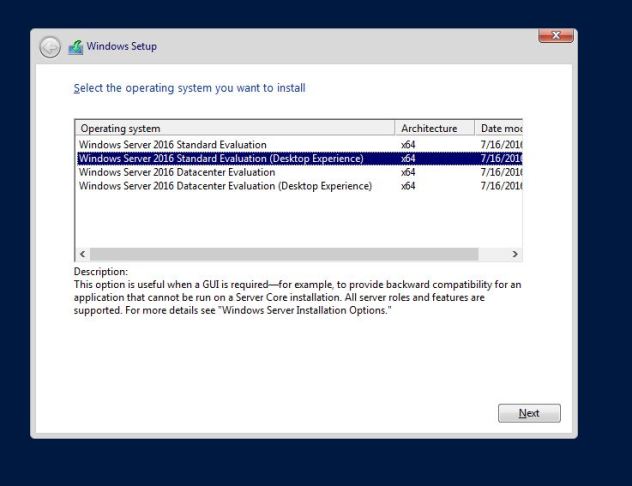
If you have installed Server 2012 right away you will notice that unlike Windows Server 2012, there is no option for “Server with a GUI,” but instead it is now called “Desktop Experience.” If you do not choose a Desktop Experience
version you will install what was known as (Server Core). You will need to use the command line to complete tasks and will not have a user interface (no use of the mouse). In Server 2012, the datacenter and standard versions contained the exact same set of
features and the only difference was the licensing capabilities. This is no longer the case however. With the Standard version you may only have 2 operating system environments while Datacenter is unlimited. The Datacenter version also includes 3 new features
not included with standard; new storage features (Storage Spaces Direct and Storage Replica), shielded Virtual Machines and Host Guardian Service (more secure VMs), a new networking stack (better network performance). Since we are using this as a trial and
do not need to pay for these, I am going to choose the “Datacenter (Desktop Experience)” version – I recommend that you do the same. On the next screen accept the licensing agreement

and click next.

On the next screen you will be prompted for the type of installation you want. If you already have Windows Server 2012 installed you may choose an Upgrade. Upgrades can be nice as they will keep your files and settings intact if
possible, however, even Microsoft claims that you should perform a fresh (Custom) install if at all possible. In my experience I have never had an Upgrade work without having things break later on. Since we do not have an OS installed, we do not have any choice
other than choosing Custom. On the next screen you will be asked choose where you want to install the operating system. If you have more than one HDD mounted to the VM then you will see them listed here. Note that it is also possible to create partitions (subdivisions)
of your HDD if you would like by selecting the drive and choosing the “New”

button and entering the size of the new partition. We have no need to do this so just click “Next” to continue the installation.

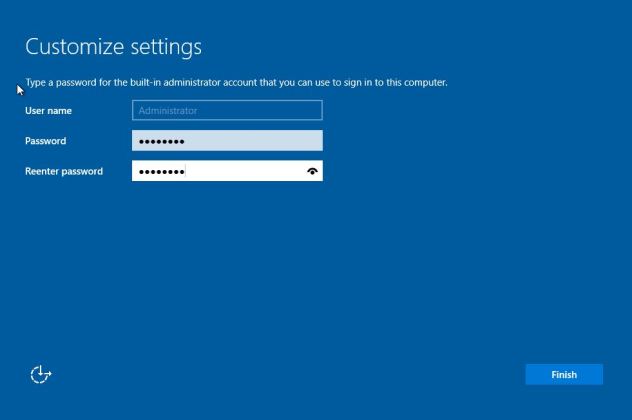
Now the installation will begin. This install generally takes at least 20 minutes so now is a good time to take a break and wait for the installation to finish. Once the installation is complete you will be prompted to enter the
password for the built-in account “Administrator.” It is very important that you don’t forget this password so make sure you write the password down if your work policy allows or memorize it and click finish.

The computer will finish the installation and you will be brought to the login screen:

You may login with the Administrator credentials you just created by pressing Right-CRTL + DEL and entering the new password you just created.
Basic Windows Server 2016 Configuration
In this lecture we are going to do some basic configurations. First we are going to install VirtualBox Guest Additions and setup some basic preferences. Setup the computer’s network configuration and make sure it can reach then
internet as well as communicate with our Host computer. Finally, we will change the computer name and reboot the server. Open the VM and Press Right-Crtl+DEL to enter your login credentials. Wait for the server to fully load then at the top of the VM window,
select “Devices > Insert Guest Additions CD image…”.

Open File Explorer by clicking the folder

icon on the task bar. Select “This PC” on the left side of the File Explorer. Under Devices and Drives you should see the VirtualBox Guest Additions CD.

Double click on this CD to launch the installation. Once the welcome appears click next through the prompts and select Install. During the installation process you will be asked to install device software. Click the Install button
to continue.

Once the installation is complete you will be required to reboot the server. Choose the finish button and wait for the server to complete the reboot. Once the computer reboots, log back into your desktop and wait for Windows to
fully load. Once Windows is fully loaded we need to open Server Manager and Command Prompt. To do this, click the windows

button in the bottom left and choose the

server manager button. I recommend that you right-click on this button, choose “More > Pin to taskbar” as you will be using it quite often.

Once you are done with that I also recommend that you pin command prompt to the taskbar. You can find the command prompt launcher by clicking the windows button again and searching for “cmd”.

Now we are going to setup our network connection for our Host-only network. If you are running a physical Server or your particular environment doesn’t use VirtualBox or a Host-only network you can skip this step. However, if you
have been following all of the steps I have done so far continue on and follow these steps. Open command prompt and enter the command “ipconfig”. We are looking for your two ethernet adapters 1 and 2.

If you do not see the same settings I do then you likely do not have the exact same network settings that I have on the Guest VM. Notice the first adapter has an IP address of 10.0.2.15. I have assigned adapter 1 on my VM to be
a NAT adapter. If I attempt to run the command “ping google.com” for example, I can test to see if I have internet connectivity.

I can see I am getting replies from Google.com. This tells me that I am connected to the internet. Now I need to get the second adapter working. Notice the IP is a 169.254.***.*** address. This means that the computer itself was
unable to find a DHCP server on the network and instead assigned a private IP address to itself. We need to configure an IP address the is on the same network as the Host-only network we have created in previous lessons. To do this, we need to exit the full
screen on the VM (Crtl + F) and open File > Preferences on the VirtualBox window. Navigate to Network and select “Host-only Networks”. Select your Host-only network and click the “Edit Selected” button.


Notice if you navigate to the DHCP Server it is turned off. This is what our VM got a 169.254.***.*** address. Do not turn this back on however as we will be creating our own DHCP server on this VM later. We need to give our VM’s
second adapter an IP address in the range of 192.168.0.2-254. Navigate back to your Guest VM and open the Server Manager Window. Choose the “Local Server” tab and edit the settings for “Ethernet 2” by selecting the blue “IPv4…” text to the right.

Right click on the Ethernet 2 Adapter and choose Properties.


Uncheck the “Internet Protocol Version 6” checkbox, select “Internet Protocol Version 4” and choose Properties. Check the “Use the following IP address:” and enter the following information.

Remember, you can use any address between 2 – and 254 for the last octet of your IP address, but I am going to choose .10. Choose the subnet mask and this information will be automatically prefilled. Next, choose the “Default Gateway”.
This will be the address of our network. If you remember, we set this in VirtualBox to be the 192.168.0.1 address. For DNS settings we are going to set the preferred DNS server to a loopback IP address which is 127.0.0.1. This IP address points back to the
local server, and although we haven’t built the DNS server yet we will be doing that in the future. For the alternate IP address we will use Google’s DNS servers which is 8.8.8.8. Select OK and close out of the Properties window. Now before we can communicate
between our other VMs and our Host we need to modify the firewall settings of our local server. Go back to the Server Manager > Local Server and modify the settings for “Windows Firewall”.

Choose Advanced settings on the left hand side of the screen and click “Windows Firewall Properties”.

We need to customize the protected network connections for Domain, Private, and Public profiles. Choose the “Customize” button for “Protected Network Connections” and uncheck your Host-only network which in my case is “Ethernet
2”.

Select OK and repeat these steps for the Private and Public profiles. This will allow traffic on our Host-only network to pass through our network adapter without being blocked or rejected. Now we need to verify that we can communicate
between our Host computer and our Guest VM. To do this we are going to attempt to ping our Guest VM from our Host computer. Exit full-screen on the VM and on your Host Computer open Command Prompt. Attempt to ping the VM by typing the ping command followed
by the IP address of the Server you just configured. In my case I set it to 192.168.0.10 so I will attempt to ping this address.

Here we can see that I can successfully ping the Guest VM. Now we have a VM server that can reach the internet as well as communicate with other VMs and the Host computer. Next we are going to rename the server. By default the
server will be named with a “WIN” prefix. To change your server name, open the Server Manager and navigate to Local Server. Click the computer name to open the System Properties.

Select “Change” and enter a new name. I am going to type in the name “ITFDC01”. ITF stands for my website name, “itFlee” and DC stands for “Domain Controller”. The 01 simply means that this is the first domain controller in this
network.

Click OK and click OK again when you are notified you must restart. Select Close on the “System Properties” and choose “Restart Now” when the window appears.

Now we are done making the basic configuration changes.
Server Manager
The primary way you manage your server is with a program that is included with all versions of Windows Server called “Server Manager”. By default, Server manager will launch when the operating system starts, but if it doesn’t you
can start it by clicking the Windows button and selecting “Server Manager”.

Server manager allows you to manage your local server as well as other servers on your local network. From here you can manage the computer name, IP address, firewall settings, Windows updates, view Events, Services, and much,
much more. On the left pane you will see Dashboard, Local Server, All Servers, and File and Storage Services. The first three items relate to the server or remote servers. The fourth is a server role called “File and Storage Services” (note that this is installed
by default). Whenever you install new server roles they will appear in this pane.

The dashboard gives a quick overview of your server and allows you to configure the server quickly. If there are any issues with the local server or remote servers (such as a service that failed to start) you will see them on this
screen. To see errors with remote servers you need to first add them as a remotely managed server. Errors with remove servers will be shown under the “All Servers” section.

The local server tab will give you detailed information about the server you are currently logged into. If you need to change anything from the computer name, domain membership, firewall, network settings etc, this is the place
to do it. You will also have all of your events and services listed here. There is much more to the local server tab, but this is the most important parts of it. The all servers tab allows you to view the same information on the local server and for remote
servers, but you cannot change the server properties (computer name, domain, firewall settings, etc). The last tab is File and Storage Services. This server role includes technologies that help you set up and manage one or more file servers, which are servers
that provide central locations on your network where you can store files and share them with users.
Roles & Features
Let’s talk about two key terms that you must know in order to successfully work with Windows Server 2016; Roles and Features.
Roles
A server role is a set of software programs that allow a server to provide a specific service to its network. An example of a role would be adding the DHCP role to our server. This will allow the server to act as a DHCP server
Features
Features are individual software programs that are sometimes required to be installed by roles, although they can be independently installed without roles as well. You can add or remove roles and features by selected the Manage
button at the top right-hand corner of the Server Manager window and selecting either “Add” or “Remove Roles and Features”

The windows for adding and removing roles are nearly identical. One allowing you to check checkboxes for roles and the other allowing you to uncheck role checkboxes. If you open the “Add Roles and Features” window you will be presented
with the “Before You Begin” tab. This tab has no functionality and is simply informational so I recommend that you check the “Skip this page by default” checkbox and click next.

The Installation Type tab gives you two options. The first option is the most common and is for installing roles and features on a single server. The second option is for installing roles onto a virtual machine (not related to
VirtualBox). Choose the first option and click next.

If you have added remote servers to manage then they will be listed here. You can also choose to install the roles on a virtual hard disk. Unless you are using Hyper-V (we are using VirtualBox), you likely won’t use this second
option. Click next.

On the Server Roles tab, you can choose any of the roles you would like to add to the server. If you only want to install features, you do not have to check any of these checkboxes. For this lecture, we are going to install and
uninstall roles and features so you understand how it works. Choose the “Fax Server” check box. You will get a popup stating that you need to add required features in order to install this role. Click “Add Features”, and then click Next.

The Features tab looks very similar to Server Roles tab. If we had not selected any roles to install, we would not be able to progress past this screen. It is important for you to know that you do not have to install roles, but
you must at least install features in order to complete this wizard. The features required by the Fax Server role are already checked for installation, so simply click next to continue. The next screen will prompt us about the new Fax Server role we are installing.
Generally when you add a new server role, you will have some type of informational tabs added to the wizard. Click Next through the prompts. When you are brought to the Role Services tab, you can check additional services if you would like them. Since this
role is temporary and just an example, I am not going to include any of these optional role services. Click Next. Now we are brought to the Confirmation tab. If you would like you can check the “restart the destination server…” checkbox but I am going to leave
it unchecked since I plan to uninstall the role immediately. As a general rule, it is a good idea to check this checkbox.

Click Install and you will be brought to the results window.

Note that you may close this wizard at any time, and the installation will still continue. Once the window is closed, you may view the progress by clicking on the flag icon on the top right-hand corner of Server Manager.

Once the installation is complete, refresh Server Manager by either pressing F5 or by pressing the refresh button next to the notifications button.

On the notifications button you will see new notification stating that you must complete the post-deployment configurations.

Just about every role you install will require some type of post-deployment configuration – since we are about to uninstall this role, we do not need to complete this. Now, let’s uninstall the newly installed Server Role. Click
Manage > “Remove Server Roles and Features.” Click next through the prompts, choosing the same settings we did when adding the Server Role. When you get to the Server Roles tab, uncheck the “Fax Server” checkbox.

You will get the popup stating that you can remove the features that were required by the server role. Notice that this list is not exactly the same as the features we were required to install. This is because we will need to uninstall
additional roles as well. Click the Remove Features button and uncheck the “Print and Document Services” checkbox. Again, you will be prompted to remove features that require the role. Click the Remove Features button. Click Next until you reach the confirmation
Window. This time, check the “Restart the Destination Server Automatically if required” checkbox. Select Yes when you receive the warning message about the reboot. Click the Remove button and wait for the uninstall to finish and the Server to reboot.
Chapter 3 – Building a Windows Domain and Domain Controller
What is a Windows Domain and Domain Controller?
Windows Domains have been around since 1993 with the release of Windows NT. They provide System Administrators an efficient way to manage small or large networks. You only need one Domain Controller (DC) to build a Windows Domain
although most Windows Domains contain several servers and computers. A DC is any server that has the Active Directory Domain Services (AD DS) role installed. The server’s job is to handle authentication request across the domain. Domain controllers hold the
tools Active Directory and Group Policy among others — so when you need to create new user accounts or change domain policies, this is all done from a domain controller. You can have several domain controllers within a domain but there is only one primary
or main domain controller. The primary reason for having more than one DC is fault tolerance. The critical information (user, computer account information, etc) is replicated between the DCs so if one goes down the client computers will switch to the other
DC that is still functioning. Domain controllers use a tool called Active Directory Users and Computers, commonly referred to as AD or Active Directory. This tool is used to not only manage user and computer accounts but also acts as a directory service for
resources on your network (like printers, file shares etc). When a domain user searches for a printer to install, they will find all the printers that have been added to the Domain Controller with AD. AD is a tool to manage domain users, computers, printers,
file shares, groups, and more – these are all considered AD objects. Groups contain members which can be any valid AD object (user, computer, etc.). By default, there are several groups that come with AD like Domain Admins, Domain Users, etc. All of these
AD objects are stored within folders called Organizational Units. Group Policy Management (often called GP or Group Policy) is another important tool that is located on a Domain Controller. It allows an administrator to manage all domain users or domain computers
remotely. Group Policy uses GPOs (Group Policy Objects) to manage the settings of valid AD objects. You can target specific AD objects, specific OUs, or the entire domain. Basically anything you want to create a custom setting for, you can do it with Group
Policy – You can configure the desktop backgrounds for certain users and/or computers, manage what websites they can visit (in Internet Explorer only), manage security settings or countless other settings. To recap what we have covered in this lecture; a Windows
Domain allows management of large (or small) computer networks, they use a Windows server called a “DC” or Domain Controller, a DC is any server that has the AD DS role installed, DCs respond to authentication request across the domain, DCs have the tools
AD (Active Directory) and GP (Group Policy), Active Directory contains Objects and OUs (Organizational Units) and GP contains GPOs (Group Policy Objects) and manage settings for AD objects.
Adding the Active Directory Domain Services Role
we are going to create a Domain Controller by installing the Active Directory Domain Services (AD DS) role. Remember that any server running the AD DS role is considered a domain controller. We are going to add this role to our
server and create a new domain called “itflee.com”. This is the name of my website and if you would like you can create any domain name you want. You won’t break any “real” websites since there are no internet DNS servers pointing to the domain that we are
about to create. Finally, once we add the AD DS role we will promote the server as a Domain Controller. You should already know how to install a server role on the server you are currently logged in to but I am going to cover the steps again. Open Server Manager
and select Manage > Add Roles and Features

On the Installation Type Screen leave the default option “Role-based or feature-based…” checkbox check and click next.

On the Server Selection screen choose the server we built earlier called “ITFDC01” and click next.

In the server roles list choose the “Active Directory Domain Services” role

. You will see a popup window stating you cannot install AD DS unless certain role services or features are also installed:

Click the Add Features button

and then click Next to proceed to the Features screen. We do not need any additional features as all the required features were already added. Again click Next. Now you will be brought to the AD DS screen. It tells us that we will
also need install the DNS role if we do not already have it set up.

Click Next and continue on to the Confirmation screen. Here we can see the roles and features we are about to install. Click Install and wait for the installation to finish. Once the installation is complete you will have post-deployment
configuration steps to complete as well:

Click the notification flag next to manage and choose “Promote this server to a domain controller”. The AD DS configuration wizard will appear giving us three options:

The first option, “Add a Domain Controller to an existing domain” is for adding additional domain controllers to a domain you have already created. This option is not suitable for us now because we have not created a domain yet.
The second option, “Add a new domain to an existing forest” is for adding child (also called sub) domains. Let me explain. We are going to create a domain called itflee.com. If that domain already existed we could create a sub (or child) domain called courses.itflee.com.
In theory we could setup this sub domain called courses.itflee.com simply to separate our students and teachers from the administrators who reside in the domain itflee.com.

You could configure this sub domain so that Admins from the itflee.com domain can reach into the courses.itflee.com domain, but students and teachers could not reach back to the resources in the itflee.com. Again this is not an
appropriate option for us because the itflee.com domain does not yet exists. The third option is to “Add a new forest”. This allows us to create and specify a new domain. Choose this option and specify a root domain name.

I am going to enter itflee.com and click next. It will take a second before the Domain Controller Options screen will appear to just be patient while it processes. The first two options Forest Functional Level and Domain Functional
Level specify which operating system the DC will use. You need to specify the OS you are using (in this case it is Windows Server 2016). There is a bug with the latest version of Server 2016 where the developers did not configure this screen to show the latest
version as “Server 2016” but instead show it as the “Windows Server Technical Preview” so I have to choose this options.

Make sure the Domain name System (DNS) server checkbox is checked. If you remember, when we installed the AD DS role it said that we had to install this in order for the DC to function properly. The Global Catalog option means
that the server will list all active directory objects. This is a requirement for a primary domain controller or when we are creating a new domain forest.

If you choose the Read Only Domain Controller option, then the domain controller will not be able to make changes to the domain. We will want to make changes to our domain so do not check this checkbox. Type in a DSRM password
and make sure that you either write it down or memorize it. The DSRM (Directory Services Restore Mode) password allows an administrator to take an instance of AD offline for reasons like maintenance or troubleshooting. This is not a commonly used password
but you will want to keep “just in case”. Click next to proceed on to the DNS options. On the DNS Options screen you will see a warning about the DNS delegation.

This warning means that people on the internet will not be able to resolve local DNS names on your local DNS server (names like itflee.com or ITFDC01 etc). This is fine because we don’t want people on the internet to be able to
access our server for security reasons. Click next and proceed on to the Additional Options. The NetBIOS domain name is populated for us as ITFLEE. The NetBIOS name is an abbreviation of the Fully Qualified Domain Name (FQDN) which is itflee.com. I am going
to leave this at the default of ITFLEE and click continue.

On the Paths screen we can see the default paths chosen for the folders that are required by AD DS. If you would like to choose an alternate drive you can do so by clicking the “…” button

and choosing the alternate path. I recommend that you leave them at the default setting and click next.

We are brought to the Review Options screen where we can see all of the options we have chosen so far. If you would like you can click the “View script” button

and you will be presented with a PowerShell script that you can save in order to later execute and quickly complete the wizard with the same settings we just used. Close the PowerShell script and click next. Now we are brought
to the “Prerequisites Check” window. The wizard is going to go verify that the server is ready to be promoted as a DC. This will take a few minutes before it is ready so just be patient wait for it to complete the checks. Once the checks complete at the top
you will see that all prerequisite checks have passed:

If you have errors, you can address the errors (Google is your friend) and click the rerun prerequisite checks text:

Under the view results window we can see there are various warnings. None of these are critical but it is worth reading through them. We can see that the first one is a security setting stating that anything with crypography not
compatible with Windows NT 4.0 will be blocked. This is not an issue for us because we are not using old servers or old technology. The second is in regards to our first networking adapter not having a static IP address. This is because the first adapter is
connected to our NAT adapter and will not be used for our local domain. This can be ignored. The third warning is about the DNS delegation. Again we do not care if people on the internet can resolve our DNS records within our network.

Click the install button and wait for the installation to complete and the server to reboot. This can take a good while depending on the speed of your server so you will need to be patient while it works. I am going to speed up
this video so you don’t need to sit and watch the entire installation. Once the installation completes and the server reboots, press ctrl+alt+del to log in. The first thing you will notice is the NetBIOS name of our domain precedes the user account we are
logging into (in this case, “ITFLEEAdministrator”). This is in the format of [Domain Name][Domain Username].

If we had multiple domain names we could specify a different domain name by typing the name of the domain we want to use followed by a backslash and the name of the user account you want to log into. Type in the password you used
to create the administrator account when you installed the server and log in. Under the server manager you will see the new server roles of AD DS and DNS.

That is all we have to do to get our Windows Domain and Domain Controller fully operational.
Chapter 4 – Joining a Windows 10 Workstation to Our Domain
Downloading Windows 10
Now we are going to download a Windows 10 ISO installation file from Microsoft. An ISO file is a disc image file that can emulate a CD or DVD. This file cannot be natively opened on Windows, but VirtualBox will be able to read
the ISO and get the Windows installation files from the ISO. It’s important for you to know that we are going to complete this lecture from our Host computer and not from a Virtual Machine. To download Windows 10, open your preferred web-browser on your Host
computer and navigate to google.com. In the search bar type in “Windows 10 Download Tool”. The first result with be
Microsofts software downloads page that allows us to download the Windows 10 Media Creation Tool. Click the
Download tool now button and wait for the download to complete.

Once the download is complete, launch the installer file.


Once the installation has begun, accept the license terms and on the following screen you want to select
Create installation media for another PC and click Next.

On the next screen you can leave the default settings or if you want you could customize them by unchecking the
Use the recommended options for this PC checkbox. I am going to leave them at the default setting and click
Next.

On the next screen choose the ISO file checkbox. This option allows us to download an ISO file that we can later mount to a VM and use to install Windows 10.

Click Next and choose where you want to save the new ISO file. I recommend that you change the name from
Windows.iso to Windows10.iso. We don’t want to be confused between this ISO and Windows Server ISO later on down the road.

Click Save and now we simply need to wait for the download to finish.
Installing Windows 10
Next we need to create a new VM and install Windows 10. The reason why we are doing this is so we can later join the new computer to our Windows Domain and learn how to manage a client computer from a DC. To get started, the first
thing we need to do is create a new Virtual Machine. Open VirtualBox and click on the New button.

The Create Virtual Machine window will appear. If you see the
Expert button at the bottom of the Window, go ahead and switch over to that mode.


I am going to name my VM “Windows 10 VM”. Once I input that name it automatically selects the
Type, Version and Memory Size. Make sure you check the Create a virtual hard disk
now checkbox and click Create. The Create Virtual Hard Disk window will appear. Leave the file location at the default setting. Specify the HDD size you want in gigabytes. I am going to use 80 GB. Make sure
Dynamically Allocated is checked and click Create.

Now we need to mount the Windows 10 ISO we downloaded earlier. To mount an ISO means to virtually insert the disc into the computer (or VM). Right-click on the VM and select Settings. Navigate to the
Storage tab. Select the empty disc icon and under Attributes on the right side of the window click the disc icon and select
Choose Virtual Optical Disk File…

Browse to and open the Windows 10 ISO we downloaded earlier with the Microsoft Media Creation Tool. Now you should see “Windows10.iso” in the CD icon under the
Storage Tree.

The last thing we need to do is put our VM on the Host-only network we previously created for our domain controller. Click on the
Network tab and choose Adapter 2. Check the
Enable Network Adapter checkbox and change the Attached to dropdown list from
NAT to Host-only Adapter. Make sure that the same network you’re using for your DC is listed under
Name.

Click OK to close the settings Window. We are now ready to begin the installation of Windows 10. Right-click on the VM and choose
Start > Normal Start. The VM will begin to power on an it will load the Windows installation files.

Once the initial loading is complete you will be prompted to enter your language, time settings and keyboard method. Make sure you select the correct Keyboard method as this can making using the OS nearly impossible if it is wrong.
Mine is configured correctly by default so I am just going to click Next. On the next screen click
Install now. The following screen will prompt you to enter your license key. If you have one you may enter it now otherwise click the
I don’t have a product key button at the bottom of the screen.

The next screen will ask you what version you want to install. Select the appropriate version you would like to install and click
Next.

You now need to accept the license terms and click Next. Since we do not already have an OS installed that we are upgrading, we need to choose
Custom: Install Windows only (advanced).

The next screen asks us to choose the HDD we want to install the OS on. The default options are fine so I am going to click
Next. Now the installation will begin. This will take about 20 minutes to complete so I am going to speed up this video. You can pause this lecture until your installation is complete and we will complete the installation.

Once the installation completes you will be brought to the
Get going fast screen. Click Use Express settings to continue.

On the next screen you will need to specify who owns the PC. Since we are going to join this computer to a domain you will want to select
My work or school owns it and click Next.

On the next screen we want to choose Join a local Active Directory domain and click
Next.

Now we need to create our local user account for this machine. I am going to use the username paul.hill.local and I will create a password and a hint. Click
Next. Now we need to decide if we want to use Cortana or not. I am going to choose
Not now because I don’t want the computer slowed down unnecessarily by Cortana. Now the desktop will load and we are done install Windows 10. We just need to install VirtualBox Guest Additions. On the VM window, select
Devices > Insert Guest Additions CD Image… Once the CD mounts run the installation just like you did for our Domain Controller and reboot the computer when complete.
Joining our Workstation to our Windows Domain
we are going to join our newly created Windows 10 VM to our itflee.com domain. The first thing we will need to do is manually configure our TCP/IP settings so we can communicate with our DC then we can rename the computer and join
it to our Domain. We will also switch over to our Domain Controller and see where our new computer was automatically placed in Active Directory. In order to complete this lecture, we will need our Domain Controller running so we can join our new Windows 10
VM to the domain. Open your Windows 10 VM and if you still have the “VirtualBox Guest Additions CD Image” mounted we can unmount it by selecting
Devices > Optical Drives > Remove Disk from optical drive. Now we need to log into the VM. Press right-crtl+del and type in your user credentials that you created when you installed the OS. Once you are logged in and Windows has fully loaded,
click the Start button and search for “Network”. Click Network and Sharing Center when it appears.

Select the Ethernet 2 text on the right hand side of the screen.

Choose the Properties button. Uncheck
IPv6 since we are not going to be using this internet protocol. Select
IPv4 and choose Properties.

Select the Use the following IP address checkbox and for the
IP address enter 192.168.0.50 — we could use any unused IP address ending with 2 – 254 but I am going to use .50. Press the tab key and the
Subnet mask will be automatically populated as 255.255.255.0 which is correct. Now under the Default gateway enter 192.168.0.1 which is the same address as the host only network we created in VirtualBox. For the
Preferred DNS server we want to enter the IP of our DC which is 192.168.0.10.

Click OK and close out of the
IPv4 Properties and Ethernet 2 Status windows. Now we want to verify that we can communicate with our DC by attempting to ping it. A ping command sends a message to a target computer and asks for a response. If we get a response, we
know that we can communicate with the target computer. To ping a computer we need to open Command Prompt. Press the start button and type “CMD” in the search box. You will see Command Prompt show up in the results.

Start Command Prompt and enter the command ping “192.168.0.10”.

We can see that we are getting responses back from our DC. Now that we know we are able to communicate with the DC we need to rename this computer and join it to our Windows Domain. Press the Windows button again and search for
“System”. Click the Control Panel System that appears in the search results.

You will see a section called “Computer name, domain, and workgroup settings”. Click the
Change settings text to the right of this.

The System Properties window will appear. Click the
Change… button in the middle of the screen. Enter a computer name. I am going to use “ITFWS001” for ITFLEE WORKSTATION 001. Check the
Domain checkbox and enter the name of the domain you want to join. In my case it is “itflee.com��

Click OK. Now we will be prompted to enter our domain administrative credentials so we can join this computer to the domain. We can use the “Administrator” account we used to create our Domain Controller. Enter
the username “Administrator” and the password you used when creating your domain controller VM.

Click OK. In a moment you will see the “Welcome to the itflee.com domain” message appear. Click
OK and you will then be notified that you must restart the computer. Click
OK and Close the computer settings window. Now you will be asked to reboot your computer. Click
Restart Now and wait for your computer to reboot.

Now while the computer is rebooting let’s switch over to our Domain Controller. If you are in full screen mode on the Windows 10 VM press right-crtl+F to exit full screen mode and switch over to our Domain Controller. Log in to
your DC and once Windows fully loads open Server Manager and select Tools > Active Directory Users and Computers. Navigate to itflee.com > Computers. Notice we can see our new workstation has been added to built-in OU called Computers.

Now our Windows 10 workstation is on the same network as our Domain Controller and we have successfully joined it to the Windows Domain that we created earlier. We can now practice managing the workstation from our Domain Controller
using Active Directory and Group Policy. Spend some time experimenting (change the desktop background with group policy, edit security settings etc…).
Credits
Originally posted at
https://www.itflee.com
In this note; I will show you how you can install Windows server 2016 on Oracle VM Virtual Box step by step. Actually all my notes about database security. But I will use this server to show you some security feature of SQL Server.
- First; you have create a blank Windows machine by Oracle VM Virtual Box Manager by clicking New in Machine menu.

2.In the dialog box give a name for the virtual machine and choose Windows 2016 (64bit) as a version.
3. Now ; select the machine RAM , I chose 2 GB as you see in the picture below.
4. After pressing Next; you will come to Hard Disk configuration page; in my machine I decided to create a virtual disk.

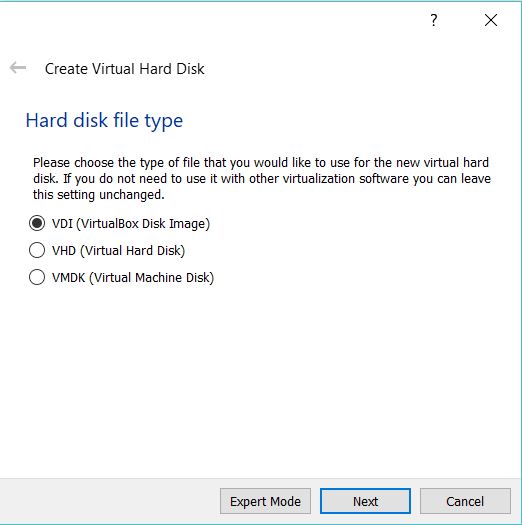
5. Choose VDI as a hard disk type.
6. In the Storage on physical hard disk page choose your disk type and I chose dynamically allocated disk

7. In File location and size page; choose you hard disk size and location and press the Create button to create a blank machine. Now you blank Windows 2016 server is ready.

8. Now It is the time to download Windows 2016 Server ISO from Microsoft support page.
9. After downloading ISO page ; insert this file into previously created blank machine. You can do this from the setting page of the machine , choose storage section and Optical Drive part.

10. Now start the machine and press Install Now.

11. Choose Windows Server 2016 Standart Evaluation ( Desktop Experience)
12. This is a new installation for this reason ; choose Custom install

13. Now create you disk drive ; just choose Drive 0 and press Next.

14. Windows installation starts and you have to wait for a while

15. At the and you should enter your Administration password and you have make some regional setting.
16. And now you virtual Windows 2016 server is ready you can open your desktop by pressing Ctrl-Alt-Del from Input – keyboard menu .

I hope this note will be helpful for you.
Y. Anil Akduygu from Istanbul

The Windows Server 2016 is the cloud-ready operating system that delivers new layers of security and Azure-inspired innovation for the applications and infrastructure. Please see the following guides on how to perform Post OS Installation configuration of Windows Server 2019 Properties, how to install Windows Server 2019 Operating System. Also, you may be interested in my YouTube video on how to setup Windows Server 2019 on a VMware Workstation. If you would like to try this out in a lab environment, download it here. Also, see this guide on how to perform an in-place upgrade from Windows Server 2016 to Windows Server 2019.
Below are the features of Windows Server 2016: See this guide for how to install Windows Server 2022 on VMware Workstation.

- Built-in Security: Windows Server 2016 gives you the power to prevent attacks and detect suspicious activity with new features to control privileged access, protect virtual machines, and harden the platform against emerging threats.
- Software-defined Infrastructure: Windows Server 2016 delivers a more flexible and cost-efficient operating system for your data center, using software-defined compute, storage, and network virtualization features inspired by Azure.
- Cloud-ready Application Platform: Windows Server 2016 delivers new ways to deploy and run both existing and cloud-native applications – whether on-premises or in Microsoft Azure – using new capabilities such as Windows containers and the lightweight Nano Server installation option.
The steps are similar to installing Windows Server on a dedicated appliance. see this guide for how to install Windows Server 2019. Load the ISO image in a VM or DVD onto a physical server and boot the VM or Server from it.

In the setup window, select your desired language, time format and language to install.

Click on install in the next Window as shown below

This will continue the setup process as shown below

Select the Operating System you wish to install. This ISO evaluation is for the Datacenter and Standard editions. The Datacenter edition is a complete edition and includes the new datacenter-specific features (Shielded Virtual Machines, Storage Spaces Direct, Storage Replica, and Software-Defined Networking) in addition to unlimited server virtualization.
I will be choosing Windows Server 2016 Datacenter Evaluation (Desktop Experience)
– Click on Next
Note: A Server with Desktop Experience is a complete installation and includes a full graphical user interface (GUI).

Accept the license and click on Next as show below
– If you do not tick the checkbox, you cannot proceed. As you can see it is grayed out.

Since we are not performing an upgrade, I will be selecting the second option
– Custom: Install Windows only (advanced). Just click on it to proceed

In this Window below, you will select where to install Window. I am okay installing it on Drive 0.
– Note: You can create a new Drive as shown below if you want to have Windows installed to it.
– Because I do not want to create a new drive, I will click on Cancel 🙂
– Then click on Next


This will now start the process of installing Windows Server 2016 on your server or VM. This can take a while but seat back with and enjoy your glass of Palm wine 😉

Note: Your server will restart multiple times as Windows is being installed.

Now it is time to customise your your Server Settings

This completes and finalize the entire Windows Server 2016 installation process. As you can see below, you can now log on to your server.

Log on to the device with the local administrators account and password as created above.

That is all. You can start installing applications etc on your server. Since I have a DHCP server running in my Network, the server automatically received a DHCP IP Address. See the guide “How to configure a Windows client to obtain IP Address automatically from a DHCP Server“.

If you would like to configure your server statically, see the guide on Post installation of Windows Server 2019 Properties.
– You can configure all settings from the Server Manager on the fly as shown below.

I hope you found this blog post helpful. If you have any questions, please let me know in the comment session.
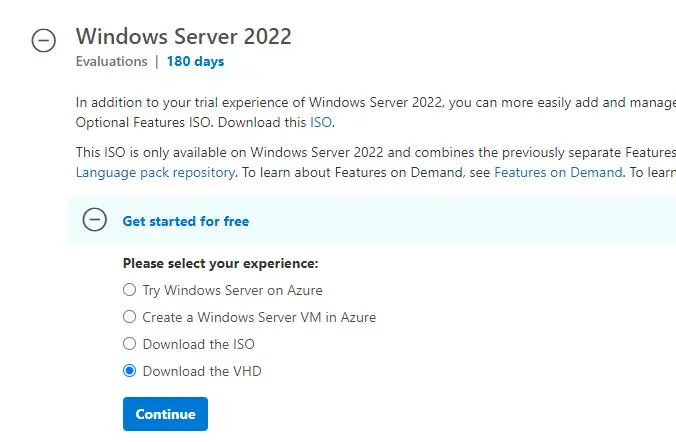
If you want to try and evaluate Microsoft Windows servers by pre-installed VHD files on VirtualBox or VMware, you are at the right place. Using pre-installed virtual hard disks always ease our job by avoiding ISO download, installation, and configuration.
You can find out more information about the download links of Windows 2022, 2019, 2016 and 2012 R2 server VHD/VHDX and how to attach them to VirtualBox or VMware in this guide.
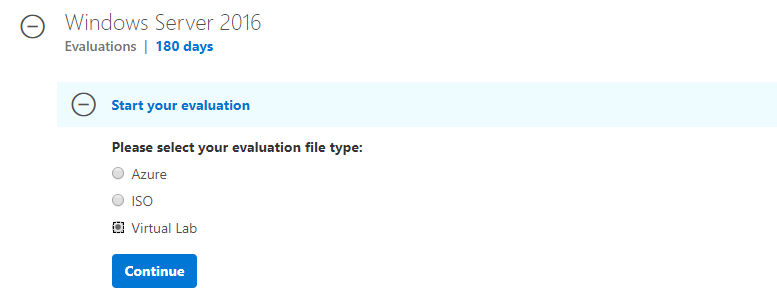
Note: This guide was originally written for the Windows 2012 R2 server with the older version of VirtualBox and VMware. But the same steps are applicable for the latest Microsoft Servers which are available for evaluation for 180 days from Microsoft official site.
The Microsoft Evaluation centre is the ideal place to download the official Windows servers with 6 month working period with all the features. 180 days must be enough to test and evaluate the new OS in your environment with the existing business-critical applications. Not only the Server Operating Systems you can download but also the latest Hyper-V servers and Windows admin centre.
Download Windows 2022/2019/2016 & 2012 R2 VHD/VHDX
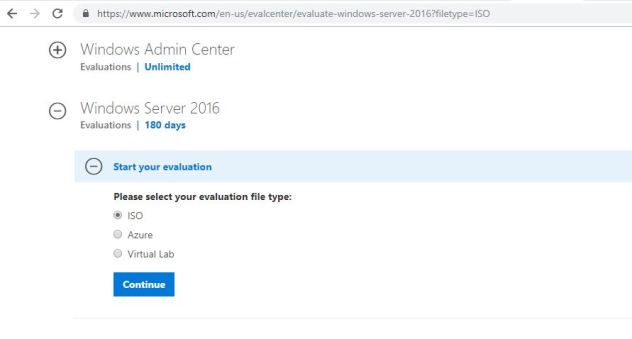
1) You can download either server core or with GUI here at the official evaluation centre (Microsoft account is required).
If you don’t find the VHD format of the required server OS, you need to select the ISO, Azure or Virtual Lab format to install and get hands-on experience. Downloading ISO and installing it on VirtualBox or VMware is not that hard either.
Windows 2019 is available as VHD, unfortunately, it did not work on VirtualBox. You can read this guide about the issues and how to install it on Windows 10 PC by VirtualBox.
Basically, these VHD preinstalled images are optimized well for Microsoft hypervisor platforms such as Hyper-V and Azure.
Here are the available download formats for Windows 2022 server.
2) Extract the exe file you have downloaded. Since this image was made for the Hyper-v server to import directly, you will find more files and folders inside it.
We need the only VHD file which resides inside the ‘Virtual Hard Disks’ folder.
How to Use Windows Server VHD on VirtualBox
3) You must have the latest version of VirtualBox. If you do not have the version that supports Windows server OS as guest VM, you may get an error message that says ‘Your PC needs to restart’ on the black screen.
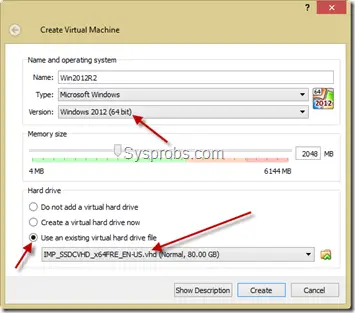
4) Create a new virtual machine. Select Windows Server 64bit appropriate to the VHD file as client OS.
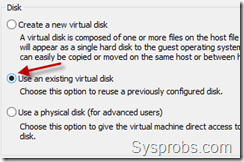
Instead of creating the new hard disk, select the existing virtual hard drive option. Browse the extracted VHD file which is located inside the ‘Virtual Hard Disks’ folder.
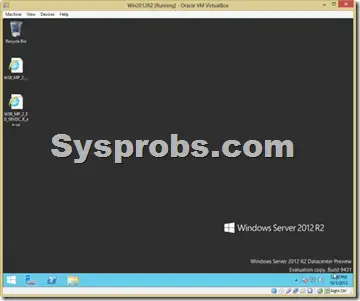
5) There should not be any issues when you start the virtual machine.
The administrator password is R2Preview! (for Windows 2012 R2 OS) , as of now. You could find more information here from the Microsoft site.
Here is the working virtual machine on VirtualBox.
Use Windows Server 2022/2019 or 2012 R2/2016 VHD in VMware Workstation
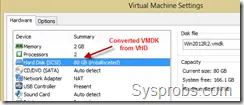
6) VMware workstation or VM Player do not support VHD disk files for direct import. Therefore, the VHD file needs to be converted to VMDK format. There are few free tools available for this purpose in the Windows OS platform.
WinImage is a tool (free for 30 days) that can be used to convert VHD to VMDK in Windows 10. Also, StarWind’s V2V converter is available for free after registration.
Download WinImage here. It’s a small application.
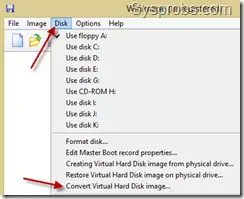
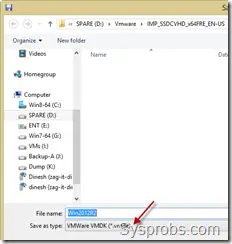
In the WinImage tool, select Disk from the menu and ‘Convert Virtual Hard Disk image’. Browse the VHD file you need to convert and select default options on the next screen to make a fixed size volume.
In the saving dialogue box, select VMDK file format from drop-down and press save. This will start converting VHD to VMDK.
7) Once the disk is converted successfully, create a new virtual machine in the VMware workstation.
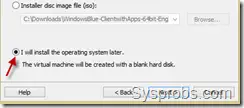
Select the ‘I will install OS later’ option because we are not going to install OS in this case.
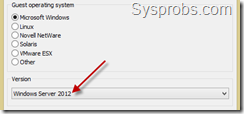
 Select Windows Server 2012 or whatever version you are trying as guest OS. You must have the latest version of the VMware workstation to list out the all recent supported Windows server Operating Systems.
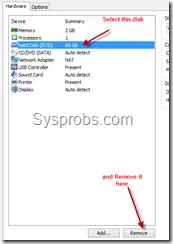
9) Once the new VM is created successfully, follow the below step to delete the default vmdk file.
After deleting, let’s attach our VMDK file which was converted from the original VHD.
Press Add and select the hard drive. Make sure to select an existing disk option.
Browse and attach the converted 2012 R2 VMDK file.
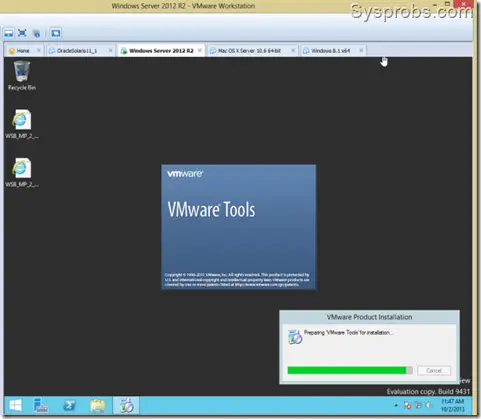
10) You can modify other hardware settings (such as RAM and processor cores) if you wish. Then power on the virtual machine.
I’m sure it will start smoothly. VMware Tools can be installed on the guest OS to get optimal performance and enhancements.
As I mentioned earlier, if you have the proper VHD or VHDX of Windows 2022 and 2019/2016 servers, you can follow the above steps to convert and import on a VMware workstation. It will enable you to evaluate the product before implementing it in the production environment.
By using this method, you can use the same VMDK (which converted from the original Windows server VHD) on VMware ESXi or vSphere hypervisor hosts.
Share your experience about these steps to install and use the latest Windows Servers by VHD/VMDK files in VirtualBox or VMware workstation.
Как загрузить окна на виртуальный бокс?
Установка VirtualBox
- Загрузите ISO-образ Windows 10. Во-первых, перейдите на страницу загрузки Windows 10. …
- Создайте новую виртуальную машину. …
- Выделите RAM. …
- Создайте виртуальный диск. …
- Найдите ISO-образ Windows 10. …
- Настройте параметры видео. …
- Запустите установщик. …
- Установите гостевые дополнения VirtualBox.
7 сред. 2020 г.
Windows Server — это просто операционная система. Он может работать на обычном настольном ПК. … Windows Server 2016 использует то же ядро, что и Windows 10, Windows Server 2012 использует то же ядро, что и Windows 8. Windows Server 2008 R2 использует то же ядро, что и Windows 7, и т. Д.
Как включить x64 на виртуальном боксе?
Настроить и запустить 64-битную гостевую систему в Virtualbox
- Скачайте и установите последнюю версию Virtualbox со своей страницы. …
- Загрузите и установите последние гостевые дополнения Virtualbox.
- Перезагрузите компьютер в BIOS и включите аппаратную виртуализацию. …
- Когда вы запускаете Virtualbox и нажимаете New, вы должны увидеть вариант для 64-битной операционной системы.
7 колода 2018 г.
Безопасно ли скачивать VirtualBox?
VirtualBox на 100% безопасен, эта программа позволяет вам загружать ОС (операционную систему) и запускать ее как виртуальную машину, это не означает, что виртуальная ОС не содержит вирусов (это хорошо зависит, например, если вы загружаете Windows, она будет вроде если бы у вас был нормальный компьютер windows, есть вирусы).
Виртуальная машина Windows бесплатна?
Несмотря на то, что существует ряд популярных программ для виртуальных машин, VirtualBox полностью бесплатен, имеет открытый исходный код и великолепен.
Есть ли в Windows 10 виртуальная машина?
Включение Hyper-V в Windows 10
Hyper-V — это инструмент технологии виртуализации от Microsoft, доступный в Windows 10 Pro, Enterprise и Education. Hyper-V позволяет создавать одну или несколько виртуальных машин для установки и запуска разных ОС на одном ПК с Windows 10.
Как настроить виртуальную машину?
Выполните следующие шаги, чтобы создать виртуальную машину с помощью VMware Workstation:
- Запустите VMware Workstation.
- Щелкните Новая виртуальная машина.
- Выберите тип виртуальной машины, которую вы хотите создать, и нажмите Далее:…
- Нажмите «Далее.
- Выберите гостевую операционную систему (ОС), затем нажмите «Далее». …
- Нажмите «Далее.
- Введите код продукта.
24 колода 2020 г.
Сколько оперативной памяти мне нужно для Server 2016?
Память — минимум 2 ГБ или 4 ГБ, если вы планируете использовать Windows Server 2016 Essentials в качестве виртуального сервера. Рекомендуемый размер — 16 ГБ, а максимальный, который вы можете использовать, — 64 ГБ. Жесткие диски. Вам потребуется как минимум жесткий диск объемом 160 ГБ с системным разделом на 60 ГБ.
Можно ли использовать в качестве сервера обычный ПК?
Ответ
Практически любой компьютер можно использовать в качестве веб-сервера при условии, что он может подключаться к сети и запускать программное обеспечение веб-сервера. Поскольку веб-сервер может быть довольно простым и доступны бесплатные веб-серверы с открытым исходным кодом, на практике любое устройство может выступать в качестве веб-сервера.
Какая польза от Windows Server 2016?
Целью Microsoft при выпуске Windows Server 2016 является дальнейшее ассимилирование локальных ресурсов с общедоступными и частными облачными инфраструктурами для обеспечения большей степени управляемости в различных вычислительных средах (виртуализированных и физических), сохраняя при этом беспроблемную продуктивность для предприятий и пользователей.
Почему в VirtualBox нет 64 бита?
Если VirtualBox показывает только 32-разрядные версии в списке версий, убедитесь, что: У вас установлен процессор x64. (Оптимально для получения приемлемой производительности виртуализации также должна быть установлена 64-разрядная ОС.) Аппаратная виртуализация включена в BIOS.
Как включить режим SVM?
Как включить AMD Secure Virtual Machine, SVM. Шаг 1. Запустите Turbo NAS и нажимайте клавишу F2, пока не отобразится экран BIOS. Затем перейдите в «Дополнительно»> «Конфигурация ЦП». Шаг 2: Перейдите в «Режим SVM» и выберите «Включено».
Могу ли я установить 64-битную ОС на VirtualBox?
Согласно документации, VirtualBox позволяет установить 64-битную ОС, даже если у вас установлена 32-битная ОС. Но одно необходимое условие — у вас 64-битный процессор. Следующее, что вам нужно сделать, это включить аппаратную виртуализацию.