Summary: Windows 10’s File Explorer stalls saying “Working on it…” during the folder type automatic discovery process. And in earlier versions of Windows, Windows may sometimes assign incorrect template for folders if the content discovery or sniffing goes wrong or the folder view settings in the registry are messed up.
For example, in earlier versions of Windows, when you open a folder containing text files, Windows may incorrectly assign it the Music template, and thereby showing all the irrelevant columns such as Artist Name, Album Title, Track Number, Genre, etc.
Although incorrect folder type assignment is no longer a problem in recent versions of Windows, Windows 10’s File Explorer slows down or hangs when opening folders with a large number of files.
If you have a folder containing a huge number of files (especially your Downloads folder can become crowded over a period of time), opening File Explorer would lock up showing the message “Working on it…”. The fix is to set the folder template manually, which seems to work for most users.

Step 1: Set the Folder Type Template Manually
You can fix this problem on a per-folder basis using these steps:
- Open the folder which has incorrect template assigned
- Right-click on an empty area on the folder and choose Properties
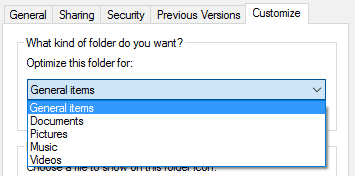
- Click the Customize tab
- Under Optimize this folder for:, select the appropriate item from the list box.

- Click OK.
Step 2: Disable Folder Contents Sniffing (Discovery) by Windows
You can prevent Windows from sniffing folder contents and automatically assigning the folder type template. This is done by creating the following registry key using Registry Editor (regedit.exe).
HKEY_CURRENT_USERSoftwareClassesLocal SettingsSoftwareMicrosoftWindowsShellBagsAllFoldersshell
After creating the above key, create a new String (REG_SZ) value named FolderType and set its Value data to NotSpecified or Generic
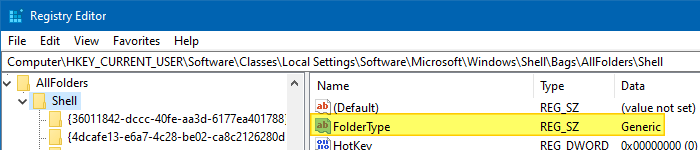
NotSpecified (or Generic) corresponds to General items (All Items in previous versions of Windows) folder type template.
After applying the above registry setting, when you open a folder for the first time, Windows looks for the AllFolders registry key and if it’s present, it reads the folder type template from there. So every new folder will have the General items folder template assigned by default, irrespective of what content the folder has. However, you can still customize the folder type template if you need to, on a per-folder basis using the Customize tab as explained previously in this article.
Note: Existing folders whose FolderType setting was already assigned prior to applying the above registry setting, are not affected and continue to have the existing folder type template. And this registry setting does not prevent you from customizing the individual folder views and other settings.
Step 3: Reset Quick access completely
For some users, the problem occurs only when opening the Quick access view which is where File Explorer opens to by default. In that case, try clearing the Quick access Pinned and Recent items by deleting the relevant .automaticdestinations-ms file. Also, you can make File Explorer Open to “This PC” in Windows 10
If File Explorer is still slow whether you open to This PC, or Quick access view, resetting the Quick access completely can help. Note that the following procedure removes all the pinned and recent items in Quick access.
Open Command Prompt and run the following commands:
cd /d %AppData%MicrosoftWindowsRecentAutomaticDestinations
del f01b4d95cf55d32a.automaticDestinations-ms
This resets Quick access completely. If that doesn’t help, delete all the .automaticDestinations-ms files in that folder by running:
del *.automaticDestinations-ms
exit
Important: Deleting all the .automaticDestinations-ms files in that folder removes the pinned items in the jumplists for all programs.
Deleting the Quick access data also fixed the slow opening of This PC for some users.
One small request: If you liked this post, please share this?
One «tiny» share from you would seriously help a lot with the growth of this blog.
Some great suggestions:
- Pin it!
- Share it to your favorite blog + Facebook, Reddit
- Tweet it!
So thank you so much for your support. It won’t take more than 10 seconds of your time. The share buttons are right below. 
Download PC Repair Tool to quickly find & fix Windows errors automatically
You may have noticed that in some cases your folders in Windows 11/10 may become unresponsive and take quite a bit of time to display their contents and the green progress bar in the address bar loads slowly. At times it may even display a Working on it message along with the green bar.

This happens when your folder may have a lot of large documents or images or music or video files.
To fix the slow loading of folders with the Green loading bar indefinitely in Windows 11/10, you need to optimize Explorer folders, so that they load and display the contents faster. Follow these suggestions:
- Restart Explorer
- Customize the folder for items
- Clear the Automatic Destinations folder contents
- Delete File Explorer History.
- Select List View.
Let us look at these suggestions in detail now.
Fix Slow loading of folders with Green loading bar indefinitely in Windows 11/10
1] Restart Explorer
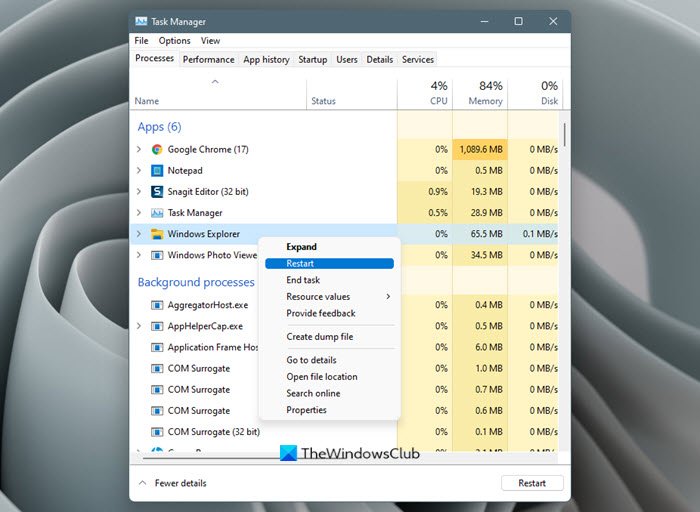
Open Task Manager and restart the Explorer process and see if that helps.
2] Customize the folder for items
You can better optimize to display specific kinds of items as follows:
- Right-click on the folder
- Click Properties
- Select Customize tab
- Now under What kind of folder do you want? Optimize the folder for, select from the drop-down menu the type of files the said folder predominantly holds.
- You may select from
- General items,
- Documents,
- Pictures,
- Music or
- Videos.
If you wish to apply this template to all the folders, also select the Also apply this template to all subfolders check box and click OK.
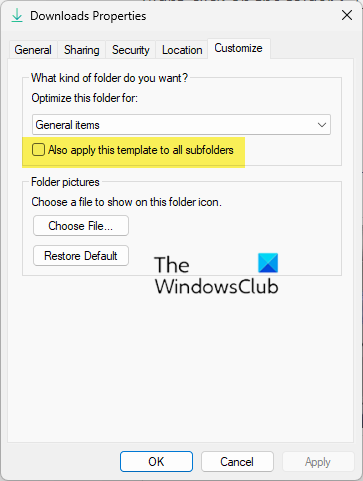
It is better to optimize the folder for the majority of the items that that folder contains. For example, it is better to select Music for the Music folder, Pictures for the Pictures folder, and General for the folder which contains a mix.
3] Clear the Automatic Destinations folder contents
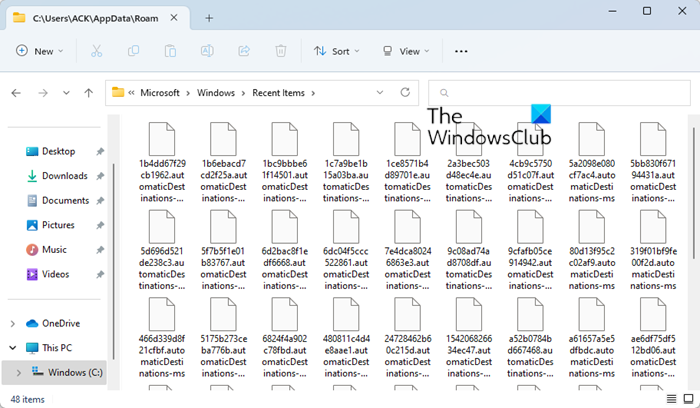
Open File Explorer Options and under the General tab, press the Privacy – Clear button.
You may also delete the File Explorer cache which is located here:
C:Users<username>AppDataRoamingMicrosoftWindowsRecentAutomaticDestinations
You will now see that the contents of your folder will load and display faster.
4] Delete File Explorer History
![]()
You can also do to delete the Explorer History:
- Open Explorer Options
- Under the General tab, locate Privacy
- Click on the Clear button against Clear File History history
- Click OK and exit.
5] Select List View
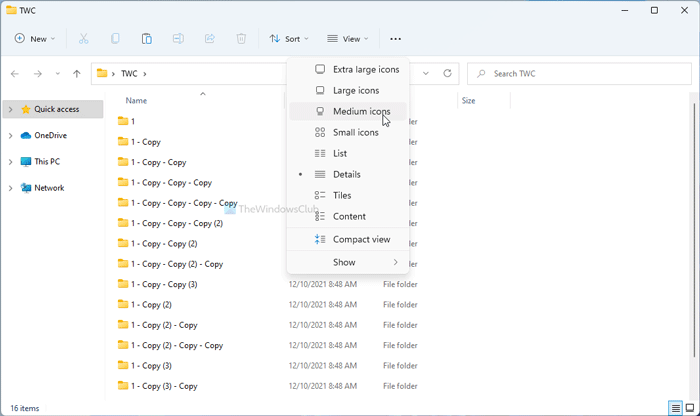
If nothing helps, then selecting the List view can as in this view, Explorer loads the fastest.
Click on the View button in File Explorer and choose List.
PS: Some users have reported that disabling Cortana helped them. You may create a system restore point first and then try to disable Cortana and see if it helps you.
How to fix Explorer is slow to open?
If your File Explorer is slow to open in Windows, take these steps:
- Restart File Explorer
- Disable Quick Access
- Disable Preview Pane
- Change the default Explorer opening location
- Run System File Checker
- Scan your PC with your antivirus software
- Troubleshoot in Clean Boot State.
How to fix a slow loading Downloads folder?
To fix a slow loading Downloads folder:
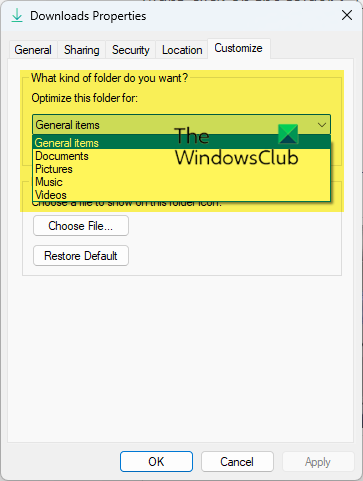
- Right-click the folder for which you are facing this issue. In this case the Downloads folder.
- Now click on Properties.
- Go to the Customize tab.
- Click on the drop-down that says Optimize this folder for. And select General items from the drop-down. It must have been set to Pictures or Video by default.
- You can also select Also apply this template to all subfolders if the folder contains any subfolders.
- Apply the settings and restart Windows Explorer.
Also read: Downloads Folder not responding in Windows.

Anand Khanse is the Admin of TheWindowsClub.com, a 10-year Microsoft MVP (2006-16) & a Windows Insider MVP (2016-2022). Please read the entire post & the comments first, create a System Restore Point before making any changes to your system & be careful about any 3rd-party offers while installing freeware.
- Remove From My Forums
-
Вопрос
-
I have had this problem for months (prior to loading Windows 8.1). Coincident with this problem, I was unable to access «Change PC Settings». I have fixed the «Change PC Settings» issue but am still plagued with the explorer issue
The problem seems intermittent. After a boot, all is well. If I bring up Explorer at the «MyPC» (now «ThisPC») level. I can see my drives. If I select C:, I can see my files. When I click the up arrow to go back to the «ThisPC»
level, the folders display says «This folder is empty.» and the green status bar at the top goes to about 98% and stops.I have tried:
- Turning off indexing
- Defragging
- Disk Check (using my Intel RAID application code)
- Google Chrome uninstalled
Info:
- I have two RAIDs (1+0 [2TB] and 5 [1TB]) and two 1TB external drives
- Sometimes when I reboot, I get an exception from AMD control center (I have upgraded the software and I have changed video cards)
- The problem is not isolated to the MyPC/ThisPC level or to folder size. I also see this (intermittently) when I open other folders (large- 100GB and small 10MB).
windows 10 file explorer slow")
Here we can see “Windows 10 file explorer slow”
To fix various PC problems, we recommend Restoro PC Repair Tool:
- You’ll disable Cortana, change folder optimization, and make a replacement File Explorer shortcut to correct this problem.
- If you’re no stranger to such issues, just visit our File Explorer Troubleshooting section next.
- For more quick tips because of the ones below, there’s also this PC Software Hub you’ll bookmark.
File Explorer is the default file management application on Windows 10 and one of the few applications that each Windows user uses daily.
However, many users report that File Explorer is slow on Windows 10, a serious problem that will interfere with work.
How can I fix a slow File Explorer?
1. Disable Cortana
One of the foremost anticipated features of Windows 10 was its virtual assistant Cortana. While it’s most certainly a useful feature, some users claim that Cortana slows down File Explorer.
To fix this problem, users suggest disabling Cortana. This is often relatively simple, and you’ll roll in the hay by following these steps:
1. Press Windows Key + R and enter Regedit. Click OK or press Enter.
2. When Registry Editor opens, within the left pane, navigate to the
HKEY_LOCAL_MACHINESOFTWAREPoliciesMicrosoftWindowsWindowsSearchkey
3. If this key isn’t available, you would like to make it. Simply right-click the Windows key and choose New > Key. Now enter Windows Search because of the name of the new key.
4. Once you open the Windows Search key, right-click the space on the proper pane and choose New > DWORD (32-bit) Value.
5. Enter AllowCortana because of the name of the new DWORD. Double click AllowCortana DWORD and set its Value data to 0. Click OK to save changes.
Close Registry Editor and restart your computer.
If you don’t want to edit the registry manually, you’ll use a .reg file to form the required changes. to try to do that, do the following:
- Download this File.
- Open the downloaded file and extract all files.
- Now double click on Disable Cortana. reg file
- A confirmation message will appear. Click Yes to continue.
- Optional: If you would like to enable Cortana again, run Enable Cortana. Reg file.
Another way to disable Cortana is to use Group Policy. to try to do that, follow these steps:
- Press Windows Key + R and enter gpedit.msc.
- The local Group Policy Editor will now start. within the left pane navigate to Computer Configuration > Administrative Templates > Windows Components > Search.
- In the right pane, locate Allow Cortana and double-click it.
- Select the Disabled option and click on Apply and OK to save changes.
After doing that, Cortana should be disabled, and any problems will File Explorer will be solved.
2. Check your Quick access list
The Quick access list is extremely useful if you would like to navigate to a particular folder quickly. However, a couple of users reported that certain folders within the Quick access list could cause File Explorer to become slow.
Network folders that aren’t currently available can cause this problem to seem. to get rid of a network folder from the Quick access list, do the following:
- Open File Explorer.
- Locate the problematic folder within the Quick access menu within the left pane.
- Right-click the folder you would like to get rid of and choose Unpin from Quick access.
After removing the folder from the fast access menu, the matter with File Explorer should be resolved.
A few users reported that you might need to eliminate all items from the fast access list to repair this problem.
If that solves the matter, make certain to feature the removed folders to the fast access list once more.
3. Change folder optimization
Windows 10 frequently performs optimization within the background, which can cause File Explorer to be slow.
If this error occurs when trying to access a selected folder, you would want to vary that folder’s optimization.
This is rather simple, and you’ll roll in the hay by following these steps:
- Right-click the folder that’s slowing down File Explorer. Choose Properties from the menu.
- Go to the Customize tab.
- Set Optimize this folder for General items. If this value is already set, select the other value from the list. Then, switch it back to General items.
- Check Also apply this template to all or any subfolders.
- Click Apply and OK to save changes.
If this problem occurs with multiple folders, you’ll need to repeat this solution for each affected folder.
Few users reported that they solved this issue by setting the optimization to Documents, so you would also want to undertake that.
4. Restart File Explorer
If File Explorer is running slow on your Windows 10 PC, you would possibly be ready to temporarily fix the matter with this solution. To restart File Explorer, do the following:
- Press Ctrl + Shift + Esc on your keyboard to start Task Manager.
- Once Task Manager starts, locate Windows Explorer and right-click it. Choose Restart from the menu.
Alternatively, you’ll end Windows Explorer processes and begin it again from Task Manager. to try to do that, follow these steps:
- Locate Windows Explorer within the list of processes. Right-click it and choose End task from the menu.
- Now click the File menu within the Task Manager and choose Run new task.
- Enter Explorer and click on the OK button. File Explorer will now start again.
Keep in mind that this is often just a short-lived workaround, so you’ll need to repeat this solution whenever File Explorer becomes slow.
Another solution that we strongly recommend is to put in a passionate third-party file manager, which is meant to figure fast on slow PCs because of the software below.
It offers you a plethora of options and features that are very useful once you manage your files. With the new features, you’ll edit files and automatically save your work on cloud-based files.
It has a special-designed engine that optimizes the method, and it also allows you to compress your files in several known formats.
5. Use Windows Key + E shortcut
According to users, you’ll circumvent this problem just by using the File Explorer shortcut because it seems issues occur as long as you begin it by clicking its icon.
However, you’ll start File Explorer by pressing Windows Key + E on your keyboard.
After doing that, File Explorer will start, and it’ll work with no problems. Confine mind that this isn’t a permanent solution, however.
Windows Key not working? Don’t panic! Solve the matter in no time with the assistance of this easy guide.
6. Reset File Explorer view to default
A few users claim that you can fix problems with a slow File Explorer by resetting File Explorer’s view to default. This is often relatively simple, and you’ll roll in the hay by following these steps:
- Press Windows Key + S and enter file explorer options. Choose File Explorer Options from the list of results.
- Go to the View tab and click on the Reset Folders button. When the confirmation message appears, click Yes.
- Click Apply and OK to save changes.
After resetting the folder view to default, the difficulty with File Explorer should be fixed.
7. Change File Explorer settings
According to users, File Explorer can become slow if it opens the fast Access folder by default. to repair this problem, you would like to vary certain settings. to try to to that, follow these steps:
- Open File Explorer.
- In the left pane, right-click Quick access and choose Options from the menu.
- The Folder Options window will appear. Under the overall tab, change Open File Explorer to the present PC.
- Click Apply and OK to save changes.
- Optional: Disable all options within the Privacy section and click on the Clear button.
After doing that, File Explorer will open This PC by default rather than Quick Access. By making this alteration, the matter is going to be completely resolved.
Some users also suggest disabling the Always search file name and contents option in File Explorer Options.
To do that, navigate to the Search tab in File Explorer Options and uncheck the Always search file names and contents option.
8. Create a new File Explorer shortcut
If your File Explorer is slow, you would be ready to fix it using certain launch parameters. to try to do that, you would like to make a replacement shortcut by following these steps:
1. Right-click space on your Desktop and choose New > Shortcut from the menu.
2. When the Create Shortcut window opens, enter
C:Windowsexplorer.exe
in the Type the situation of the item field. Alternatively, you’ll click the Browse button and locate explorer.exe manually. Once you’re done, click Next.
3. Enter the specified name for your shortcut and click on Finish.
4. Now locate the newly created shortcut, right-click it, and choose Properties from the menu.
5. Go to the Shortcut tab.
6. Locate the Target field and add /n at the top. After making the change, your Target field should appear as if this:
C:Windowsexplorer.exe /n
. Click Apply and OK to save changes.
After doing that, use the newly created shortcut to start File Explorer. We’ve to say that this is often just a workaround, so you’ll get to use this new shortcut whenever you would like to start File Explorer.
9. Rebuild the index
According to users, you’ll fix the matter with slow File Explorer just by rebuilding the index. This is often rather simple:
- Press Windows Key + S and enter indexing options. Choose Indexing Options from the menu.
- When the Indexing Options window opens, click Advanced.
- Now click on the Rebuild button.
After the index is rebuilt, the difficulty with File Explorer should be resolved.
10. Perform an SFC scan
File Explorer can become slow if some Windows components are corrupted. However, you’ll fix corrupted components with an SFC scan. to try to do that, follow these steps:
- Press Windows Key + X to open Win + X menu. Choose prompt (Admin) from the menu.
- When prompt starts, enter sfc /scannow and press Enter.
- Wait for the SFC scan to finish.
After the scan is finished, File Explorer should be fixed. A couple of users reported they could not run an SFC scan, but if that’s the case, you’ll use DISM to repair SFC problems.
To perform a DISM scan, do the following:
1. Open prompt as administrator.
2. When prompt opens, enter the subsequent lines:
DISM /Online /Cleanup-Image /CheckHealthDISM /Online /Cleanup-Image /ScanHealthDISM /Online /Cleanup-Image /RestoreHealth
3. Wait for the DISM to end.
4. After the DISM scan is completed, attempt to perform the SFC scan again.
11. Remove corrupted files
Sometimes, File Explorer is slow if you’ve got corrupted files within the folder you’re trying to access. Users report they’ve managed to unravel the difficulty by deleting the corrupted File from the folder.
If you’ve got an equivalent problem, await the folder to open, then find and take away the corrupted File. After doing that, File Explorer should start working again.
12. Use Event Viewer to fix the problem
Event Viewer may be a powerful application that will assist you in troubleshooting any problems on Windows 10.
If File Explorer is slow on your Windows 10 PC, you would possibly be ready to fix it by following these steps:
- Press Windows Key + S and enter the event. Choose the Event Viewer from the list of results.
- In the left pane, navigate to Windows Logs > Application.
- In the right pane, click the Clear Log option.
- Open File Explorer and await the matter to seem again. Sometimes it’d take a couple of minutes for the matter to seem, so twiddling my thumbs.
- After the matter appears, attend the Event Viewer and click on Windows Logs > Application again.
- Now check the available errors from the list. Navigate to the small print or General tab on rock bottom to ascertain which File caused the error.
According to some users, DTShellHlp.exe explained this problem on their PC and is said to Deamon Tools. After removing Deamon Tools, the difficulty with slow File Explorer was resolved completely.
A few users reported that they could not get rid of Deamon Tools from their PC, but they solved the difficulty by removing Deamon Tools entries from the registry.
We have to say that nearly any File can cause this problem to seem, so you would possibly need to do a touch of research before you discover the explanation for the matter.
13. Use netsh winsock reset command
According to users, you’ll fix this problem by using the netsh command in prompt. To run that command, follow these steps:
- Press Windows Key + X and choose prompt (Admin) from the menu.
- When prompt opens, enter netsh Winsock reset and run the command.
- After the command is executed, close the prompt and restart your PC.
After your PC starts again, check if the matter with File Explorer is resolved.
14. Disable the TDM service
Users report that File Explorer can become slow thanks to the TDM service. Consistent with users, Dell computers accompany a Trusted Drive Manager feature that permits you to encrypt your drive.
However, this service can cause File Explorer to become slow. Therefore we advise you to disable it.
To do that, simply open the Services window, locate TDM Service, and set its Startup type to Disabled. Additionally, make certain to prevent the service also.
After you disable the service and restart your PC, the matter is going to be completely resolved.
Few users reported that Wave Authentication Manager and Intel Rapid Storage Technology service could also cause drag, making certain to disable them.
Run a System Scan to discover potential errors
- Download Restoro PC Repair Tool
- Click Start Scan to find Windows issues.
- Click Repair All to fix issues with Patented Technologies.
We have to say that this solution only applies to Dell computers that have the TDM feature. If you’ve got the TDM feature on your PC, make certain to disable it and check if that solves the matter.
15. Check the Indexing Options
According to users, File Explorer can become slow thanks to Indexing options.
If you added large folders with many subfolders and files to the index, you would possibly want to get rid of them to repair this problem. This is often relatively simple:
- Press Windows Key + S and enter indexing options. Select Indexing Options from the menu.
- A list of all indexed folders will appear. to get rid of a particular folder, click the Modify button.
- Now uncheck the problematic folder and click on OK to save changes.
After removing large folders from the index, the matter should be completely resolved.
16. Check your LAN settings
A few users claim they fixed the difficulty just by disabling one option in LAN Settings. to try to do that on Windows 10, follow these steps:
- Press Windows Key + S and enter internet options. Choose Internet Options from the menu.
- When the Internet Properties window opens, attend the Connections tab and click on LAN settings.
- In the Automatic configuration section, disable the Automatically detect settings option. Click OK to save changes.
After making the changes, the matter with File Explorer should be resolved.
17. Disconnect and reconnect external storage
According to users, auxiliary storage can cause File Explorer to become slow. To temporarily fix this problem, try disconnecting and reconnecting your external disk drive or storage.
A few users reported that reconnecting their external disk drive fixed the matter for them, making certain to undertake this solution.
We have to say that this is often just a workaround and that we assume that the difficulty will appear again.
18. Enable Launch folder windows in a separate process option
If File Explorer is slow on your PC, you would be ready to fix it by changing the File Explorer options. to try to do that, simply open File Explorer Options and navigate to the View tab.
In the Advanced settings section, check the Launch folder windows during a separate process option. Click Apply and OK to save changes.
After enabling this feature, the matter with File Explorer should be completely resolved.
19. Disable Indexing for your drives
File Explorer can sometimes become slow, thanks to the Indexing feature. However, you’ll fix this problem by disabling Indexing for your drives.
This is relatively simple, and you’ll roll in the hay by following these steps:
- Open This PC.
- Locate the drive that you want to disable Indexing for and right-click it. Choose Properties from the menu.
- Navigate to the overall tab and unchecked Allow files on this drive to possess contents indexed and file properties. Click the Apply button.
- Select Apply changes to the drive, subfolders, and files. A confirmation menu will appear. Click OK.
Keep in mind that you simply may need to repeat this process for all larger drives on your PC.
20. Create a new user account
Sometimes File Explorer is often slow if you’ve got issues together with your user account. If that’s the case, you’ll circumvent the difficulty just by creating a replacement user account.
To do that, you would like to follow these simple steps:
- Press Windows Key + I to open the Settings app.
- Go to Accounts > Family & people.
- In the people section, click the Add somebody else to the present PC button.
- Click on I don’t have this person’s sign-in information.
- Now click on Add a user without a Microsoft account.
- Enter a username and password for the new account and click on Next.
After creating a replacement user account, switch to it and check if the difficulty is resolved. If the matter doesn’t appear on the new account, move all of your files to it and use it as your main account.
This isn’t the simplest solution, but it’s a solid workaround.
How can I fix File Explorer slow green bar in Windows 10?
1. Disable Windows Search service
Windows 10 uses all kinds of services to run, but sometimes certain services can cause problems if File Explorer is slow on your PC, which may flow from the Windows Search service.
To fix this problem, users suggest disabling Windows Search completely:
- Press Windows Key + R and enter services.msc. Press Enter or click OK.
- When the Services window opens, locate Windows Search and double-click it.
- Once the Properties window opens, set the Startup type to Disabled. If the service is running, click the Stop button to prevent it.
- Now click Apply and OK to save changes.
After disabling Windows Search, the difficulty should be completely resolved.
2. Start a new instance of File Explorer
If File Explorer is slow on your PC, you would be ready to fix it using this workaround. Many users reported that they only see a green bar once they run File Explorer.
If you’ve got an equivalent problem, you’ll fix it by starting another instance of File Explorer. to try to do that, follow these steps:
- Start File Explorer by clicking its icon within the Taskbar. Minimize the File Explorer window or simply ignore it.
- Navigate to the File Explorer Taskbar icon and right-click it. Choose File Explorer from the menu.
- Now you’ll have two File Explorer windows open. the primary File Explorer window will be sluggish, while the newly opened one will work without issues. Close the sluggish window and continue using the new one.
This isn’t the foremost efficient solution, but it’s a solid workaround that may be useful until you discover the permanent solution.
3. Remove files from the Database folder
If File Explorer is slow and you’re getting a green loading bar, you would possibly be ready to fix it by removing files from the Database folder.
Users reported that their thumbnails are missing also, and to repair this issue, you would like to try to do the following:
- Go to C:UsersYourUsernameAppDataLocalTileDataLayerDatabase folder.
- Now delete all files from the Database folder.
- After doing that, you would like to rebuild your index. We already explained how to do this in one of our previous solutions, making certain to see it out.
After removing the files and rebuilding the index, the matter should be completely resolved.
How can I fix File Explorer slow, working on it?
1. Use the Windows Memory Diagnostic tool
Few users reported they managed to repair the matter with slow File Explorer by running the Windows Memory Diagnostic tool. to try to do that, simply follow these steps:
- Press Windows Key + S and enter memory. Select Windows Memory Diagnostic from the list of results.
- Windows Memory Diagnostic window will now appear. Click Restart now and check for problems (recommended) option. Your PC will now restart and test your memory. After the testing process is completed, start File Explorer and check if the difficulty is resolved.
2. Disable show status bar option
Several users reported that File Explorer gives them performing on its message. to repair this problem, you would like to disable one option from File Explorer Options. Simply open File Explorer Options and attend the View tab.
Now locate the Show status bar option and disable it. Click Apply and OK to save changes. After you’re done, restart your PC and check if the matter is fixed.
3. Install the latest Windows updates
If File Explorer is slow and you’re performing on its message, you would be ready to fix this problem by installing the newest Windows Updates.
Microsoft frequently releases new updates to repair hardware and software issues with Windows 10. Several users reported this issue was fixed by installing the newest updates.
Windows 10 usually installs updates automatically, but you’ll also download updates manually. to try to do that, follow these steps:
- Press Windows Key + I to open the Settings app.
- Navigate to the Update & security section and click on Check for updates button. If any updates are available, Windows will download and install them automatically.
After the newest updates are installed, check if the matter persists.
4. Uninstall DropBox
DropBox may be a popular cloud storage service, but consistent with users, this application can cause the File Explorer to become slow.
If you’re getting a performing on-it message while using File Explorer, you would possibly want to undertake to uninstall DropBox. to try to do that, follow these steps:
- Open the Settings app.
- Go to the System section and choose Apps & features.
- A list of all installed applications will appear. Select Dropbox from the list and click on Uninstall.
We recommend employing a dedicated removal tool to quickly and safely uninstall apps and software. With this tool, you’ll make certain that each leftover will be removed within few clicks.
After removing DropBox, check if the matter is resolved. If so, download and install the newest version of DropBox. Alternatively, you’ll download and check out the DropBox Universal app from the Windows Store.
5. Disable the NVIDIA Control Panel option from the context menu
NVIDIA instrument panel is software that permits you to optimize your graphics card. While it’s a rather useful application, consistent with some users, it can make File Explorer slow.
In addition, this application also can cause performing on its messages to seem in File Explorer.
To fix this problem, some users suggest disabling the NVIDIA instrument panel from your context menu. To do so, you’ll need a context menu tuner like ShellExViewer.
You can also disable this feature right from the Nvidia instrument panel by following these steps:
- Open NVIDIA instrument panel.
- When the appliance opens, attend the Desktop menu and disable all available options.
How can I fix File Explorer slow load in Windows 10?
1. Unpin File Explorer from the Taskbar
If File Explorer is slow to load on your PC, you would want to undertake this easy workaround. Consistent with users, you’ll temporarily fix this problem by unpinning the File Explorer from the Taskbar.
To do that, simply locate the File Explorer icon within the Taskbar, right-click it and choose Unpin from Taskbar.
After that, simply pin File Explorer back to Taskbar, and therefore, the problem should be completely resolved.
2. Change the properties of the File Explorer shortcut
Users reported that File Explorer is slow to load if you begin it from Taskbar.
It seems that the application’s file path causes this issue, but you’ll easily fix that by doing the following:
- Navigate to the C: UsersUSERNAMEAppDataRoamingMicrosoftInternet ExplorerQuick LaunchUser PinnedTaskBar directory.
- Now locate the File Explorer shortcut, right-click it and choose Properties from the menu.
- Locate the Target field and alter it to C:Windowsexplorer.exe. Click Apply and OK to save changes.
After changing the Target path, you should be ready to start File Explorer with no issues right from your Taskbar.
3. Uninstall problematic applications
Sometimes, certain applications can cause File Explorer to slow. Users reported that Mozy Home Backup was the explanation for this issue on their PC.
If you’ve got this application installed, we advise you to get rid of it and check if that solves the matter.
Keep in mind that nearly any application can interfere with File Explorer, so you would possibly need to do a touch of research before you discover the problematic app.
4. End NVIDIA processes
A few users reported that the NVIDIA Geforce Experience could cause this problem.
To check if NVIDIA applications are causing this issue, you would like to start Task Manager locating NVIDIA processes and ending them.
If that solves the matter, you would possibly want to stop NVIDIA applications from running automatically on your PC.
Users Questions:
1. Windows 10 file manager working slowly
The file manager in windows ten often takes ages to load anything. Loading “my computer” takes the longest time. I attempted running sfc/scannow, and it said it had been unable to repair a number of the corrupt files.
2. window ten file explorer running slow. It takes years to completely load a folder.
Windows 10 file explorer is running slow. It takes years to completely load a folder.
Does someone knows the precise solution to the present ****, or should I downgrade to my windows 8.1??
3. Windows 10 File Explorer is extremely slow
This green loading bar takes 40-50 seconds to load, sometimes even more.
I’ve never experienced this before.
I’ve upgraded my system from Windows 8.1 pro to windows ten pro. My system is updated. Virus Scanned. I’m running windows on AMD A8 APU with 8GB RAM.
4. Windows 10 file explorer slow to make or delete folder names
When creating a replacement folder, Windows 10 file explorer takes 5-15 seconds to make the name. An equivalent thing happens when deleting a folder. When deleting, a box comes up with a graph stating that it’s 99% done, then I even have to attend 5 seconds before it’s deleted. This is often not occurring on my other Windows 10 computers.
Recently the File Explorer runs slowly in Windows 10 on my Surface Pro 5 tablet. When I press the Win + R shortcuts or click on its icon from taskbar, it takes a long time (about minutes) to open. There is a green bar in the upper side and it displays the loading progress. If I right click on folder, the content menu doesn’t pop up and I just get a blue circle. How can I resolve the problem?
It might be something wrong with the hardware, such as improper shutdowns and physical damage HDD or SSD. You’d better check your drives for errors.
* Open This PC in File Explorer, right click on C system drive, and select Properties option.
* Go to Tools tab, under the Error checking section, click on Check button, and select Scan drive or Repair drive to start the process.
* Then repeat the same way with other disk if you have.
The Favorites page has been replaced by Quick access in File Explorer. It is in the navigation pane and used to show the history of your frequent folders and recent files. But that always causes some unknown issue in Windows 10.
* Within the File Explorer, click the File menu, and select “Change folder and search options.”
* Under General tab, click the “Open File Explorer to” drop-down menu and select “This PC” instead of Quick access.
* If you would like to use Quick access feature, try the method to prevent the main view from displaying recent files.
In the Privacy section, uncheck two boxes, including Show recently used files in Quick access, and Show frequently used folders in Quick access. Then click Apply > OK button to take effect. Now close the File Explorer and open it again to check if it becomes normal.
If you can not do that by File Explorer, try another method to remove “Quick access”.
* Press Win + R keyboard shortcuts, type regedit.exe and press Enter.
* Navigate to the tree below:
HKEY_Local_MachineSOFTWAREMicrosoftWindowsCurrentVersionExplorer
* Double click on the HubMode DWORD, and change its value data from 0 to 1.
AD
- To fix file explorer search very slow and speed up file explorer search you need to Enable Windows Search Service, Change folder optimization Settings, Disable Quick Access.
- Clear file explorer history to speed up windows file explorer search very slow issue and green bar showing when you search for a long time in windows 10.
- Clear Quick Access cache and delete Quick Access cache file.
- Delete High CPU usage files using windows task manager.
- Disable search index in windows 10 20H2 and update outdated drivers.
- Optimize windows 10 hard drive
When you search something on windows 10 using file explorer it takes too much time and search bar shows green bar it goes on searching and searching. You can fix this file explorer slow search issue easily on your own by following simple methods below. So, lets see in detail below what is file explorer and why file explorer search becomes slow and others related to file explorer.
What is File Explorer?
Windows explorer or file explorer belongs to Microsoft Windows and it was first introduced with Windows 95. Windows explorer with some additional functionality and features is called file explorer. While file explorer has graphical user interface components with this feature you can manage and edit data and other information stored in your PC. This is the most used app in Windows 10 and other versions.
In this we can easily copy, edit and move files. Along with this you can also cancel, resume and stop the copying process. From the above mentioned advantages it may have some disadvantages that are extremely slow while copying or opening files which may be a serious issue for users who work with files on a daily basis. Luckily we provided some methods in this article to solve the above mentioned disadvantages.
Enable Windows Search Service
Change folder optimization Settings
Disable Quick Access
Clear file explorer History.
Method: 1 Windows Search Service is Disabled
These services will modify how Windows search services run on the system. It is also responsible for running of available programs and managing all resources and system settings. The reasons behind modifying service settings are troubleshooting and security, performance related. If we want to disable window service follow these steps.
Step:1 Now press Windows key+R on keyboard
VD
Step:2 Which opens a run dialog box. After that type ‘msconfig’ and click on ‘ok’
Step:3 After that in system configuration select service tab
Step:4 Next select windows search from service tab
Step:5 Now uncheck It and click on apply to make changes
Step:6 Next restart your PC and see still any problems with file explorer.
That’s it, this is how you search file explorer search slow in windows wo with green bar in windows 10.
Method:2 Change Folder Optimization Settings
If there’s any problem while accessing a specific folder. For this change the folder optimization by following simple steps.
Step:1 Select the folder and right click on it and choose ‘properties’ from the menu
Step:2 From the properties menu select customize tab
Step:3 Now check ‘optimize this folder for’ is settled in ‘general items’ or not
Step:4 If general items options is settled click in dialog box(i.e., Also apply this template to all sub folder)
Step:5 Now tap on ‘Apply’ in order to save changes made.
Also Read: 1) How to fix windows 10 search services not working
2) How to find serial number on laptop in windows 10 Using CMD
3) How to Defragment Hard Drive Windows 10
4) Know Why Your Laptop is Running Slow:
5) How to fix windows 10 high memory Usage Issue
Method:3 Disable Quick Access
One of the best features of file explorer is quick accessing. Whenever we open a file and folder recently this is all shown in file explorer under the quick access icon. It also slows down the working of file explorers. To overcome this issue by following the steps.
Step:1 Open file explorer and select file
Step:2 Under that file menu choose ‘change folder and search options’
Step:3 And click on change folder and search options it will navigate you to folder option window
Step:4 From that folder option select ‘general’ tab. Their you find ‘open file explorer to’ in that select ‘This pc’ option
Step:5 Next uncheck both show frequently used folders and show recently used files in quick access.
Step:6 And tap on ‘Apply’ in order to save changes made and click on ‘ok’ to exit.
Method:4 Clearing File Explorer History
With this method you can clear file explorer history which may include recently opened folder or files. After clearing file explorer history it improves file explorer working. We will Clear file explorer history by following these steps.
Step:1 For clearing history open control panel and select ‘file explorer options’
Step:2 After opening the file explorer option there you will find the ‘clear’ button and tap on it.
Step:3 Next click on ‘Apply’ to save made changes.
Hopefully, the above mentioned methods improve the working of file explorers and solve issues like extremely slow when copying or opening files or search in file explorer.
Windows 10 File Explorer Working on it?
if windows 10 file explorer is not working then you need to delete the quick access cache file or you need to delete a file in quick access and once you delete the quick access file your windows 10 file explorer will start working fine.
Windows 10 explorer keeps loading?
if windows 10 file explorer keeps on loading that means file explorer is still searching for the file which you have requested and its taking longer than expected due to quick access files settings or other settings on your windows 10 or due to heavy files stored on your computer or due to cache issues of your hard drive or quick access settings.
FAQ on File Explorer Search Very Slow
Due to outdated drivers or due to search overload or you may have virus or Malware or it can be due to software conflict or software glitch.
Make sure you have enabled windows service search, rebuild Search index, Delete Quick Access cache file, change file explorer settings and un-check options, Update outdated drivers, Update your windows 10 as well to fix file explorer search is very slow.
If file explorer search in folders is loading slow when you search with green bar then you need to optimize your hard drive and make sure your hard drive is having enough space and stop the services which are running or occupying cpu usage by using control + ALT +delete and delete high cpu usage files.
- Rajeshwari is Senior Content Writer, Author, and Also Senior Editorial Team Member at A Savvy Web and She has a Degree in Bachelor of Technology (Btech) and (Master of Technology) Mtech from JNTU and is a real time expert. She writes about technology guides and troubleshooting guides (tips and Solutions) and helps users to solve issues easily. She has expertise in this area for more than 5+ years of experience and enthusiastic to provide troubleshooting tips and fixes and how to articles on Tech Related subjects like iPhone, Android, iOS, Smart tv and other tech related solutions and easy methods to fix.