Group Policy Management Background
Over the past versions of Windows Server the tools used to manage Group Policy have matured and the names have changed over time. Originally Group Policy was managed with the Active Directory Tools. Next a dedicated Group Policy Management Tool called the Group Policy Management Console (GPMC) was released, this tool replaced the Group Policy functionality in the Active Directory Tools. In Windows Server 2016 the Group Policy Management Tools are simply named Group Policy Management.
Prerequisites for installing Group Policy Management Console (GPMC)
You will require a Windows Server 2016 computer with the “Graphical Management Tools and Infrastructure” installed to install the Active Directory Management Tools using the Server Manager graphical user interface.
Instructions for installing Group Policy Management
To install Group Policy Management Tools (GPMC) on Windows Server 2016 please follow these instructions.
- Open the Windows Server 2016 Server Manager Dashboard. If Server Manager does not start by default press the “Windows + R” keys, Type “servermanager” in the “Open” field and press “Enter” or click the OK button.

- In the Server Manager main window, click “Add roles and features”.
- In the “Add Roles and Features Wizard” under “Installation Type” check the “Role-based or feature-based installation” radio button and click “Next”
- In the “Add Roles and Features Wizard” under “Server Selection” check the “Select a server from the server pool” radio button, select the server you want to install the Group Policy Management Console Tools (GPMC) on and click “Next”
- In the “Add Roles and Features Wizard” under “Server Roles” click “Next”
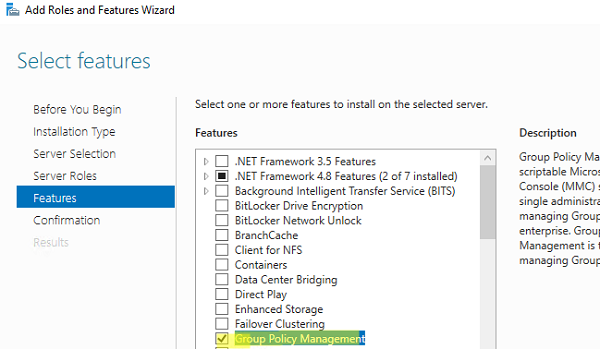
- In the “Add Roles and Features Wizard” under “Features” scroll down and check “Group Policy Management”. Click “Next” If prompted to install any supporting roles accept the defaults and continue.
- In the “Add Roles and Features Wizard” at the “Confirmation” page click “Install” to begin the installation of the Group Policy Management Tools.
- The installation of the Group Policy Management Tools will begin and the progress will be displayed. This installation should not require a restart of the server.
- The Group Policy Management Tools can now be found under the “Tools” menu in “Server Manager”.


Групповые политики являются одним из самых эффективных способов управления компьютерной сетью, построенной на базе Windows-сетей. Групповые политики используют для упрощения администрирования, предоставляя администраторам централизованное управление привилегиями, правами и возможностями как пользователей, так и компьютеров сети.
При помощи политики возможно:
- назначать сценарии пользователя и сценарии компьютера, запускающиеся в конкретно указанное время;
- определять политики параметров пароля учетных записей, блокировку пользователей;
- распространять программное обеспечение на компьютеры сети при помощи публикации или назначения;
- выполнять набор настроек безопасности для удаленных машин;
- ввести контроль над доступом к windows-компонентам, системным ресурсам, сетевым ресурсам, утилитам панели управления, рабочему столу и экрану;
- проводить настройку по распределению прав на доступ к файлам и папкам;
- настраивать перенаправление определенных папок из профиля пользователя.
Групповые политики возможно применять сразу на нескольких доменах, на отдельных доменах, на подгруппах в домене, на отдельных системах.
Политики, применяемые к отдельным системам, называются локальными групповыми политиками. Такие политики хранятся только на локальном компьютере. Остальные групповые политики соединены в объекты и хранятся в хранилище данных Active Directory.
Управление групповых политик имеется только в профессиональных и серверных версиях Windows.
Для каждой новой версии Windows вносились новые изменения в групповую политику. В некоторых случаях старые политики не применяются на новые версии Windows.
Обычно большинство политик прямо совместимы. Это означает, что, как правило, политики, предоставленные в Windows Server 2003, могут использоваться на Windows 7 и более поздних, а также на Windows Server 2008 и более поздних. Однако, политики для Windows 8/10 и Windows Server 2012/2016 обычно не применимы к более ранним версиям Windows. Для того, чтобы узнать какие версии поддерживает политика, можно открыть окно ее свойств – там посмотреть на поле Требование к версии или поддерживается. В нем указаны версии ОС, на которых эта политика будет работать:

Редактирование групповых политик
Консоль редактирования групповой политики входит в состав сервера, ее требуется установить в диспетчере сервера как дополнительный компонент управления групповыми политиками:

После этого в составе программ меню Администрирование появляется задача Управление групповыми политиками.
В оснастке Управление групповой политикой назначаются политики к подразделениям, а благодаря иерархической структуре можно визуально понять к какой группе относятся какая-либо политика:

Групповая политика изменяется в редакторе управления групповыми политиками – для этого требуется выбрать команду Изменить в меню Действия. Так же новую групповую политику можно создать либо «с нуля», для этого выбираем Объекты групповой политики выбираем команду Создать в меню Действие. Записываем новое имя объекта групповой политики после этого нажимаем ОК. Можно скопировать в нее параметры уже существующей политики в зависимости от требуемой задачи.


Чтобы применить созданную политику, требуется установить для нее связь с соответствующим объектом службы каталогов в оснастке Управление групповой политикой:

Примененную политику можно настроить по фильтру безопасности. Таким способом параметры данного объекта групповой политики возможно разделить только для заданных групп, пользователей и компьютеров, входящих в домен:

Рекомендации по применению политик
Главное заключается в том, чтобы не изменять политику по умолчанию. Потому как если в политике возникнет какая-либо серьезная ошибка, то возврат к начальному состоянию приведет к удалению не только последних настроек, но и всех других параметров. Поэтому для административных действий по управлению системой создавайте новые политики, тогда для изменения настроек вам потребуется только отключать/включать привязку политик к организационной структуре.
Обработка одной политики с наибольшим числом назначенных параметров, не отличается по времени от обработки нескольких политик, в каждой из которых назначается только часть этих параметров. Поэтому удобнее создавать несколько политик, чем включать все изменения в одну.
Не стоит удалять ранее созданные групповые политики – желательно просто отключить привязку их от объекта службы каталогов. Они могут потребоваться в дальнейшем для анализа в случае каких-либо проблем.
В рамках нашей услуги ИТ-обслуживание мы не только настраиваем групповые политики, но и берем на себя обслуживание всей ИТ-структуры клиента, включая все настройки, обновления ПО и поддержку в режиме 24/7.
Групповые политики Active Directory позволяют централизованно применять одинаковые настройки ко множеству компьютеров и/или пользователей домена и существенно упрощают управление конфигурацией в доменной среде. Консоль Group Policy Management Console (GPMC.msc) – это основной инструмент для управления групповыми политиками (Group Policy Object, GPO) в Active Directory.
Содержание:
- Установка консоли GPMC в Windows
- Управление групповыми политиками Active Directory с помощью консоли Group Policy Management
Установка консоли GPMC в Windows
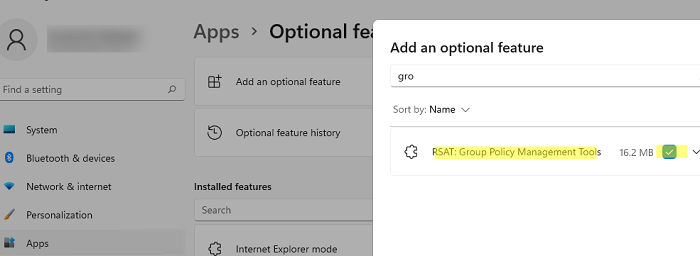
В Windows 10 и 11 консоль GPMC входит в состав RSAT, и вы можете установить ее через панель Settings. Перейдите Settings -> Apps -> Optional Features -> Add an optional feature -> выберите в списке RSAT: Group Policy Management Tools и нажмите Install.
Также вы можете установить консоль управления групповыми политиками в Windows 10 и 11 с помощью PowerShell:
Add-WindowsCapability -Online -Name Rsat.GroupPolicy.Management.Tools~~~~0.0.1.0
Или с помощью DISM:
DISM.exe /Online /add-capability /CapabilityName:Rsat.GroupPolicy.Management.Tools~~~~0.0.1.0
Обратите внимание, что в современных версиях Windows 10 и 11 для установки инструментов управления RSAT, ваш компьютер должен быть подключен к Интернету. Подробнее про установку инструментов администрирования (RSAT) в Windows описано в статье по ссылке.
В Windows Server 2022/2019/2016/2012R2 вы можете установить консоль управления GPO через Server Manager: Add Roles and Features -> Features -> Group Policy Management.
Также можно установить консоль GPMC в Windows Server с помощью PowerShell командлета Install-WindowsFeature:
Install-WindowsFeature GPMC

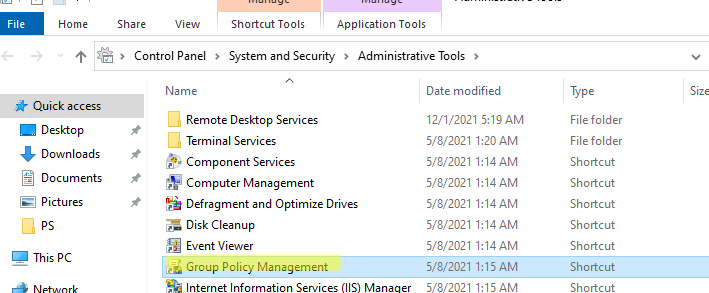
После установки, проверьте что ярлык Group Policy Management появится в разделе Administrative Tools в панели управления (Control PanelSystem and SecurityAdministrative Tools). Ярлык ссылается на MMC оснастку
%SystemRoot%system32gpmc.msc
.
Управление групповыми политиками Active Directory с помощью консоли Group Policy Management
Консоль GPMC позволяет управлять групповыми политиками на уровне сайтов AD, доменов и организационными подразделениями (Organizational Unit).
Для запуска консоли выполните команду:
gpmc.msc
По умолчанию консоль подключается к контроллеру домена с FSMO ролью Primary Domain Controller Emulator (PDC). Вы можете подключиться к любому другому DC. Для этого щелкните правой кнопкой по имени домена и выберите Change Domain Controller (для комфортной работы рекомендуем подключиться к вашему Logon Server-у).
Разверните Forest -> Domain -> Ваш домен.
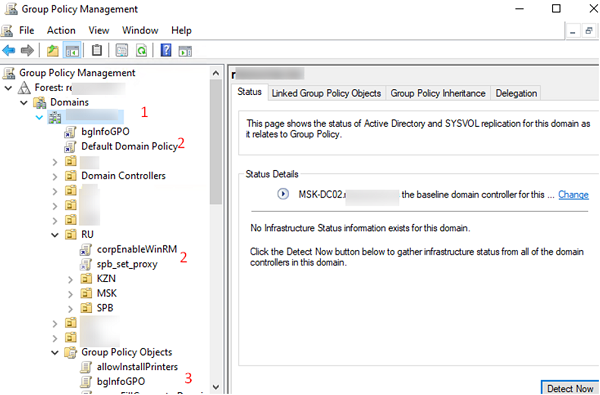
На этом скриншоте выделены:
- Имя домена, к которому подключена консоль;
- Групповые политики, которые назначены на различные OU (отображается вся структура OU, которую вы видите в консоли ADUC);
- Полный список политик (GPO) в текущем домене доступен в разделе Group Policy Objects.
Групповые политики Active Directory можно назначить на OU, сайт или весь домен. Чаще всего политики привязываются к OU с компьютерами или пользователями.
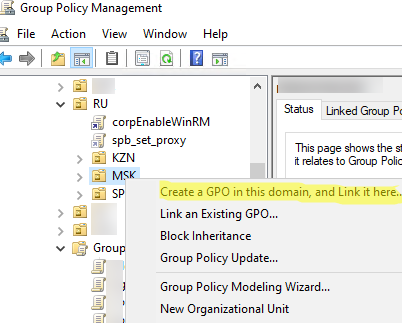
Чтобы создать новую GPO и сразу назначить ее на OU, щелкните по нужному контейнеру правой кнопкой и выберите Create a GPO in this domain, and Link it here.
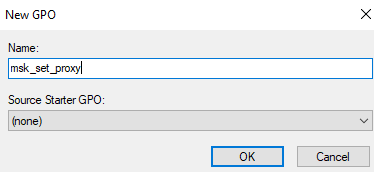
Задайте имя GPO:
В консоли GPMC вы увидите вашу новую GPO, которая сразу назначена на выбранный вами контейнер (OU).
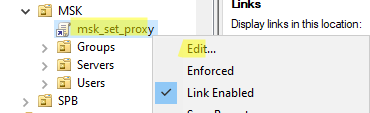
GPO активна (
Link Enabled = True
), это значит что ее настройки будут применяться ко всем объектом в данном OU.
Чтобы изменить настройки GPO выберите Edit.
Для управления параметрами групповой политики на компьютере Windows используется консоль локального редактора GPO – gpedit.msc. Он позволяет настроить параметры Windows с помощью одной или множественных локальных политик (MLGPO).
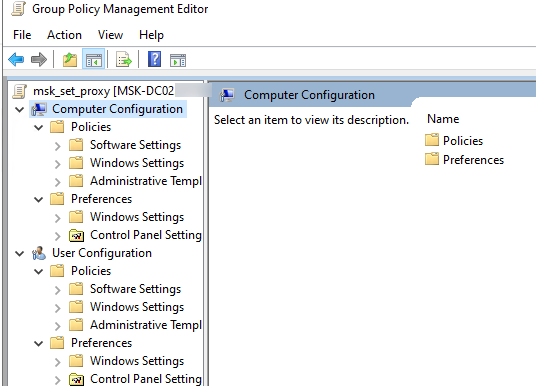
Перед вами откроется консоль редактора GPO, аналогичная локальному редактору GPO. Все настройки GPO разделены на две секции:
- Computer Configuration — здесь можно настроить параметров компьютера (Windows);
- User Сonfiguration – параметры, которые нужно применить для пользователей AD.
В каждой секции есть три подраздела:
- Software Settings – используется для установки и обновления программ через GPO;
- Windows Settings — здесь расположены основные параметры безопасности Windows: настройки политики паролей, блокировки аккаунтов, политики аудита, назначения прав пользователей и т.д;
- Administrative Templates – содержит параметры различных компонентов Windows. Здесь доступны как стандартные административные шаблоны Windows, так и дополнительно admx шаблоны, установленные администратором (например, admx шаблоны для управления программами Microsoft Office или шаблоны для Google Chrome). Рекомендуем использовать центральное хранилище административных шаблонов GPO для удобства управления.
Также здесь есть отдельный раздел Preferences. Здесь содержится дополнительный набор настроек Group Policy Preferences (GPP), которые вы можете задать для клиентских устройств через GPO.
Закройте редактор политики и вернитесь в консоль GPMC. Все настройки, которые вы изменили в GPO будут применены на клиентах при следующем цикле обновления настроек групповых политик.
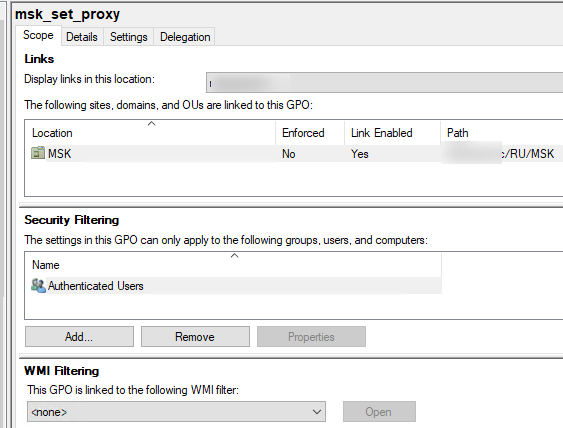
Выберите вашу GPO, чтобы вывести ее основные параметры. Здесь доступны 4 вкладки:
- Scope – здесь видно на какие OU назначена эта политики. В разделе Security Filtering можно настроить группы безопасности, для членов которых должна применяться политики (по умолчанию здесь задано Authenticated Users, это значит, что политика применяется ко всем объектам в OU). В параметре WMI filtering можно задать дополнительные правила фильтрации объектов для которых должна применяться GPO (см. WMI фильтры GPO);
- Details – содержится базовая информация о GPO (владелец, когда создана и изменена, версия, GUID);
- Settings – содержится отчет о всех настроенных параметрах GPO (отчет похож на результаты команды gpresult);
- Delegation – выводит текущие разрешения GPO, позволяет изменить их.
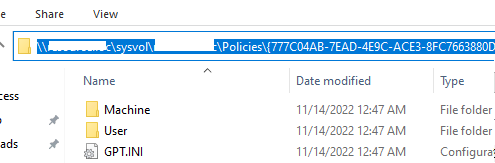
Active Directory хранит GPO хранятся в виде набора файлов и папок в каталоге SYSVOL, который реплицируется между DC. Вы можете найти каталог определенной GPO по ее GUID (на вкладке Details). Используйте следующий UNC путь:
\winitpro.rusysvolwinitpro.ruPolicies{GUID}
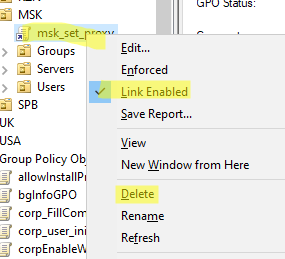
Если вы хотите, чтобы политика перестала действовать на клиенты в данном OU, можно либо удалить ссылку (
Delete
, при этом сама объект GPO не будет удален), либо временно отключить ее действие (
Link Enabled = False
).
Обратите внимание, что в домене уже есть две политики, которые действуют на все компьютеры и контроллеры домена соответственно:
- Default Domain Policy
- Default Domain Controller Policy
В большинстве случае не рекомендуется использовать эти GPO для настройки параметров клиентов. Лучше создать новые политики и назначить их на уровень всего домена или контейнера Domain Controllers.
Также консоль Group Policy Management позволяет:
- Импортировать/экспортировать, создавать резервные копии и восстанавливать GPO
- Создавать результирующие отчеты политик — Resultant Set of Policy (RSoP)
- Удаленно обновлять настройки GPO на компьютерах
- Подготавливать GPO к миграции между доменами
В отдельной статье “Почему не применяется групповая политика к компьютеру?” рассмотрены такие основные элементы групповых политик Active Directory как:
- Наследование в групповых полотках
- Область действия и порядок применения GPO (LSDOU)
- Приоритете и управление порядком применения политик
- Замыкание групповых политик (Loopback Processing mode)
- Фильтрация GPO
- Форсирование применения GPO
Рекомендуем внимательно ознакомиться с этой статьей для более эффективного использования возможностей групповых политик и понимания принципов их работы.
Server 2008Server 2012Server 2016Windows Server
In this article, we see about How to create Group policy in windows server 2016. First open Group Policy Management console by using server manager. By using GPM we can assign various polices for Organizational units(OU). We show simple example to create GP.  Right click domain name and click to create GPO in this domain and link here.
  Give a name for New GPO, we give Information Security and click OK.
Right click Group Policy Object and click Edit.
 Here we showing simple example for editing GPO, click policies-Windows settings-Security Settings-Account polices-password Policy and click Maximum password age change password expire days and click OK.
  Click GPO and click Settings to check what are the policy enabled.
  Block Inheritance Group Policy
To Block Inheritance of group policy to parent Organizational unit, it’s used to not apply any policy to blocked inheritance. For Example Right click Organizational unit and click Block Inheritance  We see now blocked Organizational units as BPO and Technical Dept.
  Enforced Group policy
Enforcing Policy will take presence and apply to all the OUs followed in the Active Directory. which means that Even you blocked any OU using the Block Inheritance, Enforce will take override of that settings and apply the policy what ever enforced. So be careful, when selecting the Enforce has it will override and apply which may cause issues if any OUs defined and required different settings..
To enable Enforce, Right click GPO and select Enforced.  Link enabled GPO
Link enabled that the group policy is linked to the OU. So the policy applies to the objects within the OU. Right click GPO and select Link enabled.  By Default Group Policy will take 90 Minutes of frequency to update to Clients which means client will contact Active Directory every 90 Minutes to check any policy changes are there and update if any changes or new Policies available and applicable for that particular client. If you want to update immediately, We can us gpupdate /force in the clients which will do check and update.
Software deployment is the most important task for System Administrator on the network. Here we just show you an easy way to deploy software using Group Policy on network client computers. It’s not difficult but needs some basic networking and Windows Server knowledge.
Let’s start with installing some software in Windows 10 through group policy. I’m using Windows 10 as a client and Windows Server 2012 R2 for Server. It works the same for Windows server 2019 as well.
1. Create a folder in Server and share it with appropriate permission for domain users to execute MSI files.
Here I have created an AppDeployment folder. The folder contains all software we need to install them through group policy.
2. Now go to Server Manager Dashboard and open the Group Policy Management or simply type “Gpmc.msc” in Windows Run.
3. In Group Policy Management console, create a new GPO and link it to your domain. I have created App Deployment for Technig.local domain.
4. Right-click the App Deployment and click edit, in order to edit the policy. In the opened Group Policy Management Editor, go to the Software installation through Computer Configuration > Policies > Software Settings > Software Installation.
5. To create a new software package, right-click the Software installation > New then click Package.
6. In the opened window, using the UNC path of the software select the software MSI file you want to deploy. Here I want to install 7zip software for Technig.local clients.
7. On the Deploy Software window select Assigned then click OK.
8. Now, Navigate to Properties of software MSI file on the Deployment tab, check the Install this application at logon then click OK. Finally, close all opened windows and update the Windows Policy by typing “Gpupdate /force /logoff” command on Command Prompt. You might need to restart your PC after executing the group policy update command.
Testing Software Deployment on Network Computers
Now you can test the software deployment with group policy on one of your client computer. Here I test it on a Windows 10 PC. I have just updated the group policy and restart my computer. Now the 7zip has been installed successfully.
You can see the 7zip has been installed successfully on Windows 10 at login through group policy. Try to apply this article to deploy software using group policy on your network environment. Please comment us if you have any issue with deploying software with group policy in Windows server.
This step-by-step article describes how to use Group Policy to automatically distribute programs to client computers or users. You can use Group Policy to distribute computer programs by using the following methods:
- Assigning Software
You can assign a program distribution to users or computers. If you assign the program to a user, it is installed when the user logs on to the computer. When the user first runs the program, the installation is completed. If you assign the program to a computer, it is installed when the computer starts, and it is available to all users who log on to the computer. When a user first runs the program, the installation is completed. - Publishing Software
You can publish a program distribution to users. When the user logs on to the computer, the published program is displayed in the Add or Remove Programs dialog box, and it can be installed from there.
Windows Installer service use to install, maintain, and remove software from your organization’s computers.
In this post this time, lets go through a easy steps how we can deploy software to our infrastructure using GPO.
For this demo, i will be using 7-zip as my application.
1 – In your Domain Server, open Server Manager, click Tools and open Group Policy Management.

2 – In the Group Policy Management console, right click domain name which is Windows.ae, and click Create a GPO in this domain, and link it here.

3 – In the New GPO box, in the Name box, type Deploy Software, and then click OK.

4 – Next, on the Group Policy Management console, right click Deploy Software GPO and click Edit.

5 – In the Group Policy Management Editor, under Computer Configuration, expand Policies, and then expand Software Settings.

6 – Right-click Software installation. From the context menu, click New, and then click Package.

7 – In the Open dialog box, browse to \172.16.1.254Software, click 7z1700-x64.msi, and then click Open.
Note : In the Open dialog box, type the full UNC path of the shared installer package that you want. For example, \file serversharefile name.msi.

8 – In the Deploy Software window, ensure that the Assigned option is selected, and then click OK.

9 – Wait for few second and verify that the 7-zip is listed in the Group Policy Management Editor.

10 – Now lets switch to our Windows 10 client PC, i do recommend that you run gpupdate /force in the client PC and then restart the client PC.

11 – after restarting your client PC and log in as domain user, you can verify that 7-zip is installed.

 i will continue later with Configuring Deploy Microsoft Office 2016 in Windows Server 2016
that’s all for now.., any Doubts type a commend.. 🙂