Групповые политики Active Directory позволяют централизованно применять одинаковые настройки ко множеству компьютеров и/или пользователей домена и существенно упрощают управление конфигурацией в доменной среде. Консоль Group Policy Management Console (GPMC.msc) – это основной инструмент для управления групповыми политиками (Group Policy Object, GPO) в Active Directory.
Содержание:
- Установка консоли GPMC в Windows
- Управление групповыми политиками Active Directory с помощью консоли Group Policy Management
Установка консоли GPMC в Windows
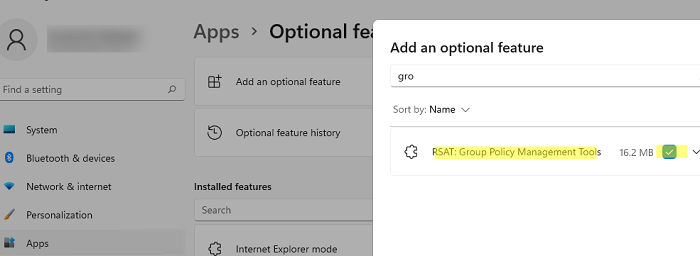
В Windows 10 и 11 консоль GPMC входит в состав RSAT, и вы можете установить ее через панель Settings. Перейдите Settings -> Apps -> Optional Features -> Add an optional feature -> выберите в списке RSAT: Group Policy Management Tools и нажмите Install.
Также вы можете установить консоль управления групповыми политиками в Windows 10 и 11 с помощью PowerShell:
Add-WindowsCapability -Online -Name Rsat.GroupPolicy.Management.Tools~~~~0.0.1.0
Или с помощью DISM:
DISM.exe /Online /add-capability /CapabilityName:Rsat.GroupPolicy.Management.Tools~~~~0.0.1.0
Обратите внимание, что в современных версиях Windows 10 и 11 для установки инструментов управления RSAT, ваш компьютер должен быть подключен к Интернету. Подробнее про установку инструментов администрирования (RSAT) в Windows описано в статье по ссылке.
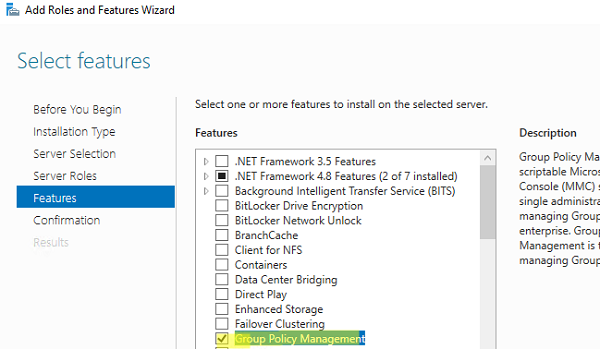
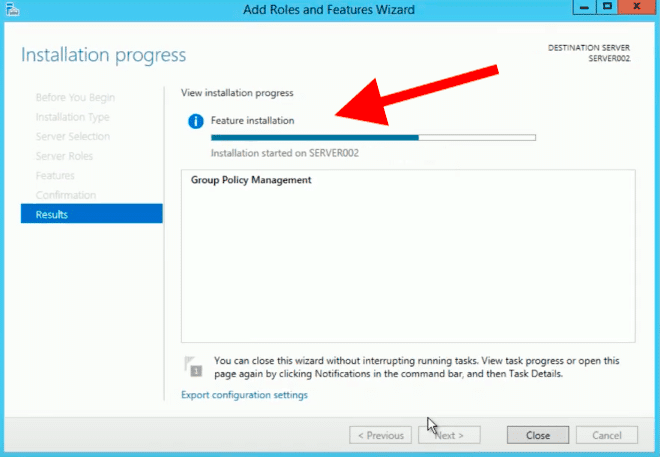
В Windows Server 2022/2019/2016/2012R2 вы можете установить консоль управления GPO через Server Manager: Add Roles and Features -> Features -> Group Policy Management.
Также можно установить консоль GPMC в Windows Server с помощью PowerShell командлета Install-WindowsFeature:
Install-WindowsFeature GPMC

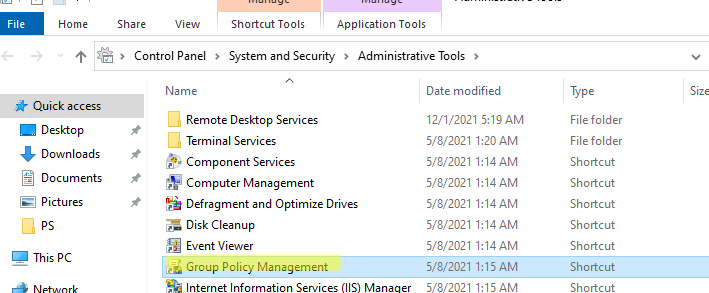
После установки, проверьте что ярлык Group Policy Management появится в разделе Administrative Tools в панели управления (Control PanelSystem and SecurityAdministrative Tools). Ярлык ссылается на MMC оснастку
%SystemRoot%system32gpmc.msc
.
Управление групповыми политиками Active Directory с помощью консоли Group Policy Management
Консоль GPMC позволяет управлять групповыми политиками на уровне сайтов AD, доменов и организационными подразделениями (Organizational Unit).
Для запуска консоли выполните команду:
gpmc.msc
По умолчанию консоль подключается к контроллеру домена с FSMO ролью Primary Domain Controller Emulator (PDC). Вы можете подключиться к любому другому DC. Для этого щелкните правой кнопкой по имени домена и выберите Change Domain Controller (для комфортной работы рекомендуем подключиться к вашему Logon Server-у).
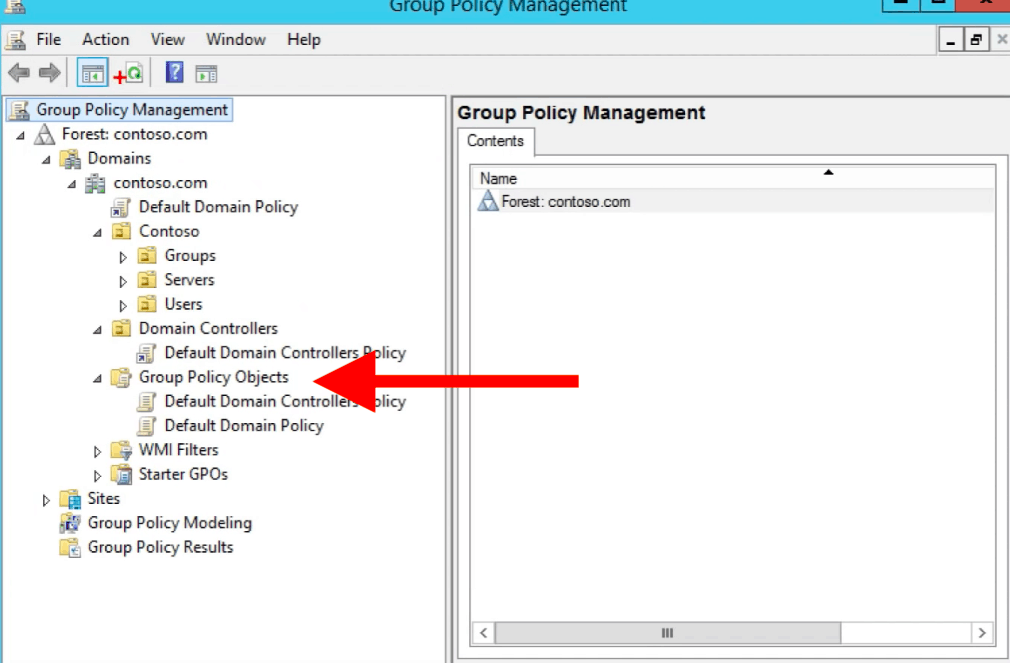
Разверните Forest -> Domain -> Ваш домен.
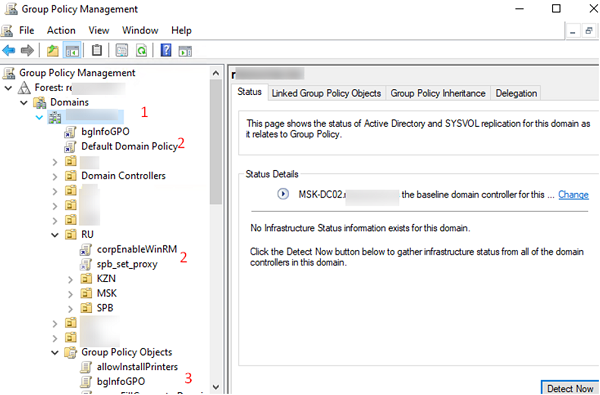
На этом скриншоте выделены:
- Имя домена, к которому подключена консоль;
- Групповые политики, которые назначены на различные OU (отображается вся структура OU, которую вы видите в консоли ADUC);
- Полный список политик (GPO) в текущем домене доступен в разделе Group Policy Objects.
Групповые политики Active Directory можно назначить на OU, сайт или весь домен. Чаще всего политики привязываются к OU с компьютерами или пользователями.
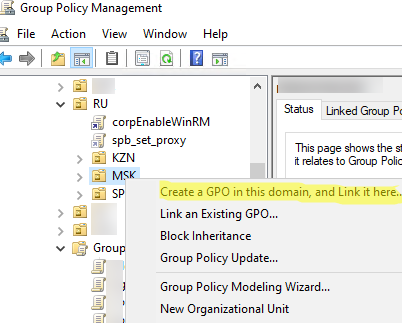
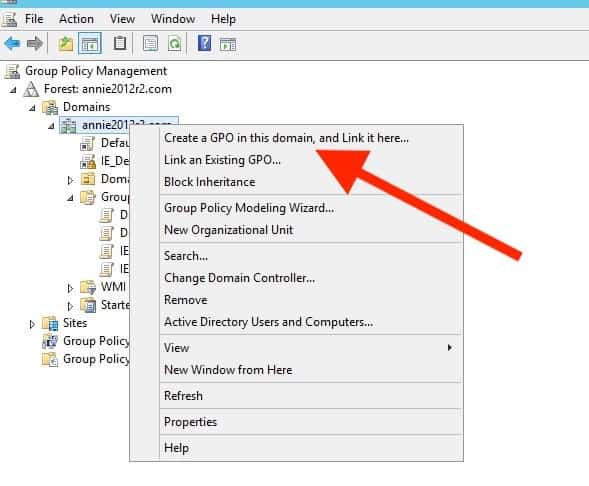
Чтобы создать новую GPO и сразу назначить ее на OU, щелкните по нужному контейнеру правой кнопкой и выберите Create a GPO in this domain, and Link it here.
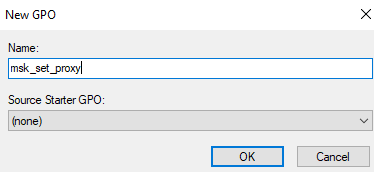
Задайте имя GPO:
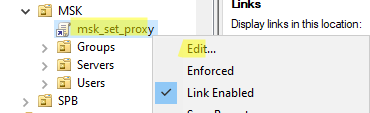
В консоли GPMC вы увидите вашу новую GPO, которая сразу назначена на выбранный вами контейнер (OU).
GPO активна (
Link Enabled = True
), это значит что ее настройки будут применяться ко всем объектом в данном OU.
Чтобы изменить настройки GPO выберите Edit.
Для управления параметрами групповой политики на компьютере Windows используется консоль локального редактора GPO – gpedit.msc. Он позволяет настроить параметры Windows с помощью одной или множественных локальных политик (MLGPO).
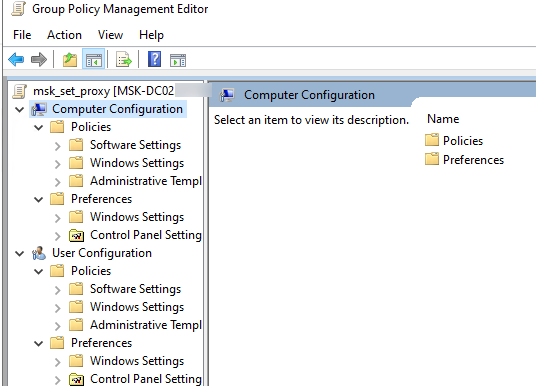
Перед вами откроется консоль редактора GPO, аналогичная локальному редактору GPO. Все настройки GPO разделены на две секции:
- Computer Configuration — здесь можно настроить параметров компьютера (Windows);
- User Сonfiguration – параметры, которые нужно применить для пользователей AD.
В каждой секции есть три подраздела:
- Software Settings – используется для установки и обновления программ через GPO;
- Windows Settings — здесь расположены основные параметры безопасности Windows: настройки политики паролей, блокировки аккаунтов, политики аудита, назначения прав пользователей и т.д;
- Administrative Templates – содержит параметры различных компонентов Windows. Здесь доступны как стандартные административные шаблоны Windows, так и дополнительно admx шаблоны, установленные администратором (например, admx шаблоны для управления программами Microsoft Office или шаблоны для Google Chrome). Рекомендуем использовать центральное хранилище административных шаблонов GPO для удобства управления.
Также здесь есть отдельный раздел Preferences. Здесь содержится дополнительный набор настроек Group Policy Preferences (GPP), которые вы можете задать для клиентских устройств через GPO.
Закройте редактор политики и вернитесь в консоль GPMC. Все настройки, которые вы изменили в GPO будут применены на клиентах при следующем цикле обновления настроек групповых политик.
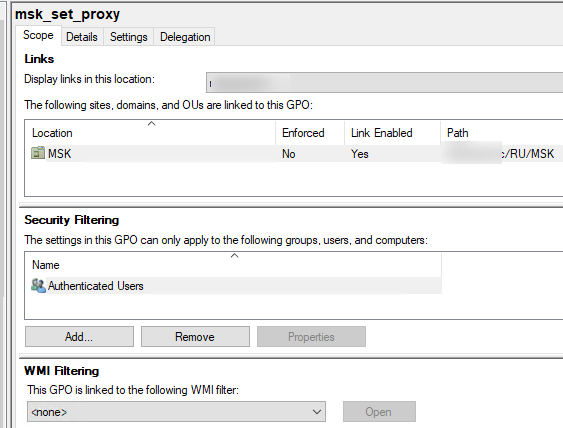
Выберите вашу GPO, чтобы вывести ее основные параметры. Здесь доступны 4 вкладки:
- Scope – здесь видно на какие OU назначена эта политики. В разделе Security Filtering можно настроить группы безопасности, для членов которых должна применяться политики (по умолчанию здесь задано Authenticated Users, это значит, что политика применяется ко всем объектам в OU). В параметре WMI filtering можно задать дополнительные правила фильтрации объектов для которых должна применяться GPO (см. WMI фильтры GPO);
- Details – содержится базовая информация о GPO (владелец, когда создана и изменена, версия, GUID);
- Settings – содержится отчет о всех настроенных параметрах GPO (отчет похож на результаты команды gpresult);
- Delegation – выводит текущие разрешения GPO, позволяет изменить их.
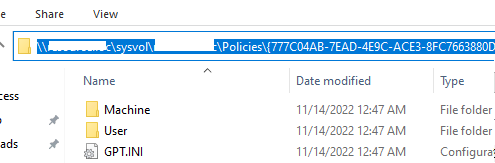
Active Directory хранит GPO хранятся в виде набора файлов и папок в каталоге SYSVOL, который реплицируется между DC. Вы можете найти каталог определенной GPO по ее GUID (на вкладке Details). Используйте следующий UNC путь:
\winitpro.rusysvolwinitpro.ruPolicies{GUID}
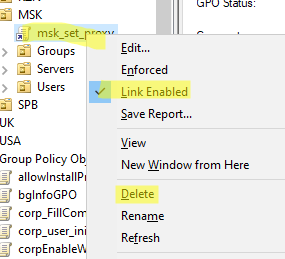
Если вы хотите, чтобы политика перестала действовать на клиенты в данном OU, можно либо удалить ссылку (
Delete
, при этом сама объект GPO не будет удален), либо временно отключить ее действие (
Link Enabled = False
).
Обратите внимание, что в домене уже есть две политики, которые действуют на все компьютеры и контроллеры домена соответственно:
- Default Domain Policy
- Default Domain Controller Policy
В большинстве случае не рекомендуется использовать эти GPO для настройки параметров клиентов. Лучше создать новые политики и назначить их на уровень всего домена или контейнера Domain Controllers.
Также консоль Group Policy Management позволяет:
- Импортировать/экспортировать, создавать резервные копии и восстанавливать GPO
- Создавать результирующие отчеты политик — Resultant Set of Policy (RSoP)
- Удаленно обновлять настройки GPO на компьютерах
- Подготавливать GPO к миграции между доменами
В отдельной статье “Почему не применяется групповая политика к компьютеру?” рассмотрены такие основные элементы групповых политик Active Directory как:
- Наследование в групповых полотках
- Область действия и порядок применения GPO (LSDOU)
- Приоритете и управление порядком применения политик
- Замыкание групповых политик (Loopback Processing mode)
- Фильтрация GPO
- Форсирование применения GPO
Рекомендуем внимательно ознакомиться с этой статьей для более эффективного использования возможностей групповых политик и понимания принципов их работы.
Group Policy is an Active Directory management technology for Windows that provides centralized management of configuration settings. While it isn’t the only available management solution — PowerShell Desired State Configuration (DSC) and Mobile Device Management (MDM) can also be used — Group Policy is the recommended technology for domain-joined client devices because it provides more granular control than other solutions.
Group Policy Management Console
Group Policy settings are configured in Group Policy objects (GPOs). You can link GPOs to domains, sites and organizational units (OUs). For even more control, GPOs can be applied according to the results of Windows Management Instrumentation (WMI) filters, although WMI filters should be used sparingly because they can significantly increase policy processing time.
The Group Policy Management Console (GPMC) is a built-in Windows administration tool that enables administrators to manage Group Policy in an Active Directory forest and obtain data for troubleshooting Group Policy. You can find the Group Policy Management Console in the Tools menu of Microsoft Windows Server Manager. It is not a best practice to use domain controllers for everyday management tasks, so you should install the Remote Server Administration Tools (RSAT) for your version of Windows.
Installing the Group Policy Management Console
If you are using Windows 10 version 1809 or later, you can install GPMC using the Settings app:
- Open the Settings app by pressing WIN+I.
- Click Apps under Windows Settings.
- Click Manage optional features.
- Click + Add a feature.
- Click RSAT: Group Policy Management Tools and then click Install.
Figure 1. Installing the Group Policy Management Console using the Setting app interface
If you are using an older version of Windows, you’ll need to download the right version of RSAT from Microsoft’s website.
For convenience, you might want to also install Server Manager. But if you choose not to, you can add GPMC to a Microsoft Management Console (MMC) and save the console.
Using the Group Policy Management Console
Every AD domain has two default GPOs:
- Default Domain Policy, which is linked to the domain
- Default Domain Controllers Policy, which is linked to the domain controller’s OU
You can see all the GPOs in a domain by clicking the Group Policy Objects container in the left pane of GPMC.
Figure 2. Interface of the Group Policy Management Console
Create a New Group Policy Object
Don’t change either the Default Domain Controllers Policy or the Default Domain Policy. The best way to add your own settings is to create a new GPO. There are two ways to create a new GPO:
- Right-click the domain, site or OU to which you want to link the new GPO and select Create a GPO in this domain, and Link it here… When you save the new GPO, it will be linked and enabled immediately.
- Right-click the Group Policy Objects container and select New from the menu. You will need to manually link the new GPO by right-click a domain, site or OU and selecting Link an Existing GPO. You can do this at any time.
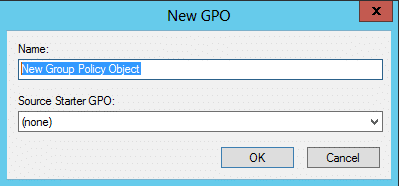
Regardless of how you create a new GPO, in the New GPO dialog you must give the GPO a name, and you can choose to base it on an existing GPO. See the next section for information about the other options.
Edit a Group Policy Object
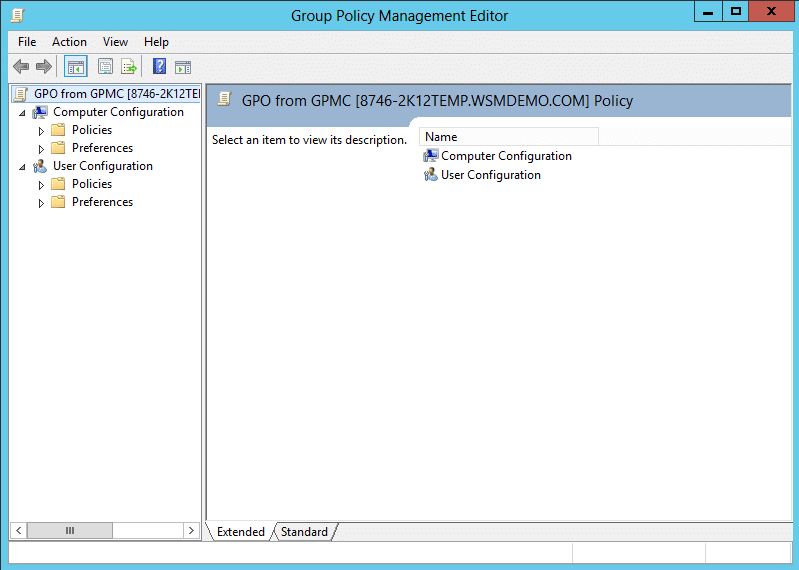
To edit a GPO, right click it in GPMC and select Edit from the menu. The Active Directory Group Policy Management Editor will open in a separate window.
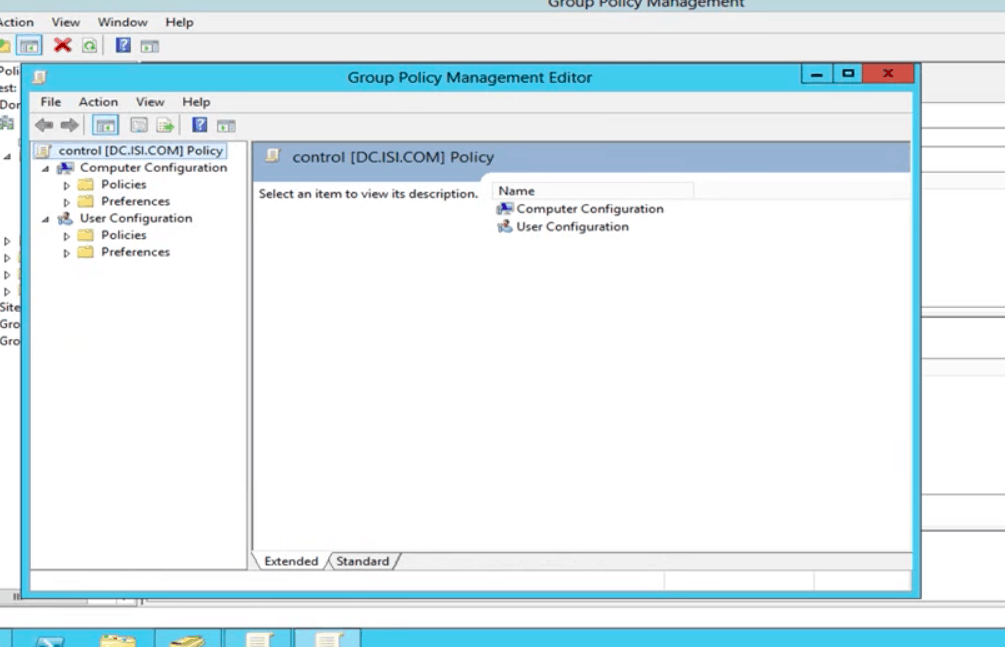
Figure 3. Interface of the Group Policy Management Editor
GPOs are divided into computer and user settings. Computer settings are applied when Windows starts, and user settings are applied when a user logs in. Group Policy background processing applies settings periodically if a change is detected in a GPO.
Policies vs Preferences
User and computer settings are further divided into Policies and Preferences:
- Policies do not tattoo the registry — when a setting in a GPO is changed or the GPO falls out of scope, the policy setting is removed and the original value is used instead. Policy settings always supersede an application’s configuration settings and will be greyed out so that users cannot modify them.
- Preferences tattoo the registry by default, but this behavior is configurable for each preference setting. Preferences overwrite an application’s configuration settings but always allow users to change the configuration items. Many of the configurable items in Group Policy Preferences are those that might have been previously configured using a login script, such as drive mappings and printer configuration.
You can expand Policies or Preferences to configure their settings. These settings will then be applied to computer and user objects that fall into the GPO’s scope. For example, if you link your new GPO to the domain controller’s OU, the settings will be applied to computer and user objects located in that OU and any child OUs. You can use the Block Inheritance setting on a site, domain or OU to stop GPOs that are linked to parent objects from being applied to child objects. You can also set the Enforced flag on individual GPOs, which overrides the Block Inheritance setting and any configuration items in GPOs that have higher precedence.
GPO Precedence
Multiple GPOs can be linked to domains, sites and OUs. When you click on one of these objects in GPMC, a list of linked GPOs will appear on the right on the Linked Group Policy Objects tab. If there is more than one linked GPO, GPOs with a higher link order number take priority over settings configured in GPOs with a lower number.
You can change the link order number by clicking on a GPO and using the arrows on the left to move it up or down. The Group Policy Inheritance tab will show all applied GPOs, including those inherited from parent objects.
Figure 4. Information about all applied GPOs in GPMC
Advanced Group Policy Management
Advanced Group Policy Management (AGPM) is available as part of the Microsoft Desktop Optimization Pack (MDOP) for Software Assurance customers. Unlike GPMC, AGPM is a client/server application where the server component stores GPOs offline, including a history for each GPO. GPOs managed by AGPM are called controlled GPOs because they are managed by the AGPM service and administrators can check them in and out, much like you might check files or code in and out of GitHub or a document management system.
AGPM provides greater control over GPOs than is possible with GPMC. In addition to providing version control, it enables you to assign roles like Reviewer, Editor and Approver to Group Policy administrators, which helps you implement strict change control throughout the entire GPO lifecycle. AGPM auditing also gives greater insight into Group Policy changes.

IT consultant and author specializing in management and security technologies. Russell has more than 15 years of experience in IT, he has written a book on Windows security, and he coauthored a text for Microsoft’s Official Academic Course (MOAC) series.

Group Policy (GP) is a Windows management feature that allows you to control multiple users’ and computers’ configurations within an Active Directory environment.
With GP, all Organizational Units, sites, or domains can be configured from a single and central place.
This feature helps network admins in large Windows environments to save time by not having to go through every computer to set a new configuration.
Although there are other ways to manage Windows estates, like Desired State Configuration (DSC), System Center Configuration Manager (SCCM), and Mobile Device Management (MDM), nothing allows the fine-grained control that GP provides.
What is the Group Policy Management Console?
A collection of Group Policy (GP) settings, referred to as a Group Policy Object (GPO), determines how a group of users or computers must behave.
GPOs are associated with AD containers, including the local computer, site, domain, and Organizational Unit (OU).
Group Policies within the entire AD forest can be managed via the Group Policy Management Console (GPMC)— a built-in Windows Server 2008 (and beyond) admin tool.
GPMC works via the Microsoft Management Console (MMC) snap-in.
It consolidates the functionality of many tools (snap-ins) into one, including the AD Users and Computers, Resultant Set of Policy, the ACL Editor, and the GMPC Delegation Wizard.
Overall, GPMC gives you the interface to view, control, and troubleshoot GPs from a central place.
But you can also have a fine-control to create GPOs that define policies, security options, software updates, installation, maintenance settings, scripts, folder redirections, and more.
Additionally, you can also backup, restore, and import GPOs.
To open GPMC, go to the Windows Server Manager > Open “Tools Menu” > “Group Policy Management”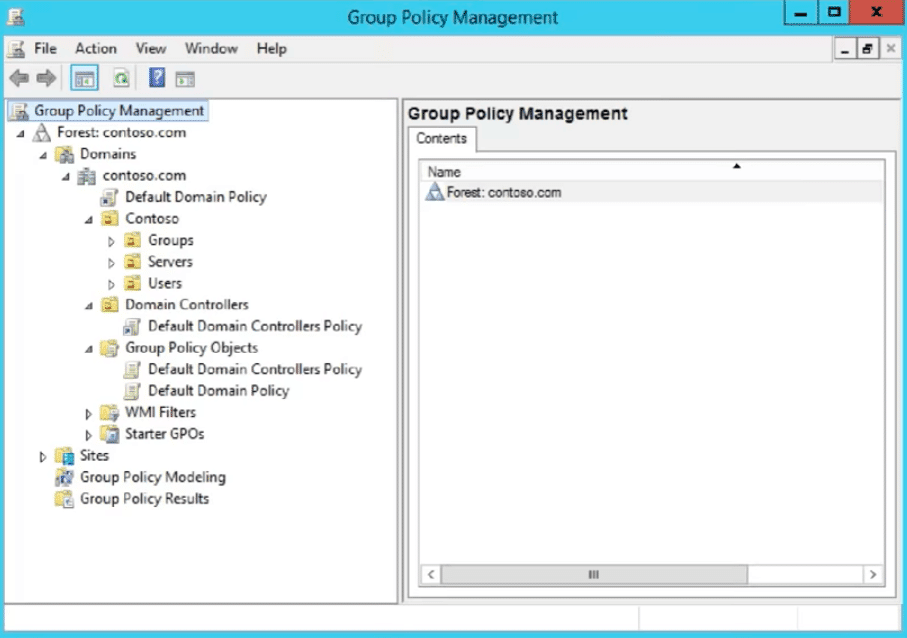
How to Install the Group Policy Management Console?
As mentioned before, GMPC is built-in in Windows Server (starting from 2008), so installing it is a very straightforward process.
In this tutorial, we’ll install the GPMC on a Windows Server 2012 R2.
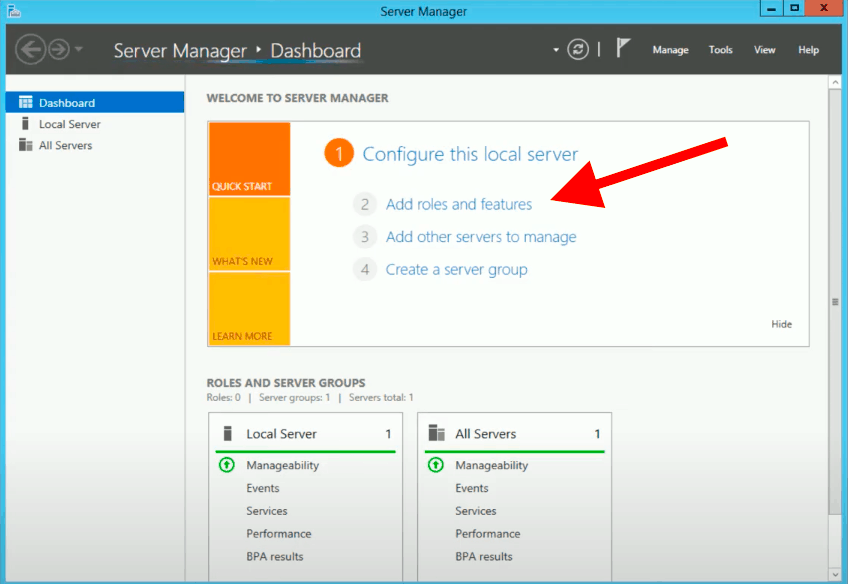
- Open the Server Manager. By default, the Server Manager application is pinned down at the taskbar. But if you can’t find it there, you can hold the combination of Win + R keys to open the Run window. Then type “Server Manager” and click “Ok.”
- In Server Manager’s dashboard, click “Add roles and features.”

- The Add Features and Roles Wizard will open.
Leave the “Installation Type” with its default values: “Role-based or Feature-based installation.”
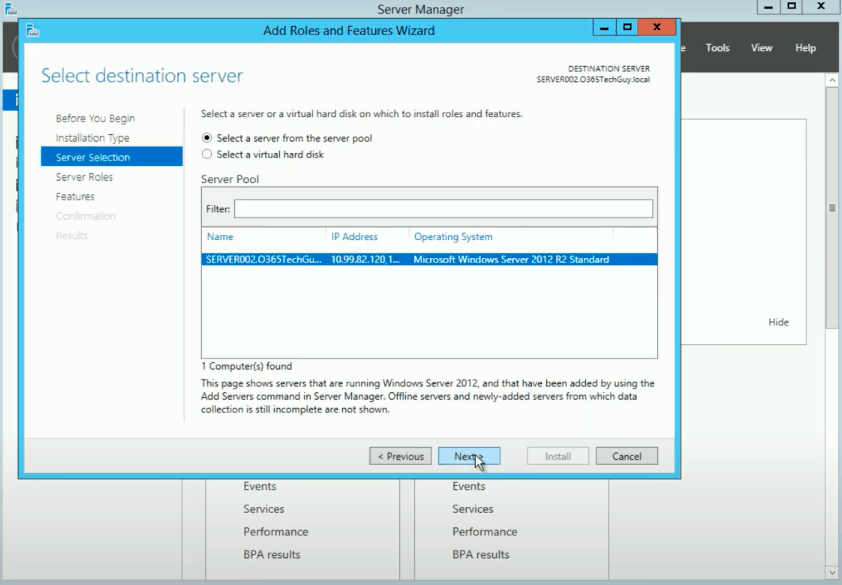
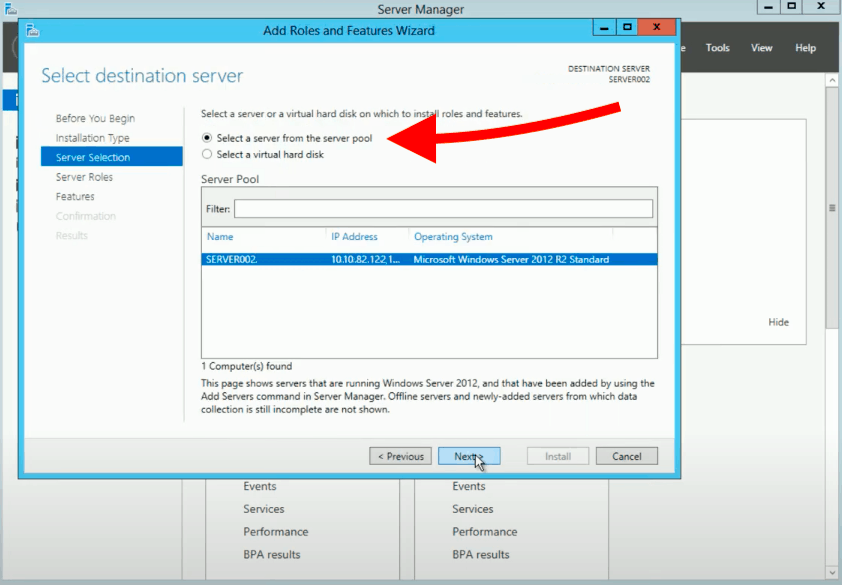
- Select a server from your server pool.
Find the server running Windows where you want to install the GPMC. Click “Next.”
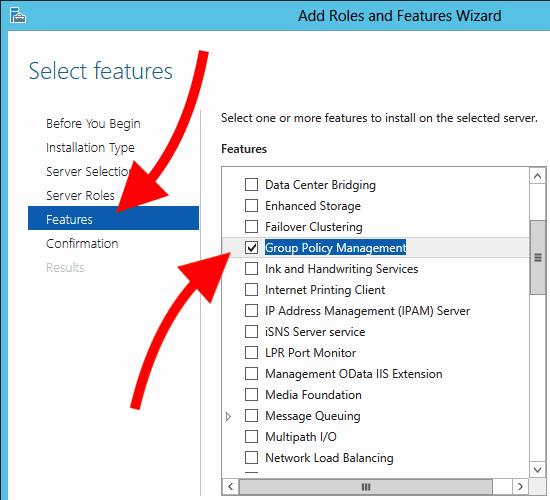
- Skip Server Roles and Go to “Features.” In the “Features” section, you should find the “Group Policy Management” tool. Go ahead, tick the box, click “Next,” and click on “Install.”

- The installation process should take a few minutes to complete.

How to use the Group Policy Management Console?
To open GPMC, go again to the Administrator Tools (Win + R and type “Administrator Tools”), find and double-click on the Group Policy Management Console.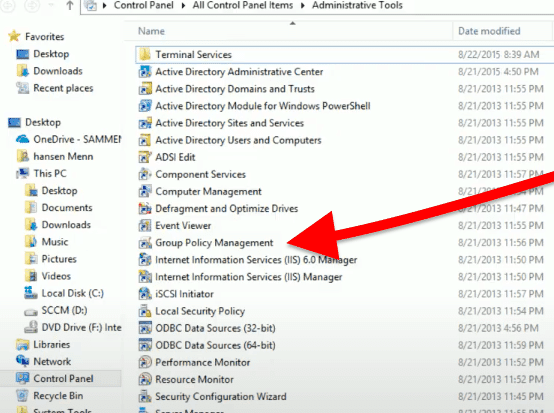
As mentioned earlier, the Group Policy Management Console allows you to manage the entire AD forest, including its sites, domains, and Organizational Units.
- To see the inventory of all GPOs configured under a Domain: Go to the left pane of the GPMC.
- Under “Forest”: Select the “Domain” > and go to “Group Policy Objects.”
- Here, you’ll notice two types of default GPOs: The Default Domain Policy and the Default Domain Controllers Policy. One is linked to the domain, and the other to the domain’s controller.

Within this structure, including Domain Controllers and Domains’s policies, you can see the status of their GPOs, linked GPOs, GP Inheritance, and their Delegation.
How to Create a New Group Policy Object (GPO)?
As a best practice, avoid changing Default Domain Policy and Default Domain Controllers Policy, as you can always take GPOs back to their original configuration.
There are a few things you need to consider when creating a new GPO.
- Give your new GPO a name (you can use another GPO’s name as a Source).
- Determine where to link your new GPO, whether OU, domain, or site.
To create a new GPO:
- Right-click on the OU, and click on the option “Create a GPO in this domain, and Link it here…”
- Give your new GPO a Name, and click “Ok.”
- When you save it, your brand new GPO will be instantly enabled and linked to the specified OU.

The second way to create a new GPO is to right-click on the Group Policy Object container and click on “New.” Your new GPO is created but un-linked!
Using this second method, you’ll have to manually link the new GPO to a domain, site, or OU. Right-click where you want to link it, and select “Link an Existing GPO.”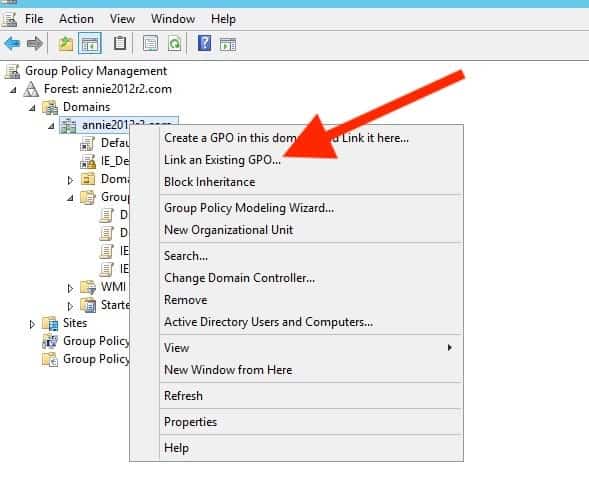
Once you create the new GPO, it will instantly be linked, enabled, and stored in the GPO inventory.
How to Edit a Group Policy Object?
Once you create a new GPO for any domain, site, or OU, it will be automatically generated with default configuration values. These values have no configuration whatsoever, so you’ll need to open the GPO and edit its “default” configuration.
To edit a GPO, go to the GPO inventory and find the GPO that you want to edit, right-click on it and select “Edit.”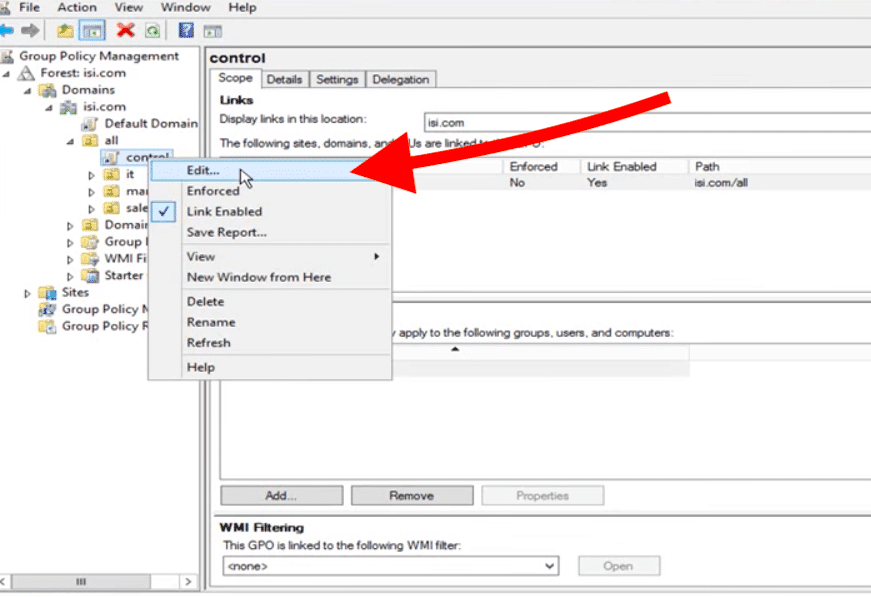
The Group Policy Management will automatically open on the editor in a new window.
The Group Policy Management Editor is also an essential Windows admin tool that allows users to change configuration policies on computers and users.
The structure of the editor is divided into two GPO configuration types: “User” and “Computer.”
The user configuration is set when the user logs in, whereas the computer configuration applies to the Windows OS when it starts.
GPO Configuration: Policies and Preferences
The GPM Editor’s structure is further divided into Policies and Preferences, whether you are under User or Computer configurations.
What are their differences?
- Policies:
Started since Windows Server 2000. Policies have been the original method on how we configure settings globally. When a policy is applied to a computer or user, configurations may be changed or removed, but they’ll go back to their value as defined in the Group Policy. These settings have more priority than the application’s configuration settings, and sometimes they even “grayed out.” Within policies, you’ll find Software Settings (apply software configuration to computers/users), Windows Settings (for Windows security or accounting settings), and Administrative Templates (Control of the OS and user).
Policies are checked and applied every 90 minutes through a process called “Background Refresh”
- Preferences:
This setting was included since Windows 2008 with the idea to replace the login custom scripts that were used to add functionality. These settings can be applied, only if desired, and are not “policied” with a background refresh (as policies do). Preferences are set only when a computer starts, or the user logs for the first time, but allow the user more flexibility to change and remove them.
Within Preferences, you can set the Windows settings and Control Panel Settings. Preferences can only be configured within domain GPOs, whereas policies can be set for both domain and local GPOs.
GPO Precedence and Inheritance
As mentioned previously, when you create a new GPO, you also need to link it somewhere, such as domain, site, or OU.
But you can also have multiple GPOs linking to different domains, sites, or OUs. But to allow this, you’ll need to set priorities.
The GPO Precedence allows GPOs to be configured with different levels of priorities.
By default, the GPOs with the most precedence are those linked to the OU. Lesser precedence goes to those linked to the domain and then to the site.
The least amount of precedence is given to local group policies. That means the GPOs linked to an OU in AD’s highest level will be processed first.
- To see the GPOs linked to a specific domain, site, or OU, go to the Linked Group Policy Objects tab.

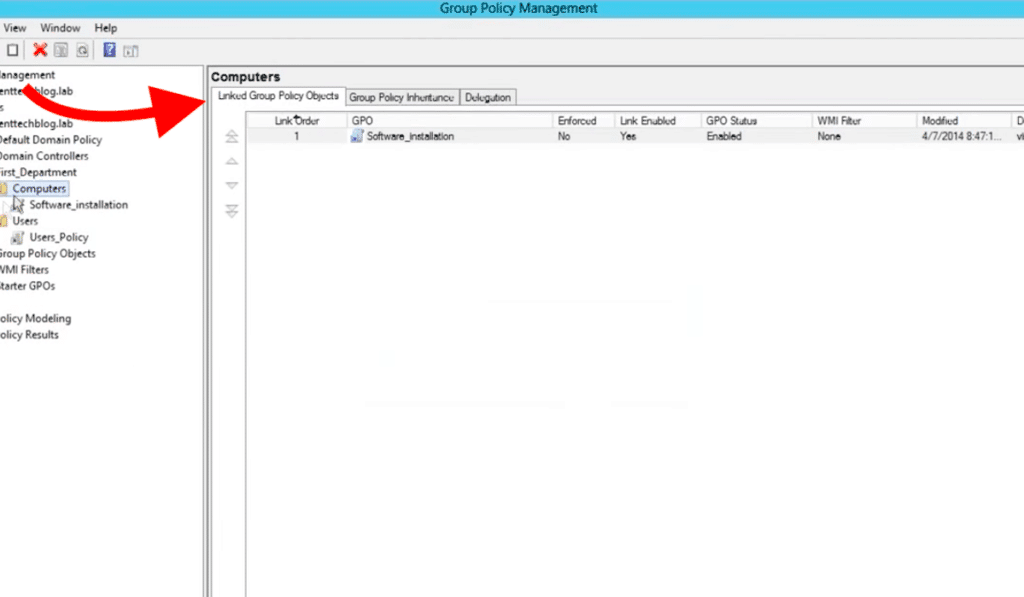
If there is a single GPO linked, you should see it in this tab. If there are more, you will see all GPOs with their respective Link Order number.
The highest the link number a GPO has, the least precedence it has.
For example, a GPO with a Link Order No. of 1 will always take precedence over a GPO with Link Order No.2.
To adjust the GPO precedence, you can change the Link Order number by moving the GPO up or down.
By default, all group policy settings linked to a parent object (i.e., site, domain, or OU) are inherited to the child objects (domain, OUs, or child OU) within the AD hierarchy.
You can see all the inherited GPOs from the Group Policy Inheritance tab.
Final Words
When configuring group policies, Microsoft’s Group Policy Management Console (GPMC) is a must!
While other third-party Group Policy management tools can also help you control GPs, with extraordinary capabilities, nothing compares to GPMC.
The GPMC is the out-of-the-box Windows Server tool.
It is easy to install and use. GPMC is not only made to create and edit GPOs; you can have exceptional fine-grain control and even automate things.
For example, If you are looking for automation while staying in the Windows environment, GPMC also includes the PowerShell module.
This module will help you automate management tasks for your Group Policies.
Related Post: Best Active Directory Monitoring Tools & Software
Group Policy Management FAQs
How do I access Group Policy Management?
Group Policy Management can be accessed through the Group Policy Management Console (GPMC) on a Windows server running Active Directory. It can also be accessed through the Local Group Policy Editor on a Windows client machine.
What are the benefits of using Group Policy?
Group Policy allows for centralized management of settings and configurations, which can save time and improve security. It also allows for the enforcement of specific settings and configurations, which can help ensure compliance with organizational policies.
How do I create a new Group Policy Object (GPO)?
To create a new GPO, open the Group Policy Management Console and navigate to the appropriate domain or organizational unit. Right-click and select «New» and then «Group Policy Object.»
How do I link a GPO to a domain or organizational unit?
To link a GPO to a domain or organizational unit, open the Group Policy Management Console and navigate to the appropriate domain or organizational unit. Right-click and select «Link an Existing GPO.»
How do I edit an existing GPO?
To edit an existing GPO, open the Group Policy Management Console and navigate to the appropriate GPO. Right-click and select «Edit.»
How do I know if a GPO is being applied to a specific user or computer?
To check the application of a GPO to a specific user or computer, open the Group Policy Management Console and navigate to the appropriate GPO. Right-click and select «Group Policy Results» or «Group Policy Modeling.»
How do I troubleshoot GPO issues?
To troubleshoot GPO issues, you can use the Group Policy Management Console to check the status of GPOs and their links, and to check the event logs for related error messages. Additionally, you can use the GPRESULT command-line tool to check the effective GPO settings for a user or computer.
Group Policy Management Background
Over the past versions of Windows Server the tools used to manage Group Policy have matured and the names have changed over time. Originally Group Policy was managed with the Active Directory Tools. Next a dedicated Group Policy Management Tool called the Group Policy Management Console (GPMC) was released, this tool replaced the Group Policy functionality in the Active Directory Tools. In Windows Server 2019 the Group Policy Management Tools are simply named Group Policy Management.
Prerequisites for installing Group Policy Management Console (GPMC)
You will require a Windows Server 2019 computer with the “Graphical Management Tools and Infrastructure” installed to install the Active Directory Management Tools using the Server Manager graphical user interface.
Instructions for installing Group Policy Management
To install Group Policy Management Tools (GPMC) on Windows Server 2019 please follow these instructions.
- Open the Windows Server 2019 Server Manager Dashboard. If Server Manager does not start by default press the “Windows + R” keys, Type “servermanager” in the “Open” field and press “Enter” or click the OK button.

- In the Server Manager main window, click “Add roles and features”.
- In the “Add Roles and Features Wizard” under “Installation Type” check the “Role-based or feature-based installation” radio button and click “Next”
- In the “Add Roles and Features Wizard” under “Server Selection” check the “Select a server from the server pool” radio button, select the server you want to install the Group Policy Management Console Tools (GPMC) on and click “Next”
- In the “Add Roles and Features Wizard” under “Server Roles” click “Next”
- In the “Add Roles and Features Wizard” under “Features” scroll down and check “Group Policy Management”. Click “Next” If prompted to install any supporting roles accept the defaults and continue.
- In the “Add Roles and Features Wizard” at the “Confirmation” page click “Install” to begin the installation of the Group Policy Management Tools.
- The installation of the Group Policy Management Tools will begin and the progress will be displayed. This installation should not require a restart of the server.
- The Group Policy Management Tools can now be found under the “Tools” menu in “Server Manager”.


Group Policy Management Console: An Introduction
The Group Policy Management Console (GPMC) is a one-stop solution for performing all the Group Policy functions an administrator has to deal with. This MMC snap-in provides all the information about Group Policies and allows one to view all the settings within a Group Policy Object (GPO). Many of the functions of the GPMC can also be scripted. The GPMC provides viewing, configuring, and analyzing GPO settings to know how they will affect target computers and users.
Here is a partial list of what administrators can do with the GPMC:
- Creating, modifying, deleting, reporting GPOs and controlling their application
- Performing Group Policy searches across the forest and domain(s)
- Check/control status of GPOs
- Linking and unlinking GPOs
- Performing backup, restore and import of GPOs
- Executing GPO modeling sessions to understand the effects of GPOs
- Setting and delegating permissions
The following are some of the highlights of the GPMC which make it such a handy tool:
- Easy user interface with drag-and-drop functionality
- Capability to backup, restore, import and copy GPOs
- Includes programmable interfaces
- Execution of fully scriptable functions
- Manages WMI filtering that helps in selectively applying GPOs
How to install Group Policy Management Console tools
You can install the GPMC using the Server manager. Here’s how you can do it in Windows Server 2016:
- Open the Server Manager Dashboard. You can do this by pressing Windows + R keys to open the Run tool, and then typing servermanager and pressing the Enter button.
- In the Dashboard section, click on Add Roles and Features.
- In the installation wizard window that pops up, under Installation Type select Role-based or feature-based installation. Then, click Next.
- Under Server Selection, select the Select a server from the server pool option. Then, click Next.
- Click Next under Server Roles.
- Under Features, select Group Policy Management. Click Next.If prompted to install any supporting roles, accept the default selection.
- Under Confirmation, click Install.
Once the installation process is complete, you can open the GPMC through Server manager under the Tools section.
Opening the GPMC
Alternatively, you can also use one of the following methods to open the GPMC:
- Go to Start → Run. Type gpmc.msc and click OK.
- Go to Start → Type gpmc.msc in the search bar and hit ENTER.
- Go to Start –> Administrative Tools –> Group Policy Management.
Before diving into working with GPOs using the GPMC, let’s take a look at what a GPO is.
What is a GPO?
A Group Policy in Active Directory is stored in the form of Group Policy Objects (GPOs). GPOs can be created like any other active directory object and are linked to a Site, domain, or OU in which the policy settings have to be applied. Hence, GPOs are how you can manage group policies and configure them as necessary. To learn more about GPOs and GPO management, you can read this article.
Creating an unlinked GPO
- Within the GPMC, right-click Group Policy Objects in the domain where the GPO is to be created and select New. Give it a suitable name.
- Click OK.
Editing a GPO
- In the GPMC, open the Group Policy Objects node.
- Right-click the appropriate GPO, and click Edit.
Deleting a GPO
- In the GPMC, open the Group Policy Objects node.
- Right-click the appropriate GPO, and click Delete.
- Click OK to confirm.
Note that it is best practice not to edit/delete the Default Domain Controllers Policy or the Default Domain Policy.
Let’s take a look at some of the other tasks that can be executed from the console.
Linking a GPO
- In the GPMC, locate the domain or OU to which the GPO is to be linked and right-click.
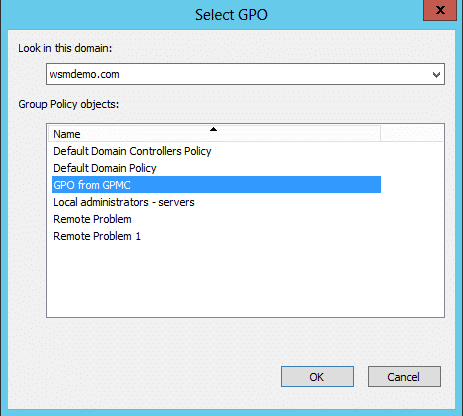
- To link an existing GPO, select the option Link an Existing GPO. In the Select GPO dialog box that appears, select the GPO that is to be linked and click OK.
- To link a new GPO, select the option Create a GPO in this domain, and link it here. Give a suitable name and click OK.
Disabling a GPO link
- In the GPMC, locate the GPO link which is to be disabled.
- Right click the GPO link and click Link Enabled. A check mark indicates that the link is enabled and the absence of it indicates that the link is disabled.
Managing GPO Backups
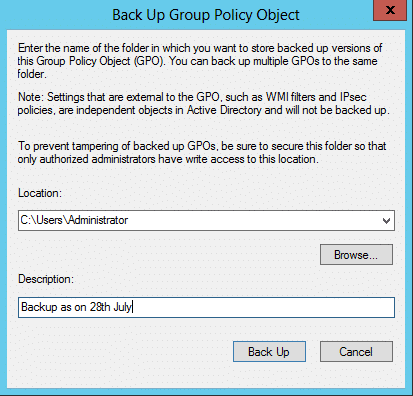
- In the GPMC, expand the Group Policy Objects node that contains the GPO that has to be backed up. Right-click the GPO, and then click Back Up.
- To back up all GPOs in the domain, right-click the Group Policy Objects node, and then click Back Up All.
- In the Back Up Group Policy Object dialog box, specify the path to the folder where the backed-up versions of the GPOs will reside. Click Back Up.
- Finally, click OK.
Restoring a GPO
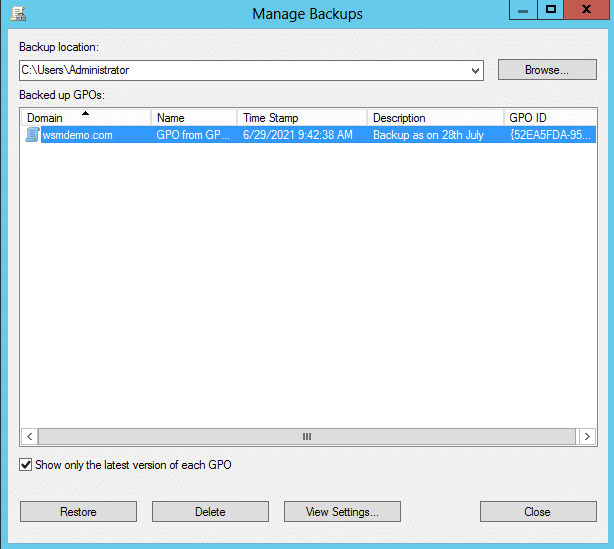
- In the GPMC, expand the Group Policy Objects container. Right-click the GPO and then click Manage Backups.
- In the Manage Backups dialog box that appears, specify the path to locate the backup folder.
- From the list Backed up GPOs, select the GPO that needs to be restored, and click Restore.
- Confirm by clicking OK.
- Finally, click OK and then Close.
Importing settings from a GPO
- In the GPMC, expand the Group Policy Objects node. Right-click the GPO and then click Import Settings. The Import Settings Wizard opens.
- Click Next to continue.
- Backup the existing settings in the GPO by clicking Backup. Then click Next.
- Specify the path to the backup folder from which the settings are to be imported. Click Next.
- Select the GPO from which the settings are to be imported. Click Next.
- The wizard will automatically scan the settings in the backup to check for references needed. After the scan completes, click Next.
- Under Migrating References, select the method for transferring references. Click Next.
- Finally, click Finish to close the wizard.

Group Policy Modeling
Group Policy Modeling can simulate the policy implementation environment and can help administrators get a sense of how the GPOs affect different users and computers, thus helping them to plan before actually applying the policies.
The following steps illustrate how to work with the Group Policy Modeling Wizard:
- In the left pane of the GPMC, click on the forest to expand it.
- Right click the Group Policy Modeling container and click on the Group Policy Modeling Wizard option.
- In the Group Policy Modeling Wizard that is launched, click Next.
- Specify the domain where the GPO is to be analyzed and click Next.
- Specify the user and computer against which the policy settings are to be simulated. Click Next.
- In the page that follows, select a particular site if required, else skip to the final page and click Next.
- In the page that follows, specify an alternate network location if required, else skip to the final page and click Next. An alternate location can help administrators see the effects of the GPOs if the computer were to be moved to a different container in the AD.
- In the page that follows, use the Add/Remove options to simulate changes to all the security groups that the selected user is a member of if required, else skip to the final page and click Next.
- In the page that follows, include the WMI filters in the simulation if required, else skip to the final page and click Next.
- In the page that follows, a summary of all selections made in the wizard is displayed. To process the simulation click Next.
- Finally, click Finish to close the wizard.
This action creates a folder that can be seen in the left pane of the GPMC that bears the name of the user/computer that is tested. Open it to display the outcome of the simulation. These reports give information about the properties and policy settings of GPOs and how the implementation of group policy modeling proceeded/succeeded. The Summary tab gives information about the GPOs that were used to compile the policy. The Settings tab lists the effective policy settings. The Query tab displays the criteria based on which the simulation was carried out.
People also read
Managing GPOs in Active Directory
Group Policy Management Console (GPMC) – Part II
GPO Delegation
In this tutorial you’ll learn how to install Group Policy Management Console in Windows 10/11.
The Group Policy Management Console (GPMC) is an advanced administrative tool for managing Group Policy and other settings in Active Directory environments. The GPMC tool is available to administrators of domain-based networks to easy manage the following objects:
- Active Directory Users and Computers
- Active Directory Sites and Services
- Resultant Set of Policy
- ACL Editor
- GPMC Delegation Wizard
In practice, the Group Policy Management Console is a central management tool used to deploy, manage, and automate policies in domains, sites, users and computers and can be installed as an additional feature on Windows Servers* or in workstations running Windows 10/11 Professional, Enterprise & Education editions. **
* Notes:
1. To install GPMC on Windows Server 2016 and above:
-
- Open the Server Manager and go to Manage -> Add Roles and Features.
- In Add Roles and Features Wizard dialog that opens, click Next and then select Role Based or feature-based installation -> Next.
- Select the Server from the server pool -> Next -> Next.
- At Features options select the Group Policy Management and click Next to install it.
2. The Group Policy Management Console cannot be installed on Windows 10 Home devices.
How to Install RSAT Group Policy Management Console on Windows 11/10.
Group Policy Management Console is part or Remote Server Administrator Tools (RSAT) and can be installed only on computers that are running Windows 10/11 Professional, Enterprise or Education editions, by using one of the methods below:
- Install GPMC from Optional features.
- Install GPMC using PowerShell.
- Download and Install GPMC.
Method 1: How to Install Group Policy Management Console from Optional features in Windows 10/11.*
* Note: Use this method only if you’re running Windows 11 or Windows 10 1809 or higher. For lower versions of Windows 10 use the instructions in method-3 below.
1. Open the Search box and type Optional Features.
2. Click Add an optional feature from the list.

2. Then select Add a feature.

3a. In search type Group Policy Management.
3b. Select the RSAT: Group Policy Management Tools and click Install.

4. Once the installation is complete, press the Windows + R keys to open the Run dialog box, type gpmc.msc and hit Enter to open Group Policy Management Console .

Method 2. How to Install Group Policy Management Console using PowerShell.
* Note: Use this method only if you’re running Windows 11 or Windows 10 1809 or higher. For lower versions of Windows 10 use the instructions in method-3 below.
1. On the Search type Powershell and then click Run as Administrator.

2. Copy and paste the command below in PowerShell window and press Enter.
- DISM.exe /Online /add-capability /CapabilityName:Rsat.GroupPolicy.Management.Tools~~~~0.0.1.0

3. Once the installation process is complete, close PowerShell and type gpmc.msc in the Run command box to open the Group Policy Management Console.
Method 3: How to Download & Install Group Policy Management Console in Windows v1803 or lower.
An alternative way to install GPMC is to download the Remote Server Administration Tools and, after installing them, enable GPMC in Windows Features.
* Note: This method is recommended only for PC’s running Windows 10 versions 1803 or lower.
1. Download Remote Server Administration Tools.

2. From the page with Choose the download you want message, tick the filename with x64.msu (64-bit) or x86.msu (32-bit), depending on the version of Windows installed (64 or 32-bit). Then select Next to begin download.

3. Open the downloaded package and Accept the license terms.

4. Once the installation completes, reboot the PC.
5a. After restart, press the Windows + R keys to open the Run dialog box.
5b. Type appwiz.cpl and hit Enter.

6. In Programs and Features, click Turn Windows Features on or off from the left.

8. Expand the Remote Server Administration Tools and the Feature Administration tools and then check the Group Policy Management Tools checkbox.
9. Finally click OK to enable the Group Policy Management Console on your device.
That’s it! Which method worked for you?
Let me know if this guide has helped you by leaving your comment about your experience. Please like and share this guide to help others.
If this article was useful for you, please consider supporting us by making a donation. Even $1 can a make a huge difference for us in our effort to continue to help others while keeping this site free:

If you want to stay constantly protected from malware threats, existing and future ones, we recommend that you install Malwarebytes Anti-Malware PRO by clicking below (we
do earn a commision from sales generated from this link, but at no additional cost to you. We have experience with this software and we recommend it because it is helpful and useful):