Group Policy Management Background
Over the past versions of Windows Server the tools used to manage Group Policy have matured and the names have changed over time. Originally Group Policy was managed with the Active Directory Tools. Next a dedicated Group Policy Management Tool called the Group Policy Management Console (GPMC) was released, this tool replaced the Group Policy functionality in the Active Directory Tools. In Windows Server 2016 the Group Policy Management Tools are simply named Group Policy Management.
Prerequisites for installing Group Policy Management Console (GPMC)
You will require a Windows Server 2016 computer with the “Graphical Management Tools and Infrastructure” installed to install the Active Directory Management Tools using the Server Manager graphical user interface.
Instructions for installing Group Policy Management
To install Group Policy Management Tools (GPMC) on Windows Server 2016 please follow these instructions.
- Open the Windows Server 2016 Server Manager Dashboard. If Server Manager does not start by default press the “Windows + R” keys, Type “servermanager” in the “Open” field and press “Enter” or click the OK button.

- In the Server Manager main window, click “Add roles and features”.
- In the “Add Roles and Features Wizard” under “Installation Type” check the “Role-based or feature-based installation” radio button and click “Next”
- In the “Add Roles and Features Wizard” under “Server Selection” check the “Select a server from the server pool” radio button, select the server you want to install the Group Policy Management Console Tools (GPMC) on and click “Next”
- In the “Add Roles and Features Wizard” under “Server Roles” click “Next”
- In the “Add Roles and Features Wizard” under “Features” scroll down and check “Group Policy Management”. Click “Next” If prompted to install any supporting roles accept the defaults and continue.
- In the “Add Roles and Features Wizard” at the “Confirmation” page click “Install” to begin the installation of the Group Policy Management Tools.
- The installation of the Group Policy Management Tools will begin and the progress will be displayed. This installation should not require a restart of the server.
- The Group Policy Management Tools can now be found under the “Tools” menu in “Server Manager”.


Server 2008Server 2012Server 2016Windows Server
In this article, we see about How to create Group policy in windows server 2016. First open Group Policy Management console by using server manager. By using GPM we can assign various polices for Organizational units(OU). We show simple example to create GP.  Right click domain name and click to create GPO in this domain and link here.
  Give a name for New GPO, we give Information Security and click OK.
Right click Group Policy Object and click Edit.
 Here we showing simple example for editing GPO, click policies-Windows settings-Security Settings-Account polices-password Policy and click Maximum password age change password expire days and click OK.
  Click GPO and click Settings to check what are the policy enabled.
  Block Inheritance Group Policy
To Block Inheritance of group policy to parent Organizational unit, it’s used to not apply any policy to blocked inheritance. For Example Right click Organizational unit and click Block Inheritance  We see now blocked Organizational units as BPO and Technical Dept.
  Enforced Group policy
Enforcing Policy will take presence and apply to all the OUs followed in the Active Directory. which means that Even you blocked any OU using the Block Inheritance, Enforce will take override of that settings and apply the policy what ever enforced. So be careful, when selecting the Enforce has it will override and apply which may cause issues if any OUs defined and required different settings..
To enable Enforce, Right click GPO and select Enforced.  Link enabled GPO
Link enabled that the group policy is linked to the OU. So the policy applies to the objects within the OU. Right click GPO and select Link enabled.  By Default Group Policy will take 90 Minutes of frequency to update to Clients which means client will contact Active Directory every 90 Minutes to check any policy changes are there and update if any changes or new Policies available and applicable for that particular client. If you want to update immediately, We can us gpupdate /force in the clients which will do check and update.
This step-by-step article describes how to use Group Policy to automatically distribute programs to client computers or users. You can use Group Policy to distribute computer programs by using the following methods:
- Assigning Software
You can assign a program distribution to users or computers. If you assign the program to a user, it is installed when the user logs on to the computer. When the user first runs the program, the installation is completed. If you assign the program to a computer, it is installed when the computer starts, and it is available to all users who log on to the computer. When a user first runs the program, the installation is completed. - Publishing Software
You can publish a program distribution to users. When the user logs on to the computer, the published program is displayed in the Add or Remove Programs dialog box, and it can be installed from there.
Windows Installer service use to install, maintain, and remove software from your organization’s computers.
In this post this time, lets go through a easy steps how we can deploy software to our infrastructure using GPO.
For this demo, i will be using 7-zip as my application.
1 – In your Domain Server, open Server Manager, click Tools and open Group Policy Management.

2 – In the Group Policy Management console, right click domain name which is Windows.ae, and click Create a GPO in this domain, and link it here.

3 – In the New GPO box, in the Name box, type Deploy Software, and then click OK.

4 – Next, on the Group Policy Management console, right click Deploy Software GPO and click Edit.

5 – In the Group Policy Management Editor, under Computer Configuration, expand Policies, and then expand Software Settings.

6 – Right-click Software installation. From the context menu, click New, and then click Package.

7 – In the Open dialog box, browse to \172.16.1.254Software, click 7z1700-x64.msi, and then click Open.
Note : In the Open dialog box, type the full UNC path of the shared installer package that you want. For example, \file serversharefile name.msi.

8 – In the Deploy Software window, ensure that the Assigned option is selected, and then click OK.

9 – Wait for few second and verify that the 7-zip is listed in the Group Policy Management Editor.

10 – Now lets switch to our Windows 10 client PC, i do recommend that you run gpupdate /force in the client PC and then restart the client PC.

11 – after restarting your client PC and log in as domain user, you can verify that 7-zip is installed.

 i will continue later with Configuring Deploy Microsoft Office 2016 in Windows Server 2016
that’s all for now.., any Doubts type a commend.. 🙂
Group Policy administrative templates let you configure hundreds of system settings, either computer or user based. Today I will introduce computer settings that directly affect system security and attack surface.
Contents
- Regional and Language Options
- MS Security Guide
- Lanman Workstation
- DNS Client
- Fonts
- Network Connections
- Group Policy
- Logon
- Autoplay Policies
- Microsoft account
- OneDrive
- Conclusion
- Author
- Recent Posts

Leos has started in the IT industry in 1995. For the past 15+ years he focused on Windows Server, VMware administration and security. Recently, Leos is focusing on automation via Ansible. He is also a Certified Ethical Hacker.
Over the last few months, I wrote several articles related to Windows Server security best practices. All were based on recommendations from the Center for Internet Security (CIS) organization. The latest one focused on audit policy configuration.
Administrative templates help configure system component behavior, like Internet Explorer, or end-user experience, like Start menu layout. However, some also affect system behavior, which may present security risks. In this post, I have picked important settings you should consider adding to your security baseline policy.
As usual, the format is as follows:
Name of the setting: Recommended value
Regional and Language Options
Allow input personalization: Disabled
Allow online tips: Disabled
Input personalization allows speech learning, inking, and typing. It is required for the use of Cortana. Online tips enable retrieval of tips and help for the Settings app. Both settings, when enabled, could lead to storage of sensitive data in users’ OneDrive, Microsoft, or third-party servers.
MS Security Guide
This section is not included in Group Policy by default; you have to download it from the Microsoft website. After downloading it, you can find the SecGuide.admx and SecGuide.adml files in the Templates folder. To import the files, copy the .admx file to the %SystemRoot%PolicyDefinitions folder and the .adml file to the %SystemRoot%PolicyDefinitionslocale (in my case en-US) folder. Reopen Group Policy Editor, and you will find the new section we just imported.
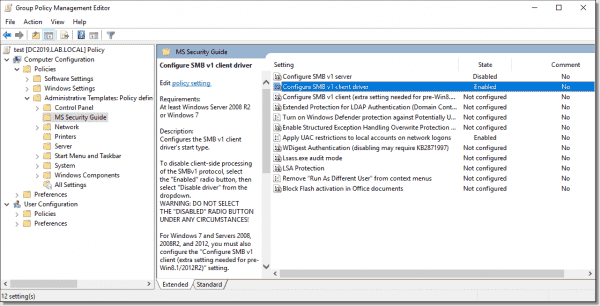
MS Security Guide settings
Configure SMB v1 server: Disabled
Configure SMB v1 client driver: Enabled: Disable driver
Both settings control the Server Message Block v1 (SMBv1) client and server behavior. SMBv1 is roughly a 30-year-old protocol and as such is much more vulnerable than SMBv2 and SMBv3. Therefore, Microsoft recommends completely disabling SMBv1 on your network. Be careful with the client driver setting—do not set it to Disabled because this will cause issues with the system. The correct setting is Enabled: Disable driver.
Note: In case you have an older device on your network, like a network printer, make sure it supports SMBv2 or higher before disabling SMBv1. Recently we had this issue where scanning to a shared folder didn’t work because the printer only supported SMBv1.
Apply UAC restrictions to local accounts on network logons: Enabled
Local accounts are a high risk, especially when configured with the same password on multiple servers. This setting controls whether you can use a local account to connect to a remote server, for example, to a C$ share. When enabled, User Account Control (UAC) removes the privileges from the resulting token, denying access. This is the default behavior.
Lanman Workstation
Enable insecure guest logons: Disabled
By default, a Windows SMB client will allow insecure guest logons, which network-attached storage (NAS) devices acting as file servers often use. Because these are unauthenticated logons, features like SMB signing and SMB encryption are disabled. This makes such communications vulnerable to man-in-the-middle attacks. Windows file servers require SMB authentication by default.
DNS Client
Turn off multicast name resolution: Enabled
Link-local multicast name resolution (LLMNR) is a secondary name resolution protocol that uses multicast over a local network. An attacker can listen to such requests (on UDP ports 5355 and 137) and respond to them, tricking the client. This is called local name resolution poisoning.
Fonts
Enable font providers: Disabled
This disables Windows from downloading fonts from online font providers. The IT department should first test and approve all system changes.
Network Connections
Prohibit installation and configuration of Network Bridge on your DNS domain network: Enabled
Network Bridge could let users connect two or more physical networks together and allow data sharing between them. This could lead to unauthorized data upload or malicious activity from the bridged network.
Prohibit use of Internet Connection Sharing on your DNS domain network: Enabled
This setting applies in Windows 10 and Windows Server 2016/2019 to the Mobile Hotspot feature. Standard users should not be able to open internet connectivity via enterprise devices.
Require domain users to elevate when setting a network’s location: Enabled
A network location setting, also known as a network profile, controls which firewall profile to apply to the system. With this setting enabled, such a change would require administrative elevation. Standard users should not change these settings.
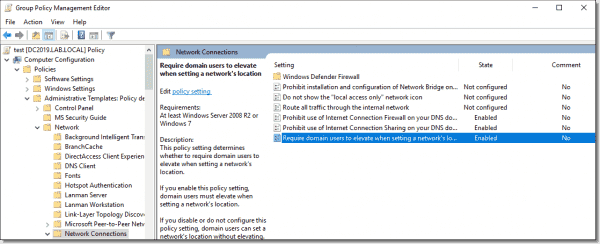
Network Connections settings
Group Policy
Configure registry policy processing: Do not apply during periodic background processing: Enabled: FALSE (unchecked)
Configure registry policy processing: Process even if the Group Policy objects have not changed: Enabled: TRUE (checked)
These two settings control how to process Group Policy. The first one should be unchecked so that the system refreshes Group Policy Objects (GPOs) in the background and does not wait for user logon or a reboot. The second should be checked to reapply each GPO setting during every refresh. This will override any unauthorized changes done locally on the system.
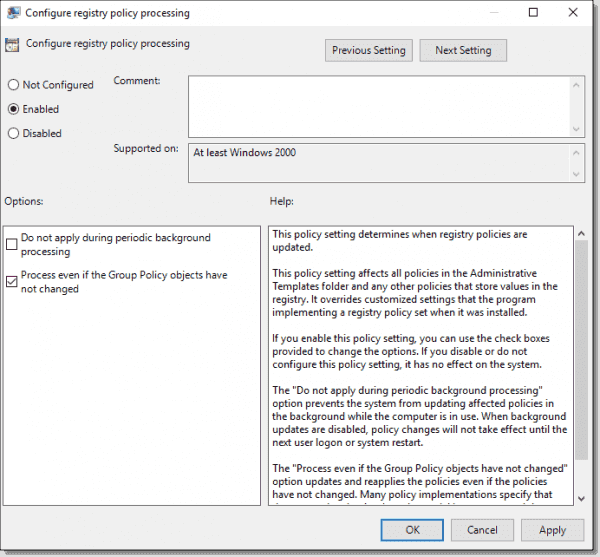
Configure registry policy processing
Logon
Turn off app notifications on the lock screen: Enabled
Application notification could expose sensitive data to unauthorized users, for example, confidential email notifications. Enable this setting to turn off such notifications.
Turn off picture password sign-in: Enabled
Turn on convenience PIN sign-in: Disabled
The Windows Hello feature allows users to sign in with a picture gesture or a PIN code similar to a credit card. Both options are relatively easy for a person standing behind a user to observe (called shoulder surfing). The recommended approach is to use complex passwords instead.
Autoplay Policies
Disallow Autoplay for non-volume devices: Enabled
This disables autoplay for external devices, like cameras or phones, which an attacker could use to launch a program or damage the system.
Set the default behavior for AutoRun: Enabled: Do not execute any autorun commands
The autorun.inf file located on a DVD or USB media stores autorun commands that often launch software installation or other commands. Even though a pop-up window displays for the user, malicious code might run unintentionally, and the recommended approach is to disable any autorun actions.
Turn off Autoplay: Enabled: All drives
Similar to autorun, autoplay starts to read data from external media, which causes setup files or audio media to start immediately. Autoplay is disabled by default, but not on DVD drives.
Microsoft account
Block all consumer Microsoft account user authentication: Enabled
In an organization, the IT department should firmly manage user authentication. Users should not be able to use their own Microsoft online IDs in any applications or services such as OneDrive.
OneDrive
Prevent the usage of OneDrive for file storage: Enabled
This policy setting lets you prevent apps and features from working with files on OneDrive, so users cannot upload any sensitive working data to OneDrive. Note that if your organization uses Office 365, this setting would prevent users from saving data to your company OneDrive.
Subscribe to 4sysops newsletter!
Conclusion
Group Policy administrative templates offer great possibilities for system and end-user experience customizations. Literally hundreds of settings are available by default, and you can add more by downloading the .admx files from Microsoft and other vendors. In this post, we have covered the important security-related settings.
Software deployment is the most important task for System Administrator on the network. Here we just show you an easy way to deploy software using Group Policy on network client computers. It’s not difficult but needs some basic networking and Windows Server knowledge.
Let’s start with installing some software in Windows 10 through group policy. I’m using Windows 10 as a client and Windows Server 2012 R2 for Server. It works the same for Windows server 2019 as well.
1. Create a folder in Server and share it with appropriate permission for domain users to execute MSI files.
Here I have created an AppDeployment folder. The folder contains all software we need to install them through group policy.
2. Now go to Server Manager Dashboard and open the Group Policy Management or simply type “Gpmc.msc” in Windows Run.
3. In Group Policy Management console, create a new GPO and link it to your domain. I have created App Deployment for Technig.local domain.
4. Right-click the App Deployment and click edit, in order to edit the policy. In the opened Group Policy Management Editor, go to the Software installation through Computer Configuration > Policies > Software Settings > Software Installation.
5. To create a new software package, right-click the Software installation > New then click Package.
6. In the opened window, using the UNC path of the software select the software MSI file you want to deploy. Here I want to install 7zip software for Technig.local clients.
7. On the Deploy Software window select Assigned then click OK.
8. Now, Navigate to Properties of software MSI file on the Deployment tab, check the Install this application at logon then click OK. Finally, close all opened windows and update the Windows Policy by typing “Gpupdate /force /logoff” command on Command Prompt. You might need to restart your PC after executing the group policy update command.
Testing Software Deployment on Network Computers
Now you can test the software deployment with group policy on one of your client computer. Here I test it on a Windows 10 PC. I have just updated the group policy and restart my computer. Now the 7zip has been installed successfully.
You can see the 7zip has been installed successfully on Windows 10 at login through group policy. Try to apply this article to deploy software using group policy on your network environment. Please comment us if you have any issue with deploying software with group policy in Windows server.