Всем привет! Всё — таки, я думаю, лучше обойтись отдельной темой на форуме, надоело уже читать разные статьи, пробовать всякие способы. Просто очень хочется улучшить инструмент, весьма эффективный и полезный для системного администратора.
Внешний жёсткий диск разбит у меня на три части теперь.
Первая часть это NTFS раздел, 50 гигабайт. На ней, собственно, загрузчик, Grub4Dos.
Вторая часть 100 мегабайт EFI раздел, на ней скопирован загрузчик Grub2.
Третья часть, собственно, данные (фотографии, музыка, фильмы, драйверы).
Почему я сделал NTFS? Да потому — что созданный мною с помощью sysprep и команды dism файл install.esd имеет размер почти 8 гигабайт, а FAT32 не поддерживает такой размер, тут у неё жёсткие ограничения.
В свою очередь, FAT32 только поддерживает UEFI режим, что тоже является лимитирующим фактором. Кроме того, по слухам, Grub4Dos не умеет работать с UEFI.
Решил я сделать улучшение, в этой статье https://www.bootdev.ru/2015/11/sozdayem-razdely-dlya-zagruzochnoy-fleshki.html (там всё по порядку, начиная от создания разделов и до активации загрузчиков), система у меня в menu.lst устанавливается так:
title Install Windows 10 Pro x64
root
chainloader /bootmgr
А содержимое ISO файла скопировано в корень раздела. В обычном режиме, в Legacy, она устанавливается вообще без проблем. Но при запуске нововведения на компьютере я получил любопытнейшую вещь — если secure boot включён, получаем ошибку и система продолжает установку в UEFI режиме, а если secure boot отключён, то появляется окно загрузчика Grub2.
В общем, после долгих размышлений, чтобы не насиловать мозг, я принял такое решение, разбить файл install.esd на несколько частей, отформатировать раздел обратно в FAT32 и больше не париться по этому вопросу.
Тут ещё остаётся несколько моментов:
1. При существующей строчке в manu.lst, если запустить в UEFI режиме установку, то без появления окна загрузчика Grub4Dos сразу пойдёт установка операционной системы? Это после переделки в FAT и дробления образа.
2. Некоторые приложения могут грузиться, такие как Acronis, в UEFI режиме. Оно вообще надо? Ведь если надо, то придётся думать, как реализовать запуск их в режиме UEFI с диска.
3. Если я захочу поставить систему, например, Windows 7, с UEFI и без, мне придётся так же целиком копировать содержимое ISO на раздел или же есть другой способ?
4. Пишут, что для Windows 10 лучше использовать esd. Как думаете, всё — таки esd или wim?
В общем, помогите советом, если можно. Уже мозги плавятся.
В качестве бонуса предлагаю свой файл, menu.lst. С его помощью, кстати, можно запустить реально drweb, kaspersky, даже установку debian, я знаю, что с этим трудности у народа есть, поэтому считаю не лишним поделиться.
Содержание
- Загрузочная флешка с несколькими OS и программами на борту!
- Как создать загрузочную флешку на основе Grub4DOS?
- BootDev
- Страницы
- 2016-03-27
- Делаем флешку мультизагрузочной, настройка Grub4Dos
- Мультизагрузочная флешка
- menu.lst (кликните на кнопку «Copy» для копирования)
- Конфигурация файла Меню
- Опции Дисплея
- Назначение параметров по умолчанию
- Защита пунктов загрузки паролем
- Использование подменю
- Grub4dos menu – как сделать, настроить
- Grub4dos menu –загрузочные команды
- Страницы
- 5 февраля 2012 г.
- Редактирование конфигурационного файла menu.lst [Configure Grub4Dos]
Загрузочная флешка с несколькими OS и программами на борту!

Продолжаю писать на тему, как создать загрузочную флешку. Но, сегодня не будут, рассмотрена очередная программа для этого дела, сегодня я расскажу, как создать загрузочную флешку используя Grub4DOS.
Я не буду особо глубоко рассказывать, что такое «Grub4DOS» В конце поста дам ссылку на Русскую документацию, на тот случай, если Вас заинтересует данный загрузчик, и Вы захотите изучить его.
Если Вам интересно тема сброса пароля на вход в Windows, как на 7, так и на XP или 8 прочитайте эту статью.
Теперь приступим к задуманным планам и создадим загрузочную флешку. На USB мы размести следующие вещи:
— Windows 7 – Для её установки.
— Windows 7 Lite – Пригодится, если вдруг, сбой основной системы.
— Ubuntu – Как для установки, так и для ознакомления без неё.
Для примера этого, хватит.
Как создать загрузочную флешку на основе Grub4DOS?
Первым делом Вам нужно скачать вот этот архив. Распакуйте содержимое куда угодно и следуйте дальнейшим действиям. Ещё, не забудьте отформатировать флешку, как предлагает Windows по умолчанию, то есть в FAT 32.
Для начала необходимо сделать флешку загрузочной. В папке «GRUB» запустите файл «grubinst_gui.exe» теперь нужно правильно выбрать нашу флешку.
Будьте внимательны. Если Вы выберете за место флэшки системный диск, то при следующем включении ПК, Вы будет приятно удивлены. Ваша Windows не загрузится.
Поэтому будьте внимательны, и прочитайте дальше то же внимательно. Отметьте пункт «Disk» теперь в выпадающем списке выбираем флешку.
Первый вариант выбора флэшки, быстрый! Ориентируйтесь по её размеру. В данном случае, моя флэшка под цифрой (2) так как, она на 4 гига, соответственно, 3820М больше похоже на неё. Под цифрой один (1) это системный диск, вот его выбирать не нужно. Под цифрой три (3) ещё одна флешка, но мне она не нужна для дальнейших действий.
Второй вариант выбора флэшки, надёжный! В скобках каждый диск отмечен как (HD0, HD1…) поэтому идём сюда и смотрим номер каждого устройства. « ПКМ по мой компьютер > управление компьютером > управление дисками».
Видим, что флэшка находится под «Диск 1» соответственно в программе нужно выбрать «HD1» как я и сделал. «Диск 2» это моя вторая флэшка, которая не нужна и «Диск 0» это мой HDD на котором находятся «C: D:» и прочие.
Теперь вы точно сможете правильно определить флешку. Как только Вы это сделали, нажимаем кнопку «INSTAL» видим консоль.
Все хорошо, нажимаем «ENTER» консоль закроется, и продолжаем дальше.Теперь из папки USB перекиньте в корень Вашей флэшки следующие файлы.
Источник
BootDev
Создание загрузочных дисков и прочие полезные мелочи
Страницы
2016-03-27
Делаем флешку мультизагрузочной, настройка Grub4Dos
Часть 1, настройка Grub4Dos.
На данном этапе, мы уже подготовили флешку, создали структуру разделов, установили необходимые загрузчики. Иными словами, у нас на руках пустая загрузочная флешка.
Получилось немного пунктов, но по сути, это самое частое что требуется от загрузочной флешки.
Теперь список того, что мы поместим на флешку:
Мультизагрузочная флешка
Для начала, создадим в корне флешки папку с именем «ISO». Впрочем можно любое другое имя, просто учитывайте это при описании путей в файлах конфигурации загрузчиков. В данной директории будут располагаться все файлы-образы которые мы будем использовать для загрузки.
Теперь, скачиваем образы указанных выше LiveCD, и скопируем их в папку ISO кроме образа Hiren’s Boot CD.
С Hiren’s Boot CD действуем иначе. Монтируем скаченный образ, например с помощью ImDisk.
Корень флешки должен выглядеть следующим образом.
Переходим к самому главному, настройке загрузчиков. Начнем с конфигурационного menu.lst файла загрузчика Grub4Dos. Редактировать данный файл можно любым текстовым редактором. Я, к примеру, использую Notepad++.
Открываем файл menu.lst, полностью удаляем его содержимое, и вставляем следующий код.
Теперь проверим как все это выглядит в загруженом виде. Для этого воспользуемся программой QemuBootTester.
Источник
Конфигурация файла Меню
Когда меню загружено и мы видим пункты загрузки, мы может отредактировать любой из них, выбрав его и нажав [e], но весь отредактированный текст остаётся в оперативной памяти и не сохранится в самом файле.
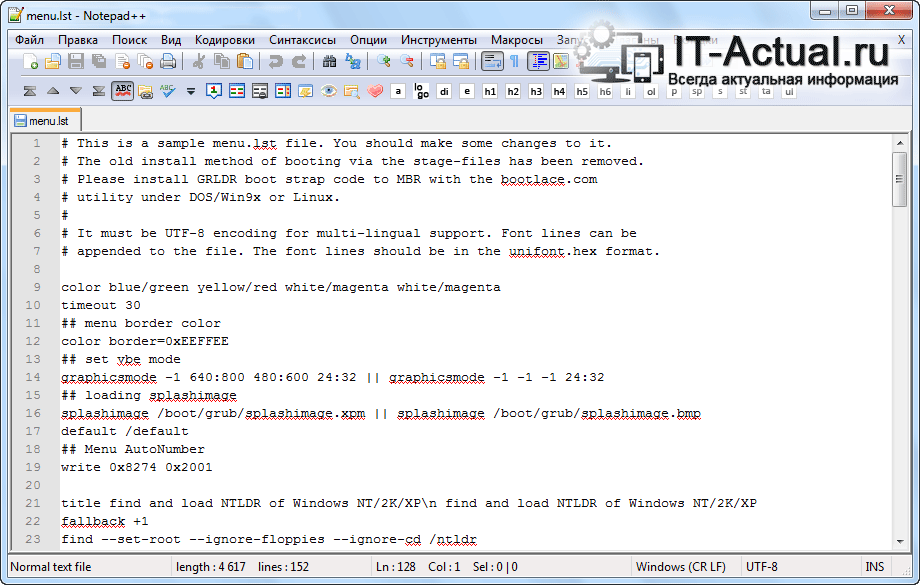
Пример файла menu.lst (он входит в пакет поставки Grub4dos):
Опции Дисплея
Цвета меню могут быть назначены следующей командой (по умолчанию мы видим белый текст на чёрном фоне, при выборе пункта меню цвет текста становится чёрным на фоне белого курсора):
Где a=это текст, b=общий фон, c=цвет текста выбранного пункта, d=цвет курсора.
Например следующий ниже текст menu.lst приведйт к отображению светло-голубого текста на синем фоне с красным курсором и выбранный текст будет светло-красным (Смотрите Фото 1 ниже):
Фоновое изображение (splash) должно быть в формате .xpm (которое может быть задавлено gzip-ом),иметь размер изображения 640×480 пикселей и максимум 14 цветов.
Чтобы почитать про изготовление загрузочных картинок загляните (сюда).
Чтобы отобразить картинку splash.xpm.gz (в текущей корневой директории) Следующая команда, должна быть использовании в файле menu.lst
Чтобы отобразить splash.xpm.gz (находящуюся на 1-ом разделе 1-го жёсткого диска) команда будет иметь вид:
По умолчанию, цвет текста будет белым, а выбранный пункт меню поменяет цвет текста на чёрный на фоне белого курсора. Чтобы это изменить исползуйте следующую запись в menu.lst:
Где RR это красный, GG это зелёный, а BB синий. Нумерация цветов с виде HEX. В следующем примере текст будет светло-фиалетовый (В виде HEX как AB82FF) курсор будет светлоголубым (В виде HEX как 191970) и цвет в курсоре тоже будет светло-фиалетовым – Смотрите Фото 2 внизу.
Назначение параметров по умолчанию
Пример задания на 10 секунд ожидания указан в следующем примере:
Чтобы выбрать пункт меню, который загрузится по истечении заданного времени (to be booted after timeout period has completed) делайте следующим образом (default 0=Первый пункт меню, default 1=Второй пункт меню, и.т.д.):
timeout 10
default /default
title Boot Windows XP
root (hd0,1)
chainloader +1
savedefault
Защита пунктов загрузки паролем
Чтобы запаролить загрузку всех или некоторых меню воспользуйтесь командой password Например:
color light-blue/blue light-red/red
timeout 10
default /default
password administrator
Когда вы загрузите Grub4dos защищённый паролем, обычные строки подсказок внизу:
Сменятся на эти строки:
Можно так же ограничить доступ к отдельным пунктам меню. После установки пароля, добавляйте команду lock в желаемый пункт загрузки, пока пользователь не введёт пароль (используя [p]) все пункты меню с опцией «lock» будут недоступны:
color light-blue/blue light-red/red
timeout 10
default /default
Команда password тоже может быть использована для защиты отдельных пунктов, Например:
title.
password password2
Каждому пункту загрузки можно назначить разный пароль, простой или зашифрованный.
Использование подменю
Используя команду configfile мы можем наделать много вложенных меню, указав ей имя конфигурационного файла, который вы намерены грузить. Например: menu.lst содержит:
Источник
Grub4Dos является весьма гибким и эффективным загрузчиком, причём самых разных операционных систем, их установочных дистрибутивов и т.п.
Однако чтобы указать Grub4Dos, что именно требуется загрузить, необходимо сформировать специальный файл меню. О нём и пойдёт речь в данном материале.
Файл Grub4dos menu носит имя menu.lst и располагается зачастую в той же директории, где и сам загрузчик. Формат данного файла текстовый, а кодировка UTF-8. Исключая случаи, когда необходимо выводить русскоязычные пункты меню, в этом случае кодировка иная. В самом файле располагаются команды, вписанные блоками в несколько строк подряд, запускающие и передающие те или иные команды непосредственно загрузчику Grub4dos.
Grub4dos menu –загрузочные команды
Наиболее распространённые команды для Grub4dos вы можете подчеркнуть из описываемого файла, который находится в папке sample дистрибутива загрузчика. Как скачать сам дистрибутив Груб4Дос – описывается в соответствующей статье.
Там представлено довольно много команд, давайте рассмотрим наиболее типовые, что вам могут пригодиться.
Приведённая команда работает следующим образом: в оперативную память загружается некий образ 0PE.ISO, что располагается в корне носителя, где и сам загрузчик Grub4dos, и уже с него происходит дальнейшая загрузка (при наличии загрузочной области).
Данная команда является весьма универсальной, потому то добрая половина примеров приведена с этой командой, изменён лишь title – данный заголовок выводится в загрузочном меню Grub4dos, дабы можно было легко сориентироваться, что именно загружать, и соответственно указан другой ISO образ (обратите внимание, в команде он указывается в двух местах).
Т.е. если вы укажете таким же образом установочный образ Windows 7, 8 (8.1), 10, то он будет загружен и с него будет произведена установка ОС.
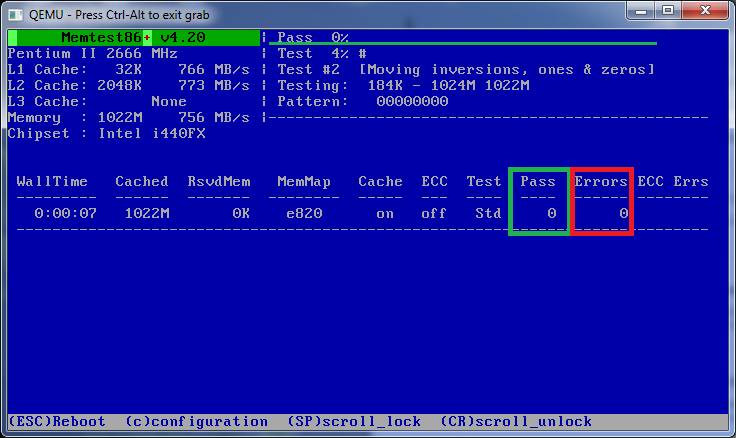
Таким же образом может быть загружен любой другой загрузочный ISO образ, на котором могут располагаться диагностические утилиты, к примеру, Memtest86+, Victoria и т.д.
Необходимо сказать о нескольких нюансах:
Из других полезных команд можно ответить:
Данная команда осуществляет поиск и загрузку установленной на компьютер операционной системы Windows NT, 2000, XP. Ныне данные системы можно встретить не часто, в основном на старых компьютерах.
А вот актуальная команда, она делает ровно тоже, что и предыдущая, но уже в случае обнаружения на компьютере Windows Vista, 7, 8 (8.1), 10. Причём команда составлена таким образом, что при отсутствии какой-либо ОС семейства Windows, данный пункт не будет показан вовсе в Grub4dos menu.
А вот и две простые, но не менее нужные команды – перезагрузка компьютера и выключение оного через меню.
Также в файле представлены примеры, позволяющие загрузить ОС Linux и различных сборок на её основе.
В свою очередь, Вы тоже можете нам очень помочь.
Просто поделитесь статьей в социальных сетях и мессенджерах с друзьями.
Поделившись результатами труда автора, вы окажете неоценимую помощь как ему самому, так и сайту в целом. Спасибо!
Источник
My work & My actions & My opinion
Страницы
5 февраля 2012 г.
Статья изменена 02.02.2013:
Добавлен пример загрузки WinPE на примере HBCD. Поправлены ссылки.
А теперь обо всем подробней.
1. Откроем через AkelPad menu.lst и удаляем все содержимое.
2. Добавим пункт меню «Загрузка с жесткого диска HD0»:
Примечание: если выбрать этот пункт, то скорей всего произойдет загрузка нашей флешки, так и должно быть, но многое зависит от вашего BIOS. Подробнее
title Boot HDD0
chainloader (hd0)+1
rootnoverify (hd0)
title Boot HDD1
chainloader (hd1)+1
rootnoverify (hd1)
title Boot Floppy
chainloader (fd0)+1
rootnoverify (fd0)
title Hiren’s BootCD 15.1
configfile /HBCD/menu.lst
title Mini Windows Xp HBCD
chainloader /HBCD/XP/XP.BIN
Дальше украсим наше загрузочное меню, используя одну из тем GfxMenu, хотя можно работать и без этих украшений. Так же покажу как сделать загрузочную флешку с установкой Windows.
При копировании статьи просьба указывать источник и автора.
С уважением, GRomR1.
Источник
Для начала мы должны иметь флешку или внешний жесткий диск с установленным на него загрузчиком grub4dos, если еще не имеем, то перейдем к руководству, как это сделать — http://nikiton21.ru/blog/post/bootice-flash
И естесственно закинем все необходимые файлы для загрузки — http://nikiton21.ru/blog/post/grub4dos-google
Для надежности можно проверить работоспособность загрузчика — http://nikiton21.ru/blog/post/grub4dos-load-test
Можно начинать, примеры использования menu.lst ниже:
Файл menu.lst начинается с данных строк:
timeout 30
default /default
gfxmenu (hd0,0)/gfxmenu
где таймаут — это задержка перед выполнением пункта (если не нажать клавишу), дефолт — он везде дефолт, а вот третий пункт интереснее — он содержит графическое окружение. Без него наш grub будет работать в консольном режиме — разницы, практически, никакой, но мне приятнее смотреть на графический интерфейс + таким образом я получаю возможность отображения кириллицы в пунктах меню. hd0,0 — это всегда то устройство, с которого осуществляется загрузка.
Картинка splashimage grub4dos
splashimage /menu/pic/main.xpm.gzСвой шрифт меню grub4dos
/menu/fonts/graphfont /menu/fonts/8x16_866.psfУстановка цвета меню grub4dos
color black/cyan yellow/cyanУстановка по умолчанию пункта меню
#default /windefault
default 2
Раз уж пошла речь про разделение, то давайте создадим подменю, специально для разных разрядностей наших образов семерки. На флешке уже должен быть файл menu_win7.lst — ознакомившись с его структурой, вы сами поймете что к чему. Но как к нему перейти? Магическая строка в menu.lst творит чудеса
title Установка Windows 7 SP1 (x86-x64, RUS-ENG)
find --set-root /menu/menu_win7.lst
configfile /menu/menu_win7.lst
Ниже меню для прямой загрузки с ISO образа без записи в память ПК образа
title Загрузка Windows 7 PE (Live CD)
map /IMG/WIN7PE.ISO (hd32)
map (hd0) (hd1)
map (hd1) (hd0)
map --hook
chainloader (hd32)
Сразу хочется предупредить про
hd32 — это для образов, объемом менее 4 гб
0xff — я так понимаю что с поддержкой файлов более 4 гб.
Загрузка с дискеты, floppy дисковода
title Загрузка с дискеты
chainloader (fd0)+1
rootnoverify (fd0)
savedefault --wait=2
Загрузка с CD/DVD-рома
title Загрузка с CD/DVD
cdrom --init
map --hook
chainloader (cd0)
Перезагрузка
title Перезагрузка
savedefault --wait=2
reboot
Выключение
title Выключение
halt
Найти и загрузить NTLDR загрузчик Windows NT/2K/XP
title Загрузчик NTLDR (NT/2K/XP)
find --set-root --ignore-floppies --ignore-cd /ntldr
map () (hd0)
map (hd0) ()
map --rehook
find --set-root --ignore-floppies --ignore-cd /ntldr
chainloader /ntldr
savedefault --wait=2
Найти и загрузить BOOTMGR загрузчик Windows Vista/7/8
title Загрузчик BOOTMGR (Vista/7/8)
find --set-root --ignore-floppies --ignore-cd /bootmgr
map () (hd0)
map (hd0) ()
map --rehook
find --set-root --ignore-floppies --ignore-cd /bootmgr
chainloader /bootmgr
savedefault --wait=2
Найти и загрузить IO.SYS загрузчик Windows 9x/Me
title Загрузчик IO.SYS (9x/Me)
find --set-root /io.sys
chainloader /io.sys
savedefault --wait=2
Установка Windows XP из ISO образа на загрузочном носителе (флешке, usb-hdd) — в 2 этапа. Образ грузится в память.
title 1.1 ->> XP setup from iso
find --set-root /ISO/XP/XP.iso
#map (hd0) (hd1)
#map (hd1) (hd0)
map --mem /ISO/img/firadisk.ima (fd1)
map --mem (md)0x6000+800 (fd0)
map /ISO/XP/XP.iso (0xfe)
map --hook
dd if=(fd1) of=(fd0) count=1
chainloader (0xff)

title 1.2 ->> Continue XP setup
find --set-root /ISO/XP/XP.iso
#map (hd0) (hd1)
#map (hd1) (hd0)
map --mem /ISO/XP/XP.iso (0xff)
map --hook
chainloader (hd0)+1
Запуск Windows XP с 1 раздела
title Windows XP с 1 раздела
ntldr/ntdetect.com won't start if are not on first disk, first active partition, thus the mapping

#map (hd0) (hd1)

#map (hd1) (hd0)
map --hook
rootnoverify (hd0,0)
chainloader /ntldr
Запуск Windows XP со 2 раздела
title Windows XP со 2 раздела
ntldr/ntdetect.com won't start if are not on first disk, first active partition, thus the mapping

#map (hd0) (hd1)

#map (hd1) (hd0)
map --hook
rootnoverify (hd0,1)
chainloader /ntldr
Запуск Windows с HDD (первой попавшейся)
title Запуск Windows с HDD
rootnoverify (hd0,0)
chainloader (hd0,0)+1
Запуск установки Windows 7 c ISO образа с загрузочного носителся — потребуются дополнительные действия по монтированию образа при необходимости (Sift+F10 и т.д. ну народ в курсе) — Образ не грузится в память, как думают некоторые.
title Windows 7 install by nikiton21.ru
map  /ISO/L/nikiton21_live.iso (hd32)
#map (hd1) (hd0)
#map (hd0) (hd1)
map --hook
chainloader (hd32)
Запуск Aklid Live USB/CD (с распакованного)
title Aklid Live USB full 28.08.2010
find --set-root /minint/setupldr.bin
chainloader /minint/setupldr.bin
Запуск Aklid Live USB/CD с ISO образа на диске — образ мапится в память
title Alkid Live CD USB full 2010.08.28 from iso
map --mem /ISO/img/firadisk.gz (fd0)
map --mem /ISO/L/alkid.live.cd.usb.full.2010.08.28.iso (hd32)
map --hook
chainloader (hd32)
Запуск Live USB/CD основанных на WIM — образы мапятся напрямую, не в память. (xalex, Sonya, VasAlex, zhuk, nikiton21)
title Live CD/USB WIM Edition
map /ISO/L/Live.iso (hd32)
map --hook
chainloader (hd32)
Запуск систем с образов Floppy — дисководов
title Boot floppy MS-DOS 8.0 from Windows Melenium
map --mem /ISO/L/winme.ima (fd0)
map --hook
chainloader (fd0)+1
rootnoverify (fd0)
Запуск Kaspersky Rescue live
title Kaspersky Rescue live 25.11.2010
map --mem /rescue/rescue.iso (hd32)
map --hook
chainloader (hd32)
Запуск Reset Windows Password
title Reset Windows Password SE
map --mem /ISO/img/firadisk.gz (fd0)
map --mem /ISO/L/rwps.iso (hd32)
map --hook
chainloader (hd32)
MemTest86+
title MemTest86+ 4.0
find --set-root /ISO/img/memtest.img
map --mem /ISO/img/memtest.img (fd0)
map --hook
chainloader (fd0)+1
Victoria 3.52c ru
title Victoria 3.52c ru
find --set-root --ignore-floppies /ISO/img/victoria.ima.gz
map --mem /ISO/img/victoria.ima.gz (fd0)
map --hook
chainloader (fd0)+1
rootnoverify (fd0)
Установка Ubuntu-server 9.10 с ISO образа с флешки или usb-hdd — образ должен находиться в корне. Файлы для установки с ISO образов: boot.img.gz initrd.gz vmlinuz берутя отсюда: http://archive.ubuntu.com/ubuntu/dists/
title Ubuntu 9.10 (Karmic) Server X86
kernel /boot/karmic/i386/vmlinuz file=/cdrom/preseed/ubuntu-server.seed boot=install splash locale=ru_RU
initrd /boot/karmic/i386/initrd.gz
Запуск Ubuntu Desctop и установка с ISO образа на флешке или usb-hdd
title Ubuntu 9.10 Desktop X86 Live
find --set-root /ISO/U/ubuntu-9.10-desktop-i386.iso
map /ISO/U/ubuntu-9.10-desktop-i386.iso (hd32)
map --hook
root (hd32)
kernel /casper/vmlinuz file=/cdrom/preseed/ubuntu.seed boot=casper persistent iso-scan/filename=/ISO/U/ubuntu-9.10-desktop-i386.iso splash locale=ru_RU
initrd /casper/initrd.lz
Запуск консоли восстановления XP из ISO образа на флешке
title Windows XP Recovery RUS
map --mem /ISO/img/firadisk.ima (fd0)
map --mem /ISO/console/rcxpsp3.iso (hd32)
map --hook
chainloader (hd32)

title Windows XP Recovery ENG
find --set-root /ISO/console/RecoveryCD.iso
map --mem /ISO/img/firadisk.ima (fd1)
map --mem (md)0x6000+800 (fd0)
map --mem /ISO/console/RecoveryCD.iso (0xff)
map --hook
chainloader (0xff)
Запуск консоли восстановления для Windows Vista & 7 из ISO образа на флешке
title Vista & 7 Recovery Disk
map  --mem (hd0,0)/ISO/console/Vista_7_Recovery_Disc.iso (hd32)
map --hook
chainloader (hd32)
Второй этап установки при установке методом winsetup from usb (также запуск Windows XP)
title Second part setup XP
geometry (hd9) && configfile /BOOTWS/10.lst
geometry (hd8) && configfile /BOOTWS/9.lst
geometry (hd7) && configfile /BOOTWS/8.lst
geometry (hd6) && configfile /BOOTWS/7.lst
geometry (hd5) && configfile /BOOTWS/6.lst
geometry (hd4) && configfile /BOOTWS/5.lst
geometry (hd3) && configfile /BOOTWS/4.lst
geometry (hd2) && configfile /BOOTWS/3.lst
geometry (hd1) && configfile /BOOTWS/2.lst
geometry (hd0) && configfile /BOOTWS/1.lst
boot
Первый этап установки при установке методом winsetup from usb
title Windows XP setup 1 part
map --unmap=0:0xff
map --unhook
map --mem (hd0,0)/WINSETUP/XPpSP3.ISO (0xff)
savedefault 2
checkrange 0x00,0x01 read 0x8280 && configfile /BOOTWS/fd.lst
geometry (hd9) && configfile /BOOTWS/10.lst
geometry (hd8) && configfile /BOOTWS/9.lst
geometry (hd7) && configfile /BOOTWS/8.lst
geometry (hd6) && configfile /BOOTWS/7.lst
geometry (hd5) && configfile /BOOTWS/6.lst
geometry (hd4) && configfile /BOOTWS/5.lst
geometry (hd3) && configfile /BOOTWS/4.lst
geometry (hd2) && configfile /BOOTWS/3.lst
geometry (hd1) && configfile /BOOTWS/2.lst
geometry (hd0) && configfile /BOOTWS/1.lst
boot
map --unmap=0:0xff
map --unhook
Установка Mandriva с распакованного дистрибутива
title Mandriva Install
kernel (hd0,0)/boot/vmlinuz root=/dev/ram3 vga=791
initrd (hd0,0)/boot/all.rdz
Вот еще:
title Victoria 3.5 (RUS)
map /IMG/VICTORIA.ISO (hd32)
map (hd0) (hd1)
map (hd1) (hd0)
map --hook
chainloader (hd32)

title mHDD 4.6
map /IMG/MHDD.ISO (hd32)
map (hd0) (hd1)
map (hd1) (hd0)
map --hook
chainloader (hd32)

title HDD Regenerator
root (hd0,0)
map --mem /IMG/HDDREG.GZ (0xff)
map --hook
chainloader (0xff)

title MemTest86+
root (hd0,0)
kernel /IMG/MEMTEST.BIN

title QuickTech Pro 5.80
map /IMG/QTPRO.ISO (hd32)
map (hd0) (hd1)
map (hd1) (hd0)
map --hook
chainloader (hd32)

title Установка Windows 7 SP1 x64
map --mem (md)0x800+4 (99)
map /img/Win7_x64.iso (0xff)
map (hd0) (hd1)
map (hd1) (hd0)
map --hook
write (99) [FiraDisk]nStartOptions=cdrom,vmem=find:/img/Win7_x64.iso;n
chainloader (0xff)

title Load CMLDR, the Recovery Console NT/2K/XP # Запуск консоли восстановления Windows XP

#map (hd0) (hd1)
#map (hd1) (hd0)
find --set-root --ignore-floppies /cmldr
chainloader /cmldr
#####################################################################
# write string "cmdcons" to memory 0000:7C03 in 2 steps:
#####################################################################
# step 1. Write 4 chars "cmdc" at 0000:7C03
write 0x7C03 0x63646D63
# step 2. Write 3 chars "ons" and an ending null at 0000:7C07
write 0x7C07 0x00736E6F

#Рабочий вариант английской версии
#title Acronis Disk Director
#root (hd0,0)
#kernel /ISO/H/AcronisDD/kernel.dat append ramdisk_size=91455 vga=791 quiet
#initrd /ISO/H/AcronisDD/ramdisk.dat
#title Acronis DD & B&R
#find --set-root /ISO/H/Acronis-10-MultiBootCD.iso
#map /ISO/H/Acronis-10-MultiBootCD.iso (0xff) || map --mem /ISO/H/Acronis-10-MultiBootCD.iso (0xff)
#map --hook
#chainloader (0xff)

title Acronis TT & DD 11 [RUS]
find --set-root /ISO/H/Acronis_TI+DD_home_11_rus_linux.iso
map /ISO/H/Acronis_TI+DD_home_11_rus_linux.iso (0xff) || map --mem /ISO/H/Acronis_TI+DD_home_11_rus_linux.iso (0xff)
map --hook
chainloader (0xff)

title Gparted live v0.7.0-4
map --mem /ISO/img/firadisk.gz (fd0)
map --mem /ISO/H/gparted-live-0.7.0-4.iso (hd32)
map --hook
chainloader (hd32)
title Start EASEUS PM 6.1.1 PE
map --mem /ISO/H/EASEUS.Partition.Master.6.1.1.Professional.iso (hd32)
map --hook
chainloader (hd32)

title Active Partition Recovery 3.0
map --mem /ISO/H/precover.gz (fd0)
map --hook
chainloader (fd0)+1
rootnoverify (fd0)
map --floppies=1

title Symantec Ghost 11 Corp
find --set-root --ignore-floppies /ISO/H/Ghost11502113.ima.gz
map --mem /ISO/H/Ghost11502113.ima.gz (fd0)
map --hook
chainloader (fd0)+1
rootnoverify (fd0)

#title Ghost 11.5
#map --mem /ISO/H/Ghost.iso (hd32)
#map --hook
#chainloader (hd32)

title Boot Disk Image
map (hd0,0)/win98.ima (fd0)
map --hook
chainloader (fd0)+1
rootnoverify (fd0)
map --floppies=1

title Boot from ISO
map (device)/path/file.iso (0xFF)
map --hook
root (0xFF)
chainloader (0xFF)
boot

title Acronis DD 11 And B&R 10
find --set-root /AcronisMedia.iso
map /AcronisMedia.iso (0xff) || map --mem /AcronisMedia.iso (0xff)
map --hook
chainloader (0xff)

title slax 6.1.2
map /ISO/slax-6.1.2.iso (0xff) || map --mem /ISO/slax-6.1.2.iso (0xff)
map --hook
root (0xff)
kernel  /boot/vmlinuz from=/ISO/slax-6.1.2.iso ramdisk_size=6666 root=/dev/ram0 rw
initrd /boot/initrd.gz

title slax-Russian-7.0.8-i486 - terminal console
map /slax-Russian-7.0.8-i486.iso (0xff) || map --mem /slax-Russian-7.0.8-i486.iso (0xff)
map --hook
root (0xff)
kernel  /slax/boot/vmlinuz from=/slax-Russian-7.0.8-i486.iso ramdisk_size=6666 root=/dev/ram0 rw
initrd /slax/boot/initrfs.img

title slax-Russian-7.0.8-i486 - KDE desktop
map /slax-Russian-7.0.8-i486.iso (0xff) || map --mem /slax-Russian-7.0.8-i486.iso (0xff)
map --hook
root (0xff)
kernel  /slax/boot/vmlinuz from=/slax-Russian-7.0.8-i486.iso vga=normal load_ramdisk=1 prompt_ramdisk=0 rw printk.time=0 slax.flags=xmode
initrd /slax/boot/initrfs.img
menu.lst — примеры использования меню grub4dos
Опубликовано в grub4dos, Системное администрирование 30.11.2016 38403
Для начала мы должны иметь флешку или внешний жесткий диск с установленным на него загрузчиком grub4dos, если еще не имеем, то перейдем к руководству, как это сделать — http://nikiton21.ru/blog/post/bootice-flash
И естесственно закинем все необходимые файлы для загрузки — http://nikiton21.ru/blog/post/grub4dos-google
Для надежности можно проверить работоспособность загрузчика — http://nikiton21.ru/blog/post/grub4dos-load-test
Можно начинать, примеры использования menu.lst ниже:
- Файл menu.lst начинается с данных строк:
timeout 30
default /default
gfxmenu (hd0,0)/gfxmenu
где таймаут — это задержка перед выполнением пункта (если не нажать клавишу), дефолт — он везде дефолт, а вот третий пункт интереснее — он содержит графическое окружение. Без него наш grub будет работать в консольном режиме — разницы, практически, никакой, но мне приятнее смотреть на графический интерфейс + таким образом я получаю возможность отображения кириллицы в пунктах меню. hd0,0 — это всегда то устройство, с которого осуществляется загрузка.
- Картинка splashimage grub4dos
splashimage /menu/pic/main.xpm.gz
- Свой шрифт меню grub4dos
/menu/fonts/graphfont /menu/fonts/8x16_866.psf
- Установка цвета меню grub4dos
color black/cyan yellow/cyan
- Установка по умолчанию пункта меню
#default /windefault
default 2
- Раз уж пошла речь про разделение, то давайте создадим подменю, специально для разных разрядностей наших образов семерки. На флешке уже должен быть файл menu_win7.lst — ознакомившись с его структурой, вы сами поймете что к чему. Но как к нему перейти? Магическая строка в menu.lst творит чудеса
title Установка Windows 7 SP1 (x86-x64, RUS-ENG)
find —set-root /menu/menu_win7.lst
configfile /menu/menu_win7.lst
- Ниже меню для прямой загрузки с ISO образа без записи в память ПК образа
title Загрузка Windows 7 PE (Live CD)
map /IMG/WIN7PE.ISO (hd32)
map (hd0) (hd1)
map (hd1) (hd0)
map —hook
chainloader (hd32)
Сразу хочется предупредить про hd32 — это для образов, объемом менее 4 гб 0xff — я так понимаю что с поддержкой файлов более 4 гб.
- Загрузка с дискеты, floppy дисковода
title Загрузка с дискеты
chainloader (fd0)+1
rootnoverify (fd0)
savedefault —wait=2
- Загрузка с CD/DVD-рома
title Загрузка с CD/DVD
cdrom —init
map —hook
chainloader (cd0)
- Перезагрузка
title Перезагрузка
savedefault —wait=2
reboot
- Выключение
title Выключение
halt
- Найти и загрузить NTLDR загрузчик Windows NT/2K/XP
title Загрузчик NTLDR (NT/2K/XP)
find —set-root —ignore-floppies —ignore-cd /ntldr
map () (hd0)
map (hd0) ()
map —rehook
find —set-root —ignore-floppies —ignore-cd /ntldr
chainloader /ntldr
savedefault —wait=2
- Найти и загрузить BOOTMGR загрузчик Windows Vista/7/8
title Загрузчик BOOTMGR (Vista/7/8)
find —set-root —ignore-floppies —ignore-cd /bootmgr
map () (hd0)
map (hd0) ()
map —rehook
find —set-root —ignore-floppies —ignore-cd /bootmgr
chainloader /bootmgr
savedefault —wait=2
- Найти и загрузить IO.SYS загрузчик Windows 9x/Me
title Загрузчик IO.SYS (9x/Me)
find —set-root /io.sys
chainloader /io.sys
savedefault —wait=2
- Установка Windows XP из ISO образа на загрузочном носителе (флешке, usb-hdd) — в 2 этапа. Образ грузится в память.
title 1.1 ->> XP setup from iso
find —set-root /ISO/XP/XP.iso
#map (hd0) (hd1)
#map (hd1) (hd0)
map —mem /ISO/img/firadisk.ima (fd1)
map —mem (md)0x6000+800 (fd0)
map /ISO/XP/XP.iso (0xfe)
map —hook
dd if=(fd1) of=(fd0) count=1
chainloader (0xff)
title 1.2 ->> Continue XP setup
find —set-root /ISO/XP/XP.iso
#map (hd0) (hd1)
#map (hd1) (hd0)
map —mem /ISO/XP/XP.iso (0xff)
map —hook
chainloader (hd0)+1
- Запуск Windows XP с 1 раздела
title Windows XP с 1 раздела
ntldr/ntdetect.com won’t start if are not on first disk, first active partition, thus the mapping
#map (hd0) (hd1)
#map (hd1) (hd0)
map —hook
rootnoverify (hd0,0)
chainloader /ntldr
- Запуск Windows XP со 2 раздела
title Windows XP со 2 раздела
ntldr/ntdetect.com won’t start if are not on first disk, first active partition, thus the mapping
#map (hd0) (hd1)
#map (hd1) (hd0)
map —hook
rootnoverify (hd0,1)
chainloader /ntldr
- Запуск Windows с HDD (первой попавшейся)
title Запуск Windows с HDD
rootnoverify (hd0,0)
chainloader (hd0,0)+1
- Запуск установки Windows 7 c ISO образа с загрузочного носителся — потребуются дополнительные действия по монтированию образа при необходимости (Sift+F10 и т.д. ну народ в курсе) — Образ не грузится в память, как думают некоторые.
title Windows 7 install by nikiton21.ru
map /ISO/L/nikiton21_live.iso (hd32)
#map (hd1) (hd0)
#map (hd0) (hd1)
map —hook
chainloader (hd32)
- Запуск Aklid Live USB/CD (с распакованного)
title Aklid Live USB full 28.08.2010
find —set-root /minint/setupldr.bin
chainloader /minint/setupldr.bin
- Запуск Aklid Live USB/CD с ISO образа на диске — образ мапится в память
title Alkid Live CD USB full 2010.08.28 from iso
map —mem /ISO/img/firadisk.gz (fd0)
map —mem /ISO/L/alkid.live.cd.usb.full.2010.08.28.iso (hd32)
map —hook
chainloader (hd32)
- Запуск Live USB/CD основанных на WIM — образы мапятся напрямую, не в память. (xalex, Sonya, VasAlex, zhuk, nikiton21)
title Live CD/USB WIM Edition
map /ISO/L/Live.iso (hd32)
map —hook
chainloader (hd32)
- Запуск систем с образов Floppy — дисководов
title Boot floppy MS-DOS 8.0 from Windows Melenium
map —mem /ISO/L/winme.ima (fd0)
map —hook
chainloader (fd0)+1
rootnoverify (fd0)
- Запуск Kaspersky Rescue live
title Kaspersky Rescue live 25.11.2010
map —mem /rescue/rescue.iso (hd32)
map —hook
chainloader (hd32)
- Запуск Reset Windows Password
title Reset Windows Password SE
map —mem /ISO/img/firadisk.gz (fd0)
map —mem /ISO/L/rwps.iso (hd32)
map —hook
chainloader (hd32)
- MemTest86+
title MemTest86+ 4.0
find —set-root /ISO/img/memtest.img
map —mem /ISO/img/memtest.img (fd0)
map —hook
chainloader (fd0)+1
- Victoria 3.52c ru
title Victoria 3.52c ru
find —set-root —ignore-floppies /ISO/img/victoria.ima.gz
map —mem /ISO/img/victoria.ima.gz (fd0)
map —hook
chainloader (fd0)+1
rootnoverify (fd0)
- Установка Ubuntu-server 9.10 с ISO образа с флешки или usb-hdd — образ должен находиться в корне. Файлы для установки с ISO образов: boot.img.gz initrd.gz vmlinuz берутя отсюда: http://archive.ubuntu.com/ubuntu/dists/
title Ubuntu 9.10 (Karmic) Server X86
kernel /boot/karmic/i386/vmlinuz file=/cdrom/preseed/ubuntu-server.seed boot=install splash locale=ru_RU
initrd /boot/karmic/i386/initrd.gz
- Запуск Ubuntu Desctop и установка с ISO образа на флешке или usb-hdd
title Ubuntu 9.10 Desktop X86 Live
find —set-root /ISO/U/ubuntu-9.10-desktop-i386.iso
map /ISO/U/ubuntu-9.10-desktop-i386.iso (hd32)
map —hook
root (hd32)
kernel /casper/vmlinuz file=/cdrom/preseed/ubuntu.seed boot=casper persistent iso-scan/filename=/ISO/U/ubuntu-9.10-desktop-i386.iso splash locale=ru_RU
initrd /casper/initrd.lz
- Запуск консоли восстановления XP из ISO образа на флешке
title Windows XP Recovery RUS
map —mem /ISO/img/firadisk.ima (fd0)
map —mem /ISO/console/rcxpsp3.iso (hd32)
map —hook
chainloader (hd32)
title Windows XP Recovery ENG
find —set-root /ISO/console/RecoveryCD.iso
map —mem /ISO/img/firadisk.ima (fd1)
map —mem (md)0x6000+800 (fd0)
map —mem /ISO/console/RecoveryCD.iso (0xff)
map —hook
chainloader (0xff)
- Запуск консоли восстановления для Windows Vista & 7 из ISO образа на флешке
title Vista & 7 Recovery Disk
map —mem (hd0,0)/ISO/console/Vista_7_Recovery_Disc.iso (hd32)
map —hook
chainloader (hd32)
- Второй этап установки при установке методом winsetup from usb (также запуск Windows XP)
title Second part setup XP
geometry (hd9) && configfile /BOOTWS/10.lst
geometry (hd8) && configfile /BOOTWS/9.lst
geometry (hd7) && configfile /BOOTWS/8.lst
geometry (hd6) && configfile /BOOTWS/7.lst
geometry (hd5) && configfile /BOOTWS/6.lst
geometry (hd4) && configfile /BOOTWS/5.lst
geometry (hd3) && configfile /BOOTWS/4.lst
geometry (hd2) && configfile /BOOTWS/3.lst
geometry (hd1) && configfile /BOOTWS/2.lst
geometry (hd0) && configfile /BOOTWS/1.lst
boot
- Первый этап установки при установке методом winsetup from usb
title Windows XP setup 1 part
map —unmap=0:0xff
map —unhook
map —mem (hd0,0)/WINSETUP/XPpSP3.ISO (0xff)
savedefault 2
checkrange 0x00,0x01 read 0x8280 && configfile /BOOTWS/fd.lst
geometry (hd9) && configfile /BOOTWS/10.lst
geometry (hd8) && configfile /BOOTWS/9.lst
geometry (hd7) && configfile /BOOTWS/8.lst
geometry (hd6) && configfile /BOOTWS/7.lst
geometry (hd5) && configfile /BOOTWS/6.lst
geometry (hd4) && configfile /BOOTWS/5.lst
geometry (hd3) && configfile /BOOTWS/4.lst
geometry (hd2) && configfile /BOOTWS/3.lst
geometry (hd1) && configfile /BOOTWS/2.lst
geometry (hd0) && configfile /BOOTWS/1.lst
boot
map —unmap=0:0xff
map —unhook
- Установка Mandriva с распакованного дистрибутива
title Mandriva Install
kernel (hd0,0)/boot/vmlinuz root=/dev/ram3 vga=791
initrd (hd0,0)/boot/all.rdz
- Вот еще:
title Victoria 3.5 (RUS)
map /IMG/VICTORIA.ISO (hd32)
map (hd0) (hd1)
map (hd1) (hd0)
map —hook
chainloader (hd32)
title mHDD 4.6
map /IMG/MHDD.ISO (hd32)
map (hd0) (hd1)
map (hd1) (hd0)
map —hook
chainloader (hd32)
title HDD Regenerator
root (hd0,0)
map —mem /IMG/HDDREG.GZ (0xff)
map —hook
chainloader (0xff)
title MemTest86+
root (hd0,0)
kernel /IMG/MEMTEST.BIN
title QuickTech Pro 5.80
map /IMG/QTPRO.ISO (hd32)
map (hd0) (hd1)
map (hd1) (hd0)
map —hook
chainloader (hd32)
title Установка Windows 7 SP1 x64
map —mem (md)0x800+4 (99)
map /img/Win7_x64.iso (0xff)
map (hd0) (hd1)
map (hd1) (hd0)
map —hook
write (99) [FiraDisk]nStartOptions=cdrom,vmem=find:/img/Win7_x64.iso;n
chainloader (0xff)
title Load CMLDR, the Recovery Console NT/2K/XP # Запуск консоли восстановления Windows XP
#map (hd0) (hd1)
#map (hd1) (hd0)
find —set-root —ignore-floppies /cmldr
chainloader /cmldr
#####################################################################
# write string «cmdcons» to memory 0000:7C03 in 2 steps:
#####################################################################
# step 1. Write 4 chars «cmdc» at 0000:7C03
write 0x7C03 0x63646D63
# step 2. Write 3 chars «ons» and an ending null at 0000:7C07
write 0x7C07 0x00736E6F
#Рабочий вариант английской версии
#title Acronis Disk Director
#root (hd0,0)
#kernel /ISO/H/AcronisDD/kernel.dat append ramdisk_size=91455 vga=791 quiet
#initrd /ISO/H/AcronisDD/ramdisk.dat
#title Acronis DD & B&R
#find —set-root /ISO/H/Acronis-10-MultiBootCD.iso
#map /ISO/H/Acronis-10-MultiBootCD.iso (0xff) || map —mem /ISO/H/Acronis-10-MultiBootCD.iso (0xff)
#map —hook
#chainloader (0xff)
title Acronis TT & DD 11 [RUS]
find —set-root /ISO/H/Acronis_TI+DD_home_11_rus_linux.iso
map /ISO/H/Acronis_TI+DD_home_11_rus_linux.iso (0xff) || map —mem /ISO/H/Acronis_TI+DD_home_11_rus_linux.iso (0xff)
map —hook
chainloader (0xff)
title Gparted live v0.7.0-4
map —mem /ISO/img/firadisk.gz (fd0)
map —mem /ISO/H/gparted-live-0.7.0-4.iso (hd32)
map —hook
chainloader (hd32)
title Start EASEUS PM 6.1.1 PE
map —mem /ISO/H/EASEUS.Partition.Master.6.1.1.Professional.iso (hd32)
map —hook
chainloader (hd32)
title Active Partition Recovery 3.0
map —mem /ISO/H/precover.gz (fd0)
map —hook
chainloader (fd0)+1
rootnoverify (fd0)
map —floppies=1
title Symantec Ghost 11 Corp
find —set-root —ignore-floppies /ISO/H/Ghost11502113.ima.gz
map —mem /ISO/H/Ghost11502113.ima.gz (fd0)
map —hook
chainloader (fd0)+1
rootnoverify (fd0)
#title Ghost 11.5
#map —mem /ISO/H/Ghost.iso (hd32)
#map —hook
#chainloader (hd32)
title Boot Disk Image
map (hd0,0)/win98.ima (fd0)
map —hook
chainloader (fd0)+1
rootnoverify (fd0)
map —floppies=1
title Boot from ISO
map (device)/path/file.iso (0xFF)
map —hook
root (0xFF)
chainloader (0xFF)
boot
title Acronis DD 11 And B&R 10
find —set-root /AcronisMedia.iso
map /AcronisMedia.iso (0xff) || map —mem /AcronisMedia.iso (0xff)
map —hook
chainloader (0xff)
title slax 6.1.2
map /ISO/slax-6.1.2.iso (0xff) || map —mem /ISO/slax-6.1.2.iso (0xff)
map —hook
root (0xff)
kernel /boot/vmlinuz from=/ISO/slax-6.1.2.iso ramdisk_size=6666 root=/dev/ram0 rw
initrd /boot/initrd.gz
title slax-Russian-7.0.8-i486 — terminal console
map /slax-Russian-7.0.8-i486.iso (0xff) || map —mem /slax-Russian-7.0.8-i486.iso (0xff)
map —hook
root (0xff)
kernel /slax/boot/vmlinuz from=/slax-Russian-7.0.8-i486.iso ramdisk_size=6666 root=/dev/ram0 rw
initrd /slax/boot/initrfs.img
title slax-Russian-7.0.8-i486 — KDE desktop
map /slax-Russian-7.0.8-i486.iso (0xff) || map —mem /slax-Russian-7.0.8-i486.iso (0xff)
map —hook
root (0xff)
kernel /slax/boot/vmlinuz from=/slax-Russian-7.0.8-i486.iso vga=normal load_ramdisk=1 prompt_ramdisk=0 rw printk.time=0 slax.flags=xmode
initrd /slax/boot/initrfs.img
В данном материале будет рассказано о быстром способе создания загрузочного Flash-драйва с минимумом усилий.
Будет подробно описан процесс подготовки, форматирования и записи универсального и мощного загрузчика Grub4Dos на флешку. С помощью этого загрузчика, который имеет открытый исходный код и поддерживается на подавляющем большинстве компьютеров (в том числе и старых – от ~2006 года выпуска) можно загрузить как различного рода диагностические утилиты, так и установку операционной системы с флешки.
Содержание:
- Подготовка Flash накопителя
- Форматирование флешки
- Запись загрузчика (загрузочной области)
- Конфигурация меню Grub4Dos
- Проверка работоспособности созданной загрузочной флешки
- Краткий итог
Подготовка Flash накопителя
Под подготовкой вашей флешки подразумевается копирование с неё всех важных данных, так как в последующем процессе форматирования, которое является обязательным условием для создания загрузочной флешки, все имеющиеся на ней данные будут безвозвратно удалены.
После создания загрузочной области на флеш-драйве вы сможете продолжать пользоваться ей и как обычным носителем данных: копировать и считывать с неё файлы и прочие данные. Записанная на неё загрузочная область при этом не пострадает. Вы всё также сможете грузиться с неё, запускать различные сервисные утилиты и устанавливать желаемую операционную систему.
Форматирование флешки
Форматирование и последующие процедуры мы будем проводить в довольно популярной утилите Bootice. Инструмент довольно мощный, но не стоит беспокоиться – все шаги будут подробно освещены.
Для начала нам необходимо её скачать, это можно сделать по данной ссылке.
Скачав архив, распакуйте его. Если у вас нет программы архиватора, то вы можете воспользоваться популярным решением под названием WinRAR.
После распаковки, запустите файл. В архиве представлен вариант программы как для 32 (x86) битной версии операционной системы, так и 64 (x64) битной.
Используйте тот вариант, который соответствует разрядности установленной в вашем случае операционной системы. Если вы затрудняетесь с определением разрядности установленной у вас операционной системы и соответственно запуском нужной версии, то данный материал вам поможет «Как узнать разрядность установленной операционной системы: 32bit или 64bit».
Сама программа портативная (не требует предварительной установки), что означает, что она готова к работе сразу после запуска исполняемого файла.
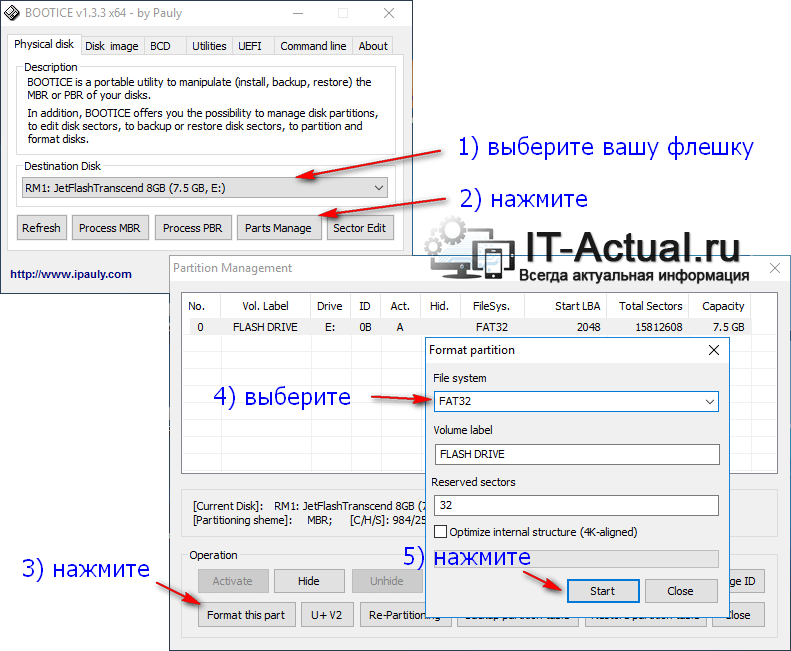
В открывшемся окне выберите ваш носитель, а после нажмите кнопку Parts Manage.
В результате будет отображено дополнительное окно, в котором вам необходимо будет нажать на кнопку Format this part. И в дополнительно появившемся окне обязательно указать a качестве файловой системы FAT32, остальные параметры можно оставить по умолчанию.
Для старта форматирования флеш-драйва нажмите клавишу Start.
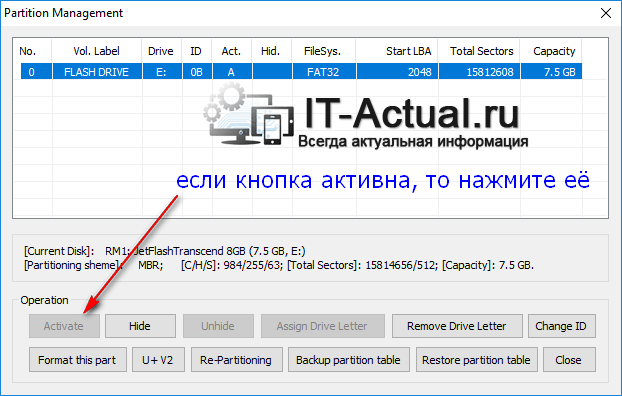
После форматирования проверьте, активен ли раздел. Если кнопка Activate неактивна (на неё нельзя нажать) в окне Partition Management, то всё хорошо. В противном случае нажмите на неё.
И так, раздел отформатирован и активен. Переходим к следующему шагу.
Запись загрузчика (загрузочной области)
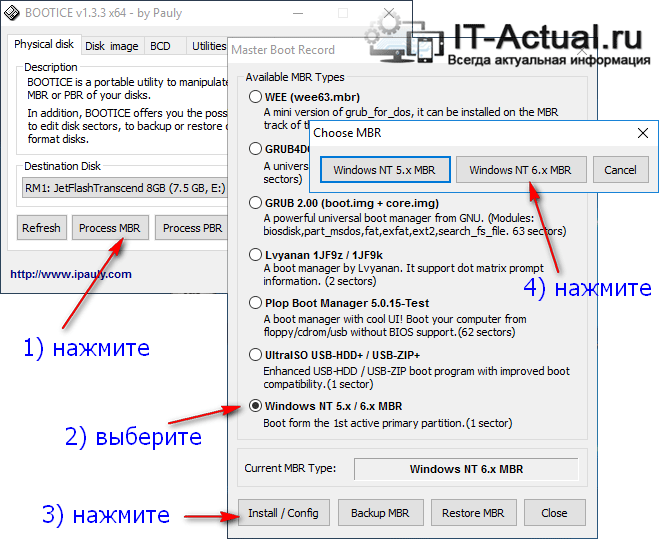
Находясь в главном окне программы, нажмите на кнопку Process MBR.
Будет открыто окно Master Boot Record, в нём выберите пункт Windows NT 5.x / 6.x MBR, а после нажмите кнопку Install / Config.
В открывшемся вспомогательном окне Choose MBR нажмите на кнопку Windows NT 6.x MBR.
В результате будет отображено сообщение об успешном проведении операции. Закройте это сообщение нажатием кнопки OK, а после и само окно Master Boot Record.
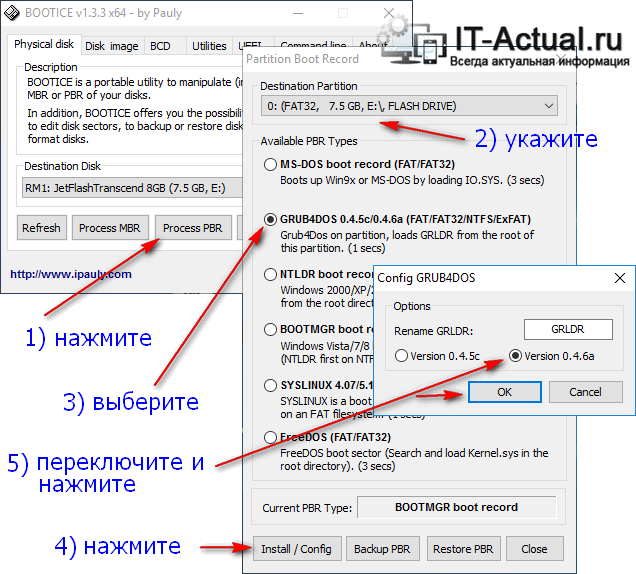
Вы вернётесь в главное окно программы, где теперь вам необходимо нажать кнопку Process PBR.
В отрывшемся окне Partition Boot Record необходимо указать раздел, с которого будет происходить загрузка. Проверьте, что этот раздел соответствует вашей флешке (определяется по размеру и имени).
А чуть ниже поставьте чекбокс (точку) у пункта GRUB4DOS 0.4.5c/0.4.6a (FAT/FAT32/NTFS/ExFAT) и нажмите на располагающуюся внизу клавишу Install / Config.
Будет открыто вспомогательное окно Config GRUB4DOS, в котором необходимо будет переключить опцию на пункт Version 0.4.6a, а после нажать кнопку OK.
Будет отображено информационное окно об успешном применении изменений. Закройте это окно и остальные, выйдите из программы Bootice.
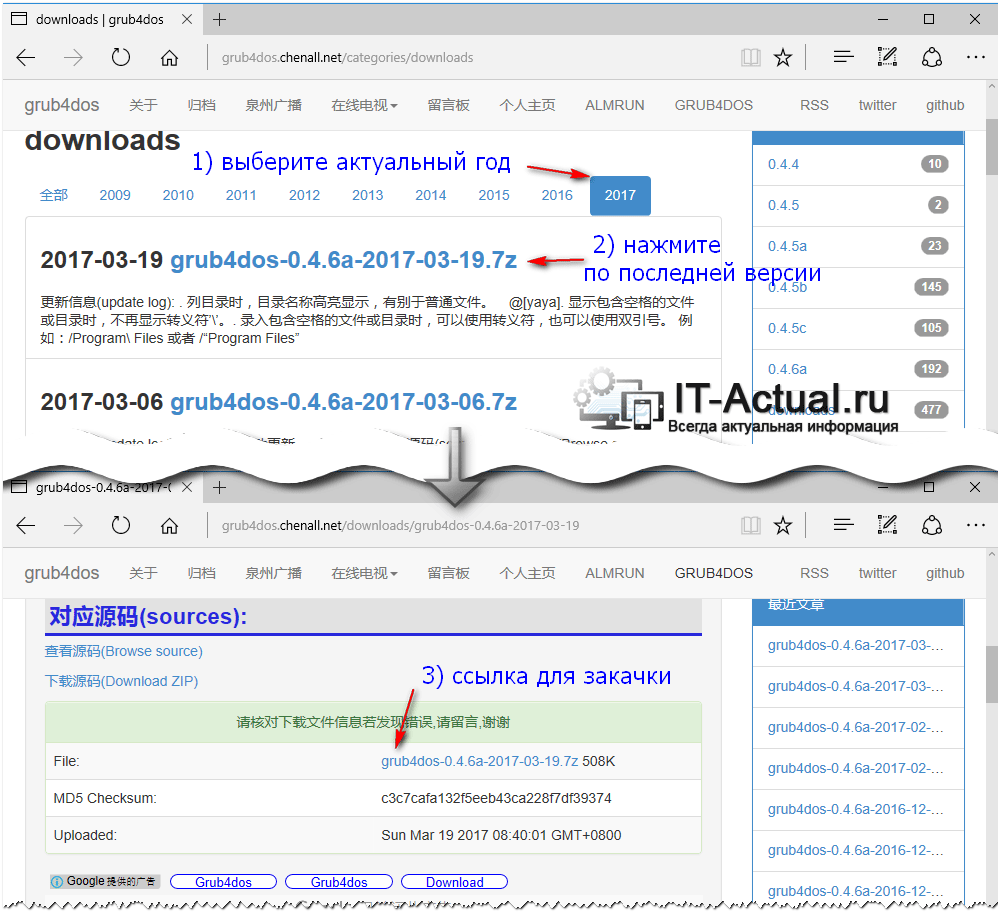
Теперь нам необходимо скачать сам загрузчик Grub4Dos. Его мы будет скачивать из официального репозитория.
Открыв сайт, скачайте последнюю версию. Для этого выберите текущий год, а после найдите в списке архив с самой свежей датой, и нажмите по нему.
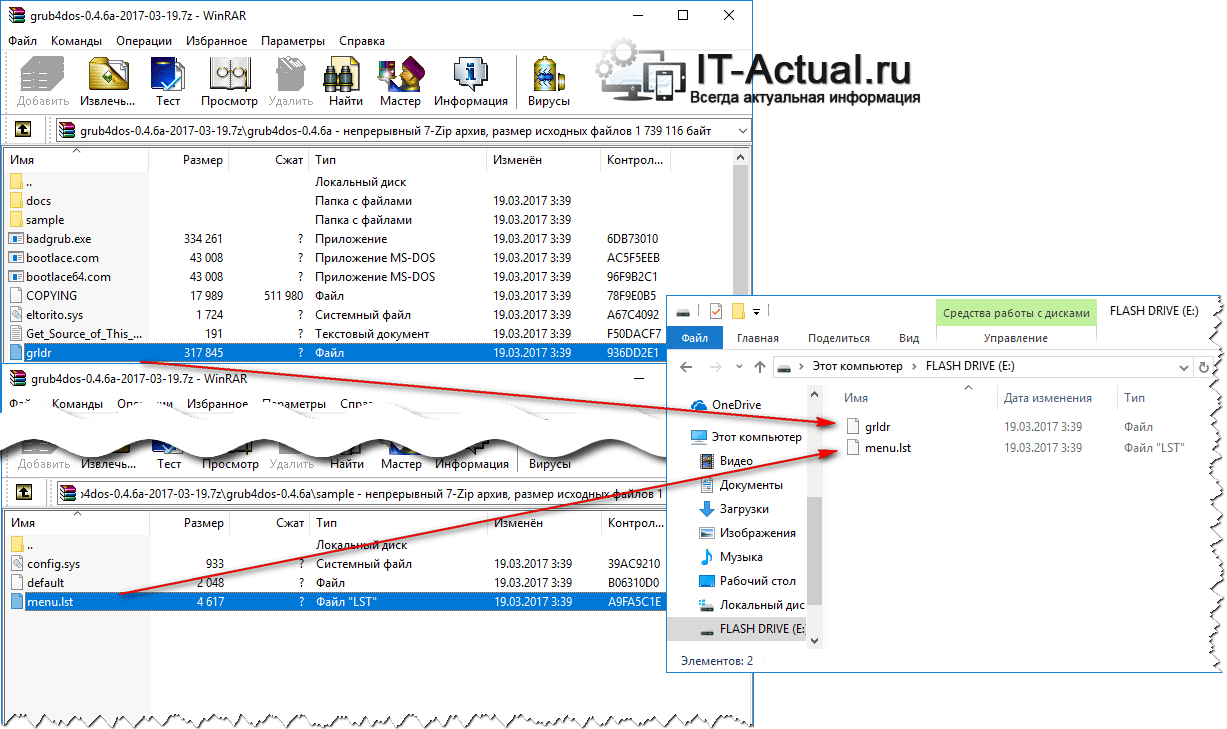
Откройте скачанный архив. Если у вас возникают трудности с его открытием, то вам поможет данный материал.
Из архива нам необходимо будет скопировать в корень загрузочной флешки только два файла – grldr (не имеет расширения) и menu.lst, который содержится в подпапке sample архива.
В рамках данной статьи едва ли возможно будет рассмотреть все «фишки» данного загрузчика. Однако про базовый функционал всё же стоит рассказать.
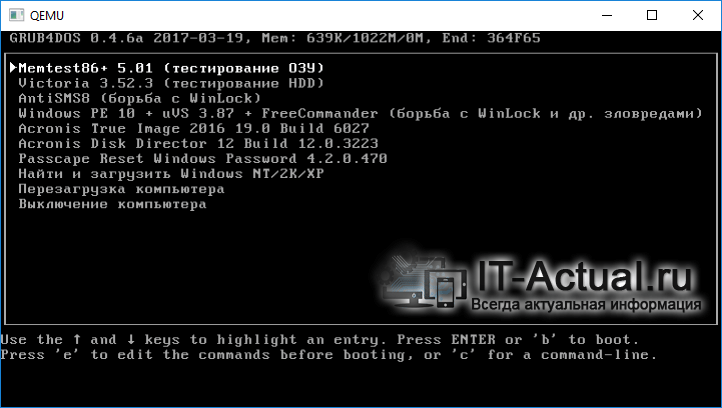
Автор данного материала в своё время создал диагностическую флешку с утилитами, которые вы можете видеть на изображении. По сей день данная флешка служит верой и правдой, и загружает необходимые мне утилиты на самом широком круге устройств.
Но вернёмся к конфигурированию меню Grub4Dos.
К примеру, вам необходимо установить Windows 7 (8.1, 10) с флешки. Просто скопируйте ISO образ (в примере он будет называться WinInstall.iso) дистрибутива Windows в предварительно созданную папку image на флешке, а после откройте menu.lst блокнотом или текстовым Notepad++ и внесите следующие строки:
title Install Windows
map /image/WinInstall.iso (0xFF) || map --mem /image/WinInstall.iso (0xFF)
map --hook
chainloader (0xFF)
По аналогии также можно добавлять LiveCD образы и диагностические загрузочные утилиты (сброс пароля, диагностика жёсткого диска, проверка оперативной памяти и т.д.), более подробно об этом читайте в статье «Grub4dos menu – как сделать, настроить».
О добавлении поддержки русского языка для пунктов загрузочного меню вы можете прочесть в статье «Русский язык (пункты меню) в Grub4Dos».
Проверка работоспособности созданной загрузочной флешки
Проще всего это сделать на компьютере, выбрав загрузку с Flash драйва в BIOS или нажав соответствующую клавишу при включении компьютера.
Универсального способа войти в меню, который бы работал на всех компьютерах, нет. Тут необходимо проявить смекалку.
Если у вас стационарный компьютер, то воспользовавшись статьёй Как узнать марку (модель) материнской платы: обзор способов узнайте марку и модель вашей материнской платы, а после воспользуйтесь поисковиком и введите следующий запрос «название вашей материнской платы меню загрузкиboot menu». Если же у вас ноутбук, то посмотрите его название и введите соответствующий запрос.
Более подробно о том, как вызвать загрузочное меню, вы можете прочесть в материале Как зайти в загрузочное меню (boot menu) – подробная инструкция.
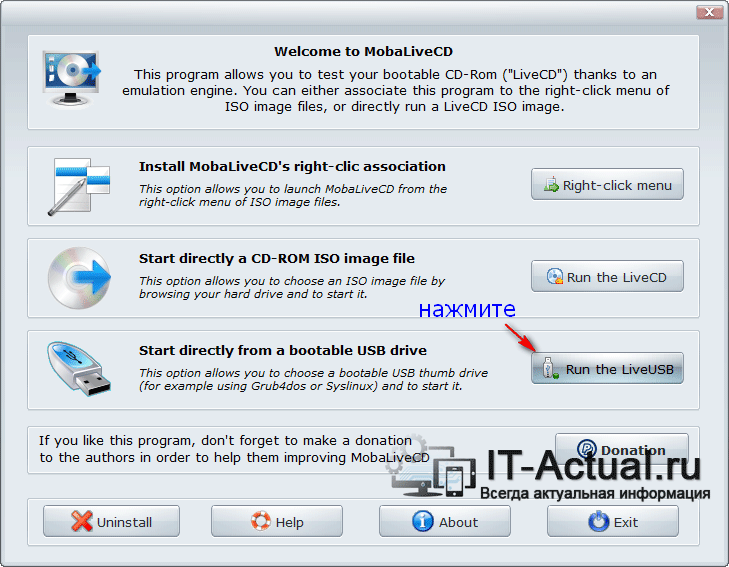
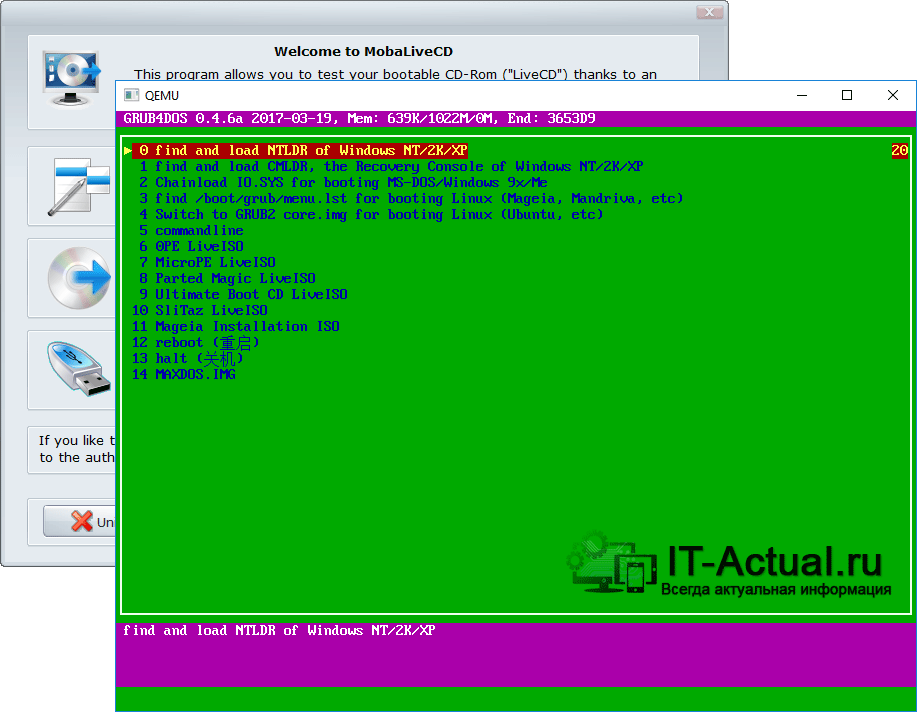
Однако если вы редактируете меню, добавляя новые пункты для загрузчика, то оперативнее будет просматривать изменения с помощью утилиты MobaLiveCD.
Скачайте её с официального сайта, сохраните в желаемом месте и запустите от имени администратора.
В открывшемся окне нажмите на кнопку Run The LiveUSB.
В открывшемся окне укажите загрузочную флешку. Ориентируйтесь по букве диска.
В следующем окне будет выдан запрос на создание образа – ответьте отказом, нажав кнопку No.
Если всё было сделано правильно, то будет эмулирован процесс загрузки, отобразится соответствующее меню.
Поздравляю! Загрузчик прописан корректно и теперь ваша флешка является загрузочной.
Краткий итог
В данном материале мы рассмотрели быстрый способ создания загрузочной флешки, с которой можно как установить операционную систему, так и провести диагностику ПК с использованием соответствующих загрузочных утилит.
Используя данное пошаговое руководство, вы без труда сможете сделать загрузочную флешку с индивидуальным списком утилит, которыми вы привыкли пользоваться при работе с компьютером.
Если у вас остались вопросы, вы можете задать их в комментариях.
|
|
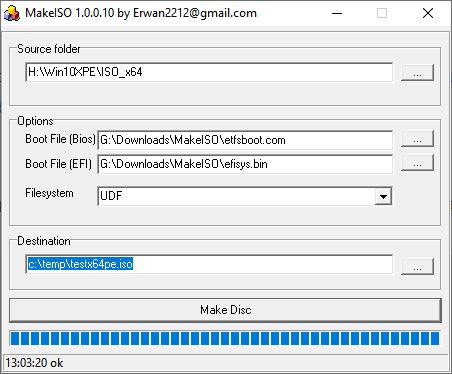
MakeISO.exe by Erwan
This Windows executable will make various bootable ISO files. You can configure some of the Boot File options by right-clicking on the … box too (e.g. Floppy disk or hard disk emulation, add a patch table).
The download includes the necessary Windows legacy and EFI boot files (etfsboot.com and efisys.bin – see screenshot) as well as folders for grub2, grub4dos and isolinux folders which you can use a templates to make your ISO boot to either of those three bootloaders.
You can choose ISO9660/Juliet/UDF filesystems for the ISO or a combination.
More information here.
Grub4DOS ISOs
If you already have a working bootable USB stick that uses grub4dos and a grub4dos menu, you might want to make a bootable ISO file from it. This tutorial explains how to do it. If you have a Windows USB drive, you can easily add grub4dos so that it will still legacy boot to Windows (see below).
I recommend using grub4dos 0.4.6a as use by RMPrepUSB (note: there are two completely different versions – one for Legacy only as used by RMPrepUSB and one for UEFI only.
Grub4dos (0.4.5c) can read files on a CD/DVD ISO 9660 CDFS filesystem and the RockRidge filesystem, but not the Joliet filesystem – thus CDs/DVDs or ISOs that are prepared with no RockRidge extensions will only be read by grub4dos as ISO 9660 standard (filenames will be 8.3).
Note: Grub4dos 0.4.6a can read Joliet ISOs.
What this means is that with some ISOs (or when you boot from a CD/DVD), grub4dos may not be able to access a particular file if it has a long filename: e.g.
title test iso
map /myiso.iso (0xff)
map --hook
root (0xff)
Note that grub4dos does not usually care about case on FAT, exFAT and NTFS volumes. Spaces must be preceded by (e.g. /my iso.iso)
Also, be aware that your grub4dos menu.lst file may need modifying because your files will be on a CD and not a ‘hard disk’ when the ISO boots. Therefore if you have any commands which expect two hard disks to be present, i.e. (hd0) and (hd1), or you have hard coded the payload files as (hd0,0)/xxxx, or if you have excluded CD’s from any file ‘find’ commands used in the menu, then when you boot from an ISO you cannot expect these to work! You can use () or (bd) as a device name for the boot device or just use / in your menus.
If you have downloaded and installed the Microsoft WAIK you can use the Microsoft OSCDIMG.exe utility.
If you do not have OSCDIMG.exe then you will need to download MKISOFS.exe.
To test that your ISO boots correctly, I recommend you load the ISO file in QEMU (use RMPrepUSB File – Boot from ISO file using QEMU Emulator) which allows you to emulate booting direct from the ISO file under Windows just as if it were a CD/DVD but without affecting your Windows system.
Some of the oscdimg information has been taken from this forum post and I have used the switches suggested by jaclaz/Wonko-the-Sane (thanks!).
Make a Windows 7/8/10 Legacy-bootable ISO from a USB drive
- Extract the contents of a bootable Windows ISO to a USB drive (or use an existing Windows USB drive)
- Click ‘Install grub4dos’ and answer Y for MBR boot code and copy over the grldr file to the USB drive
- Press F4 in RMPrepUSB and add a single line of text in the Notepad window that opens…
chainloader /bootmgr - Click the Files – ‘Make grub4dos ISO from Drive‘ to automatically convert the selected grub4dos bootable USB drive to an ISO file as below.
TO MAKE A GRUB4DOS ISO FILE
Use RMPrepUSB and use Files – ‘Make grub4dos ISO from Drive‘ to automatically convert the selected grub4dos bootable USB drive to an ISO file!
RMPrepUSB will run a .cmd script to make a grub4dos bootable ISO file.
If your USB drive has WinPE files (i.e. bootmgr, bootBCD and boot.wim) then add oscdimg.exe to the RMPrepUSB installation’s QEMU folder. ‘Make grub4dos ISO from Drive’ will then use oscdimg to make the ISO instead of mkisofs which does not make bootable WinPE ISO properly.
Note that it does not alter the menu.lst file, so you must ensure your menu.lst is suitable to run from a CD/DVD.
If you wish to use a similar manual process using a Windows .cmd script, then follow steps 1 and 2 below…
HISTORY
2013-01-01 – I have changed the mkisofs download link to point to a cygwin version – the old link used a version of mkisofs.exe that had a 2GB ISO size limitation. The cygwin version of mkisofs.exe has a 4GB size limitation. If this is still a problem then use oscdimg instead!
2013-05-26 – Changed makegrub4dosiso.cmd to use start segment of 7C0 for better compatibility with some BIOSes!
USE A WINDOWS .CMD SCRIPT
1a. If you already have Microsoft Windows WAIK installed…
1. Download the Makegrub4dos.zip file from the Download – Beta Downloads page – extract the cmd file and place it in the same folder that you want your ISO file to be made in (or an empty folder)
2. In the Windows Start Menu – click on the Deployment Tools Command Prompt to open a Command Prompt window
1b. If you do not have Microsoft Windows WAIK installed…
1. Create a new empty folder on your hard disk (e.g. C:MAKEISO)
2. Download (sorry – the file seems to be no longer available!) mkisofs.exe and the dll (note: this is a cygwin (4GB) version, MinGW versions only make files up to 2GB!)
3. Download the Makegrub4dos.zip file from the Download – Beta Downloads page – extract the cmd file and place it in the same folder.
4. Run a Windows Command Prompt window (e.g. Start Menu – Accessories – Command Prompt)
2. Using the Makegrub4dosISO.cmd file
1. Type ma and hit the <TAB> key to complete the command and press <ENTER> – you should see a usage prompt:
MAKE A GRUB4DOS BOOTABLE ISO FILE
=================================
Variable 1 = ISO FILENAME =
Variable 2 = SOURCE FOLDER =
Variable 3 = ISO VOLUME NAME = G4DOS
BOOTFILE = grldr (grldr from “source”)
Usage: makegrub4dosiso.cmd [ISO FILENAME] [SOURCE FOLDER] [ISO VOLUME NAME]
2. To make an ISO, you need to make sure that the grldr file is present at the top level of your source folder. Now type the command (use ma <TAB> to save typing!):
makegrub4dosiso.cmd test.iso I: my_iso_label
where test.iso is the name of the iso that you want to create, I: is the USB drive that you want to convert to an ISO file and my_iso_label is the volume label of the ISO that you want to create.
If all your boot files are in a folder, you can specify a source folder instead of a drive letter – e.g.
makegrub4dosiso.cmd test.iso C:myusbpenformycd my_iso_label
Do NOT use any filenames/foldernames with spaces in them.
The script will use either OSCDIMG or MKISOFS (depending on which one you have on your system) to create a new grub4dos bootable ISO file.
Note: ‘bertrand’ from reboot.pro uses this command line to prepare an ISO file, it differs in that it has a -l parameter and no -J or -r parameters (not tested):
mkisofs -v -iso-level 4 -N -D -d -joliet-long -volid "Grldr" -A GRLDR/MKISOFS -sysid "Win32" -b grldr -no-emul-boot -boot-load-seg 0x7C0 -boot-load-size 4 -o "grldr.iso" "folder"
Use this command for a WinPE bootable ISO
set VNAME=myvol
set BOOTFILE=grldr
set ISONAME=fred.iso
set SRCFOLDER=C:temp
mkisofs -iso-level 3 -force-uppercase -volid "%VNAME%" -b %BOOTFILE% -no-emul-boot -hide boot.catalog -o %ISONAME% %SRCFOLDER%
You may find grub4dos 0.4.6 does not work with level 4, so use level 3
3. Testing your ISO file
I would recommend that you test your new ISO file before burning a CD to save making coasters! Here are some alternatives which you can try:
1. The latest versions of RMPrepUSB (v2.1.652 and later) can boot from an ISO via the emulator QEMU under Windows – just type Ctrl-F11 or use the File menu tab to test that your new ISO works.
OR
use Qemu Manager – install this on your Windows system and create a new new virtual machine (New virtual machine – choose an OS and create a virtual hard disk so that at least one hard disk is present when the ISO file boots). Then in the Drives tab, click the CD-ROM icon and set the image name to your new ISO file. Then click the green arrow button to test your new ISO file.
2. Use RMPrepUSB to copy the new ISO file to a USB drive. Make a menu list that will load your ISO as a CD and test it using the RMPrepUSB – QEMU button. Note that this will test that you can at least get to the ISO’s grub4dos menu, but it may not run the menu entries correctly. If the ISO file is large (>4GB) you may need to use NTFS when you prepare the bootable USB drive.
title testiso
map /test.iso (0xff)
map --hook
chainloader (0xff)
or easy still, just copy your new ISO file to an Easy2Boot USB drive and boot it.
3. Install and run Oracle VM Virtual Box or some other virtual machine and load the ISO onto a virtual CD drive used by the emulator. Be aware that I have seen problems where QEMU boots from a grub4dos ISO successfully but Virtual Box does not.
4. If you have a Zalman VE200 HDD caddy, copy your new ISO file to the _ISO folder and select it as the CD boot file – then test it on a real system.
Note: I have seen grub4dos bootable ISOs which don’t boot from the ZalMan VE200 but that do boot when burnt to a Real CD and booted on a real system.
5. The acid test – burn the ISO to a CD or DVD and boot from it using a real computer!Unsupported embedUnsupported embed
4. Troubleshooting
If you are using MKISOFS, try the OSCDIMG utility instead (and vice versa). Mkisofs may have a 4GB size limitation.
The usual problems are due to the type of filesystem used for the ISO. When an OS boots, it may expect the files to have lowercase filenames or uppercase filenames. e.g. bootmgr or BOOTMGR. If it looks like some files are not being detected by the booting OS, this may be the reason. Try Googling for someone with similar problems to see if you can modify the makegrub4dos.cmd file by changing some of the switches on the command line.
If you are having trouble getting your grub4dos menu to work when a menu option is selected (grub4dos reports an error due to a ‘bad’ command), this is probably due to the fact that it is now booting as a CD rather than a ‘hard disk’ device. Here are some points to watch:
1. When booting from CD there may only be one hard disk (the system’s internal hard disk) in the system. So any reference to (hd1) in a menu will cause an error.
2. Try to avoid booting from a mapped image using chainloader (xxxx)+1 (where xxxx is whatever you have mapped it to) – instead specify the actual boot file such as chainloader ()/io.sys or chainloader ()/bootmgr or chainloader ()/ntldr
3. Check filenames are not case sensitive – e.g. if chainloader /bootmgr does not seem to work try chainloader /bootmgr || chainloader /BOOTMGR so that it will work whether it is lower case or uppercase.
4. If you have excluded CDROM drives from a find command then it obviously won’t find the file on the CD! For example, don’t use find –set-root –devices=h /bootmgr .
5. Use find –set-root xxxx to set the root device, this way it will work on a USB drive or on a CD.
6. There could be more than one CD device present in a system, the boot CD may not always be (cd0).
Tip: use (bd) to reference the boot device disk and that will work for both USB drives and CD/DVDs.
Here is an example of a menu that loads a DOS hard disk image file and boots it as a hard disk. Note how io.sys is specifically loaded instead of just ()+1 being used.
title HDDREG.imgnMS-DOS hard disk image file
map --mem /hddreg.img (hd0) || map /hddreg.img (hd0)
map --hook
#look for a file inside the image and set device as the root device
find --set-root /hddreg.cab
#load and boot using DOS bootloader
chainloader ()/io.sys
MAKE A LARGE DOS-BOOTABLE CD WITHOUT NEEDING CD DRIVERS!
Booting from a CD or DVD to DOS is a problem these days as most PCs have modern SATA drives and the old DOS CD-ROM drivers are often not compatible.
Do you want to make a CD which boots to DOS (MS-DOS or FreeDOS) as A: but has access to all files on the CD without needing any CD drivers?
Using the method below, you can make a bootable CD which will boot to a grub4dos menu (which can be made invisible to the user). You can then run MS-DOS or FreeDOS and boot to DOS. Once at the DOS command prompt (A:) you will have the entire contents of the CD on the virtual A: drive. Drive A: can be 500MB or more! You do not need to load CD drivers in order to access all the CD contents as the contents will be on the A: drive.
The only problem with this method is that you cannot have more than 1000’s of files in any one folder (and cannot have lots of large deep sub-folders). It does not work with an XP CD (/I386 folder), for instance, as this has 1000’s of files in one folder – however it should work with most ordinary DOS folder structures.
How it works
When you boot from a CD it can be booted as a floppy or a hard disk or as neither. The Makegrub4dos.cmd script uses a switch with mkisofs of –no-emul-boot so that the BIOS does not emulate either a floppy disk or a hard disk when booting the CD. If we used floppy-disk emulation then we could only access 2.8MB within a floppy disk image. We could use a hard disk image but that might confuse DOS when it boots, as the CD will appear as hd0 (but write-protected). Instead of using a hard disk or floppy disk image, we specify the grub4dos bootloader file grldr and specify ‘no emulation’ when we create the ISO. The ‘El Torito’ BIOS specification has more details.
When we boot from a cd with no emulation, the operating system that is loaded must use it’s own drivers to access the CD/DVD. However, grub4dos can access the CD as it understands the CD filesystem which has a CDFS (non-FAT, non-NTFS) filesystem with 800h long sectors. Once grub4dos has been loaded, we call copycd.bat. This is a grub4dos batch file which makes a large (500MB+) ram drive and then copies the contents of the cd to the virtual ram drive (fd0), folder by folder. We can then boot to DOS from the files that are now on the virtual fd0 drive. The internal Hard Disk 0 will still be hd0 in DOS so we can fdisk it or format it and copy files to it.
Requirements
- Install RMPrepUSB
- Download Makegrub4dos.zip file and extract the makegrub4dos.cmd file to a new folder on your hard disk
- Download mkisofs.exe and copy it to the same folder
- Download the grubutils zip file and extract the fat utility
Use latest RMPrepUSB to install the latest grub4dos version. Old versions of grub4dos (2011 and before) will not work!
Method
- Prepare a USB drive with the contents that you want your CD to have – in this case it will be some DOS systems files plus any other files that you require.
- Install grub4dos to the USB drive using the ‘Install grub4dos’ button on RMPrepUSB
- Copy the grubutils file ‘fat‘ to the root of the USB drive.
- Cut and paste the text below to make a new file called copycd.bat on the root of the USB drive.
- Edit the menu.lst file on the USB drive (press F4 in RMPrepUSB to load it into Notepad) – copy the menu items below into it and save the file to the USB drive. If you are using MS-DOS you can delete the FreeDOS menu’s – if you are using FreeDOS you can delete the MS-DOS menus.
# Display CD contents
ls (cd)/
title MS-DOS BOOT WITH CD contents on FD0
# call the copy batch file - first parameter is either (fd0) or (fd1) - next parameter is size of virtual drive (0x100000=512MiB)
call (bd)/copycd.bat (fd0) 0x100000
# set number of floppies seen by BIOS - must be 2 if using (fd1) instead of (fd0)
map --floppies=1
root (fd0)
chainloader /io.sys

title FREE-DOS BOOT WITH CD contents on FD0
# call the copy batch file - first parameter is either (fd0) or (fd1) - next parameter is size of virtual drive (0x100000=512MiB)
call (bd)/copycd.bat (fd0) 0x100000
# set number of floppies seen by BIOS - must be 2 if using (fd1) instead of (fd0)
map --floppies=1
root (fd0)
chainloader /kernel.sys
title ---- TEST ENTRIES ---
root ()

title TEST FREE-DOS BOOT AS FD0
map (hd0,0)+1 (fd0)
map (hd0) (hd1)
map (hd1) (hd0)
map --floppies=1
map --hook
root (fd0)
chainloader /kernel.sys

title MS-DOS BOOT AS FD0
map (hd0,0)+1 (fd0)
map (hd0) (hd1)
map (hd1) (hd0)
map --floppies=1
map --hook
root (fd0)
chainloader /io.sys
6. Test the USB drive by using the QEMU button (or just press F11) in RMPrepUSB. Use the TEST ENTRIES menu options to check that your files boot to DOS as A: and your DOS utilities run correctly. Note: the first entry which uses copycd.bat will not work correctly at this stage!
7. Now make an ISO file using the Makegrub4dos.cmd method described at the top of this article – e.g. makegrub4dos new.iso J: TESTCD where J: is your USB drive letter.
8. Use the latest version of RMPrepUSB and hit Ctrl-F11 and then select your ISO. If your CD requires that a hard disk should be present, you will also have to create a virtual hard disk when prompted.
9. ‘Rinse and Repeat’ until you are happy that it appears to be working as expected.
10. Finally delete the TEST ENTRIES from the menu.lst and change anything else you require. If you don’t want a user menu at all, just add the lines
default 0
timeout 0
to the start of the menu.
Note that the size of the virtual floppy that is created is set by the line call (bd)/copycd.bat (fd0) 0x100000 where (fd0) is the device ID and 0x100000 is the size of the virtual floppy (0x100000 = 512MB) – this must be at least as big as the CD files so you should increase this if your CD is bigger than 500MB or decrease it if the CD is smaller.
There is a 3 second delay in copycd.bat – you can reduce or remove this (see pause –wait=3 line)
Now create the ISO file again using Makegrub4dos.cmd, test it in QEMU Manager and if OK, burn it to a CD ready for testing.
Troubleshooting
- If grub4dos cannot access the CD, try the cdrom –init command in each menu (or at the top of the menu).
- if you use a ZalMan VE-200 CD emulator to test your ISO – beware! This does not seem to work with grldr ISO files. However, real CDs do work. I would therefore recommend testing using a software emulator such as QEMU Manager or Oracle Virtual Box and then burning a real CD.
- If you see an error message ‘FAT error: the physical drive cannot work!‘ then your system does not have enough memory (RAM). if you are using a virtual machine then increase the amount of memory available (but not above 1100MB), if you are booting on a real system, check if the size of the virtual drive that you have prescribed in the menu.lst (e.g. 0x100000) can be reduced (i.e. matches the size of all files on the CD).
copycd.bat contents (last updated 2012-02-19 – bugfix now use %FD%%%cd%) – (Remove # from red line below if you want to see the files listed as they are copied)
!BAT
debug off
errorcheck off
# stop 'hit Q to continue' messages
pager off
#512MB = 0x100000
#850MB = 0x1A0000
#1GB = 0x200000
set FD=%1
map --mem (md)0x300+%2 %FD%
map --hook
debug 1
clear
echo Copy CD contents to virtual drive %1 size=%2
# load fat utility as a module for quick operation
insmod (bd)/fat
fat mkfs %FD%
debug -1
pause --wait=3
debug off
root (cd)
set cd=
call :cpa
echo Finished!
goto :eof

:cpa
clear
echo Copying files in folder: %cd%
::Change source root
root (cd)%cd%/
ls | call :copyfiles
echo Finished folder %cd%
goto :eof

:copyfiles
if "%1"=="" goto :eof
::If is a directory
cat --length=0 /%1 || goto :sub-dir
::copy file
#echo %cd%/%1
fat copy /%1 %FD%%%cd%/ > nul || echo Error: %cd%/%1
shift
goto :copyfiles

:sub-dir
setlocal
fat mkdir %FD%%%cd%/%1
set cd=%cd%/%1
call :cpa
endlocal
shift
goto :copyfiles
HIRENS BOOT CD
The Hirens Boot CD contains a Make ISO batch file which uses the following command to create an HBCD ISO called MyHBCD.ISO which has a grub4dos boot loader…
mkisofs.exe -R -D -J -l -joliet-long -duplicates-once -o MyHBCD.iso -b HBCD/grldr -c HBCD/boot.cat -hide-joliet HBCD/boot.cat -hide HBCD/boot.cat -no-emul-boot -N -boot-info-table -V HirensBootCD -boot-load-size 4 CD
UDF AND FLOPPY EMULATION ISOS
There are different types of CD boot emulation, including floppy emulation – in which the boot sector of the CD is a bootable floppy disk image. The boot sector is not accessible when viewing the CD in a file manager such as Windows Explorer and might appear to be a blank disk if no files are contained on the disc root. These ISOs can be mounted as a virtual CD/DVD and most modern applications (Virtual CloneDrive or ImDisk) will allows access to all files in the UDF volume,
You may come across an ISO that is in UDF format (a newer standard intended to replace ISO9660). When grub4dos maps this to a drive, all it may see just a single README.TXT file containing the text:
“This disk contains a “UDF” file system and requires an operating system that supports the ISO-13346 “UDF” file system specification.”
grub4dos 0.4.5c cannot read the UDF file system (but 0.4.6a can!), however you can still boot from a UDF ISO file using grub4dos as follows:
title Boot from Floppy Emulation ISO
map /my.iso (0xff)
map --hook
root (0xff)
chainloader (0xff)
Star
Embed
What would you like to do?
menu.lst of grub4dos for booting iso images from usb drive
This file contains bidirectional Unicode text that may be interpreted or compiled differently than what appears below. To review, open the file in an editor that reveals hidden Unicode characters.
Learn more about bidirectional Unicode characters
| # This is a sample menu.lst file. You should make some changes to it. | |
| # The old install method of booting via the stage-files has been removed. | |
| # Please install GRLDR boot strap code to MBR with the bootlace.com | |
| # utility under DOS/Win9x or Linux. | |
| color white/light-blue yellow/cyan light-gray/magenta white/light-red | |
| title Acronis True Image Home | |
| find —set-root /atih.iso | |
| map /atih.iso (0xff) || map —mem /atih.iso (0xff) | |
| map —hook | |
| chainloader (0xff) | |
| title EASEUS Todo Backup | |
| find —set-root /todobackup.iso | |
| map /todobackup.iso (0xff) || map —mem /todobackup.iso (0xff) | |
| map —hook | |
| chainloader (0xff) | |
| title DELL Diagnostic Tool | |
| find —set-root /diags.iso | |
| map /diags.iso (0xff) || map —mem /diags.iso (0xff) | |
| map —hook | |
| chainloader (0xff) | |
| title SystemRescueCD | |
| find —set-root /systemrescuecd.iso | |
| map /systemrescuecd.iso (0xff) || map —mem /systemrescuecd.iso (0xff) | |
| map —hook | |
| root (0xff) | |
| chainloader (0xff) | |
| boot | |
| title reboot | |
| reboot | |
| title halt | |
| halt |










 (образ внутри не меняется)


