Hello World,
In our previous posts, we have been describing how to perform some customization activities on Windows 10 Operating system. We have been discussing the different ways that exists to customize the Windows background desktop and use a custom image. We have also shown how to customize the Windows Login screen and how to replace the default background image with the one you or your organization wants to use.
To read more about these customization activities, please have a look at the following posts
- Windows 10 – Customize Wallpaper if Windows is not activated…
- Windows 10 – Customize Login Screen Background image if Windows 10 is not Activated
In this post, we will show you another way (probably less known) that can be used to customize the background Desktop and the login screen. This post offers the opportunity to play with the provisioning packages and the Windows Configuration Designer….
Overview
Windows 10 and previous operating systems offers the possibility to customize the look’n feel of your machine and display your favorite images as background Desktop and via the login screen. These customization activities are usually quite common and easy to achieve through “Personalize” GUI Interface of the Windows 10 Operating system. As long as your Windows 10 machine is activated, you can easily customize your Windows 10 machine.
Home users can probably perform the customization operation manually using different methods. Organizations that need to display branding and create a corporate identity through the Desktop infrastructure, centralized and automated solution would be used in order to customize Desktop Background and/or background displayed on the login screen. In Corporate environment, Group policies or scripting would be usually used to control and deploy these customization settings.
While writing these posts, we have found another way that could be use to deploy customization settings through the network. Provisioning packages can be created and installed on target desktops. When the provisioning package is installed, the customization settings should be applied and visible… The following questions might popup in your mind right now
- What’s a provisioning package ?
- How to create a provisioning package ?
- How to deploy a provisioning package ?
Well, this is what we will try to explain in the following sections 🙂
Provision Package
A provisioning package (.ppkg) is basically a container (like a zip file) that includes a collection of configuration settings that can be applied to a Windows operating system. Provisioning package technology has been created in order to quickly customize a Windows 10 device without necessarily installing a brand new image. Provisioning packages basically let you quickly customize one or more device in a consistent way.
How do you create a provisioning package ?
To create these provisioning packages, Microsoft offers you some tools. You can get your hands on the Windows Assessment and Deployment Kit (ADK) which include the Windows Configuration Designer (WCD). The WCD is a graphical tool that will be used to create provisioning packages. If you do not want to download and Install the ADK, you can also get the WindowS configuration Designer through the Microsoft Store

Click on Picture for Better Resolution
Once the tool is installed, you can start creating your Provisioning package…
How do you distribute and deploy a provisioning package ?
When the provisioning package has been created, it can be distributed through removable media, attached to an email or made available through a network share. Actually, you can decide to manually install the provisioning package using again the Settings Apps available in Windows 10. You can also automate the deployment through PowerShell commands.
Please note that provisioning packages can be applied to a device during the first-run experience (out-of-box experience or “OOBE”) and after (“runtime”).
Permissions Needed
Applying a provisioning package to a desktop device requires administrator privileges on the device if you perform the installation manually. If you want to deploy the provisioning package and automate the process, you can try to create a powershell script and get it executed via GPO or Task scheduler….
Limitations
This is a limitation I’ve learned the hard way ! Settings in Provisioning Packages might apply in certain SKU editions and not on other ones. Our provisioning package used to customize the login screen will not be applied or processed by Windows 10 Home Editions but will work fine on Windows 10 Enterprise Editions (and Education Editions). Better be aware of this Editions limitations as you might have a perfectly valid package but the settings won’t be applied accordingly
Note : There might be a way to overcome some of the limitations through registry hacks but we will not look into this as this is not the purpose of this post
Our Provisioning Package to customize background and login screen….
This post offers the perfect opportunity to show how to create a provisioning package that would customize Desktop background and login screen settings….. We will be creating a provisioning package that will set a custom picture to the login screen….
Step 1 – Obtaining the tool
In order to obtain the Windows Configuration Designer, you have two choices…. You can either download the Windows 10 ADK kit or you can download the tool from the Microsoft Store. When the installation is completed, you will be able to launch the tool.
We have performed the ADK installation. When you have downloaded the ADK File and execute it. you will be presented with this screen (we assume that you have internet connection). Select the first option and press Enter

Click on Picture for Better Resolution
In the privacy page, select your option and press next

Click on Picture for Better Resolution
In the License Agreement Page, Press Accept

Click on Picture for Better Resolution
In the Feature page, select the Windows configuration Designer option (as shown in the screenshot below

Click on Picture for Better Resolution
Wait for the installation to complete

Click on Picture for Better Resolution
When installation is completed, you will see the Windows Configuration Designer application available in the start menu

Click on Picture for Better Resolution
Step 2 – Creating our Provisioning package
In the Windows Configuration Designer Dashboard page, we will select the option Advanced Provisioning

Click on Picture for Better Resolution
In the new Project Dialog Box, Specify the name of the project and where to store the files

Click on Picture for Better Resolution
In the parameters pages to display, select the correct Edition in order to see the settings that you need to configure. In our example, we have selected the All Windows 10 Editions

Click on Picture for Better Resolution
In the import package page, press Finish

Click on Picture for Better Resolution
In the Settings Tree on the left side, locate Personalization node and expand it in order to see the available options

Click on Picture for Better Resolution
Note :
Populate the fields as required….Either Desktop or LockScreen….based on your needs….
When you have set your configuration options, go to the Export button.

Click on Picture for Better Resolution
In the Build Dialog Box, provide a name and a version for your package and Press Next

Click on Picture for Better Resolution
In the next Dialog Box, accept default and Press Next

Click on Picture for Better Resolution
In the Location Dialog Box, specify where to save the provisioning package and settings and Press Next

Click on Picture for Better Resolution
In the Build Dialog Box, review the settings and Press Build to create the provisioning package

Click on Picture for Better Resolution
In the Build Dialog Box, click on the link provided to access the provisioning packages

Click on Picture for Better Resolution
You will see in your Windows Explorer that your provisioning package (*.ppkg file) has been created and can be now deployed to the target machines….

Click on Picture for Better Resolution
Deploying the our Provisioning package
You have multiple ways to deploy a Provisioning package. We will describe some of these methods hereafter. Most of the methods presented here requires a manual intervention. However, if there is a need to automate the process, you can always rely on Windows PowerShell as Provisioning package CmdLet exists as well….
Option 1 – Using the Removable Media…
In the Settings App, Click on Accounts

Click on Picture for Better Resolution
In the Accounts Page, Select the Access Work or School in the left menu. In the Access Work or School Page, Select the Option Add or Remove a Provisioning Package (in the right part of the screen)

Click on Picture for Better Resolution
In the Provisioning Packages Page, Click on Add a Package

Click on Picture for Better Resolution
In the Choose a method, you will have only a limited set of choices (Removable Devices)

Click on Picture for Better Resolution
After Locating the *.ppkg file, you will be prompted with a blue warning screen asking you if you trust this package. Press Yes, Add it

Click on Picture for Better Resolution
You will not see a popup that will confirm the successful installation of the package. To check that everything went fine, you should see that your provisioning package has been installed successfully and it’s listed in the Provision package page

Click on Picture for Better Resolution
As, you can see this method is a little bit cumbersome (you have to go through a lot of Windows….)
Option 2 – Double-Clicking on the provisioning Package
If the provision package has been stored on a network share or if obtained through email, you can simply double-click on the package and you will get the same warning blue screen about trusting the package. If you trust the package,Press Yes, Add it
Click on Picture for Better Resolution
You package will be installing. Again if everything is fine, you can go back to Settings > Accounts > Access Work or School > Add Provisioning Package > Provisioning Package page, you should see your package in the list
Click on Picture for Better Resolution
Option 3 – Using Powershell to install the Provisioning Package
This is probably the most convenient way to deploy and install provisioning packages through your network. Open a PowerShell Windows and issue the following command
Install-ProvisioningPackage -PackagePath <%Your Location%> -ForceInstall
To check that your Provisioning package got installed, you can also use PowerShell and issue the following command
Get-ProvisioningPackage -PackagePath <%Your Package Path%>
or
Get-ProvisioningPackage -AllInstalledPackages
Note :
If you are playing around with provisioning package, you will need to each time remove the installed package or you would need to increment package versioning in order to be able to install over again the provisioning package. If you do not do that, you might end up with Provisioning Failure – Error Code 0x800700b7
Checking our Configuration for custom login screen…
So, let’s assume that you have installed the provisioning package on a supported Windows 10 Edition and that you have received no error message, it’s time to check if the configuration settings we wanted to deploy are effective. Reboot your machine and check your login screen and Desktop look’n feel. On my screenshot, you can see that the settings have been applied correctly

Click on Picture for Better Resolution
If you want to know where the images are stored or the configuration is stored, you can go to registry and locate this key
HKLM:SOFTWAREMicrosoftWindowsCurrentVersionPersonalizationCSP
If you check the registry key; you would recognize the registry key used in the previous post…. The provisioning package is basically using the CSP technology to apply the custom settings on your Windows 10 machine.
Final Notes
Voila ! This is it for this post !
Our goal was to customize the login screen of Windows 10 using a less known approach i.e. Provisioning packages. The process might not straight forward as updating registry keys but this post offers us the possibility to investigate the Provisioning packages technology. We have quickly provided an overview of the Windows configuration Designer tool (that might replace the old system Image manager) and we have demonstrated how to create and deploy Provisioning packages.
At the end, we indeed succeed in customizing our lockscreen in Windows 10 but we have also noticed that the settings applied through the provisioning packages are basically also writing in the registry that we have been already using in this post
Hope you enjoy this post
Till next time
See ya
Same as YsabeauOk1 i got a working script also. Not my own but tweaked it a little. The more scripts the better haha. I got this one working for about 100 Windows 10 pro machines:
$systemRoot = "C:windows"
$programData = "C:ProgramData"
Start-Process -filePath "$systemRootsystem32takeown.exe" -ArgumentList "/F "$programDataMicrosoftWindowsSystemData" /R /A /D Y" -NoNewWindow -Wait«
Start-Process -filePath "$systemRootsystem32icacls.exe" -ArgumentList ""$programDataMicrosoftWindowsSystemData" /grant Administrators:(OI)(CI)F /T" -NoNewWindow -Wait«
Start-Process -filePath "$systemRootsystem32icacls.exe" -ArgumentList ""$programDataMicrosoftWindowsSystemDataS-1-5-18ReadOnly" /reset /T" -NoNewWindow -Wait«
Remove-Item -Path "$programDataMicrosoftWindowsSystemDataS-1-5-18ReadOnlyLockScreen_Z*" -Force
Start-Process -filePath "$systemRootsystem32takeown.exe" -ArgumentList "/F "$systemRootWebScreen" /R /A /D Y" -NoNewWindow -Wait«
Start-Process -filePath "$systemRootsystem32icacls.exe" -ArgumentList ""$systemRootWebScreen" /grant Administrators:(OI)(CI)F /T" -NoNewWindow -Wait«
Start-Process -filePath "$systemRootsystem32icacls.exe" -ArgumentList ""$systemRootWebScreen" /reset /T" -NoNewWindow -Wait«
Copy-Item -Path "$systemRootWebScreenimg100.jpg" -Destination "$systemRootWebScreenimg200.jpg" -Force
Copy-Item -Path "\Domain.comSYSVOLDomain.comscreensaverimg100.jpg" -Destination "$systemRootWebScreenimg100.jpg" -Force
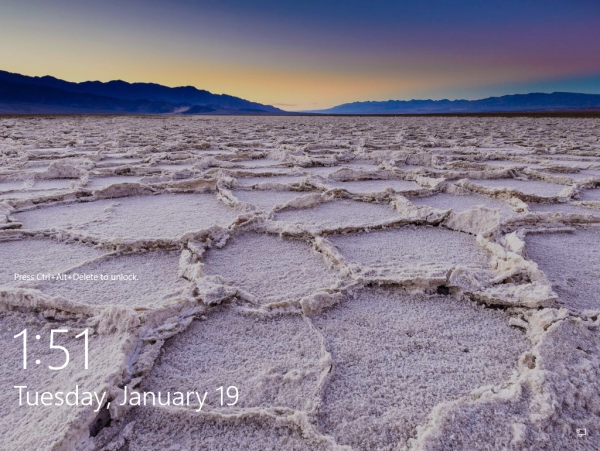
In Windows 10, the lock screen image is shown in a number of cases. For instance, if you locked your user session using Win+L or by clicking the user image in the Start Menu, the lock screen image will appear and show the image which is set in your Settings -> Personalization -> Lock screen. But if you sign out or the screen is locked at the user list screen, then Windows 10 shows another image. This is the default lock screen. So, there are two completely separate lock screens in Windows 10. Here is how you can set the default lock screen image in Windows 10.
When you sign out from your Windows 10 user session, after one minute the default Lock screen image appears. If you enable the Ctrl + Alt + Del sign in requirement, it will appear instantly.
Here is how the lock screen image for my user account looks like:
And this is the default lock screen image set in my Windows 10:
As you can see from the screenshots above, they are two different images.
Unlike the per-user lock screen image, the default one cannot be changed using the Settings app. Here is how to change default lock screen image in Windows 10.
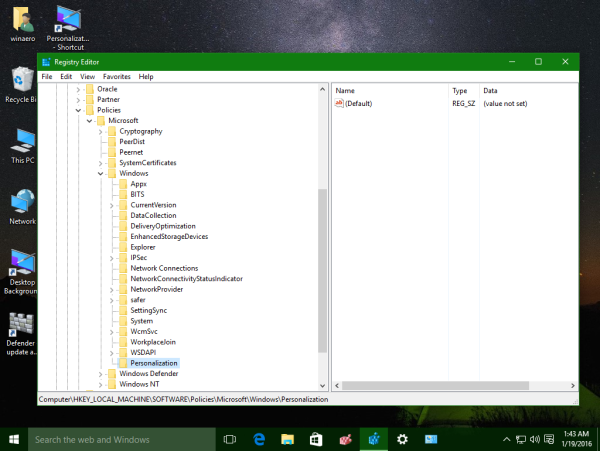
It can be done with a simple Registry tweak. Just do the following.
- Open Registry Editor
- Go to the following key:
HKEY_LOCAL_MACHINESOFTWAREPoliciesMicrosoftWindowsPersonalization
Tip: How to jump to the desired registry key with one click.
If you have no such key, then just create it.
- Create a new string value named LockScreenImage. Set its value data to the full path of the desired image which will be used as the lock screen image:
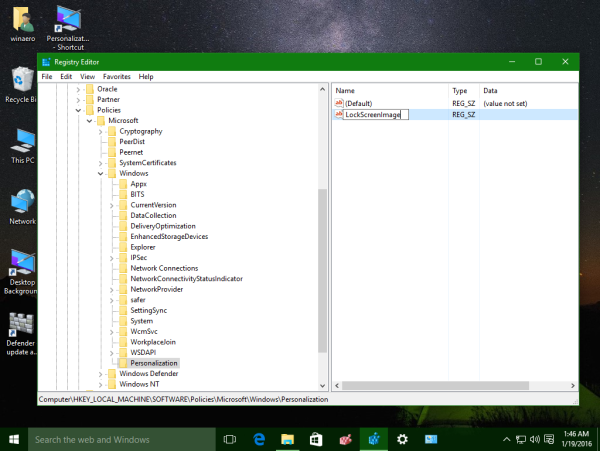 Set its value data to the full path of the desired image which will be used as the lock screen image:
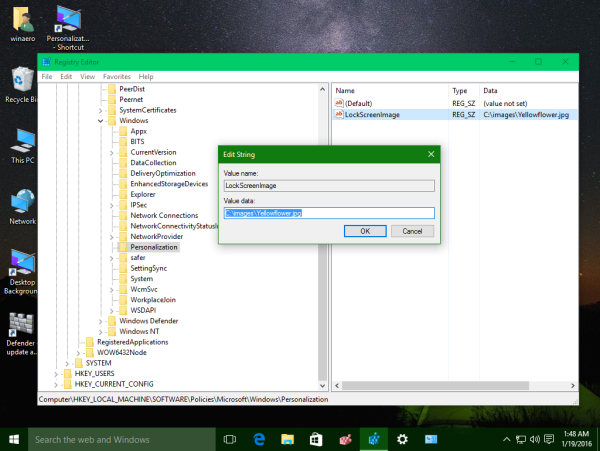
Now the default lock screen background will be set to the specified image: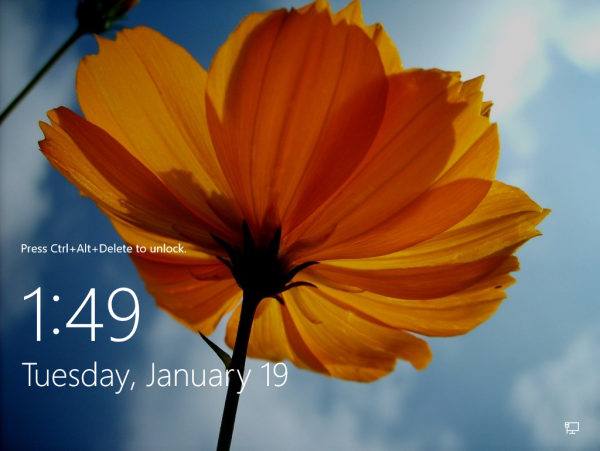
The user lock screen image will remain unchanged:
The only limitation of this trick is Windows Spotlight. It is not possible to enable it for the default Lock screen.
The same can be done using Winaero Tweaker. Go to Appearance -> Default Lock Screen Background: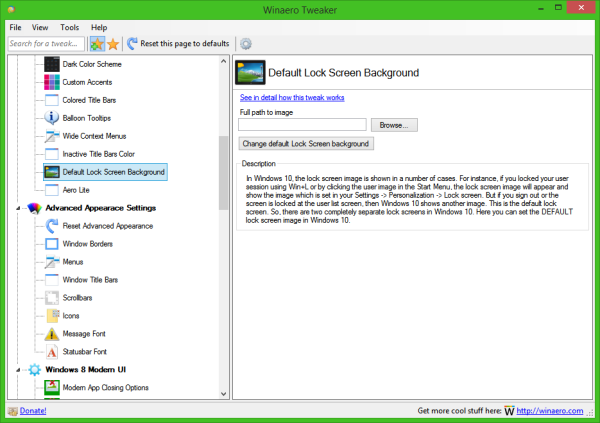
Use this option to avoid Registry editing.
You also might be interested in disabling the Lock screen completely. See this article: How to disable the Lock Screen in Windows 10.
If you have any questions or suggestions related to this tweak, you are welcome to comment.
Support us
Winaero greatly relies on your support. You can help the site keep bringing you interesting and useful content and software by using these options:
If you like this article, please share it using the buttons below. It won’t take a lot from you, but it will help us grow. Thanks for your support!
In my previous article I showed you how you can leverage PowerShell and Intune to set a computers wallpaper even if the OS was not Enterprise or Education. Currently, If you want to set the wallpaper or lock screen wallpaper via Intune Policies, you must be on either Enterprise or Education. In this article I will show you how you can leverage PowerShell and Intune, and set your own lock screen wallpaper no matter the version.
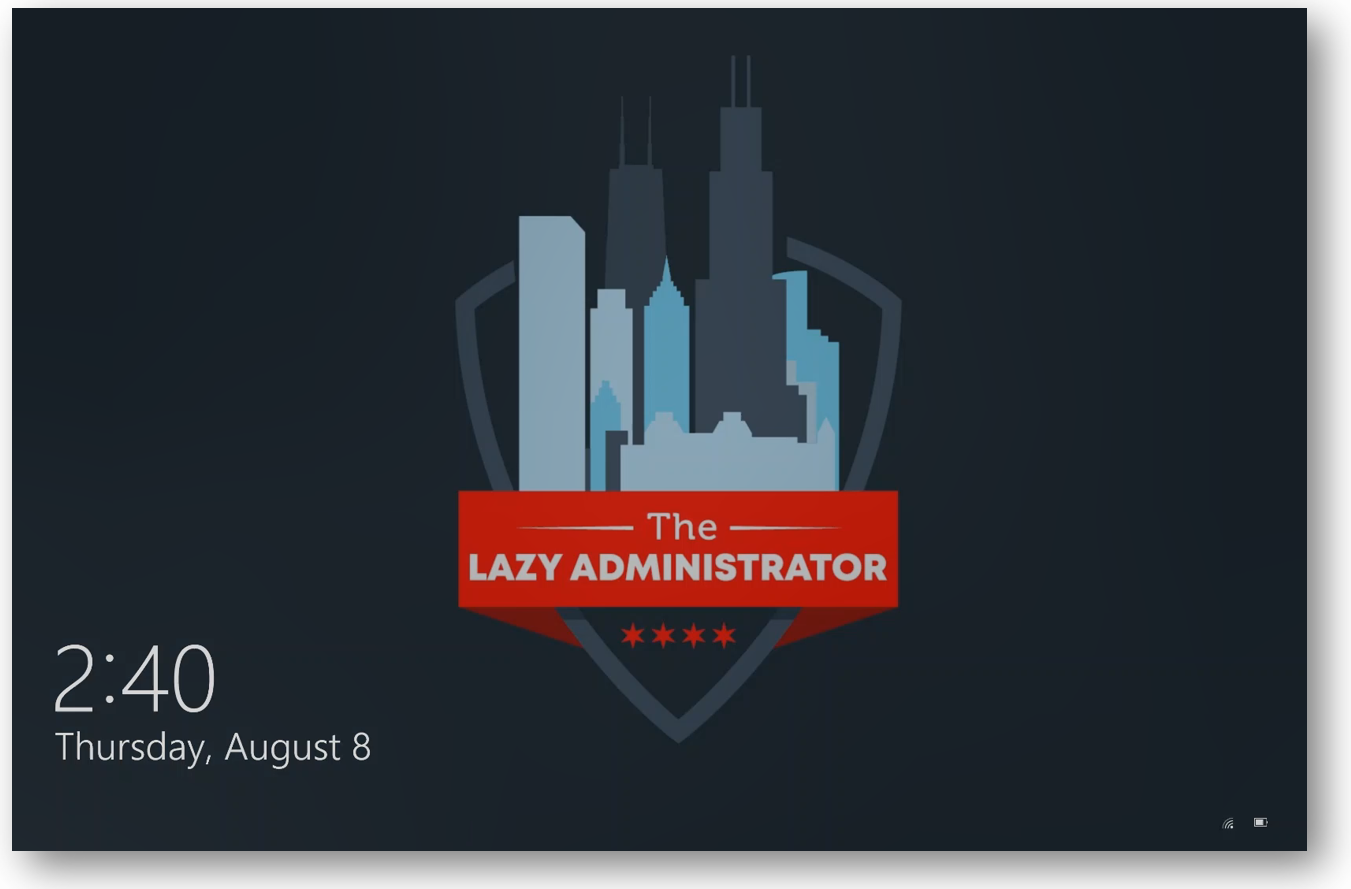
In my example I will use Intune to set the lock screen image of my end user machines to the following image:
First, we need to create a PowerShell script that will do the following:
- Download the wallpaper
- Store the wallpaper locally on the target machine
- Set the lock screen wallpaper
In my example, I want to set my wallpaper as the following image: https://www.thelazyadministrator.com/wp-content/uploads/2019/07/nicewall.jpg, which will be named wallpaper_LazyAdmin.jpg and stored at C:MDM. If the directory is not present it will create it, and if the proper registry keys are not found it will create them as well.
$RegKeyPath = "HKLM:SOFTWAREMicrosoftWindowsCurrentVersionPersonalizationCSP"


$LockScreenPath = "LockScreenImagePath"
$LockScreenStatus = "LockScreenImageStatus"
$LockScreenUrl = "LockScreenImageUrl"

$StatusValue = "1"


$url = "https://www.thelazyadministrator.com/wp-content/uploads/2019/07/nicewall.jpg"
$LockScreenImageValue = "C:MDMwallpaper_LazyAdmin.jpg"
$directory = "C:MDM"


If ((Test-Path -Path $directory) -eq $false)
{
	New-Item -Path $directory -ItemType directory
}

$wc = New-Object System.Net.WebClient
$wc.DownloadFile($url, $LockScreenImageValue)


if (!(Test-Path $RegKeyPath))
{
	Write-Host "Creating registry path $($RegKeyPath)."
	New-Item -Path $RegKeyPath -Force | Out-Null
}


New-ItemProperty -Path $RegKeyPath -Name $LockScreenStatus -Value $StatusValue -PropertyType DWORD -Force | Out-Null
New-ItemProperty -Path $RegKeyPath -Name $LockScreenPath -Value $LockScreenImageValue -PropertyType STRING -Force | Out-Null
New-ItemProperty -Path $RegKeyPath -Name $LockScreenUrl -Value $LockScreenImageValue -PropertyType STRING -Force | Out-Null

RUNDLL32.EXE USER32.DLL, UpdatePerUserSystemParameters 1, True
TIP: Because we are modifying the PersonalizationCSP key, users will see that the lock screen image is managed by Group Policy
 When you modify the PowerShell script to fit your corporate needs, save it locally as we will need to import it into Intune.
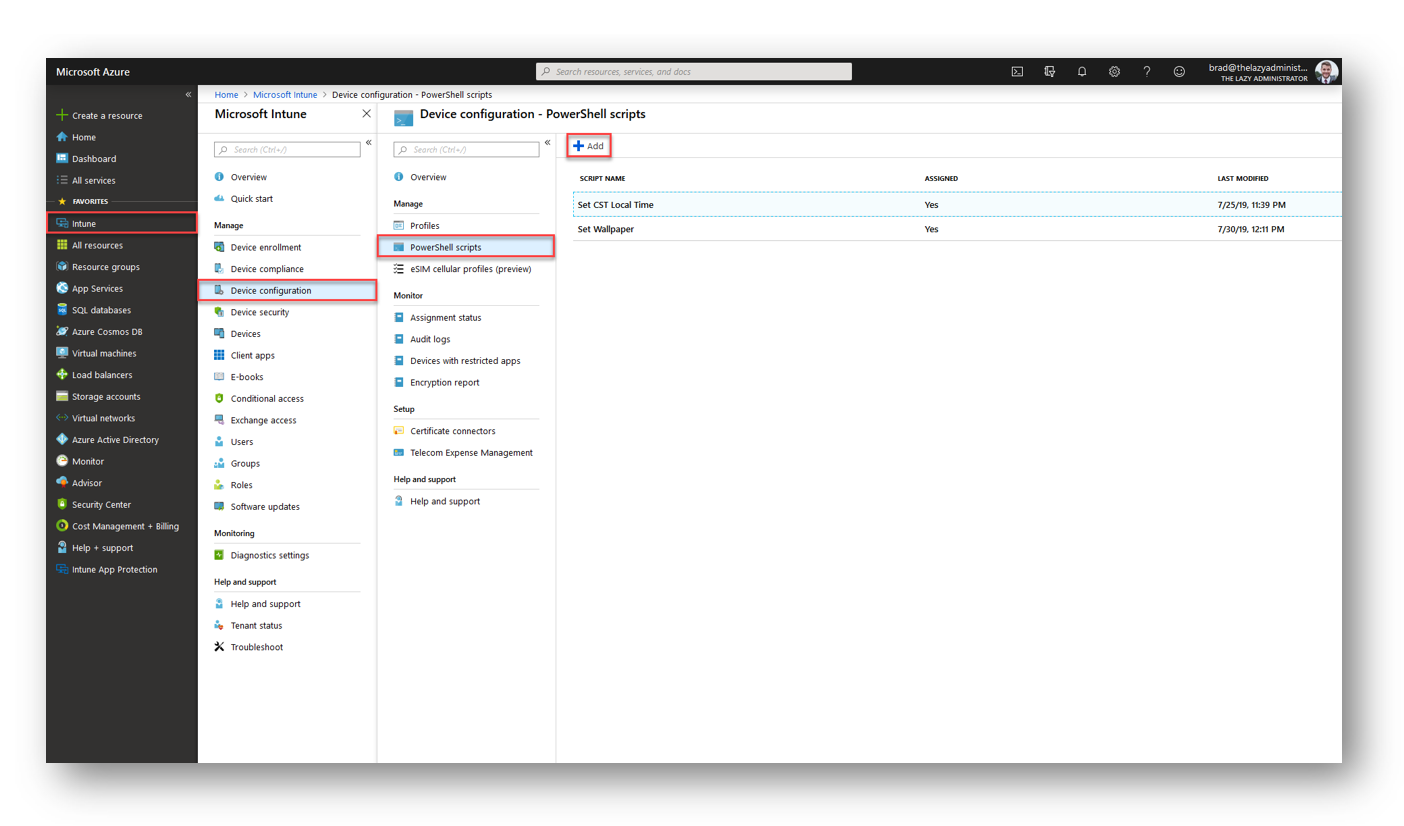
In the Azure Portal, navigate to Intune > Device Configuration > PowerShell scripts and press “+ Add” to add a new PowerShell configuration script
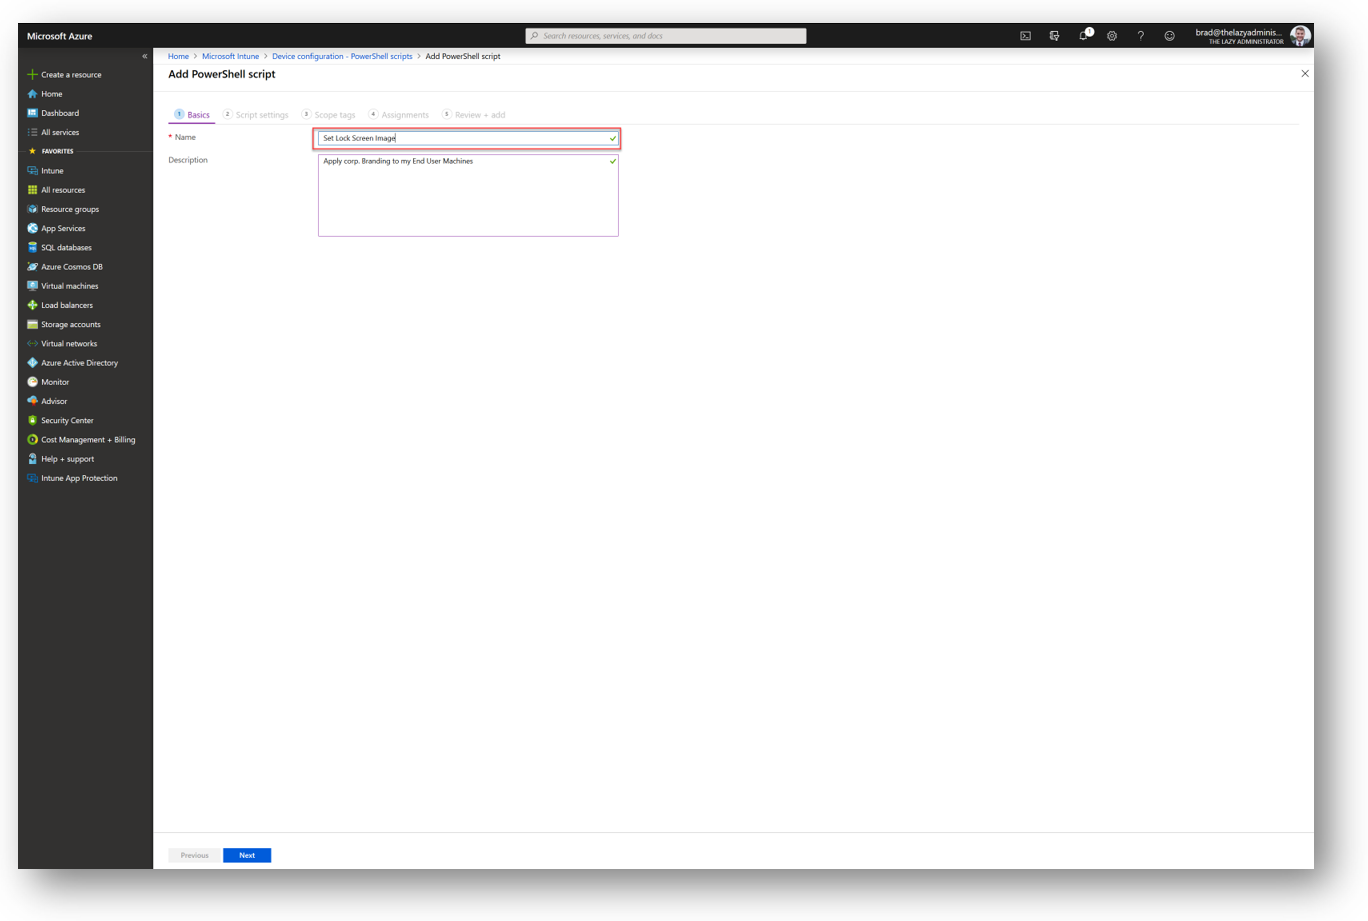
 In the Basics section, give your policy a valid Name and Description and then press Next
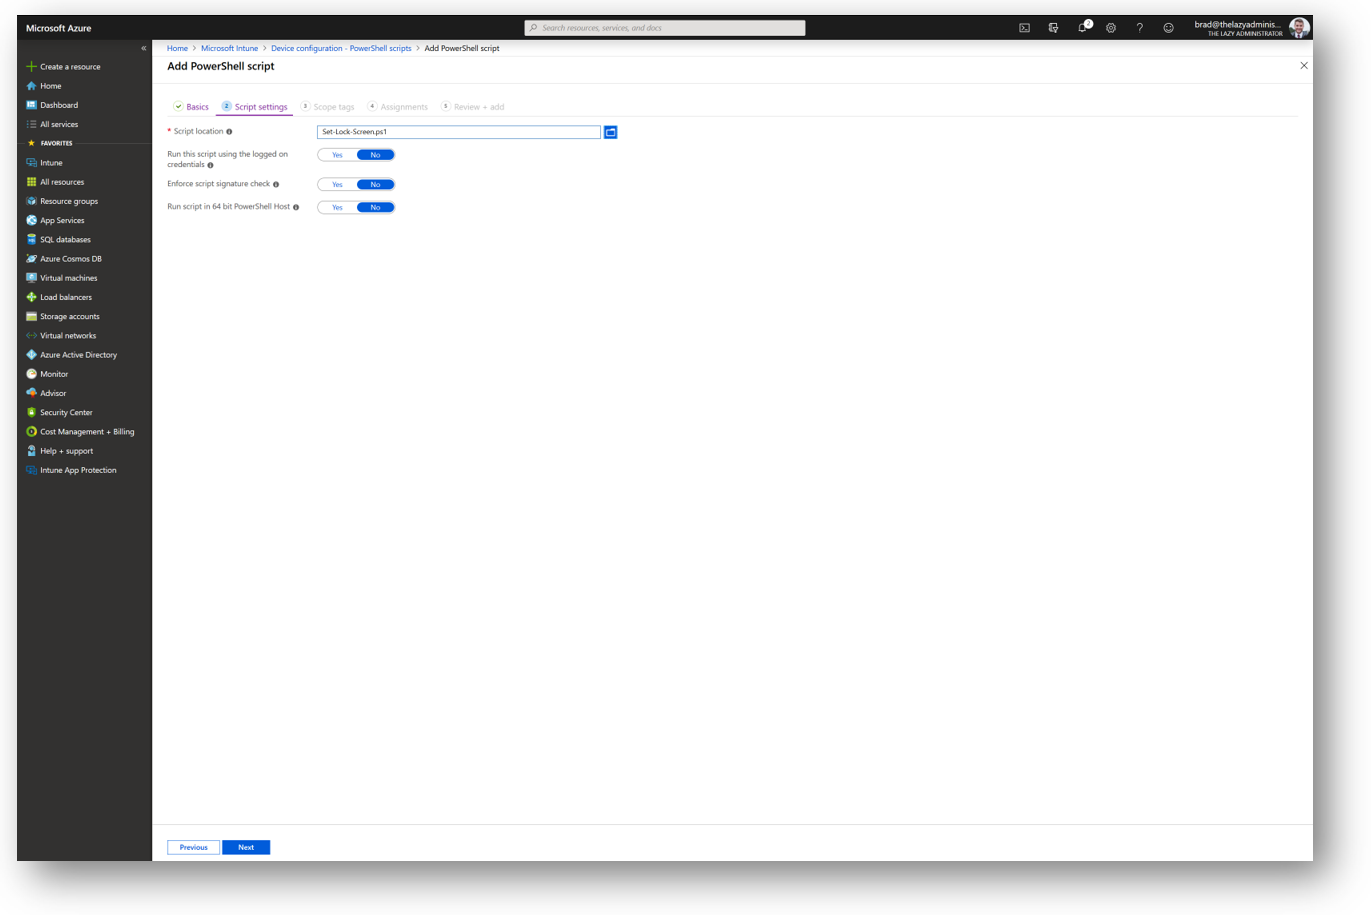
In the Script Settings section, specify the PowerShell script file we created and saved up above
 In the Scope Tags section, configure any scope tags for the policy. I do not have any scope tags so I will press Next
In the Assignments section, I will assign this policy to my “Intune Devices” group. You can apply this to any group you prefer. Once you have assigned the policy to the correct group(s) press Next

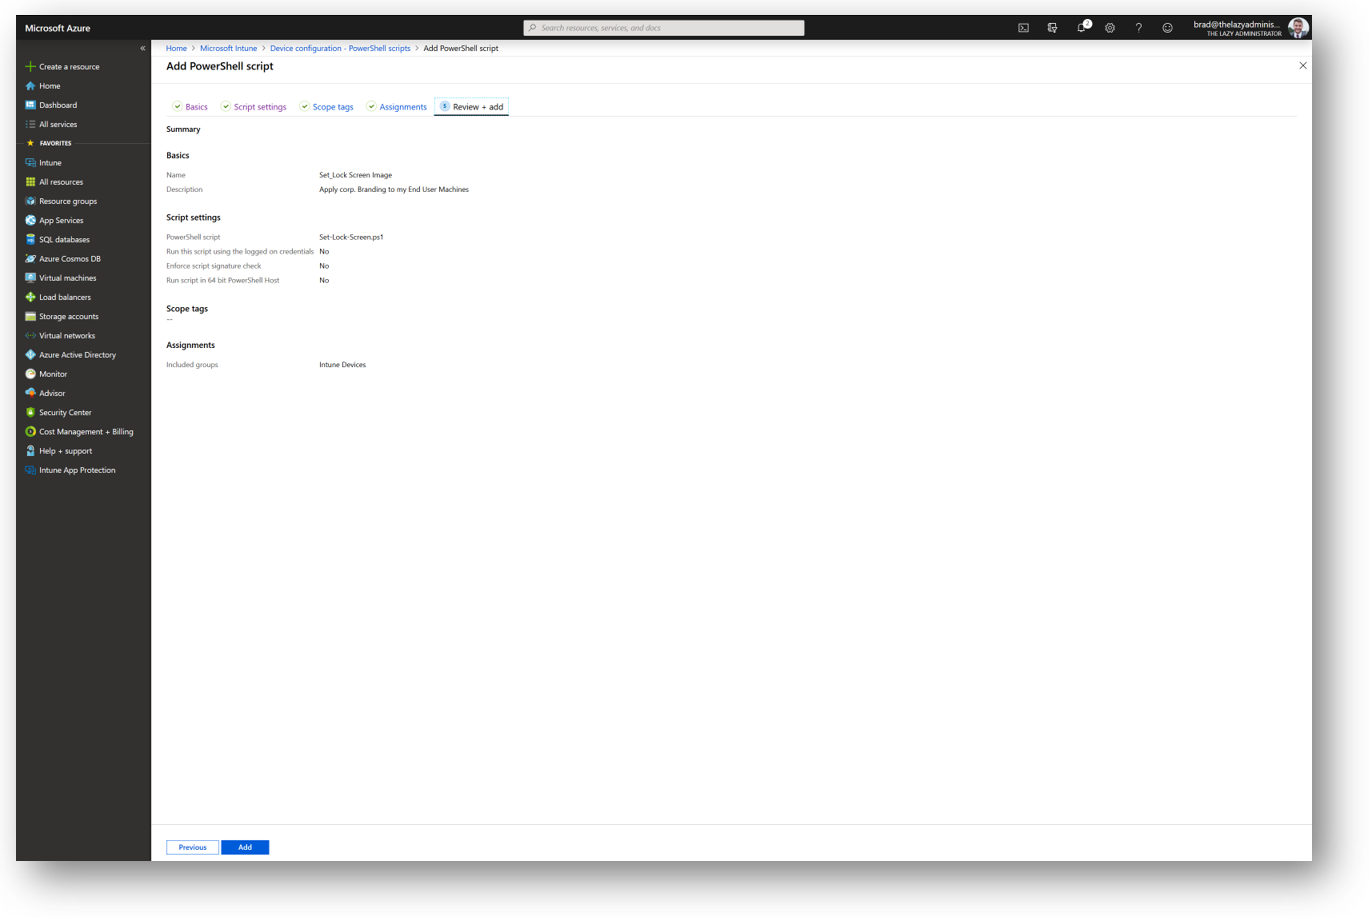
Finally, in the Review + Add section, review your new configuration policy. If it is set up to your enterprises needs, press Add.
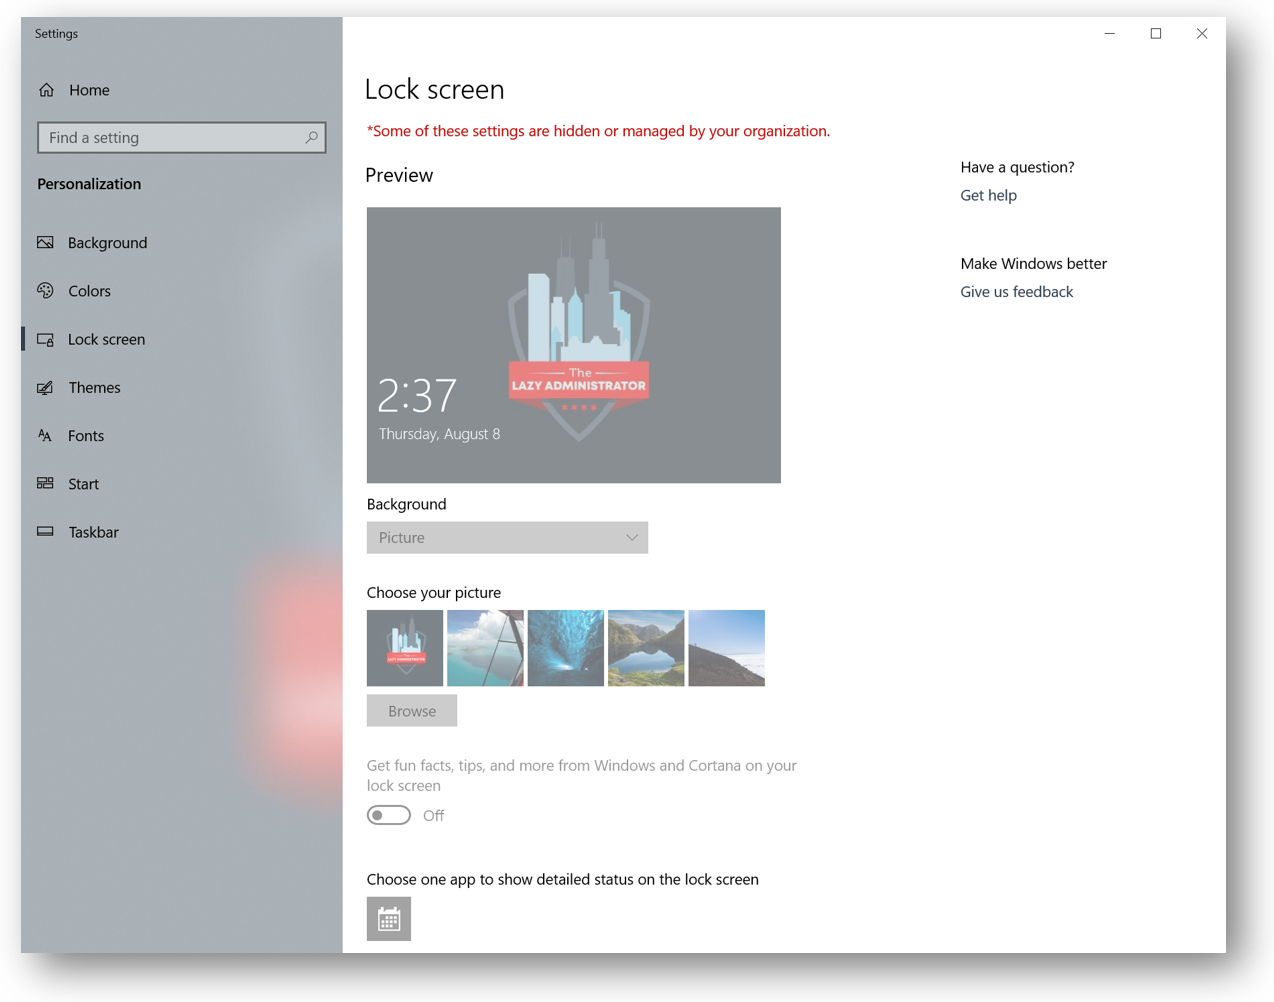
On my target machine I can see that the policy applied as my lock screen wallpaper is the image specified

My name is Bradley Wyatt; I am a Microsoft Most Valuable Professional and I am currently a Cloud Solutions Architect at PSM Partners in the Chicagoland area.
I’m trying to automate a rotation of my lock screen wallpaper by using the following registry key :
[HKEY_LOCAL_MACHINESOFTWAREMicrosoftWindowsCurrentVersionPersonalizationCSP]
"LockScreenImageStatus"=dword:00000001
"LockScreenImagePath"="*somepath*\lockscreen.jpg"
"LockScreenImageUrl"="*somepath*\lockscreen.jpg"
At this point, the image I want appears as it should in the settings app : https://i.imgur.com/OR9UKlE.jpg
However, when I actually lock my screen, there’s no picture to be seen, I only get a blue-ish background : https://i.imgur.com/ou0IGMB.jpg
Here is the picture, if it can help. I naturally tried with several other ones, of different sources. It bore no success.
Edit : I have Windows 10 1909 build 18363.900
Thanks in advance for any help.
asked Jun 16, 2020 at 20:46
![]()
Found !!
Windows (10 definitly, don’t know about previous builds) stores the lock screen wallpapers in C:ProgramDataMicrosoftWindowsSystemData and some subfolders in there. By default, no user has access to this directory, not even read-only access.
For a previous tweak, I changed the permissions in there and, by error, I removed all permissions for the system user. That was why the lock screen wallpaper could not be set properly and only appeared in the settings.
I reset the permissions with the command icacls "C:ProgramDataMicrosoftWindowsSystemData" /reset /t /c /l and everything went back to normal.
answered Jun 19, 2020 at 9:28
![]()
Goal description:
I need to personalize the screen saver on all the computers at my work place to show a specific text or picture(s).
I need to be able to set and force this screen saver and all its customization’s through a script, not with the UI or GPOs.
I need the screen saver to be active, to come on (after 5-10 minutes) and stay on (no screen blackout) — regardless of the state of the user logon, logoff or locked status.
I need this to apply to all machines, mostly Win 10, some win 7, Home and Pro editions
I will need to be able to change the customization/to change the text or pictures every week or so.
Here are my problems and concerns:
1) Limitations:
-
Any deployment of these changes needs to be made through Atera using Scripting. Atera is an RMM which supports execution of .bat and .ps1 (power-shell) files which will run on the local machine as SYSTEM or a local user account.
This is because all 150 computers are spread out over 7 different locations, and not connected to any domain or server of sorts. So, cannot use group policies. -
I am not sure how I would specify a picture or multiple pictures for a (slideshow?) screen saver in a script.
-
I am not sure how to ensure that the screen saver will apply on a system level — like when logged off — and not just a per-user level (most REG based scripts I’ve seen target the HKCU for screen saver settings — see here for example)
Also, an important note- when scripts run as SYSTEM (and will need to run as such for admin privileges) references to HKCU will not effect the currently logged on user. Therefore, in order to effect «HKCU» registry edits, I would need to edit all the profiles under the HKEY_USERS hive. Not sure how I would reference those profiles in a script. Can I use a «*»? Also, how will it effect the current user if I edit their registry hive from the HKEY_USERS directory while they are logged in? -
some computers are Pro while some are Home edition. The Home edition may not allow me to use certain registry keys that would create system policies, although I am unsure about this. Since we would like to enforce this, we want to block the ability to change the screen saver setting options — like is found here. This may not be an issue if we can have the script run daily to reset the settings anyway.
-
most REG script I’ve seen to change screen saver settings required the computer to restart or have the user logoff to take effect. This should not be necessary, but haven’t figured out how to tell the computer to recognize the new setting without restarting
2) Conflicts
-
Default on windows is to timeout the screen (black) when locked after a few minutes of idle (I am sure a registry edit can change this)
-
some computers are going to sleep after idle (possibly a HKLM_currentcontrolset registry entry can fix this).
-
I currently have a scheduled task that runs on idle (after 10 minutes) which locks the screen and closes methasoft (EMR program) after an hour using a .bat file I created. In my experience, I have seen the screen saver come on, and them upon the device being locked, it would go away and instead show the login screen (like after pressing Start+L). Also, I found that during the testing for methasoft to close (I had tested where it closed within a few minutes) I found that it would bring the screen back on (after blacking out), and I am concerned that it would also kill the screen saver and bring back the lock screen.
This may not be an issue if the screen saver will come on again when idle on the lock screen.