Install Home Assistant Operating System
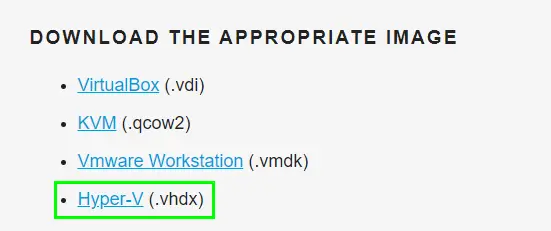
Download the appropriate image
-
VirtualBox (.vdi)
-
KVM (.qcow2)
-
Vmware Workstation (.vmdk)
-
Hyper-V (.vhdx)
Follow this guide if you already are running a supported virtual machine hypervisor. If you are not familiar with virtual machines we recommend installation Home Assistant OS directly on a Raspberry Pi or an ODROID.
Create the Virtual Machine
Load the appliance image into your virtual machine hypervisor. (Note: You are free to assign as much resources as you wish to the VM, please assign enough based on your add-on needs).
Minimum recommended assignments:
- 2 GB RAM
- 32 GB Storage
- 2vCPU
All these can be extended if your usage calls for more resources.
Hypervisor specific configuration
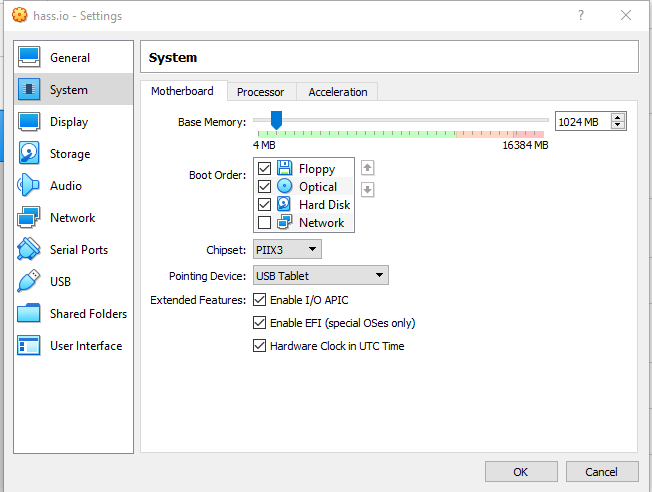
VirtualBox
KVM (virt-manager)
KVM (virt-install)
Vmware Workstation
Hyper-V
- Create a new virtual machine
- Select Type “Linux” and Version “Linux 2.6 / 3.x / 4.x (64-bit)”
- Select “Use an existing virtual hard disk file”, select the unzipped VDI file from above
- Edit the “Settings” of the VM and go “System” then “Motherboard” and select “Enable EFI”
- Then go to “Network” “Adapter 1” choose “Bridged Adapter” and choose your Network adapter
Please keep in mind that the bridged adapter only functions over a hardwired ethernet connection.
Using Wi-Fi on your VirtualBox host is unsupported.
6. Then go to «Audio» and choose «Intel HD Audio» as Audio Controller.
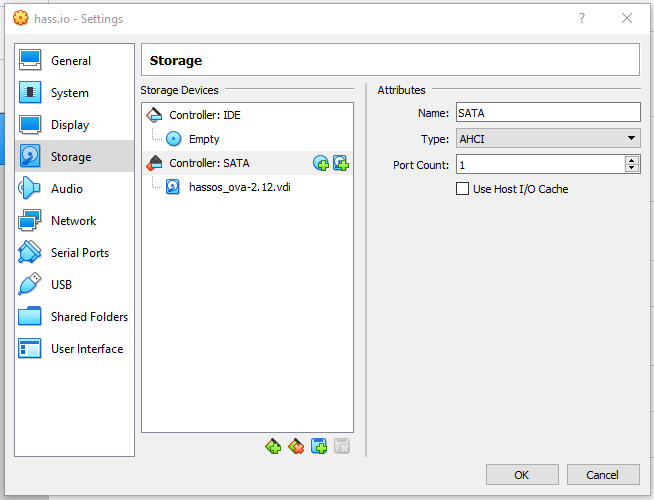
By default VirtualBox does not free up unused disk space. To automatically shrink the vdi disk image
the discard option must be enabled:
VBoxManage storageattach <VM name> --storagectl "SATA" --port 0 --device 0 --nonrotational on --discard on
- Create a new virtual machine in
virt-manager - Select “Import existing disk image”, provide the path to the QCOW2 image above
- Choose “Generic Default” for the operating system
- Check the box for “Customize configuration before install”
- Select your bridge under “Network Selection”
- Under customization select “Overview” -> “Firmware” -> “UEFI x86_64: …”. Make sure to select a non-secureboot version of OVMF (does not contain the word
secure,secboot, etc.), e.g.,/usr/share/edk2/ovmf/OVMF_CODE.fd. - Click “Add Hardware” (bottom left), and select “Channel”
- Select device type: “unix”
- Select name: “org.qemu.guest_agent.0”
- Finally select “Begin Installation” (upper left corner)
virt-install --name hass --description "Home Assistant OS" --os-variant=generic --ram=2048 --vcpus=2 --disk <PATH TO QCOW2 FILE>,bus=sata --graphics none --boot uefi
- Create a new virtual machine
- Select “Custom”, make it compatible with the default of Workstation and ESX
- Choose “I will install the operating system later”, select “Linux” -> “Other Linux 5.x or later kernel 64-bit”
- Select “Use Bridged Networking”
- Select “Use an existing virtual disk” and select the VMDK file above,
After creation of VM go to “Settings” and “Options” then “Advanced” and select “Firmware type” to “UEFI”.
Hyper-V does not have USB support
- Create a new virtual machine
- Select “Generation 2”
- Select “Connection -> “Your Virtual Switch that is bridged”
- Select “Use an existing virtual hard disk” and select the VHDX file from above
After creation go to “Settings” -> “Security” and deselect “Enable Secure Boot”.
Start up your Virtual Machine
- Start the Virtual Machine
- Observe the boot process of Home Assistant Operating System
- Once completed you will be able to reach Home Assistant on homeassistant.local:8123. If you are running an older Windows version or have a stricter network configuration, you might need to access Home Assistant at homeassistant:8123 or
http://X.X.X.X:8123(replace X.X.X.X with your ’s IP address).
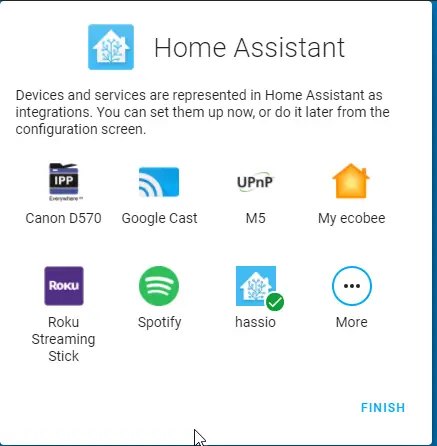
With the Home Assistant Operating System installed and accessible you can continue with onboarding.
Install Home Assistant Core
Install WSL
To install Home Assistant Core on Windows, you will need to use the Windows Subsystem for Linux (WSL). Follow the WSL installation instructions and install Ubuntu from the Windows Store.
As an alternative, Home Assistant OS can be installed in a Linux guest VM. Running Home Assistant Core directly on Windows is not supported.
This is an advanced installation process, and some steps might differ on your system. Considering the nature of this installation type, we assume you can handle subtle differences between this document and the system configuration you are using. When in doubt, please consider one of the other installation methods, as they might be a better fit instead.
Prerequisites
This guide assumes that you already have an operating system setup and have installed Python 3.10 (including the package python3-dev) or newer.
Install dependencies
Before you start, make sure your system is fully updated, all packages in this guide are installed with apt, if your OS does not have that, look for alternatives.
sudo apt-get update
sudo apt-get upgrade -y
Install the dependencies:
sudo apt-get install -y python3 python3-dev python3-venv python3-pip bluez libffi-dev libssl-dev libjpeg-dev zlib1g-dev autoconf build-essential libopenjp2-7 libtiff5 libturbojpeg0-dev tzdata
The above-listed dependencies might differ or missing, depending on your system or personal use of Home Assistant.
Create an account
Add an account for Home Assistant Core called homeassistant.
Since this account is only for running Home Assistant Core the extra arguments of -rm is added to create a system account and create a home directory.
sudo useradd -rm homeassistant
Create the virtual environment
First we will create a directory for the installation of Home Assistant Core and change the owner to the homeassistant account.
sudo mkdir /srv/homeassistant
sudo chown homeassistant:homeassistant /srv/homeassistant
Next up is to create and change to a virtual environment for Home Assistant Core. This will be done as the homeassistant account.
sudo -u homeassistant -H -s
cd /srv/homeassistant
python3 -m venv .
source bin/activate
Once you have activated the virtual environment (notice the prompt change to (homeassistant) [email protected]:/srv/homeassistant $) you will need to run the following command to install a required Python package.
python3 -m pip install wheel
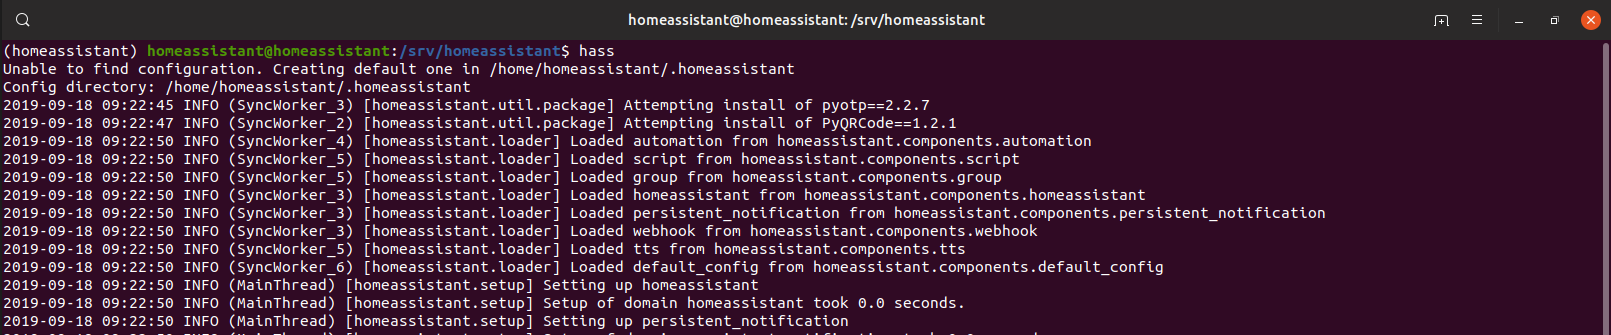
Once you have installed the required Python package, it is now time to install Home Assistant Core!
pip3 install homeassistant==2023.2.1
Start Home Assistant Core for the first time. This will complete the installation for you, automatically creating the .homeassistant configuration directory in the /home/homeassistant directory, and installing any basic dependencies.
You can now reach your installation via the web interface on http://homeassistant.local:8123.
If this address doesn’t work you may also try http://localhost:8123 or http://X.X.X.X:8123 (replace X.X.X.X with your machines’ IP address).
When you run the hass command for the first time, it will download, install and cache the necessary libraries/dependencies. This procedure may take anywhere between 5 to 10 minutes. During that time, you may get “site cannot be reached” error when accessing the web interface. This will only happen for the first time, and subsequent restarts will be much faster.
Help us to improve our documentation
Suggest an edit to this page, or provide/view feedback for this page.
READING TIME: 8 MINUTES
In this guide, I’m going to show you how to install Home Assistant in Hyper-V on a Windows Server 2019 host. The Home Assistant team has already provided a pre-configured image for us to use, so creating this is really simple to get up and running. You can probably have this created from start to finish in less than 15 minutes.
There are a lot of popular ways to run Home Assistant. My preferred method is using the VMWare Workstation install because it supports USB passthrough, meaning I can use a Nortek GoControl zwave/zigbee dongle to control zwave and zigbee devices. However, you can’t have both Hyper-V and VMWare Workstation running on the same computer, so I have VMWare on my desktop and Hyper-V on my server.
Let’s get started!
Limitations of Home Assistant in Hyper-V
Like I mentioned earlier, the biggest disadvantage of installing Home Assistant on a Hyper-V VM is that USB passthrough isn’t supported. These means you can’t use an Aeotec zwave stick (or any other USB hub) to manage your zwave or zigbee devices.
There are some workarounds available, but for the most part – if you install Home Assistant in Hyper-V, plan on using wifi-only devices.
Or, if you are like me, I am setting up a 2nd Home Assistant instance. I ran into some issues with Frigate killing zwave/zigbee on my main Home Assistant install, so I’m installing in Hyper-V solely for the purpose of installing the Frigate addon.
Prerequisites
This guide assumes that you already have a computer or server that has the Hyper-V role installed. If not, there are a ton of guides available on Google. Once Hyper-V is running, you can continue below.
Step 1: Download Home Assistant .VHDX image
To get started installing Home Assistant in Hyper-V, you first need to download the virtual hard disk (.vhdx) image that already has Home Assistant preinstalled.
Download that from here: https://www.home-assistant.io/installation/windows/
After clicking the Hyper-V link, a box will popup. Save this file to your Downloads folder.

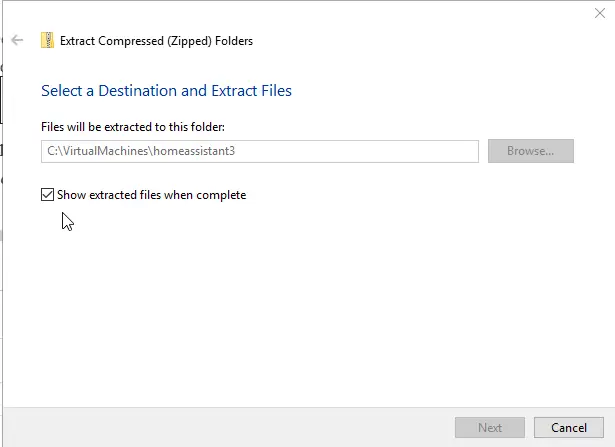
Step 2: Create a VirtualMachines folder
Next, create a new folder in Windows. This is where you’re Hyper-V configuration files and the VHDX hard drive will be stored.
For this guide, I created a folder called homeassistant3 on my C: drive (C:VirtualMachineshomeassistant3) You can name your folder whatever you want (mine is just called homeassistant3 because I had other folders already created during testing/creating this guide)
Right click the .zip file in your Downloads folder > Extract all. Then Browse to your C:VirtualMachineshomeassistant3 folder.
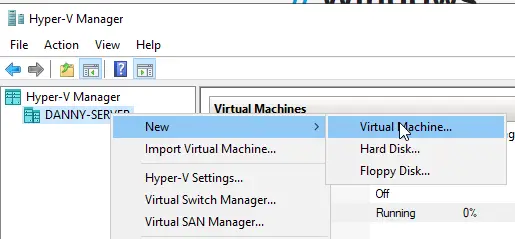
Step 3: Create Home Assistant Hyper-V VM
Open Hyper-V Manager. Right-click on your local server name (Danny-Server in the screenshot).
Then click New > Virtual Machine.
On the Before You Begin page, click Next.
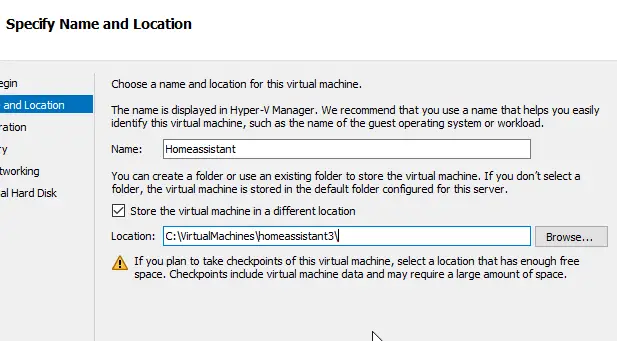
On the Specify Name and Location page, give your VM a name (i.e. – homeassistant). Check the box for “store the virtual machine in a different location” and then enter the path you created in Step 2 (i.e. – C:VirtualMachineshomeassistant3). Then click Next.
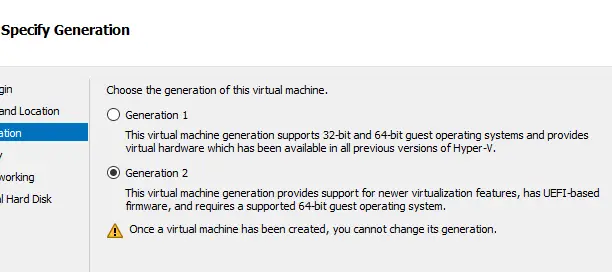
On the Specify Generation page, choose Generation 2.
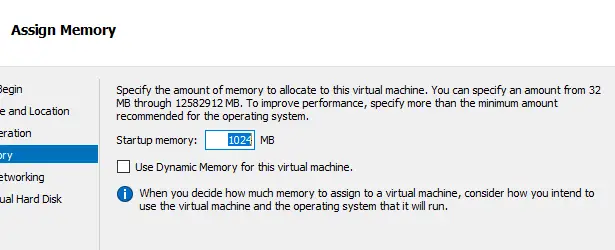
On the Assign Memory page, you can leave this as default 1024 for now (this can easily be changed later). Leave Use Dynamic Memory unchecked.
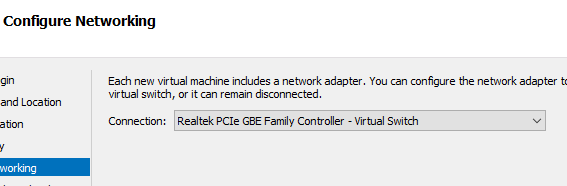
Under Configure Networking, select the dropdown and choose your network adapter. Note: If this is the very first VM you’ve ever created and nothing shows up here, you will first need to go into the Virtual Switch Manager settings of Hyper-V Manager and create a new External Switch.
On the Connect Virtual Hard Disk screen, choose Use an existing virtual hard disk. Then, browse to C:VirtualMachineshomeassistant3 and select the .vhdx.

Then click Next and Finish. Congratulations! You’re VM is now setup and ready to start using.
There is one more thing you need to do before you power it on.
Step 4: Disable Secure Boot
Before you can boot your new VM, you first need to disable secure boot.
On your Hyper-V dashboard, you’ll see your new VM. Right-click it and go to Settings.
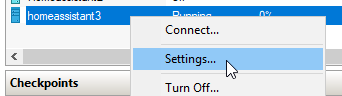
Under the Security section, uncheck Enable Secure Boot. Then click OK. The VM will not boot properly if you forget to do this.

Step 5: Start Home Assistant VM from Hyper-V Manager
To start your virtual machine, just right-click it and click Start.
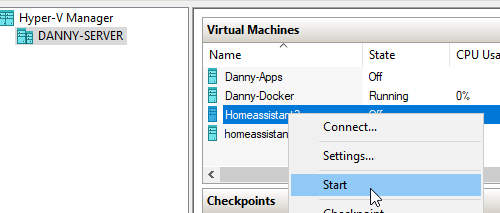
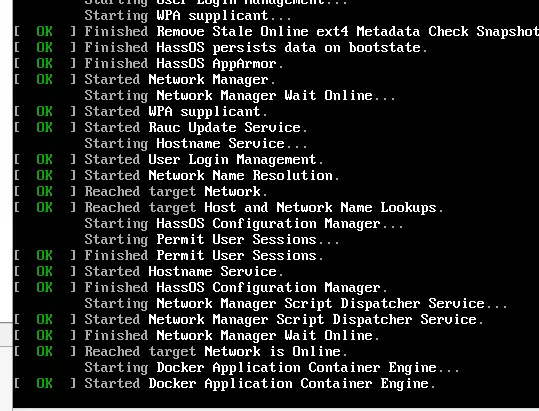
Next, double-click the VM so you can what’s going on in a new window. You should see it running through a bunch of startup tasks.
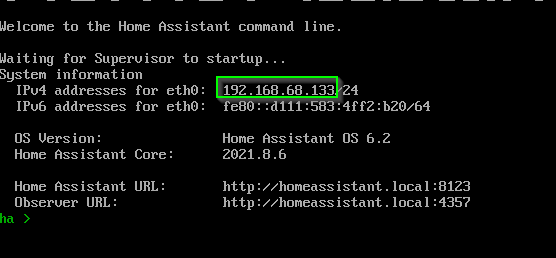
If all goes well, then after a minute or so, it should land on a System Information page showing you the IP address of your Home Assistant instance:
Step 6: Launch Home Assistant in a Web Browser
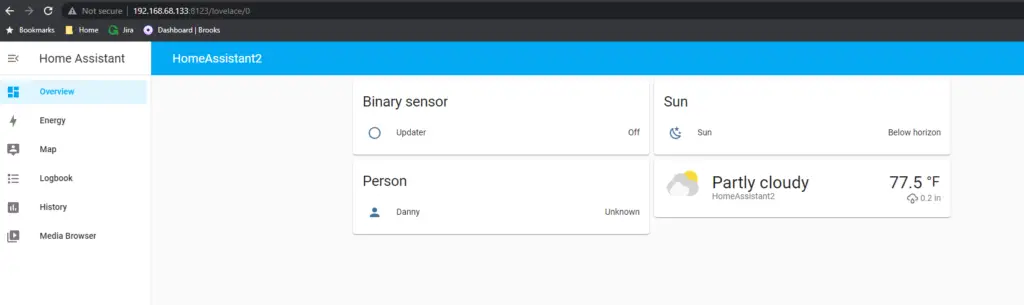
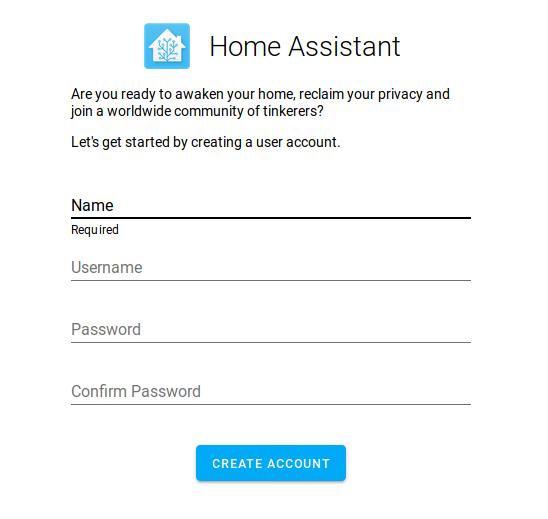
If you made it to this screen, then all you need to do is enter the IP address and port into your web browser (i.e. – 192.168.68.133:8123). It will display a screen that says “Initializing, this may take up to 20 minutes” but in my experience, it took less than 1.
Once this screen goes away, you’ll be met with a user creation screen:
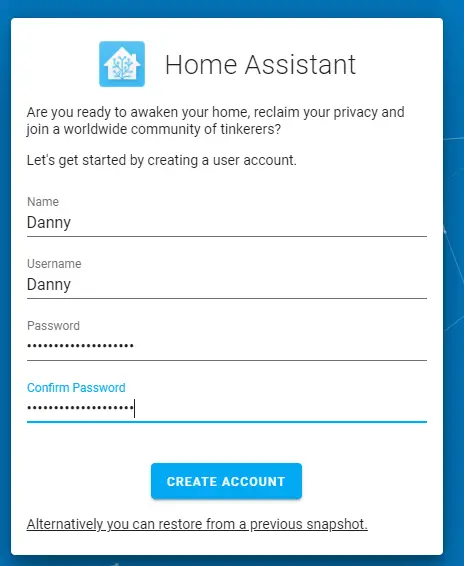
After creating a user, you’ll have a few additional first time parameters to setup, such as setting your timezone, currency, and whether or not you want to share analytics and statistic with the HA developers, etc.
Home Assistant can automatically attempt to start setting up devices on your network. Since this is just my 2nd instance and I’m only installing Frigate on it, I’m just going to click Finish.
And as you can see, Home Assistant has successfully been installed on a Hyper-V virtual machine in 2021!
Troubleshooting Home Assistant on Hyper-V Install
VM not booting: Disable secure boot (see step 4)
Not loading IP address/hostname in browser: Open Command Prompt and type ipconfig /flushdns or use a Google Incognito browser.
hostname conflicts: If you are setting this up as a secondary Home Assistant instance, then it’s possible you have two devices on your network with the default name “homeassistant”. You can change the hostname of your main instance under Supervisor>System>Host.
VM still not working: If all else fails, create a brand new VM and try it again.
The first time I set this up in Hyper-V, I didn’t disable secure boot. After turning the VM off and disabling it, I still couldn’t load the instance in a web browser, so I resorted to creating another brand new VM and ensuring to turn off secure boot BEFORE starting it. After that, it launched exactly as expected.
Wrapping Up
Now that you’ve got everything configured correctly, I urge you to look through some of my 50+ other Home Assistant tutorials. I’m sure you’ll find something fun and useful to include in your own Home Assistant setup.
If you run into any issues while following my guide, please let me know in the comments below! I’d be happy to help you out.
Danny
Hey there! I’m Danny, owner and writer of Smart Home Pursuits. I’ve worked as an IT Manager for 8 years and enjoy using my knowledge to make my smart home «smarter».
This post is a quick tutorial you can follow to get Home Assistant working on Hyper-V so you can take advantage of your PC’s compute power instead of running it on a Raspberry Pi. This installation method is really quick and doesn’t require any command line setup.
Important: If you want to use USB devices in Home Assistant, please this different tutorial -> USB Support for Home Assistant on Hyper-V. The approach used in this article doesn't allow for USB devices.
Step 1 – Create Hyper V Machine
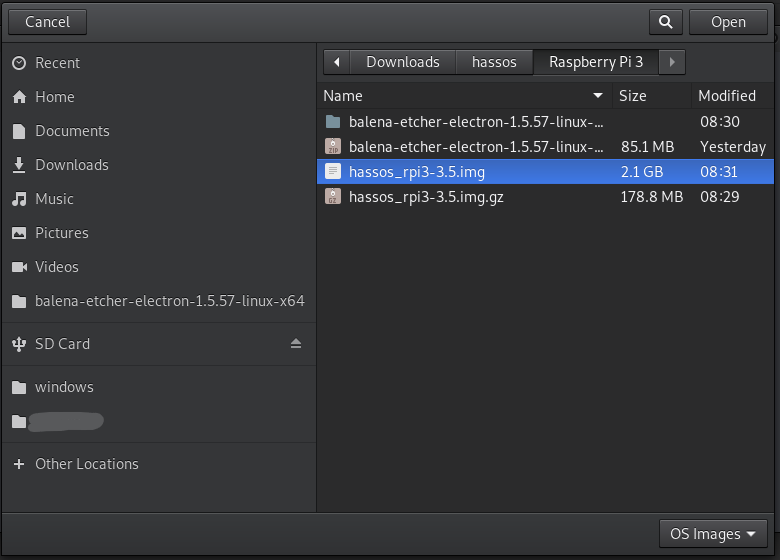
- Download the VHDX file (hassos_ova-[version].vhdx.gz) from the home-assistant GitHub Releases page.
- I recommend only using the latest non-beta release so you won’t have trouble with HA’s built-in updater. As of writing this, that is version 3.13:
- Right-click on the downloaded
.gzfile, select “Properties”, check the “Unblock” checkbox and click OK. - Extract the .vhdx file from the
.gzfile (you can use 7-Zip to do this). Don’t worry about where you extract it to, Hyper-V will make a copy. - Open Hyper-V Manager app on Windows 10.
- In the right pane, select Quick Create (at the top right).
- Choose “Local Installation Source” option for an OS and use the extracted
.vhdxfile. - You’ll be presented with the VM’s Settings window before starting it up. Here are some recommendations:
- Start the machine and wait for initial setup to complete and you see the Welcome to HassOS prompt.


At this point, you should see the following:

You’re finished with the installation, theres one more thing to do so that you can access the machine from your network
Step 2 – Setup External Network Switch
The Default switch that comes with a HyperV machine doesn’t have access to the network that the host PC is using. You can easily add a new adapter and bridge it to the PC’s adapter.
- In Hyper-V manager, open the Virtual Switch Manager:

- Select “New Virtual Switch”, select “External” and click “Create Virtual Switch”

- When it’s created, you’ll see it in the left pane, select it to change the settings. First, give it a recognizable name, like “External Switch”. Next, select the External Network radio button and choose the network adapter that you want the new switch to use (in the screenshot below, you can see I chose the PC’s wireless adapter). Finally, click OK to save the changes.

- Back in Hyper-V manager’s VMs list, right click on the VM and select Settings:

- In the Settings window, select the Network Adapter tab and change the Virtual Switch setting to use the new “External Switch” you just created:

Result
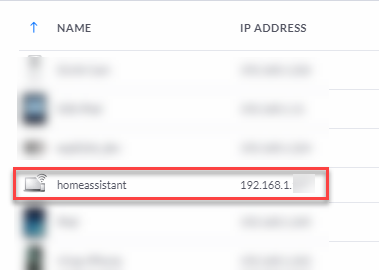
Now you can connect to Home Assistant because it is available on the network (that is connected to the same adapter you chose for “External Switch”). It should be visible on the netowrk as ‘homeassistant’:
You can now access the machine using the IP address, plus the Home Assistant port “8123” (e.g. http://the_ip_address:8123) to start the onboarding experience.

Please follow and like us:
Some preamble:
- Don’t try to install HomeAssistant on Windows. Seriously, don’t.
- Don’t try to install HomeAssistant on Docker on Windows. Serously, don’t
I’ve tried both of the above and there are too many gotchas, plus various functionality simply won’t work. No matter what you think is the justification for doing so, I assure you it’s going to be far easier to learn the few bits about Ubuntu that you need to install it on that instead.
Additonally only use Docker if you don’t need to discover devices on the local network or are happy with the security implications of giving the Docker app an IP on your host network (even then, some things might not work).
The above out of the way:
I used to run VMware at home, but as I use it all day at work I thought I’d familiarise myself with the Windows virtualisation ecosystem. I now run a Windows 2016 file server on a Hyper-V virtual machine (VM).
I have limited experience of *nix systems. However I had a lot of issues trying to get HomeAssistant running on a Windows host (see above), so here’s my full install method for getting HomeAssistant up and running under Ubuntu on a Hyper-V virtual machine with the config files in a Windows-accessible share.
Install Ubuntu 18.04 LTS on HyperV VM
During install simply make sure you give it a static IP on your local network.
Once installed, log into it using Putty or similar SSH client
Install all updates
sudo apt-get update && sudo apt-get dist-upgrade –yes
Activate Hyper-V Linux Integration Services (LIS)
Ubuntu ships with LIS drivers and services already installed:
- Edit the “modules” file located in /etc/initramfs-tools using this command:
sudo nano /etc/initramfs-tools/modules - In nano editor, navigate to the last line in the file and use the insert ( I ) command to append and enter the following lines:
hv_vmbus
hv_storvsc
hv_blkvsc
hv_netvsc - Save the file (ctrl-X)
- Install the Hyper-V KVP and VSS daemons:
sudo apt-get install linux-tools-virtual linux-cloud-tools-virtual - Next, run the following commands to re-initialize the “modules” file:
sudo update-initramfs -u - Finally, reboot the virtual machine by executing the below command:
sudo shutdown -r now
Once the guest virtual machine is rebooted, the LIS drivers and services will be registered in the system.
Prepare a samba share for your configuration files
Install and update samba
sudo apt-get update && sudo apt-get install samba –yes
Edit the smb config
sudo nano /etc/samba/smb.conf
In edit mode, hold down ctrl+k until all rows are removed (it removes one row at the time) then add the following information – amend “netbios name” and “workgroup” to your own values
[global]
netbios name = servername
server string = HA File Store
workgroup = WORKGROUP
hosts allow =
socket options = TCP_NODELAY IPTOS_LOWDELAY SO_RCVBUF=65536 SO_SNDBUF=65536
remote announce =
remote browse sync =[HOME ASSISTANT]
path = /home/homeassistant/.homeassistant/
comment = No comment
browsable = yes
read only = no
valid users =
writable = yes
guest ok = yes
public = yes
create mask = 0777
directory mask = 0777
force user = root
force create mode = 0777
force directory mode = 0777
hosts allow =
Restart the samba service
sudo service smbd restart
Install Virtual Environment
Link to HA documentation: https://home-assistant.io/docs/installation/virtualenv/
Installing Python and the virtual environment
sudo apt-get install python3 python3-venv python3-pip
Update/enable the virtual environment
sudo pip install –upgrade virtualenv
Add a user for home assistant and add to dialout group for using Z-Wave and Zigbee controllers
sudo useradd -rm homeassistant -G dialout
Create a directory for the installation of Home Assistant and change the owner to the homeassistant account.
sudo mkdir /srv/homeassistant
sudo chown homeassistant:homeassistant /srv/homeassistant
Add SMB share password (write it down!)
sudo smbpasswd -a homeassistant
Become the new user (When acting as the user “homeassistant” sudo is not needed).
sudo su -s /bin/bash homeassistant
Setup the new virtual environment
cd /srv/homeassistant
python3 -m venv .
source bin/activate
Install required packages
python3 -m pip install wheel
python3 -m pip install SQLalchemy
Install home assistant!
pip3 install –upgrade homeassistant
Type the following to exit the virtual user
exit
Note - to upgrade Homeassistant in future:sudo su -s /bin/bash homeassistant source /srv/homeassistant/bin/activate f
Configure HA to run as a service
Create a new configuration file:
sudo nano /etc/systemd/system/home-assistant@homeassistant.service
Paste the following configuration into the file then exit, saving the data
[Unit]
Description=Home Assistant
After=network-online.target[Service]
Type=simple
User=%i
ExecStart=/srv/homeassistant/bin/hass –c "/home/homeassistant/.homeassistant"[Install]
WantedBy=multi-user.target
Enable the new service
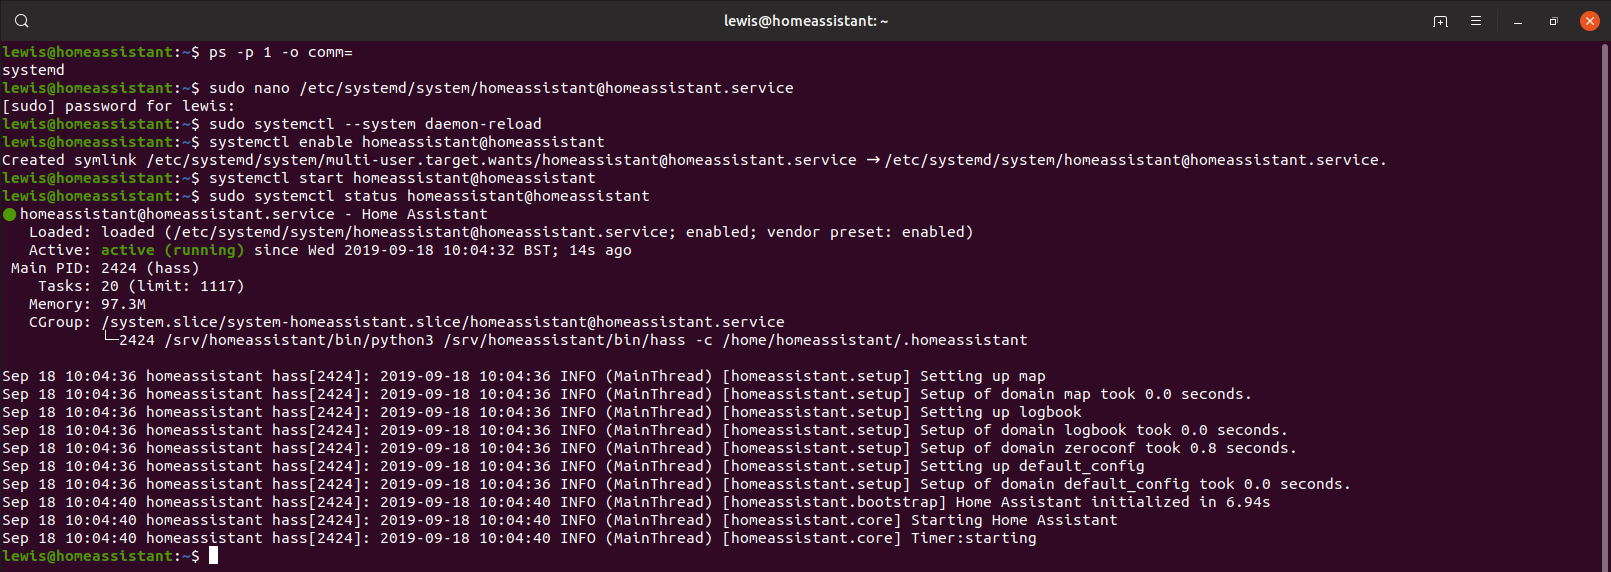
sudo systemctl –system daemon-reload
sudo systemctl enable home-assistant@homeassistant
sudo systemctl start home-assistant@homeassistant
To check status of homeassistant service
sudo systemctl status home-assistant@homeassistant
Reboot your system to see that autostart works
sudo shutdown –r now
Note to stop/start HA in future:sudo systemctl stop home-assistant@homeassistant
sudo systemctl start home-assistant@homeassistant
You should now have HA up and running.
- To edit config navigate to the servername in windows explorer and access the config files folder using the homeassistant username and password
- To access the interface http://serverip:8123
![]()
After increasing memory from 1 to 2GB i now sometimes see the hassos boot menu. The only options which «work» are the shell and System 0. The auto and system 1 don’t do anything when enter is pressed. System 0 doesn’t seem to progress through the boot however.


![]()
Same issue, very interested in finding a fix for this. Just to document what DOES NOT WORK, I tried the Microsoft Virtual Machine Converter 3.1
PS C:hassio> Import-Module ‘C:Program FilesMicrosoft Virtual Machine ConverterMvmcCmdlet.psd1’
PS C:hassio> ConvertTo-MvmcVirtualHardDisk -SourceLiteralPath C:hassiohassos_ova-1.8.vmdk -VhdType DynamicHardDisk -V hdFormat vhdx -destination C:hassio
Created a new VM with the new vxhd as existing disk. Get «image verification failed» with any form of Secure Boot enabled. Tried UEFI Certificate Authority and Open Source Shielded VM. With no secure boot, it attempts to boot «System 0» but hangs. If i spam «m» at startup I do get the menu but as vb-git mentioned only System 0 and Shell do anything. System 0 hangs at Loading MS-DOS executable ‘/mnt/system/bzImage’.
Has anyone got this working on Hyper-V? Maybe the issue is I am trying to use the GUI instead of some advanced command line switches? Some instructions would be awesome.
![]()
The 1.8 vmdk opens fine in VirtualBox (Mac) 5.2.12 — You just need to tick the EFI box and away it will go. So the steps are;
- Create new VM — Linux Other — 64bit — 1024Mb Memory with the VMDK as the disk.
- Click on System Tab — Tick EFI
- Start VM


On Mac it defaults to NAT networking so I port forward to the address of the container which is 172.30.32.1 (from ip addr show on the command line)

![]()
Same! Not working on Hyper-V 
![]()
I’m also having the same issue.
![]()
Yeah I’ve just tried it as well and it won’t boot on Hyper V
Love the guy giving instructions for the virtual box on a mac… Thanks, but doesn’t help for those of us running a proper hypervisor lol
![]()
Getting the same here on a Windows 10 Hyper-V (1803 build) using 1.9 of the image converted to a vhdx. 2vCPU, EFI (Gen2), Secure Boot Disabled, 3GB of RAM (No dynamic). And sadly still doesn’t boot.

![]()
I tried it again with the latest development 2 / build 1 release but same result it seems.
![]()
Responding to MrQuiX’s comment, you gave the argument «DynamicHardDisk». Try running it again with «FixedHardDisk» and you’ll have more luck in converting to a VHDX, however I still can’t get this to boot on my HyperVisor, running on Windows 10 Enterprise with a RYZEN platform.
![]()
Still seeing the same issue on HassOS Release 1 build 1.10 (Stable). Converted using StarWind V2V convertor, tried both VHD and VHDX (not that that should make any difference).
![]()
Same issue here, on Windows 10 Pro. Converted using the Microsoft tool mentioned above.
![]()
Same issue here, on Server 2016 and HassOS R1B1.10. Converted usin Microsoft tool. Any solution?
![]()
![]()
![]()
I attempted to convert with qemu-img convert -f vmdk hassos_ova-1.11.vmdk -O vhdx subformat=fixed hassos_ova-1.11.vhdx and still no dice (was hoping it might have been an artifact of Microsoft Virtual Machine Converter).
![]()
Any news on how to run hassos on hyper-v?
![]()
It’s worth noting that Home Assistant will run in a Hyper-V virtual machine in general. I installed a guest Ubuntu 18.04 server (enable «universe» repository for the additional python dependencies) then followed the Raspbian/Debian guide here. I suspect the python virtual env setup will work fairly well on any guest OS.
It might make more sense to specify the vmdk doesn’t boot under Hyper-V.
![]()
It’s worth noting that Home Assistant will run in a Hyper-V virtual machine in general. I installed a guest Ubuntu 18.04 server (enable «universe» repository for the additional python dependencies) then followed the Raspbian/Debian guide here. I suspect the python virtual env setup will work fairly well on any guest OS.
It might make more sense to specify the
vmdkdoesn’t boot under Hyper-V.
I’m not sure you are in the right section. Of course it works in Hyper-V as it would under pretty much any hypervisor if you manually install your own Linux OS (or any supported OS) and then manually install the environment. This repo (and issue) is specifically about HassOS.
![]()
My apologies, I thought HassOS also covered arbitrary Raspbian (or similar) environments running Home Assistant. I’ve done more reading and discovered I had misunderstood.
![]()
Just treid with HassOS 1.12 inside Hyper-V 2012-R2
Still no luck, it keeps using a lot op CPU but it’s not booting.
Any news on development to fix this?
![]()
same here still no luck
![]()
Same here.. Looks like nobody cares
![]()
To bad I do not know how to debug/investigate this problem any further (perhaps someone can point me in the right direction)
For myself I created a ‘workaround’ by manually installing Ubuntu server within a Hyper-V guest and installing Hass.IO there, it’s not fully HassOS but at least it works for me.
![]()
@pvizeli When can we expect a new release/build, in order for me to test this?
![]()
Would also be very interested in hyper-v support. If we can assist with testing just let us know 
![]()
The latest 2.4 build now boots on Hyper-V, you will need to disable secure boot (at least I had to), and use a Gen2 VM (for EFI) and the provided vhdx just works.
![]()
The latest 2.4 build now boots on Hyper-V, you will need to disable secure boot (at least I had to), and use a Gen2 VM (for EFI) and the provided vhdx just works.
Hmm, unfortunately this is not my experience, I’m seeing the same behavior as with a converted vmdk. I’m still seeing the same boot screen in the most recent screenshot you posted — after a seemingly random number of reboots it has a couple times started booting but then the docker service fails to start and the machine never fully boots.
Gen2, Secure boot disabled, not using dynamic memory, and I also tried playing with number of cores assigned and with integration services nothing I’ve tried gets it to boot properly. FWIW I’m running Server 2016 Datacenter.
![]()
![]()
No idea why I’m having so much trouble.

![]()
VHDX provided by https://github.com/home-assistant/hassos/releases/download/2.4/hassos_ova-2.4.vhdx.gz is ok. You need to setup machine 2nd generation and disable secure boot by powershell command:
Set-VMFirmware «vm-machine-name» -EnableSecureBoot Off
I cannot check right now is 2GB of memory needed.
You don’t have to do this via PowerShell, it is available in the UI as well. But yes you do need to disable secure boot at this stage.
No idea why I’m having so much trouble.
That looks like you are getting it to boot, it does take a long time on the first boot before it is functional as it runs through a lot of initial setup. If you are at least seeing the OS boot like you are, just give it some time. Although it does seem odd that you are getting Docker Failures, if I get time I’ll setup a fresh copy and see if I can replicate, but on my Win 10 Hyper-V it just deployed, booted and went without issue.
With that said, I did have an issue when rebooting the VM, it went back to being stuck on the boot menu, it seemed to fix itself after changing the SCSI ID for the virtual disk to anything other than what it was on, after that it seemed to boot again.
![]()
I had left it for a few hours with no progress, but after changing the SCSI ID I was able to get it to boot (although I have to change it any time it reboots).
Still playing with it and trying to figure out how to get wget or similar working and I need to see if I can run a boot script similarly to traditional Linux.
![]()
Hi, I just experienced this issue too after updating Hassio on webif. On reboot I got stuck at the same EFI screen.
My solution was, to get it back to work:
- check dynamic ram is Off! No matter if it was previously set on, simply turn it off.
- change SCSI ID for your VHDD, ex from 0 to 1.
- System will boot
- Shuutdown the Server again, and turn dynamic ram on again if you need.
- System will also boot again with dynamic RAM.
Im running with 512MB just fine.
![]()
![]()
I can now also report success using v. 2.8 on Hyper-V! My steps:
- download and unpack 2.8 VHDX image
- create new VM; gen2 with 1024MB memory and secure boot disabled
- attach the downloaded VHDX to the vm (don’t create a new disk, only use this one)
- boot
- enjoy HASS.io
In one evening i was able to migrate my whole Ubuntu setup to hass.io. This includes MQTT server and Node-RED. I used the hass.io addons for this and everything seems to work perfectly fine. I also performed some reboots during setting up without problems. Now to see what the longer term stability is, also when HA or HASSOS updates are performed. Thanks for the continuing development!
![]()
ghost
removed
the
board/ova
Open Virtual Appliance (Virtual Machine)
label
Feb 11, 2019
![]()
@vb-git Good to hear someone has had success! I downloaded the image, will try these steps later this week.
![]()
Working fine with Gen2 and disable secure boot on W2012R2 Storage Server HyperV
![]()
Can confirm the VHDX image works on Hyper-v running on Windows Server 2019 Standard (evaluation copy), with 1GB RAM, no secure boot.
However I did get this error on the Hyperv logs (I assume this wasn’t critical or the system would’ve stalled).
Description:
‘HASSIO’ has encountered a watchdog timeout and was reset. If the problem persists, contact Product Support for the guest operating system. (Virtual machine ID EC2BAB36-EAE3-42CA-9F91-DD3F53E0197E)
Log Name:
Microsoft-Windows-Hyper-V-Worker-Admin
Source:
Microsoft-Windows-Hyper-V-Chipset
Logged:
Fri Aug 30 2019 16:01:42 GMT+0100 (British Summer Time)
Event ID:
18600
Level:
Critical
![]()
I can confirm Home Assistant’s VHDX works with on Windows 10 1909 (v18363) or later with no effort or special VM OS setup. You do need to disable secure boot which is a easy checkbox in the settings or is done when first selection
I have written a full walk-though tutorial here: https://dvlup.com/2020/05/25/installing-home-assistant-on-hyper-v/
Runtime Proof (Onboarding experience with HassOS running in Hyper-V)
[EDIT] Added networking solution and published blog post with full tutorial.
![]()
![]()
@theskillster I am seeing a similar issue: ‘Hassio’ has encountered a watchdog timeout and was reset. If the problem persists, contact Product Support for the guest operating system. (Virtual machine ID C8589DC8-440E-4B87-BB5A-D4B6EC0678B7)
Did you manage to find a solution to this?
![]()
@GeoffAtHome I ended up giving up on HyperV and used the VirtualBox image. Super easy install and I have superb control over USB, memory and vCPUs.
[EDIT] VirtualBox really screwed up things, so I switched back to HyperV. I updated my post with complete instructions.
![]()
@LanceMcCarthy thanks. I went the other way. I started with the VirtualBox image and I am now using HyperV. Works well for me about from every now and again reporting an issue in hyper-V log. Reliable and I found it easier that VirtualBox for updating.
At one stage I was trying to use Docker on WSL but WSL needs more work. It maybe time to try this again as WSL has improved.
![]()
Hi guys, maybe somebody can help me out with this problem. I’m trying to run it on hyper v aswell. I’m just not able to reach the browser of home assistant.
Logging in with: root will give me the opertunity to check the ip: it was 172.30.32.1 but i’m not able to connect from my pc.
Can somebody help me?

![]()
Hi guys, maybe somebody can help me out with this problem. I’m trying to run it on hyper v aswell. I’m just not able to reach the browser of home assistant.
Logging in with: root will give me the opertunity to check the ip: it was 172.30.32.1 but i’m not able to connect from my pc.
@jogdy7827
Are you using the right port? by default it’s 8123. Try: http://172.30.32.1:8123
However, that IP address looks more like a loopback IP address, and a LAN IP address (i.e. 192.168.1.x) that the Hyper-V’s network adapter would be assigned from the router (or wherever your DCHP is).
Double check that Hyper-V has a network adapter that is accessible from the host. Here’s one (of many) posts that discuss how to do it: https://tunecomp.net/hyperv-virtual-machine-remote-access-lan-internet-external-switch/
![]()
Hi guys, maybe somebody can help me out with this problem. I’m trying to run it on hyper v aswell. I’m just not able to reach the browser of home assistant.
Logging in with: root will give me the opertunity to check the ip: it was 172.30.32.1 but i’m not able to connect from my pc.@jogdy7827
Are you using the right port? by default it’s8123. Try: http://172.30.32.1:8123However, that IP address looks more like a loopback IP address, and a LAN IP address (i.e. 192.168.1.x) that the Hyper-V’s network adapter would be assigned from the router (or wherever your DCHP is).
Double check that Hyper-V has a network adapter that is accessible from the host. Here’s one (of many) posts that discuss how to do it: https://tunecomp.net/hyperv-virtual-machine-remote-access-lan-internet-external-switch/
@LanceMcCarthy
Thanks for your help. I’ve checked my router and I needed to add the ip adres of my external switch into the DHCP binding. After that, rebooted and home asssistant with port 8123 was reachable.
![]()
For hyper-v is there anyway to install the Linux Integration Services?
![]()
@theskillster @GeoffAtHome @LanceMcCarthy
Are you able to run Home Assistant OS on Hyper-V without issue now?
I’ve been running it on Hyper-V on Win Server 2019 for a couple months and fairly regularly see the «[Hassio VM] has encountered a watchdog timeout and was reset» error in my Hyper-V logs.
On at least a few occasions, that error appears to have caused Windows to crash, rebooting the host OS — which is a significant issue (given I run lots of other things on there).
Any idea how to fix this?
![]()
«[Hassio VM] has encountered a watchdog timeout and was reset» error in my Hyper-V logs.
I don’t recall seeing this in my logs
On at least a few occasions, that error appears to have caused Windows to crash, rebooting the host OS — which is a significant issue (given I run lots of other things on there).
I have never seen this. I suspect you may need to change where the VMs are stored. I do not use the detail c:/users/public location. Instead, I have another SSD (avoid HDD) where I run all my Hyperv machines from.
If I had to take a wild guess, anything strong enough to crash the host system sounds like a hardware driver fault (it’s never the kernel)
![]()
I get the watchdog timer errors too since starting to use HASS in dec on hyper-v.
I assumed the were related to the «NMI received for unknown reason 00 on CPU 0. on the HASS console» but that was an assumed correlation on my part.
But I have not seen any host crashes that i am aware of (just checked the logs) when either message has happened.
I am running Server 2019, all VMs stored on SSD.
![]()
Just did some extra checking for me the watchdog timer event occurs EXACTLY 4 minutes and 59 seconds after the VM is reported as booted in the hyper-v worker log and is absolutely correlated with the NMI error on the hass console. (i just did a reboot of the whole hyper-v host to prove this).
As such I would posit that the watchodg timer was a result of the reboot after a host crash, not the cause of the host crash.
![]()
Hmm interesting — thanks. I run all my VMs off an NVMe SSD, and encountered no notable unexpected host OS reboots until the Home Assistant OS VM was added. Will try to investigate further…
![]()
I’m experiencing this issue on a stable host: #1362.
![]()
The problem persists (HASS OS v6.5)
Did anyone find a solution? Also, my HASS server encounters spontaneous reboots or hangs since I moved from Intel to Ryzen with Hyper-V.
Introduction
Welcome to the first part of our Getting started with Home Assistant series, in this part we will take you step by step through installing Home Assistant.
This series aims to help teach you about the basic configuration and functionality of Home Assistant.
Home Assistant is a wonderful open-source project that provides a very feature rich way to integrate all your smart home devices (and often “dumb” devices too!) into a single app, rather than trying to juggle multiple applications for each device. It also aims to rid the need for the “cloud” and gives you back local control. It has a staggering amount of integrations and options, 1485 at the time of writing and more constantly being added. Check them out here.
Guide
Table of Contents
There are many ways of installing Home Assistant, we will cover a few of the more popular ones here. Skip ahead to the relevant section for you:
- Hass.io on Raspberry Pi
- Hass.io for VMWare
- Home Assistant for Ubuntu/Debian/Fedora/Arch/CentOS using Virtual Environment/Python
Home Assistant OS/Hass.io on Raspberry Pi
This is probably the most popular method of installing Home Assistant and is really simple.
Requirements:
- Raspberry Pi, Intel Nuc, ODroid, OrangePi-Prime or Tinkerboard
- Large enough SD card (32GB is recommended) of good quality from a known brand (Samsung, SanDisk etc) as we want this to last. Cheaper SD cards can wear out very quickly.
- Access to Windows/Linux/MacOS to burn the SD card image
- Optional USB stick if you want to create a static IP (any size)
Installation
Download and install Balena Etcher to your machine. It is available for Linux, MacOS and Windows.
Download the Hass.io image for your device from here, make sure to choose the correct one for your device.
Insert your SD card and fire up etcher. It goes without saying that anything stored on the SD card will be wiped clean and lost.
Once open, you will see this nice simple screen:
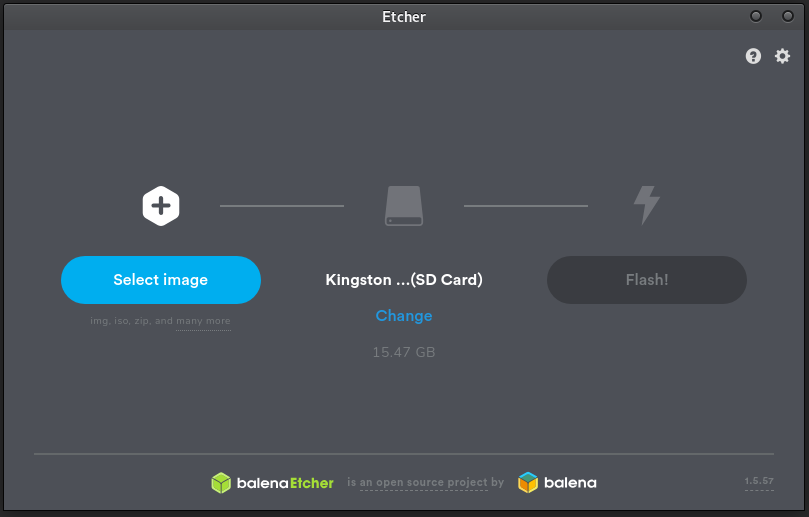
Go ahead and press the “Select image” button and navigate to your downloaded image:
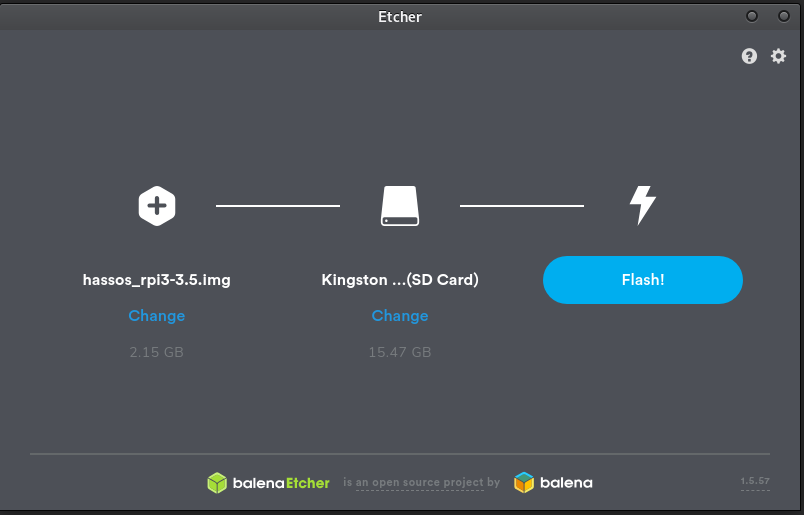
Ensure that Etcher has selected the correct device at this point, if not press the “Change” button and select the correct device.
Press the flash button and the process will start, this could take a few minutes depending on the speed of your card:

Once finished, go ahead and eject the device.
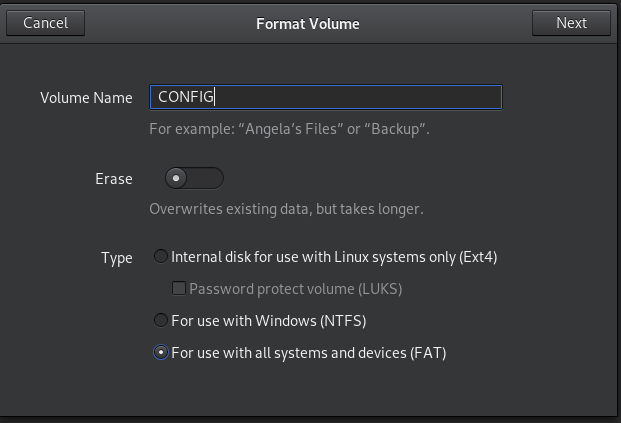
If you want to set a static IP, insert your spare USB stick now. Right click the USB stick and press format (again this will wipe everything from device), ensure that you choose FAT32 as the filesystem type and give the drive a label of “CONFIG”:
Once formatted, create a folder called “network”. Open a text editor and paste the following in:
[connection]
id=my-network
uuid=d55162b4-6152-4310-9312-8f4c54d86afa
type=802-3-ethernet

[ipv4]
method=manual
address=192.168.0.50/24,192.168.0.1
dns=192.168.0.1;

[ipv6]
addr-gen-mode=stable-privacy
method=auto
Change the address to whatever you want the IP to be. The “192.168.0.1” after the comma is the gateway address which you will need to set to your environment. DNS will also need to be set.
Save this file to the “network” folder created above and name it “my-network” with no extension:
Eject the USB stick.
With the power removed, insert the SD card into the Raspberry Pi or other device, along with the optional USB stick.
Power the device on and let it boot. It will download any updates to Hass.io which could take a little bit of time so be patient.
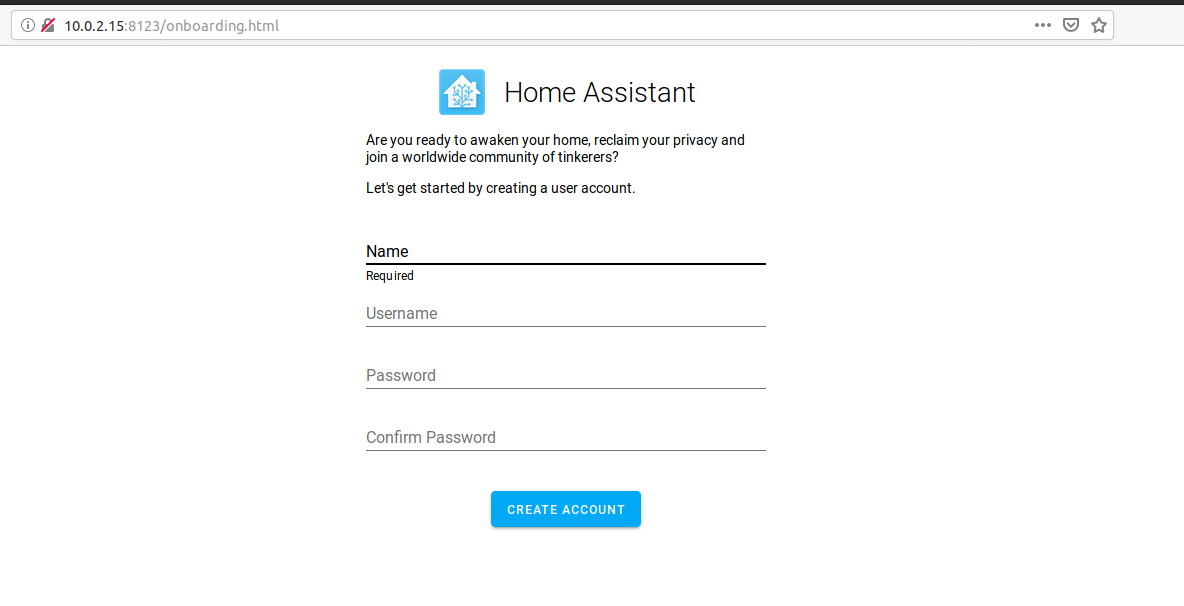
Once completed, you should be able to open a web browser and connect to the web page using http://you-ip-address:8123 which should give you:
If this works you will be presented with the initial setup page and Home Assistant is now running! In the next part of this series, we are going to be running through a basic configuration.
Check out part 2 here.
Hass.io/Home Assistant OS for VMWare/Hyper-V/VirtualBox
Installing Home Assistant OS/Hass.io is simple and is available for most virtualization platforms which is really nice, it’s really quick to get up and running.
Requirements:
- A virtual environment setup and installed – VMWare ESXI/Workstation, Hyper-V or VirtualBox.
Installation
I’m going to use VirtualBox for this example but the principles are the same for VMWare ESXI/Workstation and Hyper-V.
First download the correct disk format for the platform you are using here:
- VMWare – Choose the VMDK option
- Hyper-V – Choose the VHDX option
- VirtualBox – Choose the VDI option
Once you have the zipped file downloaded, extract it to a location you want to store the machine in:


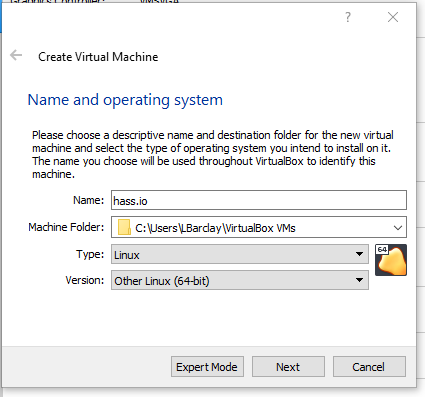
Open your Virtual Machine manager and create a new machine. Go through the following steps:
- Give the machine a name, mine is called hass.io
- Set the version to Linux 64 bit
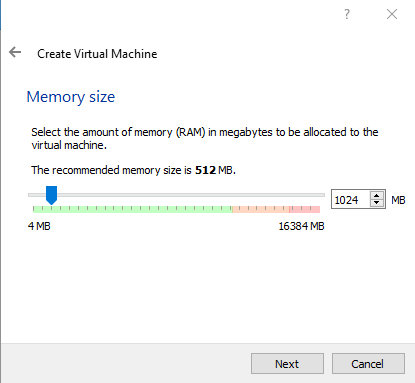
- Assign CPU and RAM based on your hardware, 512mb to 1GB should be plenty, 1 or 2 cores will also be great.
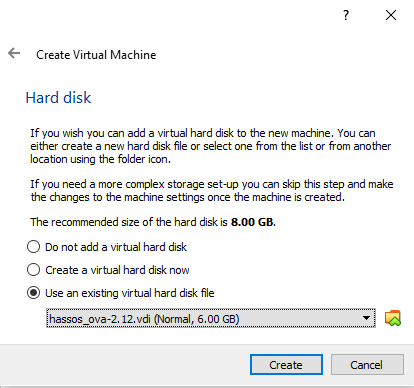
- When asked about hard disk, use an existing hard disk and attach the extracted hard disk file from earlier.
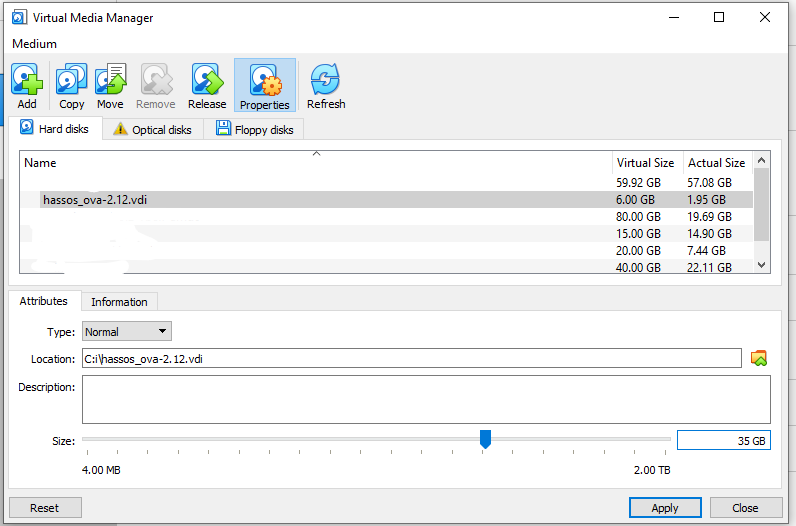
- Expand the disk size to 35GB+, the default is 6GB at the time of writing.
- Once created, edit the options of the machine and enable EFI option, the machine will not boot without this.
- In network settings, attach a network adapter and ensure promiscuous mode is on.

You can now start the newly created VM and it should hopefully boot up. If you get an error around no boot device, ensure you have enabled EFI as above.
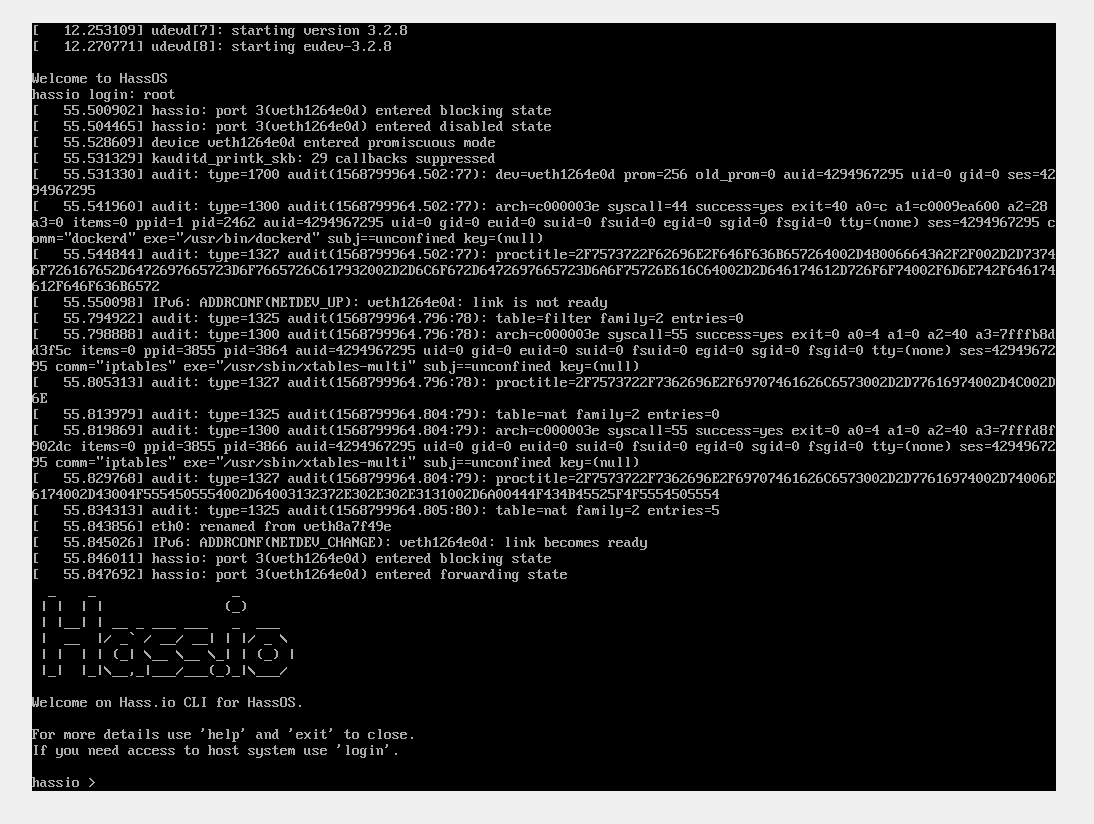
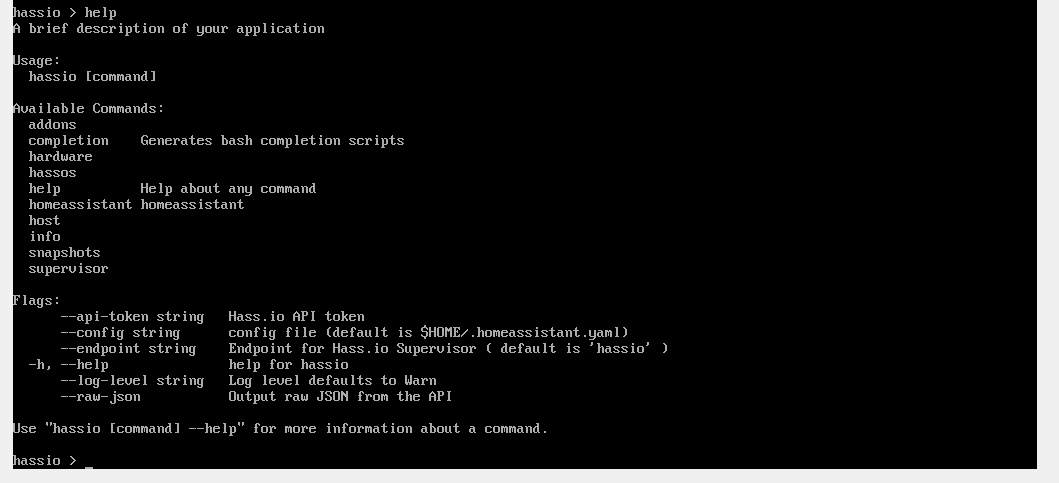
Once started, hit enter to get the login screen, enter root and hit enter. There will be no password. You will be dropped to the hassio command line:
You can get a list of available commands by typing “help” You can get further help about a specific command by typing “[command] –help” for example “homeassistant –help” which will give you further options:
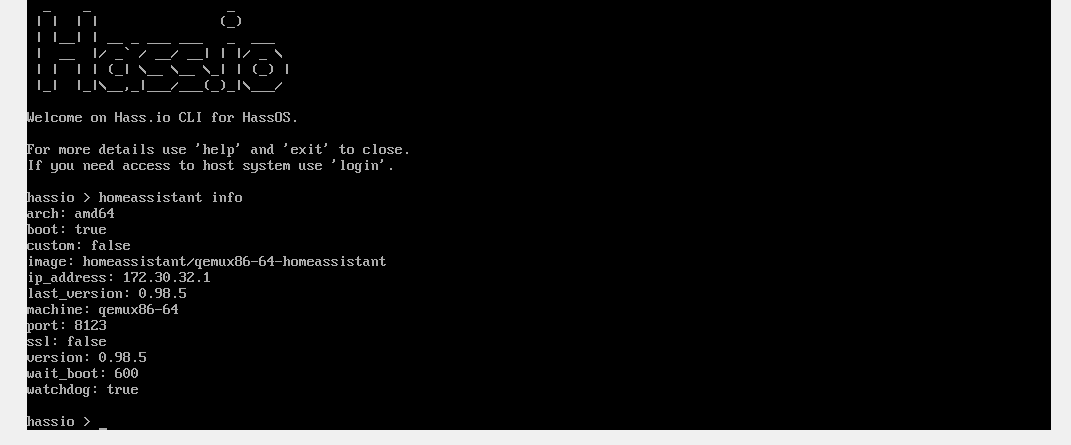
We are going to check some information about Home Assistant first, do this by using “homeassistant info”. This will print information about Home Assistant and confirms it is running. You can see we are on version 0.98.5:
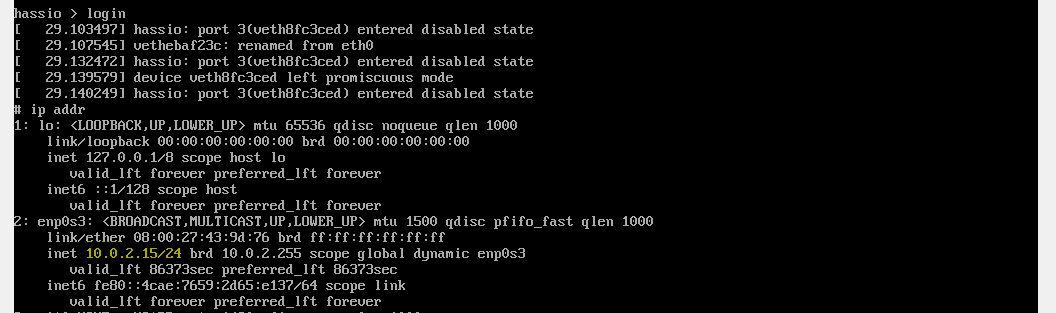
Finally we are going to get the IP address of our Hass.io instance so we can open the WebUI, do this by typing “login” which will give you the host OS’s command line. Then enter “ip addr” and search for your host machines IP address:
Finally, we connect to Hass.io using the browser on port 8123:

If this works you will be presented with the initial setup page and Home Assistant is now running! In the next part of this series, we are going to be running through a basic configuration.
Check out part 2 here.
Home Assistant for Ubuntu / Debian / Fedora / Arch / CentOS using Virtual Environment/Python
This section will take you through installing Home Assistant on pretty much any Linux Distro. The steps should be applicable to any modern distro, but for the purposes of this I am using Ubuntu 19.04. I’d suggest using a server variant of your distro to keep the footprint minimal since it will be a server, but the desktop variant will work perfectly well if you aren’t as comfortable with the command line.
Requirements
- A Linux OS installed and booted, with network access
- SSH/Terminal access to server
Installation
I’ll leave this gallery here of all the steps required, refer back at anytime if you need help:


Firstly we need to make sure we are using the latest packages:
Debian/Ubuntu/Raspbian:
sudo apt-get update && sudo apt-get upgrade -y

Fedora/CentOS/OpenSUSE
sudo dnf update -y
Then we install the required python packages and dependencies in order to run HA:
Debian/Ubuntu/Raspbian:
sudo apt-get install python3 python3-dev python3-venv python3-pip libffi-dev libssl-dev -y

Fedora/CentOS/OpenSUSE
sudo dnf install python3 python3-dev python3-venv python3-pip libffi-dev libssl-dev -y
Next we create a homeassistant user which will run the service later on and will create a home directory for us:
Raspbian on Raspberry Pi:
sudo useradd -rm homeassistant -G dialout,gpio,i2c

Everything else:
useradd -rm homeassistant
The raspberry pi command is slightly different – we add the homeassistant account to the dialout, gpio and i2c groups so that we can control various functions of the raspberry pi through HA.
Next, we are going to create a new directory for the virtual environment in the /srv directory and change the ownership to our newly create account:
cd /srv
sudo mkdir homeassistant
sudo chown homeassistant:homeassistant homeassistant
Then we change to the homeassistant account and create the virtual environment:
sudo -u homeassistant -H -s
cd homeassistant/
python3 -m venv .
source bin/activate
Install home assistant using pip via the following commands:
python3 -m pip install wheel
pip3 install homeassistant
Finally, we can temporarily start Home Assistant for the first time:
hassThis could take a few minutes depending on your hardware and internet speed, it will take longer the first time but will be quicker subsequently.
We aren’t quite done, we are going to create a service so that Home Assistant starts up automatically everytime we reboot the machine.
Press CTRL + C in the terminal to exit Home Assistant for now.
First confirm that we are using systemd on our distribution:
ps -p 1 -o comm=Which should return “systemd”.
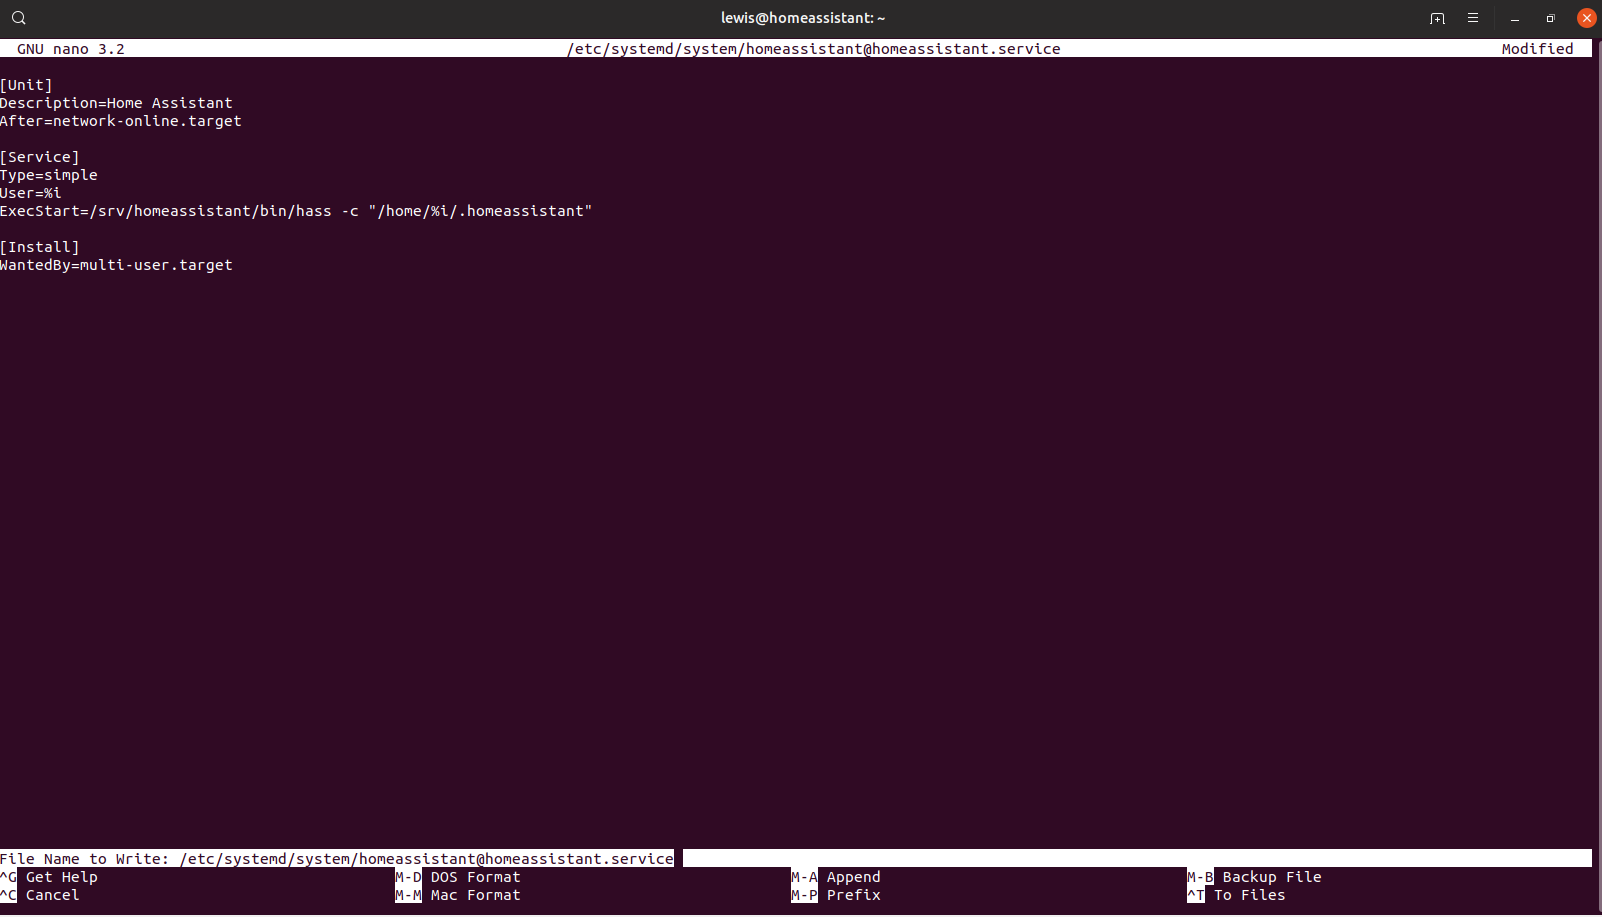
Create a new file in /etc/systemd/system called [email protected]:
sudo nano /etc/systemd/system/[email protected]Paste the following in:
[Unit]
Description=Home Assistant
After=network-online.target

[Service]
Type=simple
User=%i
ExecStart=/srv/homeassistant/bin/hass -c "/home/%i/.homeassistant"

[Install]
WantedBy=multi-user.target
Save and exit by pressing CTRL + X, hit enter to confirm.
Finally, we make systemd aware of new service, enable automatic start, start the service and check that it started:
sudo systemctl --system daemon-reload
sudo systemctl enable [email protected]
systemctl start [email protected]
systemctl status [email protected]
Assuming this worked OK it should be possible to connect to the web interface via your browser. We need the IP address to do this, if you do not know this then run the following:
Some distros (Ubuntu) have removed ifconfig by default so use ip addr:
ip addr

Otherwise:
ifconfig
Look for your IP address (see image) and enter this into your browser, make sure you are on port 8123.
If this works you will be presented with the initial setup page and Home Assistant is now installed! In the next part of this series, we are going to be running through a basic configuration.
Check out part 2 here.
Update: новая статья
У новых пользователей часто возникает вопрос — можно ли установить Home Assistant на Windows?
Конечно можно! Проблема заключается в том, что не все зависимости Home Assistant легко установятся на любую сборку Windows. Об этом можно почитать тут.
На портале уже была статья о подобной установке. В своей версии я чуть подробнее опишу детали.
Идём на сайт python и скачиваем последнюю на момент написания статьи версию. Можно скачать как обычную, так и 64-битную версию.


В процессе установки Python я встречал следующие проблемы:
- установка не стартовала на «голой» Windows 7 без важных обновлений — нужно обновить систему стандартным способом
- установка не завершалась с недоступным сайтом python (из-за РКН) — нужно отключить опции download debug…
Вот у вас и установлен Python.
Далее нажимаем на клавиатуре win R и запускаем cmd
В запустившейся консоли вводим :
pip install homeassistant
Вот у вас и установлен последний Home Assistant.
На этом этапе у вас не должно возникнуть особых проблем. Python и HA должны установиться в практически любую систему.
Первый запуск Home Assistant
В той же консоли, что и ранее, просто вводим — hass.
Начнётся первый запуск HA. Он может быть достаточно долгим. HA будет скачивать и устанавливать разные библиотеки python, которые требуются конфигурации по умолчанию. А их не мало.
Плюс, если в процессе установки в вашей локальной сети обнаружатся поддерживаемые устройства — начнётся установка и их библиотек. В логе это отображается примерно так:
INFO (SyncWorker_1) [homeassistant.util.package] Attempting install of pychromecast==4.0.1
Вот на этом этапе вполне возможны проблемы и разные ошибки в консоли.
Терпеливо ждите пока HA делает свои дела. В идеале в конце лога вы должны увидеть строчку:
INFO (MainThread) [homeassistant.core] Starting Home Assistant
Далее попытайтесь открыть в любом браузере страницу:
http://localhost:8123/Вполне возможно у вас ничего не откроется. Это нормально.
План 2
Нажимайте в консоли Ctrl C, это принудительно остановит HA. Если не получится — закрывайте консоль и запускайте её заново.
И снова вводите в консоли — hass. И снова ждём строчку Starting Home Assistant и пробуем открыть в браузере:
http://localhost:8123/
План 3
Если со второй попытки страница так и не открылась — останавливаем HA и открываем папку с конфигами. Путь до неё показывается сразу после ввода команды hass. Это должно быть что-то вроде:
C:UsersAlexeyAppDataRoaming.homeassistant
Только с именем вашего пользователя. Проще вбить этот адрес сразу в проводнике Windows.
Теперь правим файл configuration.yaml.
Заменяем всё его содержимое на 3 простые строки:
config: frontend: system_health:
Это минимальный набор модулей, необходимый для старта HA и отображения главной страницы. Сильно сократит перечень зависимостей и повысит шансы старта.
Снова запускаем hass и пробуем открыть страницу.
PS
Это не все проблемы с которыми можно столкнуться. Но, надеюсь, вам хватит советов, описанных в статье.
В последнее время, мне как-то надоедает включать свою домашнюю виртуализацию, базирующуюся на Debian 10 + Proxmox 6 и работать с VM из-под браузера. Может конечно если что-то масштабное, то да. А вот с целью побыстрее обкатать то можно на рабочем месте использовать Virtualbox (я против использования Hyper-V)
Итак, рабочая Windows 10 Pro (Version 10.0.18363.592)
Железо:
Intel® Core™ i3-2120 CPU @ 3.30GHzRAM: 8GbHDD: 250 SSD SamsungMotherboard: Asus P8H61-M LX3 R2.0
Шаг №1: На рабочую Windows 10 Pro устанавливаю VirtualBox 6.1.12 (VirtualBox-6.1.12-139181-Win.exe)
Шаг №2: Скачиваю с официального сайта Home Assistant на момент (05.08.2020) написания данной заметки vmdk файл hassos_ova-4.11.vmdk.gz (его вес 243 395 КБ), распаковываю получается файл hassos_ova-4.11.vmdk (его вес 752 128 КБ)
Шаг №3: Создаю VM через Virtualbox
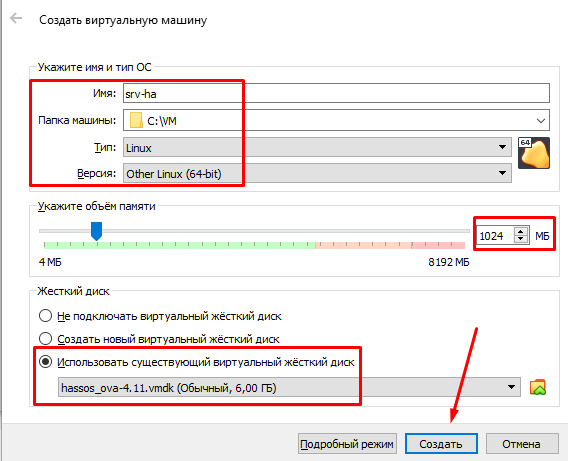
Virtualbox – Машина – Создать
Имя: srv-haПапка машины: C:VMТип: LinuxВерсия: Other Linux (64-bit)
И нажимаю "Экспертный режим", указываю количество выделяемой данной VM оперативной памяти, к примеру 1024 и Жесткий диск выбираю "Использовать существующий виртуальный жесткий диск" — "Выбрать образ виртуального жесткого диска" – Добавить – выбираю распакованный в C:VMhassos_ova-4.11.vmdk и нажимаю "Открыть" — "Выбрать" — и нажимаю "Создать"
После пока VM еще выключена изменять (через меню "Настроить" на VM) тип сетевого адаптера с
Адаптер 1: Intel PRO/1000 MT Desktop (NAT)
На "Сетевой мост".
После запускаю VM путем нажатия на кнопку "Запустить"
На заметку: Если после запуска идет надпись в консоли VM "FATAL: No bootable medium found! System halted", то это значит нужно выключить VM: Машина – Завершить работу, открыть опять "Настроить" и в меню "Система" — вкладка "Материнская плата" и отменить галочкой
Включить EFI (только специальные ОС): включить галочкой
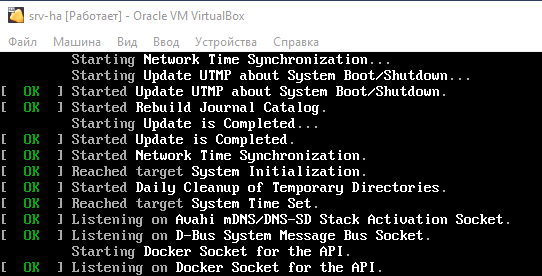
И нажимаю ОК, а затем нажимаю "Запустить". Вижу, как бегут строки загрузки VM
После в консоли нажимаю клавишу Enter и вижу приглашение на авторизацию:
homeassistant login: указываю учетную запись root
И нажимаю клавишу Enter
После вижу приглашение:
Welcome on Home Assistant command line
ha > В этой консоли нужно ввести слово "login":
# набираю команду nmcli и вижу свой IP адрес, полученный от моего DHCP-сервиса в локальной сети
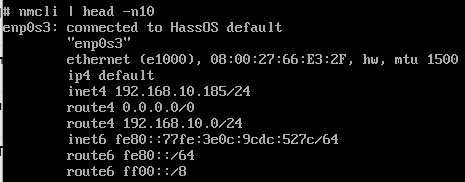
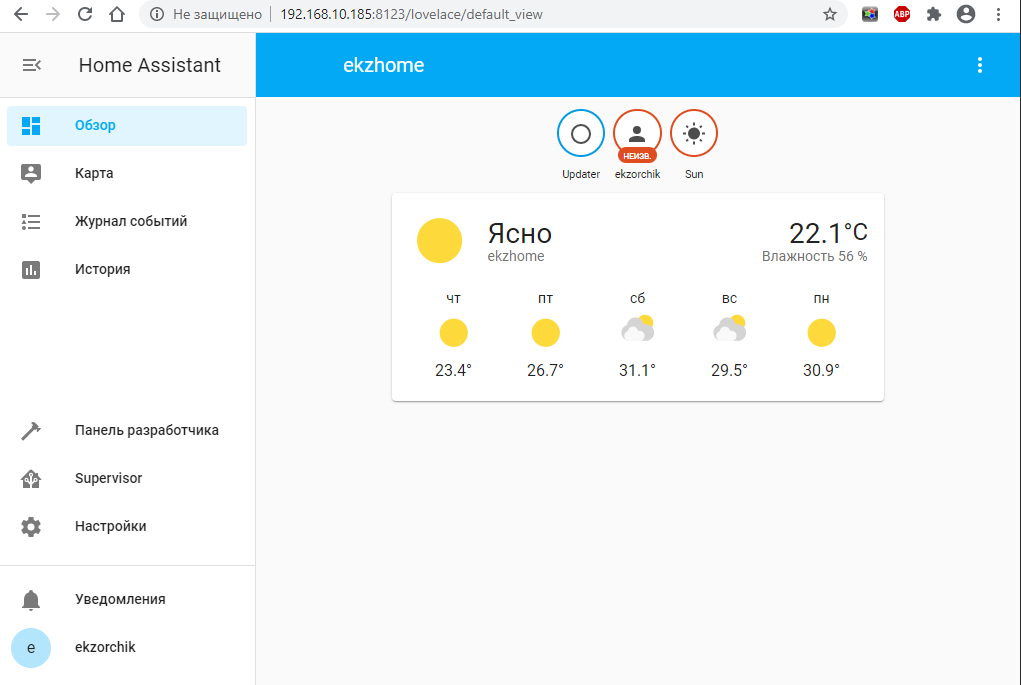
Шаг №4: Теперь зная этот адрес я могу в своей локальной сети обратиться к сервису Home Assistant посредством браузера через URL строку: http://IP&DNS:8123 (http://192.168.10.185:8123)
http://192.168.10.185:8123/onboarding.html — создаю первый раз учетную запись пользователя
Имя: ekzorchikЛогин: ekzorchikПароль: 712mbddr@Подтвердите пароль: 712mbddr@
И нажимаю "Создать учетную запись"
Именую свой Home Assistant: к примеру, как ekzhome
Часовой пояс: Europe/Moscow
И нажимаю "Далее" - "Готово"
После чего передо мной развернутый из заводского образа разработчиков система домашней автоматизации под Virtualbox операционной системы Windows 10 Pro. Когда у меня выдается свободные минуты я разбираю на работе что-то полезное для себя, как процесс самообразования:
Итого я в шагах задокументировал для себя, как под Virtualbox быстро и легко развернуть Home Assistant дабы иметь тестовый полигон настройки чтобы в последствии переносить только реально работающие решения и не засорять боевую систему. Так делаю я, да это почти двойная работа, но что в эксплуатации не должно страдать от тестов. На этом моя заметка завершена, с уважением автор блога Олло Александр aka ekzorchik.
Содержание
- Способы установки Home Assistant
- Home Assistant OS — установка на хост
- Home Assistant OS — установка в виртуальную машину
- Home Assistant Supervised
- Home Assistant Container
- Home Assistant Core
- HassWP
- Windows
- Install Home Assistant Operating System
- Download the appropriate image
- Create the Virtual Machine
- Hypervisor specific configuration
- Start up your Virtual Machine
- Install Home Assistant Core
- Install WSL
- Install dependencies
- Create an account
- Create the virtual environment
- Запускаем Home Assistant на Windows (Portable)
- Как установить Home Assistant в Virtualbox на Windows 10
- Как установить умный дом Home Assistant
Способы установки Home Assistant
Первая сложность с которой сталкиваются люди при работе с Home Assistant — как его поставить. Есть очень много способов установки системы.
С точки зрения использования системы все способы установки можно разбить на две группы:
Супервизор — это необязательная часть системы. Можно использовать Home Assistant и без супервизора.
Если есть супервизор, то в Home Assistant появляются дополнительные возможности:
Есть сайт с официльной статистикой использования Home Assistant — https://analytics.home-assistant.io.
Вот статистика разных типов установок с этого сайта (скриншот сохранен 17 мая 2022 года):

Home Assistant OS — установка на хост
Это официально рекомендованный способ установки. Установка очень быстрая и простая. Устанавливается Home Assistant вместе с супервизором.
Очень часто этот способ используют для того чтобы установить Home Assistant на Raspberry Pi.
Нужно скачать специальный файл. Этот файл — это образ в котором находится не только Home Assistant, но еще и операционная система.
Вот несколько популярных образов:
Полный список всех образов находится на GitHub.
Этот образ нужно залить на sd карту (в случае Raspberry Pi) или на жесткий диск (в случае Nuc).
Для заливки образа на sd карту очень удобно использовать бесплатную программу balenaEtcher (ссылка — https://www.balena.io/etcher/). Есть версии этой программы под Windows, macOS и Linux.
После того как образ залит на носитель, нужно подключить его к компьютеру, включить компьютер и через некоторое время вы получаете работающий Home Assistant.
У этого способа установки есть особенность — вы получаете «черный ящик» Home Assistant полностью работает, но доступ к операционной системе на которой он работает очень ограничен.
Home Assistant OS — установка в виртуальную машину
Официальный способ установки. Устанавливается Home Assistant вместе с супервизором.
С помощью этого способа можно получить работющий Home Assistant на компьютере с Windows, macOs или Linux. На компьютере появляется вирутальная машина в которой работает Home Assistant.
Нужно сказчать файл с образом с GitHub.
А дальше из этого образа нужно создать виртуальную машину. Это можно сделать, например с помощью VirtualBox.
Home Assistant Supervised
Это официальный способ установки. Но разработчики Home Assistant не особо любят его рекомендовать. Устанавливается Home Assistant вместе с супервизором.
Это возможность установить Home Assistant на компьютер с Linux. Этот способ подходит людям кто знает и умеет использовать Linux консоль. При таком способе установки остается полный доступ к операционной системе, но так же появляется Home Assistant с супервизором.
Опасность этого способа установки — нужно очень точно следовать всем рекомендациям. Если что-то сделать не совсем так, то Home Assistant переходит в режим «You are running an unsupported installation.» или даже в «Your installation is running in an unhealthy state», а в этом режиме Home Assistant работает исключительно плохо.
Главное требование — операционная система Linux обязательно должна быть Debian 10 aka Buster. Другие версии Linux официально не поддерживаются. Поддержка отсутствет даже для тех Linux дистрибутивов которые сильно похожи на Debian (например, Rasbperry OS, Ubuntu).
Прямо сейчас этот способ установки работает и на других операционных системах (Rasbperry OS, Ubuntu), но использование этих операционных систем выдает предупреждение «You are running an unsupported installation.» и, возможно, что в будущем это будет выдавать не только предупреждение, но и вызывать какие-то проблемы с работой. Так что скорее всего, если ставить Home Assistant этим способом, то стоит соблюдать все требования, или использовать другой способ установки.
Home Assistant Container
Это официальный способ запуска Home Assistant. При использовании этого способа супервизора нет.
Для этого способа нужно чтобы на машине был установлен докер. Этот способ можно использовать на любой операционной системе (Windows, macOS, Linux).
Это просто запуск докер контейнера из официального докерного образа Home Assistant. Можно запускать контейнер как напрямую через docker, можно через docker-compose, а можно использовать какие-то другие способы.
Самый простой способ для запуска HA этим способом — это одна команда:
Home Assistant Core
HassWP
Это неофицильный способ установки. Супервизора тут нет. Это возможность запустить Home Assistant на Windows машине очень быстро и просто, и сразу с некоторым наборо предустановленных дополенний.
Источник
Windows
Install Home Assistant Operating System
Download the appropriate image
Follow this guide if you already are running a supported virtual machine hypervisor. If you are not familiar with virtual machines we recommend installation Home Assistant OS directly on a Raspberry Pi or an ODROID.
Create the Virtual Machine
Load the appliance image into your virtual machine hypervisor. (Note: You are free to assign as much resources as you wish to the VM, please assign enough based on your add-on needs)
Minimum recommended assignments:
All these can be extended if your usage calls for more resources.
Hypervisor specific configuration
After creation of VM go to “Settings” and “Options” then “Advanced” and select “Firmware type” to “UEFI”.
Start up your Virtual Machine
With the Home Assistant Operating System installed and accessible you can continue with onboarding.
Install Home Assistant Core
Install WSL
To install Home Assistant Core on Windows, you will need to use the Windows Subsystem for Linux (WSL). Follow the WSL installation instructions and install Ubuntu from the Windows Store.
As an alternative, Home Assistant OS can be installed in a Linux guest VM. Running Home Assistant Core directly on Windows is not supported.
This guide assumes that you already have an operating system setup and have installed Python 3.8 (including the package python3-dev ) or newer.
Install dependencies
Install the dependencies:
Create an account
Create the virtual environment
First we will create a directory for the installation of Home Assistant Core and change the owner to the homeassistant account.
Next up is to create and change to a virtual environment for Home Assistant Core. This will be done as the homeassistant account.
Once you have installed the required Python package it is now time to install Home Assistant Core!
If this address doesn’t work you may also try http://localhost:8123 or http://X.X.X.X:8123 (replace X.X.X.X with your machines’ IP address).
When you run the hass command for the first time, it will download, install and cache the necessary libraries/dependencies. This procedure may take anywhere between 5 to 10 minutes. During that time, you may get “site cannot be reached” error when accessing the web interface. This will only happen for the first time, and subsequent restarts will be much faster.
Источник
Запускаем Home Assistant на Windows (Portable)


У меня уже была статья про установку Home Assistant на Windows.
В этом варианте его не нужно устанавливать:
Портативная версия Home Assistant под Windows. В комплекте уже есть:
PS: не стоит рассматривать HassWP, как боевое решение системы умного дома на века. Он будет полезен скорее для ознакомления и для экспериментов.


На Win10 не хочет работать
Для работы на Win10 необходимо установить Visual studio c компонентами C++
какой-то совсем не портативный вариант получается, это как за дрезиной тянуть два вагона запчастей
очень интересный вариант.
очень правильное направление.
скажите, кто-ниубудь продолжает разработку этого бандла? Может быть на коммерческой основе?
Источник
Как установить Home Assistant в Virtualbox на Windows 10
В последнее время, мне как-то надоедает включать свою домашнюю виртуализацию, базирующуюся на Debian 10 + Proxmox 6 и работать с VM из-под браузера. Может конечно если что-то масштабное, то да. А вот с целью побыстрее обкатать то можно на рабочем месте использовать Virtualbox (я против использования Hyper-V )
Итак, рабочая Windows 10 Pro (Version 10.0.18363.592)
Шаг №1: На рабочую Windows 10 Pro устанавливаю VirtualBox 6.1.12 (VirtualBox-6.1.12-139181-Win.exe)
Шаг №2: Скачиваю с официального сайта Home Assistant на момент ( 05.08.2020 ) написания данной заметки vmdk файл hassos_ova-4.11.vmdk.gz (его вес 243 395 КБ ), распаковываю получается файл hassos_ova-4.11.vmdk (его вес 752 128 КБ )
Шаг №3: Создаю VM через Virtualbox
Virtualbox – Машина – Создать
После пока VM еще выключена изменять (через меню «Настроить» на VM ) тип сетевого адаптера с
На «Сетевой мост».
После запускаю VM путем нажатия на кнопку «Запустить»
После в консоли нажимаю клавишу Enter и вижу приглашение на авторизацию:
homeassistant login: указываю учетную запись root
И нажимаю клавишу Enter
После вижу приглашение:
Welcome on Home Assistant command line
ha > В этой консоли нужно ввести слово «login»:
Шаг №4: Теперь зная этот адрес я могу в своей локальной сети обратиться к сервису Home Assistant посредством браузера через URL строку: http://IP&DNS:8123 (http://192.168.10.185:8123 )
http://192.168.10.185:8123/onboarding.html — создаю первый раз учетную запись пользователя
И нажимаю «Создать учетную запись»
Именую свой Home Assistant : к примеру, как ekzhome
Итого я в шагах задокументировал для себя, как под Virtualbox быстро и легко развернуть Home Assistant дабы иметь тестовый полигон настройки чтобы в последствии переносить только реально работающие решения и не засорять боевую систему. Так делаю я, да это почти двойная работа, но что в эксплуатации не должно страдать от тестов. На этом моя заметка завершена, с уважением автор блога Олло Александр aka ekzorchik.
Источник
Как установить умный дом Home Assistant
Это статья написана для напоминания, что умный дом стал намного ближе, чем мы думали.
Home Assistant-это open-source платформа для автоматизации, работающая на Python 3. Позволяет отслеживать и контролировать все устройства в доме и автоматизировать действия. Идеально может работать на одноплатном компьютере Raspberry PI.

Что такое умный дом можно почитать в википедии тут и тут.
Давайте по порядку:
1. Центральное ядро
Умный дом нуждается в центральном контроллере (хаб, сервер и т.д.). Это связующее звено между всеми элементами умного дома и пользователем. Бывают распределенные системы без центрального контроллера, но все равно нужен один сборщик информации, который покажет пользователю все актуальные новости каждого устройства
ПК-отличный вариант, если требуется большая нагрузка на сервер, т.к. производительности даже старых ноутбуков хватит вполне (только если вы не будете крутить 4К видео или использовать 10 камер с HEVC кодированием). Из минусов- в 95% случаев активное охлаждение и чтобы подключить обычное реле всегда приходится использовать дополнительные костыли.
Специализированные контроллеры — отличный вариант, если вам нужна надежность и отказоустойчивость. Вероятность отказа промышленного контроллера (при правильных руках) приближается к вероятности появления зомби апокалипсиса. Но есть и минус- программировать и настраивать могут либо те, кто уже автоматизировал несколько конвейеров, либо человек в мозгу которого не нейроны а релейные схемы. И чаще всего интерфейс у них, мягко говоря, аскетичный. К сожалению, я не такой умный, поэтому это вариант точно не для меня.

И тут мы приходим к самому современному варианту — это дешевые одноплатные компьютеры на базе ARM архитектуры. Сейчас их выбор просто огромен, но самый популярный родоначальник Raspberri pi. Из плюсов маленькое энергопотребление, есть пользовательские выводы и удовлетворительная производительность для запуска несложных программ.
Есть еще много экзотических вариантов автоматизации своего очага, например, кровать-будильник на Всемирной выставке 1851 года (изобретатель Теофиль Картер). Или любимое извращенство- ардуино с шилдами (прощу прощение за несерьезный мем)

2. Внешние датчики, контроллеры, элементы управления.
Эта тема настолько обширная, что описать все многодикообразие в данной статье не представляется возможным, поэтому оставим это для будущих статей. Вкратце, есть:
— DIY решения и ардуиноподбные решения
— Китайские решения (пример Sonoff)
— Дорогие красивые решения (пример nest)
Тоже вынесем сие обсуждение в отдельную тему. Сегодня мы будем рассматривать только одну из множества открытых платформ. Обзоры еще будут. Сразу отвечу на вопросы, почему именно она:
а) Огромное количество поддерживаемых сервисов,
б) Легко и бесплатно установить,
в) Приятный интерфейс.
4. Сторонние сервисы
Помогают подключить разные существующие решения и автоматизировать действия на смартфонах и ПК. Типичный пример IFTTT.
Что делать если я не умею программировать или у меня есть деньги?
Отдельно стоят решения современных экосистем от Samsung, Xiaomi, Amazon, Apple, Google и т.д. Соглашусь, что порой их решения выглядят намного красИвее, но средняя заработная плата русского человека примерно 500$, что не позволяет ощутить всю гамму вкусов.
Рекомендуется к приобретению:
1. Raspberry Pi 3 (вероятно подойдут и более старые) 35$
2. MicroSD на 16ГБ не ниже 10 класса( чем быстрее, тем лучше) с адаптером к компьютеру 7$
3. Зарядник MicroUSB на 5В и больше чем 2А 0$ (подошел от старого телефона)
4. Ваше драгоценное время. Бесценно.
5. Опционально монитор с HDMI
После записи, извлекаем флешку и вставляем в распберри пи.
ОБЯЗАТЕЛЬНО НАДО ВСТАВИТЬ В МАЛИНУ ИНТЕРНЕТ-ШНУР.
При подаче питания должна загореться красная лампочка и зеленая начать хаотично мигать. Ждем с кружкой чая 10 минут.
После этого нам надо найти уже веб интерфейс нашей системы умного дома. Для этого есть несколько способов:
1) Посмотреть через hdmi нашу командную строку и найти там IP вида 192.168.1.х ( или любого другого)
2) посмотреть в настройках роутера какой DHCP сервер присвоил адрес новому устройству
3) Воспользоваться сканером сети (например, Advanced IP Scanner Portable)
После этого открываем браузер (не программу для скачивания браузеров, а именно браузер)
И вводим наш IP + :8123 (у меня это 192.168.1.101:8123)
И вуаля! Наша система загрузилась!
На официальном сайте все хорошо описано (но на английском) поэтому, если интересно, смогу написать несколько примеров как это делать в реальной жизни.
Все шаги я записал на видео, поэтому не стесняемся и заходим на видео.
Дорогие читатели, напишите в комментариях, что еще очень хочется увидеть?
Источник