Install Home Assistant Core
{% if page.installation_type == ‘windows’ %}
Install WSL
To install Home Assistant Core on Windows, you will need to use the Windows Subsystem for Linux (WSL). Follow the WSL installation instructions and install Ubuntu from the Windows Store.
As an alternative, Home Assistant OS can be installed in a Linux guest VM. Running Home Assistant Core directly on Windows is not supported.
{% endif %}
This is an advanced installation process, and some steps might differ on your system. Considering the nature of this installation type, we assume you can handle subtle differences between this document and the system configuration you are using. When in doubt, please consider one of the other installation methods, as they might be a better fit instead.
Prerequisites
This guide assumes that you already have an operating system setup and have installed Python {{site.installation.versions.python}} (including the package python3-dev) or newer.
Install dependencies
Before you start, make sure your system is fully updated, all packages in this guide are installed with apt, if your OS does not have that, look for alternatives.
sudo apt-get update
sudo apt-get upgrade -y
Install the dependencies:
sudo apt-get install -y python3 python3-dev python3-venv python3-pip bluez libffi-dev libssl-dev libjpeg-dev zlib1g-dev autoconf build-essential libopenjp2-7 libtiff5 libturbojpeg0-dev tzdata
The above-listed dependencies might differ or missing, depending on your system or personal use of Home Assistant.
Create an account
Add an account for Home Assistant Core called homeassistant.
Since this account is only for running Home Assistant Core the extra arguments of -rm is added to create a system account and create a home directory.
{%- if site.installation.types[page.installation_type].board %}
The arguments -G dialout,gpio,i2c adds the user to the dialout, gpio and the i2c group. The first is required for using Z-Wave and Zigbee controllers, while the second is required to communicate with GPIO.
sudo useradd -rm homeassistant -G dialout,gpio,i2c
{% else %}
sudo useradd -rm homeassistant
{% endif %}
Create the virtual environment
First we will create a directory for the installation of Home Assistant Core and change the owner to the homeassistant account.
sudo mkdir /srv/homeassistant
sudo chown homeassistant:homeassistant /srv/homeassistant
Next up is to create and change to a virtual environment for Home Assistant Core. This will be done as the homeassistant account.
sudo -u homeassistant -H -s
cd /srv/homeassistant
python3 -m venv .
source bin/activate
Once you have activated the virtual environment (notice the prompt change to (homeassistant) homeassistant@raspberrypi:/srv/homeassistant $) you will need to run the following command to install a required Python package.
python3 -m pip install wheel
Once you have installed the required Python package, it is now time to install Home Assistant Core!
pip3 install homeassistant=={{ site.current_major_version }}.{{ site.current_minor_version }}.{{ site.current_patch_version }}
Start Home Assistant Core for the first time. This will complete the installation for you, automatically creating the .homeassistant configuration directory in the /home/homeassistant directory, and installing any basic dependencies.
You can now reach your installation via the web interface on http://homeassistant.local:8123.
If this address doesn’t work you may also try http://localhost:8123 or http://X.X.X.X:8123 (replace X.X.X.X with your machines’ IP address).
When you run the hass command for the first time, it will download, install and cache the necessary libraries/dependencies. This procedure may take anywhere between 5 to 10 minutes. During that time, you may get «site cannot be reached» error when accessing the web interface. This will only happen for the first time, and subsequent restarts will be much faster.
The first step is to install Home Assistant. We recommend a dedicated system to run Home Assistant.
If you are unsure of what to choose, follow the Raspberry Pi guide to
install Home Assistant Operating System.
Home Assistant offers four different installation methods. We recommend using one of the following two methods:
-
Home Assistant Operating System: Minimal Operating System optimized to power Home Assistant.
It comes with Supervisor to manage Home Assistant Core and Add-ons. Recommended installation method. - Home Assistant Container: Standalone container-based installation of Home Assistant Core (e.g. Docker).
There are two alternative installation methods available for experienced users:
- Home Assistant Supervised: Manual installation of the Supervisor.
- Home Assistant Core: Manual installation using Python virtual environment.
The list below shows the installation method available based on the device and platform being used.
If you are using the Home Assistant Blue, the Home Assistant Operating System is
already installed. Continue to onboarding.
Compare Installation Methods
| OS | Container | Core | Supervised | |
|---|---|---|---|---|
| Automations | ✅ | ✅ | ✅ | ✅ |
| Dashboards | ✅ | ✅ | ✅ | ✅ |
| Integrations | ✅ | ✅ | ✅ | ✅ |
| Blueprints | ✅ | ✅ | ✅ | ✅ |
| Uses container | ✅ | ✅ | ❌ | ✅ |
| Supervisor | ✅ | ❌ | ❌ | ✅ |
| Add-ons | ✅ | ❌ | ❌ | ✅ |
| Backups | ✅ | ✅1 | ✅1 | ✅ |
| Managed OS | ✅ | ❌ | ❌ | ❌ |
1: Backups for Home Assistant Core and Home Assistant Container is provided by the backup integration.
Help us to improve our documentation
Suggest an edit to this page, or provide/view feedback for this page.
Update: новая статья
У новых пользователей часто возникает вопрос — можно ли установить Home Assistant на Windows?
Конечно можно! Проблема заключается в том, что не все зависимости Home Assistant легко установятся на любую сборку Windows. Об этом можно почитать тут.
На портале уже была статья о подобной установке. В своей версии я чуть подробнее опишу детали.
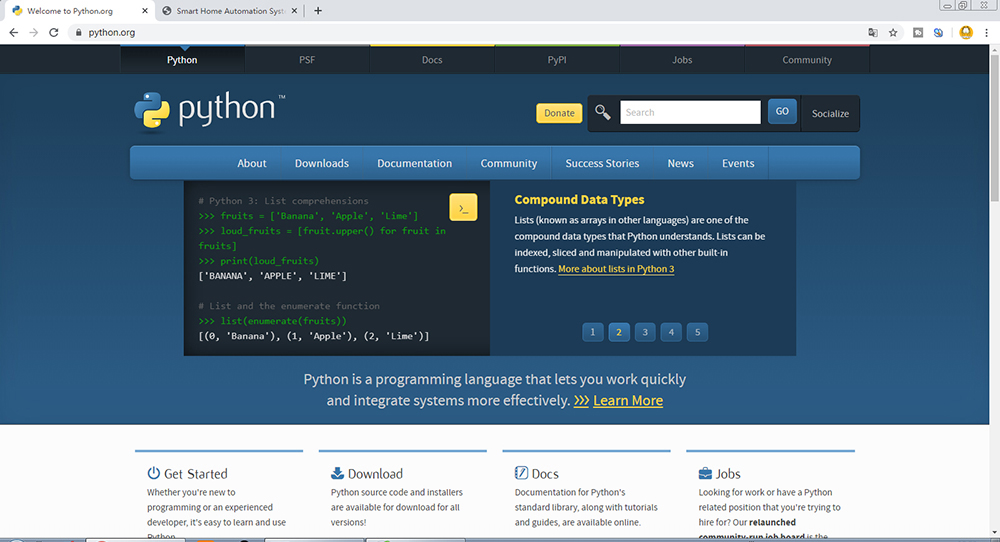
Идём на сайт python и скачиваем последнюю на момент написания статьи версию. Можно скачать как обычную, так и 64-битную версию.


В процессе установки Python я встречал следующие проблемы:
- установка не стартовала на «голой» Windows 7 без важных обновлений — нужно обновить систему стандартным способом
- установка не завершалась с недоступным сайтом python (из-за РКН) — нужно отключить опции download debug…
Вот у вас и установлен Python.
Далее нажимаем на клавиатуре win R и запускаем cmd
В запустившейся консоли вводим :
pip install homeassistant
Вот у вас и установлен последний Home Assistant.
На этом этапе у вас не должно возникнуть особых проблем. Python и HA должны установиться в практически любую систему.
Первый запуск Home Assistant
В той же консоли, что и ранее, просто вводим — hass.
Начнётся первый запуск HA. Он может быть достаточно долгим. HA будет скачивать и устанавливать разные библиотеки python, которые требуются конфигурации по умолчанию. А их не мало.
Плюс, если в процессе установки в вашей локальной сети обнаружатся поддерживаемые устройства — начнётся установка и их библиотек. В логе это отображается примерно так:
INFO (SyncWorker_1) [homeassistant.util.package] Attempting install of pychromecast==4.0.1
Вот на этом этапе вполне возможны проблемы и разные ошибки в консоли.
Терпеливо ждите пока HA делает свои дела. В идеале в конце лога вы должны увидеть строчку:
INFO (MainThread) [homeassistant.core] Starting Home Assistant
Далее попытайтесь открыть в любом браузере страницу:
http://localhost:8123/Вполне возможно у вас ничего не откроется. Это нормально.
План 2
Нажимайте в консоли Ctrl C, это принудительно остановит HA. Если не получится — закрывайте консоль и запускайте её заново.
И снова вводите в консоли — hass. И снова ждём строчку Starting Home Assistant и пробуем открыть в браузере:
http://localhost:8123/
План 3
Если со второй попытки страница так и не открылась — останавливаем HA и открываем папку с конфигами. Путь до неё показывается сразу после ввода команды hass. Это должно быть что-то вроде:
C:UsersAlexeyAppDataRoaming.homeassistant
Только с именем вашего пользователя. Проще вбить этот адрес сразу в проводнике Windows.
Теперь правим файл configuration.yaml.
Заменяем всё его содержимое на 3 простые строки:
config: frontend: system_health:
Это минимальный набор модулей, необходимый для старта HA и отображения главной страницы. Сильно сократит перечень зависимостей и повысит шансы старта.
Снова запускаем hass и пробуем открыть страницу.
PS
Это не все проблемы с которыми можно столкнуться. Но, надеюсь, вам хватит советов, описанных в статье.
На данный момент инструкция неактуальна. Текущие варианты установки можете посмотреть на официальном сайте HA.
В данной статье будет пошагово описан процесс установки home assistant на ПК под управлением Windows 10.
Важно отметить, что операционная система Windows не является основной для HA, что проявляется в неполной работоспособности программного обеспечения, в связи с чем установку HA на Win10 рекомендуется производить только для ознакомления с возможностями ПО.
Итак, приступим.
-
-
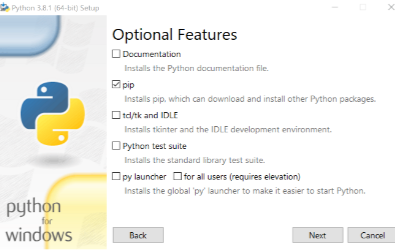
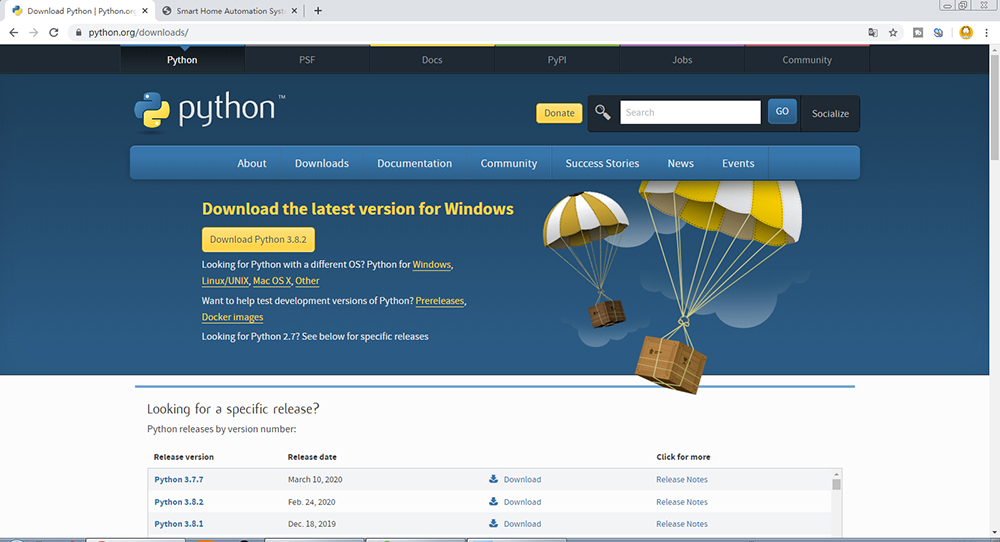
- Первым делом нам нужно установить Python. Идем на официальный сайт, выбираем последнюю версию, проматываем страницу вниз и выбираем нужный нам файл (например Windows x86-64 executable installer). Скачиваем и запускаем.
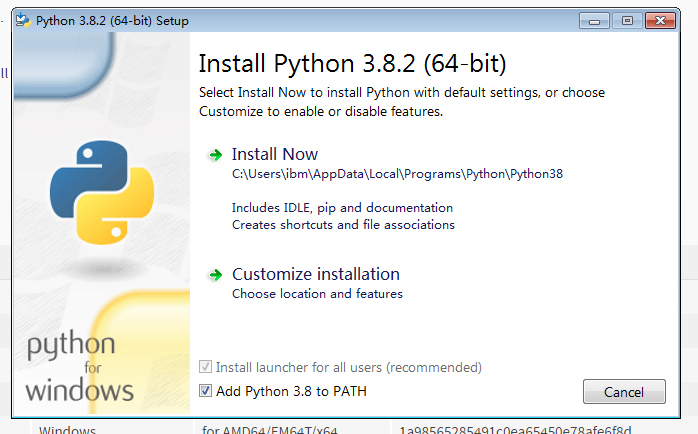
- При установке выбираем Customize installation -> на второй вкладке оставляем только pip -> на третьей выбираем Add Python to environment variables.

- После того, как Python установится запускаем командную строку: нажимаем Win и R, в появившемся поле вводим cmd и нажимаем Ок.
- Вводим в командной строке pip install homeassistant, нажимаем Enter и ждем пока все установится. В случае ошибок внимательно читаем и делаем что там будет написано. В моем случае не было Visual C++ 14.0. Для исправления – скачиваем Build Tools для Visual Studio с официального сайта, устанавливаем и перезагружаем ПК.

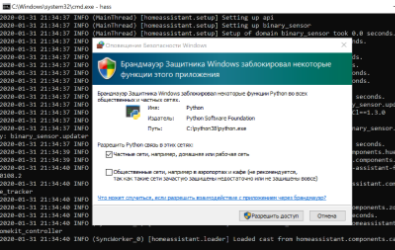
- Программа установлена и для запуска осталось ввести команду hass в командной строке. На данном этапе может появляться много ошибок, возможно придется прервать запуск (Ctrl+C) и запустить заново. Также брандмауэр может попросить разрешить доступ. Разрешаем. В самом конце запуска в консоли должна появиться строчка со следующим содержанием: INFO (MainThread) [homeassistant.core] Starting Home Assistant.
- Далее запускаем браузер и вводим localhost:8123. Если все сделано правильно, то откроется окно регистрации учетной записи. Если ничего не получилось, то попробуйте еще раз выполнить пятый пункт.
- Поздравляю, мы установили Home Assistant на ПК под управлением Windows 10.

-


Ссылки на другие уроки по настройке Home Assistant.
Open-source home automation platform running on Python 3.
Project description
Project details
Download files
Download the file for your platform. If you’re not sure which to choose, learn more about installing packages.
Source Distribution
Built Distribution
Close
Hashes for homeassistant-2023.2.1.tar.gz
| Algorithm | Hash digest | |
|---|---|---|
| SHA256 | 65f2f5d2257e8527b761aaf303f6e7a2a37cc929ece18bbeb632fbe699b7300a |
|
| MD5 | 704694f69f02a39ea4df497ab168f8c6 |
|
| BLAKE2b-256 | 41024b29b4bff21a04e559ece3330ac8622b390b3015e7039de3881805dd28b6 |
Close
Hashes for homeassistant-2023.2.1-py3-none-any.whl
| Algorithm | Hash digest | |
|---|---|---|
| SHA256 | a85038c083556553db69b9cd7ae58f7516d75f102b7eea12823700e52df96b9c |
|
| MD5 | 66d89bddd80090376ab5730158f5ad39 |
|
| BLAKE2b-256 | 199117283c16691b53e7cdcd48faaa9a12b7c96c26cc4c26d2017818a2e68ad4 |
Содержание
- Как установить умный дом Home Assistant
- Запускаем Home Assistant на Windows (Portable)
- Устанавливаем Home Assistant на Windows
- Установка Home Assistant
- Первый запуск Home Assistant
- Windows
- Install Home Assistant Operating System
- Download the appropriate image
- Create the Virtual Machine
- Hypervisor specific configuration
- Start up your Virtual Machine
- Install Home Assistant Core
- Install WSL
- Install dependencies
- Create an account
- Create the virtual environment
- Как установить Home Assistant в Virtualbox на Windows 10
Как установить умный дом Home Assistant
Это статья написана для напоминания, что умный дом стал намного ближе, чем мы думали.
Home Assistant-это open-source платформа для автоматизации, работающая на Python 3. Позволяет отслеживать и контролировать все устройства в доме и автоматизировать действия. Идеально может работать на одноплатном компьютере Raspberry PI.

Что такое умный дом можно почитать в википедии тут и тут.
Давайте по порядку:
1. Центральное ядро
Умный дом нуждается в центральном контроллере (хаб, сервер и т.д.). Это связующее звено между всеми элементами умного дома и пользователем. Бывают распределенные системы без центрального контроллера, но все равно нужен один сборщик информации, который покажет пользователю все актуальные новости каждого устройства
ПК-отличный вариант, если требуется большая нагрузка на сервер, т.к. производительности даже старых ноутбуков хватит вполне (только если вы не будете крутить 4К видео или использовать 10 камер с HEVC кодированием). Из минусов- в 95% случаев активное охлаждение и чтобы подключить обычное реле всегда приходится использовать дополнительные костыли.
Специализированные контроллеры — отличный вариант, если вам нужна надежность и отказоустойчивость. Вероятность отказа промышленного контроллера (при правильных руках) приближается к вероятности появления зомби апокалипсиса. Но есть и минус- программировать и настраивать могут либо те, кто уже автоматизировал несколько конвейеров, либо человек в мозгу которого не нейроны а релейные схемы. И чаще всего интерфейс у них, мягко говоря, аскетичный. К сожалению, я не такой умный, поэтому это вариант точно не для меня.

И тут мы приходим к самому современному варианту — это дешевые одноплатные компьютеры на базе ARM архитектуры. Сейчас их выбор просто огромен, но самый популярный родоначальник Raspberri pi. Из плюсов маленькое энергопотребление, есть пользовательские выводы и удовлетворительная производительность для запуска несложных программ.
Есть еще много экзотических вариантов автоматизации своего очага, например, кровать-будильник на Всемирной выставке 1851 года (изобретатель Теофиль Картер). Или любимое извращенство- ардуино с шилдами (прощу прощение за несерьезный мем)

2. Внешние датчики, контроллеры, элементы управления.
Эта тема настолько обширная, что описать все многодикообразие в данной статье не представляется возможным, поэтому оставим это для будущих статей. Вкратце, есть:
— DIY решения и ардуиноподбные решения
— Китайские решения (пример Sonoff)
— Дорогие красивые решения (пример nest)
Тоже вынесем сие обсуждение в отдельную тему. Сегодня мы будем рассматривать только одну из множества открытых платформ. Обзоры еще будут. Сразу отвечу на вопросы, почему именно она:
а) Огромное количество поддерживаемых сервисов,
б) Легко и бесплатно установить,
в) Приятный интерфейс.
4. Сторонние сервисы
Помогают подключить разные существующие решения и автоматизировать действия на смартфонах и ПК. Типичный пример IFTTT.
Что делать если я не умею программировать или у меня есть деньги?
Отдельно стоят решения современных экосистем от Samsung, Xiaomi, Amazon, Apple, Google и т.д. Соглашусь, что порой их решения выглядят намного красИвее, но средняя заработная плата русского человека примерно 500$, что не позволяет ощутить всю гамму вкусов.
Рекомендуется к приобретению:
1. Raspberry Pi 3 (вероятно подойдут и более старые) 35$
2. MicroSD на 16ГБ не ниже 10 класса( чем быстрее, тем лучше) с адаптером к компьютеру 7$
3. Зарядник MicroUSB на 5В и больше чем 2А 0$ (подошел от старого телефона)
4. Ваше драгоценное время. Бесценно.
5. Опционально монитор с HDMI
После записи, извлекаем флешку и вставляем в распберри пи.
ОБЯЗАТЕЛЬНО НАДО ВСТАВИТЬ В МАЛИНУ ИНТЕРНЕТ-ШНУР.
При подаче питания должна загореться красная лампочка и зеленая начать хаотично мигать. Ждем с кружкой чая 10 минут.
После этого нам надо найти уже веб интерфейс нашей системы умного дома. Для этого есть несколько способов:
1) Посмотреть через hdmi нашу командную строку и найти там IP вида 192.168.1.х ( или любого другого)
2) посмотреть в настройках роутера какой DHCP сервер присвоил адрес новому устройству
3) Воспользоваться сканером сети (например, Advanced IP Scanner Portable)
После этого открываем браузер (не программу для скачивания браузеров, а именно браузер)
И вводим наш IP + :8123 (у меня это 192.168.1.101:8123)
И вуаля! Наша система загрузилась!
На официальном сайте все хорошо описано (но на английском) поэтому, если интересно, смогу написать несколько примеров как это делать в реальной жизни.
Все шаги я записал на видео, поэтому не стесняемся и заходим на видео.
Дорогие читатели, напишите в комментариях, что еще очень хочется увидеть?
Источник
Запускаем Home Assistant на Windows (Portable)


У меня уже была статья про установку Home Assistant на Windows.
В этом варианте его не нужно устанавливать:
Портативная версия Home Assistant под Windows. В комплекте уже есть:
PS: не стоит рассматривать HassWP, как боевое решение системы умного дома на века. Он будет полезен скорее для ознакомления и для экспериментов.


На Win10 не хочет работать
Для работы на Win10 необходимо установить Visual studio c компонентами C++
какой-то совсем не портативный вариант получается, это как за дрезиной тянуть два вагона запчастей
очень интересный вариант.
очень правильное направление.
скажите, кто-ниубудь продолжает разработку этого бандла? Может быть на коммерческой основе?
Источник
Устанавливаем Home Assistant на Windows

Конечно можно! Проблема заключается в том, что не все зависимости Home Assistant легко установятся на любую сборку Windows. Об этом можно почитать тут.
На портале уже была статья о подобной установке. В своей версии я чуть подробнее опишу детали.
Установка Home Assistant
На первом экране выбираем Customize installation.

На втором нам вполне хватит только pip. Остальные выключаем.

И последние галочки про precompile и debug. Возможно они помогут при установке хитрых зависимостей Home Assistant, но это не точно 🙂
Я люблю устанавливать Python в корень диска. Так проще его найти и можно избежать проблем с кривыми путями.

В процессе установки Python я встречал следующие проблемы:
Далее нажимаем на клавиатуре win R и запускаем cmd
В запустившейся консоли вводим :
На этом этапе у вас не должно возникнуть особых проблем. Python и HA должны установиться в практически любую систему.
Первый запуск Home Assistant
Начнётся первый запуск HA. Он может быть достаточно долгим. HA будет скачивать и устанавливать разные библиотеки python, которые требуются конфигурации по умолчанию. А их не мало.
Терпеливо ждите пока HA делает свои дела. В идеале в конце лога вы должны увидеть строчку:
Далее попытайтесь открыть в любом браузере страницу:
Только с именем вашего пользователя. Проще вбить этот адрес сразу в проводнике Windows.
Теперь правим файл configuration.yaml.
Заменяем всё его содержимое на 3 простые строки:
Это минимальный набор модулей, необходимый для старта HA и отображения главной страницы. Сильно сократит перечень зависимостей и повысит шансы старта.
Снова запускае м hass и пробуе м открыть страницу.
Это не все проблемы с которыми можно столкнуться. Но, надеюсь, вам хватит советов, описанных в статье.
Источник
Windows
Install Home Assistant Operating System
Download the appropriate image
Follow this guide if you already are running a supported virtual machine hypervisor. If you are not familiar with virtual machines we recommend installation Home Assistant OS directly on a Raspberry Pi or an ODROID.
Create the Virtual Machine
Load the appliance image into your virtual machine hypervisor. (Note: You are free to assign as much resources as you wish to the VM, please assign enough based on your add-on needs)
Minimum recommended assignments:
All these can be extended if your usage calls for more resources.
Hypervisor specific configuration
After creation of VM go to “Settings” and “Options” then “Advanced” and select “Firmware type” to “UEFI”.
Start up your Virtual Machine
With the Home Assistant Operating System installed and accessible you can continue with onboarding.
Install Home Assistant Core
Install WSL
To install Home Assistant Core on Windows, you will need to use the Windows Subsystem for Linux (WSL). Follow the WSL installation instructions and install Ubuntu from the Windows Store.
As an alternative, Home Assistant OS can be installed in a Linux guest VM. Running Home Assistant Core directly on Windows is not supported.
This guide assumes that you already have an operating system setup and have installed Python 3.8 (including the package python3-dev ) or newer.
Install dependencies
Install the dependencies:
Create an account
Create the virtual environment
First we will create a directory for the installation of Home Assistant Core and change the owner to the homeassistant account.
Next up is to create and change to a virtual environment for Home Assistant Core. This will be done as the homeassistant account.
Once you have installed the required Python package it is now time to install Home Assistant Core!
If this address doesn’t work you may also try http://localhost:8123 or http://X.X.X.X:8123 (replace X.X.X.X with your machines’ IP address).
When you run the hass command for the first time, it will download, install and cache the necessary libraries/dependencies. This procedure may take anywhere between 5 to 10 minutes. During that time, you may get “site cannot be reached” error when accessing the web interface. This will only happen for the first time, and subsequent restarts will be much faster.
Источник
Как установить Home Assistant в Virtualbox на Windows 10
В последнее время, мне как-то надоедает включать свою домашнюю виртуализацию, базирующуюся на Debian 10 + Proxmox 6 и работать с VM из-под браузера. Может конечно если что-то масштабное, то да. А вот с целью побыстрее обкатать то можно на рабочем месте использовать Virtualbox (я против использования Hyper-V )
Итак, рабочая Windows 10 Pro (Version 10.0.18363.592)
Шаг №1: На рабочую Windows 10 Pro устанавливаю VirtualBox 6.1.12 (VirtualBox-6.1.12-139181-Win.exe)
Шаг №2: Скачиваю с официального сайта Home Assistant на момент ( 05.08.2020 ) написания данной заметки vmdk файл hassos_ova-4.11.vmdk.gz (его вес 243 395 КБ ), распаковываю получается файл hassos_ova-4.11.vmdk (его вес 752 128 КБ )
Шаг №3: Создаю VM через Virtualbox
Virtualbox – Машина – Создать

После пока VM еще выключена изменять (через меню «Настроить» на VM ) тип сетевого адаптера с
На «Сетевой мост».
После запускаю VM путем нажатия на кнопку «Запустить»

После в консоли нажимаю клавишу Enter и вижу приглашение на авторизацию:
homeassistant login: указываю учетную запись root
И нажимаю клавишу Enter
После вижу приглашение:
Welcome on Home Assistant command line
ha > В этой консоли нужно ввести слово «login»:

Шаг №4: Теперь зная этот адрес я могу в своей локальной сети обратиться к сервису Home Assistant посредством браузера через URL строку: http://IP&DNS:8123 (http://192.168.10.185:8123 )
http://192.168.10.185:8123/onboarding.html — создаю первый раз учетную запись пользователя
И нажимаю «Создать учетную запись»
Именую свой Home Assistant : к примеру, как ekzhome

Итого я в шагах задокументировал для себя, как под Virtualbox быстро и легко развернуть Home Assistant дабы иметь тестовый полигон настройки чтобы в последствии переносить только реально работающие решения и не засорять боевую систему. Так делаю я, да это почти двойная работа, но что в эксплуатации не должно страдать от тестов. На этом моя заметка завершена, с уважением автор блога Олло Александр aka ekzorchik.
Источник
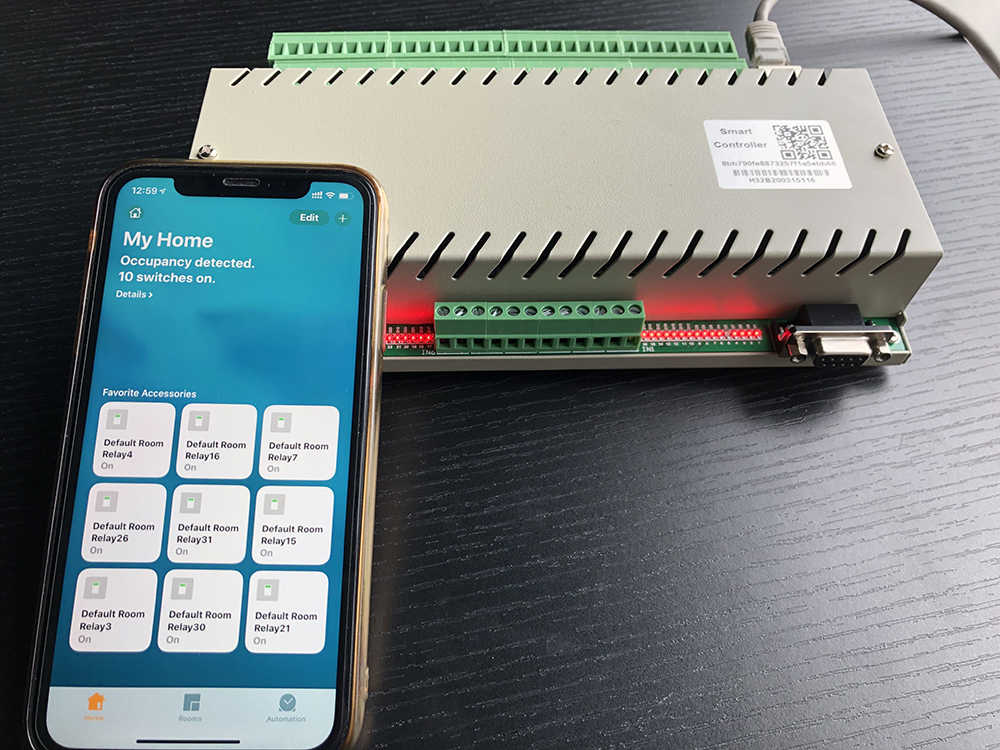
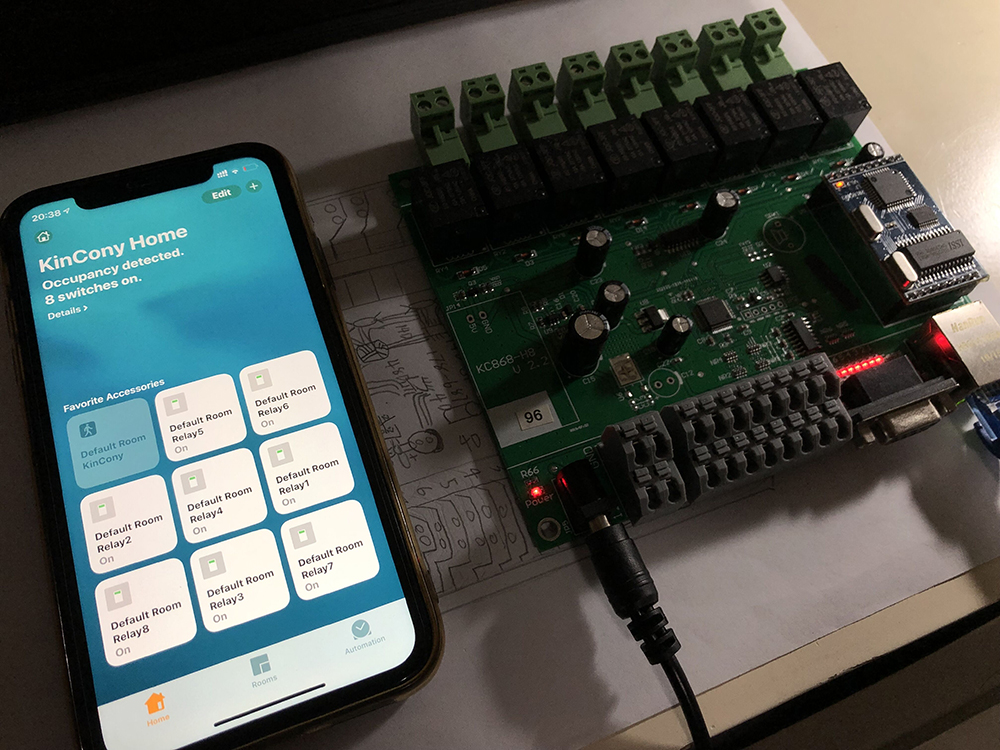
We have write a program for TCP/IP Socket -> MQTT protocl convert help smart home DIYer to use home assistant for automatic control. So now all KC868-Hx smart controller can add to home assistant. You can also use Apple homekit smart home APP, also can use Siri for voice control. Now I will tell you how to do :
Find a Windows or Linux (Ubuntu,RedHat,CentOS,Debian,Fedora,SuSE,OpenSUSE,Arch Linux,SolusOS) computer for server. Such as miniPC or Raspberry Pi .
1.install python
2.install home assistant
3.install ActiveMQ server
4.Running HADemoMain.exe ,ActiveMQ server and Home Assistant
5.Config home assistant
6.Add apple homekit for device
Note:Now we use windows OS for demo lesson, the “HADemoMain.exe” is for Windows OS, but we have supply the python source code, so if you use Linux OS, you can compile the py file to use. Such as run a compile command : “pyinstaller -F -w HADemoMain.py”.
newest “HADemoMain.exe” file and python source code you can download from this link:
https://www.kincony.com/download/HomeAssistant-Demo-KC868.rar
“configuration.yaml” file for home assistant download link.
https://www.kincony.com/download/configuration.rar
This is the end use effect.
Open python download website.
Enter the download center.
Chose a OS type install file.
Note: check the option “Add Python 3.8 to PATH”
After installed the Python, run “pip3 install homeassistant”, it will takes some time.
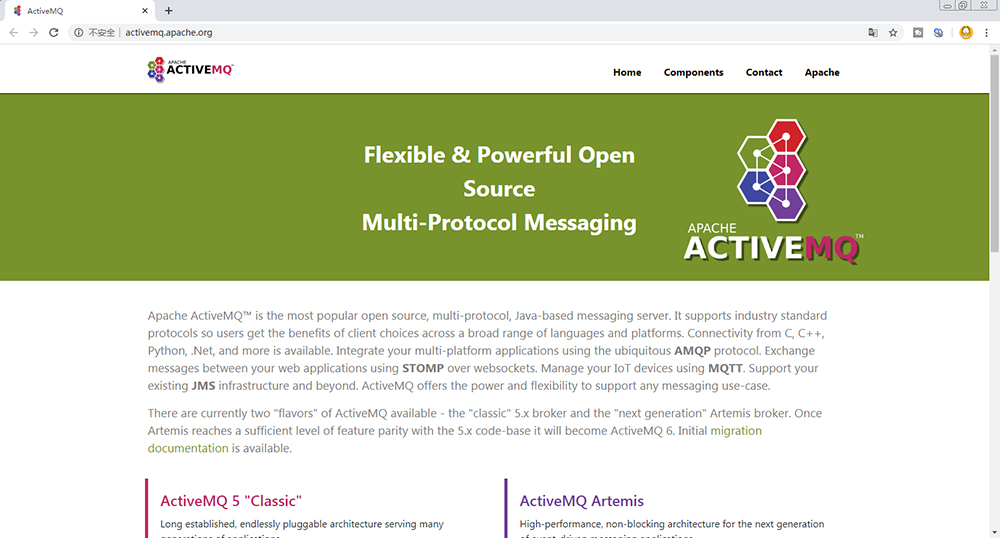
Now, open the ActiveMQ website.
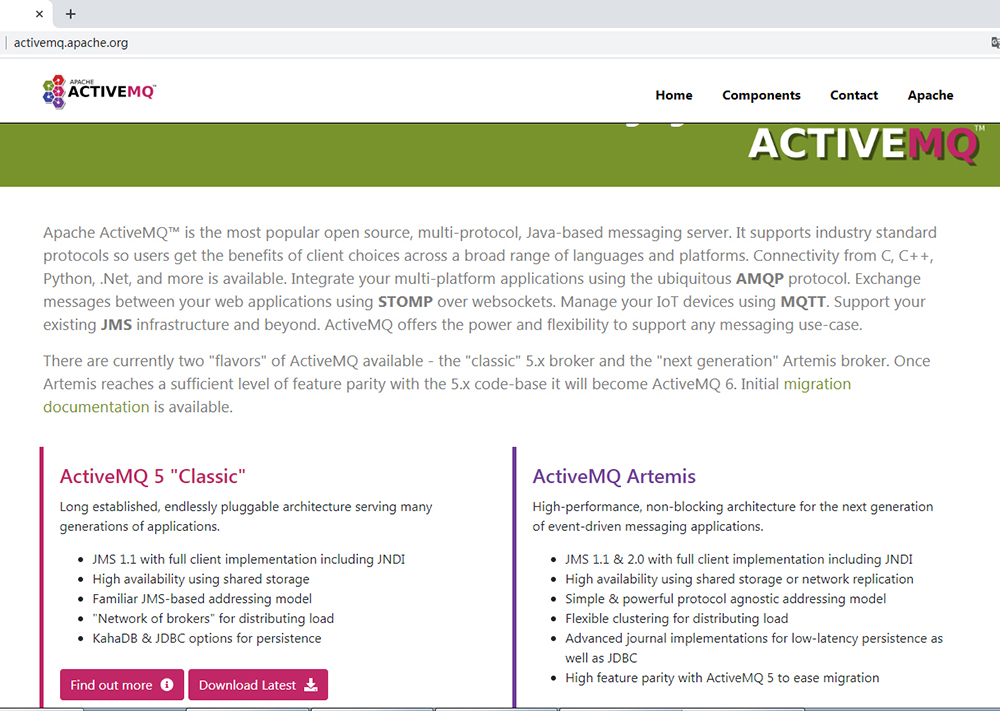
Download the Lastest version file.
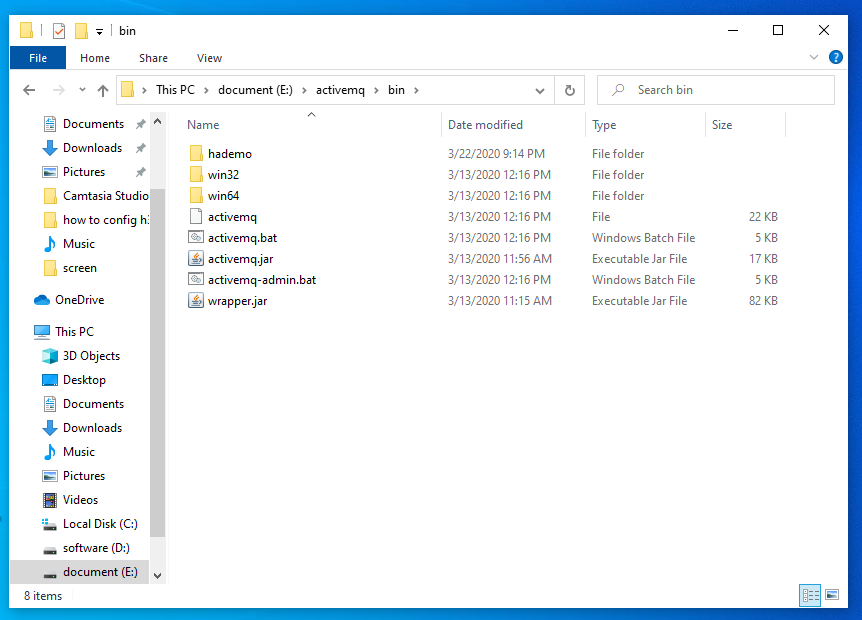
Decompression to folder E:activemq
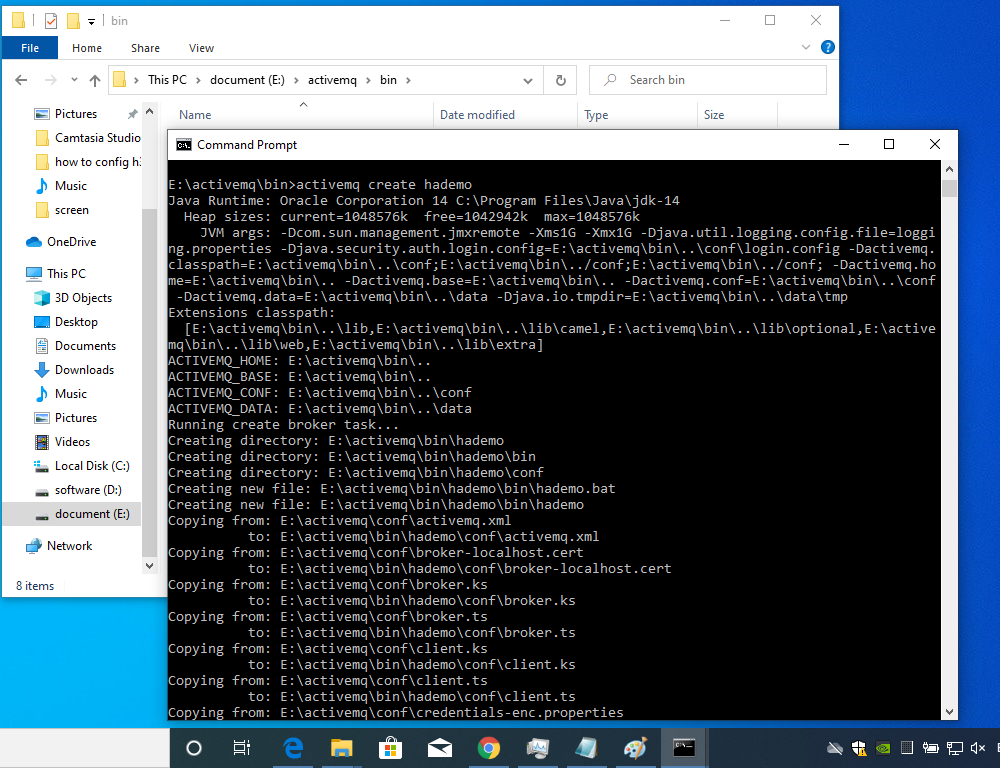
Goto E:activemqbin run “activemq create hademo” command to create MQTT server.
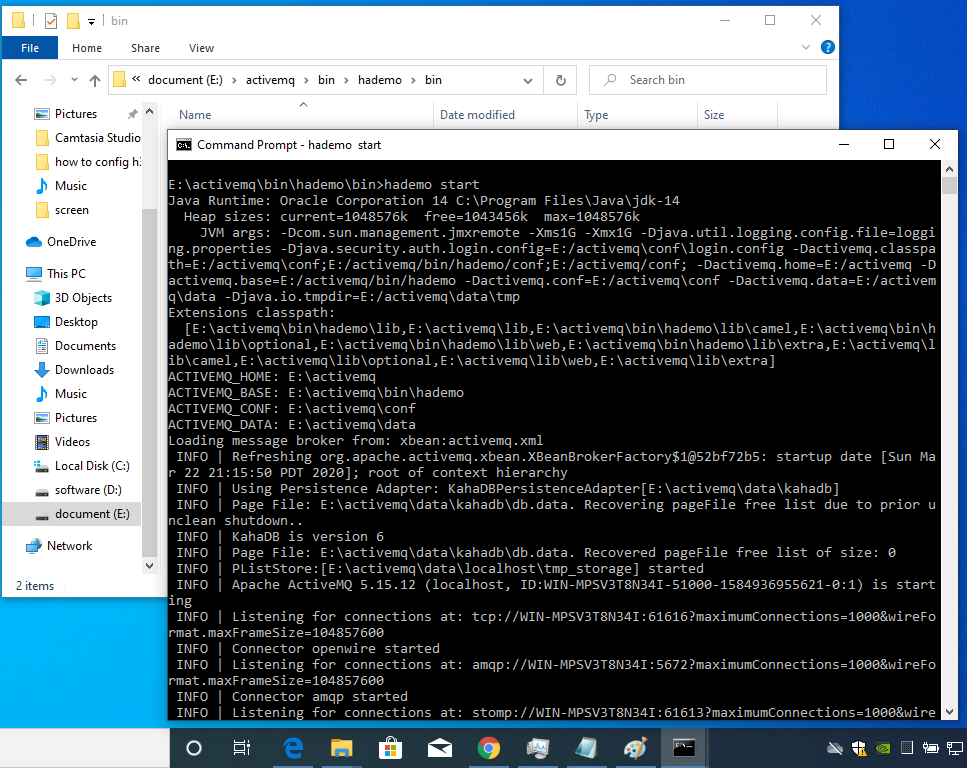
After created, run start command to start MQTT server.
newest “HADemoMain.exe” file and python source code you can download from this link:
https://www.kincony.com/download/HomeAssistant-Demo-KC868.rar
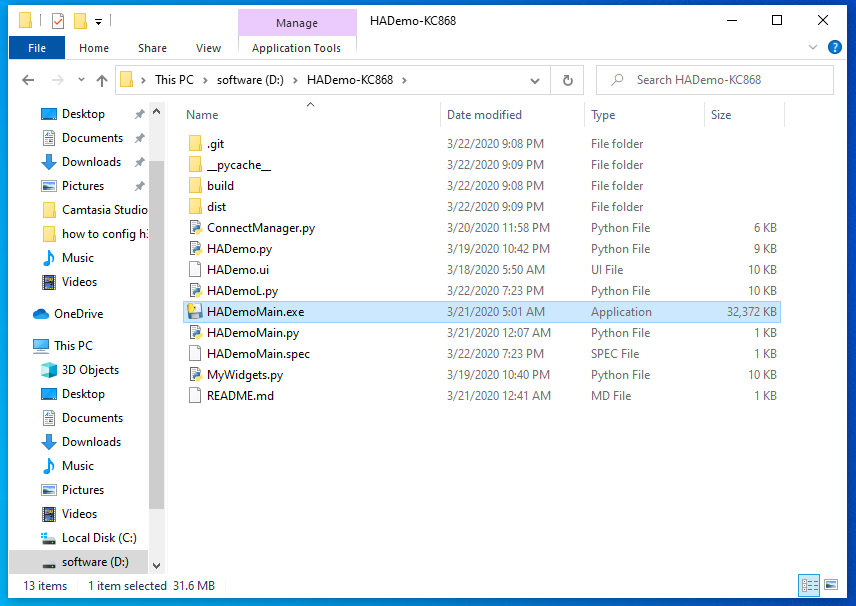
Open the HADemoMain.exe that already download from our website

Open KC868-Hx controller VirCom.exe network config tool. Set the “Work mode=TCP Server”, also we can see the device IP and Port.
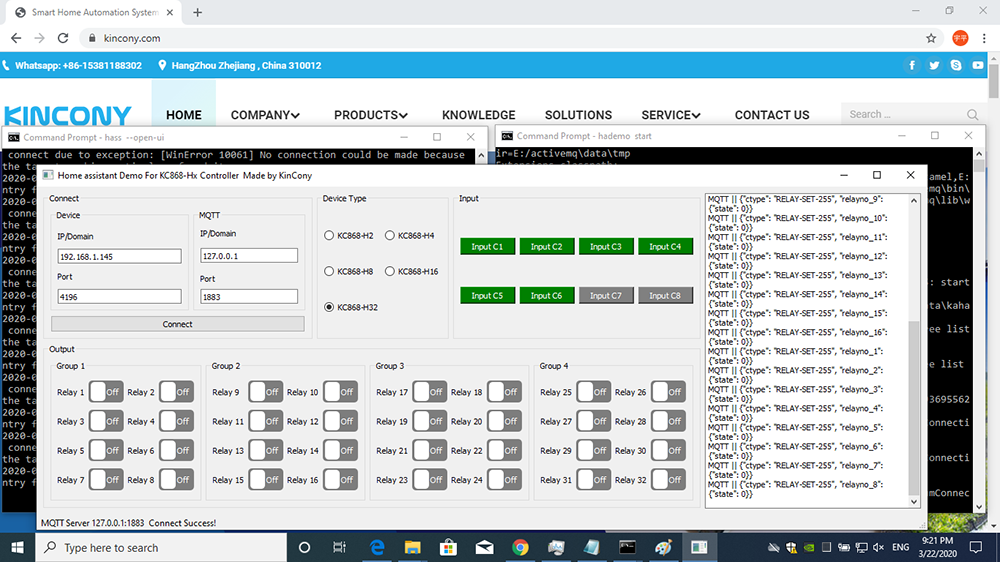
Set the Device IP and Port of controller, set the MQTT server IP and port, because we install the MQTT server in local computer, so we input IP=127.0.0.1, you can also install the MQTT server in another computer, just input the actual IP of your MQTT server.
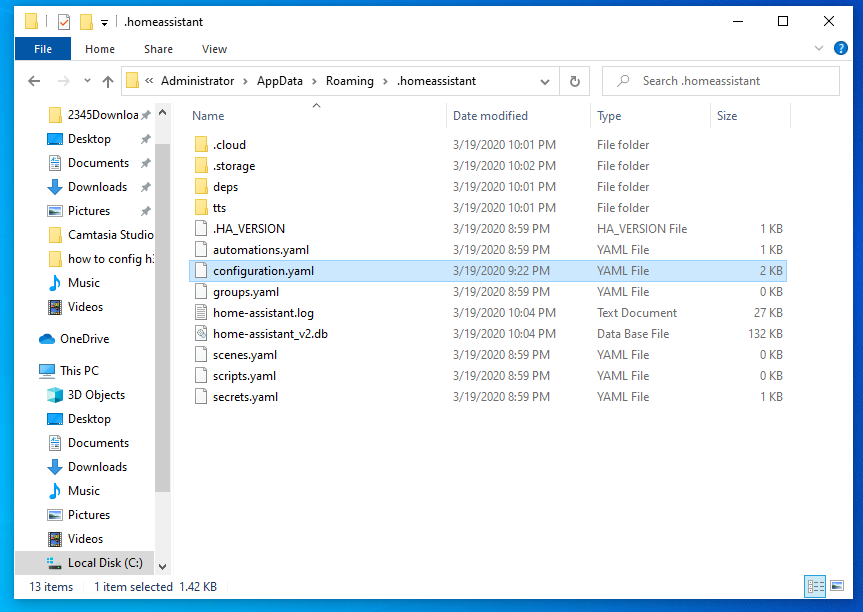
Now we open the “configuration.yaml” home assistant config file to modfiy.
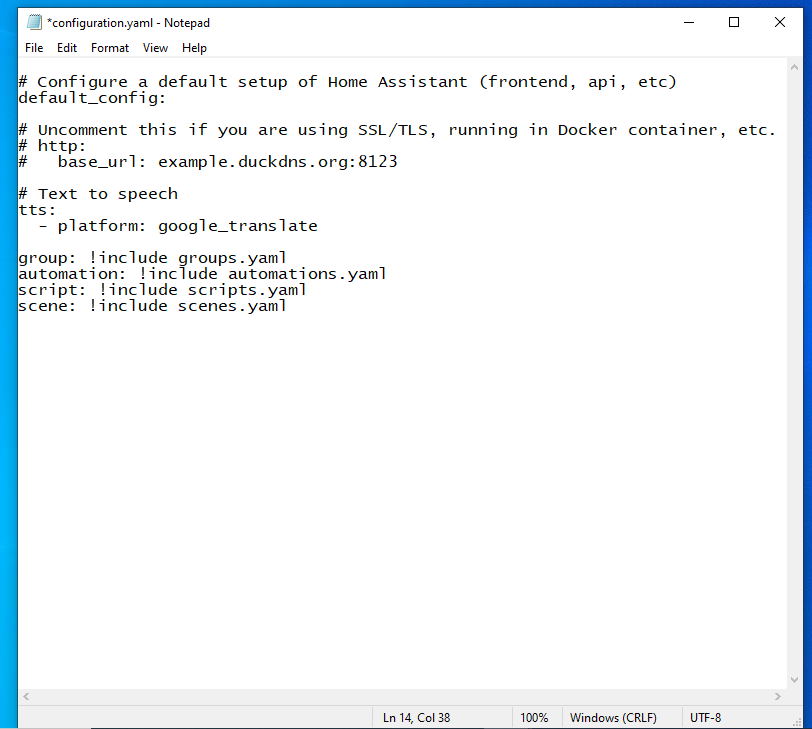
When you install the new home assistant , the config file is above.
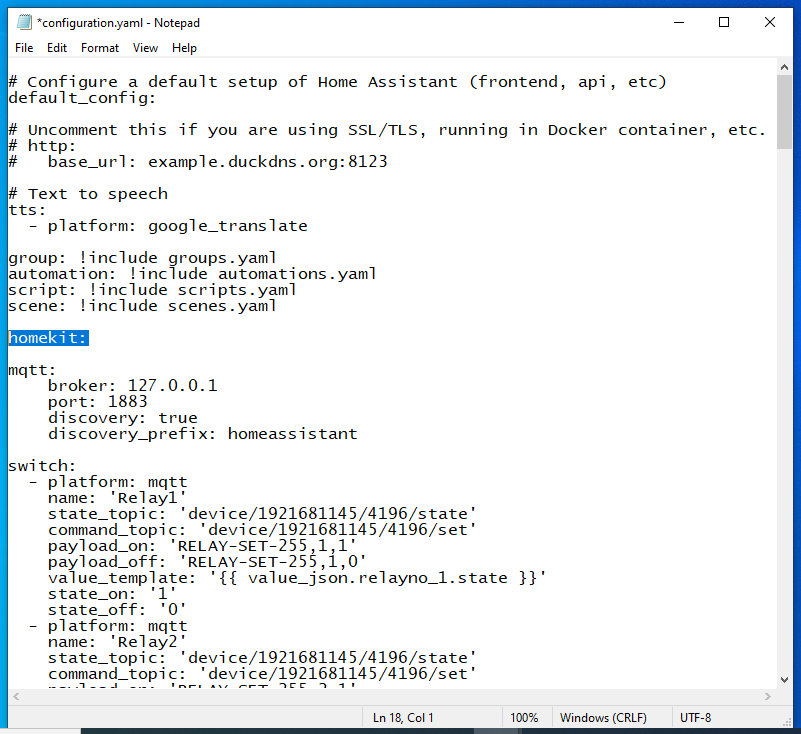
Now we will add the config content of our relay controller. MAX is KC868-H32 is 32 channel relay, you can also config for 2 channels,4 channels,8 channels,16 channels.
You can also download the “configuration.yaml” file we have updated.
https://www.kincony.com/download/configuration.rar
When you add one relay, just change the relay’s “name”,”IP” and “port” in config file as my text. if you want to use homekit, just add the line: “homekit:”

Start home assistant by command “hass —open-ui”
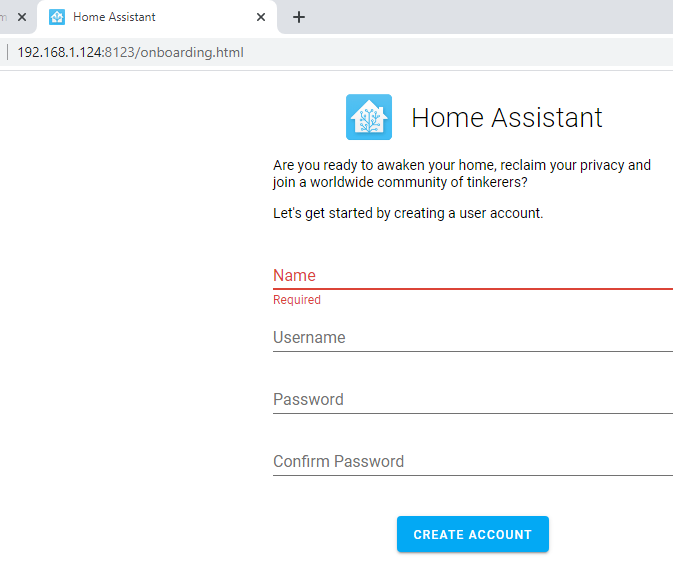
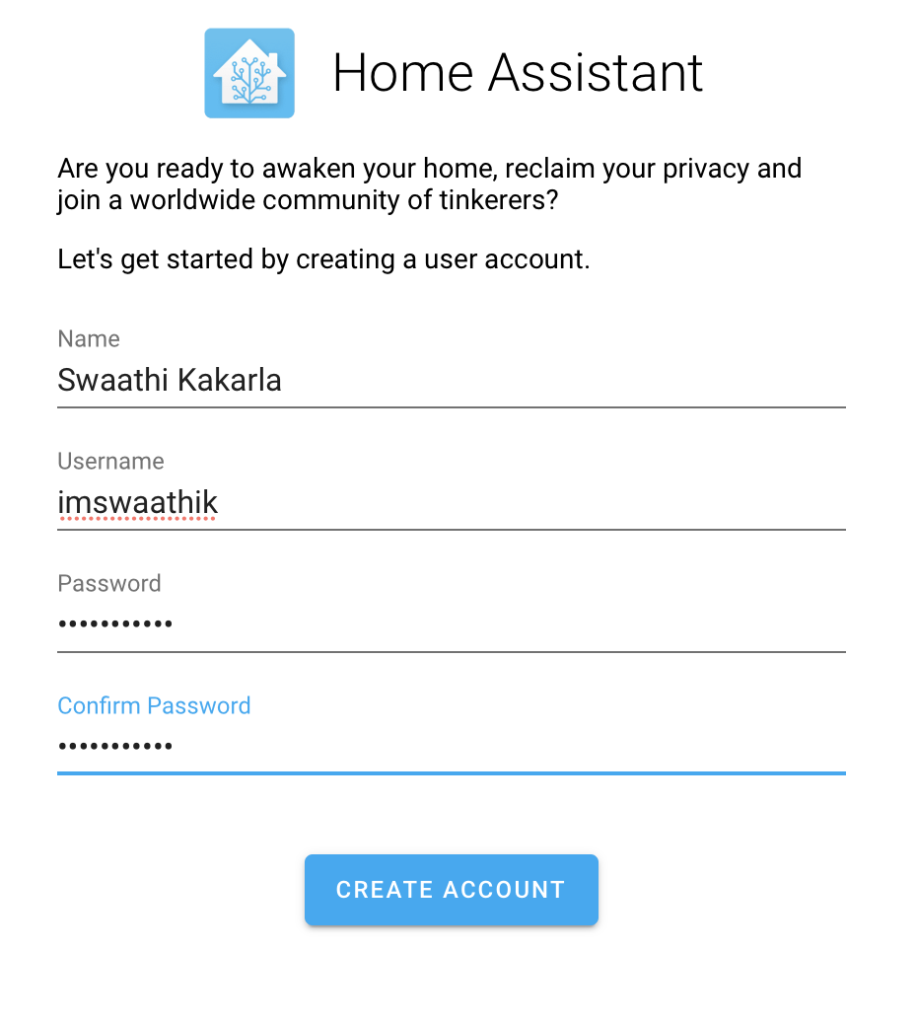
First time open the home assistant website, you need to create account.
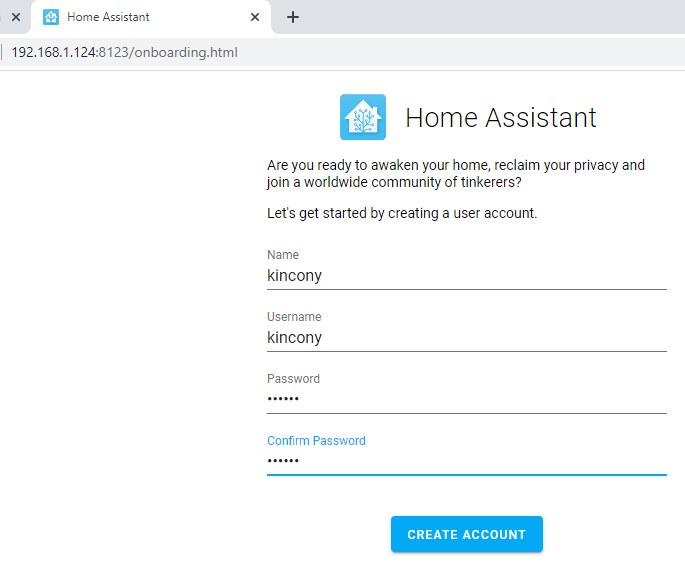
input the name and password for create the account for home assistant.
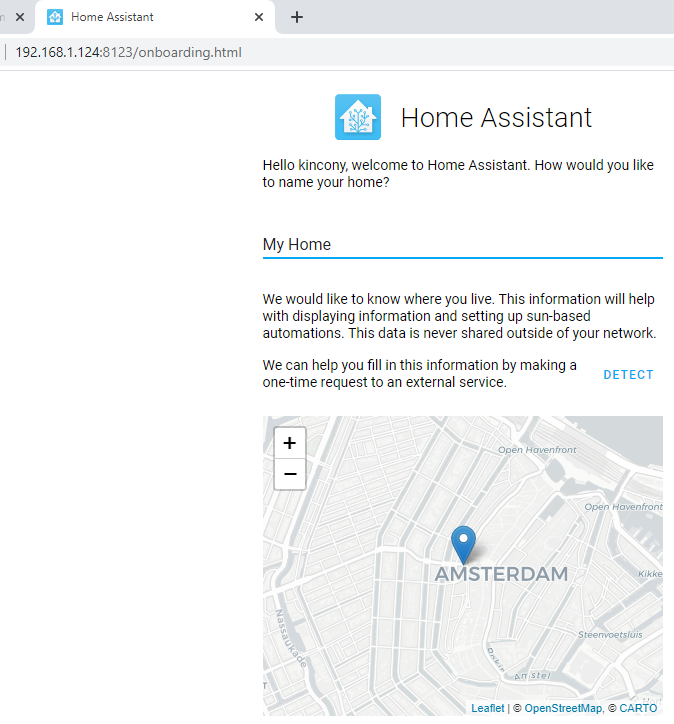
chose your home location in map, then press “Next”
Press “finish” complete the config.
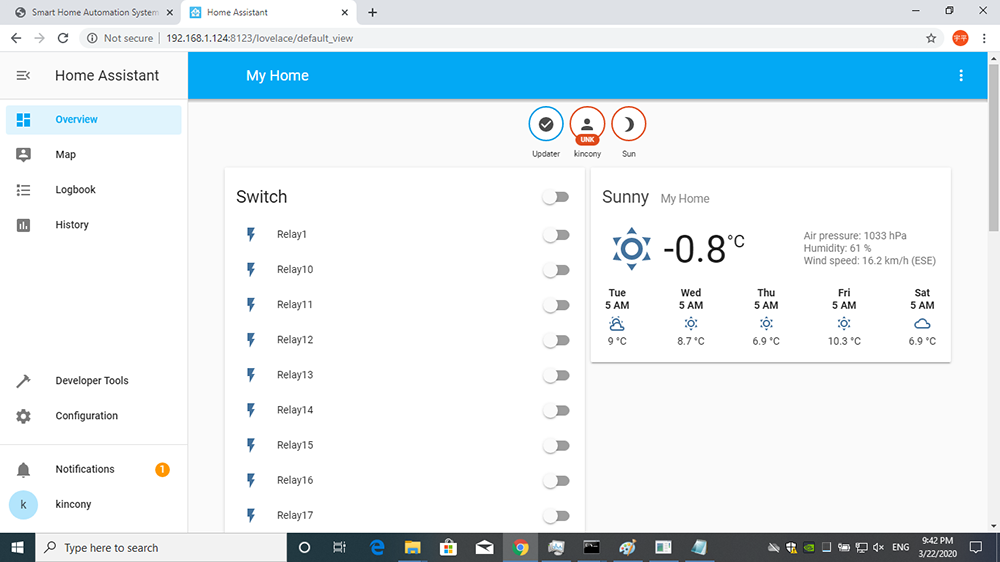
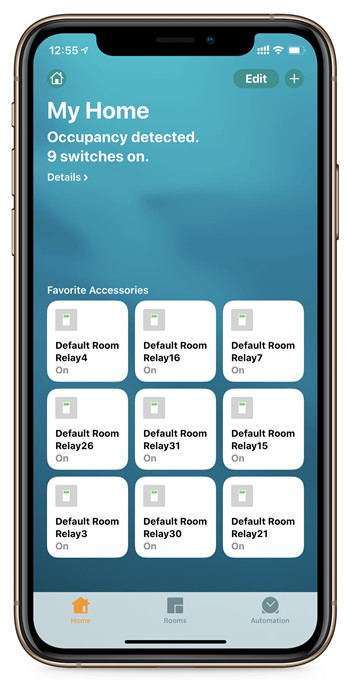
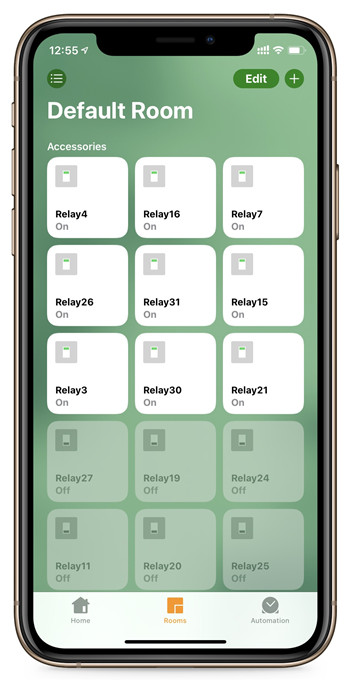
Now you can see 32 relays on the home assistant window.
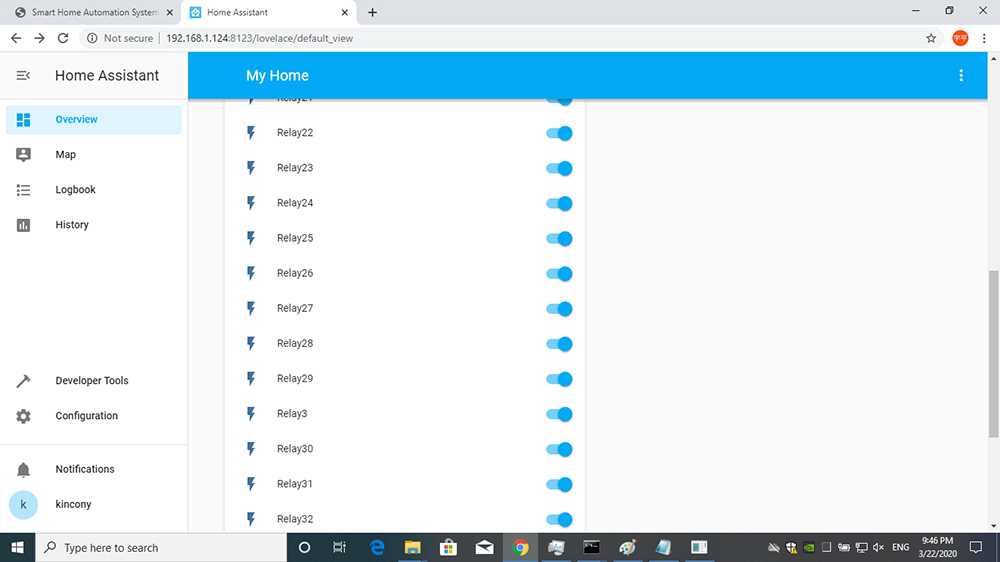
You can turn ON/OFF every relay switch.
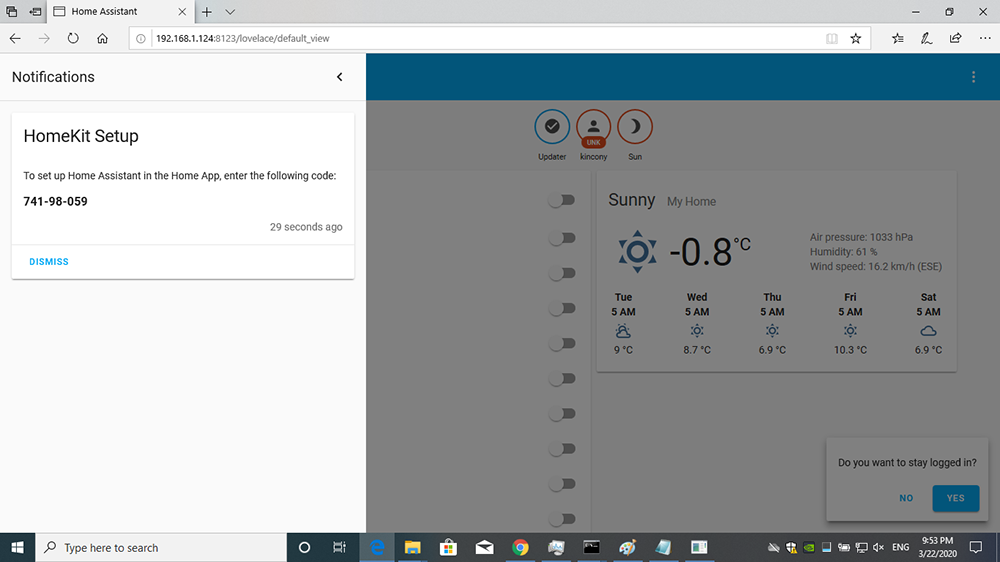
Click left window of “Notifications” website, you can see the homekit setup key.
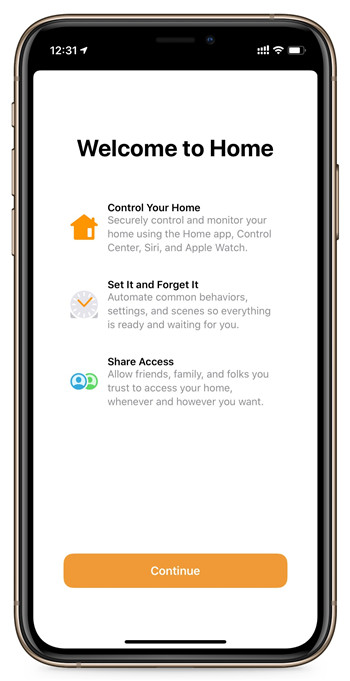
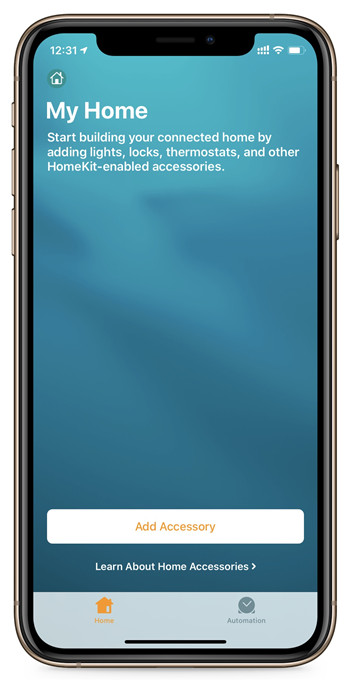
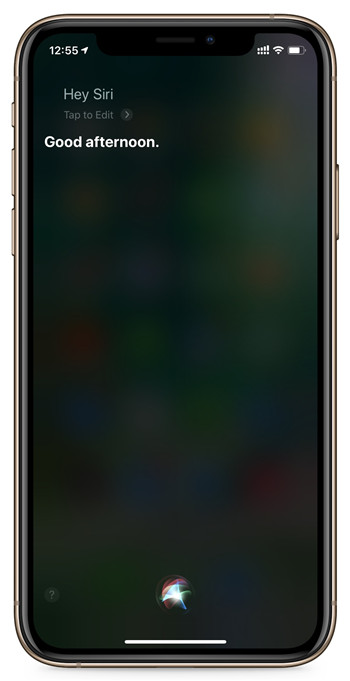
Now, we open iPhone homekit APP. Press “Add Accessory”
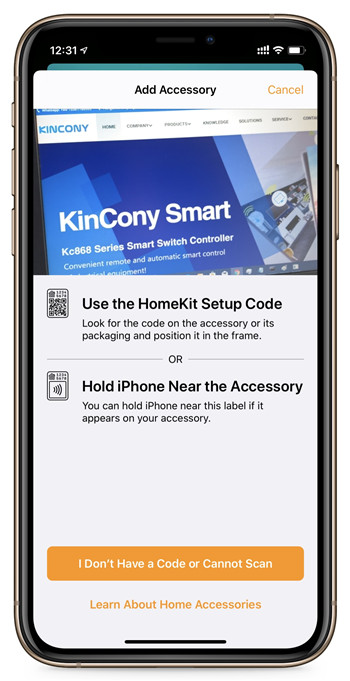
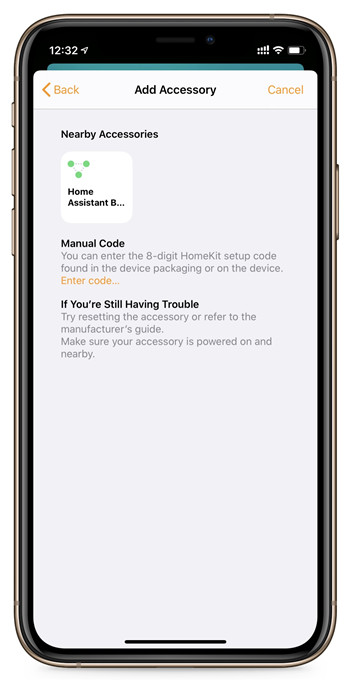
Press “I Don’t Have a Code or Cannot Scan”, Then you can see home assistant device.

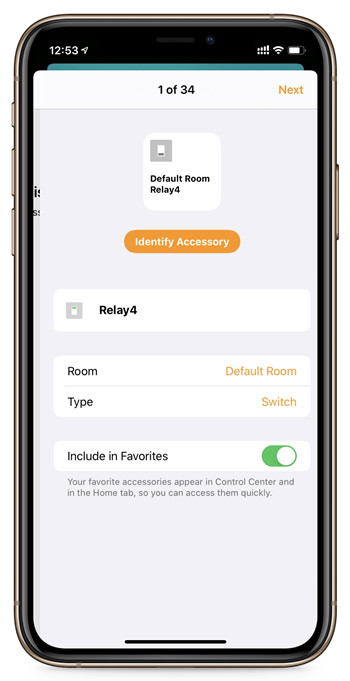
input the code we have seen on PC. Then you can set the name and room of each relay separately.
All relays config complete, you can use homekit control relay now.
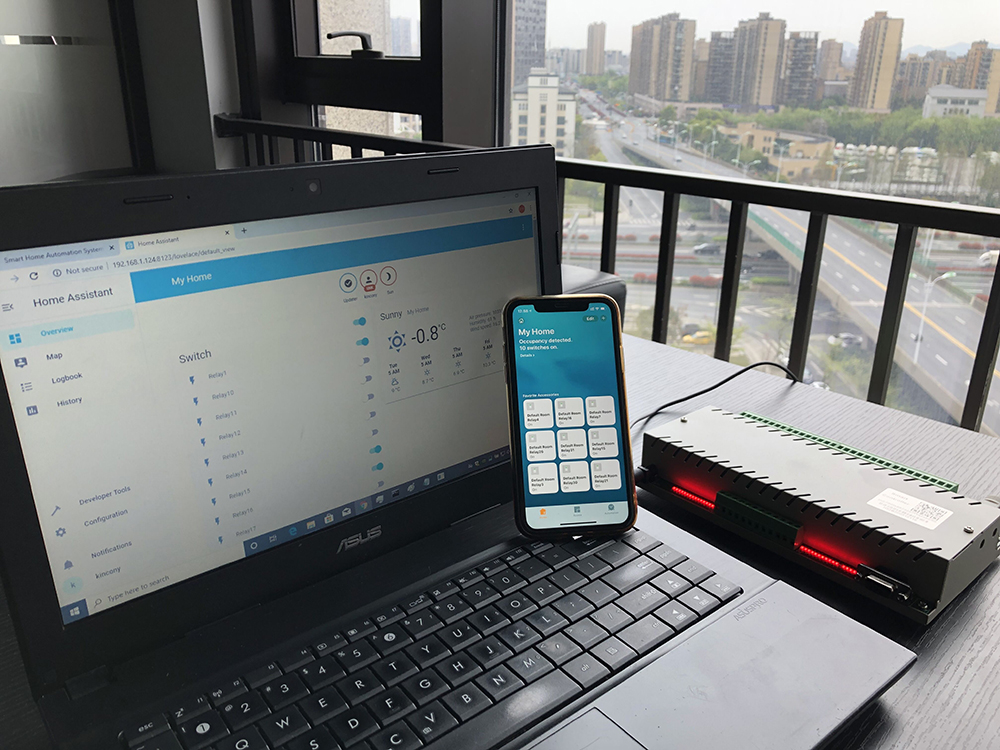

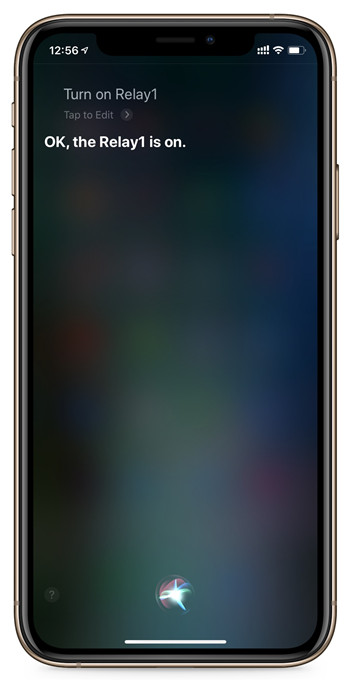
Also you can use Siri for voice control.
Python has been making home automation possible for many years now. With Python’s HomeAssitant, the power comes right in your hands. This blog demonstrates you can have fun with Python’s HomeAssistant and automate your home while practicing your Python skills. Install the “Home Assistant” build, which contains a version of Python 3.7 and HomeAssistant so you can test it out for yourself.
When I bought my first WiFi-powered desk lamp, the convenience of using software switches over mechanical switches was a revelation! I quickly WiFi enabled my water filter, air purifier, speakers – almost anything I could get my hands on.
Apple’s Homekit provided a handy way to create a central hub that could manage all my devices in one place. And with iCloud, I could share access with my family, as well. However, as I’ve often found with Apple products, I had no control or flexibility over designating which devices were shared devices, and which were my own. Then I found HomeAssistant.
HomeAssistant is a Python-based home-automation server that puts local control and privacy first. It can be installed on Raspberry Pi’s, or your local system in order to connect via WiFi to various Internet of Things (IoT) devices and cloud services.

You can also use it to create powerful ways to automate your devices, services, and even create scenarios (such as “raise the blinds at sunrise, turn off external lights, and start the coffee maker”).
In this blog post I’ll show you how to install HomeAssistant on your local system (mine is a Mac), and then control a Xiaomi Smart Bedside Lamp 2 via the Apple HomeKit controller. You will be able to implement the same steps on all other HomeKit Enabled smart devices in your house. Let’s get started!
Installing HomeAssistant
Installation is a very straightforward process that requires Python 3.7 or later installed, along with the HomeAssistant Python package.
The simplest way to get started is to get the pre-built “Home Assistant” runtime environment from the ActiveState Platform by doing the following:
- Create a free ActiveState Platform account
- Install the “Home Assistant” build, which contains a version of Python 3.7 and HomeAssistant so you can test it out for yourself.
NOTE: the simplest way to install the Home Assistant environment is to first install the ActiveState Platform’s command line interface (CLI), the State Tool.
- If you’re on Windows, you can use Powershell to install the State Tool:
IEX(New-Object Net.WebClient).downloadString('https://platform.activestate.com/dl/cli/install.ps1')
- If you’re on Linux / Mac, you can use curl to install the State Tool:
sh <(curl -q https://platform.activestate.com/dl/cli/install.sh)
Once the State Tool is installed, just run the following command to download the build and automatically install it into a virtual environment:state activate Pizza-Team/Home-Assistant
To test that everything installed properly, use your Web browser to navigate to http://localhost:8123 where you should see HomeAssistant’s homepage.
Setting Up HomeAssistant
When the HomeAssistant server first runs, it will ask you to create an account.
Okay that was easy! Now let’s now connect the Smart Lamp. Since the lamp is HomeKit enabled, it comes with prebuilt actions like turn on, turn off and toggle, which make it easy to write automation scripts. We also have access to triggers like “When device is turned on” or “When device is turned off”.
HomeAssistant can be integrated with HomeKit-enabled devices in one of two ways:
- HomeKit Controller: allows you to connect accessories the feature the “Works with HomeKit” logo
- HomeKit Bridge: allows you to control HomeAssistant-compatible devices via HomeKit
Basically, HomeKit allows for standardization of all the different IoT devices that manufacturers build, and then HomeAssistant lets you make use of those devices. For our use case, HomeKit Controller sounds perfect. Let’s get to it!
Connecting HomeAssistant to your Devices
Choose the “HomeKit Controller” option from the integrations dropdown menu.

Make sure your smart lamp is on the same network as the system you’re running HomeAssistant on. Otherwise, HomeAssistant will not be able to detect the IoT device.
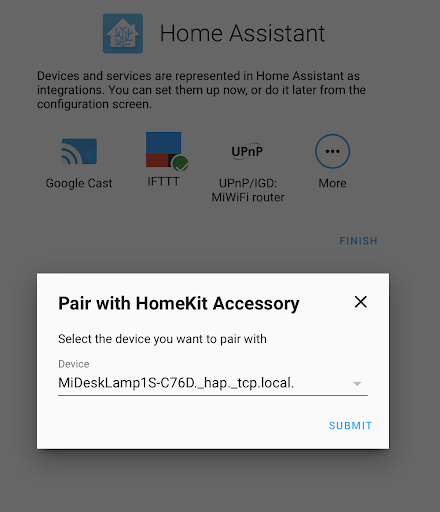
Choose your device from the dropdown.
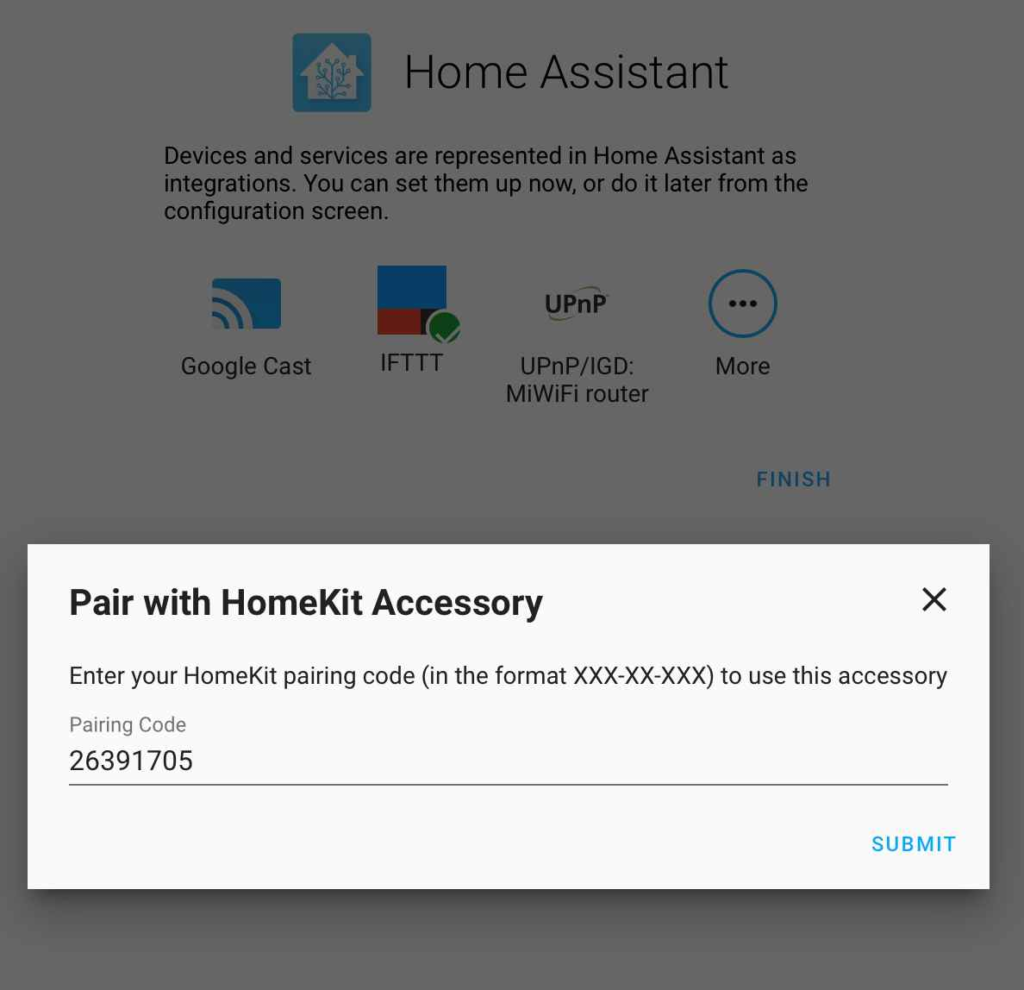
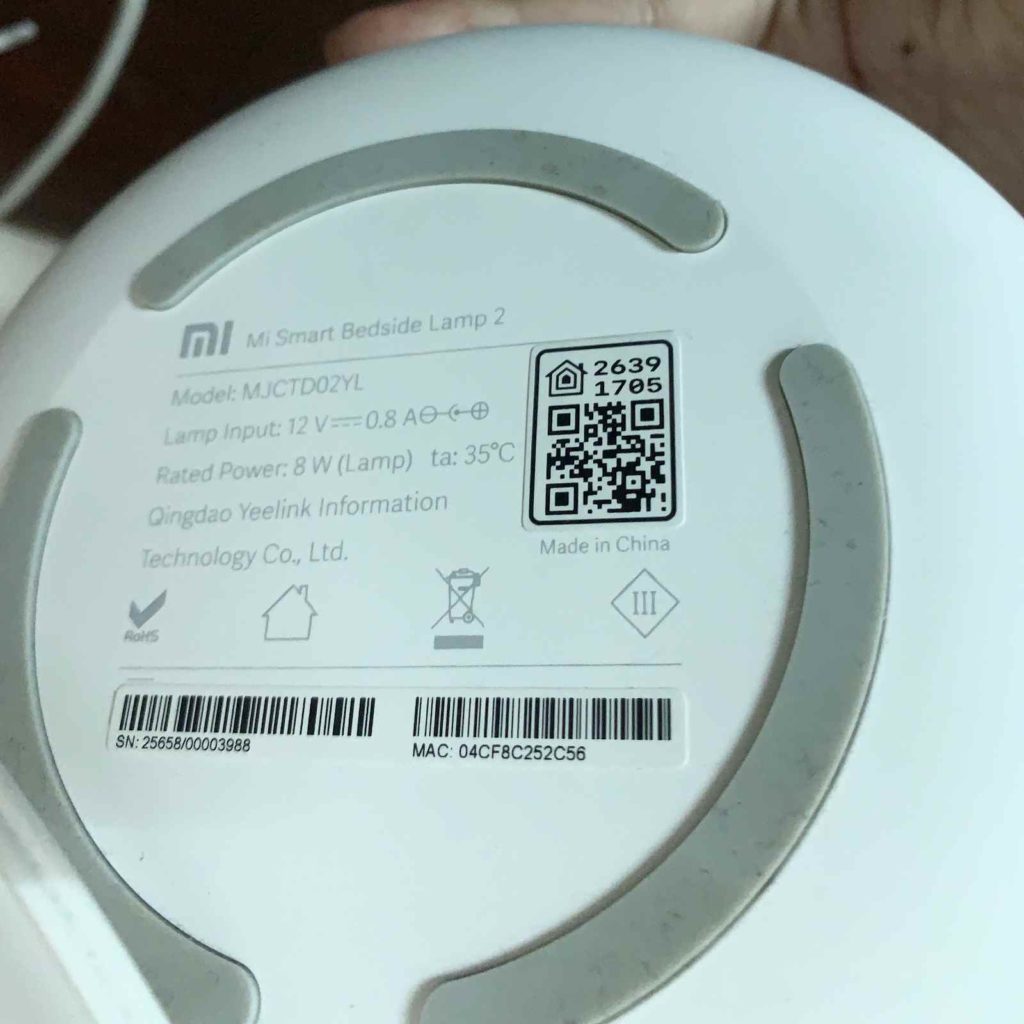
Enter the HomeKit pairing code, which can usually be found on the bottom of the device.
And that’s it!
Automating Your Home with Python
You can set up “automations” for your IoT devices using Python scripts. Each automation consists of a trigger, a condition and an action. HomeAssistant provides a good set of out-of-the-box triggers, which are the starting point of an automation. Some examples include:
- SUN TRIGGER: activates when the sun sets or rises in your configured geolocation.
- TIME TRIGGER: activates at a pre-set time.
- HOMEASSISTANT TRIGGER: activates when the HomeAssistant starts or stops. This is useful for setting the default state of all your IoT devices.
- WEBHOOK TRIGGER: activates when you make a POST request to the configured webhook path.
When the trigger is activated, the automation executes.

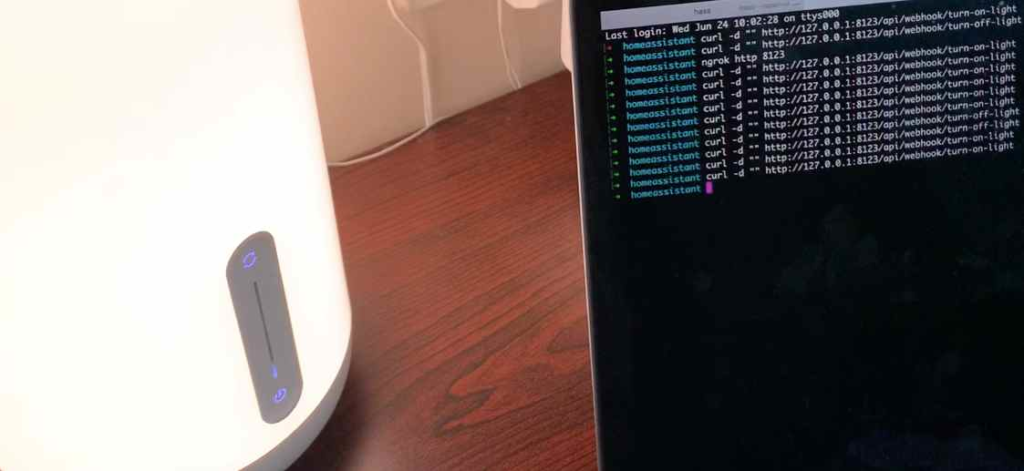
In this case, let’s use the webhook trigger to turn on the light.
- Click on the “Configuration” button on the sidebar, and then click on the “Automations” option to the right.
- Choose the “Webhook Trigger” and configure it.

The webhook ID defines the path of your webhook. In this case, our path will be “/api/webhook/turn-on-light”. Making a POST request to this path will trigger whatever action we define in the next step.
3. On the Actions screen, choose the “Device” option and the “turn on” action.
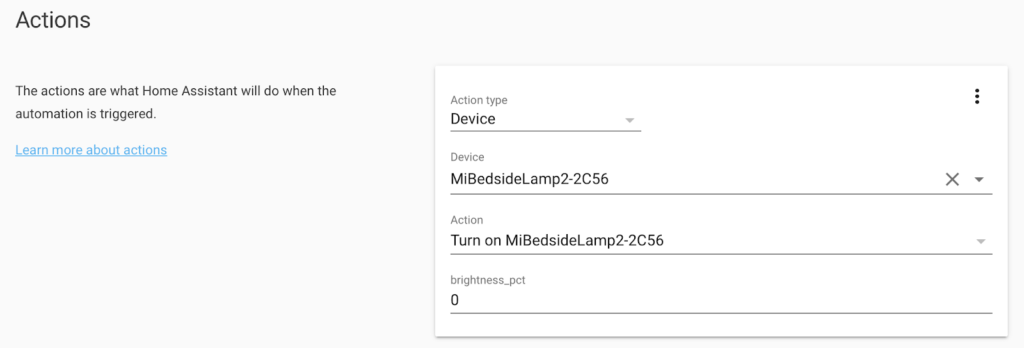
For lamps you can also configure the brightness, but I’m going to leave it at its default level.
4. Click on Save, and that’s it! The HomeAssistant abstracts away all the Python programming and creates the script for you.
Time to test it out by making a POST request to the webhook. I’m using a cURL command here, but feel free to use any API tool:
curl -d "" http://127.0.0.1:8123/api/webhook/turn-on-light
ProTip: Rather than creating two automations (one to turn on and one to turn off the lamp), you can just create one based on the toggle trigger.
Conclusions
HomeAssistant is a versatile tool that allows you to control almost all aspects of home automation. It provides deep integration to various IoT devices and home automation platforms. The web interface makes it simple to create quick and easy automations, but for more complex automation tasks it also provides a YAML file where you can write multiple commands. Try automating your home for your next weekend DIY project!
Оглавление:
— Умный дом, вопрос цены.
— Установка Home-assistant.
— Настойка Home-assistant.
— GPIO — датчики и реле в Home Assistant
— GPIO — ИК управление в Home Assistant.
— GPIO — BME280 взамен DHT11 в Home Assistant
— GPIO — дисплей LCD1602 I2C в Home Assistant.
Вообще пока есть только желание посмотреть к чему всё это приведет. Так что буду использовать то, что под рукой, стараясь ничего не покупать. Все настраивал из под Kubuntu.
С чего все начинается, конечно выбор железа для сервера…
Home-assistant построен на Python3 и способен работать на различных компьютерах, в т.ч. на Raspberry Pi. Из образа, полноценная Операционная Система Home Assistant ориентирована на Raspberry Pi4, ну по минимуму Pi3.

Полный размер
Raspberry Pi4
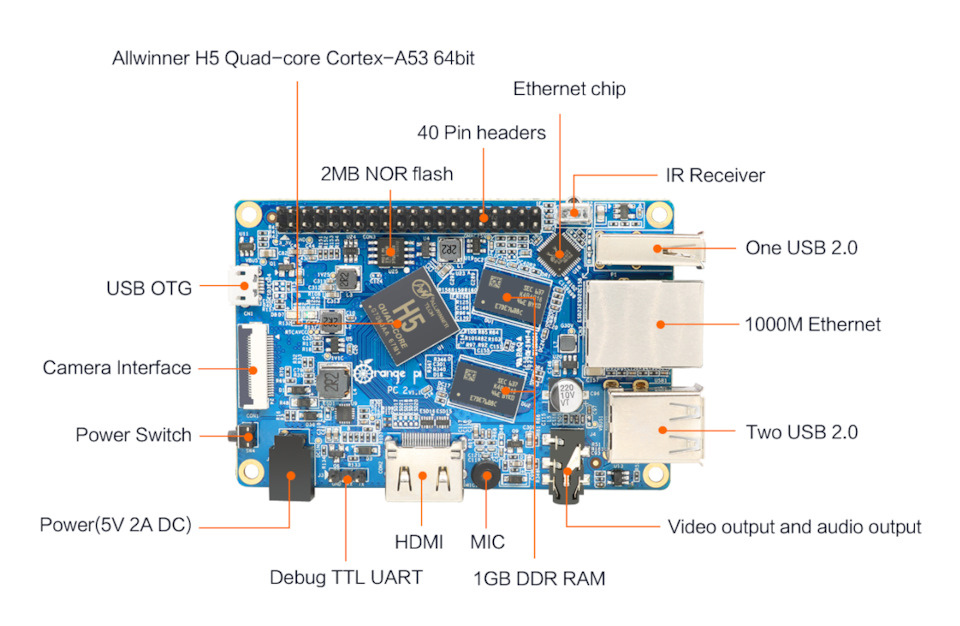
Если эффект будет положительным, то потом соберу на Orange Pi PC 2 , есть в наличии.
Полный размер
Orange Pi PC 2: загрузка устройства с USB. ARM Cortex-A53 = 4 ядра, 700 МГц 64-битный.
А пока решил попробовать собрать вообще на Raspberry Pi 1 B+, есть в наличии. Главная идея не перегружать, может зашевелится…

Полный размер
Raspberry Pi1 B+, Процессор 1 ядро 700 МГц 32-битный, RAM 512 МБ LPDDR2 SDRAM.
Устанавливать сервер Home-assistant буду на Debian для Raspberry от DietPi OS.

DietPi OS
ДиетаPi очень интересная вещь на самом деле — ставится ядро и потом, через удобное меню, можно заточить под многое. А без меню вообще под всё…
В связи с тем, что SD карта в таком режиме умрет очень быстро, надо использовать внешний накопитель подключенный по USB. У меня есть HDD 2,5’ 150гБ 700mA и SSD 500Гб 400mA, остановился на SSD (объем излишен конечно), но у него ток потребления ниже.
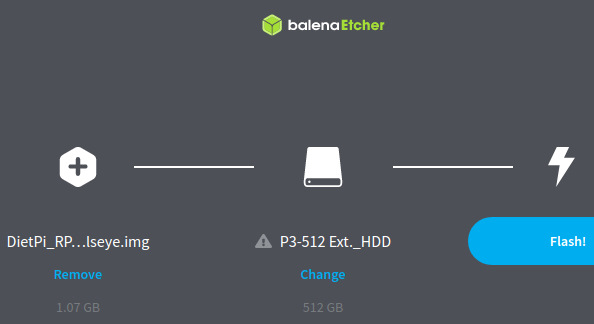
Программой balenaEtcher на чистый SSD залил DietPi_RPi-ARMv6-Bullseye.img
Прошивка поддерживает Raspberry Pi 1 B+
Для Raspberry Pi 1 B+ пришлось делать хитрый ход конем, для загрузки OC с USB — подробно тут.
* На чистой карте SD создал раздел для загрузки = Fat32 128miB, с флагами boot и lba.

Полный размер
Пример разметки
*Скопировал загрузочный раздел с накопителя SSD на карту SD, для этого:
— Смотрим как разделы называются: sudo fdisk -l
Диск /dev/sdd: 476,96 GiB ***накопитель SSD***
/dev/sdd1 * 8192 270335 262144 128M c W95 FAT32 (LBA)
/dev/sdd2 270336 2097151 1826816 892M 83 Linux
Диск /dev/sdg: 7,37 GiB ***карта SD***
/dev/sdg1 * 2048 264191 262144 128M c W95 FAT32 (LBA)
— Копируем загрузчик c SSD на карту SD : sudo dd if=/dev/sdd1 of=/dev/sdg1
* На SSD удаляем загрузочный раздел и увеличиваем рабочий.
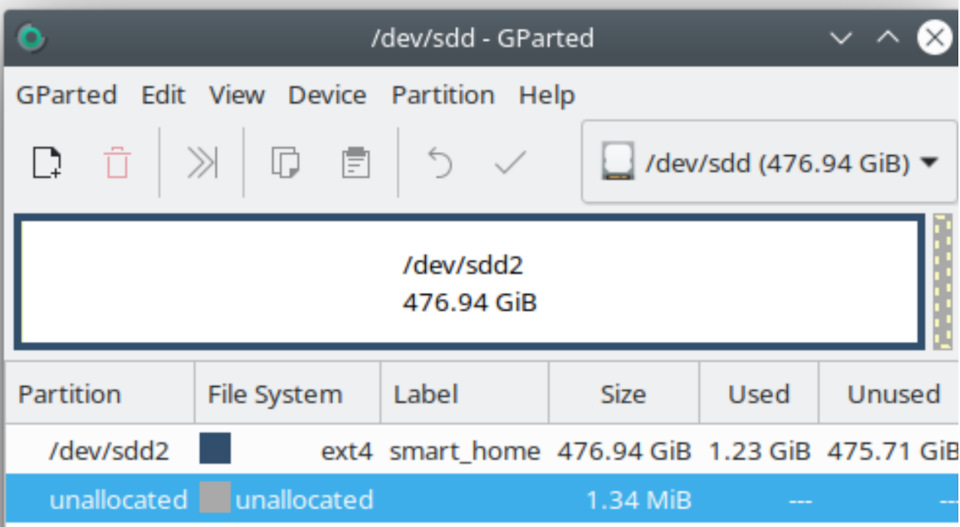
Полный размер
Финальная разметка SSD
* Открываем на карте SD в редакторе файл cmdline.txt и меняем значение root на /dev/sda2:
root=/dev/sda2 rootfstype=ext4 rootwait fsck.repair=yes net.ifnames=0 logo.nologo console=serial0,115200 console=tty
* Вставляем карту SD в Raspberry Pi1 B+, а к его USB подключаем SSD.
Зато теперь система на SSD, а карта SD с разделом загрузки и практически вечная.
Пора установить DietPi OS, а для этого нужен интернет. Все было б просто с роутером, но под рукой немного другой набор… К персональному компу подключен модем, а к нему по LAN Raspberry Pi.
Настраиваем подключение:
Раздача инета на Raspberry в Kubuntu делается элементарно, единственно что сделал это отключил IPv6.

В настройках Kubuntu надо просто правильно выбрать направление.
Теперь осталось, через терминал 🔳, определить IP адрес Raspberry 🤔:
— Если нет Nmap, то устанавливаем его : sudo apt install nmap
— Определяем пул адресов IPv4: ip -4 addr
— Ищем устройство, в моем случае пул адресов 10.42.0.1/24:
sudo nmap -sn 10.42.0.1/24
Nmap scan report for 10.42.0.55 (Raspberry Pi Foundation)
Нужный адрес: 10.42.0.55🤗
Наконец добрались, через терминал 🔳 заходим на Raspberry и начинаем настройку DietPi OS:
sudo ssh root@10.42.0.55
password: dietpi
Как только первый раз попадем в систему автоматически запустится обновление DietPi, а потом пойдут вопросы:
— collect anonymous usage statistics, отправка статистики в DietPi = 0 отказаться.
— global software password, смена глобального пароля
— serial/UART console, взаимодействия с системой без экрана или сети = «Yes» не подключать
— DietPi-Software, настройка DietPi и установка программ.
Первоначально настроил в DietPi-Software (dietpi-software — можно вызывать в терминале):
* DietPi-Config=>Language/Regional Options:
— Выставил Locale : [ru_RU.UTF-8] и Timezone : [Europe/Moscow]
* DietPi-Config=>SSH Server
— Заменил Dropbear на OpenSSH Server.

Для доступа к файловой системе — проводником FileZilla.
* Browse Software :

…
Ничего не Выбрал
Осталось дело за малым, пора переходить к установке сервера Home-assistant.
Итак есть три варианта установки 🤔:
* Из образа не пройдет (ОС Home Assistant) — нет под это железа
* Вариант с контейнером (Home Assistant Core) — тяжеловат получится
* Единственное что остается (Home Assistant Core) 🤫 — установка пакетами
Установка Home Assistant в терминале 🔳:
1. Установка зависимостей:
— Рекомендованные:
sudo apt-get install -y python3 python3-dev python3-venv python3-pip bluez libffi-dev libssl-dev libjpeg-dev zlib1g-dev autoconf build-essential libopenjp2-7 libtiff5 libturbojpeg0-dev tzdata
— Пришлось добавить к рекомендуемым:
sudo apt-get install -y libxcb-util-dev libpcap-dev
— Обновление python:
sudo pip install —upgrade pip
2. Создаем учетную запись для Home Assistant (после запятых убрать пробелы):
sudo useradd -rm homeassistant -G dialout, gpio, i2c
3. Создаем виртуальную среду:
sudo mkdir /srv/homeassistant
sudo chown homeassistant:homeassistant /srv/homeassistant
sudo -u homeassistant -H -s
cd /srv/homeassistant
python3 -m venv .
source bin/activate
Обновление python:
pip install —upgrade pip
4. Добавляем необходимые пакеты Python:
python3 -m pip install wheel hass-nabucasa pyopenssl
5. Устанавливаем Cargo — менеджер пакетов языка программирования Rust.
В идеале, надо бы перезагрузить Raspberry 🤔.
6. Посмотреть и выбрать релиз можно тут, устанавливаем Home Assistant Core!
pip3 install homeassistant==2022.9.7
7. При первом запуске Home Assistant, будет завершена установка, в терминале 🔳:
hass
Проверяем — заходим в браузере по вычисленному ранее адресу на порт 8123:
10.42.0.55:8123

Сервер поднялся 🤩.
Добавляем Home-assistant в автозагрузку.
Для этого в Raspberry создадим файл:
sudo nano /etc/systemd/system/home-assistant@homeassistant.service
Cо следующим содержимым:
[Unit]
Description=Home Assistant
After=network-online.target
[Service]
Type=simple
User=%i
WorkingDirectory=/home/%i/.homeassistant
ExecStart=/srv/homeassistant/bin/hass -c «/home/%i/.homeassistant»
RestartForceExitStatus=100
[Install]
WantedBy=multi-user.target
*** Чтобы автоматически перезапустить службу Home Assistant после сбоя, в [Service] добавить:
Restart=on-failure
RestartSec=5s
И включим Home Assistant в качестве сервиса, используем терминал 🔳:
sudo systemctl —system daemon-reload
sudo systemctl enable home-assistant@homeassistant
sudo systemctl start home-assistant@homeassistant
Сервер Home-assistant, после включения Raspberry Pi1 B+, стартует через 2 минуты.
****Актуальное в терминале 🔳******
— Выключение Raspberry немедленно: sudo shutdown -h now
— Перезапуск Raspberry: reboot
— Обновление DietPi OS: dietpi-update
— Перезапуск сервера Home-assistant:
sudo systemctl stop home-assistant@homeassistant
sudo systemctl start home-assistant@homeassistant
— Обновление сервера Home-assistant можно посмотреть тут.