What’s a Linux file system? Can I read Linux drive on Windows? How to access Linux files from Windows 10? A lot of users are confused about these questions. In the article, MiniTool will explore them one by one together with you.
If you have a Linux distribution alongside a Windows system on the laptop or desktop, you may need to access Linux files from Windows 10. After analyzing lots of user reports on forums, we conclude the following questions that are frequently talked about. Let’s start exploring them in detail.
What’s Linux File System
In order to access Linux files from Windows successfully, the first thing you should figure out is what file system is supported by Linux. The common Linux Files Systems are Ext2, Ext3, and Ext4.
At present, Ext4 has become the default file system for most Linux distributions including Debian and Ubuntu. This is because the Ext4 provides more flexibility for storing large files than other extended file systems. It’s reported that the Ext4 can support storing a file up to 16TB and creating a partition up to 1EB.
Top recommendation: How to Install Linux (Ubuntu) on Windows 10 [Ultimate Guide 2021]
Can I Access Linux Files from Windows 10
There are a lot of users who have Windows 10 plus Linux dual boot or a hard drive formatted with Ext4. So, here comes a new question. Can I access Linux files from Windows 10? As discussed above, the most common Linux file system is Ext4. That is to say, you have to read Ext4 from Windows if you want to access Linux files.
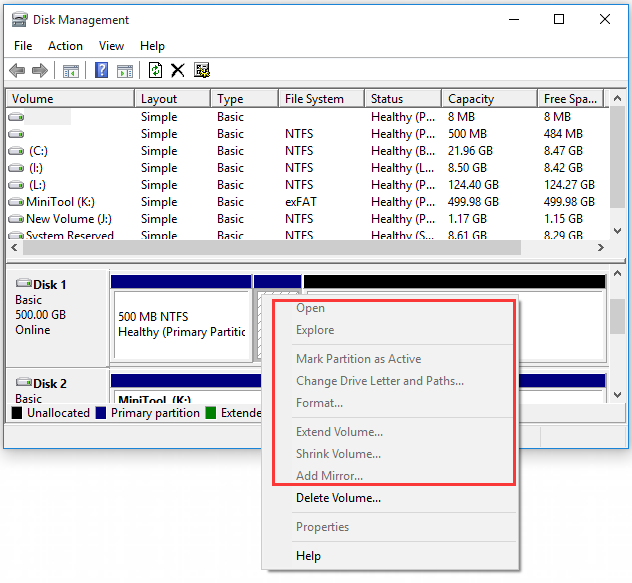
However, the Ext4 file system is not supported by Windows. When right-clicking the Ext4 partition, you will find the Open and other function menus become greyed out. Obviously, you can’t access Ubuntu files from Windows directly. What can I do if I have to read Linux drive on Windows? Please keep reading the following part.
How to Access Linux Files from Windows 10
Since Windows 10 doesn’t offer any direct methods to access Ext4, you need to utilize some professional tools to access Linux files from Windows. Here we summarize top 4 Ext4 partition readers on Windows.
Method 1. Use Ext4 Partition Manager — MiniTool Partition Wizard
MiniTool Partition Wizard is an all-in-one partition manager that supports many file systems including FAT16/32, NTFS, exFAT, and Ext2/3/4, Linux Swap. With this powerful software, you can format a hard drive, convert NTFS to FAT, convert MBR to GPT, recover lost data, migrate OS to SSD/HD, rebuild MBR, and so forth.
Free Download Buy Now
In order to access Ext4 from Windows smoothly, you can make it accessible by formatting it to NTFS. Although formatting will delete the data on the hard drive, MiniTool can help you restore the Ext4 partition data so that you can access Linux files from Windows 10.
Part 1. Read Linux Drive on Windows
Follow the steps below to format the Ext4 partition to NTFS or other file systems that are supported by Windows 10.
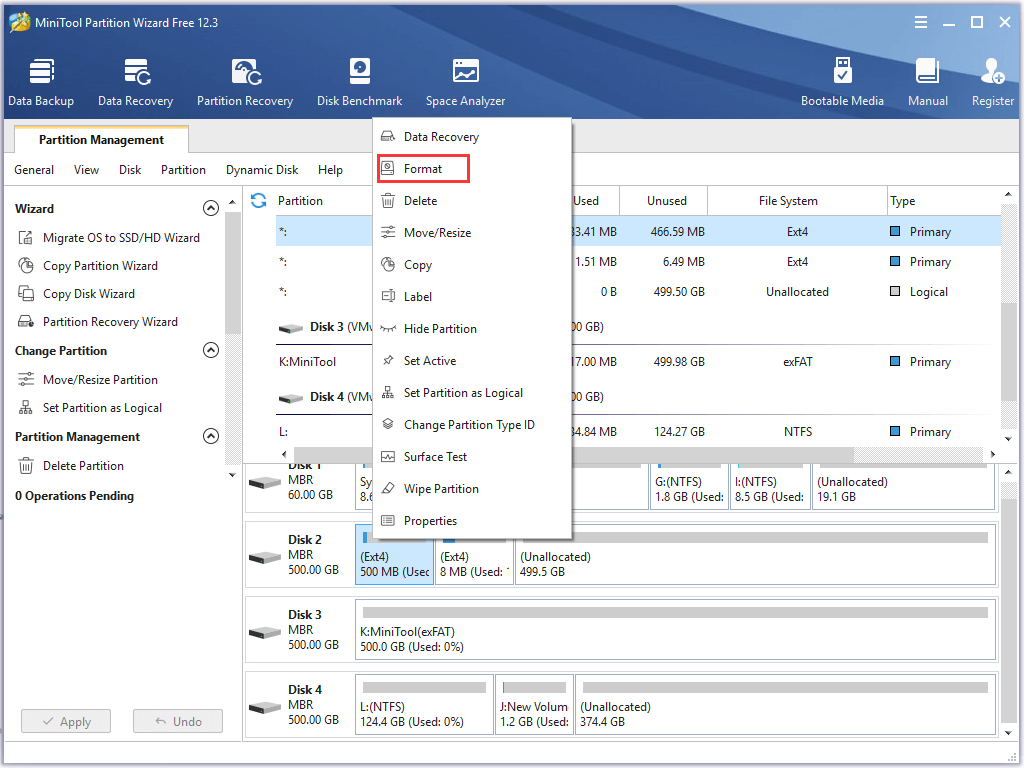
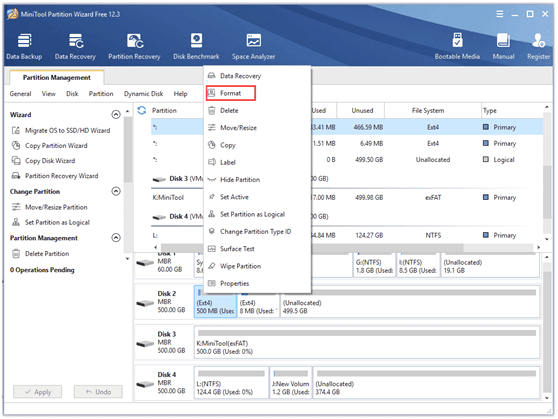
Step 1. Launch the MiniTool Partition Wizard to enter its main interface, and then right-click the Ext4 partition from the disk map and select Format.
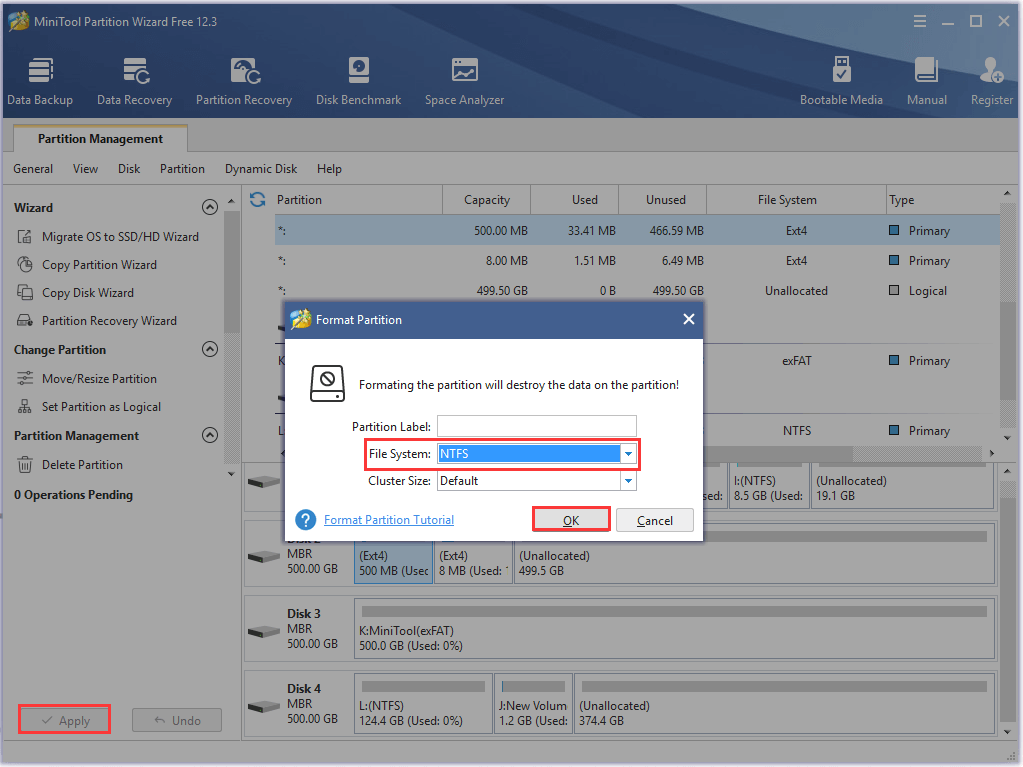
Step 2. In the pop-up window, select NTFS from the drop-down menu and click on OK to continue.
Step 3. Click on Apply button to execute the operation.
Part 2: Restore Data from the Ext4 Partition
Now, you should make the Ext4 accessible on Windows 10. Another question is how to regain data from the formatted partition. Here MiniTool Partition Wizard is capable of restoring Ext4 partition data. Please continue with the following steps.
Tip: MiniTool Partition Wizard Free Edition doesn’t support data recovery. You need to install a professional edition or a more advanced edition to recover the lost partition.
Buy Now
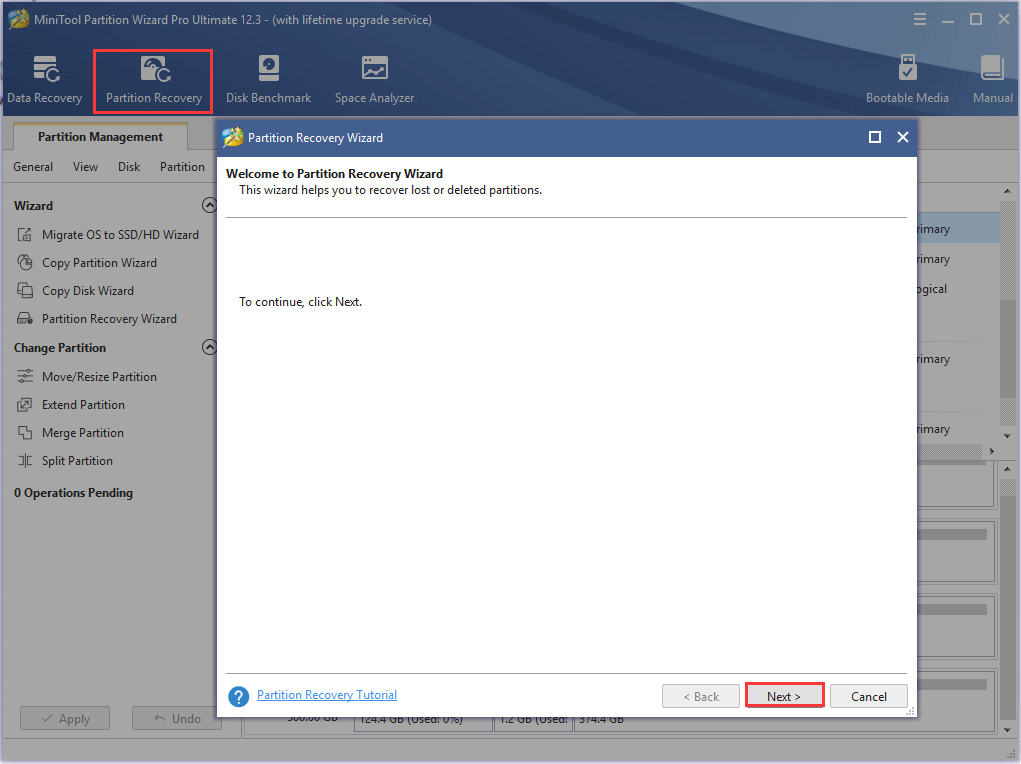
Step 1. In the main interface, select the partition that you just formatted to NTFS and click on Partition Recovery from the top toolbar. Click on Next in the pop-up window.
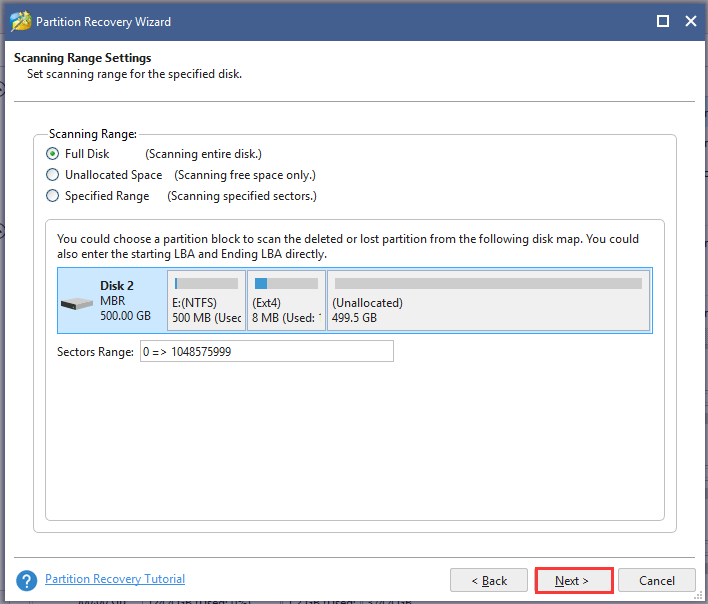
Step 2. Choose a scanning range based on your needs. There are 3 ranges to scan the disk including Full Disk, Unallocated Space, and Specified Range. Here we take Full Disk for example and click on Next to go on.
Step 3. Select a scanning method to scan the disk and click Next to continue.

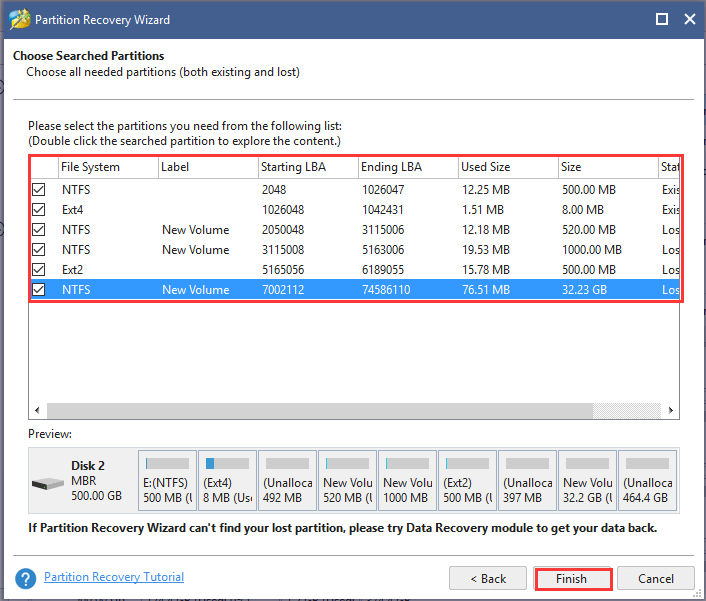
Step 4. Make sure that you check all partitions including existing partitions and deleted/formatted partitions. Wait for some time until the scanning completes and click on the Finish button.
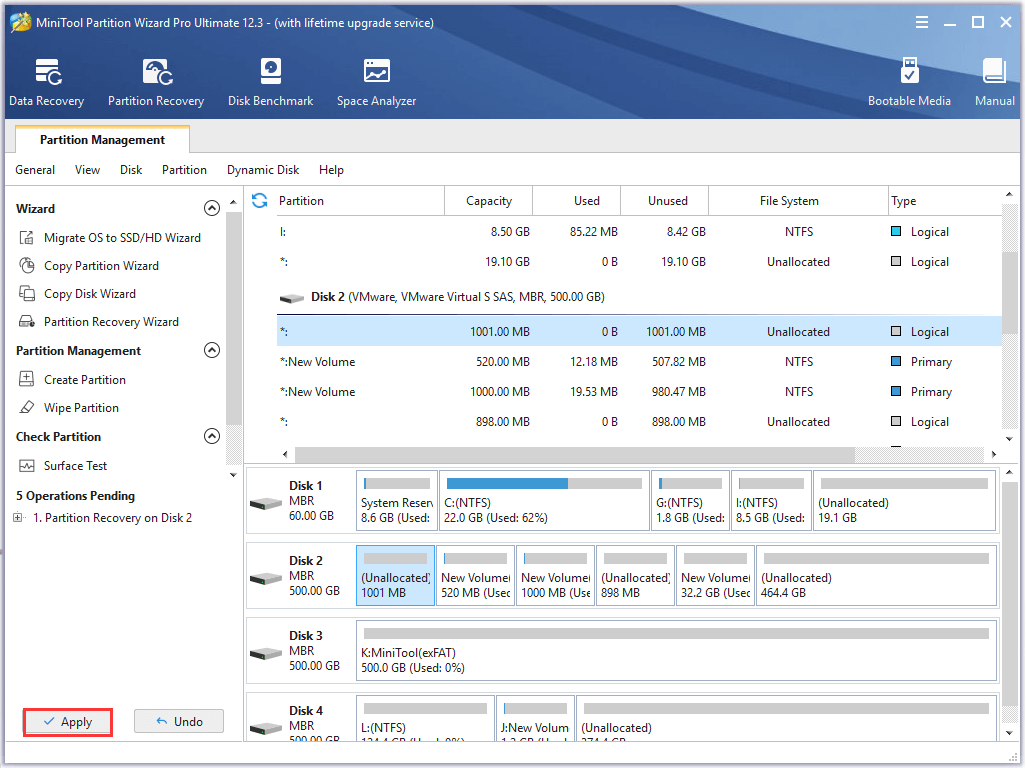
Step 5. Click on Apply button to recover the formatted partition on the hard disk.
Up till now, the formatted partition should be recovered, and then you can read Linux partition Windows 10 and access its files.
Also, you can try the other three utilities to access Ext4 from Windows 10. Let’s keep reading!
Method 2. Use Ext2Fsd
Ext2Fsd is a Windows file system driver that supports the Ext2/3/4 file system. It allows you to read Linux partition Windows 10 and access Ubuntu files by mounting the Ext4 partition and assigning a drive letter. You can lunch the Ext2Fsd at every boot or only open it when you need it.
To access Ext4 from Windows, follow the steps below:
Step 1. Install this tool on your Windows 10 PC and launch the driver.
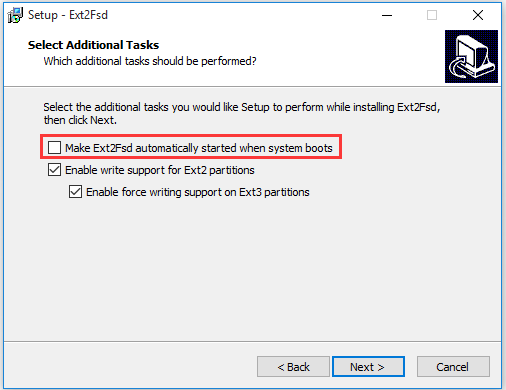
Note: If you don’t want to automatically launch the software at every boot, don’t tick the checkbox for Make Ext2Fsd automatically started when system boots.
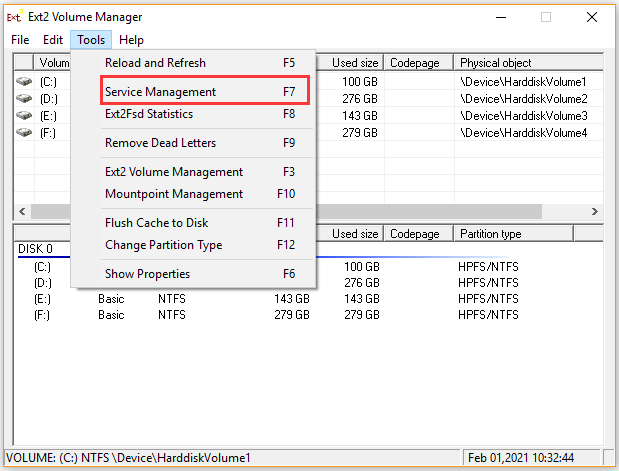
Step 2. In the main interface of Ext2Fsd, navigate to the Tools tab and select Service Management from the context menu.
Tip: If you haven’t set Ext2Fsd to automatically start at boot, you need to select Tools > Service Management > Start Ext2Fsd service before you access Linux files from Windows 10.
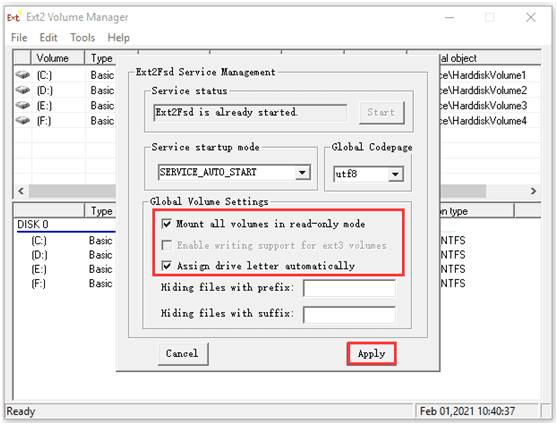
Step 3. In the Ext2Fsd Service Management window, select the checkboxes for Mount all volumes in read-only mode and Assign drive letter automatically. Then click on Apply to execute the operation. After that, this tool will automatically mount and assign drive letters to the Linux partitions.
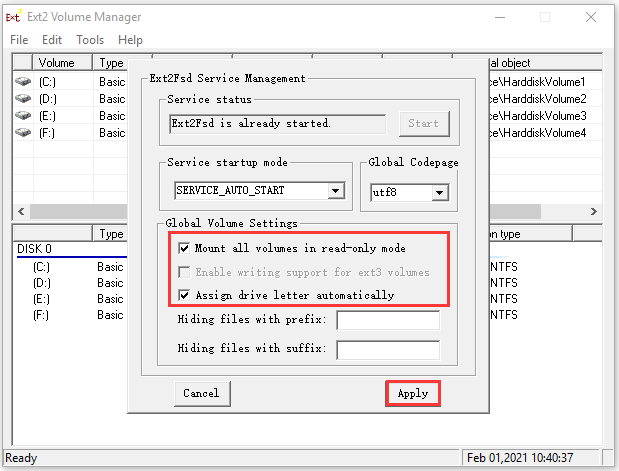
Step 4. Press Win + E keys to open File Explorer, and then you will find the Ext4 partitions are mounted with their own drive letters and you can directly access Ubuntu files from Windows.
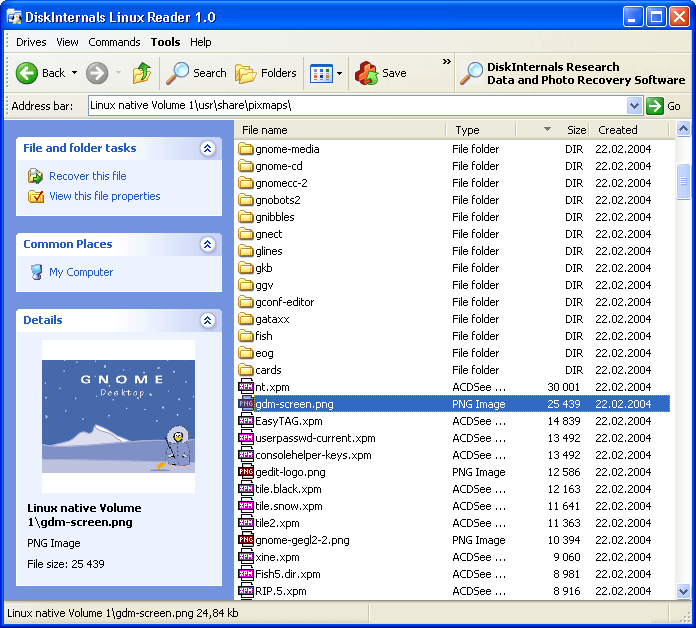
Method 3. Use DiskInternals Linux Reader
DiskInternals Linux Reader is a free utility to access Linux files from Windows 10. This tool can not only support the Ext4 file system but ReFS, HFS, and HFS+ file systems. Different from Ext2Fsd, this program allows you to read Linux drive on Windows within this application.
Step 1. Install DiskInternals Linux Reader on your Windows PC and launch it to enter the main interface.
Step 2. After the Linux Reader detects all partitions on your hard drive, navigate to the Ext4 partition from the list of drives.
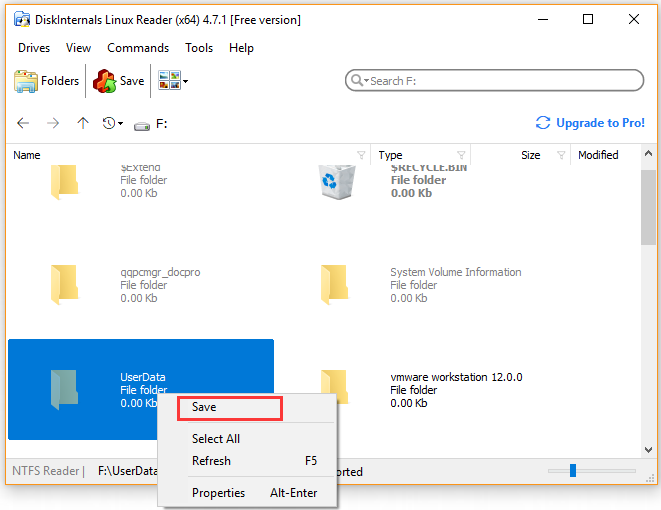
Step 3. Double click the Ext4 partition to open it and then you can preview and access the saved data on the drive.
Step 4. If you want to make full use of the Linux files on Windows, you have to transfer the files from the Ext4 partition to another location that is supported by the Windows file system. Here right-click the file that you need and click on Save from the context menu.
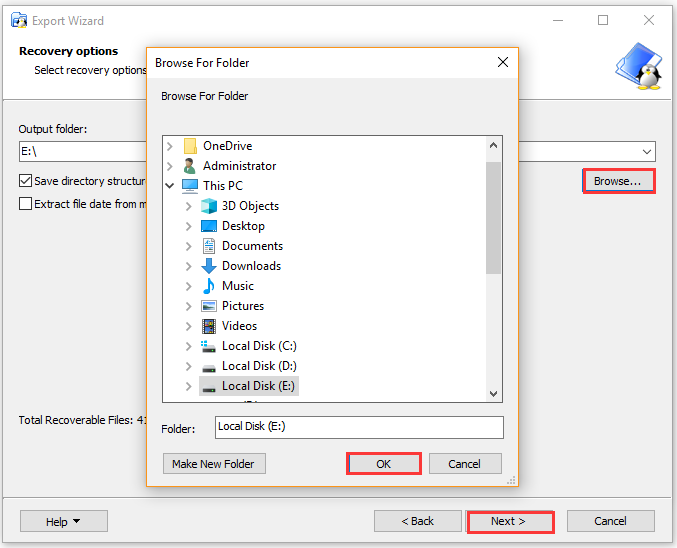
Step 5. Select the Save Files option and click on Next button.
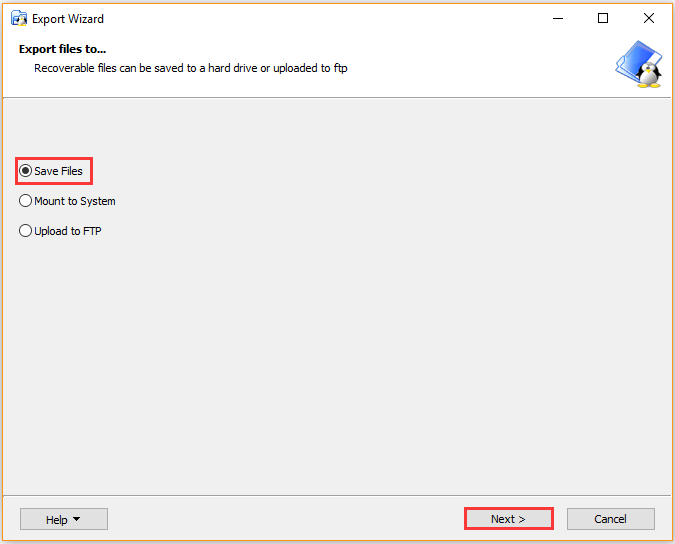
Step 6. Click on Browse button to select a location where you save the file and click on OK. Then click on Next. Wait for some time until the file is saved to your selected location.
Method 4. Use Ext2explore
Ext2explore is a practical explorer that can access Ext2/3/4 files on Windows 10. It works similarly to DiskInternals Linux Reader, but it doesn’t allow you to preview files using Ext2explore. This utility doesn’t have to be installed and you can run the .exe file directly.
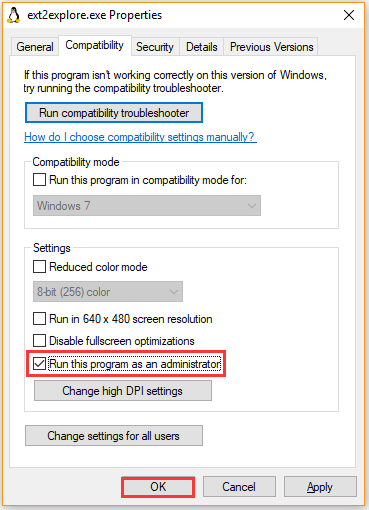
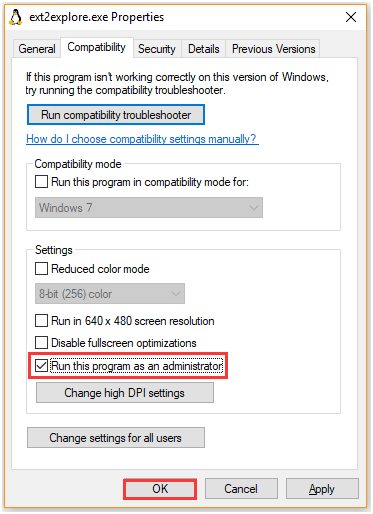
Bear in mind that you must run the Ext2explore.exe program as an administrator, or you will receive an error message.
Step 1. Right-click the Ext2explore.exe file that you download to Windows PC and select Run as administrator.
Tip: Also, you can right-click the Ext2explore.exe and select Properties. Then go to the Compatibility tab and select the checkbox for Run this program as an administrator > OK.
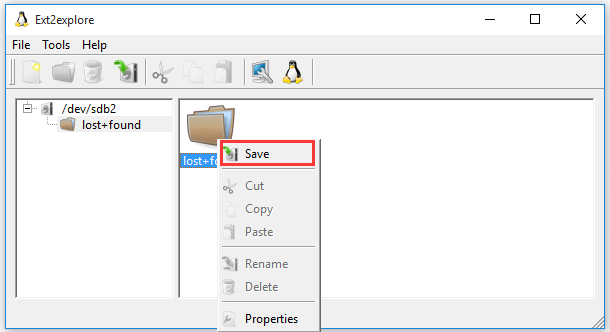
Step 2. Now, you can access the Ext4 partition and its Linux files. To open the files in the Windows system, you need to save them to the Windows partition. Right-click on the file and select Save, then navigate to another location to save files on the Windows system.
I have Windows 10 and Linux a dual boot system. Although Linux distribution has built-in support for Windows NTFS partition, Windows can’t read Linux drive. Fortunately, I found 4 effective methods to access Linux files from Windows 10. Probably you also need this post. Click to Tweet
What’s Your Opinion
This post mainly focuses on how to access Linux files from Windows 10. You can choose one from the top 4 utilities to access Ext4 from Windows. If you have any better ideas on this topic, please share them in the comment area. Also, you can send us an email via [email protected] if you have any questions about the MiniTool software.
Access Linux Files from Windows 10 FAQ
How to transfer files from Windows to Linux?
After analyzing lots of user reports and references, we summarize the following 5 methods to transfer files between Windows and Linux.
- Use the Share network folders.
- Transfer files from Windows to Linux via FTP.
- Securely copy the files or folders to Linux via SSH.
- Share the files via sync software.
- Use the shared folder in Linux virtual machine.
How to mount a Linux folder in Windows?
Here are detailed steps to mount a Linux folder in Windows.
- Press Win + E keys to open the File Explorer, and then map your Linux home folder or directory on Windows.
- Click on Tools at the top menu and select Map network drive.
- Select the drive letter from the drop-down menu and click on Browse to select the folder that you want to mount.
- Click on Finish
How to access a network drive in Linux?
- Open a terminal on your Linux, and then type sudo apt-get install smbfs in it and hit Enter.
- Type the sudo yum install cifs-utils line in terminal and press Enter.
- Execute the sudo chmod u+s /sbin/mount.cifs /sbin/umount.cifs
- Use the cifs utility to map a network drive to storage.
How to access a shared folder in Linux?
The first and simplest method is to press Alt + F2 keys to open the Run dialog box, and then type smb:// followed by the IP address of your Linux sever and the folder name. Then click on the Run button.
This question answers how to access Windows files from Ubuntu Bash, but how can I do the opposite?
Specifically, I need to access my SSH key from Windows which is located at /home/mark/.ssh/id_rsa under Bash.
![]()
asked Aug 8, 2016 at 3:35
![]()
6
\wsl$Ubuntuhomeuserwhatever
In the explorer or the Run widget (Cmd+R). Works like a normal network share and it’s safe to manipulate files.
You can also map it to a drive or folder, just as any other network share.
Note: This is a new feature implemented in Windows 10 build 18342
answered Oct 24, 2019 at 8:44
![]()
runlevel0runlevel0
8926 silver badges10 bronze badges
6
Yes but is not recommended to manipulate that folder from the windows explorer. If you want to copy, move, edit or erase files from the lxss folder you need to do it inside bash with command line tools.
Only files that are on /mnt/* are really manipulable from the windows explorer.
answered Aug 8, 2016 at 11:12
![]()
onomaonoma
2411 silver badge5 bronze badges
3
Found it by searching my entire C drive. Files are here:
C:Users<username>AppDataLocallxss
e.g., my SSH key is here:
C:UsersMarkAppDataLocallxsshomemark.sshid_rsa
answered Aug 8, 2016 at 3:45
![]()
mpenmpen
11.7k16 gold badges54 silver badges68 bronze badges
3
In powershell, use
cd ${env:appdata}..localpackagescanonical*localstaterootfs
then
ls
returns the same list of folders as
ls /
within bash on WSL.
answered Feb 27, 2019 at 12:10
![]()
masterxilomasterxilo
4786 silver badges7 bronze badges
1
If you open Windows Explorer e type the path \wsl$ it will list all your installed Linux distributions.
answered Jun 18, 2020 at 2:53
![]()
nevesneves
4492 gold badges6 silver badges11 bronze badges
3
As has been mentioned above by [onoma] files in WSL directories have attributes that would be gone if one manipulates it using explorer or text editor run under Windows system. The solution could be to start ssh-server in WSL (there might be a reinstall necessary) listening on localhost and then mounting WSL filesystem as a drive using, for example, win-sshfs or you can just use Bitvise SSH client to connect over ssh and manipulate files by sftp window. The topic has been partially discussed here: How can I SSH into “Bash on Ubuntu on Windows 10”?
answered Sep 2, 2017 at 19:52
![]()
0
I finally made a way to open explorer (and vscode) with actual correct folder context from inside WSL:
https://github.com/andymule/wslwin
For example, after you install this, in linux (WSL) you would just cd /home/mark/.ssh/ and type explorer, and it would open windows explorer at that location, whatever it is.
EDIT: this feature is being officially supported in WSL now, and you should no longer use my scripts
answered Jan 19, 2019 at 20:06
![]()
subst L: $env:LOCALAPPDATAlxss (for powershell)
or subst L: %LocalAppData%lxss (from cmd)
This puts your Linux-subsystem filesystem-root / on your L: drive.
You could also map just your home directory, or just whack %LocalAppData%lxss in an explorer window. Just don’t try browsing L:mntc or your brain might explode.
answered Jun 17, 2017 at 7:03
![]()
CheezmeisterCheezmeister
8271 gold badge8 silver badges12 bronze badges
1
I just discovered you can run powershell.exe from linux and your linux console becomes a PowerShell console at the current directory. This is the best of both worlds as you never have to leave your linux console… which is where I spend most of my time. You can then type exit to get back into linux world.
answered Nov 17, 2021 at 22:19
![]()
Im on Windows 10 Creators Update. I use SFTP NetDrive to mount the WSL filesystem into windows as as a network drive.
There are some Window sshFS ports that’ll achieve the same thing.
You’ll need to start the ssh daemon via «sudo service ssh start»
answered Aug 1, 2017 at 20:45
![]()
2
This worked for me using Powershell
cd Microsoft.PowerShell.CoreFileSystem::\wsl$Ubuntu-20.04homeusername
answered Jul 19, 2021 at 0:15
![]()
From RUN (WindowsKey + R) you can type \wsl$ and it will give you all your wsl installations.
This applies for WSL2
answered Nov 20, 2021 at 13:44
![]()
September 10th, 2020
Starting with Windows Insiders preview build 20211, WSL 2 will be offering a new feature: wsl --mount. This new parameter allows a physical disk to be attached and mounted inside WSL 2, which enables you to access filesystems that aren’t natively supported by Windows (such as ext4).
So, if you’re dual booting with Windows & Linux using different disks, you can now access your Linux files from Windows!
Getting started
To mount a disk, open a PowerShell window with administrator privileges and run:
wsl --mount <DiskPath>
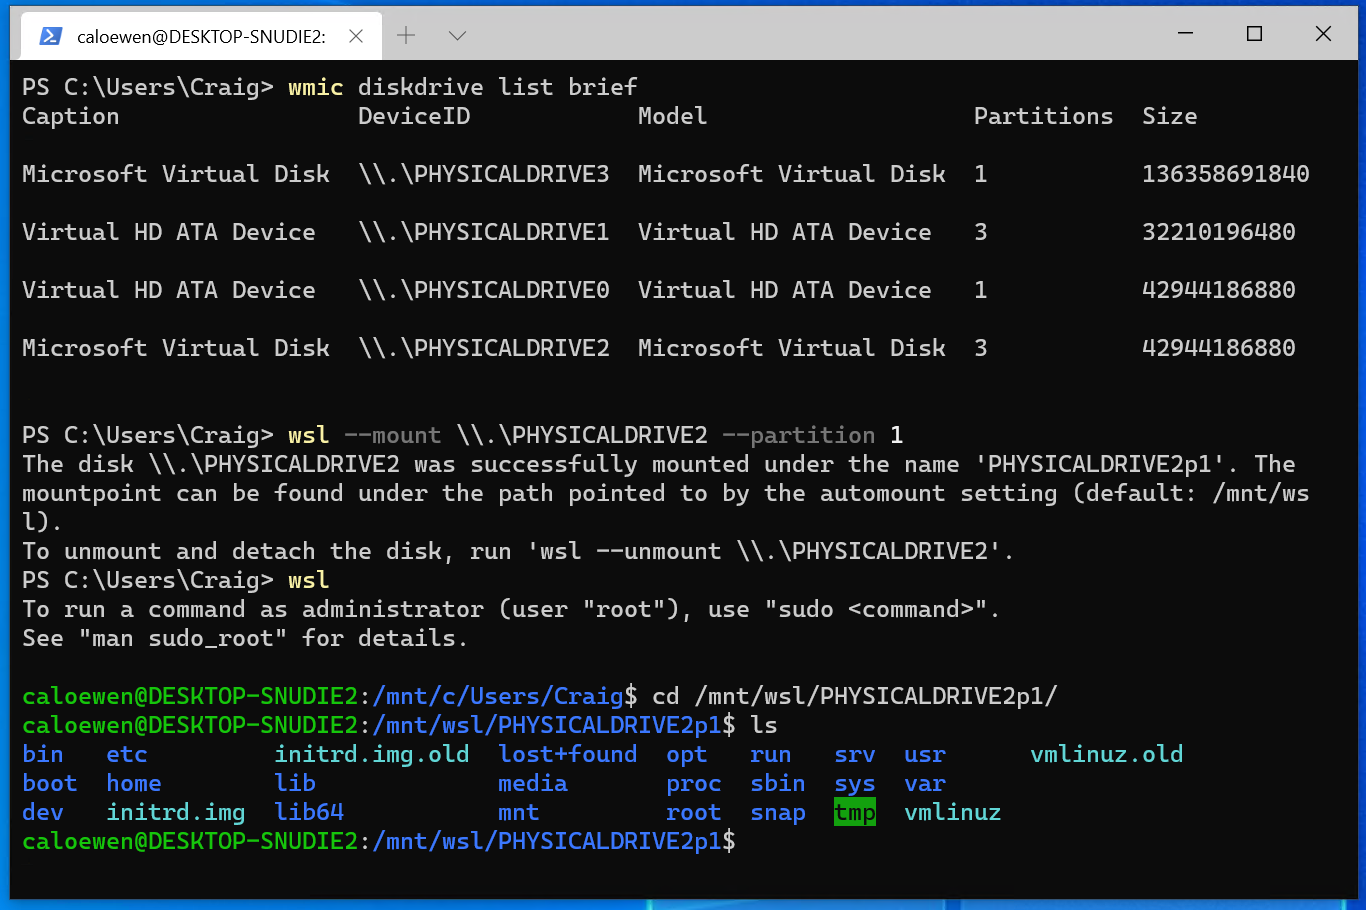
To list the available disks in Windows, run:
wmic diskdrive list brief
To unmount and detach the disk from WSL 2, run
wsl --unmount <Diskpath>
The disks paths are available under the ‘DeviceID’ columns. Usually under the \.\.PHYSICALDRIVE* format. Below is an example of mounting a specific partition of a given hard disk into WSL and browsing its files.
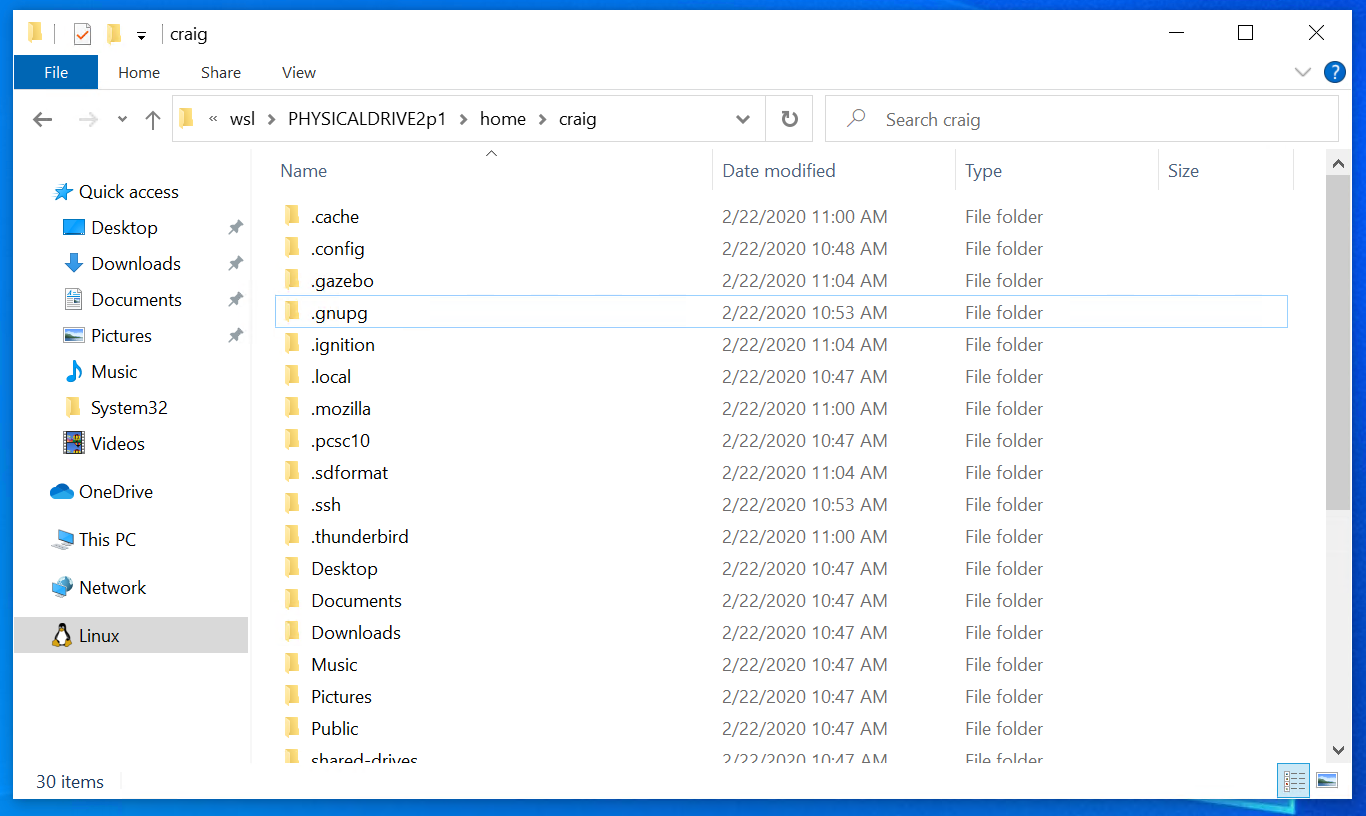
Accessing these files with File Explorer
Once mounted, it’s also possible to access these disks through the Windows explorer by navigating to wsl$ and then to the mount folder.
Limitations
By default, wsl --mount attempts to mount the disk as ext4. To specify a filesystem, or for more advanced scenarios, check out Mount a disk in WSL 2.
Also please note that this feature comes with the limitation that only physical disks can be attached to WSL 2. At this time, it’s not possible to attach a single partition. More details on the limitations here.
Give us your feedback!
If you run into any issues, or have feedback for our team please file an issue on our Github , and if you have general questions about WSL you can find all of our team members that are on Twitter on this twitter list.
wsl$ mount point did not work for me so well, it has multiple issues, and many Windows applications fail because they see it as a network drive. For my usecase, it is Rclone what helped to solve the problem to properly mount Linux filesystem so it behaves without any issues, practically the same way as a local disk.
It is free and open source. It works with sftp remote filesystems (like sshfs), so it can mount network drives both on Linux and Windows (running sshd service).
Example command how to run it, assuming remote point «server» is already configured and rclone.exe is in PATH environment variable:
rclone mount server:/ Z: --file-perms=0777 --track-renames --track-renames-strategy=modtime,leaf --metadata --vfs-cache-mode=full --sftp-disable-hashcheck --volname drive_name
For the first time, you need to configure new remote point by running:
rclone config
To find out location of the config file you have just created, run:
rclone config file
Also, you may need to install WinFsp first, if not already intalled. The best thing about it, everything just works the same way like with local disk (assuming if you provide --vfs-cache-mode=writes or --vfs-cache-mode=full option, since without it, many applications will fail to work correctly, please read the documentation to understand why). Option --file-perms=0777 is necessary to allow running .exe files. Even though --vfs-cache-mode=writes may be enough for most applications, but —vfs-cache-mode=full is important for good performance with large files. For the same reason --track-renames-strategy is limited to only modtime and leaf strategies, because if haenter code heresh strategy is used, it will be obviously slow with large files, and --sftp-disable-hashcheck is necessary to prevent rclone from running md5sum, otherwise it will run it even when trying to read a file.
To register Rclone as a system service, edit and run the following command (do not run as is, please see below how you need to edit it first):
New-Service -Name Rclone -BinaryPathName 'C:Program FilesRclonerclone.exe mount server:/ Z: --vfs-cache-mode=full --track-renames --track-renames-strategy=modtime,leaf --metadata --volname drive_name --config="C:Program FilesRclonerclone.conf" --log-file="C:Program FilesRclonerclone.txt" --file-perms=0777 --sftp-disable-hashcheck --no-console'
Obviously, you need to replace «server:/» with your actual remote point name and path, also replace drive_name with any name you like, and of cource you may need to edit paths to rclone.conf, rclone.log and rclone.exe, if you installed it in a different location.
Note: in my case running as a system service caused some permission issues (for example, when trying to save Excel files), and I did not figured out why yet, so I ended up creating startup .bat file to run Rclone as a user, since it works perfectly this way. I will update this answer if and when I figure out how to make running as a service to work as good as running as a user.
Even Windows software which does not like network drives, just works with RClone drives. All is needed, is to setup sshd in the remote system (which in this case is not really a remote syset, but in WSL distribution installed on the same PC). This how to setup sshd in WSL distribution: https://www.hanselman.com/blog/how-to-ssh-into-wsl2-on-windows-10-from-an-external-machine. And here is how to make WSL IP address static: https://github.com/ocroz/wsl2-boot, so you can have sshd running always at the same IP address.
Access Linux Files From Windows 11, Windows 10
If you are using Linux and Windows on your PC or laptop om dual-booting mode then sometimes you might need to have access to the Linux files from Windows. Accessing Windows files or drive from Linux is easy as Linux has inbuilt support for it. For Windows users, there is various software available for it. Thanks to Windows Insiders preview build 20211, You will find a new feature: wsl --mountthat lets you attach a physical disk and mount inside WSL 2, and also enables you to access filesystems that aren’t natively supported by Windows (such as ext4).
At first, run the following command on a PowerShell window with administrator privileges:
wsl--mount<DiskPath>You can also run the following command if you want to see the list of the available disks in Windows, run:
wmic diskdrive list briefOnce mounted, You can access these disks through Windows Explorer by navigating to wsl$
To unmount and detach the disk from WSL 2, run the following command
wsl --unmount <Diskpath>How To Access Linux Ext4 Partition (Files) with Ext2Read
Ext2Read is a Windows software to access Linux Ext4 partition from Windows. You can also access ext2 and ext3 files. It can recursively copy entire folders along with view and copy files and folders.
How To Access Linux Ext4 Partition with Linux Reader
Linux Reader tool lets you access files and folders on Ext, UFS, HFS, ReiserFS, or APFS file systems from Windows. It can read files from all types of hard drives, including SSD, HDD, flash drives, memory cards, and others.
You can download and install the Linux Reader like other Windows software. After installing it, you can see the list of drivers along with Linux drives in the Linux reader. You can access the Linux files from Windows by going through the drives that you can see on the Linux reader.
I’ve been getting a few questions from Windows users about accessing WSL files in Windows and vice versa. I was originally going to wait with this for the next labs, but since this might actually make things a little clearer for some, I’ll just post the information here instead. If anything’s unclear, just wait for the second lab and I’ll probably be able to explain things better in person.
The WSL distributables (i.e. Ubuntu) are kind of like another machine running within your computer. It just features a Unix command-line interface (that’s the terminal, i.e. the bash shell), so the development tools and experiences are pretty limited. You can run vim, nano, or even emacs (might need to be installed) in the terminal to edit your files, but if you want to use a full-fledged IDE you’ll normally have to edit the files on the Windows side and then transfer them over to the Linux environment in WSL.
When we start working with Python, R and jflap, you can probably just solve the exercises on Windows, since you don’t need Linux to write Python or R code. Of course, you can always install python3 in Ubuntu, but you won’t have access to an IDE (unless you follow the guide in the last part of this post).
Accessing your WSL files in Windows
If you are using WSL 1, this should probably work fine most of the time. However, if you are using WSL2, it probably won’t. WSL2 doesn’t like it when we edit files in both Linux WSL and in Windows. WSL1 doesn’t like it either, but it’s possible to do, and I’ve tried so myself many times now without issues.
To access your Linux files in Windows, open the Ubuntu terminal and type explorer.exe . (include the punctuation mark). This will open the linux directory in Windows Explorer, with the WSL prefix “wsl$Ubuntu-18.04homeyour-username”.
Now, you’ll notice that Windows treats your Linux environment as a second network. This is because, as I’ve stated earlier, the Linux environment is completely separate from the Windows environment and transferring files between these environments is very similar to transferring files between computer networks. I always recommend that you copy the file you want over to a Windows folder before editing it, so that you won’t mess up the original if the file gets corrupted.
PS: To copy the file, run
cp [filename] [destination], like this:console cp file.txt /backup/new_file.txt
Accessing your Windows files in the WSL terminal
Similarly, you can also open your Windows files in the Linux environment. Just use the cd command to navigate to your WSL root folder, then navigate into the mnt folder to access your C: drive. See the example below for more details. As you can see, I managed to access my Documents folder. Make sure to enter your own username when you try this yourself.
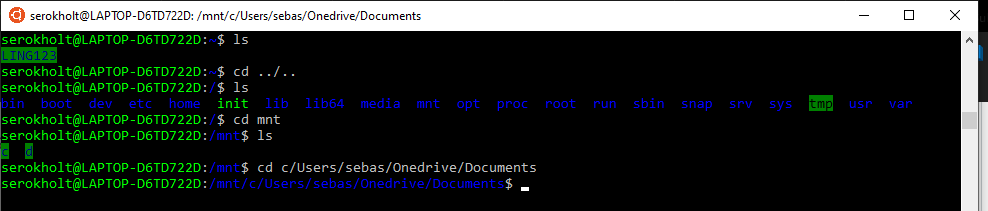
I recommend you to use the cp command to copy the files you need from Windows to your Linux environment, so that if anything should get corrupted you’re not going to mess up the original file.
Working in WSL with VScode
VScode is a full-fledged IDE from Microsoft, which has very recently released support for editing Linux files remotely. This means that you can open VScode from the Ubuntu terminal, run it in Windows, but edit the files in Linux while also being able to access the Linux terminal and viewing pathnames and home directory correctly. I’ve tried it out today, and… it just works!
So if you insist on using an IDE to edit your Linux files directly, even though you won’t really need to in this course, you can do it by installing the Remote — WSL extension for VScode. See the documentation and guides here.
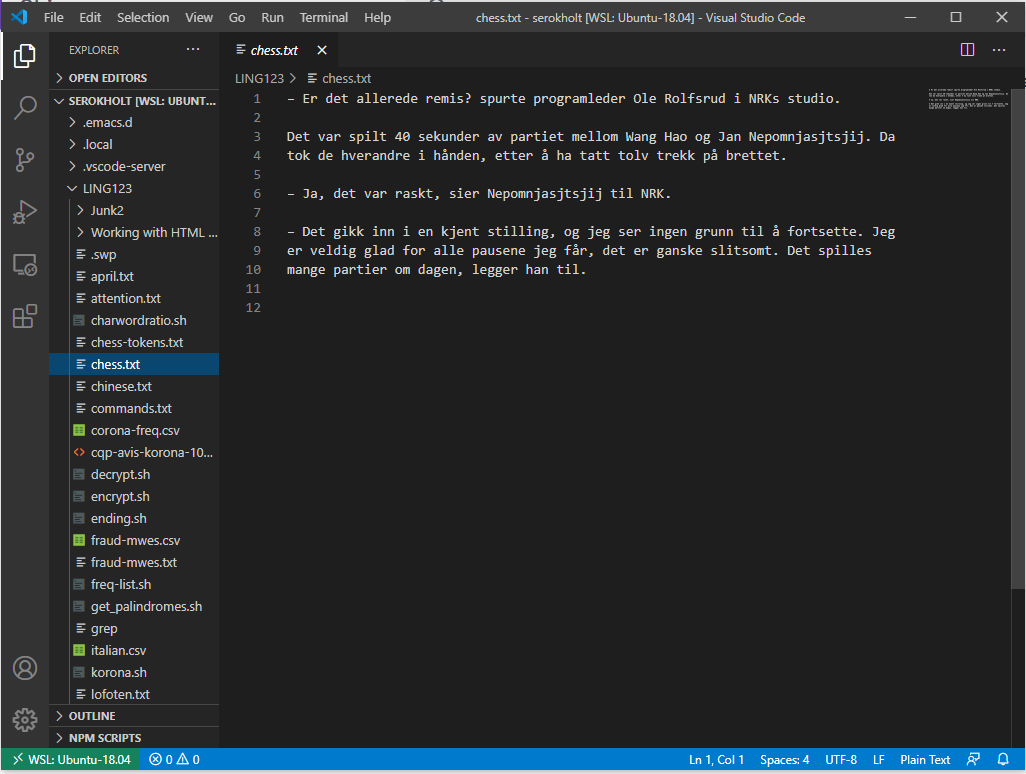 VScode editor with WSL-remote enabled
One of the most popular problems with dual-booting Linux and Windows operating systems is the ability to access Windows files from within Linux but the inability of the reverse; this is due to the way Linux and Windows file systems are set up.
The point of today’s articles is to recommend the most reliable tools that you can install to easily access your Linux files from within your Windows installation. But first, you should know how the file system in Windows and Linux differ.
Differences between Windows and Linux file systems
- The Linux filesystem is case-sensitive so you can have file names like fossmint.html and Fossmint.html in the same directory. This can’t happen on Windows because the file system is not case-sensitive as sees both file names as the same.
- Windows file systems are in the FAT (FAT12, FAT16, and FAT32) and NTFS formats while Linux file systems are in Ext2, Ext3, Ext4, JFS, XFS, etc.
- Windows disks are partitioned and given letters e.g.
C:for local disk andE:for a removable disk. In Linux, everything is under the root directory denoted by/and all devices are treated as files. E.g./dev/cdromfor removable media. - Linux doesn’t lock access to files as often as Windows and thus allows files to be deleted in situations wherein they wouldn’t be if the user was on Windows. For example, on Windows, you can’t delete a video file that was previously running a VLC without quitting the app. On Linux, you might even be able to delete the file while it’s still running in VLC.
So the most important home point is that while Linux has native support for Windows file systems i.e. NTFS and FAT, we need a 3rd party application to access Linux files from Windows.
These are the best tools available for free.
Read-Only Access to Linux Filesystem from Windows
ADVERTISEMENTS
DiskInternals Linux Reader allows users safe and quick read-only access to Ext2, Ext3, and Ext4 Linux files using a UI similar to that of the default Windows Explorer to view and extract files. It is free software but offers a pro version with extra features.
DiskInternals Linux Reader
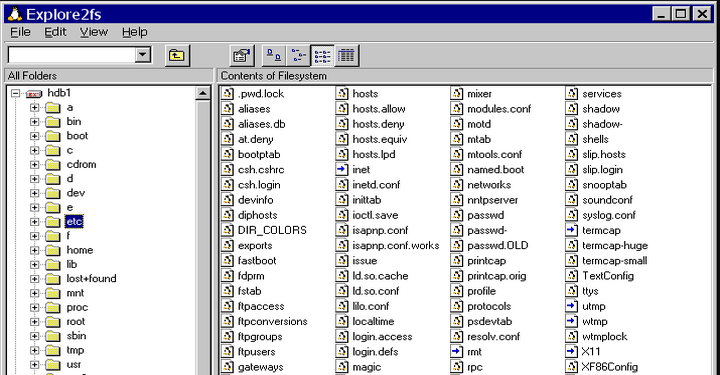
Explore2fs is a GUI drag& drop file explorer for Ex2 and Ex3 file systems. It runs on all Windows versions to allow users to read files but without the ability to make any changes.
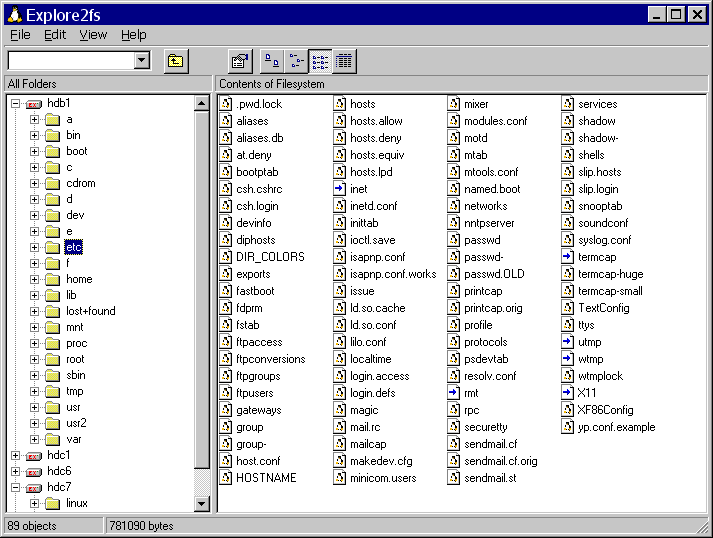
Explore2fs
Read & Write Access to Linux Filesystem from Windows
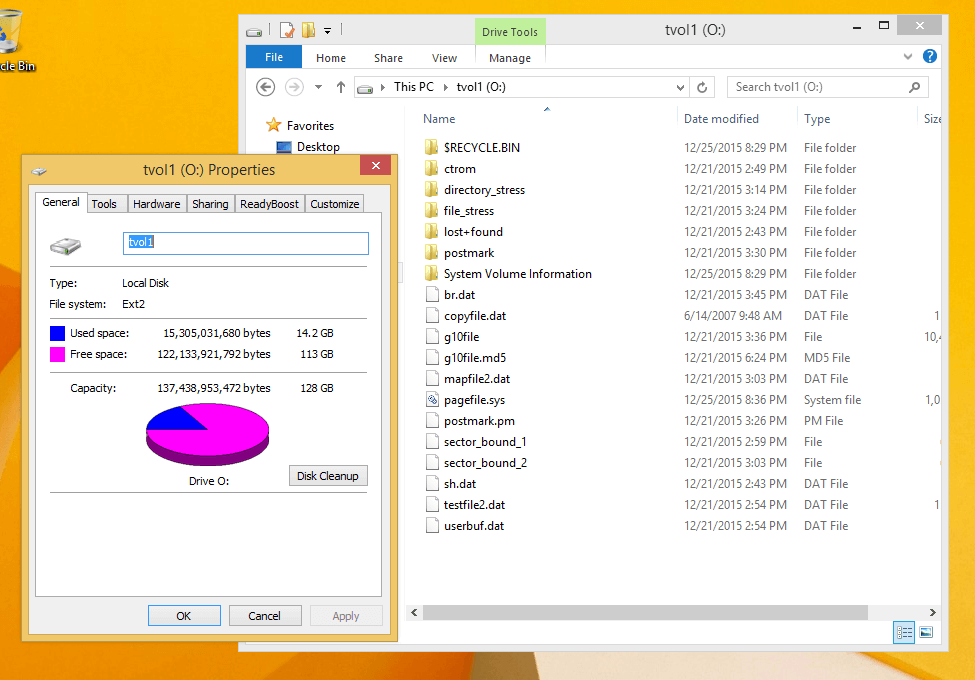
EX2 Installable File System for Windows is a freeware that provides Windows users will full read and write access to Linux Ext2 volumes by installing a pure kernel mode file system driver which extends the Windows file system to include the Ext2 file system.
With EX2 IFS, you can view Linux partitions in the disk management application and assign drive letters to them. Mind you, Ext2 Volume manager and Ext2 IFS need to be run with Compatibility mode enabled on Windows 8 and later.
EX2 Installable File System for Windows
Ext2Fsd is an open-source Linux Ext2 and Ext3 file system driver for all Windows versions with the option to access files in both read-only and read & write modes. However, Ext4 file systems load in read-only mode by default due to Ext2Fsd limited support.
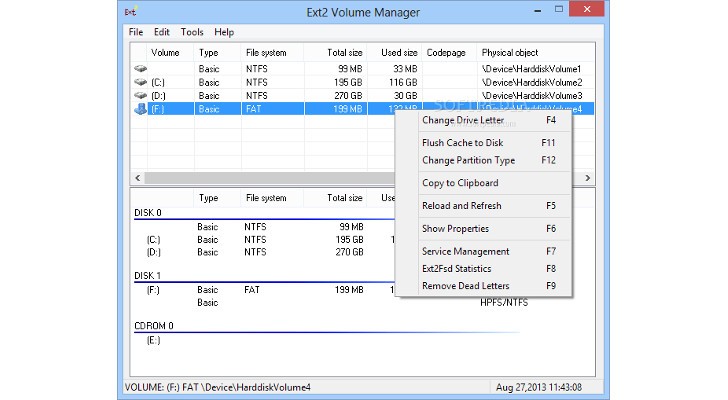
Ext2Fsd
Experts advise that accessing files from other operating systems is best done in read-only mode in other to avoid unfixable mistakes or data corruption. While the odds of such happening are slim in my opinion, always be careful when working with files. I’m not worried because it’s not the same as playing around in sever directories.
I hope this article is useful to you in getting on with your daily tasks. Do you already use any of the software on the list? Or do you have notable mentions to suggest? Add yours in the section below.
About the author

Divine Okoi
Divine Okoi is a cybersecurity postgrad with a passion for the open-source community. With 700+ articles covering different topics in IT, you can always trust him to inform you about the coolest tech.
How do I read Linux files from Windows? Accessing a Linux filesystem from Windows to be able to read and use the information stored on a Linux partition can be accomplished in several ways. As was previously outlined in How to access Linux files from Windows.
However, you can also gain access to your Linux files on Windows by using a tool called Ext2Fsd. Which is an ext file system driver for Windows.
This open source tool ships with the drivers necessary for Windows to detect and mount an ext4, ext3 or ext2 file system as read only or with read and write access. Additionally, it comes with a Volume Manager and many other useful tools like mke2fs.exe (allowing you to actually create an ext2 formatted partition from windows). Installation is simple and straight forward.

Here we are shown how easy it is to begin accessing Linux files from Windows. Notice how Windows Explorer is displaying the contents of a freshly formatted USB Flash Drive. This device was using a ext2 filesystem. The entire Linux File System was readable from within a running Windows operating environment. Though nothing had been stored there yet, any files placed there could become available between systems.

How to Read Linux Files on Windows
Here is how easy it is to Read Linux Files from Windows by using Ext2Fsd;
- Download and install Ext2Fsd.
- Ensure you enable Read and Write support for Ext2 and Ext3.

- Then reboot your computer to allow the changes to take effect.

If all went smoothly, you should now be able to access Linux partition from windows. Providing full read and write access to your ext2, ext3 or ext4 filesystems. enabling you to finally open Linux files from Windows, and edit or use Linux files on Windows.

If you have dual boot with Windows and Linux systems on the same laptop or desktop, you may meet this issue – it is easy to read Windows files from Linux, but Windows can’t access Linux files directly. It would bring inconvenience to your daily work. In this post, we’ll talk about this issue and share with you useful practical methods to help you access Linux files from Windows 10.
About Linux File System
Unlike the Windows system, file systems supported by Linux are Ext2, Ext3 and Ext4. Among them, Ext4 is the most popular and it has become the default file system of many Linux versions since Ext4 can supply users more flexibility to store large files.
On basis of different requirements, many users install dual boot in one computer, usually Windows and Linux. However, Ext2/3/4 file system is not supported by Windows. You are not able to visit Linux partitions or files from Windows directly.
Don’t worry. Keep reading the following section, and you’ll know how to access Linux files from Windows easily.
4 Methods to Access Linux Files from Windows 10
As Windows 10 doesn’t allow you to visit Ext2/3/4 files, you have to utilize some special tools to visit Linux files from Windows 10. Let’s have a look.
Fix 1 — Use Ext2Fsd
Ext2Fsd, a Windows file system driver, supporting Ext2/3/4 file system, allows you to access Linux partition from Windows 10 system. In addition, it can help you access Ubuntu files by mounting Ext4 partition and assigning a drive letter.
When you need to visit Linux files from Windows 10, you can launch Ext2Fsd when booting or only open it when necessary. Please follow these steps to access Ext from Windows 10:
Step 1: Download and install Ext2Fsd on Windows 10 computer.
Step 2: Open it and get the main interface. Go to Tools tab and click Service Management.
Step 3: In the new window, tick on options Mount all volumes in read-only mode and Assign drive letter automatically. Click Apply to confirm.
Step 4: Enter File Explorer to check if you can see Ext4 partitions mounted with their original drive letters.
Fix 2 — Use Ext2explore
Ext2explore is also a useful tool that helps you access Ext2/3/4 files from Windows 10. Moreover, it is very simple to utilize. Just follow the guide below.
Step 1: Download Ext2explore to Windows computer.
Step 2: Right-click the Ext2explore.exe file and choose Run as administrator.
Step 3: Then, you can visit Ext partition. Copy the needed Linux files and paste them to another location (on Windows system). After that, you can read them in Windows 10 system.
Fix 3 — Use DiskInternals Linux Reader
DiskInternals Linux Reader is a free utility to assist you to access Ext partitions from Windows 10. This tool not only supports multiple file system (like Ext4, ReFS, HFS and HFS+), but also allows you to preview files.
You can make use of DiskInternals Linux Reader in this way:
Step 1: Download and install this tool on Windows 10 computer. Run it to get the main interface.
Step 2: Check if all partitions are displayed. Double click the target Ext4 partition to preview the saved data in it.
Step 3: Right-click the wanted files and click Save. Click Save Files option and then Next.
Step 4: Click Browse to choose a storage location and click OK.
Wait until the process ends, then, you can check the saved Linux files in the specified storage location.

Fix 4 — Use MiniTool Partition Wizard
MiniTool Partition Wizard is an excellent partition manager, which supports multiple file systems including NTFS, FAT16/32, Ext2/3/4 and exFAT. With the help of it, you can manage computer better, like NTFS to FAT conversion, MBR to GPT conversion, formatting hard drive and resizing partitions and so on.
Please follow this tutorial to access Ext4 from Windows 10 with Partition Wizard.
Stage 1 — Format Ext4 Partition to NTFS
Step 1: Install this partition manager on Windows drive. Launch it to enter the main interface.
Step 2: Right click the target Ext4 partition and choose Format option.
Step 3: Select NTFS for the file system. Click OK to go on.
Step 4: Click Apply to make the changes effective.
Stage 2 – Restore the Ext4 Partition
You’ve made the Ext4 partition accessible now, but no data is kept in it as it was just formatted. Take it easy. MiniTool Partition Wizard also can restore data from Ext4 partition. So, let go on.
Step 1: Choose the Ext4 partition (NTFS partition now) and click Partition Recovery on the top toolbar.
Step 2: Choose a scanning range from Full Disk, Unallocated Space and Specified Range. Click Next.
Step 3: Choose a scanning method and click Next.
Step 4: Check all partitions in following list. Click Finish when the scanning process completes.
Step 5: Click Apply to begin restoring data from the formatted partition. Then, you can read the Linux files from Windows 10.

Final Words
Reading here, have you got to know how to access Linux files from Windows 10? You can choose one of these utilities if you are faced with this issue. You are welcome to give your feedback or suggestions by leaving a comment in the section below.

Linux environments you install from the Store (like Ubuntu and openSUSE) keep their files in a hidden folder. You can access this folder to back up and view files. You can also access your Windows files from the Bash shell.
Update: Starting with Windows 10’s May 2019 Update, there’s now an official, safe way to access your Linux files from Windows applications.
Don’t Modify Linux Files With Windows Tools
Microsoft strongly warns against adding or modifying Linux files with Windows software. This could cause metadata problems or file corruption, and may force you to uninstall and reinstall your Linux distribution to fix it. However, you can still view and back up your Linux files using Windows software, and that won’t cause any problems.
In other words, treat the Linux folder as if it were read-only from within Windows. Don’t use any Windows tool, including graphical apps or command line tools, to modify them. Don’t create new files within these folders using Windows tools, either.
If you do want to work with a file from both the Linux and Windows environments, you should create it in your Windows file system. For example, if you have a folder at C:project in Windows, you could also access it at /mnt/c/project in the Linux environment. Because it’s stored on the Windows file system and is accessed under /mnt/c, it’s safe to modify the file with either Windows or Linux tools.
Where Windows Stores the Linux Files
Your Linux file system is stored in a hidden folder for a reason, as Microsoft doesn’t want you tampering with it. But, if you need to view or back up some files, you’ll find them stored in a hidden folder. To access it, open File Explorer and plug the following address into the address bar:
%userprofile%AppDataLocalPackages
(This takes you to C:UsersNAMEAppDataLocalPackages . You can also show hidden folders in File Explorer and navigate here manually, if you prefer.

In this folder, double-click the folder for the Linux distribution whose files you want to view:
- Ubuntu: CanonicalGroupLimited.UbuntuonWindows_79rhkp1fndgsc
- openSUSE Leap 42: 46932SUSE.openSUSELeap42.2_022rs5jcyhyac
- SUSE Linux Enterprise Server 12: 46932SUSE.SUSELinuxEnterpriseServer12SP2_022rs5jcyhyac
The names of these folders may change slightly in the future. Just look for a folder named after the Linux distribution.
In the Linux distribution’s folder, double-click the “LocalState” folder, and then double-click the “rootfs” folder to see its files.
In other words, the files are stored at:
C:UsersNAMEAppDataLocalPackagesDISTRO_FOLDERLocalStaterootfs
Note: In older versions of Windows 10, these files were stored under C:UsersNameAppDataLocallxss. This changed starting with the Fall Creators Update.
To view the files stored in your home folder, double-click the “home” folder, and then double-click your UNIX username.
Remember, don’t modify any of these files or add files to these folders from File Explorer!
Where Your Windows System Drive Appears in Linux
The Windows Subsystem for Linux makes your full Windows system drive available so you can work with the same files in both environments. However, the Bash environment doesn’t just dump you in your C: drive. Instead, it places you in your UNIX account’s home directory within the Linux environment’s file system.
Your Windows system drive and other connected drives are exposed in the /mnt/ directory there, where other drives are traditionally made available in the Linux directory structure. Specifically, you’ll find the C: drive at the following location in the Bash environment:
/mnt/c
To change to this directory with the cd command, just type:
cd /mnt/c
If you have a D: drive, you’ll find it located at /mnt/d, and so on.
For example, to access a file stored at C:UsersChrisDownloadsFile.txt, you’d use the path /mnt/c/Users/Chris/Downloads/File.txt in the Bash environment. And yes, it’s case-sensitive, so you need “Downloads” and not “downloads.”
RELATED: How to Mount Removable Drives and Network Locations in the Windows Subsystem for Linux
You can also mount external drives and network locations to access more files from within the Linux environment.
Note that, when accessing Windows system files, your Bash shell environment has the permissions it was launched with. If you launched it normally from the shortcut, it will have the same file access permissions your Windows user account does.
For example, if you want to access a system folder your user account doesn’t have permission to access, you’d need to right-click the Bash shell shortcut and select “Run as Administrator” to launch the Bash shell with Windows Administrator privileges.
This works just like the Command Prompt, which needs to be launched as Administrator if you need write access to Administrator-only files, or write access to system files. You can’t just use sudo in the Bash environment.
READ NEXT
- › How to Mount Removable Drives and Network Locations in the Windows Subsystem for Linux
- › How to Quickly Launch a Bash Shell From Windows 10’s File Explorer
- › Everything You Can Do With Windows 10’s New Bash Shell
- › How to Change Your User Account in Windows 10’s Ubuntu Bash Shell
- › How to Access Your Linux (WSL) Files in Windows 10
- › How to Run Windows Programs from Windows 10’s Bash Shell
- › What’s the Difference Between Ubuntu, openSUSE, and Fedora on Windows 10?
- › Get PC Power With Tablet Portability in the Surface Pro 9 for $200 Off