If you work with different operating systems, it’s handy to be able to share files between them. This article explains how to set up file access between Linux (Fedora 33) and Windows 10 using Samba and mount.cifs.
Samba is the Linux implementation of the SMB/CIFS protocol, allowing direct access to shared folders and printers over a network. Mount.cifs is part of the Samba suite and allows you to mount the CIFS filesystem under Linux.
Caution: These instructions are for sharing files within your private local network or in a virtualized host-only network between a Linux host machine and a virtualized Windows guest. Don’t consider this article a guideline for your corporate network, as it doesn’t implement the necessary cybersecurity considerations.
Access Linux from Windows
This section explains how to access a user’s Linux home directory from Windows File Explorer.
1. Install and configure Samba
Start on your Linux system by installing Samba:
dnf install sambaSamba is a system daemon, and its configuration file is located in /etc/samba/smb.conf. Its default configuration should work. If not, this minimal configuration should do the job:
[global]
        workgroup = SAMBA
        server string = %h server (Samba %v)
        invalid users = root
        security = user
[homes]
        comment = Home Directories
        browseable = no
        valid users = %S
        writable = yes
You can find a detailed description of the parameters in the smb.conf section of the project’s website.
2. Modify LinuxSE
If your Linux distribution is protected by SELinux (as Fedora is), you have to enable Samba to be able to access the user’s home directory:
setsebool -P samba_enable_home_dirs onCheck that the value is set by typing:
getsebool samba_enable_home_dirsYour output should look like this:
![]()
3. Enable your user
Samba uses a set of users and passwords that have permission to connect. Add your Linux user to the set by typing:
smbpasswd -a <your-user>You will be prompted for a password. This is a completely new password; it is not the current password for your account. Enter the password you want to use to log in to Samba.
To get a list of allowed user types:
pdbedit -L -vRemove a user by typing:
smbpasswd -x <user-name>4. Start Samba
Because Samba is a system daemon, you can start it on Fedora with:
systemctl start smbThis starts Samba for the current session. If you want Samba to start automatically on system startup, enter:
systemctl enable smbOn some systems, the Samba daemon is registered as smbd.
4. Configure the firewall
By default, Samba is blocked by your firewall. Allow Samba to access the network permanently by configuring the firewall.
You can do it on the command line with:
firewall-cmd --add-service=samba --permanentOr you do it graphically with the firewall-config tool:

5. Access Samba from Windows
In Windows, open File Explorer. On the address line, type in two backslashes followed by your Linux machine’s address (IP address or hostname):

You will be prompted for your login information. Type in the username and password combination from step 3. You should now be able to access your home directory on your Linux machine:

Access Windows from Linux
The following steps explain how to access a shared Windows folder from Linux. To implement them, you need Administrator rights on your Windows user account.
1. Enable file sharing
Open the Network and Sharing Center either by clicking on the
Windows Button > Settings > Network & Internet
or by right-clicking the little monitor icon on the bottom-right of your taskbar:

In the window that opens, find the connection you want to use and note its profile. I used Ethernet 3, which is tagged as a Public network.
Caution: Consider changing your local machine’s connection profile to Private if your PC is frequently connected to public networks.
Remember your network profile and click on Change advanced sharing settings:

Select the profile that corresponds to your connection and turn on network discovery and file and printer sharing:

2. Define a shared folder
Open the context menu by right-clicking on the folder you want to share, navigate to Give access to, and select Specific people… :

Check whether your current username is on the list. Click on Share to tag this folder as shared:

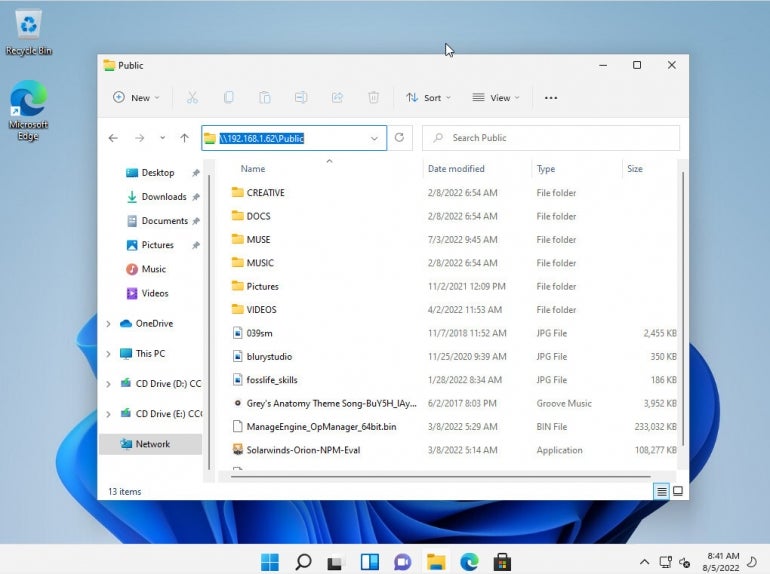
You can display a list of all shared folders by entering \localhost in File Explorer’s address line:


Image by:
<p class=»rtecenter»><sup>(Stephan Avenwedde, <a href=»https://opensource.com/%3Ca%20href%3D»https://creativecommons.org/licenses/by-sa/4.0/» rel=»ugc»>https://creativecommons.org/licenses/by-sa/4.0/» target=»_blank»>CC BY-SA 4.0</a>)</sup></p>
3. Mount the shared folder under Linux
Go back to your Linux system, open a command shell, and create a new folder where you want to mount the Windows share:
mkdir ~/WindowsShareMounting Windows shares is done with mount.cifs, which should be installed by default. To mount your shared folder temporarily, use:
sudo mount.cifs //<address-of-windows-pc>/MySharedFolder ~/WindowsShare/ -o user=<Windows-user>,uid=$UIDIn this command:
<address-of-windows-pc>is the Windows PC’s address info (IP or hostname)<Windows-user>is the user that is allowed to access the shared folder (from step 2)
You will be prompted for your Windows password. Enter it, and you will be able to access the shared folder on Windows with your normal Linux user.
To unmount the shared folder:
sudo umount ~/WindowsShare/You can also mount a Windows shared folder on system startup. Follow these steps to configure your system accordingly.
Summary
This shows how to establish temporary shared folder access that must be renewed after each boot. It is relatively easy to modify this configuration for permanent access. I often switch back and forth between different systems, so I consider it incredibly practical to set up direct file access.
 This work is licensed under a Creative Commons Attribution-Share Alike 4.0 International License.
Updated: 03/12/2022 by
The easiest and most reliable way to share files between a Linux and Windows computer on the same local area network is to use the Samba file-sharing protocol. All modern versions of Windows come with Samba installed, and Samba is installed by default on most distributions of Linux.
Create a shared folder on Windows
First, create a shared folder on your Windows computer.
Note
Following the steps below, creates a shared folder on your Windows computer that lets you access files in that folder on your Linux computer. With the right permissions you can also copy, edit, and delete files in that folder from your Linux computer.
- Open the Control Panel.
- Select the Network and Sharing Options or Network and Sharing Center option.
- Click the Change advanced sharing settings link in the left navigation menu.
- Click the Turn on Network Discovery and Turn on File and Print Sharing options.
- Click the Save changes button at the bottom of the Advanced sharing settings window.
Now, create a new folder to share or choose an existing folder that you want to share.
- Right-click the folder and select Properties.
- Go to the Sharing tab.
- If you want to share the folder with another Windows account, click the Share button, add the account to grant permission to access the shared folder, and click the Share button.
Note
If you shared the folder with another Windows account, you need to click the Advanced Sharing button, then click the Permissions button. Select the account, check the Allow box for the Change or Modify permission, and click OK.
- Click the Advanced Sharing button.
- On the Advanced Sharing window, check the box for Share this folder and click OK.
- The network path for the folder is now displayed above the Share button, indicating that it is now a shared folder. For example, it may look something like \YOURCOMPUTERNAMEUsersYourUserNameShareFolderName. Make a note of this network folder path to use later on your Linux machine.
Access a Windows shared folder from Linux using Konqueror
Many Linux distributions use the KDE desktop environment and the Konqueror file manager/browser. If you’re using this, you can follow these steps to access your Windows shared folder.
- Click the K menu icon.
- Select Internet -> Konqueror.
- In the Konqueror window that opens, click the Network Folders link, or type remote:/ in the address bar and press Enter.
- Click the Samba Shares icon.
- Click the icon of your Windows Home workgroup.
- Click the Workgroup icon.
- Click the icon for your computer.
- When prompted, enter the username and password for the Windows account that created the share.
- Click OK.
Access a Windows shared folder from Linux using Nautilus
Many Linux distributions, especially those that use the GNOME desktop environment, use the Nautilus file manager. If you’re using this, you can follow these steps to access your Windows shared folder.
- Open Nautilus.
- From the File menu, select Connect to Server.
- In the Service type drop-down box, select Windows share.
- In the Server field, enter the name of your computer.
- Click Connect.
Alternatively, in the Nautilus address bar, you can type smb://ComputerName/ShareName and press Enter. For example, when you created your Windows Share if the share name was listed as:
\YOURCOMPUTERNAMEUsersYourUserNameShareFolderName
Type smb://YOURCOMPUTERNAME/Users/YourUserName/ShareFolderName and press Enter. Note the smb: at the beginning, in Linux, use forward slashes instead of backslashes.
Access a Windows shared folder from Linux using the command line
You can also access your Windows shared folder from the Linux command line using the smbclient program.
- Open a terminal.
- Type smbclient at the command prompt.
- If you receive a «Usage:» message, smbclient is installed, and you can skip to the next step. However, if the command is not found, you need to install smbclient. Follow these steps to install it.
- If you use the apt package manager, the default on Linux systems such as Ubuntu or Debian, you can use the sudo apt-get install smbclient command.
- If you use the yum package manager, the default on Linux systems, such as CentOS, you can use the sudo yum install samba-client command.
- You can also download the Samba client directly at www.samba.org/samba/download/, which might be useful to you if you need or want to compile the program from the source code.
- With smbclient installed, you can connect to your Windows share using the command smbclient //ComputerName/ShareName -U Username. For instance, if your Windows username is Fred, and your Windows share network name is \YOURCOMPUTERNAMEUsersYourUserNameShareFolderName, use the command smbclient //YOURCOMPUTERNAME/Users/YourUserName/ShareFolderName -U Fred. Notice that the Linux command uses forward slashes instead of backslashes).
- Enter your password.
- Once authenticated, you are placed at an smb: > prompt.
- Here, you can use the ls or dir command to list files.
- Use the command get filename.ext to transfer a file named filename.ext from your Windows share to your Linux machine, for example. If the file name contains spaces, make sure to enclose it in double quotes, for example: get «My new file.txt».
- Type help for a listing of further commands.
- Type quit or exit to return to the command prompt.
In my previous article, Interoperability: Getting started with Samba, I covered installing and configuring Samba shares on a Linux server. The real power of Samba comes when Windows clients can communicate with Linux file servers. In this article, I will cover how you can access Samba shares from both Linux and Windows clients.
Install the Samba client packages
To access Samba share from Linux clients we need to install a few Samba client packages.
On the client machine, install the samba-common and samba-client packages.
# yum install samba-client samba-common -yCheck for available shares
Let’s check if we can access our shares from the server. We can use either the hostname or ip address of the server. If you use the hostname, make sure DNS is working.
# smbclient -U user -L 192.168.1.122

Enter SAMBAuser's password:

        Sharename       Type      Comment
        ---------       ----      -------
        print$          Disk      Printer Drivers
        myshare         Disk      my share
        IPC$            IPC       IPC Service (Samba 4.9.1)
        user      Disk      Home Directories

Reconnecting with SMB1 for workgroup listing.

        Server               Comment
        ---------            -------

        Workgroup            Master
        ---------            -------
        SAMBA                SAMBA-SERVER
Create a directory that we can use as our mount point. I’m going to create a directory under /mnt, but you can use any directory you would like to. You may need to configure SELinux on that directory.
# mkdir /mnt/myshareNow, mount the share.
# mount -t cifs -o username=user //192.168.1.122/myshare /mnt/share

Password for user@//192.168.1.122/myshare:  ********
Now that we’ve mounted our share, we can check the mounts with the following command:
# df -hPersistent mount
Let’s make that directory mount persistently so it can withstand a reboot. Using the text editor of your choice, edit the /etc/fstab file. You can do this in multiple ways, but I’m going to demonstrate two ways to mount the Samba share at boot in /etc/fstab.
# vim /etc/fstabThe first option provides a username and password for the Samba user in the fstab.
//192.168.1.122/myshare /mnt/share cifs username=user,password=password,_netdev 0 0The other option is to create a credential file. You can call this file anything, but I would like to call it cred. I would like to place credentials files in the home directory of the user. In our demonstration it will be /home/user/.cred.
//192.168.1.122/myshare /mnt/share cifs credentials=/home/user/.cred,_netdev 0 0The _netdev option is important since we are mounting a network device. Clients may hang during the boot process if the system encounters any difficulties with the network.
Now create that .cred file inside the user’s home directory.
# vim /home/user/.credNext, add the Samba user’s username and password.
username=user
password=password
Finally, mount all filesystems.
# mount -aAccess a share from a Windows client
I will be using Windows 10 as my client machine with a workgroup called SAMBA. We need to create a local user account on the Windows machine that matches the username and password of the Samba user account we created in my previous article. Although account creation is not necessary, this will make things simpler when accessing the share.
Like I mentioned above, this step is optional and you can skip it completely. Although there are multiple approaches to adding a new local user on a Windows machine, for the simplicity of this article I will be using PowerShell. Launch PowerShell as an administrator and issue following commands:
PS > $password = Read-Host -AsSecureString
PS > New-LocalUser -Name “user” -Password $password
Now that we have created a new local user account matching the Samba user account, we can log in to Windows with our newly created user account.
Access a share from Windows Explorer
To access the Samba share from Windows Explorer, start typing the IP address to our share in the search area. I am using the hostname of the Samba server. In my case, it is centos. You can also access the share by using the IP address of the Samba server.
You might be prompted to enter the username and password to access the share if you skipped the local user creation process. If you get prompted for credentials, enter the Samba username and password we created in the previous article.
You will need to enter the Samba share path every time you want to access the share. There is a better way to access the share by mapping a drive to Samba share in Windows.
Mapping a drive to a Samba share
To map a drive to the Samba share, open PowerShell and issue following command:
PS > NET USE M: \centosmyshareWrap up
Accessing a Samba share on Linux and Windows is easy. With this basic setup, you will be able to access file shares from client machines in your network. With somewhat more configuration, you can deploy Samba shares in a domain environment. Samba can do more than file share. If you would like to learn more about Samba, read this article about Windows and Linux interoperability. This is a basic set up, but you can do so much more with Samba.
[ Want to test your sysadmin skills? Take a skills assessment today. ]

on
August 5, 2022, 9:50 AM PDT
How to connect to Linux Samba shares from Windows
If you’re having trouble figuring out how to connect Windows 10 or 11 to your data center Samba shares, Jack Wallen eases your concern with the simple steps to make this work.
When Windows 10 was released, it seemingly broke the ability to easily connect to Linux Samba shares. It appeared one could not write to Linux share from Windows 10. Considering how many businesses rely on Samba for the sharing of folders, this was a bad move on the part of Microsoft. Fortunately, the ability to connect to Samba shares wasn’t actually removed from the Windows platform, it was merely tucked a bit out of sight.
I want to walk you through the process of making that connection between Windows 10/11 and your Linux shares.
For this tutorial, I will assume you have both Windows 10 or 11 installed on a machine (or multiple machines) and a Samba share at the ready from your data center. With that said: Let’s connect.
Connecting to your server
Open up File Explorer and then right-click on This PC (in the left pane). From the resulting context menu, select Add A Network Location (Figure A).
Figure A

A new wizard will open, one that will walk you through the process of creating a shortcut for a new network location within File Explorer. Click Next in the Welcome window. In the resulting screen (Figure B), click Choose A Custom Network Location (the only option) and then click Next.
Figure B
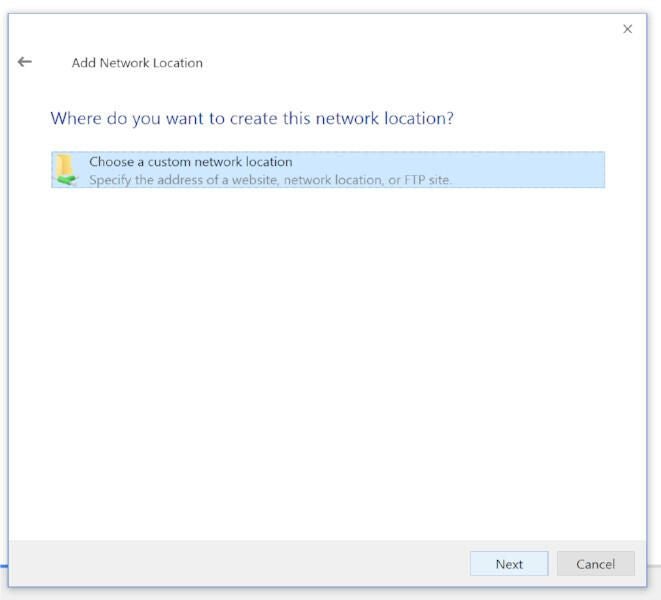
Next you must enter the IP address of your Samba server (Figure C) in the form of //SERVER_IP/SHARE, where SERVER_IP is the IP address of your Samba server and SHARE is the name of the share you want to add.
Figure C

Click Next to continue on. In the next window (Figure D), type a name for the network location. A default name will be picked up by the Samba server, you can either use that or enter a custom name that makes it easier for you to remember either where the share is or what is housed within the share.
Figure D

Click Next to reach the final screen of the wizard. Here (Figure E) click Finish and the share is now ready for you to use.
Figure E

And that is all there is to connecting a Windows 10 machine to a Samba share in your data center. It’s not quite as easy as it once was, but the feature is, in fact, still there.
How to connect from Windows 11
With Windows 11, it is much easier to make the connection. Simply open the file manager and in the address bar (Figure F) and type \SERVERSHARE, where SERVER is the IP address of the machine hosting the Samba share and SHARE is the name of the actual share.
Figure F
After hearing a number of people coming to me asking why they can not write to Linux share from Windows 10, I’m happy to tell you that it is not, in fact, broken. Although it’s a bit hidden away, you can still make that much needed desktop to data center connection.
Also See
-
How to protect Samba from the SambaCry exploit
(TechRepublic) -
How to set up Samba shares for groups
(TechRepublic) -
How to configure Ubuntu Linux server as a Domain Controller with samba-tool
(TechRepublic) -
Ethical Hacking Using Kali Linux From A to Z
(TechRepublic Academy)
-
Data Centers
-
Microsoft
-
Open source
This question answers how to access Windows files from Ubuntu Bash, but how can I do the opposite?
Specifically, I need to access my SSH key from Windows which is located at /home/mark/.ssh/id_rsa under Bash.
![]()
asked Aug 8, 2016 at 3:35
![]()
6
\wsl$Ubuntuhomeuserwhatever
In the explorer or the Run widget (Cmd+R). Works like a normal network share and it’s safe to manipulate files.
You can also map it to a drive or folder, just as any other network share.
Note: This is a new feature implemented in Windows 10 build 18342
answered Oct 24, 2019 at 8:44
![]()
runlevel0runlevel0
8926 silver badges10 bronze badges
6
Yes but is not recommended to manipulate that folder from the windows explorer. If you want to copy, move, edit or erase files from the lxss folder you need to do it inside bash with command line tools.
Only files that are on /mnt/* are really manipulable from the windows explorer.
answered Aug 8, 2016 at 11:12
![]()
onomaonoma
2411 silver badge5 bronze badges
3
Found it by searching my entire C drive. Files are here:
C:Users<username>AppDataLocallxss
e.g., my SSH key is here:
C:UsersMarkAppDataLocallxsshomemark.sshid_rsa
answered Aug 8, 2016 at 3:45
![]()
mpenmpen
11.7k16 gold badges54 silver badges68 bronze badges
3
In powershell, use
cd ${env:appdata}..localpackagescanonical*localstaterootfs
then
ls
returns the same list of folders as
ls /
within bash on WSL.
answered Feb 27, 2019 at 12:10
![]()
masterxilomasterxilo
4786 silver badges7 bronze badges
1
If you open Windows Explorer e type the path \wsl$ it will list all your installed Linux distributions.
answered Jun 18, 2020 at 2:53
![]()
nevesneves
4492 gold badges6 silver badges11 bronze badges
3
As has been mentioned above by [onoma] files in WSL directories have attributes that would be gone if one manipulates it using explorer or text editor run under Windows system. The solution could be to start ssh-server in WSL (there might be a reinstall necessary) listening on localhost and then mounting WSL filesystem as a drive using, for example, win-sshfs or you can just use Bitvise SSH client to connect over ssh and manipulate files by sftp window. The topic has been partially discussed here: How can I SSH into “Bash on Ubuntu on Windows 10”?
answered Sep 2, 2017 at 19:52
![]()
0
I finally made a way to open explorer (and vscode) with actual correct folder context from inside WSL:
https://github.com/andymule/wslwin
For example, after you install this, in linux (WSL) you would just cd /home/mark/.ssh/ and type explorer, and it would open windows explorer at that location, whatever it is.
EDIT: this feature is being officially supported in WSL now, and you should no longer use my scripts
answered Jan 19, 2019 at 20:06
![]()
subst L: $env:LOCALAPPDATAlxss (for powershell)
or subst L: %LocalAppData%lxss (from cmd)
This puts your Linux-subsystem filesystem-root / on your L: drive.
You could also map just your home directory, or just whack %LocalAppData%lxss in an explorer window. Just don’t try browsing L:mntc or your brain might explode.
answered Jun 17, 2017 at 7:03
![]()
CheezmeisterCheezmeister
8271 gold badge8 silver badges12 bronze badges
1
I just discovered you can run powershell.exe from linux and your linux console becomes a PowerShell console at the current directory. This is the best of both worlds as you never have to leave your linux console… which is where I spend most of my time. You can then type exit to get back into linux world.
answered Nov 17, 2021 at 22:19
![]()
Im on Windows 10 Creators Update. I use SFTP NetDrive to mount the WSL filesystem into windows as as a network drive.
There are some Window sshFS ports that’ll achieve the same thing.
You’ll need to start the ssh daemon via «sudo service ssh start»
answered Aug 1, 2017 at 20:45
![]()
2
This worked for me using Powershell
cd Microsoft.PowerShell.CoreFileSystem::\wsl$Ubuntu-20.04homeusername
answered Jul 19, 2021 at 0:15
![]()
From RUN (WindowsKey + R) you can type \wsl$ and it will give you all your wsl installations.
This applies for WSL2
answered Nov 20, 2021 at 13:44
![]()
This post shows students and new users how to quickly create a Samba share on Ubuntu and access it from Windows 11. Samba is an open-source implementation of the SMB/CIFS network file-sharing protocol that allows users to access files, printers, and other shared resources.
If you have a multi-operating systems environment, you can use Microsoft SMB/CIFS protocol to allow file sharing between Windows, Linux, and macOS systems. On Linux systems, you’re going to be using Samba to share and access files over SMB/CIFS.
For this tutorial, we’re going to be creating a shared folder on a Ubuntu machine, configuring Samba to allow access to the shared resource, and configuring Windows 11 to be able to get to the shared resource.
To get started with sharing the Ubuntu folder so users on Windows 11 can access it, follow the steps below:
How to enable file sharing in Windows 11
The first thing you’ll want to do to access Ubuntu shares from Windows is to allow file sharing and network discovery.
To quickly enable file sharing in Windows 11, click on the Start menu, then search for “Command Prompt” as highlighted below. Then right-click on the Command Prompt apps and select Run as administrator.

When the command prompt app opens, run the commands below
netsh advfirewall firewall set rule group="File and Printer Sharing" new enable=Yes
netsh advfirewall firewall set rule group="Network Discovery" new enable=Yes
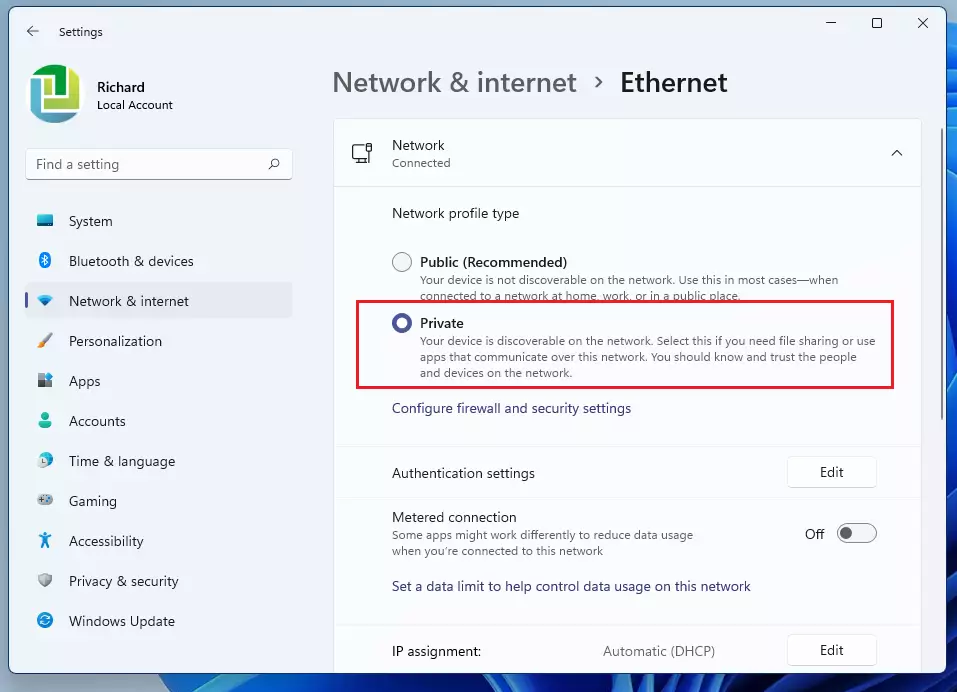
In some cases, you’ll also want to switch the network profile to Private mode in Windows 11. To do that, click on Start ==> Settings ==> Network & internet ==> Ethernet and select Private.
How to install Samba on Ubuntu
Now that file sharing is enabled in Windows, go and install Samba. Samba enables file and printer sharing on Ubuntu systems.
The commands below will install Samba.
sudo apt update
sudo apt install samba samba-common
How to find Workgroup name in Windows 11
Because we want both the Windows 11 and Ubuntu machines to be in the same workgroup, let’s find out what workgroup Windows belongs to. Then we’ll add Ubuntu to the same group.
On the Windows 11 machine, open the command prompt and type the commands below:
net config workstation
Look for the Workstation domain line to see the Workgroup Windows belongs to. By default, it’s WORKGROUP.

How to configure Samba on Ubuntu
At this point, Windows should be configured for file sharing and network discovery as well as switch to the Private network profile.
Now go and configure the Ubuntu machine to be part of the same workgroup as Windows, and configure Samba share.
Run the commands below to edit Samba’s default configuration file.
sudo cp /etc/samba/smb.conf /etc/samba/smb.conf.bak
sudo nano /etc/samba/smb.conf
Then edit the lines below in the smb.conf file to match the lines in the code block below:
[global]
workgroup = WORKGROUP
server string = Samba Server %v
netbios name = ubuntu
security = user
interfaces = 127.0.0.0/8 eth0
map to guest = bad user
name resolve order = bcast host
dns proxy = no

# add to the end
[Public]
   comment = Ubuntu File Share
   path = /srv/samba/share
   browsable = yes
   writable = yes
   guest ok = yes
   read only = no
   create mode = 0777
   directory mode = 0777
   force user = nobody
Save and exit
How to create Samba shares
Next, run the commands below to create the folder you’re sharing in the configuration file. The folder called share will be created in the /srv/samba/ directory.
sudo mkdir -p /srv/samba/share
sudo chown nobody:nogroup /srv/samba/share
sudo chmod -R 0777 /srv/samba/share
sudo chgrp sambashare /srv/samba/share
Finally, run the commands below to restart Samba and related services.
sudo systemctl restart smbd.service nmbd.service
Now open Windows File Explorer and you should browse to the Ubuntu share using the server name or IP address followed by the shared resource name.

You should also be able to map the Ubuntu share to Windows 11.

That’s it!
Conclusion:
This post showed you how to create Ubuntu Samba shares and allow access from Windows 11 machines. If you find any error above, please use the comment form below to report.
I like the idea of having a shared drive attached to my always-on Linux system, so that all my computers (Windows and Mac) can access those in a central place. It’s like a NAS without having a NAS box if you know what I mean. The easiest way to accomplish this is by using the Samba Protocol.
Essentially we’ll declare a part of our Linux system as a Samba Share, setup credentials in Samba, then let users from other systems access these files. It’s a little complex to get going, but I’ll show you all the relevant steps here. This works on CentOS 7 and Fedora.
Installing Samba
Let’s get the packages installed first:
yum install samba
This should bring up samba and install samba-common-tools as well. Let’s also start and enable Samba on system start while we’re at it.
systemctl enable smb
systemctl start smb
Setting up Samba Credentials
I already have a regular Linux user on my system, let’s call him “shareuser”. Samba needs its own password for a user, which can be a different one from the system password. We can set this up with the following command (as root), which will prompt for a new password.
smbpasswd -a username
You can run the same command as the system user too without specifying a user. man smbpasswd has more details. Once confirmed, the current (or specified) system user will be added to the Samba user group.
Setting up the Shared Folder
We need to pick a folder we’d like to use. It can live anywhere on the system, even on mounted drives. All we need is the full path to it and set it up in the Samba configuration file. We can find it here: /etc/samba/smb.conf
Use your favourite text editor and add the following to the bottom of the file:
# My Samba Share
[supershare]
path = /home/shareuser/Desktop/supershare
available = yes
valid users = shareuser
read only = no
browsable = yes
public = yes
writable = yes
I’m calling my share “supershare” here, but that’s arbitrary. The idea is that you could have various locations for different users on one system. My system (and Samba) user is called “shareuser”, and my folder location is on his Desktop. It could be anywhere else of course.
Setting the Samba Protocol
With the above configuration, macOS and other Linux systems can already access the shared folder. Windows 10 however will throw an error (or rather not connect without any clue as to what’s wrong), because the SMBv1 protocol is no longer supported for security reasons. Something about a the WannaCrypt/WannaCry exploit and ransom demands.
To keep us safe, let’s ask Samba to use a newer protocol by default instead. SMBv2 will work, and depending on your Linux (or rather Samba) version you can go up to 3 or 4. Find the [global] section in your Samba config file and add the following as the last line before the next block (leave all other lines intact).
[global]
min protocol = SMB2
After any change to the config file, we need to restart the Samba service:
systemctl restart smb
Firewalld and SELinux
By default Samba connections are blocked by the firewalld service. We can fix this by adding the following rule:
firewall-cmd --add-service samba --permanent
systemctl restart firewalld
If SELinux is enabled on the system, you can optionally add the following value to allow the Samba service write access (not necessary if SELinux is disabled or permissive):
setsebool smbd_anon_write=1
Accessing Files from Windows 10
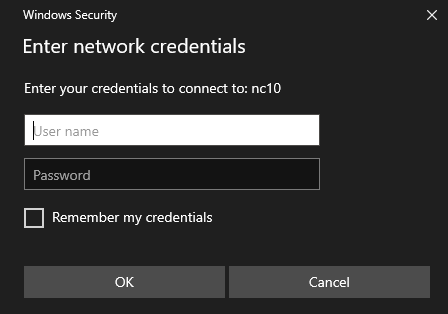
Now comes the moment of truth: can we connect from Windows? There’s various ways of doing this, but the easiest one is to setup a permanent connect so we don’t have to type in our credentials every time we want to access those files. Open Windows Explorer and choose Add a Network Location.
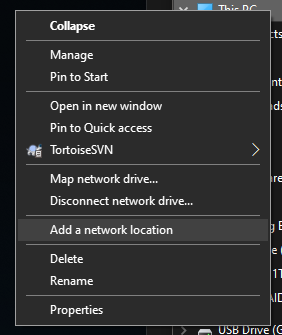
This lets you specify the location on the network, either via IP address or name. Start with two backslashes, like so
- \10.1.2.3supershare
- or
- \yourserversupershare
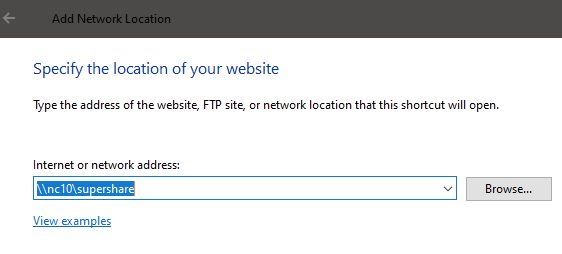
If the connection is successful, Windows will prompt you for credentials.
And that’s it! Now you can navigate to your shared Linux folder and copy files to it or remove them.
Accessing files from macOS
On the Mac it’s equally easy. Head over to the Go menu in your Finder and select Connect to Server.
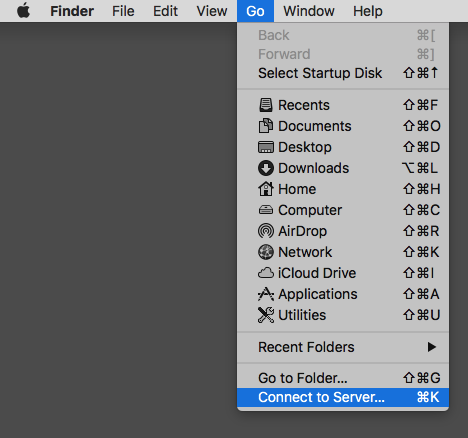
Mac likes us to specify the protocol with which we’re connecting and accepts IP addresses and server names alike:
- smb://10.2.3.4/supershare
- or
- smb://yourserver/supershare
It willl ask for credentials when you connect and offer to store them for next time.
Further Reading
- https://www.prajwaldesai.com/cant-connect-to-file-share-obsolete-smb1-protocol/
- https://www.cyberciti.biz/faq/how-to-configure-samba-to-use-smbv2-and-disable-smbv1-on-linux-or-unix/
To access the Windows 7 shared folder from Ubuntu, you have to use the Connect to Serveroption.
From the top menu toolbar click on Places and then on Connect to Server.
From the Service type drop-down menu, select Windows share.
In the Server text filed type the name or the IP Address of the Windows 7 computer.
How to Share Files between Windows and Linux
- Right-click the folder you would like to share and click Properties.
- Open the sharing tab and click Advanced Sharing.
- Check the ‘share this folder’ box and click on Permissions.
- Choose everyone to give full control (You can give read or write permissions only, it depends on your requirements).
- Click OK.
Open File Explorer and go to the Network section. There, click or tap your computer’s name and your shared folders are displayed. To view the properties of a shared folder, select it and then click or tap the Properties button, in the Open section from the Home tab, on the ribbon.
How to temporarily re-enable the SMBv1 protocol on Windows 10
- Open Control Panel.
- Click on Programs.
- Click on Turn Windows features on or off link.
- Expand the SMB 1.0/CIFS File Sharing Support option.
- Check the SMB 1.0/CIFS Client option.
- Click the OK button.
- Click the Restart now button.
To find and access a shared folder or printer:
- Search for Network , and click to open it.
- Select Search Active Directory at the top of the window; you may need to first select the Network tab on the upper left.
- From the drop-down menu next to “Find:”, select either Printers or Shared Folders.
Access a Windows shared folder from Linux, using Nautilus
- Open Nautilus.
- From the File menu, select Connect to Server
- In the Service type: drop-down box, choose Windows share.
- In the Server: field, enter the name of your computer.
- Click Connect.
Steps
- Use NFS (Network File System) to share files between Linux computers on a local network.
- Understand how NFS works.
- Open the terminal on the server computer.
- Type.
- After installation, type.
- Type.
- Make a dummy directory that will be used to share the data.
- Type pico /etc/fstab and press ↵ Enter .
How can I access Linux files from Windows?
Microsoft say the “best way” to make use the feature (once users have the update) is to simply run explorer.exe while inside the Linux home directory. This will open the Windows File Explorer inside of the Linux distro. Once open in Explorer files and folders can be managed, moved and edited just like any other.
How do I access Windows files from Ubuntu?
Originally Answered: How can I access my windows files in the same computer after installing Ubuntu? Voila. You should see the directory structure of Windows.
- Open nautilus file manager.
- Click other locations at bottom-left side.
- Now click the partition which you want to access.
- Enter password if asked.
- then hurray.
How can I see the path of a mapped drive?
2 Answers. In Windows, if you have mapped network drives and you don’t know the UNC path for them, you can start a command prompt (Start → Run → cmd.exe) and use the net use command to list your mapped drives and their UNC paths: C:>net use New connections will be remembered.
Just follow these steps:
- Press Win + E to open a File Explorer window.
- In Windows 10, choose This PC from the left side of the window.
- In Windows 10, click the Computer tab.
- Click the Map Network Drive button.
- Choose a drive letter.
- Click the Browse button.
- Select a network computer or server and then a shared folder.
Steps
- Right-click the. menu.
- Click File Explorer.
- Scroll down the left column and click Network. This displays a list of computers that are a part of the network.
- Double-click the computer where you want to see shared folders. A list of shared folders on the selected computer will now appear.
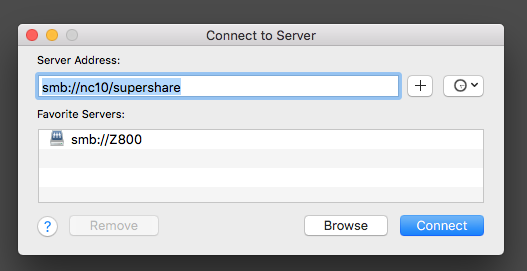
Connect to a SMB Share. In the Server Address field, enter smb:// to define the network protocol for SMB, and then enter either the IP address or the hostname of the server. To add the server to your Favorite Servers list, click the ‘+’ button. When prompted, enter your NetID user name and password to connect to server
Does Windows 10 use SMB?
SMB or Server Message Block Protocols are used to connect your computer to an external server. Windows 10 ships with support of these protocols but they are disabled in the OOBE. Currently, Windows 10 supports SMBv1, SMBv2, and SMBv3 as well.
How do I map a Linux folder in Windows?
You can map your Linux home directory on Windows by opening Windows Explorer, clicking on “Tools” and then “Map network drive”. Choose drive letter “M” and path “\serverloginname”. While any drive letter will work, your profile on Windows has been created with M: mapped to your HOMESHARE.
press Ctrl+L if you can’t type in the location bar. In shortcuts menu on top left, you have access to the shared folders on your network via the “Network” folder. You should see the PC you’re interested in there. you can also go to places->connect to server then choose windows share and then type the IP address..
On Windows. Make sure you’re on the correct network. In order to open a shared folder from a different computer, you must be using the same Internet network as the computer which is sharing the file. Skip this step if your PC is wired to the computer which is sharing the folder(s) via an Ethernet cable.
How to share files without HomeGroup on Windows 10
- Open File Explorer (Windows key + E).
- Browse to the folder with files that you want to share.
- Select the one, multiple, or all the files (Ctrl + A).
- Click the Share tab.
- Click the Share button.
- Select the sharing method, including:
How do I map a Linux drive in Windows?
Windows 7
- Start Windows Explorer by clicking its icon at the bottom left of the screen:
- Click on Computer on the left.
- Click Map network drive at the top.
- Set Drive to the letter you want to give the mapped drive.
- In Folder type the location you want to map a drive to.
- Check Reconnect at Logon.
Ubuntu 10.04 host
- Create a folder on the Host computer (ubuntu) that you would like to share, for example ~/share.
- Boot the Guest operating system in VirtualBox.
- Select Devices -> Shared Folders
- Choose the ‘Add’ button.
- Select ‘/home/<user>/share’ for Folder Path.
- Select ‘share’ for Folder Name.
To do this from the Linux Mint / Ubuntu desktop without using Terminal : 1. Press Alt + F2 and enter the IP address or the Windows system where the shared folders are hosted after the “smb://“. (This is similar to opening up “Run” box in Windows and typing \serverip to access it).
How do I navigate to a file in Ubuntu terminal?
File & Directory Commands
- To navigate into the root directory, use “cd /”
- To navigate to your home directory, use “cd” or “cd ~”
- To navigate up one directory level, use “cd ..”
- To navigate to the previous directory (or back), use “cd -“
Can I access Windows partition from Ubuntu?
Mount Windows through the menu. First click on the Home Folder to open the file browser. Unfortunately, Ubuntu just identifies drives by their capacities. So in this case I just happen to know the 64 GB partition is the NTFS one, so if I click it, it’ll mount and open.
How do I access a drive in Ubuntu terminal?
# Open a command-line terminal (select Applications > Accessories > Terminal), and then type the following command to mount /dev/sdb1 at /media/newhd/. You need to create a mount point using the mkdir command. This will be the location from which you will access the /dev/sdb1 drive.
Right-click on the folder and go to the properties. Click on sharing button and this will open the shared folder settings box. Select the option to whom you want to share the folder, select everyone if you want to give access to everyone connected to one network connection otherwise click on add the specific user.
How do I find the network path of a folder?
Browse until you find the specific folder or subfolder for which you want the direct link. Then, double click inside the address bar on the top, so that you can see the direct network path to that folder. Select it and copy it (Ctrl+C) to the clipboard. You can also right click on it and select Copy.
How do I access another computer on the same network?
Part 2 Connecting to Windows Remotely
- Using a different computer, open Start. .
- Type rdc .
- Click the Remote Desktop Connection app.
- Type the IP address of the PC you want to access.
- Click Connect.
- Enter the credentials for the host computer and click OK.
- Click OK.
Photo in the article by “SAP” https://www.newsaperp.com/en/blog-sapgui-removesapguisecuritynotifications
Windows does not offer support for the ext2, ext3 and ext4 file system, the file system used by Linux distributions, ext4 being the most used today. Now you will understand why when you have connected a hard drive with an ext2, ext3 or ext4 file system, Windows invites you to format it without having the option to access its content.
The solution to this problem is to use one of the different applications available on the Internet that allow us to access this type of unit.
Another interesting option, if we are usually forced to access this type of drive from Windows, is to use the Windows Subsystem for Linux , a functionality available from Windows 10 and with which we are going to find the versatility of accessing data stored in all drives on our computer, regardless of the file system.
Contents
- Windows Subsystem for Linux (WSL)
- Activate Windows Subsystem for Linux
- Accessing Linux drives from Windows
- Connect from Windows to Linux
- Remote desktop /RDP
- Samba
- FTP
- With programs to read EXT4 in Windows
- linux-reader
- Ext2Fsd
- Other deprecated options
Windows Subsystem for Linux (WSL)
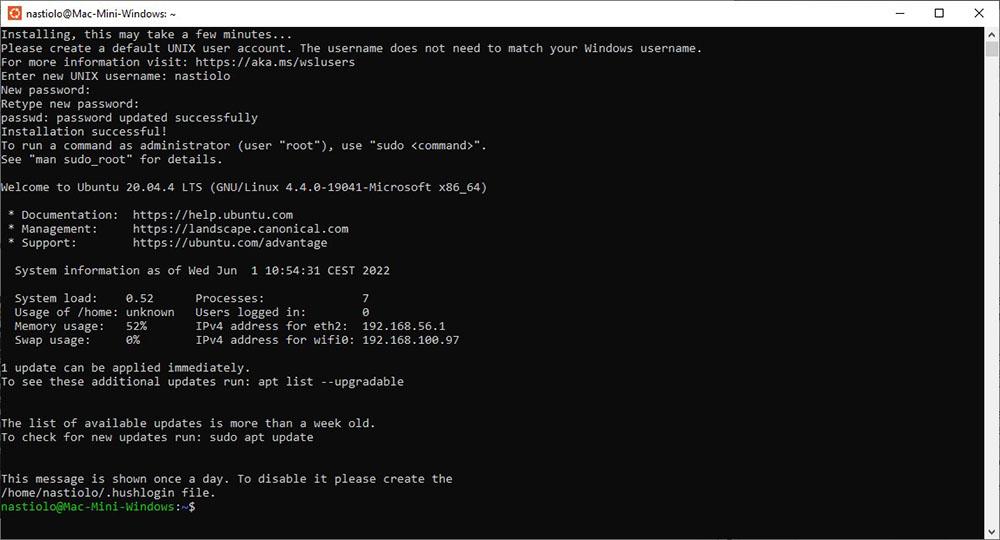
The fastest and easiest method to access ext2, ext3, and ext4 formatted drives used by Linux is to use the Windows Subsystem for Linux, better known as WSL. WSL allows us to run Linux tools from the command line which allows us to forget about using a virtual machine or using dual boot.
In addition, it also allows us to run Windows applications from the command line and Linux applications in Windows. This functionality available on the device is not natively active, so the first thing we must do is activate it.
Activate Windows Subsystem for Linux
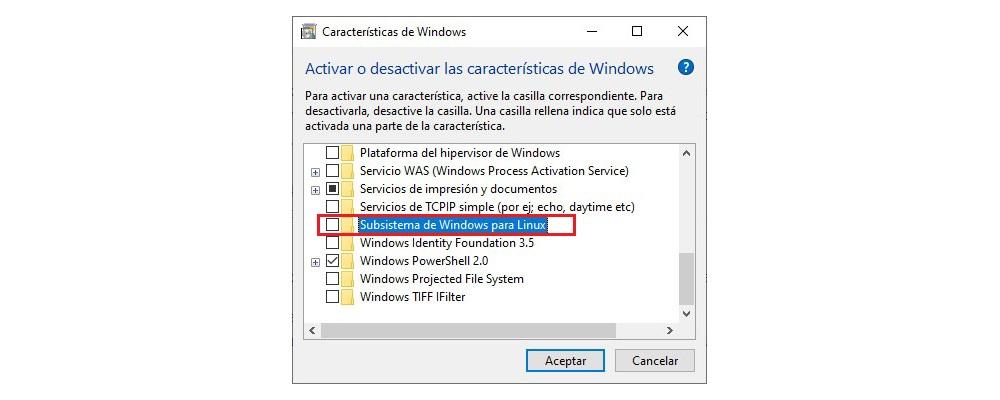
To activate the Windows subsystem for Linux, we go to the Cortana search box and enter the terms Windows Features , clicking on the first result that is displayed.
Next, a window will be displayed with the Windows features available and that we can activate or deactivate according to our needs. In our case, we must look for the Windows Subsystem for Linux option, check the corresponding box and click OK.
Seconds later, the system will invite us to restart the computer to correctly activate this function on our computer. Once we have restarted, we must install a Linux terminal environment from the Microsoft Store. In this example, we are going to use Ubuntu, as it is one of the most popular and used.
Once we have downloaded the application, we run it and wait a few minutes for the installation to finish. The first thing we need to do is create a user account, an account that is not related to the Windows user account and password.
The next step is to mount the drive so that it is natively available in Windows via file explorer.
Accessing Linux drives from Windows
The first thing we need to do is mount the drive via WSL. If we do not mount the drive first, we will never be able to access it, so you should not skip this step.
If our computer only has one hard disk, from which the Windows operating system is managed, when connecting any other unit, the system will assign the next letter of the alphabet, which, in this case, would be the letter d of the unit where we want to associate it .
To mount the Linux ext2, ext3 or ext4 formatted drive, we need to type the following command, where d is the drive from which it will be available.
sudo mkdir /mnt/d sudo mount -t drvfs d: /mnt/d
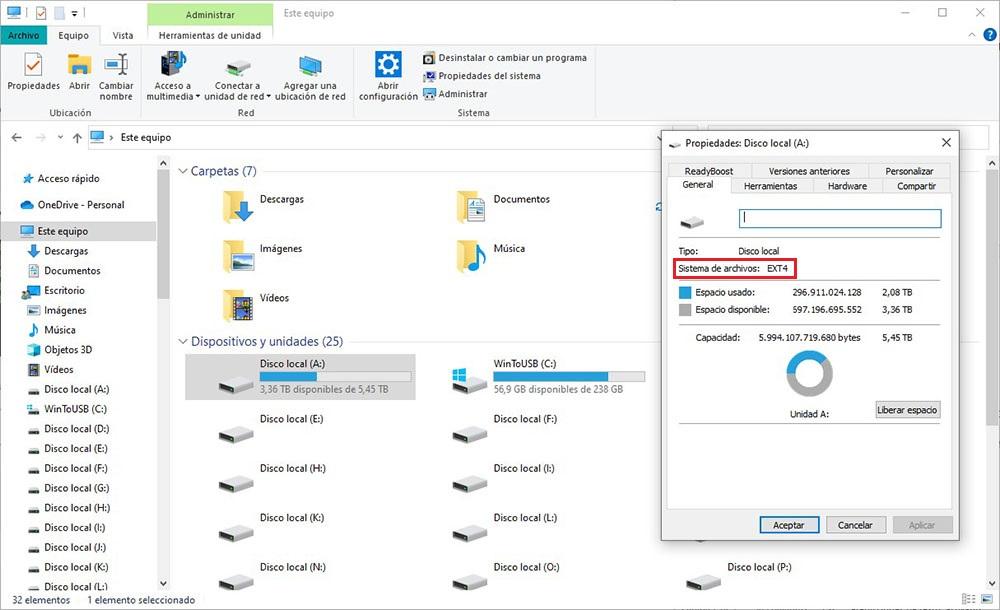
From this moment, we can close Ubuntu and go to the Windows file explorer to access all the content available on that storage unit as if it were any other hard drive with a format compatible with Windows.
From the file explorer, we can copy files from both Windows to the Linux drive and from Linux to Windows by dragging the files as usual.
What happens if we want to connect from Windows to a Linux computer to access its files? All the solutions that we have explained above are focused on connecting to hard drives or partitions with Linux format, invalid options to connect to other computers.
Remote desktop /RDP
The easiest method to connect to a Linux computer from Windows is by connecting remotely. In this way, not only will we be able to manage the Linux computer from our Windows PC, but we will also be able to share files very quickly and easily.
The first and foremost thing is to know the IP that the Linux computer is using through the ipconfig command from Terminal. Next, we access the configuration options of the router and enable port forwarding with the IP of the equipment, the port to be used and as a Remote Desktop name to be able to identify it.
The router address, along with the access data, is usually at the bottom of it.
In the next step, we must inhabit the remote desktop in Ubuntu, a function that is available in Windows, through the command:
sudo apt install xrdp
Next, in Windows, we open the Windows Remote Desktop Connection application. In the Computer section, we must enter the IP of the computer and the username of the Linux computer to which we are going to connect.
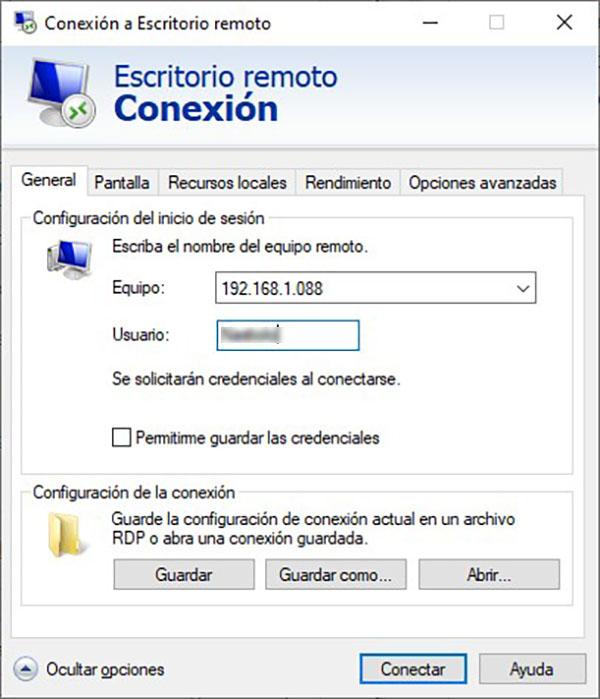
If everything works correctly, the application will ask us for the computer password and we will be remotely managing the Linux computer.
A much simpler option to remotely connect to a Linux computer from Windows and access its files is to use TeamViewer, as long as you don’t want to take advantage of the native tools that Windows and Linux make available to us.
Samba
Samba is one of the most complete solutions for accessing and sharing files between Windows and Linux computers in a very simple way.
This application uses the same protocol as Microsoft, SMB, to create shared folders on the same local network. The first thing we must do is install it on our computer through the command
sudo apt-get install samba
Once installed, we close Terminal and go to the Ubuntu file explorer, select the folder we want to share by clicking the right mouse button and selecting Share this folder.
We set the name of the folder under which it will be displayed in Windows, check the boxes Allow other people to create and delete files in this folder and Guest Access. Finally, click Create share.
In Windows, with the IP of the Linux computer, we open the file explorer and write the IP of the computer preceded by two backslashes.
FTP
Another interesting option that we can use to share files between a Windows computer and another or others managed by Linux is to use the veteran FTP protocol.
The solution that we are going to use, in Ubuntu, is vsftpd, included natively in the system. The first thing we must do is install it through the command:
sudo apt-get install vsftpd
Once the installation process is finished, we edit the vsftpd.conf file that has been created in the etc folder. Within this file, we go to Allow anonymous FTP (Disabled by default). anonymous endable=NO and we change NO to YES . In this way, it will not be necessary to create user accounts to access.
If your idea is to access remotely from outside your network or other users to access those files, you should not modify this option.
We restart the system and go to Terminal again to start the FTP server with the changes we have made using the command:
sudo etc/init.d/vsftpd start
To access the FTP server that we have created on Linux from Windows, we will use the FileZilla application, an open source application also available for macOS and Linux.
The IP address of the server to which we are going to connect is the one associated with the Linux computer while the connection port is 21 (by default).
With programs to read EXT4 in Windows
In addition to the above two ways, if we don’t mind resorting to third-party programs, we can install some specialized programs on our computer to open Linux drives from Windows. Some of the best known are the following.
linux-reader
One of the most popular and widely used applications for accessing Linux ext-formatted drives from Windows is Linux Reader. This application, available through its website , allows us to conveniently access Linux drives just like we can do from Windows Explorer to open, copy and move documents.
Linux Reader automatically handles mounting and unmounting of drives , so you don’t need any knowledge of Linux to access the content stored on these drives. In the left column, all units are displayed.
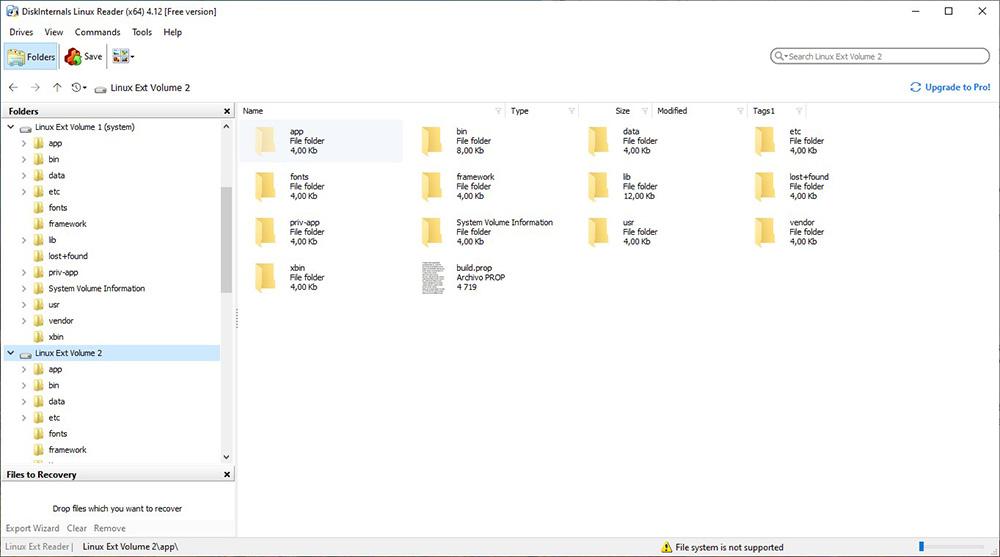
To access all the functions offered by this application, we must go through the box and buy a license. If your needs are basic and you just need occasional access to drives with the Linux file system, the free version is more than enough.
Ext2Fsd
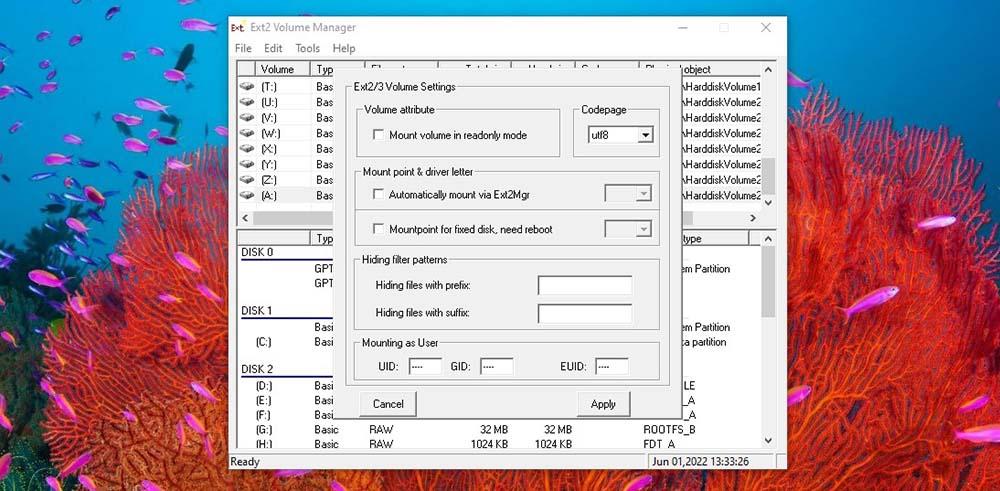
Ext2Fsd allows us to mount drives in ext2, ext3 and ext4 format on our Windows computer to be able to access their content from Windows Explorer just as we can do with WSL. Once installed, it will invite us to restart the computer.
The application allows us to mount the unit so that it is only read (it does not allow us to copy and delete content) or to set read and write permissions, the best option if we want to share data between different units just as we can do natively with the Windows solution.
You can download Ext2Fsd from the following link , as its website is not available.
Other deprecated options
The number of applications that today allow us to access drives with Linux in ext4 format from Windows is very limited, if not practically non-existent. Except for the solution that Windows offers us are WSL and Linux Reader, the rest of the applications that were used for this function, stopped updating and are not compatible with ext4 .
Explore2fs was one of the first applications released to allow Windows to interact with drives with the ext2 and ext3 file system. However, and although the application is compatible with both Windows 10 and Windows 11, it is not compatible with the ext4 file system, the most widely used today.
Another interesting option to consider, only if the file system is ext2, is the Ext2 application. This application, with an interface very similar to the Windows file explorer, allows us to open, copy and move files between Windows and Linux drives, but only with the ext2 and ext3 file system. It is not compatible with ext4, so it is not a solution to read these types of drives.
You’ve tried to use a flash drive or SD card to transfer files from Linux to a Windows computer, and you found it annoying and tiring, especially when there are lots of files to move, and it’s taking ages to complete.
You don’t have to waste your precious time using storage devices when you can move files quickly and easily over your local network (LAN).
The main methods used to do this are:
- Create a share in Linux to access it from Windows using Samba
- Create a share in Windows to access it from Linux
Create a share in Linux and access it from Windows using Samba
The best and fastest way to do this is by installing the Samba suite. Samba is an ideal solution for sharing files between different devices such as a Windows, Linux or Mac machines. The machines need to be networked with a generic router.
Windows machines come with functionality that allows them to work with Samba out of the box, so you only need to install one package for Linux machines.
1. On your Linux machine open the location containing the files you wish to share.
2. Right-click on the file and select “Sharing Options.”

3. If you get a prompt asking you to install Samba services, click “Install service.”
4. Click Restart session once Samba service is installed to enable sharing.
5. Check the “Share this folder” and “Allow others to create and delete files in this folder” boxes.
6. Click “Create Share” to complete the process.
7. Open Terminal and type the following commands:
sudo smbpasswd –a USERNAME
Replace USERNAME with your own user name.
sudo cp /etc/ samba/ smb.conf /etc/samba/smb.conf.old
sudo nano /etc/samba/smb.conf
8. Find the global section and add the lines:
encrypt passwords = true
wins support = yes
9. Press Ctrl + O and Ctrl + X to save and exit.
10. Restart Samba:
sudo service smbd restart
11. Go to the Windows machine and right-click Start, then select Run.
12. In the Run box, type the command: \computer_nameshare_name5.
Note: the computer name in this case can be the IP address of the Linux machine, which you can find by going to the Linux computer and opening terminal, then typing ipconfig.
13. Type the Linux computer name and share the resource name.
14. A prompt will be displayed asking for your credentials.
15. Type in your Linux username and password. Click OK.
16. Try to access the shares from your Windows computer.
The new server should be displayed in “My Network Places” in Windows.
Alternatively, do the following: right click Start and select Run, then enter: //server. Replace server with the name or IP address of the machine that runs your Samba server. A window with the browsable shares from the server will open.
Note: to access non-browsable shares, use this code: \servershare name
Create a share in Windows to access it from Linux
This will be done in three steps as follows:
- Enable sharing on Windows
- Share the folder
- Access it from Linux
Enable sharing on Windows
Start by ensuring the network settings are configured to allow a connection from the Linux system. To do this:
1. Go to Control Panel and click “Network and Internet.”

2. Select “Network and Sharing Center.”

3. The Network and Sharing Center window will open. Click “Change Advanced settings.”

4. Enable these two settings: “Network Discovery” and “Turn on file and printer sharing.”

5. Click Save changes.
6. Sharing is now enabled.
Share the folder
Create a shared folder for the Linux system to see, connect and access. You can share anything, so follow these steps:
1. Find the folder you want to share and right-click it.
2. Select “Properties.”

3. Under the Sharing tab, click “Advanced Sharing.”
4. Under the Advanced Sharing window, enable the “Share this folder” option.
5. Click “Permissions.”
Note: in the Permissions window you can restrict access to the folder to specific users or accounts. Select “Full Control permission to Everyone” to give any user access. This way anyone can read and write changes to the files in the folder you share.
If, however, you want to restrict access to specific user accounts, remove the “Everyone” user, add the users you want and then assign the relevant permissions to them. The user accounts are those that are on the Windows system (not the Linux system).
6. Click OK to close the Permissions window.
7. Click OK to close the Advanced Sharing window.
8. Go to the Security tab in the main properties window.
Note: configure similar permissions as those in the sharing settings so that Linux users can access the shared folder.
If they don’t match, the most restrictive settings are applied.
However, if the user you intend to share with already has security permissions, close the window and move to the third step. Otherwise, click “Edit” to add a user, click “Add” in the Permissions window that opens, and enter the user’s details.
9. Click OK on all windows. The folder should now be shared with your network.
Access from Linux
You can mount the shared folder using Linux GUI or by using a command line. For our example we’ll use Terminal because it works across many distributions, and it’s faster.
To do this, you’ll need the cifs-utils package to mount SMB shares. The complete the following steps.
1. In the terminal, type:
sudo apt-get install cifs-utils
2. Make a directory.
3. Mount the share to the directory
4. Create a folder on the desktop. (It’s easier to access from here.)
5. Create and mount the folder using these commands:
mkdir ~/Desktop/Windows-Share
sudo mount.cifs //WindowsPC/Share/home/username/Desktop/Windows-Share –o user=username
Note: if prompted for the root password of the Linux system and for your user account on Windows, insert each of them and run the command.
You’ll now see the contents of the Windows share and will be able to add data to it.
Are you now able to transfer files to and from Linux and Windows systems? Tell us what worked for you, and if you have a different method, share with us below.

Elsie Biage
My passion has always been to share every bit of useful information I find on tech, with the ultimate goal of helping people solve a problem.
Subscribe to our newsletter!
Our latest tutorials delivered straight to your inbox