wsl$ mount point did not work for me so well, it has multiple issues, and many Windows applications fail because they see it as a network drive. For my usecase, it is Rclone what helped to solve the problem to properly mount Linux filesystem so it behaves without any issues, practically the same way as a local disk.
It is free and open source. It works with sftp remote filesystems (like sshfs), so it can mount network drives both on Linux and Windows (running sshd service).
Example command how to run it, assuming remote point «server» is already configured and rclone.exe is in PATH environment variable:
rclone mount server:/ Z: --file-perms=0777 --track-renames --track-renames-strategy=modtime,leaf --metadata --vfs-cache-mode=full --sftp-disable-hashcheck --volname drive_name
For the first time, you need to configure new remote point by running:
rclone config
To find out location of the config file you have just created, run:
rclone config file
Also, you may need to install WinFsp first, if not already intalled. The best thing about it, everything just works the same way like with local disk (assuming if you provide --vfs-cache-mode=writes or --vfs-cache-mode=full option, since without it, many applications will fail to work correctly, please read the documentation to understand why). Option --file-perms=0777 is necessary to allow running .exe files. Even though --vfs-cache-mode=writes may be enough for most applications, but —vfs-cache-mode=full is important for good performance with large files. For the same reason --track-renames-strategy is limited to only modtime and leaf strategies, because if haenter code heresh strategy is used, it will be obviously slow with large files, and --sftp-disable-hashcheck is necessary to prevent rclone from running md5sum, otherwise it will run it even when trying to read a file.
To register Rclone as a system service, edit and run the following command (do not run as is, please see below how you need to edit it first):
New-Service -Name Rclone -BinaryPathName 'C:Program FilesRclonerclone.exe mount server:/ Z: --vfs-cache-mode=full --track-renames --track-renames-strategy=modtime,leaf --metadata --volname drive_name --config="C:Program FilesRclonerclone.conf" --log-file="C:Program FilesRclonerclone.txt" --file-perms=0777 --sftp-disable-hashcheck --no-console'
Obviously, you need to replace «server:/» with your actual remote point name and path, also replace drive_name with any name you like, and of cource you may need to edit paths to rclone.conf, rclone.log and rclone.exe, if you installed it in a different location.
Note: in my case running as a system service caused some permission issues (for example, when trying to save Excel files), and I did not figured out why yet, so I ended up creating startup .bat file to run Rclone as a user, since it works perfectly this way. I will update this answer if and when I figure out how to make running as a service to work as good as running as a user.
Even Windows software which does not like network drives, just works with RClone drives. All is needed, is to setup sshd in the remote system (which in this case is not really a remote syset, but in WSL distribution installed on the same PC). This how to setup sshd in WSL distribution: https://www.hanselman.com/blog/how-to-ssh-into-wsl2-on-windows-10-from-an-external-machine. And here is how to make WSL IP address static: https://github.com/ocroz/wsl2-boot, so you can have sshd running always at the same IP address.
This question answers how to access Windows files from Ubuntu Bash, but how can I do the opposite?
Specifically, I need to access my SSH key from Windows which is located at /home/mark/.ssh/id_rsa under Bash.
![]()
asked Aug 8, 2016 at 3:35
![]()
6
\wsl$Ubuntuhomeuserwhatever
In the explorer or the Run widget (Cmd+R). Works like a normal network share and it’s safe to manipulate files.
You can also map it to a drive or folder, just as any other network share.
Note: This is a new feature implemented in Windows 10 build 18342
answered Oct 24, 2019 at 8:44
![]()
runlevel0runlevel0
8926 silver badges10 bronze badges
6
Yes but is not recommended to manipulate that folder from the windows explorer. If you want to copy, move, edit or erase files from the lxss folder you need to do it inside bash with command line tools.
Only files that are on /mnt/* are really manipulable from the windows explorer.
answered Aug 8, 2016 at 11:12
![]()
onomaonoma
2411 silver badge5 bronze badges
3
Found it by searching my entire C drive. Files are here:
C:Users<username>AppDataLocallxss
e.g., my SSH key is here:
C:UsersMarkAppDataLocallxsshomemark.sshid_rsa
answered Aug 8, 2016 at 3:45
![]()
mpenmpen
11.7k16 gold badges54 silver badges68 bronze badges
3
In powershell, use
cd ${env:appdata}..localpackagescanonical*localstaterootfs
then
ls
returns the same list of folders as
ls /
within bash on WSL.
answered Feb 27, 2019 at 12:10
![]()
masterxilomasterxilo
4786 silver badges7 bronze badges
1
If you open Windows Explorer e type the path \wsl$ it will list all your installed Linux distributions.
answered Jun 18, 2020 at 2:53
![]()
nevesneves
4492 gold badges6 silver badges11 bronze badges
3
As has been mentioned above by [onoma] files in WSL directories have attributes that would be gone if one manipulates it using explorer or text editor run under Windows system. The solution could be to start ssh-server in WSL (there might be a reinstall necessary) listening on localhost and then mounting WSL filesystem as a drive using, for example, win-sshfs or you can just use Bitvise SSH client to connect over ssh and manipulate files by sftp window. The topic has been partially discussed here: How can I SSH into “Bash on Ubuntu on Windows 10”?
answered Sep 2, 2017 at 19:52
![]()
0
I finally made a way to open explorer (and vscode) with actual correct folder context from inside WSL:
https://github.com/andymule/wslwin
For example, after you install this, in linux (WSL) you would just cd /home/mark/.ssh/ and type explorer, and it would open windows explorer at that location, whatever it is.
EDIT: this feature is being officially supported in WSL now, and you should no longer use my scripts
answered Jan 19, 2019 at 20:06
![]()
subst L: $env:LOCALAPPDATAlxss (for powershell)
or subst L: %LocalAppData%lxss (from cmd)
This puts your Linux-subsystem filesystem-root / on your L: drive.
You could also map just your home directory, or just whack %LocalAppData%lxss in an explorer window. Just don’t try browsing L:mntc or your brain might explode.
answered Jun 17, 2017 at 7:03
![]()
CheezmeisterCheezmeister
8271 gold badge8 silver badges12 bronze badges
1
I just discovered you can run powershell.exe from linux and your linux console becomes a PowerShell console at the current directory. This is the best of both worlds as you never have to leave your linux console… which is where I spend most of my time. You can then type exit to get back into linux world.
answered Nov 17, 2021 at 22:19
![]()
Im on Windows 10 Creators Update. I use SFTP NetDrive to mount the WSL filesystem into windows as as a network drive.
There are some Window sshFS ports that’ll achieve the same thing.
You’ll need to start the ssh daemon via «sudo service ssh start»
answered Aug 1, 2017 at 20:45
![]()
2
This worked for me using Powershell
cd Microsoft.PowerShell.CoreFileSystem::\wsl$Ubuntu-20.04homeusername
answered Jul 19, 2021 at 0:15
![]()
From RUN (WindowsKey + R) you can type \wsl$ and it will give you all your wsl installations.
This applies for WSL2
answered Nov 20, 2021 at 13:44
![]()
I’ve been getting a few questions from Windows users about accessing WSL files in Windows and vice versa. I was originally going to wait with this for the next labs, but since this might actually make things a little clearer for some, I’ll just post the information here instead. If anything’s unclear, just wait for the second lab and I’ll probably be able to explain things better in person.
The WSL distributables (i.e. Ubuntu) are kind of like another machine running within your computer. It just features a Unix command-line interface (that’s the terminal, i.e. the bash shell), so the development tools and experiences are pretty limited. You can run vim, nano, or even emacs (might need to be installed) in the terminal to edit your files, but if you want to use a full-fledged IDE you’ll normally have to edit the files on the Windows side and then transfer them over to the Linux environment in WSL.
When we start working with Python, R and jflap, you can probably just solve the exercises on Windows, since you don’t need Linux to write Python or R code. Of course, you can always install python3 in Ubuntu, but you won’t have access to an IDE (unless you follow the guide in the last part of this post).
Accessing your WSL files in Windows
If you are using WSL 1, this should probably work fine most of the time. However, if you are using WSL2, it probably won’t. WSL2 doesn’t like it when we edit files in both Linux WSL and in Windows. WSL1 doesn’t like it either, but it’s possible to do, and I’ve tried so myself many times now without issues.
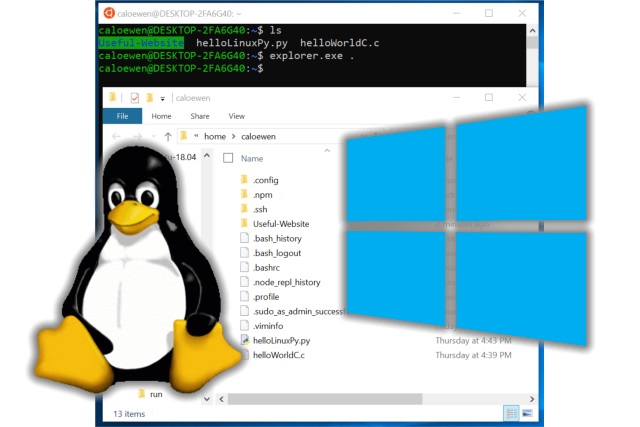
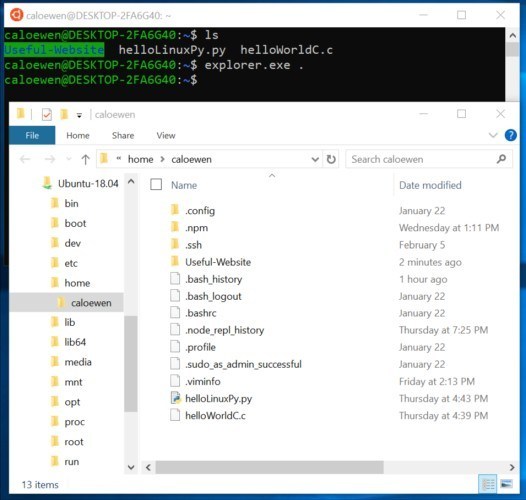
To access your Linux files in Windows, open the Ubuntu terminal and type explorer.exe . (include the punctuation mark). This will open the linux directory in Windows Explorer, with the WSL prefix “wsl$Ubuntu-18.04homeyour-username”.
Now, you’ll notice that Windows treats your Linux environment as a second network. This is because, as I’ve stated earlier, the Linux environment is completely separate from the Windows environment and transferring files between these environments is very similar to transferring files between computer networks. I always recommend that you copy the file you want over to a Windows folder before editing it, so that you won’t mess up the original if the file gets corrupted.
PS: To copy the file, run
cp [filename] [destination], like this:console cp file.txt /backup/new_file.txt
Accessing your Windows files in the WSL terminal
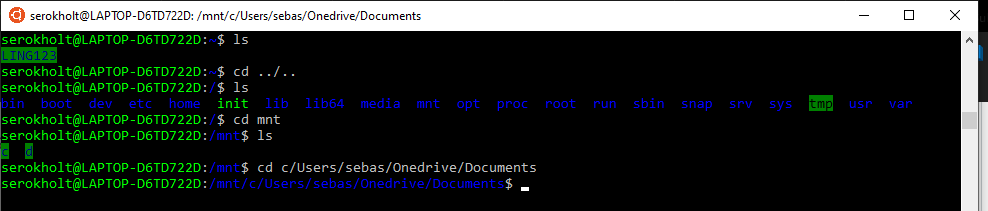
Similarly, you can also open your Windows files in the Linux environment. Just use the cd command to navigate to your WSL root folder, then navigate into the mnt folder to access your C: drive. See the example below for more details. As you can see, I managed to access my Documents folder. Make sure to enter your own username when you try this yourself.
I recommend you to use the cp command to copy the files you need from Windows to your Linux environment, so that if anything should get corrupted you’re not going to mess up the original file.
Working in WSL with VScode
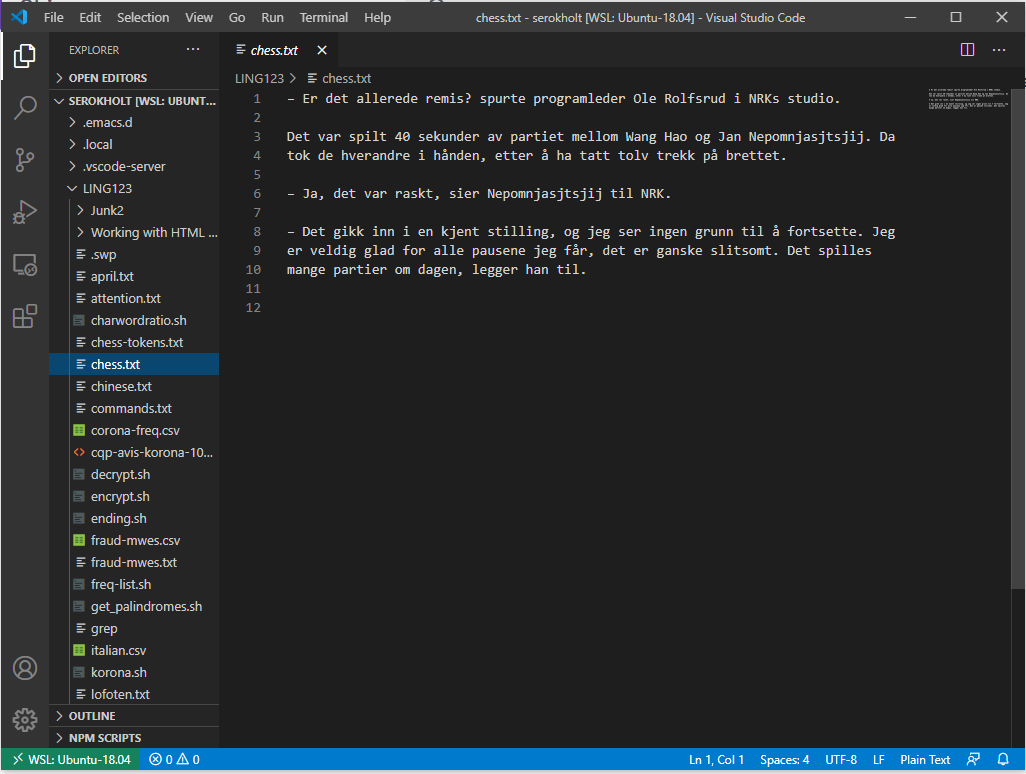
VScode is a full-fledged IDE from Microsoft, which has very recently released support for editing Linux files remotely. This means that you can open VScode from the Ubuntu terminal, run it in Windows, but edit the files in Linux while also being able to access the Linux terminal and viewing pathnames and home directory correctly. I’ve tried it out today, and… it just works!
So if you insist on using an IDE to edit your Linux files directly, even though you won’t really need to in this course, you can do it by installing the Remote — WSL extension for VScode. See the documentation and guides here.
 VScode editor with WSL-remote enabled
September 10th, 2020
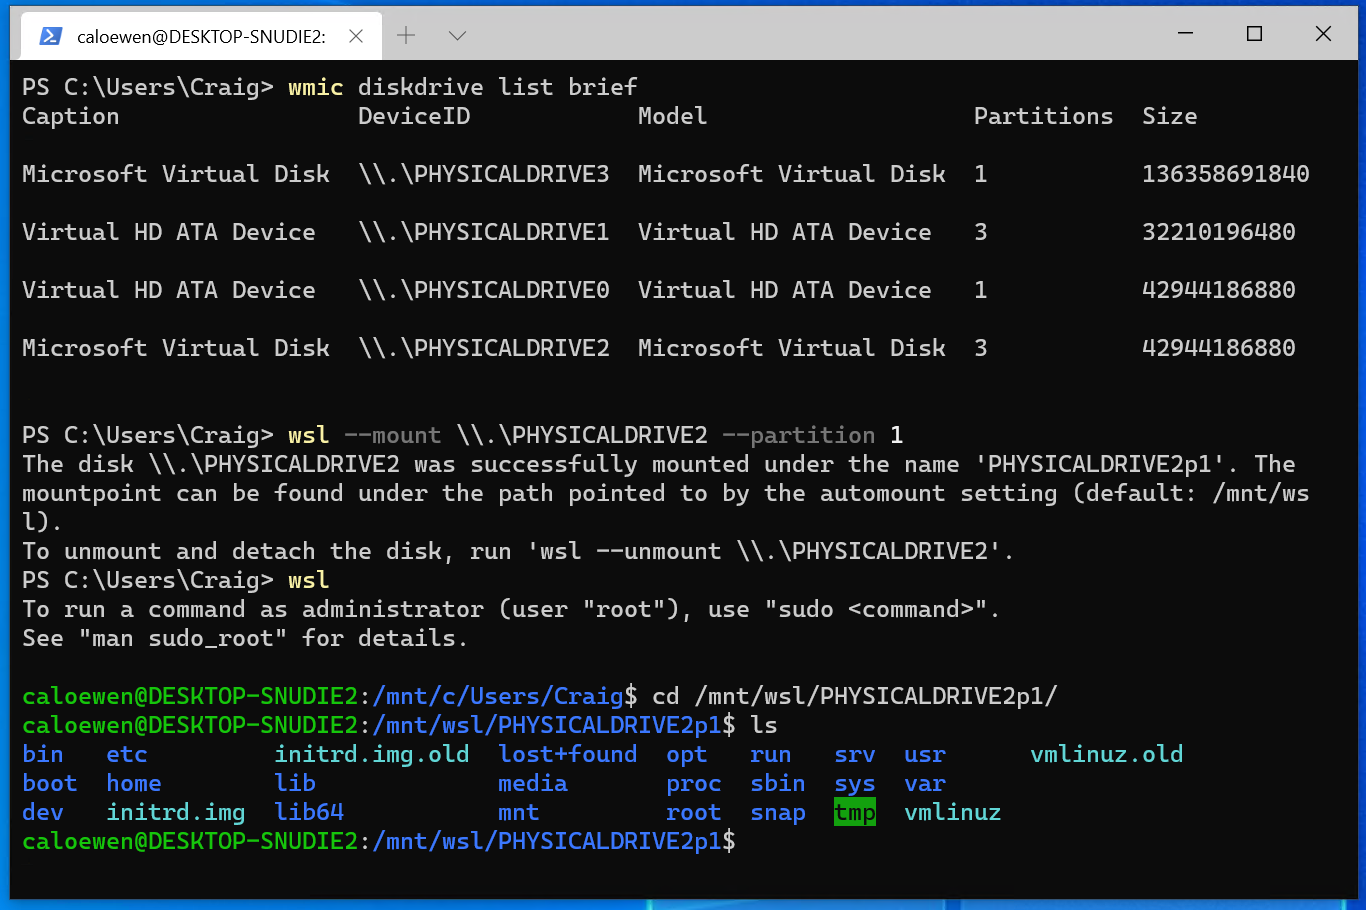
Starting with Windows Insiders preview build 20211, WSL 2 will be offering a new feature: wsl --mount. This new parameter allows a physical disk to be attached and mounted inside WSL 2, which enables you to access filesystems that aren’t natively supported by Windows (such as ext4).
So, if you’re dual booting with Windows & Linux using different disks, you can now access your Linux files from Windows!
Getting started
To mount a disk, open a PowerShell window with administrator privileges and run:
wsl --mount <DiskPath>
To list the available disks in Windows, run:
wmic diskdrive list brief
To unmount and detach the disk from WSL 2, run
wsl --unmount <Diskpath>
The disks paths are available under the ‘DeviceID’ columns. Usually under the \.\.PHYSICALDRIVE* format. Below is an example of mounting a specific partition of a given hard disk into WSL and browsing its files.
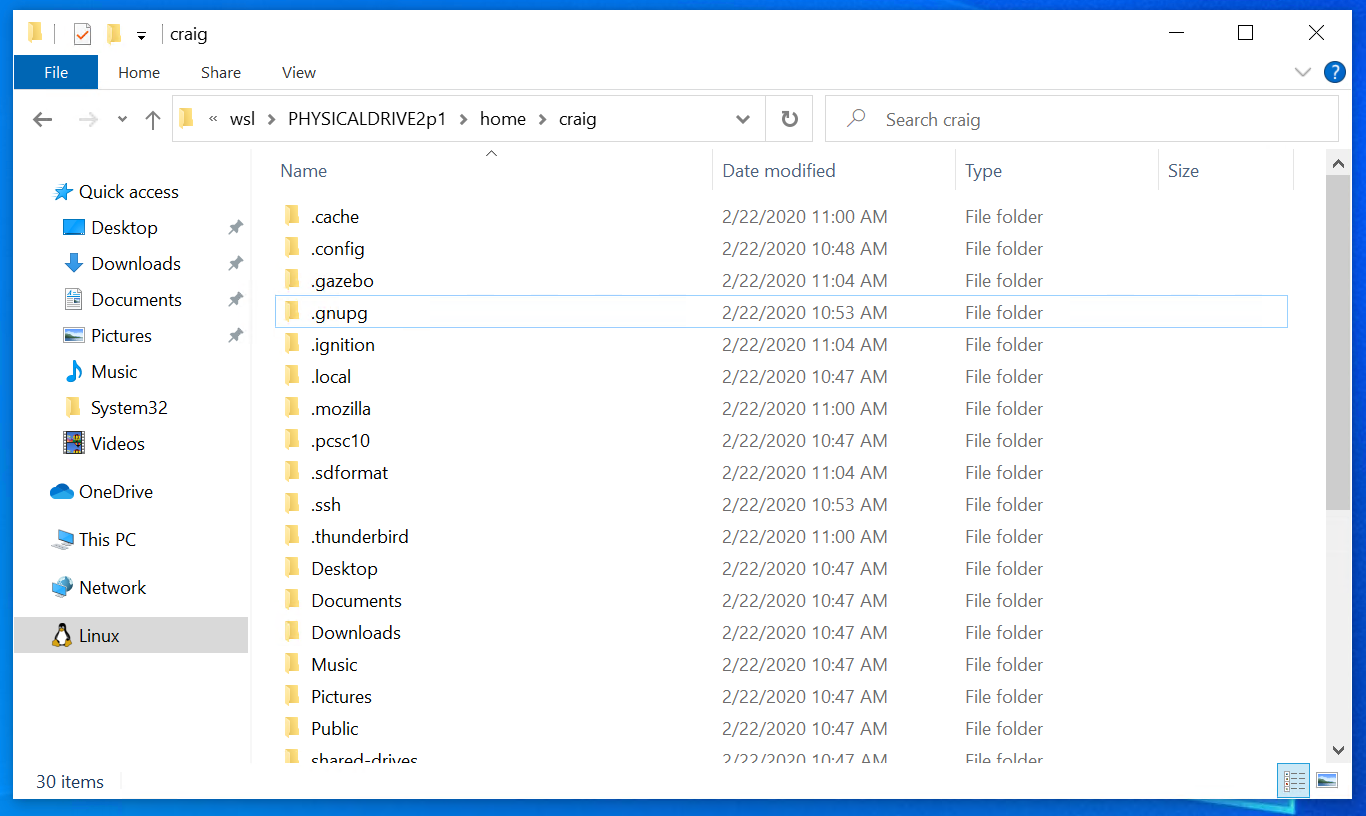
Accessing these files with File Explorer
Once mounted, it’s also possible to access these disks through the Windows explorer by navigating to wsl$ and then to the mount folder.
Limitations
By default, wsl --mount attempts to mount the disk as ext4. To specify a filesystem, or for more advanced scenarios, check out Mount a disk in WSL 2.
Also please note that this feature comes with the limitation that only physical disks can be attached to WSL 2. At this time, it’s not possible to attach a single partition. More details on the limitations here.
Give us your feedback!
If you run into any issues, or have feedback for our team please file an issue on our Github , and if you have general questions about WSL you can find all of our team members that are on Twitter on this twitter list.
Windows 10 version 1903 «April 2019 Update» comes with a number of interesting changes and improvements made to the WSL feature. These include additional distros in the Store, the ability to browse WSL files from File Exporer, and more.
The ability to run Linux natively in Windows 10 is provided by the WSL feature. WSL stands for Windows Subsystem for Linux, which initially, was limited to Ubuntu only. Modern versions of WSL allow installing and running multiple Linux distros from Microsoft Store.
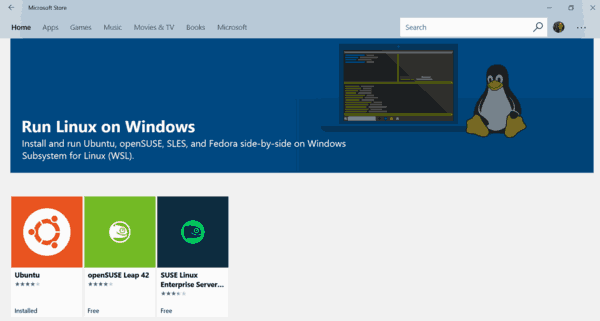
After enabling WSL, you can install various Linux versions from the Store. You can use the following links:
- Ubuntu
- openSUSE Leap
- SUSE Linux Enterprise Server
- Kali Linux for WSL
- Debian GNU/Linux
and more.
With Windows 10 version 1903 «April 2019 Update» you can easily access all the files in your Linux distros from Windows. As of this writing, this feature is implemented in Windows 10 build 18836. It is on its way to the 19h1 branch, so we will see it with the next build. Here is how it can be done.
To access WSL Linux Files from Windows 10, do the following.
- Enable the WSL feature.
- Install some distro, e.g. Ubuntu, and start it.
- While in a directory on a Linux FS, type
explorer .. - This will open a File Explorer window, located inside of your Linux distro.
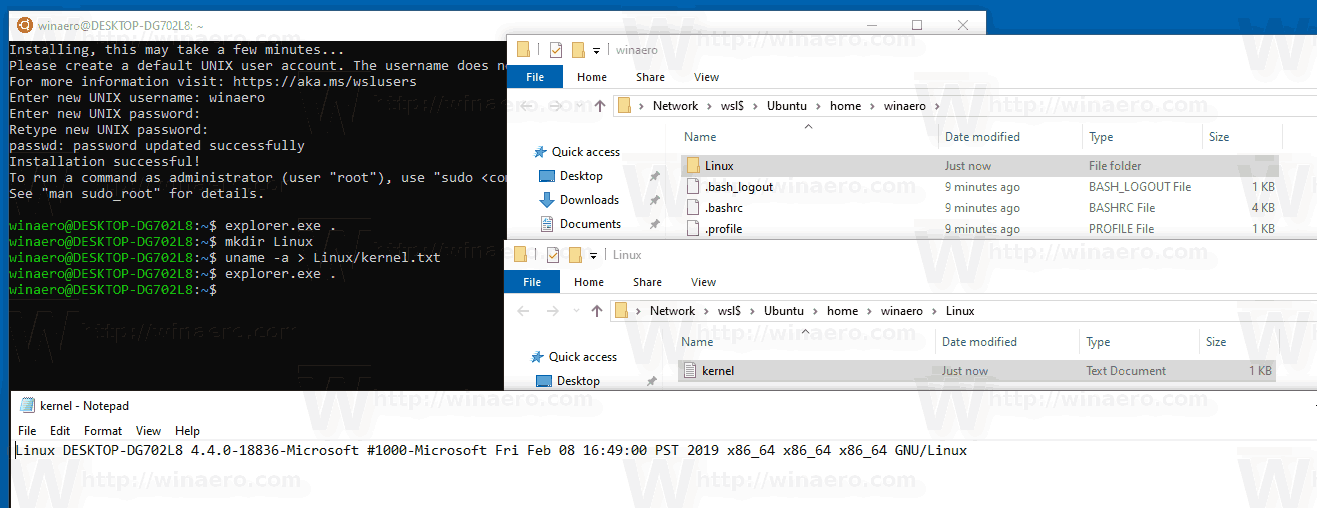
From there you can access whatever Linux files you like, just like you would any other file through File explorer. This includes operations such as: dragging files back and forth to other locations, copy and paste, and even using custom context menu entries added by Notepad++, VSCode, and other software.
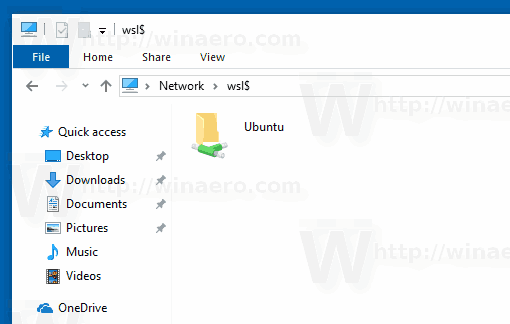
File Explorer shows the distro files as a virtual network share under the path \wsl$<running_distro_name>.
The WSL team is actively investigating ways to improve the discoverability of Linux files inside of File Explorer. The progress of their work can already be seen in Windows 10 Build 18836 that shows WSL/Linux File System in File Explorer.
Access Linux Files in Command Line
In addition to File Explorer, you can use the classic Command Prompt, and PowerShell tools to access your Linux files. Similarly, you need to navigate to \wsl${distro name} where {distro name} is the name of a running distro.
Known issues
This is a new feature, and some pieces of it may not work perfectly. Here are some known issues that we want to make you aware of when using this feature:
- As of right now, the distros files will only be accessible from Windows when the distro is running. Developer are going to add support for non-running distros in a future update.
Since the 9P file server runs inside of each distro, it is only accessible when that distro is running. The team is looking into ways to help resolve this. - Accessing Linux files is treated the same as accessing a network resource, and any rules for accessing network resources will still apply
e.g: When using CMD, cd \wsl$Ubuntuhome will not work (as CMD does not support UNC paths as current directories), however copy \wsl$Ubuntuhomesomefile.txt C:dev will work - The old rules still apply, you should NOT access your Linux files inside of the AppData folder!
If you try to access your Linux files through your AppData folder, you are bypassing using the 9P server, which means that you will not have access to your Linux files, and you could possibly corrupt your Linux distro.
Note: A 9P server is a server that contains protocols that support Linux metadata, including permissions. The WSL init daemon now includes a 9P server. There is a Windows service and driver that acts as the client and talks to the 9P server (which is running inside of a WSL instance). Client and server communicate over AF_UNIX sockets, since WSL allows interop between a Windows application and a Linux application using AF_UNIX.
Source: Microsoft
Support us
Winaero greatly relies on your support. You can help the site keep bringing you interesting and useful content and software by using these options:
If you like this article, please share it using the buttons below. It won’t take a lot from you, but it will help us grow. Thanks for your support!
Microsoft announced Windows 11 on June 24. The software giant subsequently released the OS to members of the Windows Insider program, and it can currently be tested by those enrolled in the Dev and Beta channels. While many welcomed the new UI changes, some were still skeptical of several inconsistencies that continue to plague Windows in general.
However, one neat feature of Windows 11 is the improved Windows Subsystem for Linux (WSL), which can now handle graphics and audio natively. In this article, we take a look at what’s new in WSL in Windows 11 and how to get started with it.
- What is the Windows Subsystem for Linux
- Installing WSL in Windows 11
- Upgrading from WSL 1 to WSL 2
- Enabling WSL in Windows 11
- Installing a Linux distro in WSL 2 on Windows 11
- Update your WSL apps
- Check and upgrade Linux distro version
- Accessing Linux files in Windows 11 and vice-versa
- Ways to access WSL Files from Windows
What is the Windows Subsystem for Linux
More often than not, developers find themselves switching between the familiar interface of Windows and the ease of command line-based development toolchains in Linux. Also, those who deal with large data find a good number of open source tools natively developed for Linux. The Windows Subsystem for Linux, or WSL for short, enables developers to continue using Windows as their primary OS while giving access to native Linux binaries.
Users, therefore, don’t have to worry about the emulation overhead of running virtual machines or take the pains of configuring a dual-boot setup. While Cygwin does provide a POSIX compatibility layer for running Unix-like commands, it requires recompilation of those commands and as such has limited applicability. With WSL, Windows users can directly invoke the Linux shell just like any other program and run native Linux binaries.
Starting with Windows 10 1903, Microsoft introduced a new version of WSL called WSL 2 that offers tighter integration with the Windows filesystem, fast boot times, faster disk reads, and a fully functioning Linux kernel. Now with Windows 11, Microsoft is even adding GUI and real-time audio support.
Installing WSL in Windows 11
Installing the Windows Subsystem for Linux requires some prerequisites to be taken care of. Since WSL 2 uses an actual virtual machine, your CPU needs to support virtualization. While this shouldn’t be a problem with most modern CPUs from Intel and AMD powering desktops and laptops, this feature is generally turned off in the BIOS/UEFI of the computer.
Boot into the BIOS/UEFI interface of your PC (usually, this involves pressing DEL or F2 key during power-on; refer to your computer’s user guide for more information). Once inside the BIOS, search for Intel Virtualization Technology or AMD Secure Virtual Machine (also indicated as SVM) depending on your CPU and enable it. Save changes and restart the PC.
Upgrading from WSL 1 to WSL 2
Unless you are upgrading from a previous version of Windows with WSL 1, WSL 2 is used by default in all recent versions of Windows 10 (1903 and above) and Windows 11. Using the new GUI, audio, and filesystem enhancements requires a mandatory upgrade to WSL 2.
Follow the steps mentioned below to perform an in-place upgrade from WSL 1 to WSL 2:
1. Type the following in an elevated command prompt, Windows Terminal, or PowerShell.
wsl --set-version <distro-name> 22. Make sure to enter the exact name of the distro. If in doubt, just type:
wsl -l -v 3. This command lists the installed Linux distros, their current state, and the WSL version they are using. Use the name listed here in the previous command to convert a WSL 1 instance to WSL 2.
Enabling WSL in Windows 11
If this is the first time you are using WSL on Windows 11, you will be automatically offered a WSL 2 environment. All you need to do is to ensure CPU virtualization is enabled in the BIOS and WSL features are installed in your environment.
1. To enable WSL, click on the Start button.
2. Type “Turn Windows features on or off”, and in the dialog box enable Windows Subsystem for Linux, Windows Hypervisor Platform, and Virtual Machine Platform.
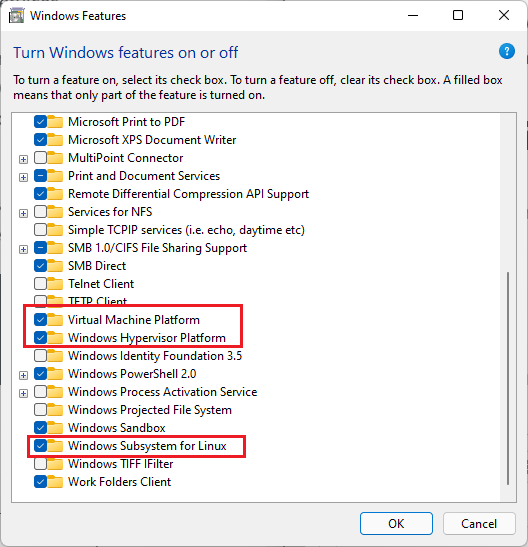
3. Click on Ok and restart the PC.
The best part about WSL 2 is that most kernel-level features are directly supplied by Windows Update. Your PC may automatically offer the WSL 2 kernel update. If not, just go to the Settings app, click on Windows Update, and click Check for updates to download the latest kernel that enables WSLg (short for WSL GUI) functionality.
At this point, note that you need to have the latest graphics drivers from Intel, NVIDIA, or AMD depending on your primary GPU adapter in order to get full GPU acceleration. You can use the beta drivers for your corresponding GPU or just install the latest public versions. Now that the prerequisites are taken care of, you are all set to install a Linux distro on your Windows 11 machine.
Installing a Linux distro in WSL 2 on Windows 11
The easiest way to get Linux up and running on Windows 11 is to just go to the Microsoft Store and search for a distro of your choice. Currently available options include Ubuntu (16.04, 18.04, and 20.04), Kali Linux, SUSE Linux Enterprise Server, openSUSE leap, Fedora Remix for WSL, and Debian.
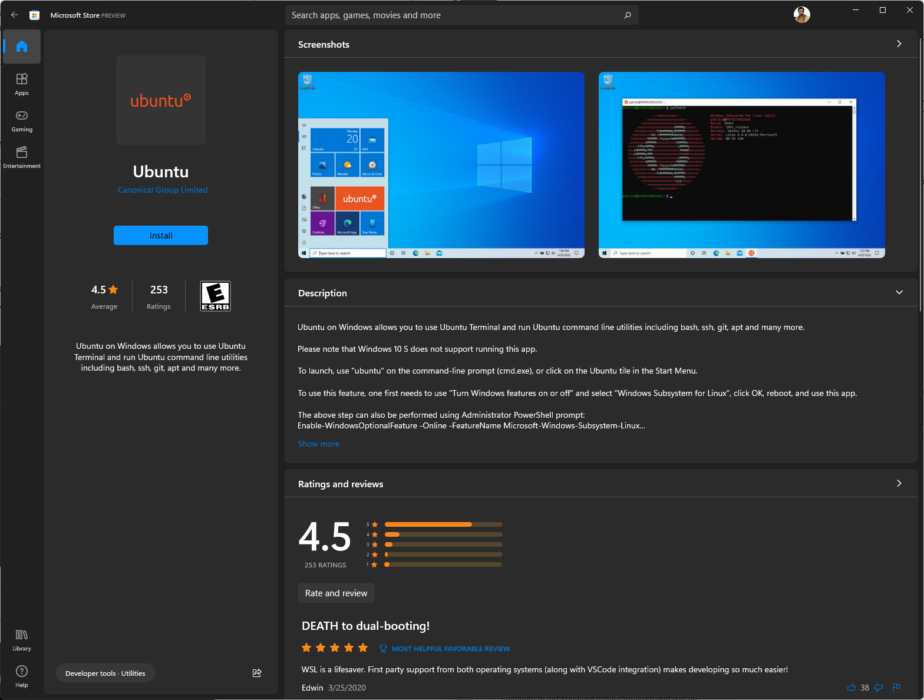
While the Microsoft Store allows for easy download and installation of these distros, the choices are currently limited. However, with WSL 2, it is possible to create and sideload your own distribution by obtaining the corresponding .tar file. For this article, we will use Ubuntu since it is very popular and there are excellent resources available online if you ever get stuck at a particular command or operation.
Some organizations or domain-joined PCs may have limited access to the Microsoft Store. In such cases, you can directly download the install packages from Microsoft. Follow the steps below to install the distro:
1. You can double-click the installer or use the below PowerShell command from the installer folder.
Add-AppxPackage .distro_name.appx2. Once your distro of choice has been installed, it should pop up instantly on the Start Menu.
3. Just click on the icon to start an installation instance of Ubuntu.
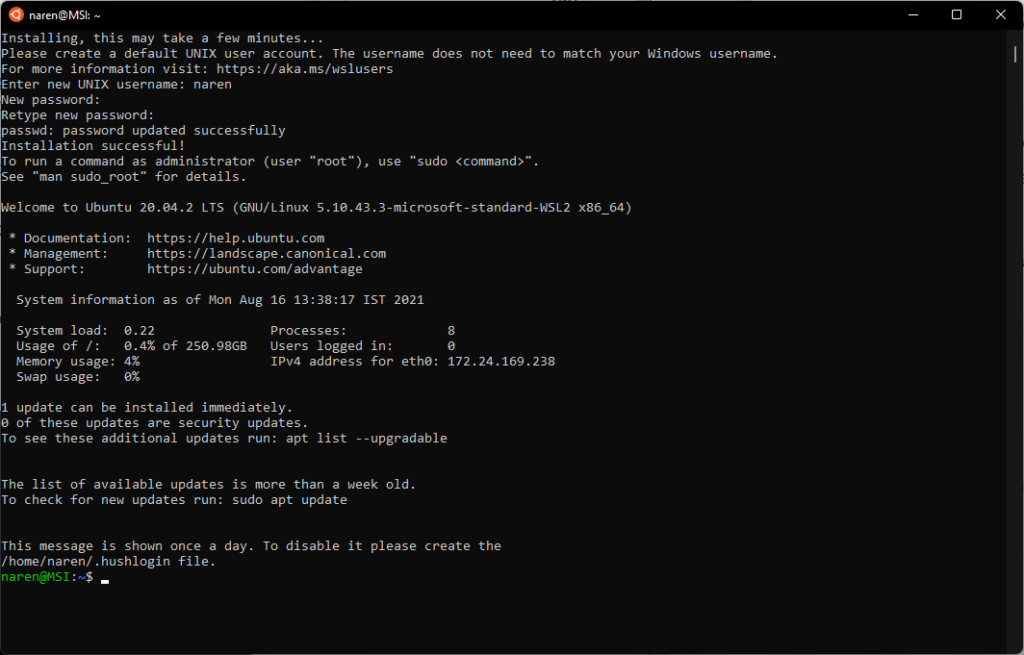
4. After a few seconds, you will be prompted to create a user account and password. If for some reason, the installer does not prompt you for a user account or password, it will directly log you in as root.
Remember that operating with root privileges is a bad security practice. There is no root password assigned by default, which makes it all the more vulnerable. It always helps to first assign a root password and then create a regular user account. Here’s how you can do it:
1. To assign a new root password, use the command:
sudo passwd root2. Next, enter and confirm the new root password. Be sure to note it down safely. To create a regular user account, which can then be used for root access as and when needed, type:
sudo adduser <username>3. Ubuntu will then ask to enter and confirm your password along with some other information such as your Full Name and Phone (this is optional).
4. This creates your dedicated /home directory and shows your username with a $ sign at the bash shell prompt.
The WSL 2 Ubuntu instance is now ready for use.
Update your WSL apps
At this point, we are done with installing Ubuntu and creating a user account and password. Before going on to further steps, it helps to do a quick update check and install the latest packages available for your distro version.
This ensures all your inbox packages are up to date and that you are using the latest features and security improvements. Follow the steps:
1. Enter the following commands to fetch new versions:
sudo apt-get update

sudo apt-get upgrade
2. At the bash prompt, the first time you run sudo, it asks you to enter your password, which should be valid for at least 15 minutes to run successive sudo commands.
Do note that apt-get upgrade will only refer to the repositories defined in /etc/apt/sources/list or /etc/apt/sources.list.d/ and upgrades accordingly.
3. For a more seamless update process, also run:
sudo apt-get dist-upgradeThis command can intelligently add or remove packages to ensure there are no redundancies in the system.
Check and upgrade Linux distro version
Generally, the Microsoft Store offers the latest long-term service (LTS) version of Ubuntu by default. It is recommended to use the LTS versions for maximum stability. You can check for new OS versions by running:
sudo do-release-upgradeHowever, ensure that the existing installation is up to date by first running the update and upgrade commands as described above. You can check your OS version by typing:
lsb_release -a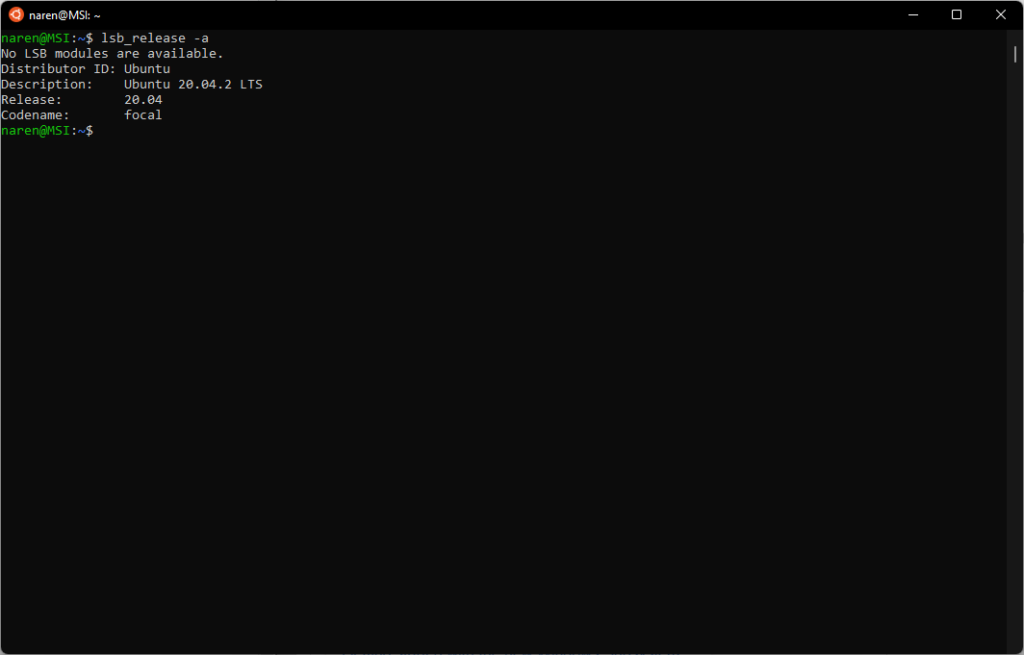
Do note that you can also get more information about any command by typing:
man <command name>Accessing Linux files in Windows 11 and vice-versa
Now that we have successfully installed and configured Ubuntu in Windows 11’s WSL 2, it helps to know how to seamlessly move between Linux and Windows files. In Linux, NTFS and other file systems can be mounted onto a dedicated mount directory.
One neat approach with WSL is that you can directly invoke a Linux terminal from a Windows folder and have the folder already mounted for you. This is made possible via a filesystem plugin called DrvFs that WSL uses to enable interop between the Linux instance and the Windows filesystem.
DrvFs automounts fixed disks such as HDDs and SSDs and makes them available for immediate use. The C drive is mounted on /mnt/c, D drive on /mnt/d, and so on.
1. You can verify this by running the df -h command to list all disks and their mount points. In this example, we have a single C drive, which is mounted on /mnt/c via DrvFs
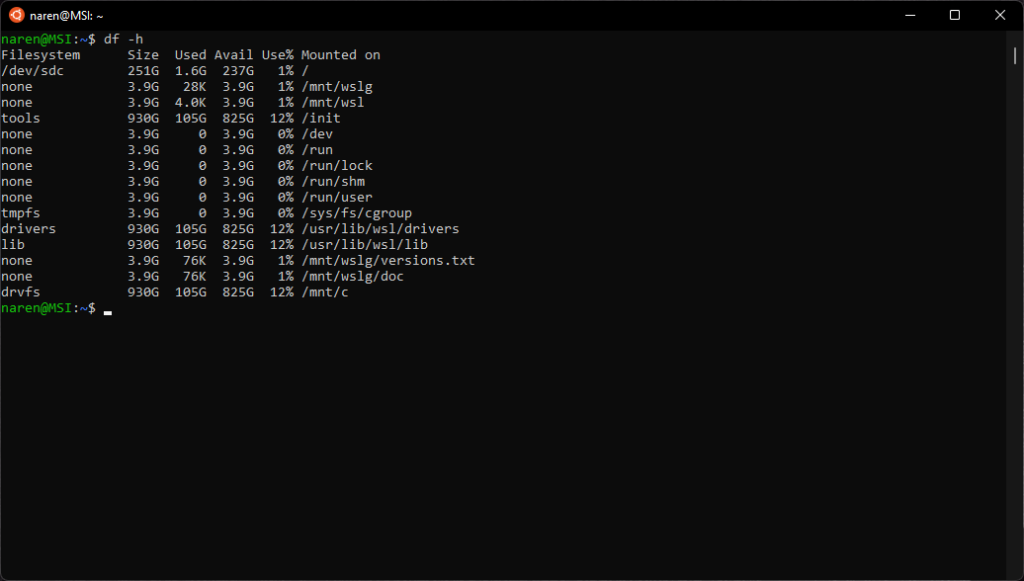
2. To switch to a Windows drive onto WSL, type the following command in the command prompt and hit enter.
cd /mnt/c #substitute c with the corresponding drive letter as needed3. Just like regular Linux, you can also mount external storage devices by creating a mount point. Use the following command
sudo mkdir /media/<dir name> #where <dir name> can be any directory name you wish to mount onto.4. Then mount a drive or partition to this directory.
sudo mount /dev/<deviceID> /media/<dir name>5. To view the contents of the mounted drive, first switch to it using the command.
cd /media/<dir name>6. Lastly, list the contents using the command.
ls -lsSince the whole point of WSL is to have seamless interop between Linux and Windows, it is also possible to view Linux files directly under Windows and edit them with Windows programs.
Windows sees WSL as a PC on the network and mounts Linux as a network share to ensure file permissions are properly maintained as users switch between both operating systems. There are several ways to access WSL files from Windows.
Ways to access WSL Files from Windows
1. The easiest way is to simply look at the left-hand panel of File Explorer for an entry named “Linux”.
2. Clicking on that will list your installed distros as folders. Click the corresponding distro folder to access all Linux directories in that distro.
3. From there, you can create your own files and directories just like how you normally do in Windows.
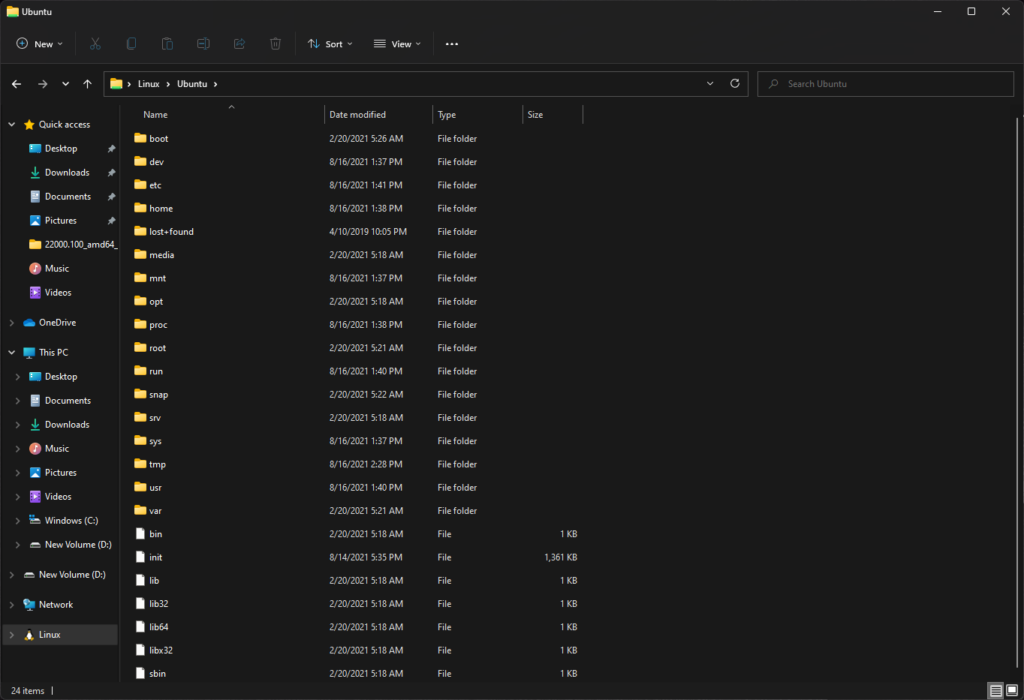
4. The above directory listing can also be reached by typing \wsl$ in any File Explorer or Run dialog box in Windows.
5. If endless navigation is not your cup of tea, you can also type explorer.exe from any Linux directory in WSL. This will directly open the Windows File Explorer in the current working Linux directory.
In this article, we have familiarized ourselves with WSL 2 and how to successfully install and update a Linux instance within WSL 2. We have also seen how to seamlessly navigate with filesystems across both Windows and Linux. In the upcoming articles, we will look into installing graphics and audio apps and see how well they work in WSLg in Windows 11.
If you have something to add, drop your thoughts in the comments below.
Download PC Repair Tool to quickly find & fix Windows errors automatically
Microsoft added the support for Windows Subsystem for Linux (WSL) on Windows 11 and Windows 10. It made it possible for users to install various Linux distros like Ubuntu, SUSE Linux, Kali Linux and more on Windows 10 devices. Not only is WSL getting a real Kernel, but the ability to access Linux files on Windows 11/10 using File Explorer will also be present.

There are two methods to access Windows Subsystem for Linux files using File Explorer on Windows 11/10:
- Opening File Explorer from the WSL Terminal.
- Launching the root from File Explorer.
1] Using File Explorer inside WSL Terminal

- Open WSL terminal.
- Navigate the root directory or top folder inside of the Terminal.
- Type in explorer.exe and hit Enter to open that location inside of the File Explorer.
2] Launching the root from File Explorer
This is a relatively straightforward method.
- Launch the File Explorer.
- Type in Linux and hit Enter in the address bar of the File Explorer.
- It will mount the storage for the Linux distros installed on your computer.
- The files are visible in File Explorer.
After you access these files within File Explorer, you can use programs installed on your computer to execute them normally. And any modification that you make will be visible inside the Terminal window.
Can you access Windows files from Linux subsystem?
Yes, you can access Windows files from the Linux subsystem and vice versa. It is possible to share and access Windows files from the Linux subsystem using the WSL terminal. You need to open the File Explorer in the terminal. In other words, you can enter the explorer.exe command in the terminal window to get access to it.
Read: An error occurred mounting one of your file systems WSL error
Where are the Linux subsystem files on Windows 11/10?
To access the Linux subsystem files or Linux Bash files on Windows 11/10, you need to go to %userprofile%AppDataLocalPackages. Alternatively, you can go to C:Usersuser-nameAppDataLocalPackages in the File Explorer. However, you must show hidden files to access the AppData folder in the C drive or system drive.
WSL has proven to be a boon for all the developers who had to dual boot a Linux flavor to get their needs with the Terminal done.
Troubleshoot: Windows Subsystem for Linux Error Messages and Codes.

Ayush has been a Windows enthusiast since the day he got his first PC with Windows 98SE. He is an active Windows Insider since Day 1 and has been a Windows Insider MVP.
| title | description | keywords | ms.date | ms.topic |
|---|---|---|---|---|
|
Working across file systems |
Learn about the considerations and interop commands available when working across Windows and Linux file systems with WSL. |
wsl, Linux, Windows, file systems, interop, across directories, mnt |
09/27/2021 |
article |
Working across Windows and Linux file systems
There are a number of considerations to keep in mind when working between Windows and Linux file systems. We have outlined a few of them for you in this guide, including some examples of interoperability support for mixing Windows and Linux-based commands.
File storage and performance across file systems
We recommend against working across operating systems with your files, unless you have a specific reason for doing so. For the fastest performance speed, store your files in the WSL file system if you are working in a Linux command line (Ubuntu, OpenSUSE, etc). If you’re working in a Windows command line (PowerShell, Command Prompt), store your files in the Windows file system.
For example, when storing your WSL project files:
- Use the Linux file system root directory:
\wsl$Ubuntuhome<user name>Project - Not the Windows file system root directory:
/mnt/c/Users/<user name>/Project$orC:Users<user name>Project
When you see /mnt/ in the file path of a WSL command line, it means that you are working from a mounted drive. So the Windows file system C:/ drive (C:Users<user name>Project) will look like this when mounted in a WSL command line: /mnt/c/Users/<user name>/Project$. It is possible to store your project files on a mounted drive, but your performance speed will improve if you store them directly on the \wsl$ drive.
View your current directory in Windows File Explorer
You can view the directory where your files are stored by opening the Windows File Explorer from the command line, using:
Alternatively, you can also use the command: powershell.exe /c start . Be sure to add the period at the end of the command to open the current directory.
To view all of your available Linux distributions and their root file systems in Windows File explorer, in the address bar enter: \wsl$

Filename and directory case sensitivity
Case sensitivity determines whether uppercase (FOO.txt) and lowercase (foo.txt) letters are handled as distinct (case-sensitive) or equivalent (case-insensitive) in a file name or directory. Windows and Linux file systems handle case sensitivity in different ways — Windows is case-insensitive and Linux is case-sensitive. Learn more about how to adjust case sensitivity, particularly when mounting disks with WSL, in the Adjust case sensitivity how-to article.
Interoperability between Windows and Linux commands
Windows and Linux tools and commands can be used interchangeably with WSL.
- Run Windows tools (ie. notepad.exe) from a Linux command line (ie. Ubuntu).
- Run Linux tools (ie. grep) from a Windows command line (ie. PowerShell).
- Share environment variables between Linux and Windows. (Build 17063+)
Run Linux tools from a Windows command line
Run Linux binaries from the Windows Command Prompt (CMD) or PowerShell using wsl <command> (or wsl.exe <command>).
For example:
C:temp> wsl ls -la
<- contents of C:temp ->
Binaries invoked in this way:
- Use the same working directory as the current CMD or PowerShell prompt.
- Run as the WSL default user.
- Have the same Windows administrative rights as the calling process and terminal.
The Linux command following wsl (or wsl.exe) is handled like any command run in WSL. Things such as sudo, piping, and file redirection work.
Example using sudo to update your default Linux distribution:
C:temp> wsl sudo apt-get update
Your default Linux distribution user name will be listed after running this command and you will be asked for your password. After entering your password correctly, your distribution will download updates.
Mixing Linux and Windows commands
Here are a few examples of mixing Linux and Windows commands using PowerShell.
To use the Linux command ls -la to list files and the PowerShell command findstr to filter the results for words containing «git», combine the commands:
wsl ls -la | findstr "git"
To use the PowerShell command dir to list files and the Linux command grep to filter the results for words containing «git», combine the commands:
C:temp> dir | wsl grep git
To use the Linux command ls -la to list files and the PowerShell command > out.txt to print that list to a text file named «out.txt», combine the commands:
C:temp> wsl ls -la > out.txt
The commands passed into wsl.exe are forwarded to the WSL process without modification. File paths must be specified in the WSL format.
To use the Linux command ls -la to list files in the /proc/cpuinfo Linux file system path, using PowerShell:
C:temp> wsl ls -la /proc/cpuinfo
To use the Linux command ls -la to list files in the C:Program Files Windows file system path, using PowerShell:
C:temp> wsl ls -la "/mnt/c/Program Files"
Run Windows tools from Linux
WSL can run Windows tools directly from the WSL command line using [tool-name].exe. For example, notepad.exe.
Applications run this way have the following properties:
- Retain the working directory as the WSL command prompt (for the most part — exceptions are explained below).
- Have the same permission rights as the WSL process.
- Run as the active Windows user.
- Appear in the Windows Task Manager as if directly executed from the CMD prompt.
Windows executables run in WSL are handled similarly to native Linux executables — piping, redirects, and even backgrounding work as expected.
To run the Windows tool ipconfig.exe, use the Linux tool grep to filter the «IPv4» results, and use the Linux tool cut to remove the column fields, from a Linux distribution (for example, Ubuntu) enter:
ipconfig.exe | grep IPv4 | cut -d: -f2
Let’s try an example mixing Windows and Linux commands. Open your Linux distribution (ie. Ubuntu) and create a text file: touch foo.txt. Now use the Linux command ls -la to list the direct files and their creation details, plus the Windows PowerShell tool findstr.exe to filter the results so only your foo.txt file shows in the results:
ls -la | findstr.exe foo.txt
Windows tools must include the file extension, match the file case, and be executable. Non-executables including batch scripts. CMD native commands like dir can be run with cmd.exe /C command.
For example, list the contents of your Windows files system C: directory, by entering:
Or use the ping command to send an echo request to the microsoft.com website:
ping.exe www.microsoft.com
Parameters are passed to the Windows binary unmodified. As an example, the following command will open C:tempfoo.txt in notepad.exe:
notepad.exe "C:tempfoo.txt"
This will also work:
notepad.exe C:\temp\foo.txt
Share environment variables between Windows and WSL with WSLENV
WSL and Windows share a special environment variable, WSLENV, created to bridge Windows and Linux distributions running on WSL.
Properties of WSLENV variable:
- It is shared; it exists in both Windows and WSL environments.
- It is a list of environment variables to share between Windows and WSL.
- It can format environment variables to work well in Windows and WSL.
- It can assist in the flow between WSL and Win32.
[!NOTE]
Prior to 17063, only Windows environment variable that WSL could access wasPATH(so you could launch Win32 executables from under WSL). Starting in 17063,WSLENVbegins being supported.
WSLENV is case sensitive.
WSLENV flags
There are four flags available in WSLENV to influence how the environment variable is translated.
WSLENV flags:
/p— translates the path between WSL/Linux style paths and Win32 paths./l— indicates the environment variable is a list of paths./u— indicates that this environment variable should only be included when running WSL from Win32./w— indicates that this environment variable should only be included when running Win32 from WSL.
Flags can be combined as needed.
Read more about WSLENV, including FAQs and examples of setting the value of WSLENV to a concatenation of other pre-defined environment vars, each suffixed with a slash followed by flags to specify how the value should be translated and passing variables with a script. This article also includes an example for setting up a dev environment with the Go programming language, configured to share a GOPATH between WSL and Win32.
Disable interoperability
Users may disable the ability to run Windows tools for a single WSL session by running the following command as root:
echo 0 > /proc/sys/fs/binfmt_misc/WSLInterop
To re-enable Windows binaries, exit all WSL sessions and re-run bash.exe or run the following command as root:
echo 1 > /proc/sys/fs/binfmt_misc/WSLInterop
Disabling interop will not persist between WSL sessions — interop will be enabled again when a new session is launched.
Updated January 2023: Stop getting error messages and slow down your system with our optimization tool. Get it now at this link
- Download and install the repair tool here.
- Let it scan your computer.
- The tool will then repair your computer.
The connection between Linux and Windows is getting closer and closer. Now that Microsoft has supported Linux with the WSL (Windows Subsystem for Linux), it is doing what users have asked it to do: The Windows 10 April 2019 update allows access to Linux files from Windows.
Version 1903 of Windows 10 not only gives you the ability to open Linux files in the Explorer, but also the ability to edit Linux files on Windows.
One of the most surprising things about Windows 10 is that you can activate a Windows subsystem for Linux, install a Linux distribution like Ubuntu, and then run Linux commands in a Bash shell.
What is a Windows subsystem for Linux (WSL)?
The Windows for Linux Subsystem (WSL) is a new feature of Windows 10 that allows you to run native Linux command line tools directly on Windows in addition to your traditional Windows desktop applications and modern shop applications.
This feature has been available in one form or another since early 2016, but Microsoft is constantly working to improve the way Windows and Linux can be shared.
For example, you couldn’t start Windows applications from a Linux terminal at an early stage. Now you can. And although you have been able to access Windows files from a Linux terminal for some time now, it is not the opposite that happens. But it will be soon.

How to access Ubuntu files (Windows subsystem) from Windows 10
Although we show this tutorial for the Ubuntu subsystem, the process will be the same for other systems installed on the WSL, such as OpenSUSE, Kali, and others.
The address at which Windows 10 WSL stores the Linux environment file: %user profile%AppDataLocal packages
To access Linux WSL files on Windows 10, do the following.
- Enable the WSL function.
- Install Distro, for example Ubuntu, and start it.
- If you are in a directory under Linux FS, type explorer.
- This will open a File Explorer window located inside your Linux distribution.
January 2023 Update:
You can now prevent PC problems by using this tool, such as protecting you against file loss and malware. Additionally it is a great way to optimize your computer for maximum performance.
The program fixes common errors that might occur on Windows systems with ease — no need for hours of troubleshooting when you have the perfect solution at your fingertips:
- Step 1 : Download PC Repair & Optimizer Tool (Windows 10, 8, 7, XP, Vista – Microsoft Gold Certified).
- Step 2 : Click “Start Scan” to find Windows registry issues that could be causing PC problems.
- Step 3 : Click “Repair All” to fix all issues.

From there, you can access all Linux files, just like any other file in the File Explorer. This includes operations such as: Drag and drop files in both directions, copy and paste, and even use custom context menu items added by Notepad++, VSCode, and other software.
The File Explorer displays the distribution files as a virtual network share under the path \wsl$\.
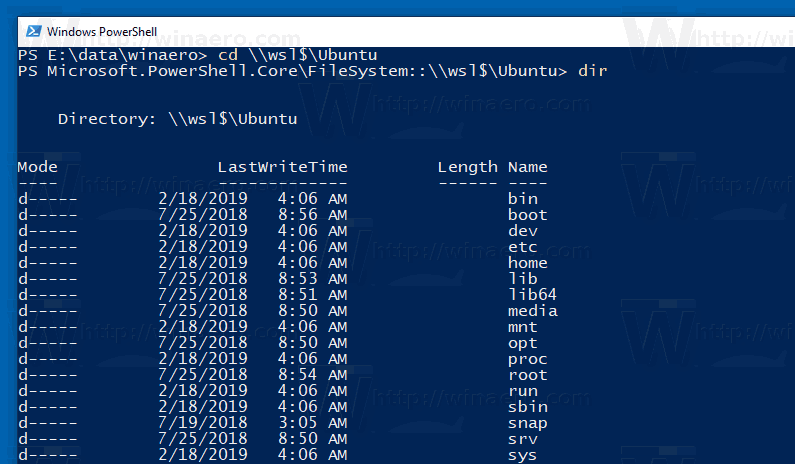
Accessing Linux files from running WSL Distro in PowerShell
1. open a PowerShell or a raised PowerShell.
2. copy and paste the wsl –list – which works in PowerShell, then press Enter to display the current WSL distortions. Note the name of the WSL distribution (for example, Ubuntu) for which you want to access the files. (see screenshot below)
Type the following command in PowerShell and press Enter to go to the WSL distribution directory.
cd wsl$NameDistributionName>>NameDistribution
Replace in the above command with the real name of the WSL distribution (e. g. “Ubuntu”) you want in step 2.
For example: cd wsl$Ubuntu
Enter them at the command prompt and press Enter to display the above directory.
You can now access your Linux files as usual in PowerShell.
Start the root from the file explorer
It is a relatively simple method.
- Start the File Explorer.
- Type Linux and press Enter in the address bar of the file explorer.
- It will mount the memory for the Linux distributions installed on your computer.
- The files are visible in the File Explorer.
After accessing these files in the File Explorer, you can run them normally with the programs installed on your computer. And all the changes you make will be visible in the Terminal window.
https://superuser.com/questions/1083962/windows-linux-subsystem-accessing-files-outside-of-ubuntu
Expert Tip: This repair tool scans the repositories and replaces corrupt or missing files if none of these methods have worked. It works well in most cases where the problem is due to system corruption. This tool will also optimize your system to maximize performance. It can be downloaded by Clicking Here

CCNA, Web Developer, PC Troubleshooter
I am a computer enthusiast and a practicing IT Professional. I have years of experience behind me in computer programming, hardware troubleshooting and repair. I specialise in Web Development and Database Design. I also have a CCNA certification for Network Design and Troubleshooting.
Post Views: 117