I’m trying to create and activate a virtual environment, using Windows 10 command prompt. I know that virtualenv is installed correctly, as the command
virtualenv venv
Works. I’ve navigated to my virtualenv download, DownloadsvenvScripts, and am trying to activate my virtual environment venv. I’ve tried
venv activate
Which doesn’t work since Windows doesn’t recognize venv as a command. I’ve also tried
virtualenv venv activate
Which also doesn’t work since virtualenv is saying that «venv activate» isn’t a valid argument.
![]()
asked Oct 23, 2017 at 18:26
![]()
1
Use the activate script in the Scripts directory of your virtual environment:
> venvScriptsactivate
This will activate your virtual environment and your terminal will look like this depending on the directory you’re in:
(venv) C:UsersacerDesktop>
I hope this helps!
![]()
tim-kt
3046 silver badges17 bronze badges
answered May 8, 2020 at 12:54
![]()
3
If you’re using virtualenvwrapper-win, and using the DOS command prompt (as opposed to e.g. Powershell), then new virtualenvs are created using:
mkvirtualenv myenv
and activated using
workon myenv
You should define the environment variable WORKON_HOME to point to where you want you virtualenvs to reside.
If you’ve installed virtualenvwrapper-win>=1.2.4 then the virtualenvwrapper command will give you a list available commands:
go|c:srv> virtualenvwrapper

 virtualenvwrapper is a set of extensions to Ian Bicking's virtualenv
 tool.  The extensions include wrappers for creating and deleting
 virtual environments and otherwise managing your development workflow,
 making it easier to work on more than one project at a time without
 introducing conflicts in their dependencies.

 virtualenvwrapper-win is a port of Dough Hellman's virtualenvwrapper to Windows
 batch scripts.

 Commands available:

   add2virtualenv: add directory to the import path

   cdproject: change directory to the active project

   cdsitepackages: change to the site-packages directory

   cdvirtualenv: change to the $VIRTUAL_ENV directory

   lssitepackages: list contents of the site-packages directory

   lsvirtualenv: list virtualenvs

   mkproject: create a new project directory and its associated virtualenv

   mkvirtualenv: Create a new virtualenv in $WORKON_HOME

   rmvirtualenv: Remove a virtualenv

   setprojectdir: associate a project directory with a virtualenv
   toggleglobalsitepackages: turn access to global site-packages on/off

   virtualenvwrapper: show this help message

   whereis: return full path to executable on path.

   workon: list or change working virtualenvs
answered Dec 1, 2017 at 23:47
![]()
thebjornthebjorn
25.7k10 gold badges92 silver badges135 bronze badges
From the directory where you have your virtual environment (e.g. myenv)
you need to run the following command: .myenvScriptsactivate
answered Oct 12, 2021 at 13:23
![]()
Go to the folder where you have created the virtual environment in cmd and
enter the command .venvScriptsactivate
It will activate the virtual env in windows
![]()
pegah
7318 silver badges15 bronze badges
answered Sep 12, 2021 at 10:30
![]()
from the command (cmd) prompt:
call venv/Scripts/activate
![]()
D.L
3,7574 gold badges20 silver badges39 bronze badges
answered Aug 27, 2022 at 14:09
![]()
0
Make sure the Python Scripts folder is in your environment variables.
Usually the path is: «C:UsersadminAppDataLocalProgramsPythonPython37-32Scripts»
(Change «admin» to your windows username and «Python37-32» path according to your python version)
answered Jan 22, 2019 at 7:38
![]()
Deep ShahDeep Shah
1012 silver badges7 bronze badges
When you use «virtualenv» to create an env, it saves an «activate.bat» file in the scripts folder originating from the directory you ran the first command. E.g if you ran the command virtualenv env from C:/Users/Name/Documents/..., the .bat will be located in C:/Users/Name/Documents/.../env/scripts/activate.bat. You can run it from there.
![]()
Jawad
10.9k3 gold badges23 silver badges36 bronze badges
answered Jan 21, 2020 at 15:12
![]()
Simply you can activate your virtualenv using command: workon myenvname
answered Jun 6, 2020 at 6:27
![]()
You can also create a command-line script like this —
@echo off
CD
CD "C:Users[user name]venvScripts"
start activate.bat
start jupyter notebook
Save this in a notepad file with an extension «.cmd».
You are ready to go
answered Sep 19, 2020 at 18:26
![]()
if you have anaconda installed then open anaconda terminal and type
> conda env list              # for list of environment you already have
> conda activate {env_name}   # to activate the environment
answered Jan 5, 2021 at 10:46
![]()
VikasKMVikasKM
1923 silver badges6 bronze badges
This works for me from Anaconda prompt,
.\myvenv\Scripts\activate.bat
answered Jan 31, 2021 at 18:05
![]()
MohitMohit
1,0354 gold badges18 silver badges45 bronze badges
- start python 3.7
python -m virtualenv
"You must provide a DEST_DIR"python -m venv demodjango("demodjango is file name)"activate.batpip install djangodjango-admin.py startproject demo1(demo1 is my project)python manage.py runserver
Performing system checks...- After doing this on a command prompt, you will get an URL. Click on that and you will see a message in the browser window that Django has been properly installed.
![]()
Simon Zyx
6,1331 gold badge24 silver badges36 bronze badges
answered Nov 6, 2018 at 19:09
![]()
VivekVivek
31 silver badge4 bronze badges
How to connect create a Python Virtual Environment
It is often useful to have one or more Python environments where you can experiment with different combinations of packages without affecting your main installation. Python supports this through virtual environments. The virtual environment is a copy of an existing version of Python with the option to inherit existing packages. A virtual environment is also useful when you need to work on a shared system and do not have permission to install packages as you will be able to install them in the virtual environment.
Outline
- Open a terminal
- Setup the pip package manager
- Install the virtualenv package
- Create the virtual environment
- Activate the virtual environment
- Deactivate the virtual environment
- Optional: Make the virtual environment your default Python
- More: Python virtualenv documentation
Requirements
- An installation of Python
Jargon
Link to Jargon page with terms: terminal
Open a terminal
The method you use to open a terminal depends on your operating system.
Windows
Open the Windows Command Prompt (show path via Start menu and keyboard shortcuts)
Mac OS / Linux
Open the Terminal program. This is usually found under Utilities or Accessories.
Setup the pip package manager
Check to see if your Python installation has pip. Enter the following in your terminal:
If you see the help text for pip then you have pip installed, otherwise download and install pip
Install the virtualenv package
The virtualenv package is required to create virtual environments. You can install it with pip:
Create the virtual environment
To create a virtual environment, you must specify a path. For example to create one in the local directory called ‘mypython’, type the following:
Activate the virtual environment
You can activate the python environment by running the following command:
Mac OS / Linux
source mypython/bin/activateWindows
You should see the name of your virtual environment in brackets on your terminal line e.g. (mypython).
Any python commands you use will now work with your virtual environment
Deactivate the virtual environment
To decativate the virtual environment and use your original Python environment, simply type ‘deactivate’.
Optional: Make the virtual environment your default Python
More: Python virtualenv documentation
For more detailed information, see the offical virtualenv documentation
Python virtual environments allow you to install Python packages in an isolated location from the rest of your system instead of installing them system-wide. Let’s look at how to use the Python venv, short for Python virtual environment, also abbreviated as virtualenv.
In this article, you will learn:
- The advantages of using virtual environments
- How to create a venv
- How to activate and deactivate it
- Different ways to delete or remove a venv
- How a venv works internally
If you have some time to spare, please consider my Python Fundamentals II course to learn about virtual environments and get hands-on, real-world practice. It’s a deep dive into modules, packages, virtual environments, and package managers.
Table of Contents
- 1 Why you need virtual environments
- 2 Virtual environments vs. other options
- 3 How to create a Python venv
- 4 Python venv activation
- 5 How a Python venv works
- 6 Deactivate the Python venv
- 7 Deleting a Python venv
- 8 Conclusion
- 9 Keep learning
Why you need virtual environments
There are multiple reasons why virtual environments are a good idea, and this is also the reason why I’m telling you about them before we continue to the part where we start installing 3rd party packages. Let’s go over them one by one.
Preventing version conflicts
You could argue that installing third-party packages system-wide is very efficient. After all, you only need to install it once and can use the package from multiple Python projects, saving you precious time and disk space. There’s a problem with this approach that may start to unfold weeks or months later, however.
Suppose your project, Project A, is written against a specific version of library X. In the future, you might need to upgrade library X. Say, for example, you need the latest version for another project you started, called Project B. You upgrade library X to the latest version, and project B works fine. Great! But once you did this, it turns out your Project A code broke badly. After all, APIs can change significantly on major version upgrades.
A virtual environment fixes this problem by isolating your project from other projects and system-wide packages. You install packages inside this virtual environment specifically for the project you are working on.
Easy to reproduce and install
Virtual environments make it easy to define and install the packages specific to your project. Using a requirements.txt file, you can define exact version numbers for the required packages to ensure your project will always work with a version tested with your code. This also helps other users of your software since a virtual environment helps others reproduce the exact environment for which your software was built.
Works everywhere, even when not administrator (root)
If you’re working on a shared host, like those at a university or a web hosting provider, you won’t be able to install system-wide packages since you don’t have the administrator rights to do so. In these places, a virtual environment allows you to install anything you want locally in your project.
Virtual environments vs. other options
There are other options to isolate your project:
- In the most extreme case, you could buy a second PC and run your code there. Problem fixed! It was a bit expensive, though!
- A virtual machine is a much cheaper option but still requires installing a complete operating system—a bit of a waste as well for most use cases.
- Next in line is containerization, with the likes of Docker and Kubernetes. These can be very powerful and are a good alternative.
Still, there are many cases when we’re just creating small projects or one-off scripts. Or perhaps you just don’t want to containerize your application. It’s another thing you need to learn and understand, after all. Whatever the reason is, virtual environments are a great way to isolate your project’s dependencies.
There are several ways to create a Python virtual environment, depending on the Python version you are running.
Before you read on, I want to point you to two other tools, Python Poetry and Pipenv. Both these tools combine the functionality of tools you are about to learn: virtualenv and pip. On top of that, they add several extras, most notably their ability to do proper dependency resolution.
To better understand virtual environments, I recommend you learn the basics first though, using this article. I just want to ensure that you know there are nicer ways to manage your packages, dependencies, and virtual environments.
Python 3.4 and above
If you are running Python 3.4+, you can use the venv module baked into Python:
python -m venv <directory>
This command creates a venv in the specified directory and copies pip into it as well. If you’re unsure what to call the directory: venv is a commonly seen option; it doesn’t leave anyone guessing what it is. So the command, in that case, would become:
python -m venv venv
A little further in this article, we’ll look closely at the just-created directory. But let’s first look at how to activate this virtual environment.
All other Python versions
The alternative that works for any Python version is using the virtualenv package. You may need to install it first with pip install:
pip install virtualenv
Once installed, you can create a virtual environment with:
virtualenv [directory]
Python venv activation
How you activate your virtual environment depends on the OS you’re using.
Windows venv activation
To activate your venv on Windows, you need to run a script that gets installed by venv. If you created your venv in a directory called myenv, the command would be:
# In cmd.exe
venvScriptsactivate.bat
# In PowerShell
venvScriptsActivate.ps1
Linux and MacOS venv activation
On Linux and MacOS, we activate our virtual environment with the source command. If you created your venv in the myvenv directory, the command would be:
$ source myvenv/bin/activate
That’s it! We’re ready to rock! You can now install packages with pip, but I advise you to keep reading to understand the venv better first.
Modules, Packages, And Virtual Environments
My course Python Fundamentals II extensively covers:
- creating modules and packages
- Using virtual environments
- Leveraging Python package managers like Poetry and Pipenv to make your life as a programmer easier.
Advance your productivity as a Python programmer and join my course today!
How a Python venv works
When you activate a virtual environment, your PATH variable is changed. On Linux and MacOS, you can see it for yourself by printing the path with echo $PATH. On Windows, use echo %PATH% (in cmd.exe) or $Env:Path (in PowerShell). In my case, on Windows, it looks like this:
C:UserserikDevvenvScripts;C:Program FilesPowerShell7;C:Program FilesAdoptOpen....
It’s a big list, and I only showed the beginning of it. As you can see, the Scripts directory of my venv is put in front of everything else, effectively overriding all the system-wide Python software.
So what does this PATH variable do?
When you enter a command that can’t be found in the current working directory, your OS starts looking at all the paths in the PATH variable. It’s the same for Python. When you import a library, Python starts looking in your PATH for library locations. And that’s where our venv-magic happens: if your venv is there in front of all the other paths, the OS will look there first before looking at system-wide directories like /usr/bin. Hence, anything that gets installed in our venv is found first, and that’s how we can override system-wide packages and tools.
What’s inside a venv?
If you take a look inside the directory of your venv, you’ll see something like this on Windows:
.
├── Include
├── Lib
│   └── site-packages
├── pyvenv.cfg
└── Scripts
    ├── activate
    ├── activate.bat
    ├── Activate.ps1
    ├── deactivate.bat
    ├── pip3.10.exe
    ├── pip3.exe
    ├── pip.exe
    ├── python.exe
    └── pythonw.exe
And on Linux and MacOS:

You can see that:
- The Python command is made available as both python and python3 (on Linux and MacOS), and the version is pinned to the version with which you created the venv by creating a symlink to it.
- On Windows, the Python binary is copied over to the scripts directory.
- All packages you install end up in the site-packages directory.
- We have activation scripts for multiple shell types (bash, csh, fish, PowerShell)
- Pip is available under pip and pip3, and even more specifically under the name
pip3.7because I had a Python 3.7 installation at the time of writing this.
Deactivate the Python venv
Once you have finished working on your project, it’s a good habit to deactivate its venv. By deactivating, you leave the virtual environment. Without deactivating your venv, all other Python code you execute, even if it is outside your project directory, will also run inside the venv.
Luckily, deactivating your virtual environment couldn’t be simpler. Just enter this: deactivate. It works the same on all operating systems.
Deleting a Python venv
You can completely remove a virtual environment, but how you do that depends on what you used to create the venv. Let’s look at the most common options.
Delete a venv created with Virtualenv or python -m venv
There’s no special command to delete a virtual environment if you used virtualenv or python -m venv to create your virtual environment, as is demonstrated in this article. When creating the virtualenv, you gave it a directory to create this environment in.
If you want to delete this virtualenv, deactivate it first and then remove the directory with all its content. On Unix-like systems and in Windows Powershell, you would do something like this:
deactivate
# If your virtual environment is in a directory called 'venv':
rm -r venv
Delete a venv with Pipenv
If you used Pipenv to create the venv, it’s a lot easier. You can use the following command to delete the current venv:
pipenv --rm
Make sure you are inside the project directory. In other words, the directory where the Pipenv and Pipenv.lock files reside. This way, pipenv knows which virtual environment it has to delete.
If this doesn’t work, you can get a little nastier and manually remove the venv. First, ask pipenv where the actual virtualenv is located with the following command:
pipenv --env
/home/username/.local/share/virtualenvs/yourproject-IogVUtsM
It will output the path to the virtual environment and all of its files and look similar to the example above. The next step is to remove that entire directory, and you’re done.
Delete a venv with Poetry
If you created the virtualenv with Poetry, you can list the available venvs with the following command:
poetry env list
You’ll get a list like this:
test-O3eWbxRl-py2.7
test-O3eWbxRl-py3.6
test-O3eWbxRl-py3.7 (Activated)
You can remove the environment you want with the poetry env remove command. You need to specify the exact name from the output above, for example:
poetry env remove test-O3eWbxRl-py3.7
Conclusion
You learned how to create, activate, deactivate, and delete virtual environments. We also looked behind the curtains to see why and how a venv works. Now that you know how to create a venv, you need to learn how to install packages inside of it. After that, I strongly recommend you to learn about Pipenv or Poetry. These tools combine the management of your virtual environment with proper package and dependency management.
Keep learning
- Next up: how to install packages with pip inside your venv
- Pipenv is a better way of managing your venv and packages.
- Learn the most common Linux commands (like cd, mkdir, pwd, etcetera)
- Official venv documentation: If you want to know all the details and command-line options
Are you enjoying this free tutorial? Please also have a look at my premium courses. They offer a superior user experience with small, easy-to-digest lessons and topics, progress tracking, quizzes to test your knowledge, and practice sessions. Each course will earn you a downloadable course certificate.
Watch Now This tutorial has a related video course created by the Real Python team. Watch it together with the written tutorial to deepen your understanding: Working With Python Virtual Environments
In this tutorial, you’ll learn how to work with Python’s venv module to create and manage separate virtual environments for your Python projects. Each environment can use different versions of package dependencies and Python. After you’ve learned to work with virtual environments, you’ll know how to help other programmers reproduce your development setup, and you’ll make sure that your projects never cause dependency conflicts for one another.
By the end of this tutorial, you’ll know how to:
- Create and activate a Python virtual environment
- Explain why you want to isolate external dependencies
- Visualize what Python does when you create a virtual environment
- Customize your virtual environments using optional arguments to
venv - Deactivate and remove virtual environments
- Choose additional tools for managing your Python versions and virtual environments
Virtual environments are a common and effective technique used in Python development. Gaining a better understanding of how they work, why you need them, and what you can do with them will help you master your Python programming workflow.
Throughout the tutorial, you can select code examples for either Windows, Ubuntu Linux, or macOS. Pick your platform at the top right of the relevant code blocks to get the commands that you need, and feel free to switch between your options if you want to learn how to work with Python virtual environments on other operating systems.
How Can You Work With a Python Virtual Environment?
If you just need to get a Python virtual environment up and running to continue working on your favorite project,
then this section is the right place for you.
The instructions in this tutorial use Python’s venv module to create virtual environments.
This module is part of Python’s standard library, and it’s the officially recommended way to create virtual environments since Python 3.5.
For basic usage, venv is an excellent choice because it already comes packaged with your Python installation. With that in mind, you’re ready to create your first virtual environment in this tutorial.
Create It
Any time you’re working on a Python project that uses external dependencies that you’re installing with pip,
it’s best to first create a virtual environment:
- Windows
- Linux
- macOS
If you’re using Python on Windows
and you haven’t configured the PATH and PATHEXT variables,
then you might need to provide the full path to your Python executable:
PS> C:UsersNameAppDataLocalProgramsPythonPython310python -m venv venv
The system path shown above assumes that you installed Python 3.10 using the Windows installer provided by the Python downloads page. The path to the Python executable on your system might be different. Working with PowerShell, you can find the path using the where.exe python command.
Many Linux operating systems ship with a version of Python 3.
If python3 doesn’t work, then you’ll have to first install Python, and you may need to use the specific name of the executable version that you installed, for example python3.10 for Python 3.10.x. If that’s the case for you, remember to replace mentions of python3 in the code blocks with your specific version number.
Older versions of macOS come with a system installation of Python 2.7.x that you should never use to run your scripts. If you’re working on macOS < 12.3 and invoke the Python interpreter with python instead of python3, then
you might accidentally start up the outdated system Python interpreter.
If running python3 doesn’t work, then you’ll have to first install a modern version of Python.
Activate It
Great! Now your project has its own virtual environment. Generally, before you start using it, you’ll first activate the environment by executing a script that comes with the installation:
- Windows
- Linux + macOS
PS> venvScriptsactivate
(venv) PS>
$ source venv/bin/activate
(venv) $
Before you run this command, make sure that you’re in the folder that contains the virtual environment you just created.
Once you can see the name of your virtual environment—in this case (venv)—in your command prompt, then you know that your virtual environment is active. You’re all set and ready to install your external packages!
Install Packages Into It
After creating and activating your virtual environment, you can now install any external dependencies that you need for your project:
- Windows
- Linux + macOS
(venv) PS> python -m pip install <package-name>
(venv) $ python -m pip install <package-name>
This command is the default command that you should use to install external Python packages with pip. Because you first created and activated the virtual environment, pip will install the packages in an isolated location.
Congratulations, you can now install your packages to your virtual environment. To get to this point, you began by creating a Python virtual environment named venv and then activated it in your current shell session.
As long as you don’t close your terminal, every Python package that you’ll install will end up in this isolated environment instead of your global Python site-packages. That means you can now work on your Python project without worrying about dependency conflicts.
Deactivate It
Once you’re done working with this virtual environment, you can deactivate it:
- Windows
- Linux + macOS
(venv) PS> deactivate
PS>
After executing the deactivate command, your command prompt returns to normal.
This change means that you’ve exited your virtual environment. If you interact with Python or pip now, you’ll interact with your globally configured Python environment.
If you want to go back into a virtual environment that you’ve created before, you again need to run the activate script of that virtual environment.
At this point, you’ve covered the essentials of working with Python virtual environments.
If that’s all you need, then happy trails as you continue creating!
However, if you want to know what exactly just happened,
why so many tutorials ask you to create a virtual environment in the first place,
and what a Python virtual environment really is,
then keep on reading! You’re about to go deep!
Why Do You Need Virtual Environments?
Nearly everyone in the Python community suggests that you use virtual environments for all your projects.
But why?
If you want to find out why you need to set up a Python virtual environment in the first place,
then this is the right section for you.
The short answer is that Python isn’t great at dependency management.
If you’re not specific,
then pip will place all the external packages that you install in a folder called site-packages/ in your base Python installation.
Technically, Python comes with two site-packages folders:
purelib/should contain only modules written in pure Python code.platlib/should contain binaries that aren’t written in pure Python, for example.dll,.so, or.pydistfiles.
You can find these folders in different locations if you’re working on Fedora or RedHat Linux distributions.
However, most operating systems implement Python’s site-packages setting so that both locations point to the same path, effectively creating a single site-packages folder.
You can check the paths using sysconfig:
- Windows
- Linux
- macOS
>>>
>>> import sysconfig
>>> sysconfig.get_path("purelib")
'C:\Users\Name\AppData\Local\Programs\Python\Python310\Lib\site-packages'
>>> sysconfig.get_path("platlib")
'C:\Users\Name\AppData\Local\Programs\Python\Python310\Lib\site-packages'
>>>
>>> import sysconfig
>>> sysconfig.get_path("purelib")
'/home/name/path/to/venv/lib/python3.10/site-packages'
>>> sysconfig.get_path("platlib")
'/home/name/path/to/venv/lib/python3.10/site-packages'
>>>
>>> import sysconfig
>>> sysconfig.get_path("purelib")
'/Users/name/path/to/venv/lib/python3.10/site-packages'
>>> sysconfig.get_path("platlib")
'/Users/name/path/to/venv/lib/python3.10/site-packages'
Most likely, both outputs will show you the same path. If both outputs are the same, then your operating system doesn’t put purelib modules into a different folder than platlib modules. If two different paths show up, then your operating system makes this distinction.
Even if your operating system distinguishes between the two, dependency conflicts will still arise because all purelib modules will go into a single location for purelib modules, and the same will happen with the platlib modules.
To work with virtual environments, you don’t need to worry about the implementation detail of a single site-packages folder or two separate ones. In fact, you probably won’t ever need to think about it again. If you want to, however, you can keep in mind that when someone mentions Python’s site-packages directory, they could be talking about two different directories.
Several issues can come up if all of your external packages land in the same folder. In this section, you’ll learn more about them, as well as other problems that virtual environments mitigate.
Avoid System Pollution
Linux and macOS come preinstalled with a version of Python that the operating system uses for internal tasks.
If you install packages to your operating system’s global Python, these packages will mix with the system-relevant packages. This mix-up could have unexpected side effects on tasks crucial to your operating system’s normal behavior.
Additionally, if you update your operating system, then the packages you installed might get overwritten and lost. You don’t want either of those headaches to happen!
Sidestep Dependency Conflicts
One of your projects might require a different version of an external library than another one. If you have only one place to install packages, then you can’t work with two different versions of the same library. This is one of the most common reasons for the recommendation to use a Python virtual environment.
To better understand why this is so important, imagine you’re building Django websites for two different clients. One client is comfortable with their existing web app, which you initially built using Django 2.2.26, and that client refuses to update their project to a modern Django version. Another client wants you to include async functionality in their website, which is only available starting from Django 4.0.
If you installed Django globally, you could only have one of the two versions installed:
- Windows
- Linux + macOS
PS> python -m pip install django==2.2.26
PS> python -m pip list
Package    Version
---------- -------
Django     2.2.26
pip        22.0.4
pytz       2022.1
setuptools 58.1.0
sqlparse   0.4.2

PS> python -m pip install django==4.0.3
PS> python -m pip list
Package    Version
---------- -------
asgiref    3.5.0
Django     4.0.3
pip        22.0.4
pytz       2022.1
setuptools 58.1.0
sqlparse   0.4.2
tzdata     2022.1
$ python3 -m pip install django==2.2.26
$ python3 -m pip list
Package    Version
---------- -------
Django     2.2.26
pip        22.0.4
pytz       2022.1
setuptools 58.1.0
sqlparse   0.4.2

$ python3 -m pip install django==4.0.3
$ python3 -m pip list
Package    Version
---------- -------
asgiref    3.5.0
Django     4.0.3
pip        22.0.4
pytz       2022.1
setuptools 58.1.0
sqlparse   0.4.2
If you install two different versions of the same package into your global Python environment, the second installation overwrites the first one. For the same reason, having a single virtual environment for both clients won’t work either. You can’t have two different versions of the same package in a single Python environment.
Looks like you won’t be able to work on one of the two projects with this setup! However, if you create a virtual environment for each of your clients’ projects, then you can install a different version of Django into each of them:
- Windows
- Linux + macOS
PS> mkdir client-old
PS> cd client-old
PS> python -m venv venv --prompt="client-old"
PS> venvScriptsactivate
(client-old) PS> python -m pip install django==2.2.26
(client-old) PS> python -m pip list
Package    Version
---------- -------
Django     2.2.26
pip        22.0.4
pytz       2022.1
setuptools 58.1.0
sqlparse   0.4.2
(client-old) PS> deactivate

PS> cd ..
PS> mkdir client-new
PS> cd client-new
PS> python -m venv venv --prompt="client-new"
PS> venvScriptsactivate
(client-new) PS> python -m pip install django==4.0.3
(client-new) PS> python -m pip list
Package    Version
---------- -------
asgiref    3.5.0
Django     4.0.3
pip        22.0.4
setuptools 58.1.0
sqlparse   0.4.2
tzdata     2022.1
(client-new) PS> deactivate
$ mkdir client-old
$ cd client-old
$ python3 -m venv venv --prompt="client-old"
$ source venv/bin/activate
(client-old) $ python -m pip install django==2.2.26
(client-old) $ python -m pip list
Package    Version
---------- -------
Django     2.2.26
pip        22.0.4
pytz       2022.1
setuptools 58.1.0
sqlparse   0.4.2
(client-old) $ deactivate

$ cd ..
$ mkdir client-new
$ cd client-new
$ python3 -m venv venv --prompt="client-new"
$ source venv/bin/activate
(client-new) $ python -m pip install django==4.0.3
(client-new) $ python -m pip list
Package    Version
---------- -------
asgiref    3.5.0
Django     4.0.3
pip        22.0.4
setuptools 58.1.0
sqlparse   0.4.2
(client-new) $ deactivate
If you now activate either of the two virtual environments, then you’ll notice that it still holds its own specific version of Django. The two environments also have different dependencies, and each only contains the dependencies necessary for that version of Django.
With this setup, you can activate one environment when you work on one project and another when you work on another. Now you can keep any number of clients happy at the same time!
Minimize Reproducibility Issues
If all your packages live in one location, then it’ll be difficult to only pin dependencies that are relevant for a single project.
If you’ve worked with Python for a while, then your global Python environment might already include all sorts of third-party packages. If that’s not the case, then pat yourself on the back! You’ve probably installed a new version of Python recently, or you already know how to handle virtual environments to avoid system pollution.
To clarify what reproducibility issues you can encounter when sharing a Python environment across multiple projects, you’ll look into an example situation next. Imagine you’ve worked on two independent projects over the past month:
- A web scraping project with Beautiful Soup
- A Flask application
Unaware of virtual environments, you installed all necessary packages into your global Python environment:
- Windows
- Linux + macOS
PS> python -m pip install beautifulsoup4 requests
PS> python -m pip install flask
$ python3 -m pip install beautifulsoup4 requests
$ python3 -m pip install flask
Your Flask app has turned out to be quite helpful, so other developers want to work on it as well. They need to reproduce the environment that you used for working on it. You want to go ahead and pin your dependencies so that you can share your project online:
- Windows
- Linux + macOS
PS> python -m pip freeze
beautifulsoup4==4.10.0
certifi==2021.10.8
charset-normalizer==2.0.12
click==8.0.4
colorama==0.4.4
Flask==2.0.3
idna==3.3
itsdangerous==2.1.1
Jinja2==3.0.3
MarkupSafe==2.1.1
requests==2.27.1
soupsieve==2.3.1
urllib3==1.26.9
Werkzeug==2.0.3
$ python3 -m pip freeze
beautifulsoup4==4.10.0
certifi==2021.10.8
charset-normalizer==2.0.12
click==8.0.4
Flask==2.0.3
idna==3.3
itsdangerous==2.1.1
Jinja2==3.0.3
MarkupSafe==2.1.1
requests==2.27.1
soupsieve==2.3.1
urllib3==1.26.9
Werkzeug==2.0.3
Which of these packages are relevant for your Flask app, and which ones are here because of your web scraping project? It’s hard to tell when all external dependencies live in a single bucket.
With a single environment like this one, you’d have to manually go through the dependencies and know which are necessary for your project and which aren’t. At best, this approach is tedious, but more likely, it’s error prone.
If you use a separate virtual environment for each of your projects, then it’ll be more straightforward to read the project requirements from your pinned dependencies. That means you can share your success when you develop a great app, making it possible for others to collaborate with you!
Dodge Installation Privilege Lockouts
Finally, you may need administrator privileges on a computer to install packages into the host Python’s site-packages directory. In a corporate work environment, you most likely won’t have that level of access to the machine that you’re working on.
If you use virtual environments, then you create a new installation location within the scope of your user privileges, which allows you to install and work with external packages.
Whether you’re coding as a hobby on your own machine, developing websites for clients, or working in a corporate environment, using a virtual environment will save you lots of grief in the long run.
What Is a Python Virtual Environment?
At this point, you’re convinced that you want to work with virtual environments.
Great, but what are you working with when you use a virtual environment?
If you want to understand what Python virtual environments are, then this is the right section for you.
The short answer is that a Python virtual environment is a folder structure
that gives you everything you need to run a lightweight yet isolated Python environment.
A Folder Structure
When you create a new virtual environment using the venv module, Python creates a self-contained folder structure and copies or symlinks the Python executable files into that folder structure.
You don’t need to dig deeply into this folder structure to learn more about what virtual environments are made of. In just a bit, you’ll carefully scrape off the topsoil and investigate the high-level structures that you uncover.
However, if you’ve already got your shovel ready and you’re itching to dig, then open the collapsible section below:
Welcome, brave one. You’ve accepted the challenge to venture deeper into your virtual environment’s folder structure! In this collapsible section, you’ll find instructions on how to take a look into that dark abyss.
On your command line, navigate to the folder that contains your virtual environment. Take a deep breath and brace yourself, then execute the tree command to display all the contents of the directory:
- Windows
- Linux
- macOS
You may need to first install tree, for example with sudo apt install tree.
The tree command displays the content of your venv directory in a very long tree structure.
However you end up displaying all the contents of the venv/ folder, you might be surprised what you find. Many developers experience a slight shock when they first take a peek. There are a lot of files in there!
If this was your first time and you felt that way, then welcome to the group of people who have taken a look and gotten overwhelmed.
A virtual environment folder contains a lot of files and folders, but you might notice that most of what makes this tree structure so long rests inside the site-packages/ folder. If you trim down the subfolders and files in there, you end up with a tree structure that isn’t too overwhelming:
- Windows
- Linux
- macOS
venv
│
├── Include
│
├── Lib
│   │
│   └── site-packages
│       │
│       ├── _distutils_hack
│       │
│       ├── pip
│       │
│       ├── pip-22.0.4.dist-info
│       │
│       ├── pkg_resources
│       │
│       ├── setuptools
│       │
│       ├── setuptools-58.1.0.dist-info
│       │
│       └── distutils-precedence.pth
│
│
├── Scripts
│   ├── Activate.ps1
│   ├── activate
│   ├── activate.bat
│   ├── deactivate.bat
│   ├── pip.exe
│   ├── pip3.10.exe
│   ├── pip3.exe
│   ├── python.exe
│   └── pythonw.exe
│
└── pyvenv.cfg
venv/
│
├── bin/
│   ├── Activate.ps1
│   ├── activate
│   ├── activate.csh
│   ├── activate.fish
│   ├── pip
│   ├── pip3
│   ├── pip3.10
│   ├── python
│   ├── python3
│   └── python3.10
│
├── include/
│
├── lib/
│   │
│   └── python3.10/
│       │
│       └── site-packages/
│           │
│           ├── _distutils_hack/
│           │
│           ├── pip/
│           │
│           ├── pip-22.0.4.dist-info/
│           │
│           ├── pkg_resources/
│           │
│           ├── setuptools/
│           │
│           ├── setuptools-58.1.0.dist-info/
│           │
│           └── distutils-precedence.pth
│
├── lib64/
│   │
│   └── python3.10/
│       │
│       └── site-packages/
│           │
│           ├── _distutils_hack/
│           │
│           ├── pip/
│           │
│           ├── pip-22.0.4.dist-info/
│           │
│           ├── pkg_resources/
│           │
│           ├── setuptools/
│           │
│           ├── setuptools-58.1.0.dist-info/
│           │
│           └── distutils-precedence.pth
│
└── pyvenv.cfg
venv/
│
├── bin/
│   ├── Activate.ps1
│   ├── activate
│   ├── activate.csh
│   ├── activate.fish
│   ├── pip
│   ├── pip3
│   ├── pip3.10
│   ├── python
│   ├── python3
│   └── python3.10
│
├── include/
│
├── lib/
│   │
│   └── python3.10/
│       │
│       └── site-packages/
│           │
│           ├── _distutils_hack/
│           │
│           ├── pip/
│           │
│           ├── pip-22.0.4.dist-ino/
│           │
│           ├── pkg_resources/
│           │
│           ├── setuptools/
│           │
│           ├── setuptools-58.1.0.dist-info/
│           │
│           └── distutils-precedence.pth
│
└── pyvenv.cfg
This reduced tree structure gives you a better overview of what’s going on in your virtual environment folder:
- Windows
- Linux
- macOS
-
Includeis an initially empty folder that Python uses to include C header files for packages you might install that depend on C extensions. -
Libcontains thesite-packagesfolder, which is one of the main reasons for creating your virtual environment. This folder is where you’ll install external packages that you want to use within your virtual environment. By default, your virtual environment comes preinstalled with two dependencies,pipand setuptools. You’ll learn more about them in a bit. -
Scriptscontains the executable files of your virtual environment. Most notable are the Python interpreter (python.exe), thepipexecutable (pip.exe), and the activation script for your virtual environment, which comes in a couple of different flavors to allow you to work with different shells. In this tutorial, you’ve usedactivate, which handles the activation of your virtual environment for Windows across most shells. -
pyvenv.cfgis a crucial file for your virtual environment. It contains only a couple of key-value pairs that Python uses to set variables in thesysmodule that determine which Python interpreter and which site-packages directory the current Python session will use. You’ll learn more about the settings in this file when you read about how a virtual environment works.
-
bin/contains the executable files of your virtual environment. Most notable are the Python interpreter (python) and thepipexecutable (pip), as well as their respective symlinks (python3,python3.10,pip3,pip3.10). The folder also contains activation scripts for your virtual environment. Your specific activation script depends on what shell you use. For example, in this tutorial, you ranactivate, which works for the Bash and Zsh shells. -
include/is an initially empty folder that Python uses to include C header files for packages you might install that depend on C extensions. -
lib/contains thesite-packages/directory nested in a folder that designates the Python version (python3.10/).site-packages/is one of the main reasons for creating your virtual environment. This folder is where you’ll install external packages that you want to use within your virtual environment. By default, your virtual environment comes preinstalled with two dependencies,pipand setuptools. You’ll learn more about them in a bit. -
lib64/in many Linux systems comes as a symlink tolib/for compatibility reasons. Some Linux systems may use the distinction betweenlib/andlib64/to install different versions of libraries depending on their architecture. -
pyvenv.cfgis a crucial file for your virtual environment. It contains only a couple of key-value pairs that Python uses to set variables in thesysmodule that determine which Python interpreter and which site-packages directory the current Python session will use. You’ll learn more about the settings in this file when you read about how a virtual environment works.
-
bin/contains the executable files of your virtual environment. Most notable are the Python interpreter (python) and thepipexecutable (pip), as well as their respective symlinks (python3,python3.10,pip3,pip3.10). The folder also contains activation scripts for your virtual environment. Your specific activation script depends on what shell you use. For example, in this tutorial, you ranactivate, which works for the Bash and Zsh shells. -
include/is an initially empty folder that Python uses to include C header files for packages you might install that depend on C extensions. -
lib/contains thesite-packages/directory nested in a folder that designates the Python version (python3.10/).site-packages/is one of the main reasons for creating your virtual environment. This folder is where you’ll install external packages that you want to use within your virtual environment. By default, your virtual environment comes preinstalled with two dependencies,pipand setuptools. You’ll learn more about them in a bit. -
pyvenv.cfgis a crucial file for your virtual environment. It contains only a couple of key-value pairs that Python uses to set variables in thesysmodule that determine which Python interpreter and which site-packages directory the current Python session will use. You’ll learn more about the settings in this file when you read about how a virtual environment works.
From this bird’s-eye view of the contents of your virtual environment folder, you can zoom out even further to discover that there are three essential parts of a Python virtual environment:
- A copy or a symlink of the Python binary
- A
pyvenv.cfgfile - A site-packages directory
The installed packages inside site-packages/ are optional but come as a reasonable default. However, your virtual environment would still be a valid virtual environment if this directory were empty, and there are ways to create it without installing any dependencies.
With the default settings, venv will install both pip and setuptools. Using pip is the recommended way to install packages in Python, and setuptools is a dependency for pip. Because installing other packages is the most common use case for Python virtual environments, you’ll want to have access to pip.
You can double-check that Python installed both pip and setuptools into your virtual environment by using pip list:
- Windows
- Linux + macOS
(venv) PS> python -m pip list
Package    Version
---------- -------
pip        22.0.4
setuptools 58.1.0
(venv) $ python -m pip list
Package    Version
---------- -------
pip        22.0.4
setuptools 58.1.0
Your version numbers may differ, but this output confirms that Python installed both packages when you created the virtual environment with its default settings.
These two installed packages make up most of the content of your new virtual environment. However, you’ll notice that there are also a couple of other folders in the site-packages/ directory:
-
The
_distutils_hack/module, in a manner true to its name, ensures that when performing package installations, Python picks the local._distutilssubmodule of setuptools over the standard library’sdistutilsmodule. -
The
pkg_resources/module helps applications discover plugins automatically and allows Python packages to access their resource files. It’s distributed together withsetuptools. -
The
{name}-{version}.dist-info/directories forpipand setuptools contain package distribution information that exists to record information about installed packages.
Finally, there’s also a file named distutils-precedence.pth. This file helps set the path precedence for distutils imports and works together with _distutils_hack to ensure that Python prefers the version of distutils that comes bundled with setuptools over the built-in one.
At this point, you’ve seen all the files and folders that make up a Python virtual environment if you’ve installed it using the built-in venv module.
Keep in mind that your virtual environment is just a folder structure, which means that you can delete and re-create it anytime you want to. But why this specific folder structure, and what does it make possible?
An Isolated Python Installation
Python virtual environments aim to provide a lightweight, isolated Python environment that you can quickly create and then discard when you don’t need it anymore. The folder structure that you’ve seen above makes that possible by providing three key pieces:
- A copy or a symlink of the Python binary
- A
pyvenv.cfgfile - A site-packages directory
You want to achieve an isolated environment so that any external packages you install won’t conflict with global site-packages. What venv does to make this possible is to reproduce the folder structure that a standard Python installation creates.
This structure accounts for the location of the copy or symlink of the Python binary and the site-packages directory, where Python installs external packages.
In addition to the Python binary and the site-packages directory, you get the pyvenv.cfg file. It’s a small file that contains only a couple of key-value pairs. However, these settings are crucial for making your virtual environment work:
- Windows
- Linux
- macOS
home = C:UsersNameAppDataLocalProgramsPythonPython310
include-system-site-packages = false
version = 3.10.3
home = /usr/local/bin
include-system-site-packages = false
version = 3.10.3
home = /Library/Frameworks/Python.framework/Versions/3.10/bin
include-system-site-packages = false
version = 3.10.3
You’ll learn more about this file in a later section when reading about how a virtual environment works.
Suppose you closely inspect your newly minted virtual environment’s folder structure. In that case, you might notice that this lightweight installation doesn’t contain any of the trusted standard library modules. Some might say that Python without its standard library is like a toy car without batteries!
However, if you start the Python interpreter from within your virtual environment, then you can still access all the goodies from the standard library:
>>>
>>> import urllib
>>> from pprint import pp
>>> pp(dir(urllib))
['__builtins__',
 '__cached__',
 '__doc__',
 '__file__',
 '__loader__',
 '__name__',
 '__package__',
 '__path__',
 '__spec__']
In the example code snippet above, you’ve successfully imported both the urllib module and the pp() shortcut from the pretty print module. Then you used dir() to inspect the urllib module.
Both modules are part of the standard library, so how come you have access to them even though they’re not in the folder structure of your Python virtual environment?
You can access Python’s standard library modules because your virtual environment reuses Python’s built-ins and the standard library modules from the Python installation from which you created your virtual environment. In a later section, you’ll learn how the virtual environment achieves linking to your base Python’s standard library.
In addition to the standard library modules, you can optionally give your virtual environment access to the base installation’s site-packages through an argument when creating the environment:
- Windows
- Linux + macOS
PS C:> python -m venv venv --system-site-packages
$ python3 -m venv venv --system-site-packages
If you add --system-site-packages when you call venv, Python will set the value to include-system-site-packages in pyvenv.cfg to true. This setting means that you can use any external packages that you installed to your base Python as if you’d installed them into your virtual environment.
This connection works in only one direction. Even if you give your virtual environment access to the source Python’s site-packages folder, any new packages you install into your virtual environment won’t mingle with the packages there. Python will respect the isolated nature of installations to your virtual environment and place them into the separate site-packages directory within the virtual environment.
You know that a Python virtual environment is just a folder structure with a settings file. It might or might not come with pip preinstalled, and it has access to the source Python’s site-packages directory while remaining isolated. But you might wonder how all of this works.
How Does a Virtual Environment Work?
If you know what a Python virtual environment is but wonder how it manages to create the lightweight isolation it provides, then you’re in the right section. Here you’ll learn how the folder structure and the settings in your pyvenv.cfg file interact with Python to provide a reproducible and isolated space for installing external dependencies.
It Copies Structure and Files
When you create a virtual environment using venv, the module re-creates the file and folder structure of a standard Python installation on your operating system. Python also copies or symlinks into that folder structure the Python executable with which you’ve called venv:
- Windows
- Linux
- macOS
venv
│
├── Include
│
├── Lib
│   │
│   └── site-packages
│
├── Scripts
│   ├── Activate.ps1
│   ├── activate
│   ├── activate.bat
│   ├── deactivate.bat
│   ├── pip.exe
│   ├── pip3.10.exe
│   ├── pip3.exe
│   ├── python.exe
│   └── pythonw.exe
│
└── pyvenv.cfg
venv/
│
├── bin/
│   ├── Activate.ps1
│   ├── activate
│   ├── activate.csh
│   ├── activate.fish
│   ├── pip
│   ├── pip3
│   ├── pip3.10
│   ├── python
│   ├── python3
│   └── python3.10
│
├── include/
│
├── lib/
│   │
│   └── python3.10/
│       │
│       └── site-packages/
│
├── lib64/
│   │
│   └── python3.10/
│       │
│       └── site-packages/
│
└── pyvenv.cfg
venv/
│
├── bin/
│   ├── Activate.ps1
│   ├── activate
│   ├── activate.csh
│   ├── activate.fish
│   ├── pip
│   ├── pip3
│   ├── pip3.10
│   ├── python
│   ├── python3
│   └── python3.10
│
├── include/
│
├── lib/
│   │
│   └── python3.10/
│       │
│       └── site-packages/
│
└── pyvenv.cfg
If you locate your system-wide Python installation on your operating system and inspect the folder structure there, then you’ll see that your virtual environment resembles that structure.
You can find the base Python installation that your virtual environment is based on by navigating to the path you can find under the home key in pyvenv.cfg.
While you might find some additional files and folders in your base Python installation, you’ll notice that the standard folder structure is the same as in your virtual environment. venv creates this folder structure to assure that Python will work as expected in isolation, without the need to apply many additional changes.
It Adapts the Prefix-Finding Process
With the standard folder structure in place, the Python interpreter in your virtual environment can understand where all relevant files are located. It does this with only minor adaptations to its prefix-finding process according to the venv specification.
Instead of looking for the os module to determine the location of the standard library, the Python interpreter first looks for a pyvenv.cfg file. If the interpreter finds this file and it contains a home key, then the interpreter will use that key to set the value for two variables:
sys.base_prefixwill hold the path to the Python executable used to create this virtual environment, which you can find at the path defined under thehomekey inpyvenv.cfg.sys.prefixwill point to the directory containingpyvenv.cfg.
If the interpreter doesn’t find a pyvenv.cfg file, then it determines that it’s not running within a virtual environment, and both sys.base_prefix and sys.prefix will then point to the same path.
You can confirm that this works as described. Spin up a Python interpreter within an active virtual environment and inspect both variables:
- Windows
- Linux
- macOS
>>>
>>> import sys
>>> sys.prefix
'C:\Users\Name\path\to\venv'
>>> sys.base_prefix
'C:\Users\Name\AppData\Local\Programs\Python\Python310'
>>>
>>> import sys
>>> sys.prefix
'/home/name/path/to/venv'
>>> sys.base_prefix
'/usr/local'
>>>
>>> import sys
>>> sys.prefix
'/Users/name/path/to/venv'
>>> sys.base_prefix
'/Library/Frameworks/Python.framework/Versions/3.10'
You can see that the variables point to different locations on your system.
Now go ahead and deactivate the virtual environment, enter a new interpreter session, and rerun the same code:
- Windows
- Linux
- macOS
>>>
>>> import sys
>>> sys.prefix
'C:\Users\Name\AppData\Local\Programs\Python\Python310'
>>> sys.base_prefix
'C:\Users\Name\AppData\Local\Programs\Python\Python310'
>>>
>>> import sys
>>> sys.prefix
'/usr/local'
>>> sys.base_prefix
'/usr/local'
>>>
>>> import sys
>>> sys.prefix
'/Library/Frameworks/Python.framework/Versions/3.10'
>>> sys.base_prefix
'/Library/Frameworks/Python.framework/Versions/3.10'
You should see that both sys.prefix and sys.base_prefix now point to the same path.
If these two variables have different values, then Python adapts where it’ll look for modules:
The
siteandsysconfigstandard-library modules are modified such that the standard library and header files are found relative tosys.base_prefix[…], while site-package directories […] are still found relative tosys.prefix[…]. (Source)
This change effectively allows the Python interpreter in your virtual environment to use the standard library modules from your base Python installation while pointing to its internal site-packages directory to install and access external packages.
It Links Back to Your Standard Library
Python virtual environments aim to be a lightweight way to provide you with an isolated Python environment that you can quickly create and then delete when you don’t need it anymore. To make this possible, venv copies only the minimally necessary files:
[A] Python virtual environment in its simplest form would consist of nothing more than a copy or symlink of the Python binary accompanied by a
pyvenv.cfgfile and a site-packages directory. (Source)
The Python executable in your virtual environment has access to the standard library modules of the Python installation on which you based the environment. Python makes this possible by pointing to the file path of the base Python executable in the home setting in pyvenv.cfg:
- Windows
- Linux
- macOS
home = C:UsersNameAppDataLocalProgramsPythonPython310
include-system-site-packages = false
version = 3.10.3
home = /usr/local/bin
include-system-site-packages = false
version = 3.10.3
home = /Library/Frameworks/Python.framework/Versions/3.10/bin
include-system-site-packages = false
version = 3.10.3
If you navigate to the path value of the highlighted line in pyvenv.cfg and list the contents of the folder, then you find the base Python executable that you used to create your virtual environment. From there, you can navigate to find the folder that contains your standard library modules:
- Windows
- Linux
- macOS
PS> ls C:UsersNameAppDataLocalProgramsPythonPython310

 Directory: C:UsersNameAppDataLocalProgramsPythonPython310

Mode              LastWriteTime      Length Name
----              -------------      ------ ----
d-----     12/19/2021   5:09 PM             DLLs
d-----     12/19/2021   5:09 PM             Doc
d-----     12/19/2021   5:09 PM             include
d-----     12/19/2021   5:09 PM             Lib
d-----     12/19/2021   5:09 PM             libs
d-----     12/21/2021   2:04 PM             Scripts
d-----     12/19/2021   5:09 PM             tcl
d-----     12/19/2021   5:09 PM             Tools
-a----      12/7/2021   4:28 AM       32762 LICENSE.txt
-a----      12/7/2021   4:29 AM     1225432 NEWS.txt
-a----      12/7/2021   4:28 AM       98544 python.exe
-a----      12/7/2021   4:28 AM       61680 python3.dll
-a----      12/7/2021   4:28 AM     4471024 python310.dll
-a----      12/7/2021   4:28 AM       97008 pythonw.exe
-a----      12/7/2021   4:29 AM       97168 vcruntime140.dll
-a----      12/7/2021   4:29 AM       37240 vcruntime140_1.dll

PS> ls C:UsersNameAppDataLocalProgramsPythonPython310Lib

 Directory: C:UsersNameAppDataLocalProgramsPythonPython310Lib

Mode              LastWriteTime      Length Name
----              -------------      ------ ----
d-----     12/19/2021   5:09 PM             asyncio
d-----     12/19/2021   5:09 PM             collections

# ...

-a----      12/7/2021   4:27 AM        5302 __future__.py
-a----      12/7/2021   4:27 AM          65 __phello__.foo.py
$ ls /usr/local/bin

2to3-3.10         pip3.10           python3.10
idle3.10          pydoc3.10         python3.10-config

$ ls /usr/local/lib/python3.10

$ ls
abc.py                   hmac.py            shelve.py
aifc.py                  html               shlex.py
_aix_support.py          http               shutil.py
antigravity.py           idlelib            signal.py

# ...

graphlib.py              runpy.py           zipimport.py
gzip.py                  sched.py           zoneinfo
hashlib.py               secrets.py
heapq.py                 selectors.py
$ ls /Library/Frameworks/Python.framework/Versions/3.10/bin

2to3               pip3.10            python3-intel64
2to3-3.10          pydoc3             python3.10
idle3              pydoc3.10          python3.10-config
idle3.10           python3            python3.10-intel64
pip3               python3-config

$ ls /Library/Frameworks/Python.framework/Versions/3.10/lib/python3.10/

LICENSE.txt              fnmatch.py             rlcompleter.py
__future__.py            fractions.py           runpy.py
__phello__.foo.py        ftplib.py              sched.py
__pycache__              functools.py           secrets.py

# ...

ensurepip                quopri.py              zipimport.py
enum.py                  random.py              zoneinfo
filecmp.py               re.py
fileinput.py             reprlib.py
Python is set up to find these modules by adding the relevant path to sys.path. During initialization, Python automatically imports the site module, which sets the defaults for this argument.
The paths that your Python session has access to in sys.path determine which locations Python can import modules from.
If you activate your virtual environment and enter a Python interpreter, then you can confirm that the path to the standard library folder of your base Python installation is available:
- Windows
- Linux
- macOS
>>>
>>> import sys
>>> from pprint import pp
>>> pp(sys.path)
['',
 'C:\Users\Name\AppData\Local\Programs\Python\Python310\python310.zip',
 'C:\Users\Name\AppData\Local\Programs\Python\Python310\DLLs',
 'C:\Users\Name\AppData\Local\Programs\Python\Python310\lib',
 'C:\Users\Name\AppData\Local\Programs\Python\Python310',
 'C:\Users\Name\path\to\venv',
 'C:\Users\Name\path\to\venv\lib\site-packages']
>>>
>>> import sys
>>> from pprint import pp
>>> pp(sys.path)
['',
 '/usr/local/lib/python310.zip',
 '/usr/local/lib/python3.10',
 '/usr/local/lib/python3.10/lib-dynload',
 '/home/name/path/to/venv/lib/python3.10/site-packages']
>>>
>>> import sys
>>> from pprint import pp
>>> pp(sys.path)
['',
 '/Library/Frameworks/Python.framework/Versions/3.10/lib/python310.zip',
 '/Library/Frameworks/Python.framework/Versions/3.10/lib/python3.10',
 '/Library/Frameworks/Python.framework/Versions/3.10/lib/python3.10/lib-dynload',
 '/Users/name/path/to/venv/lib/python3.10/site-packages']
Because the path to the directory that contains your standard library modules is available in sys.path, you’ll be able to import any of them when you work with Python from within your virtual environment.
It Modifies Your PYTHONPATH
To assure that the scripts you want to run use the Python interpreter within your virtual environment, venv modifies the PYTHONPATH environment variable that you can access using sys.path.
If you inspect that variable without an active virtual environment, you’ll see the default path locations for your default Python installation:
- Windows
- Linux
- macOS
>>>
>>> import sys
>>> from pprint import pp
>>> pp(sys.path)
['',
 'C:\Users\Name\AppData\Local\Programs\Python\Python310\python310.zip',
 'C:\Users\Name\AppData\Local\Programs\Python\Python310\DLLs',
 'C:\Users\Name\AppData\Local\Programs\Python\Python310\lib',
 'C:\Users\Name\AppData\Local\Programs\Python\Python310',
 'C:\Users\Name\AppData\Roaming\Python\Python310\site-packages',
 'C:\Users\Name\AppData\Local\Programs\Python\Python310\lib\site-packages']
>>>
>>> import sys
>>> from pprint import pp
>>> pp(sys.path)
['',
 '/usr/local/lib/python310.zip',
 '/usr/local/lib/python3.10',
 '/usr/local/lib/python3.10/lib-dynload',
 '/usr/local/lib/python3.10/site-packages']
>>>
>>> import sys
>>> from pprint import pp
>>> pp(sys.path)
['',
 '/Library/Frameworks/Python.framework/Versions/3.10/lib/python310.zip',
 '/Library/Frameworks/Python.framework/Versions/3.10/lib/python3.10',
 '/Library/Frameworks/Python.framework/Versions/3.10/lib/python3.10/lib-dynload',
 '/Library/Frameworks/Python.framework/Versions/3.10/lib/python3.10/site-packages']
Note the highlighted lines, which represent the path to the site-packages directory. This folder contains external modules that you’d install, for example, using pip. Without an activated virtual environment, this directory is nested within the same folder structure as the Python executable.
However, if you activate your virtual environment before starting another interpreter session and rerun the same commands, then you’ll get different output:
- Windows
- Linux
- macOS
>>>
>>> import sys
>>> from pprint import pp
>>> pp(sys.path)
['',
 'C:\Users\Name\AppData\Local\Programs\Python\Python310\python310.zip',
 'C:\Users\Name\AppData\Local\Programs\Python\Python310\DLLs',
 'C:\Users\Name\AppData\Local\Programs\Python\Python310\lib',
 'C:\Users\Name\AppData\Local\Programs\Python\Python310',
 'C:\Users\Name\path\to\venv',
 'C:\Users\Name\path\to\venv\lib\site-packages']
>>>
>>> import sys
>>> from pprint import pp
>>> pp(sys.path)
['',
 '/usr/local/lib/python310.zip',
 '/usr/local/lib/python3.10',
 '/usr/local/lib/python3.10/lib-dynload',
 '/home/name/path/to/venv/lib/python3.10/site-packages']
>>>
>>> import sys
>>> from pprint import pp
>>> pp(sys.path)
['',
 '/Library/Frameworks/Python.framework/Versions/3.10/lib/python310.zip',
 '/Library/Frameworks/Python.framework/Versions/3.10/lib/python3.10',
 '/Library/Frameworks/Python.framework/Versions/3.10/lib/python3.10/lib-dynload',
 '/Users/name/path/to/venv/lib/python3.10/site-packages']
Python replaced the default site-packages directory path with the one that lives inside your virtual environment. This change means that Python will load any external packages installed in your virtual environment. Conversely, because the path to your base Python’s site-packages directory isn’t in this list anymore, Python won’t load modules from there.
This change in Python’s path settings effectively creates the isolation of external packages in your virtual environment.
Optionally, you can get read-only access to the system site-packages directory of your base Python installation by passing an argument when creating the virtual environment.
It Changes Your Shell PATH Variable on Activation
For convenience, you’ll usually activate your virtual environment before working in it, even though you don’t have to.
To activate your virtual environment, you need to execute an activation script:
- Windows
- Linux + macOS
PS> venvScriptsactivate
(venv) PS>
$ source venv/bin/activate
(venv) $
Which activation script you’ll have to run depends on your operating system and the shell that you’re using.
If you dig into your virtual environment’s folder structure, then you’ll find a few different activation scripts that it ships with:
- Windows
- Linux
- macOS
venv
│
├── Include
│
├── Lib
│
├── Scripts
│   ├── Activate.ps1
│   ├── activate
│   ├── activate.bat
│   ├── deactivate.bat
│   ├── pip.exe
│   ├── pip3.10.exe
│   ├── pip3.exe
│   ├── python.exe
│   └── pythonw.exe
│
└── pyvenv.cfg
venv/
│
├── bin/
│   ├── Activate.ps1
│   ├── activate
│   ├── activate.csh
│   ├── activate.fish
│   ├── pip
│   ├── pip3
│   ├── pip3.10
│   ├── python
│   ├── python3
│   └── python3.10
│
├── include/
│
├── lib/
│
├── lib64/
│
└── pyvenv.cfg
venv/
│
├── bin/
│   ├── Activate.ps1
│   ├── activate
│   ├── activate.csh
│   ├── activate.fish
│   ├── pip
│   ├── pip3
│   ├── pip3.10
│   ├── python
│   ├── python3
│   └── python3.10
│
├── include/
│
├── lib/
│
└── pyvenv.cfg
These activation scripts all have the same purpose. However, they need to provide different ways of achieving it because of the various operating systems and shells that users are working with.
Two critical actions happen in the activation script:
- Path: It sets the
VIRTUAL_ENVvariable to the root folder path of your virtual environment and prepends the relative location of its Python executable to yourPATH. - Command prompt: It changes the command prompt to the name that you passed when creating the virtual environment. It takes that name and puts it into parentheses, for example
(venv).
These changes put the convenience of virtual environments into effect within your shell:
- Path: Because the path to all the executables in your virtual environment now lives at the front of your
PATH, your shell will invoke the internal versions ofpipor Python when you just typepiporpython. - Command prompt: Because the script changed your command prompt, you’ll quickly know whether or not your virtual environment is activated.
Both of these changes are minor adaptations that exist purely for your convenience. They aren’t strictly necessary, but they make working with Python virtual environments more enjoyable.
You can inspect your PATH variable before and after activation of your virtual environment. If you’ve activated your virtual environment, then you’ll see the path to the folder containing your internal executables at the beginning of PATH:
- Windows
- Linux
- macOS
PS> $Env:Path
C:UsersNamepathtovenvScripts;C:Windowssystem32;C:Windows;C:WindowsSystem32Wbem;C:UsersNameAppDataLocalProgramsPythonPython310Scripts;C:UsersNameAppDataLocalProgramsPythonPython310;c:usersname.localbin;c:usersnameappdataroamingpythonpython310scripts
$ echo $PATH
/home/name/path/to/venv/bin:/usr/local/sbin:/usr/local/bin:/usr/sbin:/usr/bin:/sbin:/bin:/home/name/.local/bin
$ echo $PATH
/Users/name/path/to/venv/bin:/Library/Frameworks/Python.framework/Versions/3.10/bin:/usr/local/bin:/usr/bin:/bin:/usr/sbin:/sbin:/Users/name/.local/bin
Keep in mind that the output of printing your PATH variable will most likely look quite different. The important point is that the activation script has added the path to your virtual environment at the beginning of the PATH variable.
When you deactivate your virtual environment using deactivate, your shell reverses these changes and puts PATH and your command prompt back to the way they were before.
Give it a try and inspect the changes. This small change to your PATH variable gives you the convenience of running executables in your virtual environment without the need to provide the full path.
It Runs From Anywhere With Absolute Paths
You don’t need to activate your virtual environment to use it. You can work with your virtual environment without activating it, even though activating it is a common action that you’ll often see recommended.
If you provide only the name of an executable to your shell, it’ll look through the location recorded in PATH for an executable file sporting that name. It’ll then pick and run the first one that matches that criterion.
The activation script changes your PATH variable so that the binaries folder of your virtual environment is the first place your shell looks for executables. This change allows you to type only pip or python to run the respective programs situated inside your virtual environment.
If you don’t activate your virtual environment, then you can instead pass the absolute path of the Python executable inside your virtual environment to run any script from within your virtual environment:
- Windows
- Linux
- macOS
PS> C:UsersNamepathtovenvScriptspython.exe
$ /home/name/path/to/venv/bin/python
$ /Users/name/path/to/venv/bin/python
This command will start the Python interpreter within your virtual environment precisely the same way it would if you first activated the virtual environment and then called it with python.
How can you confirm that using the absolute path without activating the virtual environment starts the same interpreter as when you activate the virtual environment and run python?
Take some notes of possible ways to check, then try out some of the solutions mentioned in the Solution block below.
As described in previous sections of this tutorial, you could:
- Print
sys.pathand confirm that the site-packages directory within your virtual environment is listed - Confirm that
sys.prefixhas changed and now points to a folder in your virtual environment folder structure - Activate the virtual environment, then inspect the
PATHshell variable to find the path to your virtual environment’s binary executables listed in the first place
If you’re unsure why any of these approaches could confirm that this works as described, follow the links to the relevant sections in this tutorial to refresh your memory.
Alternatively, you could confirm which Python executable you’re using by starting the interpreter and running import sys; sys.executable. These commands will return the absolute path to your current Python interpreter. Does the path lead into your virtual environment folder structure?
You’ll often activate your virtual environment before working with it and deactivate it after you’re done. However, there is an everyday use case where using the absolute paths is a helpful approach.
Embedding the activation of your virtual environment in your script is a fussy exercise that goes wrong more often than it doesn’t. Instead, equipped with the knowledge that you’ve gained in this tutorial, you can use the absolute path to the Python interpreter in your virtual environment when running your script.
You could use this, for example, if you were setting up an hourly CRON job on your remote Linux server that checks for site connectivity asynchronously using the external aiohttp package that you installed in a virtual environment:
0 * * * *
    /home/name/Documents/connectivity-checker/venv/bin/python
    -m rpchecker
    -u google.com twitter.com
    -a
You don’t need to fiddle with activating your virtual environment to use the right Python interpreter that has access to the dependencies that you’ve installed inside the virtual environment. Instead, you just pass the absolute path to the binary of that interpreter. Python takes care of the rest for you during initialization.
As long as you provide the path to your Python executable, you don’t need to activate your virtual environment to enjoy the benefits of using one.
How Can You Customize a Virtual Environment?
If you’re confident about what a Python virtual environment is and you want to customize it for a specific use case, then you’re in the right place. In this section, you’ll learn about the optional arguments that you can pass when creating a virtual environment with venv, and how these customizations can help you get precisely the virtual environment you need.
Change the Command Prompt
You can change the folder name that contains your virtual environment when you create it by passing a name other than venv. In fact, you’ll often see different names in different projects. Some of them are commonly used:
venvenv.venv
You could name the folder that you create for your virtual environment anything you want.
Whatever name you choose will show up in your command prompt after you activate the virtual environment:
- Windows
- Linux + macOS
PS> python -m venv your-fancy-name
PS> your-fancy-nameScriptsactivate
(your-fancy-name) PS>
$ python3 -m venv your-fancy-name
$ source your-fancy-name/bin/activate
(your-fancy-name) $
If you give your virtual environment folder an alternate name, you’ll also need to consider that name when you want to run your activation script, as shown in the code example above.
If you want the convenience of seeing a different command prompt, but you want to keep the folder name descriptive so that you’ll know it contains a virtual environment, then you can pass your desired command prompt name to --prompt:
- Windows
- Linux + macOS
PS> python -m venv venv --prompt="dev-env"
PS> venvScriptsactivate
(dev-env) PS>
$ python3 -m venv venv --prompt="dev-env"
$ source venv/bin/activate
(dev-env) $
Using the optional --prompt argument, you can set the command prompt that’ll show up when your virtual environment is active to a descriptive string without changing the name of your virtual environment’s folder.
In the code snippet above, you can see that you’re still calling the folder venv, which means that you’ll be able to access the activate script with the familiar path. At the same time, the command prompt that shows up after activation will be whatever you passed to --prompt.
Overwrite Existing Environments
You might want to delete and re-create one of your virtual environments at any given time. If you do that often, then you might be glad to know that you can add the --clear argument to delete the contents of an existing environment before Python creates the new one.
Before you try that out, it’s helpful to see that running the command to create a new virtual environment without this argument won’t overwrite an existing virtual environment with the same name:
- Windows
- Linux + macOS
PS> python -m venv venv
PS> venvScriptspip.exe install requests
PS> venvScriptspip.exe list
Package            Version
------------------ ---------
certifi            2021.10.8
charset-normalizer 2.0.12
idna               3.3
pip                22.0.4
requests           2.27.1
setuptools         58.1.0
urllib3            1.26.9

PS> python -m venv venv
PS> venvScriptspip.exe list
Package            Version
------------------ ---------
certifi            2021.10.8
charset-normalizer 2.0.12
idna               3.3
pip                22.0.4
requests           2.27.1
setuptools         58.1.0
urllib3            1.26.9
$ python3 -m venv venv
$ venv/bin/pip install requests
$ venv/bin/pip list
Package            Version
------------------ ---------
certifi            2021.10.8
charset-normalizer 2.0.12
idna               3.3
pip                22.0.4
requests           2.27.1
setuptools         58.1.0
urllib3            1.26.9

$ python3 -m venv venv
$ venv/bin/pip list
Package            Version
------------------ ---------
certifi            2021.10.8
charset-normalizer 2.0.12
idna               3.3
pip                22.0.4
requests           2.27.1
setuptools         58.1.0
urllib3            1.26.9
In this code example, you first created a virtual environment called venv, then used the environment-internal pip executable to install requests into the site-packages directory of your virtual environment. You then used pip list to confirm that it had been installed, together with its dependencies.
In the highlighted line, you attempted to create another virtual environment using the same name, venv.
You might expect venv to notify you that there’s an existing virtual environment on the same path, but it doesn’t. You might expect venv to automatically delete the existing virtual environment with the same name and replace it with a new one, but it doesn’t do that either. Instead, when venv finds an existing virtual environment of the same name on the path you provided, it doesn’t do anything—and again, it doesn’t communicate this to you.
If you list the installed packages after running the virtual environment creation command a second time, then you’ll notice that requests and its dependencies still show up. This might not be what you want to achieve.
Rather than navigating to your virtual environment folder and deleting it first, you can explicitly overwrite an existing virtual environment using --clear:
- Windows
- Linux + macOS
PS> python -m venv venv
PS> venvScriptspip.exe install requests
PS> venvScriptspip.exe list
Package            Version
------------------ ---------
certifi            2021.10.8
charset-normalizer 2.0.12
idna               3.3
pip                22.0.4
requests           2.27.1
setuptools         58.1.0
urllib3            1.26.9

PS> python -m venv venv --clear
PS> venvScriptspip.exe list
Package    Version
---------- -------
pip        22.0.4
setuptools 58.1.0
$ python3 -m venv venv
$ venv/bin/pip install requests
$ venv/bin/pip list
Package            Version
------------------ ---------
certifi            2021.10.8
charset-normalizer 2.0.12
idna               3.3
pip                22.0.4
requests           2.27.1
setuptools         58.1.0
urllib3            1.26.9

$ python3 -m venv venv --clear
$ venv/bin/pip list
Package    Version
---------- -------
pip        22.0.4
setuptools 58.1.0
Using the same example as before, you added the optional --clear argument when running the creation command the second time.
You then confirmed that Python automatically discarded the existing virtual environment with the same name and created a new default virtual environment without the previously installed packages.
Create Multiple Virtual Environments at Once
If one virtual environment isn’t enough, you can create multiple separate virtual environments in one go by passing more than one path to the command:
- Windows
- Linux
- macOS
PS> python -m venv venv C:UsersNameDocumentsvirtualenvsvenv-copy
$ python3 -m venv venv /home/name/virtualenvs/venv-copy
$ python3 -m venv venv /Users/name/virtualenvs/venv-copy
Running this command creates two separate virtual environments in two different locations. These two folders are independent virtual environment folders. Passing more than one path therefore just saves you the effort of typing the creation command more than once.
In the example shown above, you might notice that the first argument, venv, represents a relative path. Conversely, the second argument uses an absolute path to point to a new folder location. Either option works when creating a virtual environment. You can even mix and match, as you did here.
You’re also not limited to creating two virtual environments at once. You can pass as many valid paths as you want, separated by a whitespace character. Python will diligently set up a virtual environment at each location, even creating any missing folders on the way.
Update the Core Dependencies
When you’ve created a Python virtual environment using venv and its default settings and then installed an external package using pip, you’ve most likely encountered a message telling you that your installation of pip is outdated:
- Windows
- Linux + macOS
WARNING: You are using pip version 21.2.4; however, version 22.0.4 is available.
You should consider upgrading via the
'C:UsersNamepathtovenvScriptspython.exe -m pip install --upgrade pip' command.
WARNING: You are using pip version 21.2.4; however, version 22.0.4 is available.
You should consider upgrading via the
'/path/to/venv/python -m pip install --upgrade pip' command.
It can be frustrating to create something new just to see that it’s already outdated! Why does this happen?
The installation of pip that you’ll receive when creating a virtual environment with the default configuration of venv is likely outdated because venv uses ensurepip to bootstrap pip into your virtual environment.
ensurepip intentionally doesn’t connect to the Internet, but instead uses a pip wheel that comes bundled with each new CPython release. Therefore, the bundled pip has a different update cycle than the independent pip project.
Once you install an external package using pip, the program connects to PyPI and also identifies if pip itself is outdated. If pip is outdated, then you’ll receive the warning shown above.
While using the bootstrapped version of pip can be helpful in some cases, you might want to have the latest pip to avoid potential security issues or bugs that might still be around in an older version. For an existing virtual environment, you can follow the instructions that pip prints to your terminal and use pip to upgrade itself.
If you want to save the effort of doing this manually, you can specify that you want pip to contact PyPI and update itself right after installation by passing the --upgrade-deps argument:
- Windows
- Linux + macOS
PS> python -m venv venv --upgrade-deps
PS> venvScriptsactivate
(venv) PS> python -m pip install --upgrade pip
Requirement already satisfied: pip in c:usersnamepathtovenvlibsite-packages (22.0.4)
$ python3 -m venv venv --upgrade-deps
$ source venv/bin/activate
(venv) $ python -m pip install --upgrade pip
Requirement already satisfied: pip in ./venv/lib/python3.10/site-packages (22.0.4)
Suppose you use the optional --upgrade-deps argument when creating your virtual environment. In that case, it’ll automatically poll PyPI for the newest versions of pip and setuptools and install them if the local wheel isn’t up-to-date.
Gone is that pesky warning message, and you can rest assured that you’re using the most recent version of pip.
Avoid Installing pip
You might wonder why it takes a while to set up a Python virtual environment when all it does is create a folder structure. The reason for the time delay is mainly the installation of pip. pip and its dependencies are large and blow up the size of your virtual environment from a few kilobytes to many megabytes!
In most use cases, you’ll want to have pip installed in your virtual environment because you’ll probably use it to install external packages from PyPI. However, if you don’t need pip for whatever reason, then you can use --without-pip to create a virtual environment without it:
- Windows
- Linux
- macOS
PS> python -m venv venv --without-pip
PS> Get-ChildItem venv | Measure-Object -Property length -Sum

Count    : 1
Average  :
Sum      : 120
Maximum  :
Minimum  :
Property : Length
$ python3 -m venv venv --without-pip
$ du -hs venv
52K venv
$ python3 -m venv venv --without-pip
$ du -hs venv
28K venv
Your virtual environment still does everything that qualifies it as a virtual environment by providing lightweight isolation with a separate Python executable.
To work with a virtual environment that doesn’t have pip installed, you can manually install packages into your site-packages directory or place your ZIP files in there then import them using Python ZIP imports.
Include the System Site-Packages
In some situations, you might want to keep access to your base Python’s site-packages directory instead of severing that tie. For example, you might have already set up a package that’s compiled during installation, such as Bokeh, in your global Python environment.
Bokeh happens to be your data exploration library of choice, and you use it for all your projects. You still want to keep your clients’ projects in separate environments, but installing Bokeh into each of these can take a couple of minutes each. For quick iteration, you instead want to have access to the existing Bokeh installation without needing to redo it for every virtual environment you create.
You can access all modules you’ve installed to your base Python’s site-packages directory by adding the --system-site-packages flag when creating your virtual environment.
Create a new virtual environment while passing this argument. You’ll see that in addition to your local site-packages directory, the path to your base Python’s site-packages directory will stick around in sys.path.
To test this, you can create and activate a new virtual environment using the --system-site-packages argument:
- Windows
- Linux + macOS
PS> python -m venv venv --system-site-packages
PS> venvScriptsactivate
(venv) PS>
$ python3 -m venv venv --system-site-packages
$ source venv/bin/activate
(venv) $
Once again, you’ve created a new virtual environment named venv, but this time you passed the --system-site-packages argument. Adding this optional argument resulted in a different setting in your pyvenv.cfg file:
- Windows
- Linux
- macOS
home = C:UsersNameAppDataLocalProgramsPythonPython310
include-system-site-packages = true
version = 3.10.3
home = /usr/local/bin
include-system-site-packages = true
version = 3.10.3
home = /Library/Frameworks/Python.framework/Versions/3.10/bin
include-system-site-packages = true
version = 3.10.3
Instead of sporting the default value of false, the include-system-site-packages configuration is now set to true.
This change means that you’ll see an additional entry to sys.path, which allows the Python interpreter in your virtual environment to also access the system site-packages directory. Make sure your virtual environment is active, then start the Python interpreter to check the path variables:
- Windows
- Linux
- macOS
>>>
>>> import sys
>>> from pprint import pp
>>> pp(sys.path)
['',
 'C:\Users\Name\AppData\Local\Programs\Python\Python310\python310.zip',
 'C:\Users\Name\AppData\Local\Programs\Python\Python310\DLLs',
 'C:\Users\Name\AppData\Local\Programs\Python\Python310\lib',
 'C:\Users\Name\AppData\Local\Programs\Python\Python310',
 'C:\Users\Name\path\to\venv',
 'C:\Users\Name\path\to\venv\lib\site-packages',
 'C:\Users\Name\AppData\Roaming\Python\Python310\site-packages',
 'C:\Users\Name\AppData\Local\Programs\Python\Python310\lib\site-packages']
>>>
>>> import sys
>>> from pprint import pp
>>> pp(sys.path)
['',
 '/usr/local/lib/python310.zip',
 '/usr/local/lib/python3.10',
 '/usr/local/lib/python3.10/lib-dynload',
 '/home/name/path/to/venv/lib/python3.10/site-packages',
 '/home/name/.local/lib/python3.10/site-packages',
 '/usr/local/lib/python3.10/site-packages']
>>>
>>> import sys
>>> from pprint import pp
>>> pp(sys.path)
['',
 '/Library/Frameworks/Python.framework/Versions/3.10/lib/python310.zip',
 '/Library/Frameworks/Python.framework/Versions/3.10/lib/python3.10',
 '/Library/Frameworks/Python.framework/Versions/3.10/lib/python3.10/lib-dynload',
 '/Users/name/path/to/venv/lib/python3.10/site-packages',
 '/Library/Frameworks/Python.framework/Versions/3.10/lib/python3.10/site-packages']
The highlighted lines show the additional paths present in a virtual environment when you’ve created it using --system-site-packages. They point to the site-packages directories of your base Python installation and give the interpreter inside your virtual environment access to these packages.
Copy or Link Your Executables
Whether you receive a copy or a symlink of your Python binaries depends on the operating system that you’re working with:
- Windows may create either a symlink or a copy, but some versions don’t support symlinks. Creating symlinks might require you to have administrator privileges.
- Linux distributions may create either a symlink or a copy and often opt for symlinks over copies.
- macOS always creates a copy of the binaries.
PEP 405 mentions the advantages of creating symlinks:
Symlinking is preferable where possible because, in the case of an upgrade to the underlying Python installation, a Python executable copied in a venv might become out-of-sync with the installed standard library and require manual upgrade. (Source)
While it can be helpful to symlink the executables so that they’ll automatically stay in sync even if you upgrade your base Python installation, the added flimsiness of this approach may outweigh its benefit. For example, when you double-click python.exe in Windows, the operating system will eagerly resolve the symlink and ignore your virtual environment.
Most likely, you won’t ever have to touch these arguments, but if you have a good reason for attempting to force either symlinks or copies over your operating system’s default, then you can do so:
--symlinkswill attempt to create symlinks instead of copies. This option won’t have any effect on macOS builds.--copieswill attempt to create copies of your Python binaries instead of linking them to the base Python installation’s executables.
You can pass either one of these optional arguments when creating your virtual environment.
Upgrade Your Python to Match the System Python
If you’ve built your virtual environment using copies rather than symlinks and later updated your base Python version on your operating system, you might run into a version mismatch with standard library modules.
The venv module offers a solution to this. The optional --upgrade argument keeps your site-packages directory intact while updating the binary files to the new versions on your system:
- Windows
- Linux + macOS
PS> python -m venv venv --upgrade
$ python3 -m venv venv --upgrade
If you run this command and you’ve updated your Python version since initially creating the virtual environment, then you’ll keep your installed libraries, but venv will update the executables for pip and Python.
In this section, you’ve learned that you can apply a lot of customization to the virtual environments that you build with the venv module. These adaptations can be pure convenience updates, such as naming your command prompt differently from your environment folder, overwriting existing environments, or creating multiple environments with a single command. Other customizations create different functionality in your virtual environments by, for example, skipping the installation of pip and its dependencies, or linking back to the base Python’s site-packages folder.
But what if you want to do even more than that? In the next section, you’ll explore alternatives to the built-in venv module.
What Other Popular Options Exist, Aside From venv?
The venv module is a great way to work with Python virtual environments. One of its main advantages is that venv comes preinstalled with Python starting from version 3.3. But it isn’t the only option you have. You can use other tools to create and handle virtual environments in Python.
In this section, you’ll learn about two popular tools. They have different scopes but are both also commonly used for the same purpose as the venv module:
- Virtualenv is a superset of
venvand provides the basis for its implementation. It’s a powerful, extendable tool for creating isolated Python environments. - Conda offers package, dependency, and environment management for Python and other languages.
They have some advantages over venv, but they don’t come with your standard Python installation, so you’ll have to install them separately.
The Virtualenv Project
Virtualenv is a tool that was specifically made for creating isolated Python environments. It’s been a long-time favorite within the Python community and precedes the built-in venv module.
The package is a superset of venv, which allows you to do everything that you can do using venv, and more. Virtualenv allows you to:
- Create virtual environments more quickly
- Discover installed versions of Python without needing to provide the absolute path
- Upgrade the tool using
pip - Extend the functionality of the tool yourself
Any of these additional functionalities can come in handy when you’re working on your Python projects. You might even want to save a blueprint of your virtualenv in code together with your project to aid reproducibility. Virtualenv has a rich programmatic API that allows you to describe virtual environments without creating them.
After installing virtualenv on your system, you can create and activate a new virtual environment similarly to how you do it using venv:
- Windows
- Linux
- macOS
PS> virtualenv venv
created virtual environment CPython3.10.3.final.0-64 in 312ms
  creator CPython3Windows(dest=C:UsersNamepathtovenv, clear=False, no_vcs_ignore=False, global=False)
  seeder FromAppData(download=False, pip=bundle, setuptools=bundle, wheel=bundle, via=copy, app_data_dir=C:UsersNameAppDataLocalpypavirtualenv)
    added seed packages: pip==22.0.4, setuptools==60.10.0, wheel==0.37.1
  activators BashActivator,BatchActivator,FishActivator,NushellActivator,PowerShellActivator,PythonActivator
PS> Set-ExecutionPolicy Unrestricted -Scope Process
PS> venvScriptsactivate
(venv) PS>
$ virtualenv venv
created virtual environment CPython3.10.3.final.0-64 in 214ms
  creator CPython3Posix(dest=/home/name/path/to/venv, clear=False, no_vcs_ignore=False, global=False)
  seeder FromAppData(download=False, pip=bundle, setuptools=bundle, wheel=bundle, via=copy, app_data_dir=/home/name/.local/share/virtualenv)
    added seed packages: pip==22.0.4, setuptools==60.10.0, wheel==0.37.1
  activators BashActivator,CShellActivator,FishActivator,NushellActivator,PowerShellActivator,PythonActivator
$ source venv/bin/activate
(venv) $
$ virtualenv venv
created virtual environment CPython3.10.3.final.0-64 in 389ms
  creator CPython3Posix(dest=/Users/name/path/to/venv, clear=False, no_vcs_ignore=False, global=False)
  seeder FromAppData(download=False, pip=bundle, setuptools=bundle, wheel=bundle, via=copy, app_data_dir=/Users/name/Library/Application Support/virtualenv)
    added seed packages: pip==22.0.4, setuptools==60.10.0, wheel==0.37.1
  activators BashActivator,CShellActivator,FishActivator,NushellActivator,PowerShellActivator,PythonActivator
$ source venv/bin/activate
(venv) $
Like with venv, you can pass a relative or an absolute path and name your virtual environment. Before working in your virtualenv, you’ll usually activate it using one of the provided scripts.
There are two main user advantages with virtualenv over venv:
- Speed: Virtualenv creates environments much more quickly.
- Updates: Thanks to virtualenv’s embedded wheels, you’ll receive up-to-date
pipand setuptools without needing to connect to the Internet right when you first set up the virtual environment.
If you need to work with legacy versions of Python 2.x, then virtualenv can also be helpful for that. It supports building Python virtual environments using Python 2 executables, which isn’t possible using venv.
If you’re just getting started with virtual environments in Python, then you may want to stick with the built-in venv module. However, if you’ve used it for a while and you’re bumping into the tool’s limitations, then it’s a great idea to get started using virtualenv.
The Conda Package and Environment Manager
Conda gives you an alternative package and environment management approach. While the tool is primarily associated with the data science community and the Anaconda Python distribution, its potential use cases extend beyond that community and beyond just installing Python packages:
Package, dependency and environment management for any language—Python, R, Ruby, Lua, Scala, Java, JavaScript, C/ C++, FORTRAN, and more. (Source)
While you can also use conda to set up an isolated environment to install Python packages, this is only one feature of the tool:
pip installs python packages within an environment; conda installs any package within conda environments. (Source)
As you may gather from this quote, conda accomplishes this isolation differently from the venv module and virtualenv project.
Conda is its own project that’s unrelated to pip. You can set it up on your system using the Miniconda installer, which brings along the minimal requirements for running conda on your system.
In its default configuration, conda get its packages from repo.anaconda.com instead of PyPI. This alternative package index is maintained by the Anaconda project and is similar PyPI, but not identical.
Because conda isn’t limited to Python packages, you’ll find other, usually data-science-related packages on conda’s package index written in different languages. Conversely, there are Python packages available on PyPI that you can’t install using conda because they aren’t present in that package repository. If you need such a package in your conda environment, then you can instead install it there using pip.
If you’re working in the data science space and with Python alongside other data science projects, then conda is an excellent choice that works across platforms and languages.
After installing Anaconda or Miniconda, you can create a conda environment:
- Windows
- Linux
- macOS
PS> conda create -n <venv-name>
Collecting package metadata (current_repodata.json): done
Solving environment: done

## Package Plan ##

  environment location: C:UsersNameminiconda3envs<venv-name>

Proceed ([y]/n)? y

Preparing transaction: done
Verifying transaction: done
Executing transaction: done
#
# To activate this environment, use
#
#     $ conda activate <venv-name>
#
# To deactivate an active environment, use
#
#     $ conda deactivate
Suppose your standard PowerShell session doesn’t recognize the conda command after successfully installing Anaconda. In that case, you can look for the Anaconda PowerShell Prompt in your programs and work with that one instead.
$ conda create -n <venv-name>
Collecting package metadata (current_repodata.json): done
Solving environment: done

## Package Plan ##

  environment location: /home/name/anaconda3/envs/<venv-name>

Proceed ([y]/n)? y

Preparing transaction: done
Verifying transaction: done
Executing transaction: done
#
# To activate this environment, use
#
#     $ conda activate <venv-name>
#
# To deactivate an active environment, use
#
#     $ conda deactivate
$ conda create -n <venv-name>
Collecting package metadata (current_repodata.json): done
Solving environment: done

## Package Plan ##

  environment location: /Users/name/opt/anaconda3/envs/<venv-name>

Proceed ([y]/n)? y

Preparing transaction: done
Verifying transaction: done
Executing transaction: done
#
# To activate this environment, use
#
#     $ conda activate <venv-name>
#
# To deactivate an active environment, use
#
#     $ conda deactivate
This command creates a new conda environment in a central location on your computer.
To work within your new conda environment, you’ll need to activate it:
- Windows
- Linux + macOS
PS> conda activate <venv-name>
(<venv-name>) PS>
$ conda activate <venv-name>
(<venv-name>) $
After activating the environment, you can install packages from conda’s package repository into that environment:
- Windows
- Linux + macOS
(<venv-name>) PS> conda install numpy
(<venv-name>) $ conda install numpy
The install command installs a third-party package from conda’s package repository into your active conda environment.
When you’re done working in the environment, you’ll have to deactivate it:
- Windows
- Linux + macOS
(<venv-name>) PS> conda deactivate
PS>
(<venv-name>) $ conda deactivate
$
You might notice that the general idea is similar to working with Python virtual environments that you’ve created using venv. The commands differ slightly, but you’ll receive the same benefits of working within an isolated environment that you can delete and re-create when necessary.
If you primarily work on data science projects and already work with Anaconda, then you might never have to work with venv. In that case, you can read more about conda environments and how to work with them effectively on your machine.
If you only have pure-Python dependencies and you haven’t worked with Anaconda before, then you’re better off using the more lightweight venv module directly or giving virtualenv a try.
How Can You Manage Your Virtual Environments?
If you’ve absorbed all the information from the previous sections, but you’re unsure how to handle the multitude of environment folders that have started agglomerating on your system, keep reading here.
In this section, you’ll learn how to extract the essential information of your virtual environment into a single file so that you can quickly delete and re-create your virtual environment folder at any time and on any computer.
You’ll also learn about two different ways of organizing where to keep your virtual environment folders and about some popular third-party tools that can help you manage your virtual environments.
Decide Where to Create Your Environment Folders
A Python virtual environment is just a folder structure. You can place it anywhere on your system. However, a consistent structure can help, and there are two prominent opinions on where to create your virtual environment folders:
- Inside each individual project folder
- In a single location, for example in a subfolder of your home directory
Both of these have merits and disadvantages, and your preference will ultimately depend on your workflow.
In the project-folder approach approach, you create a new virtual environment in the root folder of the project that’ll use this virtual environment for:
project_name/
│
├── venv/
│
└── src/
The virtual environment folder then lives side by side with any code that you’ll write for that project.
This structure has the advantage that you’ll know which virtual environment belongs to which project, and you can activate your virtual environment using a short relative path once you’ve navigated into the project folder.
In the single-folder approach, you keep all your virtual environments in a single folder, for example in a subfolder of your home directory:
- Windows
- Linux
- macOS
C:USERSUSERNAME
│
├── .local
│
├── Contacts
│
├── Desktop
│
├── Documents
│   │
│   └── Projects
│       │
│       ├── django-project
│       │
│       ├── flask-project
│       │
│       └── pandas-project
│
├── Downloads
│
├── Favorites
│
├── Links
│
├── Music
│
├── OneDrive
│
├── Pictures
│
├── Searches
│
├── venvs
│   │
│   ├── django-venv
│   │
│   ├── flask-venv
│   │
│   └── pandas-venv
│
└── Videos
name/
│
├── Desktop/
│
├── Documents/
│   │
│   └── projects/
│       │
│       ├── django-project/
│       │
│       ├── flask-project/
│       │
│       └── pandas-project/
│
├── Downloads/
│
├── Music/
│
├── Pictures/
│
├── Public/
│
├── Templates/
│
├── venvs
│   │
│   ├── django-venv/
│   │
│   ├── flask-venv/
│   │
│   └── pandas-venv/
│
└── Videos/
name/
│
├── Applications/
│
├── Desktop/
│
├── Documents/
│   │
│   └── projects/
│       │
│       ├── django-project/
│       │
│       ├── flask-project/
│       │
│       └── pandas-project/
│
├── Downloads/
│
├── Library/
│
├── Movies/
│
├── Music/
│
├── Pictures/
│
├── Public/
│
├── opt/
│
└── venvs
    │
    ├── django-venv/
    │
    ├── flask-venv/
    │
    └── pandas-venv/
If you use this approach, it could be less effort to keep track of which virtual environments you’ve created. You can go to a single location on your operating system to inspect all virtual environments and decide which ones to keep and which ones to delete.
On the other hand, you won’t be able to activate your virtual environment quickly using a relative path when you’ve already navigated to your project folder. Instead, it’s best to activate it using the absolute path to the activate script in the respective virtual environment folder.
A third option is to leave this decision to your integrated development environment (IDE). Many of these programs include options to automatically create a virtual environment for you when you start a new project.
To learn more about how your favorite IDE handles virtual environments, check out its online documentation on the topic. For example, VS Code and PyCharm have their own approaches to creating virtual environments.
Treat Them as Disposables
Virtual environments are disposable folder structures that you should be able to safely delete and re-create at any time without losing information about your code project.
This means that you generally don’t put any additional code or information into your virtual environment manually. Anything that goes in there should be handled by your package manager, which will usually be pip or conda.
You also shouldn’t commit your virtual environment to version control, and you shouldn’t ship it with your project.
Because virtual environments aren’t entirely self-sufficient Python installations but rely on the base Python’s standard library, you won’t create a portable application by distributing your virtual environment together with your code.
Virtual environments are meant to be lightweight, disposable, and isolated environments to develop your projects in.
However, you should be able to re-create your Python environment on a different computer so that you can run your program or continue developing it there. How can you make that happen when you treat your virtual environment as disposable and won’t commit it to version control?
Pin Your Dependencies
To make your virtual environment reproducible, you need a way to describe its contents. The most common way to do this is by creating a requirements.txt file while your virtual environment is active:
- Windows
- Linux + macOS
(venv) PS> python -m pip freeze > requirements.txt
(venv) $ python -m pip freeze > requirements.txt
This command pipes the output of pip freeze into a new file called requirements.txt. If you open the file, then you’ll notice that it contains a list of the external dependencies currently installed in your virtual environment.
This list is a recipe for pip to know which version of which package to install. As long as you keep this requirements.txt file up to date, you can always re-create the virtual environment that you’re working in, even after deleting the venv/ folder or moving to a different computer altogether:
- Windows
- Linux + macOS
(venv) PS> deactivate
PS> python -m venv new-venv
PS> new-venvScriptsactivate
(new-venv) PS> python -m pip install -r requirements.txt
(venv) $ deactivate
$ python3 -m venv new-venv
$ source new-venv/bin/activate
(new-venv) $ python -m pip install -r requirements.txt
In the example code snippet above, you created a new virtual environment called new-venv, activated it, and installed all external dependencies that you previously recorded in your requirements.txt file.
If you use pip list to inspect the currently installed dependencies, then you’ll see that both virtual environments, venv and new-venv, now contain the same external packages.
Keep in mind that while this is a widespread way to ship dependency information with a code project in Python, it isn’t deterministic:
- Python Version: This requirements file doesn’t include information about which version of Python you used as your base Python interpreter when creating the virtual environment.
- Sub-Dependencies: Depending on how you create your requirements file, it may not include version information about sub-dependencies of your dependencies. This means that someone could get a different version of a subpackage if that package was silently updated after you created your requirements file.
You can’t easily solve either of these issues with requirements.txt alone, but many third-party dependency management tools attempt to address them to guarantee deterministic builds:
requirements.txtusingpip-toolsPipfile.lockusing Pipenvpoetry.lockusing Poetry
Projects that integrate the virtual environment workflow into their features but go beyond that will also often include ways to create lock files that allow deterministic builds of your environments.
Avoid Virtual Environments in Production
You might wonder how to include and activate your virtual environment when deploying a project to production. In most cases, you don’t want to include your virtual environment folder in remote online locations:
- GitHub: Don’t push the
venv/folder to GitHub. - CI/CD Pipelines: Don’t include your virtual environment folder in your continuous integration or continuous delivery pipelines.
- Server Deployments: Don’t set up a virtual environment on your deployment server unless you manage that server yourself and run multiple separate projects on it.
You still want isolated environments and reproducibility for your code projects. You’ll achieve that by pinning your dependencies instead of including the virtual environment folder that you’ve worked with locally.
Most remote hosting providers, including CI/CD pipeline tools and Platform-as-a-Service (PaaS) providers, such as Heroku or Google App Engine (GAE), will automatically create that isolation for you.
When you push your code project to one of these hosted services, the service will often allocate a virtual fraction of a server to your application. Such virtualized servers are isolated environments by design, which means that your code will run in its separate environment by default.
In most hosted solutions, you won’t have to deal with creating the isolation, but you’ll still need to provide the information about what to install in the remote environment. For this, you’ll often use the pinned dependencies in your requirements.txt file.
Most hosted platform providers will also ask you to create a settings file specific to the tool that you’re working with. This file will include information that isn’t recorded in requirements.txt but that the platform needs to set up a functioning environment for your code. You’ll need to read up on these specific files in the documentation of the hosting service that you’re planning to use.
A popular option that takes virtualization to the next level and still allows you to create a lot of the setup yourself is Docker.
Use Third-Party Tools
The Python community has created many additional tools that use virtual environments as one of their features and allow you to manage multiple virtual environments in a user-friendly manner.
Because many tools come up in online discussions and tutorials, you might wonder what each of them is about and how they can help you manage your virtual environments.
While discussing each of them is out of the scope of this tutorial, you’ll get an overview of which popular projects exist, what they do, and where you can learn more:
-
virtualenvwrapper is an extension to the virtualenv project that makes creating, deleting, and otherwise managing virtual environments lower effort. It keeps all your virtual environments in one place, introduces user-friendly CLI commands for managing and switching between virtualenvs, and is also configurable and extensible.
virtualenvwrapper-winis a Windows port of this project. -
Poetry is a tool for Python dependency management and packaging. With Poetry, you can declare packages that your project depends on, similar to
requirements.txtbut deterministic. Poetry will then install these dependencies in an auto-generated virtual environment and help you manage your virtual environment. -
Pipenv aims to improve packaging in Python. It creates and manages virtual environments for your projects using
virtualenvin the back. Like Poetry, Pipenv aims to improve dependency management to allow for deterministic builds. It’s a relatively slow, high-level tool that has been supported by the Python Packaging Authority (PyPA). -
pipx allows you to install Python packages that you’d habitually run as stand-alone applications in isolated environments. It creates a virtual environment for each tool and makes it globally accessible. Aside from helping with code quality tools such as black, isort, flake8, pylint, and mypy, it’s also useful for installing alternative Python interpreters, such as bpython, ptpython, or ipython.
-
pipx-in-pipx is a wrapper you can use for installing pipx that takes the recursive acronym for
pipto the next level by allowing you to install and manage pipx using pipx itself. -
pyenv isn’t inherently related to virtual environments, even though it’s often mentioned in relation to this concept. You can manage multiple Python versions with pyenv, which allows you to switch between a new release and an older Python version that you need for a project you’re working on. pyenv also has a Windows port called pyenv-win.
-
pyenv-virtualenv is a plugin for pyenv that combines pyenv with virtualenv, allowing you to create virtual environments for the pyenv-managed Python versions on UNIX systems. There’s even a plugin to mix pyenv with virtualenvwrapper, called pyenv-virtualenvwrapper.
The Python community built a whole host of third-party projects that can help you manage your Python virtual environments in a user-friendly manner.
Remember that these projects are meant to make the process more convenient for you and aren’t necessary for working with virtual environments in Python.
Conclusion
Congratulations on making it through this tutorial on Python virtual environments. Throughout the tutorial, you built a thorough understanding of what virtual environments are, why you need them, how they function internally, and how you can manage them on your system.
In this tutorial, you learned how to:
- Create and activate a Python virtual environment
- Explain why you want to isolate external dependencies
- Visualize what Python does when you create a virtual environment
- Customize your virtual environments using optional arguments to
venv - Deactivate and remove virtual environments
- Choose additional tools for managing your Python versions and virtual environments
Next time a tutorial tells you to create and activate a virtual environment, you’ll better understand why that’s a good suggestion and what Python does for you behind the scenes.
Watch Now This tutorial has a related video course created by the Real Python team. Watch it together with the written tutorial to deepen your understanding: Working With Python Virtual Environments
January 17, 2022

In this tutorial, we’ll learn about Python virtual environments, the benefits of using virtual environments, and how to work inside virtual environments.
After you finish this tutorial, you’ll understand the following:
- What Python virtual environments are
- The benefits of working in virtual environments
- How to create, activate, deactivate, and delete virtual environments
- How to install packages in virtual environments and reproduce them on other systems
- How to use Python virtual environments in VS Code
If you need to install Python on Mac, refer to the tutorial Getting Python Up and Running on Mac.
Note: that this tutorial is mainly for macOS and Linux users; however, Windows users should also be able to follow along.
What Are Python Virtual Environments?
A Python virtual environment consists of two essential components: the Python interpreter that the virtual environment runs on and a folder containing third-party libraries installed in the virtual environment. These virtual environments are isolated from the other virtual environments, which means any changes on dependencies installed in a virtual environment don’t affect the dependencies of the other virtual environments or the system-wide libraries. Thus, we can create multiple virtual environments with different Python versions, plus different libraries or the same libraries in different versions.
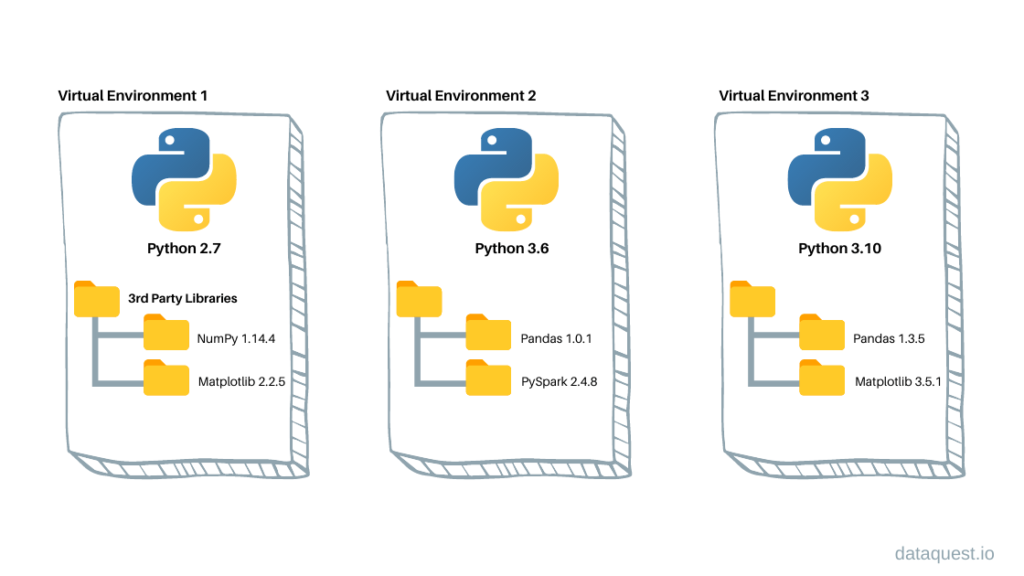
The figure above illustrates what you have on your system when we create multiple Python virtual environments. As the illustration above shows, a virtual environment is a folder tree containing a specific Python version, third-party libraries, and other scripts; thus, there is no limitation on the number of virtual environments on a system because they are just folders containing some files.
Why Are Python Virtual Environments Important?
The importance of Python virtual environments becomes apparent when we have various Python projects on the same machine that depend on different versions of the same packages. For example, imagine working on two different data visualization projects that use the matplotlib package, one using version 2.2 and the other using version 3.5. This would lead to compatibility issues because Python cannot simultaneously use multiple versions of the same package. The other use case that magnifies the importance of using Python virtual environments is when you’re working on managed servers or production environments where you can’t modify the system-wide packages because of specific requirements.
Python virtual environments create isolated contexts to keep dependencies required by different projects separate so they don’t interfere with other projects or system-wide packages. Basically, setting up virtual environments is the best way to isolate different Python projects, especially if these projects have different and conflicting dependencies. As a piece of advice for new Python programmers, always set up a separate virtual environment for each Python project, and install all the required dependencies inside it — never install packages globally.
How to Use Python Virtual Environments
So far, we’ve learned what virtual environments are and why we need them. In this part of the tutorial, we’ll learn how to create, activate, and (in general) work with virtual environments. Let’s get started!
Creating a Python Virtual Environment
First make a project folder, and create a virtual environment inside it. To do so, open the terminal app, write the following command, and hit return.
~ % mkdir alpha-prjNow, use the venv command to create a virtual environment inside the project folder, as follows:
~ % python3 -m venv alpha-prj/alpha-venvNOTE There are two tools for setting up virtual environments, virtualenv and venv, that we can use almost interchangeably. virtualenv supports older Python versions and needs to be installed using the pip command. In contrast, venv is only used with Python 3.3 or higher and is included in the Python standard library, requiring no installation.
Activating a Python Virtual Environment
To activate the virtual environment we created in the previous step, run the following command.
~ % source alpha-prj/alpha-venv/bin/activateAs you’ve seen after activating the virtual environment, its name appears in parentheses at the start of the terminal prompt. Running the which python command is another way to ensure that the virtual environment is active. If we run this command, it shows the location of the Python interpreter within the virtual environment. Let’s check the location within the virtual environment.
(alpha-venv) ~ % which python
/Users/lotfinejad/alpha-prj/alpha-venv/bin/python
It’s good to know that the Python version of the virtual environment is the same as the Python version used for creating the environment. Let’s check the Python version within the virtual environment.
(alpha-venv) ~ % python —version
Python 3.10.1
Since I use Python 3.10 to set up the virtual environment, then the virtual environment uses exactly the same Python version.
Installing Packages in a Python Virtual Environment
We are now inside an isolated virtual environment where only pip and setup tools are installed by default. Let’s check the pre-installed packages on the virtual environment by running the pip list command.
(alpha-venv) ~ % pip list
Package    Version
---------- -------
pip        21.2.4
setuptools 58.1.0
Before we want to use pip to install any packages, let’s upgrade it to the latest version. Since we’re working inside the virtual environment, the following command only upgrades the pip tool inside this environment, not in the other virtual environments or system-wide.
(alpha-venv) ~ % alpha-prj/alpha-venv/bin/python3 -m pip install --upgrade pipLet’s rerun the pip list command to see the changes.
(alpha-venv) ~ % pip list
Package    Version
---------- -------
pip        21.3.1
setuptools 58.1.0
It’s clear that pip updated from version 21.2.4 to 21.3.1. Now, let’s install the pandas package into the environments. Before installing the package, you need to decide which version to install. If you’re going to install the latest version, you can simply use the following command:
(alpha-venv) ~ % python3 -m pip install pandasBut if you want to install a specific version of the package, you need to use this command:
(alpha-venv) ~ % python3 -m pip install pandas==1.1.1Now, let’s see how we can tell pip that we are going to install any version of pandas before version 1.2.
(alpha-venv) ~ % python3 -m pip install 'pandas<1.2'Also, we can ask pip to install the pandas package after version 0.25.3 as follows:
(alpha-venv) ~ % python3 -m pip install 'pandas>0.25.3'In the previous commands, we put the package specification between quotes, as greater than > and less than < signs have special meaning on the command-line shell. Both commands will install the latest version of the pandas package that matches the given constraints. However, the best practice is to specify packages with an exact version number.
Let’s review the list of installed packages in the environment.
(alpha-venv) ~ % pip list
Package         Version
--------------- -------
numpy           1.22.0
pandas          1.3.5
pip             21.3.1
python-dateutil 2.8.2
pytz            2021.3
setuptools      58.1.0
six             1.16.0
While installing pandas, NumPy and three other packages are automatically installed as prerequisites for the pandas package.
Reproducing a Python Virtual Environment
It’s common to reproduce a virtual environment. Assume your colleague is going to work on the same project that you have been working on for weeks. She needs to install exactly the same packages with the correct versions in a virtual environment on her system. To create identical environments, you first need to list all the dependencies installed in the project’s virtual environment by using the pip freeze command.
(alpha-venv) ~ % pip freeze
numpy==1.22.0
pandas==1.3.5
python-dateutil==2.8.2
pytz==2021.3
six==1.16.0
The output of pip freeze is quite similar to pip list, but it returns the list of packages installed on an environment in a correct format to reproduce the environment with the exact package versions the project requires. The next step is exporting the package list into the requirements.txt file. To do so, run this command:
(alpha-venv) ~ % pip freeze > requirements.txtThe command above creates a text file named requirements.txt in the current folder. The requirements.txt file contains all the packages and their exact versions. Let’s look at the file content.
~ % cat requirements.txt
numpy==1.21.5
pandas==1.3.5
python-dateutil==2.8.2
pytz==2021.3
six==1.16.0
Well done, you’ve created a requirements.txt that you can distribute to your colleague to reproduce the same virtual environment on her system. Now, let’s see what she should do to reproduce the virtual environment. It’s pretty simple. She first needs to create a virtual environment, activate it, and then run the pip install -r requirements.txt command to install all the required packages.
She would run the following three commands:
~ % python3 -m venv prj/venv
~ % source prj/venv/bin/activate
(venv) ~ % pip install -r requirements.txt
The last command installs all the packages listed in requirements.txt in the virtual environment that your colleague is creating. So, if she runs the pip freeze command on her side, she gets the same packages with the same versions as yours. Another pertinent point to consider is that if you’re going to add your project to a Git repository, never add its virtual environment folder to the repository. The only thing you need to add is the requirements.txt file.
NOTE A Python project folder contains source code that runs in a virtual environment. On the other hand, a virtual environment is a folder that contains the Python interpreter, packages, and tools like pip. So, the best practice is to keep them separate and never put your project files in a virtual environment folder.
Deactivating a Python Virtual Environment
Once you are done working with a virtual environment, or you want to switch to another virtual environment, you can deactivate an environment by running this command:
(alpha-venv) ~ % deactivateDeleting a Python Virtual Environment
If you want to delete a virtual environment, you can simply delete its folder, no uninstall required.
~ % rm -rf alpha-prj/alpha-venvHow to Use Python Virtual Environments in Visual Studio Code
In this section, we will walk through using Python virtual environments in VS Code. First, ensure you have created and activated a virtual environment. Now navigate to your project folder in the terminal, and run the following command:
(alpha-venv) alpha-prj % code .The command above will open the project folder in VS Code. If the command above doesn’t work, open VS code, press command + shift + P, to open the Command Palette, type shell command and select Install ‘code’ command in PATH. Now, create a Python file, and name it my_script.py. The last step is to select the virtual environment using the Python: Select Interpreter command from the Command Palette. To do so, press Command + shift + P, and type Python, and choose Select Interpreter.
The Python: Select Interpreter command displays all available environments. The following image shows the environment that we need to select.

At this point, if you open the integrated terminal in VS Code, you will see that the virtual environment is active, and you can install any packages inside it.
In this tutorial, we learned how Python virtual environments avoid conflicts between dependencies of different projects or system-wide. Also, we learned how to work on distinct projects with different dependencies by switching between these self-contained environments.