-
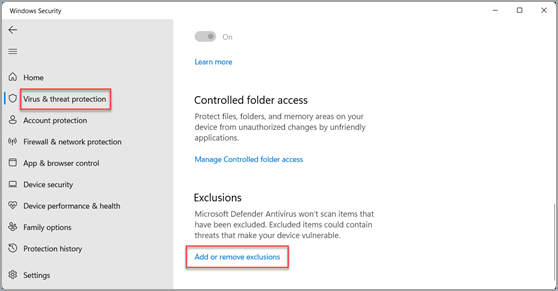
Select Start , then open Settings . Under Privacy & security , select Virus & threat protection.
-
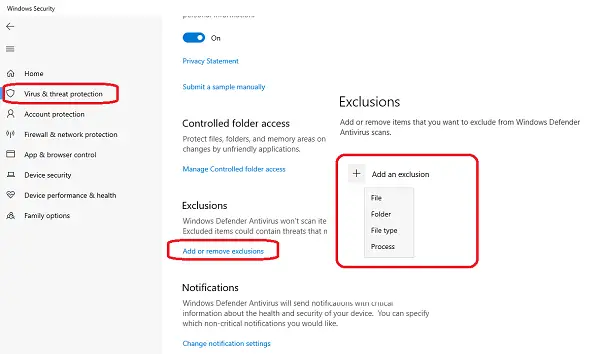
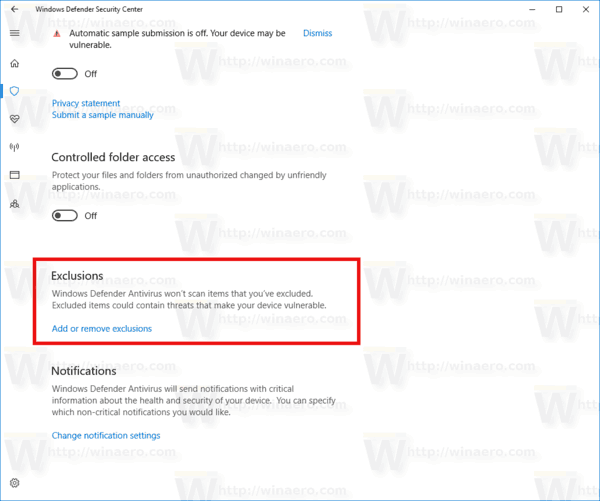
Under Virus & threat protection settings, select Manage settings, and then under Exclusions, select Add or remove exclusions.
-
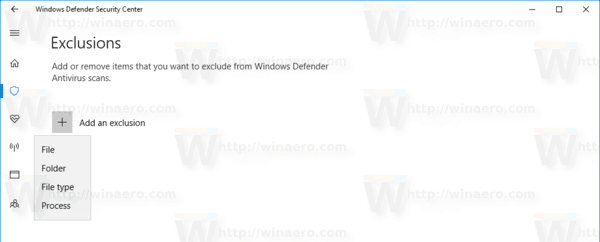
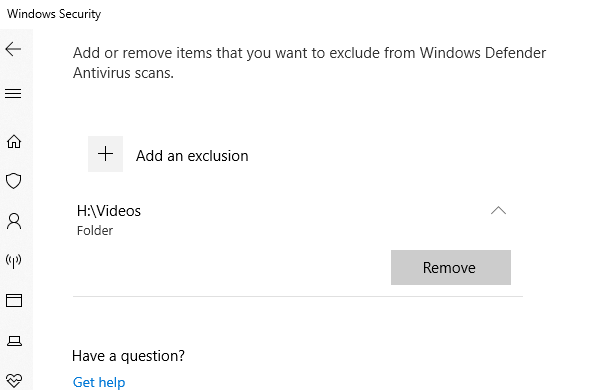
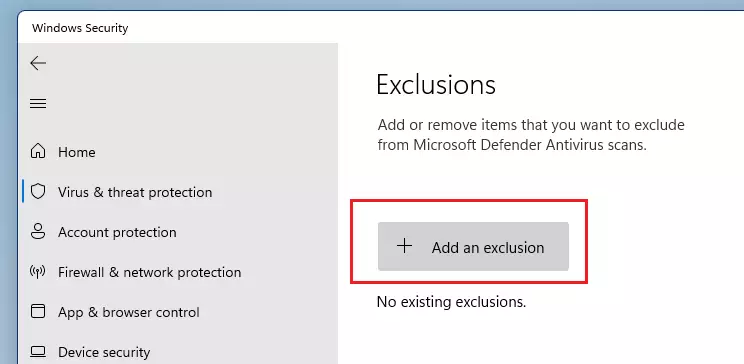
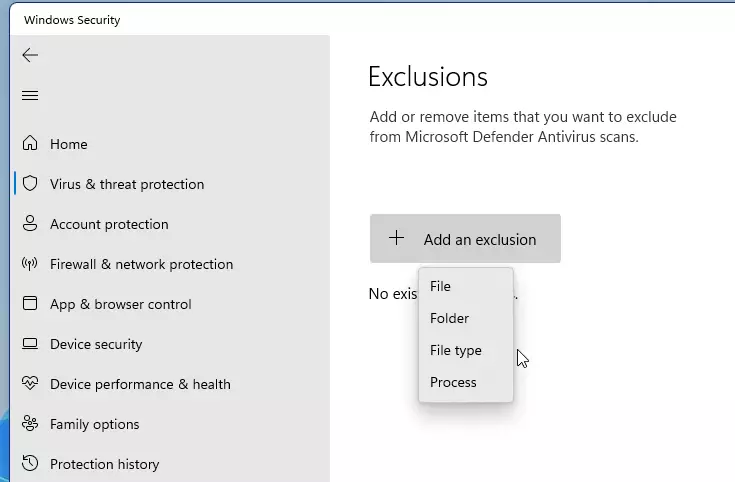
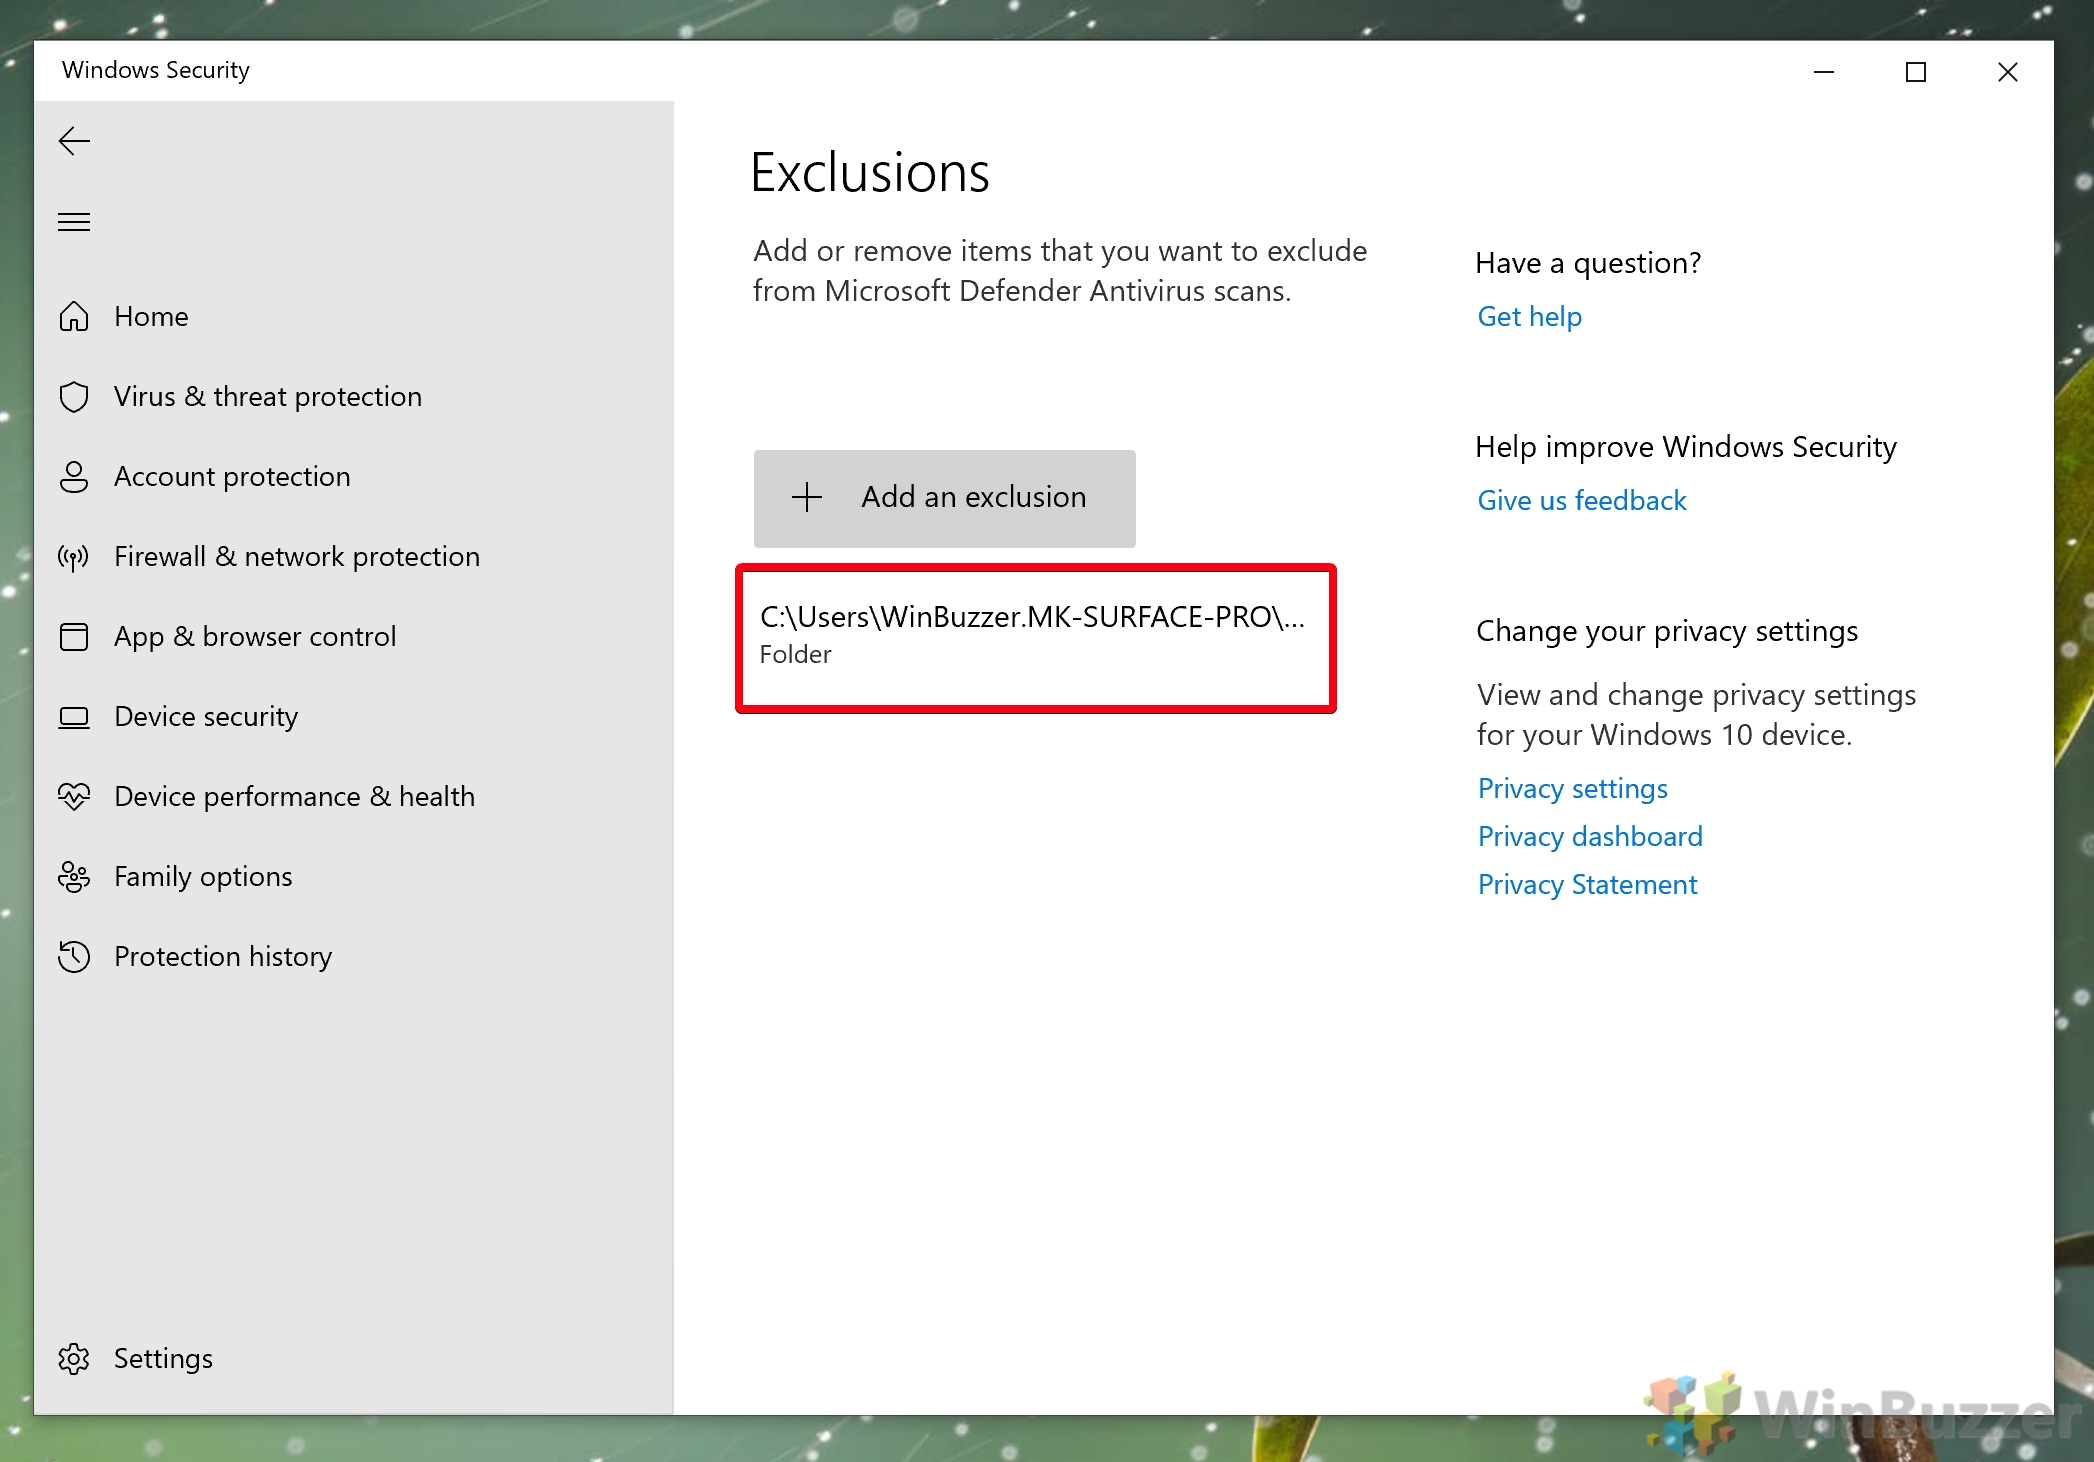
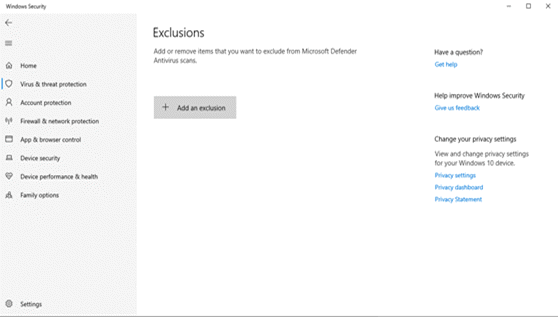
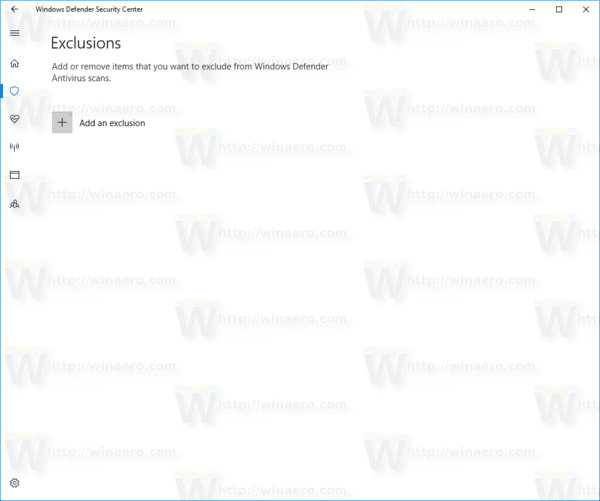
Select Add an exclusion, and then select from files, folders, file types, or process. A folder exclusion will apply to all subfolders within the folder as well.
-
Go to Start > Settings > Update & Security > Windows Security > Virus & threat protection.
-
Under Virus & threat protection settings, select Manage settings, and then under Exclusions, select Add or remove exclusions.
-
Select Add an exclusion, and then select from files, folders, file types, or process. A folder exclusion will apply to all subfolders within the folder as well.
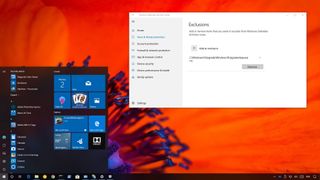
On Windows 10, the Windows Defender Antivirus is your default anti-malware engine to protect your device and data from viruses, roolkits, ransomware, and other security threats.
Although for the most part the built-in Windows 10 antivirus does a pretty good job, it may flag a file or folder that you trust as malicious. If you want to prevent this type of behavior from happening, Windows Defender Antivirus includes an option to exclude files and folders, as well as file types and processes from getting scanned and blocked.
In this Windows 10 guide, we walk you through the steps to exclude specific items and locations from Windows Defender Antivirus scans.
How to prevent Windows Defender from scanning specific files
If you have certain files, folders, file types, and processes that you want to exclude from Windows Defender Antivirus scans, use the following steps:
- Open Windows Defender Security Center.
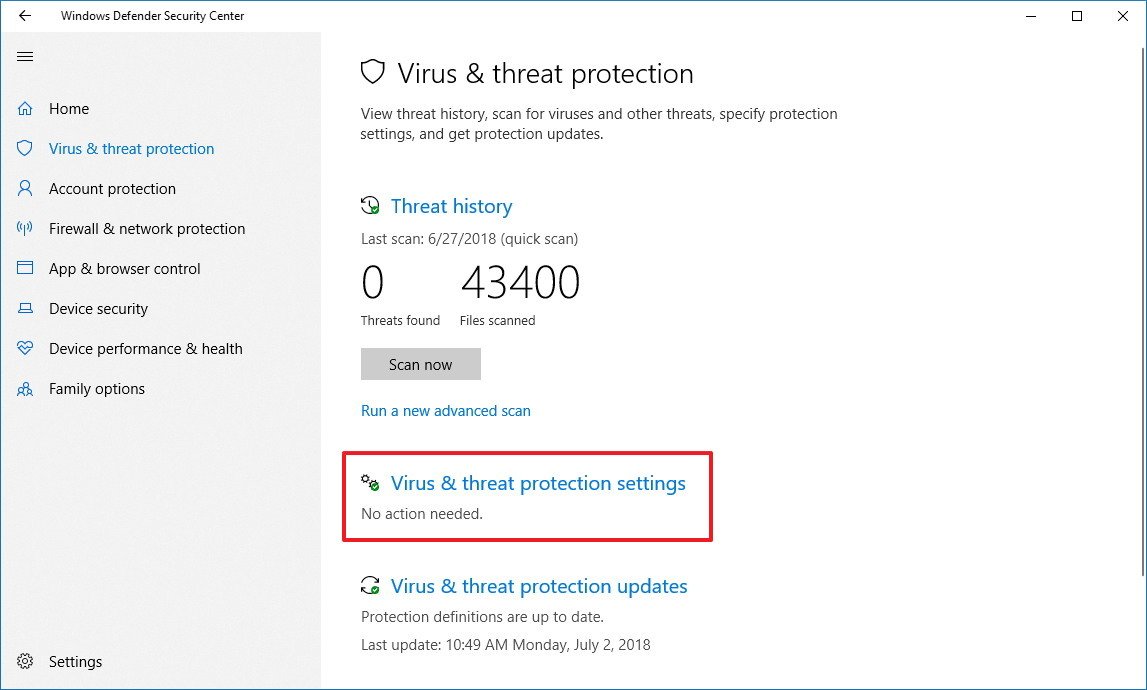
- Click Virus & threat protection.
- Click the Virus & threat protection option.
- Under «Exclusions,» click the Add or remove exclusions option.
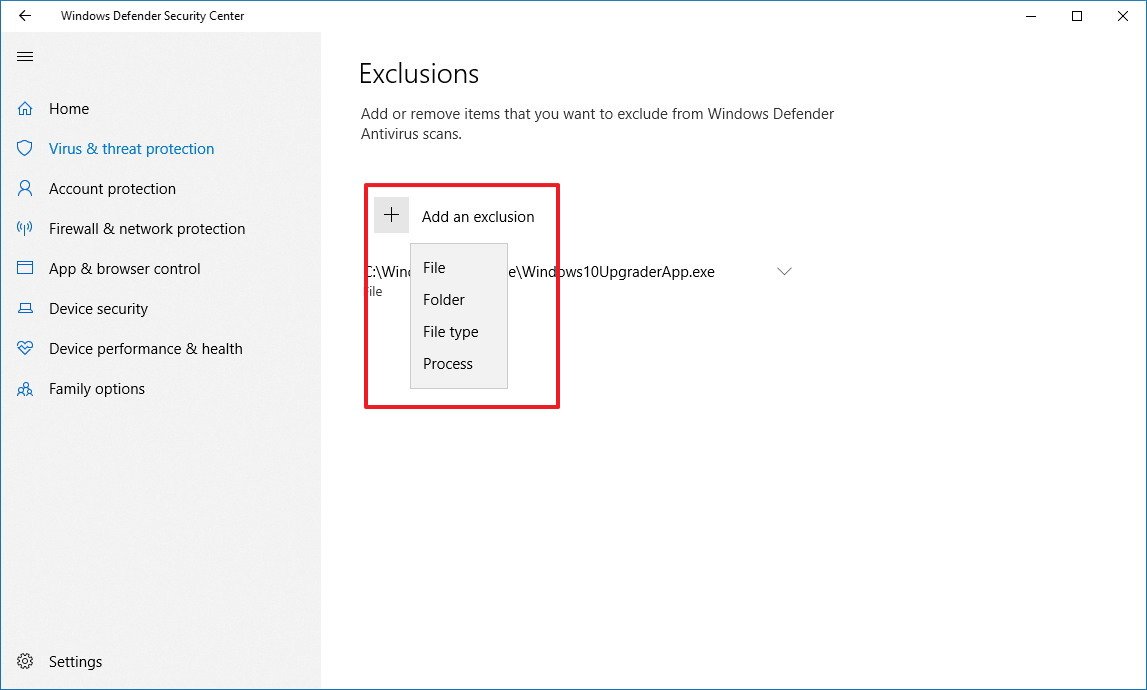
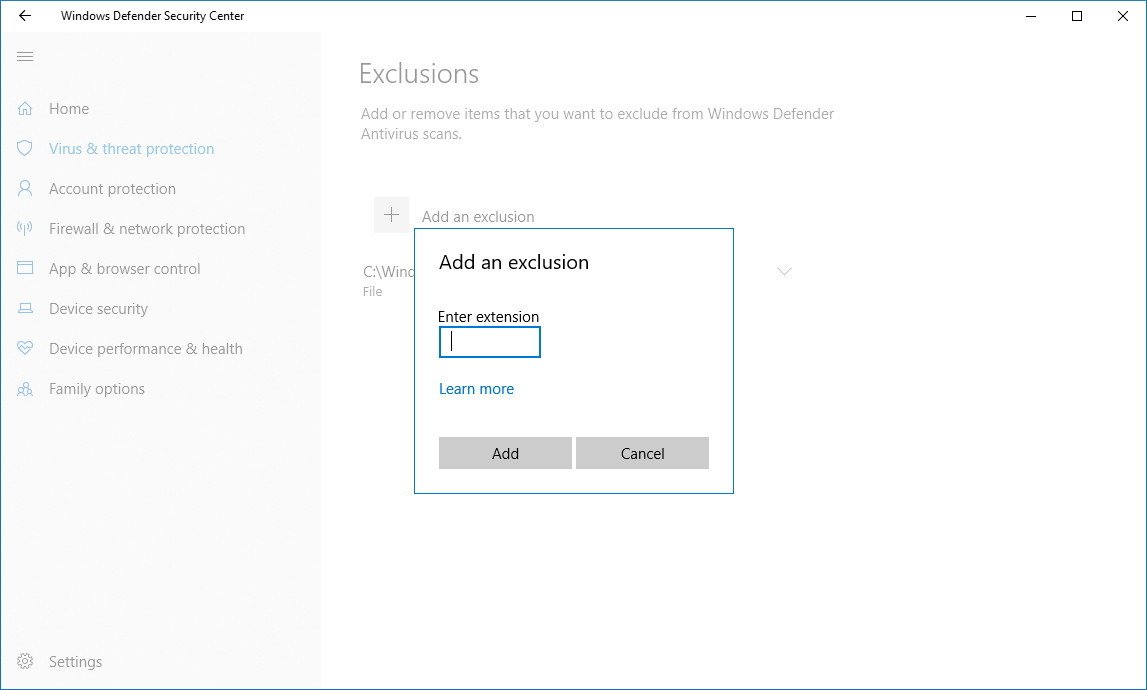
- Click the Add an exclusion button.
- Select the content you want to exclude from Windows Defender Antivirus, such as:
- File — Excludes only one file per exclusion.
- Folder — Excludes a folder and its content, including sub-folders.
- File type — Instead of excluding files and folder locations, you can configure the antivirus to ignore files with a specific extension no matter their location.
- Process — Excludes background processes by name.
- Continue with the on-screen directions to add the new exclusion depending on your selection. (For example, if you select File, you simply need to browse and select the file you want to exclude. Or if you select the File type option, you only need to enter the extension of the file format to skip during scans.)
Once you complete these steps, you may need to repeat the instructions to exclude other items you don’t want the antivirus to scan to avoid false positives.
At any time, you can remove an exclusion using the same instructions, but on step No. 5, make sure to select the item and click the Remove button.
More Windows 10 resources
For more helpful articles, coverage, and answers to common questions about Windows 10, visit the following resources:
- Windows 10 on Windows Central – All you need to know
- Windows 10 help, tips, and tricks
- Windows 10 forums on Windows Central
Get the best of Windows Central in in your inbox, every day!
Mauro Huculak is technical writer for WindowsCentral.com. His primary focus is to write comprehensive how-tos to help users get the most out of Windows 10 and its many related technologies. He has an IT background with professional certifications from Microsoft, Cisco, and CompTIA, and he’s a recognized member of the Microsoft MVP community.
In Windows 10 Creators Update, there is a new app called Windows Defender Security Center. The app, formerly known as «Windows Defender Dashboard», has been created to help the user control his security and privacy settings in a clear and useful way. It combines all essential security features under a single dashboard. It can be used to add an exception to Windows Defender Virus Protection. Here is how.
Before you proceed, here is what you need to know. Don’t confused Windows Defender with Windows Defender Security Center. Windows Defender is the built-in anti-virus software which provides real-time protection against threats. The Windows Defender Security Center app is just a dashboard which allows you to track your protection state. It can be used to configure various security options like SmartScreen. It shows an icon in the system tray.
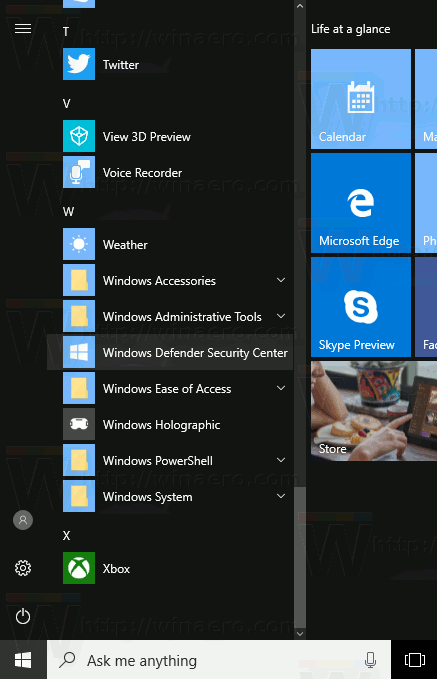
You can launch Windows Defender Security Center from the Start menu. Navigate to the letter «W» using the alphabet navigation feature of the new Start menu and click the «W» letter in the grid as shown below.
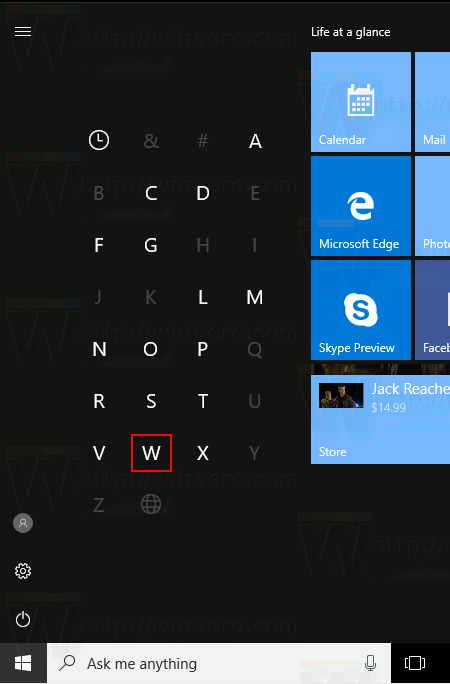
There, you’ll find the shortcut to the new Security Center app.
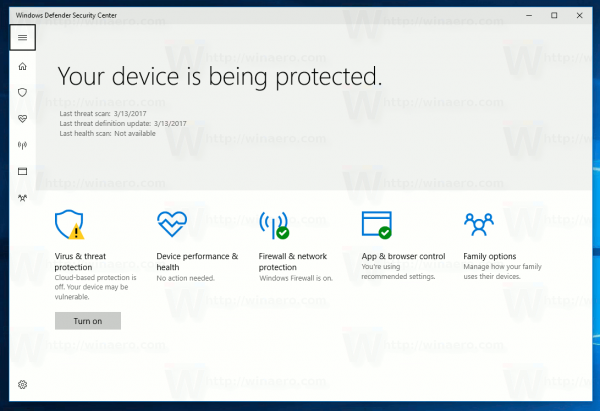
The app unifies many useful security options you might want to track and control. The user interface of the Windows Defender Security Center app comes with a toolbar on the left and the main area which occupies the rest of the window area.
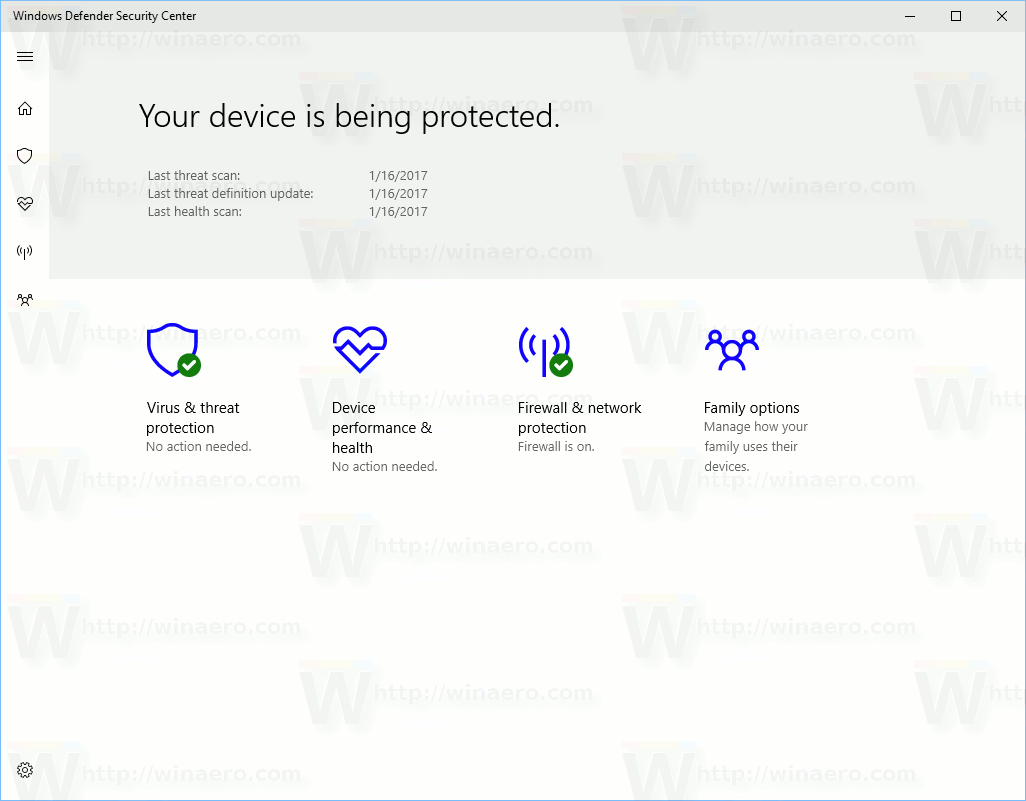
- Virus & threat protection
- Device performance & health
- Firewall & network protection
- Family options
Each section has its own icon. A special check mark indicates that a section has no issues.
Virus & threat protection is what we are looking for. Before proceeding, ensure that your user account has administrative privileges. Now, follow the instructions below.
To add an exception to Windows Defender in Windows 10, do the following.
- Open Windows Defender Security Center as described above.
- Click on the Virus & threat protection icon.
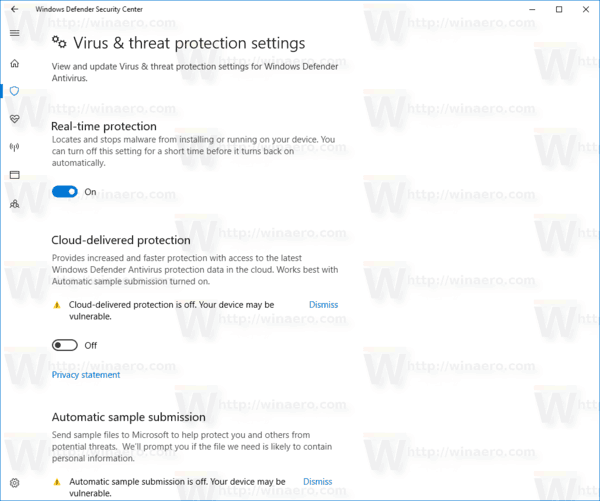
- Click on the link Virus & threat protection settings.
This will open the following page:
- Scroll down to Exclusions and click on the link Add or remove exclusions.
- The following page will open:
Here, click on the button Add an exclusion.
In the drop down menu select one of the following options:- File - Folder - File type - Process
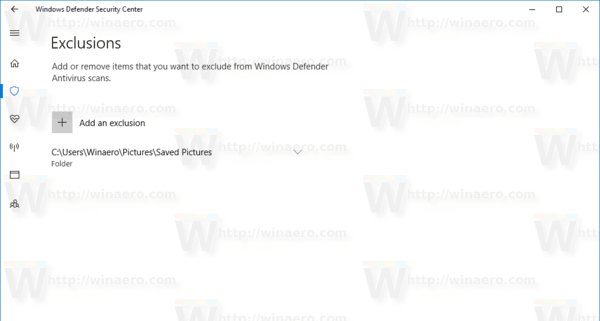
- Specify the desired object to exclude, e.g. a folder and you are done.
Here is something you need to know.
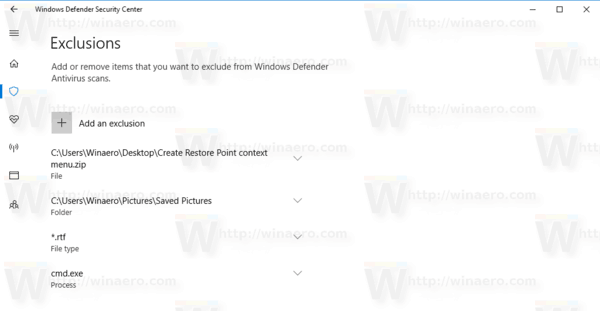
File — this option removes a specific file from being scanned by Windows Defender.
Folder — this option removes a specific folder from being scanned by Windows Defender. All its contents will be excluded recursively.
File type — here you can add a file extension (e.g. *.txt) as an exclusion.
Process — this option can be used to add a process as an exclusion, so any file used by this process won’t be scanned by Windows Defender.
See the following screenshot:
That’s it.
Support us
Winaero greatly relies on your support. You can help the site keep bringing you interesting and useful content and software by using these options:
If you like this article, please share it using the buttons below. It won’t take a lot from you, but it will help us grow. Thanks for your support!
Go to Start > Settings > Update & Security > Windows Security > Virus & threat protection. Under Virus & threat protection settings, select Manage settings, and then under Exclusions, select Add or remove exclusions. Select Add an exclusion, and then select from files, folders, file types, or process.
Contents
- 1 Where can I find exclusions in Windows 10 defender?
- 2 How do I whitelist a program in Windows Defender?
- 3 How do I add exceptions to firewall folder?
- 4 How do I add exceptions to Windows 10 firewall?
- 5 How do I stop Windows Defender blocking apps?
- 6 Is Windows Defender good enough?
- 7 How do I add programs to whitelist?
- 8 How do I know if my antivirus is blocking a program?
- 9 What is firewall whitelist?
- 10 How do you add rules to Windows Firewall?
- 11 How do I turn on Windows Defender threats in Windows 10?
- 12 How do I unblock a program in Windows 10 firewall?
- 13 Can’t change settings in Windows Firewall?
- 14 How do I enable UDP in Windows 10?
- 15 How do I unblock apps on my antivirus?
- 16 How do I stop firewall blocking?
- 17 How do I stop administrators from blocking apps?
- 18 Is Windows Defender good enough 2021?
- 19 Is Windows Defender enough 2021?
- 20 Can Windows Defender remove Trojan?
Where can I find exclusions in Windows 10 defender?
Go to Settings > Update and Security > Virus & threat protection. Under Virus & threat protection settings select Manage settings. Under Exclusions select Add or remove exclusions. You’ll see a list of current exclusions.
How do I whitelist a program in Windows Defender?
Open Windows Defender from the notification area. Select Virus & threat protection. Open Virus & threat protection settings. Scroll down and select Add or remove exclusions under the Exclusions section.
How do I add exceptions to firewall folder?
Click the Windows Orb and select Control Panel. Click Allow a program through Windows Firewall to open the Windows Firewall Settings window. Click the Exceptions tab. Click the Add Port button.
How do I add exceptions to Windows 10 firewall?
The easiest way to grant a Firewall exception on Windows 10 for a specific program is: Right Click on the Windows Start menu button and select Control Panel. Click Windows Firewall or Windows Defender Firewall. Choose Allow an app or feature through Windows Firewall.
How do I stop Windows Defender blocking apps?
1 Answer
- Launch Windows Defender Security Center from your Start menu, desktop, or taskbar.
- Click the App and browser control button on the left side of the window.
- Click Off in the Check apps and files section.
- Click Off in the SmartScreen for Microsoft Edge section.
Is Windows Defender good enough?
Windows Defender offers some decent cybersecurity protection, but it’s nowhere near as good as most premium antivirus software. If you’re just looking for basic cybersecurity protection, then Microsoft’s Windows Defender is fine.
How do I add programs to whitelist?
Whitelisting with the Windows Firewall
To manage the whitelist in the Windows Firewall, click Start, type firewall and click Windows Firewall. Click Allow a program or feature through Windows Firewall (or, if you’re using Windows 10, click Allow an app or feature through Windows Firewall).
How do I know if my antivirus is blocking a program?
How to check if Windows Firewall is blocking a program
- Press Windows Key + R to open Run.
- Type control and press OK to open Control Panel.
- Click on System and Security.
- Click on Windows Defender Firewall.
- From the left pane Allow an app or feature through Windows Defender Firewall.
What is firewall whitelist?
A whitelist (or, less commonly, a passlist or allowlist) is a mechanism which explicitly allows some identified entities to access a particular privilege, service, mobility, or recognition i.e. it is a list of things allowed when everything is denied by default.
How do you add rules to Windows Firewall?
To create an inbound port rule
Open the Group Policy Management Console to Windows Defender Firewall with Advanced Security. In the navigation pane, click Inbound Rules. Click Action, and then click New rule. On the Rule Type page of the New Inbound Rule Wizard, click Custom, and then click Next.
How do I turn on Windows Defender threats in Windows 10?
How to allow blocked file or app on Microsoft Defender Antivirus
- Open Windows Security.
- Click on Virus & threat protection.
- Under the “Current threats” section, click the Protection history option.
- Select the file or application you want to allow.
- Click the “Actions” drop-down menu and select the Allow on device option.
How do I unblock a program in Windows 10 firewall?
Whitelisting with the Windows Firewall
To manage the whitelist in the Windows Firewall, click Start, type firewall and click Windows Defender Firewall. Click Allow a program or feature through Windows Firewall (or, if you’re using Windows 10, click Allow an app or feature through Windows Firewall).
Can’t change settings in Windows Firewall?
Symptoms
- Click the Start button, then type Windows Firewall in the Search box.
- Click Windows Firewall, and then click Allow a program or feature through Windows Firewall.
- Click the Change settings button. If a User Account Control window appears, click Yes, or enter your user name and password, then click OK.
How do I enable UDP in Windows 10?
How to open a udp port in windows 10
- Navigate to Control Panel, System and Security and Windows Firewall.
- Select Advanced settings and highlight Inbound Rules in the left panel.
- Right click Inbound Rules and select New Rule.
How do I unblock apps on my antivirus?
Block or Unblock Programs in Windows Defender Firewall
- Select the “Start” button, then type “firewall“.
- Select the “Windows Defender Firewall” option.
- Choose the “Allow an app or feature through Windows Defender Firewall” option in the left pane.
How do I stop firewall blocking?
How do I stop Windows Firewall and Defender from blocking Sync?
- Click on the Start menu and Select Control Panel.
- Select Windows Firewall.
- Select Allow a program or feature through Windows Firewall on the top left panel.
- Select Change settings and then select Allow another program.
- Select Sync and click Add.
How do I stop administrators from blocking apps?
Fix 1: Disable Windows SmartScreen
- Press the Windows logo key to bring up the Start menu.
- Type ‘Smartscreen’ in the search bar and click on ‘App and browser control’ from the results.
- In the Windows Defender Security Center that opens, go to ‘Check apps and files’ and select ‘Off. ‘
- Now, try running your file again.
Is Windows Defender good enough 2021?
Overall Security
In January 2021, AV-Test (an independent security testing lab), rated Microsoft Defender as a Top Product with a perfect 6.0 score.These are some essential features found in both free and premium antivirus such as Norton 360, Avira, or even Malwarebytes.
Is Windows Defender enough 2021?
Unfortunately, it’s still not good enough to protect your Windows device in real-time. As someone who takes my PC’s security seriously, I strongly recommend using stronger antivirus in conjunction with Microsoft Defender. The best antivirus for Windows in 2021 is easily Norton 360.
Can Windows Defender remove Trojan?
1. Run Microsoft Defender. First introduced with Windows XP, Microsoft Defender is a free antimalware tool to protect Windows users from viruses, malware, and other spyware. You can use it to help detect and remove the Trojan from your Windows 10 system.
Download PC Repair Tool to quickly find & fix Windows errors automatically
Windows Defender can scan and monitor almost all the folders in Windows 11/10. In case you have a folder that may have files that could send an alarm to Windows Security, then it is best to Add an exclusion to Windows Security. It is fine to do that if you are sure that the contents of the folder are safe and Windows Defender is only throwing out false-positive warnings. That way, it will not scan those folders in the future. Again, there are some Windows files and folders you may exclude from Antivirus scans – and you may want to do that to save your scan time.
Follow the step-by-step guide to exclude a file, folder, process or file type from Windows Security scan.
This feature also comes in handy when you trust a file type or folder or any process that you believe, but Windows Security thinks it is malicious.
While it does not happen to everyone, but this is very handy for those who indulge themselves in development.
Search for Windows Security in the Search box and click on it to launch it.
Click on Virus & threat protection > Manage settings > Add or remove exclusions.
In the next screen, click on Add an exclusion > Folder. The list will include File, Folder, File Type, and Process.
In the next window, click on “+Add and exclusion”, select a folder, and click OK to include it in the Exclusions list.
To remove it, click on the ‘down’ arrow button, and then click on the Remove button.
Do note that if you are only want to ignore a few file types, it is best to configure the antivirus to ignore files with a specific extension. That way it will ignore all of them no matter their location.
When you select a folder, all the subfolders will be excluded as well. So be sure to understand what you are doing.
Read: How to add a File type or Process Exclusion to Windows Security.
Once you do that, I suggest protecting the folder using Controlled Folder Access. Since the file is not monitored for threats, the controlled folder access will ensure an external program does not modify it. That way, your folder will always be secure.
This post will help you if Windows Defender Exclusions is not working.
TIP: You can also include Add an exclusion in the context menu.
Anand Khanse is the Admin of TheWindowsClub.com, a 10-year Microsoft MVP (2006-16) & a Windows Insider MVP (2016-2022). Please read the entire post & the comments first, create a System Restore Point before making any changes to your system & be careful about any 3rd-party offers while installing freeware.
This post shows students and new users steps to add an exclusion to Microsoft Defender on Windows 11. Microsoft Defender (formally Windows Defender) will scan your computer files for viruses and malware. If you’re performing certain tasks or running virtual machines, you may want to exclude certain files and folder areas so that these are not scanned by Microsoft Defender.
Exclusions may help improve systems’ performance, however, be cautious with this feature as Microsoft Defender won’t scan your excluded files and directories for malware. If these excluded directories are compromised, there won’t be any detection and your computer might be vulnerable to threats.
On the other hand, you wouldn’t want to scan all files and directories. Microsoft Defender has built-in exclusions to improve the system’s performance. You can do the same if certain tasks or applications are being impacted by Microsoft Defender scans.
To get started with adding exclusions to Microsoft Defender, follow the steps below.
How to add exclusions to Microsoft Defender on Windows 11
As mentioned above, one can add exclusions to Microsoft Defender in cases where scans are impacting the system’s performance. Microsoft Defender has built-in exclusions, but you can add more.
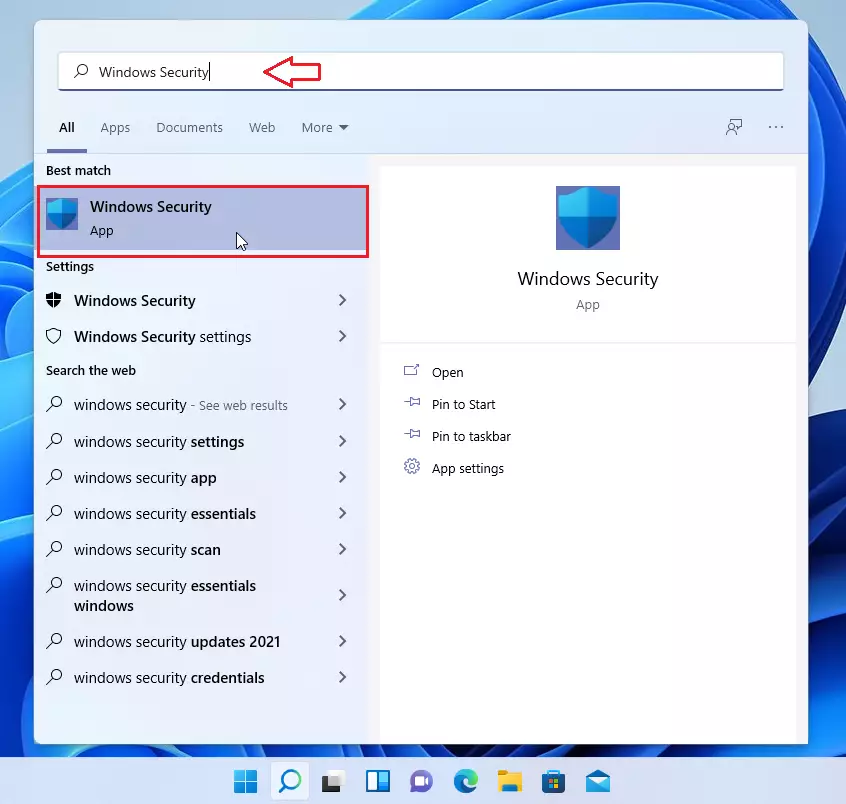
To do that, open the Windows Security app. Click the Start button and search for Windows Security, under, Best match, select open.
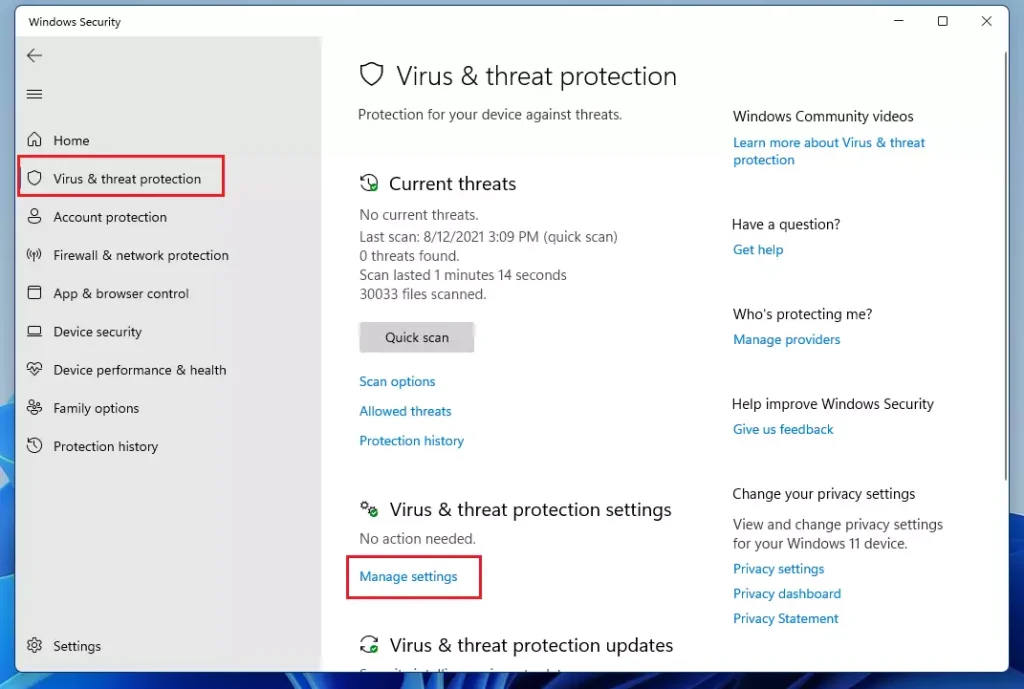
In the Windows Security dashboard, navigate to Virus & Threat Protection. Then, under Virus & threat protection settings, select Manage Settings as highlighted below.
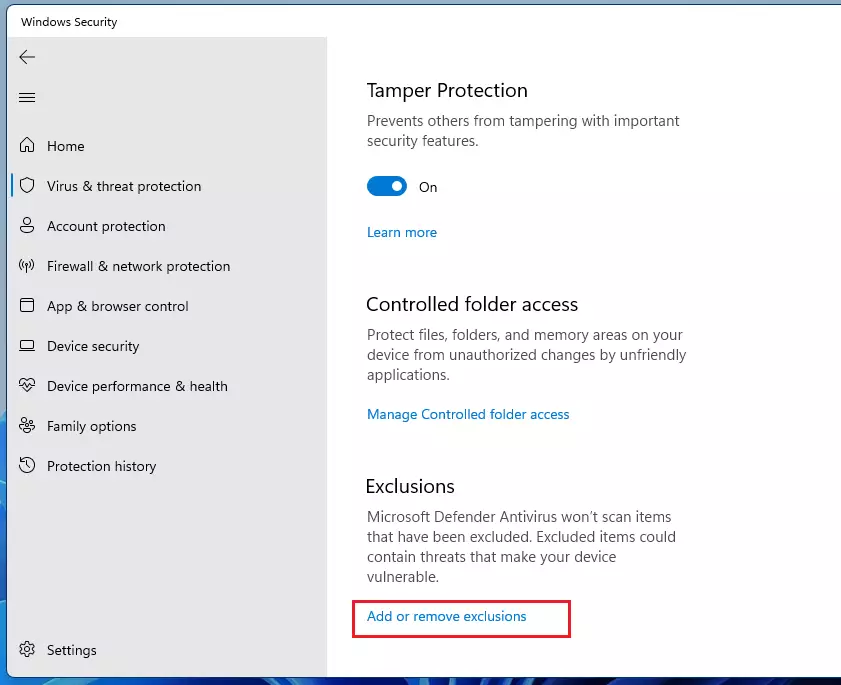
Next, scroll down to the very bottom of the page, and click Add or Remove Exclusions to begin adding or removing items on the exclusion list.
On the Exclusions page, you can add or remove files that you want to exclude from Microsoft Defender scans. To add an exclusion, click the Add An Exclusion button with a plus sign.
Choose the type of exclusions you want to add:
- File: Choose a file to select a single file that will be excluded from future scans. You’ll browse and select the file you’d like to exclude.
- Folder: Choose folder to exclude an entire folder from scans. The folder’s contents and subfolders will be excluded as well.
- File type: Choose file type to enter a file extension (e.g., “.TXT”) representing the file type that you’d like to exclude. All files of that type will be excluded from future scans.
- Process: Choose process and enter the name of a process (a running program, i.e., “explorer.exe”) to exclude from scans.
When you’re all done, close Windows Security, and your settings will be saved.
That should do it!
Conclusion:
This post showed you how to add folder or file exclusions to Microsoft Defender. If you find any error above or have something to add, please use the comment form below.
Windows Defender is incredibly useful for a free tool, providing Windows 10 users with competitive anti-virus technology and protecting against rootkits, ransomware, unwanted programs, and more. However, occasionally the program will keep flagging a file or folder that you know is safe. In these cases, it’s useful to know how to exclude a folder from Windows Defender.
Before we show you how to do that, though, there are some best practices you should be aware of. Users commonly exclude folders and types of files that will compromise their security in the future.
Best practices for adding exceptions to Windows Defender
Firstly, when you add an exception to Windows Defender, you should avoid excluding your system, or C: drive, as a whole. That includes C:, and C:*.
You should additionally avoid excluding your Java folder in Program Files, and the following directories:
- C:WindowsPrefetch (and other variations)
- C:WindowsSystem32Spool (and other variations)
- Temporary folders, including C:WindowsTemp, local app data, and LocalLow.
When you want to add Windows Defender exclusions for file extensions, you should avoid the following types:
.7z, .bat, .bin, .cab, .cmd, .com, cpl, .dll, .exe,.fla, .gif, .gz, .hta, .inf. .java, .jar, .job, .jpeg, .jpg, .js, .ko, .ko.gz, .msi, .ocx, .png, .ps1, .py, .rar, .reg, .scr, .sys, .tar, .tmp, .URL, .vbe, .vbs, .wsf, .zip.
In general, you shouldn’t add Windows Defender exceptions for Microsoft processes, either. Though you’re right in thinking that PowerShell.exe, wmic.exe, or svchost.exe are safe in their normal form an attack could modify the file to be malicious. Excluding it would allow them to slip past your defenses.
In a similar vein, you should always add the direct path to your file in your exclusion list. Let’s say you want to exclude Winbuzzer.exe from scanning.
If you manually edited your list and only defined Winbuzzer.exe, an attacker could send you any file named Winbuzzer.exe and have it skip past your defenses.
Writing C:Program FileswinbuzzerWinbuzzer.exe instead would only skip the scanning of the file in that particular folder.
With that lengthy disclaimer out of the way, let’s get down to showing you how to add Windows Defender exclusions via the Windows Security app.
Once you know where to look, creating and managing Windows Defender exceptions is quite easy. The more difficult part is making sure that adhere to the rules above to maintain your security.
Here’s how you can add items to your Windows Defender exceptions list:
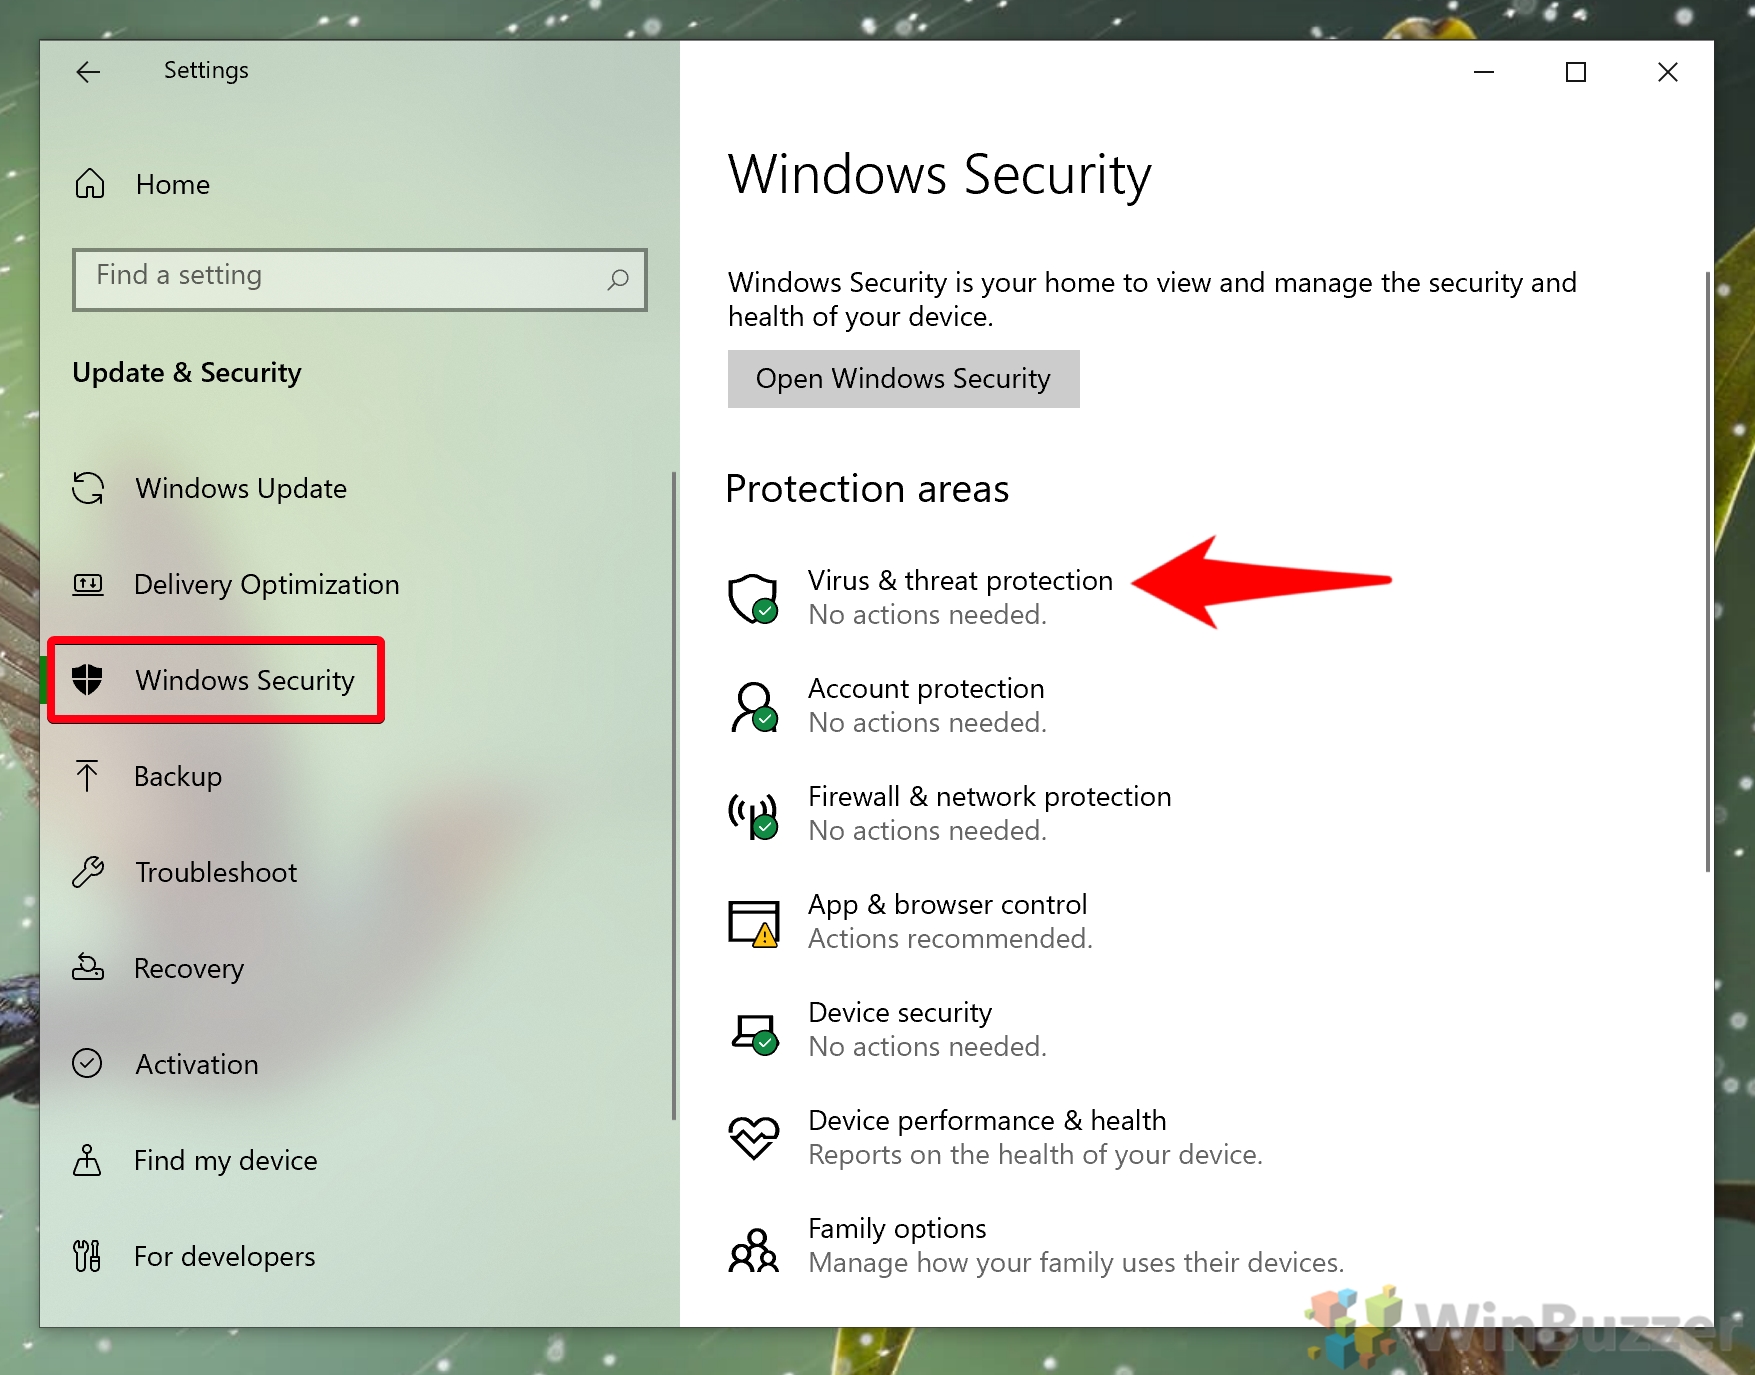
- Open Settings
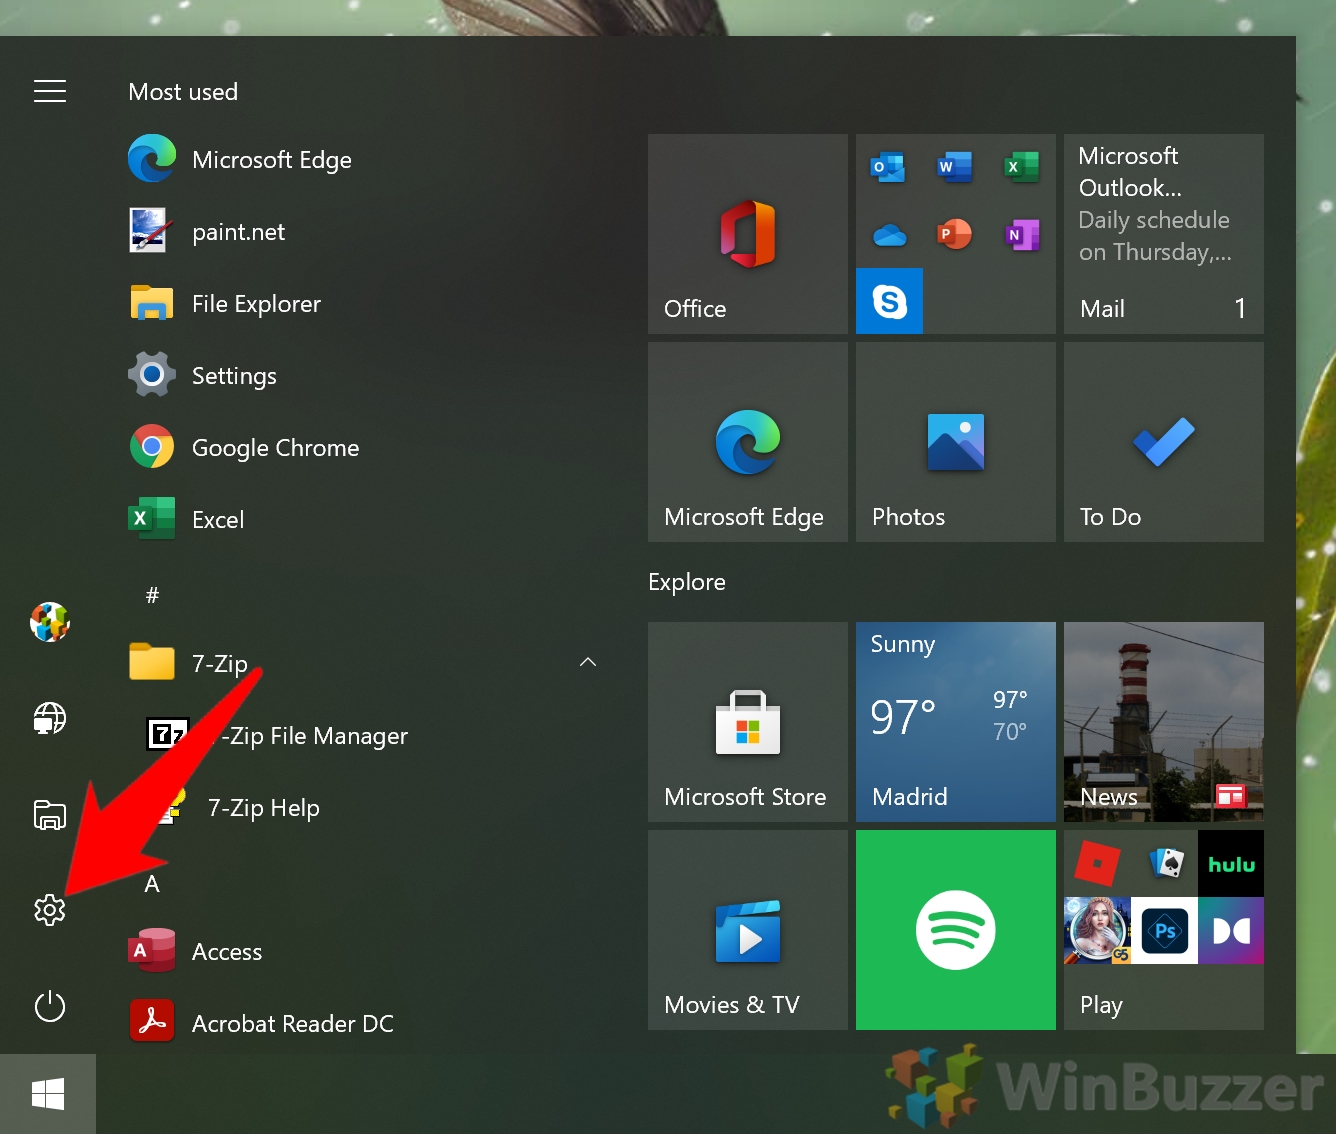
Press the Start button, then click the settings cog, above the power button. Alternatively, press Windows + I.
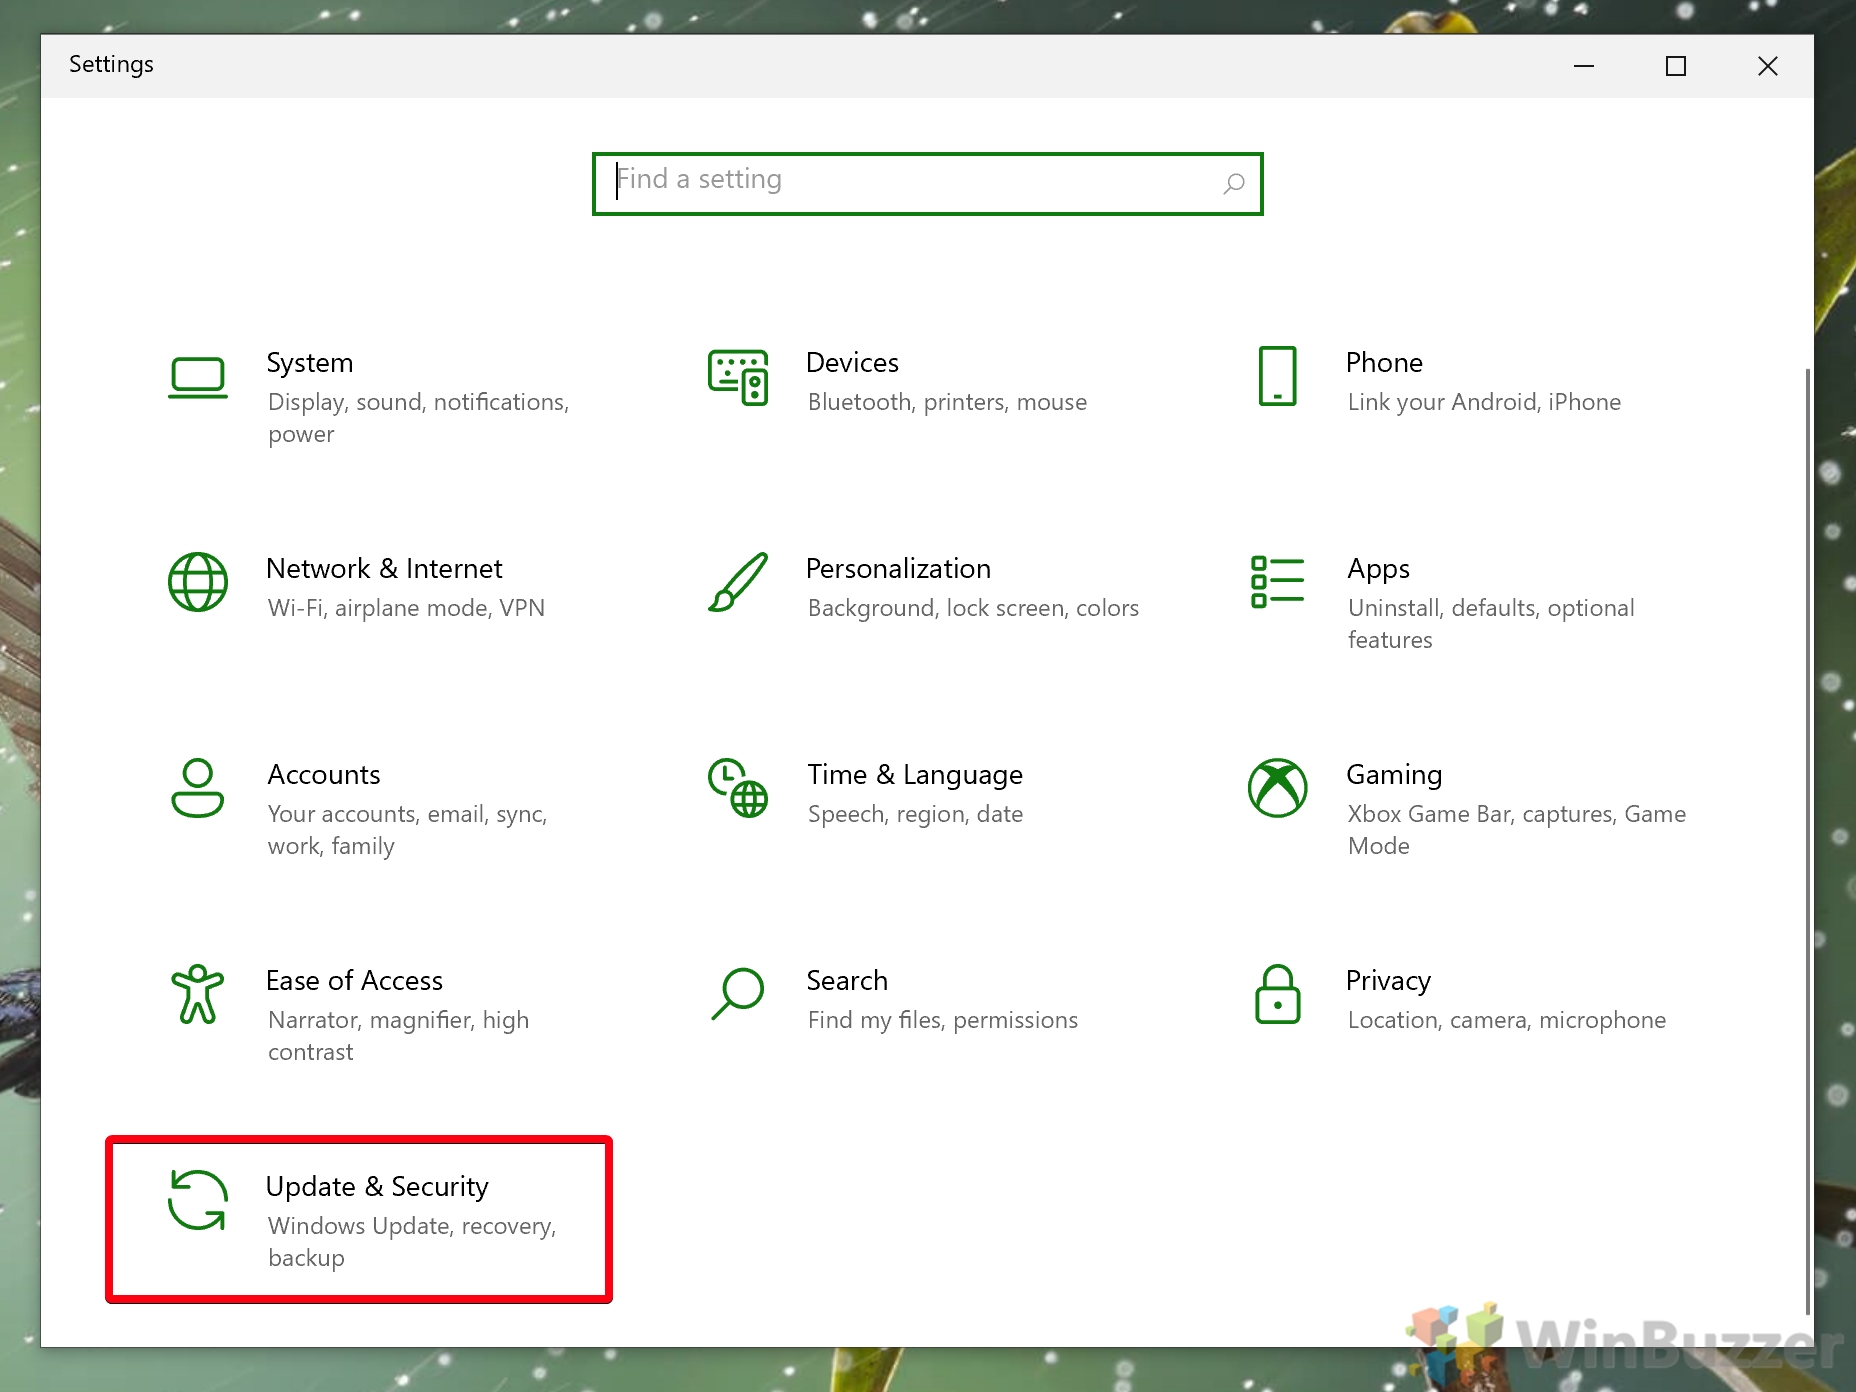
- Click on “Update & Security” in your Settings app
- Select “Windows Security” in the sidebar and click on “Virus & threat protection”
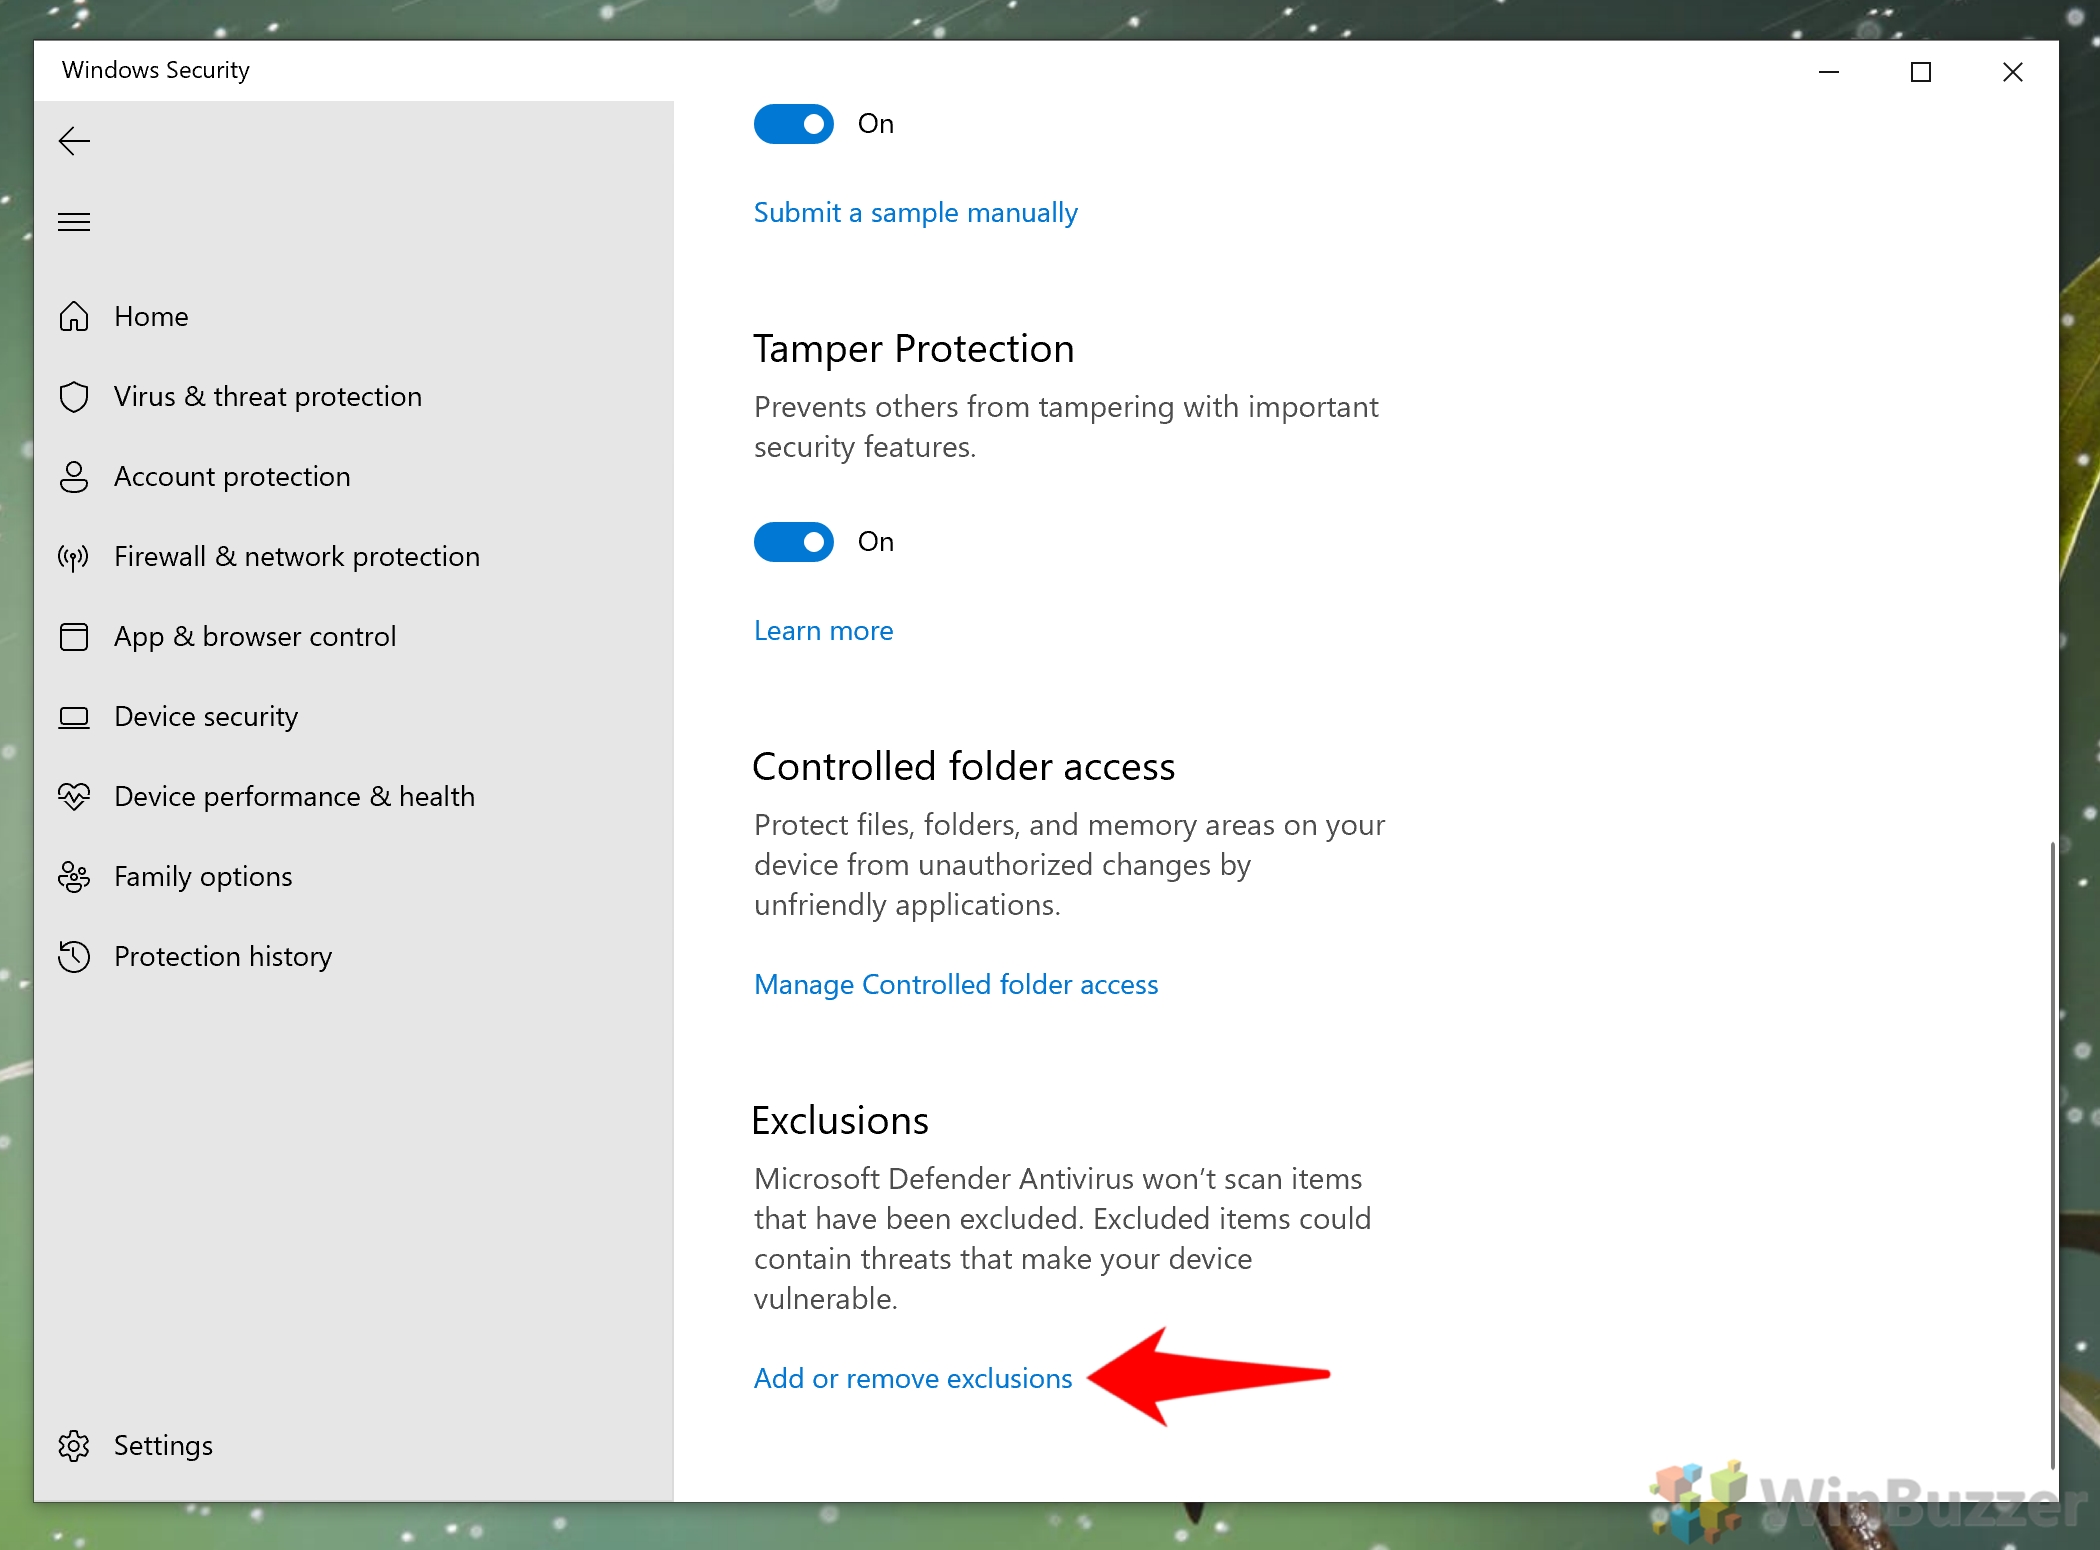
- Press “Manage settings” under “Virus & threat protection settings”
- Click “Add or remove exclusions” under the “Exclusions” heading
- Use Windows Defender to exclude a file, folder, file type or path in Windows 10
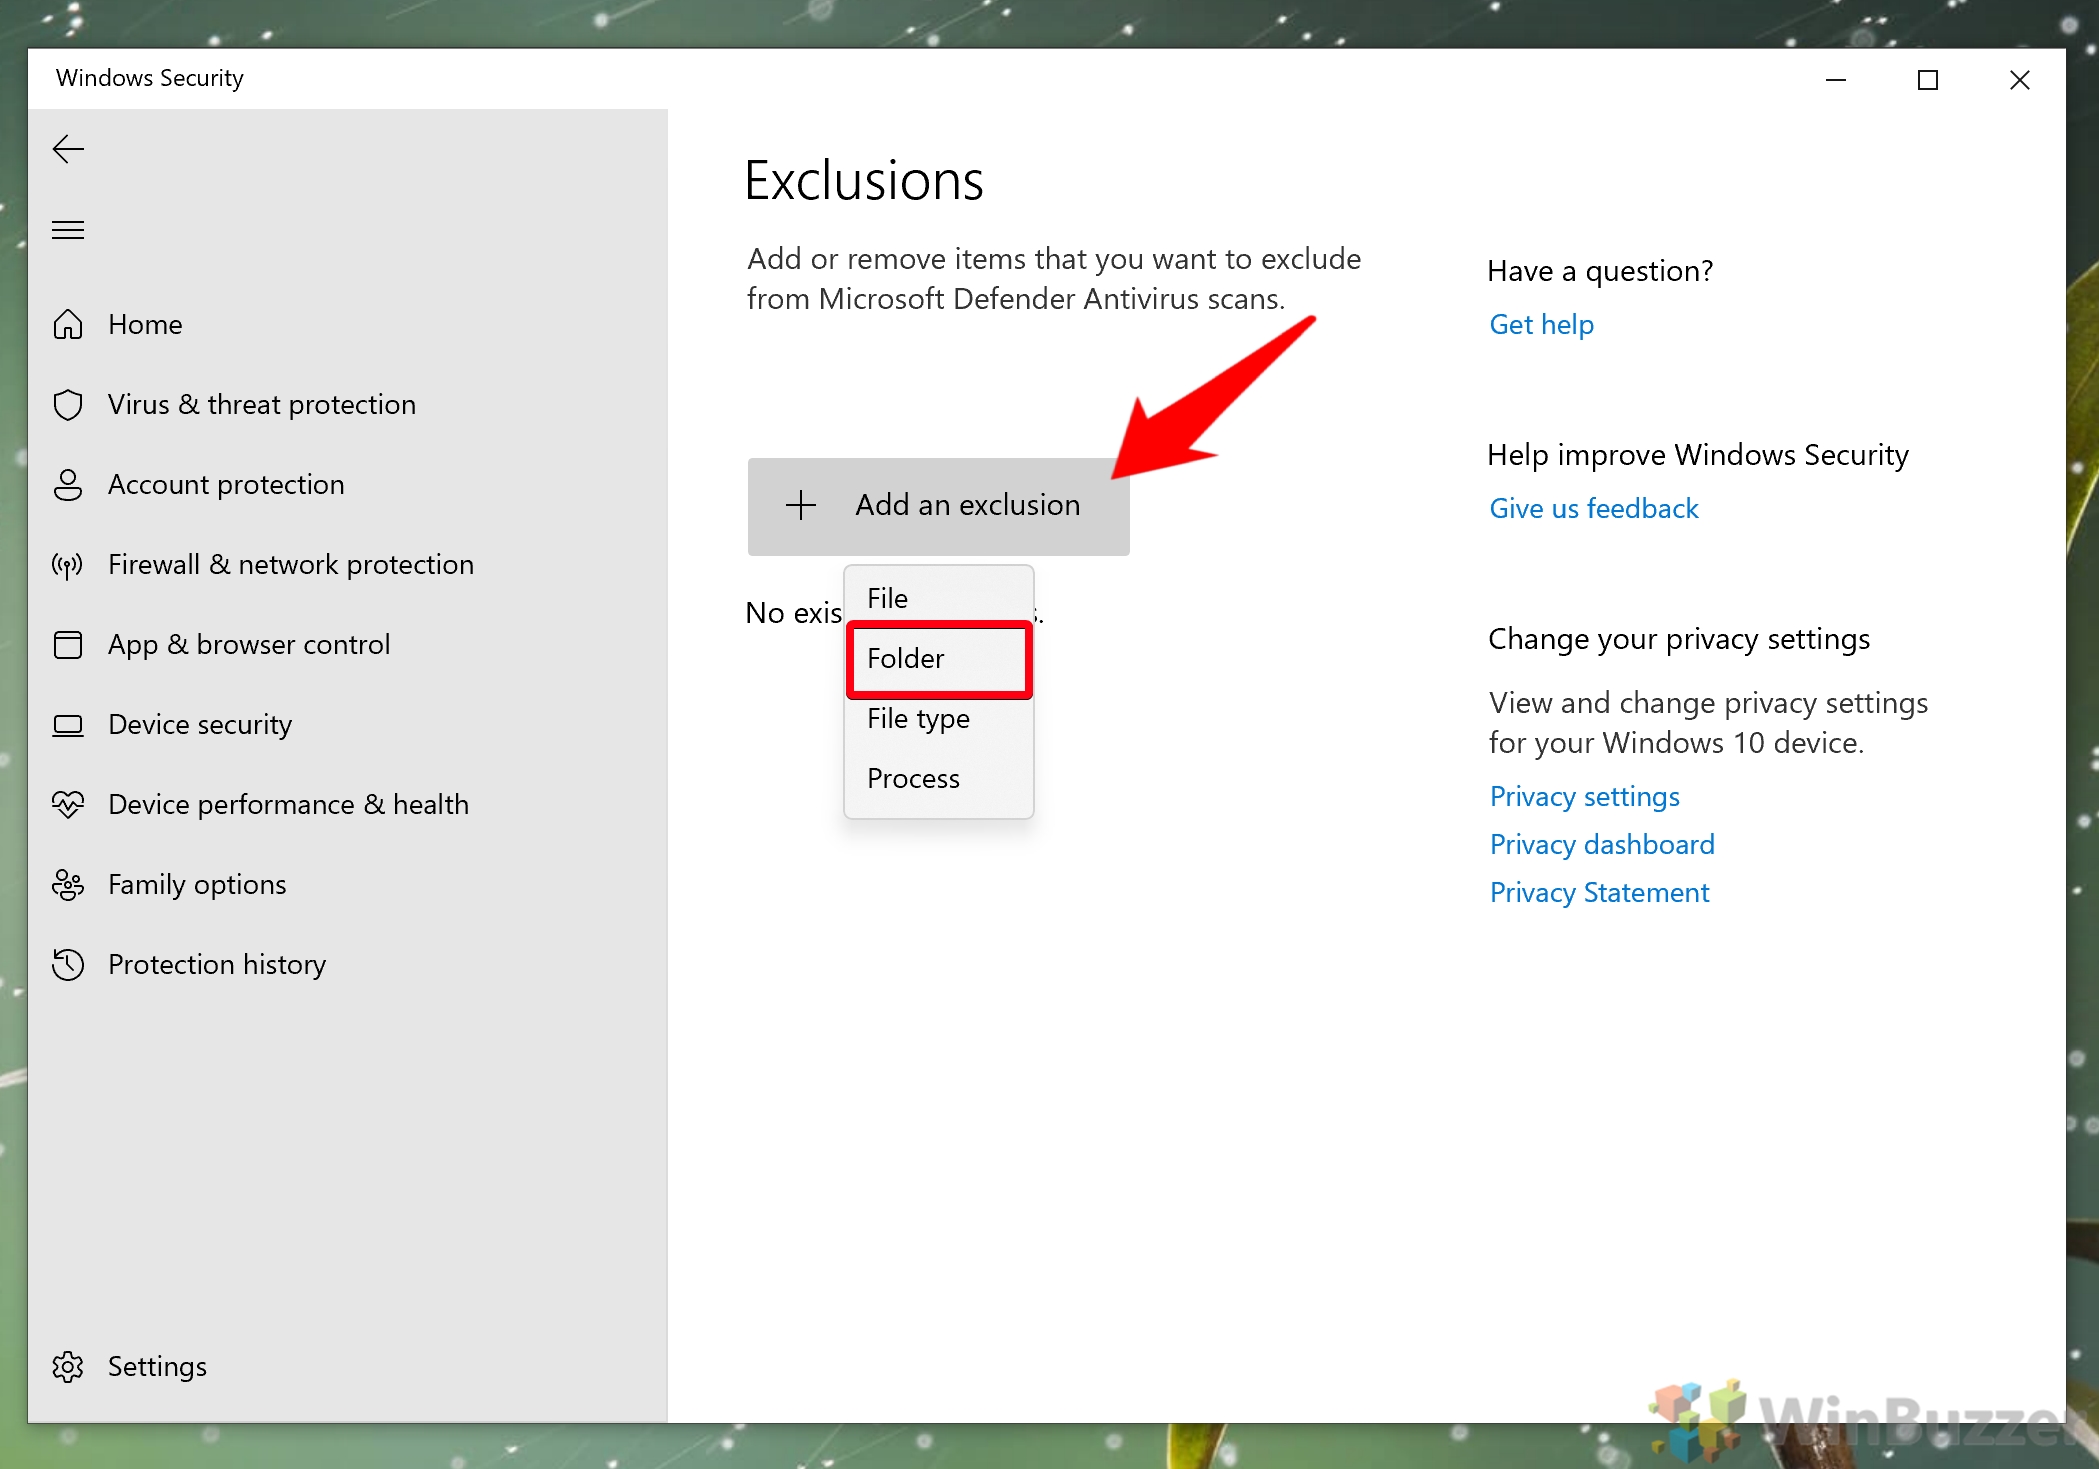
Under the “Exclusions” heading, you’ll see a big grey button labeled “Add an exclusion” click it, then press “Folder”.
Alternatively, if you want to add an exception to Windows Defender that’s a file, file type, or process, click that option.
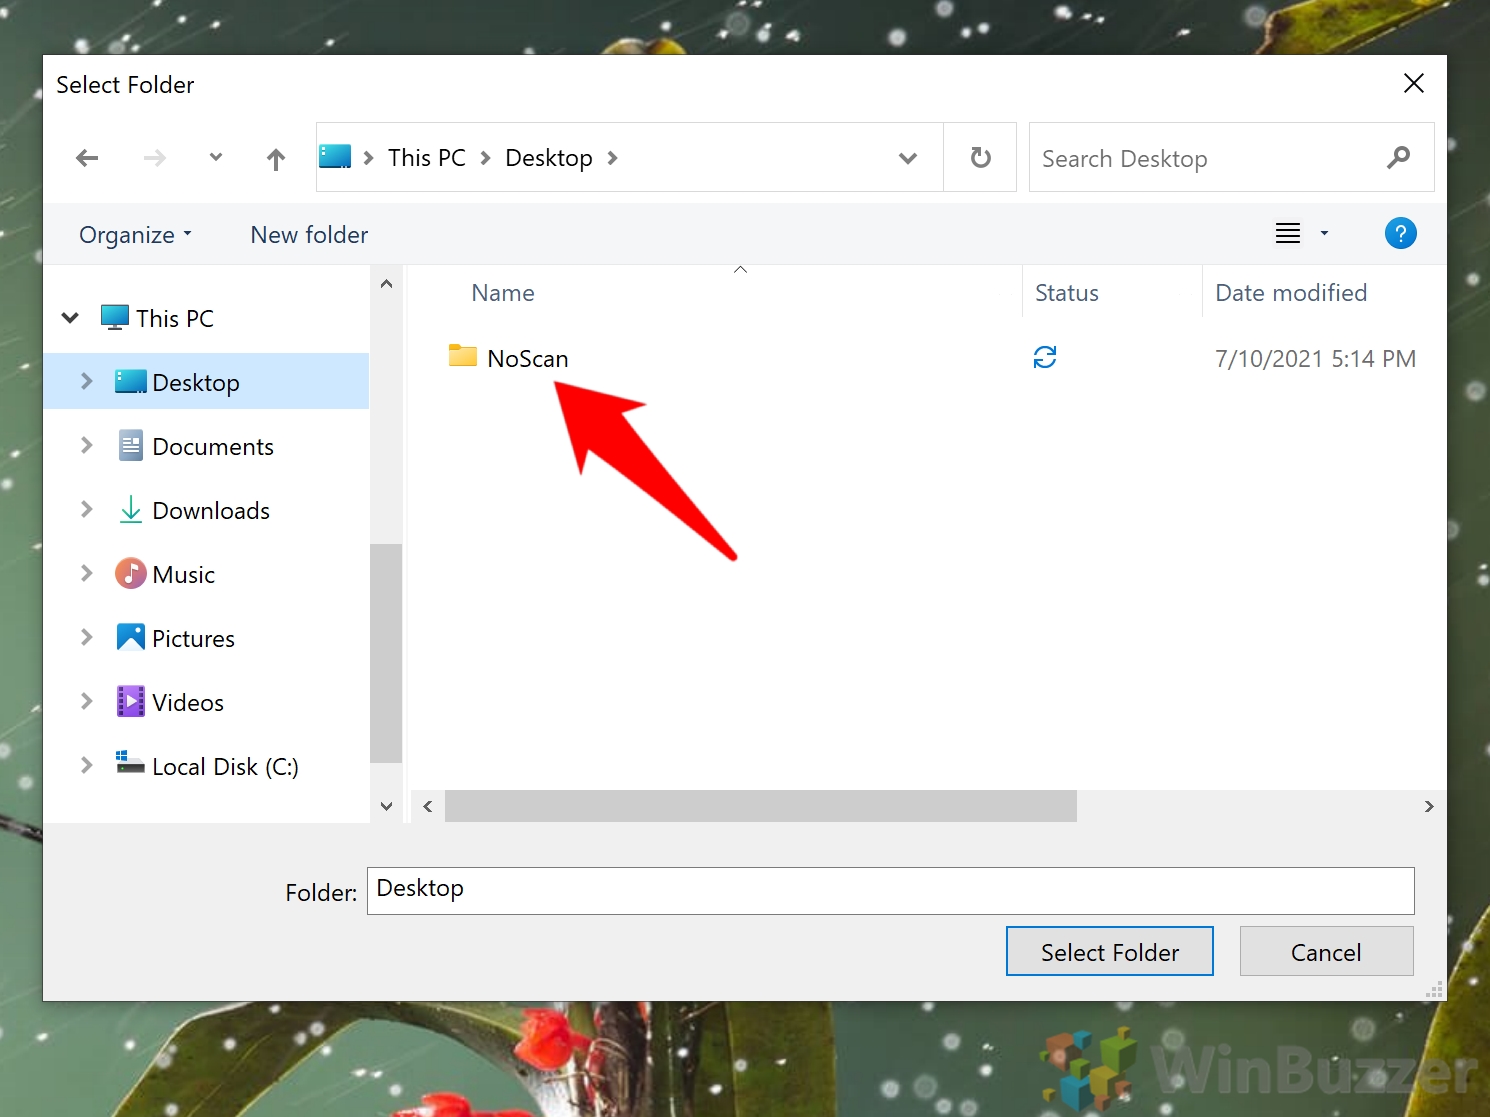
- Browse to your folder or file, click it, and press “Select Folder”
- View the excluded item in your Windows Defender Exclusions list
When you add an exclusion to Windows Security, it will show the path, followed by the type of exclusion: Folder, Process, File, or File type. If you see an addition to the list that you don’t remember making, you should remove it – this could be a sign that somebody has tampered with your security.
Now that you know how to add an exception to Windows Defender, you may want to tighten your security in other ways. The following guides will show you how to enable Windows Defender Application Guard and the Hidden Adware scanner.

В этой пошаговой инструкции подробно о том, как в Windows 11 добавить исключения в Защитник Windows 11 или Microsoft Defender (ранее — Windows Defender).
Добавление исключений Защитника Windows 11 в параметрах безопасности Windows
Для того, чтобы добавить исключения в Microsoft Defender в Windows 11, используйте следующие шаги:
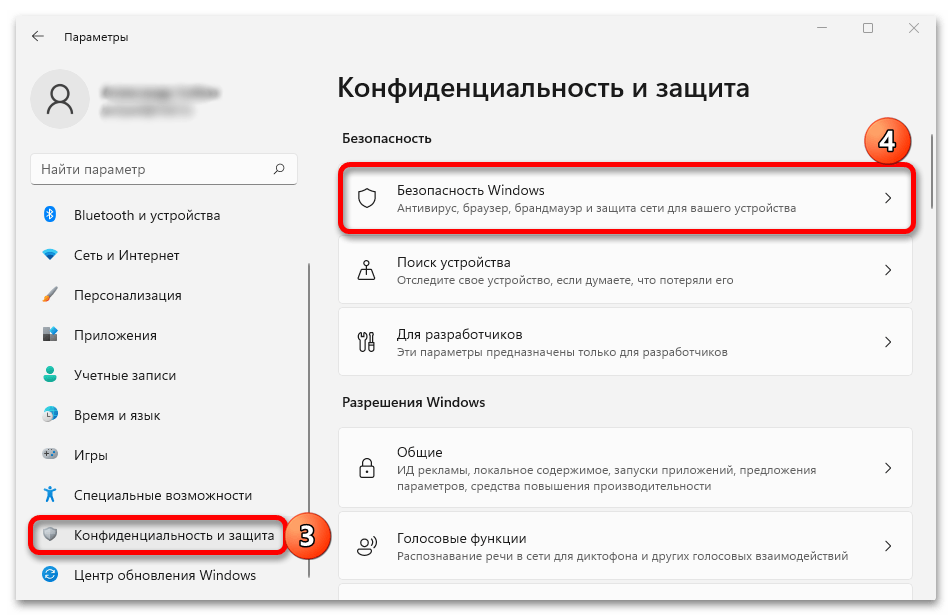
- Перейдите в окно «Безопасность Windows». Для этого можно использовать значок защитника в области уведомлений или перейти в Параметры — Конфиденциальность и защита — Безопасность Windows — Открыть службу «Безопасность Windows».
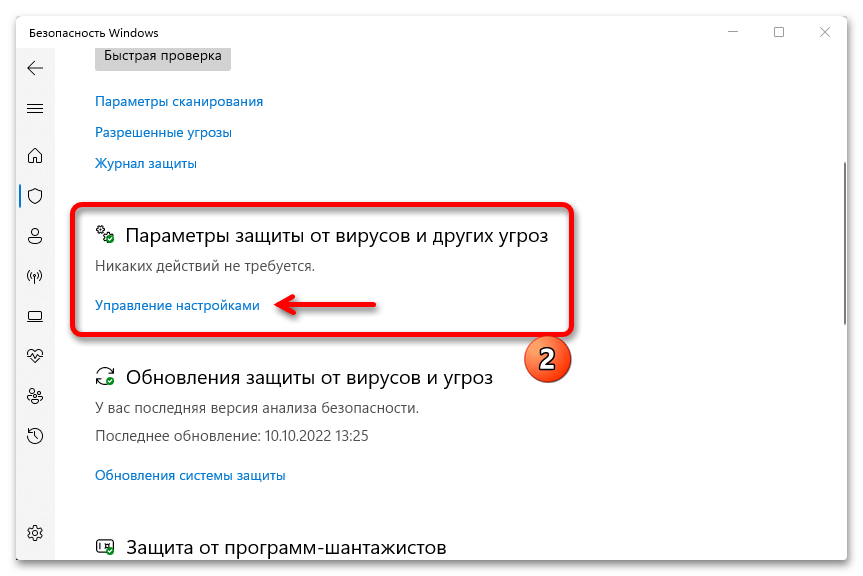
- Перейдите в раздел «Защита от вирусов и угроз», а затем в разделе «Параметры защиты от вирусов и других угроз» нажмите «Управление настройками».
- Пролистайте содержимое окна вниз и нажмите «Добавление или удаление исключений».
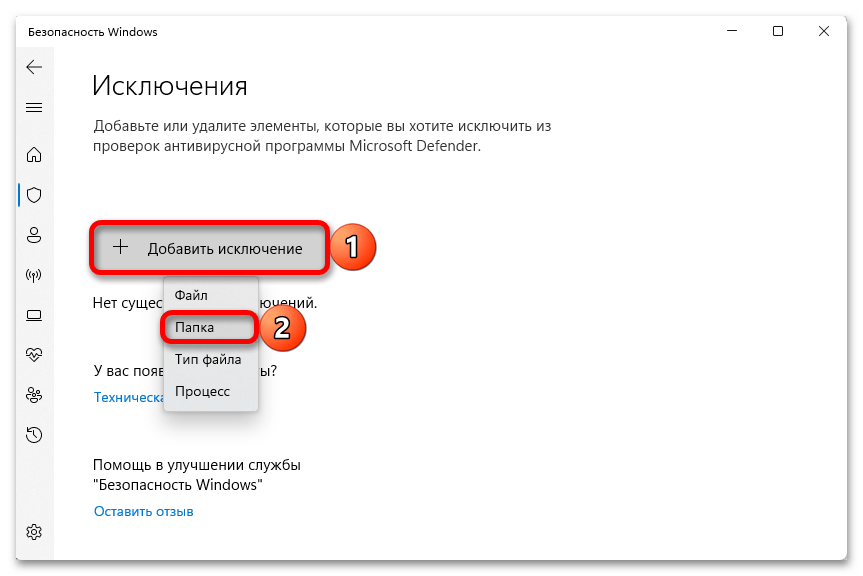
- Нажмите кнопку «Добавить исключение» и выберите один из вариантов — «Файл», «Папка», «Тип файла» или «Процесс». Как правило, для игр и программ (если их блокирует Защитник Windows) имеет смысл добавлять в исключения папку с программой.
- Укажите путь к элементу, который нужно добавить в исключения.
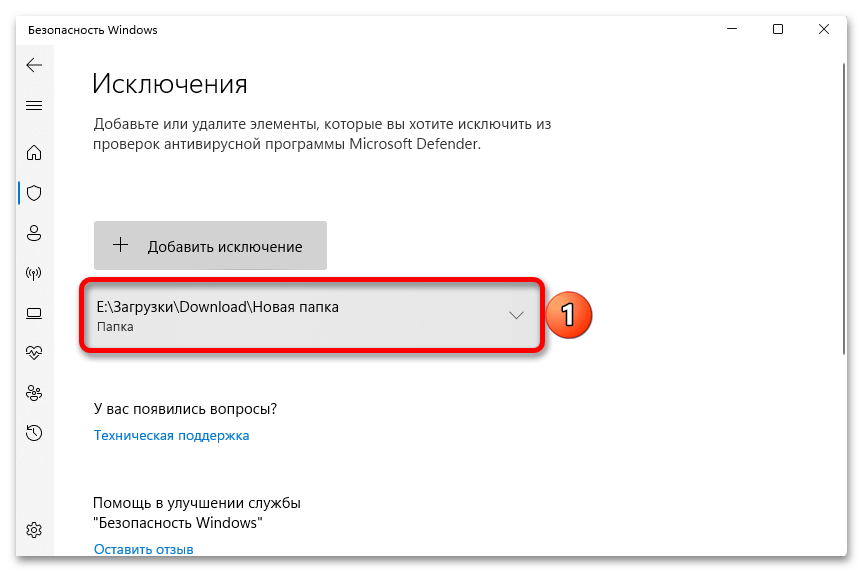
На этом всё: выбранный элемент отобразится в списке исключений, Windows Defender не будет блокировать его выполнение.
В дальнейшем, если вы захотите убрать программу, игру или другой элемент из списка исключений, перейдите в тот же раздел параметров безопасности Windows, нажмите по ранее добавленному в исключения элементу и используйте кнопку «Удалить».
Как добавить исключения Microsoft Defender в Windows PowerShell (Терминале Windows)
При необходимости вы можете использовать команды PowerShell для добавления исключений Защитника Windows:
- Запустите Терминал Windows 11 от имени администратора: нажмите правой кнопкой мыши по кнопке Пуск и выберите соответствующий пункт контекстного меню.
- Используйте команды Add-MpPreference для добавления исключений.
- Обычно достаточно добавить в исключения папку, команда будет следующей:
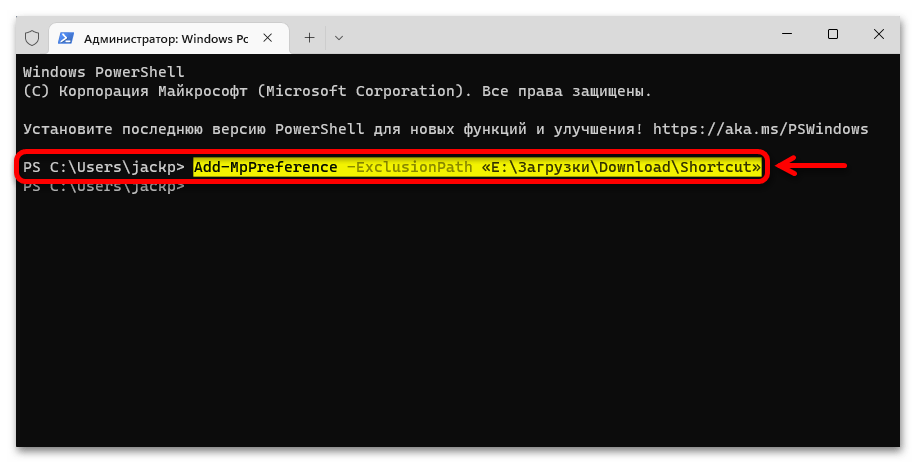
Add-MpPreference -ExclusionPath "путь_к_папке"
- Элемент будет добавлен в исключения, причем если вы зайдете в параметры исключений в окне «Безопасность Windows», там он также будет отображаться.
Другие доступные параметры для команды Add-MpPreference можно найти в справке на сайте Майкрософт.
Видео
Способ 1: Настройки безопасности
Если вы уверены, что файл, процесс или целый каталог не представляет опасности для операционной системы, можно добавить их в список исключений Windows Defender.
- Нажимаем кнопку «Пуск», вызываем окно параметров и
в разделе «Конфиденциальность и защита» открываем «Безопасность Виндовс».
Либо, если Защитник включен, а он наверняка включен, так как блокирует наш объект, открываем системный трей, кликаем иконку в виде щита и открываем нужный нам экран.
- Перемещаемся в раздел «Защиты от вирусов и угроз»,
спускаемся к блоку параметров ЗВУ, щелкаем «Управление настройками»,
ищем там раздел «Исключения» и кликаем под ним «Добавление и удаление исключений».
- Нажимаем «Добавить», выбираем нужную категорию, в нашем случаем это будет папка,
находим ее в «Проводнике» и подтверждаем выбор.
После этого она появится в списке.
- Чтобы убрать объект из списка исключений, кликаем по нему
и нажимаем «Удалить».

Читайте также:
Как отключить Защитник Windows 11
Устранение проблем с открытием «Защитника Windows» в Windows 11
Способ 2: Консоль
Добавлять объекты файловой системы в исключения можно с помощью консольных инструментов. Мы покажем, как это сделать, на примере «Терминала» Виндовс 11.
- Щелкаем правой кнопкой мышки по меню «Пуск» и запускаем «Терминал» с повышенными правами.
- Для добавления в список исключения используется команда
Add-MpPreference, а также добавочные значения в зависимости от типа объекта — «-ExclusionProcess» (для процессов и исполняемых файлов), «-ExclusionExtension» (для расширений) и «-ExclusionPath» (для путей). Мы добавляем папку, поэтому вводим командуAdd-MpPreference -ExclusionPath «путь к папке»,в кавычках указываем путь к папке и нажимаем «Enter».
С этого момента в списке исключений появится добавленный нами путь.

Способ 3: LGPE
«Редактор групповой политики» – системный инструмент, но он есть только в Windows 11 Pro и выше, т.е. домашняя версия для этого способа не подойдет.
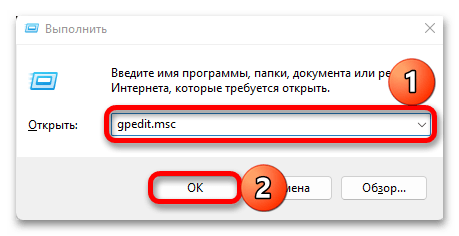
- Сочетанием клавиш «Windows+R» вызываем инструмент «Выполнить», вводим команду
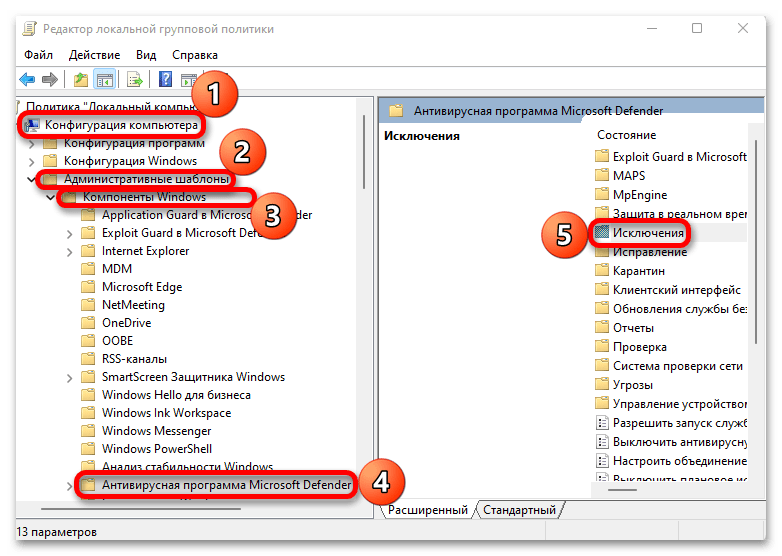
gpedit.mscи нажимаем «OK». - В левой области открываем разделы так, как показано на скриншоте, т.е. находим папку «Антивирусная программа Microsoft Defender», а затем в правой области переходим в каталог «Исключения».
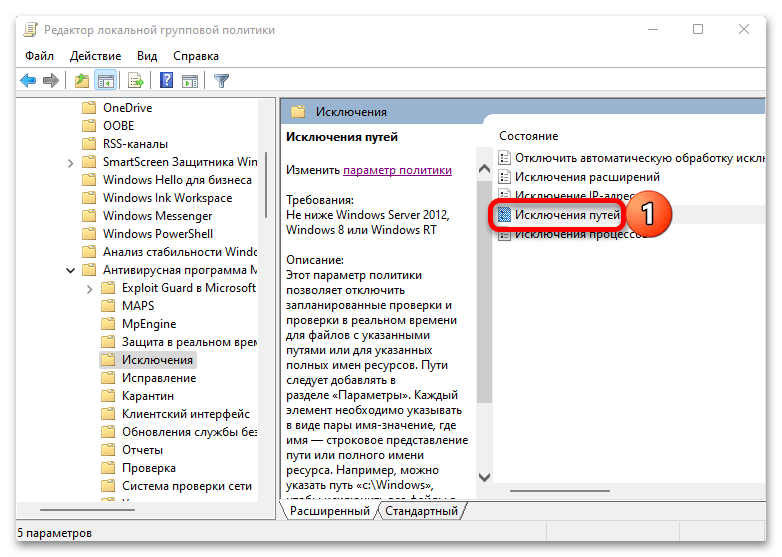
- Здесь мы можем освободить от проверки определенные расширения, ip-адреса, исполняемые файлы и пути. Мы снова добавим каталог, поэтому дважды кликаем «Исключения путей»,
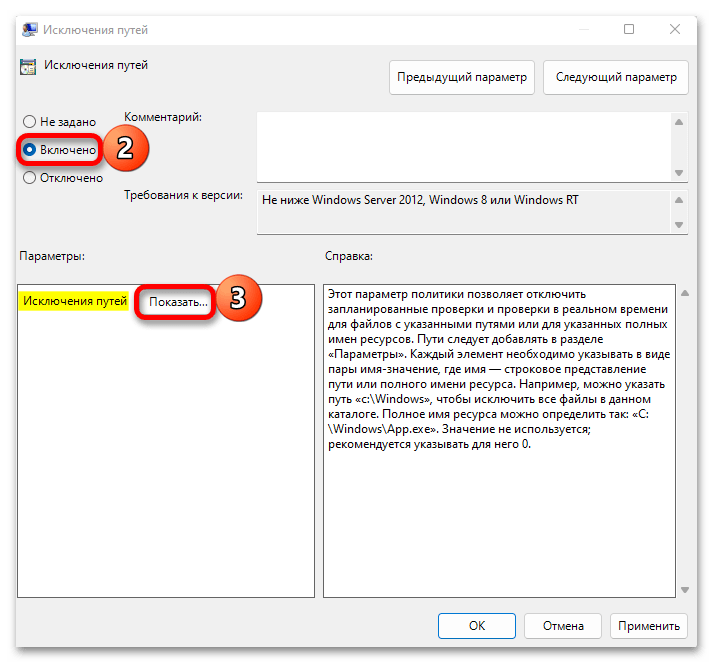
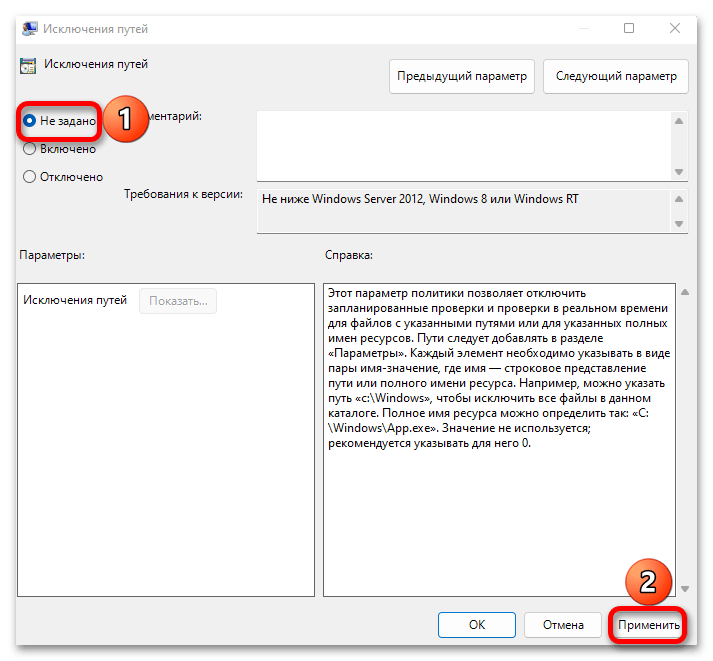
включаем параметр, затем жмем «Показать»,
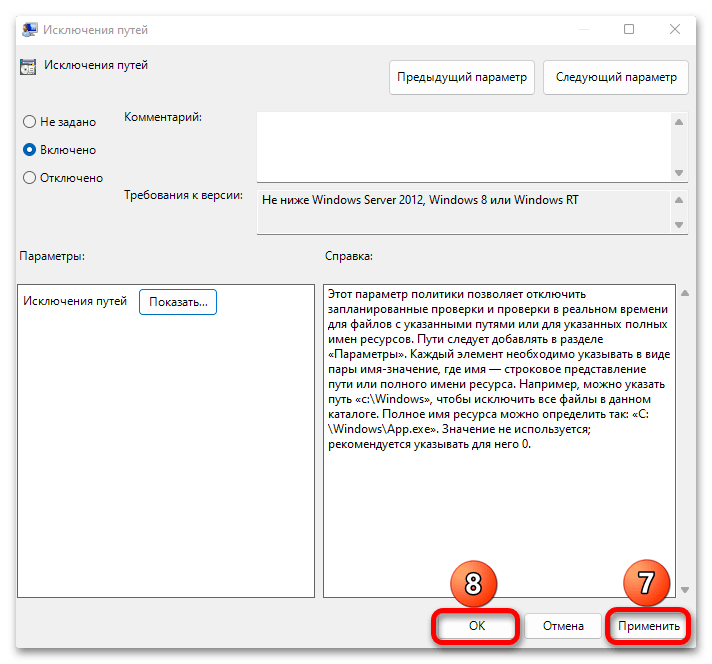
в поле «Имя значения» указываем путь к папке, в поле «Значение» ставим «0» или оставляем его пустым, подтверждаем действие,
нажимаем «Применить» и закрываем окно.
- Чтобы убрать объект из списка, можно удалить его в разделе исключений, как это описано в первом способе, или установить значение параметра – «Не задано».
Еще статьи по данной теме:

 This will open the following page:
 Here, click on the button Add an exclusion.