On Windows 10, cumulative updates download and install automatically as soon as they become available. Although this approach allows laptops and desktop computers to receive security updates to patch vulnerabilities, improve performance, and bring enhancements without user interaction, it is a very controversial feature.
Typically, it’s because updates contain bugs that can negatively affect the experience in many ways. For example, they could break existing features, introduce driver and application compatibility problems, or cause the Blue Screen of Death (BSoD), and they require a system restart to complete the installation, which can disrupt your workflow.
If you experience more problems than benefits during updates, or if you have a good reason to use a device without updates, depending on your edition of Windows 10, you can disable automatic updates using the Settings app or permanently with Group Policy and Registry.
This guide will walk you through the steps to prevent Windows Update from automatically downloading and installing updates on Windows 10.
How to disable automatic updates using Settings
You do not need to disable Windows Update permanently if you want to prevent the system from downloading a specific update immediately. Instead, you could pause updates for up to seven days.
To disable automatic updates temporarily, use these steps:
- Open Settings.
- Click on Update & Security.
- Click on Windows Update.
- Click the «Pause updates for 7 days» option.
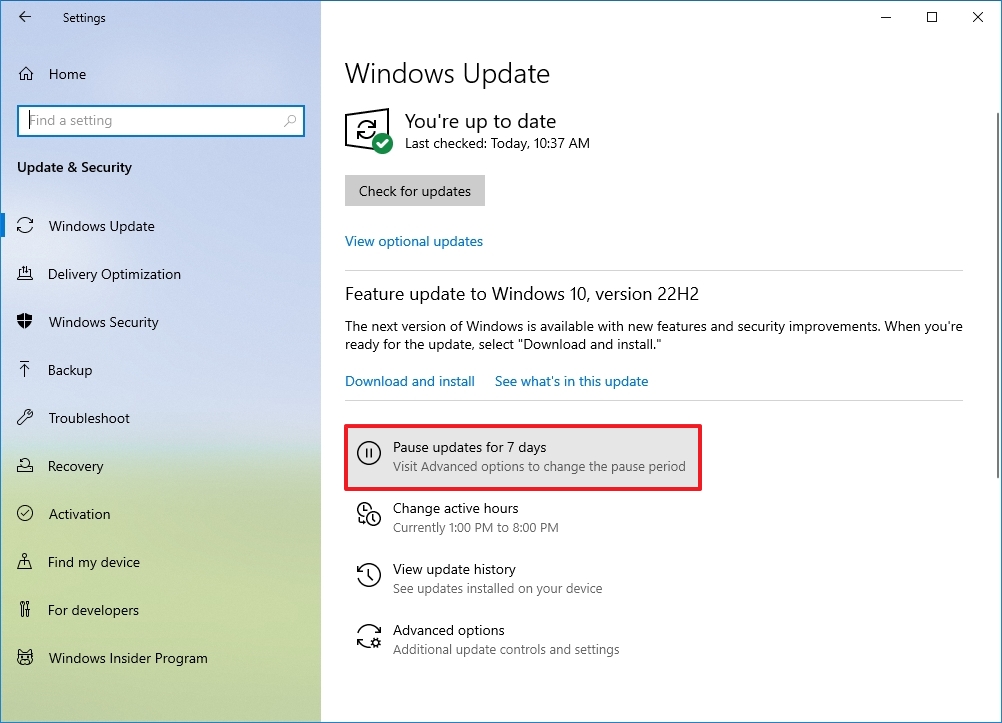
Once you complete the steps, Windows Update will no longer download for the time you specified. When the system reaches the pause limit, you will need to install the latest patch available to make the option available again.
You can always undo the changes with the instructions outlined above, but on step 4, choose the Select date option. Alternatively, you can accomplish the same effect by clicking the Resume updates button.
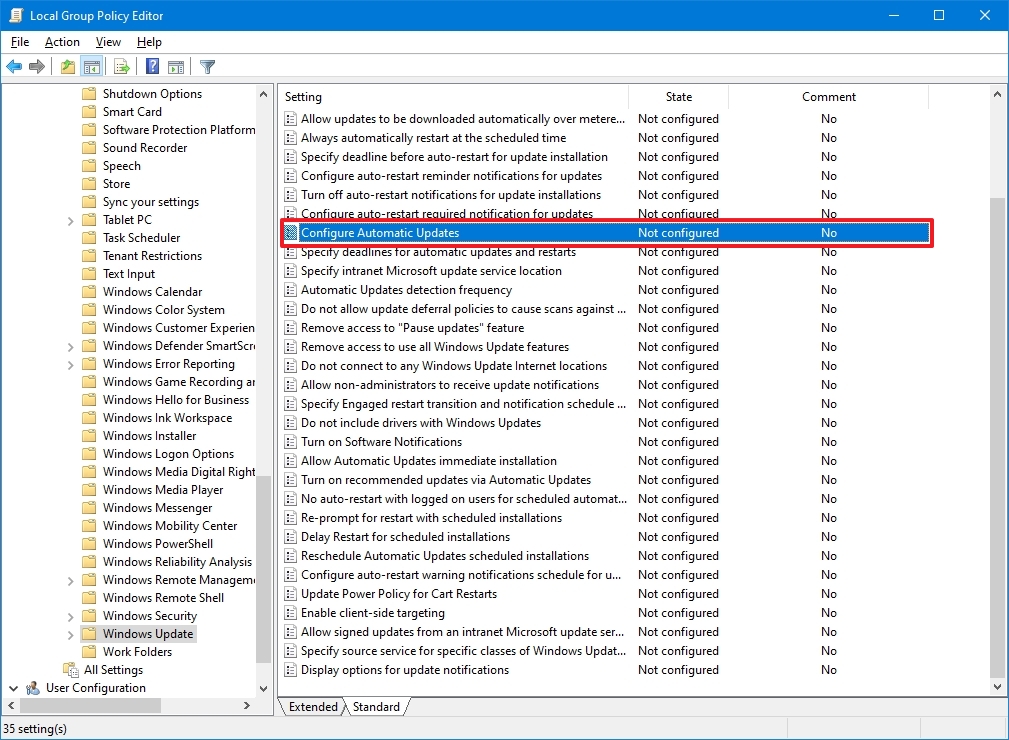
How to disable automatic updates using Group Policy
On Windows 10 Pro, the Local Group Policy Editor includes policies to permanently disable automatic updates or change the update settings to choose when patches should be installed on the device.
Disable Windows 10 updates
To disable automatic updates on Windows 10 permanently, use these steps:
- Open Start.
- Search for gpedit.msc and click the top result to launch the Local Group Policy Editor.
- Navigate to the following path: Computer Configuration > Administrative Templates > Windows Components > Windows Update
- Double-click the «Configure Automatic Updates» policy on the right side.
- Check the Disabled option to turn off automatic Windows 10 updates permanently.
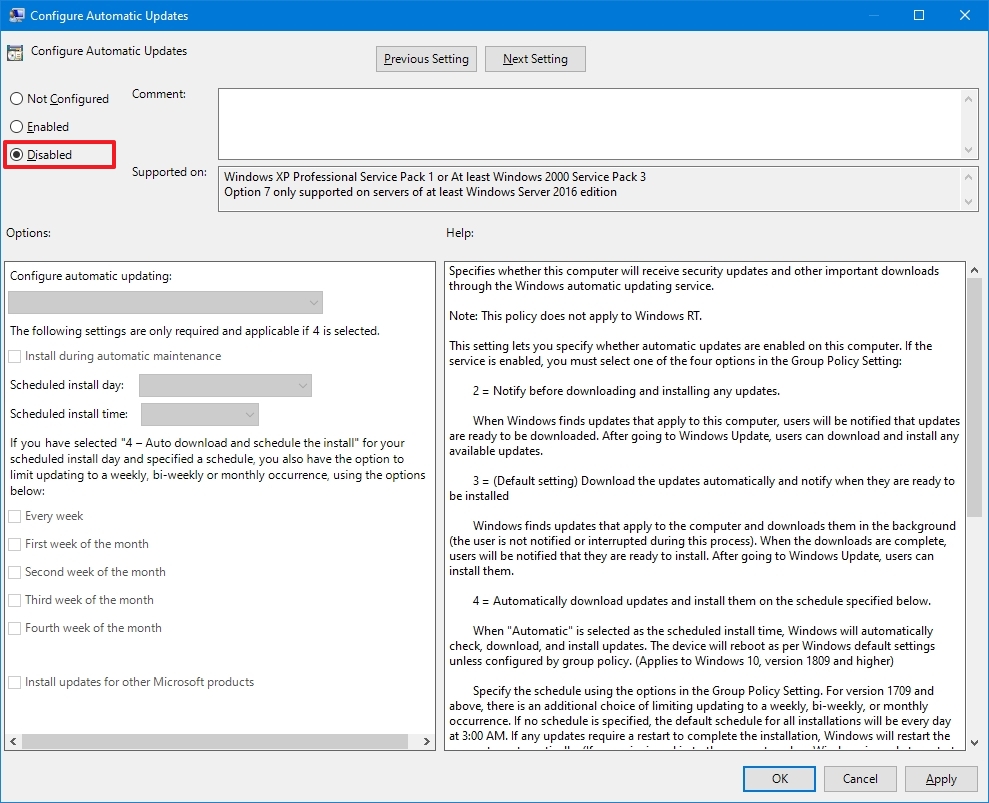
- Click the Apply button.
- Click the OK button.
After you complete the steps, Windows 10 will stop downloading updates automatically. However, the ability to check for updates manually will continue to be available on Settings > Update & Security > Windows Update, and clicking the Check for updates button to download the most recent patches as needed.
If you want to enable automatic updates on the computer again, you can use the same instructions outlined above, but in step 5, make sure to select the Not Configured option.
Limit Windows 10 updates
The Local Group Policy Editor also lets you choose how to disable automatic updates.
To manage Windows Update automatic downloads with Group Policy on Windows 10, use these steps:
- Open Start.
- Search for gpedit.msc and select the top result to launch the experience.
- Navigate to the following path: Computer Configuration > Administrative Templates > Windows Components > Windows Update
- Double-click the Configure Automatic Updates policy on the right side.
- Check the Enable option to turn on the policy.
- Under the «Options» section, select the option to prevent updates from downloading automatically on Windows 10:
- 2 — Notify for download and auto install.
- 3 — Auto download and notify for install.
- 4 — Auto download and schedule the install.
- 5 — Allow local admin to choose setting.
- 7 — Auto Download, Notify to install, Notify to Restart.
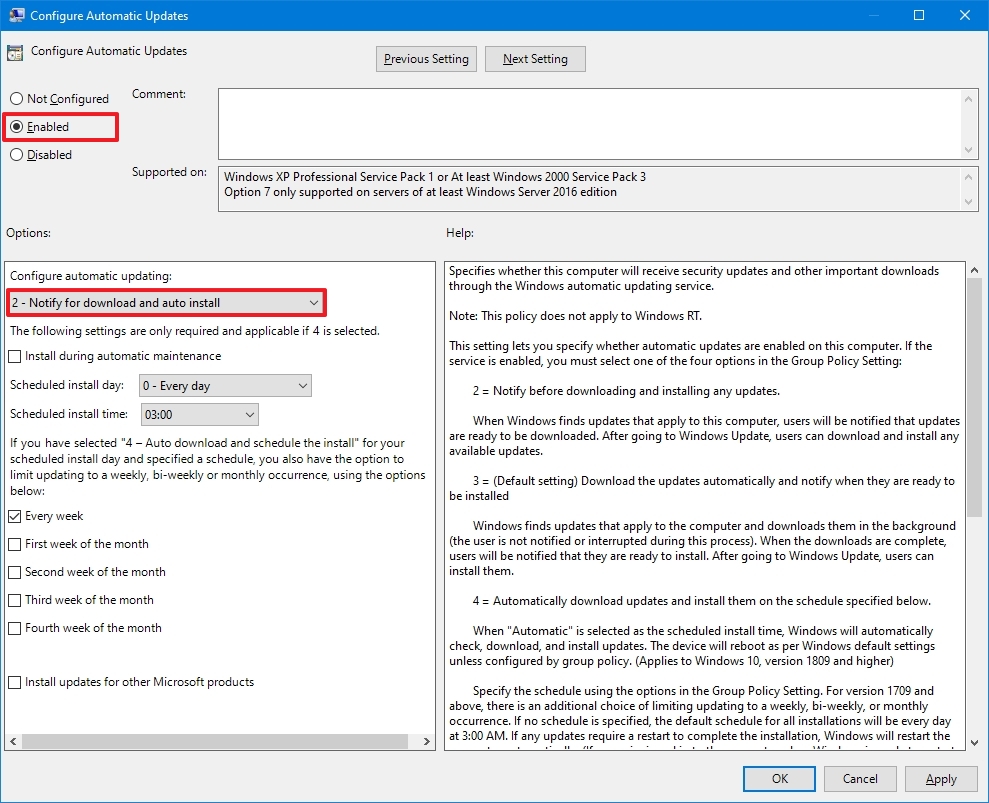
- Quick tip: The best option to disable automatic updates is the 2 — Notify for download and auto install option, but you can make a different selection. If you choose option 2, updates won’t download automatically. Instead, you will now see an «Install now» button to manually trigger an update on the Windows Update settings page.
- Click the Apply button.
- Click the OK button.
Once you complete the steps, automatic updates will be permanently disabled on Windows 10. However, when new updates become available, you can install them manually from the Windows Update settings page.
How to disable automatic updates with Registry
You can also use the Registry in two different ways to disable automatic updates on Windows 10.
Warning: This is a friendly reminder that editing the Registry is risky and can cause irreversible damage to your installation if you don’t do it correctly. Before proceeding, it’s recommended to make a backup of your PC.
Disable updates
To disable Windows 10 updates permanently by changing the Registry settings, use these steps:
- Open Start.
- Search for regedit and click the top result to launch the Registry Editor.
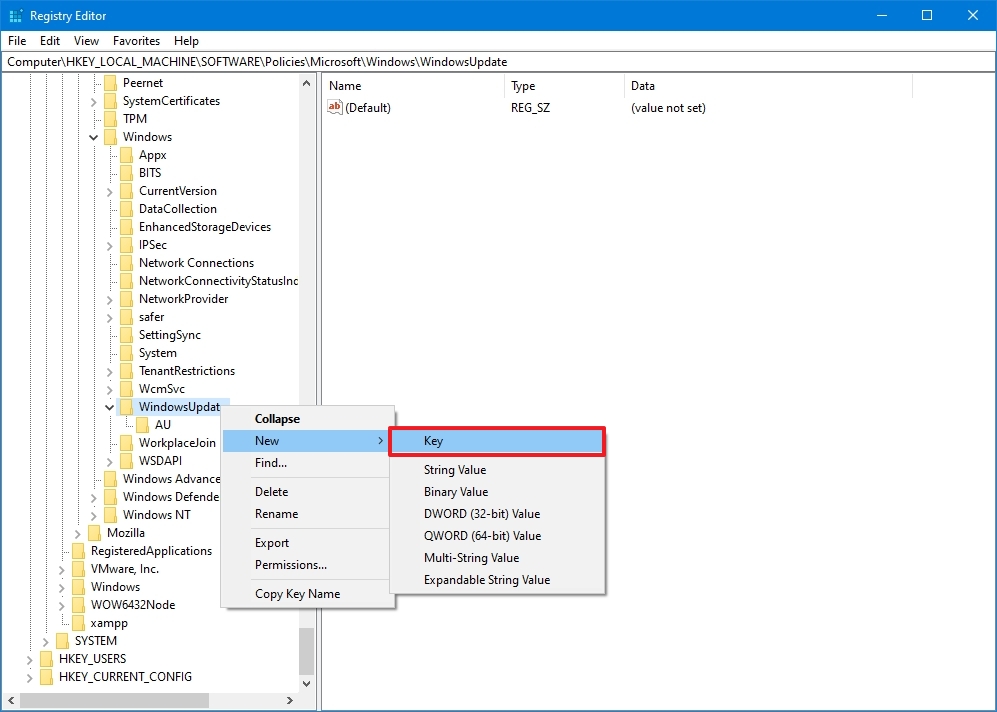
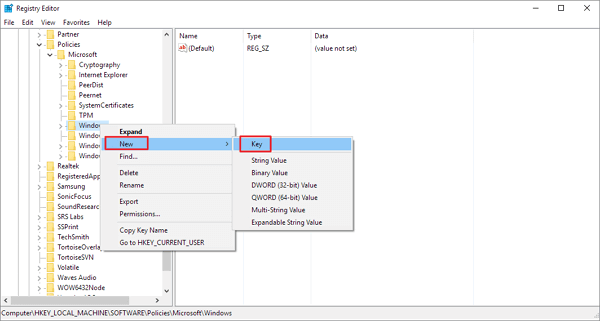
- Navigate to the following path: HKEY_LOCAL_MACHINESOFTWAREPoliciesMicrosoftWindows
- Right-click the Windows (folder) key, select the New submenu and choose the Key option.
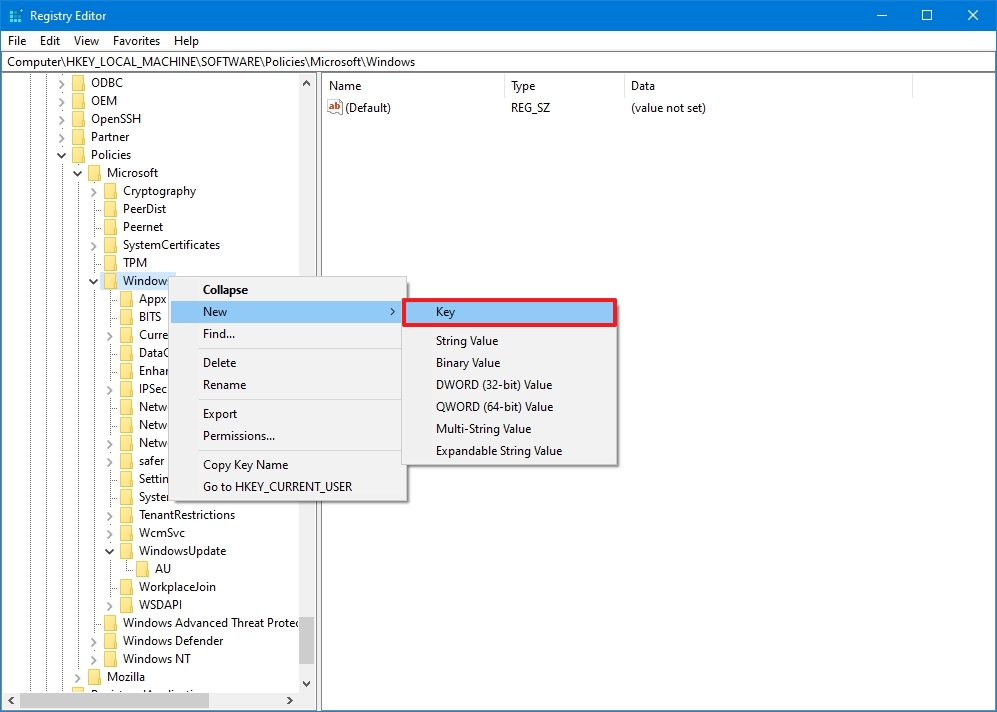
- Name the new key WindowsUpdate and press Enter.
- Right-click the newly created key, select the New submenu, and choose the Key option.
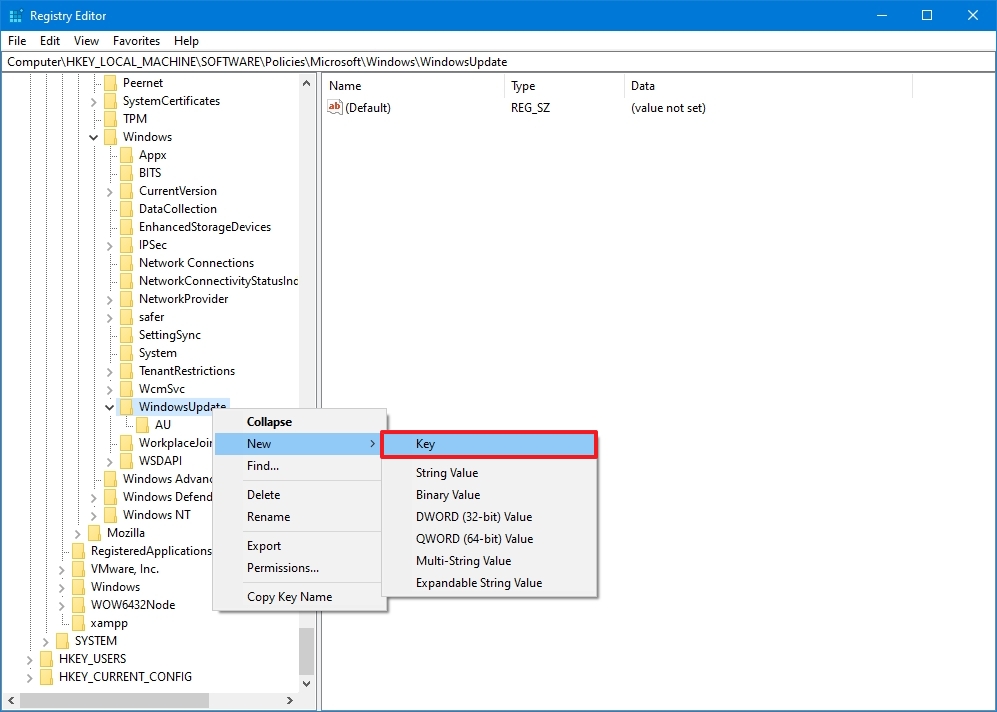
- Name the new key AU and press Enter.
- Right-click the AU key, select the New submenu, and choose the DWORD (32-bit) Value option.
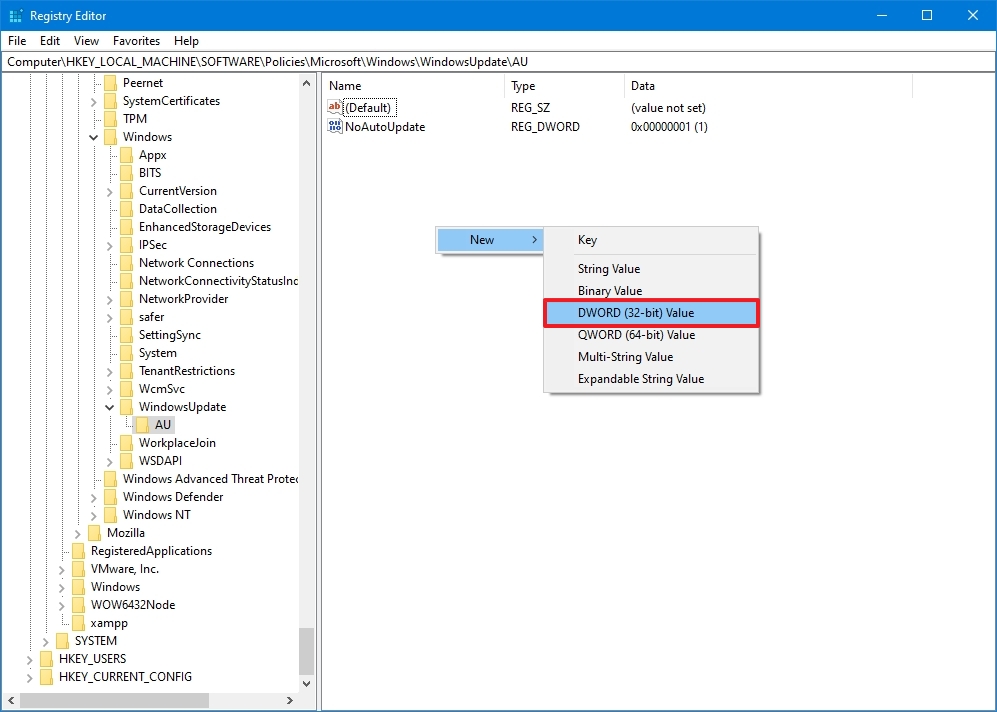
- Name the new key NoAutoUpdate and press Enter.
- Double-click the newly created key and change its value from 0 to 1.
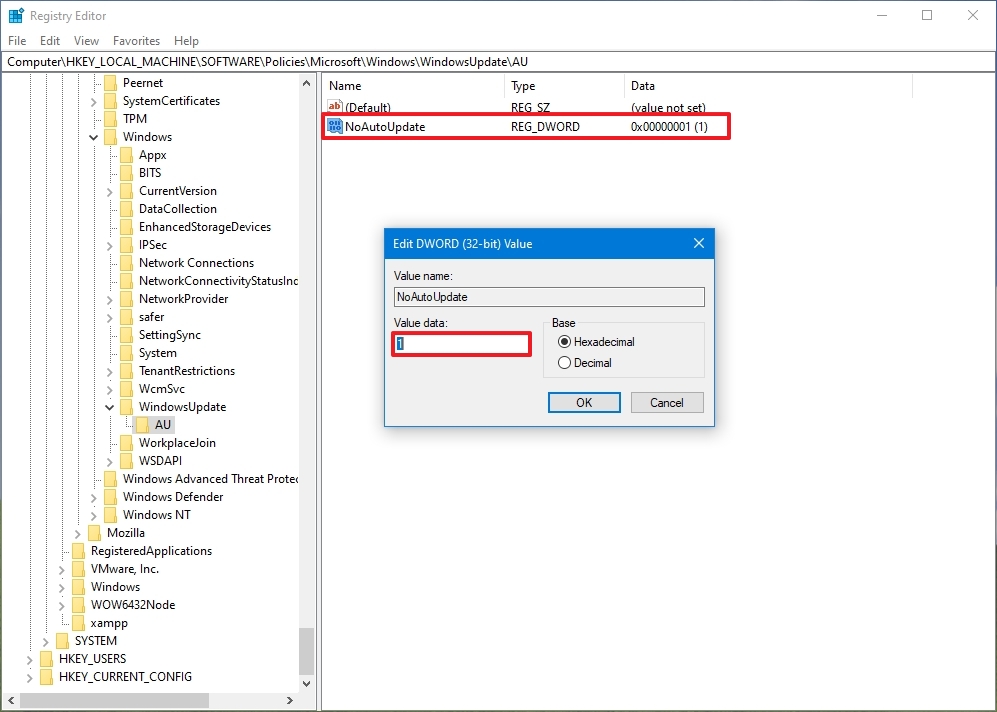
- Click the OK button.
- Restart the computer.
After you complete the steps, automatic updates will be disabled permanently on the device. However, you will still be able to download updates by clicking the Check for updates button on the Windows Update settings page.
If you want to undo the changes, you can use the same instructions outlined above, but on step 4, right-click the WindowsUpdate key, select the Delete option, then reboot the computer to apply the settings.
Limit updates
Finally, you can use the Registry to configure the system settings to decide how to get updates on Windows 10.
To use the Registry to stop automatic updates (but choosing how to receive updates), use these steps:
- Open Start.
- Search for regedit and click the top result to open the Registry Editor.
- Navigate to the following path: HKEY_LOCAL_MACHINESOFTWAREPoliciesMicrosoftWindows
- Right-click the Windows (folder) key, select the New submenu and choose the Key option.
- Name the new key WindowsUpdate and press Enter.
- Right-click the newly created key, select the New submenu, and choose the Key option.
- Name the new key AU and press Enter.
- Right-click the AU key, select the New submenu, and select the DWORD (32-bit) Value option.
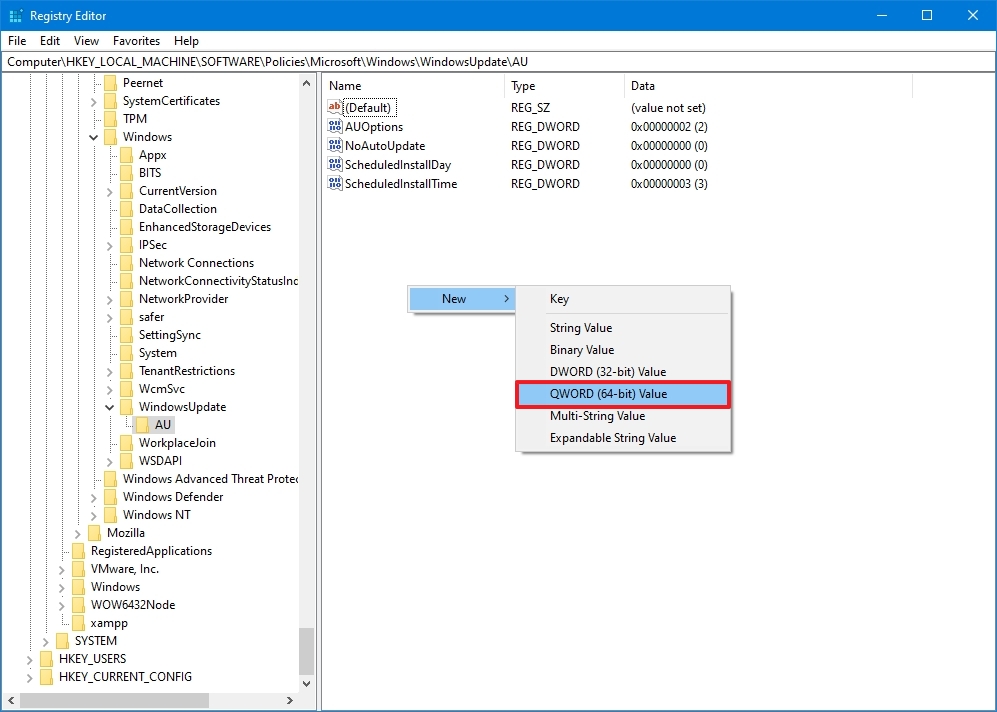
- Name the new key AUOptions and press Enter.
- Double-click the newly created key and change the value (number only) to:
- 2 — Notify for download and auto install.
- 3 — Auto download and notify for install.
- 4 — Auto download and schedule the install.
- 5 — Allow local admin to choose settings.
- 7 — Auto Download, Notify to install, Notify to Restart.
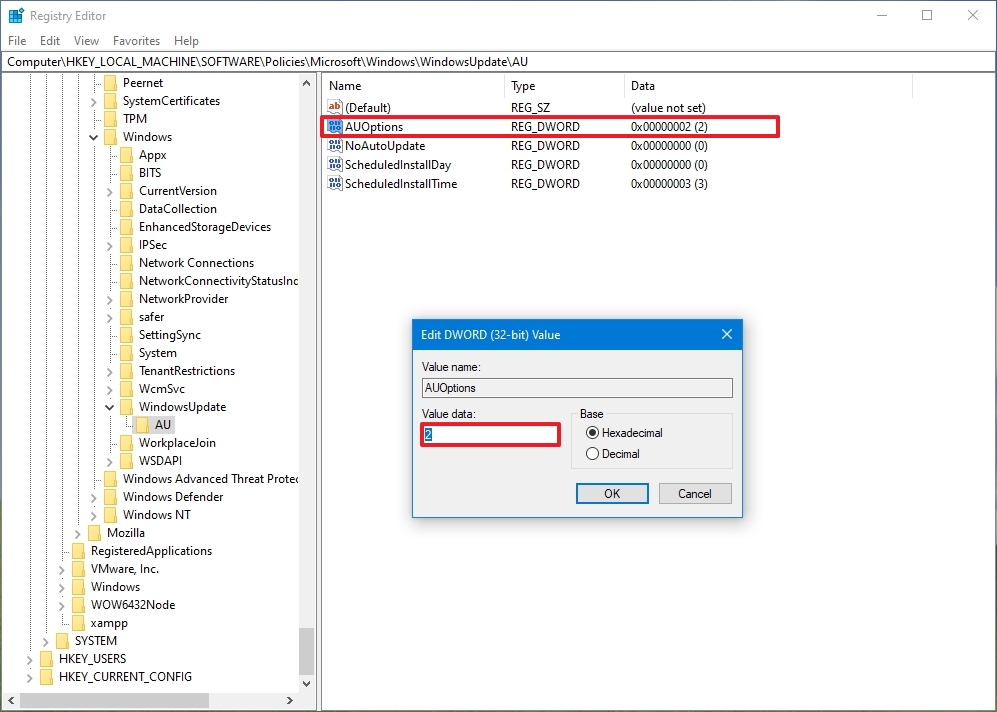
- Quick note: These options are the same as the Group Policy settings, and option 2 is the closest to disable Windows Update permanently.
- Click the OK button.
- Restart the computer.
Once you complete the steps, cumulative updates will no longer download and install automatically. However, when a new update becomes available, you will find the option to install it manually from the Windows Update settings.
You can use the same instructions outlined above to restore the original settings, but on step 4, right-click the WindowsUpdate key, select the Delete option, and reboot the computer.
Updates are essential to fix security vulnerabilities, resolve issues, and improve the overall experience, no matter the version of Windows you use. However, you may still need to disable this feature in some situations. For instance, when you want to have complete control over updates on Windows 10, when you want to avoid issues since bugs are common in most rollouts, or when you are using a critical app or equipment and you do not want to encounter any compatibility issues.
More resources
For more helpful articles, coverage, and answers to common questions about Windows 10 and Windows 11, visit the following resources:
- Windows 11 on Windows Central — All you need to know
- Windows 10 on Windows Central — All you need to know
Get the best of Windows Central in in your inbox, every day!
Mauro Huculak is technical writer for WindowsCentral.com. His primary focus is to write comprehensive how-tos to help users get the most out of Windows 10 and its many related technologies. He has an IT background with professional certifications from Microsoft, Cisco, and CompTIA, and he’s a recognized member of the Microsoft MVP community.
- Windows 11 Update Rolls Out:
- In June 2022, Microsoft has released the Insider version of Windows 11 (codenamed Sun Valley). The official version will reach every compatible computer since October 2022. The new Windows 11 requires users’ computers to equip with TPM 2.0 and boot in UEFI mode. If you want to upgrade to Windows 11 but do not sure if your computer is compatible with the minimum requirements, you can click this link to check the update to Windows 11.
«Every time I try to shut down my computer, I was forced to update my Windows 10. But I really don’t want to update my operating system because the automatic update might take up the system and network resources. Is there anybody who can help me solve this problem and disable Windows 10 update? Thanks in advance.»
All solutions to disable Windows 10/11 update:
| Solutions | Step-by-step Troubleshooting |
|---|---|
| 1. Manually Disable Windows Update | Press the Windows key + R to open the Run box…Full steps |
| 2. Change the Settings of the Group Policy Editor | Go to Computer Configuration > Administrative Templates…Full steps |
| 3. Meter Your Network Connection | Click «Network & Internet» in the Settings app…Full steps |
| 4. Change Update Settings using Registry | Type regedit, and click OK to open the Registry…Full steps |
Whenever you are faced with Windows’ automatic update notification like:
- Install updates automatically
- Download Updates but choose when to install them
- Check for updates but let me choose whether to download and install them
What would you do? Here, we have the following solutions.
- Tip
- Before proceeding with the four solutions to fully stop Windows 10 updates, check your own Windows 10 edition (Home, Professional, Education, or Enterprise) by going to Settings -> System -> About so that you can find the most appropriate solution. Besides, the fourth way of trying to control the Windows 10 update by using Registry is somewhat risky, do remember to back up your data and the details will be shown in the extra tips section.
Applies to: Windows 11, Windows 10, Windows 8. For different system versions, the operation steps may be slightly different.
Solution 1. Disable Windows Update Service
Understand the limitations of this method. While disabling the automatic update service will temporarily halt any Windows 10 cumulative updates, the service will re-enable itself after a certain amount of time. Here are the directions:
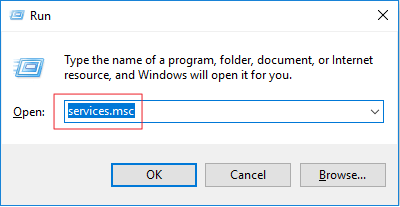
1. Press the Windows logo key + R at the same time to invoke the Run box.
2. Type services.msc and press Enter.
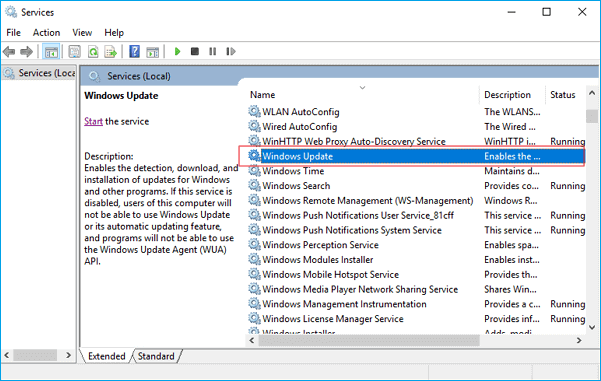
3. Scroll down to Windows Update, and double-click it.
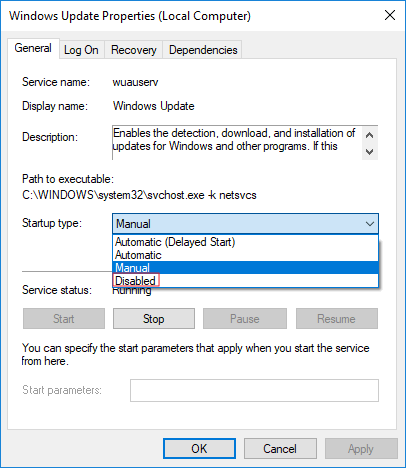
4. In Startup type, select «Disabled». Then click «Apply» and «OK» to save the settings.
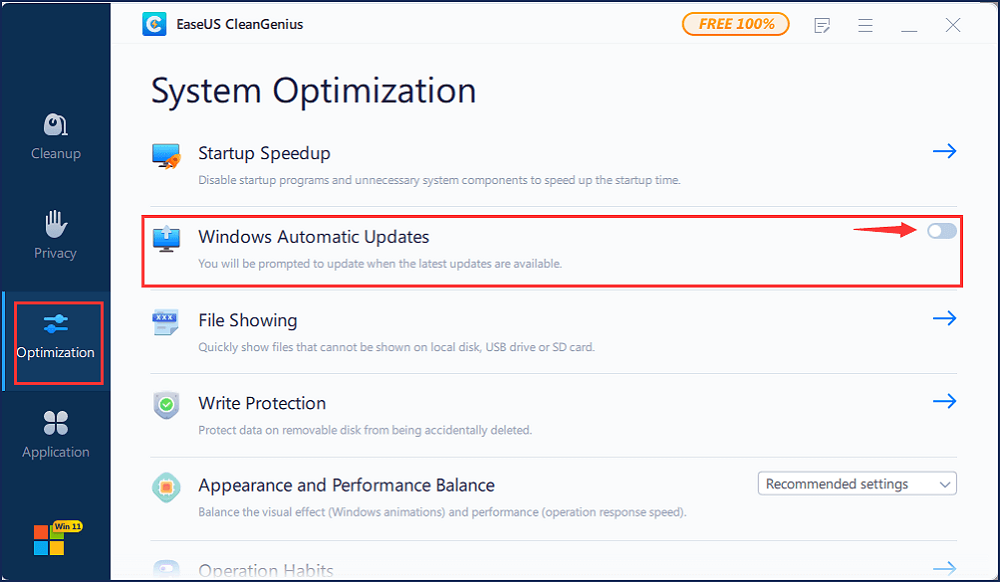
Do you prefer a one-click solution to disable the Windows automatic update feature? If so, get the versatile toolkit — EaseUS CleanGenius to help you. With it, you can disable/enable Windows Update, repair hard drives, remove/enable write-protection, and more within seconds.
To disable Windows Update:
Step 1. DOWNLOAD EaseUS CleanGenius for free and install it on your computer.
Step 2. Launch EaseUS CleanGenius and go to «Optimization».
Step 3. The tool will detect the status of the Windows Update service automatically. If Windows Update is currently enabled, click the switch to stop the service.
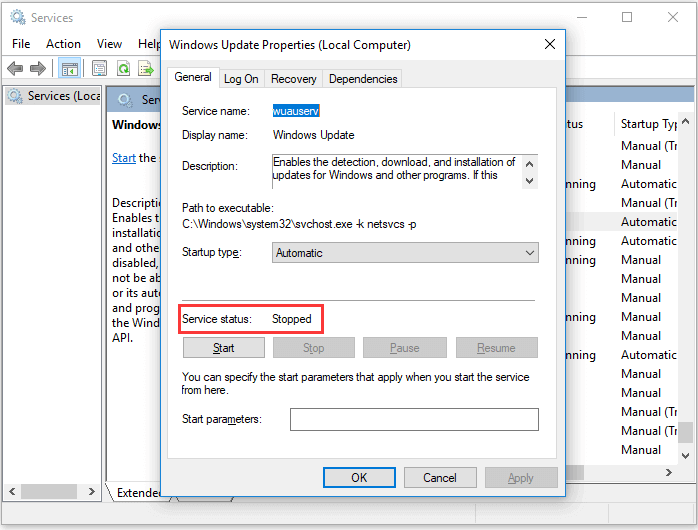
Step 4. If you want to check whether you have disabled the service automatically, go to «Start» > type «Services» > right-click «Services» and choose «Run as administrator».
Step 5. In the list of services, find and right-click «Windows Update» > «Properties». In the «Service status» section, you should see the service has been stopped.
Solution 2. Change the Setting of the Group Policy Editor
The Group Policy feature is not available in the Home edition. So, only when you run Windows 10 Professional, Enterprise, or Education, you can use the Group Policy Editor to change the settings to prevent Windows 10 from automatically updating. The group policy editor will notify you of new updates without automatically installing them.
- Press the Windows logo key + R then type gpedit.msc and click OK.
- Go to «Computer Configuration» > «Administrative Templates» > «Windows Components» > «Windows Update».
- Double-click «Configure Automatic Updates».
- Select «Disabled» in Configured Automatic Updates on the left, and click Apply and «OK» to disable the Windows automatic update feature.
Note: If you need to update your Windows version later, you can repeat the steps above, then select Enabled to turn on this feature, so that you can continue to download the updates.
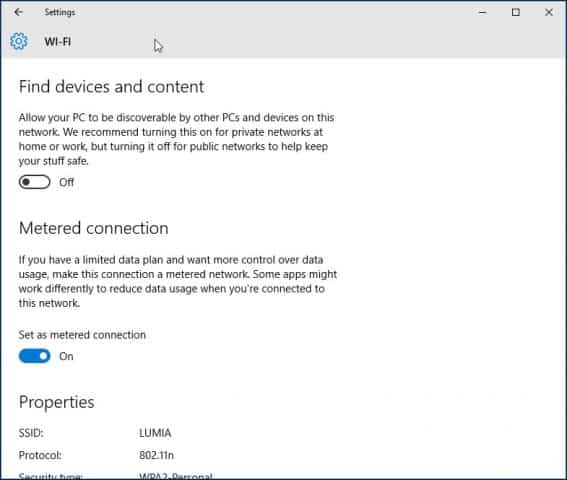
Solution 3. Meter Your Network Connection
Understand that this method won’t work for Ethernet connections. You can only disable automatic updates by using this method on a Wi-Fi connection. If your computer is connected to WiFi, you can try this to stop Windows 10 automatic updates.
1. Click the Start button at the bottom left on your desktop, then click the «Settings» app.
2. Click «Network & Internet».
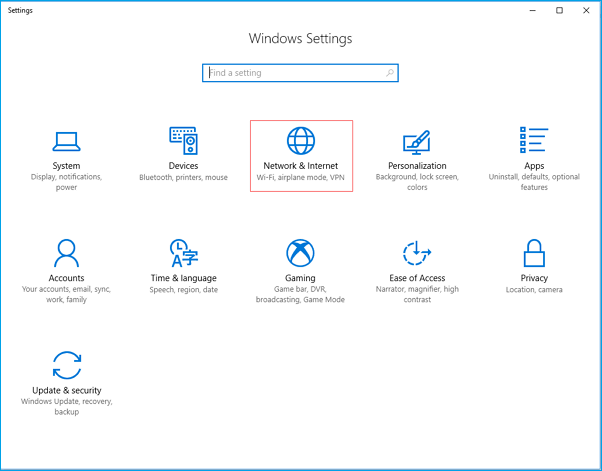
3. Click WiF in the left pane, then click the name of your Wi-Fi connection.
4. Click to turn on Set as metered connection.
Solution 4. Change the way of Windows 10/11 Updates Using Registry
Extra Tips: Editing the registry is risky, and it can cause irreversible damage to your installation if you don’t do it correctly. It’s recommended that you make a full backup of your computer before proceeding. All you need to do is use this backup software to back up your data in three steps:
Step 1. Click «Select backup contents» to initiate a backup.

Step 2. There are four data backup categories, File, Disk, OS, and Mail, click File.

Step 3. Local and network files will be displayed on the left side. You may extend the directory to choose which files to back up.

Step 4. Select the location where you want to store the backup by following the on-screen instructions.

Click «Options» to encrypt the backup with a password in «Backup Options,» and to setup a backup schedule and choose to initiate a backup at a certain event in «Backup Scheme.» There are a variety of other customization options available for the backup process.

Step 5. You may save the backup to a local disk, EaseUS’ online service, or a NAS.

Step 6. EaseUS Todo Backup enables customers to back up data to a third-party cloud drive and its own cloud drive.
If you want to back up data to a third-party cloud drive, choose Local Drive, scroll down to add Cloud Device, add your account, and then log in.

You can also save backups to EaseUS’s cloud storage service. Sign up for an EaseUS Account and log in after clicking EaseUS Cloud.

Step 7. To begin backup, click «Backup Now» Once the backup process has been finished, it will be shown as a card on the panel’s left side. To further manage a backup job, right-click it.

With a backup at hand, now it’s safe to customize a Windows 10 update without receiving any forced updates on your computer. Here’s how to make the change in Registry:
1. Press the Windows key + R key to open the Run command.
2. Type regedit, and click OK to open the Registry.
Browse the following path:
HKEY_LOCAL_MACHINESOFTWAREPoliciesMicrosoftWindows
3. Right-click the Windows folder, select «New» and then click «Key».
4. Name the new key «WindowsUpdate» and press «Enter».
5. Right-click the newly created key, select «new», and click «Key».
6. Name the new key AU and press Enter.
Inside the newly created key, right-click on the right side, select «New», and click on «DWORD (32-bit) Value».
7. Name the new key AUOptions and press Enter.
Double-click the newly created key and change its value to 2. It’s for «Notify for download and notify for install». Click «OK».
8. Close the Registry to complete the task.
Using this value prevents Windows 10 from downloading updates automatically, and you’ll get a notification when new updates are available. In this way, you can avoid any auto Windows 10 update effectively.
That’s how you could make an attempt to disable Windows 10/11 updates in every way. Each method has been proved to work as long as you wish to turn off all the automatic updates in Windows 10.
![]()
FAQ on How to Disable Windows 10 Update
1. Should I stop automatic updates on Windows 10?
Automatic updates help keep your computer safe and secure by downloading and installing the latest security patches as soon as they’re released. If you disable automatic updates, you’ll need to remember to manually update your computer regularly to ensure that it remains secure. So, we suggest not stopping it, but you can pause it.
2. How do I stop Windows 10 from automatically updating?
To stop Windows 10 from automatically updating, you can manually disable Windows update, change the settings of the Group Policy editor, meter your network connection, or change update settings using Registry. You can refer to the post for detailed steps.
One of the controversial features of Windows 10 is a new way that the operating system handles updates. Cumulative updates are installed automatically when Windows decides to do it. This can be extremely frustrating for Windows 10 users as they are often forced to restart their machine at an inopportune time.
Before proceeding, remember that some of the automatic updates will be security updates or important stability improvements that you will want to have installed on your system. Keep this in mind if you choose to keep automatic updates turned off for an extended period of time.
One option which we will not look at in depth is to make registry changes to your Windows operating system to disable automatic updates. This is a dangerous procedure and should only be taken by experienced users who have taken a full backup of their machine before attempting the registry changes. Mistakes during this process can have serious negative effects on your computer and its performance.
Option 1. Disable the Windows Update Service
Windows Update is essentially just another Windows Service and can be turned off in a similar manner to other services.
Follow these steps to stop Windows 10 updates:
When you want to re-enable automatic updates you just follow the same procedure except you select “Automatic” when choosing the “Startup Type”.
Option 2. Set Up a Metered Connection
If you are using WiFi to connect your Windows 10 machine to the Internet, you have the option of setting up a metered connection. In a metered connection, bandwidth is conserved by only automatically downloading and installing priority updates.
Microsoft’s method of classification may remain a mystery, but driver and software feature updates that may cause stability problems are minimized by opting for this option for stopping Windows 10 automatic updates.
To disable Windows 10 updates:
For some reason, Microsoft only offers this option if you are using a WiFi connection. If you connect to the Internet through an Ethernet cable you will not be able to set up a metered connection.
Option 3. Group Policy Editor
You can make changes to the Group Policy Editor if you are using Windows 10 Education, Pro or Enterprise editions. Users of Windows 10 Home edition are out of luck regarding this way of disabling Windows 10 updates.
If you opt for this solution, security updates will still be installed automatically. For all other updates, you will be notified that they are available and can install them at your convenience. This is the way Windows update worked in the past. Today, Microsoft wants to eliminate the need for novice users to engage in updates, but it has enforced this at the cost of flexibility for more experienced users.
Here’s how to update your Group Policy Editor to prevent automatic Windows 10 updates:
From this point forward Windows should notify you that updates are available and it is your responsibility to make sure that they get downloaded and installed.
Why Would I Need to Know How to Disable Windows 10 Updates?
Operating system, driver, and application updates can often lead to unexpected behavior on the computer on which they are installed. One way to protect yourself and your machine from unanticipated problems is to perform a backup before installing updates to your system.
Unfortunately, when automatic updates are being installed without your approval, you cannot take this precautionary step and face the possibility of having to resort to an older backup if you need to go back past the update.
Many updates need to reboot your machine when complete and certainly take up bandwidth while downloading. This can lead to slower response time and unforeseen reboots that can cause havoc with your work life.
So there are indeed valid reasons to turn off automatic updates in Windows 10. Just be careful not to turn the service off and forget to check for updates. While automatic updates can be problematic, letting your system lag behind critical updates can also have serious consequences.

Jeff Cochin
Jeff Cochin is a data management and recovery expert. He also serves as a technical writer, testing and reviewing tech solutions in various fields. Jeff Cochin is a professional data management, warehousing and recove…
Read full bio
Jeff Cochin is a data management and recovery expert. He also serves as a technical writer, testing and reviewing tech solutions in various fields. Jeff Cochin is a professional data management, warehousing and recove…
Read full bio

Approved by
Brett Johnson
This article has been approved by Brett Johnson, Data Recovery Engineer at ACE Data Recovery. Brett has a Bachelor’s Degree in Computer Systems and Network, 12 years of experience.
This article has been approved by Brett Johnson, Data Recovery Engineer at ACE Data Recovery. Brett has a Bachelor’s Degree in Computer Systems and Network, 12 years of experience.

Need to block a new version of Windows 10 from automatically installing? This article will show you how to do it if your hardware or apps are incompatible.
Windows 10 upgrade mechanisms do a rather basic check for compatibility: CPU speed, storage, RAM, and that’s basically it. Users can receive the offer for a new Feature Update through Windows Update but discover during installation or after setting up that the new release is incompatible with their hardware. As Microsoft continues to roll out more and more Windows 10 Feature Updates, those with older hardware are increasingly finding themselves left behind due to Windows update compatibility issues.
OEM’s maintain databases determining support for a particular release of Windows 10. That said, Windows Update, Media Creation Tool, and the Upgrade Assistant don’t reference any of these services. If you discover your system isn’t compatible with a new Windows 10 Feature Update, here is how you can block it from installing.
How to Block New Versions of Windows 10 from Automatically Installing
The Windows 10 setup process doesn’t inform users whether their computer is supported or not. Before you install a Feature Update, the first thing you should do is check the hardware vendor’s website to determine if your system is compatible. Here are some links to popular brands where you can check support status for your make and model. This can be the first step to ensure you don’t update your system to find out later in frustration you have to roll back or perform a clean install.
- Acer
- ASUS
- Dell Inc
- Fujitsu
- Hewlett Packard (HP)
- Lenovo
- Packard Bell
- Panasonic
- Samsung
- Sony Vaio
- Toshiba
Through Windows Update
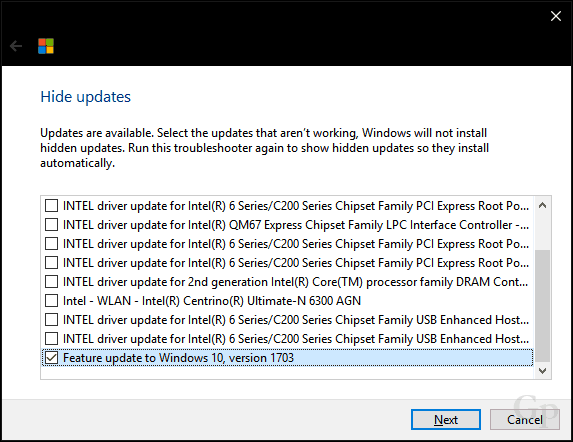
The most common way many users install a new Feature Update is through Windows Update. But how do you prevent it from installing? Microsoft’s Show or Hide Updates tool can be a first-line option. This small wizard lets you choose to hide the Feature Update in Windows Update. After downloading, launch it, click Next, wait while it detects pending Windows Updates.

Click the Hide Updates menu.

Scroll through the list, then select the Feature Update. In my case, I am hiding Windows 10 Creators Update, version 1703. Check the box next to the update, then click Next to confirm changes. When future versions are released in the fall and spring, you will see either 1709 or 1803.
Temporary Block
The next option is not practical but can temporarily block a feature update too. You can set your network up as a metered connection, which prevents large updates from downloading. Open Start > Settings > Network & Internet > Wi-Fi, click your network connection, then toggle on Metered Connection. You can also do this for wired connections in Windows 10 version 1703 or later.
Pause the Updates
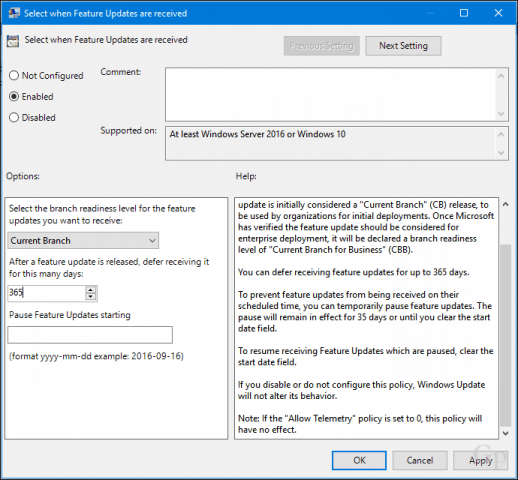
All Windows editions let you pause an update for up to 35 days. Users running premium business editions such as Windows 10 Pro, Pro Edu, Enterprise, Education, and Pro for Workstation have additional options. Using the Group Policy editor, you can defer feature updates for even longer. If you are running any of those editions, here is how you do that.
Press Windows key + R, type: gpedit.msc then hit Enter. Under Computer Configuration, expand Windows Components > Windows Updates > Defer Updates, then double click Select when Feature Updates are received.

Block Updates for a Full Year
You can block a feature update for up to 365 days. Taking into consideration that Feature Updates are released every seven months, this should be sufficient. But keep in mind, a Feature Update is only supported for 18 months, so eventually, you will need to move to a release to maintain support. So, if you block 1703, for example, you will need to move to 1809 when the time comes.
Summing Up
Being able to block Feature Updates temporarily or indefinitely works today. But the way Microsoft handles Feature Updates story is not written in stone—the Windows as a Service (WaaS) model means that doing things is always subject to change. Users are pretty much between a rock and a hard place for the time being. We don’t recommend blocking feature updates indefinitely since they have become a critical part of Windows 10’s security mechanisms. As new releases are delivered, it’s truly an unknown in the future for older hardware. I guess when we arrive at that bridge, we will have to figure how to cross it.
Let us know if you found this helpful. What are your thoughts on Feature Updates so far; are they more trouble than you asked for, or are they working just fine?
![]()
This tutorial contains detailed instructions to turn off Windows 10 updates permanently. As you may already know, in Windows 10 you cannot prevent the Updates download and installation, by disabling the Windows Update service, because Windows 10 overrides this settingand forces the service to start and install the updates.

To avoid security risks and Windows problems it is not recommended to disable the Windows 10 update, but in some cases there is the need to do that, especially if you have problems during installing an update to your system or if you face stability issues or other problems after installing an update.
How to STOP Windows 10 Automatic Updates.
Part 1. How to Disable Updates in Windows 10 (All Versions).
Part 2. How to Stop Updates using Group Policy Editor in Windows 10 Pro, Enterprise, Education version(s).
Part 3. How to Temporarily Pause Updates in Windows 10 Pro, Enterprise or Education version(s).
Part 1. How to Permanently Disable Updates in Windows 10 (All Versions).
To permanently prevent Windows 10 to install updates, use one of the following methods.
Method 1. Change Permissions to Windows Update files.
Method 2. Disable all Windows Update Services & Tasks.
Method 3. Block Updates by using a program.
Method 1. Change Permissions to Windows Update files.
The first method to disable the Automatic Update in Windows 10, is to remove the default permissions on the following files: wuaueng.dll & wuauclt.exe. To do that:
1. Open Windows Explorer and go to «C:WindowsSystem32».
2. Locate the wuaueng.dll file, right click on it and choose Properties.

3. Select the Security tab and then click Advanced.

4. Click Change Owner.

5. Type your account name (e.g. «Admin»), or type «Administrators» and click OK.

6. Then, click Apply and OK at ‘Windows Security’ information message.

7. Now, click OK two (2) to close the Properties window.
8. Then re-open the Properties of the wuaueng.dll file and go again to Security tab > Advanced.
9. Now select & Remove one-by-one all the users from the list.

10. When done click OK and click YES (twice) and OK again to close the ‘Properties’ window.

11. Perform the same steps (1-10) and remove all users from the wuauclt.exe file
12. Restart your machine.
13. From now on, whenever you go to Windows Update window you’ll see a blank screen window (without any options), or you ‘ll receive the following error message: «There were problems installing some updates, but we’ll try again later. If you keep seeing this and want to search the web or contact support for information, this may help: Error 0x80080005» *
* Note: To re-enable updates, re-add only the SYSTEM account and give to it Read & Execute permissions.
Method 2. Disable all Windows Update Services and Tasks.
The second method to prevent Windows 10 automatic update, is more complicated because you have modify the Windows Update service’s properties and to change several settings in Registry and in the Task Scheduler. But if you want to try that method, follow the steps below:
Step 1. Disable the Windows Update Service.
1. Simultaneously press the Windows ![]() + R keys to open run command box.
+ R keys to open run command box.
2. In run command box, type: services.msc and press Enter.

3. Right click on Windows Update service and select Properties.

4. At General tab:
1. Press Stop to stop the Windows Update Service.
2. Set the Startup type to Disabled.

5. Then select the Log On tab.
6. Select This Account and then click Browse.

7. Type your account name and then click Check Names.

8. Then click OK.

9. Now type a wrong password (twice), and click Apply.

10. Then select the Recovery tab and set the computer’s response if the service fails to Take No Action. Then, click OK to close the Windows Update Properties.

12. Proceed to step-2 below.
Step 2. Disable the Windows Update Medic & the Update Orchestrator Services through Registry.
Proceed and disable the following two (2) Update services using registry:
-
- Windows Update Medic Service (WaaSMedicSvc)
- Update Orchestrator Service (UsoSvc)
1. Simultaneously press the Windows ![]() + R keys to open run command box.
+ R keys to open run command box.
2. Type regedit and press Enter.

3. At the left pane, navigate to this key:
- HKEY_LOCAL_MACHINESYSTEMCurrentControlSetServicesUsoSvc
4. At the right pane double-click at Start value

5. Set the value data (from «3») to 4 and click OK.

6. Then at the left pane, navigate to this key:
- HKEY_LOCAL_MACHINESYSTEMCurrentControlSetServicesWaaSMedicSvc
7. At the right pane double-click at Start value

8. Type 4 at Value data box and click OK.

9. From now on, you will receive the following error message whenever you try to download or install updates: «There were some problems installing updates,but we’ll try again later. (0x80070437) or, you’ll see a blank window (without any options) when going to Settings > Update & Security > Windows Update.
10. Proceed to step-3 below.

Step 3. Disable Windows Update Tasks.
1. Open Task Scheduler. To do that open Cortana search and type task. Then click to open Task Scheduler.

2. In Task Scheduler (left pane), navigate to the following location:
- Task Scheduler Library -> Microsoft -> Windows -> Windows Update.
3. Right click at Scheduled Start and click Disable.

4. Then right click at sih and click Disable again.

5. Close Task Scheduler.
6. You ‘re done! *
* Note: If you change your decision and you want to install the available Windows updates in the future, then just undo the above changes and then reboot your computer.
Method 3. Block Updates in Windows 10 by using a program.
The easiest way to block Windows 10 updates, is to use one the following third-party programs.
-
- Windows Update Blocker.
- StopWinUpdates
Part 2. How to Stop Updates in Windows 10 Pro, Enterprise or Education version(s).
If you own Windows 10 Professional, Enterprise or Education version, then you can prevent Windows to download and install updates, from Group Policy Editor. To do that:
1. Simultaneously press the Windows ![]() + R keys to open the run command box.
+ R keys to open the run command box.
2. Type gpedit.msc & Press Enter.

4. In Group Policy Editor navigate to the following path:
-
Computer ConfigurationAdministrative TemplatesWindows Components Windows Update.
5. At the right pane, open the Specify Intranet Microsoft update service location policy.

6. Click Enabled and then type «http:\neverupdatewindows10.com» at the 2 fields below («intranet update service address» & «intranet statistics server») and click OK.

7. Restart your computer.
From now on, you ‘ll receive the following message in Windows Update:: «We couldn’t connect to the update service. We’ll try again later, or you can check now. If it still doesn’t work, make sure you’re connected to the Internet.» *
* Note: To re-enable updates, just set the «Specify Intranet Microsoft update service location’ policy to «Not Configured» .
Part 3. How to Temporarily Pause Updates in Windows 10 Professional, Enterprise or Education version(s).
If you have problems when installing updates in Windows 10 Pro, Enterprise or Education version(s), then you can temporarily pause the Update(s) installation for 35 days. To do that:
1. Go to Settings -> Update & Security -> Windows Update -> Advanced options –> and set the Pause Updates* option to ON.

* Note: This option is only available in Windows 10 Version 1709 and later. In previous Windows 10 versions, check the «Defer feature Updates» (or «Defer Upgrades») option to prevent Windows 10 to download and install new updates.

That’s it! Which method worked for you?
Let me know if this guide has helped you by leaving your comment about your experience. Please like and share this guide to help others.
If this article was useful for you, please consider supporting us by making a donation. Even $1 can a make a huge difference for us in our effort to continue to help others while keeping this site free:

If you want to stay constantly protected from malware threats, existing and future ones, we recommend that you install Malwarebytes Anti-Malware PRO by clicking below (we
do earn a commision from sales generated from this link, but at no additional cost to you. We have experience with this software and we recommend it because it is helpful and useful):