-
Press Windows logo key + I on your keyboard to open Settings. If that doesn’t work, select the Start button, then select Settings .
-
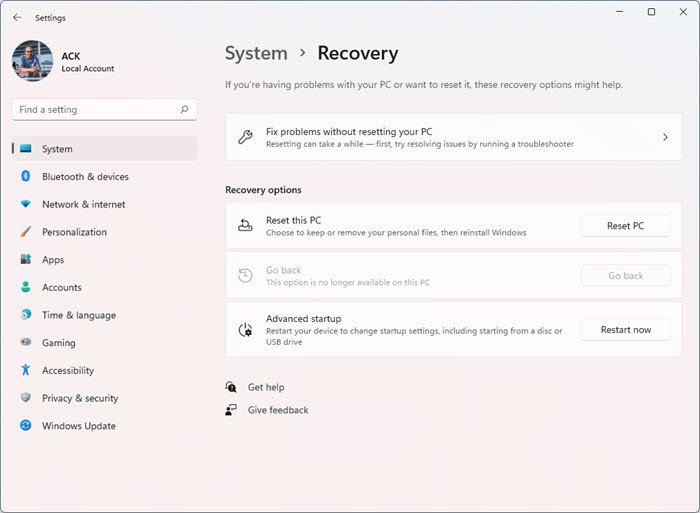
Select System > Recovery .
Open Recovery Settings -
Under Recovery options, next to Advanced startup, select Restart now.
-
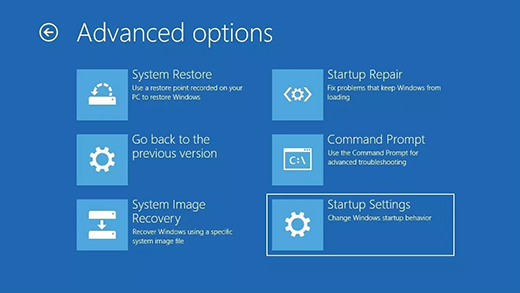
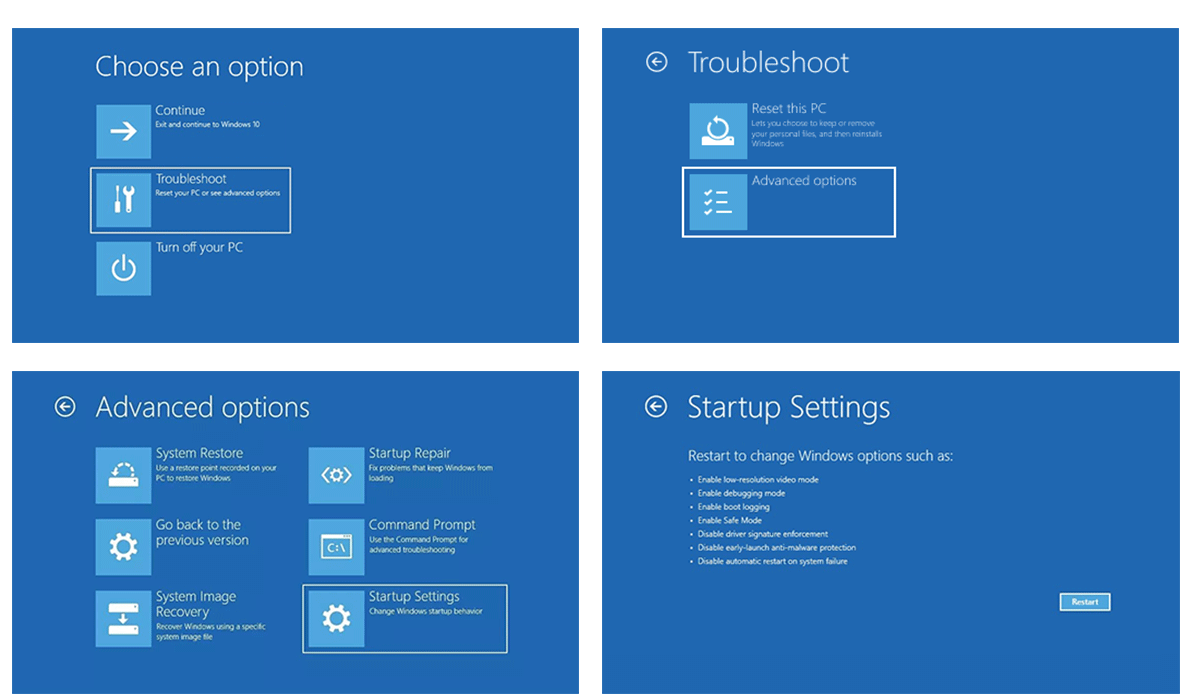
After your PC restarts to the Choose an option screen, select Troubleshoot > Advanced options > Startup Settings > Restart. You may be asked to enter your BitLocker recovery key.

-
After your PC restarts, you’ll see a list of options. Select 4 or press F4 to start your PC in Safe Mode. Or if you’ll need to use the internet, select 5 or press F5 for Safe Mode with Networking.


When you can’t open Settings to get into safe mode, restart your device from the Windows sign-in screen.
-
On the Windows sign-in screen, press and hold the Shift key while you select Power > Restart .
-
After your PC restarts to the Choose an option screen, select Troubleshoot > Advanced options > Startup Settings > Restart. You may be asked to enter your BitLocker recovery key.
-
After your PC restarts, you’ll see a list of options. Select 4 or F4 to start your PC in safe mode. Or if you’ll need to use the internet, select 5 or F5 for Safe Mode with Networking.
Note: If you’ve encrypted your device, you’ll need your BitLocker key to start in safe mode.
Before you enter safe mode, you need to enter the Windows Recovery Environment (winRE). To do this, you will repeatedly turn your device off, then on:
-
Hold down the power button for 10 seconds to turn off your device.
-
Press the power button again to turn on your device.
-
On the first sign that Windows has started (for example, some devices show the manufacturer’s logo when restarting) hold down the power button for 10 seconds to turn off your device.
-
Press the power button again to turn on your device.
-
When Windows restarts, hold down the power button for 10 seconds to turn off your device.
-
Press the power button again to turn on your device.
-
Allow your device to restart into Automatic Repair, and select Advanced options to enter winRE.
Now that you are in winRE, you will follow these steps to take you to safe mode:
-
On the Choose an option screen, select Troubleshoot > Advanced options > Startup Settings > Restart.
-
After your device restarts, you’ll see a list of options. Select option 5 from the list or press F5 for Safe Mode with Networking.
If you need more info on a black or blank screen error, see Troubleshoot black screen or blank screen errors.
Notes: Restarting your device should be sufficient to exit you from Safe Mode back into normal mode. However, if for some reason your machine is still booting into Safe Mode on its own after restarting, try this:
-
Press the Windows logo key + R.
-
Type msconfig in the Open box and then select OK.
-
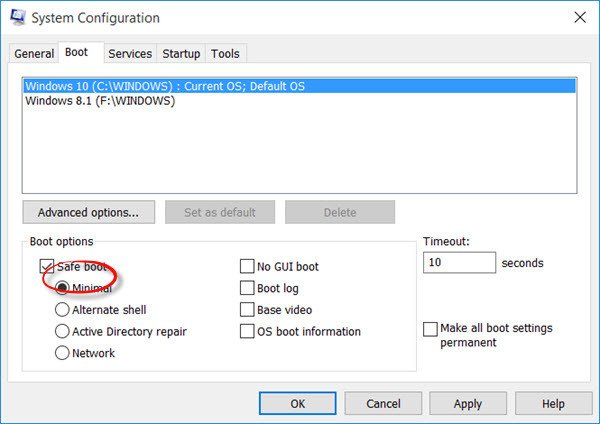
Select the Boot tab.
-
Under Boot options, clear the Safe bootcheckbox.
-
Press Windows logo key + I on your keyboard to open Settings. If that doesn’t work, select the Start button, then select Settings .
-
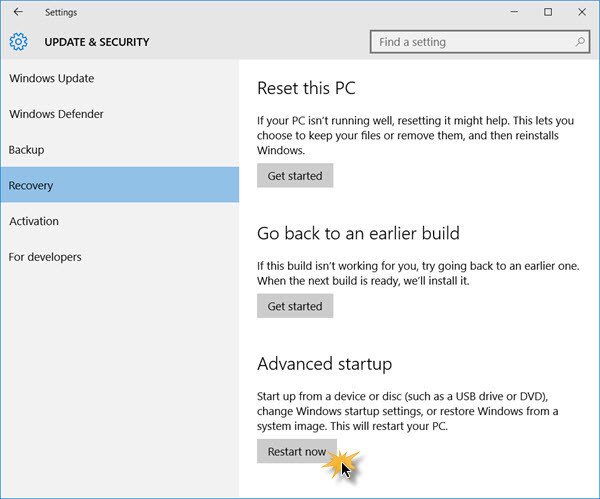
Select Update & Security > Recovery .
Open Recovery Settings -
Under Advanced startup, select Restart now.
-
After your PC restarts to the Choose an option screen, select Troubleshoot > Advanced options > Startup Settings > Restart. You may be asked to enter your BitLocker recovery key.
-
After your PC restarts, you’ll see a list of options. Select 4 or press F4 to start your PC in Safe Mode. Or if you’ll need to use the internet, select 5 or press F5 for Safe Mode with Networking.
When you can’t open Settings to get into safe mode, restart your device from the Windows sign-in screen.
-
On the Windows sign-in screen, press and hold the Shift key while you select Power > Restart .
-
After your PC restarts to the Choose an option screen, select Troubleshoot > Advanced options > Startup Settings > Restart. You may be asked to enter your BitLocker recovery key.
-
After your PC restarts, you’ll see a list of options. Select 4 or F4 to start your PC in safe mode. Or if you’ll need to use the internet, select 5 or F5 for Safe Mode with Networking.
Note: If you’ve encrypted your device, you’ll need your BitLocker key to start in safe mode.
Before you enter safe mode, you need to enter the Windows Recovery Environment (winRE). To do this, you will repeatedly turn your device off, then on:
-
Hold down the power button for 10 seconds to turn off your device.
-
Press the power button again to turn on your device.
-
On the first sign that Windows has started (for example, some devices show the manufacturer’s logo when restarting) hold down the power button for 10 seconds to turn off your device.
-
Press the power button again to turn on your device.
-
When Windows restarts, hold down the power button for 10 seconds to turn off your device.
-
Press the power button again to turn on your device.
-
Allow your device to fully restart. You will enter winRE.
Now that you are in winRE, you will follow these steps to take you to safe mode:
-
On the Choose an option screen, select Troubleshoot > Advanced options > Startup Settings > Restart.
-
After your device restarts, you’ll see a list of options. Select option 5 from the list or press F5 for Safe Mode with Networking.
If you need more info on a black or blank screen error, see Troubleshoot black or blank screen errors.
Notes: Restarting your device should be sufficient to exit you from Safe Mode back into normal mode. However, if for some reason your machine is still booting into Safe Mode on its own after restarting, try this:
-
Press the Windows logo key + R.
-
Type msconfig in the Open box and then select OK.
-
Select the Boot tab.
-
Under Boot options, clear the Safe bootcheckbox.
- Safe Mode starts your Windows computer with most features disabled.
- Boot in Safe Mode when you’re troubleshooting an issue, or if Windows won’t start normally.
- To exit Safe Mode, go into the «Boot options» menu, or just restart your computer.
Nearly every version of Windows has a Safe Mode feature. This lets you start your computer with just the basic files and drivers it needs to run. Most extra features will be disabled, and programs will run more slowly. By default, you won’t even have internet access.
Safe Mode isn’t meant to be used every day. You’ll use Safe Mode when your computer isn’t working correctly, or when it won’t start up at all. By only loading the essentials, it’ll help you narrow down what’s causing the problem, which can include the system itself or something you installed.
Here’s how to boot in Safe Mode, and exit it when you’re done.
How to boot in Safe Mode in Windows 10
There are many ways to enter Safe Mode. Here are the three easiest:
Using the Power icon
If you’re signed in:
1. Click the Windows icon in the bottom-left corner.
2. Hold down the Shift key, click the Power icon and then Restart.
William Antonelli/Insider
3. Your computer will restart and open to a blue screen titled Choose an option. Select Troubleshoot, and then Advanced options.
Dave Johnson/Insider
4. Click Startup Settings, and then Restart. Your computer will turn off and on again.
Dave Johnson/Insider
5. Once the screen comes back, you’ll be given a few options. Press 4 to start your computer in Safe Mode, or 5 to start Safe Mode with internet access.
William Antonelli/Insider
Using the Settings app
1. Open the Settings app by pressing the Windows key + I.
2. Click Update & Security, and then Recovery.
3. On this page, underneath Advanced startup, click Restart now.
Dave Johnson/Insider
4. Your computer will restart on the Choose an option screen. Here, click Troubleshoot, and then Advanced options.
5. Select Startup Settings and then Restart.
6. When your computer boots back up, you’ll be given some startup options. Press 4 to start your computer in Safe Mode, or 5 to start Safe Mode with internet access.
Holding down the power button
This is the method to use if you can’t boot into Windows normally.
1. Press your PC’s power button to turn it on.
2. As soon as you see something appear on the screen — probably the manufacturer’s logo — hold down the power button until the PC turns off again.
3. Do this two more times, and then turn your PC on. As it’s starting, the words Preparing Automatic Repair will appear at the bottom of the screen. Let your PC go through this process — it should eventually boot into the Choose an option screen.
William Antonelli/Insider
4. On this screen, select Troubleshoot, Advanced options, and then Startup Settings. When prompted, click Restart.
5. When the computer turns back on, press 4 to start your computer in Safe Mode, or 5 to start Safe Mode with internet access.
How to exit Safe Mode
There are two ways to get out of Safe Mode.
The first — and easiest — is to just restart your computer. You can do this by holding down the power button, or by going through the Start menu.
If you’ve restarted your computer but it’s still in Safe Mode, you should:
1. Press the Windows key + R to open the Run menu.
2. In the text box, type msconfig and press Enter.
Ross James/Insider
3. At the top of the System Configuration menu, click Boot.
4. Underneath Boot options, make sure that Safe boot is unchecked. Once it is, click OK and restart your computer again.
Ross James/Insider
Advanced Safe Mode Options for Troubleshooting
There are two advanced versions of Safe Mode:
- Safe Mode with Networking. The networking option allows you to access the internet and other computers on your network while in safe mode.
- Safe Mode with Command Prompt. The Command Prompt option will, after login, bring you to a command prompt window where you can conduct advanced troubleshooting.
Accessing either of these modes is accomplished by following one of the methods described above and then pressing 5 or 6 in the last step instead of 4.
William Antonelli
Tech Reporter for Insider Reviews
William Antonelli (he/she/they) is a writer, editor, and organizer based in New York City. As a founding member of the Reference team, he helped grow Tech Reference (now part of Insider Reviews) from humble beginnings into a juggernaut that attracts over 20 million visits a month.
Outside of Insider, his writing has appeared in publications like Polygon, The Outline, Kotaku, and more. He’s also a go-to source for tech analysis on channels like Newsy, Cheddar, and NewsNation.
You can find him on Twitter @DubsRewatcher, or reach him by email at wantonelli@insider.com.
Read more
Read less
Dave Johnson
Freelance Writer
Dave Johnson is a technology journalist who writes about consumer tech and how the industry is transforming the speculative world of science fiction into modern-day real life. Dave grew up in New Jersey before entering the Air Force to operate satellites, teach space operations, and do space launch planning. He then spent eight years as a content lead on the Windows team at Microsoft. As a photographer, Dave has photographed wolves in their natural environment; he’s also a scuba instructor and co-host of several podcasts. Dave is the author of more than two dozen books and has contributed to many sites and publications including CNET, Forbes, PC World, How To Geek, and Insider.
Read more
Read less
Kyle Wilson is an editor for the Reference team, based in British Columbia, Canada. Outside of Insider, his work has also appeared in publications like The Verge, VICE, Kotaku, and more. He periodically guest co-hosts the Saturday tech show «Tech Talk» on the iHeartRadio station C-FAX 1070.
Feel free to reach out to him on Twitter, where he can be found most of the time, @KWilsonMG.
Read more
Read less
Ross James is a freelance writer for Business Insider.
Read more
Read less
Windows 11/10 Safe Mode loads the operating system with a minimal set of system files and device drivers – just enough to boot the Windows OS. In Safe Mode, the startup programs, add-ons, etc. settings, do not run. We usually boot into Safe Mode, when we need to troubleshoot issues. This post will show you how to enable and start or boot Windows 11/10 in Safe Mode. There may be other ways, but we will cover only 2 of the most convenient ways.
There are three easy ways you can start Windows 11/10 in Safe Mode:
- Press Shift and then click on Restart
- Open Recovery section in Update & Settings and click on Restart now.
- Use MSConfig or System Configuration Utility and select the Safe boot and Minimal options setting and restart.
- Boot in Safe Mode using Command Prompt
- Via the Logon screen
- Enable F8 key and use it
- Boot from Windows Recovery Drive
- Using Windows Installation Media
Let us take a look at them in detail.
1] Press Shift and then click on Restart

The easiest way to boot Windows 10 into Safe Mode, would be to press Shift and then click on Restart. This will reboot your Windows 10 computer into Advanced Startup Options.
2] Open Recovery section and click on Restart now
In Windows 11, open Settings > System > Recovery > Advanced startup and click on Restart now.
In Windows 10, open the Settings app > Update & Security > Recovery. Under Advanced startup, click on Restart now.
When you follow any of the two methods mentioned, your Windows computer will restart, and you will see the following screen.

Click on Troubleshoot to proceed.
Now follow the steps laid down in Advanced Startup options in Windows.
It will take you through the entire process starting with – Troubleshoot > Advanced Options > Startup Settings > Restart > Press No 4 key.
If you have followed the procedure correctly, you will finally reach Startup Settings screen, from where you will be able to enable Safe Mode.
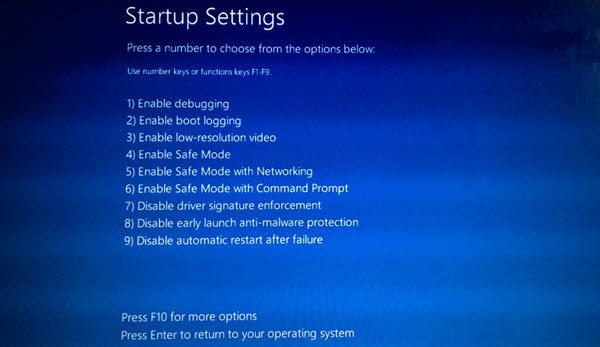
Press the ‘4’ key, and your computer will restart and enter Safe Mode. To reboot in Safe Mode with Networking, press ‘5’ key. To reboot in Safe Mode with Command Prompt, press the ‘6’ key.

You will see a black desktop with a Safe Mode watermark in the bottom left and right sides.
Read: How to Enable F8 Key to Boot into Safe Mode on Windows 11/10.
3] Use MSConfig or System Configuration Utility
The other simple way, of course, is by using the built-in System Configuration Utility. From the Win+X Menu, open Run box, type msconfig and hit Enter.
Under the Boot tab, check the Safe boot and Minimal options. Click Apply/OK and exit. On a restart, your computer will enter Safe Mode directly.
You can now work in the Safe Mode.
Before you exit, remember to open msconfig and uncheck the Safe Boot check box, click Apply/OK and then on Restart, so that on reboot, your computer will not again boot in safe mode – but instead will boot to your desktop.
4] Boot in Safe Mode using Command Prompt
You can execute the following command in an elevated command prompt, and restart, to boot Windows 10 into Safe Mode.
bcdedit /set {current} safeboot minimal
Boot into Safe Mode with Networking
bcdedit /set {current} safeboot network
Boot into Safe Mode with Command Prompt
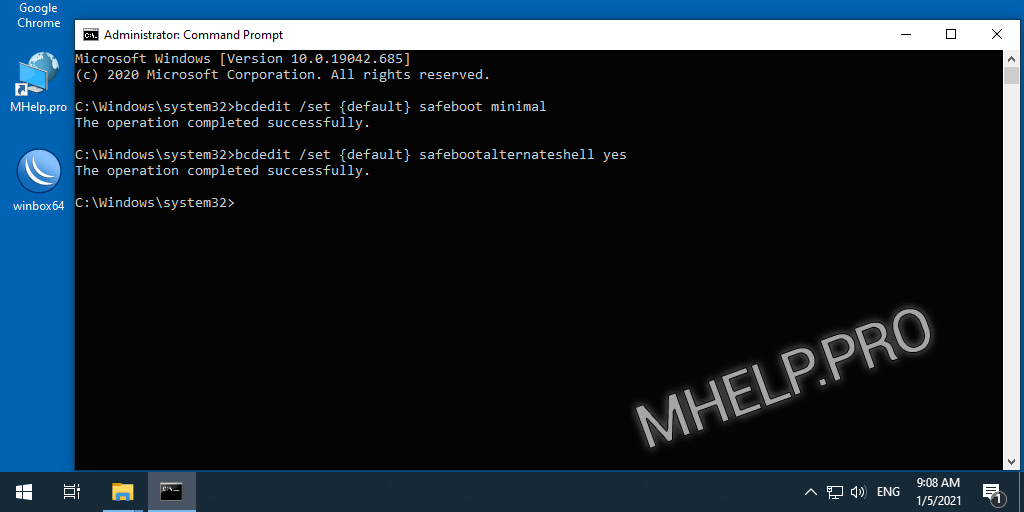
bcdedit /set {default} safeboot minimal bcdedit /set {default} safebootalternateshell yes
To exit Safe Mode, use:
bcdedit /deletevalue {current} safeboot
5] Via the Logon screen
- Once you reach the logon or sign-in screen, hold the Shift key down and click on the Power button and then select Restart.
- When your PC restarts, click on Troubleshoot > Advanced Options > Startup Settings > Restart.
- On the restart, select option 4 to boot into Safe Mode.
6] Enable F8 key and use it
You need to enable the F8 key first and then use it to boot into Safe Mode,
7] Boot from Windows Recovery Drive
You need to have already created a USB recovery drive.
- Now reboot the computer and boot to the recovery drive
- Select your keyboard layout based on your preferred language
- Select Troubleshoot > Advanced options > Startup Settings > Restart
- On the restart, select option 4 to boot into Safe Mode.
8] Using Windows Installation Media
Boot the computer to the Windows Installation Media
Click on Repair Your Computer
Select Troubleshoot > Advanced options > Command Prompt.
Execute the following command:
bcdedit /set {default} safeboot minimal
Select Continue to exit and boot into Safe Mode.
Is F8 Safe Mode for Windows working?
The F8 key that helped you earlier to boot the computer in Safe Mode is not enabled by default. You have to use this procedure using CMD to enable it first. Then you will be able to boot in Windows Safe Mode using the F8 key.
How do I boot into Windows Recovery?
The Windows Recovery Environment (WinRE) is a companion operating system installed alongside Windows 10, in a separate partition.
- You can use recovery media to boot into Windows RE.
- Execute
reagentc /boottorein an elevated command prompt and restart the device to boot into WinRE. - Execute
shutdown /r /oin an elevated command prompt and restart the device to boot into WinRE instead of Windows 10.
Also read:
- Cannot boot in Safe Mode in Windows.
- How to add Safe Mode to Boot Menu options in Windows.
- How to directly reboot in Safe Mode in Windows.
- PC is stuck and cannot exit Safe Mode.
Safe Mode is an inbuilt troubleshooting feature that disables unnecessary drivers and programs during the startup process. Windows Safe Mode loads the operating system with a minimal set of system files and device drivers, With just enough to boot the Windows OS. In Safe Mode, startup programs, add-ons, etc, do not run. We usually boot into Safe Mode, when we need to troubleshoot issues, fix Startup problems. This allows us to isolate any setting or system errors and fix them at the root, without non-essential applications interfering.
Different Types Of Safe Mode explained
On Windows 10, there are a few different types of Safe Mode you can choose from, so it’s important to know which you need.
- Safe Mode: This is the basic version that strips away all unnecessary programs and only auto starts a few chosen files and drivers to get the basic system running. It doesn’t allow for many advanced features, including connections with other computers or devices. That makes the computer safer from malware that may be able to move through local networks.
- Safe Mode with Networking: This is a mode that adds on the necessary drivers and features to access networks. It’s not quite as safe, but it’s useful if you only have one computer and need to get online to look for help or see if connections to other devices still work.
- Safe Mode with Command Prompt: This option may not be available on all versions of Windows 10, but if it is you can enter this mode to bring up a big command prompt screen. This is good for more badly damaged operating systems or technical work where you know the precise command lines necessary to find a problem or launch a specific service.
How To Boot Into Safe Mode On Windows 10
On Windows XP and Windows 7, You can simply press the F8 key at startup to access the Safe mode boot option. But on Windows 10 and 11 you can’t just hit F8 when your PC is booting to see the advanced startup options, such as Safe Mode. It all changed with Windows 11 and 10. Here we have shared Some different ways to Boot into safe mode on Windows 10. And Also Get get back that old boot options screen by pressing F8.
— Advertisement —
If you are having a windows Startup problem, Can’t Access normal desktop and want to access Safe mode to troubleshoot problems jump to this step
Using System Configuration Utility
If you are able to start windows normally then you can access safe mode boot from System configuration options.
- Press Windows + R, type msconfig and ok to Open System Configuration Utility
- Here on the System Configuration window, click on the boot tab and select safe boot.
You can choose from additional options
- Minimal: Starts Safe Mode with the absolute minimal amount of drivers and services, but with the standard Windows GUI (Graphical User Interface).
- Alternate Shell: Starts Safe Mode with a Command Prompt, without the Windows GUI. Requires knowledge of advanced text commands, as well as navigating the operating system without a mouse.
- Active Directory Repair: Starts Safe Mode with access to machine-specific information, such as hardware models. If we unsuccessfully install new hardware, corrupting the Active Directory, Safe Mode can be used to restore system stability by repairing corrupted data or adding new data to the directory.
- Network: Starts Safe Mode with the necessary services and drivers for networking, with the standard Windows GUI.
- by default select minimal and click Apply.
- system configuration will Ask for Restart.
- When you restart windows this will boot into safe mode on the next boot.
How to leave safe mode windows 10
— Advertisement —
After performing the Troubleshooting steps you can follow the steps below to leave safe mode windows 10.
- To boot into normal windows again open system configuration using msconfig.
- move to the boot Tab and uncheck the safe boot option.
- click apply and ok to make save changes and restart windows to boot into normal windows.
Using Advanced Startup Options
This is the Easiest way to boot Windows 10 into Safe Mode, which would be to press Shift and then click on Restart. This will reboot your Windows 10 computer into Advanced Startup Options. Choose Troubleshoot and then Advanced options.
— Advertisement —
Also, you can Access Advanced Startup options from the Start menu, click Settings near the bottom, then on Update and Security. Choose Recovery, then Advanced startup. Click on Startup settings and then Restart now and when your computer reboots you will see some options.
If Having Startup Problem
If you are having a Startup problem and are unable, Login into normal windows you can boot into safe mode to perform troubleshooting steps then you need an installation media. With help of this, you can access advanced boot options and access safe mode.
If you don’t have installation media create one with help of the Official windows media creation tool. When you are ready with the installation DVD or bootable USB insert it and boot from the installation media. Skip the first screen and on the next screen Select repair your computer As shown below image.
This will restart windows select Troubleshoot -> advanced options -> select Startup Settings -> restart now. After Restart this will represent the startup settings windows with a number of choices. Here press 4 to Boot into safe mode. To reboot in Safe Mode with Networking, press ‘5’ key. To reboot in Safe Mode with Command Prompt, press the ‘6’ key. it will Restart windows and load with safe mode
Enable F8 Safe mode boot on windows 10
After know how to boot into safe mode using the system configuration utility and Windows advanced options, Still, you are looking for old Advanced Boot options using F8 at bootup which is used on Windows 7, and Vista. Here follow the below steps to Enable F8 safe mode boot option on windows 10 and 8.1.
First, create the Windows 10 bootable USB flash drive or DVD. Boot from it (change your BIOS boot device settings if necessary). The windows installation screen will open, Skip the first screen by click next now on the install now screen Press Shift + F10 To open the advanced Command prompt option.
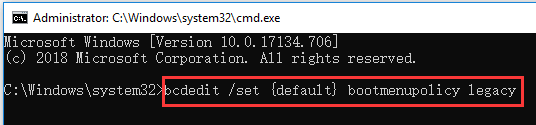
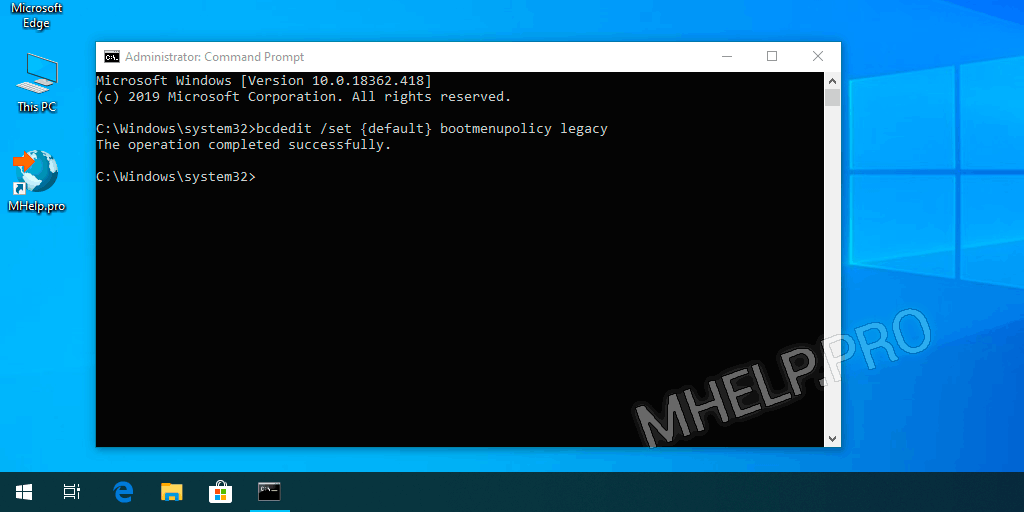
Now type the following command: bcdedit /set {default} bootmenupolicy legacy and press Enter to execute the command.
Type exit and press Enter to quit out of the Command Prompt. You can now remove your bootable Windows 10 flash drive or DVD and turn your computer off. When you next boot your PC, you can press F8 to get the Advanced Boot Options menu you once had in Windows 7. Just use the cursor keys to select the mode you want and press Enter.
These are some different ways to Access the safe mode boot option, Enable F8 safe mode boot on windows 10 and 8.1 computers. I hope after reading this post you can easily boot into safe mode using advanced options, system configuration or by enabling the F8 safe mode boot option. Have any queries, or suggestions about this post feel free to comment below. Also, Read from our blog
- How to Show Hidden Files and Folders in Windows 10
- Fix unmountable boot volume windows 10 Blue Screen STOP: 0x000000ED
- Solved: Outlook 2016 Search not working “No results found’ when using the search”
- How to Save Windows Spotlight Lock Screen Images in Windows 10
 Безопасный режим Windows 10 может быть полезен при решении самых различных проблем с компьютером: для удаления вирусов, исправления ошибок драйверов, в том числе вызывающих синий экран смерти, сброса пароля Windows 10 или активации учетной записи администратора, запуска восстановления системы из точки восстановления. Отдельная инструкция: Как зайти в безопасный режим Windows 11.
В этой инструкции — несколько способов зайти в безопасный режим Windows 10 в тех случаях, когда система запускается и вы можете в нее зайти, а также когда запуск или вход в ОС по тем или иным причинам невозможен. К сожалению, знакомый многим путь запуска безопасного режима через F8 больше не работает (но вы можете сделать, чтобы работала: Как включить вход в безопасный режим клавишей F8 в Windows 10), а потому придется пользоваться иными методами. В конце руководства имеется видео, в котором наглядно показаны способы входа в безопасный режим.
- Как запустить безопасный режим Windows 10 через msconfig
- Вход в безопасный режим через особые варианты загрузки
- Добавление пункта «Безопасный режим» в меню загрузки
- Как зайти в безопасный режим Windows 10 с использованием загрузочной флешки
- Другие способы запуска безопасного режима
- Видео инструкция
Вход в безопасный режим через конфигурацию системы msconfig
Первый, и, наверное, многим знакомый способ запустить безопасный режим Windows 10 (он работает и в предыдущих версиях ОС) — использовать встроенную утилиту конфигурации системы. Минус метода — невозможность попасть в безопасный режим, если система не запускается. Необходимые шаги:
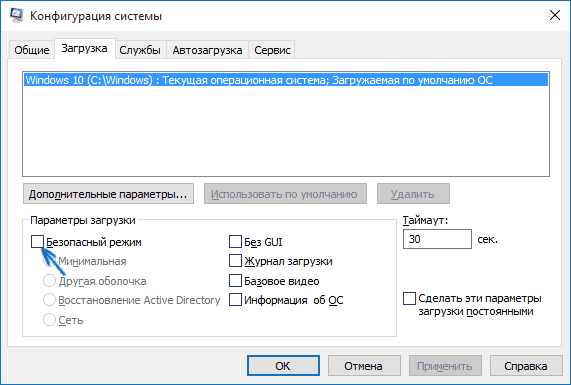
- Нажмите клавиши Win+R на клавиатуре (Win — клавиша с эмблемой Windows), введите msconfig в окно «Выполнить» и нажмите Enter.
- В открывавшемся окне «Конфигурация системы» перейдите на вкладку «Загрузка», выберите ту ОС (обычно присутствует лишь один пункт меню и выбирать не требуется), которая должна запускаться в безопасном режиме и отметьте пункт «Безопасный режим».
- При этом, для него существуют несколько вариантов безопасного режима загрузки: минимальная — запуск «обычного» безопасного режима, с рабочим столом и минимальным набором драйверов и служб; другая оболочка — безопасный режим с поддержкой командной строки; сеть — запуск с поддержкой сети.
По завершении, нажмите «Ок» и перезагрузите компьютер, Windows 10 запустится в безопасном режиме.
Затем, чтобы вернуть обычный режим запуска, тем же методом снова используйте msconfig, но в этот раз снимите установленную ранее отметку запуска безопасного режима, примените настройки и перезагрузите ПК или ноутбук.
Запуск безопасного режима через особые варианты загрузки
Данный способ запуска безопасного режима Windows 10 в общем случае также требует, чтобы ОС на компьютере запускалась. Однако, есть две вариации этого способа, позволяющие зайти в безопасный режим, даже если вход в систему или ее запуск невозможен, которые я также опишу.
В общем случае способ подразумевает выполнение следующих простых шагов:
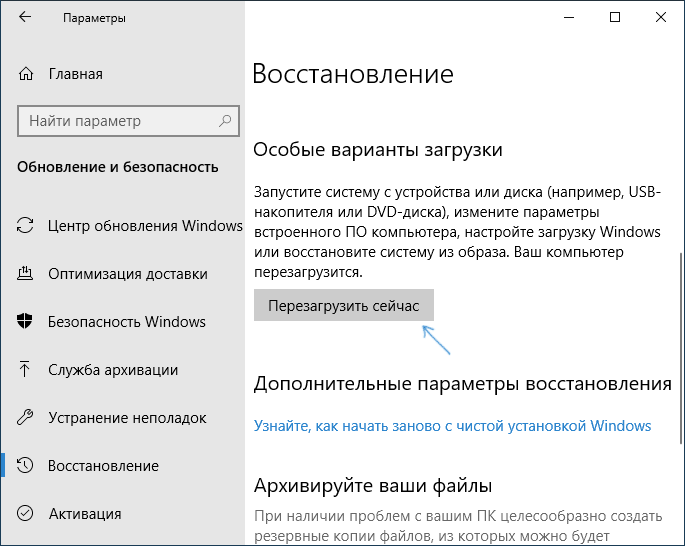
- Открыть Параметры (значок шестеренки в меню Пуск или клавиши Win+I), зайти в пункт «Обновление и безопасность», выбрать «Восстановление» и в пункте «Особые варианты загрузки» нажать «Перезагрузить сейчас». (В некоторых системах данный пункт может отсутствовать. В этом случае, для входа в безопасный режим используйте следующий способ).

- На экране особых вариантов загрузки выбрать «Поиск и устранение неисправностей» — «Дополнительные параметры» — «Параметры загрузки». Если пункт «Параметры загрузки» отсутствует, нажмите «Дополнительные параметры восстановления». На более ранних версиях Windows 10 путь такой: «Диагностика» — «Дополнительные параметры» — «Параметры загрузки». И нажать кнопку «Перезагрузить».

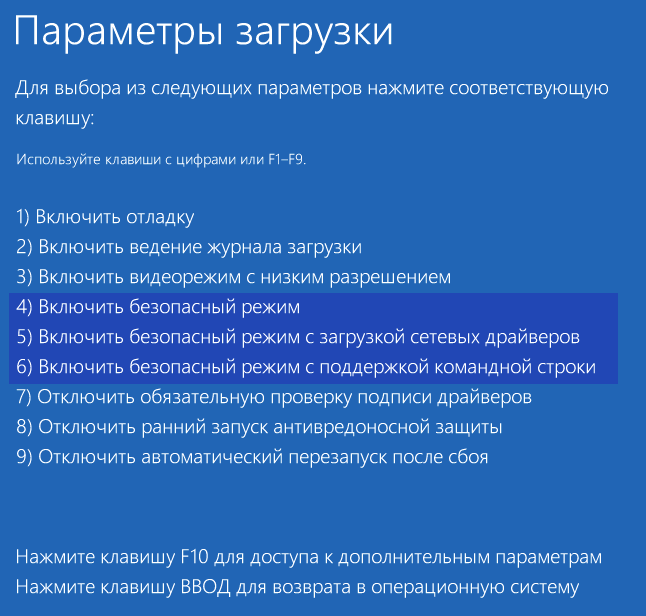
- На экране параметров загрузки, которые появятся после перезапуска системы, нажать клавиши от 4 (или F4) до 6 (или F6) для запуска соответствующего варианта безопасного режима.


Как добавить пункт «Безопасный режим» в меню загрузки Windows 10
При необходимости обезопасить себя от возможных проблем или если вы часто используете безопасный режим Windows 10, вы можете добавить его в меню загрузки вашего компьютера или ноутбука:
- Запустите командную строку от имени администратора и используйте следующие команды, нажимая Enter после каждой из них. После выполнения первой команды отобразится идентификатор GUID, который нужно будет использовать во второй команде.
-
bcdedit /copy {default} /d "Безопасный режим"
bcdedit /set {отобразившийся_GUID} safeboot minimal
- Готово, теперь при включении компьютера у вас будет отображаться меню, в котором, помимо простого запуска Windows 10 можно будет запустить и безопасный режим.


При необходимости, вы можете изменить время ожидания в меню загрузки (то есть то время, по истечении которого произойдет автоматическая загрузка Windows 10 в обычном режиме). Для этого используйте команду
bcdedit /timeout Время_в_секундах
Как зайти в безопасный режим Windows 10 с помощью загрузочной флешки или диска восстановления
И, наконец, если не удается попасть даже на экран входа в систему, то есть и еще один способ, но вам потребуется загрузочная флешка или диск с Windows 10 (которые можно легко создать на другом компьютере). Загрузитесь с такого накопителя, а затем либо нажмите клавиши Shift + F10 (это откроет командную строку), либо после выбора языка, в окне с кнопкой «Установить» нажмите «Восстановление системы», затем Диагностика — Дополнительные параметры — Командная строка. Также для этих целей можно использовать не дистрибутив, а диск восстановления Windows 10, который легко делается через панель управления в пункте «Восстановление».

В командной строке введите (безопасный режим будет применен к ОС, загружаемой на вашем компьютере по умолчанию, на случай, если таких систем несколько):
- bcdedit /set {default} safeboot minimal — для следующей загрузки в безопасном режиме.
- bcdedit /set {default} safeboot network — для безопасного режима с поддержкой сети.
Если требуется запуск безопасного режима с поддержкой командной строки, используйте сначала первую из перечисленных выше команд, а затем: bcdedit /set {default} safebootalternateshell yes

После выполнения команд, закройте командную строку и перезагрузите компьютер, он автоматически загрузится в безопасном режиме.
В дальнейшем, чтобы включить обычный запуск компьютера, используйте в командной строке, запущенной от имени администратора (или же способом, описанным выше) команду:
bcdedit /deletevalue {default} safeboot
Еще один вариант почти же способа, но запускающий не сразу безопасный режим, а различные варианты загрузки, из которых можно выбрать, при этом применяет это ко всем совместимым ОС, установленным на компьютере. Запустите командную строку с диска восстановления или загрузочной флешки Windows 10, как это уже было описано, затем введите команду:
bcdedit /set {globalsettings} advancedoptions true
И после успешного ее выполнения, закройте командную строку и перезагрузите систему (можно нажать «Продолжить. Выход и использование Windows 10». Система загрузится с предложением нескольких вариантов загрузки, как и в способе, описанном выше, и вы сможете войти в безопасный режим.
В дальнейшем, чтобы отключить особые варианты загрузки, используйте команду (можно из самой системы, используя командную строку от имени администратора):
bcdedit /deletevalue {globalsettings} advancedoptions
Дополнительные способы запустить безопасный режим
В дополнение к вышеизложенным методам, ещё два способа, позволяющих запустить Windows 10 в безопасном режиме, оба также показаны в видео ниже:
- Если вы можете попасть на экран блокировки, но не можете зайти в систему, нажмите по изображению кнопки питания справа внизу экрана блокировки, а затем, удерживая Shift, нажмите «Перезагрузка». Компьютер выполнит перезагрузку в среде восстановления, где как и в способе с особыми вариантами загрузки вы сможете попасть в безопасный режим.
- Этот метод я не могу рекомендовать, так как он потенциально может привести к проблемам с накопителями, но: если при начале загрузки Windows 10 дважды неправильно выключить компьютер или ноутбук (долгим удержанием кнопки питания), то вы попадете в окно «Автоматическое восстановление», где, нажав кнопку «Дополнительные параметры» и перейдя к пункту «Параметры загрузки» вы также сможете зайти в безопасный режим.
Безопасный режим Windows 10 — видео
И в завершение видео руководство, в котором наглядно показаны способы зайти в безопасный режим различными способами.
Думаю, какой-то из описанных способов вам непременно подойдет. Также в данном контексте может оказаться полезным руководство Восстановление Windows 10.
Windows 10 Safe Mode is one essential diagnostic method to help you identify and fix possible causes of Windows 10 PC issues. This post provides 6 ways with step-by-step guides on how to start Windows 10 in Safe Mode (while booting) to troubleshoot the problems you are having with your Windows 10 PC.
How to Start Windows 10 in Safe Mode — Quick Guide
- Press and hold Shift key and click Start > Power > Restart.
- Click Troubleshoot > Advanced options > Startup Settings > Restart after you enter into Win-RE.
- Press F4, F5, or F6 key to boot into Safe Mode in Windows 10.
Windows 10 PC is not working well? Once the computer is infected with malware, virus or installed some improper drivers, the PC may not behave normally, and freeze or crash occasionally.
Windows 10 Safe Mode may be helpful to help you diagnose and fix the issues of your computer. So, how to start Windows 10 in Safe Mode (while booting)?
Check the 6 ways with detailed guides on how to boot in Safe Mode Windows 10, and how to use Safe Mode to fix issues on Windows 10 PC.
If you suffer some data loss due to errors in Windows 10 PC, an ultimate data recovery guide is also provided in the second part of this tutorial to help you easily recover lost/deleted files for free.
Tip: MiniTool Power Data Recovery — Recover any deleted/lost files from Windows computer, USB, memory card, external hard drive, SSD, etc. Rescue data in various data loss situations.
Free Download
Windows 10 Safe Mode
What Is Safe Mode?
Safe Mode is a built-in diagnostic mode of Windows 10 (7, 8, etc.) computer operating system. If you start Windows 10 PC in Safe Mode, it will only allow starting up basic system programs and services in booting process. A Windows 10 PC booted in Safe Mode is a stripped down version of computer.
Windows 10 Safe Mode is designed to help users to troubleshoot most problems within the OS of Windows 10 PC. It is also widely used to remove malware or ransomware in computer.
How Does Windows 10 Safe Mode Work?
In Windows 10 Safe Mode, the OS will be started with only core components, and many other non-necessary drivers or services such as video drivers, sound will be disabled. Third-party startup programs are also prevented from loading. And this makes it easier to isolate causes of operating system problems.
For instance, you can start Windows 10 in Safe Mode to identify if it’s the Windows 10 default settings and drivers are causing the misbehaving of Windows 10 PC, or to diagnose if it’s the installation of poor-configured software/programs that prevents Windows 10 PC from booting in a normal state. Windows 10 Safe Mode allows you to safely remove bugged programs, solve driver issues, diagnose hardware conflicts, and more.
Besides, sometimes if you can’t start Windows 10 PC normally, but you can still start Windows 10 in Safe Mode. This makes it a good option to troubleshoot problems of PC, e.g. blue screen, black screen because of malware, virus infection, or inferior hardware drivers.
When You Need to Start Windows 10 in Safe Mode
If your Windows 10 PC seems to have some problems, doesn’t function well, keeps crashing/freezing, or occur blue screen/black screen time to time, then you may try to start Windows 10 in Safe Mode to fix some Windows 10 issues.
The Three Types of Windows 10 Safe Mode
Windows 10 offers three types of Safe Mode. You can choose to boot Windows 10 in any type of Safe Mode based on your own need.

- Enable Safe Mode: This is the most basic type of Safe Mode. It starts Windows 10 by loading the most essential settings and services of the system. Any other unnecessary programs, drivers or services won’t be loaded. This puts the PC in a safer status by cutting off the possible malware or virus that may move through third-party software, drivers, or local networks.
- Enable Safe Mode with Networking: If you choose to start Windows 10 in safe mode with networking, then it will add other necessary drivers and services that are required to access the networks, while keeping the same set of drivers and services of Safe Mode. This is not as safe as Safe Mode, but it’s useful when you need to access the Internet.
- Enable Safe Mode with Command Prompt: If you choose to boot Windows 10 in Safe Mode with Command Prompt, then your computer will display a big Command Prompt window. Professionals can easily use command lines to fix related issues of Windows 10 PC. However, if you don’t know much about CMD, it’s not advised to choose this option. Both Safe Mode and Safe Mode with Command Prompt are not connected to network.
Let’s cut to chase, check how to start Windows 10 in Safe Mode in these 6 ways, namely, through Settings, msconfig (System Configuration), Start menu, F8 key, from sign-in screen, black/blank screen.
How to Start Windows 10 in Safe Mode — 6 Ways
- Start Windows 10 in Safe Mode from Settings
- Boot Windows 10 into Safe Mode through msconfig
- Start Windows 10 in Safe Mode While Booting from Start Menu
- Start Windows 10 PC in Safe Mode from Login Screen
- Start Windows 10 in Safe Mode from a Black/Blank Screen
- Boot in Safe Mode Windows 10 While Booting through F8 Key
Quick Video Guide:
1. How to Start Windows 10 in Safe Mode from Settings
If you’ve already logged into Windows 10 computer, then you can boot into Safe Mode in Windows 10 with Advanced Startup tool.
Step 1 – Open Windows Settings
You can click Start menu and click Settings on Windows 10 PC. Or press Windows and I keys on the keyboard to open Windows 10 Settings.
Step 2 – Enter into Startup Settings Window
Then you can click Update & Security, choose Recovery option from the left panel, and click Restart now under Advanced startup to enter Windows RE (Recovery Environment).
Next you can click Troubleshoot -> Advanced options -> Startup Settings -> Restart.
Step 3 – Choose a Safe Mode Option
You can now choose preferred Safe Mode option to start Windows 10 in Safe Mode.
Press 4 or F4 on the keyboard to start Windows 10 PC in Safe Mode; press 5 or F5 to boot Windows 10 in Safe Mode with Networking; press 6 or F6 to access Windows 10 in Safe Mode with Command Prompt.
2. How to Start Windows 10 in Safe Mode through msconfig
If you can enter into Windows 10 system, you can also try another way to boot into Safe Mode in Windows 10, namely, using Windows System Configuration (msconfig.exe) tool.
Step 1 – Open Windows System Configuration Tool
You can press Windows + R key, input msconfig in Windows RUN window and hit Enter to open the System Configuration utility.
Step 2 – Select a Safe Boot Option
Then you can click Boot tab. Under Boot options, you can choose a preferred Safe boot option based on your own need.
- Minimal equals to Safe Mode.
- Alternate shell refers to Safe Mode with Command Prompt.
- Network refers to Safe Mode with Networking.
- Active Directory repair option is used to repair the Active Directory server.

Generally, you can choose either Minimal or Network option to start Windows 10 in Safe Mode to troubleshoot problems in Windows 10 system.
Tip: Booting Windows 10 in Safe Mode through msconfig, your computer will start in Safe Mode each time you start your Windows 10 PC. To get out of Safe Mode, you can check the part of “How to get out of Safe Mode Windows 10” later in this post.
If you can log in Windows 10, you can also boot into Safe Mode in Windows 10 by using Start menu.
Step 1. You can press and hold Shift key on the keyboard, and click Start menu on Windows 10 at the same time. Then click the Power icon in the Start menu and choose Restart.

Step 2. After you get into the Choose an option screen, you can click Troubleshoot -> Advanced options -> Startup Settings -> Restart, to enter into the Startup Settings window.
Step 3. Next press F4, F5, or F6 to choose a desired Safe Mode option to start Windows 10 in Safe Mode while booting.
4. How to Start Windows 10 in Safe Mode While Booting from Login Screen
If you can’t log in Windows 10, but you can enter into the Sign-in screen, you can also enter Safe Mode in Windows 10 from the login screen by using Shift + Restart.
Step 1. You can restart the Windows 10 PC. When you see the Sign-in screen, you can also press the Shift key and don’t release, and click the Power icon at the bottom-right and choose Restart.

Step 2. After you enter into the WinRE screen, click as follows: Troubleshoot -> Advanced options -> Startup Settings -> Restart.
Step 3. After the Windows 10 PC restarts, you can see a list of Windows startup options. You can then press F4 to boot Windows 10 in Safe Mode, or press F5 to start in Safe Mode in Windows 10 with Networking.
5. How to Start Windows 10 in Safe Mode from a Black/Blank Screen
If your Windows 10 PC can’t start normally, you can also choose to boot Windows 10 in Safe Mode to troubleshoot problems there.
To boot your Windows 10 PC in Safe Mode from a black or blank screen, you need to enter into the Windows Recovery Environment (WinRE) at first by turning off and on the PC 3 times.
Step 1. Enter into WinRE
You can press and hold the Power button on your PC for 10 seconds to turn off the computer, then turn on the PC by pressing the Power button again. When the computer is going to boot the operating system (e.g., the computer manufacturer’s logo appears when restarting), rightly press the Power button again for about 10 seconds to turn off the device.
Follow the same process to turn off and on your Windows 10 PC 3 times. When the PC is turned on for the third time, the computer should enter into the Automatic Repair window now. If not, follow the same steps until the WinRE screen shows.
If the Automatic Repair couldn’t repair your Windows 10 PC problems, you can click Advanced options to enter into Windows Recovery Environment screen to try other options to repair PC.
Step 2. Enter into Startup Settings
In the WinRE window, you can then enter into the Startup Settings window by clicking Troubleshoot -> Advanced options -> Startup Settings -> Restart.
Step 3. Start Windows 10 in Safe Mode with Networking
Then you can press F5 to start Windows 10 PC in Safe Mode with Networking. And this is a suggested option when you need to troubleshoot a black or blank computer screen. You can search on the Internet for solutions to the issues.
6. How to Boot in Safe Mode Windows 10 While Booting through F8 Key
In Windows 7, you can continuously press F8 key to enter into Advanced options window before logging into Windows. And we know that this method isn’t working in Windows 10 and 8 because Windows 10/8 has much faster booting speed.
However, you can still make F8 work again in Windows 10 with the BCD (Boot Configuration Data) Edit command.
Step 1. Open Administrator Command Prompt window
You can press Windows key and R key on computer keyboard at the same time to open RUN window. Then type cmd in the box, and press Ctrl + Shift + Enter key at the same time to run the Administrator Command Prompt window. Please do not simply click OK, because it won’t open the Command Prompt (Admin) window.

Step 2. Reactivate F8 key function
Then you can type this command line: bcdedit /set {default} bootmenupolicy legacy. And hit Enter key.
Step 3. Reboot Windows 10 PC in Safe Mode
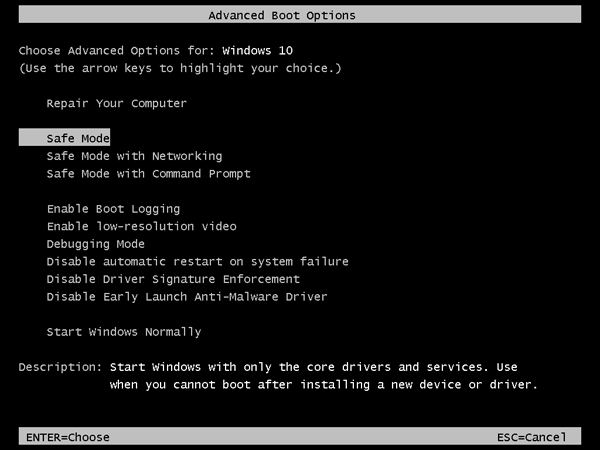
Next you can close the Command Prompt window, and restart your PC. Now before the Windows logo appears, you can constantly press F8 to enter into the Advanced Boot Options screen.
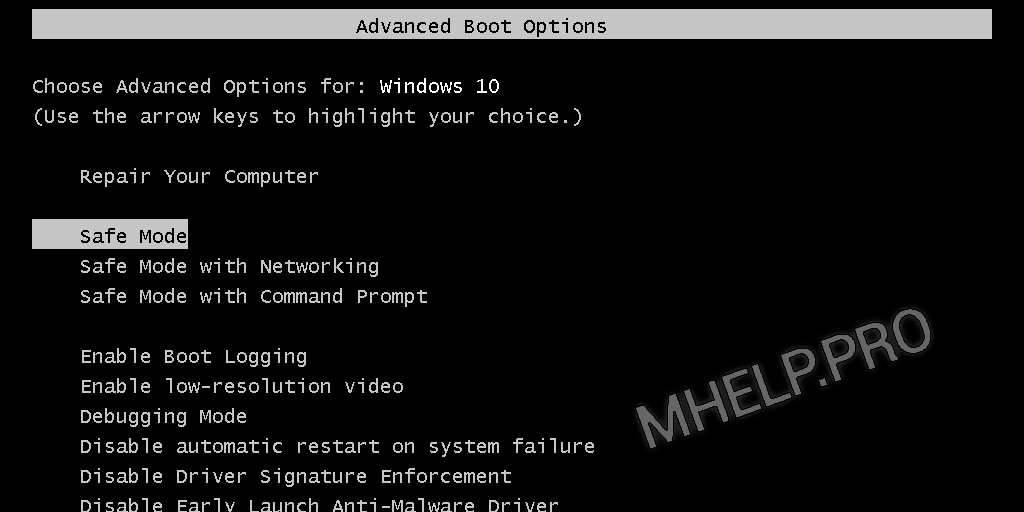
You can then use the arrow keys on the keyboard to choose to start Windows 10 in Safe Mode, Safe Mode with Networking, or Safe Mode with Command Prompt.
Tip: Please be noted that you can only reactivate F8 function in Windows 10 on condition that the Windows PC can start normally. If you can’t access Windows 10 PC, you should try other ways in this post to boot in Safe Mode Windows 10.
If you want to get rid of the F8 key function in Windows 10, you can follow the same operation to get into the Administrator Command Prompt window, and input this command line: bcdedit /set {default} bootmenupolicy standard. Hit Enter and restart computer again.

How to Get Out of Safe Mode Windows 10
To get out of Safe Mode in Windows 10, you can follow the steps below realize it.
Step 1. You can press Windows and R key on the keyboard. And then input msconfig and hit Enter again to open the System Configuration window.
Step 2. Tap Boot icon and uncheck the Safe boot option, and click OK. Then your Windows 10 computer will boot in normal screen next time you start the PC.

Click to Tweet
How to Use Safe Mode to Fix Your Windows 10 PC Issues
Starting Windows 10 PC in Safe Mode can help you fix some problems of your computer.
1. Recover Lost Data/Files in PC
If your computer is infected by malware or virus, or has a system crash or hard drive error, you may lose some important data and files, and can’t start Windows 10 normally.
After you access Windows 10 in Safe Mode, you can use the best free data recovery software like MiniTool Power Data Recovery to easily recover deleted files or lost data in 3 simple steps.
MiniTool Power Data Recovery is a 100% clean data recovery tool which is compatible with Windows 10/8/7.
You can use this software to recover lost or mistakenly deleted files from PC hard drive, external hard drive, SSD, USB flash drive, pen drive, SD card (from Android, cameras, etc.), and more, under various kinds of data loss situations.
Download and install MiniTool Power Data Recovery on Windows 10/8/7, and follow the detailed guide below to recover lost data and files with ease.
Free Download
Step 1 – Run MiniTool Power Data Recovery
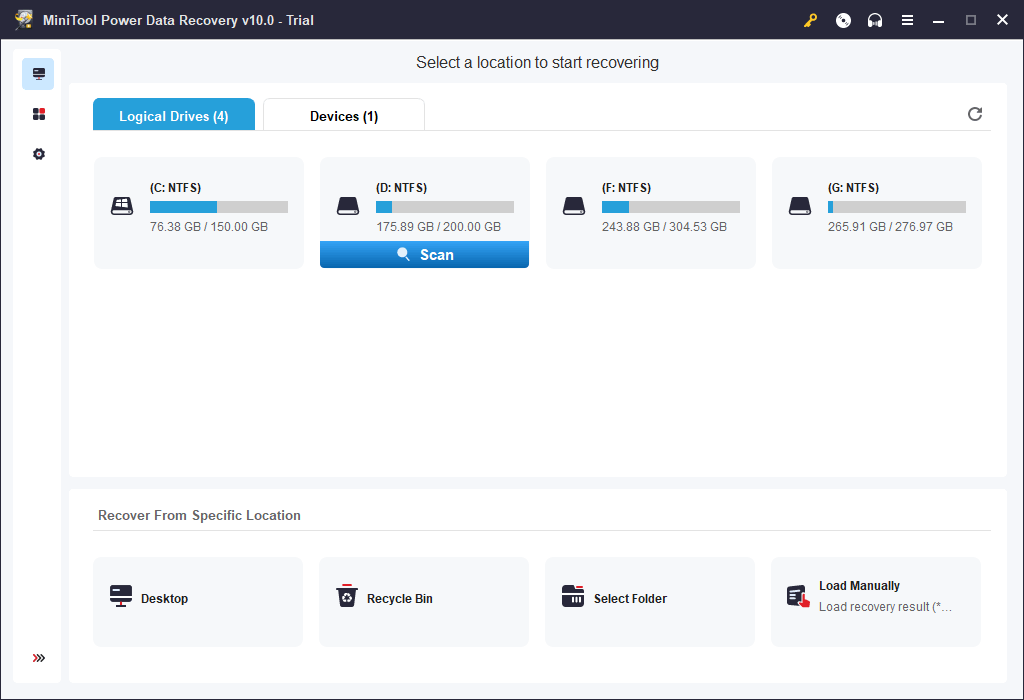
Launch MiniTool Power Data Recovery to enter into the main UI. All the detected drives and devices on PC are displayed.
Step 2 – Scan for Lost Data on PC
Choose one partition under Logical Drives and click Scan button, and it will automatically scan for all lost, deleted and normal files on this partition. If you don’t know which partition contains the deleted/lost files, you can click Devices tab and choose the whole disk to scan.
Step 3 – Preview and save lost files
After the scanning is finished, you can browse from the scan result to find your needed files, and click Save button to store the wanted files to another drive or partition, or external hard drive, USB drive, etc.
MiniTool Power Data Recovery allows you to preview up to 70 types of files.
Show Lost Files, Find, Filter functions are available to help you quickly find the wanted files.

Tip: If your Windows 10 PC can’t boot normally and your computer haven’t installed this software before, it’s advised to start Windows 10 in Safe Mode with Networking. Thus, you can download and install MiniTool Power Data Recovery Free on your PC in Safe Mode to recover lost data in PC.
If your computer can’t boot or even can’t start in Safe Mode, you can still recover data and files in Windows 10 PC with MiniTool Power Data Recovery. Related guide: How to Recover Data When PC Won’t Boot
2. Remove Malware or Virus
If your computer is crashed or stops working because of malware or virus infection, you may boot Windows 10 in Safe Mode to scan and remove malware/virus.
You can also use Windows Defender in Windows 10 to scan and kill the malware and virus in PC. If you don’t have an antivirus program in your Windows 10 PC, it’s also possible to download and install one in Safe Mode only if you start Windows 10 in safe mode with Networking.
3. Uninstall Improper Software
If your Windows 10 computer can’t normally start or work because of some recently installed programs which may have conflicted drivers, you can uninstall the suspicious software from the Control Panel in Windows 10 Safe Mode. Then restart your computer to see if the problem is fixed.
4. Perform System Restore
If your Windows 10 computer runs unstable recently, you can perform a System Restore to restore the system to an earlier state which has a good configuration. But what if Windows 10 System Restore stucks in normal Windows 10 start mode? Then you may try to start Windows 10 in Safe Mode to run a successful System Restore without crashing.
Beyond above, you can also boot Windows 10 in Safe Mode to fix Windows 10 black screen, blue screen issues like the Kernel Data Inpage Error, and more.
Click to Tweet
Bottom Line
This post illustrates 6 ways for how to start Windows 10 in Safe Mode (while booting) with step-by-step guides. If your computer doesn’t run well, can’t boot, or has some other problems, you may try to start Windows 10 in Safe Mode to fix issues of your Windows 10 computer, and recover lost data and files with MiniTool Power Data Recovery Free.
If you still have problems about how to boot in Safe Mode Windows 10, please contact [email protected].
Windows 10 Safe Mode FAQ
How to start Windows 10 in Safe Mode while booting?
This tutorial introduces 6 ways with detailed guides to allow you to start Windows 10 in Safe Mode while booting. You can try one of them.
How do I start Win 10 in Safe Mode?
You can check the 6 ways in this post to easily enter in Safe Mode on Windows 10.
How do I boot up in Safe Mode?
You can boot into Safe Mode on Windows 10 via Settings, msconfig, Start Menu, Login screen, F8 key, etc. The detailed instructions are included in this tutorial.
Can I boot in Safe Mode from BIOS?
You can press F8 key during booting to enter into Windows Advanced Boot Options screen, and choose a Safe Mode option to boot Windows 10 into Safe Mode.
What is Safe Mode and how to boot Safe mode Windows.
💡 For Windows 10, 8, 7; for laptop and computer.
Contents
- Safe Mode and Options
- Safe Mode after reboot (Windows 10,
- Using msconfig (Windows 10, 8, 7)
- Enable Advanced Boot Options (Windows 10,
- Safe Mode from System Restore (Windows 10,
- Safe mode from the command prompt (bcdedit)
- Safe mode using shutdown utility

Article in other languages:
🇪🇸 – Cómo iniciar Windows en Modo Seguro
🇷🇺 – Как зайти в безопасный режим Windows
🇫🇷 – Comment entrer en Mode sans échec Windows
🇩🇪 – So starten Sie Windows 10 im abgesicherten Modus
🇳🇱 – Hoe start je Windows in de veilige modus
Safe Mode and Options
Safe Mode is a diagnostic mode of a computer operating system. Safe mode is intended to help fix most, if not all problems within an operating system.
Wikipedia
Booting in Safe Mode Windows is often used to remove viruses and programs that cannot be removed during normal mode of the Operating System (OS).

In this mode, the minimum set of system programs and services necessary to start the system is loaded.
Starting non-system services from startup and not system programs is ignored.
🔔 The ability to work in this mode is limited.
There are three modes for starting Windows Safe Mode:
| Safe Mode | The minimum set of system services is loaded, the launch of not system programs and services is disabled. |
| Safe mode with Networking | The minimum set of system services and network services is loaded, the launch of not system programs and services is disabled. |
| Safe mode with Command Promt | The minimum set of system services + network services is loaded, the launch of not system programs and services is disabled. The command line starts, before starting Windows Explorer. |
The mode is designed to diagnose startup, fix problems and errors OS.
Safe mode after reboot (Windows 10,
An easy way to reboot Windows in safe mode.
💡 Suitable for Windows 10, 8.
- Press the START button;
- Click the Power button;
- Press and hold the SHIFT button and then click Restart. The advanced Windows boot menu is loading;
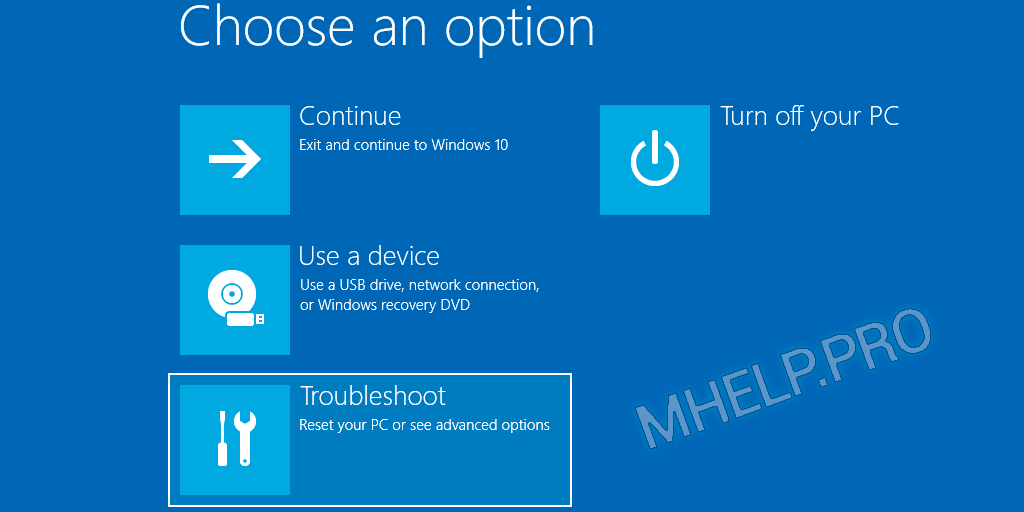
- Select the Troubleshoot;
5. In the Troubleshoot window, select the Advanced options;

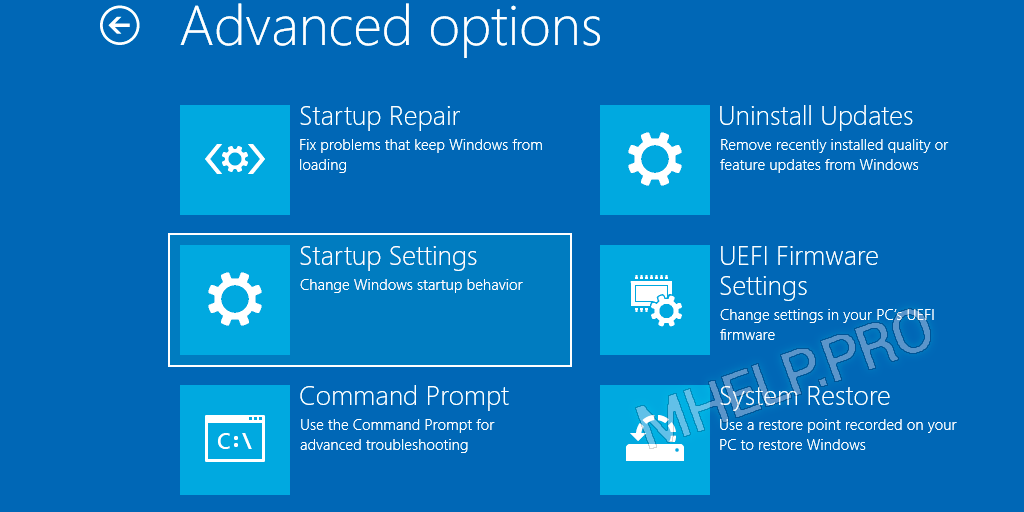
6. In the Advanced options window, select the Startup Settings;
7. In the Startup Setting window, click the Restart button;

8. After restarting your computer, In the Boot Options window (Advanced Boot Options), select the required Windows boot mode.
Windows will boot in Safe mode.
To exit Safe Mode, restart your computer.
Using msconfig (Windows 10, 8, 7)
We use the msconfig utility to boot Windows in safe mode.
💡 Suitable for Windows 10, 8, 7.
- Right-click on the START button and select Run or press the key combination Windows+R;
- Enter the name of the msconfig utility and click OK;
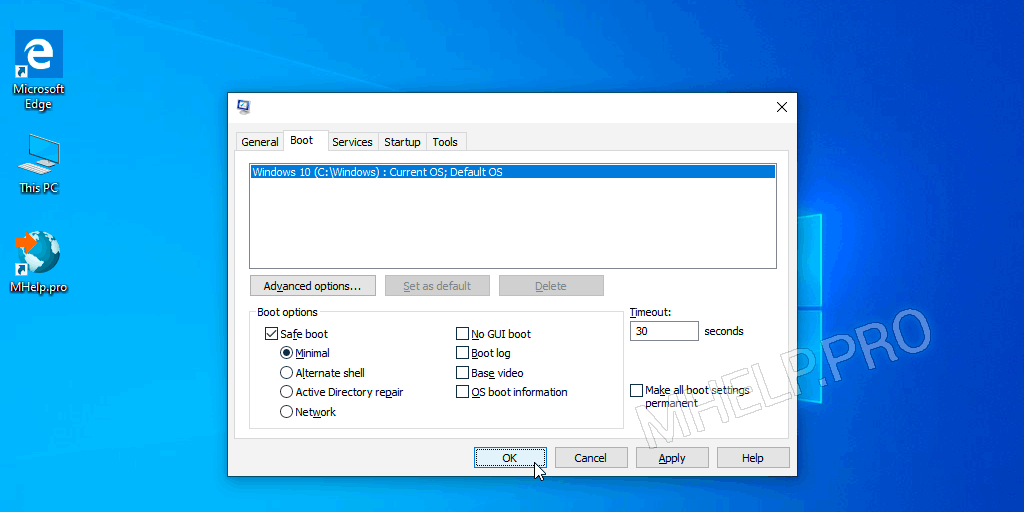
- Switch to the Boot tab, check the Safe Mode checkbox, select Minimal and press ОК;
- Click Restart to start Windows Safe Mode.
To exit Safe mode, restart your computer.
🔔 The msconfig utility provides additional options for starting the computer (disabling the launch of services and applications).
Enable Advanced boot options (Windows 10,
💡 Suitable for Windows 10, 8.
In Windows 7, XP, when loading the OS, pressing the F8 button opened the Advanced boot options menu.
In Windows 10, 8, the call to this menu with the F8 button must be turned on manually.
- Run the command prompt as administrator;
- Enter the command:
bcdedit /set {default} bootmenupolicy legacy
Close the command prompt window, restart the computer.
Before loading the operating system, press the F8 button, the Advanced boot options menu opens, where we can choose several options for starting Safe Mode or other Windows boot options.
🔔 If you have a laptop, you may have to press the Fn + F8 key combination.
Safe Mode from System Restore (Windows 10,
💡 Suitable for Windows 10, 8.
You can boot Safe Mode Windows 10, 8 from Recovery mode, after an incorrect OS boot.
After three consecutive power outages when loading Windows 10, 8, the system will start to boot Recovery mode.

Select See advanced repair options recovery options.
Further, the launch of Safe Mode will occur as in paragraph – Safe Mode after reboot (Windows 10, 8).
🔔 We dont recommend using this method of loading Windows Safe Mode, as this can cause permanent damage to the system!
Safe mode from the command prompt (bcdedit)
The bcdedit command changes persistent Windows boot options. After enabling Safe Mode, enter the command to change the configuration and disable booting into Safe Mode.
You can also use the bcdedit command in the command prompt in Windows Recovery mode.
You can boot Windows in Safe Mode by running the bcdedit command in the Command Prompt running with administrator rights.
Enable Safe Mode:
bcdedit /set {default} safeboot minimal
Enable Safe Mode with Networking:
bcdedit /set {default} safeboot network
Enable Safe Mode with Command Prompt (enter two commands):
bcdedit /set {default} safeboot minimal
bcdedit /set {default} safebootalternateshell yes
Restart your computer to apply the new configuration settings.
To disable booting Safe Mode, in Windows configuration, run:
bcdedit /deletevalue {default} safeboot
Safe mode using shutdown utility
The shutdown utility is a built-in Windows program that allows you to restart, shutdown, hibernate, or end a user session.
Run in Command Prompt or PowerShell:
shutdown.exe /r /o

After rebooting, in the System Restore window, select the required option.
Learn more about the startup parameters of the shutdown utility – here.
I hope you were able to boot Windows in Safe Mode in a convenient way.
How to boot Windows Safe Mode:
- SHIFT button and Reboot
Hold the SHIFT button and press Reset button. More…
- Msconfig utility
Run the msconfig utility, select the Safe Mode – Minimal option. More…
- Enabling the Advanced Boot Menu
Use the bcdedit command to enable the Advanced boot menu and the press F8 button (as on Windows 7, XP) to call up the menu, when the Windows boot. More…
- System shutdown
Three times, power off the system to enable the Recovery mode and boot Windows Safe Mode. More…
These were the available options for boot Safe Mode Windows 10, 8, 7.
🟢 How to boot Safe Mode in Windows 10, 8, 7 was discussed in this article. I hope you can now configure Windows to start in Safe Mode. However, if you run into any problems, do not hesitate to write in the comments. I will try to help.
When Windows 10 doesn’t start anymore you have two options when it comes to repairing it. You can either start Windows 10 in safe mode while booting or you can use a USB with the Windows 10 installation media on it.
With both options, you can start the Windows 10 recovery mode that allows you to run commands or start Windows 10 in safe mode.
In this article, I will walk you through the different options to start recovering your Windows 10 installation.
If you are able to get to the login screen of Windows 10, then you can easily restart your computer into safe mode. All you need to do is hold Shift and click Restart.
Boot Windows 10 in Safe Mode:
- Click on Power button
You can do this on the loginscreen as well as in Windows
- Hold Shift and click Restart
- Click on Troubleshoot
- Select Advanced Options
- Select Startup Settings and click Restart
If you don’t see the Startup Settings option, then click “See more recovery options” at the bottom of the screen.
- Choose 5 – Boot into safe mode with Networking
This option loads the minimum amount of drivers while keeping you connected to the internet. Having a network connection in safe mode is really useful when it comes to troubleshooting and downloading new drivers.
- Windows 10 is now booted in Safe mode
On the login screen you might not see any difference, but after you have logged in you will see the Safe Mode text in all 4 corners of the screen.
If you are trying to repair Windows 10 because you have blue screens with errors (Blue Screen of Death), then follow this article to repair it.
Start Windows 10 in Safe Mode while Booting
If you are unable to start Windows 10 at all, because you get a blue screen before you reach the login screen, you can still start the Safe Mode.
Windows 10 will automatically start the Recovery Mode after 3 failed boot attempts. So just try to start Windows 3 times in a row and the Recovery mode will start.
Another option is to cut the power (simply pull out the power cable) 3 times when Windows is loading. This will have the same effect.
1. Preparing automatic Repair
After 3 failed start attempts Windows 10 load the Automatic Repair, which is displayed under the Windows Logo
2. Open Advanced Options
You can now follow the steps described here above from Step 3, to start Window 10 in safe mode.
If these options don’t work for you, then your only option is to use a USB drive with the Windows 10 installation media on it.
Windows 10 Recovery USB Download
There are two options to create a Windows 10 Recovery USB. You can create a true Recovery Drive, but you will need to have another computer with Windows 10. Or you can use the installation media creator.
If you have access to another computer with Windows 10, then creating a Recovery USB is the fastest option.
- Click Start
- Search for recovery drive
- Make sure Back up system files to recovery drive is checked and click Next
- You will need an empty USB Drive plugged in before we continue.
- Select the USB Drive that you want to use, click Next, and Create
- It will take some time to create the drive, just let it run and wait for it finishes.
- When the Recovery Drive is finished, use it to boot into the recovery mode and follow the steps described here above from Step 3, to start Window 10 in safe mode.
1. Download the Windows 10 installation media
The other option is to create a Windows 10 Recovery USB is to use the installation media. This allows you to recover your Windows installation.
To create a Windows 10 Recovery USB you will need to have an empty USB drive that is atleast 8Gb large.
Download the latest Windows 10 installation media here at Microsoft. Click on Download tool now, the Media Creation Tool self is only 19Mb.
2. Create the Windows 10 Recovery USB
Start the tool and accept the terms and wait for it to finish preparing.
Select the second option: Create installation media and click Next
3. Select language and edition
The media creation tool will preselect the language, edition and architecture that matches the computer on which the installation media is created. If you want to use the Windows 10 Recovery USB on another computer, then make sure you select the correct language and edition for that machine.
4. Choose the media to use
Select USB Flash Drive and then make sure you select the correct USB drive on the next page
5. Wait for the tool to finish
It will take approximately 10 to 15 minutes, depending on your internet connection, to create the installation media. Wait for the tool to finish.
Boot Windows from USB
To Boot Windows from USB to recovery or installation mode you will need to interrupt the boot process. This is not difficult, all you need to do is hit the correct key when the Bios is loading.
- Make sure the USB drive is connected to your computer
- Power on your computer
- Immediately press ESC or F1, F8, F9, F11 or F12
On most computers ESC will work, otherwise, try other keys. - Choose Boot Device Option, Boot Order, or something similar.
- Select the USB drive to boot from
- The Windows Installation will now start from the UBS. Depending on your computer brand you may need to press a key to confirm that you want to boot from USB.
The Windows installation will now start. On the first screen, select your language and simply click next.
Click on Repair your Computer if you want to repair or recover your Windows Installation.
If you need to start Windows 10 in Safe mode, then select:
- Troubleshoot
- Choose Command Prompt
- Enter the following cmd:
bcdedit /set {default} safeboot minimal
- Close the Command Prompt and click Continue
- Your computer will now reboot and start into safe mode.
With this option we have set the default boot method to safe mode. When you want to leave the safe mode, make sure you reset it back:
- Press Windows key + R
- Type CMD <enter>
- Enter the following cmd
bcdedit /deletevalue {default} safeboot - Restart Windows
Wrapping up
I hope these steps helpt you to start your Windows 10 in Safe Mode while Booting. If you have any questions, just drop a comment below.