![]()
Download Article
![]()
Download Article
A bootable USB flash drive is useful for installing an operating system or diagnosing system problems. But once you have your bootable USB flash drive, how can you boot from it? This wikiHow teaches you how to start up your Windows PC or Mac from a USB flash drive.
-

1
Insert the bootable USB drive into a USB port. As long as your USB drive is bootable, it’ll be easy to boot from it when restarting your PC.
-
2
Open your Windows Settings
. You can do this by clicking the Start menu and selecting Settings or the gear icon.
Advertisement
-
3
Click the Update & Security icon. It’s the two curved arrows at the end of the list.
-
4
Click the Recovery tab. It’s in the left panel.
-
5
Click Restart Now under «Advanced Startup.» This is in the right panel.
-
6
Click Troubleshoot on the blue screen. It’s the icon with a screwdriver and a wrench.
-
7
Click UEFI Firmware Settings. It’s the option with a computer chip and a gear.
- If you don’t have this option, you will need to restart your computer and get to the BIOS using your hardware’s default key. As soon as you see the logo, you will need to hit either F1, F2, F6, F10, or Del to enter the BIOS menu—the key you need to press should appear quickly on the screen (look for «Press X to enter setup»).
-
8
Click Restart. Your PC will now reboot into the BIOS/UEFI, which is where you’ll tell your PC you want to boot from your USB flash drive.
-
9
Find the Boot menu. Every manufacturer has a different BIOS/UEFI setup, so you may have to browse around to find a menu called Boot, Boot Order, or Boot Options. You’ll know you’re in the right place once you see a list of different types of drives (such as optical drive, removable drive, USB drive, etc.).
- If you’re using a Lenovo PC, for example, you’ll select the Boot tab at the top.
- You may have to select a menu called Advanced, Storage, or System Configuration to find the Boot or Boot order menu.[1]
-
10
Change the boot order. This area is going to look different depending on the manufacturer. Your goal is to make the device that’s called something like «USB drive» or «Removable Drive» the first item in the boot order.
- If you don’t see an option to change the order of the drives, you may just need to switch on a setting that enables «USB Boot» or similar.
-
11
Save and exit. You can usually do this by selecting a tab or option called Save & Exit, or by pressing F10. Once you confirm and exit, your PC will reboot from the USB drive.
- Be sure to remove the flash drive when you’re done using it. Otherwise your PC will try to boot from it the next time you have to reboot.


Advertisement
-
1
Insert the bootable USB drive into a USB port. As long as your USB drive is bootable, it’ll be easy to boot from it when restarting your Mac.
-
2
Find out whether you have an Intel or Apple Silicon-based processor. The process to boot from a USB drive is different depending on the type of processor inside of your Mac. To find out:
- Click the Apple menu at the upper-left corner and select About This Mac.[2]
- If you see «Chip» followed by a name like «Apple M1» (or similar), you have an Apple Silicon chip.
- If you see «Processor» followed by a name that starts with «Intel,» you have an Intel processor.
- Click the Apple menu at the upper-left corner and select About This Mac.[2]
-
3
Shut down your Mac. If your Mac is on now, click the Apple menu and select Shut Down.
-
4
Start up your Mac. The process is different depending on your processor:
-
Apple Silicone: Press and hold the Power button until you see «Loading startup options.» At that point, let go of the button.[3]
- Intel: Press and hold the Option key as you restart your Mac. Keep holding down the Option key until you see a list of available startup disks.
-
Apple Silicone: Press and hold the Power button until you see «Loading startup options.» At that point, let go of the button.[3]
-
5
Click your USB drive and click Continue (Apple Silicon) or the up arrow (Intel). Your Mac will now boot from the USB drive.
- This won’t permanently change the boot order. The next time you start up your Mac, it’ll start from your regular hard drive as normal.


Advertisement
Add New Question
-
Question
Can I use and boot from an existing O/S (XP) hard drive in a USB enclosure with Windows 10?

Yes, as long as there is enough available storage to support Windows 10.
-
Question
How can I tell if my computer booted from the flash drive, if the hard drive is second priority?
The windows installation screen should appear when you are planning on installing a new Windows.
-
Question
What can cause my computer to display multiple colors after installing Windows 7?
If you’re booting from a copy of Windows 7 on a USB drive, the most likely culprits are a corrupted copy of Windows, which just requires a reinstall, or damage done to the USB, which may be present on either the drive or the computer’s port itself. Or the monitor may just be having some issues of its own. If you get these colors when doing hardware intensive tasks like gaming, exporting video files or any other GPU-intensive tasks, the driver may be crashing which can be caused system errors or by overheating of the card.
See more answers
Ask a Question
200 characters left
Include your email address to get a message when this question is answered.
Submit
Advertisement
-
If you are still unable to boot from your USB drive, it’s likely that the drive is not bootable.
Thanks for submitting a tip for review!
Advertisement
About This Article
Article SummaryX
1. Insert a bootable USB flash drive.
2. Go to Settings > Update & Security > Recovery > Restart Now.
3. Click Troubleshoot and select UEFI Firmware Settings.
4. Click Restart.
5. Open the Boot or Boot Order menu.
6. Make USB or Removable Drive the first option in the boot order.
7. Save and exit.
Did this summary help you?
Thanks to all authors for creating a page that has been read 446,093 times.
Is this article up to date?
It’s possible to boot Windows from a USB drive, as long as you follow the right approach. Here are the best ways to boot from USB on Windows 10.
So you want to boot Windows 10 from a USB flash drive?
Maybe you need to install a new version of Windows 10, or you’re looking to troubleshoot some problems. Whatever the reason, by the end of this article, you’ll be comfortable with booting your PC from a USB flash drive.
So let’s get started with booting your Windows from a USB drive.
How to Boot Windows 10 from a USB Flash Drive
To run Windows from a USB stick, you’ll need a bootable USB drive. But what’s a bootable USB anyway?
Simply put, a bootable USB is a USB drive that contains an ISO version of an operating system. An ISO file is a clone of disc files (DVD or a CD). In our case, the USB flash drive will contain the ISO version of the Windows 10 operating system.
So the first thing you need to take care of before you boot your Windows from a USB drive is to make your USB drive bootable. But how do you do that?
While there are plenty of methods to create a bootable USB drive, the easiest one is to use the Windows 10 Media Creation Tool. It’s a free tool from Microsoft that lets you download the ISO image of a Windows installation file onto a DVD or flash drive for installation.
- To get started, download and launch the application. Then select the Create installation media (USB flash drive, DVD, or ISO file) for another PC, and click on Next.
- From there, set your preferred language, Windows edition, and architecture. We suggest that you stick with the Use the recommended method for this PC radio box and let the tool take care of everything. Then, click on Next.
- Now, select the USB flash drive option to boot Windows from a USB drive, and click on Next.
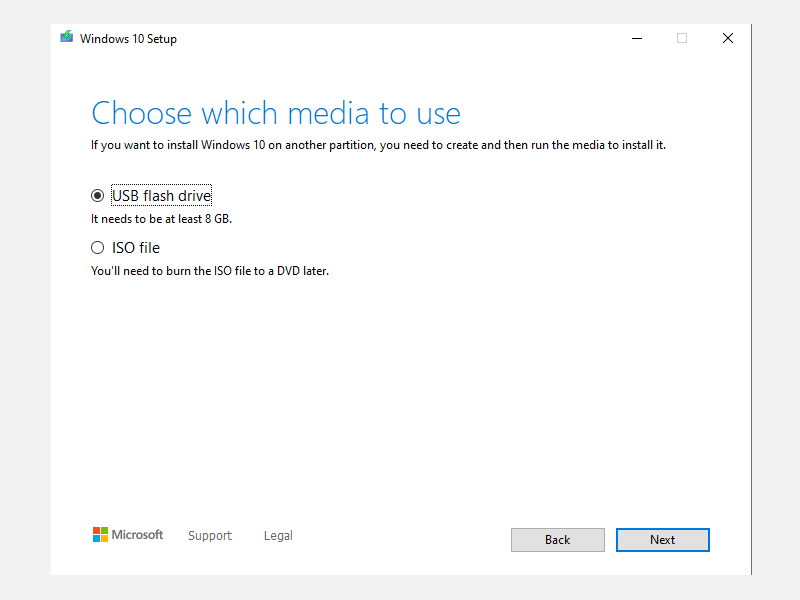
The Windows 10 installation on your USB will begin. Depending on the speed of your internet connection, the whole process could take a while.
Boot From the Windows 10 USB Driver
When your bootable USB drive is ready, you need to restart your PC with your bootable USB drive in it. After you’ve plugged your USB into the computer, here’s what you need to do next:
Startup your computer and repeatedly press the BIOS/ UEFI access key. The key could be ESC, F1, F2, F8, or F10, but it varies between manufacturers.
After successfully pressing the key, you’ll reach the BIOS. In the BIOS, ensure that the USB is set as the main boot device. This is so that your PC can boot directly from the USB flash drive instead of booting from your computer’s hard drive.
At last, save the changes and restart your computer.
If everything was done right, your PC will start from the bootable USB drive containing the Windows files. You are free to use it however you please.
Key Takeaways of Booting Windows From USB Drive
We hope this guide helped you in running your Windows 10 through the USB drive. But don’t stop here. You can also install your Windows through a bootable USB. Learn how to do it from this actionable guide below.
Download PC Repair Tool to quickly find & fix Windows errors automatically
By default, your Windows 11 or Windows 10 PC is set to boot from the first connected internal hard drive. If you want to boot from a USB drive or an external drive, you need to change the boot order. In this post, we will walk you through the steps on how to boot from USB Drive within Windows 11/10.

Normally, if you are unable to boot into Windows and cannot access your files, you can create a bootable drive and use the media to boot and repair your OS installation.
Perhaps, not widely known by PC users, there is an option to boot from a USB drive within a running Windows OS installation. If Fast Boot is enabled in UEFI/BIOS, you may not be able to boot from a USB flash drive unless you boot from the USB within Windows; otherwise, you will have to temporarily disable Fast Boot or Ultra Fast Boot to be able to boot from a USB drive.
To Boot from USB Drive within Windows 11/10, do the following:
- Plug in a bootable USB drive to a USB port on your PC.
- Boot to Advanced Startup Options via Settings app.
- After the computer restarts, click/tap on the Use a device option.
- On the next screen, click/tap on the USB drive that you want to boot from.
The computer will now restart and boot from the selected USB drive.
That’s it!
How do I boot my PC from a USB drive?
To boot from USB drive on Windows 11/10, follow these steps:
- Press the Power button for your computer.
- During the initial startup screen, press ESC, F1, F2, F8 or F10.
- When you choose to enter BIOS Setup, the setup utility page will appear.
- Using the arrow keys on your keyboard, select the BOOT tab.
- Move USB to be first in the boot sequence.
Can Windows boot from a USB connected drive?
If you have a bootable USB drive, you can boot your Windows 10 computer from the USB drive. The easiest way to boot from USB is to open the Advanced Startup Options by pressing and holding the Shift key when you choose the Restart option in the Start menu.
How do I get USB to show in boot menu?
You can enable the Quiet Boot option in the Main Menu. Under the Advanced menu, ensure that the Legacy USB Support option is enabled. Do the following:
- Restart the system into the BIOS.
- Ensure the Boot Mode is set to EFI (or UEFI). This is found in the Boot Options menu.
- Make sure that the USB Boot Priority is enabled.
- Save the changes and exit.
Is bootable USB safe?
The short answer: Yes. It is safe to run an operating system from a USB flash drive. But keep in mind that if you do decide to install Windows to a USB drive, a Flash Drive(UFD) drive, ESATA drive or store Windows Native Boot VHD on USB/UFD drive, this scenario will not be supported by Microsoft.

Anand Khanse is the Admin of TheWindowsClub.com, a 10-year Microsoft MVP (2006-16) & a Windows Insider MVP (2016-2022). Please read the entire post & the comments first, create a System Restore Point before making any changes to your system & be careful about any 3rd-party offers while installing freeware.
- If you have a bootable USB drive, you can boot your Windows 10 computer from the USB drive.
- The easiest way to boot from USB is to open the Advanced Startup Options by holding the Shift key when you choose the Restart option in the Start menu.
- If your Windows 10 computer isn’t booting from the USB drive, you may need to tweak the BIOS (basic input/output system) settings.
- Visit Business Insider’s homepage for more stories.
In the old days, people commonly booted their computer from CDs and even floppy disks, but those days are long gone.
Now, if you need to troubleshoot your PC, boot from a different version of the operating system, or install a Windows upgrade, it’s frequently done by booting from a USB drive.
Windows 10 has made booting from USB very easy to do. All you need is a USB memory drive that has a bootable version of Windows, and to follow a few simple steps.
Check out the products mentioned in this article:
HP ENVY x360 2-in-1 (From $779.99 at Best Buy)
Windows 10 (For $139.99 at Best Buy)
How to boot from USB using Windows 10
1. Make sure your computer is on and the Windows desktop is running.
2. Insert the bootable USB drive into an open USB port on your computer.
3. Click the Start button and then click the Power icon so you can see the Shutdown options.
Dave Johnson/Business Insider
4. Press and hold the Shift key, then click «Restart.»
5. Your computer will shut down, and when it restarts, you’ll see the Advanced Startup Options screen. Choose «Use a device.»
Dave Johnson/Business Insider
6. Choose the USB device that you want to boot from, and your computer will then restart using your USB drive.
How to boot from USB using your Windows computer’s startup system
If the Windows 10 boot method doesn’t work, it might be because your PC’s BIOS (basic input/output system) doesn’t support it. You can still boot from the USB drive, though you will need to tweak the BIOS settings.
Unfortunately, every BIOS screen is configured differently, so you will need to explore the options for yourself.
1. Shut off your computer.
2. Turn it back on and press the key indicated briefly on the startup screen to enter your BIOS Setup. It’s usually Escape, F1, F2, F8, F11, or F12. If no such screen appears, your BIOS may be set to «fast boot» mode, so you will need to experiment with different keys at bootup, before the Windows screen appears. For more information, you should consult the documentation that came with your PC.
3. In the boot menu, look for the boot order controls and move the USB drive to the top of the list.
4. Save your settings and restart the computer with the USB key installed.
Related coverage from How To Do Everything: Tech:
-
‘How much is Windows 10?’: A cost breakdown of all three versions of Windows 10
-
How to take a screenshot on any Windows 10 computer in several different ways
-
How to boot your Windows 10 computer into ‘Safe Mode,’ to diagnose and troubleshoot problems
-
How to properly uninstall programs on Windows 10, to protect your computer and free up space
Dave Johnson
Freelance Writer
Dave Johnson is a technology journalist who writes about consumer tech and how the industry is transforming the speculative world of science fiction into modern-day real life. Dave grew up in New Jersey before entering the Air Force to operate satellites, teach space operations, and do space launch planning. He then spent eight years as a content lead on the Windows team at Microsoft. As a photographer, Dave has photographed wolves in their natural environment; he’s also a scuba instructor and co-host of several podcasts. Dave is the author of more than two dozen books and has contributed to many sites and publications including CNET, Forbes, PC World, How To Geek, and Insider.
Read more
Read less
Insider Inc. receives a commission when you buy through our links.