How to setup CMake for C++ (Windows)
by | Last Updated:
2021-02-08
C++
In this article I will provide you with the information on how to setup CMake and compile your C++ project. You may also use this to compile third-party projects and solutions that you depend upon.
Table of Contents
- What do you need to follow through this tutorial
- Why do we need CMake?
- Install CMake
- Creating our project
- How to generate build files
- Adding more source files
- Using CMake GUI to build
- Using Visual Studio 2017/2019
What do you need to follow through this tutorial
- You would need to have some basic knowledge of C++ as I will not be explaining why or what the application that we are compiling does. Start from this post that explains the basics of C++.
- There are some terminal commands being executed but you will not need previous knowledge on Command Prompts / PowerShell. Check out this post on how to operate the command line.
- Visual Studio installed with support for C++ compilation. CMake will automatically detect your Visual Studio installation later.
Why do we need CMake?
C++ is an old language. Do not make a mistake it is really powerful and provides a lot of control over low level memory and system programming. As an old language though it misses some of the modern high-level language concepts. When programming in C++ it is hard to target multiple platforms as there is no unified project structure as well as good package management.
On other languages like Java, C# and python the code is always compiled to an intermediate language or is interpreted directly at runtime. That code is then run by a special virtual machine that translates it to commands for the specific machine.
This is what CMake strives to solve but the other way around. It is a project generator. On Windows one would want to work with Visual Studio project files and solutions and on Linux one would rather have Make files. This essentially means that we unify our project files under CMake which on the other hand generates the project files for the specific system.
Read more: You can check out more on how the compiler and linker work to gain in depth knowledge on why the process is different than other languages.
Install CMake
To install cmake you open this page: https://cmake.org/download/
You should find the corresponding binary for your windows installation (x64, x86) and download the .msi file. It should roughly look something like this:

The install wizard is pretty straightforward just make sure that on the question “By default CMake does not add its directory to the system PATH” you check one of the options Add CMake to system Path so that later we can execute commands from the windows terminal.
Creating our project
We will have the most simple example for our first compile using CMake. We will start as always with our “Hello, World!” application using a single .cpp file to demonstrate how CMake will generate a project and compile that file.
We will have the following project structure:
root
├── src/
│  └── main.cpp
└── CMakeLists.txt
In our “main.cpp” file we will write down the following “Hello, World!” application:
#include <iostream>

int main() {
    std::cout << "Hello, World!" << std::endl;
    return 0;
}
The “CMakeLists.txt” file is our base of operations when using CMake. It can link other CMakeLists files which later on will make it easy to include dependency (vendor) projects and compile them along our application. We will start with the most basic content for our file so that we can compile our “main.cpp” into a simple console application:
# This will set the minimum version of CMake required to generate the projects
# CMakeLists has its own language and features and as more and more versions are
# added it will include new keywords and options
cmake_minimum_required(VERSION 3.18)

# This will give our project a name
project(Main)

# This instructs CMake that we want to generate an executable file from this project
# Other options would be add_library but this is a topic for another time
# You can notice that we also pass on the path to our cpp file
add_executable(Main src/main.cpp)
How to generate build files
To start generating the cmake projects we will need to open a terminal window inside the root folder where our CMakeLists.txt file resides. This can easily be done by clicking shift + right mouse button inside the folder and then selecting “Open PowerShell window here”. After we’ve done that we can execute the following commands:
mkdir build
cd build
cmake ..
This will create the directory build, then move the terminal working directory to build and then generate projects using the “CMakeLists.txt” file in the previous directory as noted by the two dots after cmake (single dot means current directory, two dots means one directory up).
You can also specify the source and build directories by adding the following flags:
cmake -B [build directory] -S [source directory]After executing this command the “build” folder will be filled with project files. Double clicking the “Main.sln” file would open up Visual Studio. If you’ve followed up until now you would have 3 projects in the solution explorer as follows:
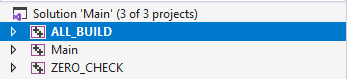
- Main – this is the project that we want to build and that will generate our executable.
- ALL_BUILD – by default this will be set up as the startup project and it will run Main and ZERO_CHECK.
- ZERO_CHECK – as our project is not actually controlled by visual studio but generated externally we cannot add source/header files inside of visual studio itself. To do that we would need to append them into the add_executable command inside of “CMakeLists.txt”. The ZERO_CHECK project would then monitor for changes in that file and regenerate VS projects based on the changes.
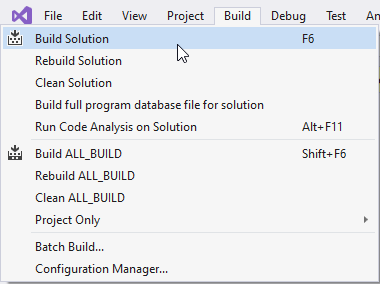
Now that we have Visual Studio open we can build the project. Use the shortcut ctrl + shift + b to run the build command or click on the top menu “Build” -> “Build Solution”.
Note: If you still have the command line open you can also use the command
cmake --build . --config Debug
You can run the project by right clicking on the “Main” project in Visual Studio solution explorer and selecting the option “Set as Startup Project”. On the top navigation bar you will notice a play button with the label of “Local Windows Debugger” that you can click to run your project (shortcut is ctrl + F5).
Note: If you’ve built the project using the command line you can run the application that we just compiled by using the following commands:
cd Debug

.Main.exe
Adding more source files
To add other files to the project you would need to create them in the target directory using Windows Explorer and then add them to CMakeLists. Lets say for example that we decide to move the “#include <iostream>” and all future includes into another file. We also want to create a header file called “main.h” and another C++ file called “other.cpp” resulting in the following following changes:
root
├── build/
│  └── Generated Build Files
├── src/
│  ├── main.h
│  ├── main.cpp
│  └── other.cpp
└── CMakeLists.txt
Create a file called main.h in the src directory with the following content
void print_hello_world();Then we modify main.cpp to include main.h instead of <iostream> and also call the newly defined function. This would result into the following file:
#include "main.h"

int main() {

print_hello_world();
    return 0;
}
Lets also add another file that would implement the print_hello_world function and call it other.cpp:
#include <iostream>

void print_hello_world() {
    std::cout << "Hello, World!" << std::endl;
}
At this point visual studio would not be able to compile the project as it will not know about other.cpp. It would be able to find the main.h file. To fix this we need to open CMakeLists.txt and modify the following line:
add_executable(Main src/main.cpp src/other.cpp src/main.h)Though it is no need to add the header file it is a good practice to list all source files so that you can also see them listed in the solution explorer later.
You can now run build. Visual Studio will display a prompt if you want to reload the projects. Be sure to click on “Reload All”.
Using CMake GUI to build
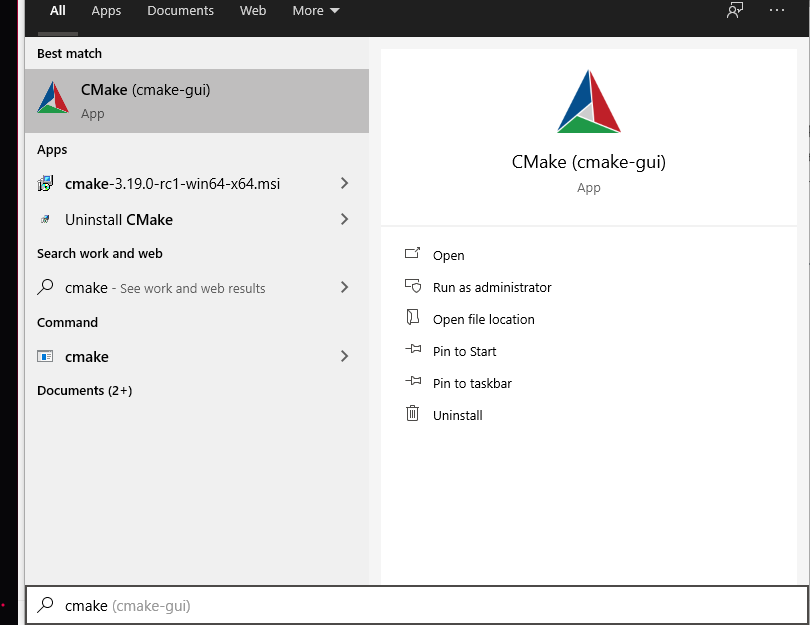
To use the visual CMake application is even easier. As CMake is already installed on Windows you can open the “Start” menu and start typing “cmake”. Select the “CMake (cmake-gui)” that should appear as a search result.
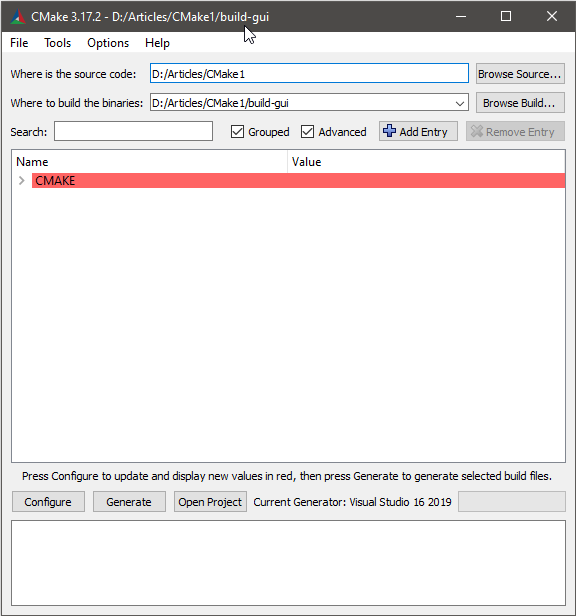
After you open it a window will appear where you can put on some options for generating the project files. First thing you should locate the “Where is the source code” input field and select the folder where your project resides (the root CMakeLists.txt file). Then you can select a directory where the projects will be generated by giving a value to the “Where to build the binaries”. In my case I create a separate directory but you can also just write the path to the “build” directory again. After these two fields are filled in you can click on the “Generate” button bellow. It should look something like this:
After the projects are generated you can repeat the steps above for the new directory “build-gui”. You will also have the option to click on the “Open Project” button in the CMake GUI Window.
Using Visual Studio 2017/2019
On the latest versions of visual studio you can open alternatively open the root directory with Visual Studio. It will automatically detect that it is a CMake type of project. The benefit of opening the solution this way is that Visual Studio will not actually generate a solution. It will use another build system called “Ninja” that I will talk about in another post. This system is faster on rebuilds which makes it more efficient to compile C++ code.
You can follow up with:
- What are CMake targets
- How to manage dependencies in CMake: Vanilla vs Vcpkg
- More posts on CMake
- Posts on the topic of C++ game development
| title | description | ms.date | helpviewer_keywords | ms.assetid |
|---|---|---|---|---|
|
CMake projects in Visual Studio |
How to create and build C++ projects using CMake in Visual Studio. |
02/14/2022 |
CMake in Visual C++ |
444d50df-215e-4d31-933a-b41841f186f8 |
CMake projects in Visual Studio
CMake is a cross-platform, open-source tool for defining build processes that run on multiple platforms. This article assumes you’re familiar with CMake. For more information about CMake, see the CMake documentation. The CMake tutorial is a good starting point to learn more.
[!NOTE]
CMake has become more and more integrated with Visual Studio over the past few releases. To see the documentation for your preferred version of Visual Studio, use the Version selector control. It’s found at the top of the table of contents on this page.
::: moniker range=»>=msvc-160″
Visual Studio’s native support for CMake enables you to edit, build, and debug CMake projects on Windows, the Windows Subsystem for Linux (WSL), and remote systems from the same instance of Visual Studio. CMake project files (such as CMakeLists.txt) are consumed directly by Visual Studio for the purposes of IntelliSense and browsing. cmake.exe is invoked directly by Visual Studio for CMake configuration and build.
Installation
C++ CMake tools for Windows is installed as part of the Desktop development with C++ and Linux Development with C++ workloads. Both C++ CMake tools for Windows and Linux Development with C++ are required for cross-platform CMake development.

For more information, see Install the C++ Linux workload in Visual Studio.
IDE integration
When you open a folder containing a CMakeLists.txt file, the following things happen.

-
Visual Studio adds CMake items to the Project menu, with commands for viewing and editing CMake scripts.
-
The Solution Explorer displays the folder structure and files.
-
Visual Studio runs CMake and generates the CMake cache file (
CMakeCache.txt) for the default configuration. The CMake command line is displayed in the Output Window, along with other output from CMake. -
In the background, Visual Studio starts to index the source files to enable IntelliSense, browsing information, refactoring, and so on. As you work, Visual Studio monitors changes in the editor and also on disk to keep its index in sync with the sources.
[!NOTE]
Starting in Visual Studio 2022 version 17.1 Preview 2, if your top-levelCMakeLists.txtexists in a subfolder and not at the root of the workspace, you’ll be prompted whether you’d like to enable CMake integration or not. For more information, see CMake partial activation.
Once CMake cache generation has succeeded, you can also view your projects organized logically by targets. Choose the Select View button on the Solution Explorer toolbar. From the list in Solution Explorer — Views, select CMake Targets View and press Enter to open the targets view:
:::image type=»content» source=»media/cmake-targets-view2.png» alt-text=»Screenshot of the Solution Explorer Views window with the C Make Targets View highlighted.»:::
Choose the Show All Files button at the top of Solution Explorer to see all the CMake-generated output in the out/build/<config> folders.
Use the CMakeLists.txt file in each project folder just as you would in any CMake project. You can specify source files, find libraries, set compiler and linker options, and specify other build system-related information. For more information on CMake language services provided by Visual Studio, see Editing CMakeLists.txt files.
Visual Studio uses a CMake configuration file to drive CMake cache generation and build. For more information, see Configuring CMake projects and Building CMake projects.
To pass arguments to an executable at debug time, you can use another file called launch.vs.json. For more information on debugging cross-platform CMake projects in Visual Studio, see Debugging CMake projects.
Most Visual Studio and C++ language features are supported by CMake projects in Visual Studio. Examples include:
-
Edit and Continue for CMake projects
-
Incredibuild integration for CMake projects
-
AddressSanitizer support for CMake projects
-
Clang/LLVM support
[!NOTE]
For other kinds of Open Folder projects, an additional JSON fileCppProperties.jsonis used. This file is not relevant for CMake projects.
Configuring CMake projects
The CMake configure step generates the project build system. It’s equivalent to invoking cmake.exe from the command line. For more information on the CMake configure step, see the CMake documentation.
Visual Studio uses a CMake configuration file to drive CMake generation and build. CMakePresets.json is supported by Visual Studio 2019 version 16.10 or later and is the recommended CMake configuration file. CMakePresets.json is supported directly by CMake and can be used to drive CMake generation and build from Visual Studio, from VS Code, in a Continuous Integration pipeline, and from the command line on Windows, Linux, and Mac. For more information on CMakePresets.json, see Configure and build with CMake Presets. CMakeSettings.json is available for customers using an earlier version of Visual Studio. For more information on CMakeSettings.json, see Customize CMake build settings.
When you make significant changes to your CMake configuration file or a CMakeLists.txt file, Visual Studio will automatically run the CMake configure step. You can invoke the configure step manually: Select Project > Configure Cache from the toolbar. You can also change your configuration preferences in Tools > Options > CMake > General.

If the configure step finishes without errors, then the information that’s available drives C++ IntelliSense and language services. It’s also used in build and debug operations.
You can also open an existing CMake cache in Visual Studio. For more information, see Open an existing cache.
Customize configuration feedback and notifications
By default, most configuration messages are suppressed unless there’s an error. To see all messages, select Tools > Options > CMake > Enable verbose CMake diagnostic output.
You can also disable all CMake cache notifications (gold bars) by deselecting Show CMake cache notification.
Troubleshooting CMake cache errors
If you need more information about the state of the CMake cache to diagnose a problem, open the Project main menu or the CMakeLists.txt context menu in Solution Explorer to run one of these commands:
-
View CMakeCache.txt opens the
CMakeCache.txtfile from the build directory in the editor. Any edits you make here toCMakeCache.txtare wiped out if you clean the cache. To make changes that persist after you clean the cache, see Customize CMake settings or Configure and build with CMake Presets. -
Delete Cache and Reconfigure deletes the build directory and reconfigures from a clean cache.
-
Configure Cache forces the generate step to run even if Visual Studio considers the environment up to date.
Building CMake projects
The CMake build step builds an already generated project binary tree. It’s equivalent to invoking cmake --build from the command line. For more information on the CMake build step, see the CMake documentation.
To build a CMake project, you have these choices:
-
In the toolbar, find the Startup Item dropdown. Select the preferred target and press F5, or choose the Run button on the toolbar. The project automatically builds first, just like a Visual Studio solution.
-
Right-click on CMake target with CMake Targets View active in the Solution Explorer and select Build from the context menu.
-
From the main menu, select Build > Build All. Make sure that a CMake target is already selected in the Startup Item dropdown in the toolbar.
As you would expect, build results are shown in the Output Window and Error List.

Edit build settings
Visual Studio uses a CMake configuration file to drive CMake builds. CMake configuration files encapsulate build options like native build tool switches and environment variables. If CMakePresets.json is your active configuration file, see Configure and build with CMake Presets. If CMakeSettings.json is your active configuration file, see Customize CMake build settings. CMakePresets.json is available in Visual Studio 2019 version 16.10 or later and is the recommended CMake configuration file.
Debugging CMake projects
All executable CMake targets are shown in the Startup Item dropdown in the toolbar. To start debugging, select one and press the Debug > Start Debugging button in the toolbar. In a CMake project, the «Current document» option is only valid for .cpp files.

The Debug or F5 commands first build the project if changes have been made since the previous build. Changes to the CMake configuration file (CMakePresets.json or CMakeSettings.json) or a CMakeLists.txt causes the CMake cache to be regenerated.
You can customize a CMake debugging session by setting properties in the launch.vs.json file. To customize debug settings for a specific target, select the target in the Startup Item dropdown and press Debug > Debug and Launch Settings for <active-target>. For more information on CMake debugging sessions, see Configure CMake debugging sessions.
Just My Code for CMake projects
When you build for Windows using the MSVC compiler, CMake projects have support for Just My Code debugging. To change the Just My Code setting, go to Tools > Options > Debugging > General.
Edit and Continue for CMake projects
When you build for Windows with the MSVC compiler, CMake projects have support for Edit and Continue. Add the following code to your CMakeLists.txt file to enable Edit and Continue.
if(MSVC)
  target_compile_options(<target> PUBLIC "/ZI")
  target_link_options(<target> PUBLIC "/INCREMENTAL")
endif()
Attach to a CMake project running on Linux
Visual Studio allows you to debug a process running on a remote Linux system or WSL and debug it with the GDB debugger. To get started, select Debug > Attach to Process…, set the Connection type to SSH, and select your Connection target from the list of connections in the Connection Manager. Select a process from the list of available processes and press Attach. GDB must be installed on your Linux machine. For more information on SSH connections, see the Connection Manager

CMake partial activation
In Visual Studio 2022 version 17.1 and later, CMake functionality won’t be enabled automatically if your root folder doesn’t contain a CMakeLists.txt file. Instead, a dialog will prompt you on whether you’d like to enable CMake functionality for your project. If you decline, CMake cache generation won’t start and CMake configurations (from CMakeSettings.json or CMakePresets.json) won’t appear in the configuration dropdown. If you accept, you’ll be taken to a workspace-level configuration file, CMakeWorkspaceSettings.json (stored in the .vs directory), to specify the folders you’d like to enable CMake for. (These folders contain your root CMakeLists.txt files).
The accepted properties are:
| Property | Description |
|---|---|
enableCMake |
Enable Visual Studio’s integration for this workspace. |
sourceDirectory |
A string or array of strings specifying the directory or directories with CMakeLists.txt. Macros (such as ${workspaceRoot}) are allowed. Relative paths are based on the workspace root. Directories outside of the current workspace will be ignored. |
You can reach CMakeWorkspaceSettings.json through the Project > CMake Workspace Settings menu command at any time, even if CMake functionality is currently disabled.
Open an existing cache
When you open an existing CMake cache file (CMakeCache.txt), Visual Studio doesn’t try to manage your cache and build tree for you. Your custom or preferred tools have complete control over how CMake configures your project.
You can add an existing CMake cache to an open project. It’s done the same way you’d add a new configuration. For more information, see our blog post on opening an existing cache in Visual Studio.
[!NOTE]
The default existing cache experience relies oncmake-server, which was removed from CMake in version 3.20. To continue using existing cache functionality in Visual Studio 2019 version 16.10 and later, take one of these steps:
- Manually install CMake version 3.19 or lower. Then, set the
cmakeExecutableproperty in your existing cache configuration to use that version of CMake.- In your existing cache configuration, set the
cacheGenerationCommandproperty to let Visual Studio request the necessary CMake file-based API files. For more information on that property, see CMakeSettings.json reference.- Use a query file to request the CMake file-based API files when generating your cache before it’s opened in Visual Studio. For query file instructions, see the next section, Advanced CMake cache troubleshooting.
Advanced CMake cache troubleshooting
Visual Studio uses the CMake file-based API (in versions 3.14 and later) to populate the editor with information specific to your project structure. For more information, see the C++ team blog post on multi-root workspaces and file-based API.
Before generating the CMake cache, your custom or preferred tools may need to create a query file named .cmake/api/v1/query/client-MicrosoftVS/query.json in your build output folder (the folder that contains CMakeCache.txt). The query file should contain this content:
{"requests":[{"kind":"cache","version":2},{"kind":"cmakeFiles","version":1},{"kind":"codemodel","version":2}]}
When your custom or preferred tools generate your cache, CMake places files under .cmake/api/v1/response that Visual Studio uses to populate the editor with information specific to your project structure.
Editing CMakeLists.txt files
To edit a CMakeLists.txt file, right-click on the file in Solution Explorer and choose Open. If you make changes to the file, a yellow status bar appears and informs you that IntelliSense will update. It gives you a chance to cancel the update operation. For information about CMakeLists.txt, see the CMake documentation.

As soon as you save the file, the configuration step automatically runs again and displays information in the Output window. Errors and warnings are shown in the Error List or Output window. Double-click on an error in the Error List to navigate to the offending line in CMakeLists.txt.

Language services for CMake
Language services for CMake are available in Visual Studio 2019 version 16.5 or later. It supports code navigation features like Go To Definition, Peek Definition, and Find All References for CMake variables, functions, and targets in CMake script files. For more information, see Code Navigation for CMake Scripts.

CMake project manipulation
CMake project manipulation is available in Visual Studio 2019 version 16.5 or later. Project manipulation enables you to add, remove, and rename source files and targets in your CMake project without manually editing your CMake scripts. When you add or remove files from the Solution Explorer, Visual Studio automatically edits your CMake project. There could be more than one place where it makes sense to add or remove a reference to a CMake script. If so, Visual Studio asks you where you want to make the change and displays a preview of the proposed changes. For step-by-step instructions, see Add, Remove, and Rename Files and Targets in CMake Projects.

IntelliSense for CMake projects
By default, Visual Studio uses the IntelliSense mode that matches the compiler and target architecture specified by the active CMake configuration.
If CMakePresets.json is your active CMake configuration file, then you can specify IntelliSense options using intelliSenseMode and intelliSenseOptions in the Visual Studio Settings vendor map. For more information, see the Visual Studio Settings vendor map reference.
If CMakeSettings.json is your active CMake configuration file, then you can specify IntelliSense options using intelliSenseMode in CMakeSettings.json. For more information, see the CMakeSettings.json reference.
Configure IntelliSense with CMake toolchain files
In Visual Studio 2019 version 16.9 and later, Visual Studio automatically configures IntelliSense in CMake projects based on CMake variables when you use a CMake toolchain file. For more information, see Configure IntelliSense with CMake Toolchain Files.
Vcpkg integration
CMake projects opened in Visual Studio integrate with vcpkg, a cross-platform C/C++ dependency manager. Before using vcpkg with Visual Studio, you must run vcpkg integrate install. For instructions and more information on vcpkg, see the vcpkg documentation.
If CMakeSettings.json is your active configuration file, Visual Studio automatically passes the vcpkg toolchain file (vcpkg.cmake) to CMake. This behavior is disabled automatically when you specify any other toolchain in your CMake Settings configuration.
If CMakePresets.json is your active configuration file, you’ll need to set the path to vcpkg.cmake in CMakePresets.json. We recommend using the VCPKG_ROOT environment variable instead of an absolute path to keep the file shareable. For more information, see Enable vcpkg integration with CMake Presets. CMakePresets.json is available in Visual Studio 2019 version 16.10 or later and is the recommended CMake configuration file.
Run CMake from the command line
If CMakePresets.json is your active CMake configuration file, then you can easily reproduce your local builds outside of Visual Studio. For more information, see Run CMake from the command line or a CI pipeline. CMakePresets.json is supported in Visual Studio 2019 version 16.10 or later and is the recommended CMake configuration file.
If CMakeSettings.json is your active CMake configuration file, then you’ll need to manually pass the arguments that are encoded in your CMakeSettings.json file to CMake. If you have installed CMake from the Visual Studio Installer, you can run it from the command line by following these steps:
-
Run the appropriate
vsdevcmd.batfile (x86/x64). For more information, see Building on the command line . -
Switch to your output folder.
-
Run CMake to build or configure your app.
::: moniker-end
::: moniker range=»msvc-150″
Visual Studio 2017 has rich support for CMake, including cross-platform CMake projects. The Visual C++ Tools for CMake component uses the Open Folder feature to enable the IDE to consume CMake project files (such as CMakeLists.txt) directly for the purposes of IntelliSense and browsing. Both Ninja and Visual Studio generators are supported. If you use a Visual Studio generator, it generates a temporary project file and passes it to MSBuild. However, the project is never loaded for IntelliSense or browsing purposes. You also can import an existing CMake cache.
Installation
Visual C++ Tools for CMake is installed as part of the Desktop development with C++ and Linux Development with C++ workloads.

For more information, see Install the C++ Linux workload in Visual Studio.
IDE integration
When you choose File > Open > Folder to open a folder containing a CMakeLists.txt file, the following things happen:
-
Visual Studio adds a CMake menu item to the main menu, with commands for viewing and editing CMake scripts.
-
Solution Explorer displays the folder structure and files.
-
Visual Studio runs CMake and optionally generates the CMake cache for the default configuration, which is x86 Debug. The CMake command line is displayed in the Output Window, along with other output from CMake.
-
In the background, Visual Studio starts to index the source files to enable IntelliSense, browsing information, refactoring, and so on. As you work, Visual Studio monitors changes in the editor and also on disk to keep its index in sync with the sources.
You can open folders containing any number of CMake projects. Visual Studio detects and configures all the «root» CMakeLists.txt files in your workspace. CMake operations (configure, build, debug), C++ IntelliSense, and browsing are available to all CMake projects in your workspace.

You can also view your projects organized logically by targets. Choose Targets view from the dropdown in the Solution Explorer toolbar:

Visual Studio uses a file called CMakeSettings.json to store environment variables or command-line options for CMake. CMakeSettings.json also enables you to define and store multiple CMake build configurations. You can conveniently switch between them in the IDE.
Otherwise, use the CMakeLists.txt just as you would in any CMake project to specify source files, find libraries, set compiler and linker options, and specify other build system-related information.
If you need to pass arguments to an executable at debug time, you can use another file called launch.vs.json. In some scenarios, Visual Studio automatically generates these files. You can edit them manually, or even create the file yourself.
[!NOTE]
For other kinds of Open Folder projects, two additional JSON files are used:CppProperties.jsonandtasks.vs.json. Neither of these are relevant for CMake projects.
Import an existing cache
When you import an existing CMakeCache.txt file, Visual Studio automatically extracts customized variables and creates a pre-populated CMakeSettings.json file based on them. The original cache isn’t modified in any way. It can still be used from the command line, or with whatever tool or IDE used to generate it. The new CMakeSettings.json file is placed alongside the project’s root CMakeLists.txt. Visual Studio generates a new cache based the settings file. You can override automatic cache generation in the Tools > Options > CMake > General dialog.
Not everything in the cache is imported. Properties such as the generator and the location of the compilers are replaced with defaults that are known to work well with the IDE.
To import an existing cache
-
From the main menu, choose File > Open > CMake:

This command brings up the Import CMake from Cache wizard.
-
Navigate to the
CMakeCache.txtfile that you want to import, and then choose OK. The Import CMake Project from Cache wizard appears:When the wizard completes, you can see the new
CMakeCache.txtfile in Solution Explorer next to the rootCMakeLists.txtfile in your project.


Building CMake projects
To build a CMake project, you have these choices:
-
In the General toolbar, find the Configurations dropdown. It’s probably showing «Linux-Debug» or «x64-Debug» by default. Select the preferred configuration and press F5, or choose the Run (green triangle) button on the toolbar. The project automatically builds first, just like a Visual Studio solution.
-
Right-click on
CMakeLists.txtin Solution Explorer and select Build from the context menu. If you have multiple targets in your folder structure, you can choose to build all or only one specific target. -
From the main menu, select Build > Build Solution (F7 or Ctrl+Shift+B). Make sure that a CMake target is already selected in the Startup Item dropdown in the General toolbar.

You can customize build configurations, environment variables, command-line arguments, and other settings in the CMakeSettings.json file. It lets you make changes without modifying the CMakeLists.txt file. For more information, see Customize CMake settings.
As you would expect, build results are shown in the Output Window and Error List.
In a folder with multiple build targets, you can specify which CMake target to build: Choose the Build item on the CMake menu or the CMakeLists.txt context menu to specify the target. If you enter Ctrl+Shift+B in a CMake project, it builds the current active document.
Debugging CMake projects
To debug a CMake project, choose the preferred configuration and press F5. Or, press the Run button in the toolbar. If the Run button says «Select Startup Item», select the dropdown arrow and choose the target that you want to run. (In a CMake project, the «Current document» option is only valid for .cpp files.)

The Run or F5 commands first build the project if changes have been made since the previous build.
You can customize a CMake debugging session by setting properties in the launch.vs.json file. For more information, see Configure CMake debugging sessions.
Editing CMakeLists.txt files
To edit a CMakeLists.txt file, right-click on the file in Solution Explorer and choose Open. If you make changes to the file, a yellow status bar appears and informs you that IntelliSense will update. It gives you a chance to cancel the update operation. For information about CMakeLists.txt, see the CMake documentation.
As soon as you save the file, the configuration step automatically runs again and displays information in the Output window. Errors and warnings are shown in the Error List or Output window. Double-click on an error in the Error List to navigate to the offending line in CMakeLists.txt.
CMake configure step
When significant changes are made to the CMakeSettings.json or to CMakeLists.txt files, Visual Studio automatically reruns the CMake configure step. If the configure step finishes without errors, the information that’s collected is available in C++ IntelliSense and language services. It’s also used in build and debug operations.
Multiple CMake projects may use the same CMake configuration name (for example, x86-Debug). All of them are configured and built (in their own build root folder) when that configuration is selected. You can debug the targets from all of the CMake projects that participate in that CMake configuration.

You can limit builds and debug sessions to a subset of the projects in the workspace. Create a new configuration with a unique name in the CMakeSettings.json file. Then, apply the configuration to those projects only. When that configuration is selected, IntelliSense and the build and debug commands only apply to those specified projects.
Troubleshooting CMake cache errors
If you need more information about the state of the CMake cache to diagnose a problem, open the CMake main menu or the CMakeLists.txt context menu in Solution Explorer to run one of these commands:
-
View Cache opens the
CMakeCache.txtfile from the build root folder in the editor. (Any edits you make here toCMakeCache.txtare wiped out if you clean the cache. To make changes that persist after the cache is cleaned, see Customize CMake settings.) -
Open Cache Folder opens an Explorer window to the build root folder.
-
Clean Cache deletes the build root folder so that the next CMake configure step starts from a clean cache.
-
Generate Cache forces the generate step to run even if Visual Studio considers the environment up to date.
Automatic cache generation can be disabled in the Tools > Options > CMake > General dialog.
Single file compilation
To build a single file in a CMake project, right-click on the file in Solution Explorer. Choose Compile from the pop-up menu. You can also build the currently open file in the editor by using the main CMake menu:

Run CMake from the command line
If you have installed CMake from the Visual Studio Installer, you can run it from the command line by following these steps:
-
Run the appropriate
vsdevcmd.batfile (x86/x64). For more information, see Building on the Command Line. -
Switch to your output folder.
-
Run CMake to build or configure your app.
::: moniker-end
::: moniker range=»msvc-140″
In Visual Studio 2015, Visual Studio users can use a CMake generator to generate MSBuild project files, which the IDE then consumes for IntelliSense, browsing, and compilation.
::: moniker-end
See also
Tutorial: Create C++ cross-platform projects in Visual Studio
Configure a Linux CMake project
Connect to your remote Linux computer
Customize CMake build settings
CMakeSettings.json schema reference
Configure CMake debugging sessions
Deploy, run, and debug your Linux project
CMake predefined configuration reference
This tutorial will guide you through the process of creating and developing a simple CMake project. Step by step, we will learn the basics of CMake as a build system, along with the CLion settings and actions for CMake projects.
1. Simple CMake project
CMake is a meta build system that uses scripts called CMakeLists to generate build files for a specific environment (for example, makefiles on Unix machines). When you create a new CMake project in CLion, a CMakeLists.txt file is automatically generated under the project root.
Let’s create a new CMake project in CLion.
-
Select from the main menu.
-
Choose C++ Executable on the left-hand pane. In our example, the project name is cmake_testapp and the selected language standard in C++17.

-
We get the default project with a single source file main.cpp and the automatically created root CMakeLists.txt containing the following commands:

Command
Description
cmake_minimum_required(VERSION 3.24)Specifies the minimum required version of CMake, as set in the default toolchain. For most cases, if CMake executable was not changed intentionally, this is the bundled CMake version.
project(cmake_testapp)Defines the project name according to what we provided during project creation.
set(CMAKE_CXX_STANDARD 17)Sets the CMAKE_CXX_STANDARD variable to the value of 17, as we selected when creating the project.
add_executable(cmake_testapp main.cpp)Adds the cmake_testapp executable target to be built from main.cpp. We’ll get into targets further below.
-
In the CMake tool window, you can check the progress and status of project load. To access it, call or switch to it in the tool windows bar:


2. CMake targets and CLion configurations
Target is an executable or a library to be built using a CMake script. You can define multiple build targets in a single script.
For now, our test project has only one build target, cmake_testapp. Upon the first project loading, CLion automatically adds a run/debug configuration associated with this target:

Click Edit Configurations in the switcher or select from the main menu to view the details. The target name and the executable name are the same as specified in CMakeLists.txt:

Notice the Before launch area of this dialog. Build is set as a before launch step by default. So we can use this configuration not only to debug or run our target, but also to perform the build. To learn more about various build actions available in CLion, check out Build actions.
3. Adding files to targets
Let’s create a new source file general.cpp and add it to our cmake_testapp target.
-
Right-click the root folder in the Project tree and select New | C/C++ Source File:

-
Set the Add to targets checkbox to automatically add the file to an existing target:

-
Click OK, and the new file will be added to the
add_executablecommand:


4. Adding targets and reloading the project
Now let’s add another source file calc.cpp and create new targets for it: first an executable, and then a library target.
New executable target
-
Right-click the root folder in the Project tree and select New | C/C++ Source File again.
-
Since our goal now is to create a new target, we need to clear the Add to targets checkbox:

-
After we click OK, CLion opens the new file and notifies us that it does not belong to any target:

-
Let’s declare a new target manually in the CMakeLists.txt. Note that CLion treats CMake scripts as regular code files, so you can use code assistance features like syntax highlighting, auto-completion, and navigation (see CMake editing tips below).

-
When we make changes in CMakeLists.txt manually, CLion shows notification that the project needs to be reloaded:

We can either reload the project once (Reload changes) or enable automatic reload to let CLion silently apply all the changes in CMakeLists.txt.
The option for enabling/disabling auto-reload is also available in .
After reload, you can find a new configuration in the list:


New library target
Up to this point, the targets we added were executables, and we used add_executable to declare them. For library targets, we need another command: add_library. As an example, let’s create a static library from the calc.cpp.
-
Add the following line to the CMakeLists.txt script:
add_library(test_library STATIC calc.cpp)
-
Similarly to executable targets, CLion creates configurations for library targets:

However, this is a non-executable configuration, so if we attempt to run or debug it, we will get the
 Executable not specified error message:
-
To get the library file, we need to build the test_library target. For this, switch to the corresponding configuration and press
, or call Build | Build «test_library»:
The libtest_library.a file will appear in the cmake-build-debug folder:


 Executable not specified error message:
 , or call

5. CMake presets and CLion CMake profiles
To configure and share CMake options for your project, you can use CMake presets, CLion’s CMake profiles, or both.
CMake Profiles have many settings in common with CMake Presets and are also shareable via VCS. The major difference is that profiles reference CLion toolchains, which contain information that is not present and not needed in CMake presets (like the debugger or environment settings).
CMake presets
CMake Presets are a way to configure and share CMake options using two files:
-
CMakePresets.json for project-wise builds. This file can be shared via VCS.
-
CMakeUserPresets.json for developers’ own local builds. This file should not be checked into VCS.
Both of these files have the same format and should be located in the project’s root directory.
CMake profiles
A profile includes toolchain and build type, as well as CMake options such as generators and environment variables. You can configure multiple profiles for your project in order to, for example, use different compilers or to build targets with differing settings.
See the next chapter for an example of adding a profile for Release build.
6. Build types
All the Run/Debug configurations created so far were Debug configurations, which is the default build type of the CMake profile that was automatically configured for our project.
For example, to separate the Debug and Release builds, we can add  a new CMake profile in and set its build type to Release:

Notice the Build directory field that specifies the location of build results. The default folders are cmake-build-debug for Debug profiles and cmake-build-release for Release profiles. You can always set  other locations of your choice.
Now the Run/Debug configuration switcher shows two available profiles:

7. Adding include directories
In order to use additional headers located in separate directories, we need to add them either to all the targets or to some specific ones.
-
As an example, create three directories under the project root: includes, includes/general, includes/math.
-
Write the following commands in CMakeLists.txt:
target_include_directories (cmake_testapp_calc PUBLIC includes/math)
target_include_directories (cmake_testapp_calc PUBLIC includes/general) -
These two commands make the headers located in general and math available for including from the sources of the
cmake_testapp_calctarget.For example, if we place a header called header_math.h inside the includes/math folder, we can then include it from calc.cpp using
#include "header_math.h":

8. Linking libraries
Static libraries
On step 3, we created a static library called test_library (the default filename is libtest_library.a).
Now let’s see how this library can be linked to our project. For convenience, we will create and use a separate folder for the library.
-
Create a lib directory under the project root.
-
Copy libtest_library.a from its default location (which is cmake-build-debug) to the lib folder.
-
We need two commands to link our static library to the cmake_testapp target:
find_library(TEST_LIBRARY test_library lib)
target_link_libraries(cmake_testapp LINK_PUBLIC ${TEST_LIBRARY})-
find_library provides the full path to the library,
-
which we then pass directly into the target_link_libraries command via the
${TEST_LIBRARY}variable.

-

Dynamic libraries (Boost.Test example) and CMake subprojects
To illustrate linking dynamic libraries, we will take an example of using the Boost.Test framework.
Code to be tested
Let’s prepare a code piece to be tested using Boost.Test.
-
In calc.cpp, add a simple function
int add_values (int a, int b) { return a+b;} -
Create the associated header named calc.h and add the function declaration there:
int add_values (int a, int b);

Add a subproject for tests
As our project gets more complicated, the root CMakeLists.txt file can become difficult to maintain. To avoid this, and to build a transparent project structure, we will extract tests into a subproject with its own CMakeLists.txt.
-
Create a new directory and call it test.
-
In the test directory, create a new source file and call it tests.cpp.
-
Right-click the test directory once again and select New | CMakeLists.txt.


Link the Boost library
Initially, the subdirectory test/CMakeLists.txt script is empty. We will start filling it up by inserting a live template for Boost with libs.
-
Press Ctrl+J or click , and choose
boost_with_libs:
The inserted code will look like this:

-
Manually adjust the inserted code to the following:
set(Boost_USE_STATIC_LIBS OFF) #enable dynamic linking
# search for unit_test_framework
find_package(Boost REQUIRED COMPONENTS unit_test_framework)include_directories(${Boost_INCLUDE_DIR})
# create a cmake_testapp_boost target from test.cpp
add_executable(cmake_testapp_boost tests.cpp)# link Boost libraries to the new target
target_link_libraries(cmake_testapp_boost ${Boost_LIBRARIES})# link Boost with code library
target_link_libraries(cmake_testapp_boost test_library) -
To make the test target, cmake_testapp_boost, available for the main build, we need to place the
add_subdirectory(test)command in the root CMakeLists.txt.This command, when placed in the root CMake script, declares a subproject test that has its own CMakeLists.txt.


Boost.Test run/debug configuration
After reloading the changes in both CMakeLists.txt files, CLion creates a run/debug configuration for the cmake_testapp_boost target. However, this is a regular CMake configuration, and it does not cover test specifics.
There is a dedicated configuration with test runner called Boost.Test. CLion creates this type of configuration when you run Boost tests using the gutter menu, or you can always create it manually.
-
Click the gutter icon next to
BOOST_AUTO_TEST_SUITEand select Run:
-
CLion will run the test suit and show the results in a tree view with the tests’ output, status, and duration:

Now there is a new temporary configuration in the list:

-
We can save (
) this temporary configuration and modify it : 


 ) this temporary configuration and modify it :
9. CMake debug
In case there are errors or unwanted behaviour during CMake configuration, you can debug the CMake script similarly to other code in your project.
-
Place breakpoints in your CMakeLists.txt file or files.
-
Open the top-level CMakeLists.txt, click the gutter icon next to the first command, and select Debug:


-
CLion will start a CMake debug session:

See CMake debug features.


10. Tips on editing CMakeLists.txt
CLion provides code insight features to help you work with CMake scripts effectively. For example:
-
Structure view for CMake shows variables, functions, macros, and targets used your script. To open it, press Alt+7 (for the tool window) or Ctrl+F12 (for the popup).

-
Code completion works for most of the elements in your CMakeLists.txt, including the arguments of commands like
find_package():
-
Quick Documentation popup helps you get more information on code elements. To invoke it, use mouse hover or press Ctrl+Q.
You can view quick documentation even for completion suggestions:

-
You can adjust the color and font scheme for CMake files in :


11. Working with CTest
This chapter gives a simple example of how to use CTest, a framework for compiling and running tests as part of the CMake build process. Find general description of the framework in CTest support.
Add CTest to the sample project
-
Create a subdirectory inside test and call it ctest.
-
Add two source files, addvalues_zero.cpp and addvalues_negpos.cpp, a header file (where we will place the assertion macro) assert_macro.h, and a CMakeLists.txt script:

-
Add the following lines to ctest/CMakeLists.txt:
cmake_minimum_required(VERSION 3.24 FATAL_ERROR)
add_executable(ctest_exe_addvalues_zero addvalues_zero.cpp)
add_executable(ctest_example_addvalues_negpos addvalues_negpos.cpp)add_test(ctest_addvalues_zero ctest_exe_addvalues_zero)
add_test(ctest_addvalues_negpos ctest_example_addvalues_negpos)The first line states the minimum supported version of CTest, which corresponds to the version of CMake, 3.14.
We are using the add_test command here to register our executables,
ctest_exe_addvalues_zeroandctest_example_addvalues_negpos, with CTest. -
Now we can place the actual code inside the test sources:
-
assert_macro.h:
#include <iostream>
#include <sstream>#define assertEqual( … )
do {
if( !( __VA_ARGS__ ) ) {
std::cerr << «Unit test assert [ »
<< ( #__VA_ARGS__ )
<< » ] failed in line [ »
<< __LINE__
<< » ] file [ »
<< __FILE__ << » ]»
<< std::endl;
err_code = 1;
}
} while( false ) -
addvalues_zero.cpp:
#include «assert_macro.h»
int test_addvalues_zero() {
int err_code = 0;
assertEqual (0+0 == 0);
assertEqual ((-5)+5 == 0);
return err_code;
}int main() {
return test_addvalues_zero();
} -
addvalues_negpos.cpp:
#include «assert_macro.h»
int test_addvalues_negpos() {
int err_code = 0;
assertEqual ((-5)+10 == 5);
assertEqual ((-10)+5 == -5);
assertEqual (5+(10) == 5); //test to fail
return err_code;
}int main() {
return test_addvalues_negpos();
}
-
-
Next, we need to enable CTest and declare the subproject in the top-level CMakeLists.txt:
enable_testing()
add_subdirectory(test/ctest)The enable_testing command creates a built-in target
testwhich will execute CTest. -
Reload the project.

After the reload, CLion detects the tests and creates a ready-to-go All CTest configuration:

If we run this configuration, the results will be shown in the Test Runner window, similarly to other supported testing frameworks:

We can also use the gutter menu next to the add_test commands in ctest/CMakeLists.txt to run or debug our tests:

In case of running/debugging a test via the gutter menu, CLion creates a temporary configuration, so if we go to , we will find two automatically generated configurations of the CTest Application type:

Let’s check the All CTest configuration. Click the pen icon next to the Test list to run field. This opens the List of Available Tests dialog, where we can change the set of tests:

12. Useful links
To dig deeper into CMake in CLion, learn how to:
-
Change project root
-
Reset CMake Cache
-
Specify compiler flags
-
Switch compilers
-
Run Build actions and CMake install
-
Use environment variables and the CLION_IDE macro.
-
Run CMake profiling
-
Debug CMake
-
Use CMake install
Last modified: 11 January 2023
Полное руководство по CMake. Часть вторая: Система сборки +37
C++, Системы сборки, C
Рекомендация: подборка платных и бесплатных курсов таргетированной рекламе — https://katalog-kursov.ru/

Введение
В данной статье рассмотрено использование системы сборки CMake, применяемой в колоссальном количестве проектов на C/C++. Строго рекомендуется прочитать первую часть руководства во избежание непонимания синтаксиса языка CMake, явным образом фигурирующего на протяжении всей статьи.
Ниже приведены примеры использования языка CMake, по которым Вам следует попрактиковаться. Экспериментируйте с исходным кодом, меняя существующие команды и добавляя новые. Чтобы запустить данные примеры, установите CMake с официального сайта.
Принцип работы
Система сборки CMake представляет из себя оболочку над другими платформенно зависимыми утилитами (например, Ninja или Make). Таким образом, в самом процессе сборки, как бы парадоксально это ни звучало, она непосредственного участия не принимает.
Система сборки CMake принимает на вход файл CMakeLists.txt с описанием правил сборки на формальном языке CMake, а затем генерирует промежуточные и нативные файлы сборки в том же каталоге, принятых на Вашей платформе.
Сгенерированные файлы будут содержать конкретные названия системных утилит, директорий и компиляторов, в то время как команды CMake орудуют лишь абстрактным понятием компилятора и не привязаны к платформенно зависимым инструментам, сильно различающихся на разных операционных системах.
Проверка версии CMake
Команда cmake_minimum_required проверяет запущенную версию CMake: если она меньше указанного минимума, то CMake завершает свою работу фатальной ошибкой. Пример, демонстрирующий типичное использование данной команды в начале любого CMake-файла:
# Задать третью минимальную версию CMake:
cmake_minimum_required(VERSION 3.0)
Как подметили в комментариях, команда cmake_minimum_required выставляет все флаги совместимости (смотреть cmake_policy). Некоторые разработчики намеренно выставляют низкую версию CMake, а затем корректируют функционал вручную. Это позволяет одновременно поддерживать древние версии CMake и местами использовать новые возможности.
Оформление проекта
В начале любого CMakeLists.txt следует задать характеристики проекта командой project для лучшего оформления интегрированными средами и прочими инструментами разработки.
# Задать характеристики проекта "MyProject":
project(MyProject VERSION 1.2.3.4 LANGUAGES C CXX)
Стоит отметить, что если ключевое слово LANGUAGES опущено, то по умолчанию задаются языки C CXX. Вы также можете отключить указание любых языков путём написания ключевого слова NONE в качестве списка языков или просто оставить пустой список.
Запуск скриптовых файлов
Команда include заменяет строку своего вызова кодом заданного файла, действуя аналогично препроцессорной команде include языков C/C++. Этот пример запускает скриптовый файл MyCMakeScript.cmake описанной командой:
message("'TEST_VARIABLE' is equal to [${TEST_VARIABLE}]")

# Запустить скрипт `MyCMakeScript.cmake` на выполнение:
include(MyCMakeScript.cmake)

message("'TEST_VARIABLE' is equal to [${TEST_VARIABLE}]")
В данном примере, первое сообщение уведомит о том, что переменная TEST_VARIABLE ещё не определена, однако если скрипт MyCMakeScript.cmake определит данную переменную, то второе сообщение уже будет информировать о новом значении тестовой переменной. Таким образом, скриптовый файл, включаемый командой include, не создаёт собственной области видимости, о чём упомянули в комментариях к предыдущей статье.
Компиляция исполняемых файлов
Команда add_executable компилирует исполняемый файл с заданным именем из списка исходников. Важно отметить, что окончательное имя файла зависит от целевой платформы (например, <ExecutableName>.exe или просто <ExecutableName>). Типичный пример вызова данной команды:
# Скомпилировать исполняемый файл "MyExecutable" из
# исходников "ObjectHandler.c", "TimeManager.c" и "MessageGenerator.c":
add_executable(MyExecutable ObjectHandler.c TimeManager.c MessageGenerator.c)
Компиляция библиотек
Команда add_library компилирует библиотеку с указанным видом и именем из исходников. Важно отметить, что окончательное имя библиотеки зависит от целевой платформы (например, lib<LibraryName>.a или <LibraryName>.lib). Типичный пример вызова данной команды:
# Скомпилировать статическую библиотеку "MyLibrary" из
# исходников "ObjectHandler.c", "TimeManager.c" и "MessageConsumer.c":
add_library(MyLibrary STATIC ObjectHandler.c TimeManager.c MessageConsumer.c)- Статические библиотеки задаются ключевым словом
STATICвторым аргументом и представляют из себя архивы объектных файлов, связываемых с исполняемыми файлами и другими библиотеками во время компиляции. - Динамические библиотеки задаются ключевым словом
SHAREDвторым аргументом и представляют из себя двоичные библиотеки, загружаемые операционной системой во время выполнения программы. - Модульные библиотеки задаются ключевым словом
MODULEвторым аргументом и представляют из себя двоичные библиотеки, загружаемые посредством техник выполнения самим исполняемым файлом. - Объектные библиотеки задаются ключевым словом
OBJECTвторым аргументом и представляют из себя набор объектных файлов, связываемых с исполняемыми файлами и другими библиотеками во время компиляции.
Добавление исходников к цели
Бывают случаи, требующие многократного добавления исходных файлов к цели. Для этого предусмотрена команда target_sources, способная добавлять исходники к цели множество раз.
Первым аргументом команда target_sources принимает название цели, ранее указанной с помощью команд add_library или add_executable, а последующие аргументы являются списком добавляемых исходных файлов.
Повторяющиеся вызовы команды target_sources добавляют исходные файлы к цели в том порядке, в каком они были вызваны, поэтому нижние два блока кода являются функционально эквивалентными:
# Задать исполняемый файл "MyExecutable" из исходников
# "ObjectPrinter.c" и "SystemEvaluator.c":
add_executable(MyExecutable ObjectPrinter.c SystemEvaluator.c)

# Добавить к цели "MyExecutable" исходник "MessageConsumer.c":
target_sources(MyExecutable MessageConsumer.c)
# Добавить к цели "MyExecutable" исходник "ResultHandler.c":
target_sources(MyExecutable ResultHandler.c)
# Задать исполняемый файл "MyExecutable" из исходников
# "ObjectPrinter.c", "SystemEvaluator.c", "MessageConsumer.c" и "ResultHandler.c":
add_executable(MyExecutable ObjectPrinter.c SystemEvaluator.c MessageConsumer.c
ResultHandler.c)Генерируемые файлы
Местоположение выходных файлов, сгенерированных командами add_executable и add_library, определяется только на стадии генерации, однако данное правило можно изменить несколькими переменными, определяющими конечное местоположение двоичных файлов:
- Переменные
RUNTIME_OUTPUT_DIRECTORYиRUNTIME_OUTPUT_NAMEопределяют местоположение целей выполнения. - Переменные
LIBRARY_OUTPUT_DIRECTORYиLIBRARY_OUTPUT_NAMEопределяют местоположение библиотек. - Переменные
ARCHIVE_OUTPUT_DIRECTORYиARCHIVE_OUTPUT_NAMEопределяют местоположение архивов.
Исполняемые файлы всегда рассматриваются целями выполнения, статические библиотеки — архивными целями, а модульные библиотеки — библиотечными целями. Для «не-DLL» платформ динамические библиотеки рассматриваются библиотечными целями, а для «DLL-платформ» — целями выполнения. Для объектных библиотек таких переменных не предусмотрено, поскольку такой вид библиотек генерируется в недрах каталога CMakeFiles.
Важно подметить, что «DLL-платформами» считаются все платформы, основанные на Windows, в том числе и Cygwin.
Компоновка с библиотеками
Команда target_link_libraries компонует библиотеку или исполняемый файл с другими предоставляемыми библиотеками. Первым аргументом данная команда принимает название цели, сгенерированной с помощью команд add_executable или add_library, а последующие аргументы представляют собой названия целей библиотек или полные пути к библиотекам. Пример:
# Скомпоновать исполняемый файл "MyExecutable" с
# библиотеками "JsonParser", "SocketFactory" и "BrowserInvoker":
target_link_libraries(MyExecutable JsonParser SocketFactory BrowserInvoker)
Стоит отметить, что модульные библиотеки не подлежат компоновке с исполняемыми файлами или другими библиотеками, так как они предназначены исключительно для загрузки техниками выполнения.
Работа с целями
Как упомянули в комментариях, цели в CMake тоже подвержены ручному манипулированию, однако весьма ограниченному.
Имеется возможность управления свойствами целей, предназначенных для задания процесса сборки проекта. Команда get_target_property присваивает предоставленной переменной значение свойства цели. Данный пример выводит значение свойства C_STANDARD цели MyTarget на экран:
# Присвоить переменной "VALUE" значение свойства "C_STANDARD":
get_target_property(VALUE MyTarget C_STANDARD)

# Вывести значение полученного свойства на экран:
message("'C_STANDARD' property is equal to [${VALUE}]")
Команда set_target_properties устанавливает указанные свойства целей заданными значениями. Данная команда принимает список целей, для которых будут установлены значения свойств, а затем ключевое слово PROPERTIES, после которого следует список вида «<название свойства> <новое значение>»:
# Установить свойству 'C_STANDARD' значение "11",
# а свойству 'C_STANDARD_REQUIRED' значение "ON":
set_target_properties(MyTarget PROPERTIES C_STANDARD 11 C_STANDARD_REQUIRED ON)
Пример выше задал цели MyTarget свойства, влияющие на процесс компиляции, а именно: при компиляции цели MyTarget CMake затребует компилятора о использовании стандарта C11. Все известные именования свойств целей перечисляются на этой странице.
Также имеется возможность проверки ранее определённых целей с помощью конструкции if(TARGET <TargetName>):
# Выведет "The target was defined!" если цель "MyTarget" уже определена,
# а иначе выведет "The target was not defined!":
if(TARGET MyTarget)
    message("The target was defined!")
else()
    message("The target was not defined!")
endif()
Добавление подпроектов
Команда add_subdirectory побуждает CMake к незамедлительной обработке указанного файла подпроекта. Пример ниже демонстрирует применение описанного механизма:
# Добавить каталог "subLibrary" в сборку основного проекта,
# а генерируемые файлы расположить в каталоге "subLibrary/build":
add_subdirectory(subLibrary subLibrary/build)
В данном примере первым аргументом команды add_subdirectory выступает подпроект subLibrary, а второй аргумент необязателен и информирует CMake о папке, предназначенной для генерируемых файлов включаемого подпроекта (например, CMakeCache.txt и cmake_install.cmake).
Стоит отметить, что все переменные из родительской области видимости унаследуются добавленным каталогом, а все переменные, определённые и переопределённые в данном каталоге, будут видимы лишь ему (если ключевое слово PARENT_SCOPE не было определено аргументом команды set). Данную особенность упомянули в комментариях к предыдущей статье.
Поиск пакетов
Команда find_package находит и загружает настройки внешнего проекта. В большинстве случаев она применяется для последующей линковки внешних библиотек, таких как Boost и GSL. Данный пример вызывает описанную команду для поиска библиотеки GSL и последующей линковки:
# Загрузить настройки пакета библиотеки "GSL":
find_package(GSL 2.5 REQUIRED)

# Скомпоновать исполняемый файл с библиотекой "GSL":
target_link_libraries(MyExecutable GSL::gsl)

# Уведомить компилятор о каталоге заголовков "GSL":
target_include_directories(MyExecutable ${GSL_INCLUDE_DIRS})
В приведённом выше примере команда find_package первым аргументом принимает наименование пакета, а затем требуемую версию. Опция REQUIRED требует печати фатальной ошибки и завершении работы CMake, если требуемый пакет не найден. Противоположность — это опция QUIET, требующая CMake продолжать свою работу, даже если пакет не был найден.
Далее исполняемый файл MyExecutable линкуется с библиотекой GSL командой target_link_libraries с помощью переменной GSL::gsl, инкапсулирующей расположение уже скомпилированной GSL.
В конце вызывается команда target_include_directories, информирующая компилятора о расположении заголовочных файлов библиотеки GSL. Обратите внимание на то, что используется переменная GSL_INCLUDE_DIRS, хранящая местоположение описанных мною заголовков (это пример импортированных настроек пакета).
Вам, вероятно, захочеться проверить результат поиска пакета, если Вы указали опцию QUIET. Это можно сделать путём проверки переменной <PackageName>_FOUND, автоматически определяемой после завершения команды find_package. Например, в случае успешного импортирования настроек GSL в Ваш проект, переменная GSL_FOUND обратится в истину.
В общем случае, команда find_package имеет две разновидности запуска: модульную и конфигурационную. Пример выше применял модульную форму. Это означает, что во время вызова команды CMake ищет скриптовый файл вида Find<PackageName>.cmake в директории CMAKE_MODULE_PATH, а затем запускает его и импортирует все необходимые настройки (в данном случае CMake запустила стандартный файл FindGSL.cmake).
Способы включения заголовков
Информировать компилятора о располжении включаемых заголовков можно посредством двух команд: include_directories и target_include_directories. Вы решаете, какую из них использовать, однако стоит учесть некоторые различия между ними (идея предложена в комментариях).
Команда include_directories влияет на область каталога. Это означает, что все директории заголовков, указанные данной командой, будут применяться для всех целей текущего CMakeLists.txt, а также для обрабатываемых подпроектов (смотреть add_subdirectory).
Команда target_include_directories влияет лишь на указанную первым аргументом цель, а на другие цели никакого воздействия не оказывается. Пример ниже демонстрирует разницу между этими двумя командами:
add_executable(RequestGenerator RequestGenerator.c)
add_executable(ResponseGenerator ResponseGenerator.c)

# Применяется лишь для цели "RequestGenerator":
target_include_directories(RequestGenerator headers/specific)

# Применяется для целей "RequestGenerator" и "ResponseGenerator":
include_directories(headers)
В комментариях упомянуто, что в современных проектах применение команд include_directories и link_libraries является нежелательным. Альтернатива — это команды target_include_directories и target_link_libraries, действующие лишь на конкретные цели, а не на всю текущую область видимости.
Установка проекта
Команда install генерирует установочные правила для Вашего проекта. Данная команда способна работать с целями, файлами, папками и многим другим. Сперва рассмотрим установку целей.
Для установки целей необходимо первым аргументом описанной функции передать ключевое слово TARGETS, за которым должен следовать список устанавливаемых целей, а затем ключевое слово DESTINATION с расположением каталога, в который установятся указанные цели. Данный пример демонстрирует типичную установку целей:
# Установить цели "TimePrinter" и "DataScanner" в директорию "bin":
install(TARGETS TimePrinter DataScanner DESTINATION bin)
Процесс описания установки файлов аналогичен, за тем исключением, что вместо ключевого слова TARGETS следует указать FILES. Пример, демонстрирующий установку файлов:
# Установить файлы "DataCache.txt" и "MessageLog.txt" в директорию "~/":
install(FILES DataCache.txt MessageLog.txt DESTINATION ~/)
Процесс описания установки папок аналогичен, за тем исключением, что вместо ключевого слова FILES следует указать DIRECTORY. Важно подметить, что при установке будет копироваться всё содержимое папки, а не только её название. Пример установки папок выглядит следующим образом:
# Установить каталоги "MessageCollection" и "CoreFiles" в директорию "~/":
install(DIRECTORY MessageCollection CoreFiles DESTINATION ~/)
После завершения обработки CMake всех Ваших файлов Вы можете выполнить установку всех описанных объектов командой sudo checkinstall (если CMake генерирует Makefile), или же выполнить данное действие интегрированной средой разработки, поддерживающей CMake.
Наглядный пример проекта
Данное руководство было бы неполным без демонстрации реального примера использования системы сборки CMake. Рассмотрим схему простого проекта, использующего CMake в качестве единственной системы сборки:
+ MyProject
      - CMakeLists.txt
      - Defines.h
      - StartProgram.c
      + core
            - CMakeLists.txt
            - Core.h
            - ProcessInvoker.c
            - SystemManager.c
Главный файл сборки CMakeLists.txt описывает компиляцию всей программы: сперва происходит вызов команды add_executable, компилирующей исполняемый файл, затем вызывается команда add_subdirectory, побуждающая обработку подпроекта, и наконец, исполняемый файл линкуется с собранной библиотекой:
# Задать минимальную версию CMake:
cmake_minimum_required(VERSION 3.0)

# Указать характеристики проекта:
project(MyProgram VERSION 1.0.0 LANGUAGES C)

# Добавить в сборку исполняемый файл "MyProgram":
add_executable(MyProgram StartProgram.c)

# Требовать обработку файла "core/CMakeFiles.txt":
add_subdirectory(core)

# Скомпоновать исполняемый файл "MyProgram" со
# скомпилированной статической библиотекой "MyProgramCore":
target_link_libraries(MyProgram MyProgramCore)

# Установить исполняемый файл "MyProgram" в директорию "bin":
install(TARGETS MyProgram DESTINATION bin)
Файл core/CMakeLists.txt вызывается главным файлом сборки и компилирует статическую библиотеку MyProgramCore, предназначенную для линковки с исполняемым файлом:
# Задать минимальную версию CMake:
cmake_minimum_required(VERSION 3.0)

# Добавить в сборку статическую библиотеку "MyProgramCore":
add_library(MyProgramCore STATIC ProcessInvoker.c SystemManager.c)
После череды команд cmake . && make && sudo checkinstall работа системы сборки CMake завершается успешно. Первая команда запускает обработку файла CMakeLists.txt в корневом каталоге проекта, вторая команда окончательно компилирует необходимые двоичные файлы, а третья команда устанавливает скомпонованный исполняемый файл MyProgram в систему.
Заключение
Теперь Вы способны писать свои и понимать чужие CMake-файлы, а подробно прочитать про остальные механизмы Вы можете на официальном сайте.
Следующая статья данного руководства будет посвящена тестированию и созданию пакетов с помощью CMake и выйдет через неделю. До скорых встреч!