Sign in with Microsoft
Sign in or create an account.
Hello,
Select a different account.
You have multiple accounts
Choose the account you want to sign in with.
To change the administrator name on your Microsoft account:
-
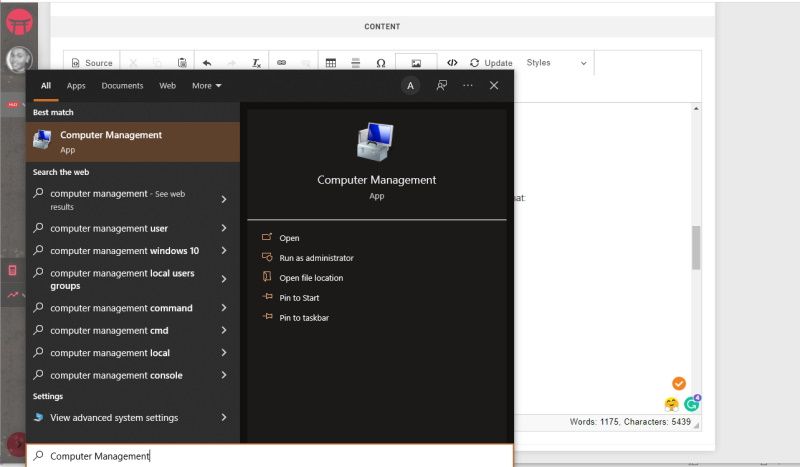
In the search box on the taskbar, type Computer Management and select it from the list.
-
Select the arrow next to Local Users and Groups to expand it.
-
Select Users.
-
Right-click Administrator and select Rename.
-
Type a new name. Note that you’ll need to be the administrator to change this name.
Need more help?
Thank you for your feedback!
×
Whether you got a computer from work, bought it second-hand, or you just entered the wrong name while setting up your PC, the administrator’s name can always be changed later on your Windows computer.
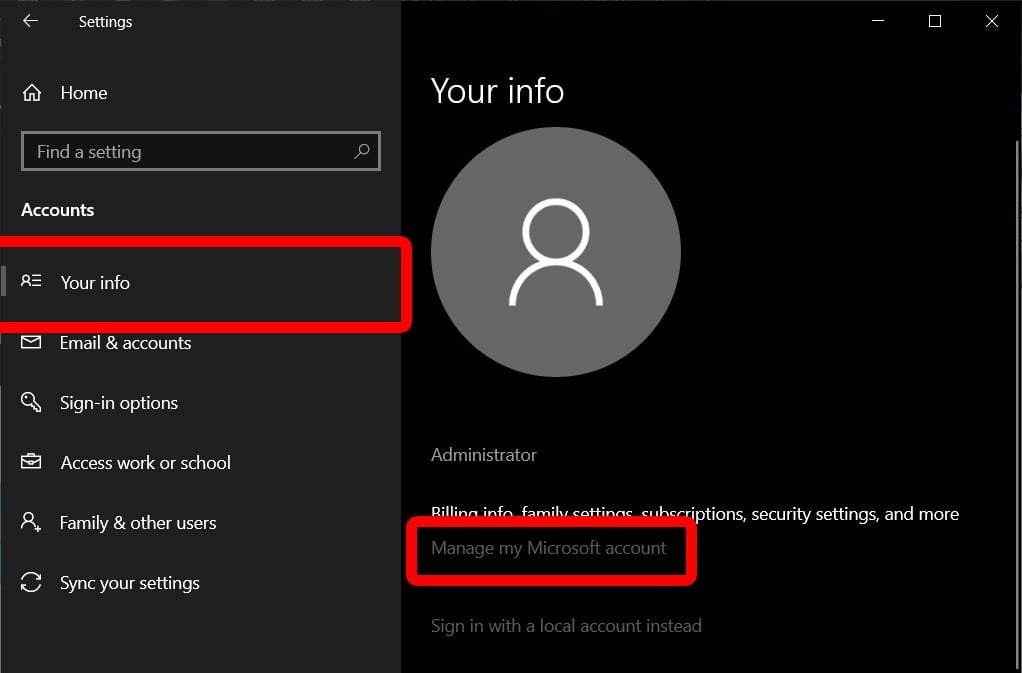
If the administrator account you want to change is linked to a Microsoft account, you can change an admin’s name by going to settings > Accounts > Your Info, and then clicking on the Manage my Microsoft Account option. This will take you to Microsoft’s website, where you can edit your profile. Make sure to restart your device after you’re done. Here’s how to change an administrator name on Windows 10:
Once you restart, you will see your new username on the sign-in screen.
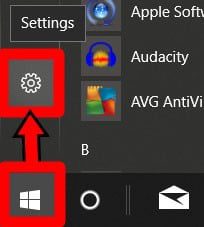
- Open the Windows Start menu. You can do this by clicking the button in the lower-left corner of your screen shaped like the Windows logo.
- Then select Settings. This is the gear-shaped icon just above the power button.

- Then click on Accounts.
- Next, click on Your info. You can find this option in the left sidebar.
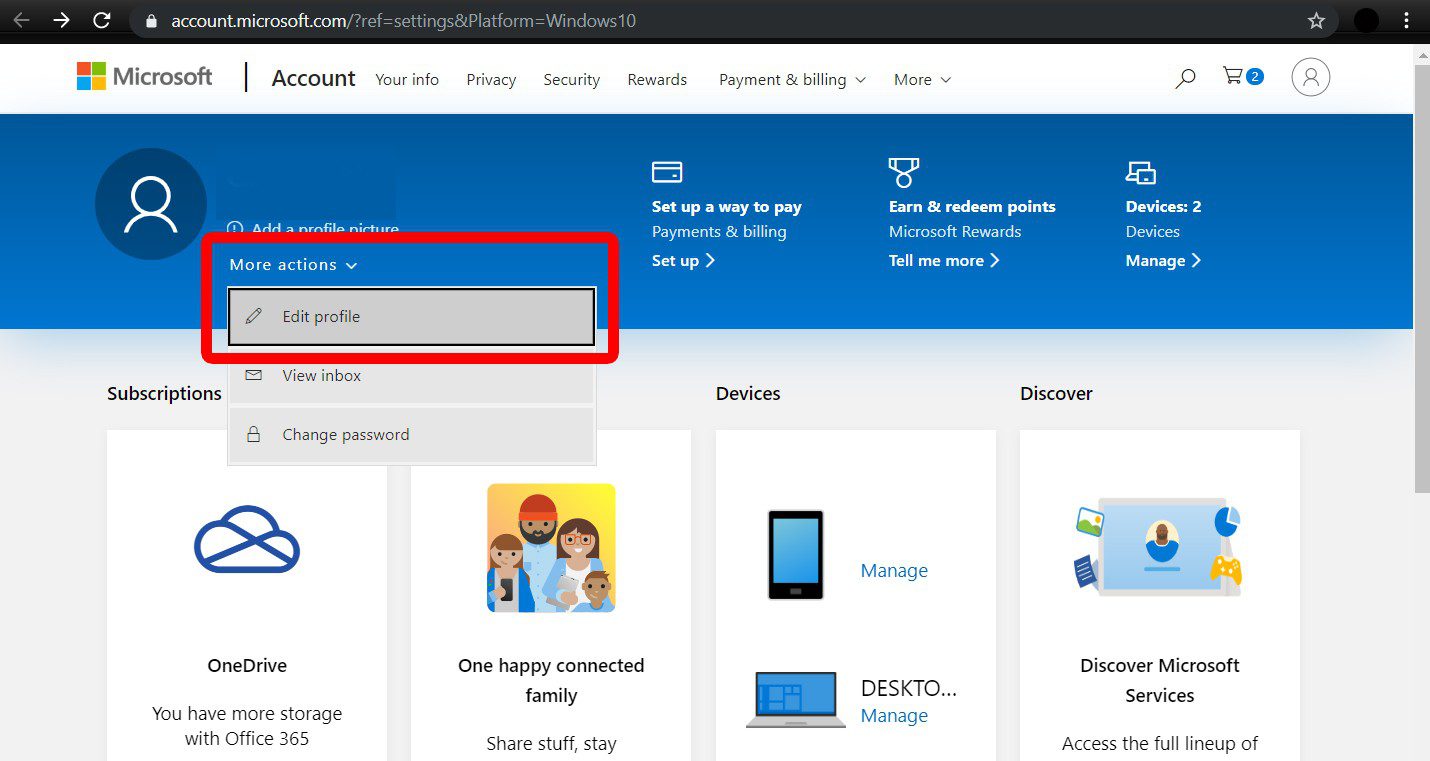
- Click on Manage my Microsoft Account. This will take you to your Microsoft account webpage.
- Then click More actions. You can find this drop-down menu next to your user account name in the top left corner.
- Next, click Edit profile from the drop-down menu.
- Then click Edit name under your current account name.
- Enter the new first and last name that you want.
- Enter the Captcha code.
- Then click Save.
- Restart your computer for the changes to go into effect.
How
to Change Administrator Name via Advanced Control Panel
You
can also change a user’s account name with Advanced Control Panel, which can be
accessed by certain commands. The option appears when you click on Properties of the chosen user.
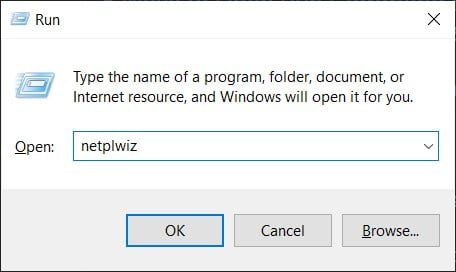
- Press the Windows key and R simultaneously on your keyboard. This will open the Run command tool.
- Type netplwiz in the Run command tool.
- Choose the account you would like to rename.
- Then click Properties.
- Type a new username in the box under the General tab.
- Click OK.
- Click OK again on the User Accounts Panel.
If
you are want to change the name of a local account, you will have to do so
through Control Panel. Here’s how:
How to Change Administrator Name on Windows 10 via Control Panel
If you want to change an
Administrator name that is not linked to a Microsoft Account, you can open the
Control Panel and click Change account type.
Note: The following steps only work for local accounts that are not linked with Microsoft account.
- Type Control Panel into the Windows Search Bar. You will find this by clicking the magnifying glass icon in the lower-left corner of your screen.
- Then click Open.
- Click on Change account type under Use Accounts.
- Select a user account you would like to rename.
- Click on Change the account name.
- Type the new user account name in the box.
- Finally, click on Change Name. Your changes will appear when you go back to the previous screen.

Now that you know how to change an administrator name on Windows 10, check out our guide on how to change an administrator account on Windows 10 here.
«I want to know how can I change the administrator user name of my windows account. I don’t mean the name of the folder of my user in Windows. I mean the subname that my user account have. Really I don’t know where can I do this.»
If the administrator user account has a different name than your actual name, you may want to fix it, so it shows your actual and real name everywhere. It’s easy to change your user account name on a Windows 10 PC and the following guide teaches how to change administrator name on Windows 10 using four different ways.
Each of the method described below uses a unique way to let you change your name in the administrator account. Regardless of what method you use to change admin name Windows 10, it will have the same effect and your name will be changed system wide.
Way 1. Change Administrator Name in Control Panel
Way 2. Change Administrator Name in Local Users and Groups
Way 3. Change Administrator Name in Local Group Policy Editor
Way 4. Change a Microsoft Account Name from Microsoft website
Extra Tip: How to Change Forgotten Administrator Password on Windows 10?
Way 1. Change Administrator Name in Control Panel
Control Panel is a preferred way for many users to accomplish your tasks. If you use it for most of your tasks, why not for changing your admin name? This section shows how you can use Control Panel to make changes to the name of your admin account. Here’s how you do it:
Step 1. Press the Windows + X key and select Control Panel from the menu that appears on your screen.
Step 2. Click on User Accounts and Family Safety and then click on the option that says User Accounts.
Step 3. Under your account settings, click on the option that says Change your account name to change your name in your account.
Step 4. You will be asked to enter the new name you would like to have for your account. Enter a new name and click on the button that says Change Name.
There you go. Your administrator account name should now be changed and the new name will appear everywhere on your computer.
That is how you use Control Panel to change administrator name on Windows 10.
Way 2. Change Administrator Name in Local Users and Groups
Local Users and Groups is yet another utility that allows you to make changes to your user accounts including the ability to let you change your name. If you have never used the utility before, the following will teach you how to use it to change administrator name Windows 10. Here you go:
The following is how you use SFC to fix the Windows 10 no login screen on startup issue:
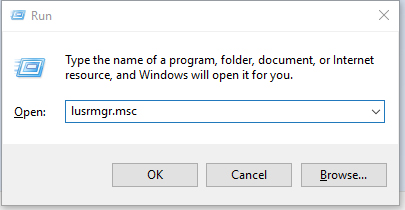
Step 1. Press the Windows + R keys together and type in lusrmgr.msc in the Run box and hit Enter.
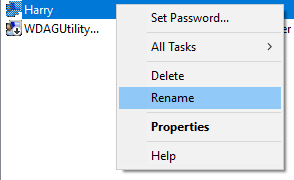
Step 2. When the utility opens, find and click on the option that says Users in the left sidebar. Then, find your admin account in the right panel, right-click on the account, and select the option that says Rename.
Step 3. Enter in a new name for the account and hit Enter.

You are all set. The administrator account name has been successfully changed on your Windows 10 based computer.
Way 3. Change Administrator Name in Local Group Policy Editor
Local Group Policy Editor can also be used to change administrator name and the following is how you do it.
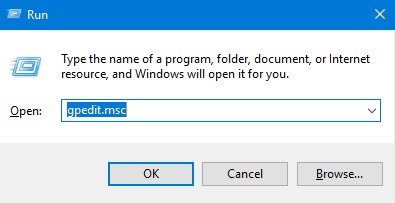
Step 1. Open the Run dialog box by pressing Windows + R keys and type in gpedit.msc and press Enter.
Step 2. Head to the following path and open the entry that says Accounts: rename administrator account.
Computer Configuration/Windows Settings/Security Settings/Local Policies/Security Options/
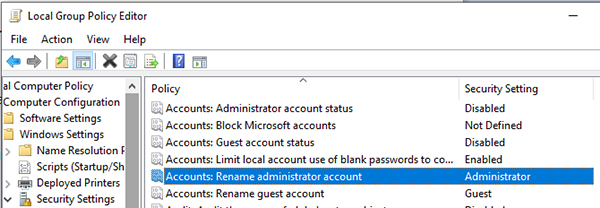
Step 3. Enter in a new name for the account and click on OK.
You should be able to create a new user account for your Windows 10 computer. Once created, reboot your PC and you will see the traditional sign-in screen prompting you to enter your password to access your account.
Way 4. Change a Microsoft Account Name from Microsoft website
If you use a Microsoft account with your Windows 10 PC, you can use the Microsoft website to change the name for your administrator account.
The following shows how to change admin name on Windows 10 using the Microsoft website:
Step 1. Launch the Start Menu, select your account, and choose the option that says Change account settings.
Step 2. Select the option that says Manage my Microsoft account and it will take you to the Microsoft website.
Step 3. Open your account settings, click on Your info, and click on Edit name.
Step 4. Enter a new name for your account and click on Save.
You are all done. The name of the Microsoft account integrated with your Windows 10 system has been changed. You will find that the new name appears everywhere on your computer.
Extra Tip: How to Change Forgotten Administrator Password on Windows 10?
If you are an admin user on your PC and you ever forget the password of your account, you can get your entire computer locked out as your PC won’t let you access your account without a password. Those having a normal account won’t be able to execute admin tasks.
Fortunately, there’s a software called Windows Password Key that allows users to recover and reset passwords for your user accounts. Using the software, you can recover the password for your account and then use it to log-in to your system.
We really hope the above guide helps you to change administrator name Windows 10 so that your system reflects your actual and current name. And in case you forget the password of your account, Windows Password Key will help you out.
Recommended Product
![]()
- Reset/Remove Windows admin and other user password for local/domain account.
- Create a new local/domain admin account to unlock your computer.
- Change your Microsoft account password offline.
- Fully support Windows 10/8.1/8/7/Vista/XP, Windows Server 2012 (R2)/2008 (R2)/2003 (R2).
Free Download
- Related Articles
- 2 Ways to Change Account Type of Users in Windows 10
- Windows 10 Keeps Asking for Login User Password, How to Fix It
- Windows 10 Password is Incorrect, How to Fix it
comments powered by
Содержание
- Изменяем имя учетной записи администратора в Windows 10
- Вариант 1: Локальная учетная запись администратора
- Вариант 2: Аккаунт Microsoft
- Вариант 3: Маркировка «Администратор»
- Изменение имени папки администратора
- Вопросы и ответы

Администратор в Windows 10 — привилегированная учетная запись, имеющая все необходимые права для полного управления компьютером. Имя такого профиля задается еще на стадии его создания, однако в будущем может потребоваться сменить его. Справиться с этой задачей можно разными способами, что зависит непосредственно от поставленной задачи, поскольку к операционной системе может быть подключена как локальная учетная запись, так и аккаунт Microsoft. Дополнительно отметим и доступность изменения самого названия «Администратор». Давайте рассмотрим все эти варианты более детально.
Пользователям, обратившимся к этой статье, придется выбрать один из доступных методов, представленных далее, чтобы реализовать его, отталкиваясь от личных предпочтений. Принцип действий меняется в зависимости от типа профиля, а также иногда хочется поменять именно маркировку «Администратор». Обо всем этом мы постарались рассказать максимально развернуто в следующих руководствах.
Вариант 1: Локальная учетная запись администратора
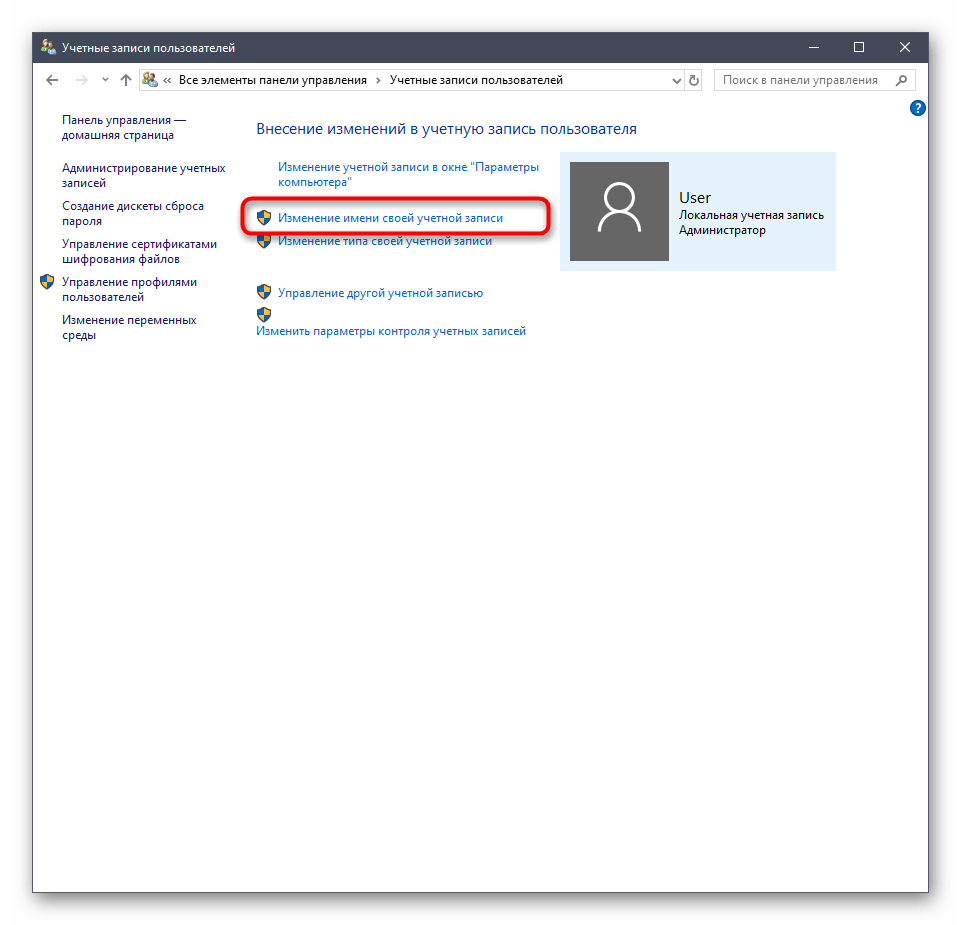
При установке Windows 10 юзеру предлагается выбор — подключать аккаунт Microsoft, параллельно создав его в случае отсутствия, или же добавить локальную учетную запись так, как это было реализовано в предыдущих сборках ОС. Если был выбран второй вариант, изменение имени будет происходить по знакомому сценарию, который выглядит так:
- Откройте «Пуск», отыщите через поиск «Панель управления» и запустите это приложение.
- В появившемся меню выберите категорию «Учетные записи пользователей».
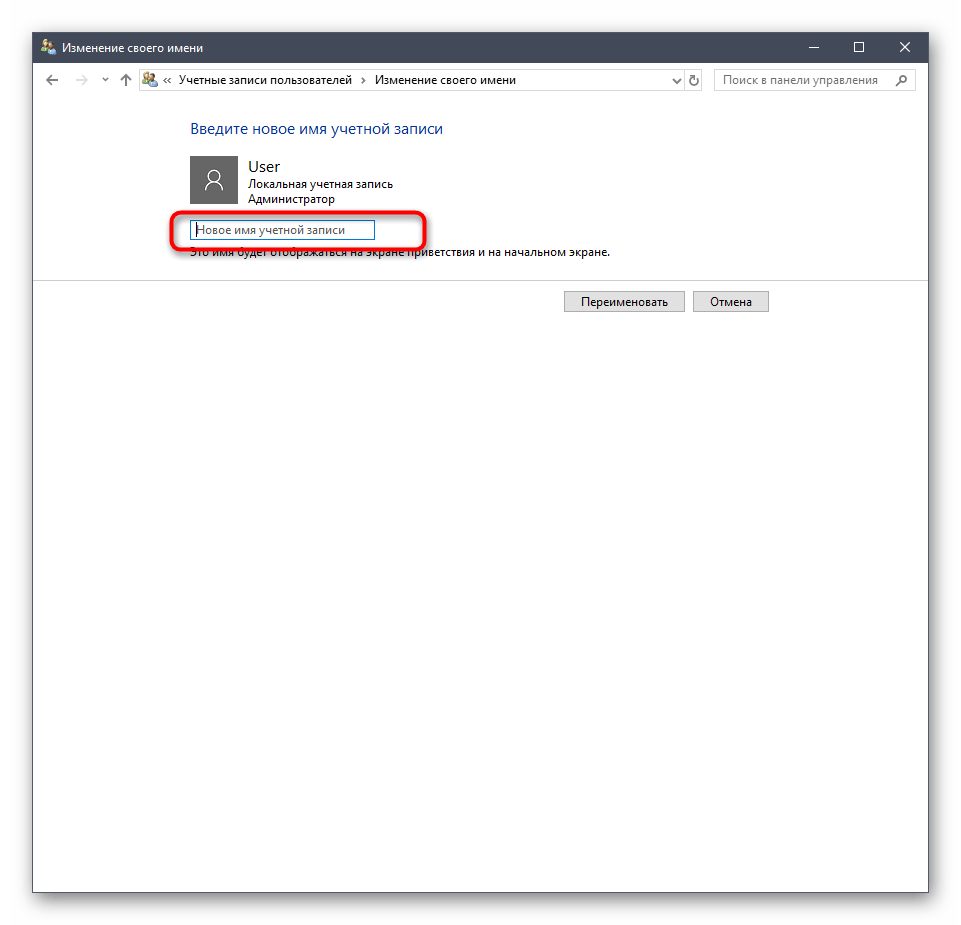
- В главном окне отобразятся настройки текущей локальной учетной записи. Здесь следует кликнуть по кнопке «Изменение имени своей учетной записи».
- Задайте новое имя, вписав его в соответствующую строку.
- Перед нажатием на кнопку «Переименовать» внимательно проверьте правильность написания нового логина.
- Покиньте активное меню, чтобы убедиться в том, что все изменения вступили в силу.


Учитывайте, что после произведения такой настройки пользовательская папка все еще не изменит своего имени. Это понадобится сделать собственноручно, о чем мы поговорим в конце сегодняшнего материала.
Вариант 2: Аккаунт Microsoft
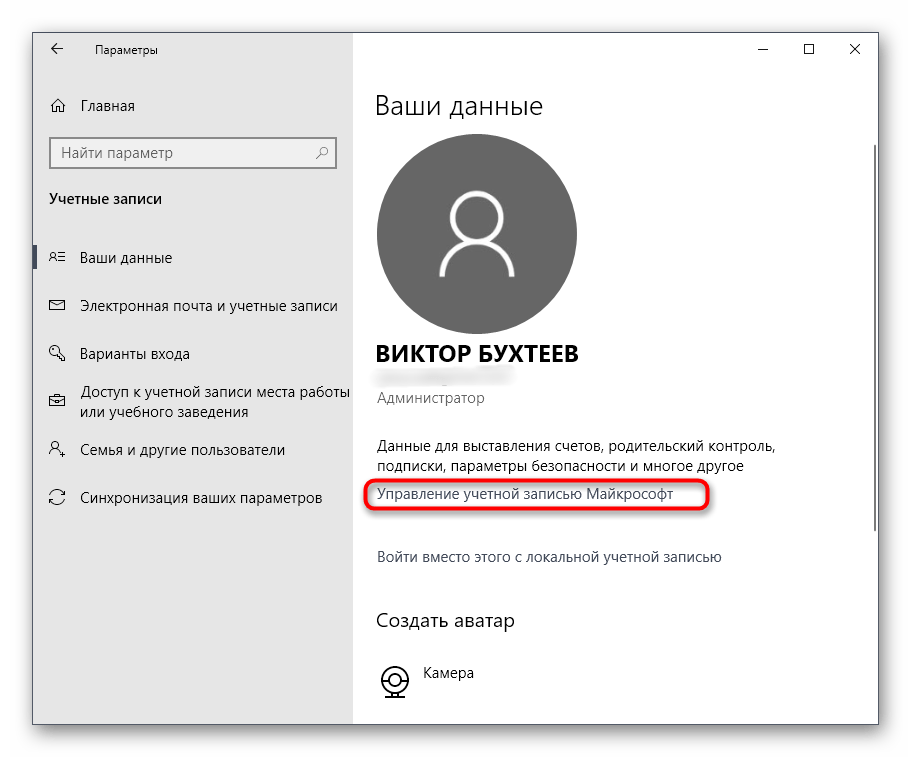
Сейчас большинство пользователей создают аккаунты в Microsoft при установке ОС или подключают уже существующие профили. Это позволит сохранять настройки и пароли, применяя их в будущем при повторной авторизации, например, на втором компьютере. Изменение имени администратора, подключенного таким способом, отличается от той инструкции, которая была представлена ранее.
- Для этого перейдите в «Параметры», например, через меню «Пуск», где выберите плитку «Учетные записи».
- Если по каким-либо причинам вход в запись еще не выполнен, нажмите на «Войти вместо этого с учетной записью Майкрософт».
- Введите данные для входа и следуйте далее.
- По желанию задайте пароль, чтобы обезопасить систему.
- После этого кликните по надписи «Управление учетной записью Майкрософт».
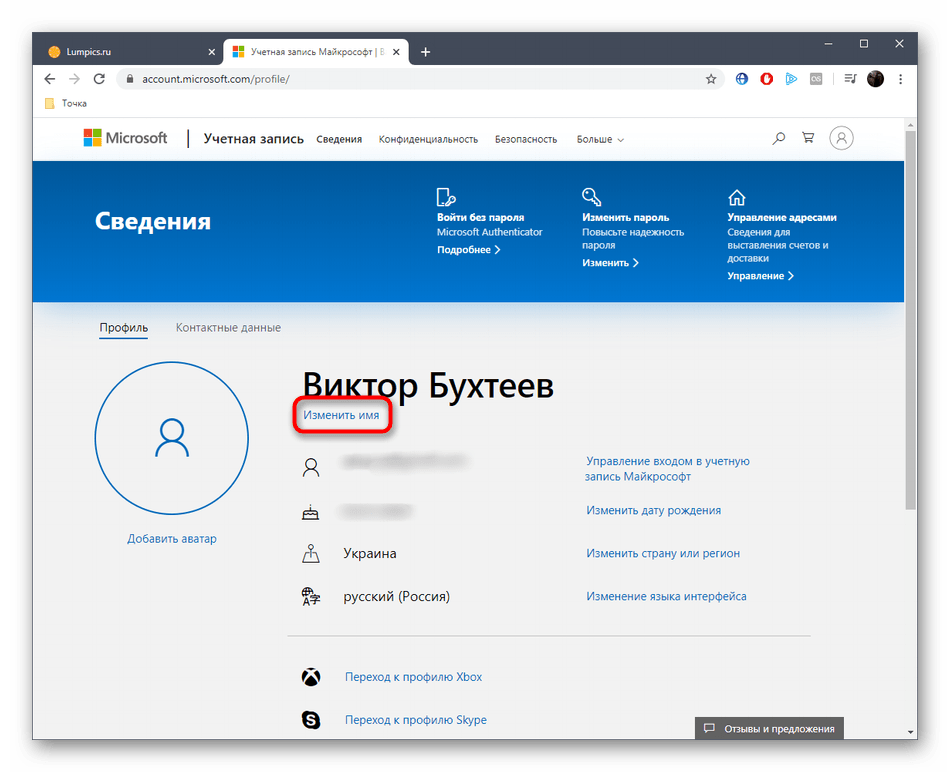
- Произойдет переход на страницу аккаунта через браузер. Здесь разверните раздел «Дополнительные действия» и в появившемся списке выберите «Редактировать профиль».
- Нажмите по надписи «Изменить имя».
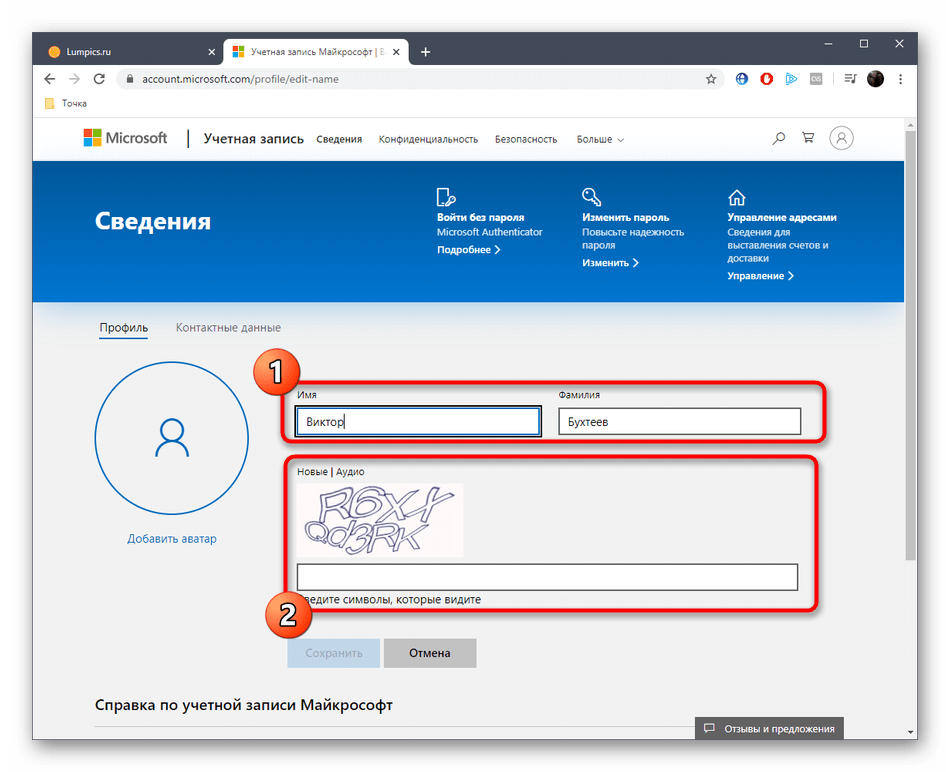
- Задайте новые данные, обязательно заполните капчу, а затем примените изменения, предварительно проверив их.


Вариант 3: Маркировка «Администратор»
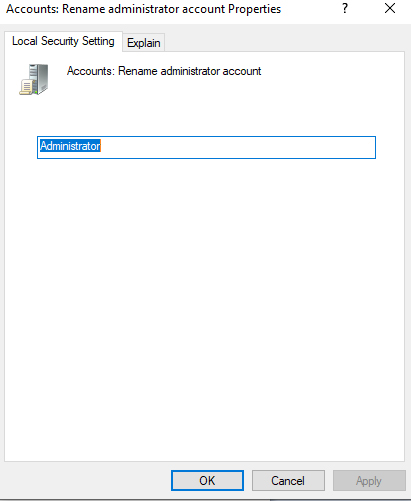
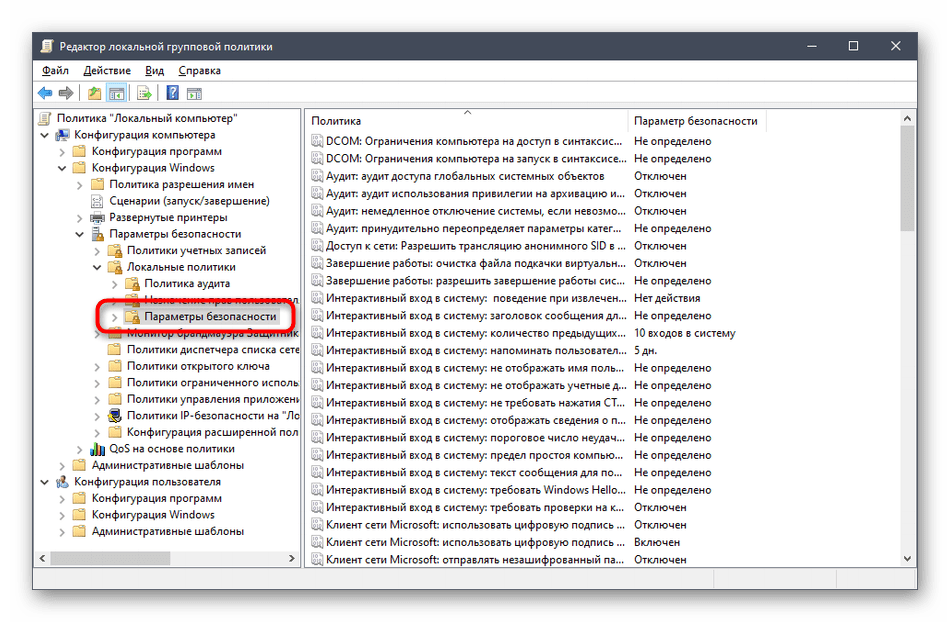
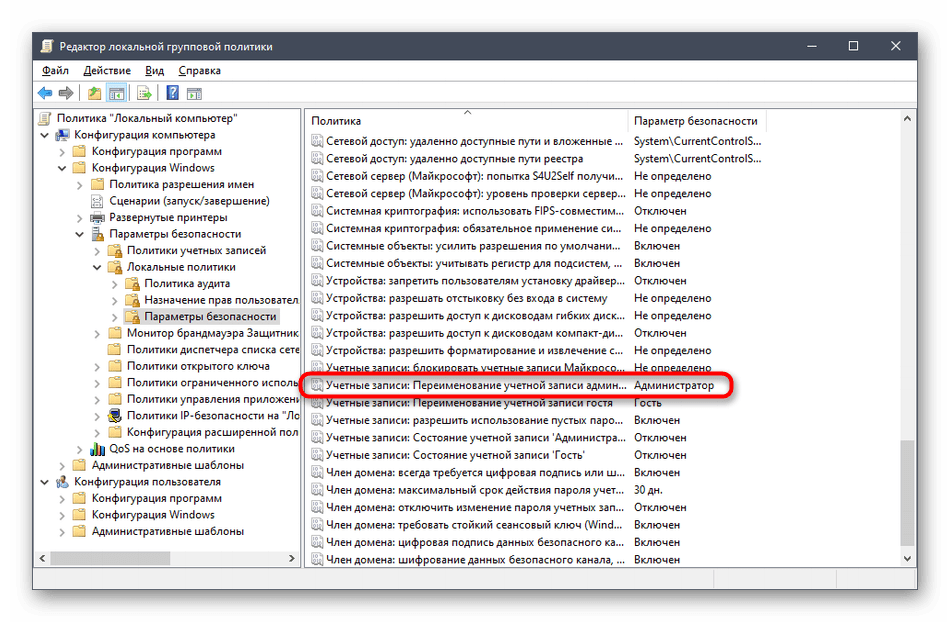
Этот метод подойдет только обладателям сборок Windows 10 Pro, Enterprise или Education, поскольку все действия будут производиться в редакторе групповых политик. Его суть заключается в изменении маркировки «Администратор», которая обозначает пользователя с привилегированными правами. Реализовывается данная задача так:
- Откройте утилиту «Выполнить» через Win + R, где напишите
gpedit.mscи нажмите на Enter. - В появившемся окне перейдите по пути «Конфигурация компьютера» — «Конфигурация Windows» — «Параметры безопасности» — «Локальные политики» — «Параметры безопасности».
- В конечной папке отыщите пункт «Учетные записи: Переименование учетной записи администратора» и нажмите по ней дважды левой кнопкой мыши.
- Запустится отдельное окно свойств, где в соответствующем поле задайте оптимальное название для этого типа профилей, а затем сохраните изменения.

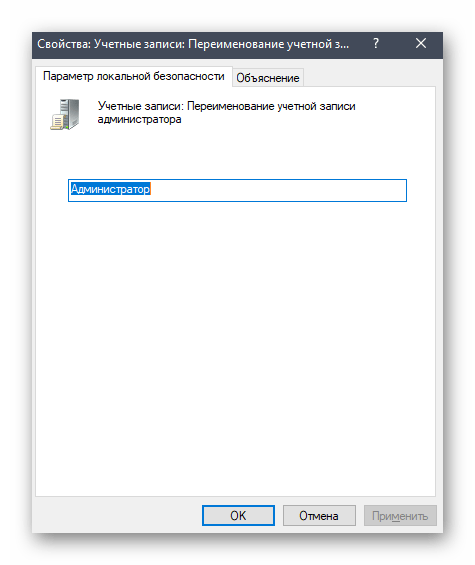
Все настройки, которые производились в редакторе групповых политик, вступят в действие только после перезагрузки компьютера. Выполните это, после чего уже проверяйте новую конфигурацию в действии.
Изменение имени папки администратора
У администратора Windows 10, как и у любого другого зарегистрированного пользователя, имеется личная папка. Стоит учитывать, что при изменении имени профиля она не меняется, поэтому переименование нужно произвести самостоятельно. Более детально об этом мы предлагаем узнать в отдельном материале на нашем сайте, воспользовавшись приведенной ниже ссылкой.
Подробнее: Меняем имя папки пользователя в Windows 10
Это были все варианты, о которых мы хотели рассказать в рамках сегодняшнего материала. Вам остается только выбрать подходящий, чтобы следовать инструкциям и справиться с поставленной задачей без каких-либо трудностей.
Еще статьи по данной теме:
Помогла ли Вам статья?
Changing the administrator name in Windows 7 or Windows 8 was easy, but it is a bit tricky when it comes to Windows 10. In this article, we’ll teach you how to change the administrator name on Windows 10 conveniently. There are four easy ways to choose to change the name of the administrator.
4 ways of changing the administrator name on Windows 10
All of the four ways mentioned below are tried and tested by experts.
1. Via computer Management
Renaming the administrator’s name via the computer management option is the fastest of all. Follow these steps to change the name instantly:
- Right-click on the start menu at the bottom of your screen.
- Select the option “Computer Management” to proceed.
- Expand the “Local Users and Groups” option once the Computer Management option opens.
- Click on the “Users” option.
- Select the “Administrator” option and right-click on it to open the dialog box.
- Choose the “Rename” option to change the name of the administrator.
- After typing your preferred name, press the enter key, and you’re done!
2. Via Command Prompt
A bit technical but 100% effective way of changing the administrator’s name on Windows 10 is by choosing the command prompt option. The steps to do so are:
- Type the command “cmd” in the search bar located at the bottom of your screen.
- Select the second option i.e., “Run as Administrator,” from the menu that has appeared on your right side.
- A dialog box will appear asking you whether you allow this application to make changes to your system. Select the option “Yes.”
- Once the command prompt is open, type the command mentioned below.
- wmic useraccount where name=’Administrator’ call rename name=’newAdministratorName’
- Make sure you have changed the ‘newAdminstratorName’ area to the name you want to give to your administrator account.
- Now press the enter key to confirm the changes.
- To ensure your changes are saved, check the “Local Users and Groups” option in the “Computer Management.”
3. Via Windows PowerShell
You can also rename your administrator name by following the Windows PowerShell route. The steps for this are:
- In the search bar located at the bottom of the screen, type the command “PowerShell”
- Click on the “Run as Administrator” option visible at the now appeared menu on your right side.
- A dialog box will prompt asking your permission to either allow the application to run on your system or not. Choose the “Yes” option to proceed.
- Now get your administrator account’s current name by entering the command mentioned below into the Windows PowerShell.
- Get-LocalUser
- The command will list down all the local users of your PC or laptop. Don’t forget to note the name of “Built-in account for administering the computer/domain.”
- Now to rename your administrator’s account as per your preference, enter the command mentioned below.
- Rename-LocalUser -Name Administrator -NewName NewAdminName
- Make sure you have changed the ‘newAdminName’ area to the name you want to give to your administrator account.
- Now hit the enter key to finalize the changes.
- To confirm that the changes are completely accepted, open “Local Users and Groups” by visiting the “Computer Management” option.
4. Via Group Policy
Group Policy is a useful Sys Admins setting from where the administrator can change the name in all domain-joined computers. It involves creating GPO, linking the GPO to Active Directory Container, and then configuring the overall policy to change the name in Windows 10.
Once your GPO is created and linked to Active Directory Container, proceed with these steps:
- After logging in to the Domain Controller, click on “Server Manager” to open.
- Once inside the Server Manager, click on the “Tools” option located on the screen’s top right side.
- In the now open menu, click on the “Group Policy Management” option.
- Once the Group Policy Management is open, right-click the GPO you desire to use and click on the “Edit” option.
- Beneath “Computer Configuration” in Group Policy Management Editor, go to Windows Settings -> Security Settings -> Local Policies. Now select “Security Options.”
- In Security Options, select Accounts: Rename administrator account policy option.
- Now select the “Define this policy setting” box.
- Change the name you prefer as the administrator’s name and then click the “Apply” and “Ok” option.
- Once “Not Defined” in policy status changes to your assigned admin name, you’re good to go.
Rename your Microsoft admin login name
What to Know
- Win+R > secpol.msc > Local Policies > Security Options > Accounts: Rename administrator account.
- Win+X > Computer Management > System Tools > Local Users and Groups > Users > right-click Administrator > Rename.
- Admin rights are required.
This article describes how to change the built-in Administrator account name in Windows 10 to bolster your computer’s security. We’ll also look at how to change the name of other accounts that have admin privileges.
Use one of these first three methods if you’re changing the built-in Administrator account name. The last method works only for regular accounts that have admin rights.
Local Security Policy
This is the quickest method, even if you’ve never heard of or used this part of Windows. There’s a policy called Accounts: Rename administrator account that’s easy to edit.
By deafult, in Windows 10 Home, the Accounts: Rename administrator account option is not available, so you’ll need to use another method to change your Administrator account.
-
Open the Run dialog box with the Win+R keyboard shortcut.
-
Type this and then choose OK:
secpol.msc
-
Go to Local Policies > Security Options and double-click Accounts: Rename administrator account.
-
Enter a new name and then select OK. You can now close out of the Local Security Policy window.
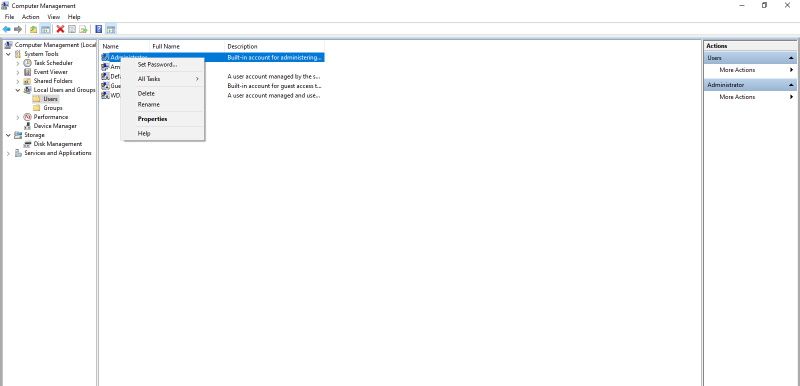
Computer Management
The Power User Menu provides access to Computer Management, the next best way to change the Administrator account name.
-
Right-click the Start button or press Win+X, and choose Computer Management from the menu.
-
From the left panel, open System Tools > Local Users and Groups > Users.
You might not see this screen depending on your edition of Windows 10. Use the Command Prompt method below instead.
-
Right-click Administrator from the right side and choose Rename. This is the same way you can rename other accounts.
-
Enter a new name and then press Enter. You can now exit Computer Management.
Command Prompt
You can also use the powerful Command Prompt. It isn’t as straightforward as the methods described above because you have to type out a particular command for it to work.
Here’s exactly how it’s done:
-
Open Command Prompt as admin. The fastest method is to search for cmd from the search bar, right-click the result, and select Run as administrator.
-
Type this, changing NewName to the name you want to use:
wmic useraccount where name='Administrator' rename 'NewName'
-
Press Enter to submit the command. You’ll know it ran correctly if you see a Method execution successful message. You can now exit Command Prompt.
Control Panel
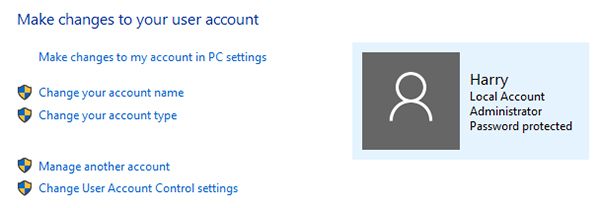
If you do not want to change the name for the built-in Administrator account but instead just a user with admin privileges (or even one without), it’s much easier through Control Panel.
-
Open Control Panel. The quickest way to find it is to type Control Panel in the search bar near the Start button.
-
Select User Accounts. If you see it again on the next screen, choose User Accounts once more.
-
Select Change your account name.
Don’t see it? You’re using your Microsoft account to log in, so you’ll need to change the name from your profile page on Microsoft’s website instead of following these steps.
To change the account name for a different user (it won’t work for the built-in Administrator account), select Manage another account, choose the account, and select Change the account name.
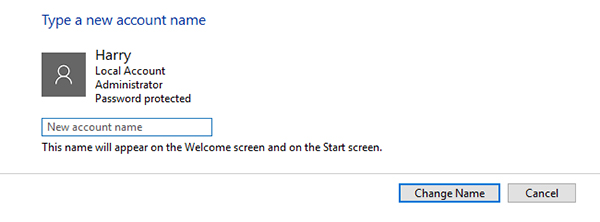
-
Enter a new name in the box provided.
-
Select Change Name. You can now exit the window.
Why Change the Administrator Account Name?
Changing the account name is like changing the password. It prevents hackers from succeeding if their automatic password-breaking tools assume the default name hasn’t been changed.
As the name explains, the built-in Administrator account has administrative rights. You can use it to install programs and make extensive system changes. It’s useful for those reasons, which is why some people choose to use it.
However, it’s disabled by default, so using it requires you to enable the admin account manually. It’s not entirely necessary, though, because you can convert any user account to one with admin rights; it’s pretty easy to create and delete accounts in Windows 10.
Nevertheless, if you’ve chosen to keep the built-in Administrator account enabled, it’s important to assign it a strong password and change its name. «Administrator» is chosen by default, so anyone with access to your computer knows right away that unless you’ve changed the account name, they can guess passwords using that username.
Thanks for letting us know!
Get the Latest Tech News Delivered Every Day
Subscribe
Windows 10 lets you personalize your PC in a number of ways, such as letting you choose and set an admin name. This admin name is usually displayed on the Welcome screen and on the Start screen, among others.
Thankfully, you can always easily change your Windows 10 admin name. So, if you mistakenly misspelled your name, for instance, you can simply change it without affecting critical system function.
In this article, you’ll learn why people change their Windows 10 admin name, how to change your admin name in Windows 10, and what happens after you change it.
Why You May Want to Change Your Windows 10 Admin Name
Usually, the first account you create upon installing your Microsoft Windows OS bears your Microsoft Account administrator name which you can change at any time and for any reason.
Speaking of reason, there are several reasons why people may want to change their Windows 10 admin name.
Some of them include:
- You just bought an unformatted pre-owned laptop.
- You changed your given name and want it to reflect on your username.
- You want to start changing your admin name routinely and this is your first attempt.
- You just noticed a spelling error in your admin name.
- Your organization is rebranding and changing its name.
- You were newly made an administrator and will need admin privileges to install and manage software, among others.
- Other people want to use your PC and you want to set up a separate account for them.
Let’s now see how to change your Windows 10 admin name.
How to Change Your Windows 10 Admin Name
There are several ways to change your Windows 10 admin name. Here are six different methods we used to change our Windows 10 admin name.
1. How to Change Your Windows 10 Admin Name via Your Microsoft Account Profile Photo
Changing your Windows 10 admin name via your Microsoft Account profile photo is one of the easiest ways. Here’s how:
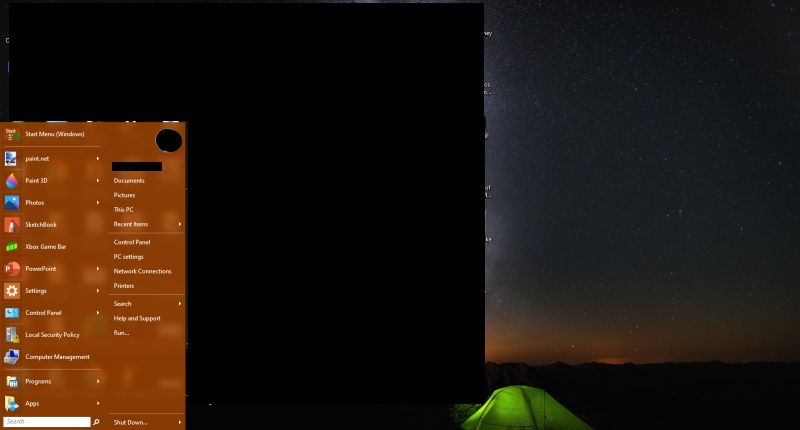
- Turn on your PC and click on the Start button.

- Click on your profile photo (at the top of the Start menu) if you have one set up.
- Click on Change your account name.

- Enter a new account name in the «New account name» box.
- Click Change Name when you’re done and just like that your Windows 10 admin name is changed.
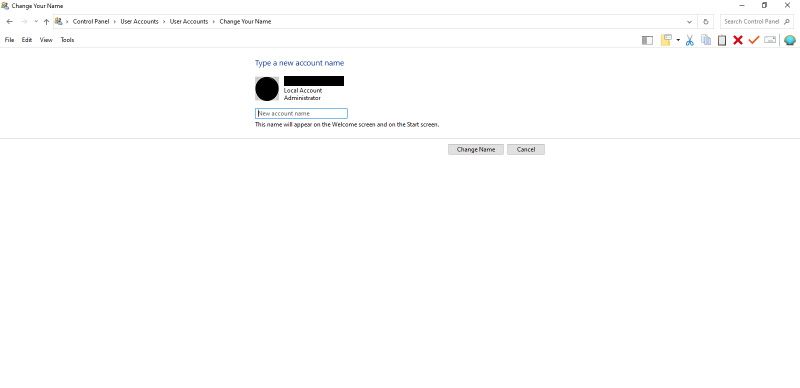
This change in admin name will be reflected across your entire Windows 10 PC.
2. How to Change Your Windows 10 Admin Name via the Search Box on the Taskbar
You can also change your Windows 10 admin name via the search box on the taskbar. Here’s how to do that:
- Click on the Search icon next to the Start button.
- Type «Computer Management» (without quotation marks) and press Enter.

- Click on Local Users and Groups in the left pane.
- Double-click the Users folder in the middle pane.
- Right-click on Administrator or any other name you want to change and select Rename.

- Enter the new name and click anywhere within the pane to set your new admin name.
- Close the window when done.
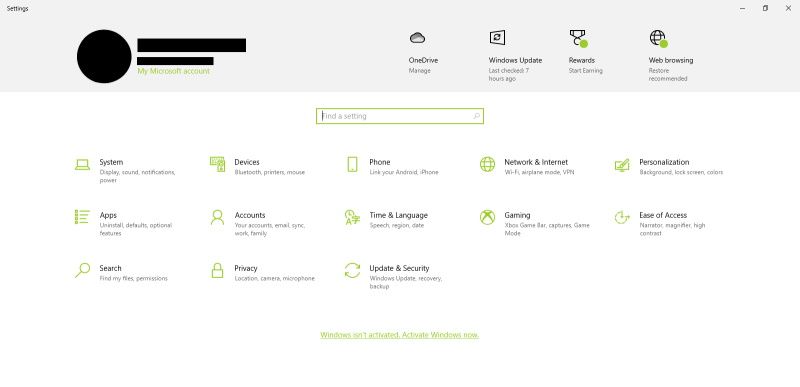
3. How to Change Your Windows 10 Admin Name via PC Settings
To change your Windows 10 admin name via your PC Settings:
- Click on the Start button or press the Windows key on your keyboard.
- Click on PC Settings.
- Click on Accounts.

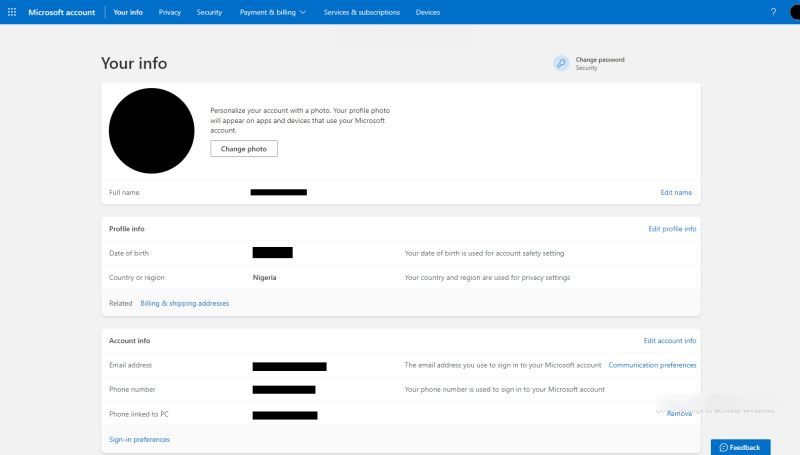
- Click Manage my Microsoft account. You’ll be directed to the Microsoft website.
- Either click on your name or on Your info at the top taskbar.
- Click on Edit name and enter the new name.

- Enter the Captcha in the space provided and click Save when done.
- Restart your system for the name change to take effect.
You can also reset your Windows 10 Settings app to further customize your OS.
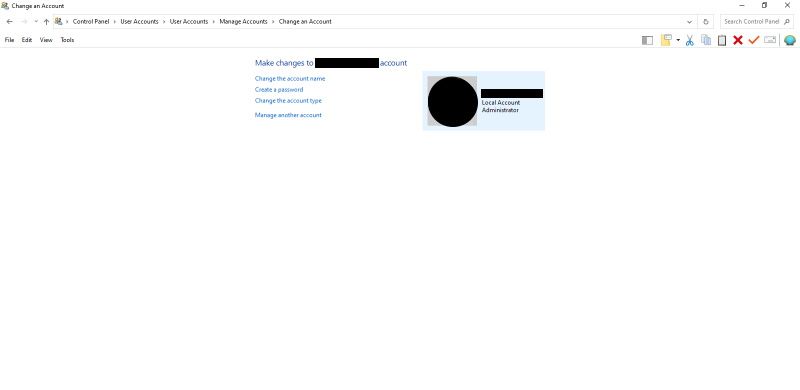
4. How to Change Your Windows 10 Admin Name via the Control Panel
If you prefer to change your Windows 10 admin name via the Control Panel, here’s what to do:
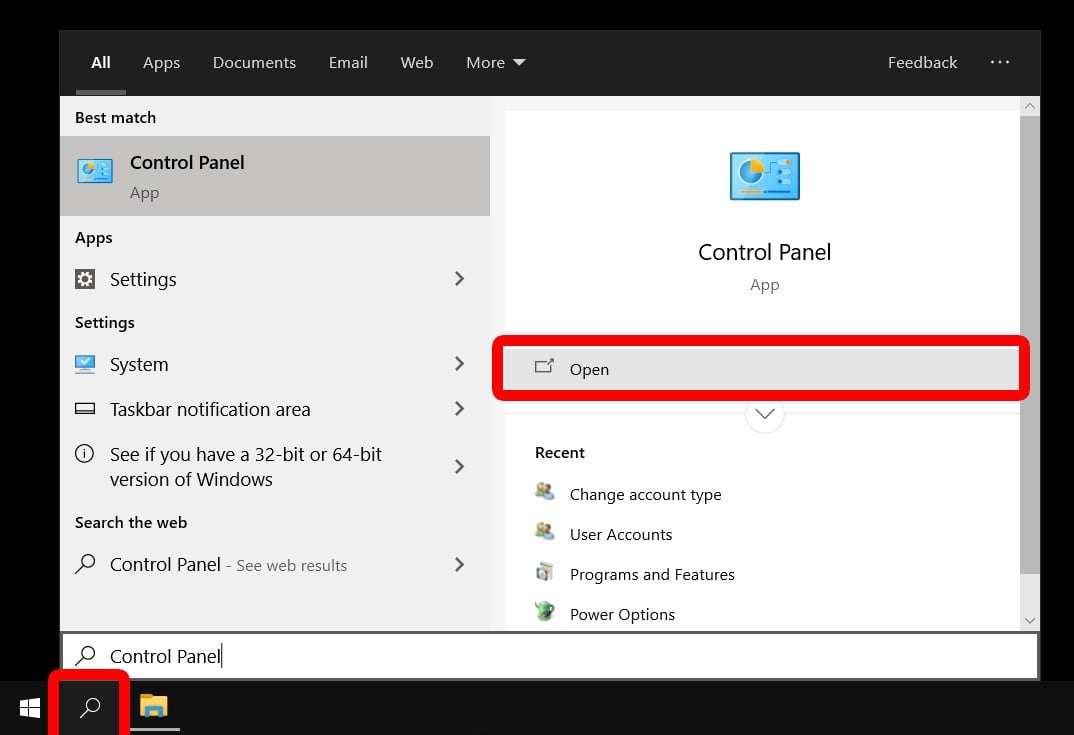
- Click on the Search icon next to the Start button in the bottom taskbar.
- Type «Control Panel open» (without quotation marks) and press Enter. You can also try other ways to access the Control Panel in Windows 10.
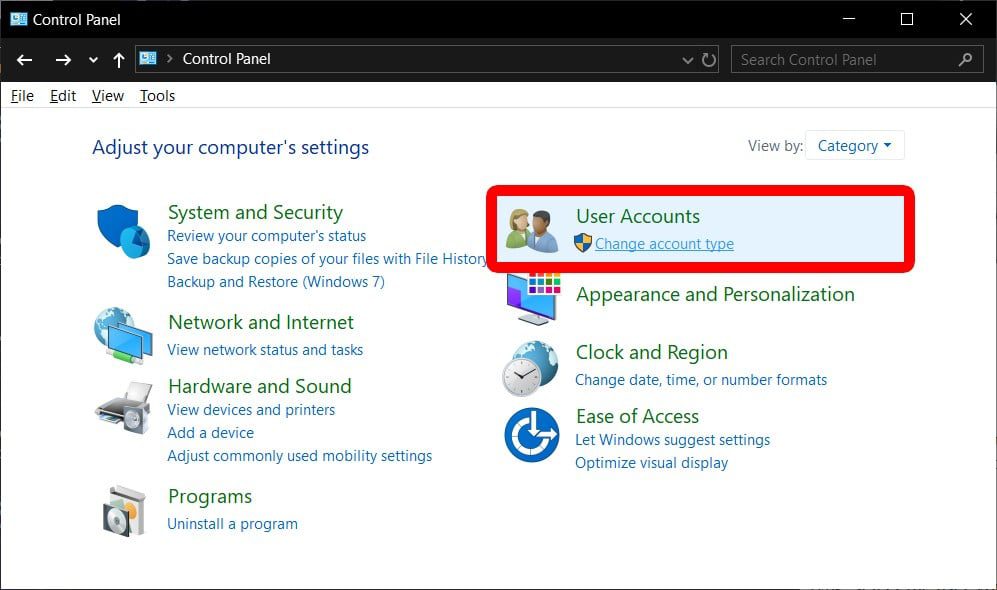
- Click on Change account type under User Account.

- Click on the Local Account Administrator that you’ll like to change.
- Click on Change the account name. From here you can also create a password, change the account type, and manage another account.

- Enter the new name in the New account name box and click Change Name when done.
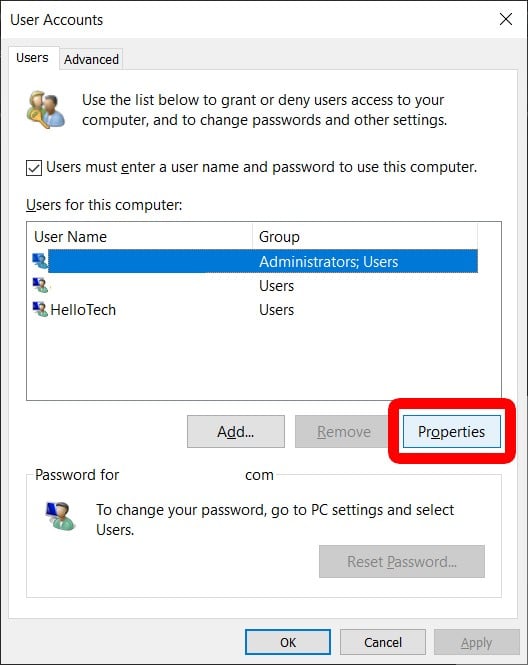
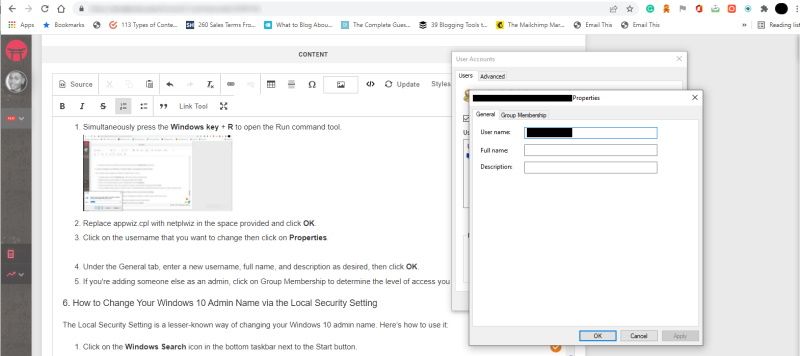
5. How to Change Your Windows 10 Admin Name via the Run Command
This is another way to change your Windows 10 admin name. To do so:
- Simultaneously press the Windows key + R to open the Run command tool. You can also try other ways to open the Windows Run command dialog box.

- Replace appwiz.cpl with netplwiz in the space provided and click OK.
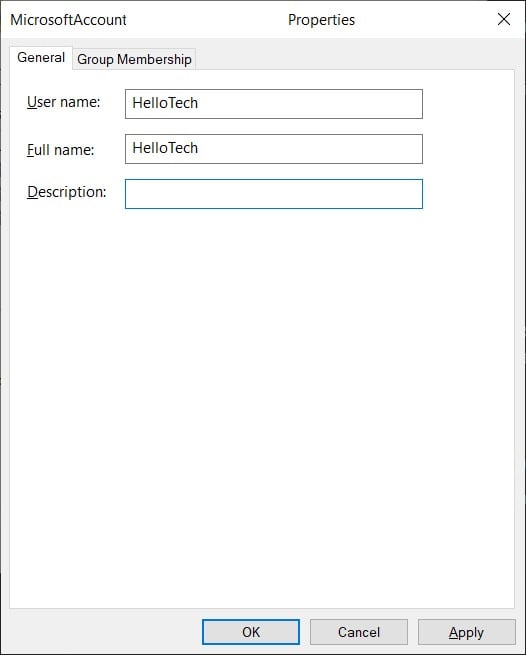
- Click on the username that you want to change then click on Properties.

- Under the General tab, enter a new username, full name, and description as desired, then click OK.
- If you’re adding someone else as an admin, click on Group Membership to determine the level of access you want to grant the user.

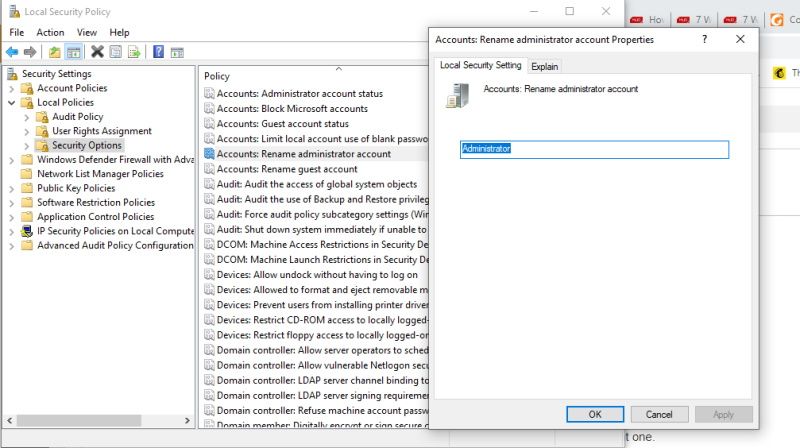
6. How to Change Your Windows 10 Admin Name via the Local Security Setting
The Local Security Setting is a lesser-known way of changing your Windows 10 admin name. Here’s how to use it:
- Click on the Windows Search icon in the bottom taskbar next to the Start button.
- Type «Local Security Policy» (without quotation marks) and press Enter.
- Under the Security Settings pane on the left, click on Local Policies.

- Double-click on Security Options in the right pane.
- Scroll through the options and double-click on Accounts: Rename administrator account.

- Under the «Local Security Setting» tab, enter the new administrator name to replace the current one.
- Click OK or press Enter on your keyboard to confirm the change.

Try a Different Windows 10 Admin Name for a Change
Whether for the reasons stated above or any other reason for that matter, you may find that trying a different Windows 10 admin name for a change is worth it.
It can be a breath of fresh air, feel like a new start, or simply allow you to create a guest account for other people using your computer, among others.
And if you change your mind, you can simply use any of the methods described above to change your Windows 10 admin name.
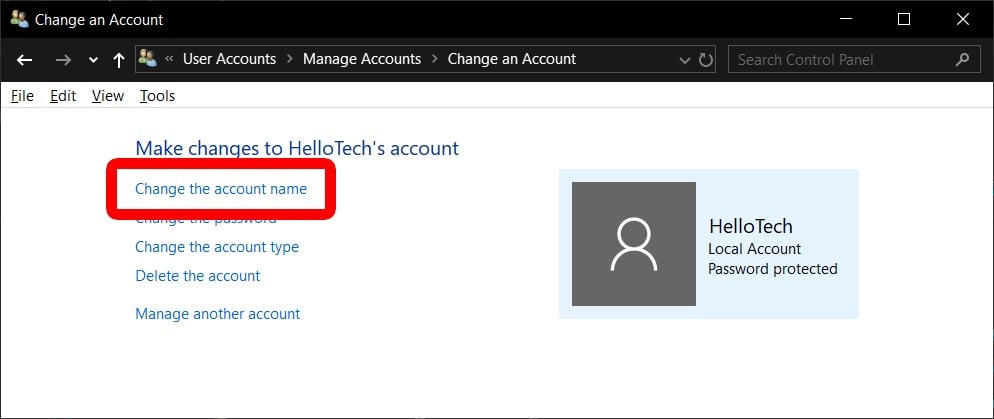
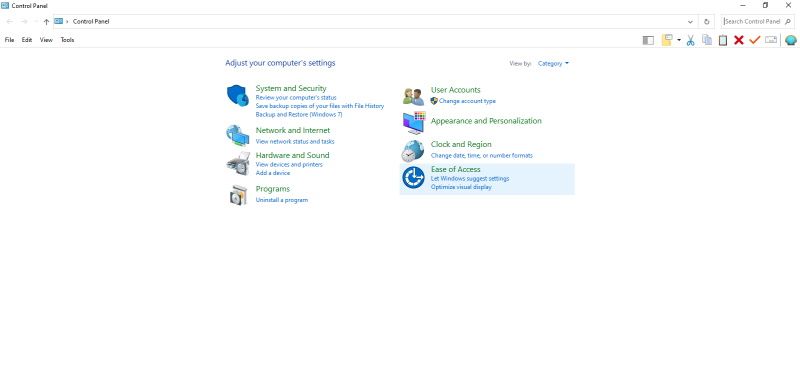
How to Change Administrator Name on Windows 10 via Control Panel
- Type Control Panel into the Windows Search Bar.
- Then click Open.
- Click on Change account type under Use Accounts.
- Select a user account you would like to rename.
- Click on Change the account name.
- Type the new user account name in the box.
Contents
- 1 How do I change the Administrator name on my computer?
- 2 Can we rename Administrator account?
- 3 How do I change my display name in Windows 10?
- 4 How do I find my Administrator name on Windows 10?
- 5 How do I change the display name on my user account?
- 6 How do I change my display name?
- 7 Why can’t I change my account name on Windows 10?
- 8 How do I change my C users username in Windows 10 2021?
- 9 How do I change the name of a user in C drive?
- 10 Can you rename user folder Windows 10?
- 11 Will there be a Windows 11?
How do I change the Administrator name on my computer?
Click on the “Users” option. Select the “Administrator” option and right-click on it to open the dialog box. Choose the “Rename” option to change the name of the administrator. After typing your preferred name, press the enter key, and you’re done!
Can we rename Administrator account?
Click the Group Policy tab, click the Group Policy object that you want, and then click Edit. Expand Computer Configuration, expand Windows Settings, expand Security Settings, expand Local Policies, and then click Security Options. In the right pane, double-click Accounts: Rename administrator account.
How do I change my display name in Windows 10?
Here’s the easy way to change your computer’s name:
- Open Settings and go to System > About.
- In the About menu, you should see the name of your computer next to PC name and a button that says Rename PC.
- Type the new name for your computer.
- A window will pop up asking if you want to restart your computer now or later.
How do I find my Administrator name on Windows 10?
Right-click the name (or icon, depending on the version Windows 10) of the current account, located at the top left part of the Start Menu, then click on Change account settings. The Settings window will pop up and under the name of the account if you see the word “Administrator” then it is an Administrator account.
How do I change the display name on my user account?
You can do this by clicking the Start button or pressing the Windows key, typing “Control Panel” into the search box in the Start menu, and then clicking on the Control Panel app. Next, click “User accounts.” Click “User accounts” one more time. Now, select “Change your account name” to change your display name.
How do I change my display name?
Change Display Name For Local Users
- Type Control panel into the search box on the taskbar and click on the app to open it.
- Click on “Change account type” under the User accounts section.
- Select the desired account where you want to change the name.
- Click on “Change the account name” in the left part of the window.
Why can’t I change my account name on Windows 10?
Follow these steps:
- Open Control Panel, then click User Accounts.
- Click the Change account type, then select your local account.
- In the left pane, you’ll see the option Change the account name.
- Just click it, input a new account name, and click Change Name.
How do I change my C users username in Windows 10 2021?
how to change username on pc located in c:/users in windows 10 pro?
- In the search box, type user accounts and click on User Accounts.
- Click on “Change your account name”
- If it’s prompting for password please enter and click on Yes. If you do not have password click on Yes.
- Enter the new user name.
- Click on change name.
How do I change the name of a user in C drive?
Method 1. Using Control Panel
- Open Control Panel.
- Click on “User Accounts”.
- Again, click on “User Accounts” to proceed.
- Now, click on the “Change your account name” option.
- Now, type a new name for the user account name that you want and click on the “Change Name” button to proceed.
Can you rename user folder Windows 10?
Way 1.
In the search result list, find the user folder and right-click it and you will see the Rename option. Click Rename to change the name for the user folder in Windows 10.
Will there be a Windows 11?
Starting today, October 5th, Microsoft is rolling out the new Windows 11 to eligible devices. Earlier this year, Microsoft announced the new flagship update to its operating system: Windows 11.