Windows has become synonymous with its modern blue-tiled logo. It can be seen in the black backdrop whenever PC is powered on. Windows gives tons of customization abilities to its users which include changing the default boot logo to any other picture. In this article, we bring to you a helpful guide that will teach you how to change Windows 10 boot logo, edit Windows startup and also look into Windows 10 boot screen changer.
Contents
- How to Change Windows 10 Boot Logo
- How to Revert back to default Windows Boot Logo
- How to Disable Secure Boot
Here are some necessary pre-requisites to change Windows 10 boot logo.
- Windows should be running on UEFI boot mode.
- Secure boot must be disabled.
- Administrative privileges are required.
Most modern Windows PC come with UEFI while older systems use Legacy BIOS. You can follow our guide below to check which one your system is running. Follow our guide to Check if your PC is using UEFI or Legacy BIOS.
Windows 10 doesn’t allow changing boot logo but there is a safe way to do it. HackBGRT is an open-source and free command-line tool used to change boot logo. Follow these steps to do so.
Note: Using HackBGRT, GIFs or transparent images cannot be used as the boot logo and the required image resolution is 300px x 300px.
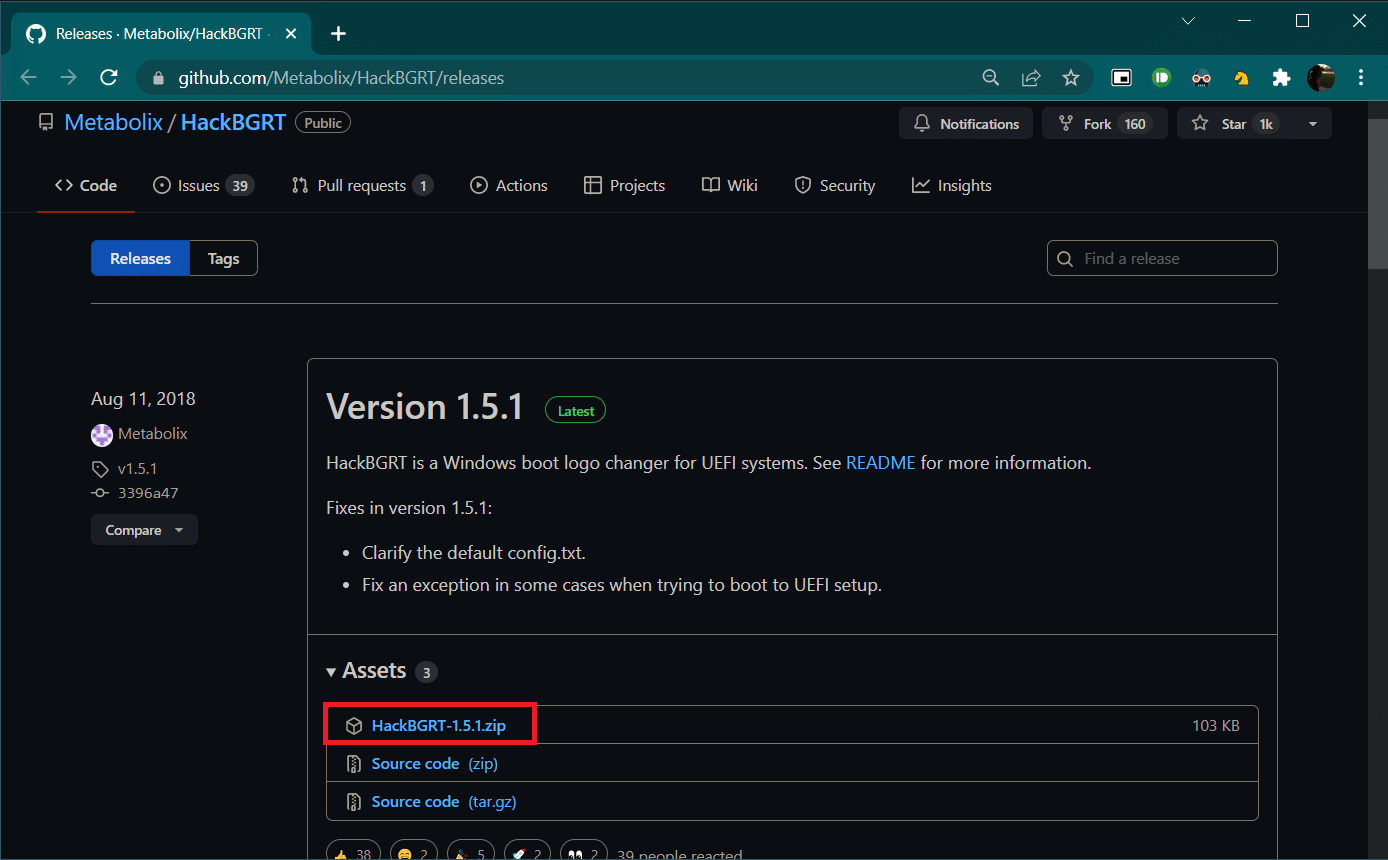
1. Go to download page of HackBGRT and download zip file for the latest version (1.5.1).
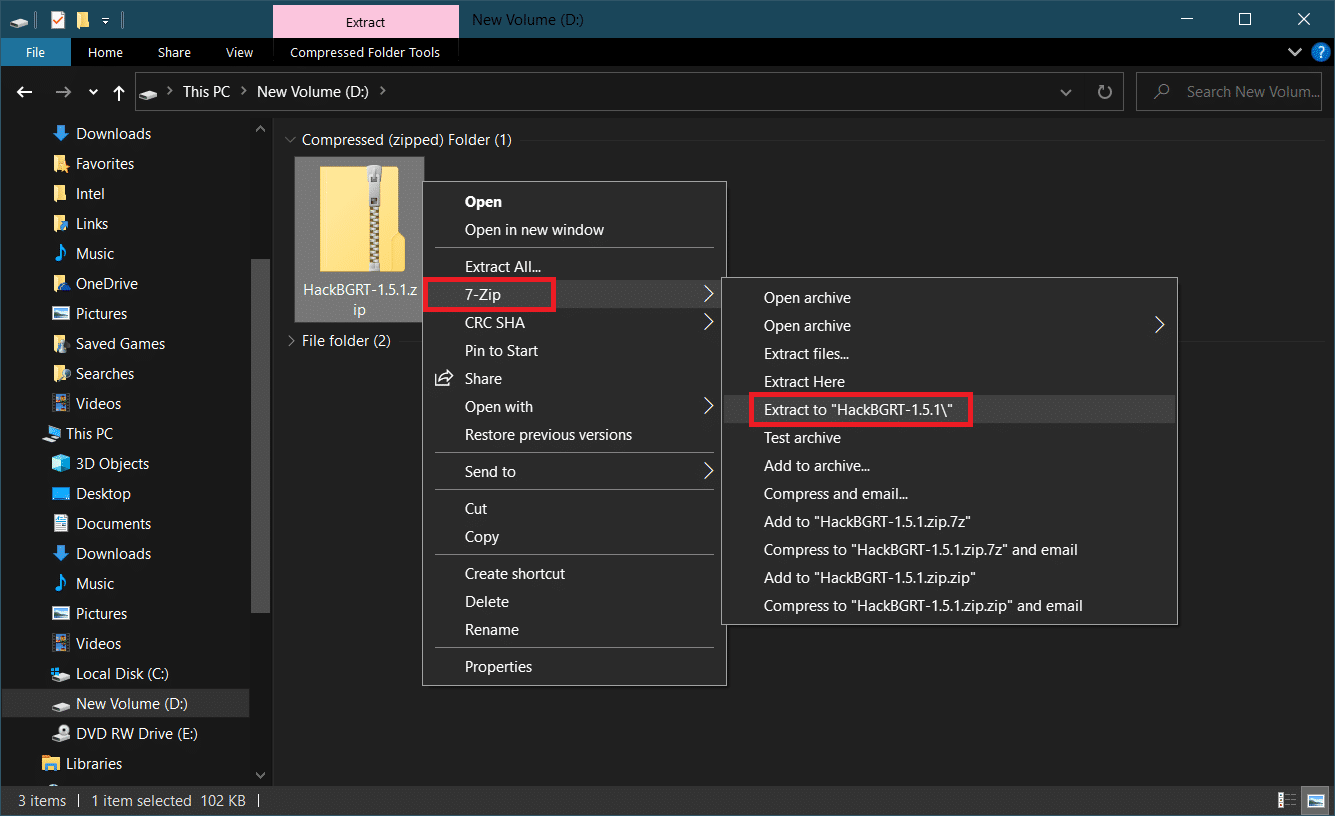
2. Once downloaded, unzip HackBGRT – 1.5.1.zip using appropriate tool like 7-zip.
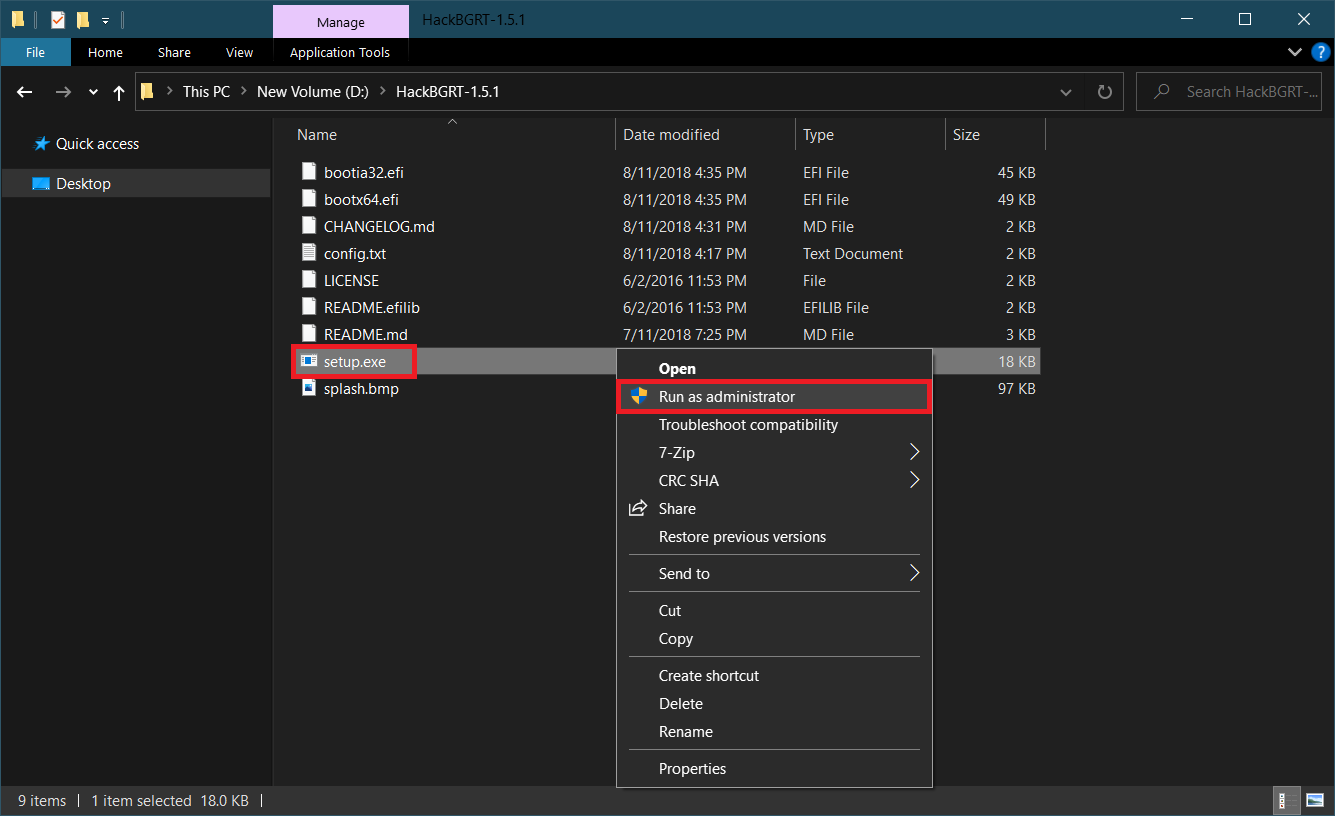
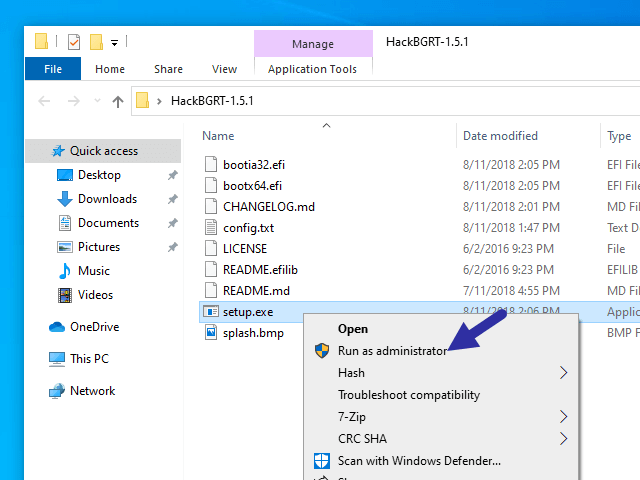
3. In the extracted folder, right–click on setup.exe file and select Run as administrator from context menu.
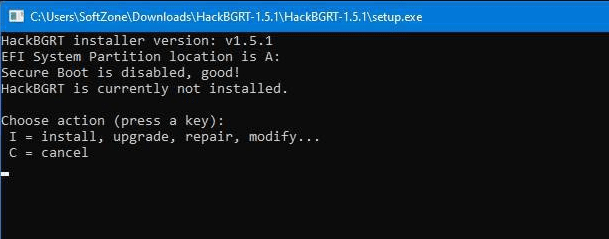
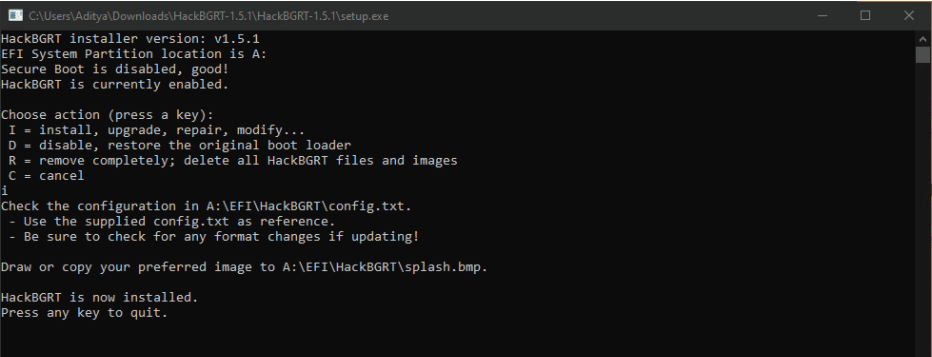
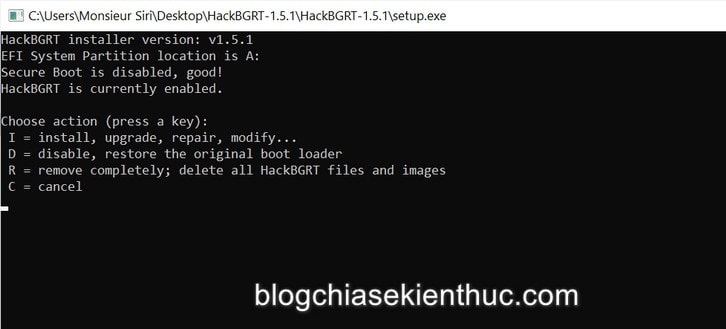
4. HackBGRT will open Command Prompt window. HackBGRT will detect location of UEFI System Partition and check if Secure Boot has been disabled. Information regarding the same will be displayed.
5. Install HackBGRT by pressing the I key.
6. After executing the install command HackBGRT config file will open up in Notepad. Close it by changing it.
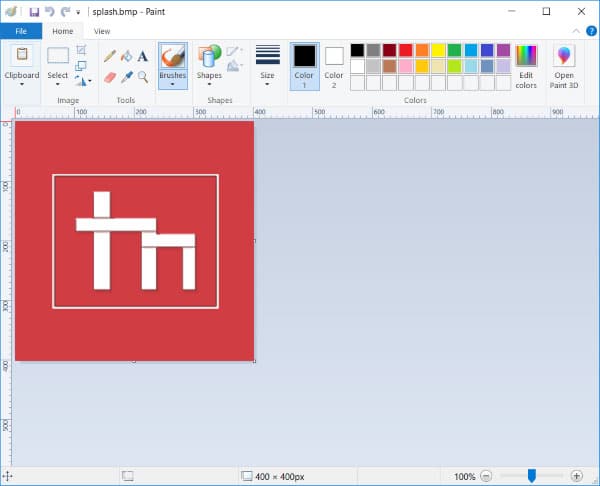
7. HackBGRT will automatically launch the Paint application now with its logo on it.
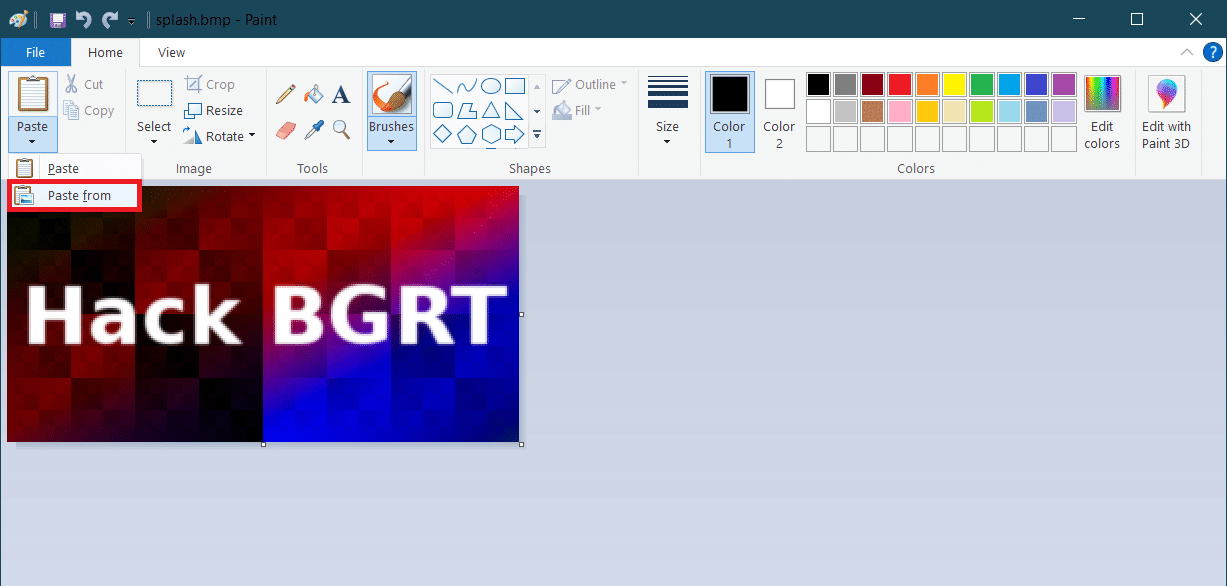
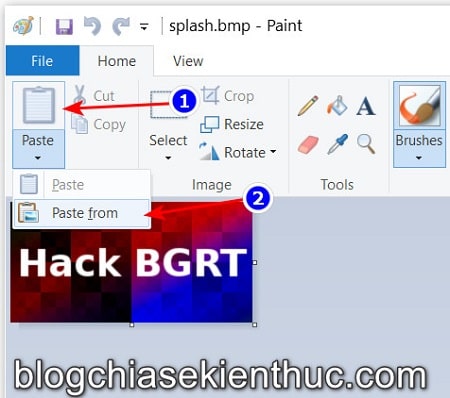
8. To replace the boot logo with your preferred image, expand the Paste drop-down list and select Paste from the option.
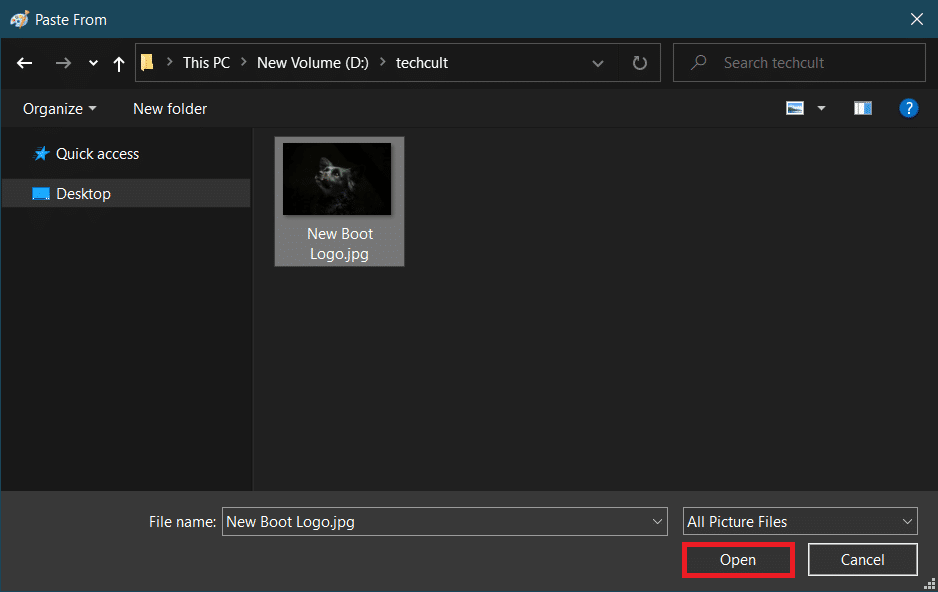
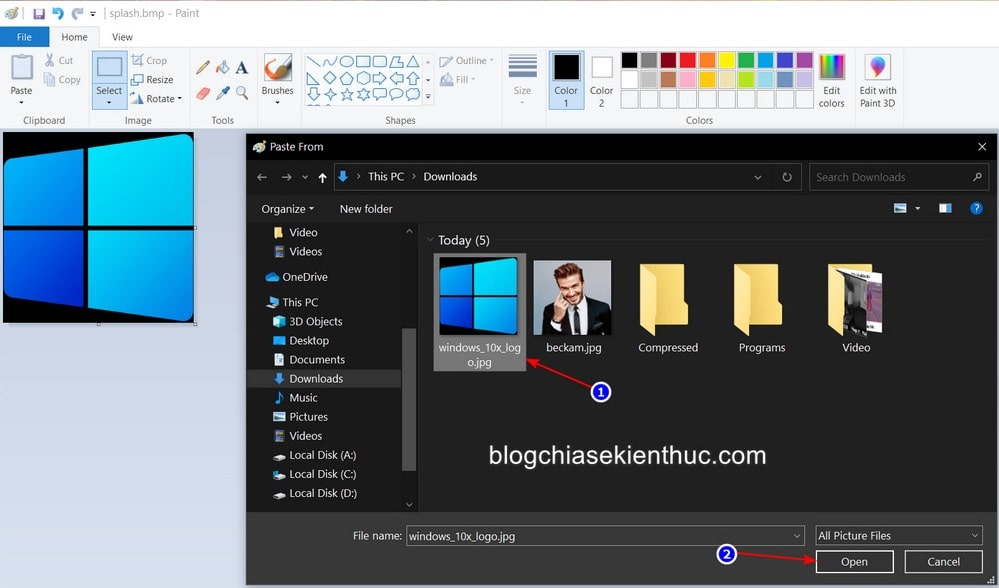
9. Locate image file you wish to set as new boot logo, select it and click on Open.
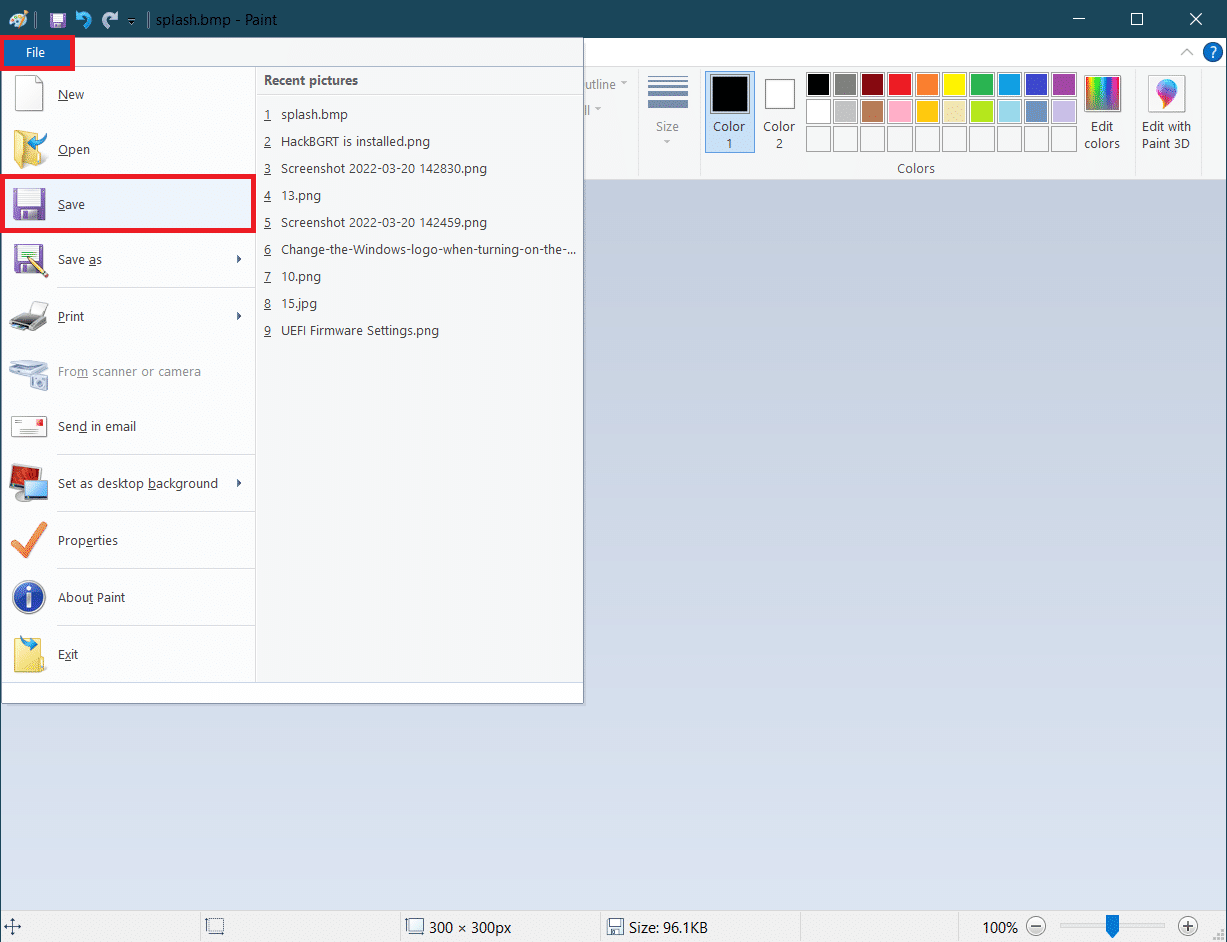
10. Edit it as you wish and once satisfied, click on File > Save. Close the Paint application window.
11. Look for confirmation message HackBGRT is now installed and then close Command Prompt.
12. Finally, reboot the PC and you will see the new boot logo.
Also Read: What is Windows 10 Boot Manager?
How to Revert back to default Windows Boot Logo
If you wish to revert back to the original Windows 10 boot logo, you will need to remove the HackBGRT application. Follow these steps to do so.
1. Follow Step 3 from the previous method to open the HackBGRT setup file as administrator.
2. You will see additional options to remove and disable HackBGRT.
Note: If you want to keep the application, press the D key to disable it and it will restore the default boot logo.
3. Press the R key to execute the remove command. It will remove HackBGRT completely from your System.
4. Once you receive HackBGRT has been removed confirmation message, press any key to quit the Command Prompt window.
The Default Windows logo will now be restored.
Also Read: How to Boot Windows 10 into Recovery Mode
How to Disable Secure Boot
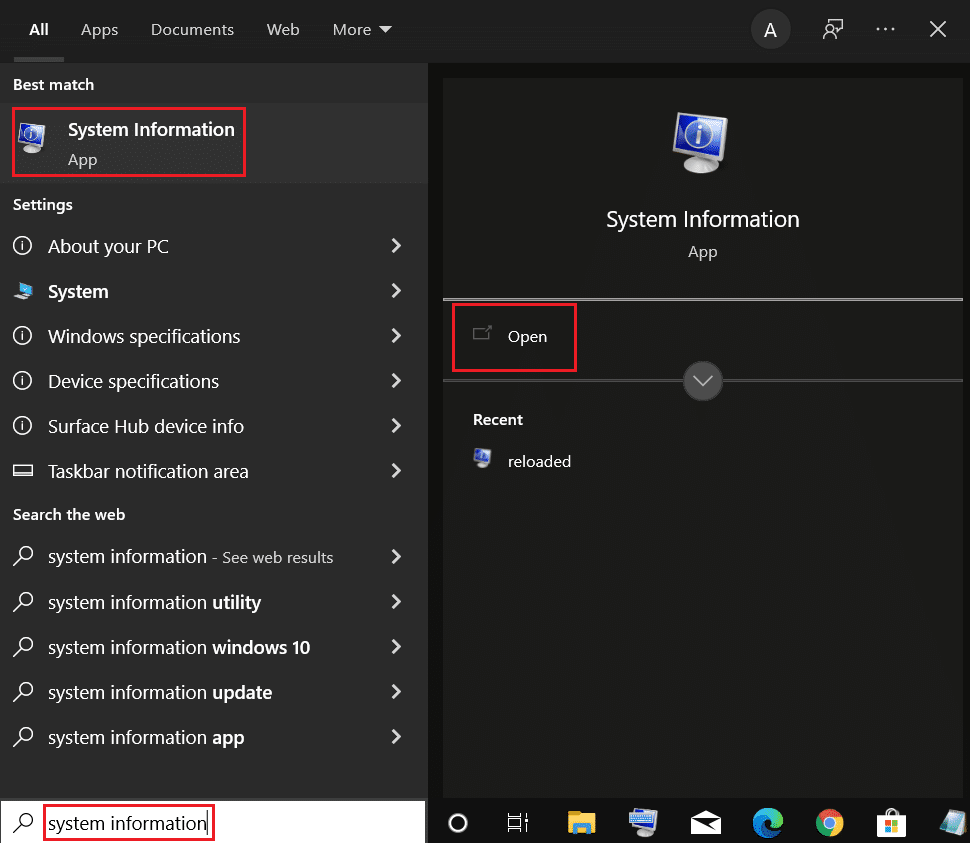
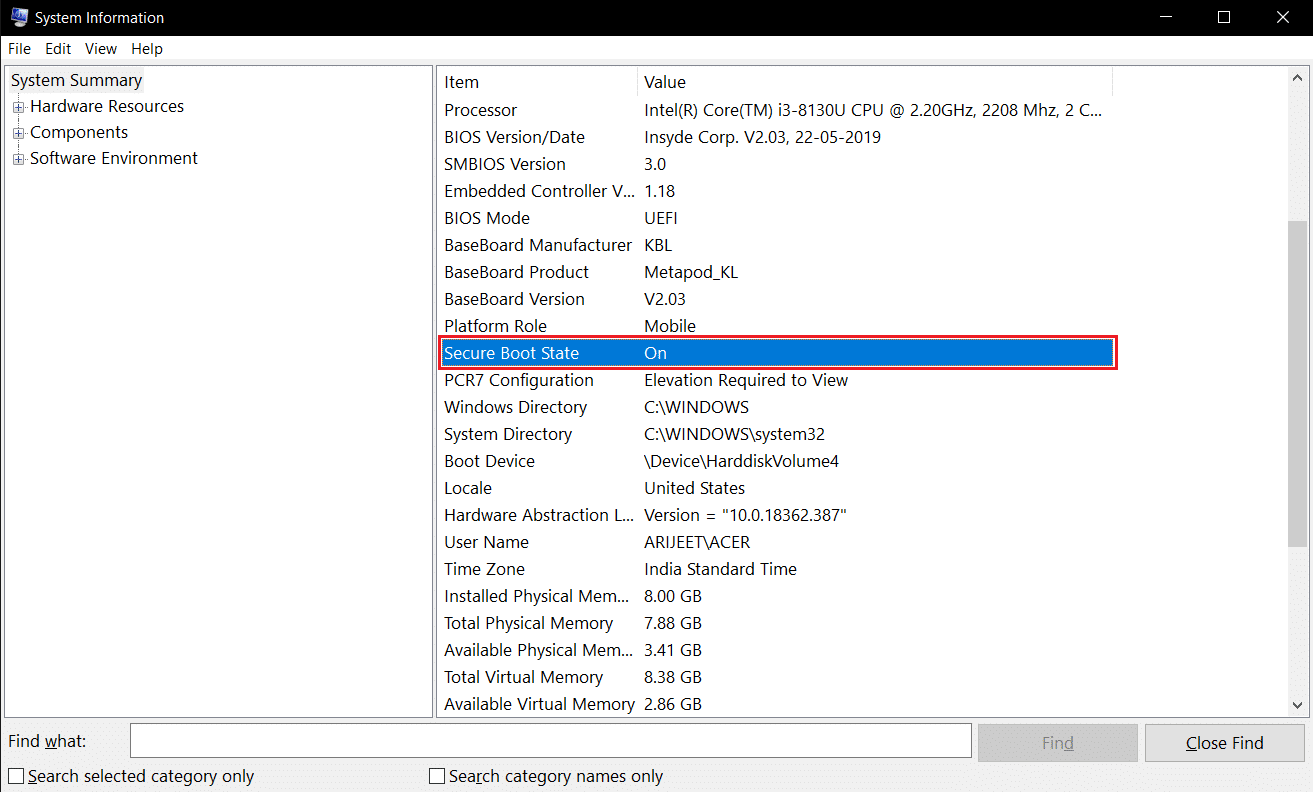
If your Windows PC is running UEFI then you will need to disable Secure boot to change Windows 10 boot logo. Secure boot ensures that the device boots using only system-manufactured trusted software. If enabled, it will prevent the third-party applications from running and changing the boot logo. Follow these steps to check whether it is enabled.
1. Press the Windows key and type System Information, and click on Open.
2. Check whether Secure Boot State is On or Off.
If it is On, follow the steps below to disable it.
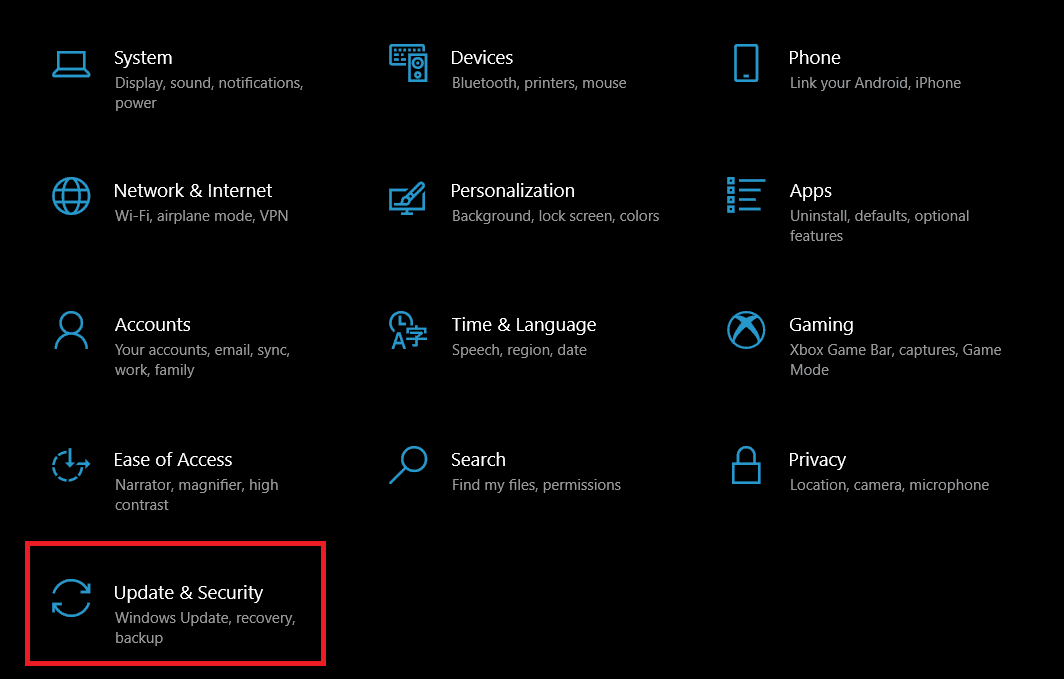
1. Launch Settings application by pressing Windows + I keys and clicking on Update & Security tile.
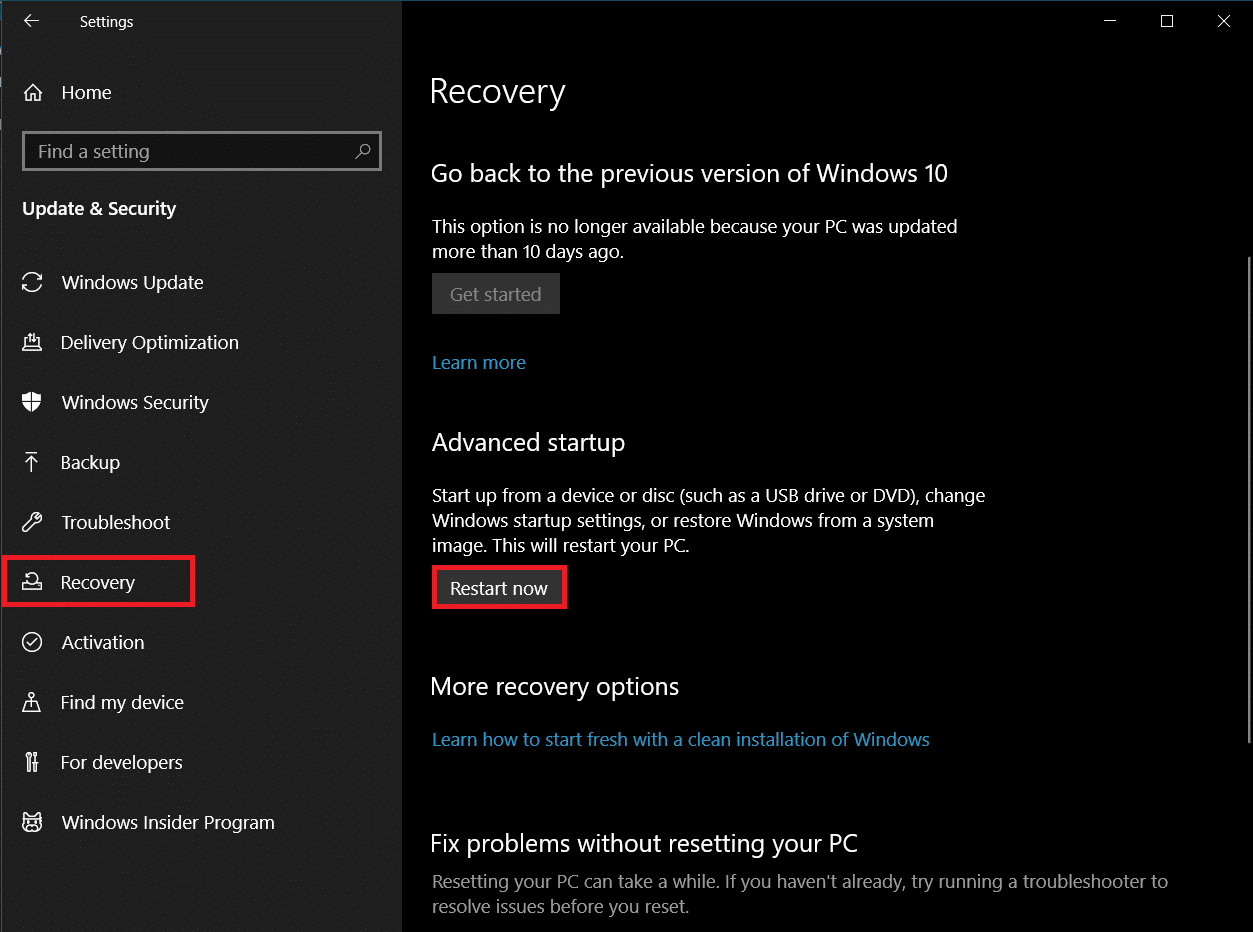
2. Move to Recovery tab and click on Restart now button under Advanced Startup.
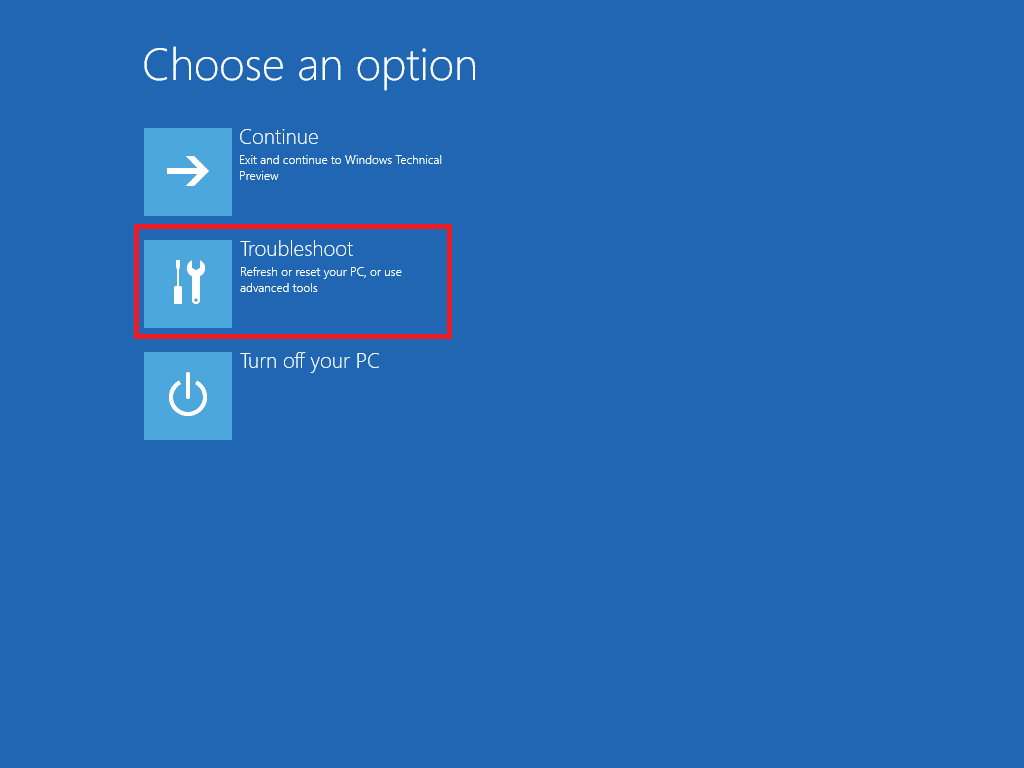
3. On the Choose an Option screen, click on Troubleshoot.
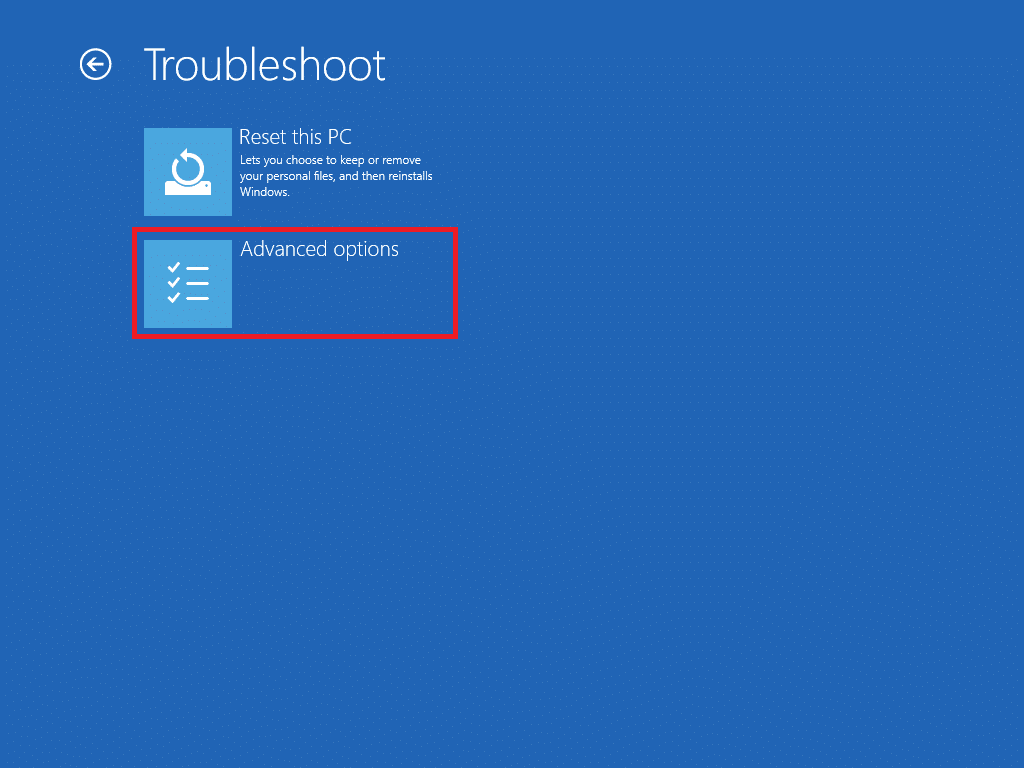
4. Click on Advanced Options.
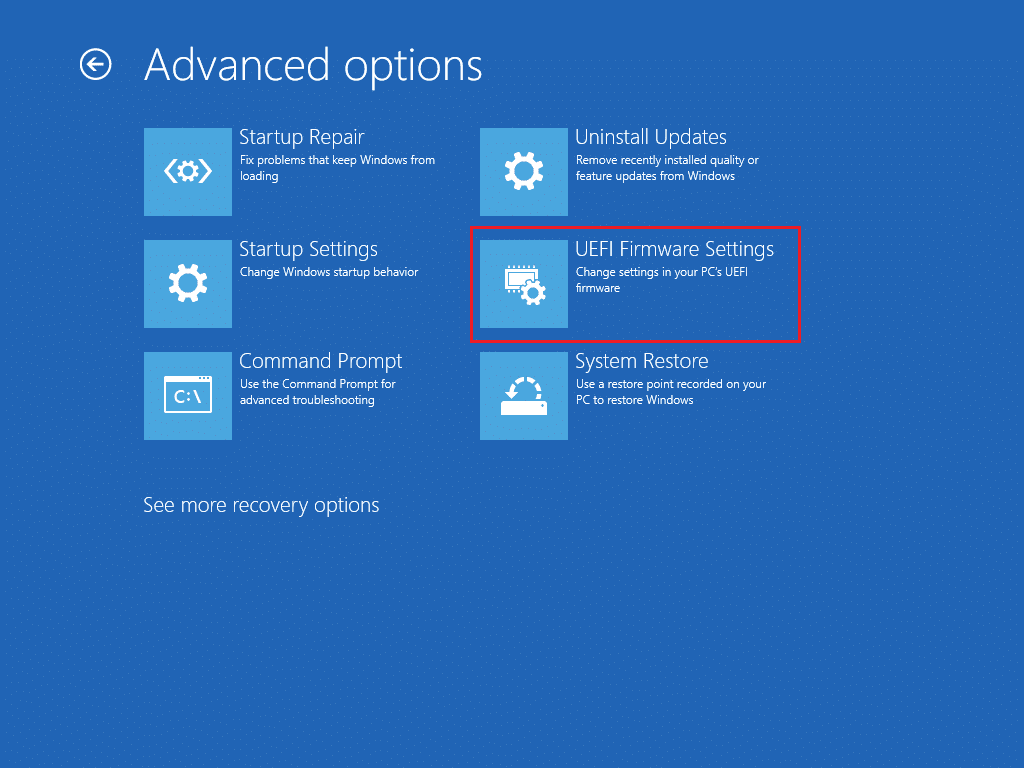
5. Select UEFI Firmware Settings and click on Restart on the next screen.
6. Your system will now boot into the BIOS menu.
Note: The placement of Secure Boot settings varies for each manufacturer. Read our article to access BIOS settings in Windows 10.
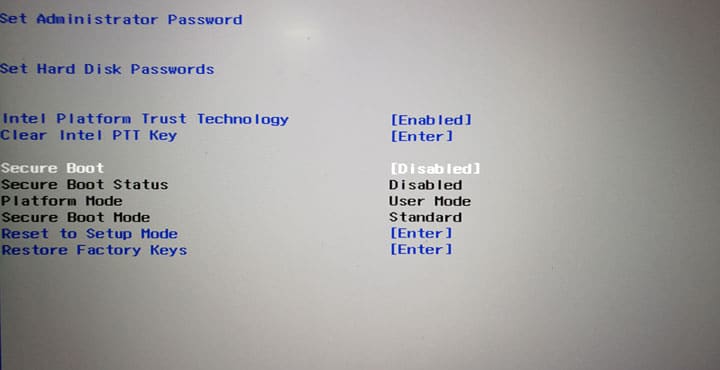
7. Using Arrow Keys go to the Boot tab and find the Secure Boot option.
8. Press Enter key or use + or – to change its status to Disabled, Press F10 to confirm changes.
Restart your PC and now you are ready to change the Windows 10 boot logo.
Recommended:
- Fix WaasMedicSVC.exe High Disk Usage in Windows 10
- How to Convert M4B to MP3 in Windows 10
- Fix Windows 10 Bluetooth Mouse Lag
- What is Test Mode in Windows 10?
We hope that this guide was helpful and you were able to change Windows 10 boot logo. We showed how to edit Windows startup using Windows 10 boot screen changer application, HackBGRT. If you have any queries or suggestions then feel free to drop them in the comments section.
For further personalization, you can change the boot logo in Windows to anything you want. Follow these steps to add a custom boot logo in Windows.
By default, Windows 10 shows the modern Windows logo on the boot logo. Generally, the new logo sits on top of pure black background and looks pretty neat all the while being minimal and not burning our eyes in dark environments. But, if you got bored with the default Windows logo on the boot screen, you can add your own custom logo to the boot screen.
To do that, all you have to do is point Windows 10 to the image of your choice, and you are done. So, without further ado, let me show you the steps to change the boot logo in Windows 10.
Before Adding Custom Boot Logo:
Before making any changes, make sure you know and follow the below list.
- Important: Create a full backup or a rescue disk before making any changes to the Windows boot logo. This is because, if anything goes wrong, you will not able to boot back into Windows. That’s where the backup or rescue disk comes handy.
- Windows should be running in UEFI mode, not Legacy BIOS. You can easily check if Windows is running on UEFI or Legacy BIOS.
- If Windows is running on UEFI, make sure the Secure Boot feature is disabled. When Secure Boot is enabled in UEFI, you cannot change the boot logo.
- You cannot set GIFs or transparent images as the new boot logo.
- Have the image you want to set as the boot logo ready and available. The image can be no bigger than 300px x 300px. The size is not a strict requirement.
- You need administrative privileges to change the Windows boot logo.
- This guide is only applicable to Windows 10. It might not work in Windows 8 or 7 (I have not tested it).
Once you are sure of everything in the above list, follow the next section.
Step-by-Step Guide to Change Boot Logo in Windows 10
Again, make sure you did a full Windows backup or have a rescue disk before following the below steps.
1. Since Windows has no options to change the boot time logo, we are going to use a third-party free and open-source tool called HackBGRT. So, download this software, open the ZIP file, and extract the folder in it to your desktop.
2. Now, open the extracted folder, right-click on the “setup.exe” file and select the “Run as administrator” option.
3. The above action will launch the application’s command-line tool. Here, press the i key on your keyboard.
4. As soon as you press the key, the program’s config file will be opened in the Notepad. Out of the box, the application’s settings are configured properly. So, simply close the Notepad by clicking on the “X” icon on the top-right corner.
5. Once you close the Notepad, the HackBGRT will open the Paint application with its own default boot logo. Here, click on the “Paste” drop-down button and select the “Paste from” option.
6. Now, find the image you want to set as the new Windows boot logo, select it, and click on the “Open” button.
A quick tip: Since the boot logo doesn’t support transparent images, change the background color of your transparent image to black before adding it to the Paint application.
7. This action will add the image to the Paint application. If needed, resize the image by clicking on the “Resize” button.
8. Once you are done, select the “File → Save” option to save the file. After saving, close the Paint application.
9. As soon as you close the application, you are done with the HackBGRT installation. You can now close it too.
That is it. From now on, whenever you boot into Windows, you will see your new custom boot logo instead of the default Windows logo.
Restore Original Boot Logo
If you want to restore the original boot logo, you can do that using the same application. Just follow the below steps.
1. First, open the HackBGRT folder, right-click on the “setup.exe” file and select the “Run as administrator” option.
2. Since the application is already installed in your system, you will see additional options.
3. To completely remove HackBGRT and restore the original boot logo, press r. If you want to disable the application and restore the original boot logo, press d. In my case, I want to fully remove it. So, I pressed r.
4. As soon as you press the key, HackBGRT will restore the original boot logo.
Just reboot the system and you will see the original Windows boot logo.
That is all. It is that simple to change the Windows boot logo or add a custom boot logo. If you are stuck or need some help, comment below and I will try to help as much as possible.
Windows стала синонимом современного логотипа с синей плиткой. Его можно увидеть на черном фоне, когда компьютер включен. Windows предоставляет своим пользователям массу возможностей для настройки, включая изменение загрузочного логотипа по умолчанию на любое другое изображение. В этой статье мы предлагаем вам полезное руководство, которое научит вас, как изменить загрузочный логотип Windows 10, отредактировать запуск Windows, а также заглянуть в средство смены экрана загрузки Windows 10.
Вот некоторые необходимые предварительные условия для изменения Windows 10 логотип загрузки.
- Windows должна работать в режиме загрузки UEFI.
- Безопасная загрузка должна быть отключена.
- Требуются административные привилегии.
Большинство современных ПК с Windows поставляются с UEFI, в то время как более старые системы используют Legacy BIOS. Вы можете следовать нашему руководству ниже, чтобы проверить, какая из них работает в вашей системе. Следуйте нашему руководству, чтобы проверить, использует ли ваш компьютер UEFI или Legacy BIOS.
Windows 10 не позволяет менять загрузочный логотип, но есть безопасный способ сделать это. HackBGRT — это бесплатный инструмент командной строки с открытым исходным кодом, используемый для изменения загрузочного логотипа. Для этого выполните следующие действия.
Примечание. При использовании HackBGRT GIF-файлы или прозрачные изображения нельзя использовать в качестве загрузочного логотипа, а требуемое разрешение изображения составляет 300 x 300 пикселей.
1. Перейдите на страницу загрузки HackBGRT и загрузите zip-файл последней версии (1.5.1).
2. После загрузки разархивируйте HackBGRT — 1.5.1.zip, используя соответствующий инструмент, например 7-zip.
3. В извлеченной папке щелкните правой кнопкой мыши файл setup.exe и выберите «Запуск от имени администратора» в контекстном меню.
4. HackBGRT откроет окно командной строки. HackBGRT обнаружит расположение системного раздела UEFI и проверит, отключена ли безопасная загрузка. Информация о том же будет отображаться.
5. Установите HackBGRT, нажав клавишу I.
6. После выполнения команды установки файл конфигурации HackBGRT откроется в Блокноте. Закройте его, изменив его.
7. Теперь HackBGRT автоматически запустит приложение Paint со своим логотипом.
8. Чтобы заменить загрузочный логотип предпочитаемым изображением, разверните раскрывающийся список «Вставить» и выберите «Вставить».
9. Найдите файл изображения, который вы хотите установить в качестве нового загрузочного логотипа, выберите его и нажмите «Открыть».
10. Отредактируйте его по своему усмотрению и, когда все будет готово, нажмите «Файл» > «Сохранить». Закройте окно приложения Paint.
11. Найдите подтверждающее сообщение, что HackBGRT теперь установлен, а затем закройте командную строку.
12. Наконец, перезагрузите компьютер, и вы увидите новый загрузочный логотип.
Как вернуться к логотипу загрузки Windows по умолчанию
Если вы хотите вернуться к исходному загрузочному логотипу Windows 10, вам необходимо удалить приложение HackBGRT. Для этого выполните следующие действия.
1. Выполните шаг 3 предыдущего метода, чтобы открыть установочный файл HackBGRT от имени администратора.
2. Вы увидите дополнительные параметры для удаления и отключения HackBGRT.
Примечание. Если вы хотите сохранить приложение, нажмите клавишу D, чтобы отключить его, и оно восстановит загрузочный логотип по умолчанию.
3. Нажмите клавишу R, чтобы выполнить команду удаления. Он полностью удалит HackBGRT из вашей системы.
4. Когда вы получите подтверждающее сообщение HackBGRT было удалено, нажмите любую клавишу, чтобы выйти из окна командной строки.
Логотип Windows по умолчанию теперь будет восстановлен.
Как отключить безопасную загрузку
Если ваш ПК с Windows работает под управлением UEFI, вам необходимо отключить безопасную загрузку, чтобы изменить загрузочный логотип Windows 10. Безопасная загрузка гарантирует, что устройство загружается с использованием только доверенного программного обеспечения, разработанного системой. Если он включен, он предотвратит запуск сторонних приложений и изменение загрузочного логотипа. Выполните следующие действия, чтобы проверить, включена ли она.
1. Нажмите клавишу Windows, введите «Информация о системе» и нажмите «Открыть».
2. Проверьте, включено ли состояние безопасной загрузки.
Если он включен, выполните следующие действия, чтобы отключить его.
1. Запустите приложение «Настройки», нажав клавиши Windows + I и щелкнув плитку «Обновление и безопасность».
2. Перейдите на вкладку «Восстановление» и нажмите кнопку «Перезагрузить сейчас» в разделе «Расширенный запуск».
3. На экране «Выберите вариант» нажмите «Устранение неполадок».
4. Нажмите Дополнительные параметры.
5. Выберите «Настройки прошивки UEFI» и нажмите «Перезагрузить» на следующем экране.
6. Теперь ваша система загрузится в меню BIOS.
Примечание. Расположение параметров безопасной загрузки зависит от производителя. Прочтите нашу статью, чтобы получить доступ к настройкам BIOS в Windows 10.
7. С помощью клавиш со стрелками перейдите на вкладку «Загрузка» и найдите параметр «Безопасная загрузка».
8. Нажмите клавишу «Ввод» или используйте + или –, чтобы изменить его статус на «Отключено». Нажмите F10, чтобы подтвердить изменения.
Перезагрузите компьютер, и теперь вы готовы изменить загрузочный логотип Windows 10.
***
Мы надеемся, что это руководство было полезным, и вы смогли изменить загрузочный логотип Windows 10. Мы показали, как редактировать запуск Windows с помощью приложения смены экрана загрузки Windows 10, HackBGRT. Если у вас есть какие-либо вопросы или предложения, не стесняйтесь оставлять их в разделе комментариев.
Unlike mobile devices, we users only need to turn on the power once and can use it for a long time afterwards.
As for computers, it is different, we will have to turn off the power when not in use to save power and also to prolong the life of electronic components in the computer.
The computers I’m talking about here are personal computers, not servers
However, there is one thing in common between these devices that is, every time you turn on the power, you will see a Logo while waiting for the system to boot.
Apple’s home goods will definitely be the Apple logo, which is half-eaten, and with computers, there are many forms, but the Windows Logo is probably the most familiar to our PC users, simply because Windows is widely used. the most variable
So do you ever intend to change that Logo when starting up? for example, replace it with a picture of a lover or lover for example
Or A very good idea is that you can borrow the Laptop of your lover/boyfriend/crush… (generally the person you are interested in) => then replace the Boot Logo with your mother’s. So every day when I start up the computer, “that person” will see your “bastard” face :))
Well, in this article, I will show you in detail how to change the Boot Logo on Windows 10. If you like, you can apply it to your computer.
#first. What is the boot logo?
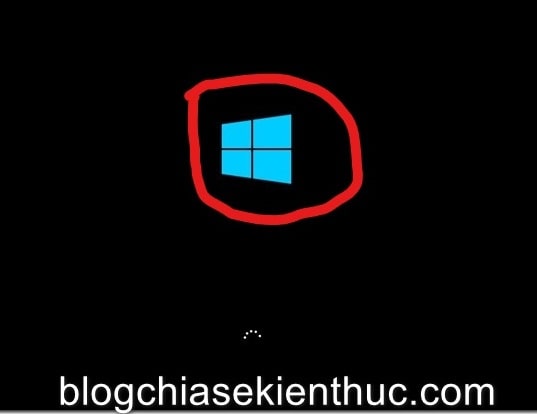
Yes, a question that sounds very frustrating! Because the name says it all, it is the Logo that appears every time you start the device, here is Windows 10, which is the one I circled in red in the picture below 🙂
Every time we press the power button to turn on the computer, we will see this Windows Logo before seeing the login screen to Windows 10.
That part of the Loading screen is called boot flag, if you see the Logos of Mainboard companies, or Laptop manufacturers such as MSI, Dell, Gigabytes, Asus, … instead of this Windows Logo, it is because your computer has been integrated by the company. boot flag enter the BIOS.
The get built-in boot flag or not at all, does not affect the performance of the computer, does it make your computer look cooler with the Logo of Asus ROG, MSI Gaming or GIGBYTES Aorus 😀
In addition, you can completely turn off the display of the company’s Logos in the BIOS so that the computer displays the operating system’s Logo again when Booting. Details you can review in the admin’s in-depth analysis of the Windows 10 installation process!
Before going into the details of the steps, there are a few things that I need to keep in mind::
- Make sure you have a backup of your data to restore, because you won’t be able to boot into Windows if you do it wrong.
- Only works with Windows 10 with UEFI standard and turned off
Secure Bootin BIOS, how to determine standard UEFI and Legacy Boot, you can see here! - Only still images can be used to make Windows 10’s Boot Logo, GIF animations are not supported.
- Only maximum sized images can be used
300px x 300px, unlimited capacity. - Using the ILoveIMG tool (https://www.iloveimg.com/resize-image) to resize images online if you don’t know how to use the software.
In general, you should also have a bit of computer knowledge 🙂 Yes, and if you have met all of the above, then let’s get started!
#2. Instructions to change the Boot Logo on Windows 10
By default in Windows 10, there is no tool to support this, not even the Registry Editor or Local Group Policy can do it.
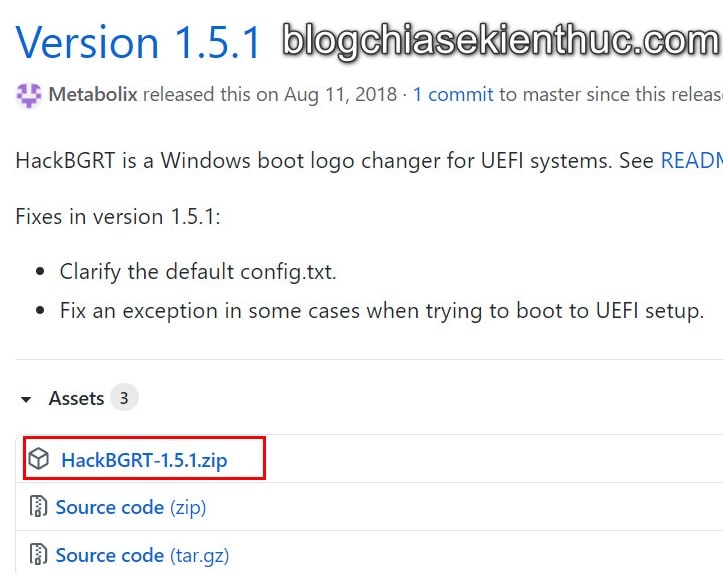
So we need a 3rd party software called HackBGRT, it’s free so you can go to the Github page here (backup link I uploaded more) to download, the current latest version is 1.5.1.
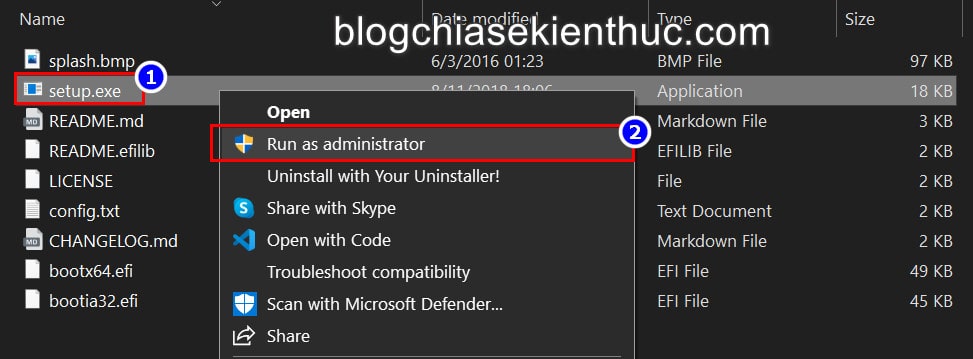
+ Step 1: After downloading, please unzip it => you will get the files as shown in the image below.
Now right click on the file setup.exe => and choose Run as administrator to run the software HackBGRT with Admin rights => This action is required!
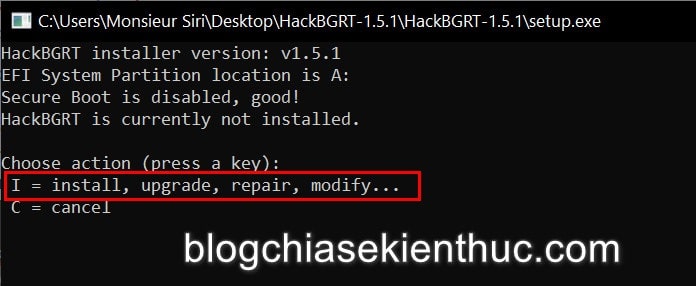
+ Step 2: The CMD (Command Prompt) window appears with an interface similar to the image below, as you can see, HackBGRT has checked that its Windows 10 is UEFI standard and Secure Boot has been disabled in the BIOS.
=> Now press the key I on the keyboard to install HackBGRT software into Windows 10.
+ Step 3: Right after that, the software will automatically open the configuration file config.txt by tool Notepad, but you don’t need to care, just close that Notepad window.
HackBGRT will open the software MS Paint right after you close Notepad for you to choose the image you want to make the new Windows 10 Boot Logo.
Default will be the Logo of the software HackBGRT hey => now click the arrow under the . button Paste => and choose Paste from to select the image you want to make the Logo that you have prepared.
+ Step 4: Next, you choose the path to the image you want to use as the new Boot Logo => and press Open to put on Paint.
Then tap File => Save to save this new image to file splash.bmp – is the Logo file that will be displayed during the Windows 10 boot process.
Finally, close the software Paint and even the Command Prompt window of HackBGRT, the Windows 10 Boot Logo change is complete.
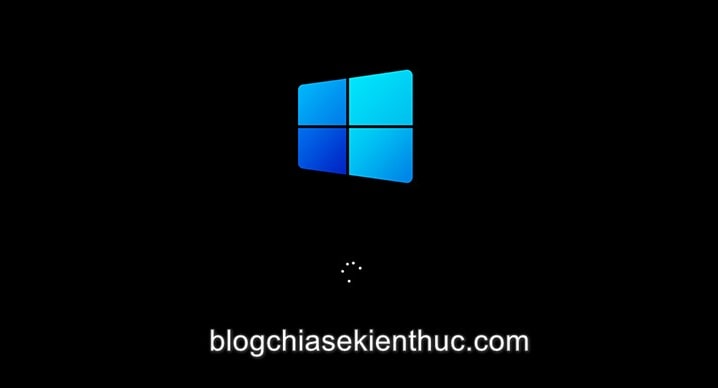
+ Step 5: Personally, I will use the Logo of the upcoming version of Windows 10X with a new Fluent Design design to synchronize with the interface of Windows 10.
And did you notice that the photo I used has the ending JPG with a black background?
Simply because we cannot use transparent background images in the form of PNG To make Logo bootable, you have to make their background black to match the black background of the screen to be beautiful.
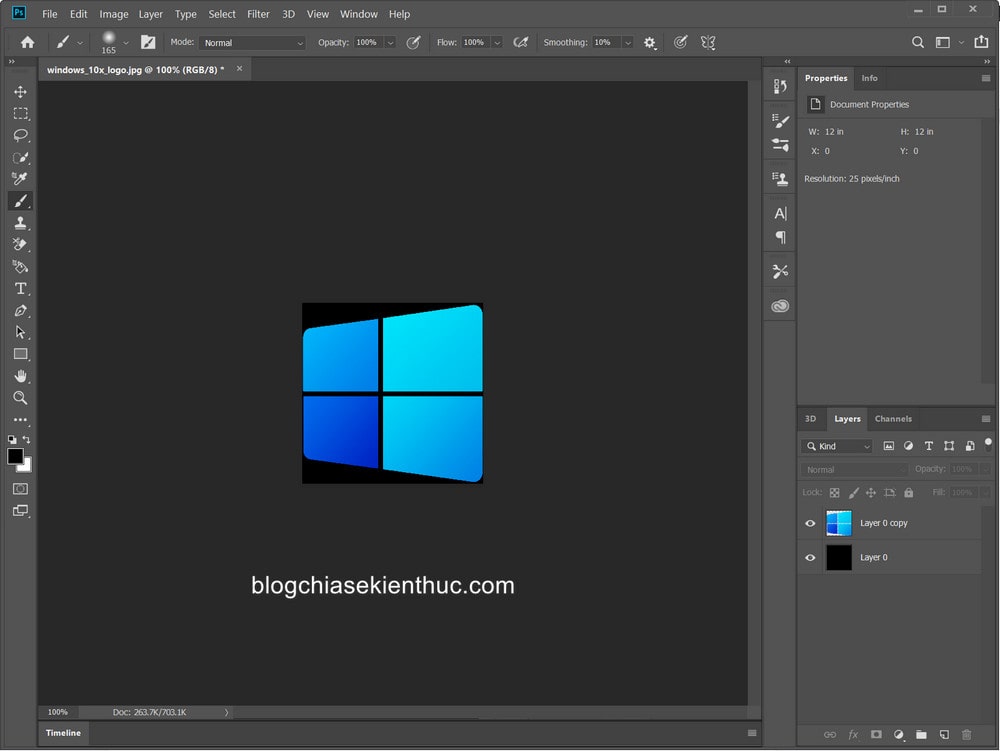
The way to create a black background is also very simple, for me, I will open a PNG image with a transparent background using Adobe Photoshop software.
Perform:
Open Photoshop software => press Ctr + J to duplicate the layer of this photo => then just fill the entire layer below with black and you’re done.
Don’t forget to click Image and choose Image Size… (Alt + Ctrl + I) to resize the image properly by 300px x 300px before saving if necessary, it’s best to just make sure.
From now on, every time I turn on the machine, I will see this Windows 10X Logo, not the old Windows 10 anymore, it looks vjp pro =))
#3. Restore the original Windows 10 Boot Logo
What if you want to go back to the original Logo? Well, HackBGRT has also included an option for you to restore at any time.
First, go back to the folder containing the file setup.exe As already compressed at the beginning of the article, if you delete it, then take it easy => then right-click again setup.exe and choose Run as administrator once again.
At this Command Prompt window you will have 2 options:
- Restore only to the original Boot Logo, press the . key
R - Or restore to the original Boot Logo and uninstall HackBGRT on the computer, press
D
I just want to restore to the original Logo, because maybe later I will change to another one, so I will not delete it, so I will click R => and then press any key to close the CMD window, that’s it.
And at the next boot, you will see the familiar Windows 10 Logo again.
#4. Epilogue
So I just finished the tutorial for you How to change Windows 10’s Boot Logo according to your liking. It’s very simple, isn’t it, it’s also fun to sit back and do these things in your free time =)
Hope you enjoy this article. If you encounter any difficulty during the implementation, just comment below and we will help you. Good luck !
You might like:
CTV: Nguyen Thanh Tung – techtipsnreview
Note: Was this article helpful to you? Don’t forget to rate the article, like and share it with your friends and family!
Содержание
- How to Change Boot Logo on Windows 10
- How to Add a Custom Boot Logo
- October 2022 Update:
- How to Undo the Changes
- Как изменить логотип загрузки Windows с помощью HackBGRT 2022
- How to Change Windows 10’s Boot Logo Easily | Guiding Tech
- Изменить логотип загрузки в Windows 10
- Как отменить сделанные изменения
- HackBGRT Windows Boot logo changer software download
- Как изменить каталог загрузки по умолчанию в Internet Explorer
- Как изменить логотип оператора на iphone (джейлбрейк не требуется)
- Как изменить местоположение загрузки в Opera Mini на Android
- Enable Windows 10X Boot Logo Animation in Windows 10
- How to Change Windows 10 Boot Logo (Add Custom Boot Logo)
- Step-by-Step Guide to Change Boot Logo in Windows 10
- Restore Original Boot Logo
- Change Windows 10 Boot Logo
- Related Searches
- Listing Of Websites About change windows 10 boot logo
- How to Change Windows 10 Boot Logo (Add Custom Boot Logo)
- How to Change Windows 10’s Boot Logo Easily | Guiding Tech
- How to Change Windows 10 Boot Screen in an Easy Way
- How To Change Boot Logo In Windows 10
- Unbranded Boot | Microsoft Docs
- Enable Windows 10X Boot Logo Animation in Windows 10
- What Is
- How to Enable New Boot Animation in Windows 11
- How to change windows 10 boot logo image : chrultrabook
- How to change Windows Boot Logo using HackBGRT
- HOW TO CHANGE BOOT LOGO IN WINDOWS 10
- HackBGRT: Windows 10 UEFI Boot Logo Changer
- Change Windows 10 Boot Logo (Anniversary Update)
How to Change Boot Logo on Windows 10
Update: Stop getting error messages and slow down your system with our optimization tool. Get it now at this link
For further customization, you can change the startup logo in Windows as you wish. Follow these steps to add a custom Windows startup logo.
By default, Windows 10 displays the modern Windows logo on the startup logo. Typically, the new logo is placed on a black background and looks pretty neat, but it is minimal and won’t burn your eyes in dark environments. But if you get tired of the standard Windows logo on the startup screen, you can add your own custom logo on the startup screen.
Just point Windows 10 at the image of your choice and you’re done. Without further ado, let me show you how to change the startup logo in Windows 10.
How to Add a Custom Boot Logo
HackBGRT is a free software to change the Windows boot logo for UEFI systems, which allows you to change the default boot logo of your Windows 10/8/7 computer.
After downloading the program, open the setup.exe file, then you can follow the on-screen instructions to change the startup logo. Before doing anything, you must disable the “Secure Boot” feature. If you have enabled Secure Boot, the program will ask you if you want to disable it. For more details on disabling Secure Boot, visit your laptop manufacturer’s website.
If Secure Boot has been disabled, open the setup.exe file again. Now press I to start the installation. The program will then open a Notepad window with a configuration. In this configuration file, you must specify the path to the image you want to display and other parameters such as positioning, etc. You can also specify several images to be taken at random with the specified weight.
October 2022 Update:
After saving the configuration file, a paint window opens with the default splash image. You can draw your image there or copy it from another source and paste it here. Now make sure that you save all images in Microsoft Paint’s 24-bit BMP format.
Once the pictures are saved, the program will make the necessary changes and you can restart your computer to see these changes.
How to Undo the Changes
Something didn’t go as planned? Restart the setup.exe file and this time press D instead of I at the command prompt. You may also be unable to boot your system. This is unlikely, but we have already warned you. If you have created recovery media or already have one, you can use it. You can also use a Windows system recovery point that you might have created.
Because you won’t be able to boot the system, you might need bootable Windows media, such as a disk or USB flash drive. You can also use the backup created with the HackBGRT tool by copying [EFI System Partition]EFIHackBGRTbootmgfw-original.efi to [EFI System Partition]EFIMicrosoftBootbootmgfw.efi. To do this, you must use the command prompt from a Windows media or USB memory stick, etc.
CCNA, Web Developer, PC Troubleshooter
I am a computer enthusiast and a practicing IT Professional. I have years of experience behind me in computer programming, hardware troubleshooting and repair. I specialise in Web Development and Database Design. I also have a CCNA certification for Network Design and Troubleshooting.
Источник
Как изменить логотип загрузки Windows с помощью HackBGRT 2022
How to Change Windows 10’s Boot Logo Easily | Guiding Tech
Что такое система UEFI
Внимание : внесение изменений в загрузчик немного рискованно, и это может сделать систему не загружаемой. Убедитесь, что у вас есть надлежащий Windows Recovery Media, если что-то пойдет не так. Хотя программа предоставляет альтернативу исправлениям, но все же хорошо иметь свои собственные носители для восстановления.
Изменить логотип загрузки в Windows 10
После вас сохранили конфигурационный файл, откроется окно Paint с заставкой по умолчанию. Здесь вы можете нарисовать свое изображение или копию из другого источника и вставить его здесь. Теперь убедитесь, что вы сохранили все изображения в формате 24 бит BMP из Microsoft Paint.
После того, как изображения будут сохранены, программа внесла все изменения, и вы сможете перезагрузить компьютер, чтобы увидеть эти изменения на месте.
Как отменить сделанные изменения
Если что-то пойдет не так, и вы не можете загрузиться в свою систему, что очень маловероятно, используйте носитель для восстановления для восстановления вашего компьютера. Или вы можете использовать резервную копию загрузчика, которая была создана HackBGRT для восстановления загрузчика.
Для этого вы можете скопировать [EFI System Partition] EFI HackBGRT bootmgfw-original.efi в [EFI System Partition] EFI Microsoft Boot bootmgfw.efi с помощью некоторых других средств, таких как командная строка Linux или Windows.
HackBGRT Windows Boot logo changer software download
Как изменить каталог загрузки по умолчанию в Internet Explorer
В этой статье будет показано, как изменить каталог загрузки по умолчанию в Internet Explorer, в любую папку по вашему выбору.
Как изменить логотип оператора на iphone (джейлбрейк не требуется)
Вот как можно изменить логотип оператора в строке состояния вашего iPhone без джейлбрейка.
Как изменить местоположение загрузки в Opera Mini на Android
Источник
Enable Windows 10X Boot Logo Animation in Windows 10
You can now enable the Windows 10X boot logo animation in Windows 10, in regular desktop versions. The boot animation in Windows 10X looks different from what we have these days in desktop OS editions. It features a WinUI 3 spinning circle instead of Win8-like style circles.
Windows 10X is Microsoft’s answer to Chrome OS. It supposed to be a lightweight, minimalist edition of Windows. It does not have everything that the full-featured Windows 10 has. The project already has an interesting history. It started as an operating system for dual screen portable Windows devices, but eventually got support for lower-end single screen devices.
Windows 10X is notable for its streamlined design and containerized apps. Visually, a number of things are updated, from its icons, to animations to even the Start menu, taskbar and Action Center.
These changes in Windows 10X are coming to Desktop with the Sun Valley project, the new user interface that should hit consumer devices in the second half of 2022 with the major 21H2 release.
One of the Windows 10X novelties is a new boot logo animation with a WinUI 3 spinning circle instead of Win8-like style circles.
Here’s how to enable it in desktop editions of Windows 10. You must be running Windows 10 build 19587 or greater.
Источник
How to Change Windows 10 Boot Logo (Add Custom Boot Logo)
For further personalization, you can change the boot logo in Windows to anything you want. Follow these steps to add a custom boot logo in Windows.
By default, Windows 10 shows the modern Windows logo on the boot logo. Generally, the new logo sits on top of pure black background and looks pretty neat all the while being minimal and not burning our eyes in dark environments. But, if you got bored with the default Windows logo on the boot screen, you can add your own custom logo to the boot screen.
To do that, all you have to do is point Windows 10 to the image of your choice, and you are done. So, without further ado, let me show you the steps to change the boot logo in Windows 10.
Before Adding Custom Boot Logo:
Once you are sure of everything in the above list, follow the next section.
Step-by-Step Guide to Change Boot Logo in Windows 10
Again, make sure you did a full Windows backup or have a rescue disk before following the below steps.
6. Now, find the image you want to set as the new Windows boot logo, select it, and click on the “Open” button.
Restore Original Boot Logo
If you want to restore the original boot logo, you can do that using the same application. Just follow the below steps.
1. First, open the HackBGRT folder, right-click on the “setup.exe” file and select the “Run as administrator” option.
4. As soon as you press the key, HackBGRT will restore the original boot logo.
That is all. It is that simple to change the Windows boot logo or add a custom boot logo. If you are stuck or need some help, comment below and I will try to help as much as possible.
Источник
Change Windows 10 Boot Logo
Listing Of Websites About change windows 10 boot logo
How to Change Windows 10 Boot Logo (Add Custom Boot Logo)
Posted at: 4 days ago | Categories: FAQs | 259 People Used View Detail
How to Change Windows 10’s Boot Logo Easily | Guiding Tech
Posted at: 1 week ago | Categories: FAQs | 308 People Used View Detail
Posted at: 1 day ago | Categories: FAQs | 105 People Used View Detail
Posted at: 2 days ago | Categories: FAQs | 147 People Used View Detail
How to Change Windows 10 Boot Screen in an Easy Way
Posted at: 6 days ago | Categories: FAQs | 190 People Used View Detail
How To Change Boot Logo In Windows 10
Posted at: 1 day ago | Categories: FAQs | 494 People Used View Detail
Unbranded Boot | Microsoft Docs
Posted at: 6 days ago | Categories: FAQs | 264 People Used View Detail
Enable Windows 10X Boot Logo Animation in Windows 10
Posted at: 1 week ago | Categories: FAQs | 473 People Used View Detail
Posted at: 3 days ago | Categories: FAQs | 424 People Used View Detail
What Is
Posted at: 3 days ago | Categories: What Is | 304 People Used View Detail
Posted at: 3 days ago | Categories: FAQs | 121 People Used View Detail
Posted at: 1 week ago | Categories: FAQs | 472 People Used View Detail
How to Enable New Boot Animation in Windows 11
Posted at: 6 days ago | Categories: FAQs | 465 People Used View Detail
Posted at: 2 days ago | Categories: FAQs | 234 People Used View Detail
Posted at: 4 days ago | Categories: FAQs | 406 People Used View Detail
How to change windows 10 boot logo image : chrultrabook
Posted at: 1 week ago | Categories: FAQs | 123 People Used View Detail
Posted at: 2 days ago | Categories: FAQs | 169 People Used View Detail
How to change Windows Boot Logo using HackBGRT
Posted at: 1 week ago | Categories: FAQs | 340 People Used View Detail
Posted at: 6 days ago | Categories: FAQs | 266 People Used View Detail
Posted at: 5 days ago | Categories: FAQs | 50 People Used View Detail
HOW TO CHANGE BOOT LOGO IN WINDOWS 10
Posted at: 4 days ago | Categories: FAQs | 437 People Used View Detail
Posted at: 4 days ago | Categories: FAQs | 224 People Used View Detail
HackBGRT: Windows 10 UEFI Boot Logo Changer
Posted at: 1 week ago | Categories: FAQs | 141 People Used View Detail
Posted at: 1 week ago | Categories: FAQs | 78 People Used View Detail
Posted at: 6 days ago | Categories: FAQs | 198 People Used View Detail
Posted at: 4 days ago | Categories: FAQs | 162 People Used View Detail
Change Windows 10 Boot Logo (Anniversary Update)
Posted at: 1 week ago | Categories: FAQs | 86 People Used View Detail
Источник
Anytime you boot your Windows computer, the very first thing you see on your screen is the manufacturer’s logo. I don’t know about you but I’ve always wanted to change just about everything on my Windows PC ever since I got the customization flu. The boot logo though is not as easy as changing the wallpaper or even the Windows login screen. The manufacturer doesn’t want you to change the logo. Although, Windows is a pretty popular platform. When a lot of developers have something, somebody will always find a way to change the Windows 10 boot logo. That is how we have this nifty tool called HackBGRT. It lets you change the Windows UEFI boot logo.
Warning
HackBGRT is a little complicated to use. Also, you’re not using it to change wallpapers. Remember, Windows is an OS that might fail to boot when you try as much as installing an icon pack. Changing the UEFI Boot logo is something at another level. It’s our duty to let you know that if you do proceed with using this tool your PC might fail to boot. It is unlikely if you’ve followed the guide below carefully but still very possible. We recommend creating a recovery media first or at least a system restore point. You can create a Windows system restore point and use it to restore your PC.
HackBGRT also creates a backup of the bootloader for such situations. We’ll show you how to use that as well.
Requirements to Chane UEFI Boot Logo
HackBGRT only supports UEFI systems and is not meant to work on anything else. If you’ve bought your computer recently, it is more than likely to support UEFI. If you’re running a dual boot setup, you’re most probably using the Legacy bootloader, in which case you can’t use this tool. You must also make sure Secure Boot is disabled. This can be done in the BIOS menu accessing which is different, depending on the manufacturer of your PC.
Download
HackBGRT from GitHub
Steps to Change Windows 10 Boot Logo
- Download the latest HackBGRT zip from GitHub using the link above and extract the archive.
- In the extracted folder, double-click on the setup.exe file. If your system doesn’t support UEFI or you have it turned off you will be told so in the command prompt window that opens up. Similarly, you will be asked to disable Secure Boot if you have it enabled.
- Hit I on your keyboard to begin the installation. After that is complete the program will open a configuration file in a Notepad.
- In this configuration file, you’ll be required to specify the path to the image file you want to use, the positioning of the image on the screen, etc.
- When you’re done with it, save the configuration file and close it. The default boot logo will then be opened in an MS Paint window. You can edit the image or copy from another source, then save the image in 24-bit BMP format.
- Once the image is saved, the program will make the necessary changes and your boot logo will be applied. You can see the changes when you reboot your system.
How to revert changes
Did something not go as planned? Launch the setup.exe file again and hit D instead of I this time in the command prompt window. There is also the possibility that you might not be able to boot into your system. This is quite unlikely, but we did warn you before. If you did create a recovery media or already had one, you can use that. Or you can use a Windows system restore point that you may have created.
Since you aren’t able to boot into the system, you may still need a bootable Windows media, such as a disc or a USB drive. You can also use the backup created by the HackBGRT tool by copying [EFI System Partition]EFIHackBGRTbootmgfw-original.efi into [EFI System Partition]EFIMicrosoftBootbootmgfw.efi. To do that you will need to use the command prompt from a Windows media or use an Ubuntu Flash drive, etc.
Having applied a custom boot logo on your PC, you might also want to install a custom theme on your Windows 10.
Windows 10 is the latest version of windows and it is the best version yet. But just like windows 7 and windows 8, it is boring to look at and much more exciting to use. 8oot logo changer is a free tool designed to change the default boot logo picture of the windows boot screen with a custom picture. The tool does the job by replacing first of all, you need access to bootres. Dll, which is located in c: windows boot resources bootsres. Takeown /f c:windowsb wim file you extracted in the previous step using 7-zip and extract the images to the folder you made to edit them. 7. Open any image editor and make an image of the same. …
Let’s be honest for once.
When we boot into our trusty Windows 10, we are either greeted with the hardware manufacturer’s logo or the newest Windows Logo at the start screen.
It reminds time to time that we are not in complete control of our devices.
Wouldn’t it be cool if you could be greeted with your favorite superhero or just your boy/girlfriend’s image?
Sounds cheesy?
Well, the high minds ha d already made the solutions available to us. It is just finding and setting it up in the correct manner.
Today, we are going through the rundown of the best windows boot logo changer software.
Windows 10 is the latest version of Windows and It is the best version of Windows yet. But just like Windows 7 and Windows 8, It is a bit boring to look at and much more exciting to use. If you want to make Windows 10 Boot Screen more interesting, you can use Windows Vista Boot Screen for that. Windows Vista Boot Logo Changer is a utility to replace the default boot screen logo of Windows 10 with your own custom logo which can be PNG image.
Before we do anything, here’s a disclaimer.
Making changes to the bootloader is risky, and could make your system unbootable. It is suggested that you have a proper Windows Recovery Media if anything goes haywire.
1. HackBGRT
HackBGRT only supports UEFI and not basic BIOS. Make sure your computer supports it (Almost all newest devices are UEFI based, but it is best to double-check).
Here is a simple How-To:
1. Get the latest release from the Releases page. https://github.com/Metabolix/HackBGRT
2. Start setup.exe and follow the instructions. You may need to disable Secure Boot manually.
3. The installer will launch Notepad for modifying the configuration.
4. For one custom image, the defaults are fine. Else, check out the examples in the configuration file. In this configuration file, you need to specify the path to the image that you want to display and other parameters such as positioning, etc. You can specify multiple images that will be picked up randomly.
5. The installer will launch Paint for creating the image(s). You can create multiple images, just sure to always use the 24-bit BMP/DIB format.
6. After the images are saved, the program will make all the changes.
Additionally, you can follow Readme for the GitHub repository to enable such settings for multi-OS systems.
When you mess up and want to remove the default logo, press D in the CMD window.
Additionally, you can use the backup of the bootloader that was created by HackBGRT to recover the bootloader. Copy “[EFI System Partition]EFIHackBGRTbootmgfw-original.efi” to “[EFI System Partition]EFIMicrosoftBootbootmgfw.efi”.
2. 8oot Logo Changer Tool
It is a free tool designed to change the default boot logo picture of the Windows boot screen with a custom picture. The tool does the job by replacing the default images in the bootloader.
For this, one needs to turn Test Signing mode on. Changing the boot screen logo when Test Signing mode is turned off will show a blank boot screen. The only caveat is that you might see Test Mode watermark at the bottom right area of the desktop. It can be turned off by using a patcher in 8oot to hide the watermark by editing shell32.dll.mui and basebrd.dll.mui. Backup original files using ‘Backup shell32.dll.mui’ and ‘Backup basebrd.dll.mui buttons’ before patching.
To use it,
1. Download the tool.
2. Run the application. You may get UAC prompt, click ‘Yes’.
3. Switch to the Testmode tab. Click on Test signing checkbox to turn it on or off. For our purposes, we need to keep it checked.
4. Switch back to the Bitmaps tab and click the ‘Load Picture’ button to browse to the picture file and open the same.
5. if the picture is too large, you my want to crop the picture to your liking to use as boot logo, click the Arrow button under Edited Pictures section to generate 6 new BMPs.
6. Click on the “Generate” button to make a new bootres.dll file containing your custom boot logo.
7. You can preview the new logo by clicking the Preview button located next to the Load Picture button, for any last-minute changes, before applying the new boot logo.
8. Click on “Apply” button, which will replace the original bootres.dll logo provided by the system, with the new one; you have selected. Click Yes button on UAC prompt to replace the original bootres.dll file with the custom one.
3. Manual way
To modify the Boot screen, we can take the manual approach to have more granular control over the process.
So, how to do it.
1. First of all, you need access to bootres.dll, which is located in C: Windows Boot Resources bootres.dll.
The easiest way to do this is by using the application TakeOwnershipEx, made by WinAero. It can be used to obtain full access to files and folders on your computer.
In modern Windows, the default owner of most system files is TrustedInstaller, and all users, even users with administrative privileges to have read-only access in most cases, even if you are the administrator. TakeOwnershipEx allows users to become owners of files or folders with one click. And grants full access permissions too. So, you are the owner of the whole system files that you didn’t have access to previously.
Alternatively, you can run these command in elevated privileges.
takeown /f C:WindowsBootResourcesbootres.dll
icacls C:WindowsBootResourcesbootres.dll /grant %username%:f
2. You need to download additional soft-wares to complete the process.
Signer: Signer is a tool that makes and signs scripts or programs with self-certificates. Without certificate signing, no system files will execute.
7-Zip: 7-zip is an open source and free archiving tool, used to compress and expand data into zipped files, called archives.
Restorator: It is a utility for editing Windows resources in applications and their components; e.g,. files with. .exe, .dll, .res, .rc, and .dcr, extensions
3. To replace bootres.dll, create a directory on your C drive with any name, and copy the bootres.dll file to that folder. Create a folder called Logos inside that previous folder. This is the folder where the images you extract from the DLL will be stored, so you can edit them or take as a backup.
4. Using Restorator, open the bootres.dll file and go to the RCData section on the left.
5. Within the RCData section, you will see a file called “1”. Right click on it and extract, then select Extract as and then select extract as… and save it as RCDATA_1.wim.
6. Open the RCDATA_1.wim file you extracted in the previous step using 7-zip and extract the images to the folder you made to edit them.
7. Open any image editor and make an image of the same dimensions as the images you have extracted and saved it with a 24-bit bitmap format.
8. When you finish, use 7-Zip again to pack the edited images back into the RCDATA_1.wim file.
9. In Restorator, right-click “1” and select Assign, then click Assign to. Browse for your edited RCData_1.wim.
10. Save the DLL file.
11. Open an elevated command prompt, change to the C:Bootlogo folder by typing:
cd C:<folder name> and then type the following command in your <folder name> folder:
signer /sign sign bootres.dll
The Signer app will ask you to install a root certificate, choose yes when prompted.
12. Place your modified bootres.dll file back in the C:WindowsBootresources folder and reboot your PC!
If you could see only the boot animation (the spinning circle) and not the logo, then try one of these two things:
run the following command in a command prompt running as an administrator:
Bcdedit.exe -set TESTSIGNING ON, and reboot your PC.
Windows 8 and 10 are the latest version of Windows, and they have a few new features. One of those is a boot logo which is a Windows icon at the bottom of the screen. If you don’t like the default logo, you can now replace it with your own. It’s super easy to change logo on windows 10 boot screen.
Go to Windows 10 boot logo changer to know more about how to change logo on windows 10 boot screen.

Hello! My name is Lucas, and I am the creator of ursuperb.com. I’ve been writing about technology for almost 10 years now, and I love talking about tech news, reviews, and tutorials. I’m currently living in San Francisco, CA, and I’ve been blogging professionally since 2012. I love what I do, and I really enjoy interacting with people online. I believe in creating positive change for humanity, and I try to inspire others to do the same. You can read more about me here.
My favorite thing about Ursuperb is that I’m able to provide useful information to anyone interested in learning more about technology. No matter what kind of tech you use (computer, smartphone, tablet), you will definitely find something interesting to read on Ursuperb. So, let’s take a look at some of the topics I cover on Ursuperb:
1) How To Build An Online Business With WordPress
2) How To Make Money On YouTube Using AdSense
3) What Is Google Analytics? And Why Should You Use It?
4) How To Make Your Own Website Design Software For Free


