Skip to main content
Support
Support
Sign in
Sign in with Microsoft
Sign in or create an account.
Hello,
Select a different account.
You have multiple accounts
Choose the account you want to sign in with.
Microsoft account Microsoft Store Windows 10 More…Less
Rename your device to make it easier to identify if you use multiple computers with your Microsoft account.
-
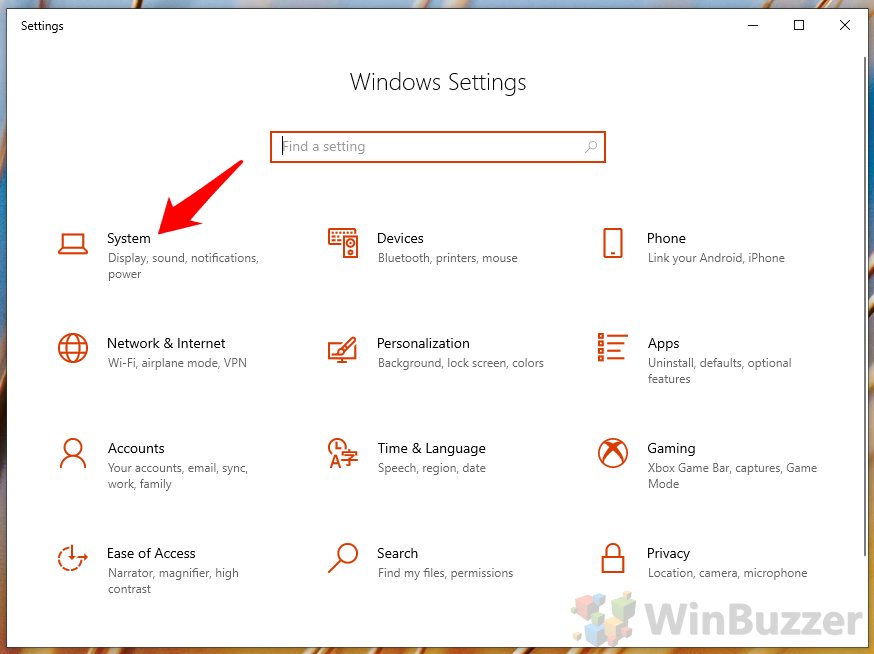
Select Start > Settings > System > About.
-
Select Rename this PC.
-
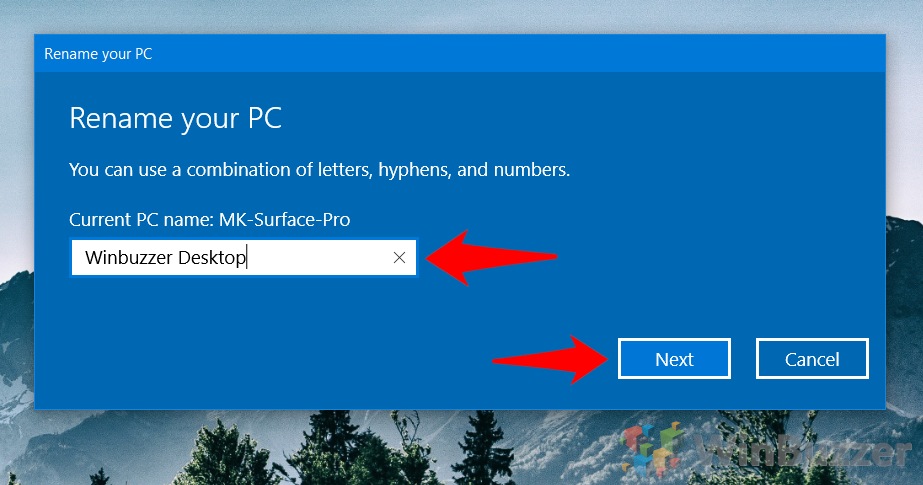
Enter a new name and select Next. You may be asked to sign in.
-
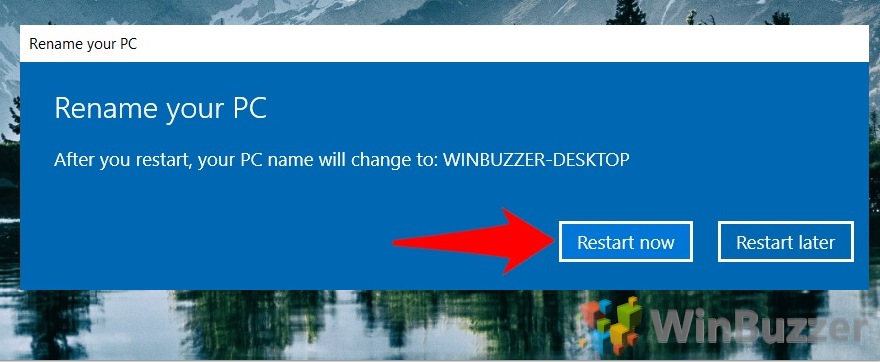
Select Restart now or Restart later.
Get more help managing your devices


SUBSCRIBE RSS FEEDS
Need more help?
Expand your skills
Explore Training
Get new features first
Join Microsoft Insiders
Was this information helpful?
(The more you tell us the more we can help.)
(The more you tell us the more we can help.)
What affected your experience?
Resolved my issue
Clear instructions
Easy to follow
No jargon
Pictures helped
Other
Didn’t match my screen
Incorrect instructions
Too technical
Not enough information
Not enough pictures
Other
Any additional feedback? (Optional)
Thank you for your feedback!
×

Contents
- 1 How to Change Computer Name via Settings
- 2 How to Change Computer Name in Windows 10 via Control Panel
- 3 How to Change Computer Name via CMD
- 4 How to Change Computer Name in PowerShell
By default computer names in Windows 10 tend to be quite plain. By default, they tend to be ‘WIN’ or ‘Desktop’, followed by a string of random letters and numbers. This can make them quite difficult to identify, which leaves many wondering how to change their computer name in Windows 10.
The good news is that to rename a computer in Windows 10 is incredibly easy and there are multiple ways to do it. Doing so shouldn’t have any negative effect on your system or network and is easily reversible.
Today we’re going to show you how to change your computer name in Windows 10 via the settings menu, Control Panel, Command Prompt, and PowerShell. You can return your PC back to default by noting down its name and following the steps again. Let’s get started:
How to Change Computer Name via Settings
Unsurprisingly, the simplest way to change PC name in Windows 10 is via the Settings interface.
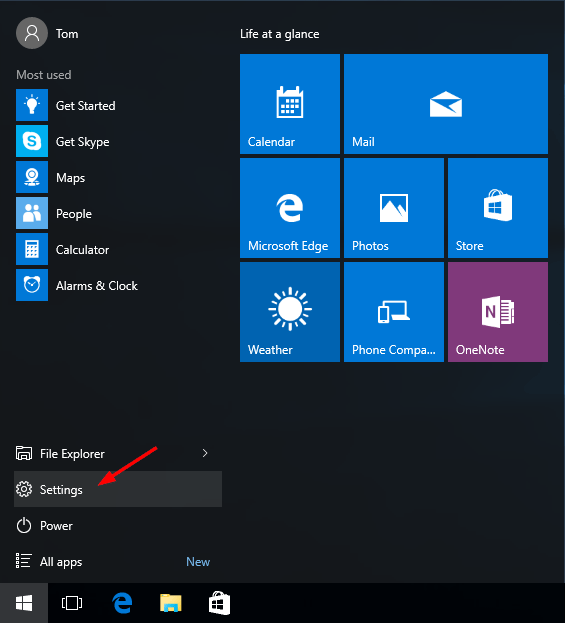
- Open Settings
Press the “Start” button, then the settings cog to open Settings.

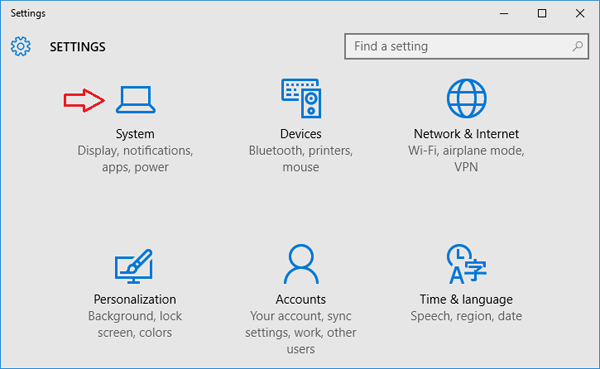
- Click the “System” icon

- Rename your computer in Windows 10 Settings
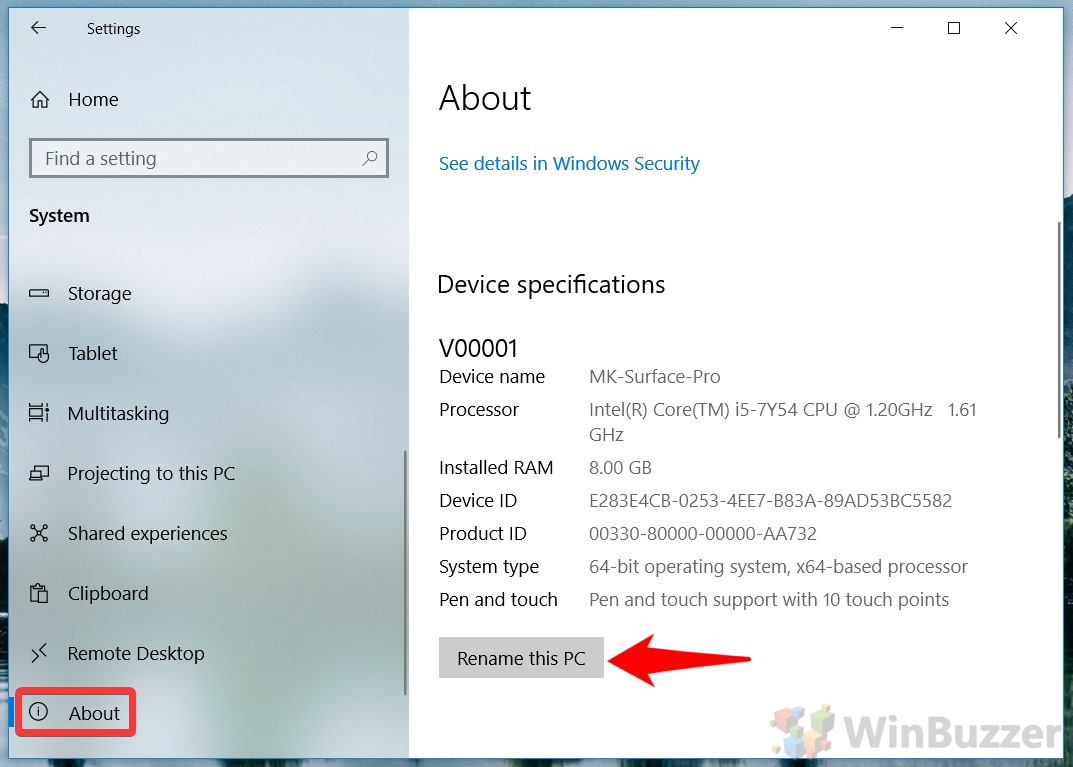
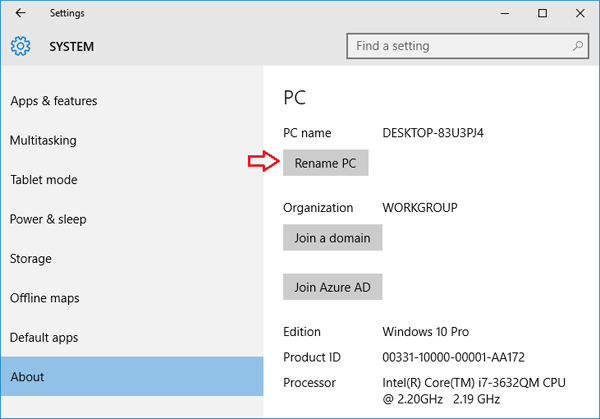
Click “About” in the sidebar, then scroll down until you see “Rename this PC”. Click the button.

- Set your Computer name
Type the new name into the dialog box and click “Yes”. Bear in mind that you won’t be able to use symbols other than a hyphen.

- Restart your PC
Microsoft will prompt you to restart your PC. You can do this now or later, but it’s best to do it immediately so you can make sure the change has stuck.


How to Change Computer Name in Windows 10 via Control Panel
If you prefer Windows 10’s legacy interface, you can also rename your PC via the Control Panel.
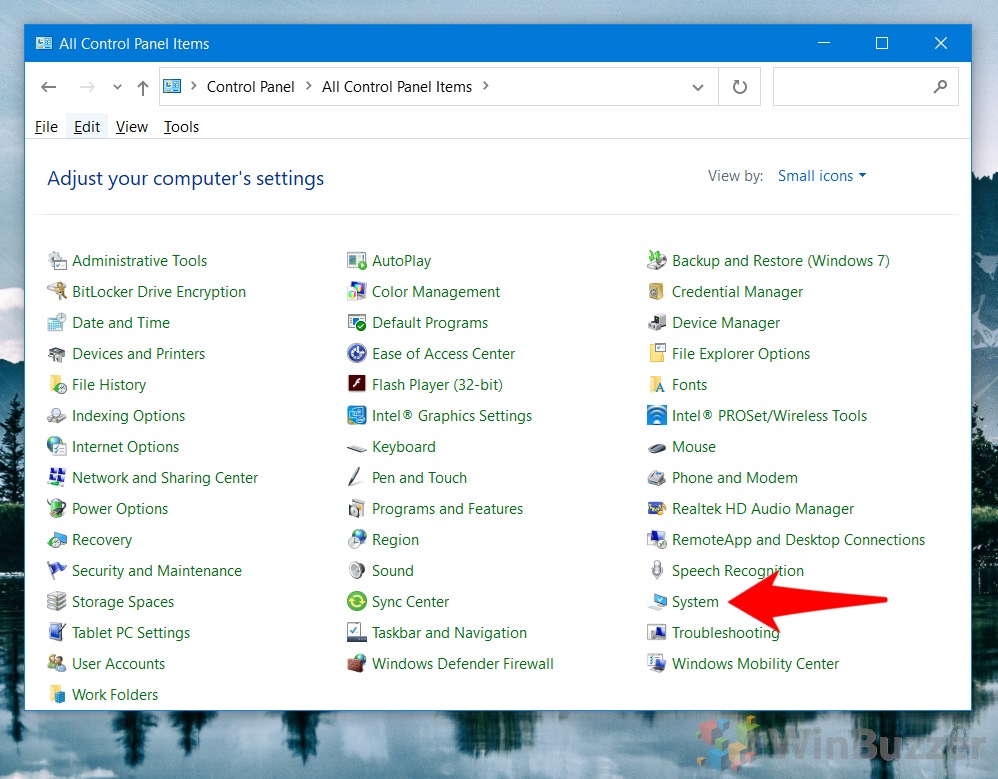
- Open Control Panel
Press “Start” and type “Control Panel”, then click the top result.

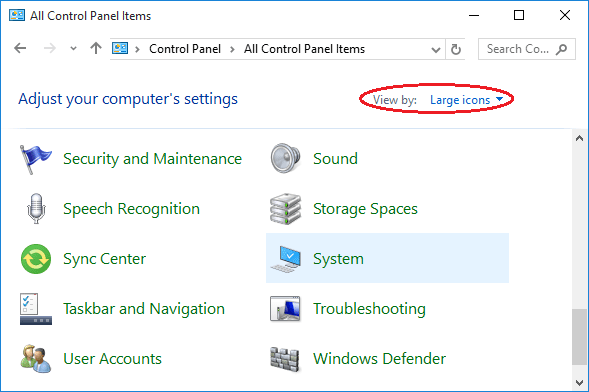
- Switch to the small icon view
Next to the “View by:” heading in Control Panel, click the “Category” dropdown and change it to “Small icons”.

- Open System settings
Click the “System” heading.

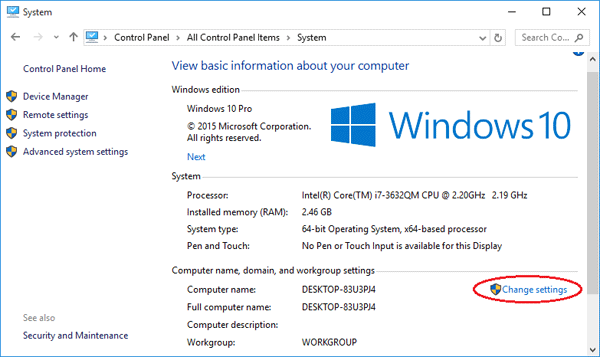
- Click “Change Settings”
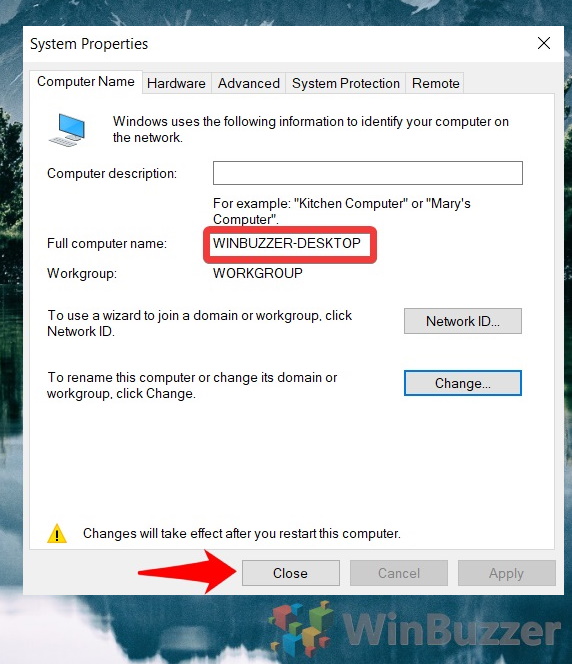
Under “Computer name, domain, and workgroup settings”, click “Change settings”.

- Change PC name in Windows 10 Control Panel
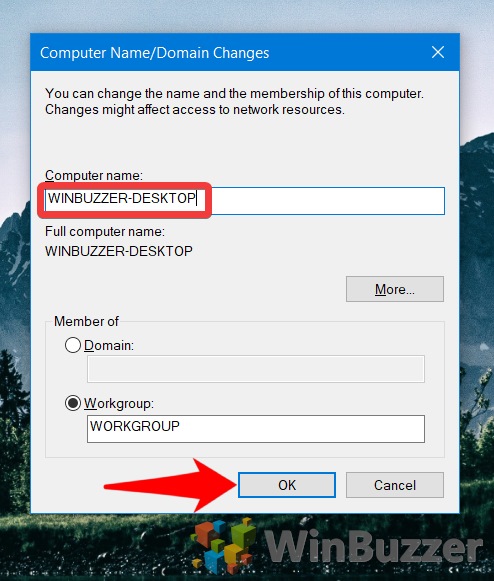
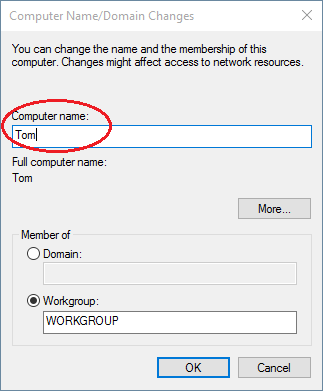
In the “Computer Name” tab, click “Change…”.

- Enter your new computer name
Type the new label in the “Computer name” field and press “OK”.
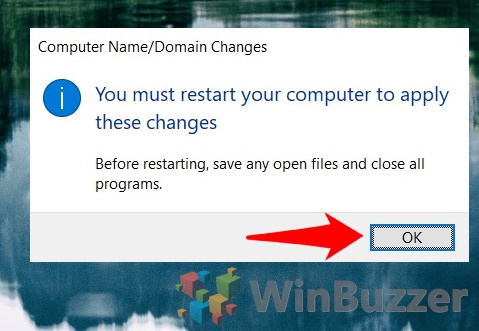
- Press “OK”

- Click “Close”

- Choose “Restart Now”
You’ll see your new name once your PC reboots.


If you’d prefer to change computer name via the command-line, Command Prompt is also an option. This tends to be quicker and is helpful if you don’t have access to a GUI, on a Windows Server install for example.
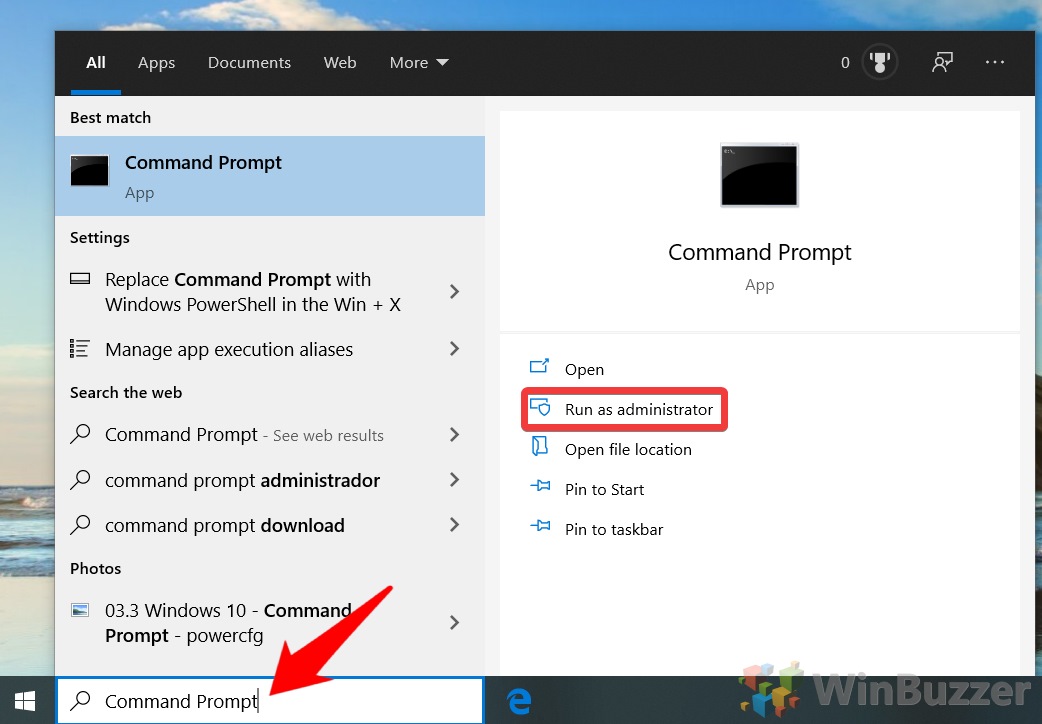
- Open CMD
Press “Start” and type “cmd”, then click “Run as administrator” next to the “Command Prompt” entry.

- Enter the change computer name CMD command
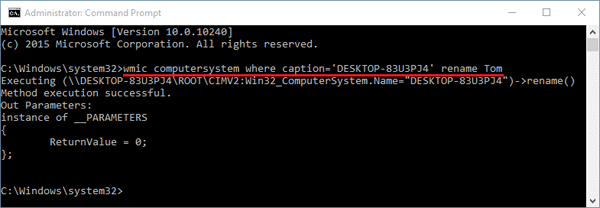
In Command Prompt, type the following and press “Enter”:
wmic computersystem where name="%computername%" call rename="YOUR-NEW-NAME"Naturally, you should change
Your-New-Namefor your PC name of choice. You’ll likely have to restart your PC for these changes to take effect.

How to Change Computer Name in PowerShell
Alternatively, you can use a PowerShell command to change computer name if you’re more comfortable with the tool.
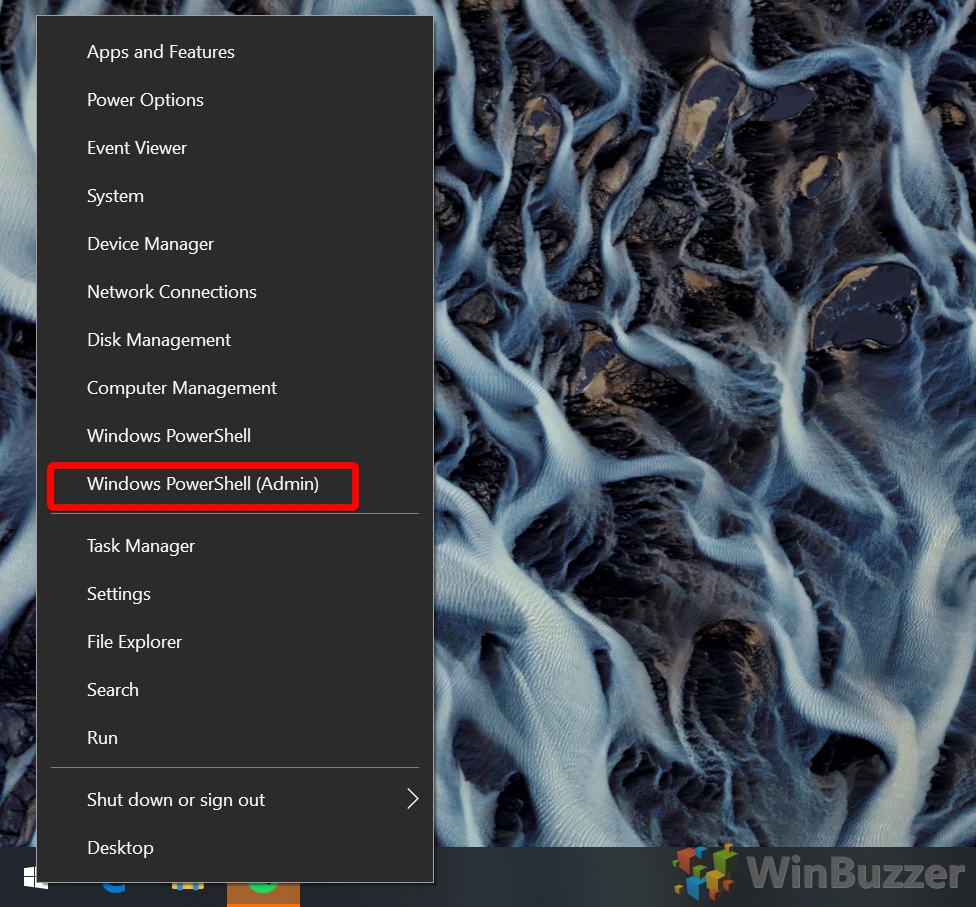
- Open PowerShell
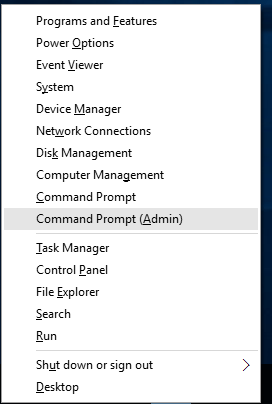
Press “Windows + X” to open the Start menu flyout, then click “Windows PowerShell (Admin)”.

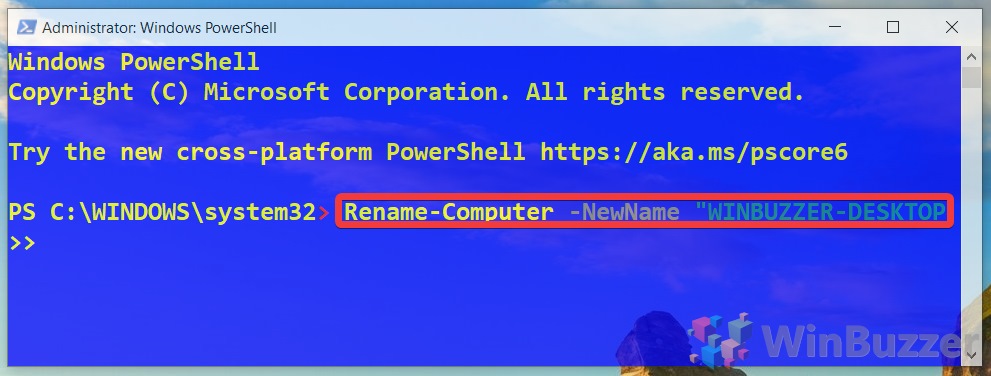
- Type the PowerShell change computer name command
Enter the following in PowerShell and press “Enter”, substituting ‘Winbuzzer-Desktop’ with your preferred name.
Rename-Computer -NewName "WINBUZZER-DESKTOP"Restart your PC for the changes to take effect.

When you install Windows for the first time, a random computer name is automatically assigned to Windows. This name is like DESKTOP-xxxxxxx, where x’s are random characters. You can easily change computer name to something of your own liking.
Personalizing the computer name becomes more important when you want to access and share network items. Making the computer name easier to remember makes it easier to access. For example, I keep my computer name itechtics-pc which is easier to remember for me.
Let us discuss how you can rename your local and remote computer on the network/domain through different ways in Windows 10.
Table of contents
- How to change local computer name
- Change computer name using the Control Panel
- Change computer name using Windows Settings
- Change computer name using Command Prompt
- Change computer name using PowerShell
- Change remote computer name using Windows PowerShell
- Closing words
Changing your computer name from something complicated to a bit more descriptive is always helpful. Organizations use the naming convention to identify the devices easily.
For example, a computer name starting with “CRITICAL” can mean that it is a production server that affords zero downtime, then the employees would know not to tamper with it.
Windows 10 gives users several ways through which they can change the name of their computer as they please.
Change computer name using the Control Panel
The Legacy Control Panel still provides vast configurable options for the user to manage, including renaming their PC. Here is how you can assign a new name to your computer using the Control Panel:
- Open Run -> control. This will open the legacy Control Panel.
- Navigate to the following path:
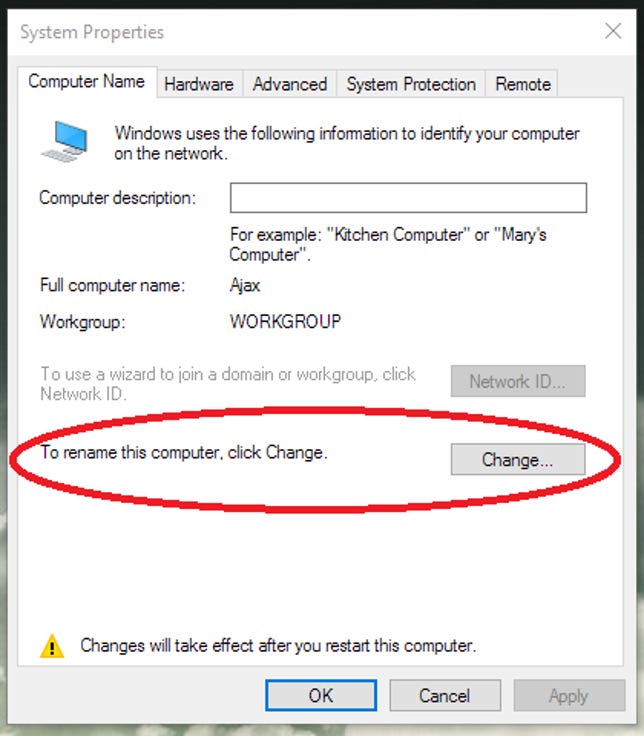
Control panel -> System & Security -> System -> Change Settings - In the System Properties window, under the Computer Name tab, click Change.
 12")
- In the new pop-up window, type the new name of the computer you want to set under the Computer name. Click Ok when done.
 13")
- Restart your Windows computer for the changes to take effect.
 12")
 13")
When you log back in, you will notice that the name of the computer has been changed.
To confirm the new name, open Command Prompt and run the following command:
C:>hostname
Change computer name using Windows Settings
Since Microsoft has been shifting and duplicating various system settings management in the new Settings app, they have also added an option to change the PC name from the app.
- Navigate to the following:
Start Menu -> Settings -> System -> About - Now click Rename this PC under Device specifications.
 14")
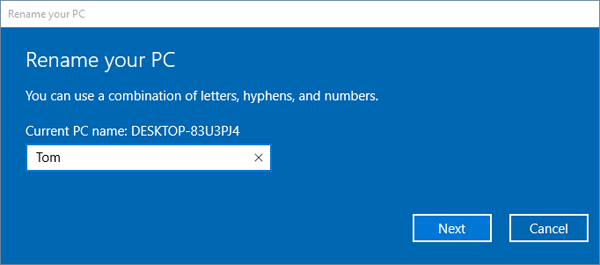
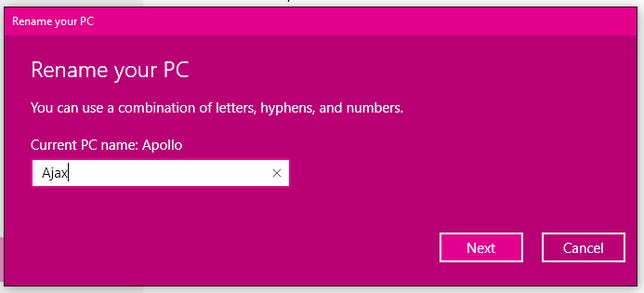
- On Rename your PC window, enter the new name of the computer you wish to set and then click Next.
 15")
- Now restart the PC from the next screen by clicking Restart now.
 14")
 15")
When the computer reboots, you can check to see that the new name has been allotted to the computer.
Change computer name using Command Prompt
Command Prompt can also be used to change the computer name. A single-line command can be quicker and easier to use as an alternative for the two methods discussed above. Follow the guide below to change your local computer name via the Command Prompt.
- Launch Command Prompt with administrative privileges.
- Run the command below to change the computer name:
WMIC computersystem where caption='CurrentName' rename NewName
Replace CurrentName with the existing name of the computer, and NewName with the new name you wish to assign to the computer, as in the example below: 16")
- Restart your computer for the changes to take effect.
 16")
Change computer name using PowerShell
Windows PowerShell is another built-in utility in Windows 10 with a Command Line Interface (CLI). It can run more powerful scripts than the Command Prompt and can also be used to rename the computer. Here is how it is done:
- Launch the Windows PowerShell with administrative privileges.
- Run the following command:
Rename-Computer -NewName PCName -LocalCredential LocalUsername -PassThru
Replace PCName with the new name you wish to assign to the computer, and also replace LocalUsername with a local user account name with administrative privileges, as in the example below: 17")
- You will then be prompted to enter the credentials of the user account you have entered. Enter the password and then click Ok.
 18")
- Once you enter the required credentials, you will be prompted to restart the computer to make the required changes.
 17")
 18")
Once the computer restarts, you can check that the PC name has been successfully changed.
Change remote computer name using Windows PowerShell
Users with administrative privileges on the network or domain can also change another computer’s name on the same network/domain. This is especially helpful if you are an IT administrator, and you would not need to leave your seat each time you want to assign a unique name to a computer.
Follow the steps below to change the remote computer name:
- Launch the Windows PowerShell with administrative privileges.
- Enter the following command:
Rename-Computer -ComputerName "ExistingRemoteName" -NewName "NewRemoteName" -DomainCredential DomainUsername -Force
Replace ExistingRemoteName with the current computer name of the remote PC, NewRemoteName with the new name of the remote PC you want to set, and DomainUsername with a domain user account with administrative privileges, as in the example below: 19")
- Now enter the credentials for the domain user and then click Ok.
 20")
- You will then be prompted to reboot the remote computer for the changes to take effect. Enter the command below to restart the remote computer:
Restart-Computer -ComputerName ExistingRemoteName -Credential DomainUsername -Force
Replace ExistingRemoteName with the old name of the computer, and DomainUsername with the domain user account with administrative privileges, as in the example below: 21")
- Now enter your domain user account credentials again and click Ok. The remote computer will now restart.
 20")
Once the remote computer reboots, its new name will be updated as you assigned.
Closing words
It is possible for users to accidentally assign a conflicting name to a computer that was already in use. There is no way to prevent this from happening, as there is currently no technology to differentiate the computer names in the same domain. The confusion might cause users to connect to a different device, or the domain policies might not be properly implemented.
Therefore, it is always recommended to assign a unique name to each PC, whether it is on the same network/domain or not.
Also see:
Subhan Zafar is an established IT professional with interests in Windows and Server infrastructure testing and research, and is currently working with Itechtics as a research consultant. He has studied Electrical Engineering and is also certified by Huawei (HCNA & HCNP Routing and Switching).
January 19, 2016 updated by
Leave a reply »
How can I change the name of my Windows 10 computer from Command Prompt? Whatever the reason you want to rename your computer, here’s our step-by-step tutorial on how to change computer name in Windows 10, from Control Panel, PC Settings and Command Prompt.
Method 1: Change Computer Name from Control Panel
- To begin, you have to open the Control Panel. Simply press the Windows key + X to open the Quick Access menu and click “Control Panel“.

- Set the View by option to Large icons. Click on System.

- Scroll down to the “Computer name, domain, and workgroup settings” section, click on Change settings.

- The System Properties screen will open with the “Computer Name” tab already selected. Click on the Change… button.

- Now type the new name you want in the “Computer name” box and click OK.

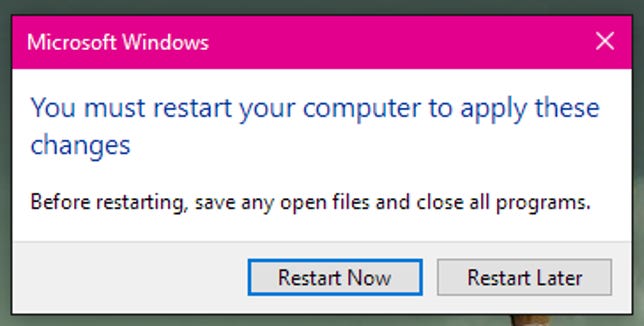
- A restart will be required to complete the name change, and after that, you’re all set!


Method 2: Change Computer Name from PC Settings
- Click on Start to access the Start Menu. Select Settings.

- When the PC Settings app opens, click on System.

- Go to the About section and then click on “Rename PC“.

- Type the new name you want to use and click on Next.

- You will be prompted to restart your PC to apply your new settings, click on Restart Now to proceed.
Method 3: Change Computer Name from Command Prompt
Looking for a way to change Windows 10 host name via command line? Here’s how to rename Windows 10 computer name from Command Prompt (cmd):
- Press the Windows key + X to open the Quick Access menu. Click on Command Prompt (Admin).

- In the Command Prompt, you can use the WMIC computersystem command to change your computer name easily, assuming you know the current computer name.
WMIC computersystem where caption='current_pc_name' rename new_pc_nameReplace current_pc_name with your current computer name, and new_pc_name with your desired new computer name.

- After running the command, you need to reboot the computer to make the changes effective.
This method works on Windows 10, 8, 7, Vista, XP and Windows Server 2012/2008/2003. This command can also be used from a batch file to rename any Windows computer, including domain-joined machines.
Besides changing the name of a local computer, you can also use WMIC command to rename a remote computer on the same network. For example, if want to rename a remote PC named Jon-Laptop to Jon-Tech and you know the login credentials, then type this command in the Command Prompt:
WMIC /node:"Jon-Laptop" /user:Admin /password:password123 computersystem call rename "Jon-Tech"
The value following /node: indicates the name of the remote computer on the LAN. The value following /user: must be an admin account on the remote computer.
- Previous Post: 2 Options to Rename “This PC” Back to “My Computer” in Windows 10
- Next Post: Windows 10 Downgrade: Revert Back to Previous Windows 8 or 7
Windows 10 comes with many great features that improve user experience. However, one of its few shortcomings is that it generates a random computer name during installation. The OS assigns a name with “DESKTOP” prefix followed by a combination of numbers and letters like “DESKTOP- 8DGNCKM”. This can be confusing when you need to identify your computers, especially if you have more than one Windows 10 PCs. Therefore, finding and renaming your computer name is not all about personalization but also enhances efficiency. A unique name identifies the PC on a network as well as makes it easy to manage multiple devices.
Related: 11 ways to secure Windows 10 PC.
For whatever reasons you would like to know or change your PC unique identifier, this article will take you through how you can view or change Windows 10 computer name in various ways. If you have Mac, learn how to change computer name of your Mac.
What is the Name of Your Windows 10 PC?
To view your computer name in Windows 10;
- Right click the Windows Start Button and select “System” from the menu list.

- This will open the “About” page, which shows basic information about your computer.

- Go to the “Device specification” section. Beside the “Device Name”, you will find the PC name.
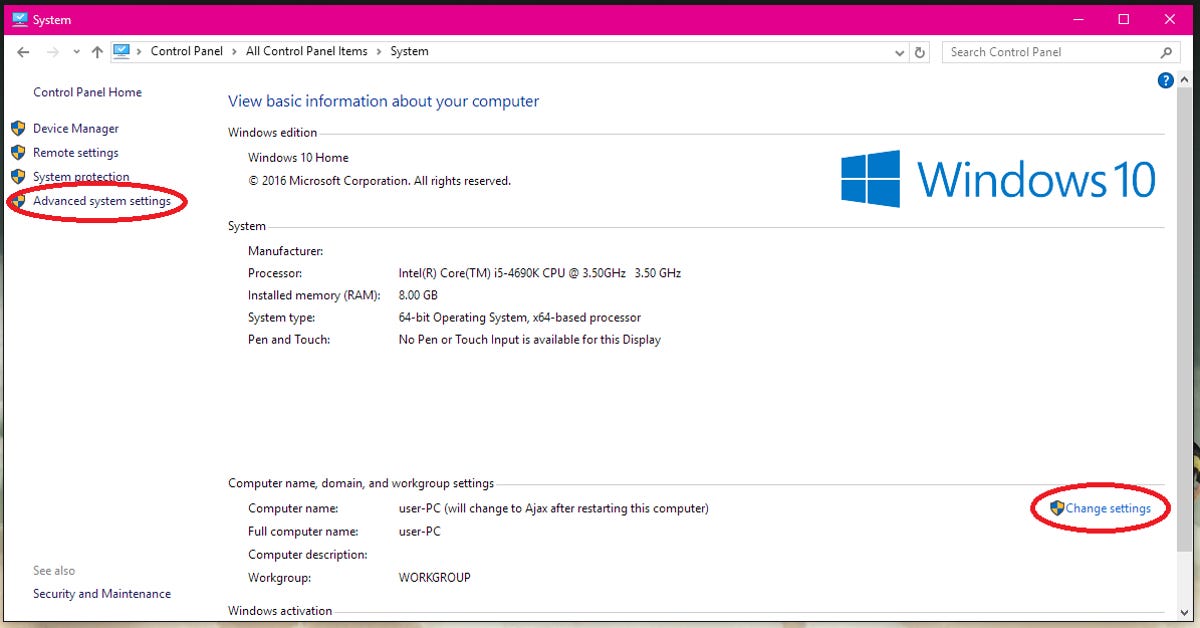
- You can also view more information such as “Full computer name”, “Workgroup” and “Domain” settings. Scroll down the “About” page and click on “System info” under the heading, “Related settings”.

- A new window opens with all the basic information regarding your PC. You will see your PC identification details under “Computer name, domain and workgroup settings” heading.

You can view the system details by right clicking and going to “Properties” option of “This PC” icon on your desktop. If you don’t see “This PC” icon, learn how to enable it on your desktop.
4 Ways to Change Computer Name in Windows 10
You can use any of the following four methods to rename your PC to a descriptive name that is easy to recognize and remember.
- PC
Settings. - Control
Panel. - Command
Prompt. - PowerShell.
Method 1: Rename using Windows PC settings
- Go to the “About” page as explained above. From the “About” settings page, click “Rename this PC” at the bottom of the specification section.
- A new window will pop up showing the current name and a dialog box for the new name. Type your preferred name in the white box and click the “Next” button.

- You can choose either “Restart now” or “Restart later” options from the prompt. The changes will take place once you restart your computer.

Method 2: Rename from Control Panel
- Open the Windows “Control Panel” and select the “System and Security” category. Look for and click “System” from the list to view the system information.

- On the system information page, under the PC name, domain and workgroup settings, click on “Change settings”.

- This will open the “Computer Name” tab on the “System Properties” window. Click the “Change” button.

- This will open another window allowing you to edit the computer name. Type your new PC name and click “OK”.

- From the resulting pop-up window, click “OK” to restart the computer.
Method 3: Using Command Prompt to Change Computer Name
- Search for and open “Command Prompt” as admin. To view the existing computer name, type “host name” and hit “Enter”.
- Then type the following Command to rename the computer and press “Enter”.
WMIC computersystem where caption='DESKTOP-8DGNCKM' rename NEWPCNAME

- Restart
your computer to implement the changes.
Method 4: Renaming your PC using PowerShell
- Right
click the Start button and open “PowerShell” (Admin option). - Click
“Yes” to allow the application to make changes to your PC. - PowerShell
uses the same command as Command Prompt to display the current PC name (Step 1
of method 3 above). - Type
the following command and press “Enter” on your keyboard:
RENAME-COMPUTER –computername CURRENT-PC-NAME –newname NEWPCNAME

- Restart
the computer.
Note: You can use a combination of letters, numbers
and hyphens when renaming your computer, but you should avoid spaces between
the characters. For example, you can rename your computer to “SALES-DEPT-PC”.
Conclusion
A computer name is a unique identity for your PC
on a network. Can you recognize your PC from multiple devices on the network?
Would you like your current PC name to something more descriptive and
memorable? You may want to rename your computer for many reasons. Whether you
want to give your PC a fancy name, for easy identification on a network or allow
smooth device connectivity, no need to worry. Windows 10 provides the above
four simple methods for changing your PC identity. However, you need to follow
the system-naming format and restart your PC to effect the changes. Windows
offers the option to restart immediately or later. Moreover, you should ensure
that your name is easy to remember, preferably not more than 15 characters.
Changing your Windows 10 PC name isn’t just about personalization, it’s about making things easier. We’re living in a time where we use multiple devices, which can include a combination of a desktop, laptop, tablet, and phone. If we don’t keep these devices organized, it’ll soon become difficult to inventory them and take advantage of additional features.
For instance, on Windows 10, most people now use a Microsoft account to sign in. This type of account not only helps you to sign in to multiple devices with the same credentials, but it also allows you to keep an organized inventory, and access other perks, such as features to locate your device and the ability to re-activate Windows 10 after a hardware change. If you don’t rename your Windows 10 PC accordingly, it’s more difficult to use these features.
In addition, a name can help you identify your computer when you have multiple devices connected to the local network. Using a descriptive name, it’s easier to connect with other devices around the house, or even to configure your router to allow or deny access to the internet.
In this guide, you’ll learn the steps to change the name of a Windows 10 desktop, laptop, or tablet using the Settings app, Control Panel, Command Prompt, and even PowerShell.
- Change PC name using Settings on Windows 10
- Change PC name using Control Panel on Windows 10
- Change PC name using Command Prompt on Windows 10
- Change PC name using PowerShell on Windows 10
Change PC name using Settings on Windows 10
To rename a Windows 10 PC using the Settings app, use these steps:
-
Open Settings on Windows 10.
-
Click on System.
-
Click on About.
-
Under the “Device specifications” section, click the Rename this PC button.

Settings app rename PC option -
Specify a new name for your computer.
Quick tip: You can use a combination of letters, numbers, and hyphens. Avoid any special characters, keep it short (less than 15 characters is always recommended), and don’t leave a space when you’re trying to use multiple words.
-
Click the Next button.

Windows 10 Rename Your PC dialog -
Click the Restart now button.


Once you complete the steps, the device will restart, and it’ll start with new name.
You can also watch the video below to learn the steps to change the name of your computer on Windows 10.
Change PC name using Control Panel on Windows 10
To rename the computer name with Control Panel on Windows 10, use these steps:
-
Open Control Panel.
-
Click on System and Security.
-
Click on System.

-
Click the Change settings option.
-
Click the Computer Name tab.
-
Click the Change button.
-
Specify a new name for your computer.
Quick tip: You can use a combination of letters, numbers, and hyphens. Avoid any special characters, keep it short (less than 15 characters is always recommended), and don’t leave a space when you’re trying to use multiple words.
-
Click the OK button.
-
Click the OK button again.
-
Click the Close button.
-
Click the Restart Now button.


After you complete the steps, the computer will reboot, and upon restart, it’ll start using the name.
Change PC name using Command Prompt on Windows 10
To change your PC name on Windows 10 using Command Prompt, use these steps:
-
Open Start.
-
Search for Command Prompt, right-click the top result, and select the Run as administrator option.
-
Type the following command to reveal the current device name and press Enter:
hostname
-
Type the following command to rename the Windows 10 PC name and press Enter:
WMIC computersystem where caption='CURRENT-PC-NAME' rename 'NEWPCNAME'
Quick note: Make sure to update the command with your information, and you should use double quotation marks, or single quotation marks, on the caption switch, and even more important when you’re using a hyphenated name.

-
Type the following command to restart the device and press Enter:
shutdown -r -t 00

Once you complete the steps, the changes will apply after restarting the computer.
Change PC name using PowerShell on Windows 10
To change a Windows 10 PC name with PowerShell, use these steps:
-
Open Start.
-
Search for PowerShell, right-click the top result, and select the Run as administrator option.
-
Type the following command to reveal the current PC name and press Enter:
Rename-Computer -NewName "NEW-PC-NAME"

PowerShell rename Windows 10 PC command -
Type the following command to restart the device and press Enter:
Restart-Computer

After you complete the steps, the computer will restart to apply the changes.
While renaming a desktop computer, laptop, or tablet using the Settings app only works on Windows 10, you can use the System Properties and Command Prompt, and even PowerShell to change the name of a device all major releases of the operating system, including Windows 10, Windows 8.1, Windows 7 and other versions.
Update July 1, 2020: This guide was originally published in September 2016, and it’s been revised to reflect changes on Windows 10.
![]()
Download Article
![]()
Download Article
- Using the Settings Menu
- Using the Control Panel
|
Naming your PC is a great way to manage your home network properly. Setting up a PC name helps you to identify traffic on your network and know where content, like videos, are streaming from. With Windows 10, it is now easier than ever to rename your PC.
-

1
Open the Settings menu. In Windows 10, there is a simplified Settings menu that is very easy to understand. Click Start >> Settings to open it. You should see a series of 13 different categories available to you.
-
2
Open the System Settings menu. From the list given, click the System option. You should see a new page with a series of 11 different menu options down the left-hand side of the window. Click About. It should be the very last option on the bottom.
Advertisement
-
3
Rename your PC. On the new page, you should see the Rename PC button at the very top. Click this button once and a small box should pop up. This box should contain an input box, with the current PC name listed above it. Enter a name that identifies the PC here.
- For instance, if the PC you are renaming is being used to stream media, like movies and music, to other devices in your home, something like Home-Media or Media-Server may be a good name. The name that you choose will also be the name discovered in Bluetooth.
- Note: Your PC name can contain letters, hyphens, and numbers, but no spaces.
-
4
Restart the PC. Once you have entered a new name, click the Next button and wait a moment. If the PC name is approved, then you will be asked if you would like to restart your PC in order for the changes to take effect. Click the Restart now button, and after the PC restarts, it will be renamed.
- If you want to skip the restart process, click Restart Later instead.


Advertisement
-
1
Open the Control Panel. Press and hold the Windows key and hit R. A small box will open in the lower left-hand corner of your screen. There should be an input box inside it. Type in control and hit Enter on your keyboard.
-
2
Open the System settings. You should now be looking at the Control Panel and a series of 8 different options. Click the System and Security option in the upper left-hand corner of the window to open the System settings.
-
3
View the current PC name. You should now be looking at a series of 11 or so different menu options. The third option down should be System, and under it, in blue, should be an option that says See the name of this computer. Click this and a new page should appear. On this page there is basic information about the PC split up into four different subheadings.
-
4
Look for Computer name, domain, and workgroup settings. The very first option under the heading should say Computer name: and display the current name of the PC to the right of it. To the left of the name of the PC there should be a blue Change settings button. Click this to continue.
-
5
Rename the PC. There should be a small window that opens with a series of five different tabs at the top. The current tab that is open is the one you want. There should be a button labeled Change inside the white box at the very bottom. Click this button. Another, even smaller, window will pop up with the top input box highlighted. The title above the input box will say Computer name. Enter a new name for your PC inside this box. Once you are done, click the OK button in the lower right-hand corner of the window.
-
6
Restart the PC. You will be told that you will need to restart the PC before changes can take effect, and that you should save and close all programs before the restart begins. Click OK, then click the Close button in the other window. You will then be given two different buttons to choose from. Select Restart Now to restart, and after restarting, the PC will be renamed.
- You can select Restart Later if you want to continue what you’re doing for now.


Advertisement
Ask a Question
200 characters left
Include your email address to get a message when this question is answered.
Submit
Advertisement
Thanks for submitting a tip for review!
About This Article
Thanks to all authors for creating a page that has been read 81,558 times.
Is this article up to date?
There are plenty of reasons to change your computer’s name — especially if you bought it directly from a manufacturer and it’s named something generic like «windows-user-pc» or «TUF000445811EE». If you want to connect computers through a homegroup, or just be able to recognize which computers are on your network, changing your computer’s name to something more descriptive is definitely helpful.
Or maybe you just want to name your computer something cool — add a personal touch. I name all my computers after figures from Greek mythology. I also name my cars.
Before Windows 10, changing your computer’s name was complicated. Well, not so much complicated as hidden inside the Control Panel in the System Properties windows. While you can still change your computer’s name in System Properties (we’ll show you how), Windows 10 has made it much simpler by putting it in the new Settings menu.
Here’s the easy way to change your computer’s name:
1. Open Settings and go to System > About.

Sarah Jacobsson Purewal/CNET
2. In the About menu, you should see the name of your computer next to PC name and a button that says Rename PC. Click this button.
Sarah Jacobsson Purewal/CNET
3. Type the new name for your computer. You can use letters, numbers and hyphens — no spaces. Then click Next.

Sarah Jacobsson Purewal/CNET
4. A window will pop up asking if you want to restart your computer now or later. If you want to change to the new name immediately, click Restart now to restart your computer. If you don’t want to restart your computer right this second, click Restart later. Your computer’s name will be updated the next time you restart it.
If you’d rather change your computer’s name in the Control Panel, or if you’re running an older version of Windows, here’s how to do that:
1. Right-click on the Start button and click Control Panel.
Sarah Jacobsson Purewal/CNET
2. Navigate to System and either click Advanced system settings in the left-hand menu or click Change settings under Computer name, domain, and workgroup settings. This will open the System Properties window.
Sarah Jacobsson Purewal/CNET
3. In the System Properties window, click the Computer Name tab. You’ll see the message, «To rename this computer, click Change.» Click Change…

Sarah Jacobsson Purewal/CNET
4. Type the new name for your computer and click OK. A window will pop up telling you that you must restart your computer before the changes can be applied. Click OK. This will not restart your computer.
Sarah Jacobsson Purewal/CNET
5. A new window will pop up asking if you would like to restart your computer now or later. Click Restart Now to restart your computer immediately. If you’re not ready to restart, click Restart Later to do it later, at your leisure.