Содержание
- Способ 1: «Параметры»
- Способ 2: «Управление дисками»
- Способ 3: «Командная строка» (DiskPart)
- Способ 4: Сторонний софт
- Вопросы и ответы
Если поменять букву раздела диска, где установлена Windows 11 или какие-либо программы, могут возникнуть проблемы с поиском и запуском данного диска системой, поэтому пытаться поступать таким образом настойчиво не рекомендуется!
Способ 1: «Параметры»
Очень простой, наиболее безопасный и, если можно так выразиться, самый современный подход к решению задачи замены буквы, которая назначена как идентифицирующая любой, кроме системного, логический раздел диска ПК под управлением Windows 11, реализуется при помощи главного приложения для настройки операционки – «Параметры».
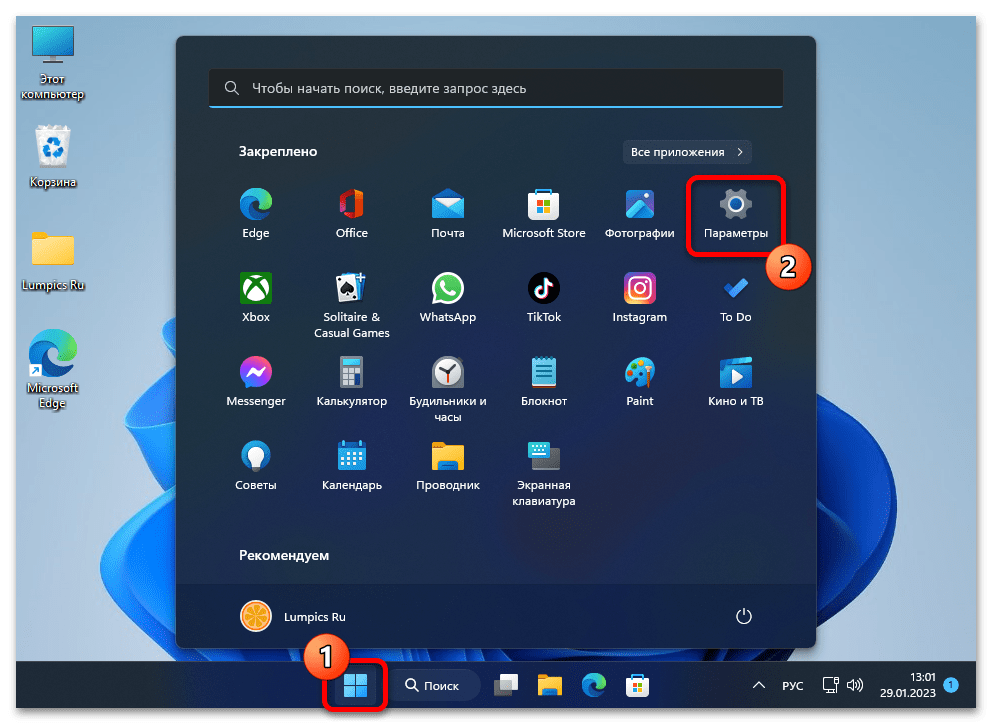
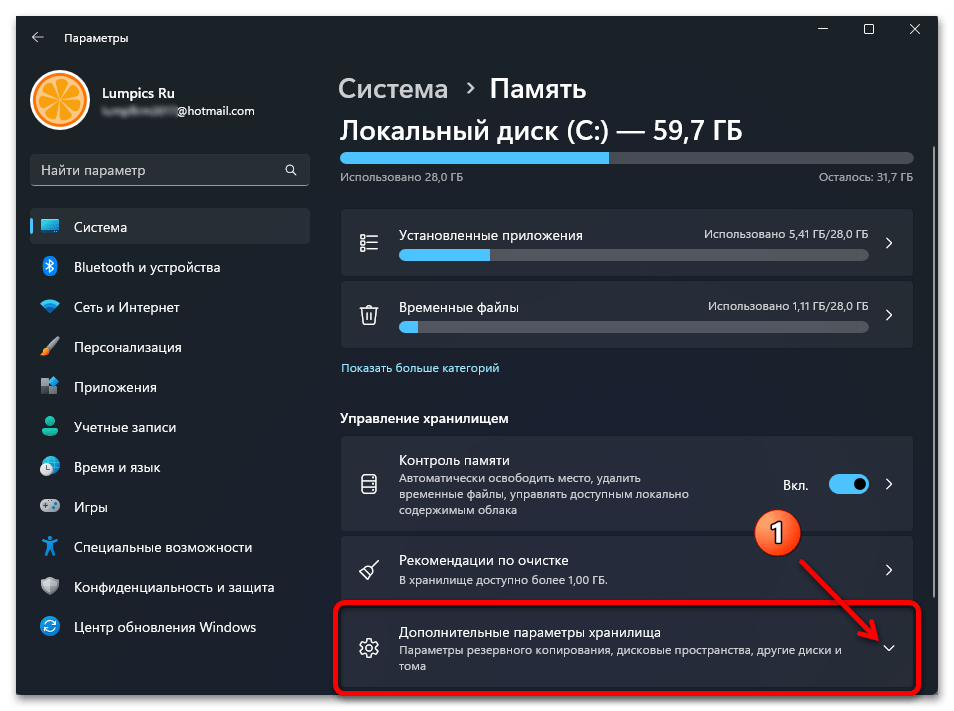
- Открываем «Параметры» Windows 11. С этой целью можно воспользоваться Главным меню ОС, перечнем дополнительных функций кнопки «Пуск» на Панели задач (вызывается щелчком правой кнопкой мыши), клавиатурной комбинацией «Win»+«I» и другими способами.
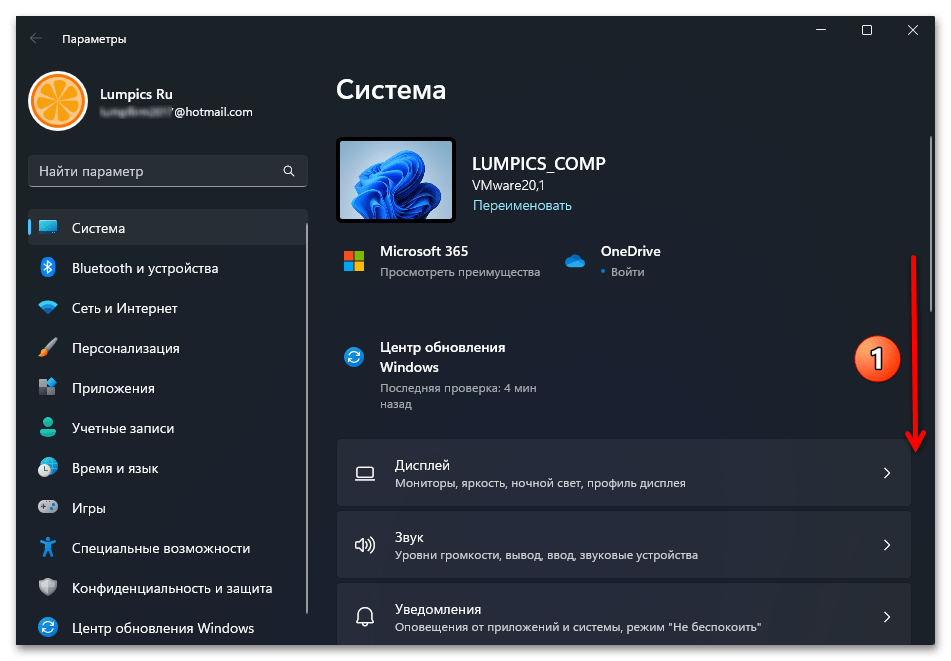
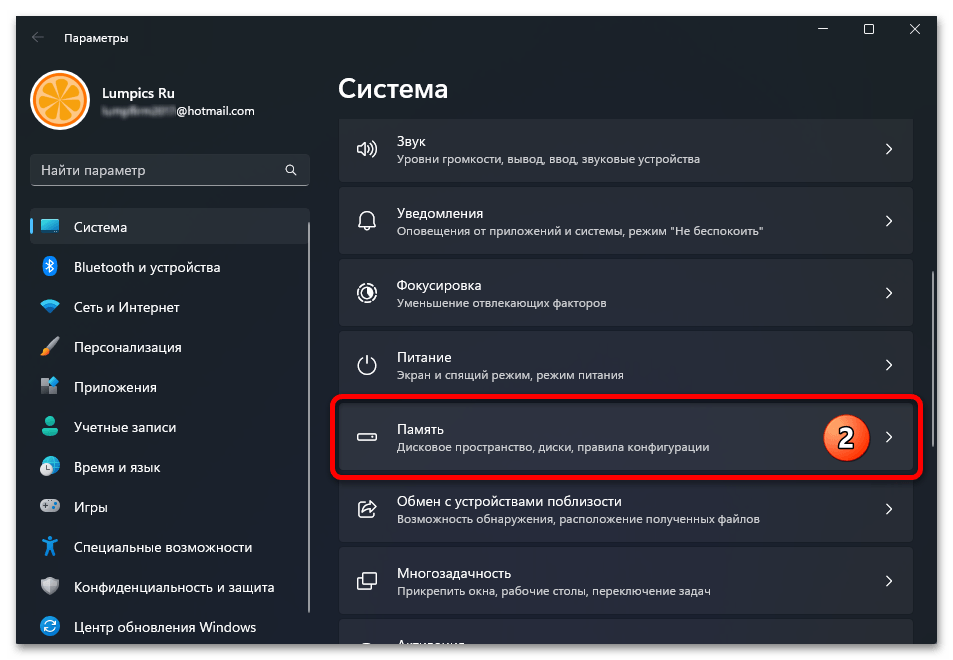
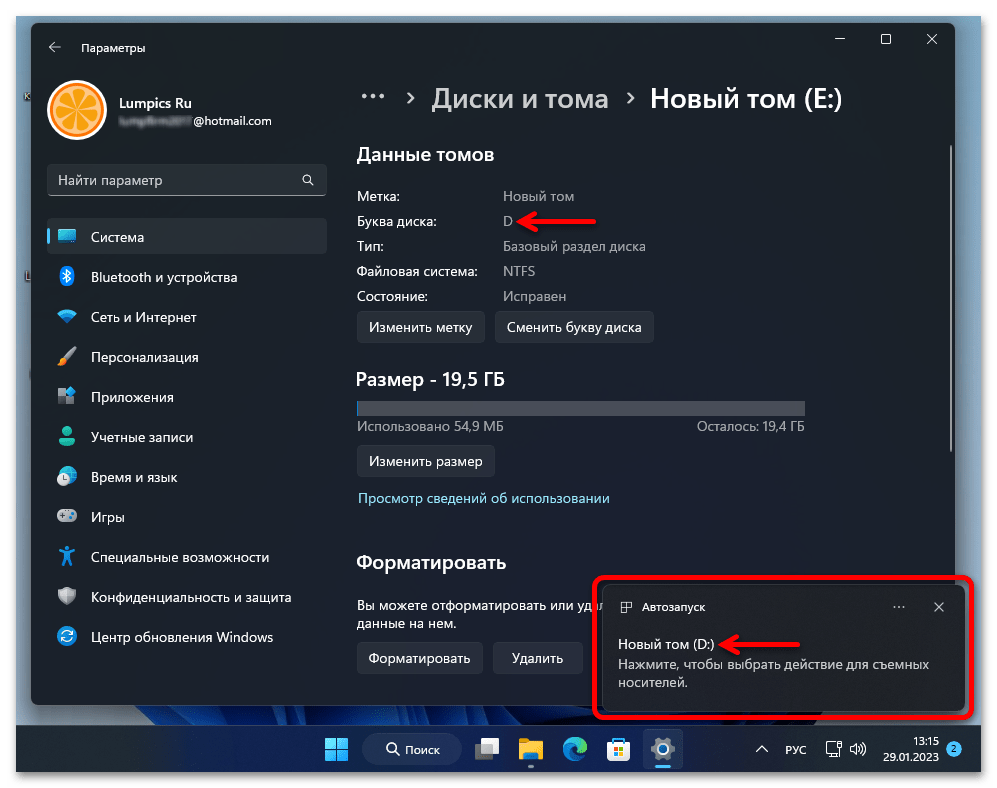
- Прокручиваем список категорий настроек в разделе «Система» «Параметров»,

находим и открываем «Память».
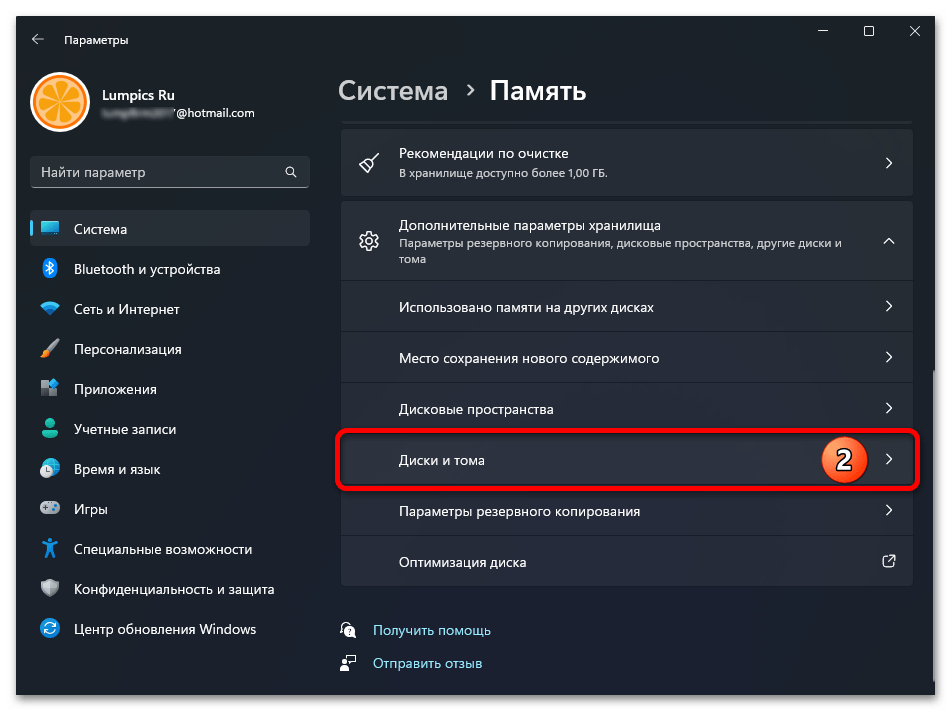
- Далее разворачиваем перечень «Дополнительные параметры хранилища»,

а затем нажимаем «Диски и тома».
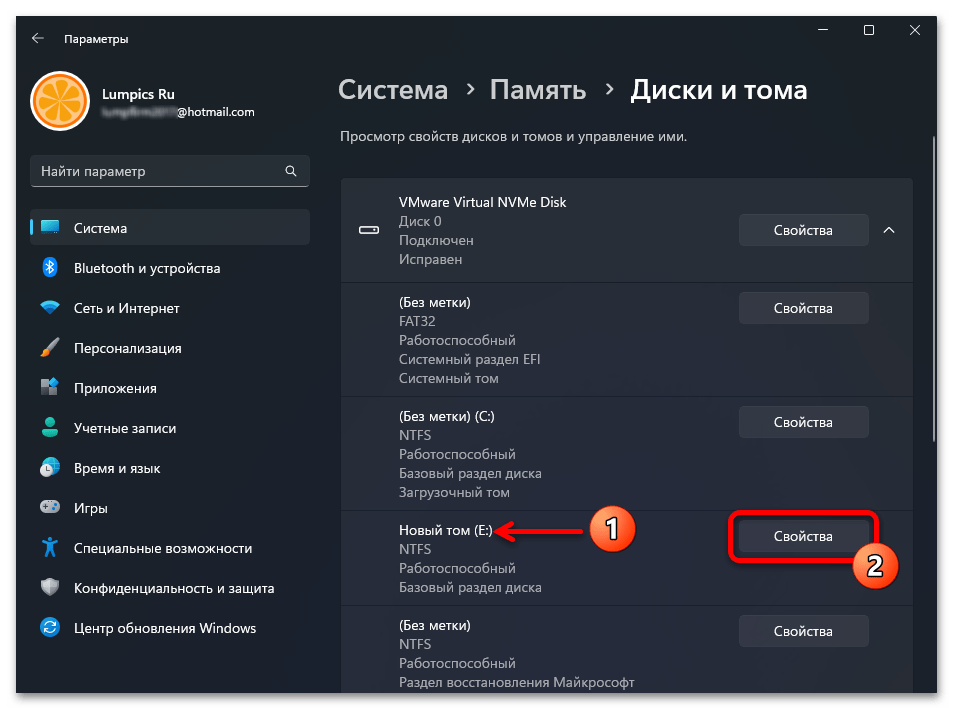
- В следующем открывшемся списке находим том, букву которого требуется изменить, щёлкаем «Свойства» в демонстрирующем информацию о нём блоке.
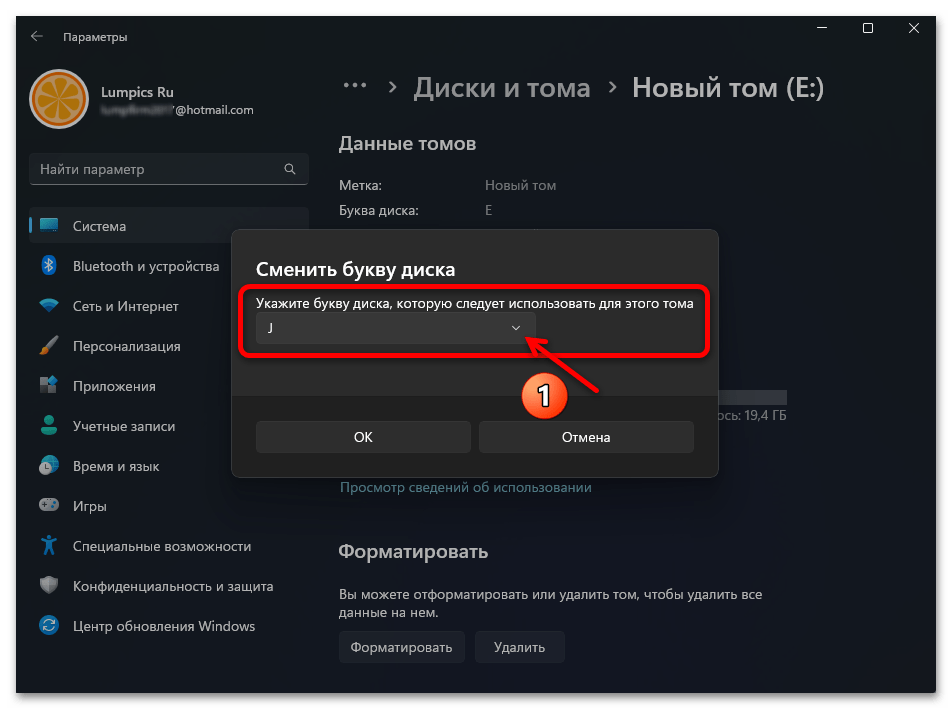
- Нажимаем на кнопку «Сменить букву диска» под списком параметров «Данные томов».
- В раскрывающемся списке отобразившегося окошка

выбираем новую назначаемую разделу диска букву,

после чего кликаем «ОК».
- На этом всё, закрываем окно «Параметры».

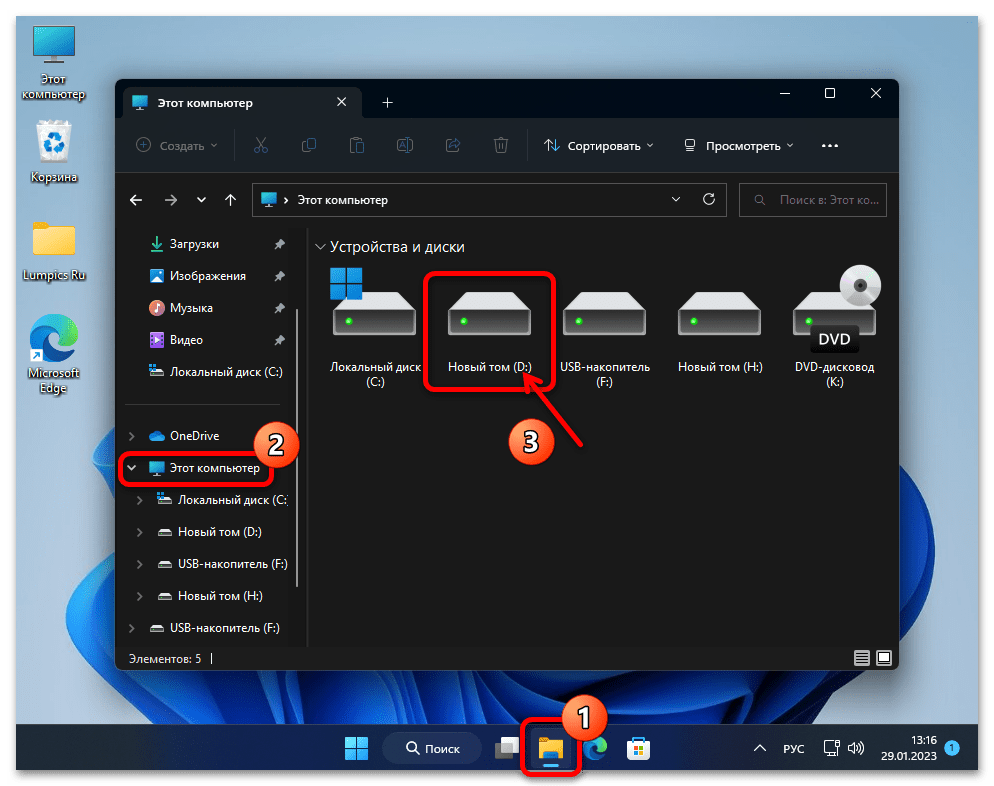
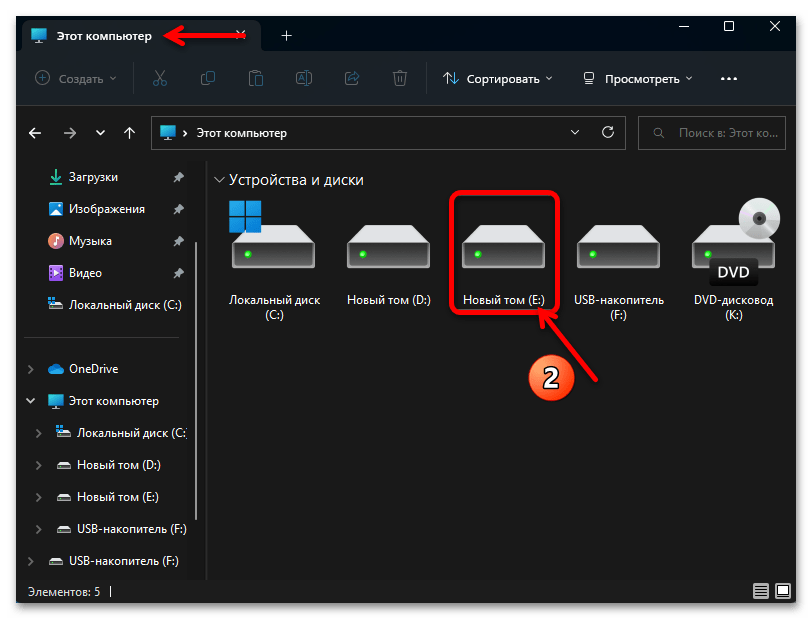
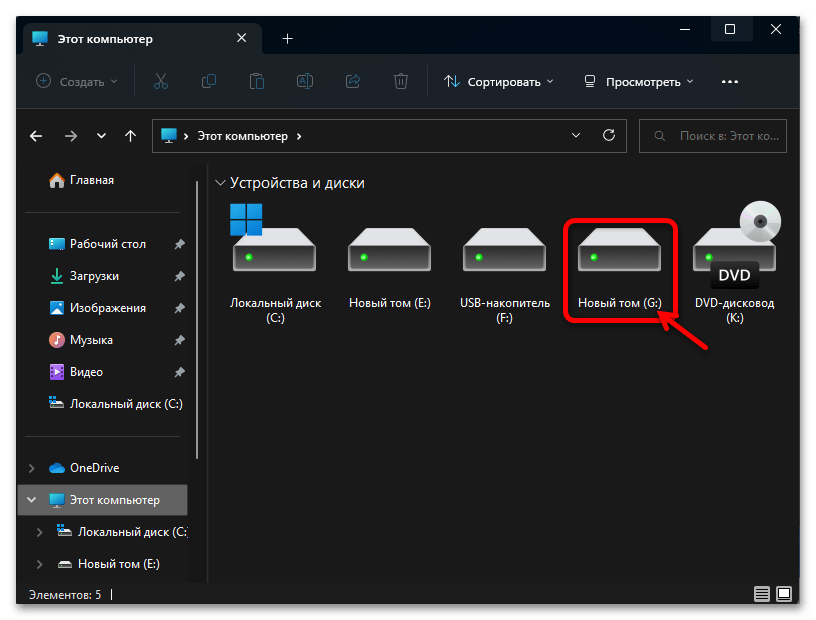
Диск, в отношении которого производились манипуляции, уже функционирует, будучи обозначенным в системе новой буквой, а чтобы убедиться в этом, можно, к примеру, открыть «Мой компьютер».
Подробнее: Как открыть «Этот компьютер» в Windows 11


Способ 2: «Управление дисками»
Предназначенная для выполнения различных манипуляций с хранилищами Windows-компьютера (инициализация новых дисков, расширение и сжатие томов и многое другое) оснастка «Управление дисками» привлекается пользователями Win 11 с целью смены буквы тома более часто нежели «Параметры» (вероятно, как ставшее более привычным при эксплуатации предыдущих версий ОС от Microsoft средство).
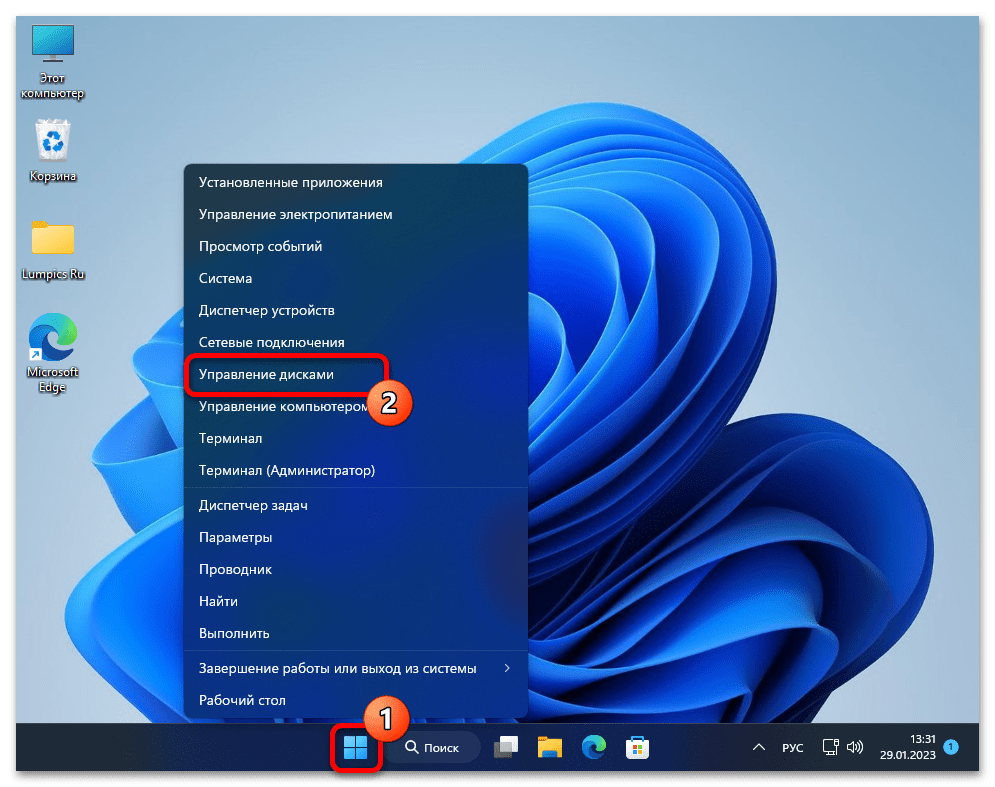
- Вызываем оснастку «Управление дисками». С этой целью проще всего будет воспользоваться меню дополнительных функций кнопки «Пуск» на Панели задач Виндовс 11: кликаем по указанному элементу правой кнопкой мыши или нажимаем «Win» + «X» на клавиатуре, после чего щёлкаем по наименованию требуемого инструментария в отобразившемся перечне.
Подробнее: Как открыть «Управление дисками» в Windows 11
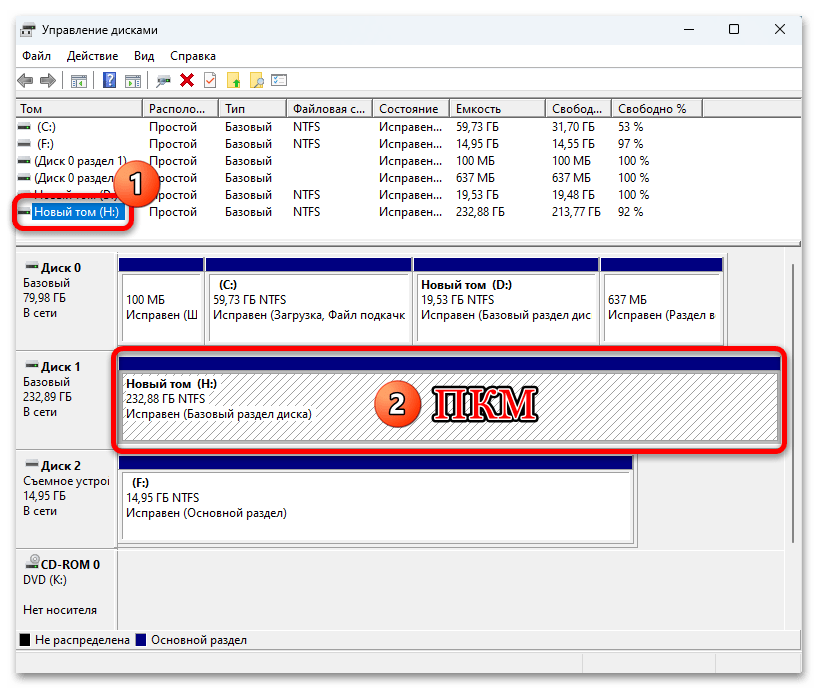
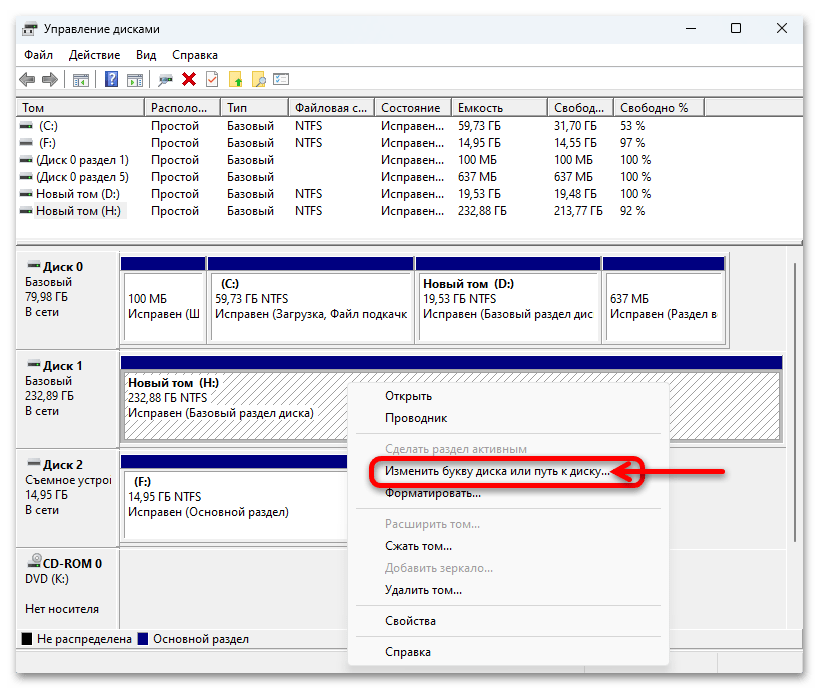
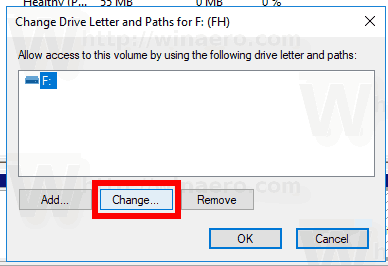
- В окне оснастки «Управление дисками» перемещаемся к области с данными физического диска, где размещён целевой для изменения буквы том, кликаем по области с данными последнего правой кнопкой мыши.
- Через открывшееся контекстное меню вызываем функцию «Изменить букву диска или путь к диску».
Обратите внимание! Отсутствие или неактивность команды «Изменить букву или путь к диску» в контекстном меню раздела говорит о том, что он ещё не готов к назначению литеры (к примеру, когда диск ещё не распределен или требует инициализации). Кроме того, указанная ситуация может свидетельствовать о том, что целевой диск не предназначен для доступа со стороны пользователя Windows (например, является системным разделом EFI или разделом восстановления).
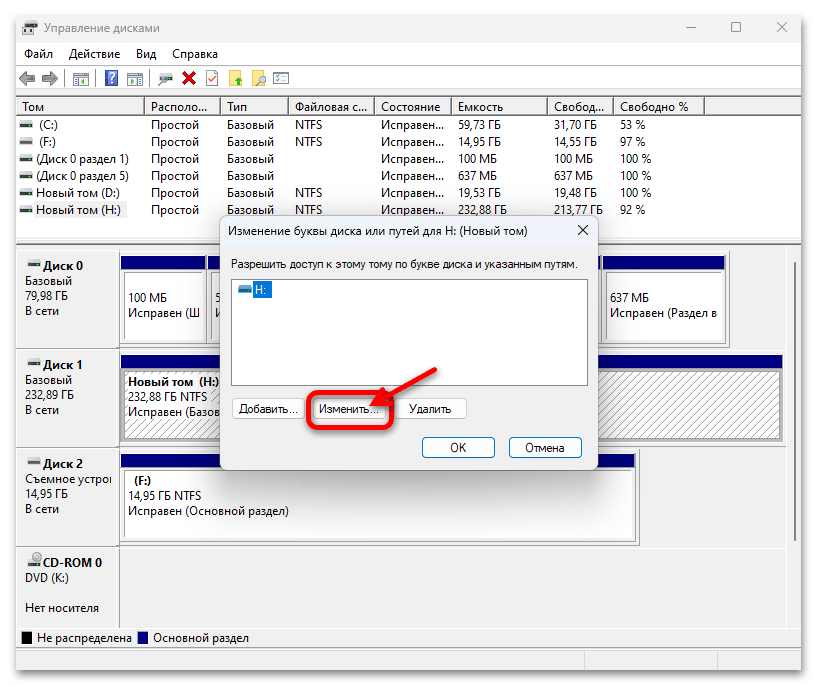
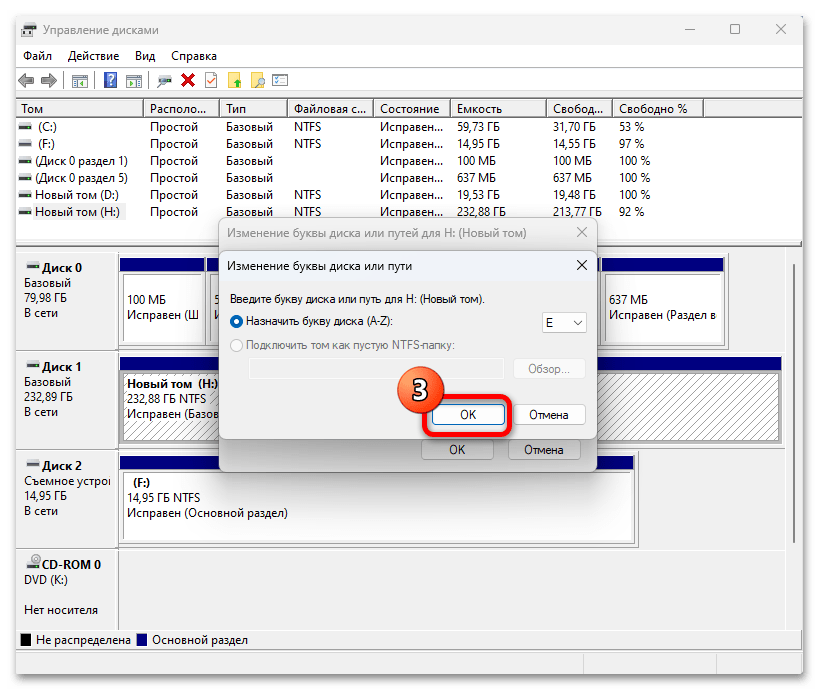
- Кликаем по кнопке «Изменить…» в открывшемся окошке.
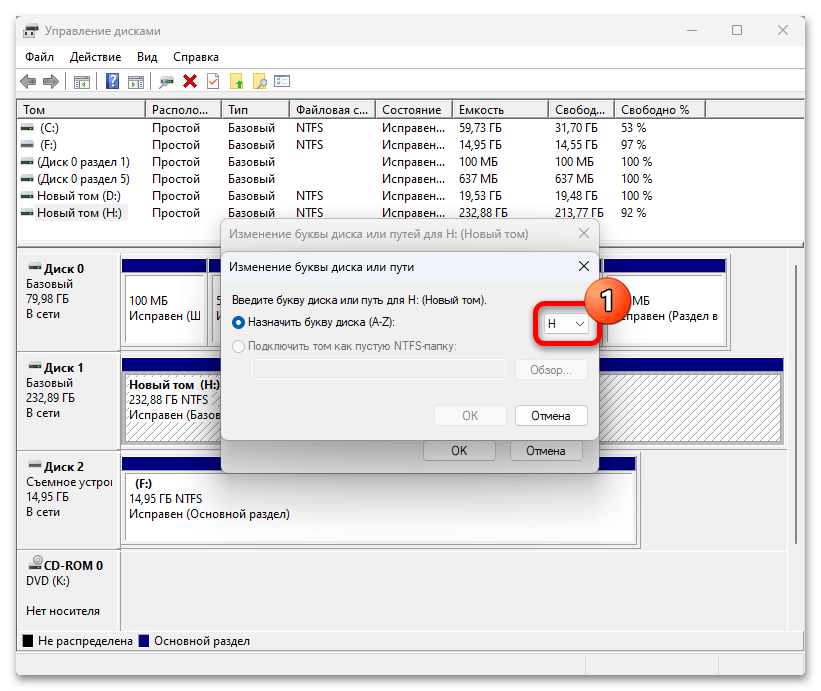
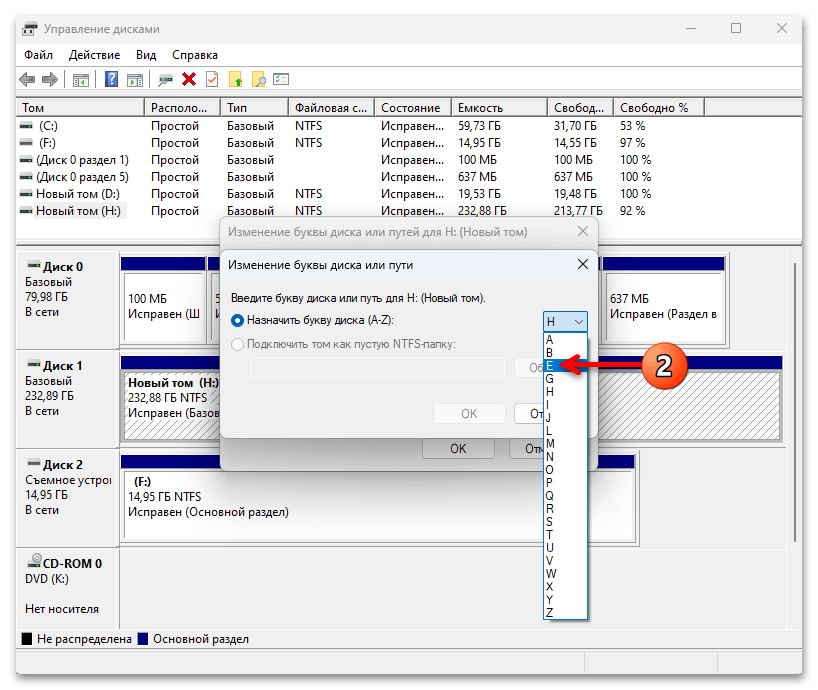
- Далее разворачиваем список «Назначить букву диска (A-Z)»,

кликаем по присваиваемой логическому разделу литере.

Осуществив выбор буквы, нажимаем «ОК».
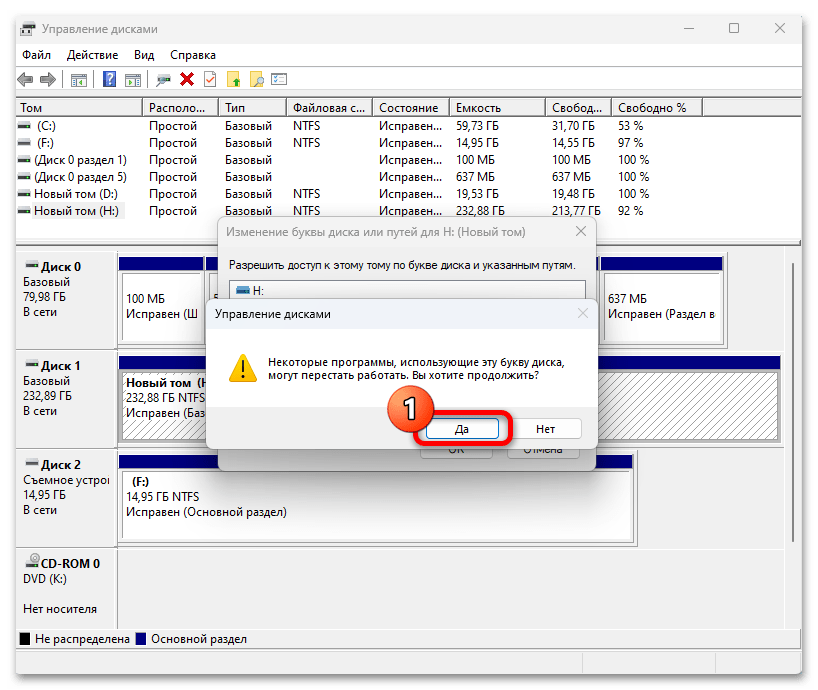
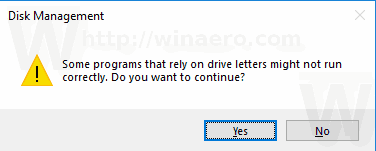
- Щёлкаем «Да» в ответ на отобразившееся предупреждение оснастки,
в результате чего по прошествии нескольких секунд буква диска изменится на выбранную.
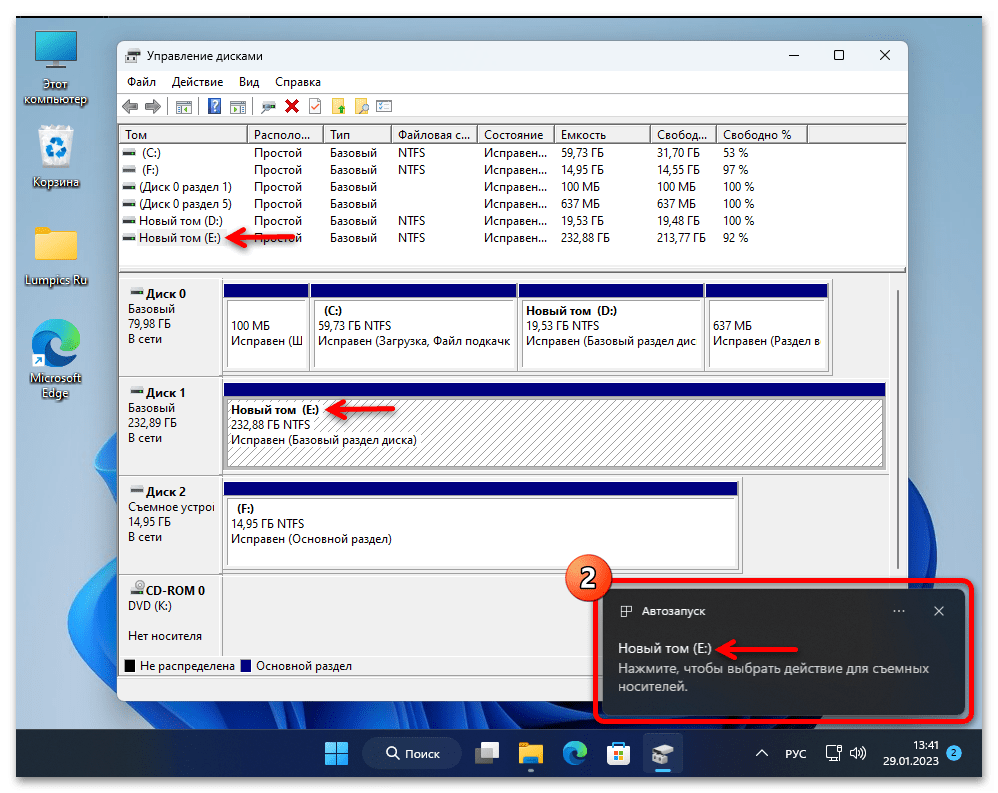
- При необходимости повторяем процедуру смены буквы относительно других томов, после чего закрываем окно «Управление дисками»

кликом по крестику в его заголовке справа. Убеждаемся в результате.

Способ 3: «Командная строка» (DiskPart)
Ещё одно интегрированное в Windows 11 средство, которое позволяет сменить букву любого подключённого к компьютеру или ноутбуку под её управлением диска – это мощная программа командной строки Microsoft DiskPart. Преимуществом решения в сравнении с вышеописанными следует считать возможность его использования и в тех случаях, когда ОС не запускается (к примеру, при устранении связанных с некорректной литерой системного раздела проблем).
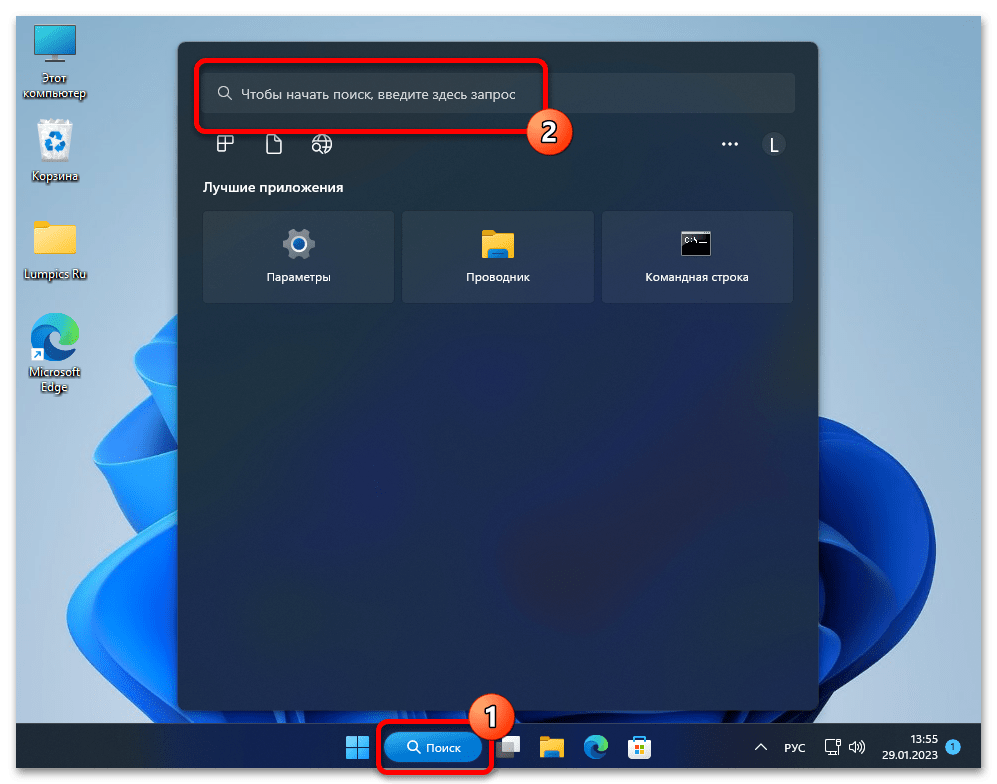
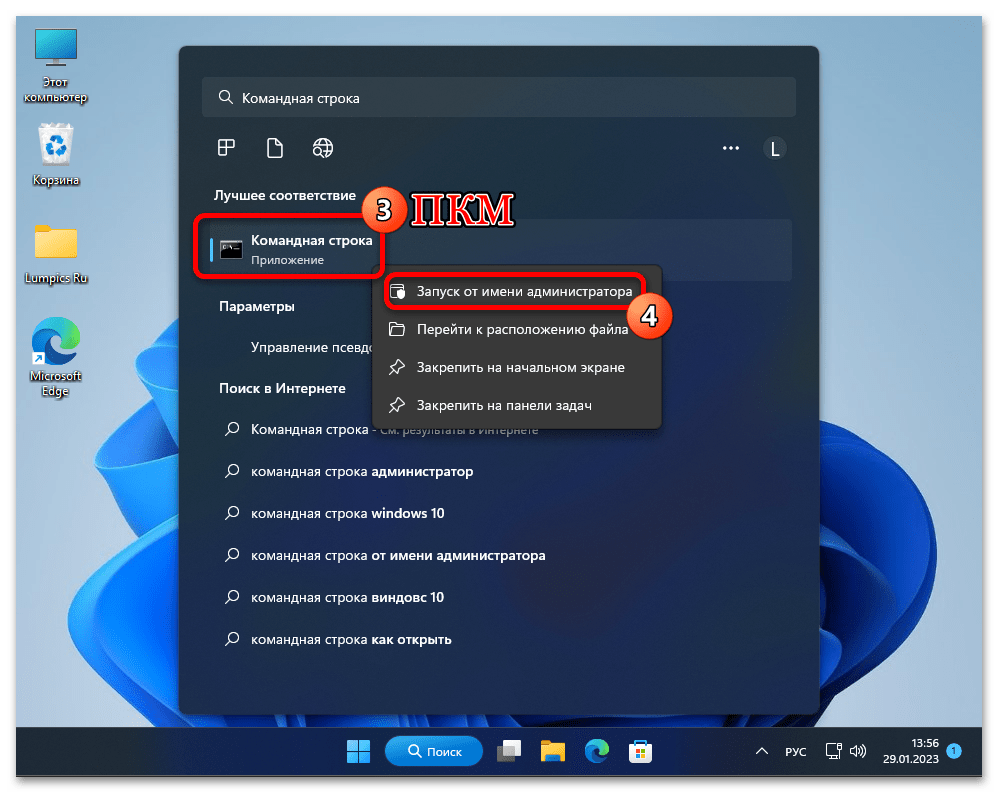
- Запускаем «Командную строку» Windows от имени Администратора. Быстрее всего это выполнить через системный «Поиск»: кликаем по вызывающему последний элементу на Панели задач операционки или нажимаем «Win»+«S» на клавиатуре; вводим запрос
Командная строкав поле поиска;
щёлкаем правой кнопкой мыши по предоставленному системой результату-ссылке на запуск приложения и выбираем пункт «Запуск от имени администратора» в отобразившемся контекстном меню.

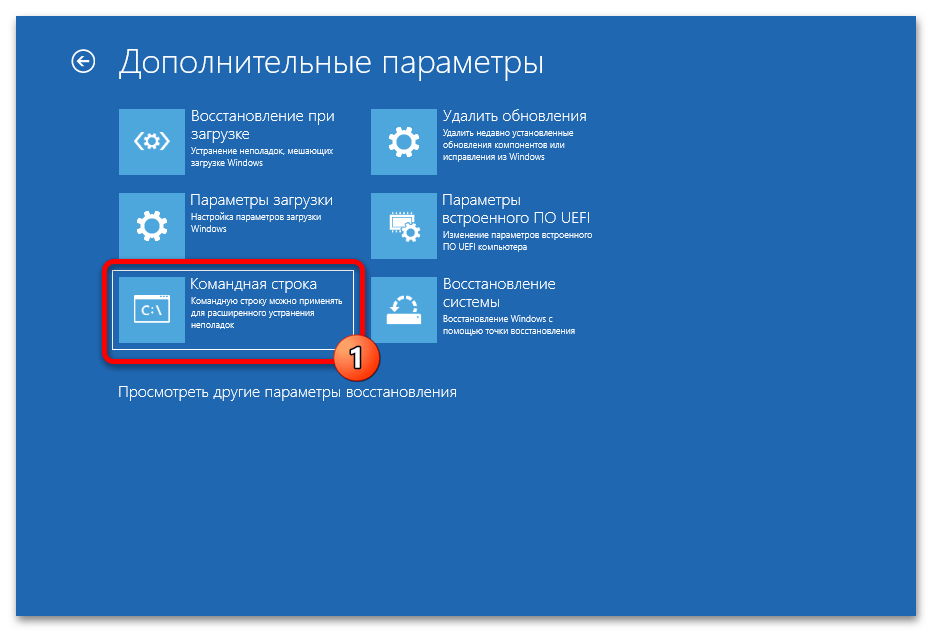
Если ОС не запускается и предположительно для устранения данной проблемы следует сменить букву какого-либо диска, можно перейти в «Расширенные параметры запуска» Win 11 и вызвать «Командную строку» средствами данного модуля.

Подробно указанный подход рассмотрен в следующем материале:
Подробнее: Расширенные параметры запуска (среда восстановления) Windows 11
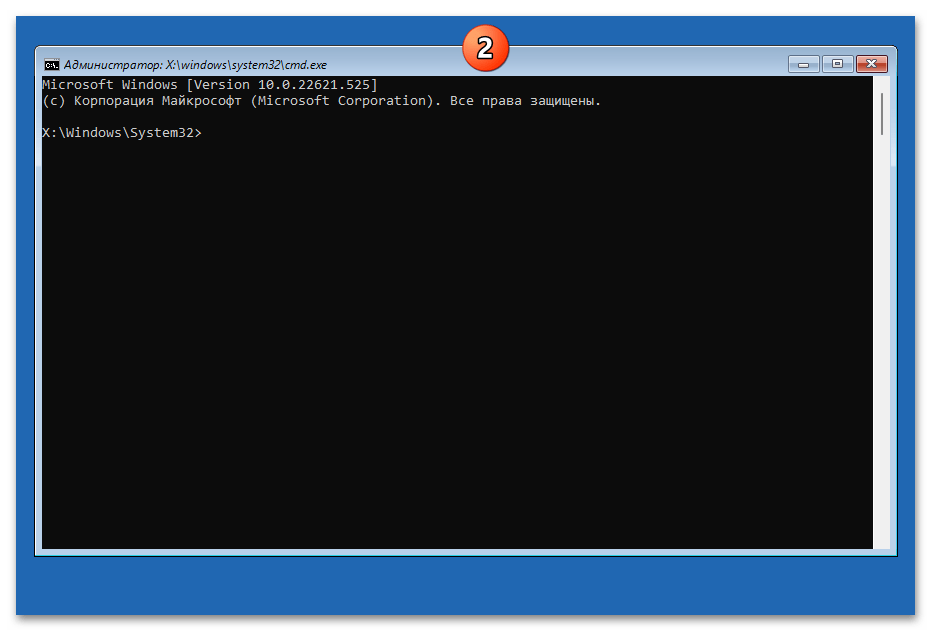
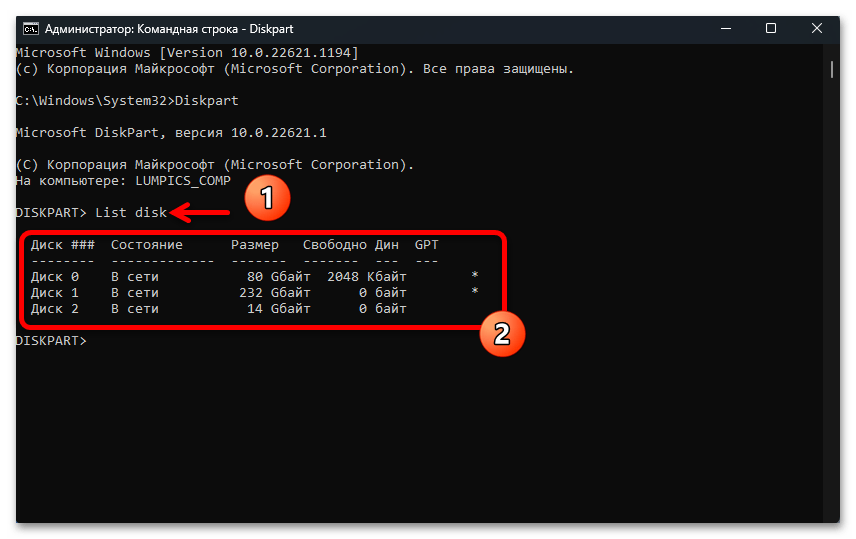
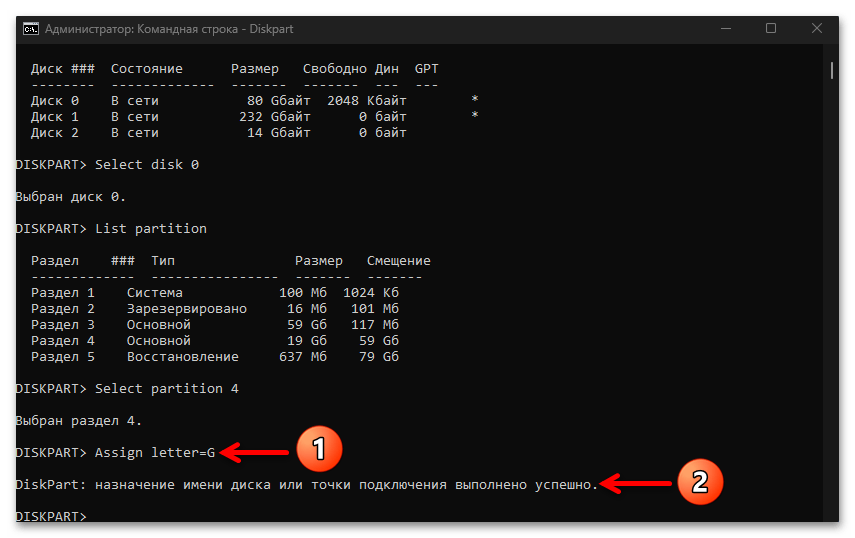
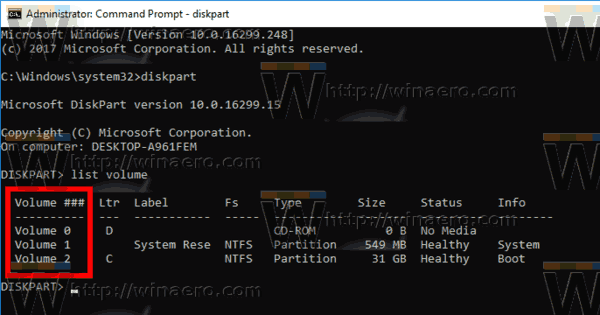
- Вызываем консольную утилиту для управления дисками «DiskPart». С этой целью вводим в «Командую строку» её имя (в любом регистре) после чего нажимаем «Enter» на клавиатуре:
Diskpart - Вводим и отправляем на выполнение команду вывода списка всех доступных на ПК физических дисков:
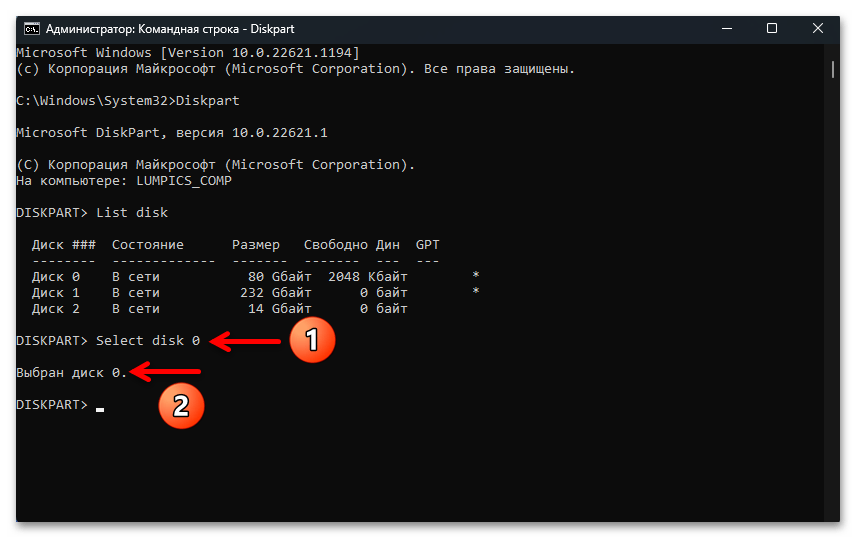
List disk - Переключаемся на работу с содержащим целевой для смены буквы диск (символ
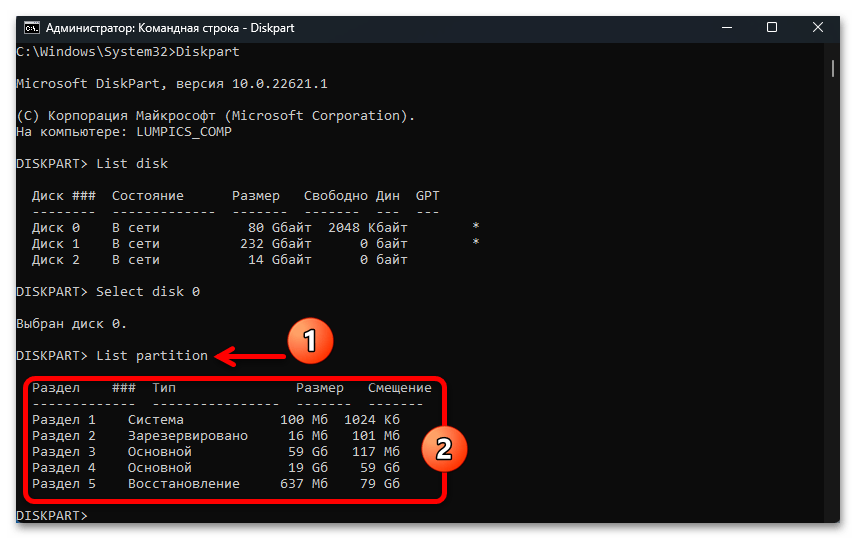
#в указанной далее команде меняем на цифру-номер накопителя из полученного в результате выполненияList diskперечня:Select disk # - Путём запуска следующей команды получаем список всех разделов на выбранном в «DiskPart» на шаге выше физическом диске:
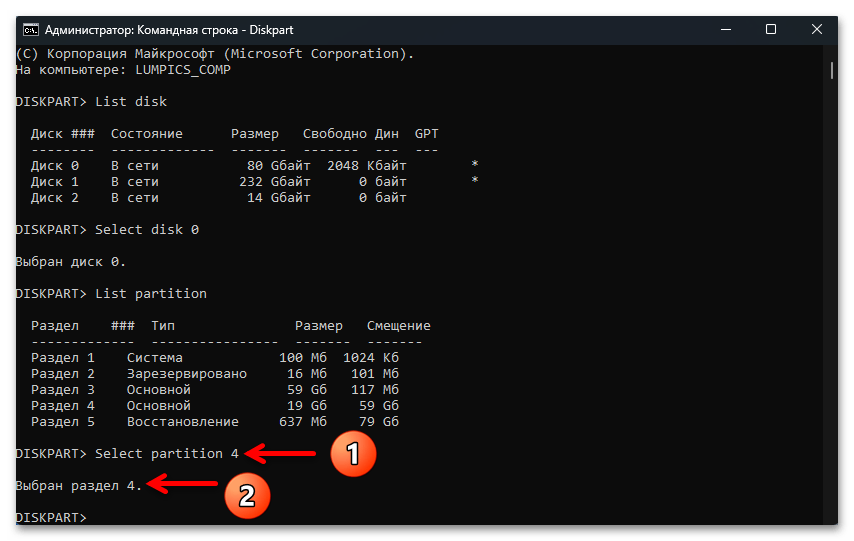
List partition - Переводим «фокус» на целевой (где нужно сменить букву) логический раздел. Команда для этого будет следующей (меняем
#на цифру из полученного в консоли при выполнении предыдущего пункта инструкции списка):Select partition # - Наконец, пишем и отправляем на выполнение команду смены идентифицирующей логический диск литеры (
БУКВАзаменяем на назначаемую разделу латинскую литеру):Assign letter=БУКВА - Чтобы завершить работу «DiskPart», запускаем команду:
Exit - Закрываем окно «Командной строки», на этом задача смены буквы отдельного логического раздела диска в Windows 11 средствами «DiskPart» считается выполненной.


Способ 4: Сторонний софт
Помимо вышеперечисленных системных средств, замену буквы позволяет произвести большинство специализированных программ, которые предназначены для выполнения расширенных операций в отношении функционирующих в среде Windows, в том числе 11-ой версии, дисков.
Читайте также: Программы для работы с разделами жесткого диска
Практически все программы из описанных в материале по ссылке выше характеризуются, по большому счёту, одинаковым набором функций и возможностей, а также имеют схожий интерфейс, поэтому можно считать, что замена буквы раздела диска с их помощью выполняется одним и тем же путём. Далее рассмотрим осуществление процедуры на примере софта MiniTool Partition Wizard.
Скачать MiniTool Partition Wizard
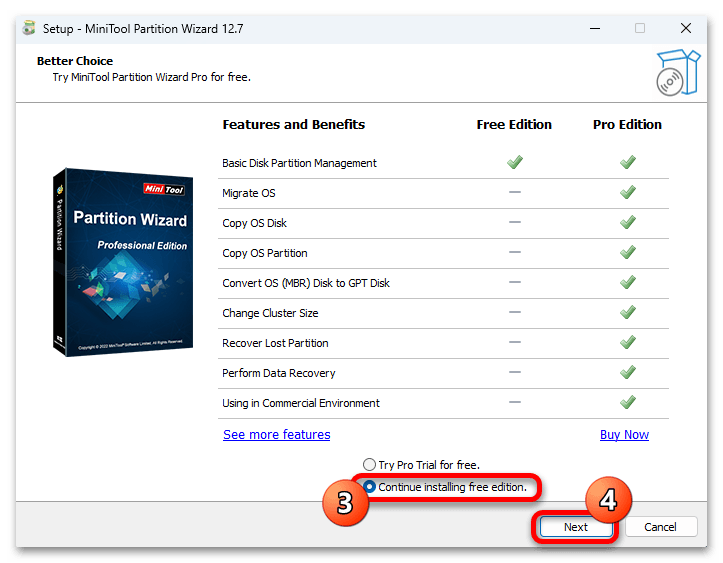
- Скачиваем с официального сайта (для смены буквы диска достаточно предоставляемых FREE-версией софта возможностей),

устанавливаем

и открываем MiniTool Partition Wizard.
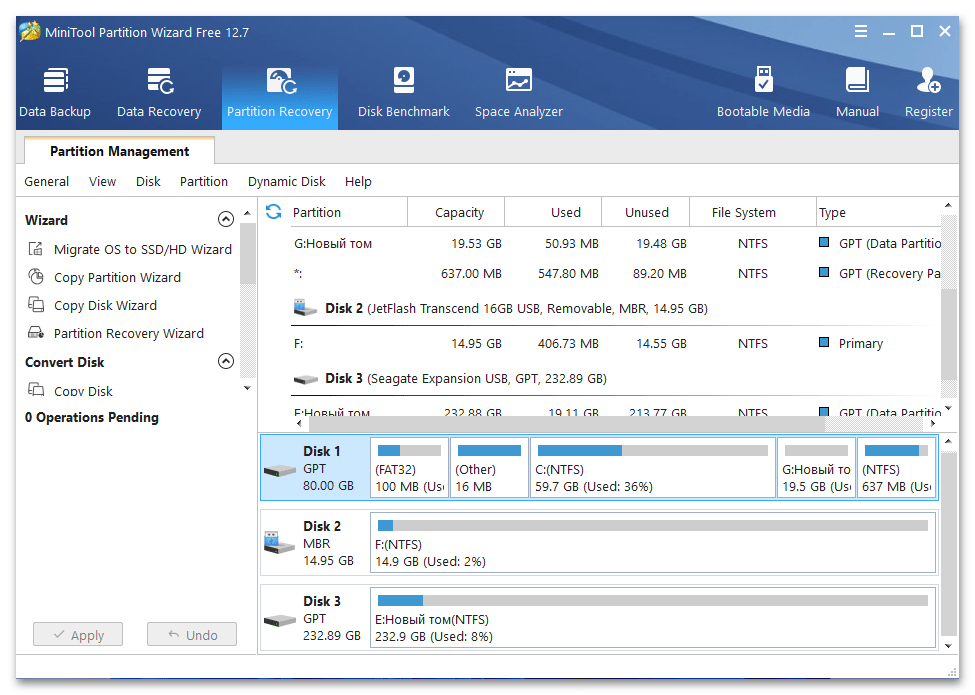
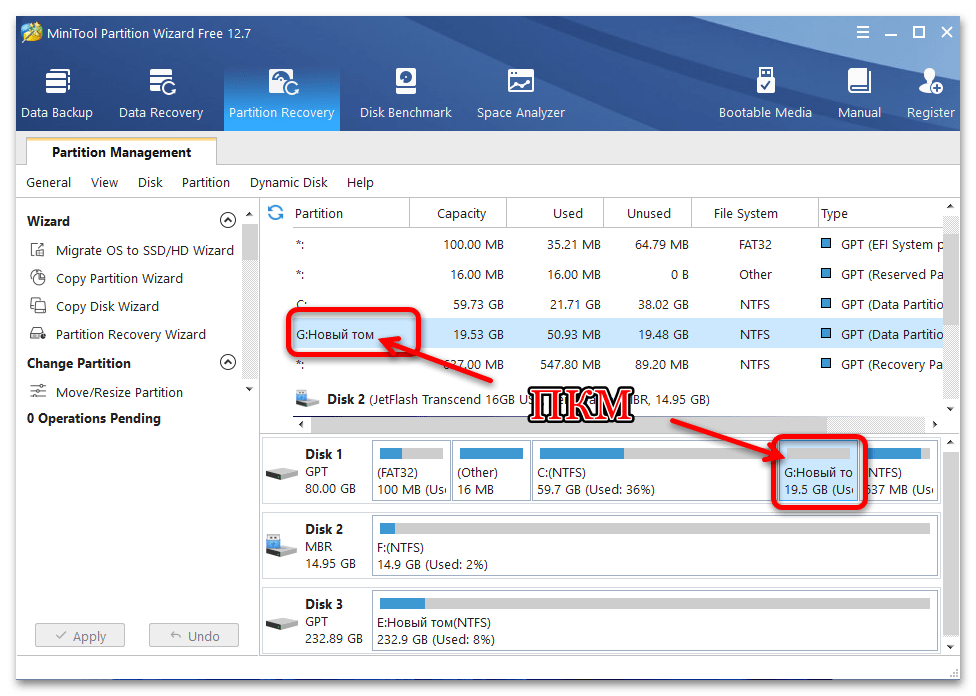
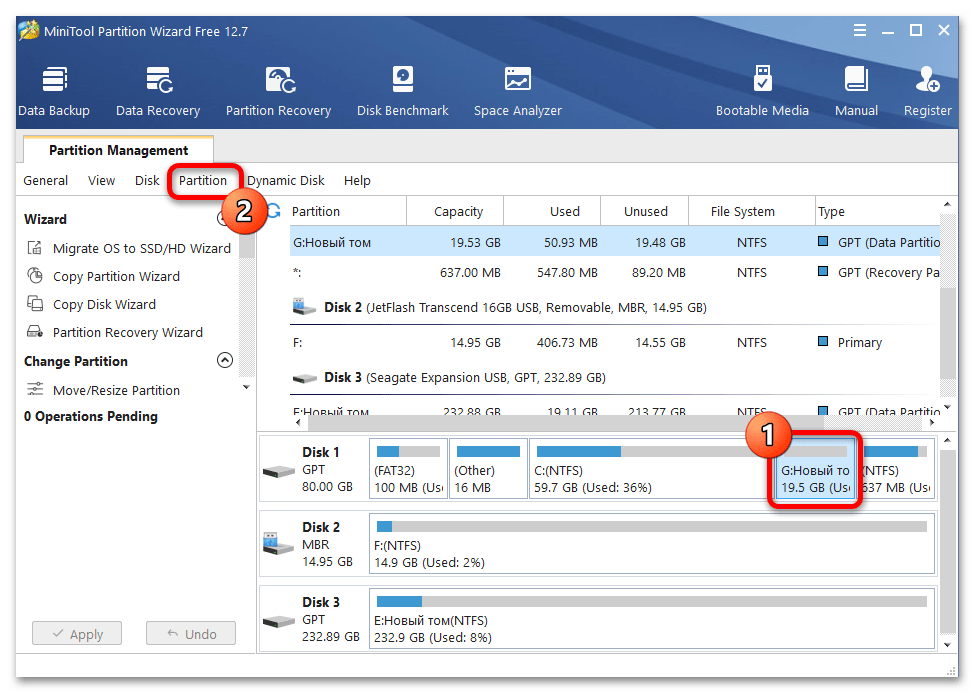
- Находим том, букву которого нужно сменить в первой или второй сверху справа секции окна программы, кликаем по его наименованию правой кнопкой мыши.

Другой вариант действий: кликом ЛКМ выделяем строчку или блок с данными логического раздела, затем вызываем меню софта озаглавленное «Partition».
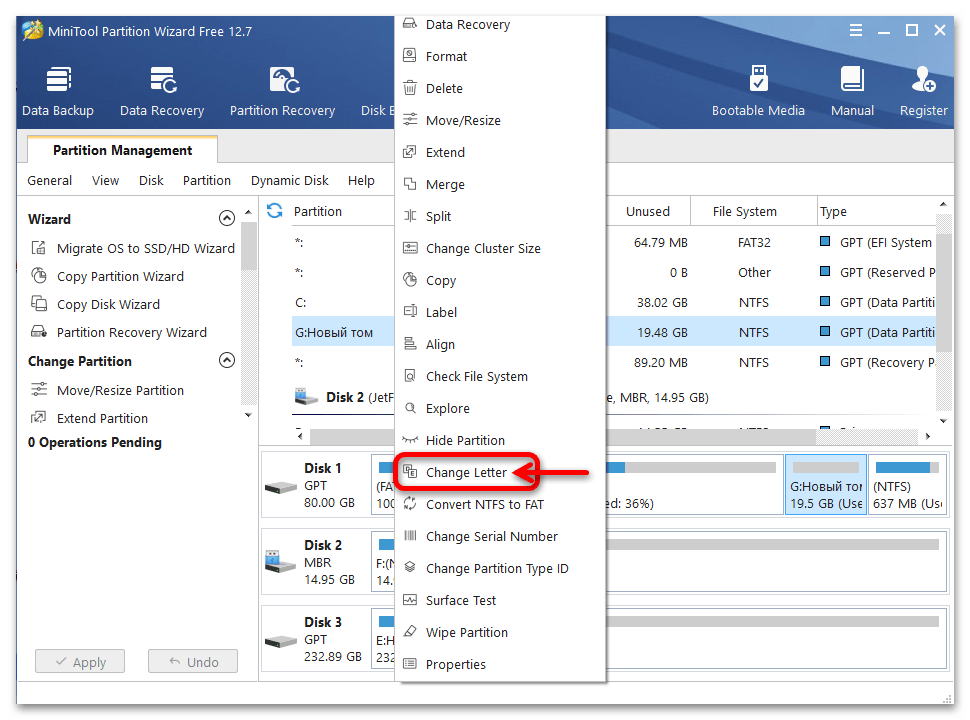
- В открывшемся меню выбираем функцию «Change letter».
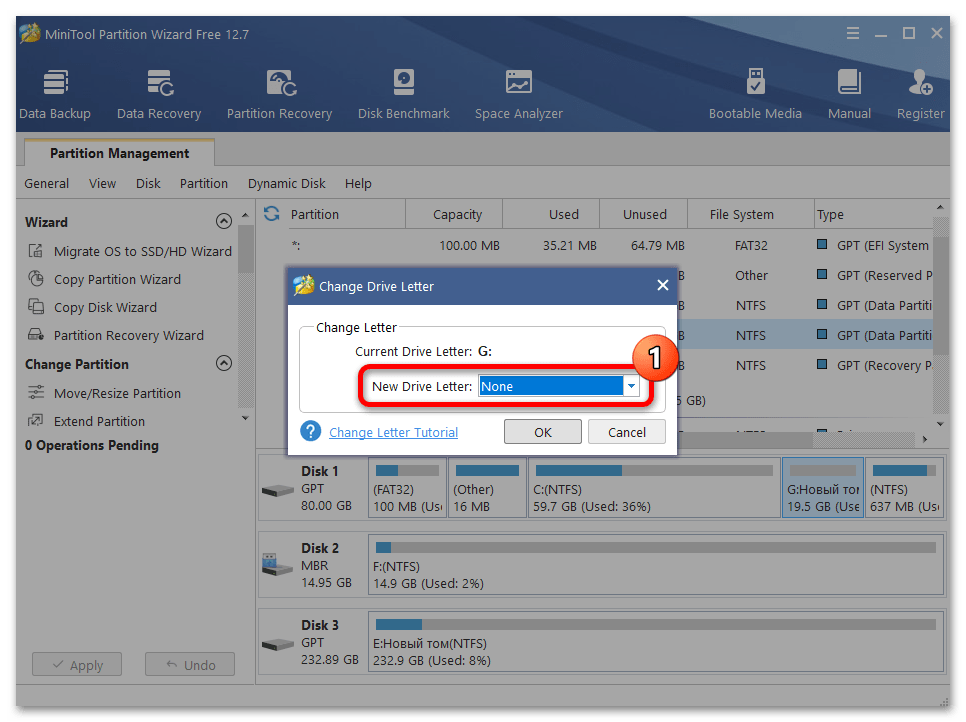
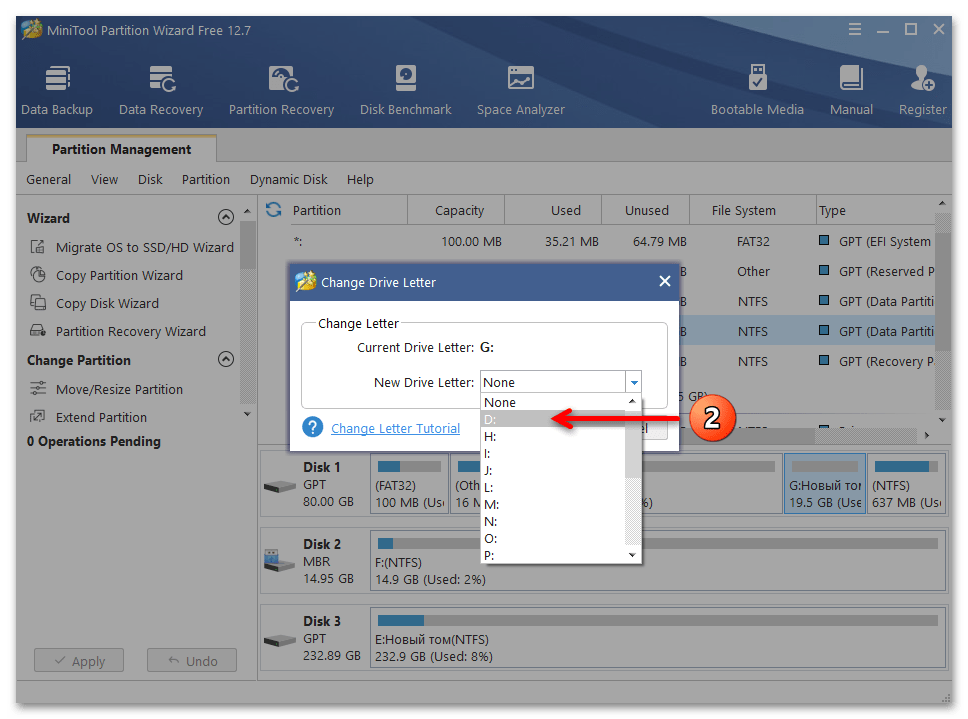
- В отобразившемся окошке «Change Drive Letter» открываем список «New Drive Letter»,

выбираем в нём назначаемую диску букву.
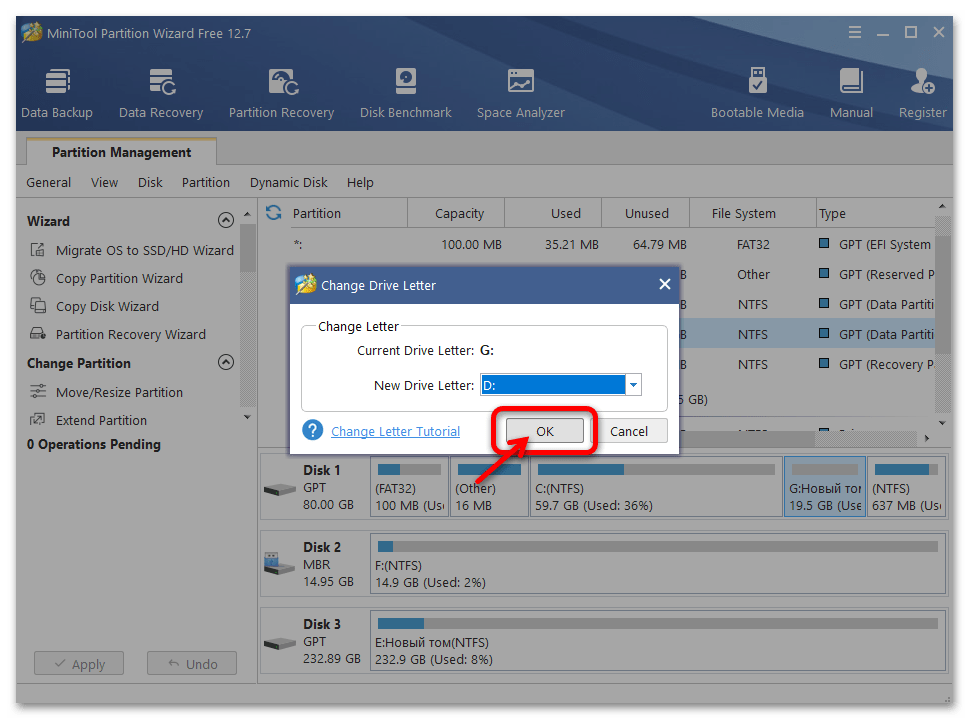
- Определившись с литерой, кликаем «ОК», — в результате этого окно «New Drive Letter» закроется.
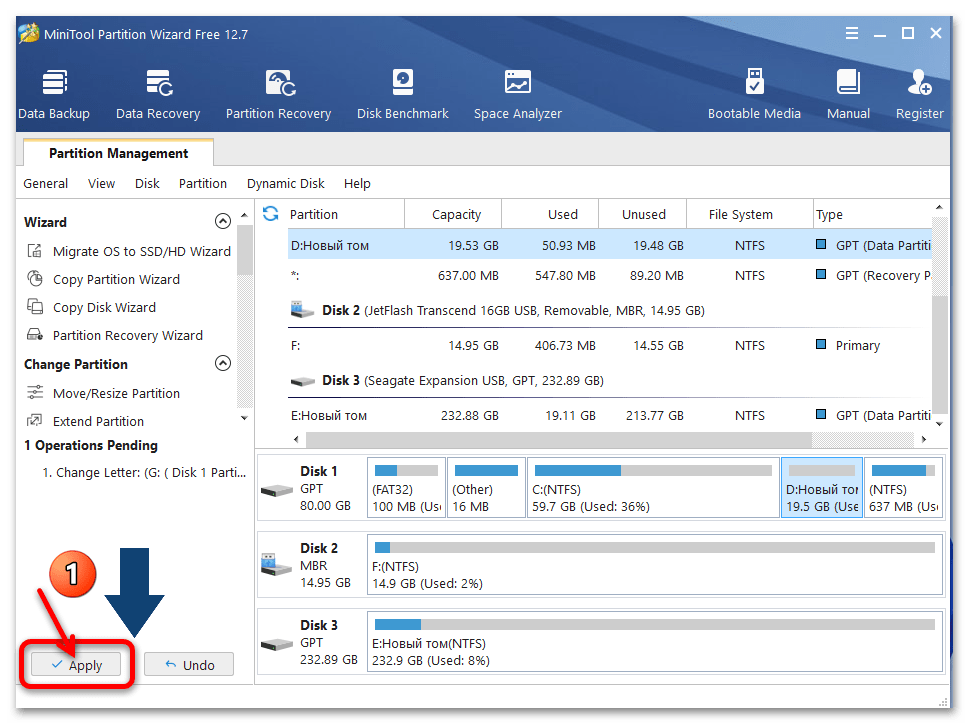
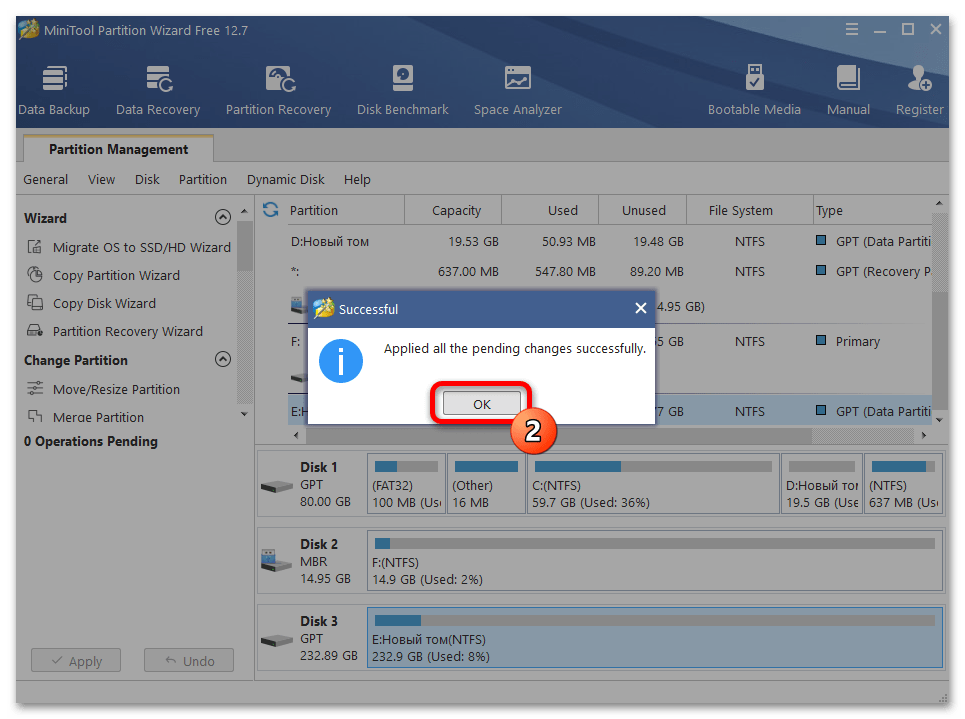
- Далее перемещаемся на панель слева окна МиниТул Партишн Визард, нажимаем на расположенную здесь внизу кнопку «Apply»,

кликаем «Yes» в окошке-запросе софта «Apply Changes?».
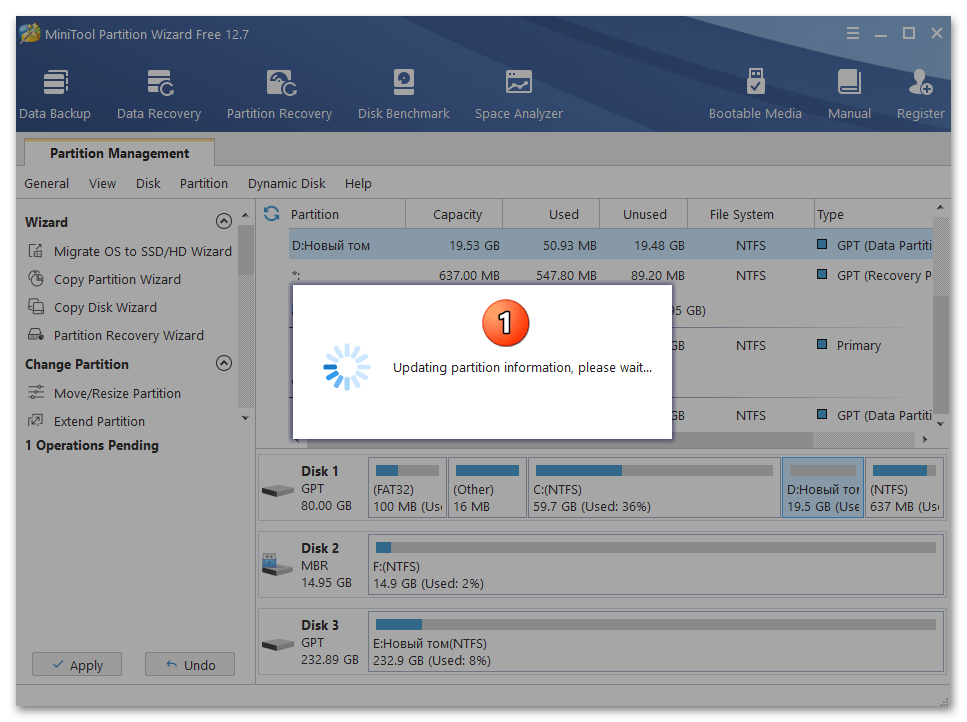
- Немного ожидаем, пока операция смены идентифицирующей раздел диска литеры будет выполнена программой,

нажимаем «ОК» под сообщением об успешном завершении операции.
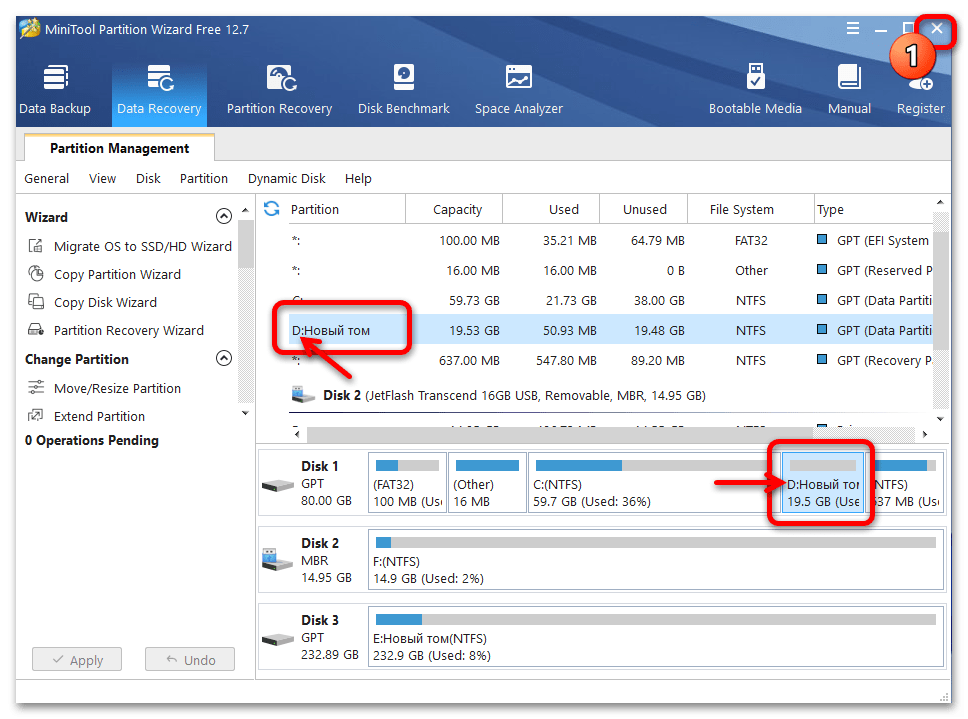
- Закрываем MiniTool Partition Wizard, —

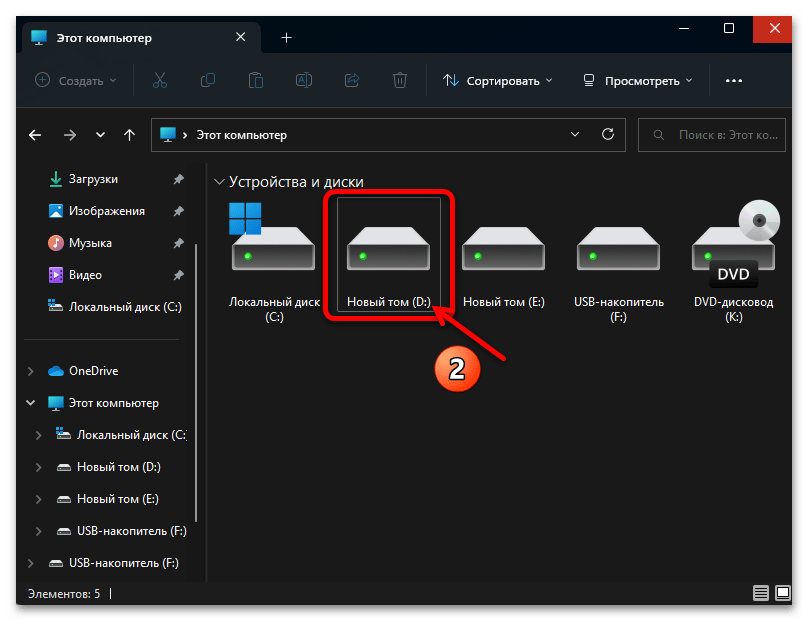
поставленная нами цель уже достигнута, а убедиться в этом возможно, например, открыв «Этот компьютер».


Еще статьи по данной теме:
Помогла ли Вам статья?
217
217 people found this article helpful
Don’t like the letters assigned to your drives in Windows? Change them!
Updated on November 30, 2021
What to Know
- Open Disk Management. Locate the drive you want to change. Right-click and choose Change Drive Letter and Paths > Change.
- Select the drive letter you want to assign from Assign the following drive letter. Then select OK and choose Yes.
The letters assigned to your hard drives, optical drives, and USB drives in Windows are not fixed. Use the Disk Management tool in Windows to change drive letters. These steps apply to Windows XP and newer versions of Windows.
How to Change Drive Letters in Windows
Follow these steps to change the driver letters in any version of Windows.
You can’t change the drive letter of the partition that Windows is installed onto. On most computers, this is usually the C drive.
-
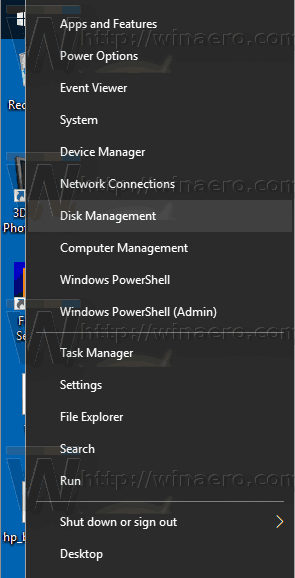
Open Disk Management, the tool in Windows that lets you manage drive letters, among [many] other things.
In Windows 11/10/8, Disk Management is also available from the Power User Menu (WIN+X keyboard shortcut) and is probably the quickest way to open it. You can also start Disk Management from the Command Prompt in any version of Windows, but starting it via Computer Management is probably best for most of you.
-
Locate from the list at the top, or from the map at the bottom, the drive you want to change the drive letter of.
If you’re not sure that the drive you’re looking at is really the one you want to change the drive letter for, you can right-click or tap-and-hold the drive and then choose Explore. If you need to, look through the folders to see if that’s the right drive.
-
Right-click or tap-and-hold the drive and choose Change Drive Letter and Paths.
-
Select Change.
If you’ve selected the primary drive by accident, some versions of Windows will display a message that reads Windows cannot modify the drive letter of your system volume or boot volume.
-
Choose the drive letter you want Windows to assign to this storage device by selecting it from the Assign the following drive letter drop-down box.
You don’t need to worry if the drive letter is already being used by another drive because Windows hides any letters you can’t use.
-
Select OK.
-
Choose Yes to the Some programs that rely on drive letters might not run correctly. Do you want to continue? question.
If you have software installed to this drive, it might stop working properly after changing the drive letter. See details on this in the section below.
-
Once the drive letter change is complete, which usually only takes a second or two, you’re welcome to close any open Disk Management or other windows.
If You Have Programs Not on the Main Drive
Changing drive letter assignments for drives that have software installed to them may cause the software to stop working. This isn’t quite as common with newer programs and apps but if you have an old program, especially if you’re still using Windows XP or Windows Vista, this is likely to be a problem.
Fortunately, most of us don’t have software installed to drives other than the primary drive (typically the C drive), but if you do, consider this your warning that you might need to reinstall the software after changing the drive letter.
No Changes for the Operating System Drive
You cannot change the drive letter of the drive that the Windows operating system is installed on. If you’d like Windows to exist on a drive other than C, or whatever it happens to be now, you can make that happen but you’ll have to complete a clean install of Windows to do it. Unless you have a pressing need to have Windows exist on a different drive letter, we don’t recommend going through all that trouble.
Change, Don’t Switch
There’s no built-in way to switch drive letters between two drives in Windows. Instead, use a drive letter that you don’t plan on using as a temporary «holding» letter during the drive letter change process.
For example, let’s say you’d like to swap Drive A for Drive B. Start by changing Drive A’s letter to one that you don’t plan on using (like X), then Drive B’s letter to Drive A’s original one, and finally Drive A’s letter to Drive B’s original one.
Using the Command Prompt
You can also change the drive letter from Command Prompt. It’s not as easy as using Disk Management and you can’t see right away which letters are available to choose, but it is completely doable with the diskpart command.
Thanks for letting us know!
Get the Latest Tech News Delivered Every Day
Subscribe
- Column
- TECHNOLOGY Q&A
By J. Carlton Collins, CPA
Q. How difficult is it to change drive letters in Windows 10?
A. Changing a drive letter in Windows 10 is relatively easy, as follows. Right—click the Windows 10 Menu button and select Disk Management to display a list of all available hard drives. Right—click the specific hard drive letter you want to change, and select Change Drive Letter and Paths. Click the Add button, select a new drive letter, and then click the Change button, as pictured below.

Notes:
- Letters A and B are reserved for floppy drives.
- The drive letter for the system volume or boot partition (usually drive C) cannot be modified or changed.
- Any letter between C and Z can be assigned to a hard disk drive, CD drive, DVD drive, portable external hard disk drive, or USB flash memory key drive.
- If you change the drive letter for drives where applications or programs are installed, those applications or programs may or may not function properly after the change because they might refer to the original path used to install those products. In this case, you would likely need to reinstall those applications or programs for them to work properly.
About the author
J. Carlton Collins (carlton@asaresearch.com) is a technology consultant, a conference presenter, and a JofA contributing editor.
Submit a question
Do you have technology questions for this column? Or, after reading an answer, do you have a better solution? Send them to jofatech@aicpa.org. We regret being unable to individually answer all submitted questions.
By default, Windows 10 automatically assigns drive letters to connected drives, including internal and external drives. You might want to change these letters. Here is how it can be done.
Windows 10 assigns an available drive letter to a new drive connected to the computer. The operating system goes through the alphabet from A to Z to find the first available letter to assign it to various drives. Historically, it reserves the drive letters A and B for floppy drives.
Modern Windows versions assign the C letter to the system partition which Windows is installed on. Even in a dual-boot configuration, Windows 10 displays its own system partition as C:.
![]()
Changing drive letters will allow re-arranging drives in the This PC folder. This can be useful after you add an extra drive or create a new partition. For example, you might want to change its drive letter to display it before the DVD drive. Also, when you change the drive letter of a USB drive, it will be assigned permanently. Often Windows 10 randomly changes the drive letter for external drives when you connect them, so this way you can make this process more predictable.
Tip: Show drive letters before drive names in This PC / Computer folder.
There are a number of methods you can use to change the drive letter of a drive in Windows 10. Let’s review them.
To change the drive letter in Windows 10, do the following.
- Press the Win + X keys together.
- In the menu, select Disk Management.

- In Disk Management, right-click on the partition whose drive letter you would like to change. Select Change Drive Letter and Paths in the context menu.

- In the next dialog, click on the Change… button.

- Select Assign the following drive letter and choose the desired letter in the drop down list.
 Confirm the change.

 Confirm the change.
You are done. The drive will appear in File Explorer under the letter you’ve chosen.
Change the drive letter in the command prompt
- Open an elevated command prompt.
- Type
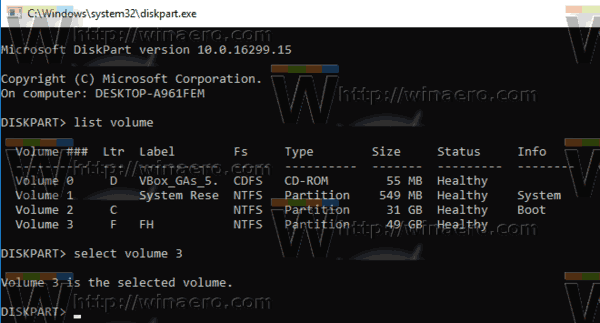
diskpart. - Type
list volumeto see all drives and their partitions.
- Look at the ### column in the output. You need to use its value with the command
select volume NUMBER. Substitute the NUMBER portion with the actual partition number for which you want to change the drive letter.
- Type the command
assign letter=Xto change the drive letter. Substitute the X portion with a desired letter. Note: If the new drive letter you are trying to use is not available, you will get an appropriate error message.
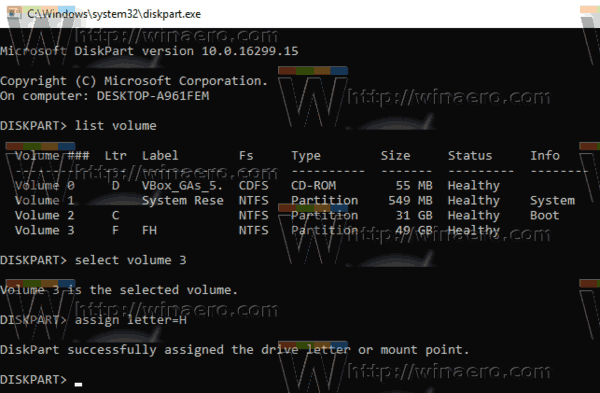
You are done.
Change the drive letter in PowerShell
- Open an elevated PowerShell instance.
- Type
Get-Partitionto see the list of your partitions.
- Note the drive letter and type the next command:
Get-Partition -DriveLetter <your_current_drive_letter> | Set-Partition -NewDriveLetter <a_new_drive_letter>
For example, the command can look as follows:
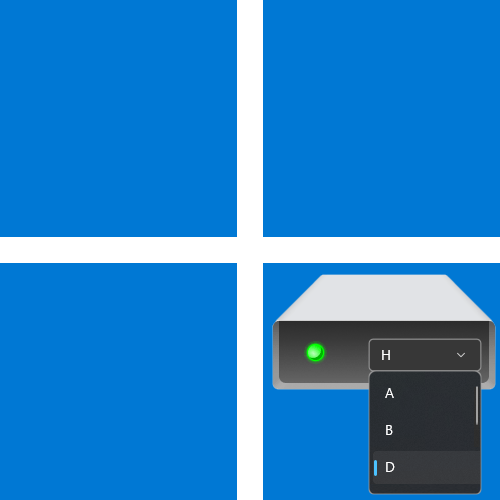
Get-Partition -DriveLetter H | Set-Partition -NewDriveLetter F

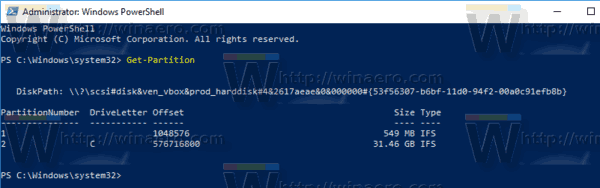
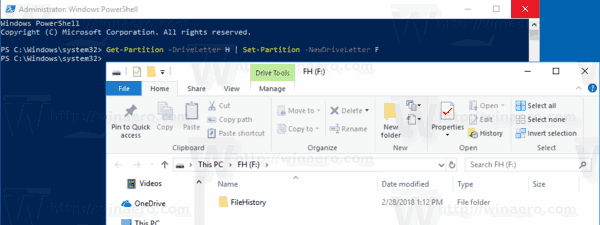
That’s it!
Support us
Winaero greatly relies on your support. You can help the site keep bringing you interesting and useful content and software by using these options:
If you like this article, please share it using the buttons below. It won’t take a lot from you, but it will help us grow. Thanks for your support!
Download PC Repair Tool to quickly find & fix Windows errors automatically
This post will show you how to change the Drive letter in Windows 11/10. For each hard drive partition, a letter like C, D, E, etc., is assigned automatically. If you want to change or rename some drive letter, then you can try any of the simple options covered in this post.
There are 5 different ways covered in this post to change or rename a drive letter in Windows 11/10. These are:
- Using Command Prompt
- Disk Management
- PowerShell
- Registry Editor
- Drive Letter Changer software.
1] Using Command Prompt

Follow these steps to change a drive letter using CMD or Command Prompt window:
- Run Command Prompt as an administrator
- Type
diskpartcommand and hit the enter key - Execute
list volumecommand to see the list of all hard drives including their volume numbers and letters - Run
select volume 5command. Replace 5 with any other volume number for which you want to change the drive letter - Execute
assign letter=Lcommand. Here again, replace L with any other alphabet.
This will change the drive letter immediately.
If the Drive letter is missing or hidden, then you can try some easy options to fix such an issue and then see the newly assigned letter.
2] Using Disk Management

Type diskmgmt in the Search box and use the Enter key.
In the Disk Management window, the list of all volumes or drives, volume type, capacity, free space, etc., are visible. Right-click on a volume and use Change Drive Letters and Paths option.
A small box appears. Here, use the Change button, and another box will open. Now you can select the new letter using the drop-down menu and press the OK button.
Finally, confirm the change using the Yes button.
Read: How to Show Drive Letters first before Drive Names.
3] Using PowerShell

This option is also useful to change drive letters, but it doesn’t show volume numbers and letters. So, you first need to check which drive letter you want to change. After that, use these steps:
- Run elevated PowerShell window
- Now execute this command:
Get-partition -driveletter F | set-partition -newdriveletter L
Make sure to replace F and L with your actual drive letter and new drive letter.
4] Using Registry Editor

This method requires a PC reboot after applying the changes. The steps are:
Launch Registry Editor by typing regedit in the Search box.
Go to MountedDevices Registry key. Its path is:
HKEY_LOCAL_MACHINESYSTEMMountedDevices
On the right section, you will see DWORD values like DosDevicesD: for all the hard drives along with drive letters. Right-click on a value and use the Rename option.
You need to only rename the drive letter with a new letter and leave everything as it is. For example, change DosDevicesD: with DosDevicesL: and save it.
5] Using Drive Letter Changer software

Drive Letter Changer is a free and portable tool. If you want to try some freeware to change drive letters in Windows 10, then this tool is nice. This tool also shows which letters are already assigned to other hard drives and which letters are available or free.
Grab this tool and execute its EXE file to launch its interface. It will show the list of all the drives. Select a drive and it will show the Change drive letter menu. Access that menu and the list of assigned and free drive letters will be visible to you. Select a letter and confirm your action using the Yes button to change the drive letter.
You can also use this tool to directly open the Disk Management window, Restart File Explorer, etc.
Hope these ways will help you easily change drive letters in Windows 11/10.
Related read: How to change Drive Icons in Windows 11/10.

Anand Khanse is the Admin of TheWindowsClub.com, a 10-year Microsoft MVP (2006-16) & a Windows Insider MVP (2016-2022). Please read the entire post & the comments first, create a System Restore Point before making any changes to your system & be careful about any 3rd-party offers while installing freeware.