Windows account help
- Overview
- Sign in to Windows
- Sign-in options and account protection
- Sign out of Windows
- Troubleshoot sign in issues
- Error: We can’t sign in to your account
- Learn about Windows Hello
- Sign in with Windows Hello
- Troubleshoot Windows Hello
- Change or reset a password
- Create a password reset disk
- Reset a local account password
- PIN reset if signed in
- PIN reset if signed out
- Add or remove accounts
- Change your account picture
- Switch accounts
- Switch from a local account to a Microsoft account
Sign in with Microsoft
Sign in or create an account.
Hello,
Select a different account.
You have multiple accounts
Choose the account you want to sign in with.
Thank you for your feedback!
×
To do this, follow these steps: Press Windows + I to open Settings, then go to “Your email and accounts”. Select the account that you want to sign out and click Remove. After removing all, add them again. Set the desired account first to make it the primary account.
Contents
- 1 How do I change my default Microsoft account?
- 2 How do I change my administrator account on Windows 10?
- 3 How do I change my Microsoft account on Windows 10 without losing data?
- 4 How do I delete my main account on Windows 10?
- 5 How do I change my Microsoft account email on Windows 10?
- 6 How do I change my local account to Administrator on Windows 10 without admin rights?
- 7 What happens if I switch Microsoft accounts on my PC?
- 8 Can I change Microsoft Account without losing data?
- 9 How can I change my Microsoft Account without losing files?
- 10 How do I change the primary email on my Microsoft account?
- 11 How do I change my Microsoft account email on my laptop?
- 12 How do I remove a primary account from Outlook?
- 13 How do I make myself the administrator Windows 10?
- 14 How do I get administrator privileges on Windows 10?
- 15 How do I get administrator privileges on Windows 10 standard account?
- 16 Will there be a Windows 11?
- 17 Can you delete a Microsoft Account?
- 18 Does changing Microsoft Account delete files?
- 19 How do I change my Outlook account on my computer?
- 20 How do I transfer data from one Microsoft account to another?
How do I change my default Microsoft account?
- Press windows + x.
- Select control panel.
- Select user account.
- Select Manage user account.
- Choose the local account you want it to be default.
- Login with local account and restart.
How do I change my administrator account on Windows 10?
- Select Start >Settings > Accounts.
- Under Family & other users, select the account owner name (you should see “Local account” below the name), then select Change account type.
- Under Account type, select Administrator, and then select OK.
- Sign in with the new administrator account.
How do I change my Microsoft account on Windows 10 without losing data?
How to change Microsoft email account without deleting my data?
- Sign in using the Microsoft account that you want to change.
- Go to Settings.
- Click Accounts.
- Under Your email and accounts, click Sign in with a local account instead.
- Type the password of the Microsoft account and click Next.
How do I delete my main account on Windows 10?
Select Start > Settings > Accounts > Email & accounts. Select the account you wish to remove, then select Remove. Select Yes to confirm your actions.
Change Primary email address of Microsoft Account
- Sign in to your Microsoft account page.
- Locate Account option.
- Select the Your Info tab.
- Now click on Manage how you sign in to Microsoft.
- Here, you can change the primary Microsoft Account email.
- Select your desired email ID and click Make primary.
How do I change my local account to Administrator on Windows 10 without admin rights?
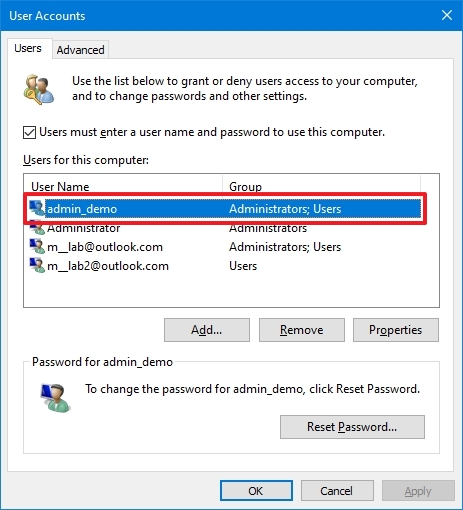
Press the Windows key + R to open the Run box. Type netplwiz and press Enter. Check the “Users must enter a user name and password to use this computer” box, select the user name that you want to change the account type of, and click on Properties.
What happens if I switch Microsoft accounts on my PC?
No, the account is separate from the install and apps. It just replaces the account with a different one. Or if you don’t even want to replace the account, you can sign into it and go into Settings > Accounts > Your Info and choose Sign in with a Local Account instead, let it convert to Local, restart PC.
Can I change Microsoft Account without losing data?
Replies (1)
Switching from Microsoft account to Local account will help, switching the account will not delete any data so you can go ahead and use the option Sign in with a local user.
How can I change my Microsoft Account without losing files?
Just Open the “PC Settings” app and go to the Account section. There you can disconnect from the old email account and connect it to your new Microsoft Account while leaving all your stuff in place.
How do I change the primary email on my Microsoft account?
Change my Microsoft Rewards primary email
- Go to Manage how you sign in to Microsoft.
- To add an email address, select Add email. This can be any email address (e.g., Gmail, Outlook.com, Hotmail, Yahoo, etc.).
- Select Make primary next to the email address that you’d like to receive Microsoft Rewards communications from.
How do I change my Microsoft account email on my laptop?
A new email address. Select Create a new email address and add it as an alias, and then follow the instructions. A non-Microsoft email address (such as an @gmail.com or @yahoo.com email address). Select Add an existing email address as a Microsoft account alias, and then select Add alias.
How do I remove a primary account from Outlook?
How can I change or remove the primary account from Outlook?
- Close Outlook.
- Go to Start.
- Here, click on Control Panel.
- Click on the Mail icon.
- In Account Settings, remove all secondary accounts.
- Then, delete the primary account.
- With all the accounts now removed, click the Data Files tab.
How do I make myself the administrator Windows 10?
How to change user account type using Settings
- Open Settings.
- Click on Accounts.
- Click on Family & other users.
- Under the “Your family” or “Other users” section, select the user account.
- Click the Change account type button.
- Select the Administrator or Standard User account type.
- Click the OK button.
How do I get administrator privileges on Windows 10?
How Do I Get Full Administrator Privileges On Windows 10? Search settings, then open the Settings App. Then, click Accounts -> Family & other users. Finally, click your user name and click Change account type – then, on the Account type drop-down, select Administrators and click OK.
How do I get administrator privileges on Windows 10 standard account?
How to Change Administrator on Windows 10 via Settings
- Click the Windows Start button.
- Then click Settings.
- Next, select Accounts.
- Choose Family & other users.
- Click on a user account under the Other users panel.
- Then select Change account type.
- Choose Administrator in the Change account type dropdown.
Will there be a Windows 11?
Windows 11 is here, and if you own a PC, you might be wondering whether it’s time to upgrade your operating system. After all, you are likely to get this new software free. Microsoft first revealed its new operating system in June, its first major software upgrade in six years.
Can you delete a Microsoft Account?
Select the Start button, and then select Settings > Accounts > Email & accounts . Under Accounts used by email, calendar, and contacts, select the account you want to remove, and then select Manage. Select Delete account from this device. Select Delete to confirm.
Does changing Microsoft Account delete files?
When you switch a user account from a Microsoft Account to a Local account, it will not affect local files stored in the users folder, you are just changing the way you sign into that account, not creating or deleting a new account in the background . . . Power to the Developer!
How do I change my Outlook account on my computer?
Switch to another Outlook email profile
- In Outlook, Click File > Account Settings > Change Profile.
- Outlook will close. You’ll need to start Outlook again manually.
- The next time Outlook starts, it will display the Choose Profile Dialog.
How do I transfer data from one Microsoft account to another?
Replies (3)
- Press Windows + X keys on the keyboard, select Control Panel.
- Select System and Security and then System.
- Click Advanced System Settings.
- Under User Profiles, click Settings.
- Select the profile you want to copy.
- Click Copy to, and then enter the name of, or browse to, the profile you want to overwrite.
To change the account type with the Settings app on Windows 10, use these steps:
- Open Settings.
- Click on Accounts.
- Click on Family & other users.
- Select a user account.
- Click the Change account type button.
- Select the Administrator or Standard User account type depending on your requirements.
- Click the OK button.
How do I change the Microsoft account on my computer?
Step 1: To convert the account, you can do the following:
- Sign in to your Microsoft account on Windows 10.
- Click Start and then PC settings.
- Click Users and accounts and under Your Profile click Disconnect on the right of the screen.
- Enter your Microsoft account’s password, and click on Next.
How do I sign into a different Microsoft account on Windows 10?
How to manage account sign-in options on Windows 10
- Open Settings.
- Click on Accounts.
- Click on Sign-in options.
- Under “Password,” click the Change button.
- Enter your current Microsoft account password.
- Click the Sign-in button.
- Enter your old password.
- Create a new password.
How can I remove my Microsoft account from Windows 10?
To remove a Microsoft account from your Windows 10 PC:
- Click the Start button, and then click Settings.
- Click Accounts, scroll down, and then click the Microsoft account you would like to delete.
- Click Remove, and then click Yes.
How do I unlink my Microsoft account from Windows 10?
To unlink your Microsoft Account from your computer, follow the instructions below. Though these use Windows 10, the instructions are similar for 8.1. 1. In the Start menu, click the “Settings” option or search “Settings” and select that option.
Can I change the Microsoft account on my laptop?
Open Settings > Accounts and click Your info. After confirming that the account is set up to use a Microsoft account, click Sign in with a local account instead. Enter the password for your Microsoft account to confirm that you’re authorized to make the change, and then click Next.
If you wish to change your primary Microsoft Account email address associated with your Windows device, you can choose an Alias or create a new one and then make it Primary. Visit your Microsoft account page and sign in. Next, select the ‘Your Info’ tab adjacent to ‘Account’ option.
Does Windows 10 require a Microsoft account?
A local user account in Windows 10 will allow you to install traditional desktop apps, personalize settings and use the operating system the old fashioned way. You can access the Windows Store but, if you use Windows 10 Home, you cannot download and install apps without a Microsoft account.
How do I change the primary account on Windows 10?
1. Change a user account type on Settings
- Use the Windows key + I keyboard shortcut to open the Settings app.
- Click Accounts.
- Click Family & other people.
- Under Other people, select the user account, and click Change account type.
- Under Account type, select Administrator from the drop down menu.
How do I sign into a different Microsoft account?
In the upper-right corner, tap or click Sign In. Under Switch to a Microsoft account on this PC, tap or click Sign into each app separately instead (not recommended). Under Add your Microsoft account, enter the email address and password of the Microsoft account that you want to use for this app.
How do I remove my Microsoft account from Windows 10 2018?
How to Completely Delete Microsoft Account on Windows 10
- Press the Windows key + I to open the Settings app, click Accounts.
- Once you’ve selected the Your info tab, click the option labeled “Sign in with a local account instead” on the right side.
- Enter your Microsoft account password and it will let you create a new local account.
How do I remove Microsoft account from Windows 10 without password?
Add or remove a password for a Windows 10 local account
- At the desktop, press the Windows key and type “sign”. Select Sign-in options from the menu.
- Under the Password section, click Change and follow the instructions to add a password. To remove a password, enter the current password and leave all other fields blank.
How do I delete the administrator account on my computer Windows 10?
Click User Accounts. Step 2: Click Manage another account link to see all user accounts on the PC. Step 3: Click on the admin account which you want to delete or remove. Step 5: When you see the following confirmation dialog, either click Delete Files or Keep Files button.
How do I Unsync my Microsoft account from Windows 10?
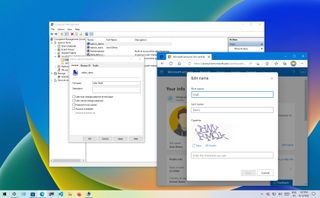
Option 1: Change the sign-in screen name.
- On the Search bar, type Settings.
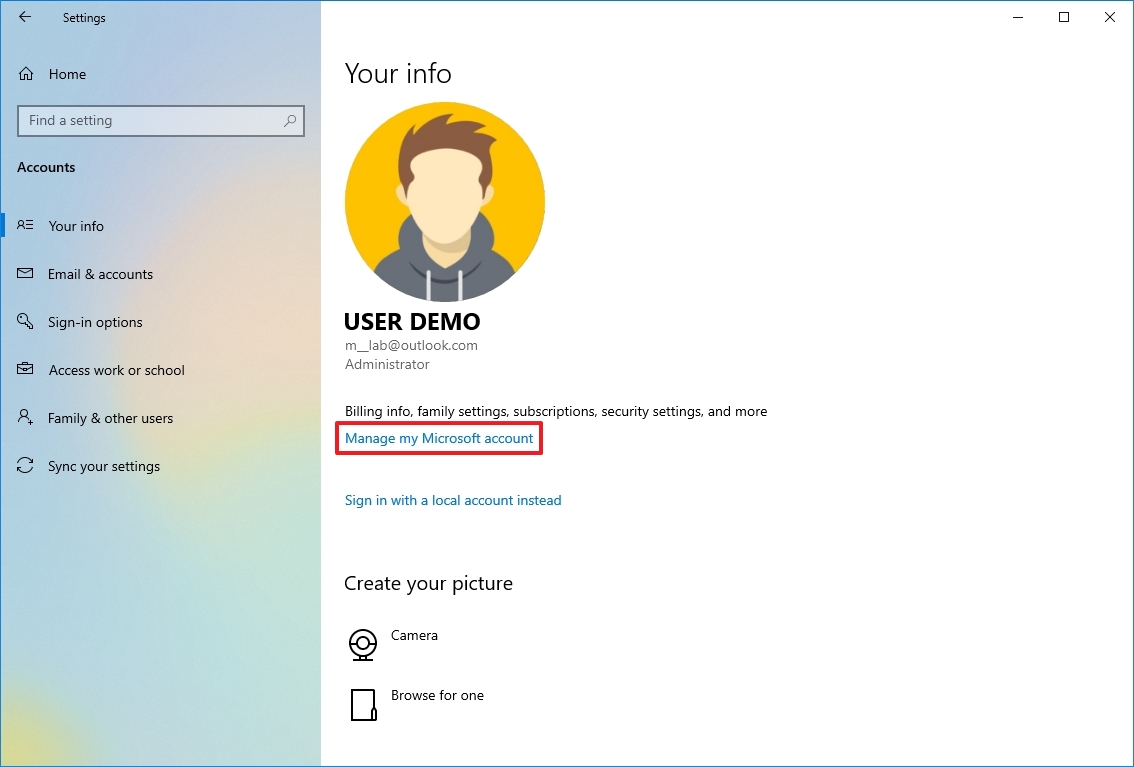
- Open the Settings app and click Accounts.
- Go to Your email and accounts tab and click the Manage my Microsoft account link.
- In the Microsoft account page, click Edit name.
- After saving the new name, restart your PC.
How do I unlink my computer from my Microsoft account?
Try these steps:
- a) Login to Microsoft account which you want to change it to Local account.
- b) Press Windows key + C, click on Settings and select Pc Settings.
- c) In pc settings click on Accounts and select Your Account.
- d) In the right panel you will see your live-ID with Disconnect option just below it.
How do I Unsync my Microsoft account from my computer?
Please follow the steps given below and check if that helps.
- Swipe in from the right edge of the screen, and then tap Settings. (
- Tap or click Accounts.
- Click on Disconnect from Microsoft account.
- Go to Settings again and click on Accounts again to connect back.
How do I change my Microsoft account password?
To change your Microsoft account password
- Sign in to your Microsoft account, then select Security.
- Select Change password.
- Type your current password, then type a new password and type it again to verify. If you forgot your current password, you can reset your password.
- Select Save.
How do I change the Microsoft account on my HP laptop?
Replies (2)
- Press Windows key + X.
- Select Control Panel.
- Click on User accounts.
- Under make changes to your account, click on Manage another account.
- Select the account which you want to change.
- Now click on change the account type.
- Select Standard and click on Change the Account Type to change the account type.
How do I delete a Microsoft account from my laptop?
To remove an email account:
- Select the Start button, and then select Settings > Accounts > Email & accounts .
- Under Accounts used by email, calendar, and contacts, select the account you want to remove, and then select Manage.
- Select Delete account from this device.
- Select Delete to confirm.
Photo in the article by “Wikimedia Commons” https://commons.wikimedia.org/wiki/File:20150913_230116_Windows_10_Upgrade.jpg
Содержание
- Change your account picture
- Change your account picture
- Delete an account picture
- Change your account picture
- Delete an account picture
- How to Change Microsoft Account on Windows 10
- Gaurav Bidasaria
- Add Email ID and Number to Same Microsoft Account
- Change Microsoft Account to Local and Vice Versa
- Change to New Microsoft Account or Add New Microsoft Account
- Dual Accounting System
- Read Next
- How to Change Local Account to Microsoft Account in Windows 8
- How to Change the Default Email Account for Microsoft Notifications in Windows 8
- 6 Best Ways to Change User Account Name in Windows 10
- Top 3 Ways to Fix Windows 10 Guest Account Not Appearing on Login Screen
- What Happens When You Delete Your Skype Account
- How to Change the System Language in Windows 10
- How to Add Users and Manage User Accounts in Windows 8
- How to Add and Manage Multiple OneDrive Accounts in Windows 10
- How to change a Windows 10 user account type and why you might want to
- How to change user account type using Settings
- How to change user account type using User Accounts
- How to change user account type using Control Panel
- How to change user account type using PowerShell
- How to change user account type using Command Prompt
- More Windows 10 resources
- Join us LIVE for the Windows Central Video Podcast today at 2:30PM ET
- Razer Wolverine V2 review: Razer’s Xbox controller almost feels illegal
- Best Destiny 2 Exotic weapons and armor in 2022
- The NFL is back! Check out these must-have Windows apps for football fans
- How to change sign-in account name on Windows 10
- How to change account name with Settings on Windows 10
- How to change account name using Control Panel on Windows 10
- Change account name with User Accounts
- Change account name with netplwiz
- Change account name with Computer Management
- More Windows 10 resources
- You can now purchase Microsoft’s Surface Duo 2
- Best Destiny 2 builds, and how to make your own
- All the Xbox Game Pass games coming and leaving soon
- The NFL is back! Check out these must-have Windows apps for football fans
Change your account picture
If you want your account picture to have more of a personal touch and reflect you, you can change your picture in Windows 11.
Change your account picture
You can change the picture for either a Windows account or a Microsoft account. Here’s how.
Tip: If you use just a username and password to sign in to Windows 11, you’re using a local account to access Windows. If you use an email address and password to sign in, you’re using a Microsoft account.
Change your account picture in Windows 11
Select the Start > Settings > Accounts > Your info.
Under Adjust your photo, select Browse files. Or, if your device has a camera, select Take a photo and take a selfie.
Note: Windows remembers the last three pictures you’ve used. Select the picture on the Your info page to switch to that one.
Change your Microsoft account picture in Windows 11
Select Add a photo or Change photo, then follow the instructions.
Note: Windows remembers the last three pictures you’ve used, so you can easily switch back to a recent favorite.
Delete an account picture
Windows is designed to let you switch between your three most recent pictures on the Your info page. If you really need to delete one of your account pictures:
Open File Explorer from the taskbar. If you don’t see File Explorer on the taskbar, select Start and type File Explorer.
Go to C:Users yournameAppDataRoamingMicrosoftWindowsAccountPictures.
Replace yourname with your account name.
Delete the account picture you no longer want to use.
If you want your account picture to have more of a personal touch and reflect you, you can change your picture in Windows 10.
Change your account picture
You can change the picture for either a local account or a Microsoft account. Here’s how.
Tip: If you use just a username and password to sign in to Windows 10, you’re using a local account. If you use an email address and password to sign in, you’re using a Microsoft account.
Change your local account picture in Windows 10
Select the Start button, then select Settings > Accounts > Your info.
Under Create your picture, select Browse for one. Or, if your device has a camera, select Camera and take a selfie.
Note: Windows remembers the last three pictures you’ve used. Select the picture on the Your info page to switch to that one.
Change your Microsoft account picture in Windows 10
Select Add picture or Change picture, then follow the instructions.
Note: Windows remembers the last three pictures you’ve used, so you can easily switch back to a recent favorite.
Delete an account picture
Windows is designed to let you switch between your three most recent pictures on the Your info page. If you really need to delete one of your account pictures:
Go to C:Users yournameAppDataRoamingMicrosoftWindowsAccountPictures.
Replace yourname with your account name.
Delete the account picture you no longer want to use.
Источник
How to Change Microsoft Account on Windows 10
Gaurav Bidasaria
09 Sep 2020
All Microsoft products and services are connected to your Microsoft account. Even Windows offers the option to login using the
same account. That said, many users have multiple Microsoft accounts to separate their personal life from professional. Others like to use a local account instead. But, how do you change the Microsoft account on your Windows 10 computer when needed? How do you create/add a new account?
While a Microsoft account is not necessary to use Windows 10 computer, it is recommended nonetheless. There could be other reasons to update or change your Microsoft account details on your computer:
Let’s find out how you can change Microsoft account on Windows 10 computer and what you need to keep in mind.
Add Email ID and Number to Same Microsoft Account
Many users wanted to change their Microsoft account’s sign-in email and phone number. No need to create a new account just for that. You can add up to 10 email IDs and numbers to the same account as ‘alias’ without creating a new account for each one. You can also replace old account details with a new one or make the new ID ‘primary’.
Step 1: Open your Microsoft Account manage area and under Account aliases where you can add a new email ID or number.
Step 2: Choose the first option if you want to create a new Outlook account right there and the second option if you are using a third-party email provider like Gmail.
You must know that there is no way to move aliases from one Microsoft account to another. You can’t recover aliases either. If you delete an alias in one Microsoft account, it will be deleted from Microsoft servers forever, and you or anyone else can’t use it on another Microsoft account.
Change Microsoft Account to Local and Vice Versa
Other users wanted to get rid of their Microsoft account and go local or vice versa.
For the uninitiated, there are two types of accounts you can create on Windows-powered computers. You can either create a local account or a Microsoft account. A local account is one that does just requires a username and password. Also, you can remove your password later. None of your Microsoft data leaves your computer or synced to another Windows device. It stays offline and on a single device. Several Microsoft apps like Store, Skype, etc. won’t work or downloaded without a Microsoft account though.
On the other hand, a Microsoft account will sync all your activities across devices and keep all the data in the cloud on Microsoft’s servers. The benefit is obvious. Do you want to change between them?
Step 1: Press Windows key+I to open Settings and click on Accounts.
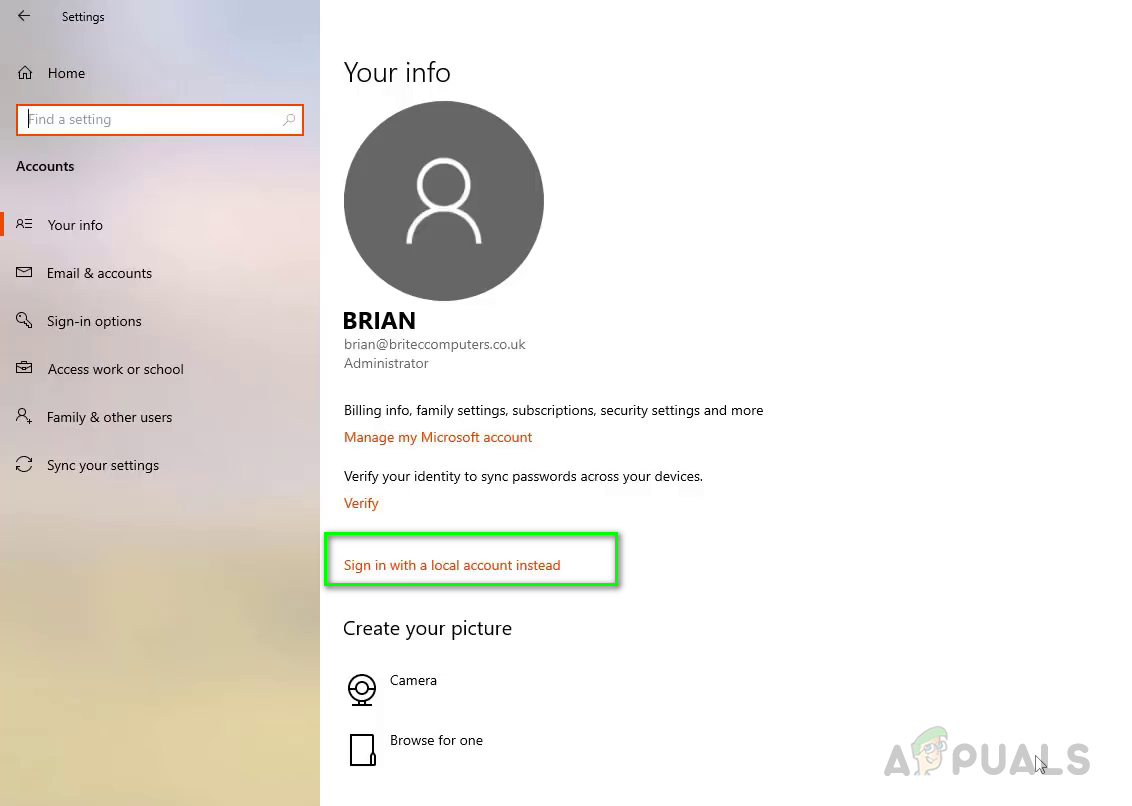
Step 2: Click on ‘Sign in with a local account instead’ option to begin the process.
Follow on-screen instructions after that. You may have to enter your current Microsoft account’s password/PIN for verification.
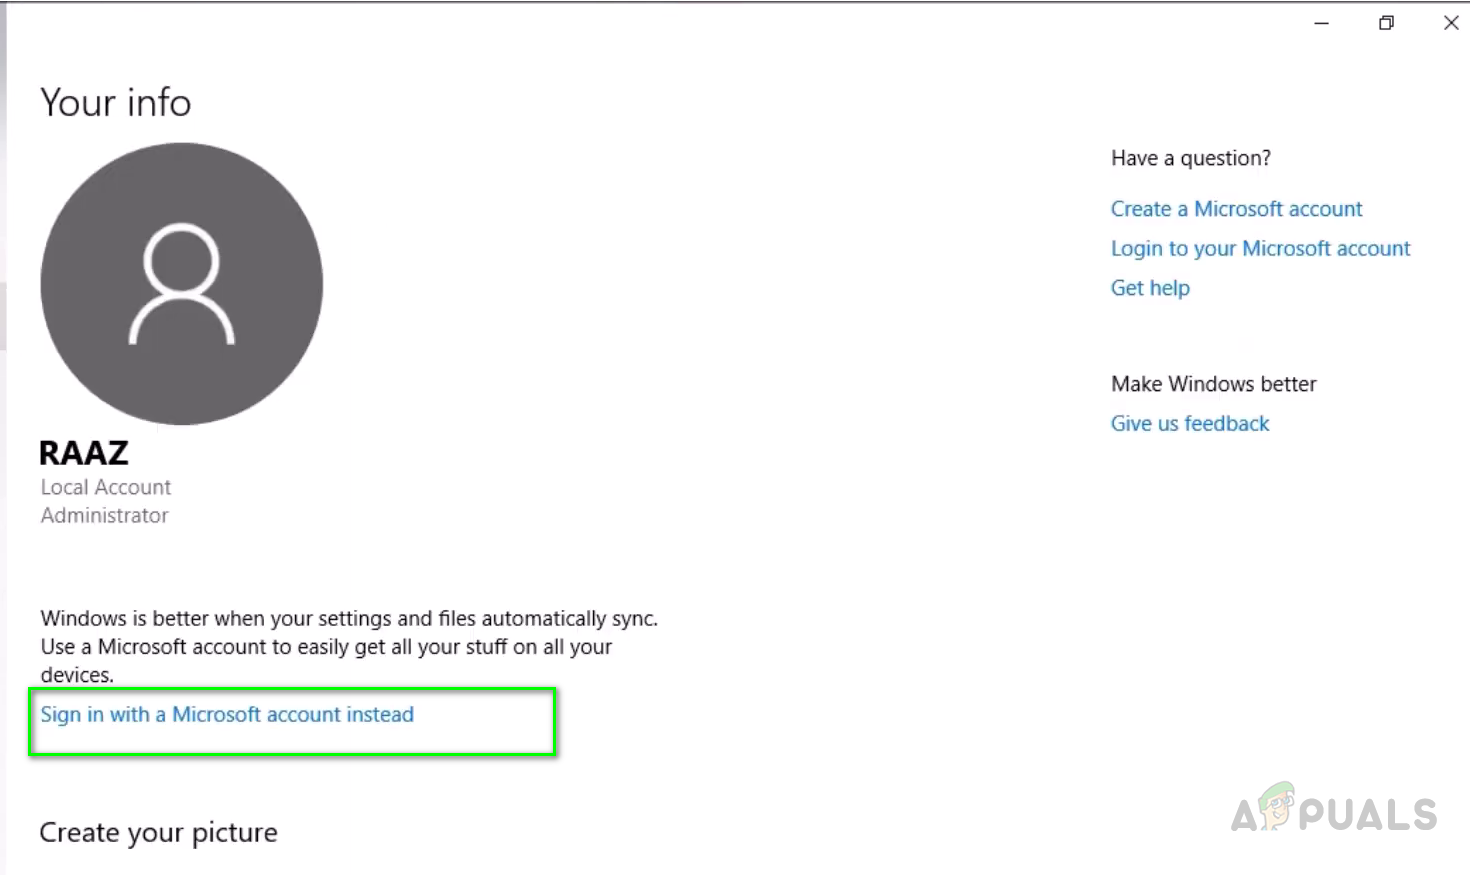
To change from a local account to a Microsoft account, you will follow the same steps. This time, you will select ‘Sign in with a Microsoft account instead’ option that should be visible because you are using a local account instead.
Change to New Microsoft Account or Add New Microsoft Account
You have a new Microsoft account with a different email ID (Outlook.com or Live.com, which is owned by Microsoft) and want to use this new account on your Windows 10 computer.
Step 1: Open Settings again (Windows key+I) and go to Accounts > Family & other users.
Step 2: Click on ‘Add someone else to this PC’ button.
You will now follow on-screen instructions and enter the new Microsoft account ID and password to add that account to your computer. The setup instructions will include settings like 2FA and Windows Hello. Just like when you added your first Microsoft account.
What you are doing is creating a new user account on your computer with this new Microsoft account. You can switch between these two users like you normally do from the Start menu or reboot your computer.
Dual Accounting System
Microsoft allows a lot of ways to manage your Windows 10 computer. Unlike Windows 7 and earlier versions, you have more options like using a local or Microsoft account, opening up new possibilities. I suggest you take the time to think through what you want to do and how you want it done. That will save you the trouble of going back and forth between settings and accounts. Always protect your account with features like Hello or 2FA. Either will save you a lot of headaches someday.
Let us know if you have any questions in the comments section below.
Next up: Do you know the difference between a standard and administrator user on Windows 10? Click on the link below to learn the difference between two types of user accounts on Windows.
Last updated on 10 Sep, 2020
The above article may contain affiliate links which help support Guiding Tech. However, it does not affect our editorial integrity. The content remains unbiased and authentic.
Read Next
How to Change Local Account to Microsoft Account in Windows 8
Learn How to Change Local Account to Microsoft Account in # Windows 8, and Why You Should or Should Not.
How to Change the Default Email Account for Microsoft Notifications in Windows 8
Learn How to Change the Default Email Account for Microsoft Notifications in # Windows 8.

6 Best Ways to Change User Account Name in Windows 10
You can change user account name in # Windows 10 computer whenever you want to. Here are the 6 easy ways to change your user account name on your # Windows 10 computer.

Top 3 Ways to Fix Windows 10 Guest Account Not Appearing on Login Screen
Here are two ways to enable the default guest user account on # Windows 10 and one way to create a new one from scratch using the Command Prompt.

What Happens When You Delete Your Skype Account
Do you want to delete your # Skype account because you no longer use the app? Should you delete your Skype account or not? What happens when you do? Find out in this explainer.

How to Change the System Language in Windows 10
Learn how to change system # language in # Windows 10 and have granular control over the display, app, website, and welcome screen # language settings.

How to Add Users and Manage User Accounts in Windows 8
Learn how to add new users and manage # user accounts in # Windows 8. It’s a bit different interface and overall easier to switch users.

How to Add and Manage Multiple OneDrive Accounts in Windows 10
Do you have multiple # OneDrive accounts? Check out how to add them to your # Windows computer and manage them effectively.
Источник
How to change a Windows 10 user account type and why you might want to
 Source: Windows Central
On Windows 10, you have two main account types for users, including Administrator and Standard User, each one offering a different set of privileges to use a device and apps. The Administrator type provides complete system control, which means that users can change settings globally, install apps, execute elevated tasks, and perform pretty much anything.
In comparison, the Standard User account type is more restrictive. Users with the standard account can work with apps, but they can’t install new applications. They can change settings, but only those that won’t affect other accounts, which means that global system configurations aren’t allowed. If an app or a command requires elevation, they’ll need administrative credentials to complete the task.
Usually, it’s recommended to use an account with standard privileges as it offers a more secure environment. However, depending on the situation, it may be necessary to change the account type from Standard User to Administrator (or in reverse), and Windows 10 includes multiple ways to complete the process using Settings, Control Panel, User Accounts, PowerShell, and Command Prompt.
In this Windows 10 guide, we’ll walk you through virtually every method that you can use to change the account type on your device.
Quick tip: If you’re looking to make your primary account standard, it’s best to create a new administrator account first, and then use the new account to change your old account to standard and make administrative changes.
How to change user account type using Settings
To change the account type with Settings, use these steps:
Click the Change account type button.
 Source: Windows Central
Select the Administrator or Standard User account type.
 Source: Windows Central
Once you complete the steps, restart your computer to start using the account with the new privilege level.
How to change user account type using User Accounts
To set an account to Standard user or Administrator type using User Accounts (netplwiz), use these steps:
Click the Properties button.
 Source: Windows Central
Select the Standard user or Administrator account type depending on your requirements.
Source: Windows Central
Quick tip: You can also select the Other membership option, which allows you to choose different user groups, such as Power Users, Backup Operators, Remote Desktop Users, etc.
Once you complete the steps, restart the device to apply the changes and start using the new account type on Windows 10.
How to change user account type using Control Panel
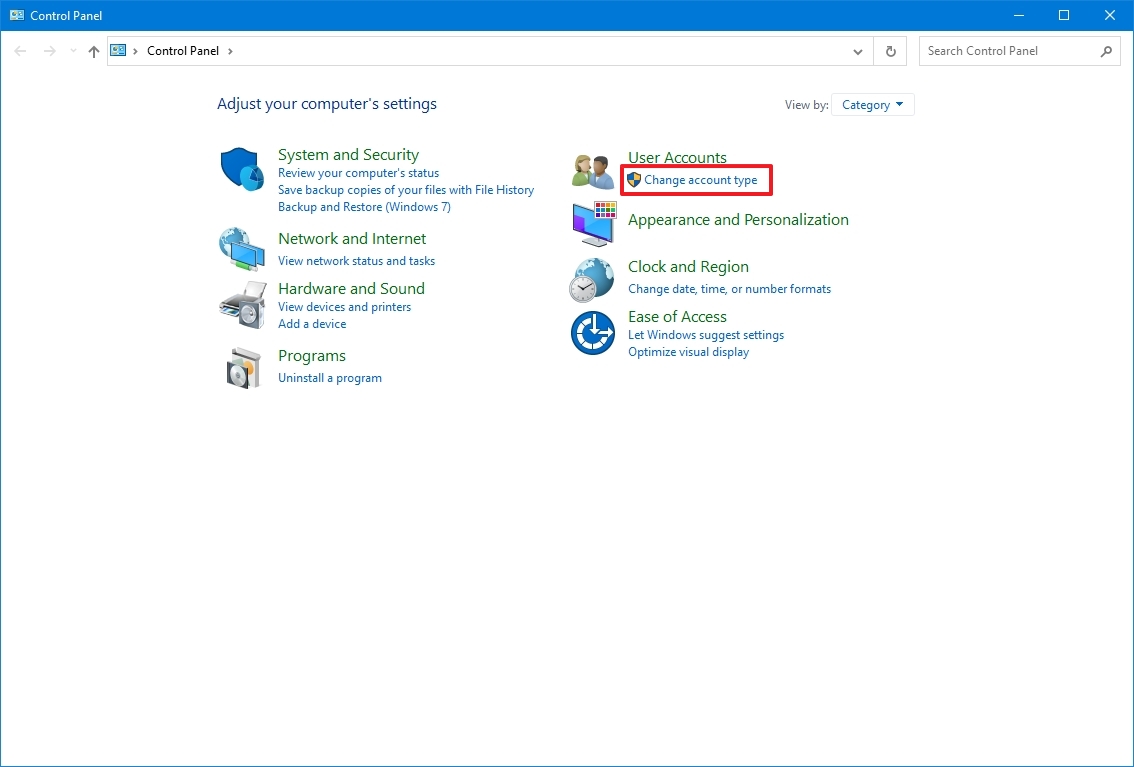
To change an account type using Control Panel, use these steps:
Under the «User Accounts» section, click the Change account type option.
Source: Windows Central
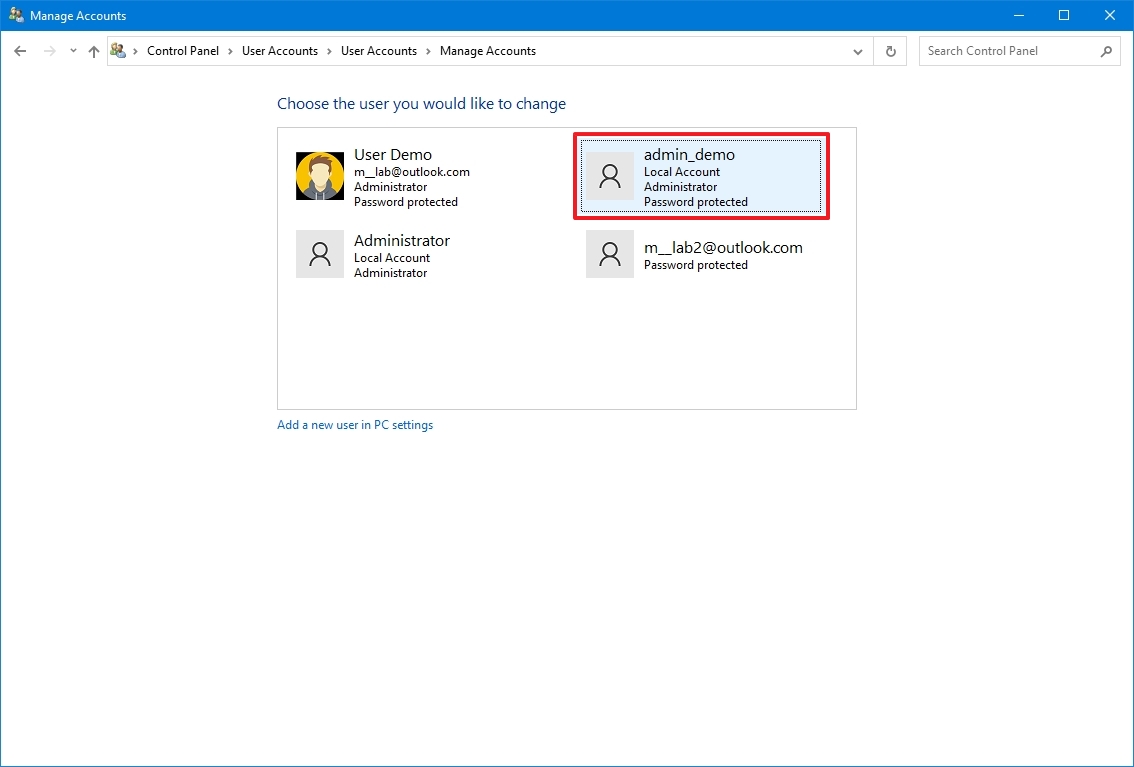
Select the account that you want to change.
Source: Windows Central
Click the Change the account type option.
Source: Windows Central
Select either Standard or Administrator as required.
Source: Windows Central
After you complete the steps, the next time the user signs in to the account, it’ll be limited to the permissions allowed by the user group that you specified.
How to change user account type using PowerShell
To change a Windows 10 account type with PowerShell, use these steps:
Type the following command to change the account type to «Standard User» and press Enter:
Source: Windows Central
In the command, make sure to change the ACCOUNT-NAME for the actual name of the account that you want to change. If you’re trying to change an account using a Microsoft account, then the account name would be the first five letters of the email address.
Type the following command to change the account type to «Administrator» and press Enter:
 Source: Windows Central
In the command, make sure to change the ACCOUNT-NAME for the actual name of the account that you want to change.
Quick note: Users with administrator accounts are part of both, the «Administrators» and «Users» groups. As a result, to make a user standard, you only need to remove the user from the «Administrators» group.
After you complete the steps, the account type will switch to the Administrator or Standard group depending on your configuration.
How to change user account type using Command Prompt
To switch account types with Command Prompt, use these steps:
Type the following command to change the account type to Standard User and press Enter:
net localgroup Administrators «ACCOUNT-NAME» /delete
Source: Windows Central
In the command, make sure to change the ACCOUNT-NAME for the actual name of the account that you want to change. If you’re trying to change an account using a Microsoft account, then the account name would be the first five letters of the email address.
Type the following command to change the account type to Administrator and press Enter:
net localgroup Administrators «ACCOUNT-NAME» /add
Source: Windows Central
In the command, make sure to change the ACCOUNT-NAME for the actual name of the account that you want to change.
Type the following command view the account type and press Enter:
net user ACCOUNT-NAME
Source: Windows Central
Once you complete the steps, the next time the user signs in to the device, the account will load with the privileges allowed by the group that you specified in the command.
More Windows 10 resources
For more helpful articles, coverage, and answers to common questions about Windows 10, visit the following resources:
![]()
Join us LIVE for the Windows Central Video Podcast today at 2:30PM ET
We’re LIVE with the Windows Central Video Podcast today at 2:30pm ET, make sure you’re there!
![]()
Razer Wolverine V2 review: Razer’s Xbox controller almost feels illegal
Razer’s second iteration of its popular Wolverine controller is all about building a better mouse trap, and in some ways, the team has firmly accomplished that. Here’s our full review.
![]()
Best Destiny 2 Exotic weapons and armor in 2022
Destiny 2’s sandbox is filled with plenty of unique and powerful Exotic weapons and armor pieces. Here’s a breakdown of which Exotics are the most effective in 2022.
![]()
The NFL is back! Check out these must-have Windows apps for football fans
After months of waiting through the offseason, the NFL is finally back this week. With these Windows 10 apps, you won’t miss a snap of the NFL action.
Источник
How to change sign-in account name on Windows 10
 Source: Windows Central
On Windows 10, you may have many reasons to change an account name. For instance, you recently changed your name, and you want to reflect the correct information. The device has a local account, and you want to display your actual name instead of the nickname. Or you want to modify the name of the account to make it a little more private.
Regardless of the reason, Windows 10 includes different settings to change the name that appears in the Sign-in screen and across the experience, but it is not a straightforward process. Depending on the account type you are using, the instructions will be entirely different.
In this Windows 10 guide, we will walk you through the various methods to change the account name that appears on the Sign-in screen for a local or Microsoft account.
How to change account name with Settings on Windows 10
If the device uses a Microsoft account, Windows 10 pulls the account name from the cloud. As a result, you have to change the settings online if you want to change your device’s account name.
To change the name of the Windows 10 account, use these steps:
Click the Manage my Microsoft account option.
Source: Windows Central
Quick tip: You can always access your account settings online on this Microsoft page.
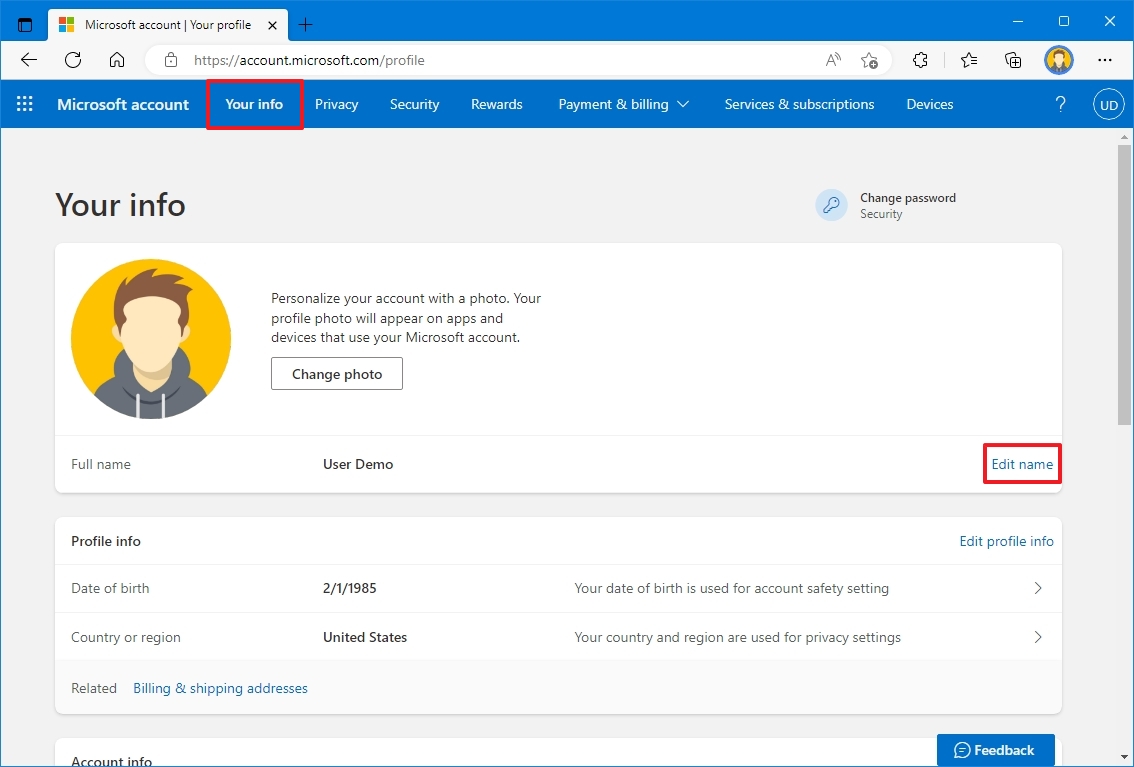
Click the Your Info tab.
 Source: Windows Central
Under your current name, click the Edit name option.
Source: Windows Central
Change the new account name as needed.
Source: Windows Central
Quick tip: If you want to make your information a little more private, you can use the first six letters of your name and the first two letters of your last name (often known as «six-by-two» by network administrators).
Once you complete the steps, the Sign-in screen should reflect the new name change, but allow sometime before the changes sync and apply to all your computers.
Although changing the account name is a straightforward process, the caveat is that renaming the account online also changes the first and last name of any services connected to your Microsoft account, including Xbox Live, Outlook, OneDrive, Microsoft 365, and others.
How to change account name using Control Panel on Windows 10
When using a local account, you have several different ways to modify the account’s name using Control Panel.
Change account name with User Accounts
To change the account name using the User Accounts settings, use these steps:
Under the «User Accounts» section, click the Change account type option.
Source: Windows Central
Select the local account to change its name.
Source: Windows Central
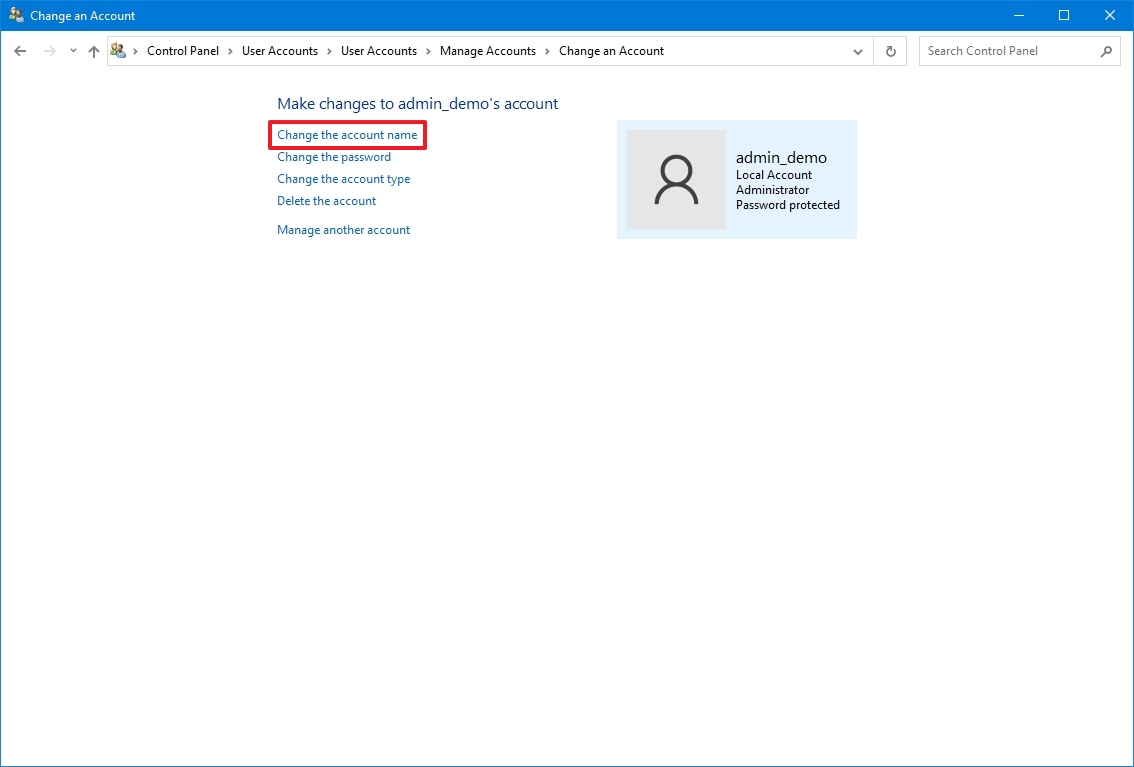
Click the Change the account name option.
Source: Windows Central
Confirm the new account name to in the Sign-in screen.
Source: Windows Central
After you complete the steps, sign-out of the current session and the Sign-in screen should display the new name.
Change account name with netplwiz
You can also use the legacy account management tool (netplwiz) to complete the same task on Windows 10.
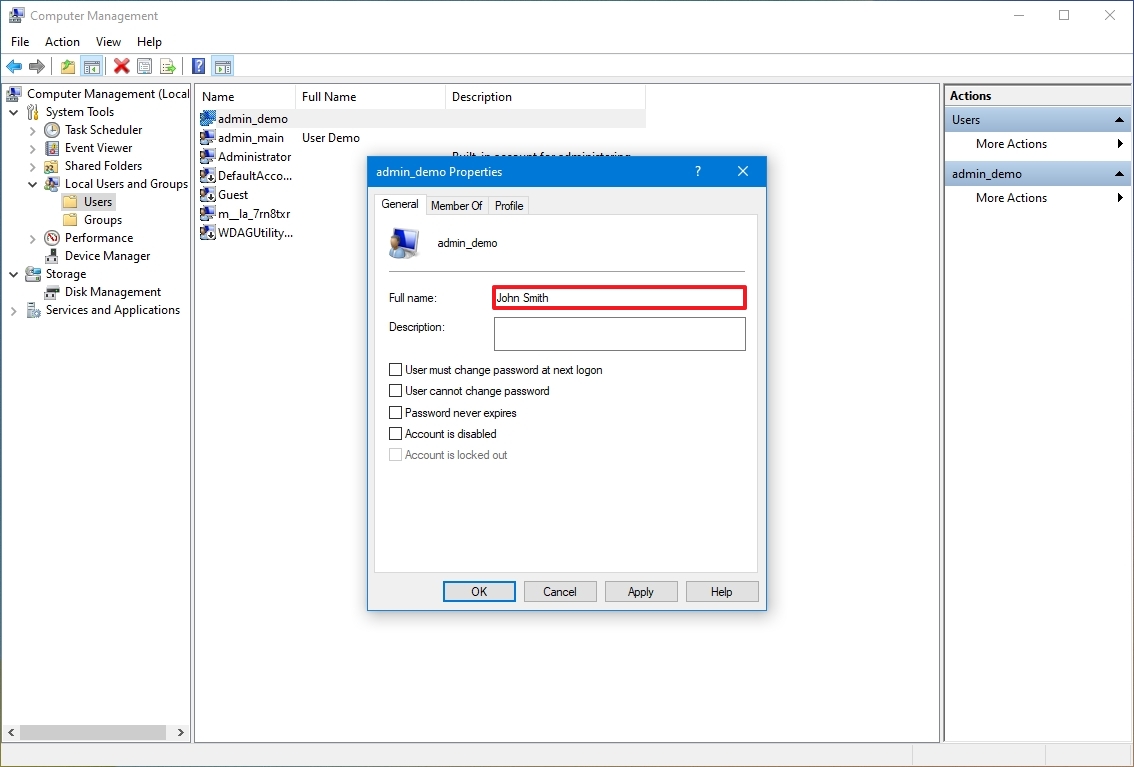
To update the account name with netplwiz, use these steps:
Click the Properties button.
![]() Source: Windows Central
Source: Windows Central
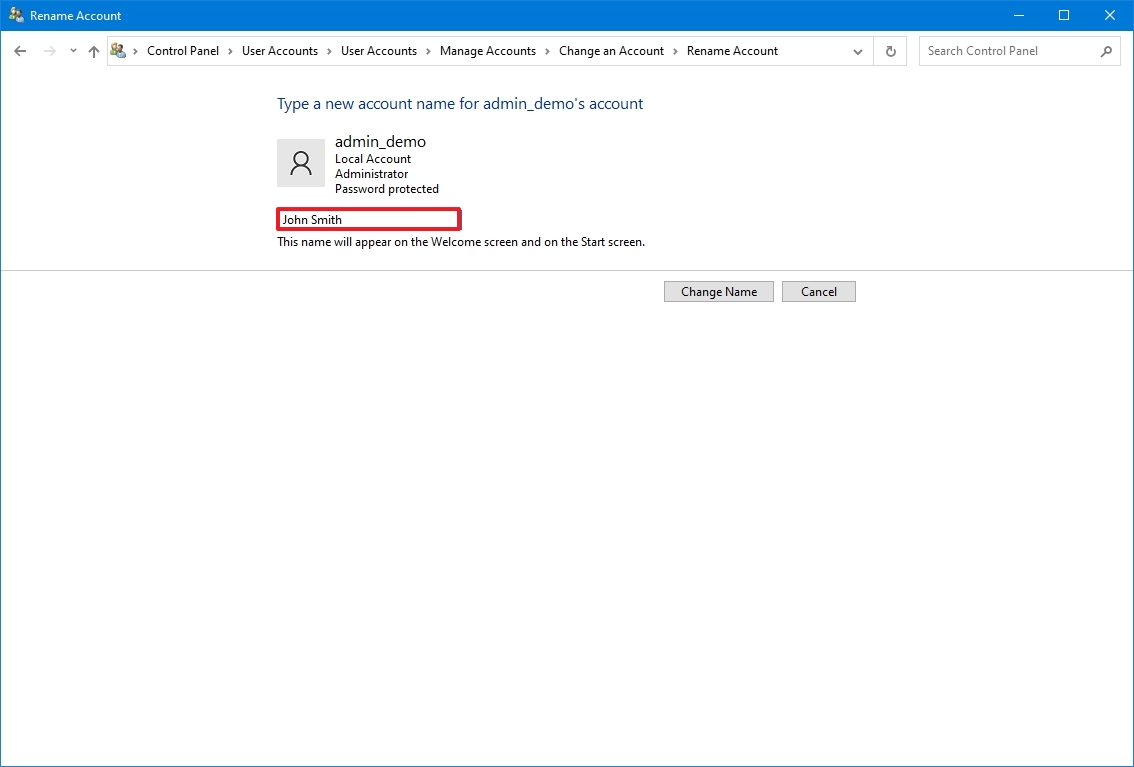
Confirm the new name in the «Full Name» field – for example, «John Smith.»
![]() Source: Windows Central
Source: Windows Central
Quick tip: If you want to display a nickname instead of your real name, you can leave the «Full Name» field empty.
Once you complete the steps, sign-out, and the Sign-in screen will show the name you specified in the «Full Name» field.
You can also edit the accounts linked to a Microsoft account with the legacy tool. However, the information will again be overwritten by the cloud settings, thus making this option only available for local profiles.
Change account name with Computer Management
To use a different name for an account on Windows 10, use these steps:
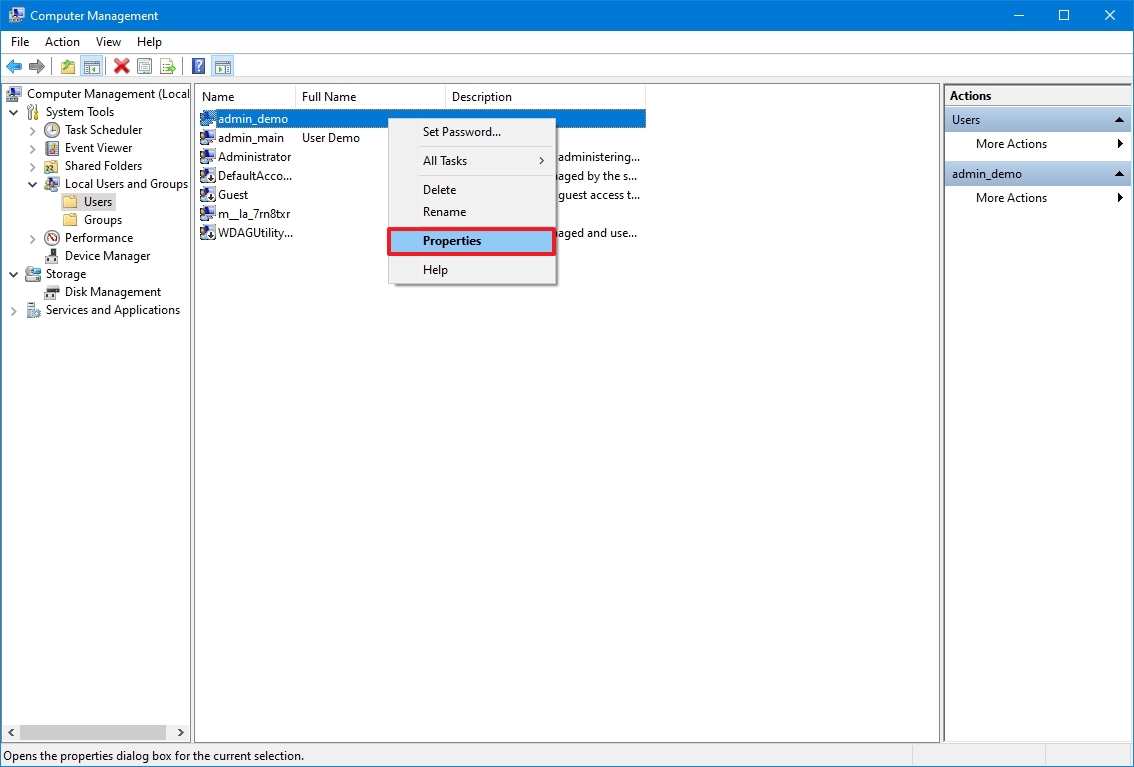
Right-click the account you want to edit and select the Properties option.
Source: Windows Central
Quick tip: You can use the Rename option to change the profile nickname from the context menu.
In the «Full name» field, confirm a new name for the Windows 10 account.
![]() Source: Windows Central
Source: Windows Central
After you complete the steps, the next time you sign in to the account, the Sign-in screen will show the local account’s new name.
On Windows 10, you have several methods to change the name of an account, but any of the available options will not change the name of the profile folder in the «Users» folder. You might find online some workarounds, but it is not recommended to use those instructions, as you may end up creating other issues.
If you want to change the account name everywhere on Windows 10, you should create a new account with the name you wish to use, and then transfer all your settings and files to the newly created account.
More Windows 10 resources
For more helpful articles, coverage, and answers to common questions about Windows 10, visit the following resources:
We may earn a commission for purchases using our links. Learn more.
![]()
You can now purchase Microsoft’s Surface Duo 2
The Surface Duo 2 is now available for order. The foldable phone features a better camera system and a more refined design than its predecessor. It also runs on a Snapdragon 888 processor and supports 5G and NFC.
![]()
Best Destiny 2 builds, and how to make your own
Destiny 2’s sandbox has become both wider and deeper than ever before, and as a result, players have the tools to create some very effective builds in both PvE and PvP. Here’s an overview of the best ones, as well as a guide on how you can start creating your own builds.
![]()
All the Xbox Game Pass games coming and leaving soon
Xbox Game Pass is constantly evolving with new games joining the service all the time. Keep track of everything coming and going from Xbox Game Pass with our comprehensive guide.
![]()
The NFL is back! Check out these must-have Windows apps for football fans
After months of waiting through the offseason, the NFL is finally back this week. With these Windows 10 apps, you won’t miss a snap of the NFL action.
Источник
Download PC Repair Tool to quickly find & fix Windows errors automatically
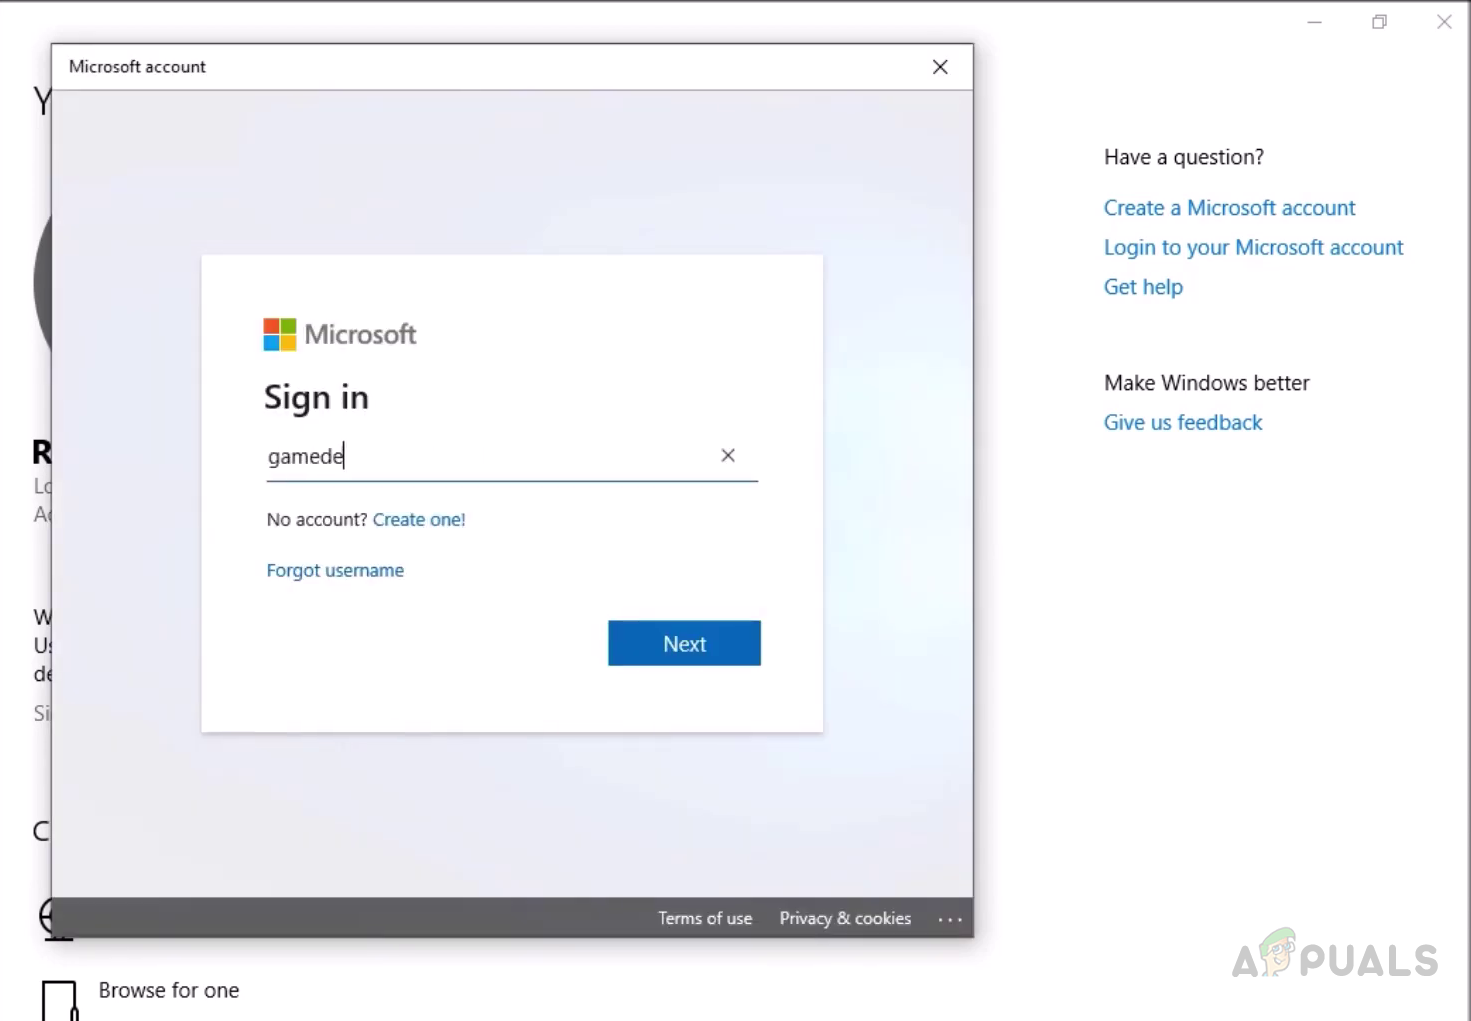
While installing Windows 11/10 or setting up your computer for the first time, Windows may have persuaded you to log in using a Microsoft Account. Microsoft Account is generally the one you’ve been using to log in to your email on Outlook, Hotmail, or Live. There was an option to sign in using a local account too, but it usually goes unnoticed. So, now if for some reason you want to switch to a Local Account from a Microsoft Account, this tutorial will guide you. You can create a separate local account or you can convert your existing account to a local account.
In order to change the Microsoft Account to a Local Account in Windows 11, follow the below suggestions:
- Press the Windows+I keyboard shortcut to open the Settings app.
- Now click on the Accounts tab in the left pane.
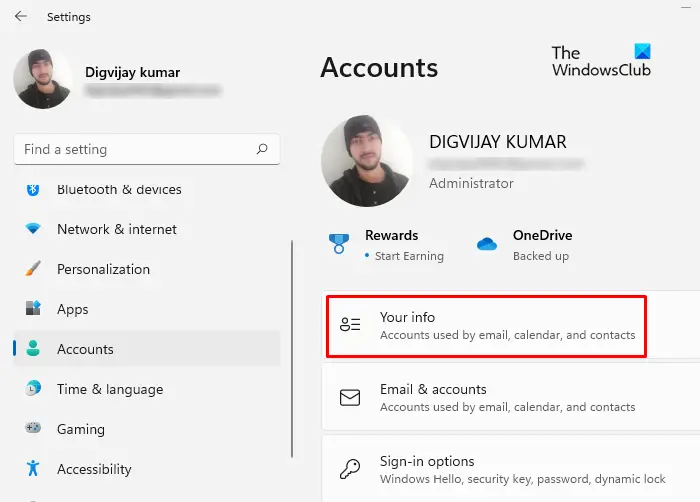
- Then go to the right side of the page and click on the Your info option.
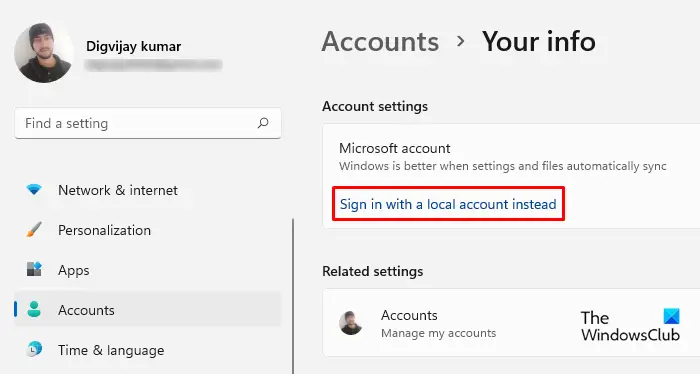
- Under Account settings, click on the link Sign in with a local account instead.
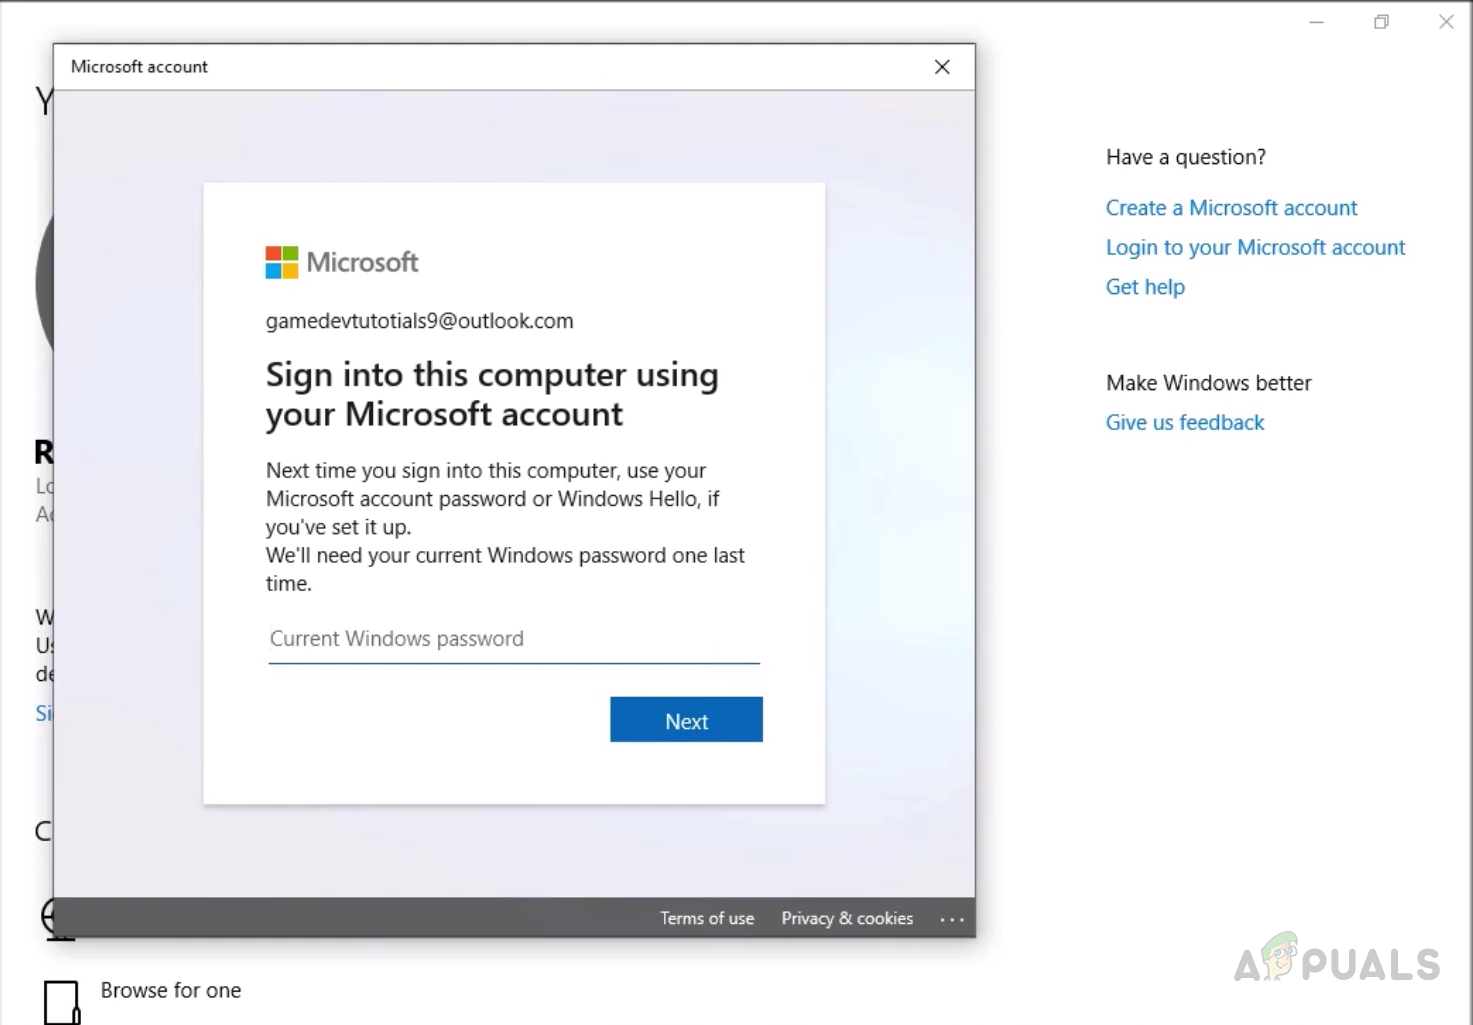
- You will now be asked to confirm that if you really want to switch to a local account. Click on the Next button to continue.
- Thereafter, a password for the Microsoft account that is currently logged in will be asked. You may also enter your PIN or another form of sign-in you previously set up.
- So, the next step requires you to enter your local account details. Here, a password should be added.
- Once you have created or renewed a local account using the username and password, Windows will now ask you to use this account to log in.
- Click Next once you’ve finished entering your information.

- Now click on the Sign out and finish button. After signing out, you’ll be able to log into your local account.
Change Microsoft Account to Local Account in Windows 10
Step 1: Hit ‘Start’ and then go to ‘Settings’.

Step 2: Go to ‘Accounts’ and then go to ‘Your Info’. Verify that you are logged in using a Microsoft Account.
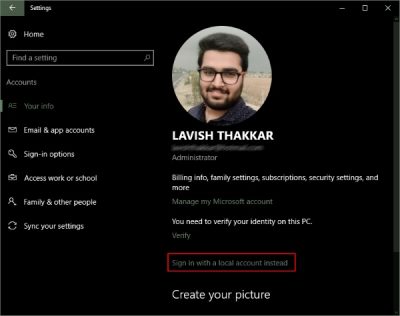
Step 3: Click on “Sign in with a local account instead”. Enter your current Microsoft Account password to authenticate and hit ‘Next’.
Step 4: Select a new username and password for your local account and you are almost done. Click ‘Sign out and finish’ and that is it.

Now you just need to log out and log in with new credentials. None of your files or programs will be affected. The account will remain as it is, only the login procedure changes. You can easily access the files through the library folders as they were before switching your account. Any data associated with the Windows Store applications also remains as it is. But you need to log in again with your original account so that the apps can access that data.
So, this was how you can change your Microsoft Account to a local one. The local account does not synchronize your data and settings. And to download Windows Store apps, you need to log in again. To regain your access to the services, you can log in again with your Microsoft Account. Stuck on anything? Comment down your queries and we will be happy to help.
As I mentioned earlier, the local account does not synchronize your data and settings. And to download Windows Store apps, you need to log in again. To regain your access to the services, you can log in again with your Microsoft Account.
Stuck on anything? Comment down your queries and we will be happy to help.
What is a Local Account?
A local account lets you log into a home computer running the Windows 10 or Windows 11 operating system. It controls access to one specific computer. Credentials for local accounts such as usernames and passwords are stored locally on the computer’s hard drive, and it obtains authentication from its own files.
What is the difference between Microsoft Account to Local Account?
There are several benefits of using a Microsoft Account over a Local Account. A Microsoft Account enables all the cloud services and lets you sync your settings across devices. Also, it lets you access the Windows Store and download/install applications to your computer. You can access some of the other services by only using the Microsoft Account. But a local account is a simple offline account with no synchronization capabilities. You need to separately log in to Windows Store to download an application and most of the cloud services are disabled.
It is good to have your settings and files synced over devices but for some reason, you may not want to do that. Maybe you have a common computer at home and you don’t want to login using your personal Microsoft Account. Or you just simply want to have a local account instead. Follow the steps to convert your existing Microsoft Account to a Local account.
Is a Local account better than Microsoft account?
Unlike Microsoft accounts, Local Accounts do not have many Microsoft features such as Microsoft App Stores OneDrive, etc. In this way, Microsoft’s data access is faster and easier than that of the local account

Lavish loves to follow up on the latest happenings in technology. He loves to try out new Windows-based software and gadgets and is currently learning JAVA. He loves to develop new software for Windows. Creating a System Restore Point first before installing a new software is always recommended, he feels.
Switching your Primary Account in Windows can be a little tricky. Since all the preferences, profile information, and account data are linked to your account. You do not find any option in the Windows Account settings to change your Windows Account and that can be very frustrating. There is a difference between the Windows Account and Microsoft account. Your Microsoft Account lets you manage your subscription and services like Xbox, Live, Outlook.com, Skype, and Windows from a single account. You can try the below methods.
Solution: Switch your User Account
In this method, we will first switch the login account to the one you need to set as a primary account by switching to the Local User Account and then switch back to the Microsoft account of your choice. A local user account is simply a Windows Account that you use to login. To set up this account, you only need a user name and a password and you can even remove the password if you like.
Step 1: Switch to a Local User Account
- In the Windows, menu Click on Settings.
- Click on Accounts and then select Sign in with a local account instead.

Click on Sign in with a local account instead - Click on the Next button to confirm. Now, enter your credentials for Microsoft Account to verify.
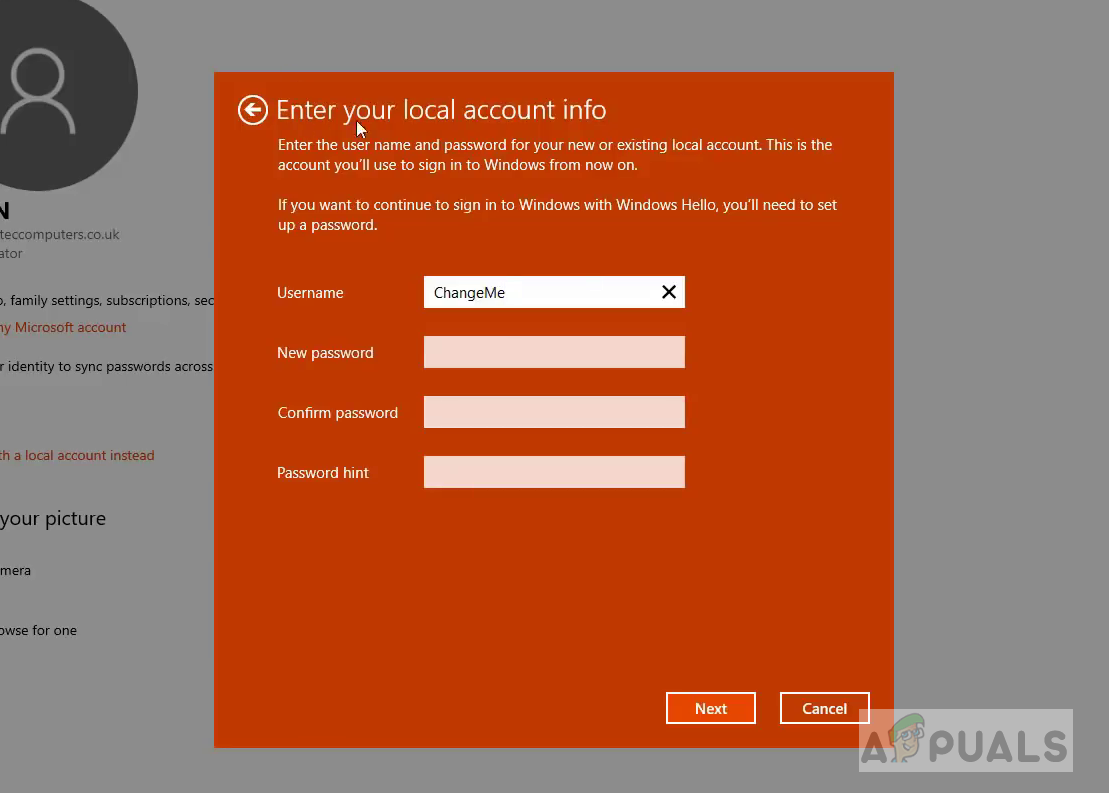
- Now set up your user name and password for the Local user account and click next

set up your user name and password for the Local user account - You can leave the password field empty if you do not want to use a password.
- Once it is set up and you are ready just click on the button that says Sign Out and Finish.
- You will go back to the Sign-In Screen and now you can log in with your new Local User Account.
Step 2: Switch to a Microsoft Account
- In the Windows, menu Click on Settings and then click on Accounts.
- Click the link that says Sign in with a Microsoft Account instead

Click the link that says Sign in with a Microsoft Account instead - Type the credentials of your Microsoft Account which you want to set as Primary Account and click Next

Type the credentials of your Microsoft Account which you want to set as Primary Account - If you have two-factor authentication enabled then you will have to choose the option on how you want to verify thing Login
- Enter the code from Microsoft to verify and then enter your current Local Account Password that you set up earlier

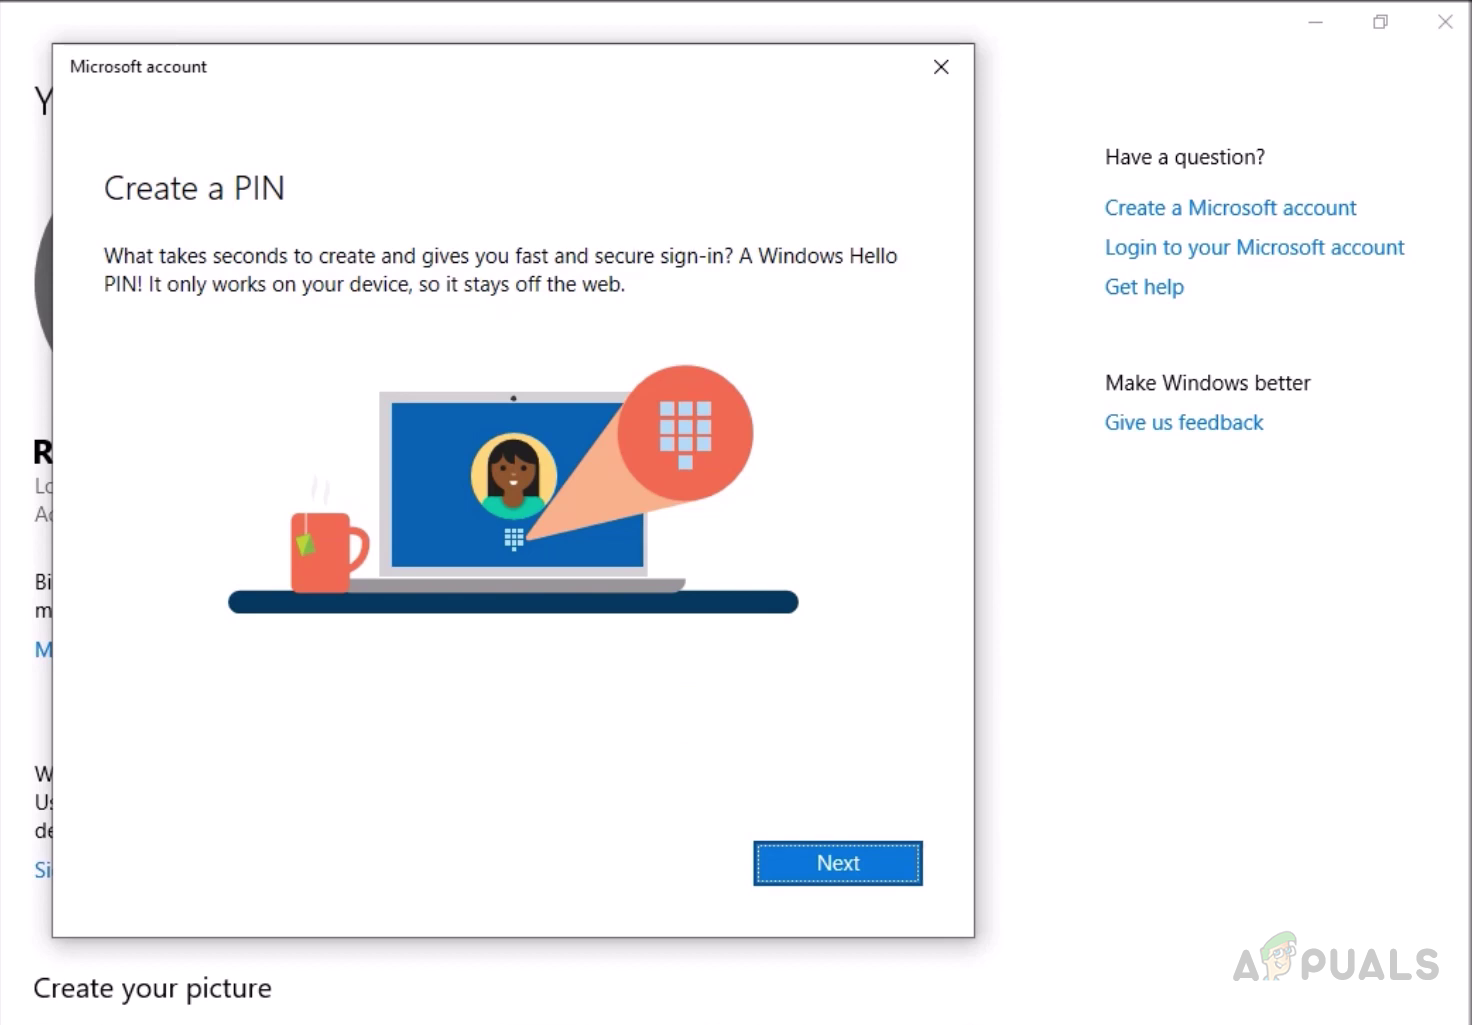
Now enter your current Local Account Password that you set up earlier - Windows will prompt you to set up a PIN if you do not have already, if you already have one then just click Next and enter the PIN code.

Windows will prompt you to set up a PIN if you do not have already - Now you have successfully switched from Local User Account to your Microsoft Account

Kevin Arrows
Kevin is a dynamic and self-motivated information technology professional, with a Thorough knowledge of all facets pertaining to network infrastructure design, implementation and administration. Superior record of delivering simultaneous large-scale mission critical projects on time and under budget.
Back to top button
(Image credit: Future)
On Windows 10, you can change the account name for many reasons, including because you may need to update your personal information if you recently changed your name. The computer has a local account, and you prefer showing the actual name instead of the nickname. Or you want to update the name to make it a little more private.
Regardless of the reason, Windows 10 includes different ways to change the name on the Sign-in screen and across the desktop, but it is not a straightforward process. Depending on the account type, the instructions will be entirely different.
This guide will walk you through the steps to change the account name on the Sign-in screen for a local or Microsoft account on Windows 10.
How to change account name with Settings on Windows 10
Windows 10 displays the account name from your cloud account when the computer is configured with a Microsoft account. As a result, you must change the settings online if you want to change the account name.
To change the name of the account on Windows 10, use these steps:
- Open Settings.
- Click on Accounts.
- Click on Your info.
- Click the «Manage my Microsoft account» option.
- Quick tip: You can always access your account settings online on this Microsoft page (opens in new tab).
- Sign in with your credentials (if applicable).
- Click the Your Info tab.
- Under the current name of the account, click the Edit name option.
- Change the new account name as necessary.
- Quick tip: To make your information more private, you can use the first six letters of your name and the first two letters of your last name (often known as «six-by-two» by administrators).

- Confirm the challenge to verify that a robot is not making the changes in the account.
- Click the Save button.
- Restart the computer.
Once you complete the steps, the Sign-in screen will reflect the new name change but allow some time for the device to sync the latest information.
While changing the account name is a straightforward process, renaming the account online also changes the first and last name of any services connected to your account, including Xbox Live, Outlook, OneDrive, Microsoft 365, and others.
How to change account name using Control Panel on Windows 10
When using a local account on Windows 10, you have several ways to modify the account’s name through Control Panel.
Change account name with User Accounts
To change the account name using the User Accounts settings on Windows 10, use these steps:
- Open Control Panel.
- Under the «User Accounts» section, click the «Change account type» option.
- Select the local account to change its name.
- Click the «Change the account name» option.
- Confirm the new account name for the Sign-in screen.
- Click the Change Name button.
After completing the steps, sign out of the current session, and the Sign-in screen should display the new name.
Change account name with netplwiz
You can also use the legacy account management tool (netplwiz) to complete the same task on your computer.
To update the account name with netplwiz, use these steps:
- Open Start.
- Search for netplwiz and click the top result to open the legacy account management tool.
- Click the Users tab.
- Select the account to change its name.
- Click the Properties button.
- (Optional) Update the «User name» field to change the account nickname.
- Confirm the new name in the «Full Name» field — for example, «John Smith.»
- Quick tip: If you want to display a nickname instead of your real name, leave the «Full Name» field empty.

- Click the Apply button.
- Click the OK button.
- Click the OK button again.
Once you complete the steps, sign out, and the Sign-in screen will show the name in the «Full Name» field.
With the legacy tool, you can also edit the accounts linked to a Microsoft account. However, the cloud settings will overwrite the information again, thus making this option only available for local profiles.
Change account name with Computer Management
To use a different name on your Windows 10 account, use these steps:
- Open Start.
- Search for Computer Management and click the top result to open the app.
- Double-click to expand the System Tools branch.
- Double-click the Local Users and Groups branch.
- Click on Users.
- Right-click the account to edit and select the Properties option.
- Quick tip: You can use the Rename option to change the profile nickname from the context menu.
- Click the General tab.
- In the «Full name» field, confirm a new name for the account.
- Click the Apply button.
- Click the OK button.
After you complete the steps, the sign-in screen will show the local account’s new name when you sign into the account.
On Windows 10, you have several methods to change the account name, but none of the available options will change the name of the profile folder in the «Users» folder. You might find some workarounds online, but it is not recommended to use those instructions, as you may create other issues.
If you want to rename the account everywhere on Windows 10, you should create a new account with the name you wish to use and then transfer all your settings and files to the newly created account.
More resources
For more helpful articles, coverage, and answers to common questions about Windows 10 and Windows 11, visit the following resources:
- Windows 11 on Windows Central — All you need to know
- Windows 10 on Windows Central — All you need to know

(opens in new tab)
Cutting-edge operating system
A refreshed design in Windows 11 enables you to do what you want effortlessly and safely, with biometric logins for encrypted authentication and advanced antivirus defenses.
Get the best of Windows Central in in your inbox, every day!
Mauro Huculak is technical writer for WindowsCentral.com. His primary focus is to write comprehensive how-tos to help users get the most out of Windows 10 and its many related technologies. He has an IT background with professional certifications from Microsoft, Cisco, and CompTIA, and he’s a recognized member of the Microsoft MVP community.

На Windows 10 есть возможность работать с несколькими учётными записями. В то же время каждой записи можно дать те или иные права доступа. Например, в системе обязательно должен быть как минимум один администратор, который может без ограничений контролировать работу компьютера и других пользователей за ним.
Содержание
- Изменение прав пользователей в ОС Windows 10
- Вариант 1: «Панель управления»
- Вариант 2: «Параметры»
- Вариант 3: Консоль
- Вариант 4: «Локальная политика безопасности»
- Вариант 5: «Локальные пользователи и группы»
Если вы являетесь администратором в системе, то можете контролировать и другие учётные записи. В данной статье будет рассмотрено как добавить той или иной учётной записи права администратора. Обратный процесс будет практически идентичным.
Вариант 1: «Панель управления»
Это самый простой и понятный способ, который подойдёт и для более ранних версий ОС Windows. Инструкция выглядит следующим образом:
- Перейдите в «Панель управления». Сделать это можно несколькими способами, например, вызвать специальное меню сочетанием клавиш Win+X, а в этом меню выбрать соответствующий пункт.

- Для удобства поставьте напротив «Просмотр» (находится в правой верхней части) «Крупные значки», либо «Мелкие значки».
- Теперь выберите пункт «Учётные записи пользователей». Для удобства можно использовать поисковую строку, что расположена в верхней правой части.

- Откроется окно с настройками. Нужно нажать на ссылку «Управление другой учётной записью».

- Теперь кликните по аватару той записи, которой хотите сменить права доступа.

- Нажмите по ссылке «Изменение типа учётной записи».

- На данном шаге нужно просто поставить маркер напротив «Администратор» и нажать по кнопке «Изменение типа учётной записи».


Вариант 2: «Параметры»
Данный вариант тоже очень удобен и просто, однако он актуален только для пользователей Windows 10. Следуйте инструкции:
- Перейдите в «Параметры». Это можно быстро сделать при помощи комбинации клавиш Win+I. Если комбинация клавиш не срабатывает, то кликнете по «Пуску» и найдите там иконку шестерёнки.
- В «Параметрах» выберите элемент «Учётные записи».

- Перейдите в «Семья и другие люди».

- Нажмите по названию и/или автару аккаунта, которому хотите изменить права доступа. Откроется небольшое контекстное меню, где нужно выбрать «Изменить тип учётной записи».

- Под заголовком «Тип учётной записи» поставьте значение «Администратор» и нажмите «Ок».


Вариант 3: Консоль
Этот вариант подходит для всех версий ОС Windows, однако для неопытного пользователя он покажется очень сложным и неудобным.
Воспользуйтесь этой инструкцией:
- Откройте «Командную строку». Сделать это можно несколькими способами, например, использовать специальное меню, что вызывается кликом правой кнопкой мыши по иконке «Пуска», либо сочетанием клавиш Win+X. Здесь нужно выбрать пункт «Командная строка (администратор)». На последних версиях Windows 10 вместо этого пункта выберите «PowerShell (администратор)».

- Введите команду:
net user administrator /active:yesДля ввода нажмите Enter, а для применения изменений выполните перезагрузку системы.


Вариант 4: «Локальная политика безопасности»
Тоже достаточно сложный способ смены типа учётной записи:
- Откройте строку «Выполнить» при помощи комбинации клавиш Win+R. В неё нужно ввести:
secpol.mscДля перехода используйте Enter, либо кнопку «Ок».

- Откроется окно «Локальной политики безопасности». В левой части нужно развернуть ветку «Локальные политики» и выбрать папку «Параметры безопасности».
- Теперь поставьте значение «Включён» для параметра, который вы можете видеть на скриншоте.


Вариант 5: «Локальные пользователи и группы»
Данный способ может быть использован только для отключения прав администратора той учётной записи, через которую вы сидите в данный момент:
- Вызовите строку «Выполнить» (сочетание клавиш Win+R). В эту строку нужно ввести:
lusrmgr.mscДля перехода нажмите Enter или кнопку «Ок».

- Откроется окно с настройками. В правой части перейдите в «Пользователи».
- Кликните правой кнопкой мыши по той учётной записи, у которой хотели бы отнять права администратора. В контекстном меню нужно перейти в «Свойства».
- Перейдите во вкладку «Общее». Обычно она всегда открывается по умолчанию.
- Поставьте галочку напротив «Отключить учётную запись». Нажмите «Применить» и «Ок». Чтобы изменения вступили в силу нужно перезапустить компьютер.


Используя данные способы вы без проблем сможете распределять уровни доступа между учётными записями всех пользователей ПК.