(Image credit: Windows Central)
Although Windows 10 will help you configure the default language during the initial setup, if you didn’t select the correct option or use a computer already configured with a different language, you don’t have to struggle when your requirements are different.
If you have to change the device’s default language settings, you can complete this task using the Settings app without reinstalling Windows 10.
In this Windows 10 guide, we will walk you through the steps to change the system default language on your computer.
How to change default system language on Windows 10
If you happen to be using the incorrect language on Windows 10, you can adjust the system settings to configure the correct language without reinstallation.
Disable language sync
On Windows 10, when using a Microsoft account, some of your preferences (including language) will sync across the device. If you only plan to change the settings on the computer, you should disable the option to sync your language settings to prevent changing the same settings on other devices.
To disable language preference sync on Windows 10, use these steps:
- Open Settings.
- Click on Accounts.
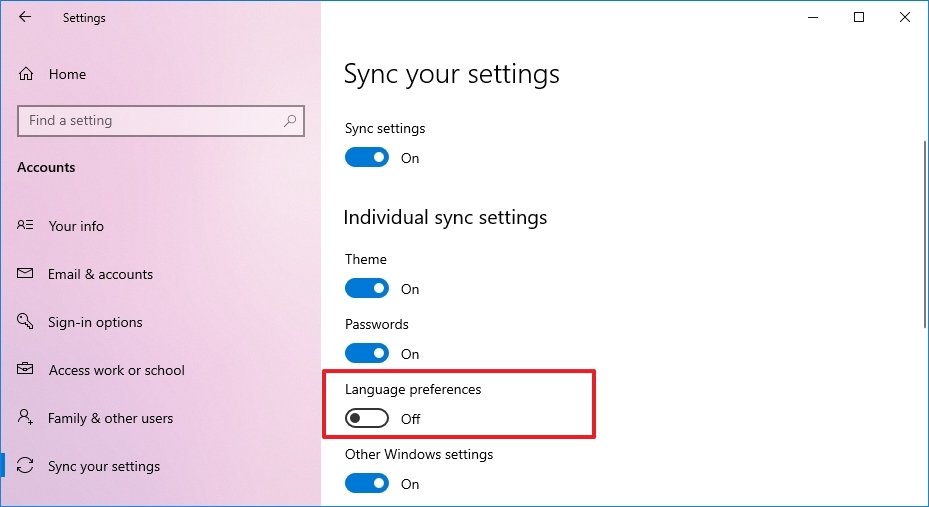
- Click on Sync your settings.
- Under the «Individual sync settings» section, turn off the Language preferences toggle switch.
Once you complete the steps, you can change the language settings without affecting the other devices connected with the same Microsoft account.
Change system language settings
To change the system default language, close your apps, and use these steps:
- Open Settings.
- Click on Time & Language.
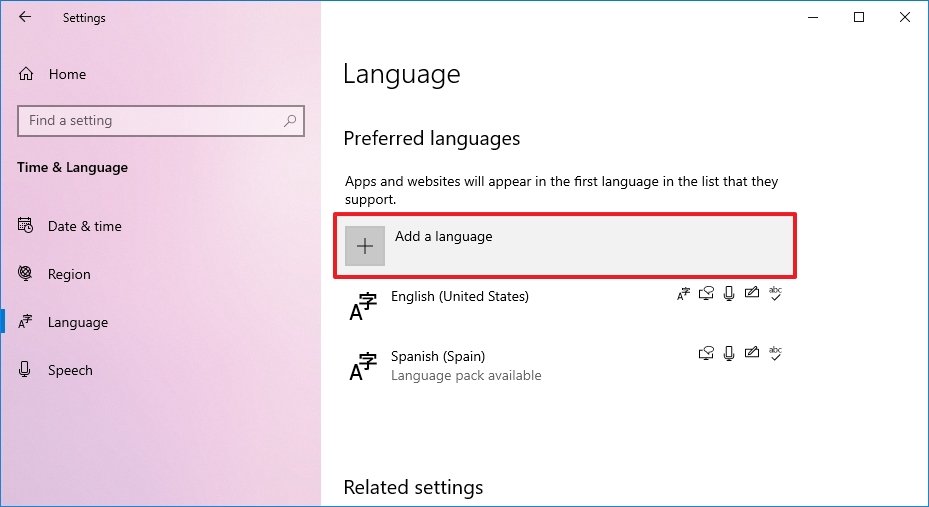
- Click on Language.
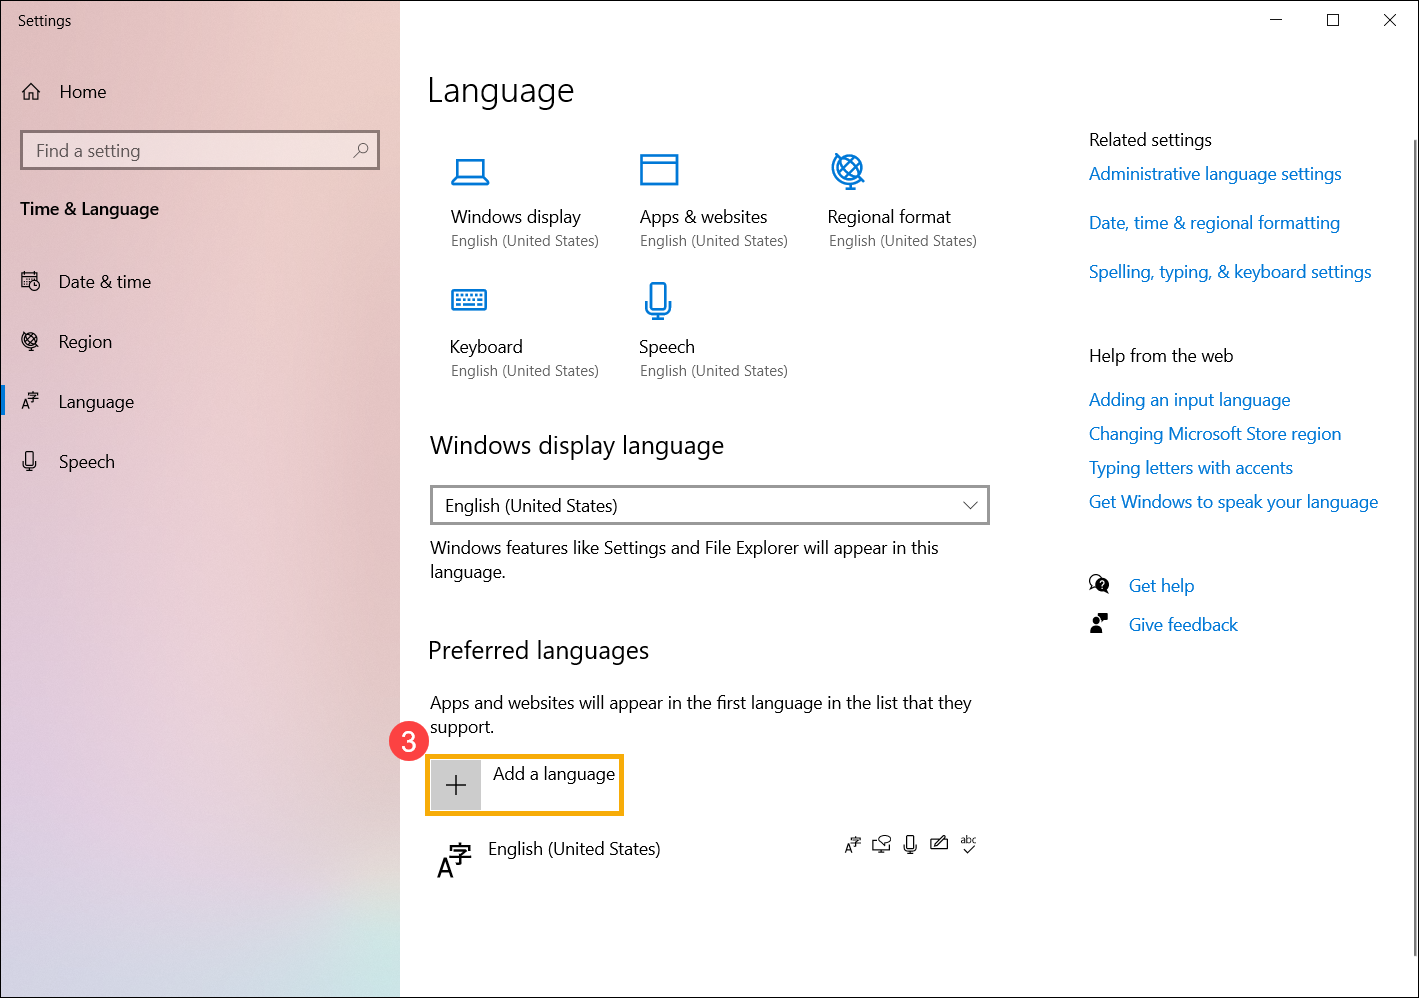
- Under the «Preferred languages» section, click the Add a language button.
- Search for the new language using the language or country name.
- Select the package from the result.
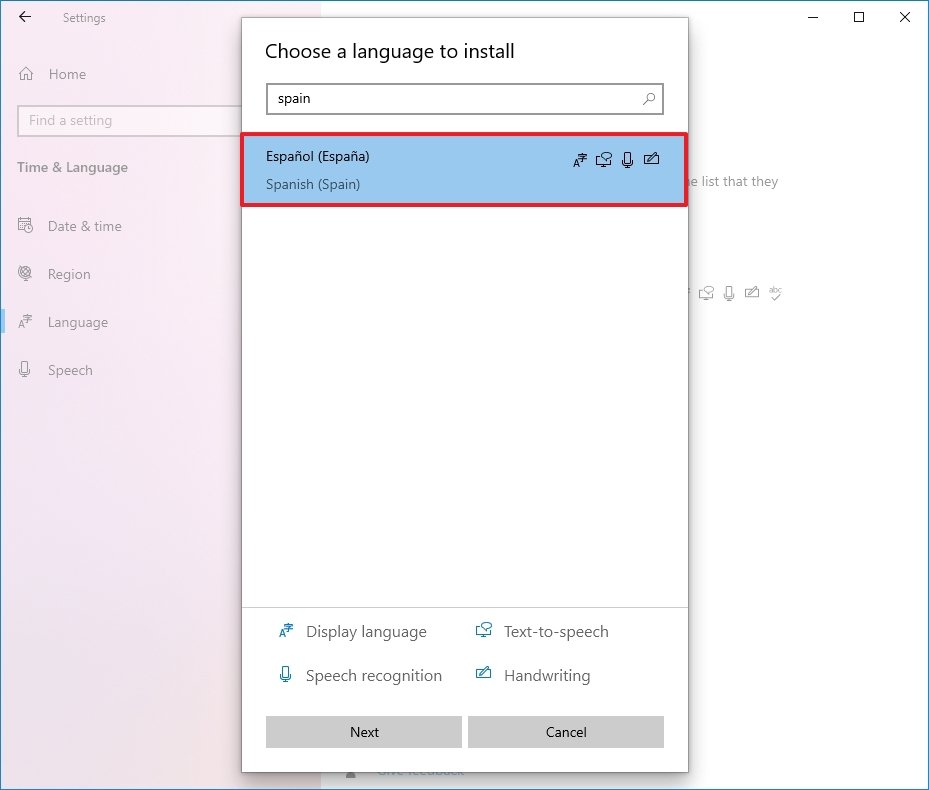
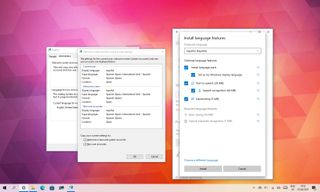
- Click the Next button.
- Check the Install language pack option.
- Check the Set as my Windows display language option.
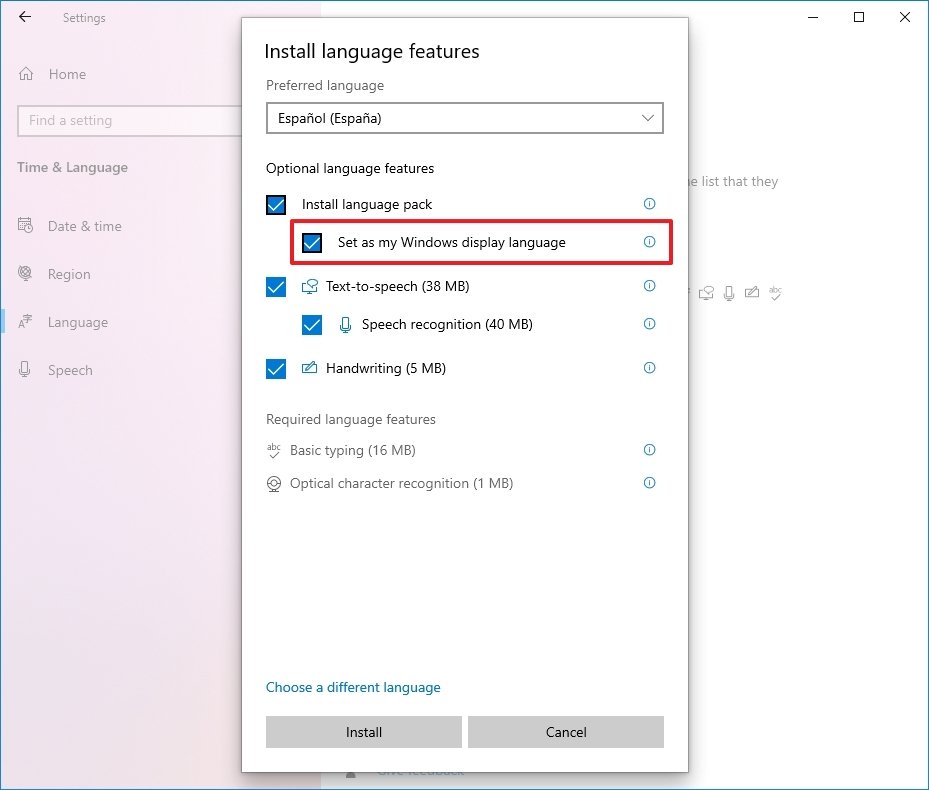
- Check the additional features as needed — for example, «Text-to-speech» and «Handwriting.»
- Click the Install button.
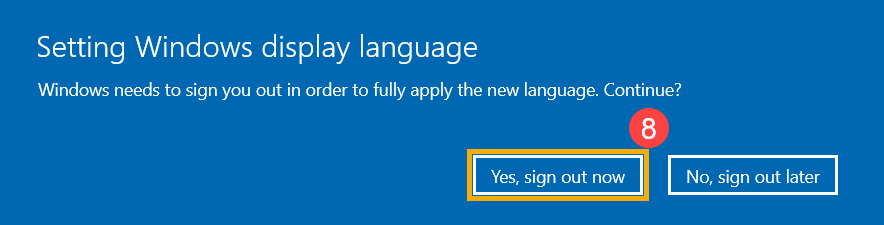
- Click the Yes, sign out now button.
- Sign back into the account.
After you complete the steps, the Windows 10 language will change across the experience, including the Sign-in screen, Settings app, File Explorer, Desktop, apps, browser, and websites you visit.
Change system region settings
You will also have to change the region settings if you need to adjust the language settings because you are in a different region.
To change the local region settings on Windows 10, use these steps:
- Open Settings.
- Click on Time & Language.
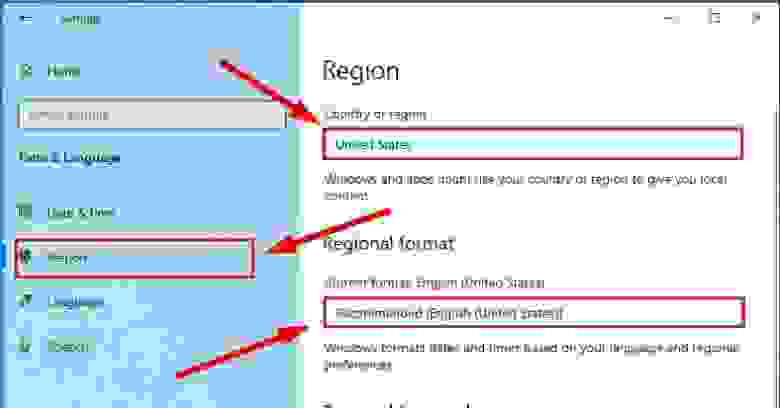
- Click on Region.
- Under the «Region» section, select the current location with the «Country or region» drop-down menu (if applicable).
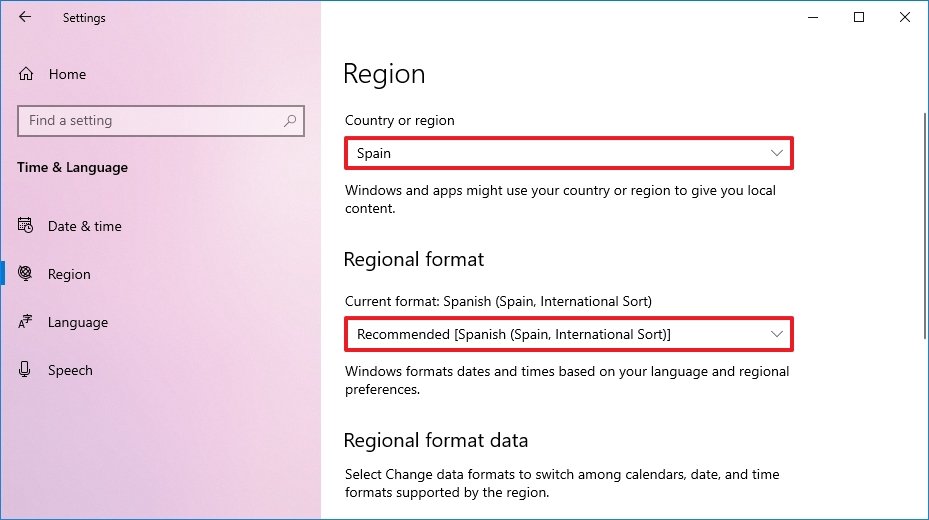
- Under the «Regional format» section, select the formats for the region’s date and time with the «Current format» drop-down menu (if applicable).
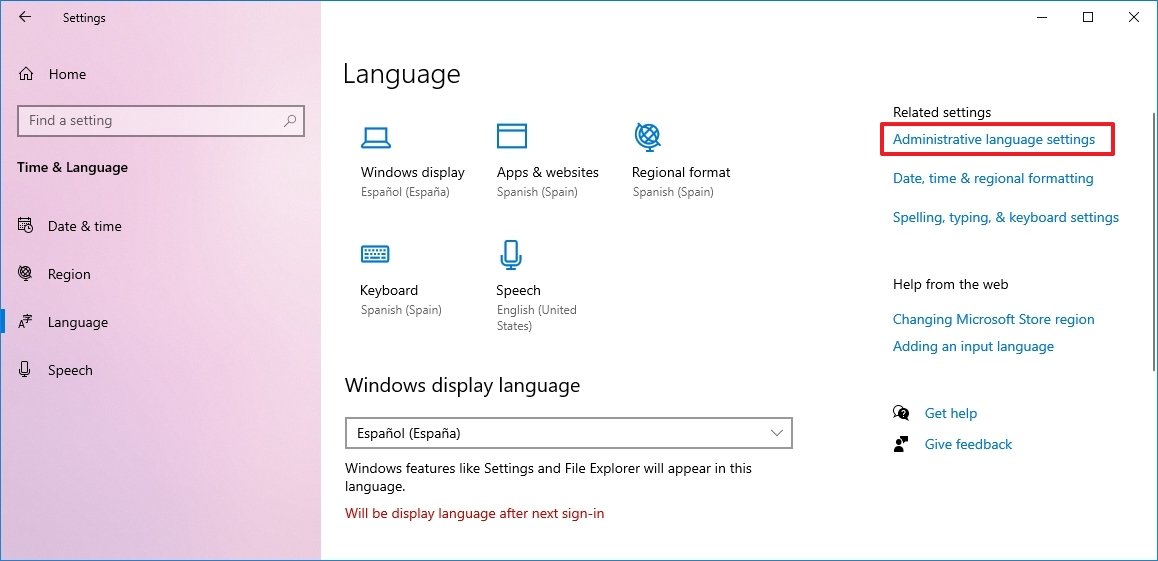
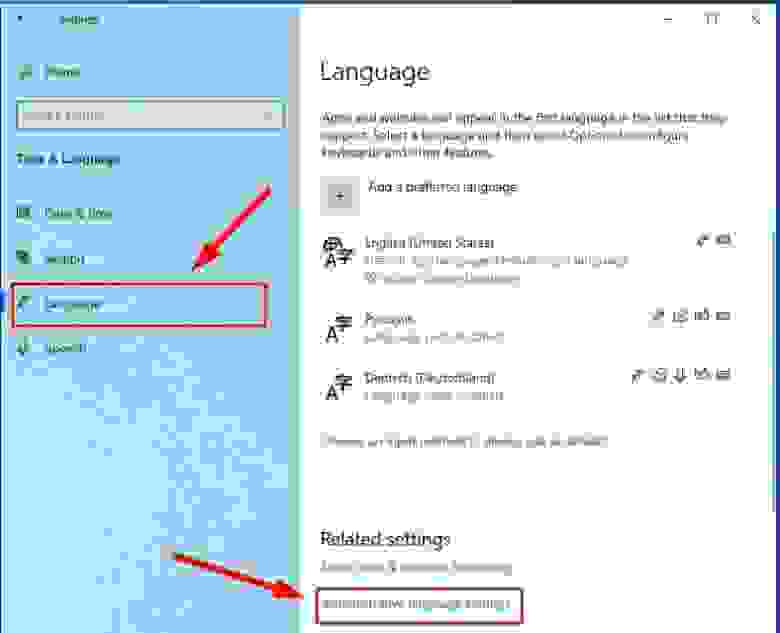
- Click on Language.
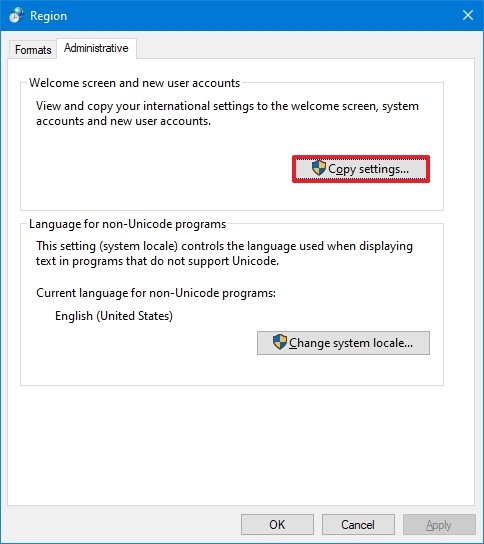
- Under the «Related settings» section, click the Administrative language settings option.
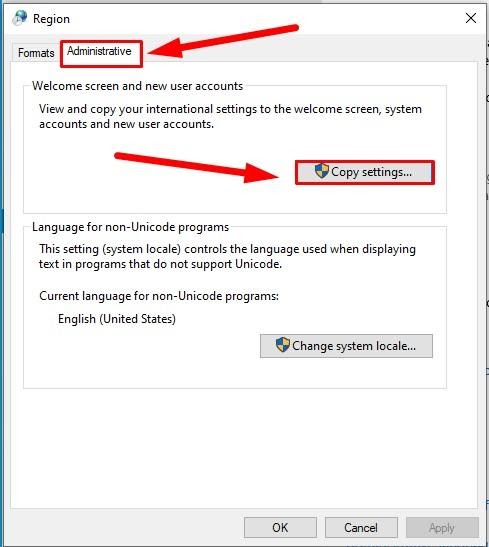
- Click the Administrative tab.
- Under the «Language for non-Unicode programs» section, click the Change system locale button.
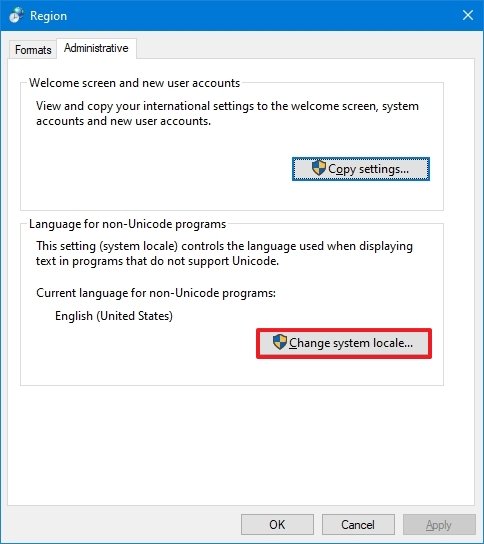
- Select the new system locale language with the «Current system locale» drop-down menu.

- Click the OK button.
- Click the Copy settings button in the «Administrative» tab.
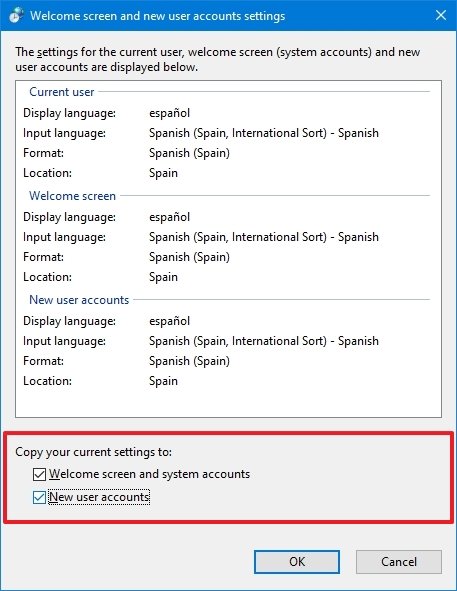
- Under the «Copy your current settings to» section, check the Welcome screen and system accounts and New user accounts options.
- Click the OK button.
- Click the OK button again.
- Click the Restart now button.
Once you complete the steps, the settings will apply, and the computer will now use the correct region settings.
Usually, you rarely have to change or install additional languages on Windows 10. However, changing these settings may come in handy in organizations working with people who need to use different preferences. It’s also a helpful feature to match the locale settings if you relocate to another region or when buying a new device that ships from a different country.
The only caveat with changing the region settings is that it will also change the settings for the Microsoft Store, which may block access to certain apps and services, depending on the location. In the same way, you can change the region settings to access an application from the Microsoft Store that is only available in a specific region. If you happen to be one of the remaining users using Cortana, consider changing the region settings that may prevent you from accessing the digital assistant.
More Windows resources
For more helpful articles, coverage, and answers to common questions about Windows 10 and Windows 11, visit the following resources:
- Windows 11 on Windows Central — All you need to know
- Windows 11 help, tips, and tricks
- Windows 10 on Windows Central — All you need to know
Get the best of Windows Central in in your inbox, every day!
Mauro Huculak is technical writer for WindowsCentral.com. His primary focus is to write comprehensive how-tos to help users get the most out of Windows 10 and its many related technologies. He has an IT background with professional certifications from Microsoft, Cisco, and CompTIA, and he’s a recognized member of the Microsoft MVP community.
Read this article to find out how to change the language of Windows 10 interface without having to reinstall it, what system languages can be installed and what settings should be modified for that purpose.
Introduction
In Windows 10, people usually choose the preferred language for the entire operating system when they install it. However, if the language settings were wrong, or people have to use computing devices with certain language preferences, there are some settings to be modified in order to bring them in line with your personal likings.
So if you ever need to change language preferences in Windows 10, this can be done in a quick and easy way with the help of the Settings app and without having to reinstall the operating system.
In today’s article, we will show you how to change the default display language into any other, including doing it for new and existing user accounts.
How to change the default display language in Windows 10?
If you have to move to a different region or you need to use a display language different from the default choice, or the initial language settings for the computing device have been wrong, there is absolutely no point in reinstalling Windows 10. All you need is to modify a couple of system settings to enjoy the experience of using your operating system in the right language.
Disable language synchronization
If you are using a Microsoft account, the language settings will apply to all devices linked to such account. If you plan to change regional and language settings for one computer only, you need to disable synchronization of such settings before you proceed.
This is how you disable language sync in Windows 10.
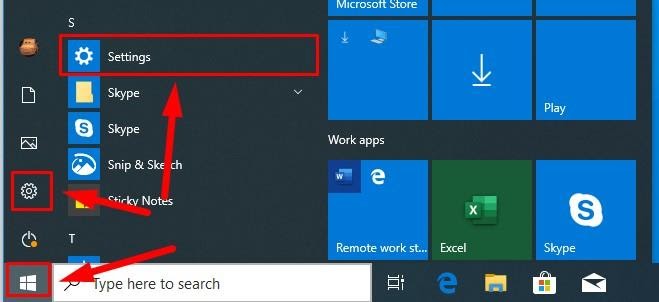
Open the main system application, Settings. You can do it in any way you prefer. For example, click on the Start button in the lower left corner of your desktop, on the Taskbar, and open the main Windows menu. Use the scroll bar or the mouse wheel to search the list of all programs and applications installed on this computer and find the line Settings, or click on the Settings button in the left side of the user menu, and the application will open.
In the main Settings window, scroll down if necessary and choose the tab Accounts.

In the left panel, go to Sync your settings.
In the right panel, find the section Individual sync settings and the line Language preferences, then set the slider to the Off position (disabled).

When these steps are taken, you can start changing language settings for the copy of Windows 10 installed on this computer, without worrying that this can affect similar settings in other linked devices.
The steps to take if you want to change the display language
To change the display language of your Windows 10, you should close all running applications and do what is described below.
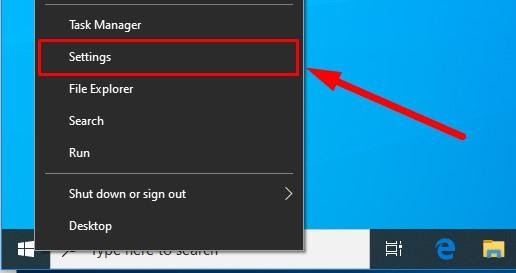
Use any method you prefer to open the Settings application. For example, right-click on the Start button that you can find on the Taskbar, in the left lower corner of the desktop, or press the key sequence Windows + X instead to open the context menu, and select the line Settings. The application will start immediately.
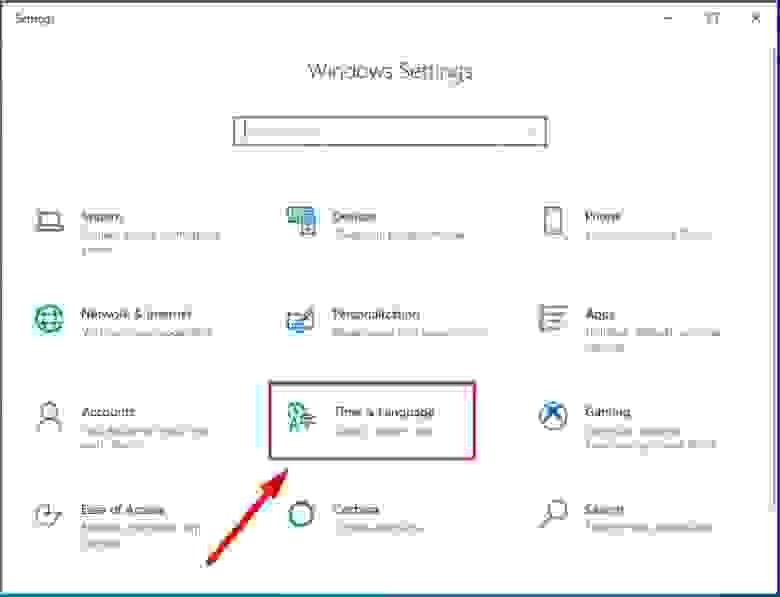
Use the scroll bar or the mouse wheel to navigate the Settings window, and find the tab Time and language.
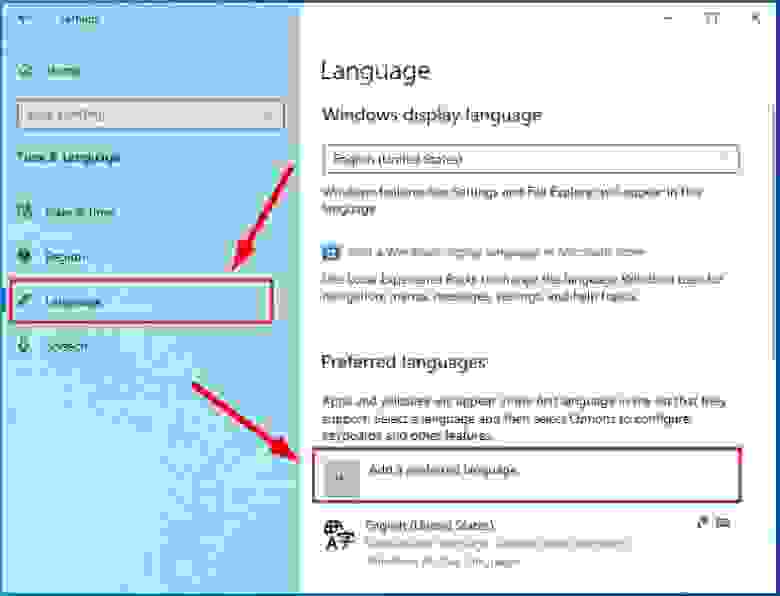
In the left panel, go to Language.
Now look to the right and find the section Preferred languages, where you can prioritize language settings, and click on the button Add a preferred language, with a + (plus) symbol on it.
In the new window Choose a language to install use the scroll bar or the mouse wheel to find the language you need, or start typing its name in the search field above.
Choose the language pack you are planning to use in Windows 10 from the list.

When the language is chosen, hit Next.
In the next page Install language features check the box for Install language pack to confirm your choice (the box with the tick will become blue, i.e. active).
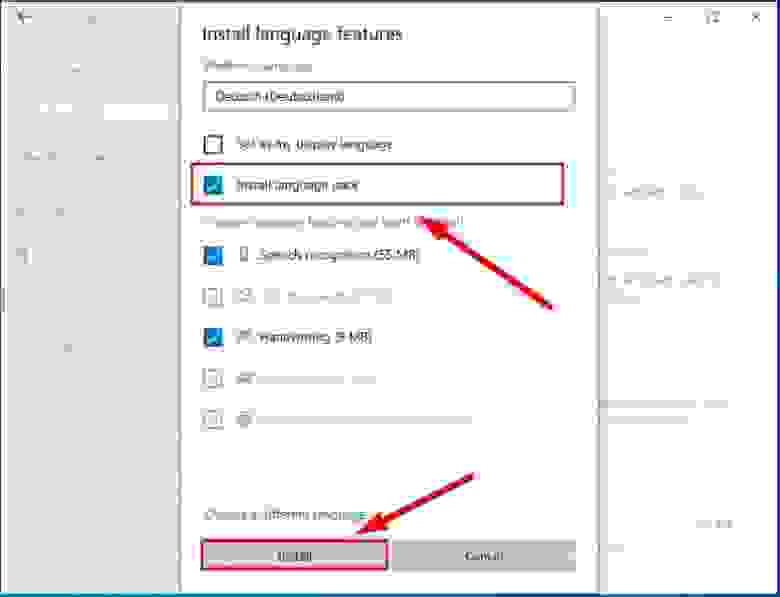
Click Install below.
Changes will take effect after the language package is installed, which usually takes several minutes only. In some cases, restarting your Windows 10 may be required, and then the corresponding language settings will apply to all system elements. The changes will affect the sign-in screen, the Settings app, Windows Explorer, desktop, all applications, preferred browsers and websites you visit. From now on, they will use the new language by default. Besides, Windows 10 may suggest reviewing your current privacy settings.
Changing region settings
If you change the display language for Windows 10 because you move to a different region, then regional settings should be modified too.
Changing them in Windows 10 is easy enough: just follow the steps below.
Open the main system application, Settings, using any way you prefer. For example, press the keyboard shortcut Windows + I to access the app directly.
In the main window of the Settings app, find and select the tab Time and language.
In the left panel, select Region.
In the right panel, find the section Region and use the nested menu Country or region to specify your new location if it differs from the current settings.
In the section Regional format use another nested menu to select proper formats to display date and time in Windows, if these differ for your time and region.
Now look at the left panel and jump to the tab Language again.
Use the scroll bar or the mouse wheel to find the section Related settings and click on the link Administrative language settings.
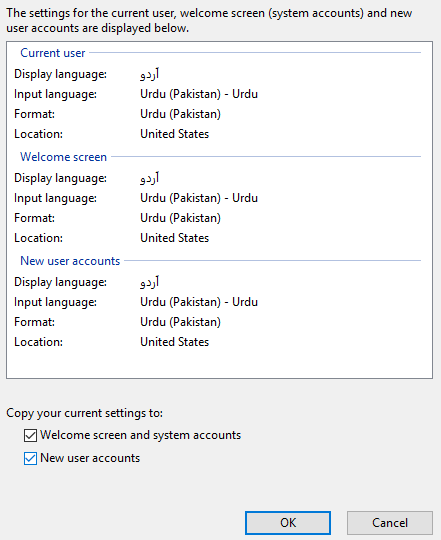
In the new pop-up Region window, jump to the tab Administrative and in the section Welcome screen and new user accounts hit the button Copy settings.
The new window will show you corresponding screen and account settings. In the section Copy your current settings to check the boxes for each option: Welcome screen and system accounts and New user accounts.
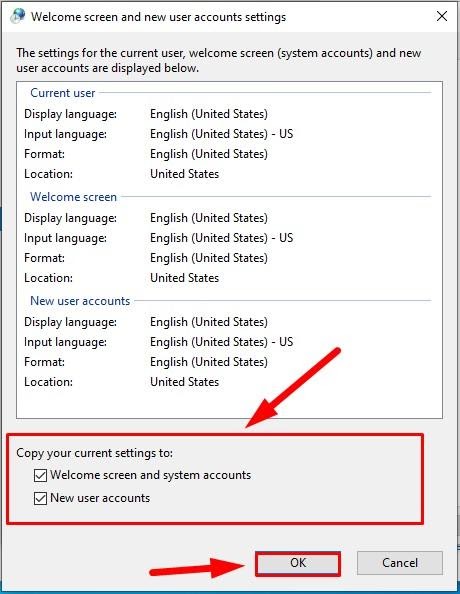
Click ОК.
Click ОК one more time, and then restart the computer.
After all these steps, your computer will display proper regional settings specified according to your physical location.
Most of the time, people don’t change or install additional languages regularly for their personal needs. This opportunity to change language packs quickly is more often required in small or large companies that need to deal with customers having various language preferences.
Besides, this option would be useful for people who have to move to a different region and would like their regional settings to comply. Another scenario is buying a computer from another country when the required configuration is not available locally.
Also, you should remember that modifying language settings may disable some functions like Cortana because this service is not supported in certain regions.
Conclusion
Preferred display language is one of the easily customizable things in the operating system. If you ever need to change the language settings, use one of the methods described here to replace the language pack currently used by Windows 10 without having to reinstall it.
See the full article with all additional video tutorials. If you still have any questions, please ask in a comments. Also visit our Youtube channel, there are over 400 video tutorials.
FAQ
In Windows, you can change the display language for system, settings, and function, etc. You can also add multiple languages and switch them anytime.
Note: If you receive an “Only one language pack allowed” or “Your Windows license supports only one display language” message, it means that you have a single language edition of Windows 11/10, you can’t add a new language unless you purchase an upgrade to either Windows 11/10 Home or Windows 11/10 Pro.
Please go to the corresponding instruction based on the current Windows operating system on your computer:
- Windows 11
- Windows 10
Windows 11 operating system
Table of Contents:
- Install language pack
- Change display language
- Uninstall language pack
Install language pack
When installing a new language pack, Windows needs to connect to the internet to download it. Please make sure your laptop is in an available network environment.
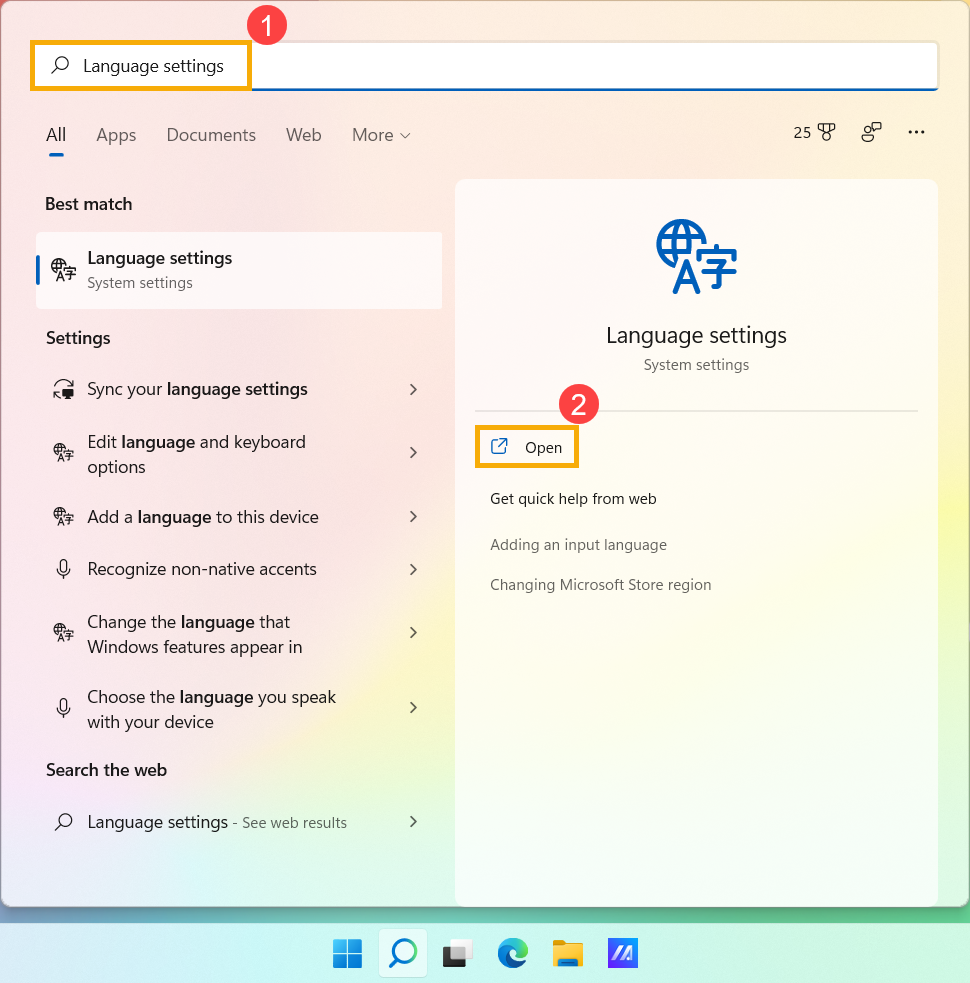
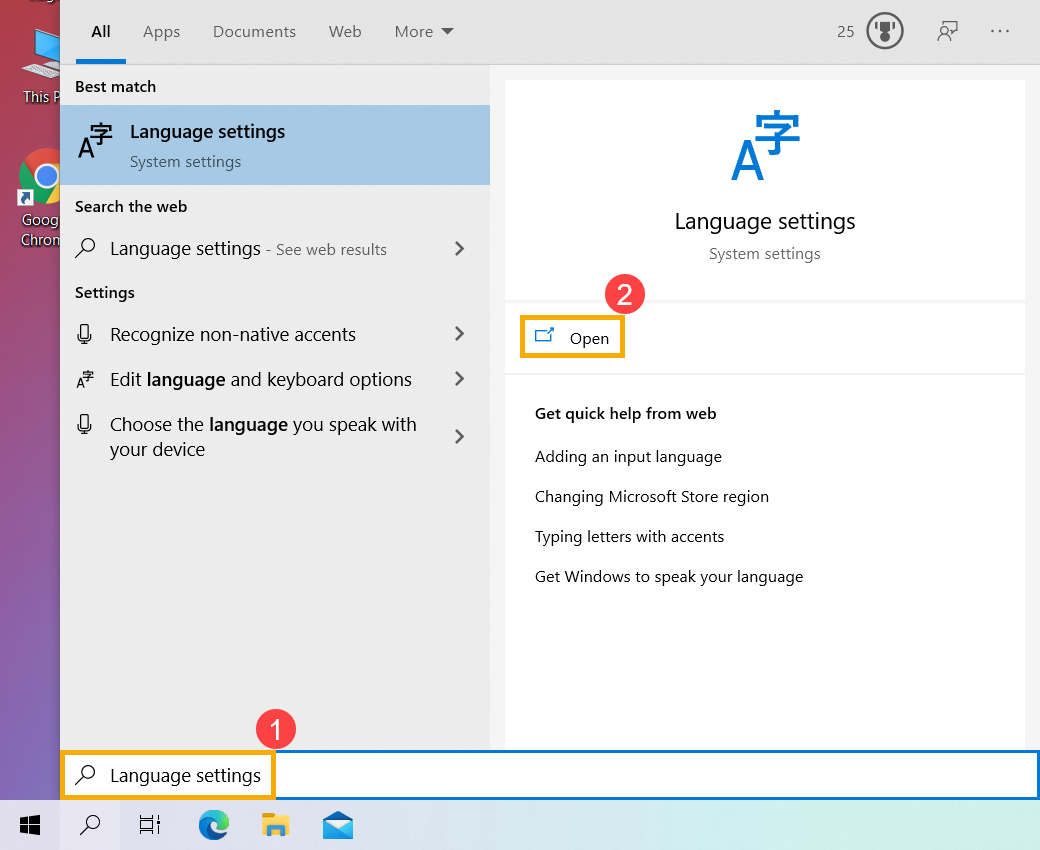
- Type and search [Language settings] in the Windows search bar①, and then click [Open]②.

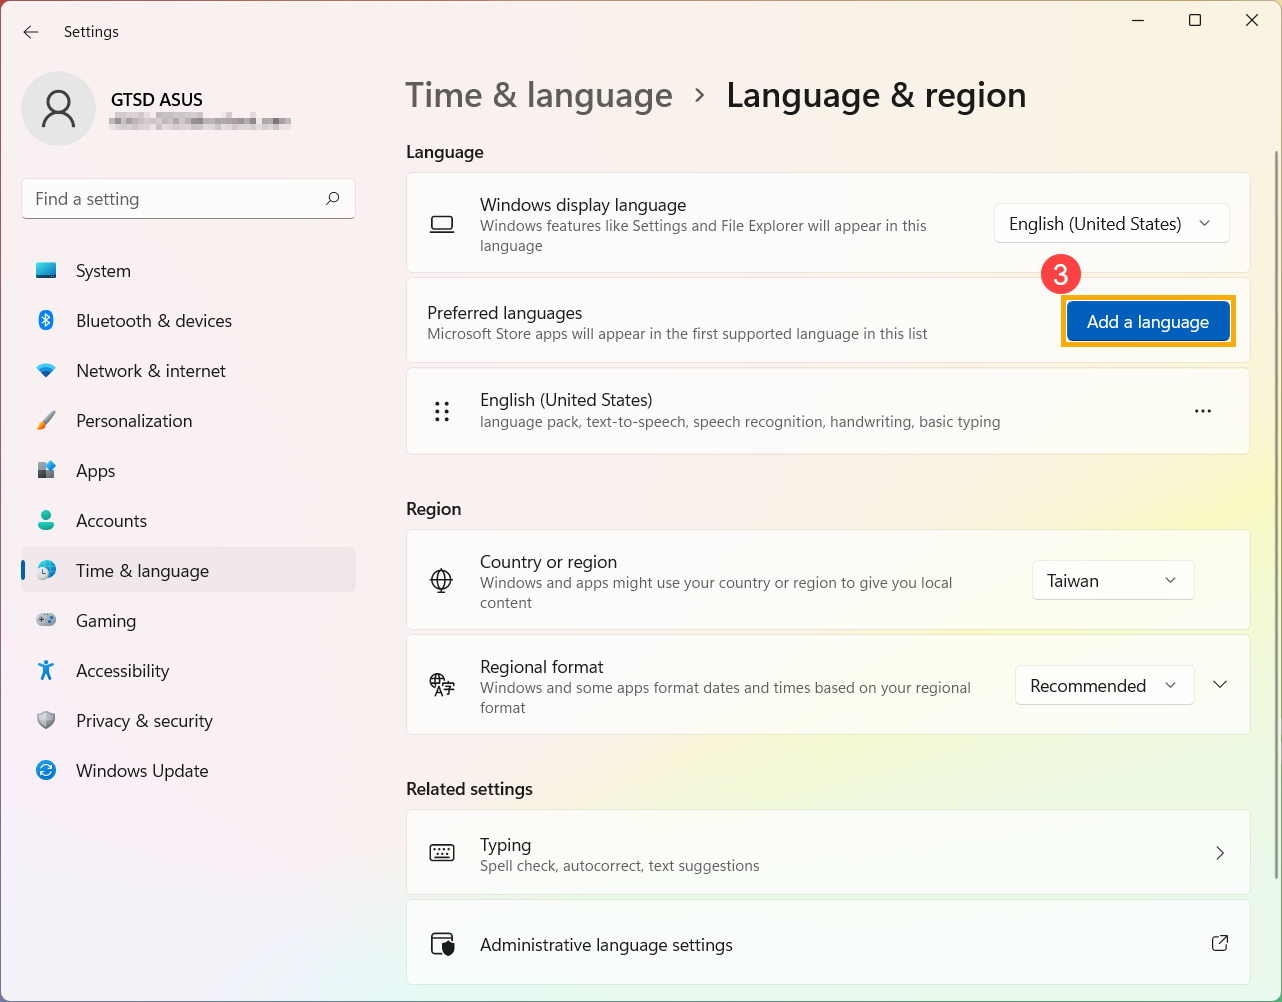
- In preferred languages, click [Add a language]③.
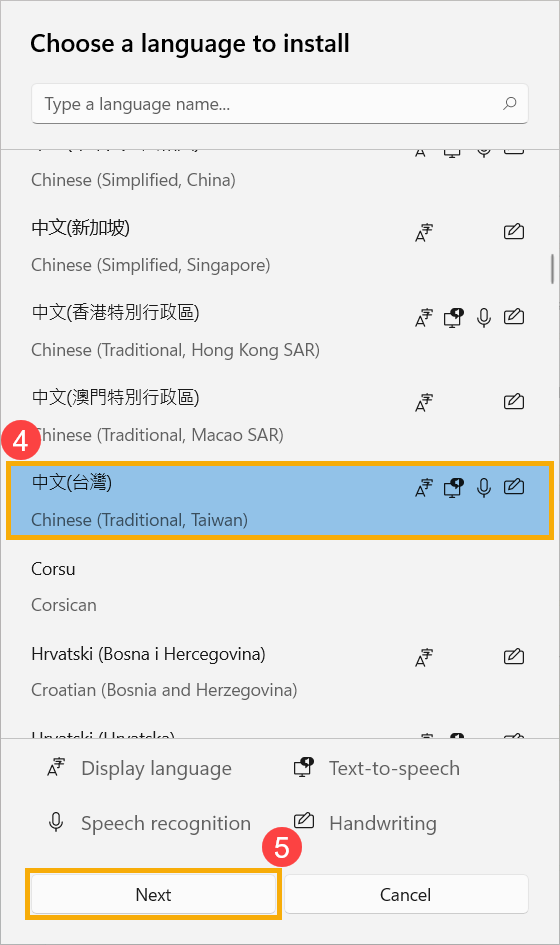
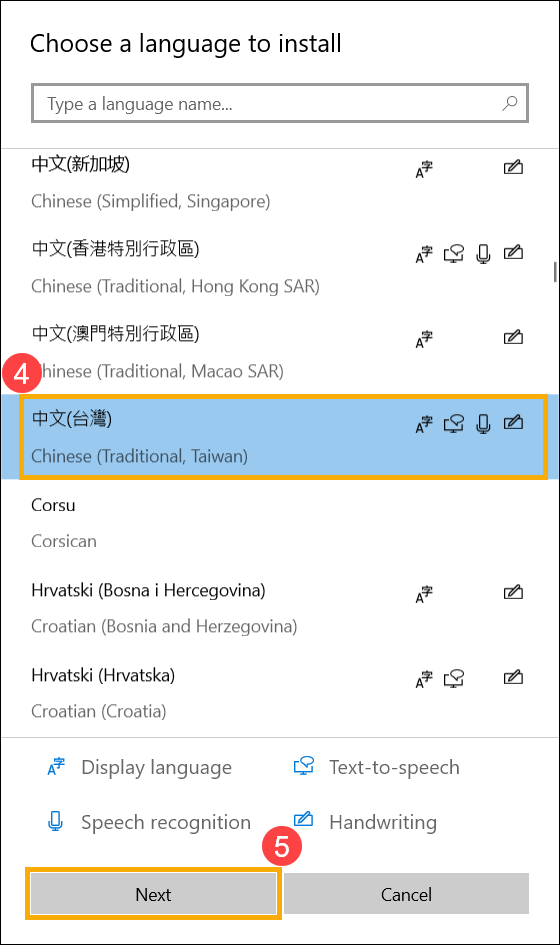
- Choose a language you want to install from the list④, and then select [Next]⑤. The following takes Chinese (Traditional, Taiwan) as a reference.
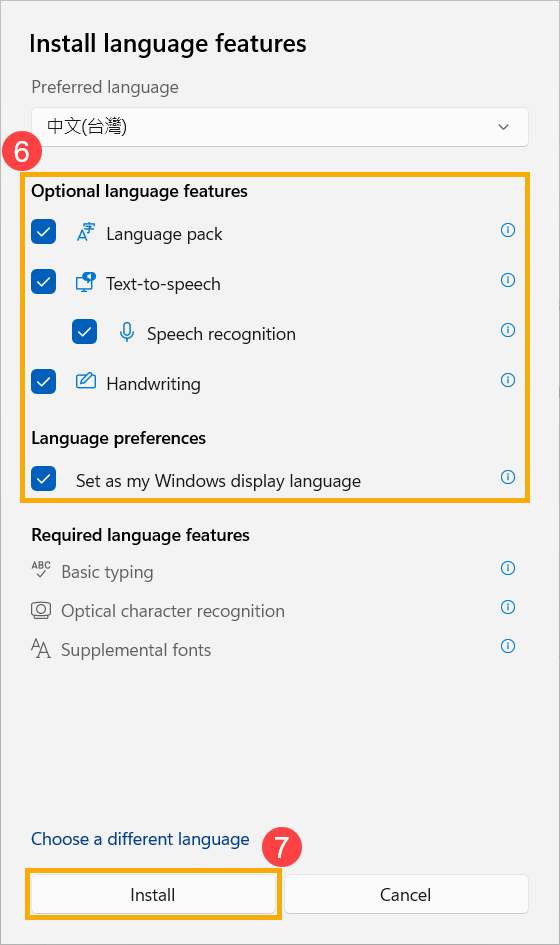
- You can select the language features that you want to install⑥, and then select [Install]⑦. Windows will start to download and install the language pack and related features.
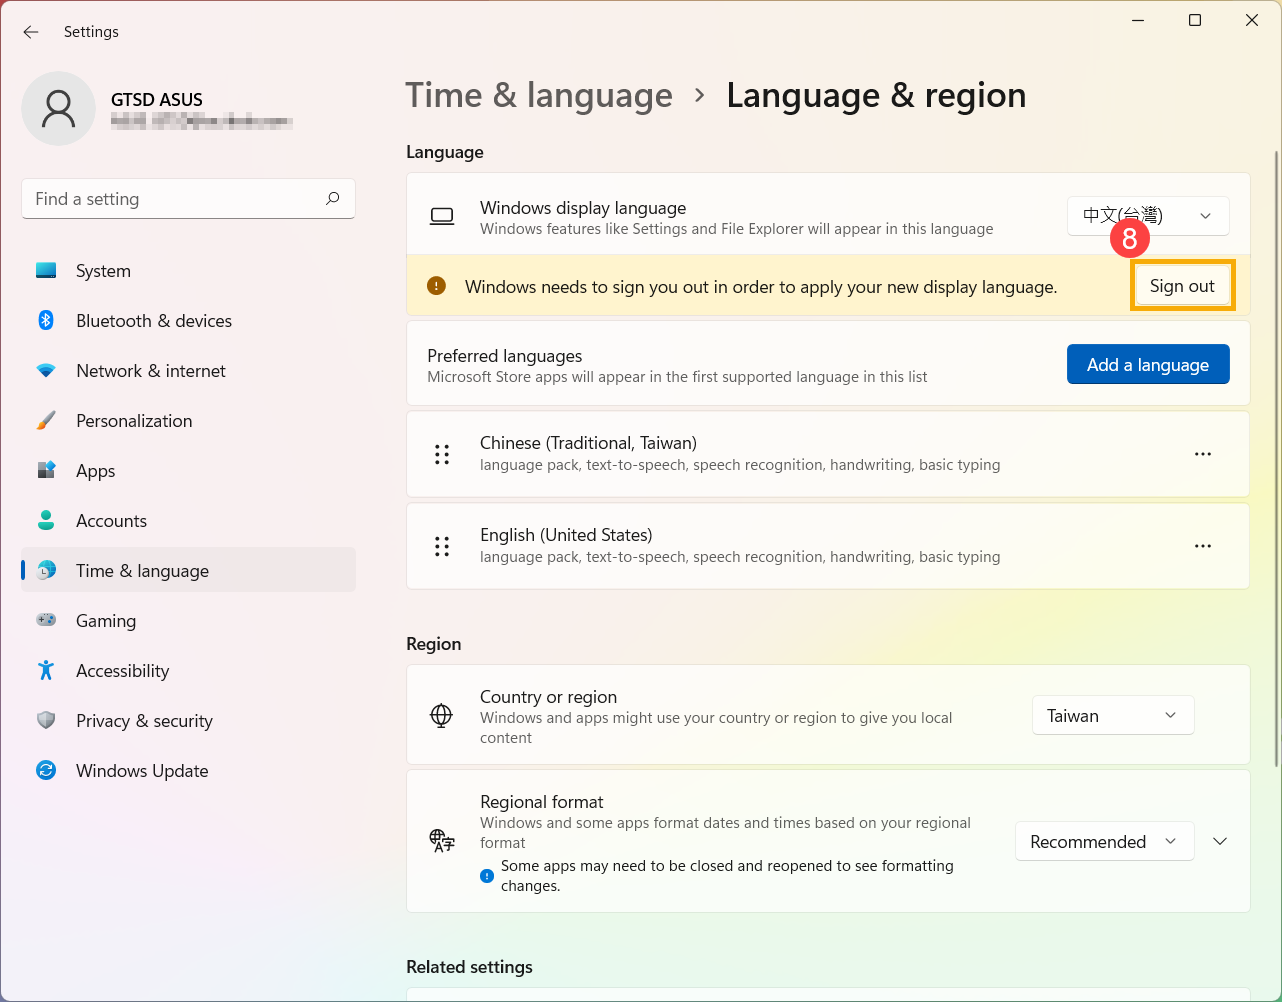
- If you had selected Set as my Windows display language in the previous step, you will receive the following notification after the language pack installation is completed. You can select [Sign out]⑧, and the computer will sign out to apply the language. Please make sure all your works have been saved before signing out.
If you don’t select sign out, Windows will change the display language next time when you sign in.
Back to Table of Contents
Change display language
If you have downloaded several language packs, you can switch the display language anytime.
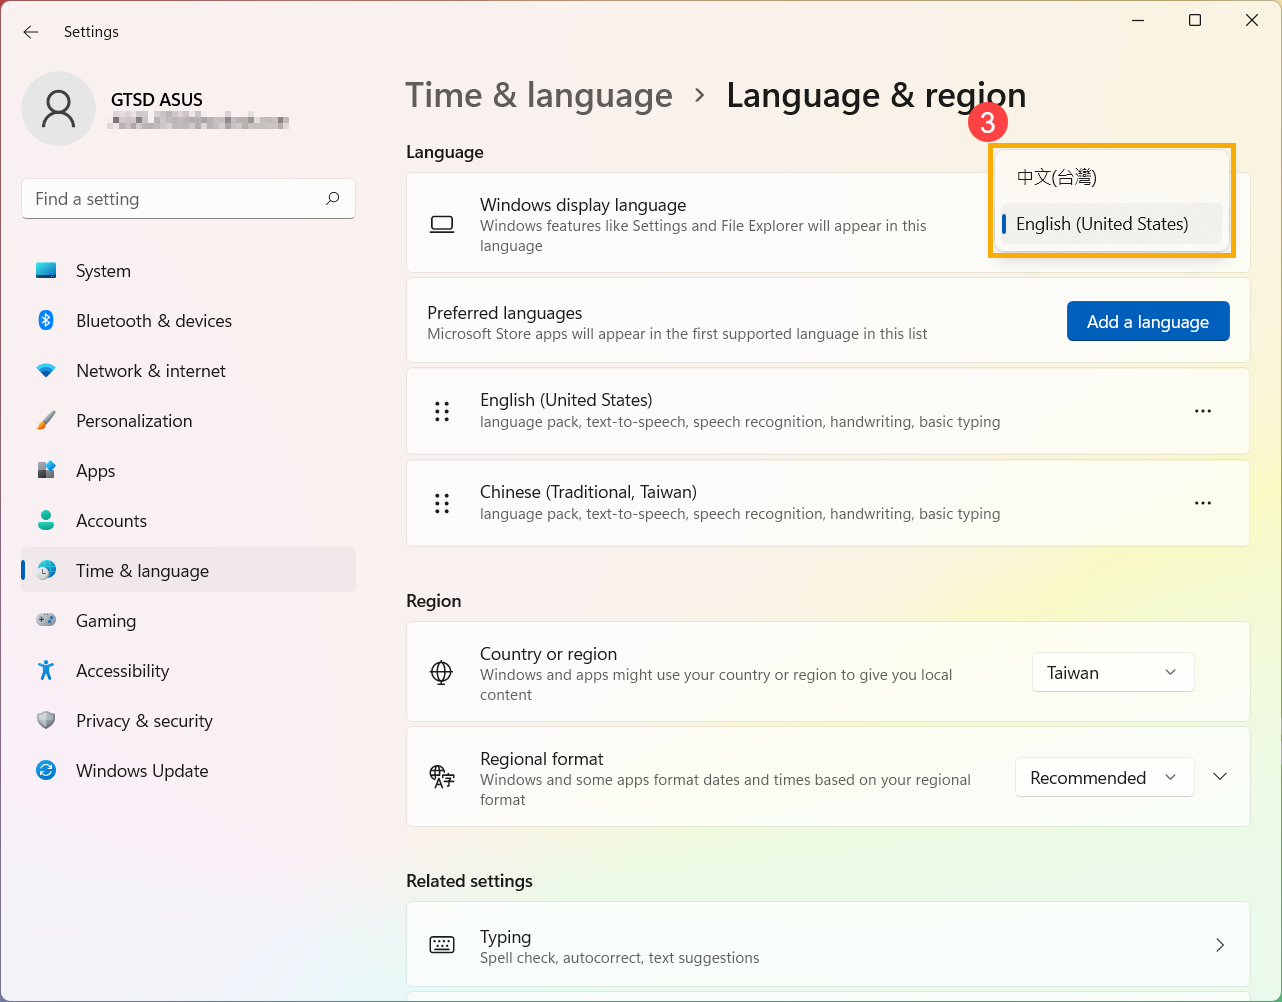
- Type and search [Language settings] in the Windows search bar①, and then click [Open]②.
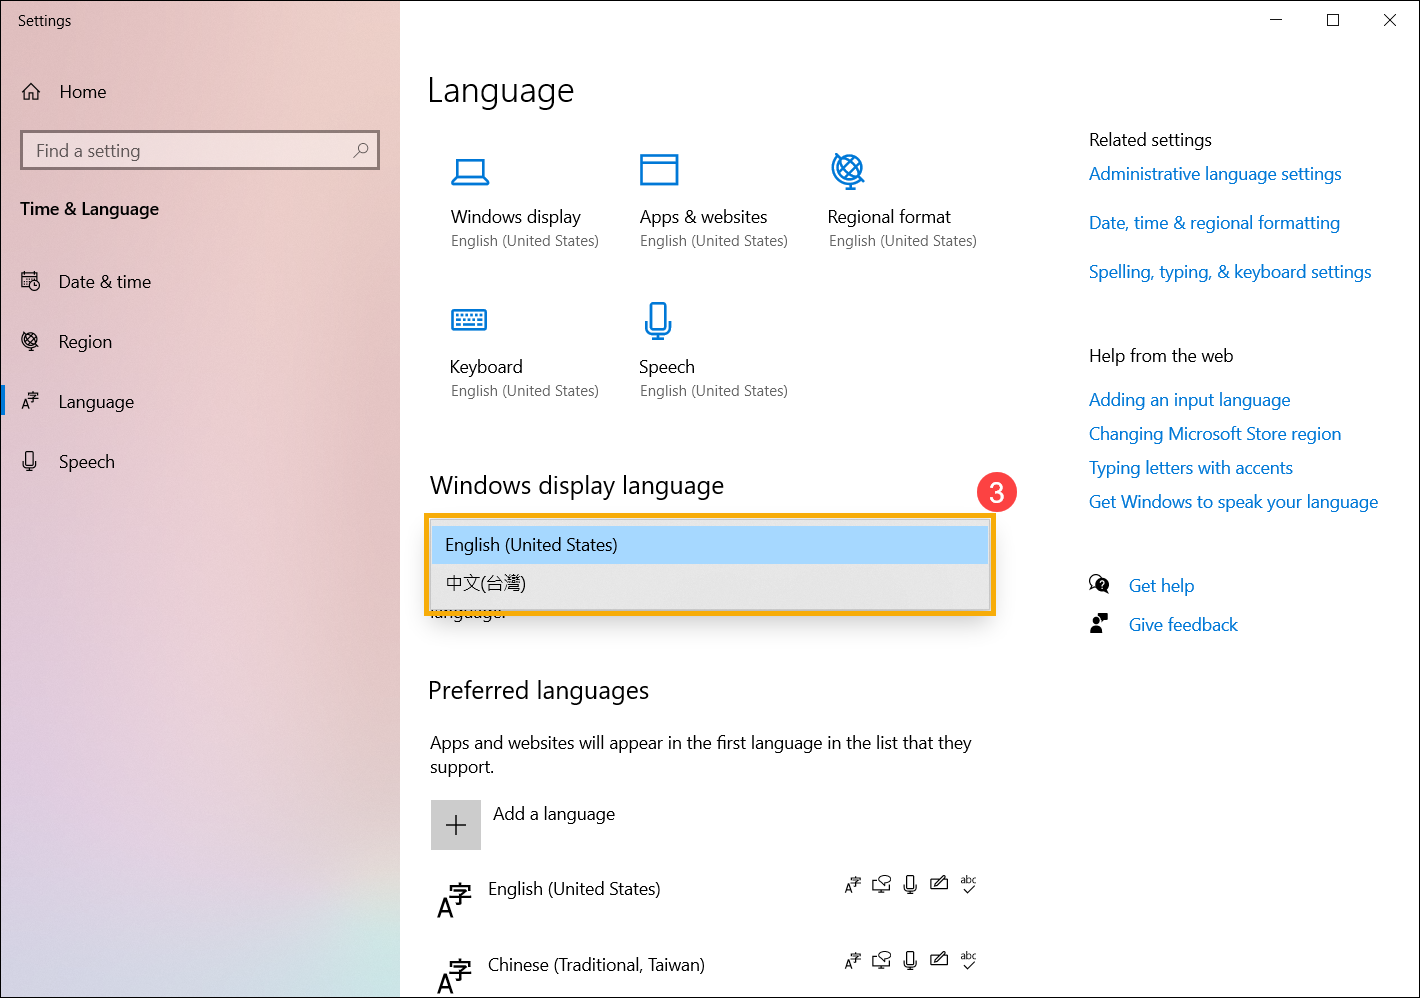
- Select the language you want from the drop-down menu under Windows display language③.
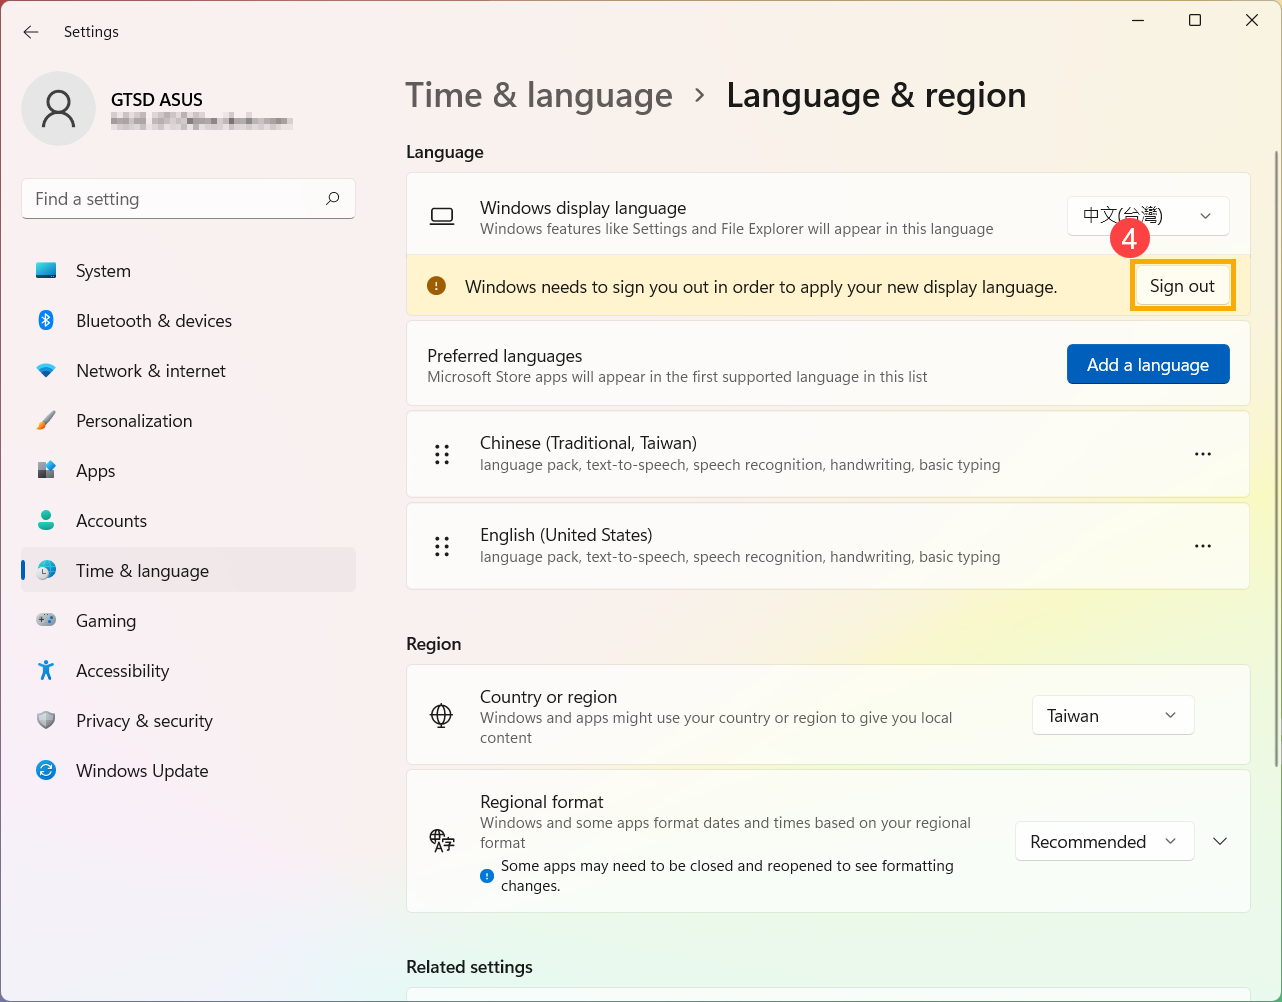
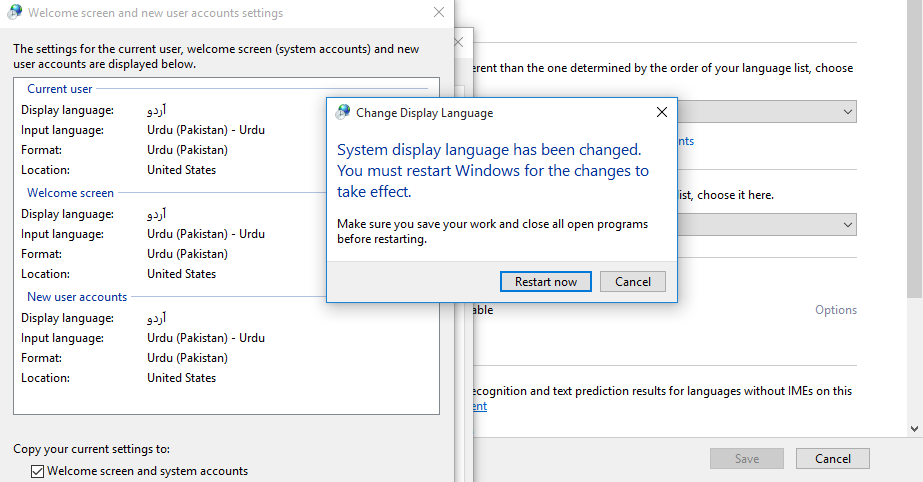
- After selecting the Windows display language, you will receive the following notification. You can select [Sign out]④, and the computer will sign out to complete the system language changes. Please make sure all your works have been saved before signing out.
If you don’t select sign out, Windows will change the display language next time when you sign in.
Back to Table of Contents
Uninstall language pack
Installing multiple language packs might affect the hard drive space, so you are able to uninstall the language packs you will no longer use.
- Type and search [Language settings] in the Windows search bar①, and then click [Open]②.
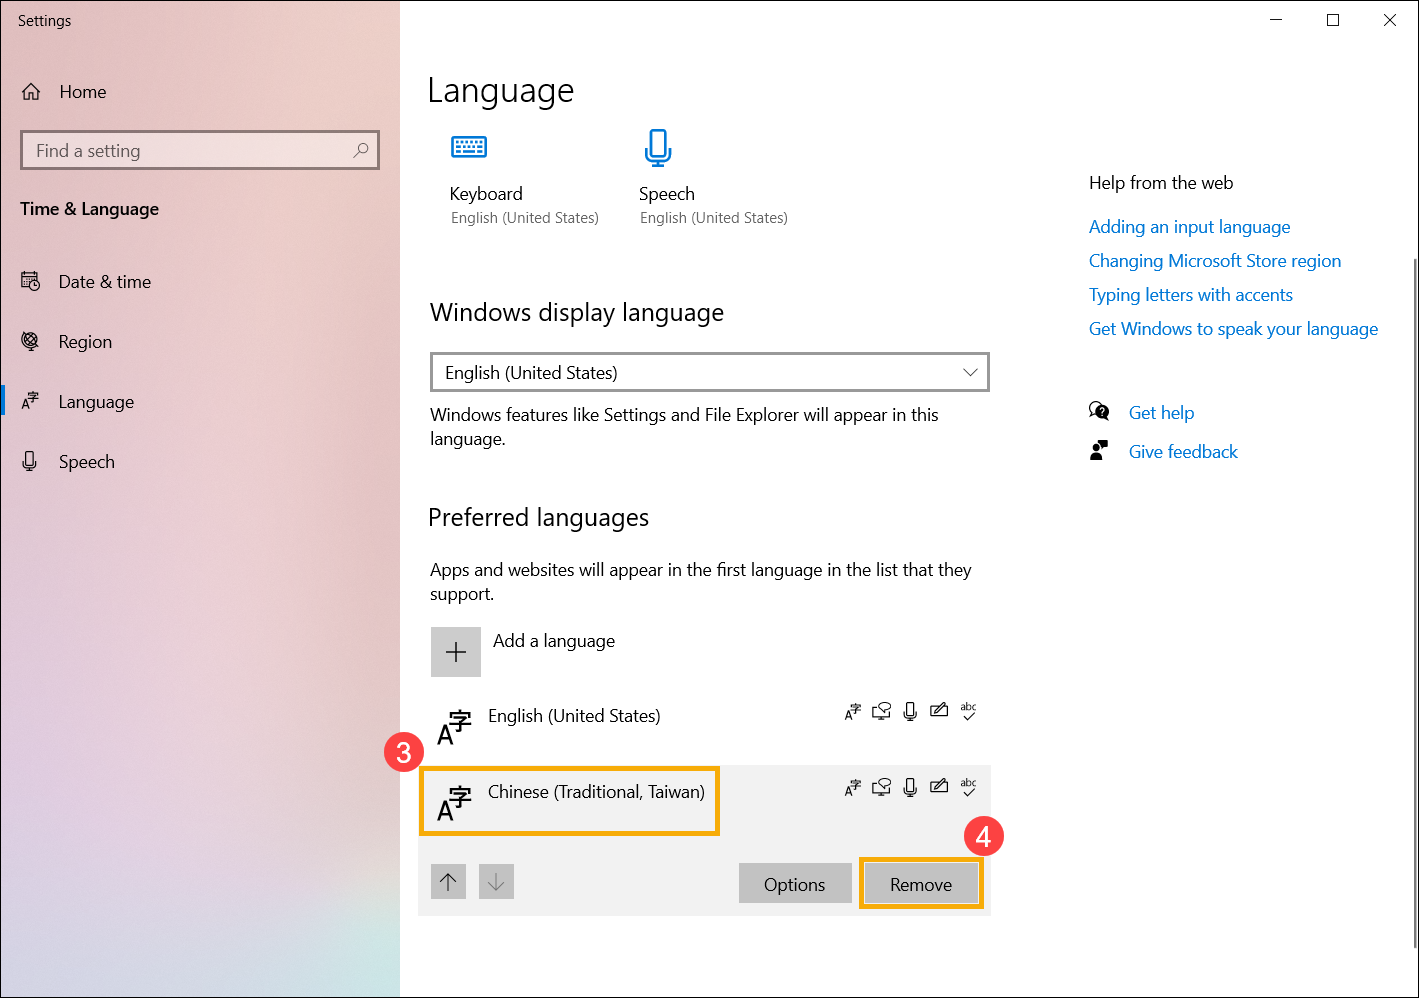
- Select the [More] icon③ next to the language you want to remove, and then click [Remove]④. The language packs and all corresponding keyboard languages will be removed.
 icon
icon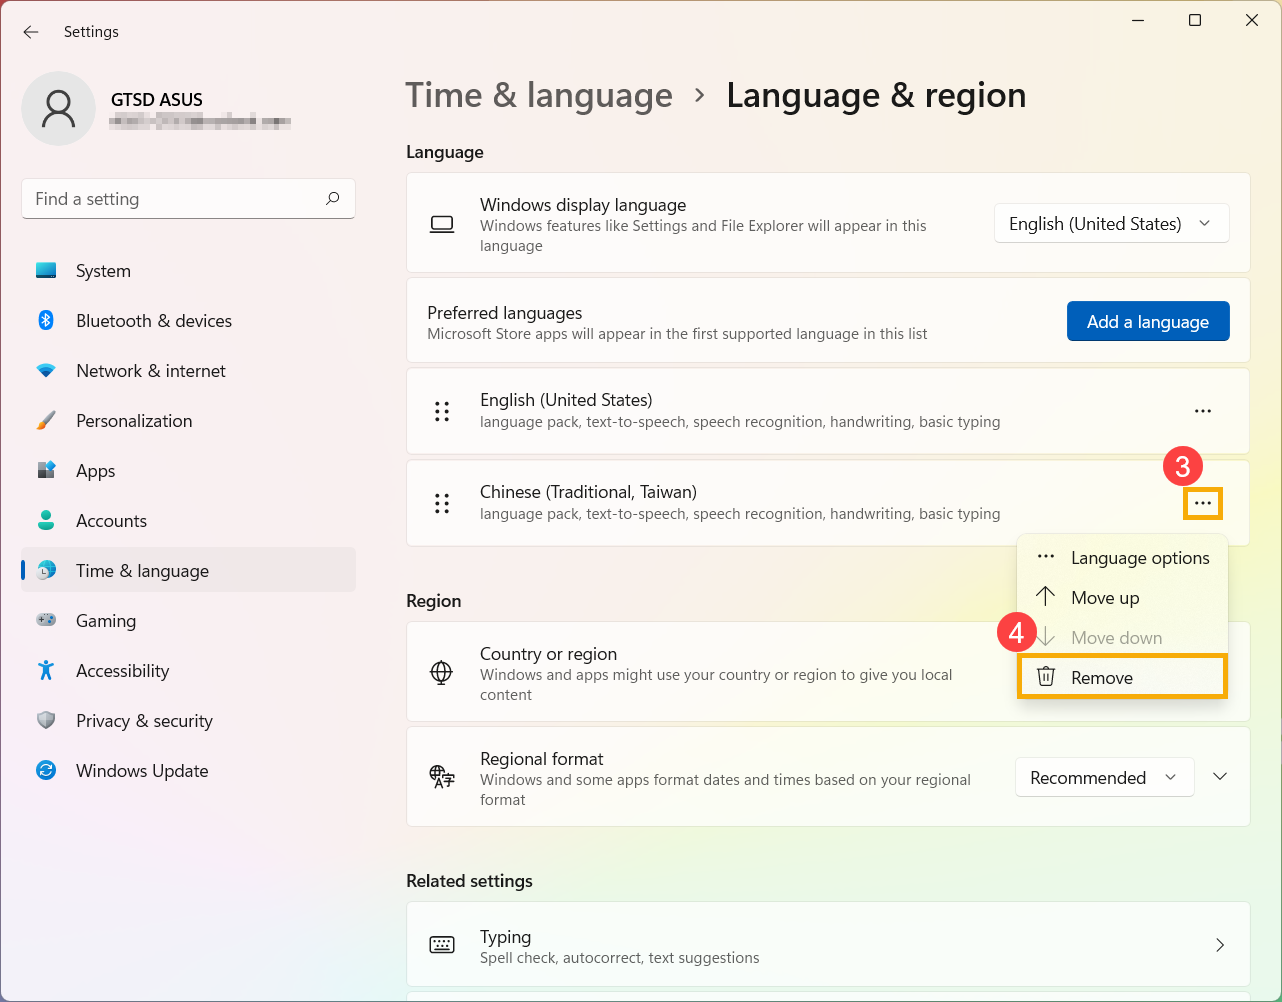
Back to Table of Contents
Windows 10 operating system
Table of Contents:
- Install language pack
- Change display language
- Uninstall language pack
Install language pack
When installing a new language pack, Windows needs to connect to the internet to download it. Please make sure your laptop is in an available network environment.
- Type and search [Language settings] in the Windows search bar①, and then click [Open]②.
- In preferred languages, click [Add a language]③.
- Choose a language you want to install from the list④, and then select [Next]⑤. The following takes Chinese (Traditional, Taiwan) as a reference.
- You can select the language features that you want to install⑥, and then select [Install]⑦. Windows will start to download and install the language pack and related features.
- If you had selected Set as my Windows display language in the previous step, you will receive the following notification after the language pack installation is completed. You can select [Yes, sign out now]⑧, and the computer will sign out to apply the language. Please make sure all your works have been saved before signing out.
If you select to sign out later, Windows will change the display language next time when you sign in.


Back to Table of Contents
Change display language
If you have downloaded several language packs, you can switch the display language anytime.
- Type and search [Language settings] in the Windows search bar①, and then click [Open]②.
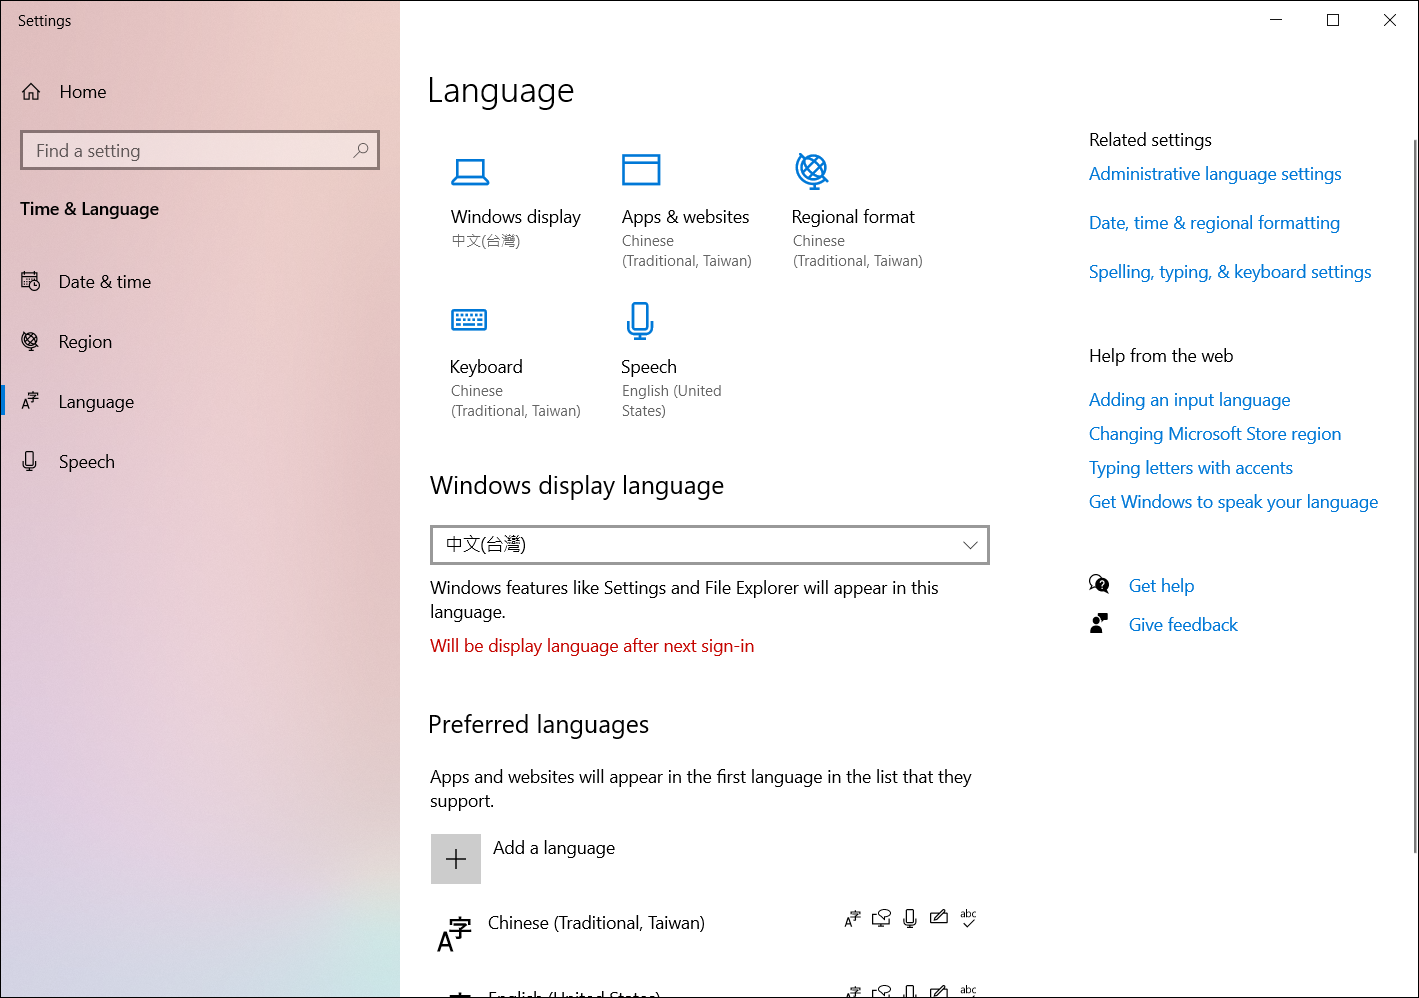
- Select the language you want from the drop-down menu under Windows display language③.
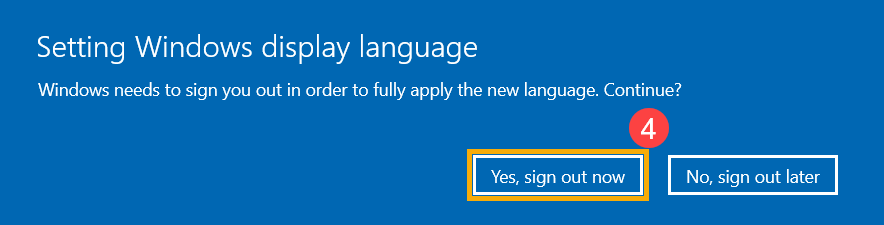
- You can select [Yes, sign out now]④, and the computer will sign out to complete the system language changes. Please make sure all your works have been saved before signing out.
If you select sign out later, Windows will change the display language next time when you sign in.


Back to Table of Contents
Uninstall language pack
Installing multiple language packs might affect the hard drive space, so you are able to uninstall the language packs you will no longer use.
- Type and search [Language settings] in the Windows search bar①, and then click [Open]②.
- Select the language you want to remove③, and then select [Remove]④. The language packs and all corresponding keyboard languages will be removed.
Back to Table of Contents
-
Category
Windows Setting/ Operation -
Type
Product Knowledge
Was this information helpful?
Yes
No
- Above information might be partly or entirely quoted from exterior websites or sources. please refer to the information based on the source that we noted. Please directly contact or inquire the sources if there is any further question and note that ASUS is neither relevant nor responsible for its content/service
- This information may not suitable for all the products from the same category/series. Some of the screen shots and operations could be different from the software versions.
- ASUS provides the above information for reference only. If you have any questions about the content, please contact the above product vendor directly. Please note that ASUS is not responsible for the content or service provided by the above product vendor.
- Brand and product names mentioned are trademarks of their respective companies.
You can change the default display language of your Windows 10 from English to any other language. This is useful in scenarios where multiple users are accessing the same system and they understand different languages.
In this guide, I will walk through to change the default English language to Urdu (you can change it to Spanish, French or German etc. :)) If you like to change the Cortana voice language, have a look here.
Step 1. Press Windows key + I on the keyboard to open the settings window.
Step 2. Click Time and language.
Step 3. Click Region and Language.
Step 4. Click Add a language.

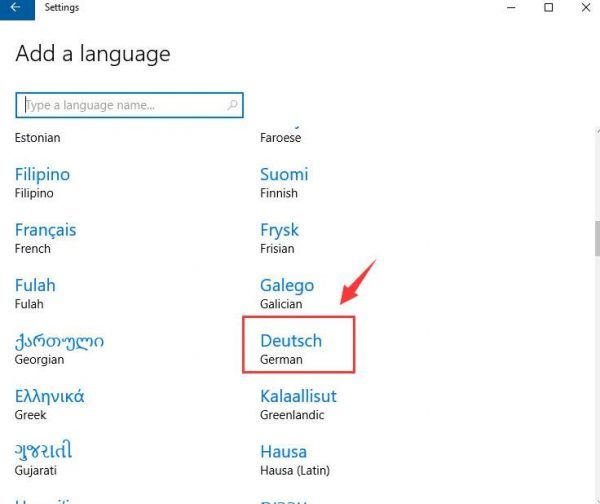
Step 5. Select your desired language and its variation (if applicable) by clicking on the language name.
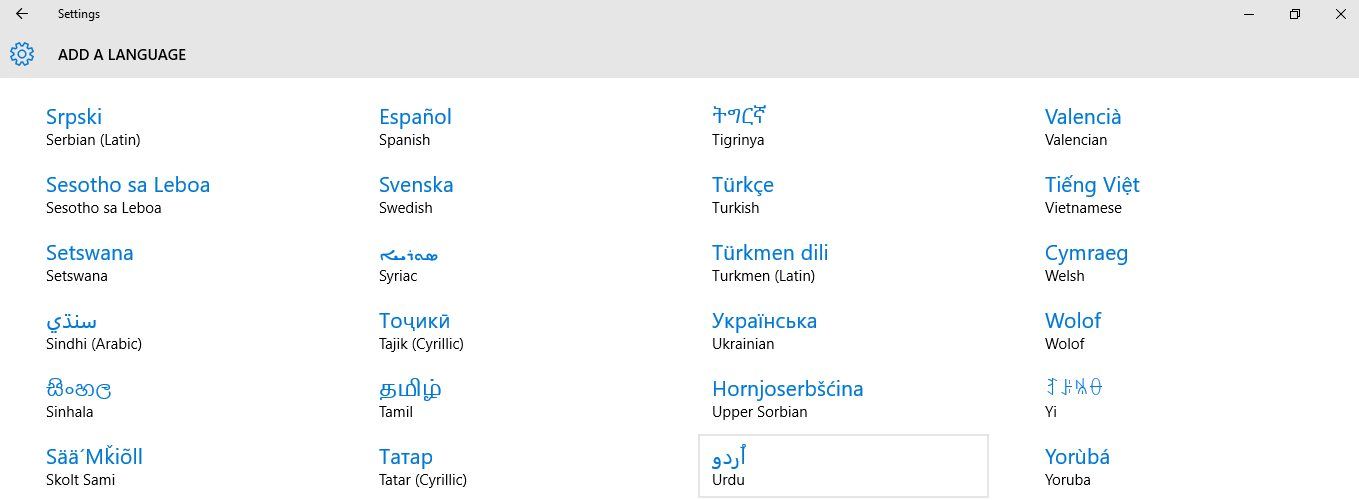
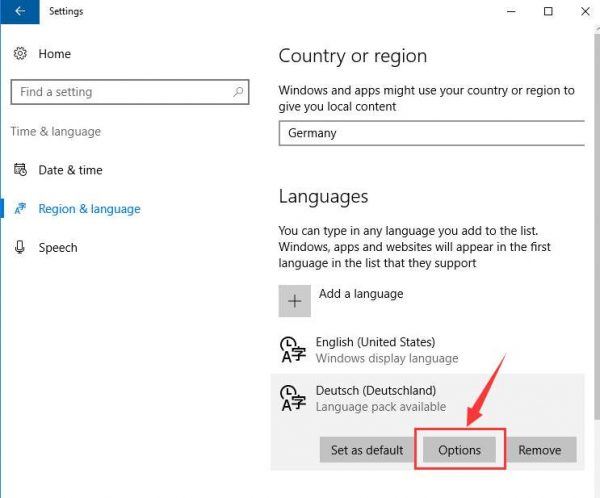
Step 6. Select the new language and click Options.
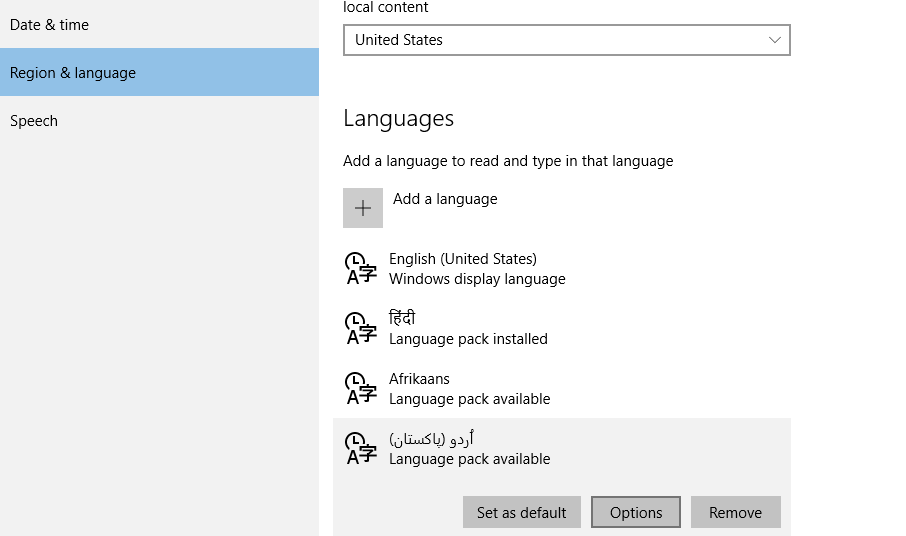
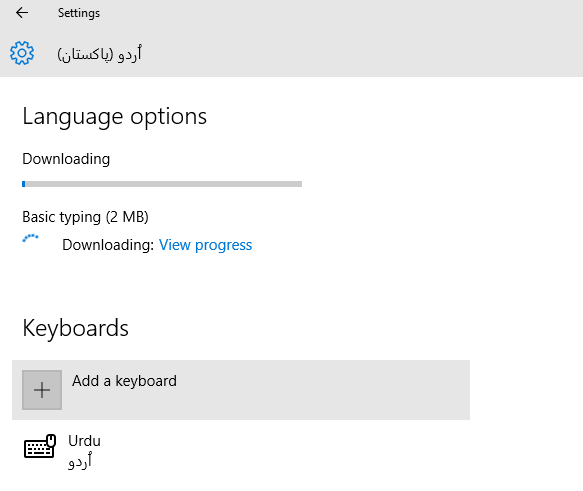
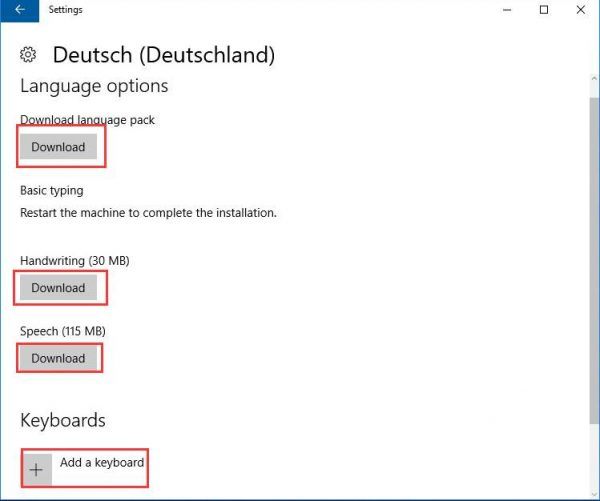
Step 7. Download the language pack.
Step 8. Select the new language and click Set as default.
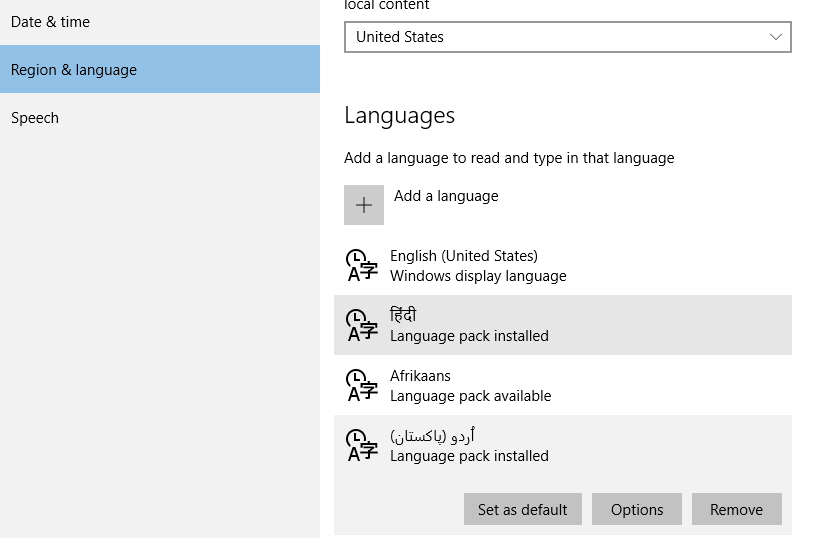
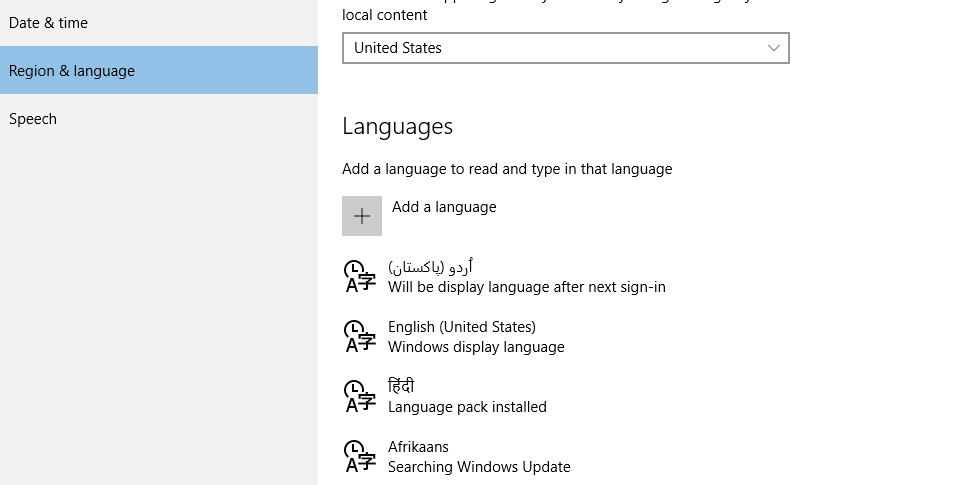
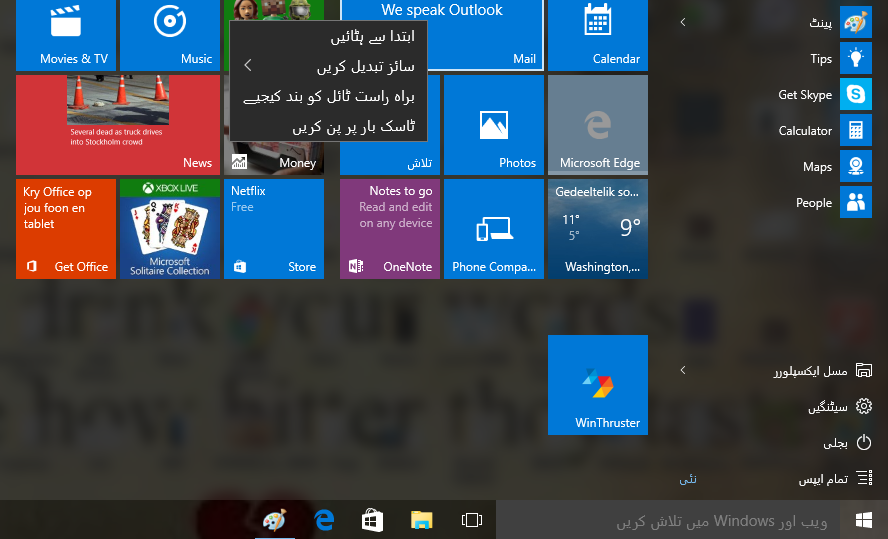
Step 9. Your new language will be displayed after next sign-in (See below screen shot).
Step 10. Press Windows key + X from the keyboard, scroll the power menu and click Control Panel.
Step 11. Click Add a language.
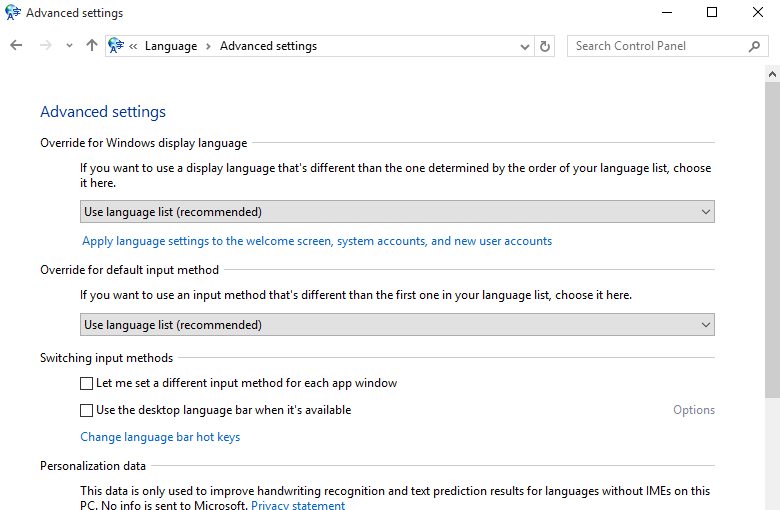
Step 12. Click Advanced Settings in the left pane.
Step 13. Click «Apply language settings to the Welcome screen, system accounts, and new user accounts.».
Step 14. Open Administrative tab and click Copy settings.
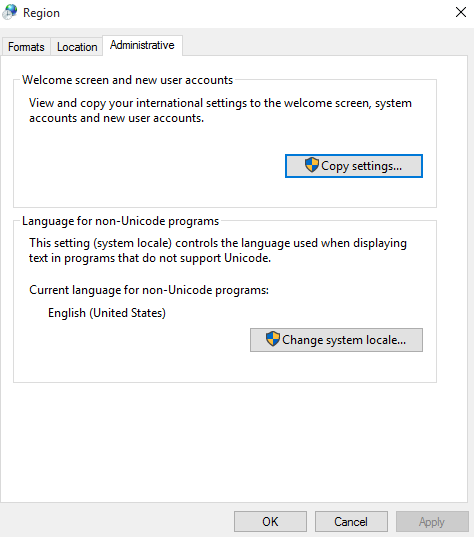
Step 15. Check both «Welcome screen and system accounts» and «New user accounts» options. Click OK.
Step 16. Click Restart now and let your system reboot so changes may take effect.
When the system reboots successfully, everything will be displayed in the new language.
Язык интерфейса в Windows 10 выбирается при установке операционной системы. Но после того как процедура установки закончена, его можно изменить. Для этого понадобится языковой пакет.
Для чего нужен языковой пакет
Языковой пакет (далее «ЯП» для краткости) – набор слов и предложений, обеспечивающий перевод системы на определённый язык. Например, установив русский ЯП, вы переведёте все системные сообщения, приложения и настройки на русский язык. Соответственно, выбрав ЯП другого языка, вы сможете пользоваться Windows на наиболее удобном для вас языке.
Установка ЯП
В Windows 10 встроено несколько методов, позволяющих работать с ЯП. Благодаря им можно выбирать язык из уже скачанных пакетов, а также устанавливать новые ЯП.
Если вам нужно изменить ЯП на одном компьютере, то легче всего воспользоваться автозагрузкой, то есть дать системе самой скачать и установить необходимый пакет. Если же требуется сменить язык на нескольких ПК, то удобнее один раз скачать файл ЯП, а потом перенести его при помощи флешки на каждый из компьютеров, сэкономив тем самым интернет-трафик. Файлы ЯП имеют расширение .cab. Скачать их можно со сторонних ресурсов, так как Microsoft не распространяет ЯП в виде отдельных файлов на своём официальном сайте.
Установка ЯП при помощи настроек параметров Windows
В Windows 10 есть встроенная утилита «Параметры», позволяющая управлять настройками системы. Если ОС на вашем компьютере уже обновлена до версии 1803 April Update, то с помощью этой утилиты можно загрузить дополнительный ЯП. Если у вас установлена более старая версия Windows, то воспользуйтесь любым из описанных ниже методов — результат будет тот же. Для загрузки ЯП с помощью утилиты «Параметры» сделайте следующее:
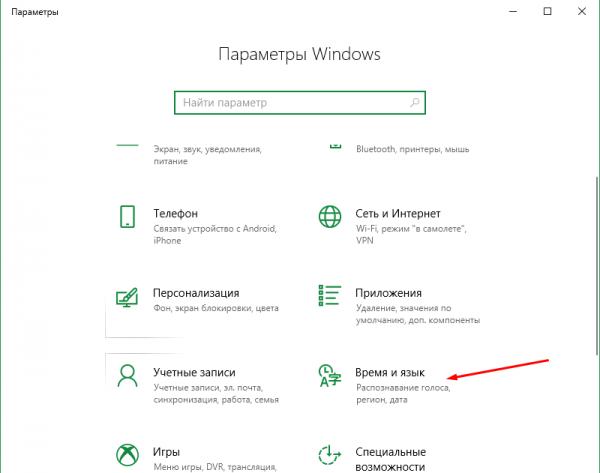
- Войдя в консоль «Параметры Windows», разверните блок «Время и язык».

Откройте раздел параметров «Время и язык» - Раскройте подпункт «Регион и язык», затем кликните по кнопке «Добавить язык» и выберите из появившегося списка подходящий вариант. Начнётся загрузка ЯП из сети.

После щелчка по кнопке «Добавить язык» откроется список языков, которые можно добавить
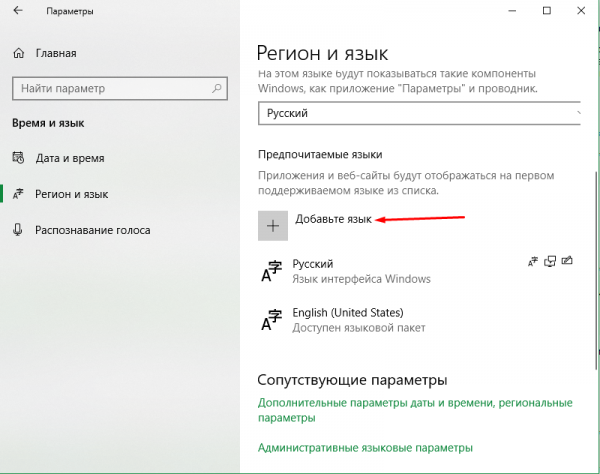
Как только загрузка закончится, в списке языков появится новый ЯП — выберите его, чтобы осуществить перевод системы на нужный язык.
Установка ЯП из панели управления Windows
Пользователи, не обновившие ещё свою Windows до версии 1803 или более поздней, могут выполнить смену ЯП через панель управления. Для этого сделайте следующее:
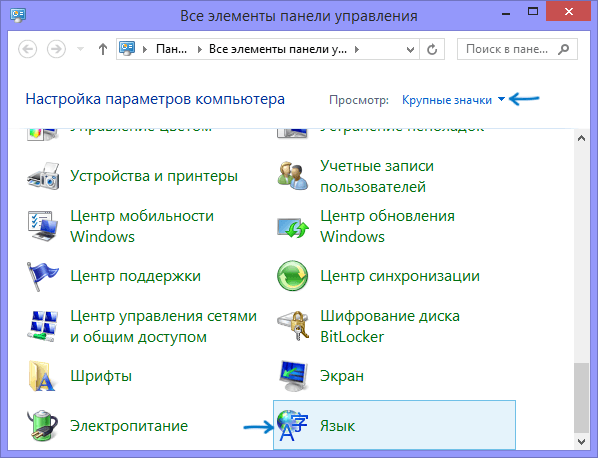
- Войдя в панель управления, перейдите в раздел «Язык». Панель управления можно найти при помощи системной поисковой строки.

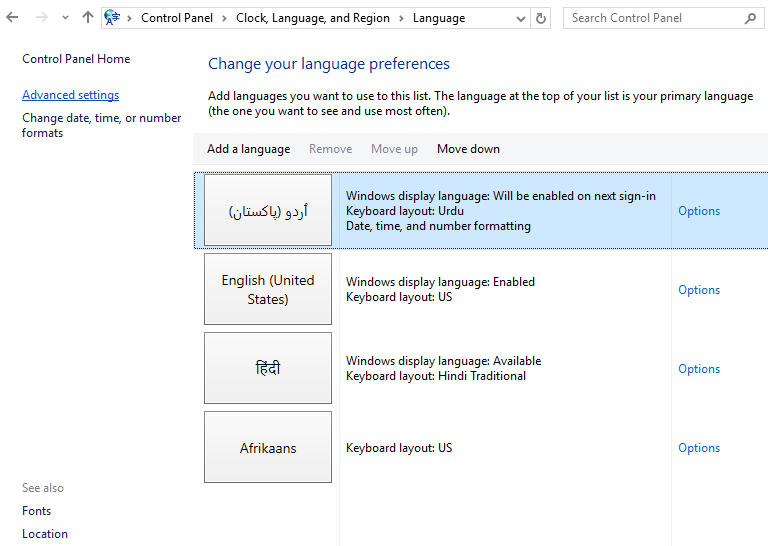
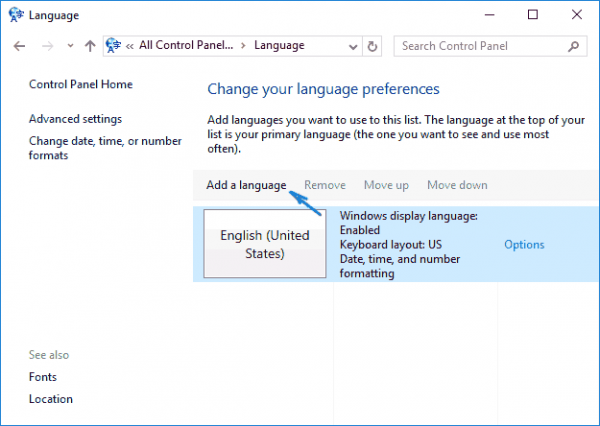
Откройте раздел «Язык» в панели управления Windows - Щёлкните по кнопке «Добавить язык» для выбора нужного ЯП. Появится список языков, доступных для добавления. Отметьте из них тот, который хотите добавить.

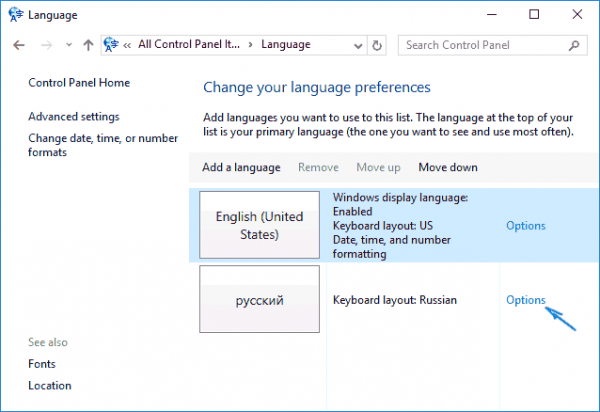
Нажмите кнопку «Добавить язык»и выберите нужный языковой пакет - Перейдите к свойствам выбранного языка.

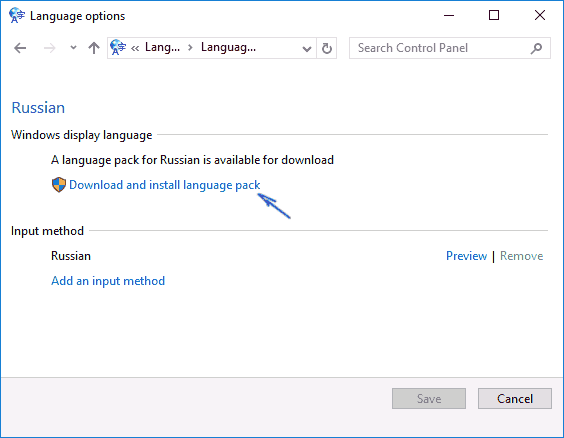
Нажмите кнопку «Свойства» для добавляемого языка - В открывшемся окне свойств языка нажмите кнопку «Загрузить и установить языковой пакет», после чего начнётся загрузка ЯП.

Щёлкнув по кнопке «Загрузить и установить языковой пакет», начните загрузку ЯП выбранного языка - После окончания процесса установки ЯП снова зайдите в свойства языка и назначьте его основным языком системы.
Назначьте выбранный язык основным языком интерфейса Windows

Готово. Новый ЯП загружен и применён. Возможно, вас попросят выйти из системы, чтобы применить изменённые параметры. Дайте согласие, затем снова войдите в свою учётную запись и проверьте результат.
Добавление языка из cab-файла
Если у вас есть отдельно загруженный ЯП в формате cab, то для его установки выполните следующие шаги:
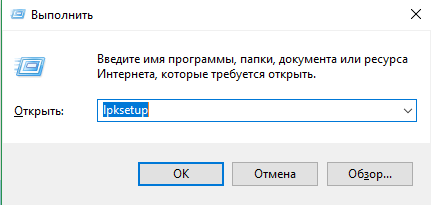
- Нажмите комбинацию клавиш Win + R, чтобы открыть окно «Выполнить». Введите в нём команду lpksetupe и запустите её выполнение, нажав кнопку OK.

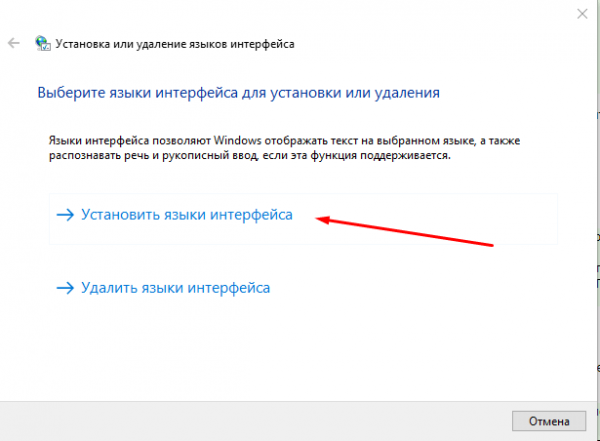
Введите и выполните команду lpksetup - Появится окно установки ЯП. Укажите, что хотите загрузить новый ЯП, а не удалить уже имеющийся. Для этого щёлкните по строке «Установить язык интерфейса».

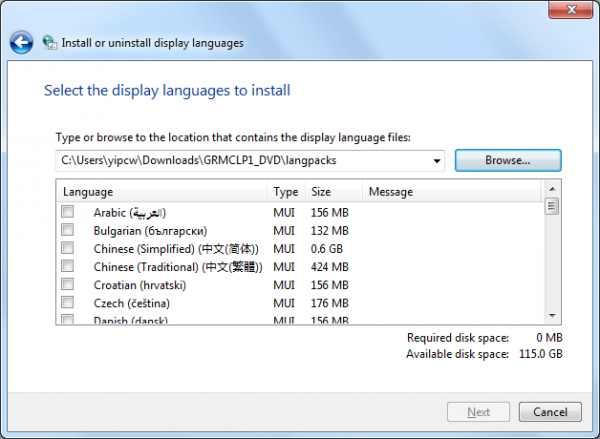
Укажите, что надо установить новый языковой пакет - Откройте cab-файл, для чего нажмите кнопку Browse и найдите его на диске. В строке рядом с кнопкой отобразится путь до файла. Если в файле содержится сразу несколько языков, выберите из них те, которые нужно установить. Начните процедуру установки, нажав кнопку Next, и дождитесь её окончания. Затем перейдите в окно«Параметры» или в панель управления Windows, выберите новый ЯП в качестве основного (как это сделать, описано в двух предыдущих пунктах).

Укажите путь до файла и выберите желаемые языки
Изменение языка интерфейса
Установка нового ЯП не гарантирует того, что язык системы изменится. Обычно для этого нужно ввести соответствующую команду, которая изменит язык интерфейса. Выполните следующие шаги:
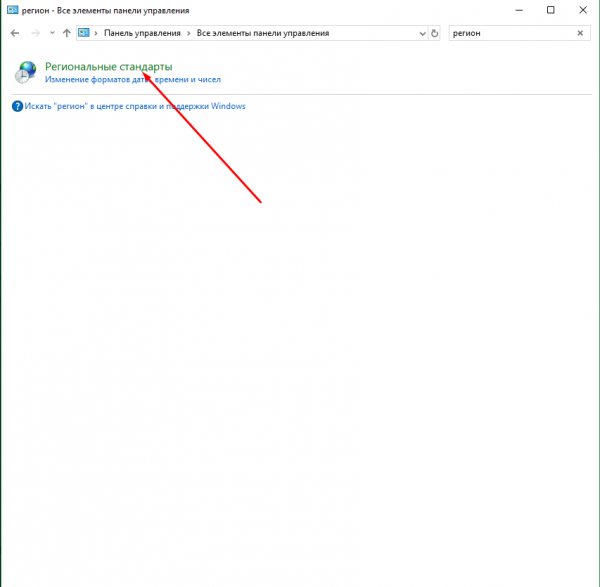
- Находясь в панели управления, разверните пункт «Региональные стандарты». Если не можете найти его в главном меню, воспользуйтесь встроенной поисковой строкой.

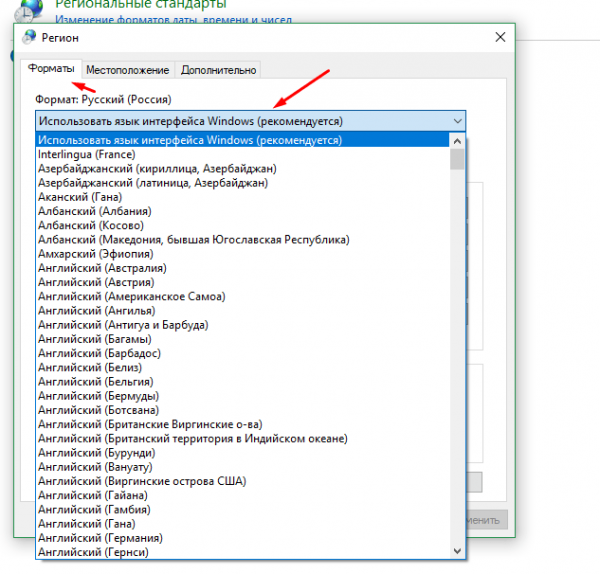
Войдите в раздел панели управления «Региональные стандарты» - В первой вкладке «Форматы» выберите подходящий вам язык интерфейса, а затем сохраните новые значения. Возможно, придётся выйти из системы и войти заново, чтобы изменённые настройки вступили в силу.

Выберите подходящий язык интерфейса и сохраните изменения
Видео: работа с языковыми пакетами в Windows 10
Изменения языка приветствия
Если вы хотите при входе в систему видеть тот же язык, который назначили языком интерфейса, то выполните дополнительные шаги:
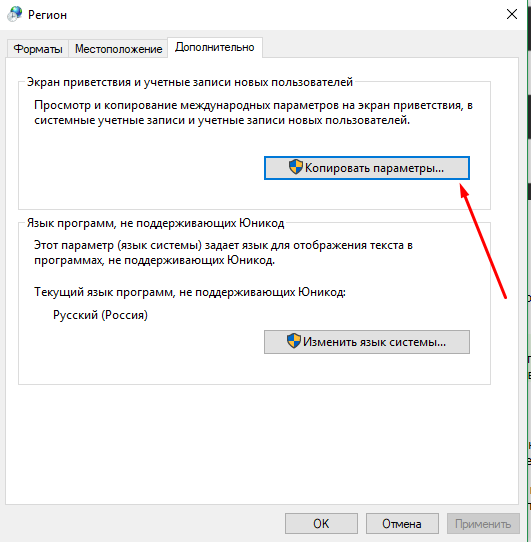
- Разверните вкладку «Дополнительно» в окне региональных стандартов. Нажмите кнопку «Копировать параметры».

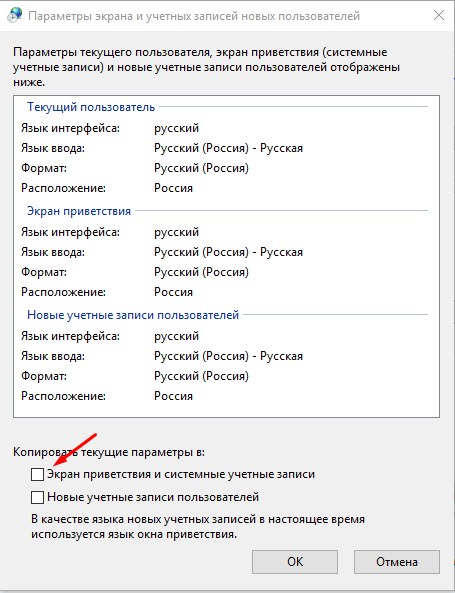
Нажмите кнопку «Копировать параметры» в окне региональных стандартов - Поставьте галочку, обеспечивающую копирование текущих языковых параметров на экран приветствия и в системные аккаунты. Нажав затем кнопку ОК, вы сохраните новый язык для экрана приветствия. Также, отметив соответствующую галочку, в этом окне можно включить копирование установленного языка во все новые учётные записи, которые будут созданы в будущем.

Включите копирование текущих языковых настроек на экран приветствия и в системные учетные записи
Установка ЯП на Single Language версию
Есть специальная редакция Windows — Single Language. Она включает в себя только один язык и не позволяет загрузить дополнительные ЯП через панель управления или утилиту «Параметры». Сделано это для того, чтобы неопытный пользователь случайно не перевёл систему не непонятный ему язык.
Если вы столкнулись с тем, что на вашем компьютере установлена версия Single Language, а новый ЯП вам нужен, то воспользуйтесь методом, описанным в пункте «Добавление языка из cab-файла». Установить пакет и начать пользоваться им можно, предварительно загрузив cab-файл со стороннего ресурса.
Изменения языка программ
Сторонние программы работают на том языке, который вы выбрали при установке, но встроенные в Windows приложения и утилиты, загруженные из официального магазина Microsoft, при определении языка интерфейса опираются на настройки системы. Используемый в них язык выбирается на основе данных о местоположении.
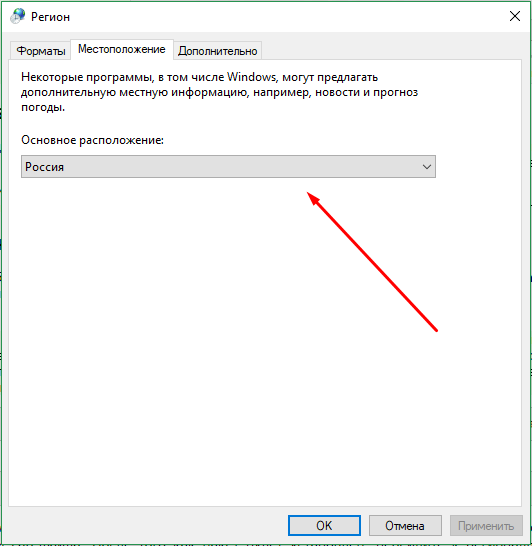
- Чтобы сменить язык во всех стандартных программах Windows, снова откройте окно «Региональные стандарты» в панели управления и перейдите к вкладке «Местоположение». Укажите страну, язык которой вам нужен, и сохраните изменения. Большинство приложений после этого изменят свой язык.

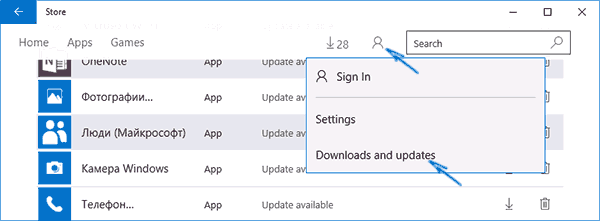
В строке «Основное расположение» выберите из списка нужную страну и нажмите кнопку OK - Если вы заметили, что какие-то программы остались на прежнем языке, то откройте приложение Windows Store и запустите принудительное обновление. Дополнив свою базу данных нужным ЯП, приложения перейдут на выбранный ранее язык.

В Windows Store запустите принудительное обновление приложений
В более ранних версиях Windows 10 языковые пакеты устанавливаются через панель управления, а в последних — через параметры системы. Универсальный способ — установить ЯП при помощи cab-файла. После того как пакет будет установлен, перейдите в настройки региональных стандартов и измените язык интерфейса, приветствия и стандартных программ.
- Распечатать
Оцените статью:
- 5
- 4
- 3
- 2
- 1
(14 голосов, среднее: 4.6 из 5)
Поделитесь с друзьями!
Before getting to use a computer with Windows 10 operating system installed, you are required to select the default language for your PC. But if you prefer to use a different language, you can change it any time you want. This is particularly helpful if you are sharing your PC with other users who prefer different languages. To change the system language, you can follow the steps below to get it done fast and easily!
Note: You are required to signed into Windows 10 and use an administrative account to proceed.
1: Install a language
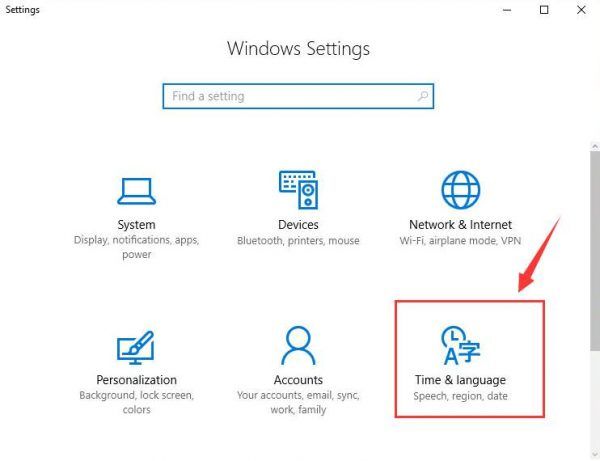
1) Hit Windows key, then choose Settings from the Start panel. In the Settings window, choose Time & language option.
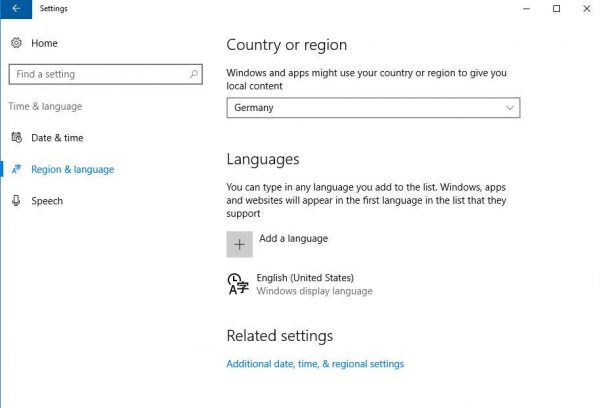
2) On the left side of the pane, choose Region & language. Then on the right side of the pane, choose Add a language option under Languages category.
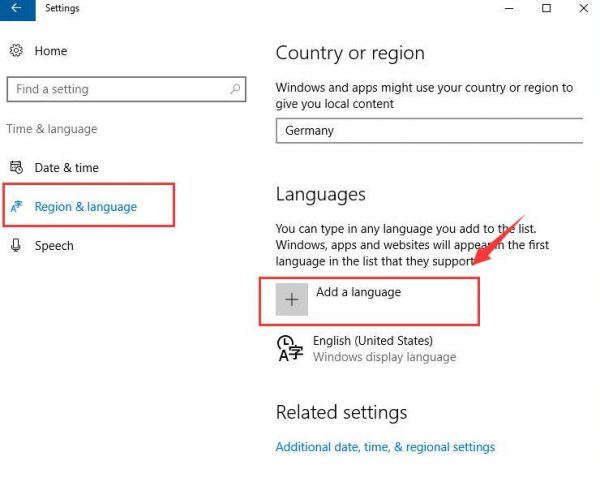
3) Then choose the language that you want to add to your system from the choices. We choose Deutsch (German) as an example.
4) Then single click the language that you want to setup and choose Options button under it.
5) Press the Download button under the options that you want to add to your system, such as the Speech, Keyboard etc.
2: Change the display language
Once you have downloaded the language that you prefer, you can change the language now.
1) Repeat step 1) to step 3) above. Then choose the language, and select Set as default option.
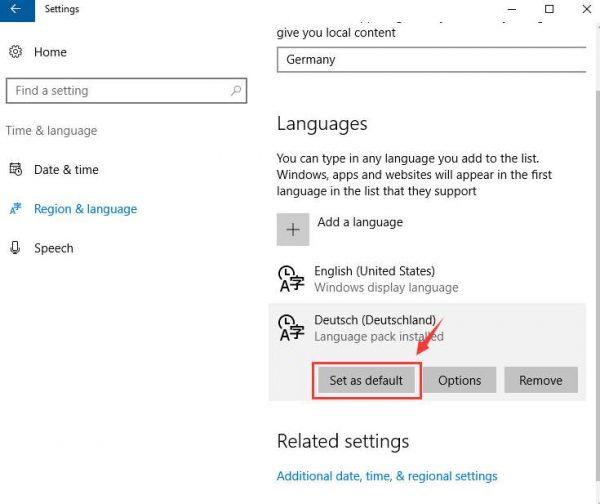
You will see Will be display language after next sign-in notification under the language that you just chose to be your new system language.
13
13 people found this helpful