To manage all aspects of the input and display language settings on your Windows 11 PC, use the following methods.
To switch the keyboard layout you’re using, press and hold the Windows key and then repeatedly press the Spacebar to cycle through all your installed keyboards. (If this doesn’t do anything, it means you have only one installed.)
You can also select the language abbreviation in your taskbar then choose the language or input method you want to use.
Note: In the input field, press the Windows logo key + period (.) to access the Emoji & more keyboard, if your language supports it.
If you can’t find the keyboard layout you want, you may have to add a new keyboard.
Adding an input language lets you set a language-preference order for websites and apps, as well as change your keyboard language.
-
Select the Start > Settings > Time & language > Language & region.
-
Select the language that has the keyboard you want, then select Options.
-
Select Add a keyboard and choose the keyboard you want to add. If you don’t see the keyboard you want, you may have to add a new language to get additional options. If this is the case, go on to step 4.
-
Return to the Language settings page, go to Preferred languages, then select Add a language.
-
Choose the language you want to use from the list, then select Next.
-
Review any language features you want to set up or install, and select Install.
«Add a keyboard» shortcut
The display language you select changes the default language used by Windows features like Settings and File Explorer.
-
Select Start > Settings > Time & language > Language & region.
-
Choose a language from the Windows display language menu.
«Change your display language» shortcut
If a language is listed under Preferred languages but doesn’t appear on the Windows display language list, you’ll first need to install its language pack (if it’s available).
-
Select Start > Settings > Time & language > Language & region.
-
In Preferred languages, select Add a language, enter the language you want, then select Next.
-
Select Download from the Download language pack option.
-
After the language pack is installed, select Back.
-
Choose a language from the Windows display language menu.
«Install a language pack» shortcut
If you receive an «Only one language pack allowed» or «Your Windows license supports only one display language» message, you have a single language edition of Windows 10. Here’s how to check your Windows 10 language edition:
-
Select Start > Settings > About, and then go to the Windows specification section.
-
If you see Windows 11 Home Single Language next to Edition, you have a single language edition of Window 11, and you can’t add a new language unless you purchase an upgrade to either Windows 11 Home or Windows 11 Pro.
Upgrade to Windows 11 Home or Windows 11 Pro
-
Select Start > Settings > Time & language > Language & region.
-
Under Preferred languages, select the language you want to remove, and then select Remove.
-
To remove an individual keyboard, select the language (see step 2), select Options, scroll down to the Keyboards section, select the keyboard you want to remove, and select Remove.
To manage all aspects of the input and display language settings on your Windows 10 device, use the following methods.
To switch the keyboard layout you’re using in Windows 10, press and hold the Windows key and then repeatedly press the Spacebar to cycle through all your installed keyboards. (If this doesn’t do anything, it means you have only one installed.)
You can also select the language abbreviation on the far right of the taskbar and then choose the language or input method you want to use.
Note: In the input field, press Windows +period (.) to access the emoji keyboard, if your language supports this.
If you can’t find the keyboard layout you want, you may have to add a new keyboard.
Adding an input language lets you set a language-preference order for websites and apps, as well as change your keyboard language.
-
Select the Start button, then select Settings > Time & Language > Language.
-
Under Preferred languages, select the language that contains the keyboard you want, and then select Options.
-
Select Add a keyboard and choose the keyboard you want to add. If you don’t see the keyboard you want, you may have to add a new language to get additional options. If this is the case, go on to step 4.
-
Return to the Language settings page, and select Add a language.
-
Choose the language you want to use from the list, and then select Next.
-
Review any language features you want to set up or install, and select Install.
«Add a keyboard» shortcut
Some languages require additional language features
For some languages to work properly, you need an admin on your PC to install the language features. Here’s a list of the languages that are affected:
-
Microsoft IME – Primary keyboard of Japanese
-
Microsoft Pinyin – Primary keyboard of Chinese (Simplified, China), Primary keyboard of Chinese (Simplified, Singapore)
-
Microsoft Wubi – Secondary keyboard of Chinese (Simplified, China), Secondary keyboard of Chinese (Simplified, Singapore)
-
Microsoft Bopomofo – Primary keyboard of Chinese (Traditional, Taiwan), Secondary keyboard of Chinese (Traditional, Hong Kong SAR), Secondary keyboard of Chinese (Traditional, Macao SAR)
-
Microsoft ChangJie – Secondary keyboard of Chinese (Traditional, Taiwan), Secondary keyboard of Chinese (Traditional, Hong Kong SAR), Secondary keyboard of Chinese (Traditional, Macao SAR)
-
Microsoft Quick – Secondary keyboard of Chinese (Traditional, Taiwan), Primary keyboard of Chinese (Traditional, Hong Kong SAR), Primary keyboard of Chinese (Traditional, Macao SAR)
-
Bangla Phonetic – Secondary keyboard of Bengali (India)
-
Gujarati Phonetic – Secondary keyboard of Gujarati
-
Hindi Phonetic – Secondary keyboard of Hindi
-
Kannada Phonetic – Secondary keyboard of Kannada
-
Malayalam Phonetic – Secondary keyboard of Malayalam
-
Marathi Phonetic – Secondary keyboard of Marathi
-
Odia Phonetic – Secondary keyboard of Odia
-
Punjabi Phonetic – Secondary keyboard of Punjabi (Gurmukhi)
-
Tamil Phonetic – Secondary keyboard of Tamil (India)
-
Telugu Phonetic – Secondary keyboard of Telugu
The display language you select changes the default language used by Windows features like Settings and File Explorer.
-
Select the Start button, then select Settings > Time & Language > Language.
-
Choose a language from the Windows display language menu.
«Change your display language» shortcut
If a language is listed under Preferred languages but doesn’t appear on the Windows display language list, you’ll first need to install its language pack (if it’s available).
-
Select the Start button, then select Settings > Time & Language > Language.
-
Choose a language from the Add a language list under Preferred languages, and then select Options.
-
Select Download from the Download language pack option.
-
After the language pack is installed, select Back .
-
Choose a language from the Windows display language menu.
«Install a language pack» shortcut
If you receive an «Only one language pack allowed» or «Your Windows license supports only one display language» message, you have a single language edition of Windows 10. Here’s how to check your Windows 10 language edition:
-
Select the Start button, select Settings > About, and then scroll down to the Windows specification section.
-
If you see Windows 10 Home Single Language next to Edition, you have a single language edition of Window 10, and you can’t add a new language unless you purchase an upgrade to either Windows 10 Home or Windows 10 Pro.
Upgrade to Windows 10 Home or Windows 10 Pro
-
Select the Start button, then select Settings > Time & Language > Language.
-
Under Preferred languages, select the language you want to remove, and then click Remove.
-
To remove an individual keyboard, select the language in question (see step 2), select Options, scroll down to the Keyboards section, select the keyboard you want to remove, and click Remove.
Need more help?
(Image credit: Windows Central)
Although Windows 10 will help you configure the default language during the initial setup, if you didn’t select the correct option or use a computer already configured with a different language, you don’t have to struggle when your requirements are different.
If you have to change the device’s default language settings, you can complete this task using the Settings app without reinstalling Windows 10.
In this Windows 10 guide, we will walk you through the steps to change the system default language on your computer.
How to change default system language on Windows 10
If you happen to be using the incorrect language on Windows 10, you can adjust the system settings to configure the correct language without reinstallation.
Disable language sync
On Windows 10, when using a Microsoft account, some of your preferences (including language) will sync across the device. If you only plan to change the settings on the computer, you should disable the option to sync your language settings to prevent changing the same settings on other devices.
To disable language preference sync on Windows 10, use these steps:
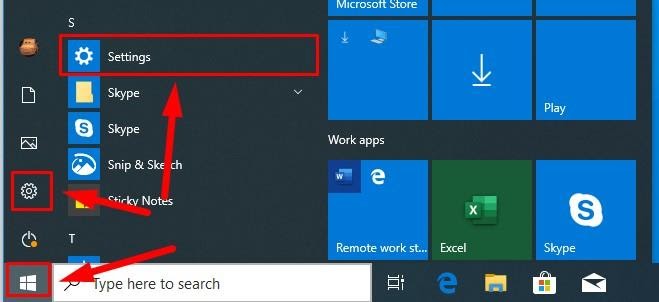
- Open Settings.
- Click on Accounts.
- Click on Sync your settings.
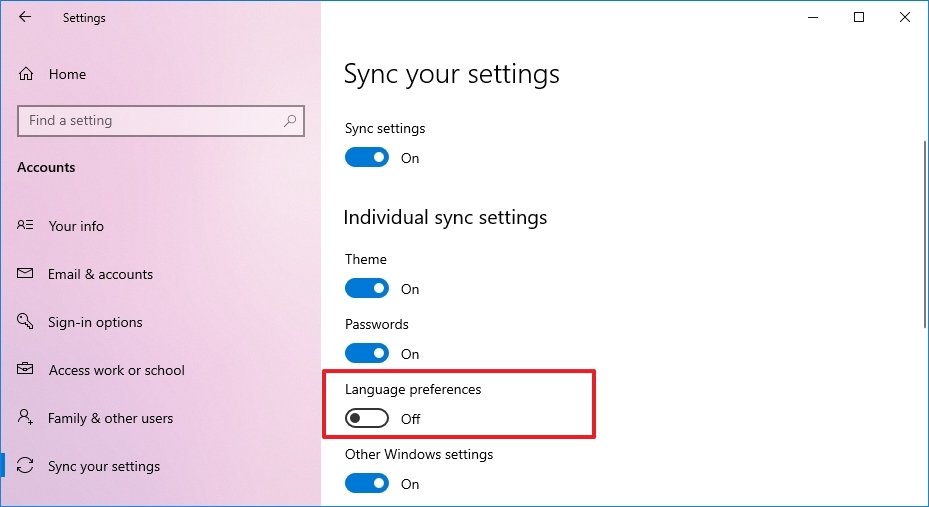
- Under the «Individual sync settings» section, turn off the Language preferences toggle switch.
Once you complete the steps, you can change the language settings without affecting the other devices connected with the same Microsoft account.
Change system language settings
To change the system default language, close your apps, and use these steps:
- Open Settings.
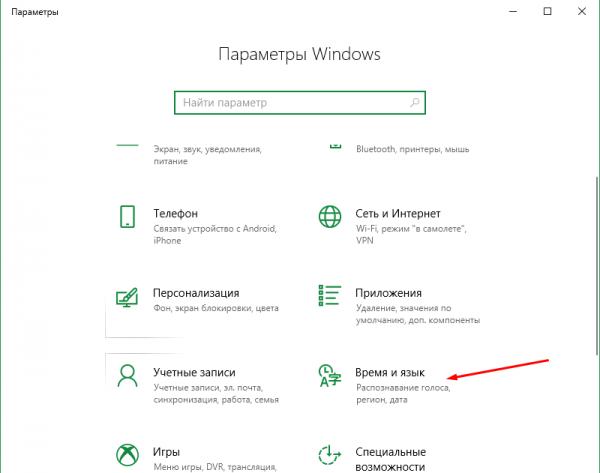
- Click on Time & Language.
- Click on Language.
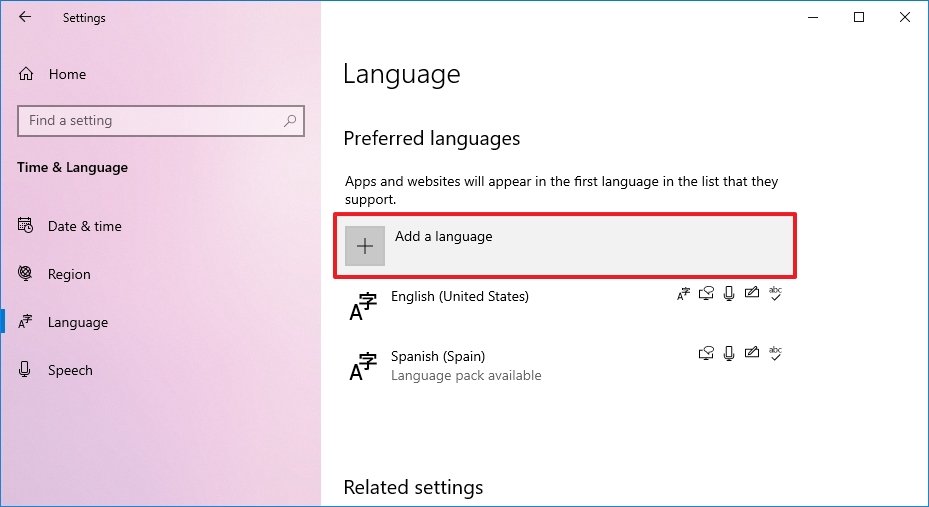
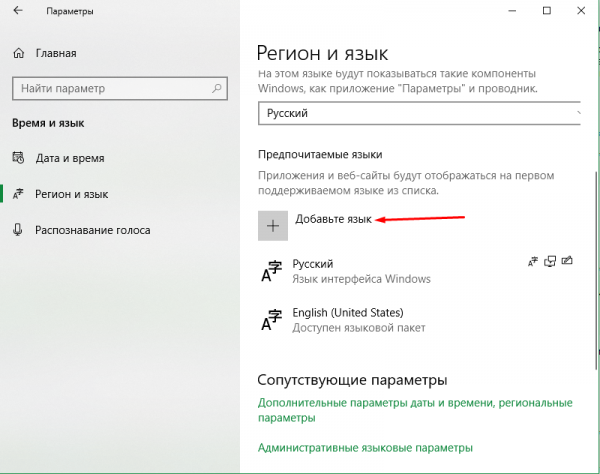
- Under the «Preferred languages» section, click the Add a language button.
- Search for the new language using the language or country name.
- Select the package from the result.
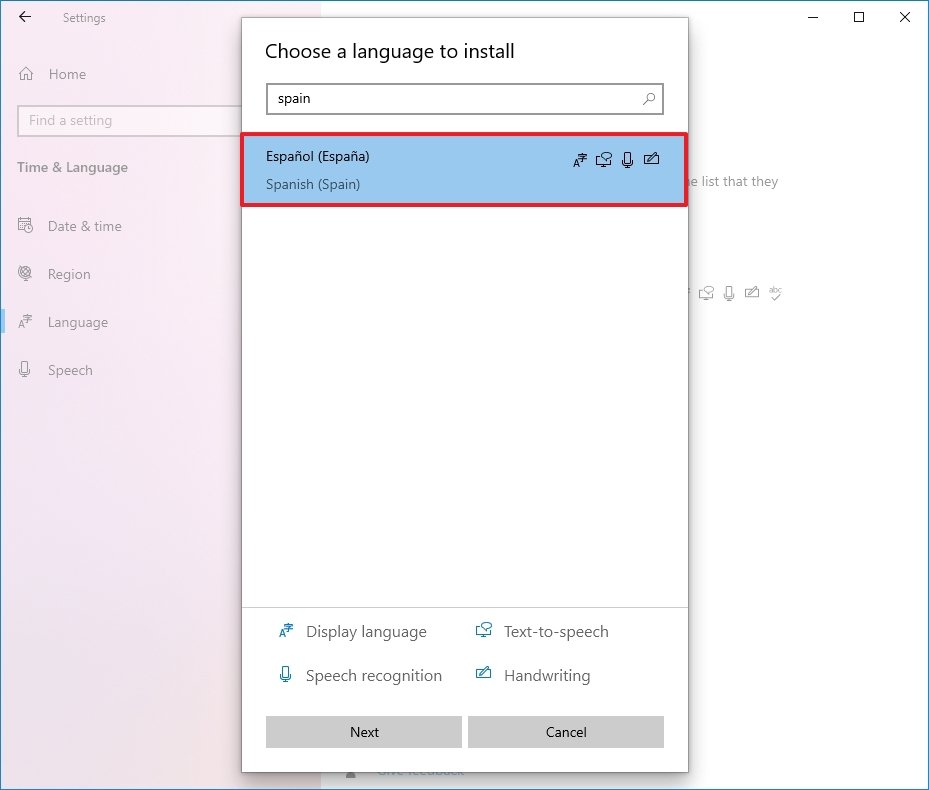
- Click the Next button.
- Check the Install language pack option.
- Check the Set as my Windows display language option.
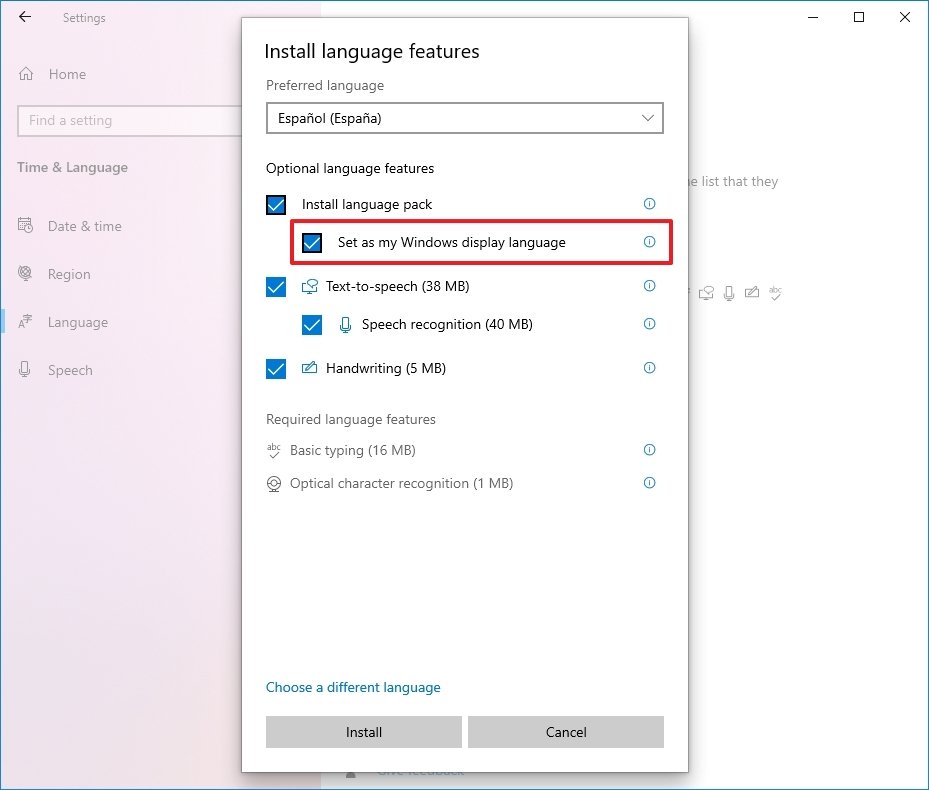
- Check the additional features as needed — for example, «Text-to-speech» and «Handwriting.»
- Click the Install button.
- Click the Yes, sign out now button.
- Sign back into the account.
After you complete the steps, the Windows 10 language will change across the experience, including the Sign-in screen, Settings app, File Explorer, Desktop, apps, browser, and websites you visit.
Change system region settings
You will also have to change the region settings if you need to adjust the language settings because you are in a different region.
To change the local region settings on Windows 10, use these steps:
- Open Settings.
- Click on Time & Language.
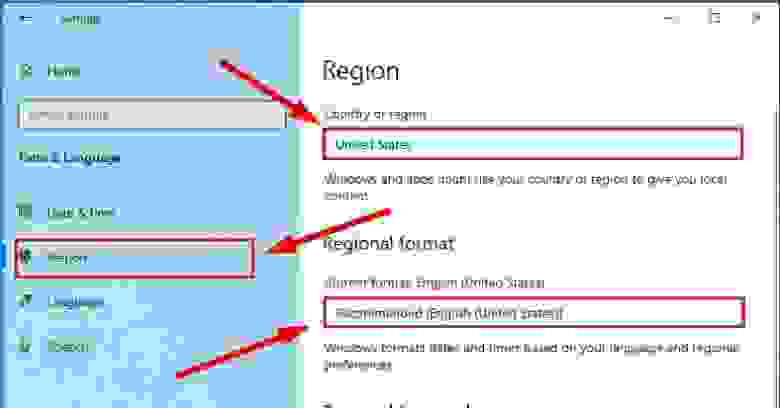
- Click on Region.
- Under the «Region» section, select the current location with the «Country or region» drop-down menu (if applicable).
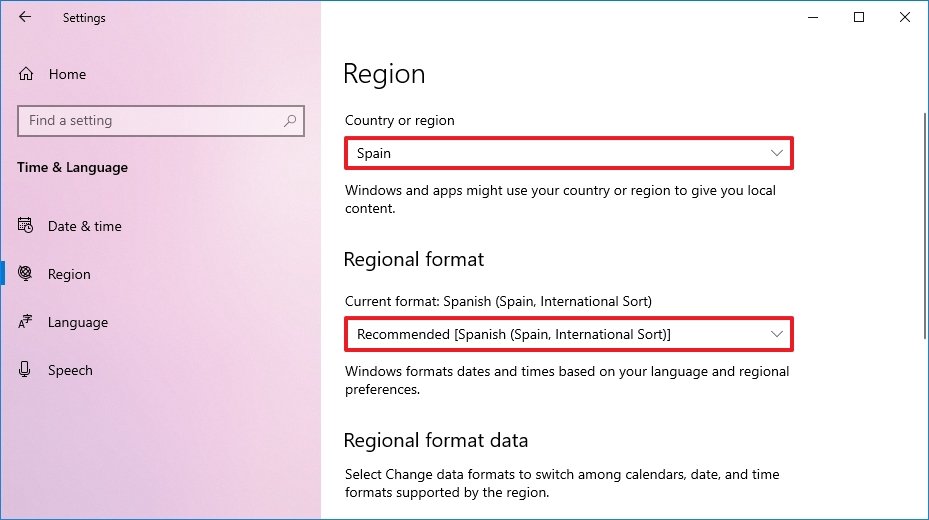
- Under the «Regional format» section, select the formats for the region’s date and time with the «Current format» drop-down menu (if applicable).
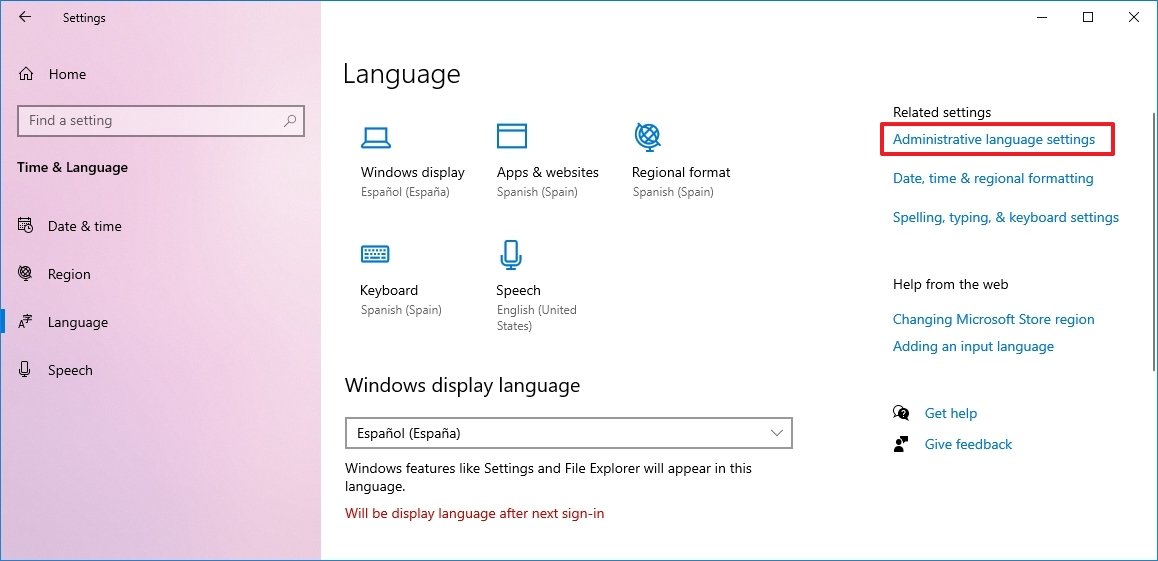
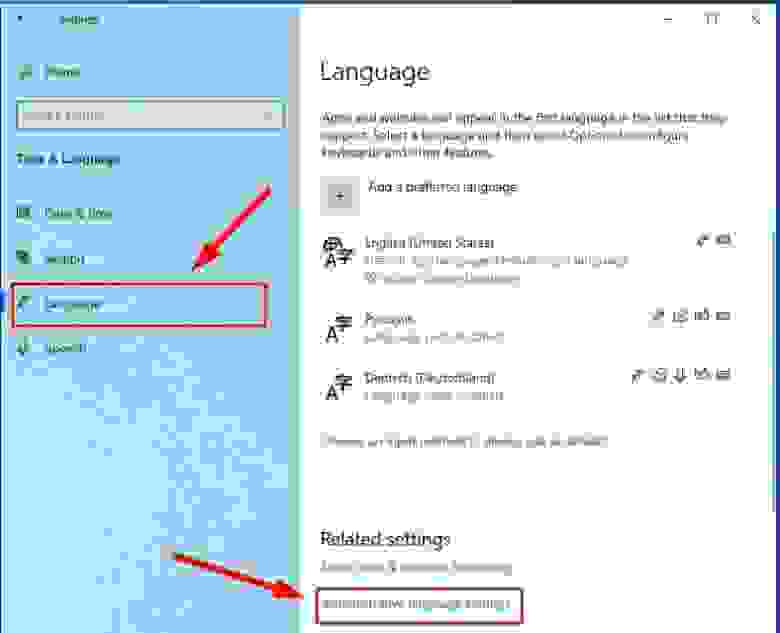
- Click on Language.
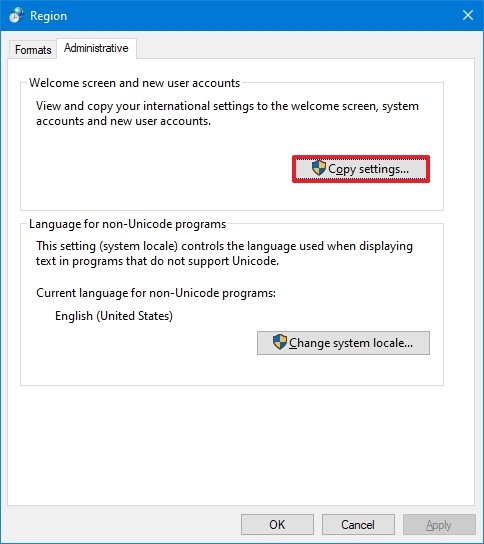
- Under the «Related settings» section, click the Administrative language settings option.
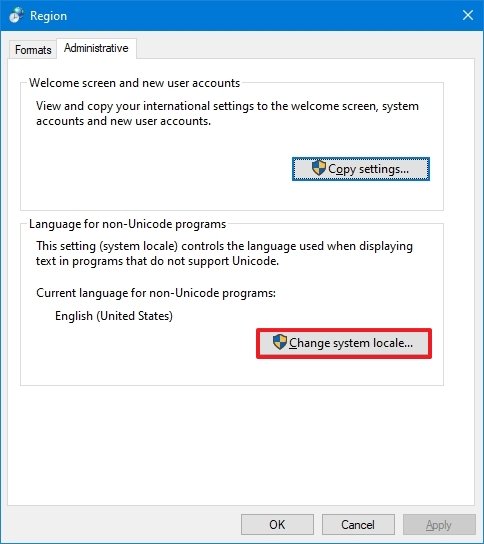
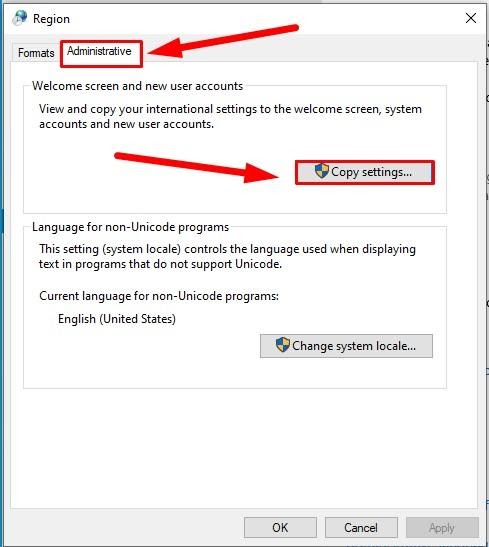
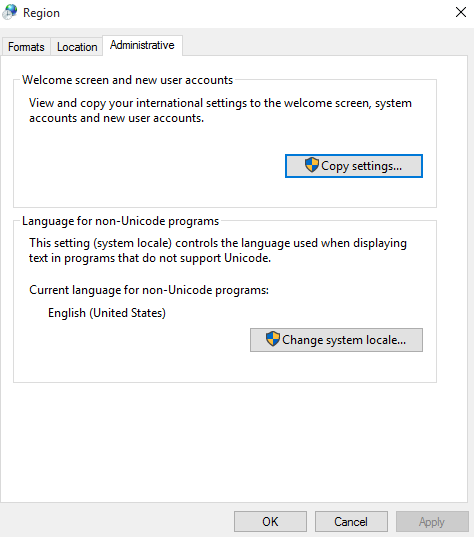
- Click the Administrative tab.
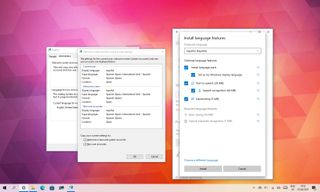
- Under the «Language for non-Unicode programs» section, click the Change system locale button.
- Select the new system locale language with the «Current system locale» drop-down menu.

- Click the OK button.
- Click the Copy settings button in the «Administrative» tab.
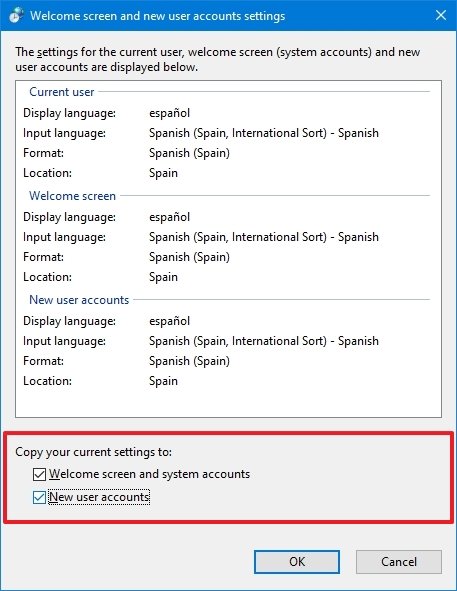
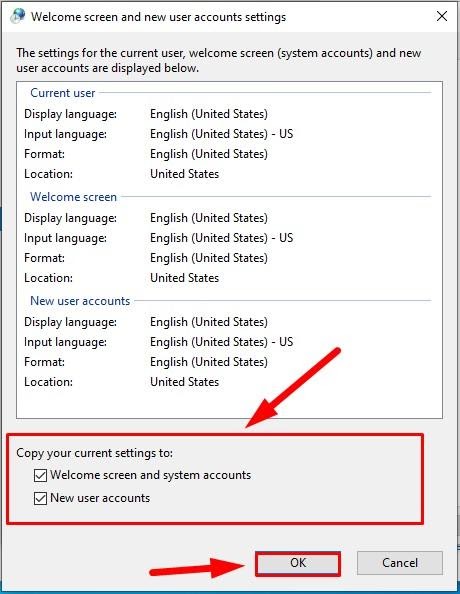
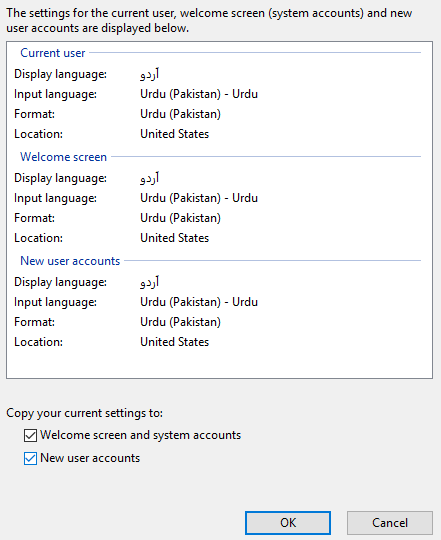
- Under the «Copy your current settings to» section, check the Welcome screen and system accounts and New user accounts options.
- Click the OK button.
- Click the OK button again.
- Click the Restart now button.
Once you complete the steps, the settings will apply, and the computer will now use the correct region settings.
Usually, you rarely have to change or install additional languages on Windows 10. However, changing these settings may come in handy in organizations working with people who need to use different preferences. It’s also a helpful feature to match the locale settings if you relocate to another region or when buying a new device that ships from a different country.
The only caveat with changing the region settings is that it will also change the settings for the Microsoft Store, which may block access to certain apps and services, depending on the location. In the same way, you can change the region settings to access an application from the Microsoft Store that is only available in a specific region. If you happen to be one of the remaining users using Cortana, consider changing the region settings that may prevent you from accessing the digital assistant.
More Windows resources
For more helpful articles, coverage, and answers to common questions about Windows 10 and Windows 11, visit the following resources:
- Windows 11 on Windows Central — All you need to know
- Windows 11 help, tips, and tricks
- Windows 10 on Windows Central — All you need to know
Get the best of Windows Central in in your inbox, every day!
Mauro Huculak is technical writer for WindowsCentral.com. His primary focus is to write comprehensive how-tos to help users get the most out of Windows 10 and its many related technologies. He has an IT background with professional certifications from Microsoft, Cisco, and CompTIA, and he’s a recognized member of the Microsoft MVP community.
Read this article to find out how to change the language of Windows 10 interface without having to reinstall it, what system languages can be installed and what settings should be modified for that purpose.
Introduction
In Windows 10, people usually choose the preferred language for the entire operating system when they install it. However, if the language settings were wrong, or people have to use computing devices with certain language preferences, there are some settings to be modified in order to bring them in line with your personal likings.
So if you ever need to change language preferences in Windows 10, this can be done in a quick and easy way with the help of the Settings app and without having to reinstall the operating system.
In today’s article, we will show you how to change the default display language into any other, including doing it for new and existing user accounts.
How to change the default display language in Windows 10?
If you have to move to a different region or you need to use a display language different from the default choice, or the initial language settings for the computing device have been wrong, there is absolutely no point in reinstalling Windows 10. All you need is to modify a couple of system settings to enjoy the experience of using your operating system in the right language.
Disable language synchronization
If you are using a Microsoft account, the language settings will apply to all devices linked to such account. If you plan to change regional and language settings for one computer only, you need to disable synchronization of such settings before you proceed.
This is how you disable language sync in Windows 10.
Open the main system application, Settings. You can do it in any way you prefer. For example, click on the Start button in the lower left corner of your desktop, on the Taskbar, and open the main Windows menu. Use the scroll bar or the mouse wheel to search the list of all programs and applications installed on this computer and find the line Settings, or click on the Settings button in the left side of the user menu, and the application will open.
In the main Settings window, scroll down if necessary and choose the tab Accounts.

In the left panel, go to Sync your settings.
In the right panel, find the section Individual sync settings and the line Language preferences, then set the slider to the Off position (disabled).

When these steps are taken, you can start changing language settings for the copy of Windows 10 installed on this computer, without worrying that this can affect similar settings in other linked devices.
The steps to take if you want to change the display language
To change the display language of your Windows 10, you should close all running applications and do what is described below.
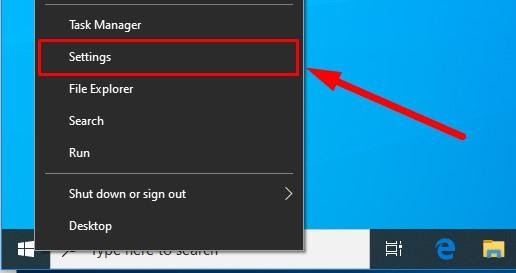
Use any method you prefer to open the Settings application. For example, right-click on the Start button that you can find on the Taskbar, in the left lower corner of the desktop, or press the key sequence Windows + X instead to open the context menu, and select the line Settings. The application will start immediately.
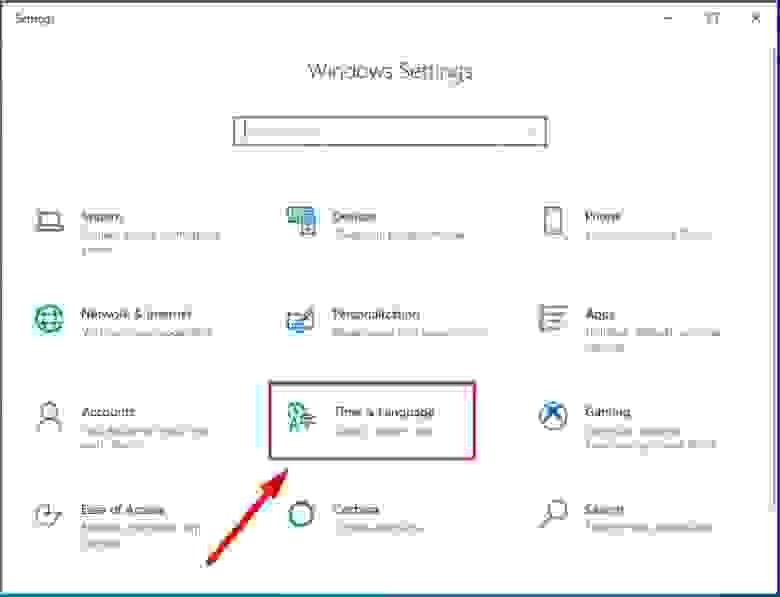
Use the scroll bar or the mouse wheel to navigate the Settings window, and find the tab Time and language.
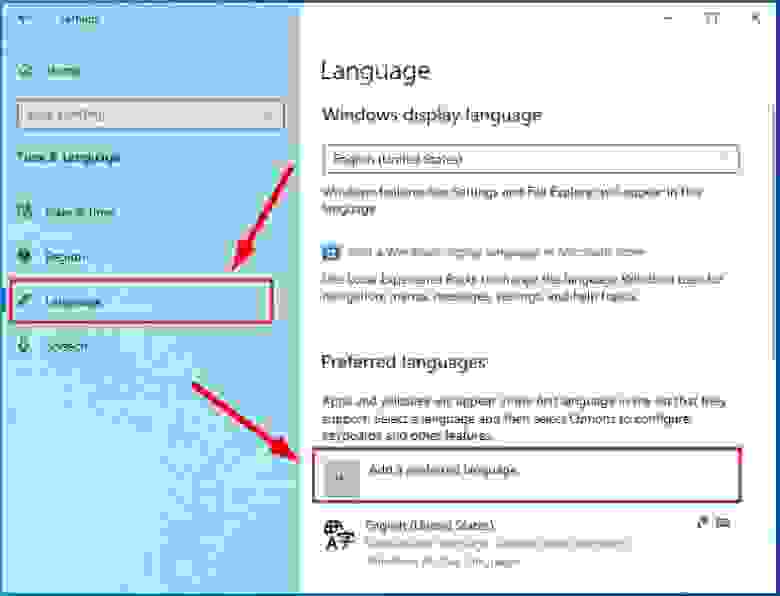
In the left panel, go to Language.
Now look to the right and find the section Preferred languages, where you can prioritize language settings, and click on the button Add a preferred language, with a + (plus) symbol on it.
In the new window Choose a language to install use the scroll bar or the mouse wheel to find the language you need, or start typing its name in the search field above.
Choose the language pack you are planning to use in Windows 10 from the list.

When the language is chosen, hit Next.
In the next page Install language features check the box for Install language pack to confirm your choice (the box with the tick will become blue, i.e. active).
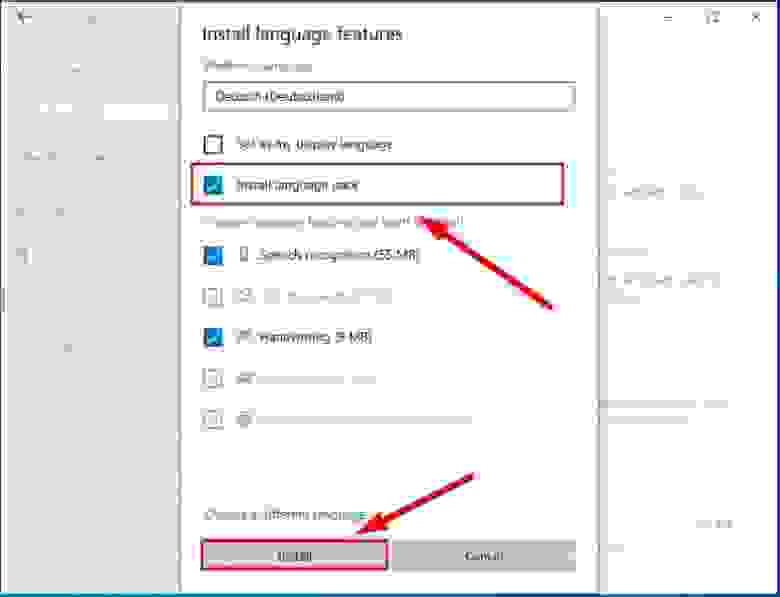
Click Install below.
Changes will take effect after the language package is installed, which usually takes several minutes only. In some cases, restarting your Windows 10 may be required, and then the corresponding language settings will apply to all system elements. The changes will affect the sign-in screen, the Settings app, Windows Explorer, desktop, all applications, preferred browsers and websites you visit. From now on, they will use the new language by default. Besides, Windows 10 may suggest reviewing your current privacy settings.
Changing region settings
If you change the display language for Windows 10 because you move to a different region, then regional settings should be modified too.
Changing them in Windows 10 is easy enough: just follow the steps below.
Open the main system application, Settings, using any way you prefer. For example, press the keyboard shortcut Windows + I to access the app directly.
In the main window of the Settings app, find and select the tab Time and language.
In the left panel, select Region.
In the right panel, find the section Region and use the nested menu Country or region to specify your new location if it differs from the current settings.
In the section Regional format use another nested menu to select proper formats to display date and time in Windows, if these differ for your time and region.
Now look at the left panel and jump to the tab Language again.
Use the scroll bar or the mouse wheel to find the section Related settings and click on the link Administrative language settings.
In the new pop-up Region window, jump to the tab Administrative and in the section Welcome screen and new user accounts hit the button Copy settings.
The new window will show you corresponding screen and account settings. In the section Copy your current settings to check the boxes for each option: Welcome screen and system accounts and New user accounts.
Click ОК.
Click ОК one more time, and then restart the computer.
After all these steps, your computer will display proper regional settings specified according to your physical location.
Most of the time, people don’t change or install additional languages regularly for their personal needs. This opportunity to change language packs quickly is more often required in small or large companies that need to deal with customers having various language preferences.
Besides, this option would be useful for people who have to move to a different region and would like their regional settings to comply. Another scenario is buying a computer from another country when the required configuration is not available locally.
Also, you should remember that modifying language settings may disable some functions like Cortana because this service is not supported in certain regions.
Conclusion
Preferred display language is one of the easily customizable things in the operating system. If you ever need to change the language settings, use one of the methods described here to replace the language pack currently used by Windows 10 without having to reinstall it.
See the full article with all additional video tutorials. If you still have any questions, please ask in a comments. Also visit our Youtube channel, there are over 400 video tutorials.
Change the system language on Windows will be able to users with any level of technical knowledge. To do this, visit the control panel and go to the desired section. In Windows 7 and Windows 10, the interface language switches in different ways. Therefore, we compiled two separate instructions. Following the recommendations will help to achieve the desired result. Moreover, the language of the system can be anything — the main thing is to be able to return everything back if something goes wrong.
Setting the interface language in Windows 7
To change the language in Windows 7, follow the instructions:
- Open the control panel and go to the menu «Language and regional standards»;
- Go to the tab «Languages and keyboards»;
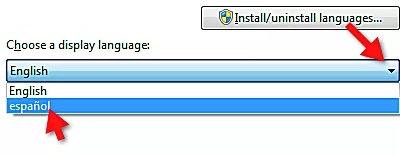
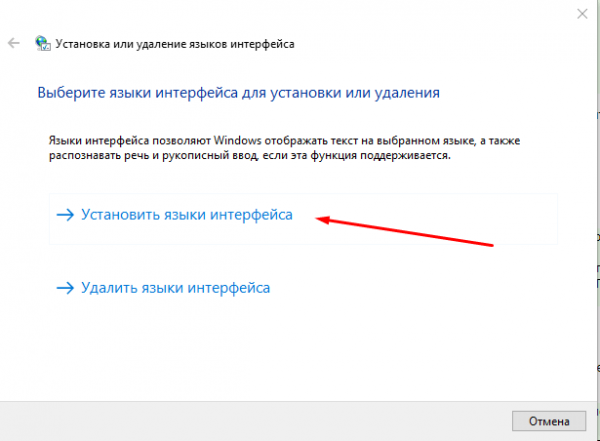
- In the «Interface Language» menu, click the «Install or Uninstall Language» button;
- Click the «Install Interface Languages» button;
- Select the download of the desired language from the «Windows Update», click the link to install optional updates;
- After the update download is complete, select your Windows language.
After downloading the desired language, return to the tab «Languages and keyboards», select the desired language. Click Apply to apply the new settings.
Changing the language in Windows 7 may not work if you are using a pirated copy of the operating system. In this case, you need to download the language pack somewhere and install it manually through the «Install or Uninstall Language» button. You can also purchase the Windows 7 distribution in the desired language.
Installing a language on Windows 10
To change the language, follow the instructions:
- Open the «Windows Settings» menu;
- Go to the menu «Time and Language», open the tab «Language»;
- Select the desired language pack from the drop-down list;
- To apply the settings, Windows will prompt you to log out;
- Click “Yes, exit now” and wait for completion.
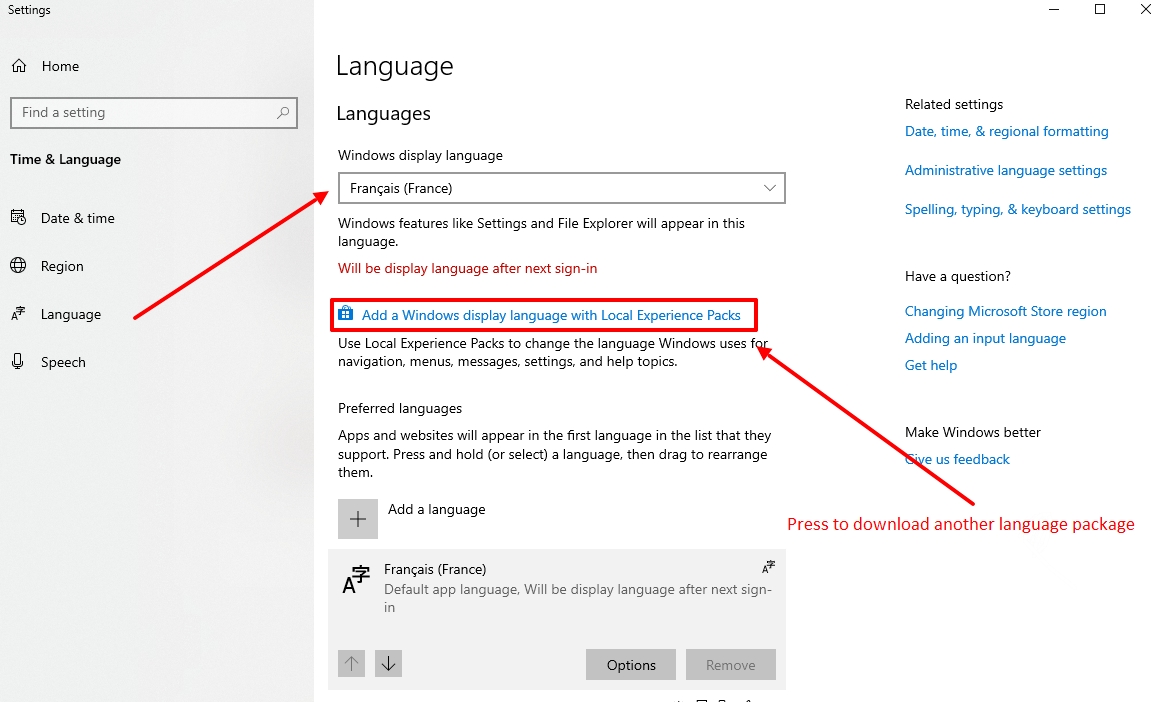
If the required language is not in the list, click the link “Add a Windows interface language to the Microsoft Store” and download the appropriate language pack. You can also do it without logging out. In this case, the changes will take effect after restarting the computer or manual exit.
Also, read the instructions on how to connect the proxy on the Windows 10.
Please note that in some versions of Windows 10, the language pack is selected in the menu «Language and Regional Standards». Go to this menu and select the desired package.
Learn more about how to clear cache and cookies in popular browsers.
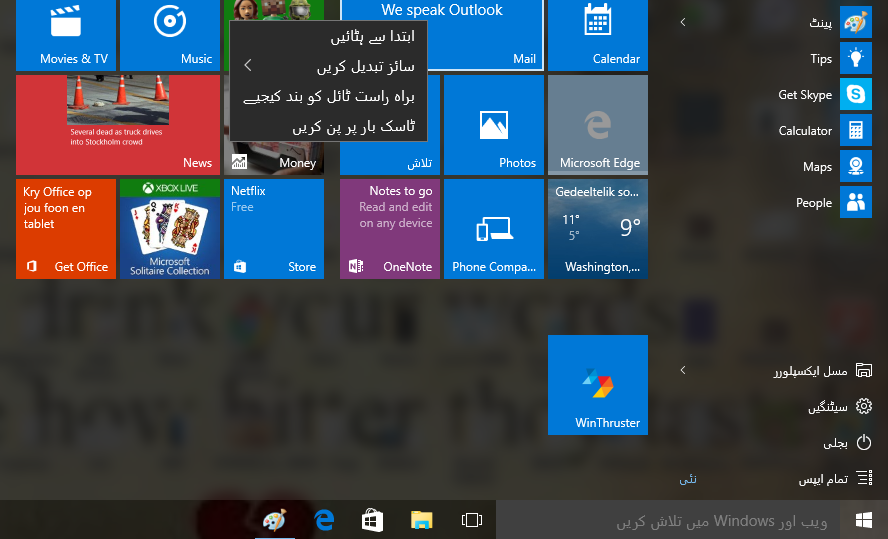
Go to Start Menu => Options => Time and Language. Select on the left side “Region and language” and in the right column click on “Add language”. A window will open with all known languages in alphabetical order, select the one you need and wait until it loads.
Changing the interface language
- Login to your account. …
- In Windows, search for and open Language Settings.
- In the Time & Language window, select your preferred language from the drop-down menu under Windows Display Language.
- Select Yes, sign out now and sign in when prompted by the system.
Manage interface language settings in Windows 10
- Select Start> Settings> Time & Language> Language.
- Select a language from the Windows interface language menu.
How do I change the system language on my computer?
To change the interface language, follow these steps:
- Click the Start button, and then type Change display language in the Start Search box.
- Select Change interface language.
- Select the language you want from the drop-down list and click OK.
How to change the interface language in Microsoft Office 2019?
Adding a language
- Open an Office app such as Word.
- Select File> Options> Language.
- In the Customize Office Language Settings dialog box, under Select Editing Languages, select the editing language you want to add from the Add additional editing languages list, and then click Add.
How do I change the language of Windows 11?
How to change the Windows 11 interface language
- Go to Settings> Time & Language> Language & Region.
- In the item «Windows interface language» select Russian or any other language that you need. …
- To set the interface language in Windows 11, click on «Add language».
How to change the interface language in Android?
How to change the language on an Android device
- On your Android device, open Settings.
- Click System Language and input Languages. If there is no «System» item, then in the «Personal data» section, select Language and input Languages.
- Click Add language and select the desired language.
- Drag it to the top of the list.
How to return the Russian language to Windows 10?
How to enable Russian interface language in Windows 10 applications
- Go to the control panel — «Language» and make sure that the Russian language is in the first place in the list. …
- In the control panel go to «Regional standards» and on the «Location» tab in the item «Primary location» select «Russia».
How to set Russian by default on Windows 10?
On the Keyboards and Languages tab of the Regional and Language Options dialog box, click Change keyboard. In the Default Input Language list box in the Languages and Test Input Services dialog box, select the language that you want to use as the default.
What does Windows 10 Home mean?
Windows 10 Home is the basic version for PC, laptop and tablet users.
How to change the language in Windows 10 for one language?
How to change the interface language in Windows 10 Single Language
- Download the Russian language pack. …
- Rename the package to “lp. …
- Press Win + X and select Command Prompt (Admin).
- Enter the command dism / Online / Add-Package / PackagePath: C: lplp. …
- Enter dism / Online / Get-Packages | findstr / c: «LanguagePack».
How to make Russian in Windows 7?
Change the Windows 7 language
- Click Start and enter Change display language in the search bar of the Start menu.
- Click Change display language.
- In the window that appears, select Russian from the drop-down list and click OK.
- Restart the computer.
How do I change the language using the keys?
To change the language using the keyboard, press the following buttons: press and hold the «Shift» key and press the «Alt» key and release both buttons, the result of changing the language can be seen on the screen at the very bottom on the right side.
How to change the interface language in Microsoft Office 2019 Mac?
To change the display language for Office for Mac, you must install a different primary language for your operating system.
- From the Apple menu, choose System Preferences> Language & Region
- In the Preferred languages list, set the desired language as the main one by dragging and dropping it to the top of the list of preferred languages.
How to translate a word into Russian?
№ 1.
- Open Word and go to the File menu.
- Go to the «Options» section.
- Select «Language» in the preferences window. …
- Select «Russian» («Russian») or any other that you want to use in the program as the interface language.
How to change the language in Word 2007 from English to Russian?
To do this, follow these steps:
- open any application of the Office suite, for example, Word;
- go to the menu «File» — «Options» — «Language»;
- in the new window, find the item «Language settings» and in it select the menu responsible for editing languages;
- in the list, click «Add additional. languages ”and select them.
Как изменить язык в Windows 10
Статья о том, как изменить язык интерфейса Windows 10 . А также, как добавить ещё один или несколько языков для выбора и изменения в любое время. Бывают случаи, когда может понадобиться изменение языка ОС. В большинстве случаев это необходимо, если была установлена ее английская версия. Еще это будет полезно если несколько людей пользуются компьютером, и им нужны разные языки. Есть возможность загрузить и установить другие языки Windows 10, для отображения меню, диалоговых окон и других элементов пользовательского интерфейса на удобном для вас языке.
Но если вдруг случилось что ваша операционная система вышла из строя, и вы хотите ее переустановить – не спешите. Лучше попытайтесь восстановить ее, так вы не потеряете свои данные хранящиеся на компьютере . Видео нашего канала в YouTube помогут вам в этом.
Установка языка в Windows 10
Сначала войдите в Windows 10 с помощью учетной записи администратора. Нажмите Windows + I , чтобы открыть окно «Settings (Параметры)» , а затем нажмите «Time & Language (Время и язык)» .
Выберите «Regional & language (Регион и язык)» слева, а затем нажмите «Additional date, time & regional settings (Дополнительные параметры даты и времени, региональные параметры)» справа.
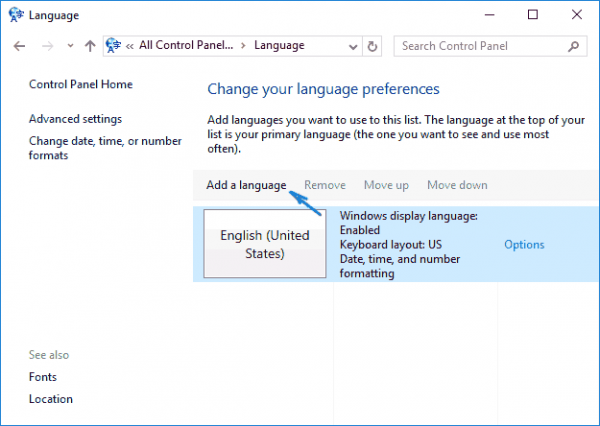
В окне «Clock, Language, and Region» нажмите «Add language» . Здесь языки перечислены в алфавитном. Выберите тот который хотите загрузить.
В открывшемся окне «Language» еще раз нажмите «Add a language» вы увидите уже установленные языки.
Откроется окно «Add language» со списком доступных языков в алфавитном порядке.
Выбираете тот который нужен, например, русский и нажимаете «Add» .
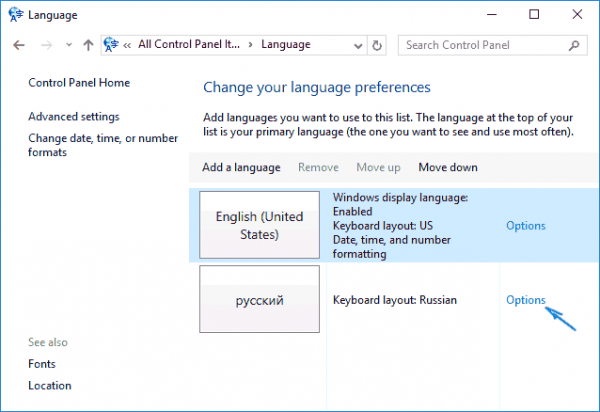
Далее нужно будет зайти в настройки языка, в окне «Language» и нажать «Options» .
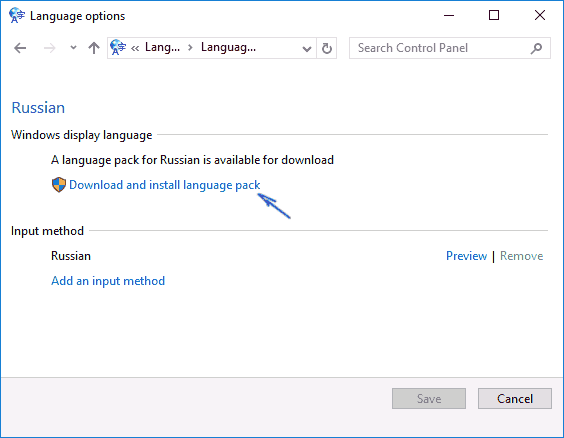
В следующем окне нужно загрузить язык «Download and install language pack» .
На экране «Region & language» отображены языки, установленные в системе. Выберите конкретный язык, и увидите три параметра внизу: «Set as default (Установить как значение по умолчанию)» , «Options (Параметры)» , «Remove (Удалить)» . Выберите «Set as default» , чтобы установить этот язык главным по умолчанию.
После вы увидите сообщение «Will be display language after next sign-in» (Этот язык интерфейса будет использоваться, когда вы в следующий раз войдете в систему).
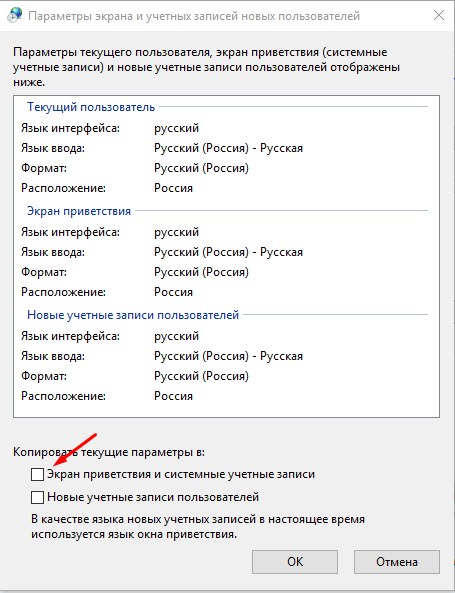
Еще что нужно будет сделать, это снова зайти в «Clock, Language, and Region» и там выбрать «Change location» в открывшемся окне «Administrative» / «Copy settings» , отметить «Welcome screen and system accounts» и «New user accounts» и нажать Ок.
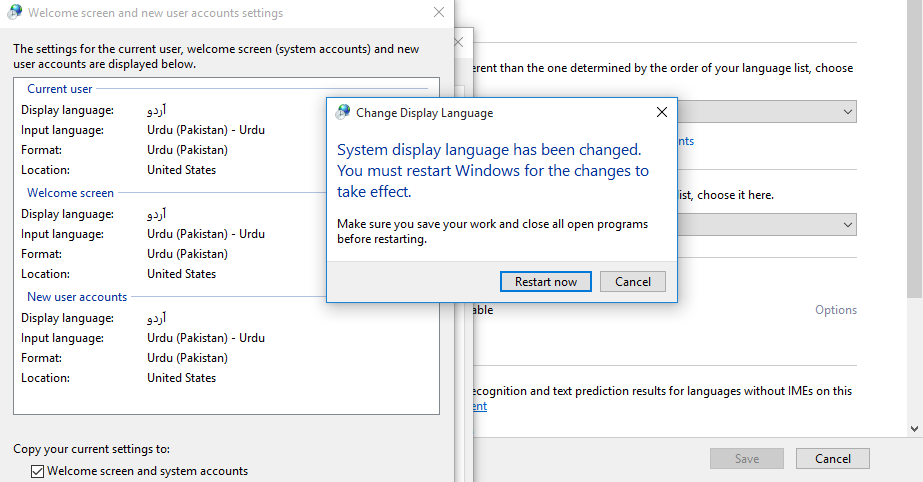
После чего система предложит вам перезагрузить компьютер. Нажимаете «Restart now» , и после перезагрузки интерфейс вашей ОС должен сменится на выбранный вами язык.
Добавление еще одного языка
Если вдруг понадобиться добавить еще один язык, нажмите Windows + I , чтобы открыть окно «Параметры» , а затем нажмите «Время и язык» .
Дальше «Регион и язык» / «Добавление языка»
Выбираете нужный язык, например Французский.
В дальнейшем его так же можно использовать как основной язык.
Если у вас возникают какие-либо проблемы при выполнении выше описанных действий или хотите поделиться некоторыми советами, пишите в комментариях.
Источник
How to Change System Language in Windows 10
You can change the default display language of your Windows 10 from English to any other language. This is useful in scenarios where multiple users are accessing the same system and they understand different languages.
In this guide, I will walk through to change the default English language to Urdu (you can change it to German etc. :))
Change System Language in Windows 10
Step 1. Press Windows key + I on the keyboard to open the settings window.
Step 2. Click Time and language.
Step 3. Click Region and Language.
Step 4. Click Add a language.

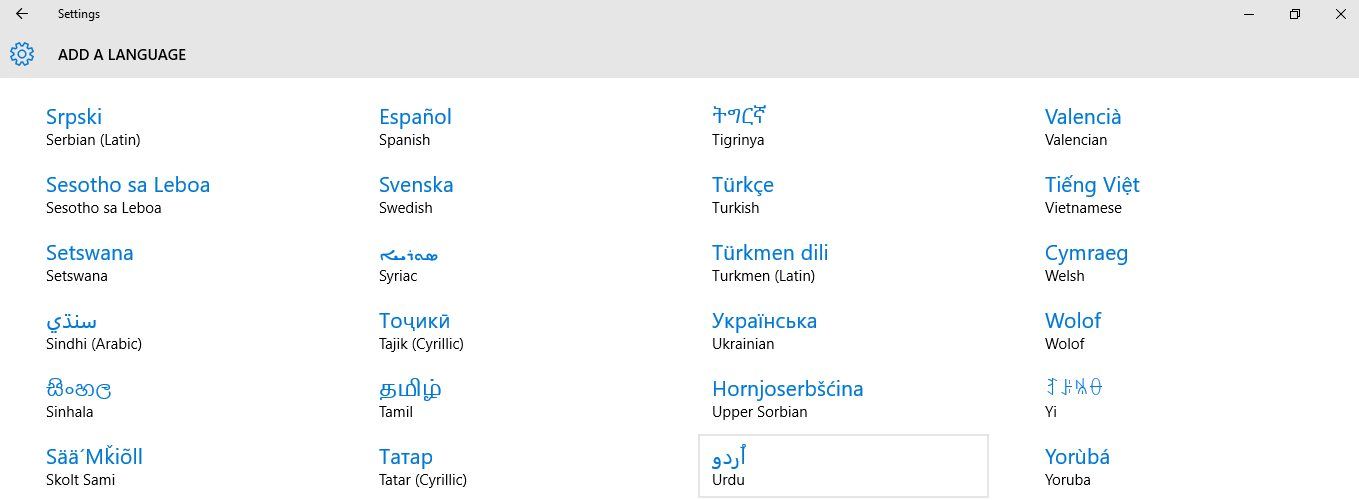
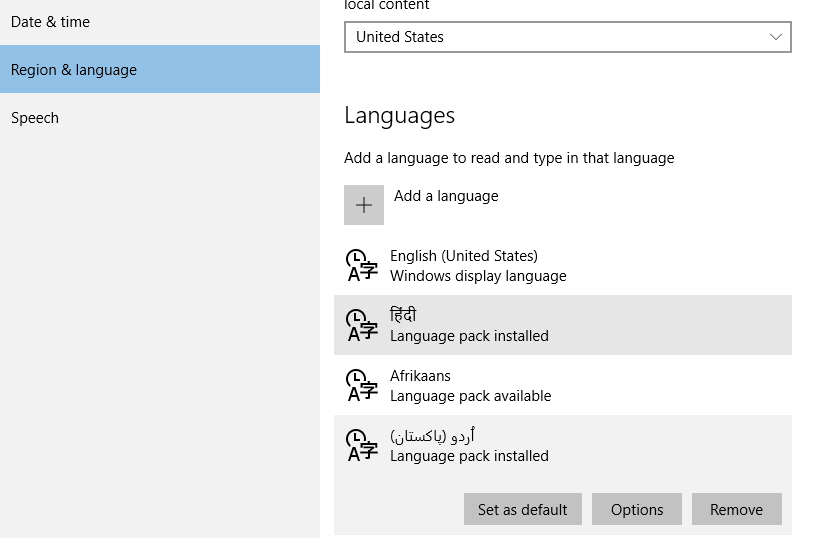
Step 5. Select your desired language and its variation (if applicable) by clicking on the language name.
Step 6. Select the new language and click Options.
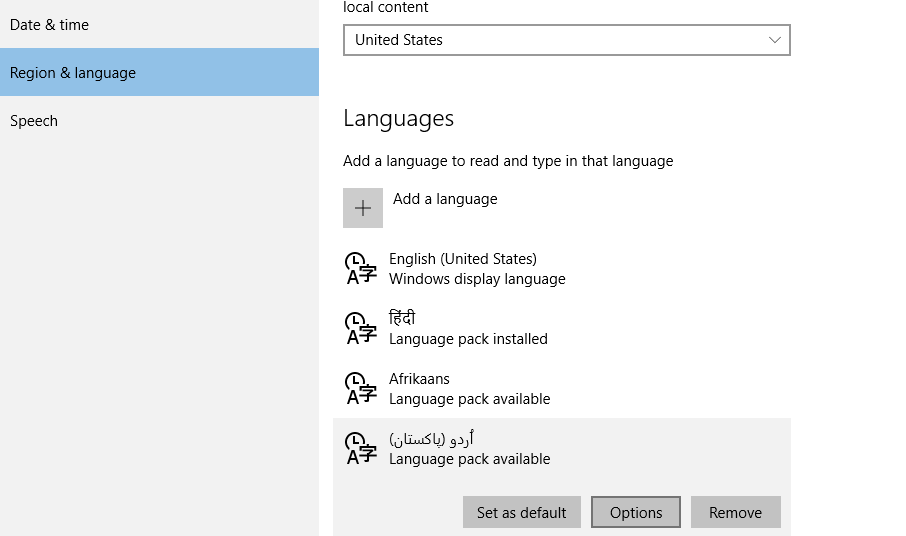
Step 7. Download the language pack.
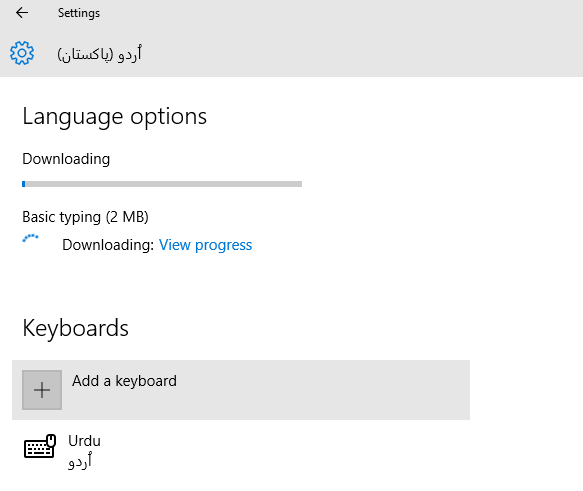
Step 8. Select the new language and click Set as default.
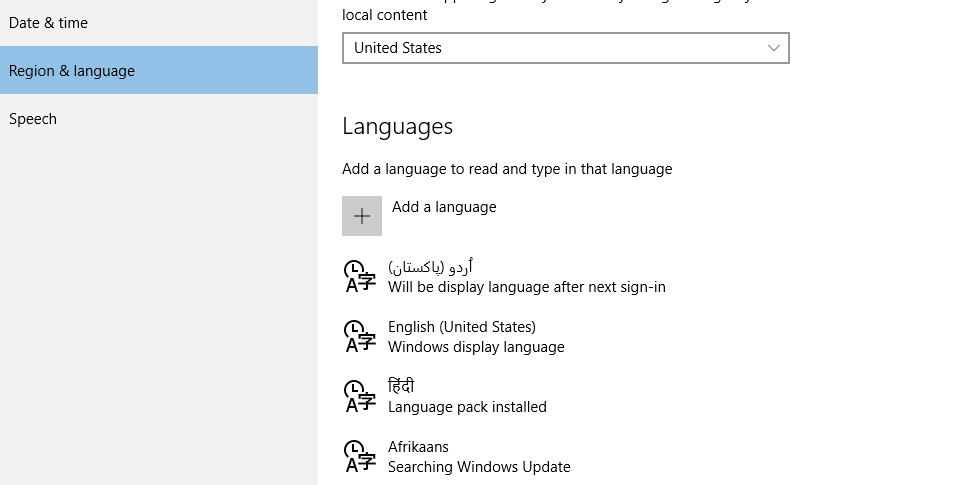
Step 9. Your new language will be displayed after next sign-in (See below screen shot).
Step 10. Press Windows key + X from keyboard, scroll the power menu and click Control Panel.
Step 11. Click Add a language.
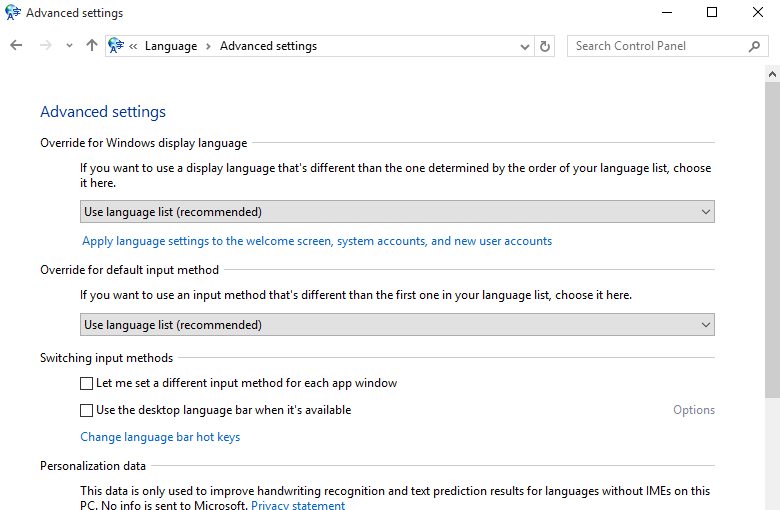
Step 12. Click Advanced settings in left pane.
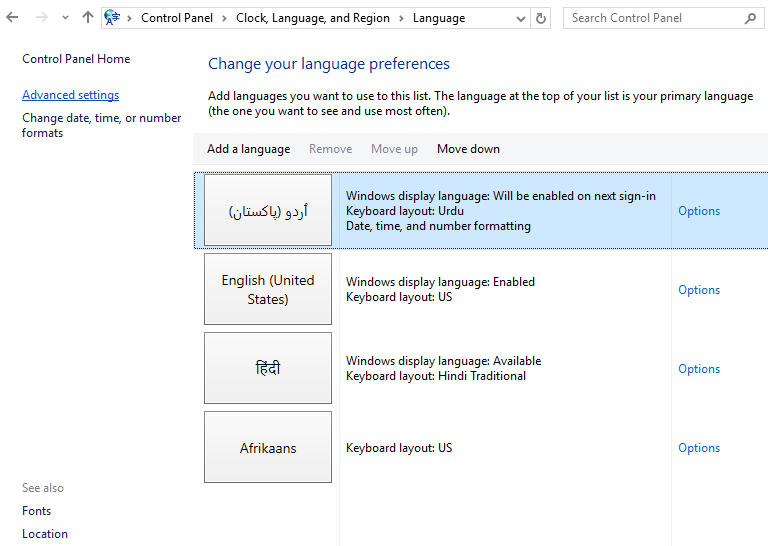
Step 13. Click «Apply language settings to the Welcome screen, system accounts, and new user accounts.».
Step 14. Open Administrative tab and click Copy settings.
Step 15. Check both «Welcome screen and system accounts» and «New user accounts» options. Click OK.
Step 16. Click Restart now and let your system reboot so changes may take effect.
When the system reboots successfully, everything will be displayed in the new language.
Karim Buzdar
About the Author: Karim Buzdar holds a degree in telecommunication engineering and holds several sysadmin certifications. As an IT engineer and technical author, he writes for various web sites. He blogs at LinuxWays.
One thought on “ How to Change System Language in Windows 10 ”
I’m haveing a problem with my brothers PC. I cant start it up because it’s on russian and it has some problem and refuses to boot up… Is there any whay to change language in bios maybe or before the system tries to boot up?
Источник
How to change system language on Windows 10
 Source: Windows Central
On Windows 10, the initial setup process offers you the option to set the default language. However, if you made a mistake or using a device already configured, you don’t have to struggle with the incorrect settings when your requirements are different.
If you have to change your device’s language settings, you can complete this task using the Settings app without reinstalling Windows 10.
In this Windows 10 guide, we’ll walk you through the steps to change your device’s system default language.
How to change default system language on Windows 10
If you’re using a computer with the incorrect language configuration, it’s unnecessary to reinstall Windows 10. You only need to adjust a few settings to set the appropriate language.
Disable language sync
On Windows 10 configured with a Microsoft account, the language preferences will sync across devices. In the case that you only need the settings on one computer, it’s recommended to disable the option to sync the language settings before making any changes to prevent the new configuration from overwriting the settings on your other devices.
To stop syncing the language preferences on Windows 10, use these steps:
- Open Settings.
- Click on Accounts.
- Click on Sync your settings.
Under the «Individual sync settings» section, turn off the Language preferences toggle switch.
 Source: Windows Central
Once you complete the steps, you can change the language settings without affecting your other devices.
Change language settings
To change the system default language, close running applications, and use these steps:
- Open Settings.
- Click on Time & Language.
- Click on Language.
Under the «Preferred languages» section, click the Add a language button.
 Source: Windows Central
Select the language package from the result.
Source: Windows Central
Check the Set as my display language option.
Source: Windows Central
Click the Yes, sign out now button.
Source: Windows Central
After you complete the steps, the display language will change across the entire Windows 10 experience, including the Sign-in screen, Settings app, File Explorer, Desktop, apps, browser, and websites you visit. Depending on your new settings, Windows 10 may prompt you to review your privacy settings again.
Change region settings
In the case that you are adjusting the Windows 10 language because you’re now in a different region, you’ll also need to change the region settings.
To change the local region settings on Windows 10, use these steps:
- Open Settings.
- Click on Time & Language.
- Click on Region.
Use the «Country or region» drop-down menu to select the current location (if applicable).
Source: Windows Central
Under the «Related settings» section, click the Administrative language settings option on the right side.
 Source: Windows Central
Under the «Language for non-Unicode programs» section, click the Change system locale button.
![]() Source: Windows Central
Source: Windows Central
Select the new system local by specifying the new language.
![]() Source: Windows Central
Source: Windows Central
In the «Administrative» tab, click the Copy settings button.
![]() Source: Windows Central
Source: Windows Central
Under the «Copy your current settings to» section, check the Welcome screen and system accounts and New user accounts options.
 Source: Windows Central
Once you complete the steps, the computer will now use the correct region settings.
Typically, users never have to worry about changing or installing additional languages. However, the ability to change language-related settings may come in handy for organizations working with people that need to use different preferences. It’s also a useful feature to match the local settings if you relocate to another region or when buying a new device that ships from a different country.
The only caveat about changing the region settings is that you may lose access to Cortana, and the Microsoft Store may show different contents depending on the region you specified.
More Windows 10 resources
For more helpful articles, coverage, and answers to common questions about Windows 10, visit the following resources:
We may earn a commission for purchases using our links. Learn more.
![]()
Keepa browser extension can help you find the very best Prime Day deals
In this guide, we’ll show you the steps to use the Keepa extension on Edge, Chrome, and Firefox to understand the product’s price history to shop smarter during Prime Day 2020.
![]()
Here’s what reviewers are saying about the Surface Laptop Go
On the face of it, the new Surface Laptop Go just looks like a tiny Surface Laptop. That’s true to some extent, but there’s much more to this new budget Surface. Here’s a look at what reviewers are saying around the web.
![]()
Review: Surface Laptop Go may be tiny, but it is also mighty
Microsoft hit it out of the park with Surface Laptop Go, a tiny Windows 10 laptop that is perfect for the couch or boardroom. While the $550 model is tempting, you should opt for the $700 version. Here is why, as well as why we like this laptop so much.
![]()
The NFL is back! Check out these must-have Windows apps for football fans
After months of waiting through a unique offseason and no preseason games, the NFL is finally back this week. With these Windows 10 apps, you won’t miss a snap of the NFL action.
Источник
Язык интерфейса в Windows 10 выбирается при установке операционной системы. Но после того как процедура установки закончена, его можно изменить. Для этого понадобится языковой пакет.
Для чего нужен языковой пакет
Языковой пакет (далее «ЯП» для краткости) – набор слов и предложений, обеспечивающий перевод системы на определённый язык. Например, установив русский ЯП, вы переведёте все системные сообщения, приложения и настройки на русский язык. Соответственно, выбрав ЯП другого языка, вы сможете пользоваться Windows на наиболее удобном для вас языке.
Установка ЯП
В Windows 10 встроено несколько методов, позволяющих работать с ЯП. Благодаря им можно выбирать язык из уже скачанных пакетов, а также устанавливать новые ЯП.
Если вам нужно изменить ЯП на одном компьютере, то легче всего воспользоваться автозагрузкой, то есть дать системе самой скачать и установить необходимый пакет. Если же требуется сменить язык на нескольких ПК, то удобнее один раз скачать файл ЯП, а потом перенести его при помощи флешки на каждый из компьютеров, сэкономив тем самым интернет-трафик. Файлы ЯП имеют расширение .cab. Скачать их можно со сторонних ресурсов, так как Microsoft не распространяет ЯП в виде отдельных файлов на своём официальном сайте.
Установка ЯП при помощи настроек параметров Windows
В Windows 10 есть встроенная утилита «Параметры», позволяющая управлять настройками системы. Если ОС на вашем компьютере уже обновлена до версии 1803 April Update, то с помощью этой утилиты можно загрузить дополнительный ЯП. Если у вас установлена более старая версия Windows, то воспользуйтесь любым из описанных ниже методов — результат будет тот же. Для загрузки ЯП с помощью утилиты «Параметры» сделайте следующее:
- Войдя в консоль «Параметры Windows», разверните блок «Время и язык».

Откройте раздел параметров «Время и язык» - Раскройте подпункт «Регион и язык», затем кликните по кнопке «Добавить язык» и выберите из появившегося списка подходящий вариант. Начнётся загрузка ЯП из сети.

После щелчка по кнопке «Добавить язык» откроется список языков, которые можно добавить
Как только загрузка закончится, в списке языков появится новый ЯП — выберите его, чтобы осуществить перевод системы на нужный язык.
Установка ЯП из панели управления Windows
Пользователи, не обновившие ещё свою Windows до версии 1803 или более поздней, могут выполнить смену ЯП через панель управления. Для этого сделайте следующее:
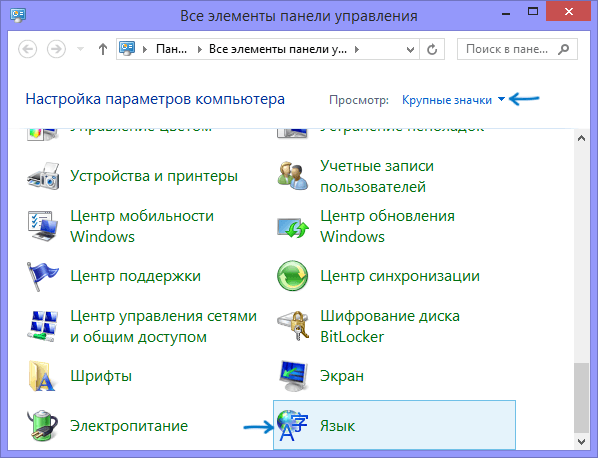
- Войдя в панель управления, перейдите в раздел «Язык». Панель управления можно найти при помощи системной поисковой строки.

Откройте раздел «Язык» в панели управления Windows - Щёлкните по кнопке «Добавить язык» для выбора нужного ЯП. Появится список языков, доступных для добавления. Отметьте из них тот, который хотите добавить.

Нажмите кнопку «Добавить язык»и выберите нужный языковой пакет - Перейдите к свойствам выбранного языка.

Нажмите кнопку «Свойства» для добавляемого языка - В открывшемся окне свойств языка нажмите кнопку «Загрузить и установить языковой пакет», после чего начнётся загрузка ЯП.

Щёлкнув по кнопке «Загрузить и установить языковой пакет», начните загрузку ЯП выбранного языка - После окончания процесса установки ЯП снова зайдите в свойства языка и назначьте его основным языком системы.
Назначьте выбранный язык основным языком интерфейса Windows

Готово. Новый ЯП загружен и применён. Возможно, вас попросят выйти из системы, чтобы применить изменённые параметры. Дайте согласие, затем снова войдите в свою учётную запись и проверьте результат.
Добавление языка из cab-файла
Если у вас есть отдельно загруженный ЯП в формате cab, то для его установки выполните следующие шаги:
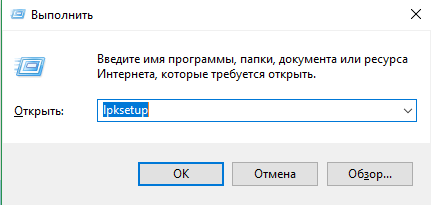
- Нажмите комбинацию клавиш Win + R, чтобы открыть окно «Выполнить». Введите в нём команду lpksetupe и запустите её выполнение, нажав кнопку OK.

Введите и выполните команду lpksetup - Появится окно установки ЯП. Укажите, что хотите загрузить новый ЯП, а не удалить уже имеющийся. Для этого щёлкните по строке «Установить язык интерфейса».

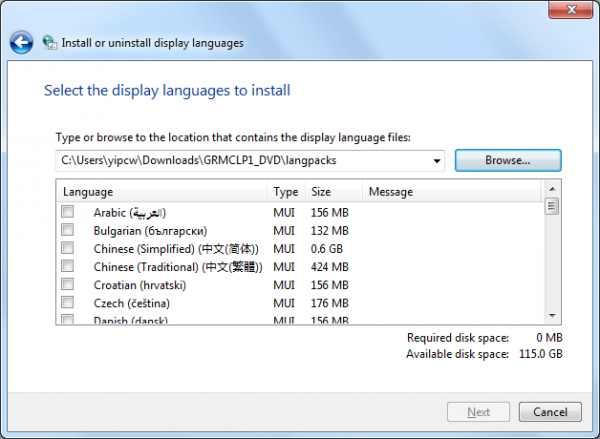
Укажите, что надо установить новый языковой пакет - Откройте cab-файл, для чего нажмите кнопку Browse и найдите его на диске. В строке рядом с кнопкой отобразится путь до файла. Если в файле содержится сразу несколько языков, выберите из них те, которые нужно установить. Начните процедуру установки, нажав кнопку Next, и дождитесь её окончания. Затем перейдите в окно«Параметры» или в панель управления Windows, выберите новый ЯП в качестве основного (как это сделать, описано в двух предыдущих пунктах).

Укажите путь до файла и выберите желаемые языки
Изменение языка интерфейса
Установка нового ЯП не гарантирует того, что язык системы изменится. Обычно для этого нужно ввести соответствующую команду, которая изменит язык интерфейса. Выполните следующие шаги:
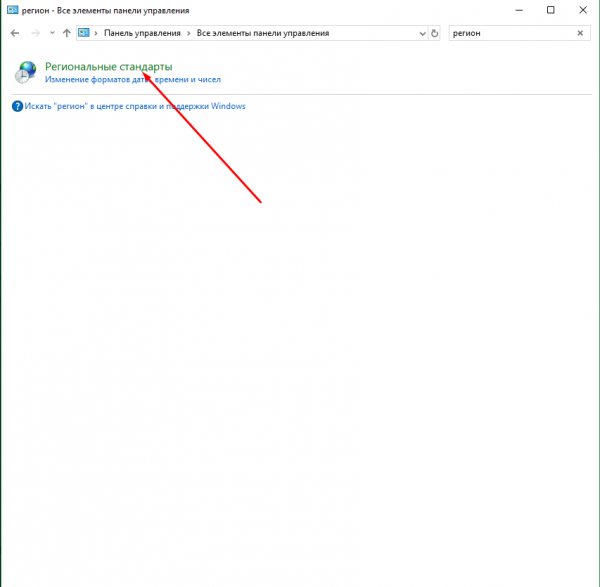
- Находясь в панели управления, разверните пункт «Региональные стандарты». Если не можете найти его в главном меню, воспользуйтесь встроенной поисковой строкой.

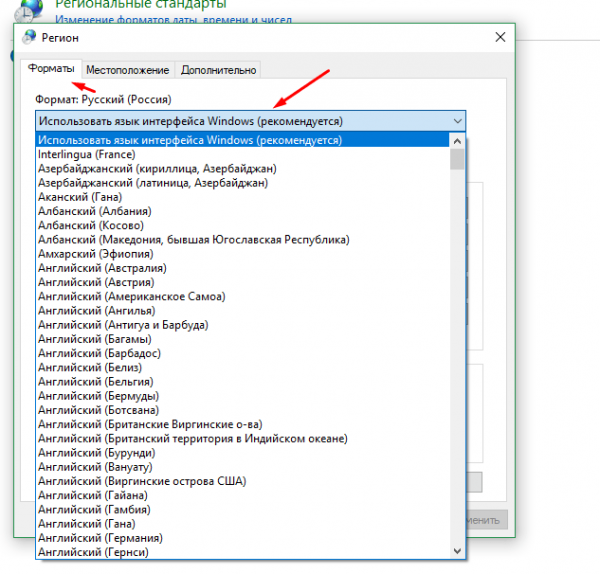
Войдите в раздел панели управления «Региональные стандарты» - В первой вкладке «Форматы» выберите подходящий вам язык интерфейса, а затем сохраните новые значения. Возможно, придётся выйти из системы и войти заново, чтобы изменённые настройки вступили в силу.

Выберите подходящий язык интерфейса и сохраните изменения
Видео: работа с языковыми пакетами в Windows 10
Изменения языка приветствия
Если вы хотите при входе в систему видеть тот же язык, который назначили языком интерфейса, то выполните дополнительные шаги:
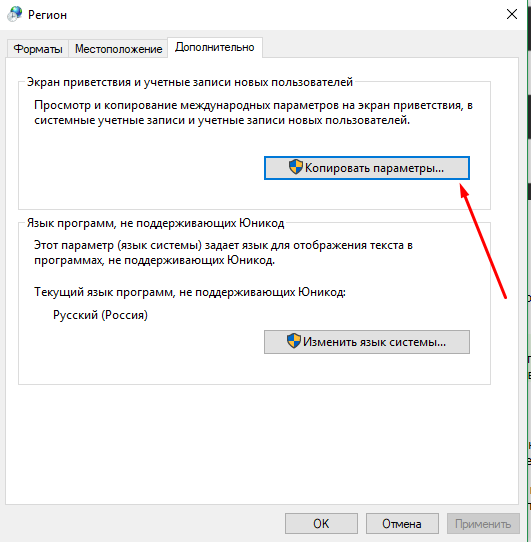
- Разверните вкладку «Дополнительно» в окне региональных стандартов. Нажмите кнопку «Копировать параметры».

Нажмите кнопку «Копировать параметры» в окне региональных стандартов - Поставьте галочку, обеспечивающую копирование текущих языковых параметров на экран приветствия и в системные аккаунты. Нажав затем кнопку ОК, вы сохраните новый язык для экрана приветствия. Также, отметив соответствующую галочку, в этом окне можно включить копирование установленного языка во все новые учётные записи, которые будут созданы в будущем.

Включите копирование текущих языковых настроек на экран приветствия и в системные учетные записи
Установка ЯП на Single Language версию
Есть специальная редакция Windows — Single Language. Она включает в себя только один язык и не позволяет загрузить дополнительные ЯП через панель управления или утилиту «Параметры». Сделано это для того, чтобы неопытный пользователь случайно не перевёл систему не непонятный ему язык.
Если вы столкнулись с тем, что на вашем компьютере установлена версия Single Language, а новый ЯП вам нужен, то воспользуйтесь методом, описанным в пункте «Добавление языка из cab-файла». Установить пакет и начать пользоваться им можно, предварительно загрузив cab-файл со стороннего ресурса.
Изменения языка программ
Сторонние программы работают на том языке, который вы выбрали при установке, но встроенные в Windows приложения и утилиты, загруженные из официального магазина Microsoft, при определении языка интерфейса опираются на настройки системы. Используемый в них язык выбирается на основе данных о местоположении.
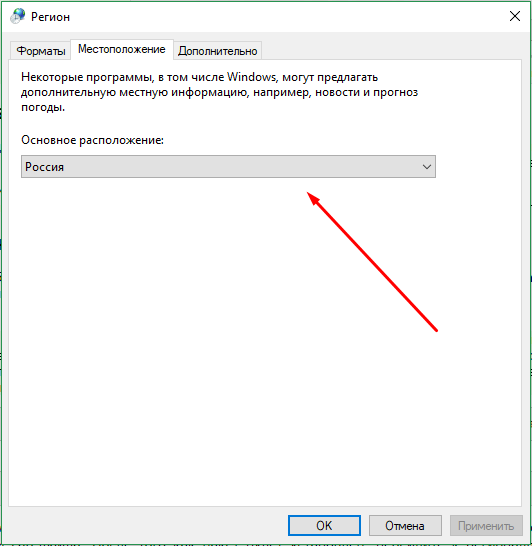
- Чтобы сменить язык во всех стандартных программах Windows, снова откройте окно «Региональные стандарты» в панели управления и перейдите к вкладке «Местоположение». Укажите страну, язык которой вам нужен, и сохраните изменения. Большинство приложений после этого изменят свой язык.

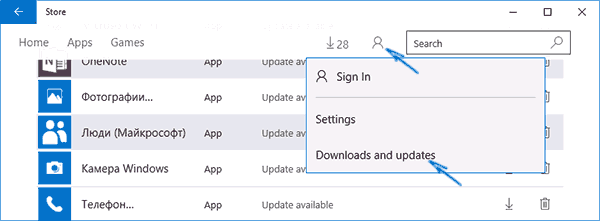
В строке «Основное расположение» выберите из списка нужную страну и нажмите кнопку OK - Если вы заметили, что какие-то программы остались на прежнем языке, то откройте приложение Windows Store и запустите принудительное обновление. Дополнив свою базу данных нужным ЯП, приложения перейдут на выбранный ранее язык.

В Windows Store запустите принудительное обновление приложений
В более ранних версиях Windows 10 языковые пакеты устанавливаются через панель управления, а в последних — через параметры системы. Универсальный способ — установить ЯП при помощи cab-файла. После того как пакет будет установлен, перейдите в настройки региональных стандартов и измените язык интерфейса, приветствия и стандартных программ.
- Распечатать
Оцените статью:
- 5
- 4
- 3
- 2
- 1
(14 голосов, среднее: 4.6 из 5)
Поделитесь с друзьями!
В разных регионах на компьютерах под управлением операционной системы Windows 10 по умолчанию установлены разные языки. Если выбранный по умолчанию вариант вам не подходит, можно поменять его. Это делается легко и быстро. В этой статье рассказано, как именно сменить системный язык Windows 10 по умолчанию.
Изменение системного языка Windows 10 по умолчанию для текущего пользователя
Зачем может потребоваться менять язык Windows 10? Такая необходимость может возникнуть по работе или если вы изучаете иностранный язык и хотите попрактиковаться в нём. Причин может быть множество. В любом случае, язык меняется следующим образом:
- Нажмите на кнопку «Пуск» и на изображение шестерёнки, чтобы открыть приложение «Параметры» (Win + I).
- Перейдите в раздел «Время и язык».
- Откройте вкладку «Язык».
- В разделе «Предпочитаемые языки» нажмите на «Добавление языка».
- Появится список доступных языков, где вы можете выбрать нужный вам. Поддерживается поиск языков.
- Нажмите на выбранный язык и затем «Далее».
- Появятся несколько дополнительных опций, которые вы можете выбрать или нет. Затем нажмите «Установить».
- Когда языковой пакет скачен, можно поменять отображаемый на экране язык. В разделе «Язык» нажмите на иконку «Дисплей Windows».
- Из выпадающего меню выберите нужный вам язык.
- После выбора появится окно с запросом выхода из аккаунта. Можно выбрать выход позже или прямо сейчас.
- После повторного входа откройте вкладку «Язык» и нажмите «Приложения и веб-сайты».
- Здесь также можно поменять язык. Под заголовком «Предпочитаемые языки» первый язык используется по умолчанию. Чтобы поменять его, можете использовать команду «Добавление языка». Если нужный вам язык есть в списке, выделите его и при помощи стрелки переместите в верхнюю позицию. После этого приложения и сайты будут отображаться на выбранном языке.
- Можно поменять языковые настройки клавиатуры. На вкладки «Язык» нажмите «Клавиатура».
- Из выпадающего меню выберите нужный вам язык.
- Снова вернитесь на вкладку «Язык» и нажмите «Распознавание голоса».
- Здесь тоже можно выбрать предпочитаемый язык из выпадающего меню. Этот выбор используется в приложениях, которые преобразуют речь в текст.
Экран приветствия и язык новой учётной записи пользователя
Все описанные выше изменения относятся только к аккаунту текущего пользователя. Если будет создан новый аккаунт, языковые настройки для него нужно менять в панели управления. Это же относится к экрану приветствия Windows, входа и выхода в учётную запись, выключения компьютера и меню «Пуск».
- Нажмите на кнопку «Пуск» и наберите в поиске «панель управления». Откройте её.
- Нажмите «Часы и регион».
- Нажмите «Региональные стандарты».
- На вкладке «Дополнительно» нажмите «Копировать параметры».
- В появившемся окне внизу поставьте галочки «Экран приветствия и системные учётные записи» и «Новые учётные записи пользователей». Нажмите OK.
В результате будут изменены языковые настройки для текущего и новых аккаунтов пользователей. Нужно иметь в виду, что сначала нужно поменять языковые настройки экрана, чтобы применить изменения к экрану приветствия и новым аккаунтам пользователей. В противном случае на них будет применяться нынешний язык.
Пожалуйста, оцените статью.
Есть русская винда, а нужно сделать английский язык интерфейса. Экзотическая задача, потому что обычно всем нужно наоборот: винда анлийская, а хочется интерфейс на родном языке.
 Ну да ладно, вопрос не сложный, когда у вас, например, Windows 10 Pro: нужно всего-лишь зайти в панель управления, языки, выбрать English и в доп параметрах Windows сам докачает интерфейс для этого языка.
Но если у вас Windows 10 Home Single Language (уже предустановленная на купленном ноутбуке), то в панели управления вам покажут фигу. И как быть?
Нашел решение в интернете, может кому пригодится:
- Скачиваем нужный языковой пакет руками по ссылке (см в конце поста)
- Для удобства переименовываем скачанный пакет в lp.cab, копируем куда-нибудь на диск С:mui
- В винде открываем командную строку с правами админа и даем вот такую команду dism /Online /Add-Package /PackagePath:C:muilp.cab
- Выполенение команды может занять 5-10 мин в зависимости от расторопности компа.
- После этого там же в командной строке даем команду dism /Online /Get-Packages
- Удаляем русский интерфейс командой dism /Online /Remove-Package /PackageName:Microsoft-Windows-Client-LanguagePack-Package~31bf3856ad364e35~amd64~ru-RU~10.0.10240.16384
- После удаления комп попросит передагрузиться. Соглашаемся и после перезагрузки интерфейс станет английским.
Ссылочки на языковые пакеты
Windows 10 x64 (Build 10240):
zh-CN: Chinese download.windowsupdate.com/d/msdownload/update/software/updt/2015/07/lp_9949b0581789e2fc205f0eb005606ad1df12745b.cab
hr-HR: Croatian download.windowsupdate.com/d/msdownload/update/software/updt/2015/07/lp_c3bde55e2405874ec8eeaf6dc15a295c183b071f.cab
cs-CZ: Czech download.windowsupdate.com/d/msdownload/update/software/updt/2015/07/lp_d0b2a69faa33d1ea1edc0789fdbb581f5a35ce2d.cab
da-DK: Danish download.windowsupdate.com/d/msdownload/update/software/updt/2015/07/lp_15e50641cef50330959c89c2629de30ef8fd2ef6.cab
nl-NL: Dutch download.windowsupdate.com/d/msdownload/update/software/updt/2015/07/lp_8658b909525f49ab9f3ea9386a0914563ffc762d.cab
en-us: English download.windowsupdate.com/d/msdownload/update/software/updt/2015/07/lp_75d67444a5fc444dbef8ace5fed4cfa4fb3602f0.cab
fr-FR: French download.windowsupdate.com/d/msdownload/update/software/updt/2015/07/lp_206d29867210e84c4ea1ff4d2a2c3851b91b7274.cab
de-DE: German download.windowsupdate.com/d/msdownload/update/software/updt/2015/07/lp_3bb20dd5abc8df218b4146db73f21da05678cf44.cab
hi-IN: Hindi download.windowsupdate.com/d/msdownload/update/software/updt/2015/07/lp_e9deaa6a8d8f9dfab3cb90986d320ff24ab7431f.cab
it-IT: Italian download.windowsupdate.com/d/msdownload/update/software/updt/2015/07/lp_42c622dc6957875eab4be9d57f25e20e297227d1.cab
ja-JP: Japanese download.windowsupdate.com/d/msdownload/update/software/updt/2015/07/lp_adc2ec900dd1c5e94fc0dbd8e010f9baabae665f.cab
kk-KZ: Kazakh download.windowsupdate.com/d/msdownload/update/software/updt/2015/07/lp_a03ed475983edadd3eb73069c4873966c6b65daf.cab
ko-KR: Korean download.windowsupdate.com/d/msdownload/update/software/updt/2015/07/lp_24411100afa82ede1521337a07485c65d1a14c1d.cab
pt-BR: Portuguese download.windowsupdate.com/d/msdownload/update/software/updt/2015/07/lp_894199ed72fdf98e4564833f117380e45b31d19f.cab
ru-RU: Russian download.windowsupdate.com/d/msdownload/update/software/updt/2015/07/lp_d85bb9f00b5ee0b1ea3256b6e05c9ec4029398f0.cab
es-ES: Spanish download.windowsupdate.com/c/msdownload/update/software/updt/2015/07/lp_7b21648a1df6476b39e02476c2319d21fb708c7d.cab
uk-UA: Ukrainian download.windowsupdate.com/d/msdownload/update/software/updt/2015/07/lp_131991188afe0ef668d77c8a9a568cb71b57f09f.cab
Windows 10 x86 (Build 10240):
zh-CN: Chinese download.windowsupdate.com/d/msdownload/update/software/updt/2015/07/lp_e7d13432345bcf589877cd3f0b0dad4479785f60.cab
hr-HR: Croatian download.windowsupdate.com/d/msdownload/update/software/updt/2015/07/lp_60856d8b4d643835b30d8524f467d4d352395204.cab
cs-CZ: Czech download.windowsupdate.com/d/msdownload/update/software/updt/2015/07/lp_dfa71b93a76b4500578b67fd3bf6b9f10bf5beaa.cab
da-DK: Danish download.windowsupdate.com/d/msdownload/update/software/updt/2015/07/lp_af0ea4318f43d9cb30bcfa5ce7279647f10bc3b3.cab
nl-NL: Dutch download.windowsupdate.com/d/msdownload/update/software/updt/2015/07/lp_cbcdf4818eac2a15cfda81e37595f8ffeb037fd7.cab
en-us: English download.windowsupdate.com/d/msdownload/update/software/updt/2015/07/lp_41877260829bb5f57a52d3310e326c6828d8ce8f.cab
fr-FR: French download.windowsupdate.com/d/msdownload/update/software/updt/2015/07/lp_80fa697f051a3a949258797a0635a4313a448c29.cab
de-DE: German download.windowsupdate.com/d/msdownload/update/software/updt/2015/07/lp_7ea2648033099f99f87642e47e6d959172c6cab8.cab
hi-IN: Hindi download.windowsupdate.com/d/msdownload/update/software/updt/2015/07/lp_78a11997f4e4bf73bbdb1da8011ebfb218bd1bac.cab
it-IT: Italian download.windowsupdate.com/d/msdownload/update/software/updt/2015/07/lp_9e62d9a8b141e0eb6434af5a44c4f9468b60a075.cab
ja-JP: Japanese download.windowsupdate.com/d/msdownload/update/software/updt/2015/07/lp_79bd099ac811cb1771e6d9b03d640e5eca636b23.cab
kk-KZ: Kazakh download.windowsupdate.com/d/msdownload/update/software/updt/2015/07/lp_59e690df497799cacb96ab579a706250e5a0c8b6.cab
ko-KR: Korean download.windowsupdate.com/d/msdownload/update/software/updt/2015/07/lp_a88379b0461479ab8b5b47f65c4c3241ef048c04.cab
pt-BR: Portuguese download.windowsupdate.com/d/msdownload/update/software/updt/2015/07/lp_bb9f192068fe42fde8787591197a53c174dce880.cab
ru-RU: Russian download.windowsupdate.com/d/msdownload/update/software/updt/2015/07/lp_280bf97bbe34cec1b0da620fa1b2dfe5bdb3ea07.cab
es-ES: Spanish download.windowsupdate.com/c/msdownload/update/software/updt/2015/07/lp_31400c38ffea2f0a44bb2dfbd80086aa3cad54a9.cab
uk-UA: Ukrainian download.windowsupdate.com/d/msdownload/update/software/updt/2015/07/lp_41cd48aa22d21f09fbcedc69197609c1f05f433d.cab