![]()
Download Article
![]()
Download Article
- Display Language (Ultimate and Enterprise)
- Display Language (Any Version)
- Input Language
- Video
- Q&A
|
|
|
|
Windows 7 allows you to change the display language for most of the interface. The process is fairly straightforward and the most comprehensive if you have Windows 7 Ultimate or Enterprise. If you are using Windows 7 Starter, Basic, or Home, you can install Language Interface Packs, which translate the most-used elements into your chosen language. You can also change the keyboard input language so that you can easily type in other languages.
-

1
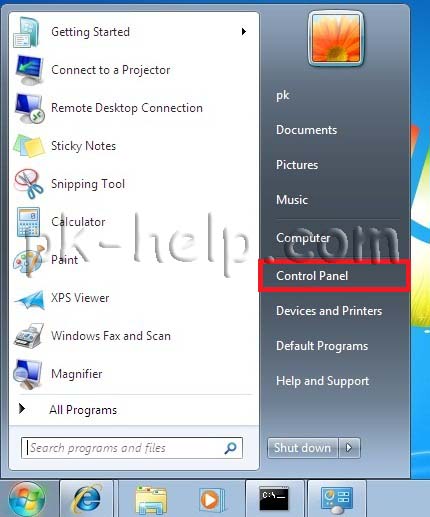
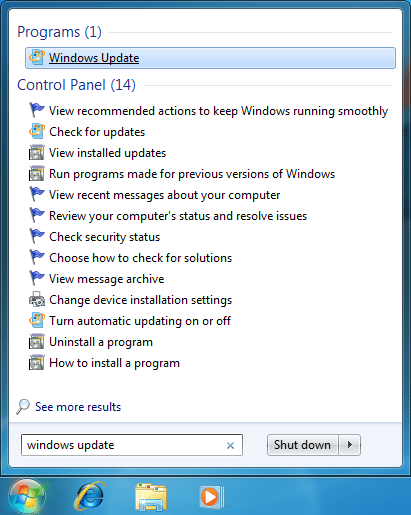
Open the Control Panel. If you are using Windows 7 Ultimate or Enterprise, you can install language packs that translate most of the Windows interface. These are only available for Ultimate and Enterprise. If you are using Starter, Basic, or Home, you can install Language Interface Packs (LIPs).[1]
These translate parts of the interface, and require a base language installed. See the next section for details.- You can open the Control Panel from the Start menu.
-
2
Click the «View by» menu and select «Large icons» or «Small icons». This will allow you to quickly access any Control Panel option.
Advertisement
-
3
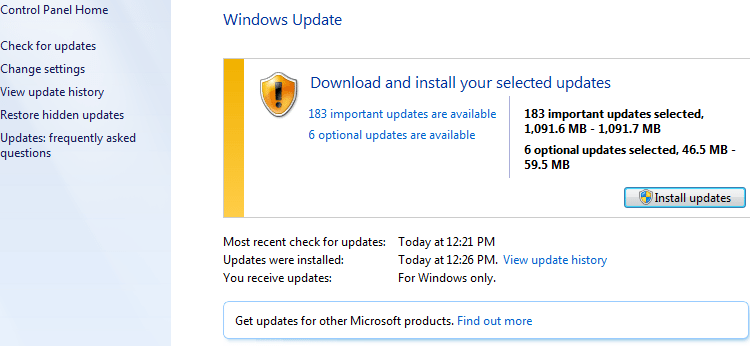
Select Windows Update. You can use the Windows Update tool to download any of the available language packs.
-
4
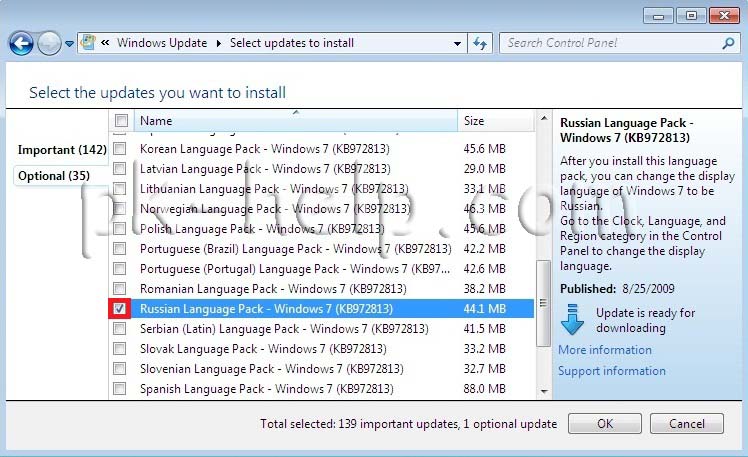
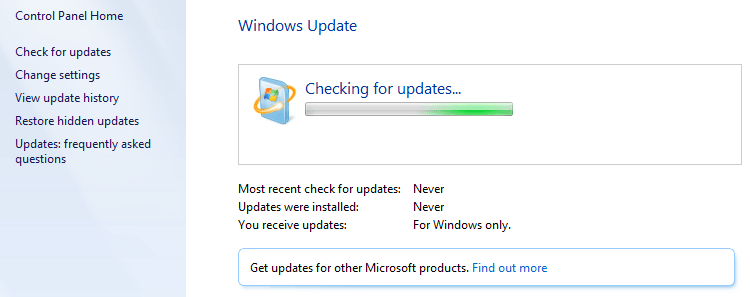
Click the «# optional updates are available» link. If the link is not there, click «Check for updates».
-
5
Check the box for the language you want to download. After selecting the language, click OK.
-
6
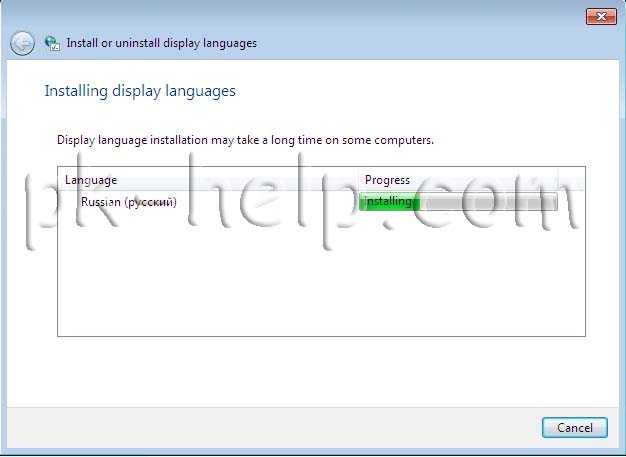
Click the .Install updates. You may be prompted by UAC to continue, and you may be asked to input the administrator password.
- It may take a few minutes for the language pack to download.
-
7
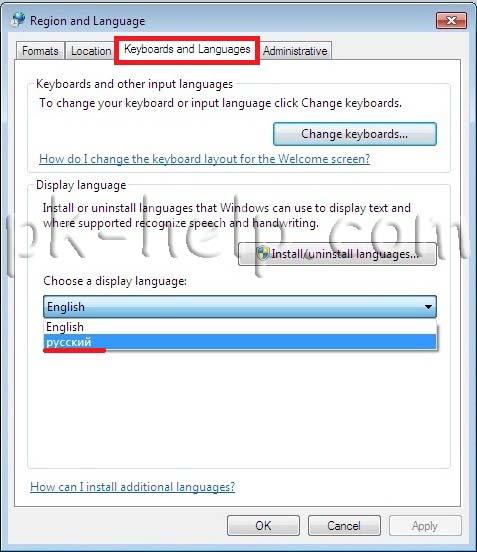
Return to the Control Panel and select «Region and Language». Select the Keyboards and Language tab.
-
8
Select the language you just installed from the «Choose a display language» drop-down menu. All of your installed languages will be listed here.[2]
[3]
-
9
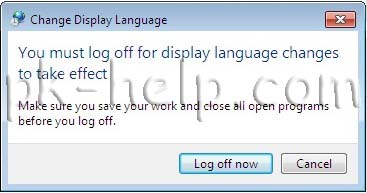
Click .Apply and then Log off now to log out. Your changes will be applied when you log back into Windows.
-
10
Change your system locale if the language is not displaying in some programs. Some programs may not display your new language until you change your system locale settings to match that region.
- Open the Control Panel and select «Region and Language».
- Click the Administrative tab and click Change system locale.
- Select the language you’ve just installed and click OK. You’ll be prompted to restart your computer.[4]


Advertisement
-
1
Understand the difference between language packs and Language Interface Packs (LIPs). Traditional language packs translate the majority of the UI elements, and are only available to Ultimate and Enterprise users (see the above section). For everyone else, there are LIPs. These are smaller packs that translate the most-used parts of the interface. They require a base-language installed, since not everything is translated.[5]
-
2
Visit the LIP download page. You can browse through all of the available LIPs here.
-
3
Check the requirements. The third column of the table will let you know what base language the LIP requires, as well as what versions of Windows it works with.
- If the LIP requires Ultimate or Enterprise, you’ll need to upgrade your copy of Windows to change the language.
-
4
Click the «Get it now» link. This will open the page for the language you’ve selected. The page will be displayed in that language.
-
5
Click the «Download» button. This will open a new window displaying the language files.
-
6
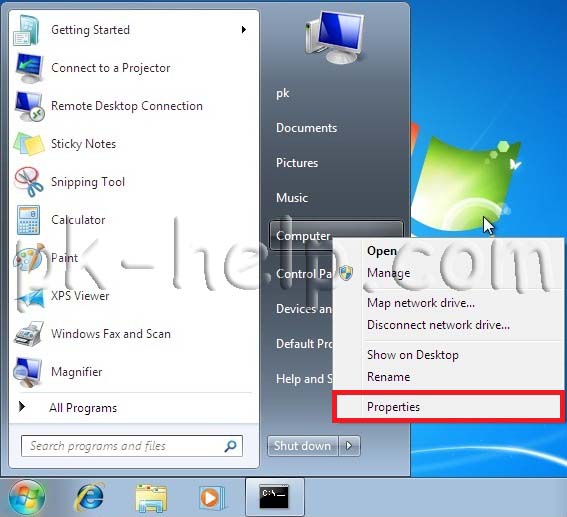
Select the appropriate file for your computer. You will have the option to choose between a 32-bit or a 64-bit file. You can find the version that you have by opening the Start menu, right-clicking «Computer», and selecting «Properties». Look for the «System type» entry.
-
7
Check the box for the file and then click the «Download» button. The LIP file will be downloaded to your Downloads folder.
-
8
Double-click the downloaded file. This will open the language installer with your new language automatically selected. Click Next to start the installation.
- You’ll be asked to read and accept the Microsoft terms before the language is installed.
-
9
Review the ReadMe file. The ReadMe file for the language you select will be displayed before it is installed. You usually don’t need to review this, but it may contain information about known issues or compatibility problems.
-
10
Wait for the language to install. This may take a few moments.
-
11
Select and apply your new language. After the installation is complete, you’ll see a list of all of your installed languages. Select your newly-installed language and click Change display language.
- If you want the Welcome screen to change, as well as any system accounts, check the box beneath the list of languages.
-
12
Log out to complete the change. You will be prompted to log out in order for your new language to be applied. When you log back in, Windows will be using the new language. Anything that isn’t translated with the LIP will be displayed in the base language.
-
13
Set a new system locale if some programs don’t recognize the new language. Some programs designed for certain languages will only display the language if the system is set to that region.
- Click the Start menu and open the Control Panel.
- Open the «Region and Language» option.
- Click the Administrative tab and then click Change system locale.
- Select the language that you just installed, and reboot your computer when prompted.


Advertisement
-
1
Open the Control Panel. You can add additional keyboard layouts to your Windows installation that will allow you to type in different languages.
-
2
Click the «View by» drop-down menu and select «Large icons» or «Small icons». This will make it easier to find the correct option.
-
3
Select «Region and Language» and then click the .Keyboards and Languages tab. Click the Change keyboards… button.[6]
-
4
Click .Add to install another language. A list of available languages will appear.
-
5
Select the keyboard language you want to install. Expand the language, and then expand the «Keyboard» option. Select the specific form of that language that you want by checking the box. Click OK to add the language.
- Languages will have multiple options if different regions speak different dialects.
-
6
Switch between languages using the Language bar. This is located in the taskbar, to the left of the System Tray and clock.[7]
The abbreviation for the active language will be displayed. Clicking the abbreviation will allow you to switch between your different input methods.- You can also press ⊞ Win+Space to cycle through the installed languages.
- If you can’t find the Language bar, right-click on the taskbar, select «Toolbars», and then click «Language bar»


Advertisement
Add New Question
-
Question
I lost my MSN homepage for news, and it is now in Japanese. How do I get the English version for the USA back again?

Click the Settings wheel in the top right corner and select Options to open the Outlook.com Mail settings. Here, under General, you will see the setting to change Region & Time Zone; you’ll find the setting to change the Language there as well.
-
Question
What If l can’t read German?
The coding cat
Community Answer
If you cannot read the language displayed on screen, use a translating app until you get to the language settings.
-
Question
I tried to change the language of a Windows 7, which is Arabic. I tried the first method seeing the pics but it didn’t work. The whole system is in Arabic so I cant understand a single word.
The coding cat
Community Answer
If you cannot understand the language your machine is displaying, use a translating app until you can change the language.
See more answers
Ask a Question
200 characters left
Include your email address to get a message when this question is answered.
Submit
Advertisement
References
About This Article
Article SummaryX
To change the display language on Windows 7, open the Control Panel, and change the view to Large icons. Click the Region and Language icon and select a language from the menu. If you don’t see what you’re looking for, click the Install/uninstall languages button to add it to the list. Once the language is selected, click Apply, and then follow the on-screen instructions to log out and back into Windows 7 with the new language. If you don’t see the correct language, return to the Region and Language panel, select Administrative, and then click Change system locale. Select your language and reboot when prompted.
To change the keyboard or input language, open the Control Panel and change the view to Large icons. Click the Region and Language icon. On the Keyboard and Languages tab, click the Change keyboards button, and click Add to install another language. Check the box next to the language you want to install, and then click OK to install it. You can now switch between input languages using the taskbar language menu near the bottom-right corner of the screen.
Did this summary help you?
Thanks to all authors for creating a page that has been read 692,953 times.
Reader Success Stories
-

«Thank you for such a big help. I had this problem for two years and with your images, it made it much easier for…» more
Is this article up to date?
Asked
9 years, 9 months ago
Viewed
175k times
How can I change the Windows language from Spanish to English in a Windows 7 Professional?
Please note that this is not Enterprise or Ultimate version. So the normal way using a MUI is not possible.
![]()
nixda
26.5k17 gold badges107 silver badges154 bronze badges
asked May 2, 2013 at 19:18
1
The installation of additional languages is normally not possible — unless you upgrade to Windows 7 Ultimate or Enterprise.
However, it can be done. But it will violate your Windows EULA.
Instructions
- Download the MUI (Multilingual User Interface) for your Language. I downloaded the hu-HU package on
C:lp.cab. You have to change the path and language shorthand to your own -
After the download completes, open a command line prompt as administrator and type
DISM /Online /Add-Package /PackagePath:C:lp.cab bcdedit /set {current} locale hu-HU bcdboot %WinDir% /l hu-HU -
Open regedit.exe and delete the
en-ENkey underHKEY_LOCAL_MACHINE / SYSTEM / CurrentControlSet / Control / MUI / UILanguages
- Reboot
Source
![]()
nixda
26.5k17 gold badges107 silver badges154 bronze badges
answered May 2, 2013 at 19:25
![]()
AutumnalAutumnal
3,0121 gold badge16 silver badges16 bronze badges
7
Способ 1: Установка языкового пакета
Для редакций «семёрки» Корпоративная (Enterprise) и Максимальная (Ultimate) предусмотрена возможность установки дополнительных языковых пакетов, которые можно получить на официальном ресурсе Microsoft. Все нюансы изменения языка системы с помощью этого метода рассмотрел один из наших авторов, поэтому, чтобы не повторяться, просто приведём ссылку на соответствующий материал.
Подробнее: Установка языкового пакета в Windows 7
Способ 2: Vistalizator
Владельцам версий Виндовс 7 Домашняя и Профессиональная повезло меньше – эти редакции не поддерживают официальную инсталляцию обновлений с новыми языками. Впрочем, энтузиасты нашли обходной путь и создали собственное решение нашей задачи под названием Vistalizator.
Официальный сайт Vistalizator
- Скачайте сначала исполняемый файл программы – кликните по ссылке с её именем.
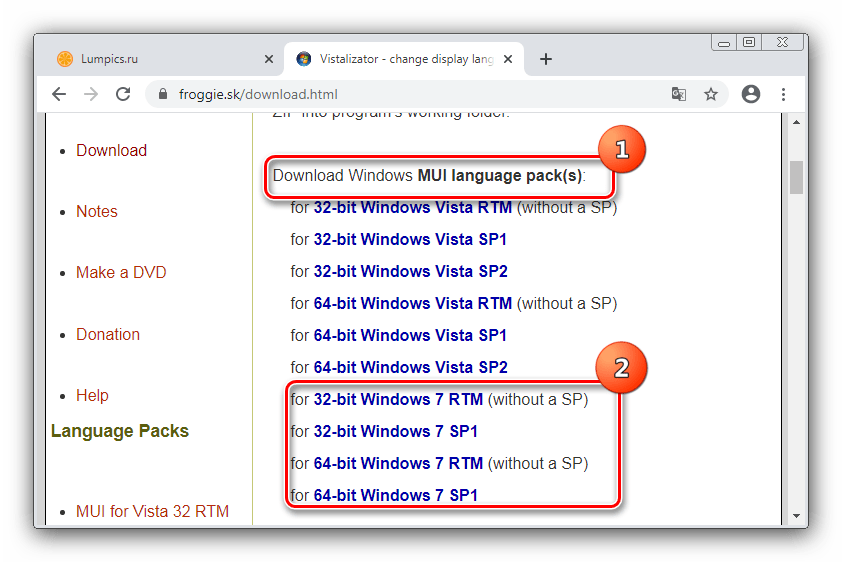
- Также понадобится загрузить MUI-пак с требуемым языком – например, русским. Для этого прокрутите страницу до блока «Download Windows MUI language pack(s)», после чего воспользуйтесь ссылкой, которая соответствует разрядности и редакции вашей ОС.

Откроется перечень языков, щёлкните по интересующему для начала загрузки.
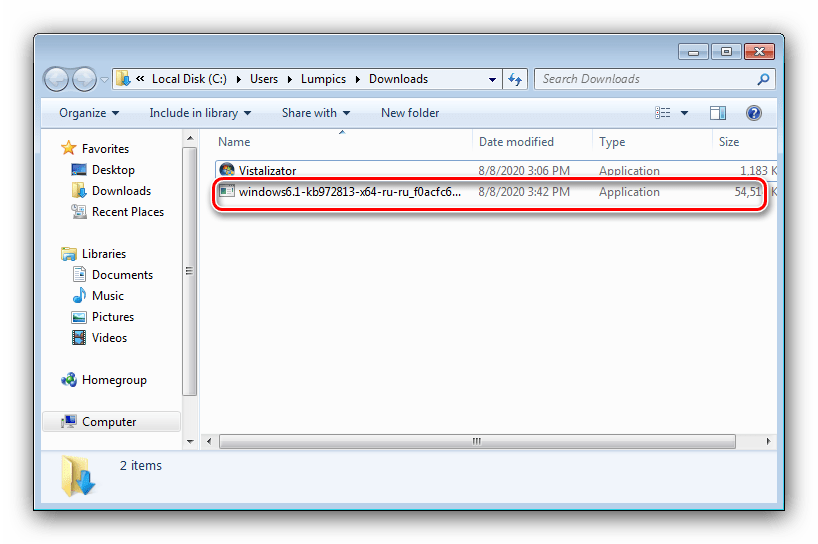
По окончании скачивания переместите полученный файл в папку с Vistalizator.
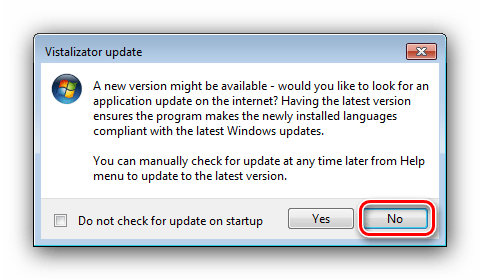
- После всех приготовлений запустите EXE-файл программы. При старте она предложит поискать обновления — таковых больше не предвидится, поэтому смело нажимайте «No».
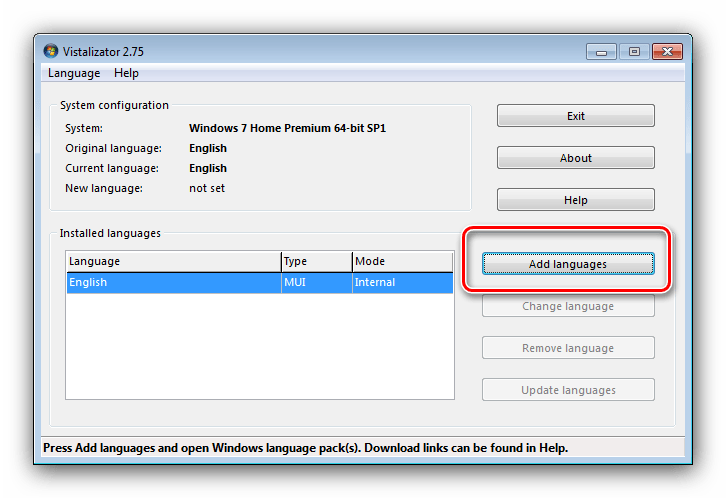
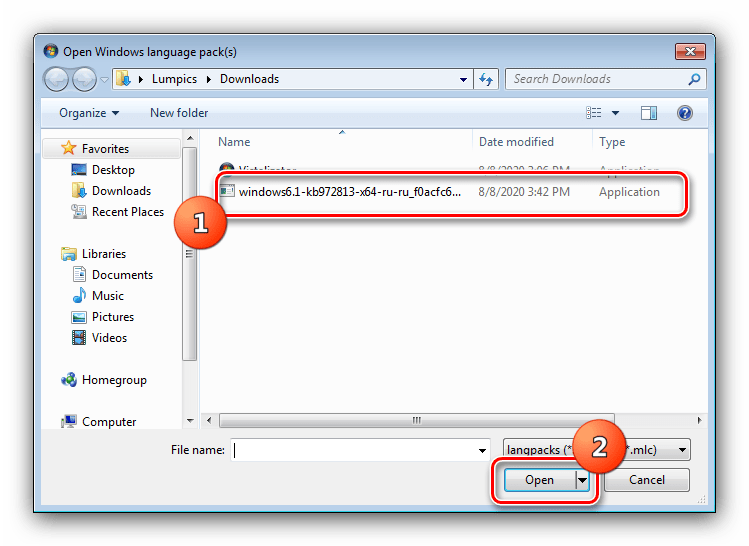
- Когда программа прогрузит интерфейс, нажмите на кнопку «Add languages…».

В диалоговом окне «Проводника» выберите скачанный на шаге 2 пак.
- Подождите, пока Вистализатор сконвертирует его в свой формат, после чего в ещё одном отдельном окошке станет доступна кнопка «Install language».
- Процесс установки языкового пакета занимает достаточно долгое время, поэтому запаситесь терпением.
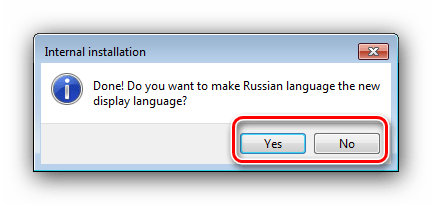
- По окончании инсталляции нажмите «Yes» для отображения интерфейса на новом языке.

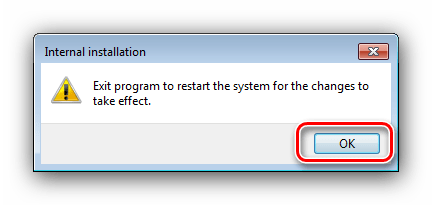
Далее кликните «ОК» и перезапустите компьютер для применения изменений.
- После перезагрузки новый язык будет установлен по умолчанию.


Данный метод удобный и практичный, от официального отличается только способом установки языкового пакета.
Еще статьи по данной теме:
Помогла ли Вам статья?
How do I change Windows 7 from German to English?
- Click the “Start” orb and select “Control Panel.”
- Click “Change display language” under the heading “Clock, Language and Region.”
- Click the drop-down arrow under the bottom section labeled “Choose a display language.” Currently, “German” should be selected, so click “English” to select it as the new display language.
How do you change the language back to English?
How to change the language on Android
- Open the Settings app on your Android device.
- Tap “System.”
- Tap “Languages & input.”
- Tap “Languages.”
- Tap “Add a Language.”
- Select your preferred language from the list by tapping on it.
17 апр. 2020 г.
How do I change my Windows 7 language to English?
How to change the Windows 7 Display Language: Go to Start -> Control Panel -> Clock, Language, and Region / Change the display language. Switch the display language in the Choose a display language dropdown menu. Click OK.
Click Start, and then type Change display language in the Start Search box. Click Change display language. In the drop-down list that appears, select the language that you want, and then click OK. Log off for the changes to take effect.
How do I change my browser language?
Change the language of your Chrome browser
- On your computer, open Chrome.
- At the top right, click More. Settings.
- At the bottom, click Advanced.
- Under “Languages,” click Language.
- Next to the language you’d like to use, click More . …
- Click Display Google Chrome in this language. …
- Restart Chrome to apply the changes.
How do I change my iPhone 7 from Chinese to English?
Change the language on your iPhone, iPad, or iPod touch
- Open Settings. On the Home screen, tap Settings.
- Tap General. On the next screen, tap General.
- Select Language & Region. Scroll down and tap Language & Region.
- Tap Device language. On the next screen, tap “[Device] Language”.
- Select your language. Pick your language from the list.
- Confirm your selection.
26 окт. 2020 г.
Why are my emails in a different language?
Email settings misconfiguration could be a reason why you’re receiving emails in a different language. We suggest checking if your timezone and country in the settings is correct. … Locate Home, choose your country on the drop-down that you can see beside Country/ region. Kindly set your Country’s region and timezone.
How do I remove a language from Windows 7?
How to uninstall a Windows 7 language pack
- Click Start, and then type Uninstall display language in the Start Search box.
- Click Install or uninstall display languages.
- Click Uninstall display languages.
- Select the language or the languages that you want to uninstall, and then click Next.
How do I change Windows from Chinese to English?
How to change the system language (Windows 10) ?
- Click at left bottom corner and tap [ Settings ].
- Choose [ Time & Language ].
- Click [ Region & Language ] , and choose [Add a language].
- Choose the language you would like to use and apply . …
- After you add the preferred language , click this new language and choose [ Set as default ].
22 окт. 2020 г.
How do I change the language on control panel?
Open the Control Panel. Click the Clock, Language, and Region option. Click the Change the display language link. In the Choose a display language drop-down list, select the language you to use as the display language and click OK.
How do you restore a Windows 7 computer to factory settings?
The steps are:
- Start the computer.
- Press and hold the F8 key.
- At Advanced Boot Options, choose Repair Your Computer.
- Press Enter.
- Select a keyboard language and click Next.
- If prompted, login with an administrative account.
- At the System Recovery Options, choose System Restore or Startup Repair (if this is available)
What is the shortcut to change language?
Keyboard shortcut: To switch between keyboard layouts, press Alt+Shift. icon is just an example; it shows that English is the language of the active keyboard layout. The actual icon shown on your computer depends on the language of the active keyboard layout and version of Windows.
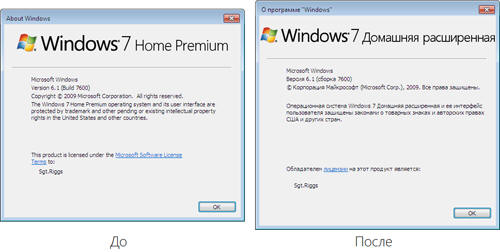
Язык интерфейса — это язык, который используется Windows в диалоговых окнах, меню, разделах центра справки и поддержки, а также в других элементах пользовательского интерфейса. В зависимости от версии вашей Windows существует несколько способов поменять язык интерфейса. В этой статье я опишу как поменять язык во всех возможных версиях Windows7, а именно Домашняя базовая Home Basic, Домашняя расширенная Home Premium, Профессиональная Professional, Корпоративная Enterprise, Максимальная Ultimate.
Для начала предлагаю рассмотреть как поменять язык в Window7 Professional, Корпоративная Enterprise, Максимальная Ultimate, поскольку для этих версий предусмотрен штатный способ смены языков.
Смена языка на Window7 Корпоративная Enterprise, Максимальная Ultimate.
Существует два способа изменить язык:
1) с помощью обновлений
2) скачать EXE файлы и установить.
Начнем, на мой взгляд, с самого легкого, скачаем необходимый нам язык и запустим его установку. Если вы хотите изменить язык с неведомого (английского, французского, итальянского и т.д.) на русский, для этого скачайте файл соответствующей вашей систем.
Русский язык для Windows7 (KB972813):
Windows7 x86 (32 bit) без SP1
Windows7 x64 без SP1
Windows7 x86 (32 bit) SP1
Windows7 x64 SP1
После того как вы скачали необходимое обновление, запустите его, кликнув на нем двойным кликом и запустите установку. Установка может занять до 15-30 мин.
Следующим шагом необходимо сменить язык в настройках Windows 7, для этого нажимаете «Пуск- Control Panel (Панель управления)».
Выбрав «Smoll icons» (Мелки значки) нажмите на «Region and Language» (Язык и региональные настройки).

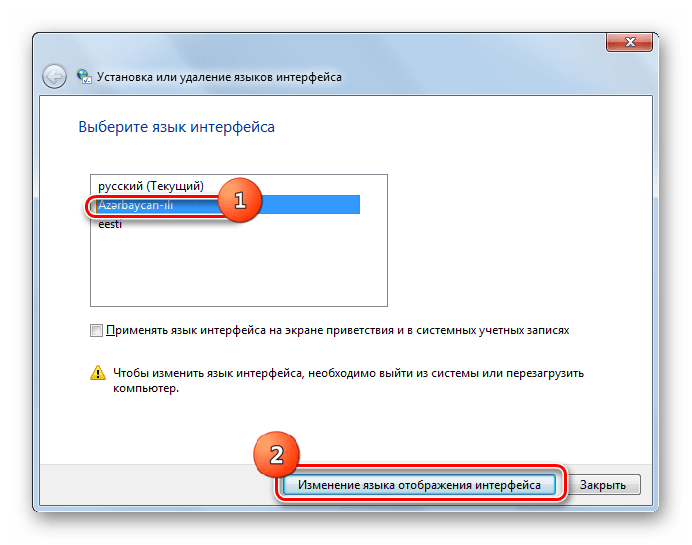
.В открывшемся окне выберите вкладку «Keyboards and Languages» (Языки и клавиатуры) и в поле Choose a display language выберите необходимый язык, если вы хотите русифицировать необходимо выбрать «Русский«.
После этого вам будет предложено перелогиниться. Нажимаем «Log off now» и при следующем входе в систему, вы увидите изменившийся язык интерфейса Windows7.
Если вам по каким то причинам вам не подошел первый способ русификации Windows7, предлагаю рассмотреть второй способ- Изменения языка интерфейса с помощью установки обновлений.
Нажимаем «Пуск» находим кнопку «Computer» (Компьютер), нажимаем правой кнопкой и выбираем «Properties«.
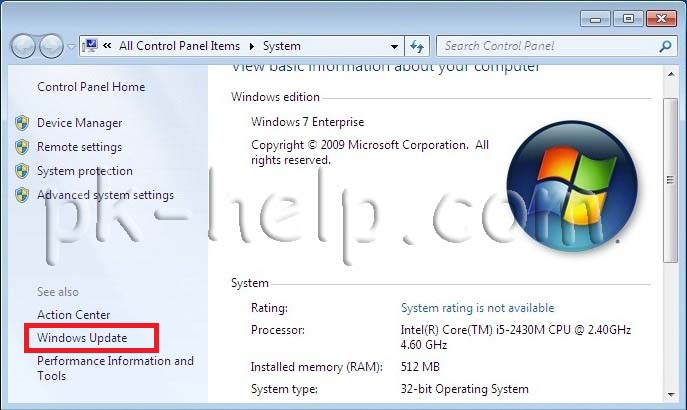
В открывшемся окне выбираем «Windows Update» (Центр обновления Windows).
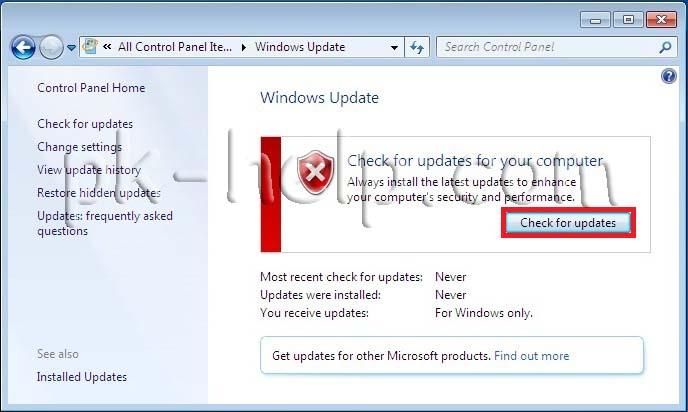
Затем нажимаем «Check for updates» (Проверить наличие обновлений). Наличие интернет обязательно!!!
После того как пройдет процесс поиска обновлений, он может занять несколько минут, необходимо выбрать необязательные обновления «optional updates are available«.
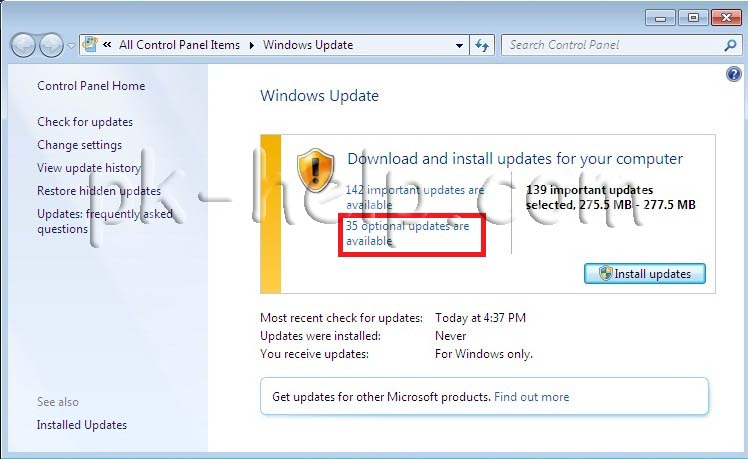
В открывшейся вкладке находим язык на который мы хотим изменить интерфейс Window7, в данном случае- Русский, ставим галочку на против необходимого языка и нажимаем «Ok«.
После этого устанавливаем все обновления, установка языка может занять до 15- 30 мин.
После установки языка необходимо изменить настройки Windows, как это сделано описано выше.
Смена языка на Window7 Домашняя базовая Home Basic, Домашняя расширенная Home Premium, Профессиональная Professional.
Сменить язык интерфейса в Windows7 Домашняя базовая Home Basic, Домашняя расширенная Home Premium, Профессиональная Professional, можно различными способами, можно самому с помощью командной строки, а можно и готовыми инструментами, например программой Vistalizator. Использование этой программой для смены языка- элементарно:
1 Скачиваете программу с официального сайта.
2 Скачиваете необходимый язык. Скачать можно с сайта программы Vistalizator, или если вам необходимо русифицировать Windows7 можно по ссылка в этой статье.
3 Заходите в компьютер под локальным администратором, запускаете программу (она не требует установки).
4 Выбираете добавить язык, указываете на скачанный ранее файл, и спустя 15-20 мин у вас необходимый для вас язык интерфейса Windows7.
Я очень надеюсь, моя статья помогла Вам! Просьба поделиться ссылкой с друзьями:
By default, Microsoft only allows us to change the Windows 7 language on the expensive Windows 7 Ultimate / Enterprise editions. However, there is a simple trick that allows us to do a Windows 7 language change in Home Premium and Professional versions. In this guide, we will use Microsoft’s language files and the free Vistalizator app to change the Windows 7 language in just a few minutes.
Unblock any international website, browse anonymously, and download movies and Mp3 with complete safety with CyberGhost, just for $2.75 per month:
We have updated this guide using the
en_windows_7_home_premium_with_sp1_x64_dvd_u_676549 digital river ISO file, with the complete Windows updates up to 1/5/2018.
To download any Windows 7 version as an ISO straight from the Microsoft servers, check out our guide:
Every Way to Download Windows 7 ISOs, Legally and for Free
Table of Contents
- Preparation
- Take a full Windows backup
- Do a full Windows update
- Download Vistalizator and our preferred language
- Install and change Windows 7 language
- Did you have any problem changing the Windows 7 language?
Preparation
While it’s easy to change the Windows 7 language, it does need some preparation, both for the method to work, and to be prepared in case anything goes wrong.
Take a full Windows backup
Changing the Windows 7 language is an action that affects the system at a basic level. While in our tries we have never had a problem, nevertheless it’s best to create a full Windows backup. As the old adage says, better safe than sorry.
For this, we suggest the use of AOMEI Backupper, a free application which is exceedingly easy to use and can recover our full Windows installation in mere minutes.
Full Windows Backup Image with AOMEI Backupper
Do a full Windows update
Before we begin the procedure to change the Windows 7 language, it’s essential that we have installed all Windows updates. There are a few updates that, if missing, will block us from the Windows 7 language change.
So, if we have a new installation or an old installation where we didn’t bother with updating, we must go to Windows update by looking for it in search…
…and click on «Check for updates». This check could take a few minutes, especially if we’ve never checked for updates before.
Once we get the results, we should select all of the updates. Not just the «important», which are pre-selected…
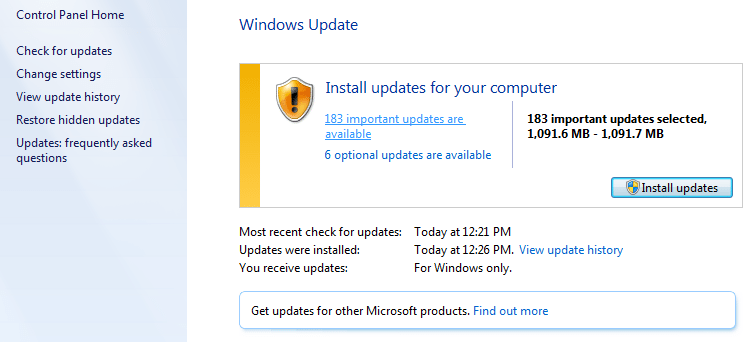
…but the «optional» too.
Depending on the Windows’ version, and the last time we did an update, the complete download could very well exceed one gigabyte in size.
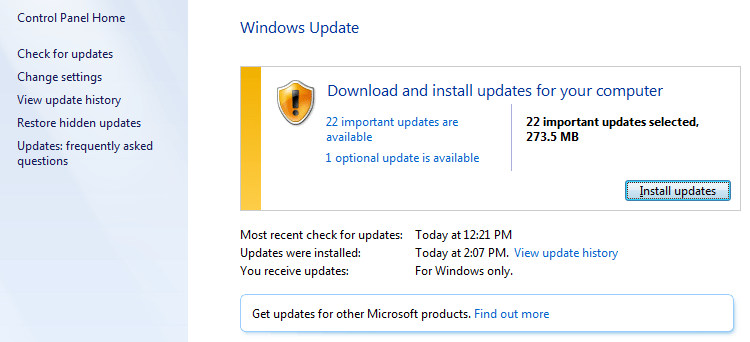
After we install the updates and reboot, we should make a final check in Windows update, that there are no additional updates available. If there are more, we must install them too.
We might not need every single Windows update to change the Windows 7 language. In any case, though, having our Windows installation fully updated is essential for our system’s security and well-being.
And, contrary to popular opinion, Windows Update doesn’t slow Windows down.
Windows Update — Does it Slow Down Windows?
So, we shouldn’t quit until we installed every single update, and get the nice green checkmark on Windows update.

Download Vistalizator and our preferred language
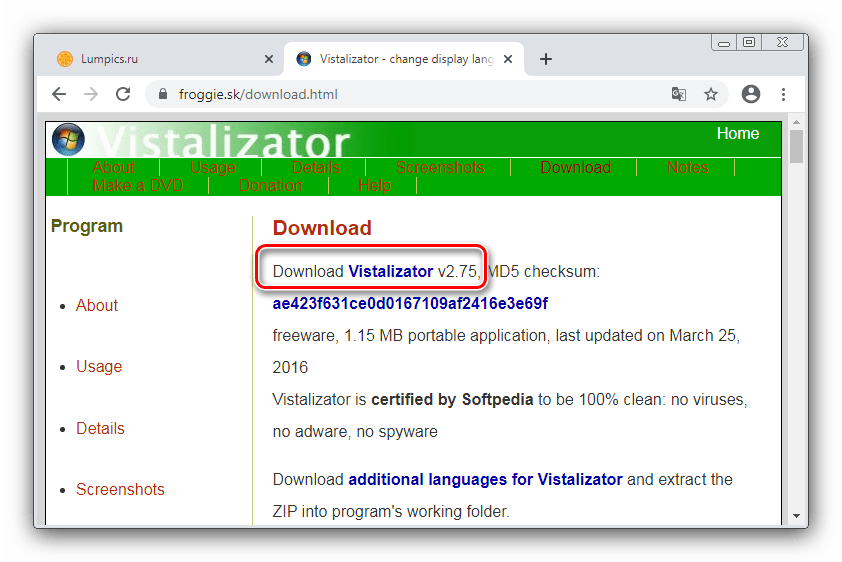
The software that allows us to change the Windows 7 Language is called Vistalizator, and we will find it at http://www.froggie.sk/download.html.
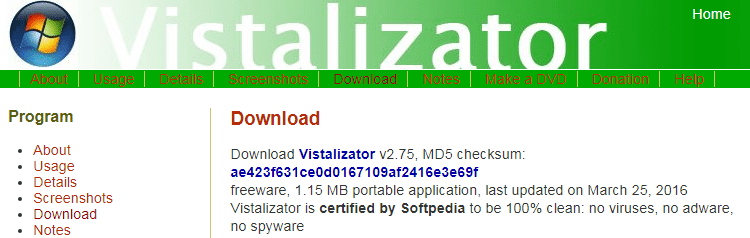
The latest version, as of this writing, is v2.75, updated on March 25, 2016.
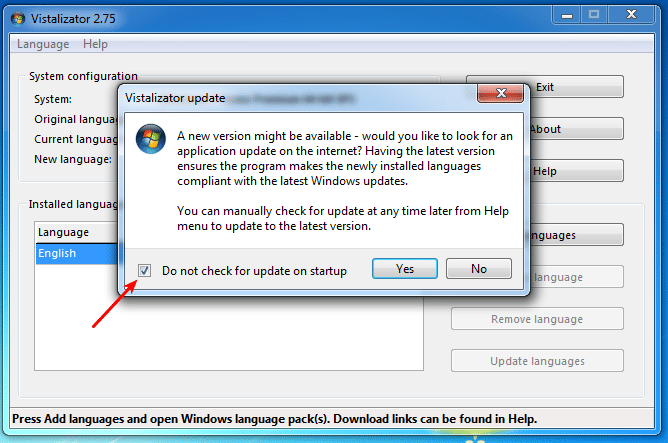
Vistalizator is a portable program that does not require an installation. The first time we run it, we will get a prompt to check for updates on startup. We can safely disable this prompt. After all, changing the Windows 7 Language is usually a one-time deal.
It’s important to note our Windows version, whether it is 32 or 64-bit, and if it has SP1 or not.

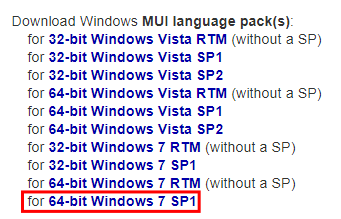
Back on the Vistalizator download page, we select the proper link. For the example, it is 64-bit Windows 7 SP1.
There, we download the language of our choice.
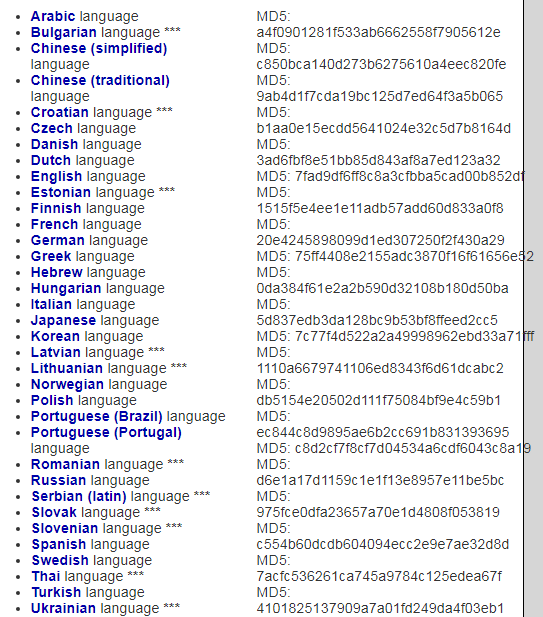
Languages with three stars are only 80% translated from Microsoft.
For the example, we will change the Windows 7 language from English to Spanish. Those links point to Microsoft’s servers, so we know for a fact that they are legitimate. The size of the Spanish language file is just shy of 110MB.
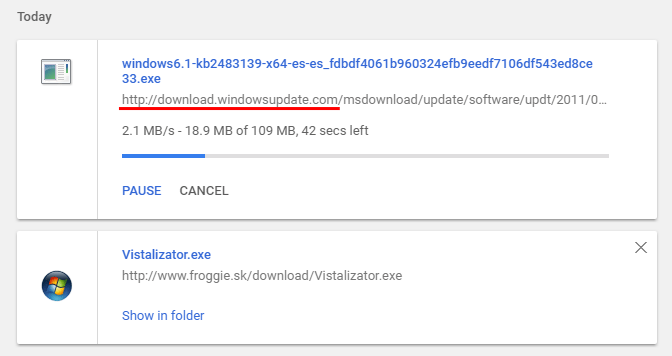
Even though the language file we downloaded is an application file, we don’t open it.
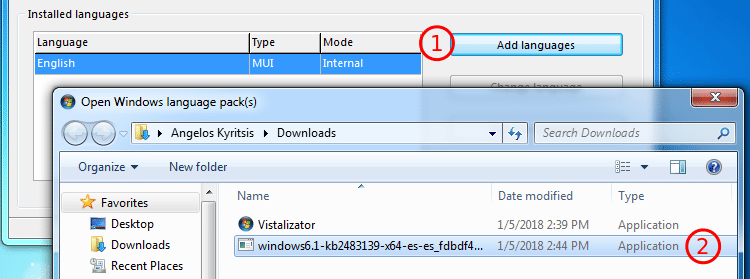
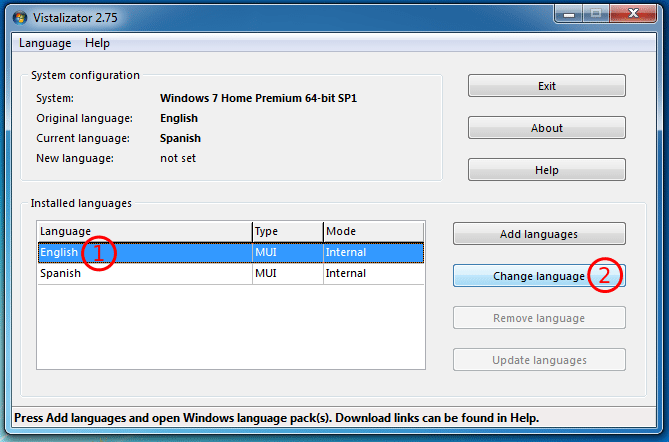
What we do is, on Vistalizator, click on the «Add languages» button and select and open the file from our download folder.
Vistalizator will check the file integrity, and prompt us to install the language of our choice.
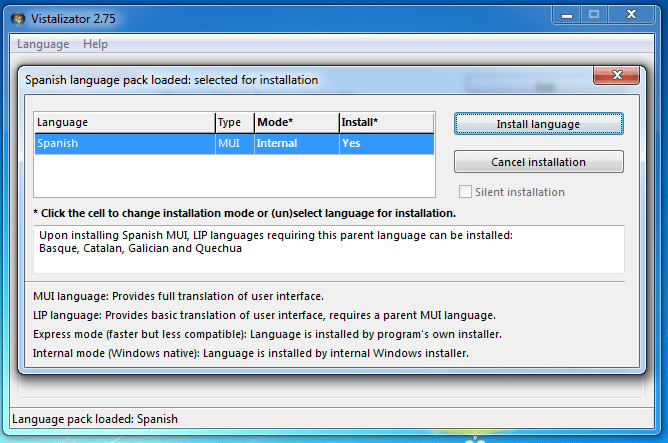
The program claims it might take up to 20 minutes, but it will usually take much less, typically under five minutes.

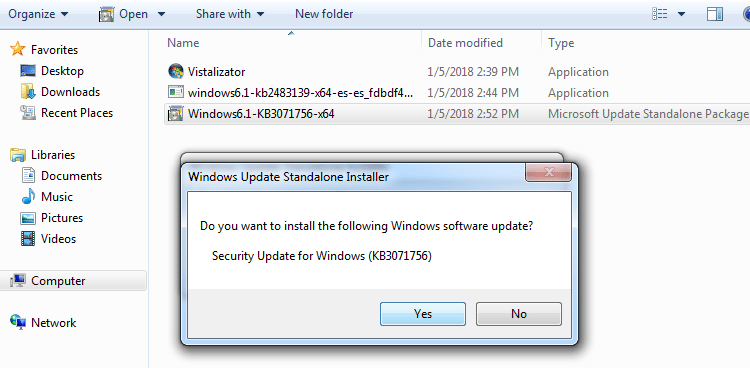
After that, it will ask us to change the Windows 7 Language. We click «Yes».

The current Vistalizator version 2.75 will always display an error. Don’t worry, it’s not a problem.
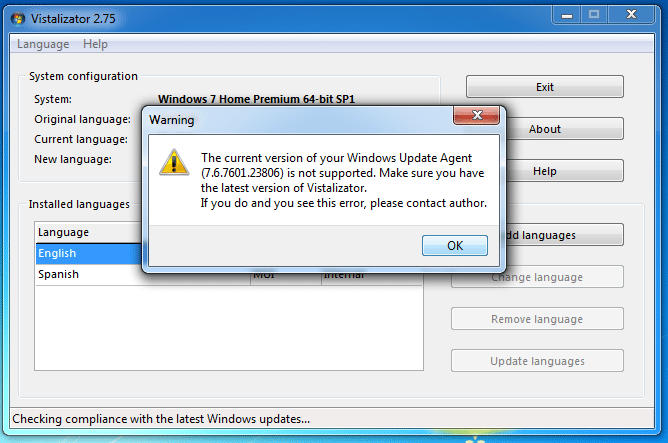
We just need to download a particular Windows update, by clicking on the link. Yes, even after we have installed hundreds of megabytes of updates.
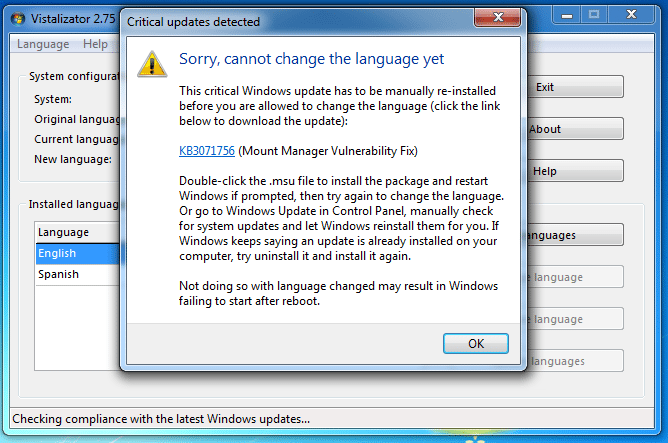
As with the language files, this is an official package from Microsoft.
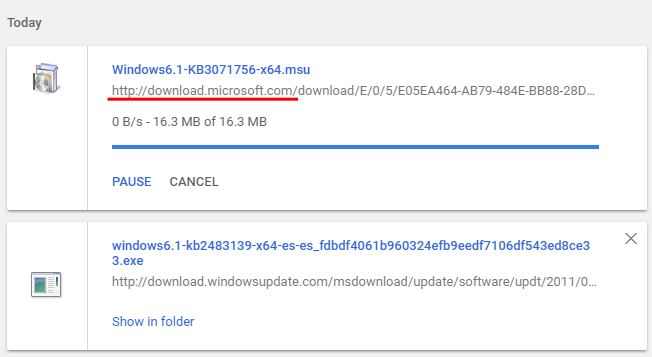
This file is a «Microsoft Update Standalone Package». We double-click to open it and install it.
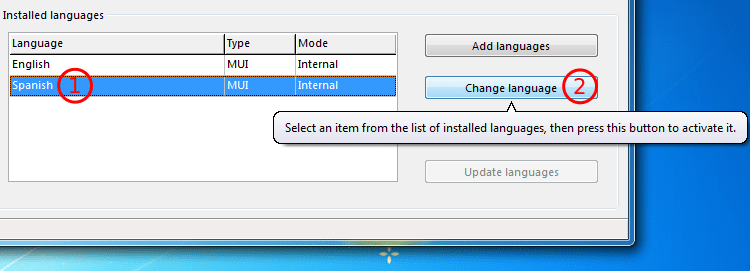
After a successful installation, we return to Vistalizator. We select the language of our choice and click on «Change language».
We will still get the error…
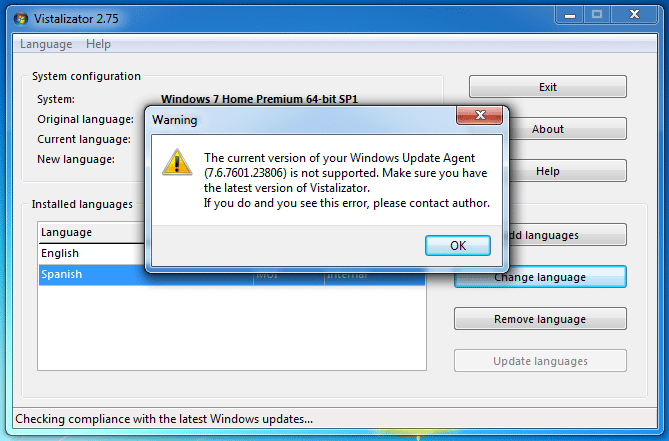
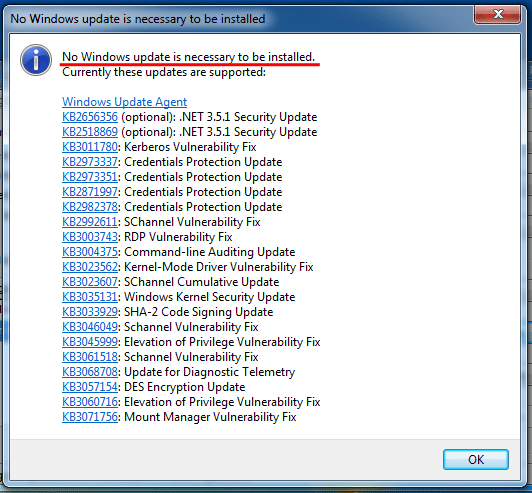
…but this time we also get a message that «No Windows update is necessary to be installed».
After that, we just need to close the program.
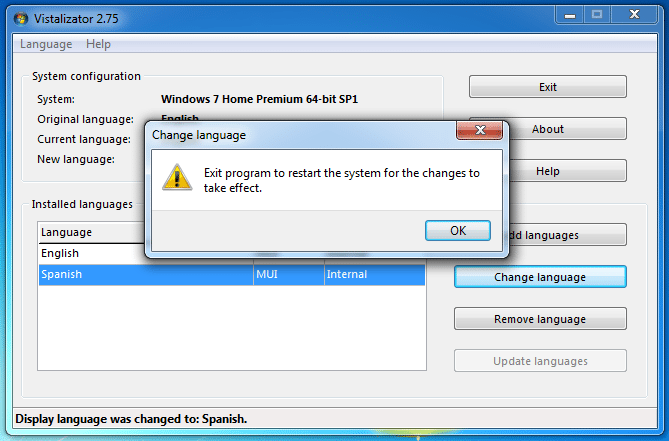
It will prompt us to restart. We should do so.
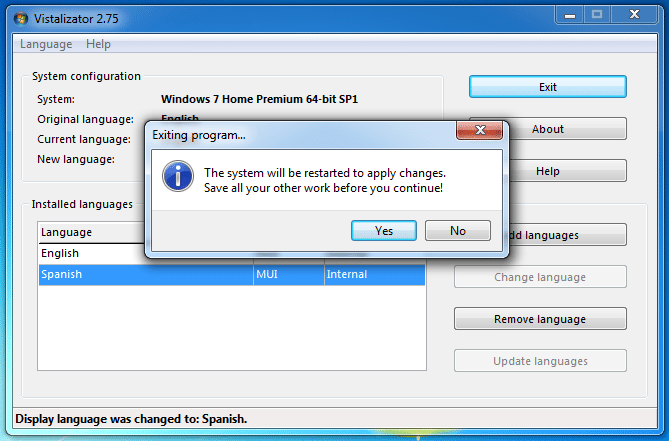
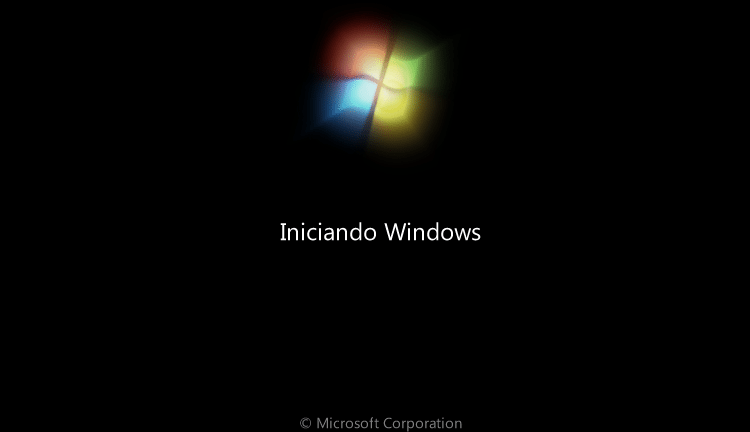
The language has changed even at the boot level.
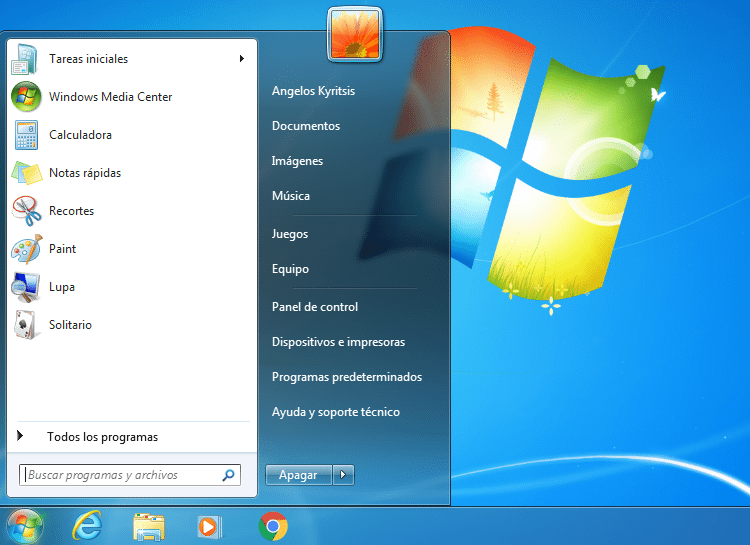
And we are ready. Se habla Español.
If we want to revert to English Windows, we just fire up Vistalizator, choose English and click on «Change language».
Did you have any problem changing the Windows 7 language?
Most problems with Vistalizator are solved by manually installing the Windows updates the program suggests.
However, if you’ve done that, and you still can’t change the Windows 7 language, leave us a comment with the exact error message you are getting.
Support PCsteps
Do you want to support PCsteps, so we can post high quality articles throughout the week?
You can like our Facebook page, share this post with your friends, and select our affiliate links for your purchases on Amazon.com or Newegg.
If you prefer your purchases from China, we are affiliated with the largest international e-shops:
- Banggood
- Geekbuying

Поддержка MUI (Multilingual User Interface — англ. «многоязычный пользовательский интерфейс») появилась еще в Windows XP, но тогда она не получила широкого распространения, поскольку система переводилась, что называется «в лоб»: локализации подвергались сами системные файлы, и MUI был неким дополнением, по сути, ненужным большинству пользователей. С приходом Windows Vista ситуация изменилась: теперь библиотеки, программы и прочие компоненты, требующие перевода, локализуются исключительно при помощи MUI-файлов, содержащих все ресурсы, которые в Microsoft посчитали нужным локализовать. Они входят в состав LP (Language Packs — англ. «языковые пакеты»), которые можно бесплатно скачать через службу Windows Update. Поэтому в Windows Vista и новой Windows 7 LP-пакеты составляют более 95% пользовательского интерфейса, а еще их можно установить в таком количестве, которое позволит ваш жесткий диск.
Все бы хорошо, но поддержку смены языков локализации в уже установленной системе корпорация Microsoft включила только в редакции Enterprise и Ultimate. Это значит, что если у вас установлена, например, Windows 7 Professional, то, однажды установив ее, вы уже не сможете изменить язык интерфейса, не переустановив систему «начисто». Конечно, если вы купили русский дистрибутив и не собираетесь экспериментировать с языками, вам это не нужно. Но что делать, если вы на первых порах приобрели английскую версию, а теперь хотите работать с родным языком?
В Windows Vista для этого требовалось буквально «плясать с бубном», подменяя системные файлы. В Windows 7 же для этого есть средство DISM (Deployment Image Servicing and Management tool — англ. «средство обслуживания и управления распространяемым образом»), запускаемое из командной строки (т.е. консольное). Оно позволяет работать с пакетами интерактивных образов (offline images) системы, из которых, собственно, и устанавливается Windows 7, а также с уже работающей системой.
Примечание: выполняйте данные операции на свой страх и риск, поскольку они могут привести к неработоспособности системы.
Что нам нужно?
Для проведения операции нам понадобятся всего две вещи:
1. Языковой пакет, представляющий собой файл с расширением .cab;
2. Установленная на компьютер Windows 7 в редакции Home Basic / Home Premium / Professional.
В своем примере я буду устанавливать русский языковой пакет на английскую версию Windows 7 Home Premium. Я буду использовать 32-разрядную версию системы, однако в данном процессе разницы между 32- и 64-разрядными версиями системы нет.
Процесс установки
Если запустить панель управления Windows 7 Home Premium, то мы увидим следующую картинку:
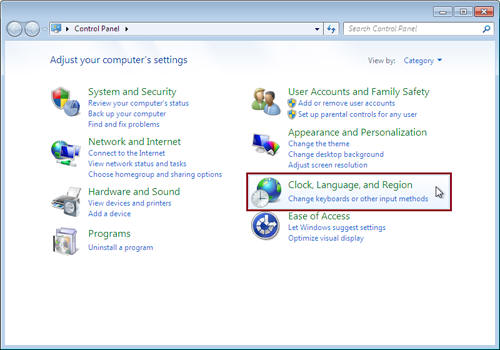
Я специально выделил пункт Clock, Language, and Region красным прямоугольником, чтобы показать отсутствие среди предлагаемых задач пункта Install or Remove display languages (Установка или удаление языков отображения). Таким образом, мы еще раз убеждаемся в том, что смена LP-пакетов в этой редакции Windows 7 недоступна.
Что же мы будем делать? Поместим наш языковой пакет с расширением .cab в какую-нибудь папку на жестком диске, например, в C:langpack. В моем случае у меня на диске C: появилась папка langpack, а в ней — файл lp.cab. Также создадим на диске C: папку, в которой будут выполняться все промежуточные операции, такие, как извлечение файлов и т.д. Я для этого создал папку C:scratch.
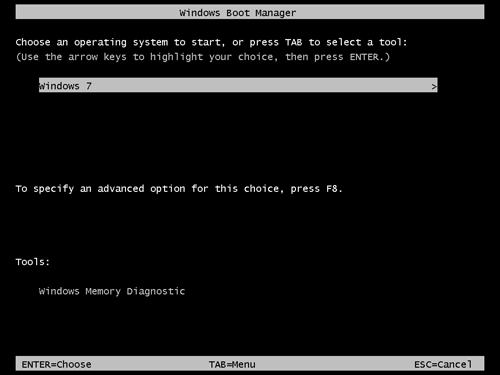
Дальше нам понадобится среда Windows PE (Preinstallation Environment — англ. «среда предустановки» — в ней, например, проходит установка Windows, если компьютер загружен с дистрибутива системы). Чтобы ее запустить, нужно добраться до параметров загрузки Windows 7. Для этого при загрузке системы вызываем Boot Manager (Диспетчер загрузки), нажимая клавишу F8 после экранов BIOS, но до появления загрузочного экрана системы. Когда на экране отобразится список установленных систем (скорее всего, там будет лишь пункт Windows 7), нужно еще раз нажать клавишу F8, и в появившемся на этот раз списке вариантов загрузки (Advanced Boot Options) выбрать первый — Repair Your Computer (Устранение неполадок компьютера).
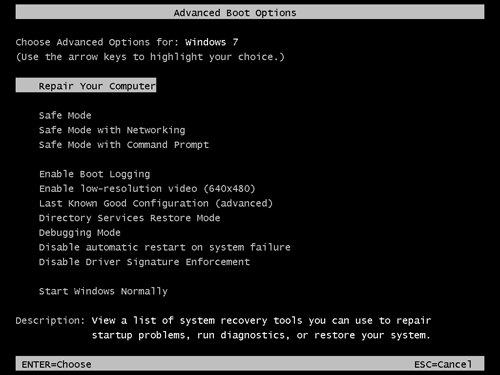
После того, как Windows PE будет загружена, мы увидим небольшое окошко с заголовком System Recovery Options (Параметры восстановления системы). Это загрузилась программа-приглашение, выводящая список инструментов, которые в иной раз помогут восстановить работоспособность системы после сбоя, но сейчас нам эти инструменты не нужны. Тем не менее, данная программа нам еще понадобится.
Поскольку средство DISM является консольным, выполнять все операции мы будем в командной строке. Чтобы открыть консольное окно, нажмите кнопку Next в окне программы-приглашения, введите свои учетные данные в Windows 7 и в появившемся окне со списком инструментов выберите командную строку (Command Prompt). Вы увидите стандартную командную строку Windows с ее приглашением.

В Windows PE все диски могут быть обозначены со сдвигом на одну букву (т.е. диск C: в Windows 7 будет диском D: в Windows PE, и т.д.). Это происходит тогда, когда Windows 7 устанавливается на неразмеченное пространство на жестком диске. В этом случае система создает свой загрузчик на отдельном разделе, размер его порядка 100 МБ. Поэтому перед тем, как начать работу с DISM, проверьте, на каком именно разделе, по мнению Windows PE, установлена ваша система. Для этого последовательно выполняйте команды <буква_диска>: и dir. Когда вы увидите нужную структуру папок, запомните букву этого диска и вернитесь на раздел Windows PE командой X:. В моем примере это диск D:.
Замечание: DISM может выдать ошибку доступа в том случае, если вы открывали в командной строке какие-либо папки на разделе с системой командой cd <папка>. В этом случае сначала верните командную строку в корень этого раздела, выполнив команду cd .
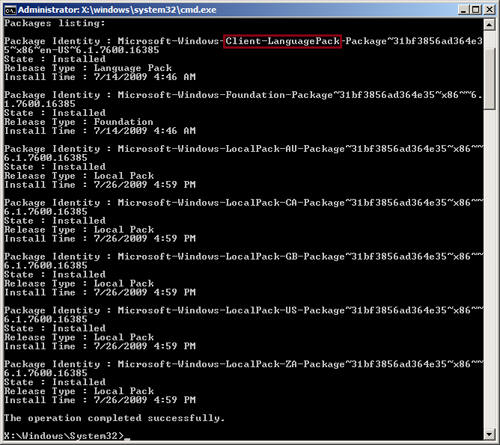
Теперь работать будет DISM. Я привожу последовательный алгоритм команд, выполнив которые, вы получите локализованную версию вашей Windows 7:
1.
dism /image:D: /Get-Packages
После выполнения этой команды DISM покажет список пакетов, установленных в системе. Прокрутите этот список вверх до тех пор, пока не увидите строку, содержащую Client-LanguagePack. Имя этого пакета нам понадобится в следующем шаге, поэтому запомните его.
2. Этот шаг нужен только тем, кто собирается использовать лишь новый язык. По сути, на этом шаге мы просто освобождаем жесткий диск от ненужных более файлов «старого» языка. При желании предыдущий язык можно вернуть тем же способом. Если вы не хотите удалять старый язык, переходите сразу к шагу 3.
Итак, если вы решили удалить «старый» язык, выполните команду:
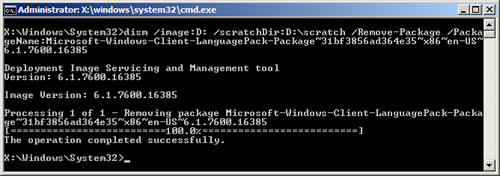
dism /image:D: /scratchDir:D:scratch /Remove-Package /PackageName:<имя_языкового_пакета>
Под <именем_языкового_пакета> подразумевается имя того пакета, который мы запомнили на предыдущем шаге. Например, в моем случае это Microsoft-Windows-Client-LanguagePack-Package~31bf3856ad364e35~x86~en-US~6.1.7600.16385.
После запуска этой команды DISM покажет прогресс в процентах. На выполнение этой операции уйдет несколько минут, после чего вы увидите сообщение The operation completed successfully и обычное приглашение командной строки:
3. Теперь мы переходим к основной части процесса — непосредственно установке нашего языкового пакета в систему. Чтобы DISM начал установку, просто выполните следующую команду:
dism /image:D: /scratchDir:D:scratch /Add-Package /PackagePath:D:langpacklp.cab
Этот процесс практически ничем не отличается от предыдущего (удаления пакета), однако он занимает немного больше времени. Просто подождите, пока пакет будет установлен, и на экране появится все то же сообщение The operation completed successfully и приглашение командной строки:

4. Этот шаг крайне важен. Если его пропустить, то у тех, кто удалил «старый» язык, система не будет загружаться. Несмотря на особую важность, суть этого шага весьма проста: сообщить системе, что наш «новый» язык является основным и его нужно использовать. Для этого выполним команду:
dism /image:D: /Set-SKUIntlDefaults:<код_языка>
Под кодом языка здесь подразумевается сокращение вида «2 буквы — дефис — 2 буквы». Например, для английского языка это en-US, а для моего случая — русского языка — кодом будет ru-RU. На самом деле, этот код можно «подсмотреть» в имени языкового пакета, который мы устанавливали на предыдущем шаге.
Проверить языковые параметры можно командой dism /image:D: /Get-Intl. Если напротив строки Default system UI language: указан код вашего языка, можно смело перезагружать компьютер.
Дополнительная обработка
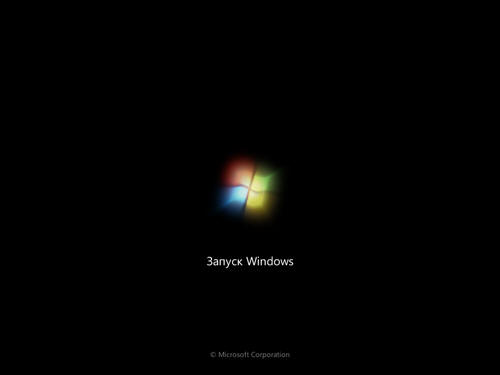
После перезагрузки вас вначале ждет не совсем приятная картина. Если вы не удаляли «старый» язык, то загрузочный экран Windows 7 и менеджер загрузки (вызывается клавишей F8 перед загрузкой Windows, или же показывается автоматически, если на компьютере установлено несколько ОС) останутся на старом языке (в моем случае — на английском). Если же вы удалили предыдущий язык, то ситуация еще хуже: после перезагрузки вы увидите загрузочный экран Windows Vista, то есть зеленую полосу загрузки!
В этом нет ничего страшного, просто наши действия по установке языкового пакета требуют пост-обработки. Открываем командную строку с правами администратора (на этот раз уже из загруженной Windows 7) и вводим следующую команду:
bcdedit /set {current} locale <код_языка>
<Код_языка> здесь тот же самый, что и при работе с DISM, то есть, в моем случае, ru-RU. Таким образом, мы указали загрузчику, ресурсы какого языка нужно использовать при загрузке системы. Если вы хотите, вы можете также выполнить команду:
bcdedit /set {bootmgr} locale <код_языка>
Она таким же образом изменит язык диспетчера загрузки на ваш «новый».
Наслаждайтесь локализованной версией Windows 7!
Вместо заключения
Как видно, способ установить LP-пакет на неподдерживаемую редакцию Windows 7 довольно прост и не требует изменения системных файлов, и для его осуществления используется средство, включенное в состав операционной системы.
Конечно, это не является полноценной заменой документированной для Windows 7 Enterprise и Ultimate поддержки MUI, поскольку изначально она предполагает возможность выбора языка интерфейса для каждого пользователя в отдельности, но, тем не менее, для многих этот способ смены языка окажется весьма полезным. Ведь если вы — единственный пользователь компьютера, то, создав на компьютере некий набор необходимых вам языков интерфейса, вы сможете переключаться между ними, выполняя в командной строке Windows PE следующую команду:
dism /image:D: /Set-UILang:<код_языка>
Удачных начинаний!