To manage all aspects of the input and display language settings on your Windows 11 PC, use the following methods.
To switch the keyboard layout you’re using, press and hold the Windows key and then repeatedly press the Spacebar to cycle through all your installed keyboards. (If this doesn’t do anything, it means you have only one installed.)
You can also select the language abbreviation in your taskbar then choose the language or input method you want to use.
Note: In the input field, press the Windows logo key + period (.) to access the Emoji & more keyboard, if your language supports it.
If you can’t find the keyboard layout you want, you may have to add a new keyboard.
Adding an input language lets you set a language-preference order for websites and apps, as well as change your keyboard language.
-
Select the Start > Settings > Time & language > Language & region.
-
Select the language that has the keyboard you want, then select Options.
-
Select Add a keyboard and choose the keyboard you want to add. If you don’t see the keyboard you want, you may have to add a new language to get additional options. If this is the case, go on to step 4.
-
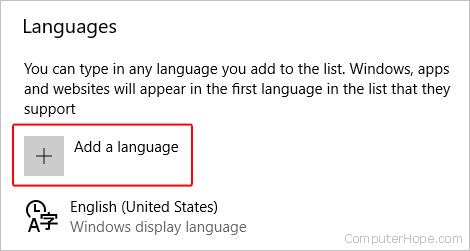
Return to the Language settings page, go to Preferred languages, then select Add a language.
-
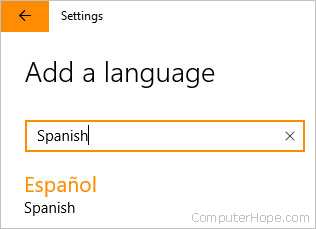
Choose the language you want to use from the list, then select Next.
-
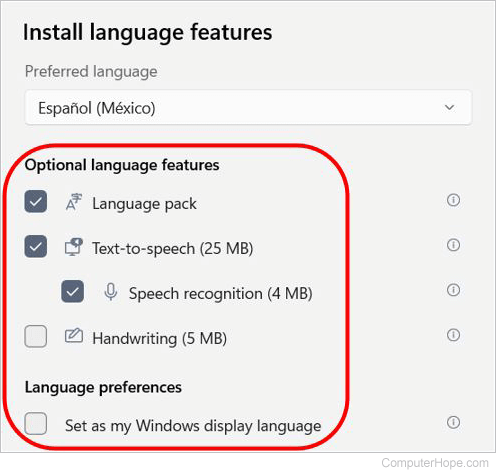
Review any language features you want to set up or install, and select Install.
«Add a keyboard» shortcut
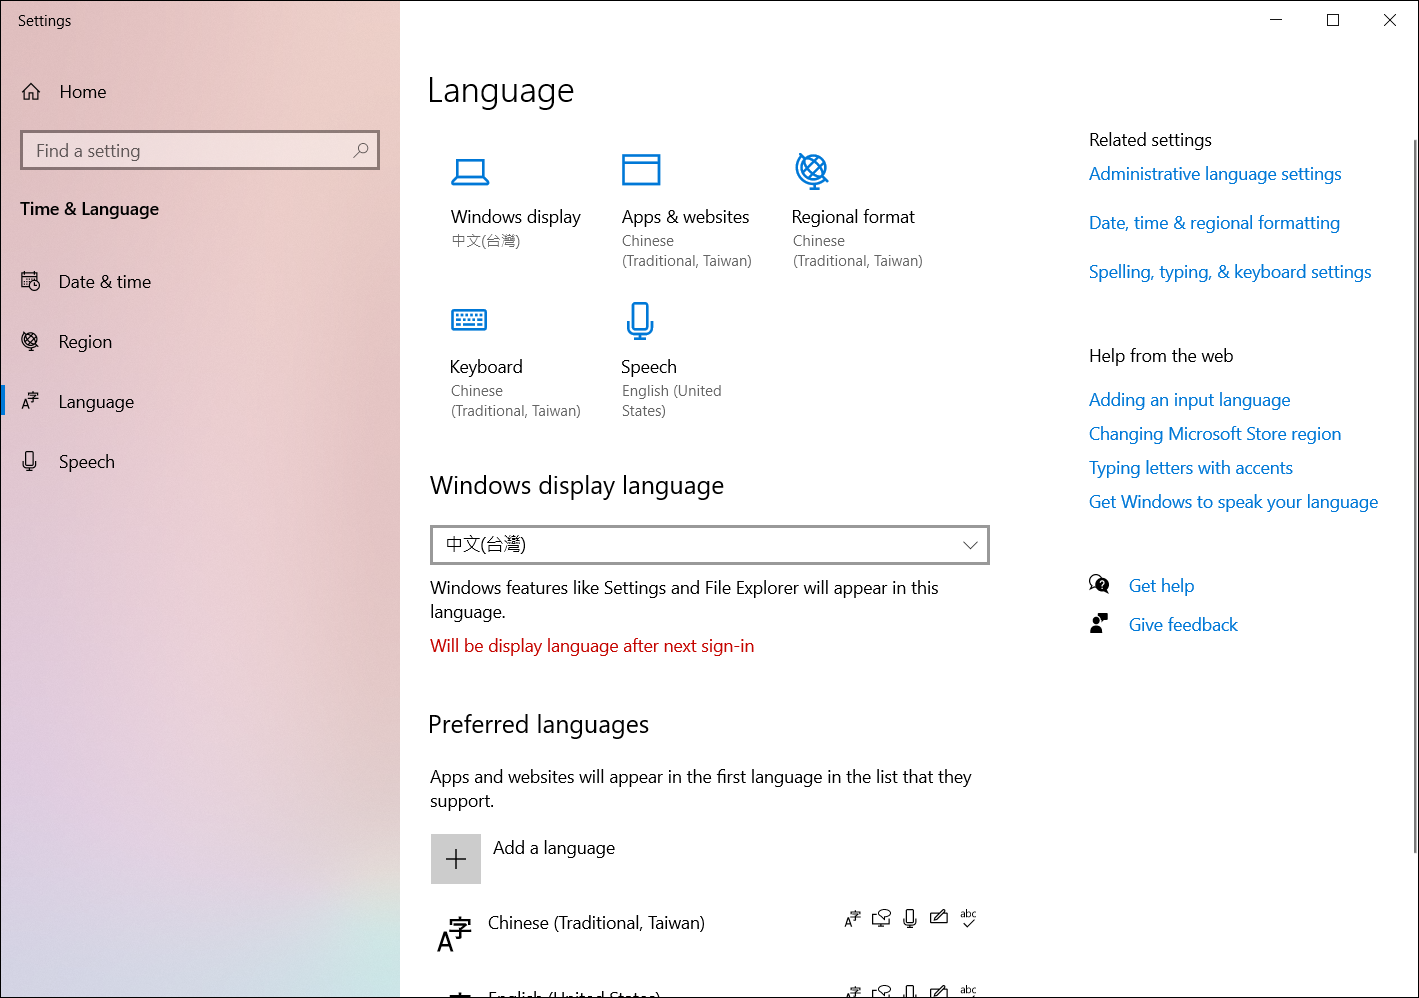
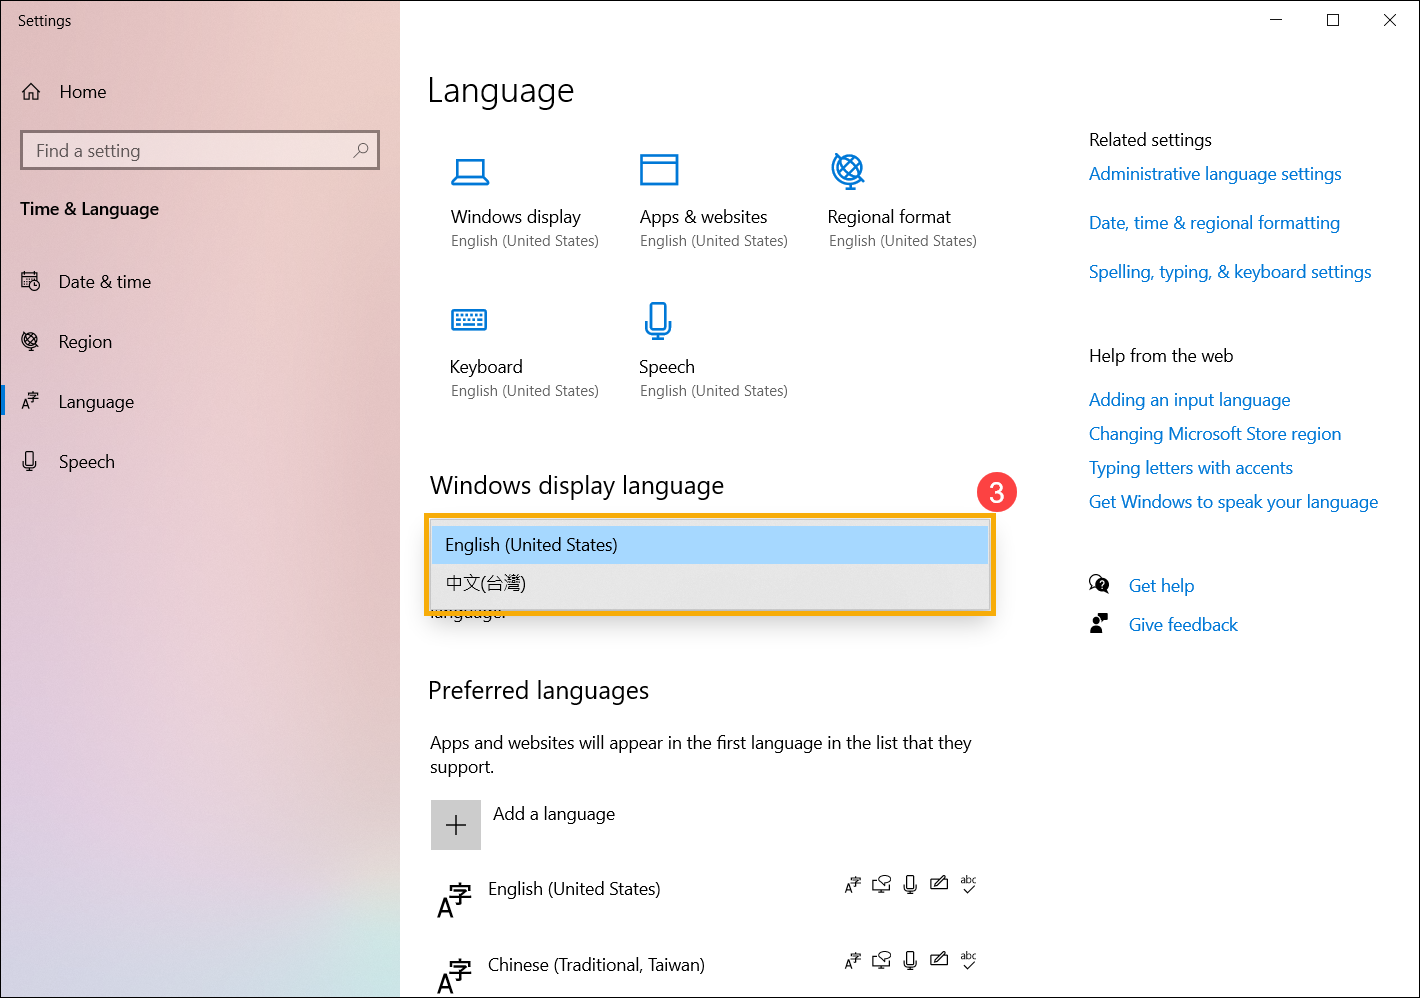
The display language you select changes the default language used by Windows features like Settings and File Explorer.
-
Select Start > Settings > Time & language > Language & region.
-
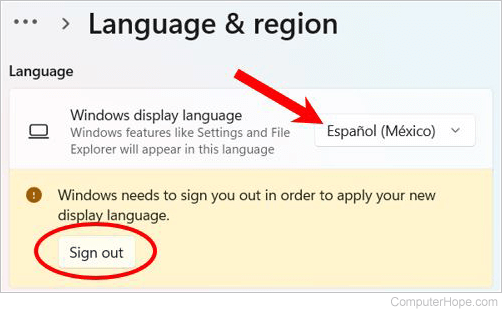
Choose a language from the Windows display language menu.
«Change your display language» shortcut
If a language is listed under Preferred languages but doesn’t appear on the Windows display language list, you’ll first need to install its language pack (if it’s available).
-
Select Start > Settings > Time & language > Language & region.
-
In Preferred languages, select Add a language, enter the language you want, then select Next.
-
Select Download from the Download language pack option.
-
After the language pack is installed, select Back.
-
Choose a language from the Windows display language menu.
«Install a language pack» shortcut
If you receive an «Only one language pack allowed» or «Your Windows license supports only one display language» message, you have a single language edition of Windows 10. Here’s how to check your Windows 10 language edition:
-
Select Start > Settings > About, and then go to the Windows specification section.
-
If you see Windows 11 Home Single Language next to Edition, you have a single language edition of Window 11, and you can’t add a new language unless you purchase an upgrade to either Windows 11 Home or Windows 11 Pro.
Upgrade to Windows 11 Home or Windows 11 Pro
-
Select Start > Settings > Time & language > Language & region.
-
Under Preferred languages, select the language you want to remove, and then select Remove.
-
To remove an individual keyboard, select the language (see step 2), select Options, scroll down to the Keyboards section, select the keyboard you want to remove, and select Remove.
To manage all aspects of the input and display language settings on your Windows 10 device, use the following methods.
To switch the keyboard layout you’re using in Windows 10, press and hold the Windows key and then repeatedly press the Spacebar to cycle through all your installed keyboards. (If this doesn’t do anything, it means you have only one installed.)
You can also select the language abbreviation on the far right of the taskbar and then choose the language or input method you want to use.
Note: In the input field, press Windows +period (.) to access the emoji keyboard, if your language supports this.
If you can’t find the keyboard layout you want, you may have to add a new keyboard.
Adding an input language lets you set a language-preference order for websites and apps, as well as change your keyboard language.
-
Select the Start button, then select Settings > Time & Language > Language.
-
Under Preferred languages, select the language that contains the keyboard you want, and then select Options.
-
Select Add a keyboard and choose the keyboard you want to add. If you don’t see the keyboard you want, you may have to add a new language to get additional options. If this is the case, go on to step 4.
-
Return to the Language settings page, and select Add a language.
-
Choose the language you want to use from the list, and then select Next.
-
Review any language features you want to set up or install, and select Install.
«Add a keyboard» shortcut
Some languages require additional language features
For some languages to work properly, you need an admin on your PC to install the language features. Here’s a list of the languages that are affected:
-
Microsoft IME – Primary keyboard of Japanese
-
Microsoft Pinyin – Primary keyboard of Chinese (Simplified, China), Primary keyboard of Chinese (Simplified, Singapore)
-
Microsoft Wubi – Secondary keyboard of Chinese (Simplified, China), Secondary keyboard of Chinese (Simplified, Singapore)
-
Microsoft Bopomofo – Primary keyboard of Chinese (Traditional, Taiwan), Secondary keyboard of Chinese (Traditional, Hong Kong SAR), Secondary keyboard of Chinese (Traditional, Macao SAR)
-
Microsoft ChangJie – Secondary keyboard of Chinese (Traditional, Taiwan), Secondary keyboard of Chinese (Traditional, Hong Kong SAR), Secondary keyboard of Chinese (Traditional, Macao SAR)
-
Microsoft Quick – Secondary keyboard of Chinese (Traditional, Taiwan), Primary keyboard of Chinese (Traditional, Hong Kong SAR), Primary keyboard of Chinese (Traditional, Macao SAR)
-
Bangla Phonetic – Secondary keyboard of Bengali (India)
-
Gujarati Phonetic – Secondary keyboard of Gujarati
-
Hindi Phonetic – Secondary keyboard of Hindi
-
Kannada Phonetic – Secondary keyboard of Kannada
-
Malayalam Phonetic – Secondary keyboard of Malayalam
-
Marathi Phonetic – Secondary keyboard of Marathi
-
Odia Phonetic – Secondary keyboard of Odia
-
Punjabi Phonetic – Secondary keyboard of Punjabi (Gurmukhi)
-
Tamil Phonetic – Secondary keyboard of Tamil (India)
-
Telugu Phonetic – Secondary keyboard of Telugu
The display language you select changes the default language used by Windows features like Settings and File Explorer.
-
Select the Start button, then select Settings > Time & Language > Language.
-
Choose a language from the Windows display language menu.
«Change your display language» shortcut
If a language is listed under Preferred languages but doesn’t appear on the Windows display language list, you’ll first need to install its language pack (if it’s available).
-
Select the Start button, then select Settings > Time & Language > Language.
-
Choose a language from the Add a language list under Preferred languages, and then select Options.
-
Select Download from the Download language pack option.
-
After the language pack is installed, select Back .
-
Choose a language from the Windows display language menu.
«Install a language pack» shortcut
If you receive an «Only one language pack allowed» or «Your Windows license supports only one display language» message, you have a single language edition of Windows 10. Here’s how to check your Windows 10 language edition:
-
Select the Start button, select Settings > About, and then scroll down to the Windows specification section.
-
If you see Windows 10 Home Single Language next to Edition, you have a single language edition of Window 10, and you can’t add a new language unless you purchase an upgrade to either Windows 10 Home or Windows 10 Pro.
Upgrade to Windows 10 Home or Windows 10 Pro
-
Select the Start button, then select Settings > Time & Language > Language.
-
Under Preferred languages, select the language you want to remove, and then click Remove.
-
To remove an individual keyboard, select the language in question (see step 2), select Options, scroll down to the Keyboards section, select the keyboard you want to remove, and click Remove.
Need more help?
(Image credit: Windows Central)
Although Windows 10 will help you configure the default language during the initial setup, if you didn’t select the correct option or use a computer already configured with a different language, you don’t have to struggle when your requirements are different.
If you have to change the device’s default language settings, you can complete this task using the Settings app without reinstalling Windows 10.
In this Windows 10 guide, we will walk you through the steps to change the system default language on your computer.
How to change default system language on Windows 10
If you happen to be using the incorrect language on Windows 10, you can adjust the system settings to configure the correct language without reinstallation.
Disable language sync
On Windows 10, when using a Microsoft account, some of your preferences (including language) will sync across the device. If you only plan to change the settings on the computer, you should disable the option to sync your language settings to prevent changing the same settings on other devices.
To disable language preference sync on Windows 10, use these steps:
- Open Settings.
- Click on Accounts.
- Click on Sync your settings.
- Under the «Individual sync settings» section, turn off the Language preferences toggle switch.
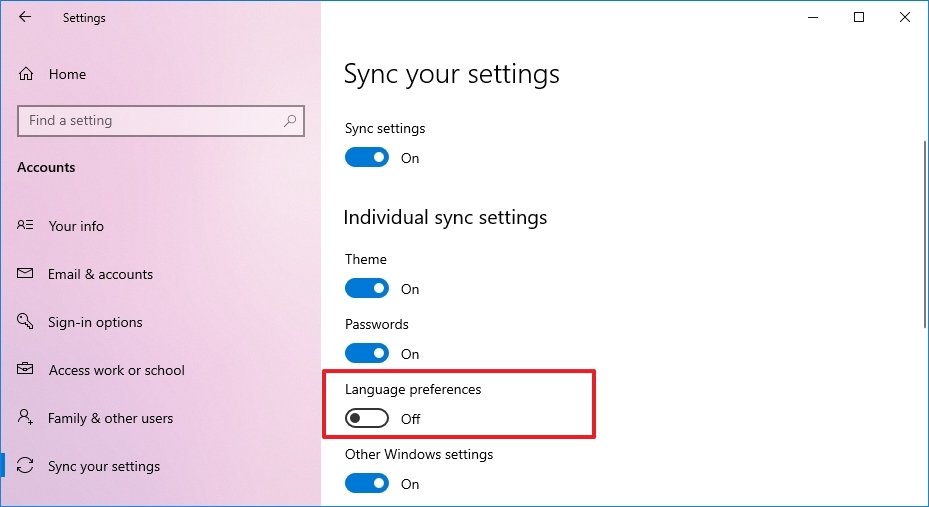
Once you complete the steps, you can change the language settings without affecting the other devices connected with the same Microsoft account.
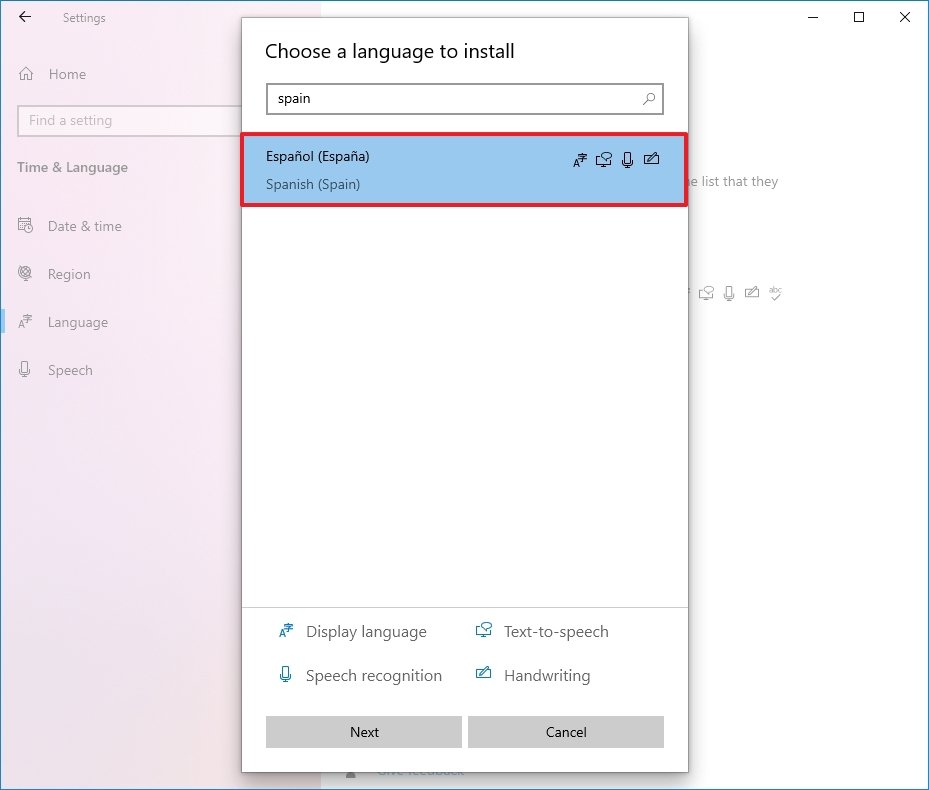
Change system language settings
To change the system default language, close your apps, and use these steps:
- Open Settings.
- Click on Time & Language.
- Click on Language.
- Under the «Preferred languages» section, click the Add a language button.
- Search for the new language using the language or country name.
- Select the package from the result.
- Click the Next button.
- Check the Install language pack option.
- Check the Set as my Windows display language option.
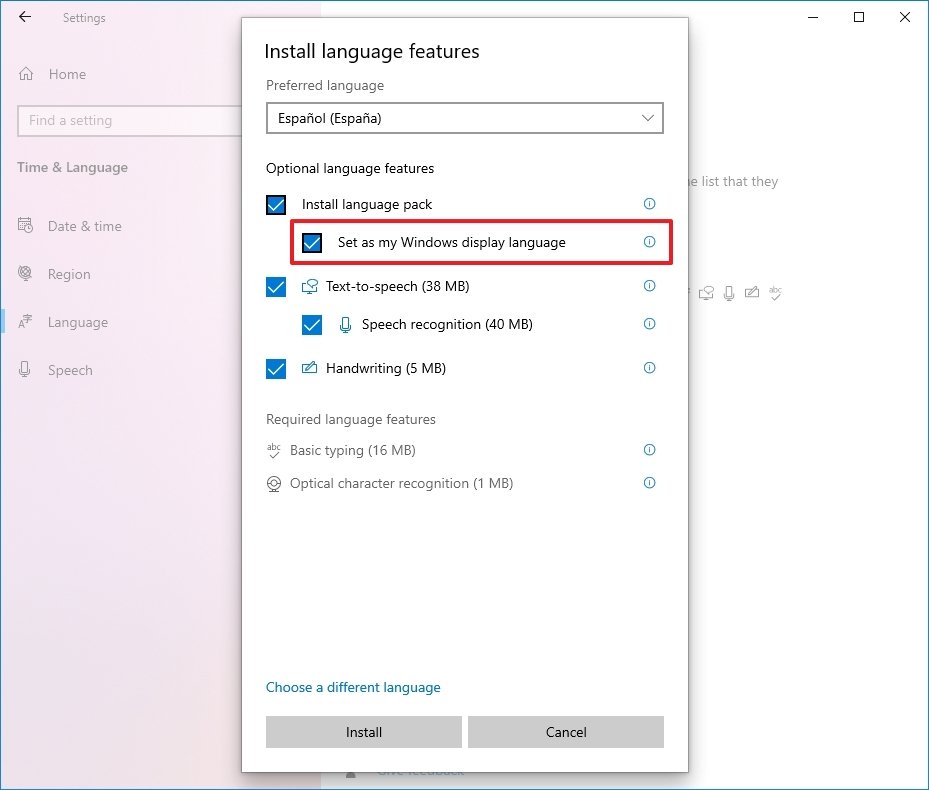
- Check the additional features as needed — for example, «Text-to-speech» and «Handwriting.»
- Click the Install button.
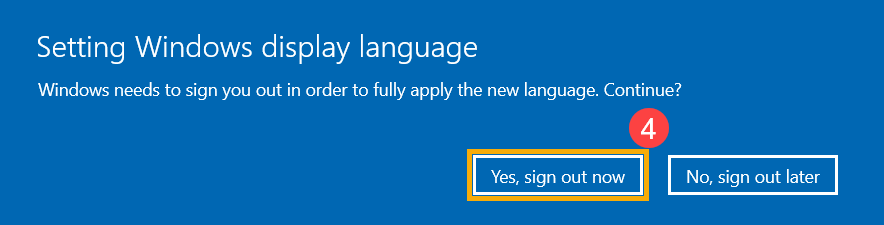
- Click the Yes, sign out now button.
- Sign back into the account.
After you complete the steps, the Windows 10 language will change across the experience, including the Sign-in screen, Settings app, File Explorer, Desktop, apps, browser, and websites you visit.
Change system region settings
You will also have to change the region settings if you need to adjust the language settings because you are in a different region.
To change the local region settings on Windows 10, use these steps:
- Open Settings.
- Click on Time & Language.
- Click on Region.
- Under the «Region» section, select the current location with the «Country or region» drop-down menu (if applicable).
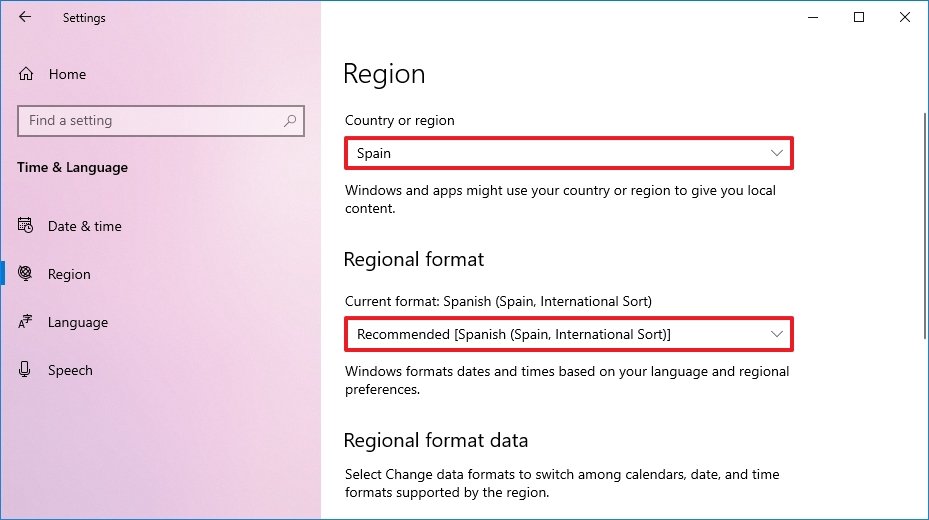
- Under the «Regional format» section, select the formats for the region’s date and time with the «Current format» drop-down menu (if applicable).
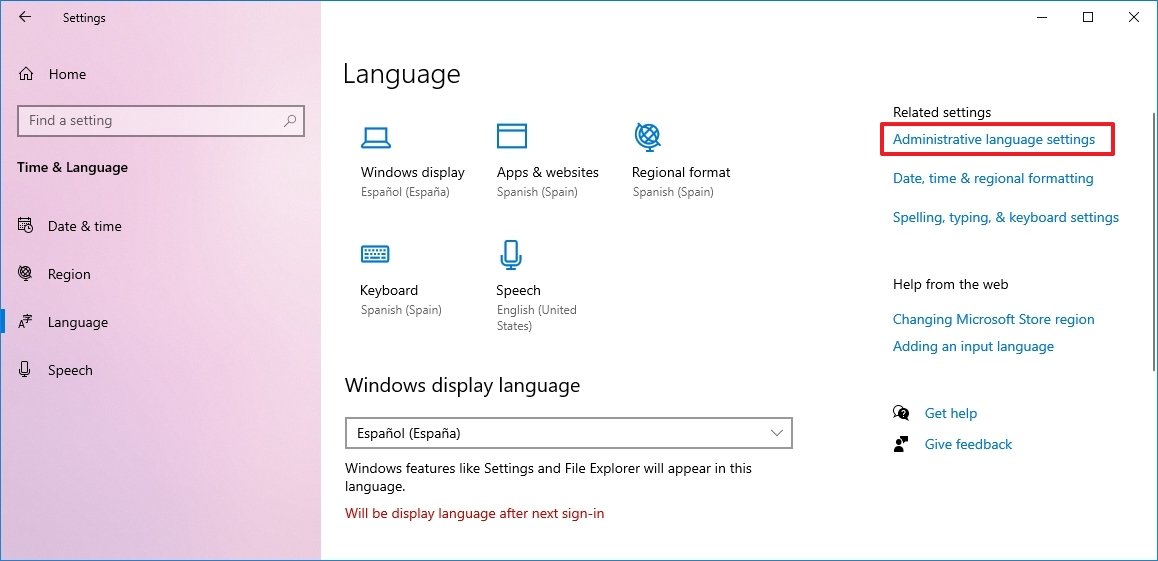
- Click on Language.
- Under the «Related settings» section, click the Administrative language settings option.
- Click the Administrative tab.
- Under the «Language for non-Unicode programs» section, click the Change system locale button.
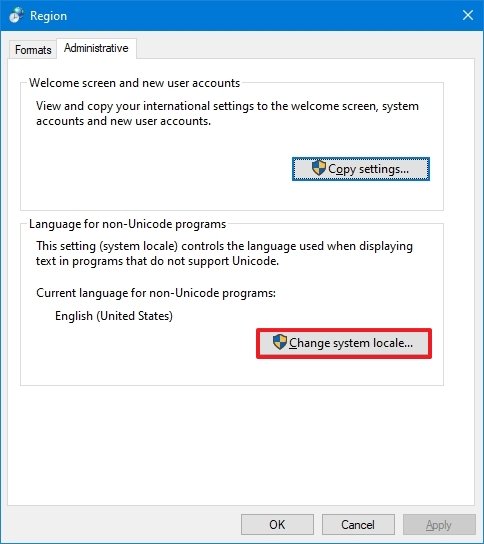
- Select the new system locale language with the «Current system locale» drop-down menu.

- Click the OK button.
- Click the Copy settings button in the «Administrative» tab.
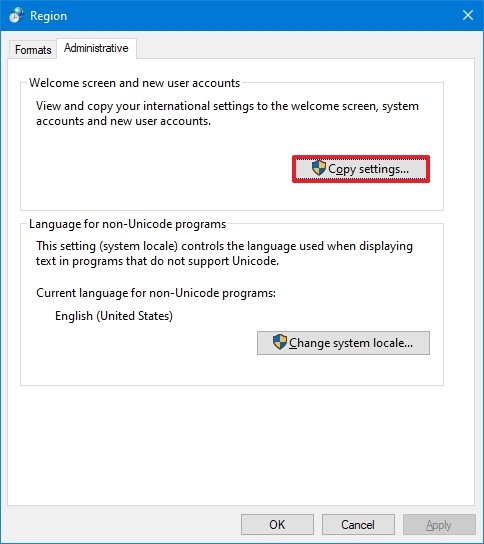
- Under the «Copy your current settings to» section, check the Welcome screen and system accounts and New user accounts options.
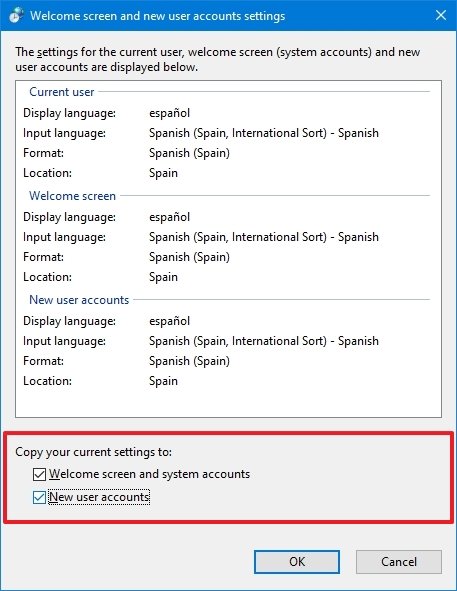
- Click the OK button.
- Click the OK button again.
- Click the Restart now button.
Once you complete the steps, the settings will apply, and the computer will now use the correct region settings.
Usually, you rarely have to change or install additional languages on Windows 10. However, changing these settings may come in handy in organizations working with people who need to use different preferences. It’s also a helpful feature to match the locale settings if you relocate to another region or when buying a new device that ships from a different country.
The only caveat with changing the region settings is that it will also change the settings for the Microsoft Store, which may block access to certain apps and services, depending on the location. In the same way, you can change the region settings to access an application from the Microsoft Store that is only available in a specific region. If you happen to be one of the remaining users using Cortana, consider changing the region settings that may prevent you from accessing the digital assistant.
More Windows resources
For more helpful articles, coverage, and answers to common questions about Windows 10 and Windows 11, visit the following resources:
- Windows 11 on Windows Central — All you need to know
- Windows 11 help, tips, and tricks
- Windows 10 on Windows Central — All you need to know
Get the best of Windows Central in in your inbox, every day!
Mauro Huculak is technical writer for WindowsCentral.com. His primary focus is to write comprehensive how-tos to help users get the most out of Windows 10 and its many related technologies. He has an IT background with professional certifications from Microsoft, Cisco, and CompTIA, and he’s a recognized member of the Microsoft MVP community.
FAQ
In Windows, you can change the display language for system, settings, and function, etc. You can also add multiple languages and switch them anytime.
Note: If you receive an “Only one language pack allowed” or “Your Windows license supports only one display language” message, it means that you have a single language edition of Windows 11/10, you can’t add a new language unless you purchase an upgrade to either Windows 11/10 Home or Windows 11/10 Pro.
Please go to the corresponding instruction based on the current Windows operating system on your computer:
- Windows 11
- Windows 10
Windows 11 operating system
Table of Contents:
- Install language pack
- Change display language
- Uninstall language pack
Install language pack
When installing a new language pack, Windows needs to connect to the internet to download it. Please make sure your laptop is in an available network environment.
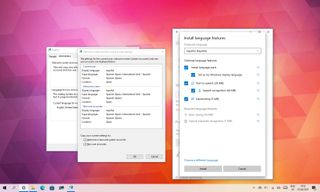
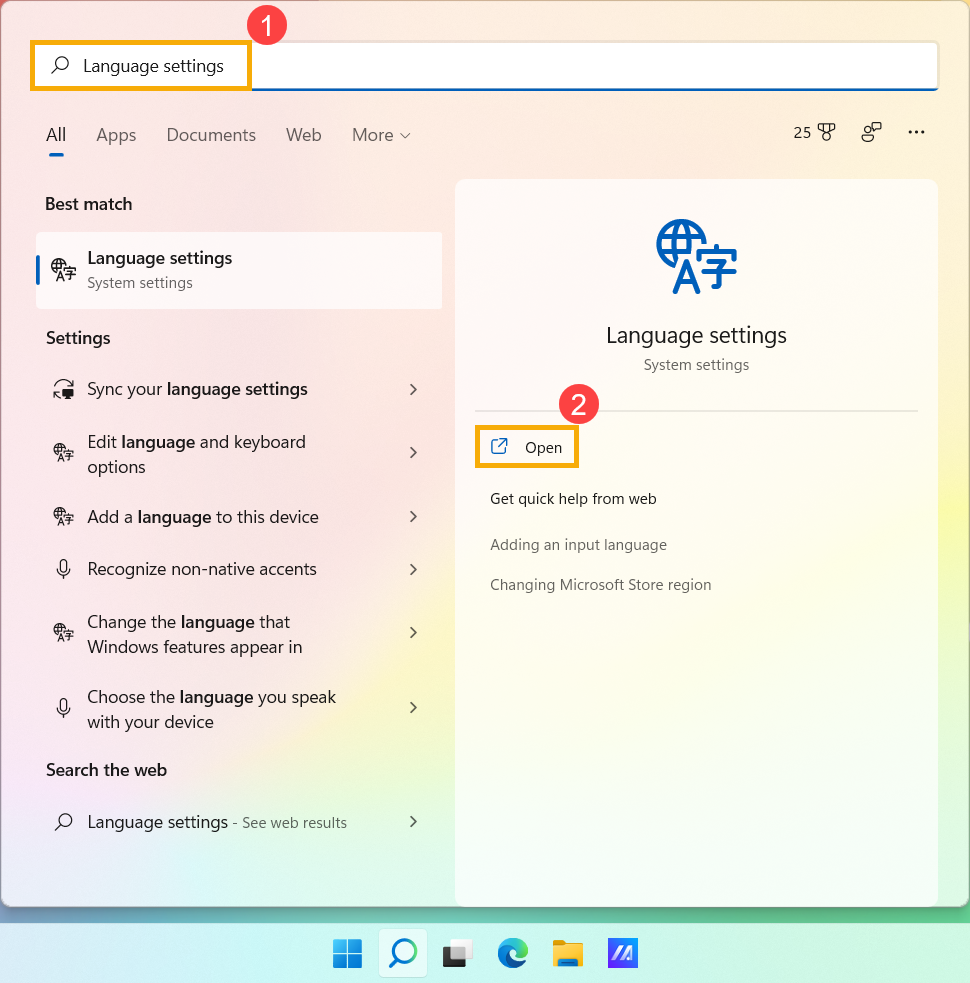
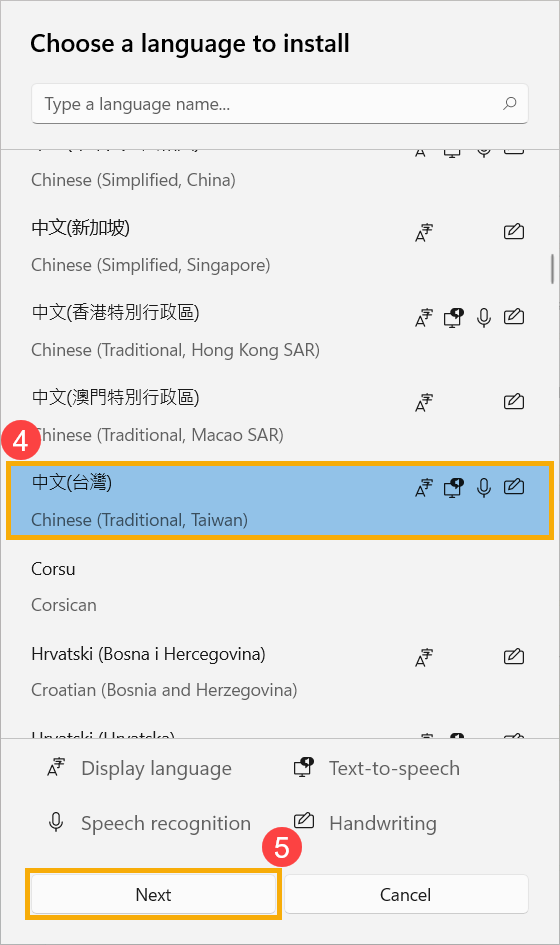
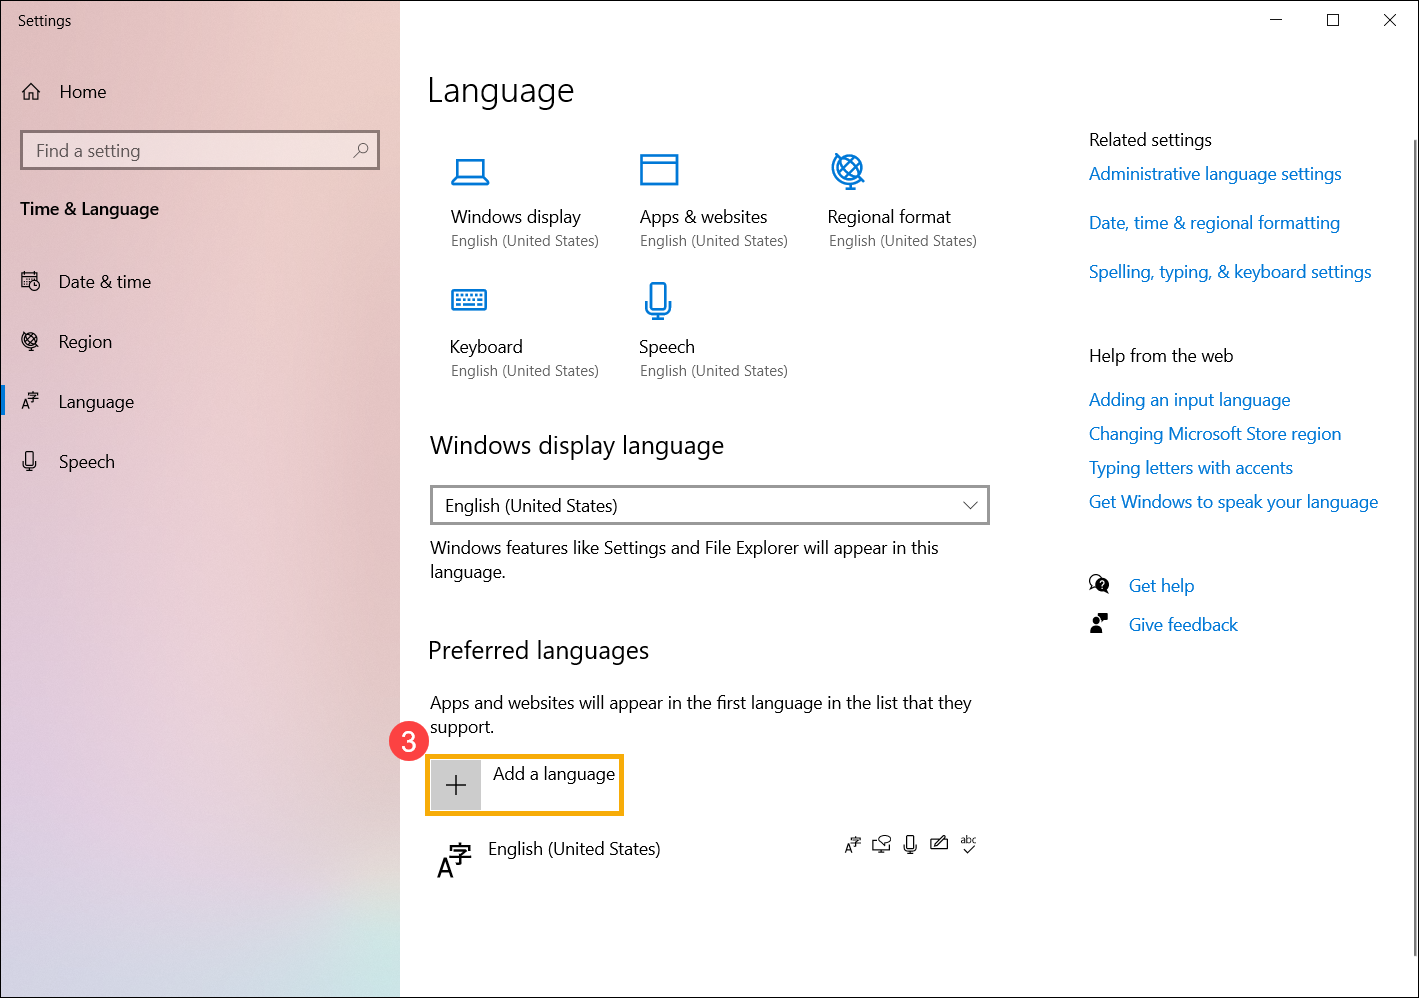
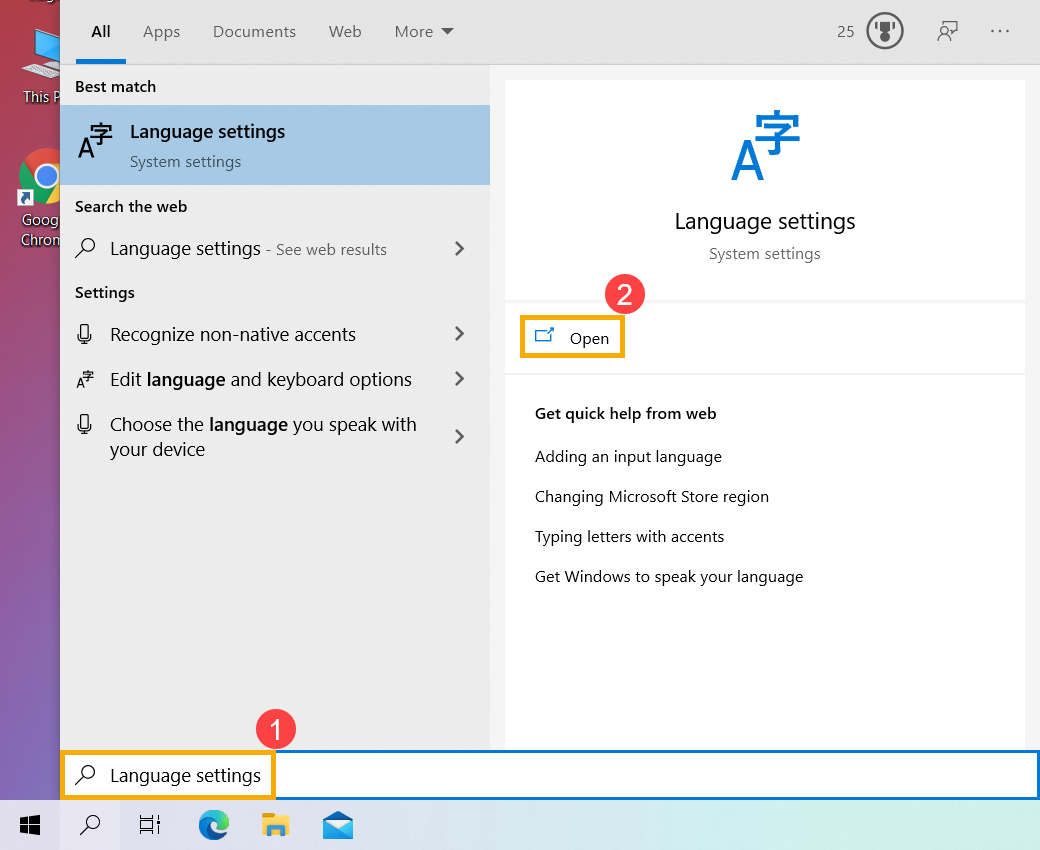
- Type and search [Language settings] in the Windows search bar①, and then click [Open]②.

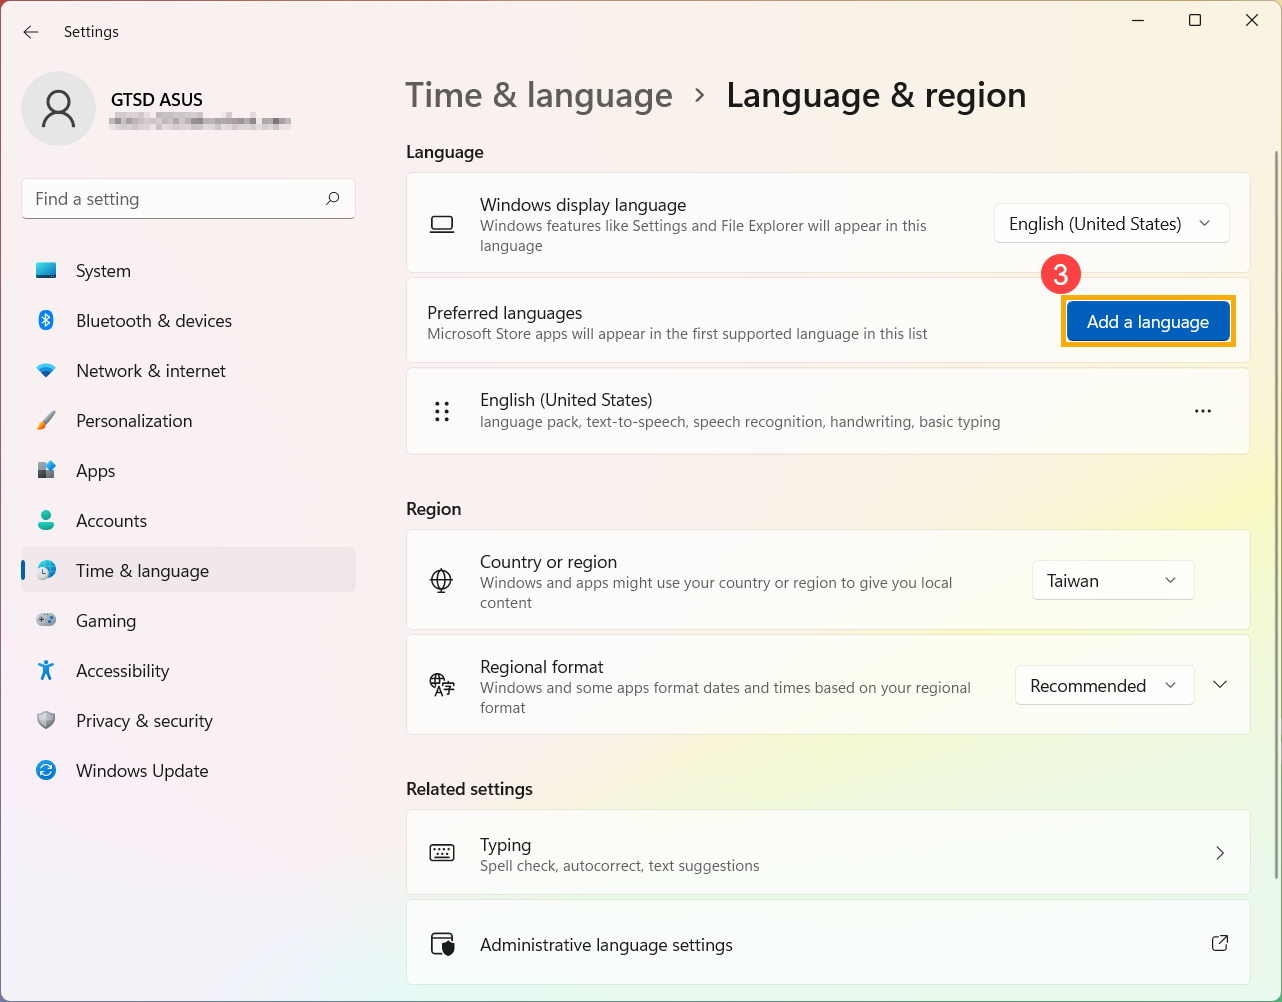
- In preferred languages, click [Add a language]③.
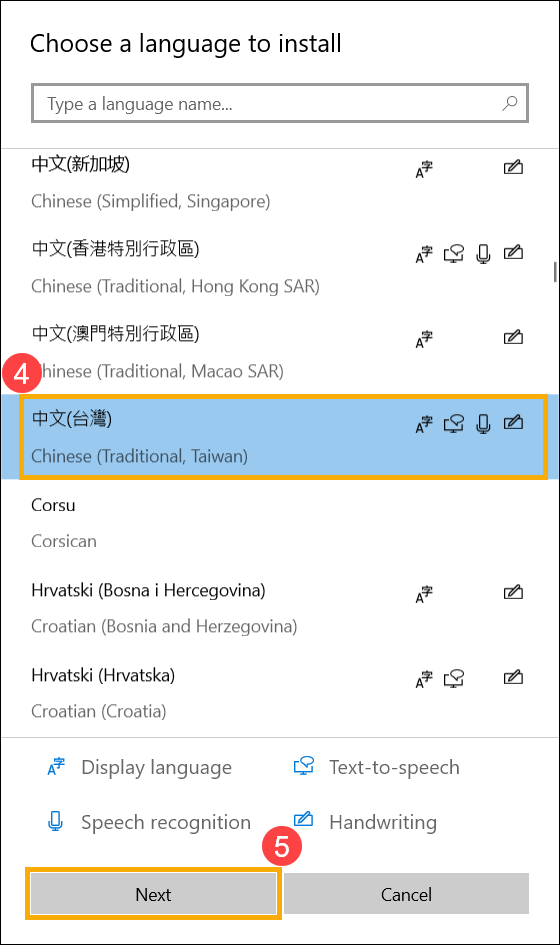
- Choose a language you want to install from the list④, and then select [Next]⑤. The following takes Chinese (Traditional, Taiwan) as a reference.
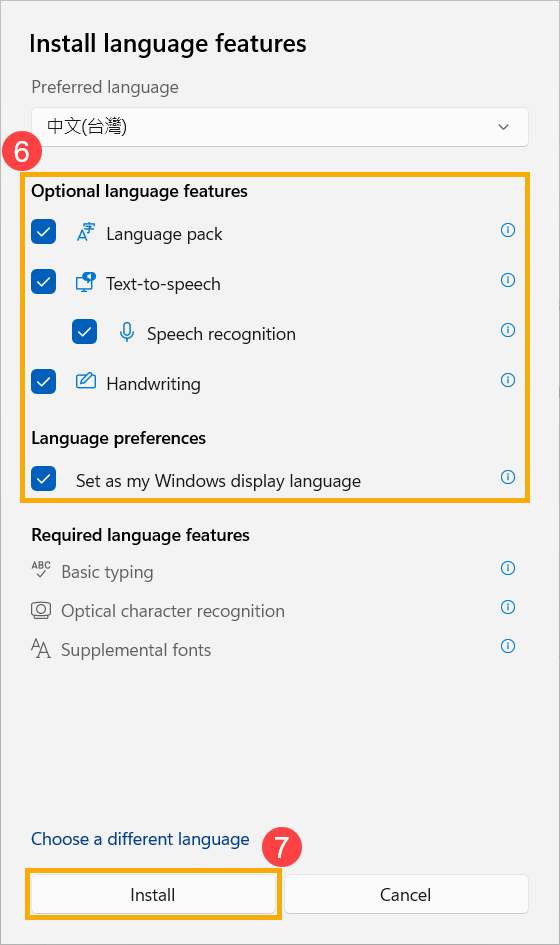
- You can select the language features that you want to install⑥, and then select [Install]⑦. Windows will start to download and install the language pack and related features.
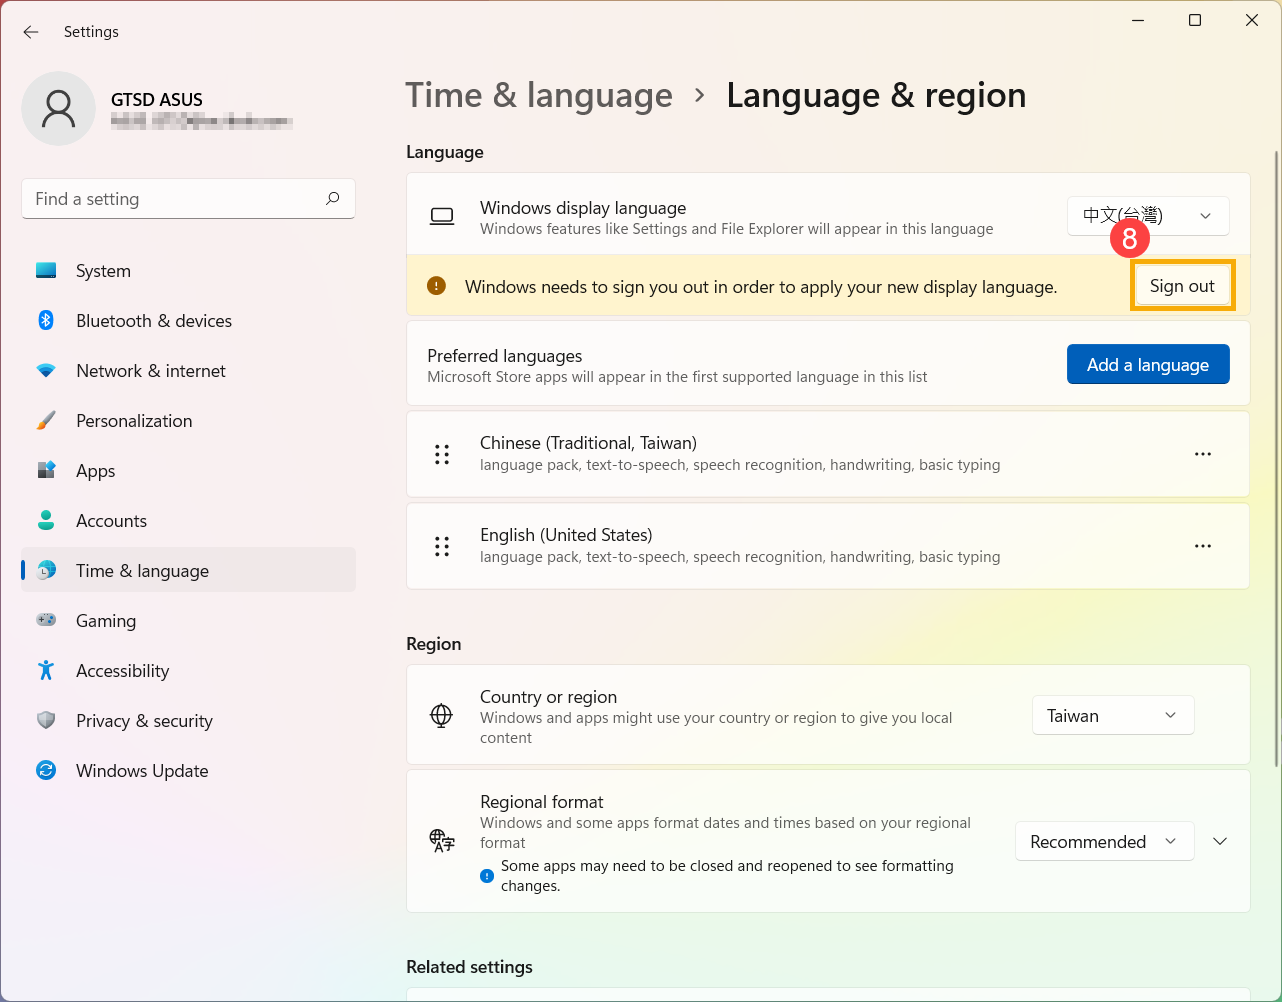
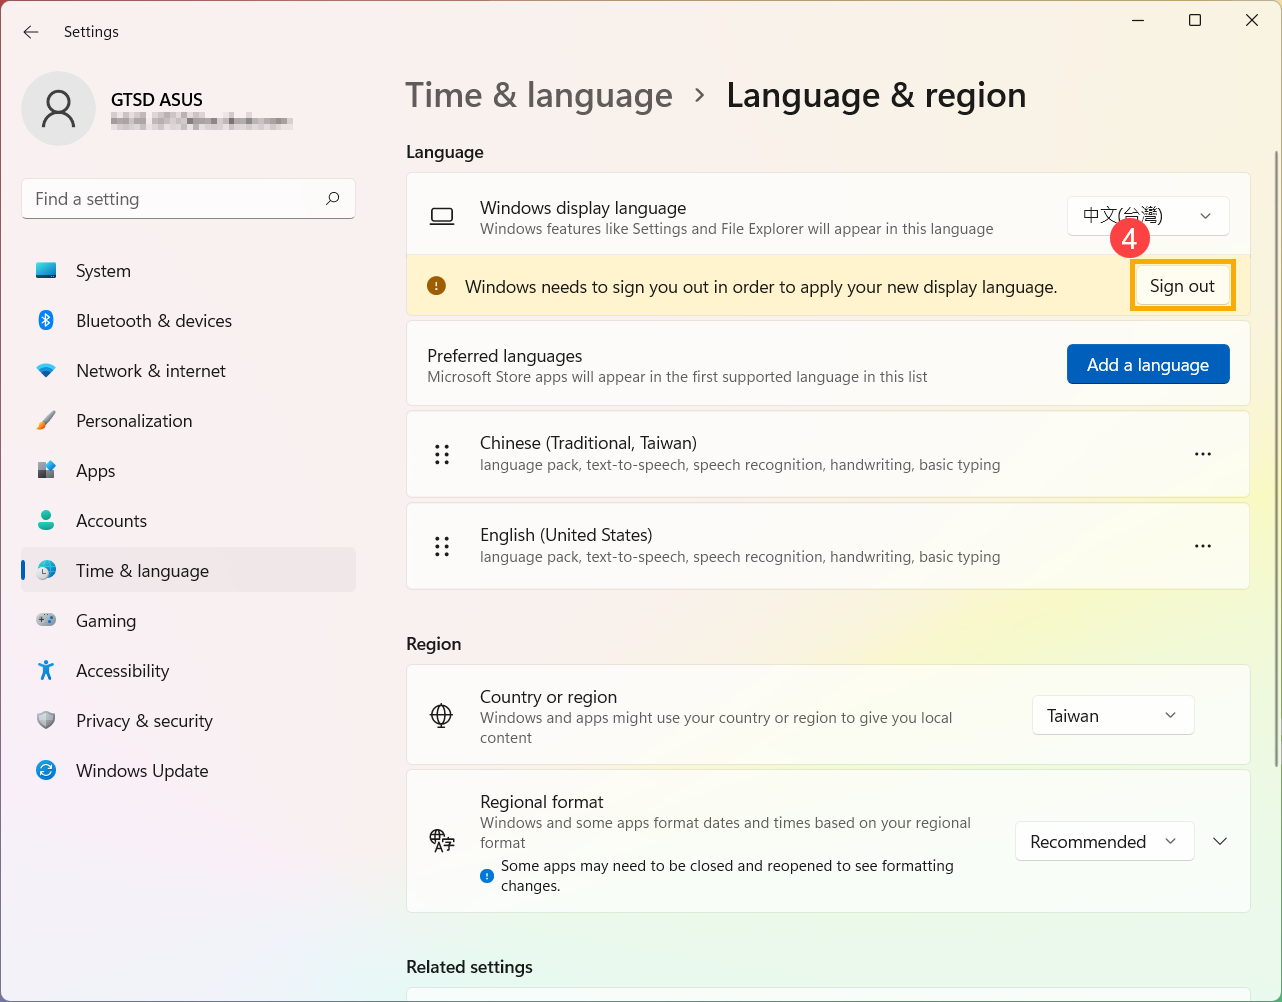
- If you had selected Set as my Windows display language in the previous step, you will receive the following notification after the language pack installation is completed. You can select [Sign out]⑧, and the computer will sign out to apply the language. Please make sure all your works have been saved before signing out.
If you don’t select sign out, Windows will change the display language next time when you sign in.
Back to Table of Contents
Change display language
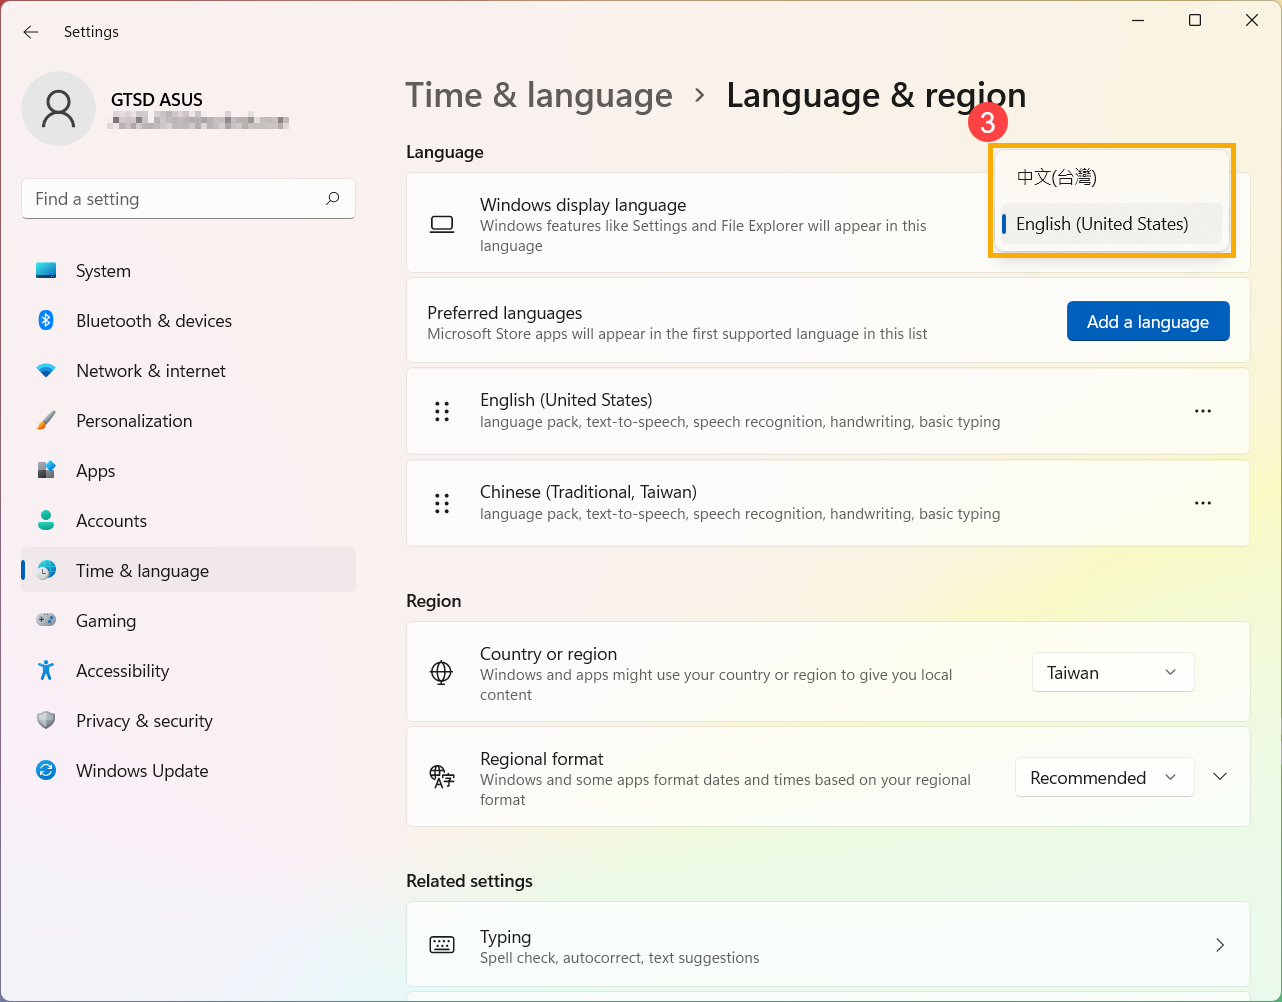
If you have downloaded several language packs, you can switch the display language anytime.
- Type and search [Language settings] in the Windows search bar①, and then click [Open]②.
- Select the language you want from the drop-down menu under Windows display language③.
- After selecting the Windows display language, you will receive the following notification. You can select [Sign out]④, and the computer will sign out to complete the system language changes. Please make sure all your works have been saved before signing out.
If you don’t select sign out, Windows will change the display language next time when you sign in.
Back to Table of Contents
Uninstall language pack
Installing multiple language packs might affect the hard drive space, so you are able to uninstall the language packs you will no longer use.
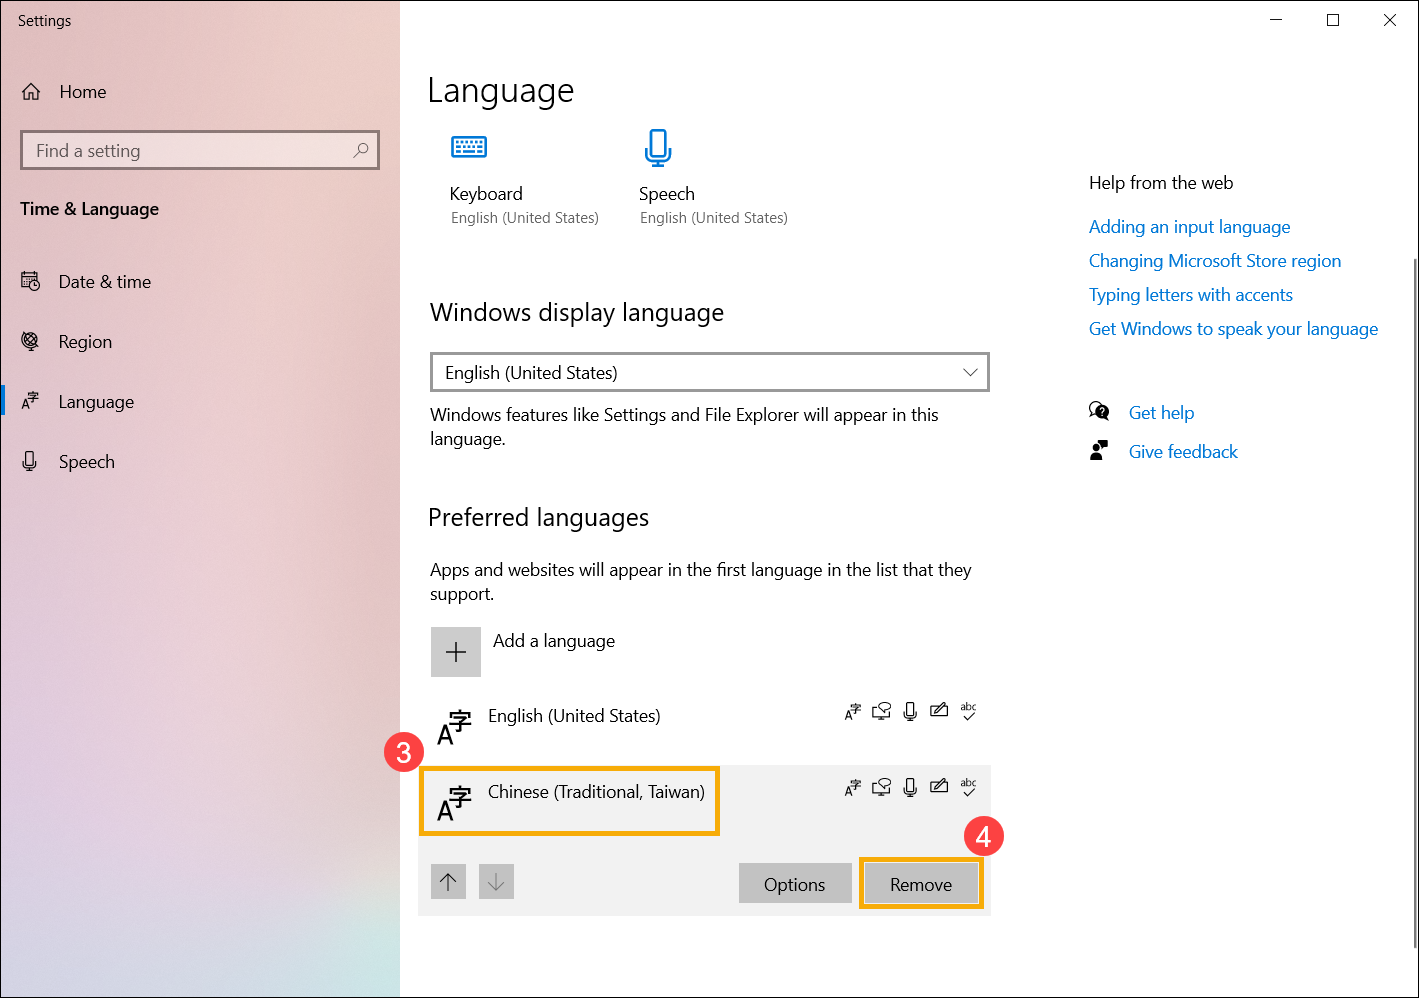
- Type and search [Language settings] in the Windows search bar①, and then click [Open]②.
- Select the [More] icon③ next to the language you want to remove, and then click [Remove]④. The language packs and all corresponding keyboard languages will be removed.
 icon
icon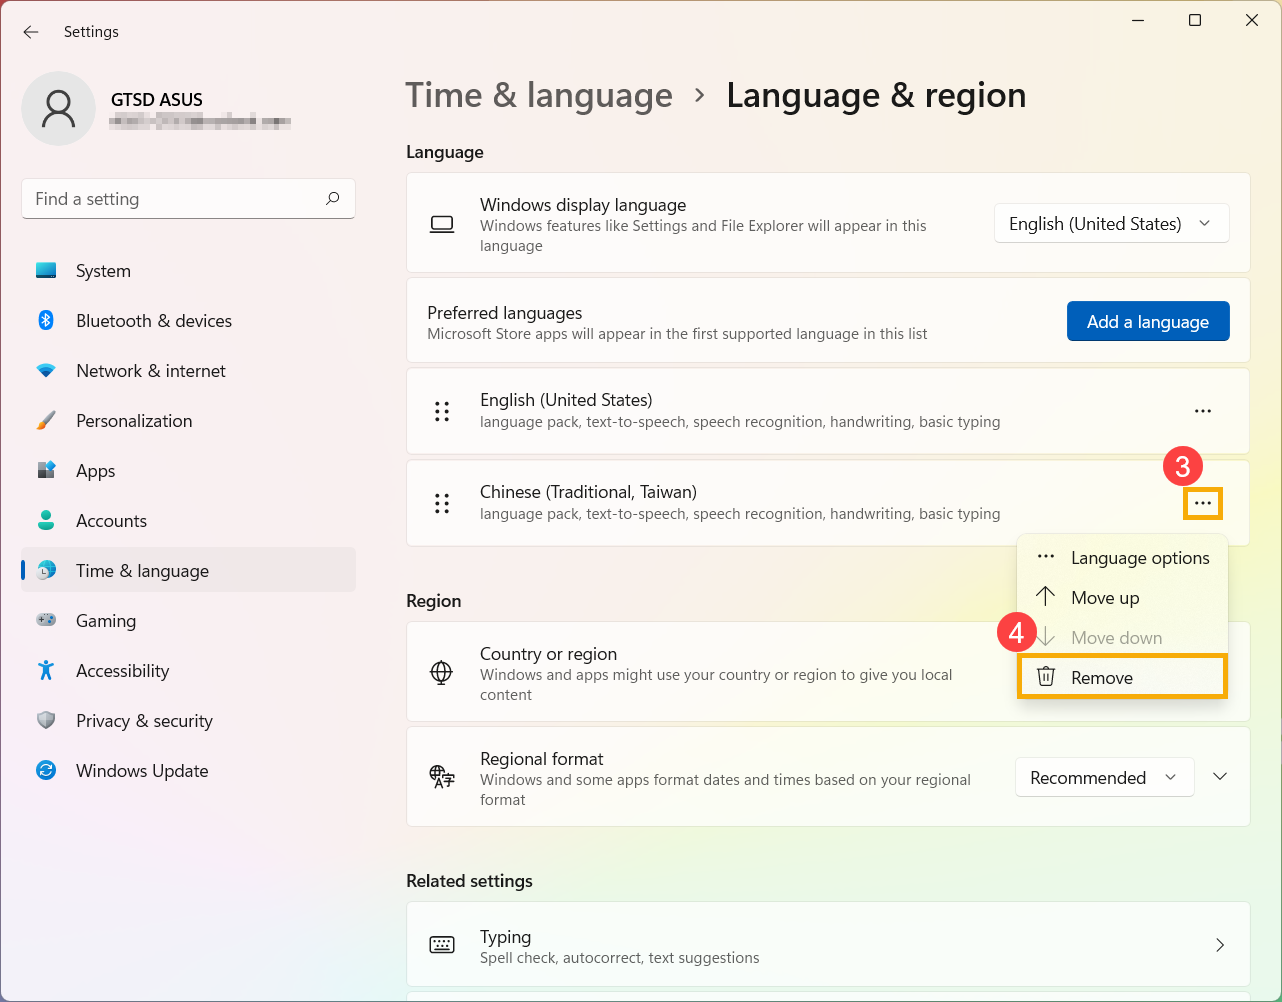
Back to Table of Contents
Windows 10 operating system
Table of Contents:
- Install language pack
- Change display language
- Uninstall language pack
Install language pack
When installing a new language pack, Windows needs to connect to the internet to download it. Please make sure your laptop is in an available network environment.
- Type and search [Language settings] in the Windows search bar①, and then click [Open]②.
- In preferred languages, click [Add a language]③.
- Choose a language you want to install from the list④, and then select [Next]⑤. The following takes Chinese (Traditional, Taiwan) as a reference.
- You can select the language features that you want to install⑥, and then select [Install]⑦. Windows will start to download and install the language pack and related features.
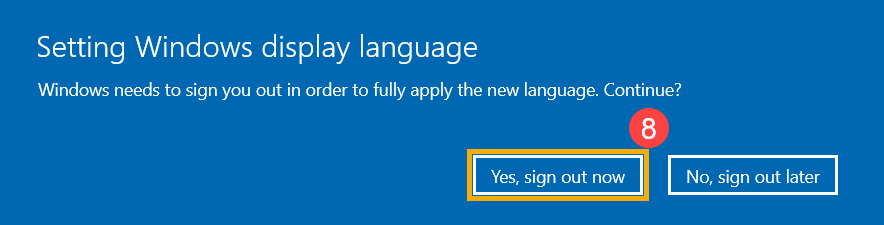
- If you had selected Set as my Windows display language in the previous step, you will receive the following notification after the language pack installation is completed. You can select [Yes, sign out now]⑧, and the computer will sign out to apply the language. Please make sure all your works have been saved before signing out.
If you select to sign out later, Windows will change the display language next time when you sign in.


Back to Table of Contents
Change display language
If you have downloaded several language packs, you can switch the display language anytime.
- Type and search [Language settings] in the Windows search bar①, and then click [Open]②.
- Select the language you want from the drop-down menu under Windows display language③.
- You can select [Yes, sign out now]④, and the computer will sign out to complete the system language changes. Please make sure all your works have been saved before signing out.
If you select sign out later, Windows will change the display language next time when you sign in.


Back to Table of Contents
Uninstall language pack
Installing multiple language packs might affect the hard drive space, so you are able to uninstall the language packs you will no longer use.
- Type and search [Language settings] in the Windows search bar①, and then click [Open]②.
- Select the language you want to remove③, and then select [Remove]④. The language packs and all corresponding keyboard languages will be removed.
Back to Table of Contents
-
Category
Windows Setting/ Operation -
Type
Product Knowledge
Was this information helpful?
Yes
No
- Above information might be partly or entirely quoted from exterior websites or sources. please refer to the information based on the source that we noted. Please directly contact or inquire the sources if there is any further question and note that ASUS is neither relevant nor responsible for its content/service
- This information may not suitable for all the products from the same category/series. Some of the screen shots and operations could be different from the software versions.
- ASUS provides the above information for reference only. If you have any questions about the content, please contact the above product vendor directly. Please note that ASUS is not responsible for the content or service provided by the above product vendor.
- Brand and product names mentioned are trademarks of their respective companies.
Things You Should Know
-
1
Open Start
. Click the Windows logo in the bottom-left corner of the screen.
- You can also press the Windows key on your keyboard to open Start.
-
2
Click Settings
. This gear-shaped icon is in the lower-left side of the Start window.
Advertisement
-
3
Click Time & language. It’s in the middle of the Settings window.
-
4
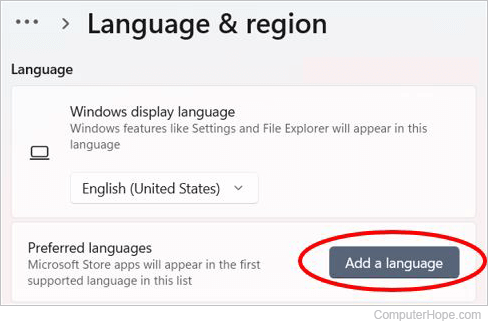
Click the Region & language tab. You’ll find this on the far-left side of the window.
-
5
Click Add a language. It’s next to a large + sign in the middle of the page, below the «Languages» heading.
-
6
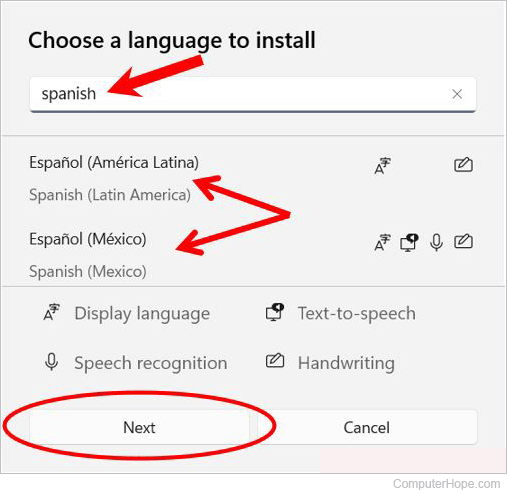
Select a language. Click the language you want to use on your computer.
-
7
Select a dialect. If clicking your preferred language brings you to a page with different regional dialects available, click a dialect to select it.
- This may not be available for your selected language.
-
8
Click your added language. It should be below your current default language in the «Languages» section of the window. Doing so will expand the language’s box.
-
9
Click Options. This button appears below the language. Doing so opens the language’s Options window.
-
10
Download the language pack. Click Download below the «Download language pack» heading in the upper-left side of the page.
-
11
Click Back
. It’s in the top-left corner of the screen.
-
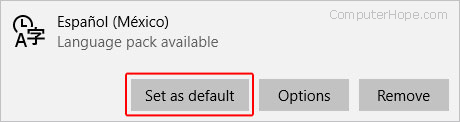
12
Click the language again, then click Set as default. You’ll find this button below the language. Doing to will move the language to the top of the «Languages» section and set it as the default for all built-in menus, apps, and other display options.
-
13
Restart your computer. Open the Start menu, click Power
, and click Restart. Once your computer restarts and you sign back into your account, your selected language will be in place.


Advertisement
-
1
Open the Apple menu
. Click the Apple logo in the top-left corner of the screen. A drop-down menu will appear.
-
2
Click System Preferences. It’s near the top of the drop-down menu.
-
3
Click Language & Region. It’s a flag-shaped icon near the top of the System Preferences window.
-
4
Click +. This icon is below the bottom-left corner of the «Preferred language:» box on the left side of the Language & Region window. Doing so prompts a pop-up window with different languages.
-
5
Scroll to select the language you want, then click Add.
-
6
Click Use [Language] when prompted. This is the blue button in the bottom-right corner of the window. Doing so will set your computer’s default display language to the added language.
- If you miss this step, just click and drag the language you added from the bottom of the «Preferred languages» box to the top.
-
7
Restart your Mac to complete the language change.


Advertisement
Add New Question
-
Question
What if I don’t understand the language it is in?

KingTehMasteh Games
Community Answer
If you have a phone, try downloading Google Translate. Then take a picture of the words and it will translate.
-
Question
If you press «Restart», would that restart your computer and make you have to set it up all over again?
DonutAtwork.com
Community Answer
If you had saved the setting, it would not revert back upon restarting. If it does, try Windows update and update your computer to the latest settings.

Ask a Question
200 characters left
Include your email address to get a message when this question is answered.
Submit
Advertisement
-
Changing your computer’s language won’t change the language for all apps, programs, menus, and so on. When downloading software, you’ll still have to select your preferred language as part of the installation process.
Thanks for submitting a tip for review!
Advertisement
-
Be sure not to change the language on your computer to something you don’t understand or can’t easily backtrack through.
Advertisement
About This Article
Article SummaryX
1. Open your Windows Settings.
2. Click Time & Language.
3. Click Region & language.
4. Click Add a language.
5. Select a language.
6. Select a dialect.
7. Click Options.
8. Download the language pack.
9. Set the language as default.
Did this summary help you?
Thanks to all authors for creating a page that has been read 337,920 times.
Is this article up to date?
Updated: 07/31/2022 by

The Microsoft Windows operating system allows users to change the display language from one language to another, including Spanish, French, German, and Arabic. Some restrictions may apply, depending on the version of Windows. Follow the steps below for your version of Windows to change the display language settings.
Windows 11
- Press the Windows key, type Language settings, and then press Enter.
- In the window that appears, click the Add a language button under the Language section.
- Type a language to add or select from the list.
- After you select a language, click the Next button.
- In the Install language features window, select or deselect any optional language features you want to install.
- You should now see the new language under the Languages section.
- Click the Install button to install the new language. The installation process may take several minutes to complete.
- After the new language is installed, select it from the Windows display language drop-down menu.
- Use the Sign Out button to sign out and then sign back into Windows, with the new language now set as the default language.
Windows 10
- Press the Windows key, type Regional & language settings, and then press Enter.
- In the window that appears, click the
 icon.
icon.
- Type a language to add or select from the list.
- After you select a language, you are asked to pick a region.
- You should now see the new language under the Languages section.
- Click the new language again and click the
 button.
 - In the screen that appears, under Language options, click the
 button.
 - Once the new language is downloaded, return to the previous screen.
- Click the new language again, and then click the Set as default button.
- Restart your computer to display the new language.
Windows 8
- Open the Control Panel.
- Under the Clock, Language, and Region section, click the Add a language link.
- Under Change your language preferences, click the Add a language option.
- Select the language you want to add and click the Add button.
Note
Some languages have sub-options or different dialects you need to choose. If the Add button changes to «Open,» you must select a sub-option for that language.
- The selected language is added to the language list. To make the added language the primary language, click the language in the list and click Move up until it’s at the top.
The language pack you added may need to be downloaded and installed in Windows 8 before you can use it. Next to the language name, if it says «Windows display language: Available for download,» follow the steps below.
- Click the Options link to the right of the language name.
- Click the Download and install language pack link under the Windows display language section.
- After the download and install process is completed, restart the computer for the new display language to take effect.
Windows 7 and Vista
Note
Changing the language in Windows 7 requires you to have the Ultimate edition or Enterprise edition. Home and Professional editions do not have the language option.
In Windows 7, you first need to download and install the language pack you want to use. Then you can select and change the display language.
Download and install the language pack
- Open the Start menu and navigate to All Programs > Windows Update.
- Click the Optional Updates option.
- Check the box for the language pack you want to download and install, then click OK.
- Run the Install Updates process to download and install the language pack.
Change display language
- Open the Control Panel.
- Click the Clock, Language, and Region option.
- Click the Change the display language link.
- In the Choose a display language drop-down list, select the language you want to use as the display language and click OK.
- Restart the computer for the new display language to take effect.
When installing Windows, you are asked to select the default language for your PC. But if you prefer to change this language later? Or multiple users access the PC; you might want to change default language without reinstalling Windows. Right?
In this guide, we will discuss simple ways to easily change language settings on Windows 10, including new and existing accounts.
How To Change Default System Language Windows 10
If you are moving to another region or have selected incorrect language while configuring Windows, follow the steps to change the language to English or your preferred language on Windows 10.
Note: To apply changes, sign in to Windows 10, and use an administrative account.
- Disable Language Sync
- Installing Language in Windows 10
- Change System Language
- Change Regional Settings, Welcome Screen and New User Accounts
- Adding New Keyboard
Additional Information
- Removing Language from Windows 10
- Uninstalling Language Pack
Disable Language Sync
Language settings on Windows 10 sync across devices; therefore, before making any changes, let’s learn how to disable language settings on Windows 10. Once you do so, the system language will be changed for only one PC.
1. To disable language sync on Windows 10, follow the steps below:
2. Press Windows + I to open Windows Settings.
Click Accounts > Sync your settings from the left pane.


Note: Make sure you are signed into Microsoft account; otherwise, all the options will be greyed out like in the screenshot.
3. Next, under “Individual sync settings” section, disable “Language preferences.”

4. You are now all set to make language setting changes.
Installing Language in Windows 10
To install language on Windows 10, you’ll need to log in using an administrative account. Once signed in, follow the steps below to install language in Windows 10:
1. Press Windows + I to open the Settings window
2. Hit Time & Language option

3. Choose language > Add a preferred language.

4. Look for the language you want to add, select it, and click Next.

5. Make sure the Install language pack box is checked. Alongside, if you want to set it as display language, select Set as my display language.

6. Once all settings are set, click Install. Wait for the action to finish.

7. When done, you will see the installed language
 8. To add this language as default app language, use the up-arrow key

9. This will make the selected language the default input, app language.
10. The changes will be applied after you restart the PC and sign in.
Change System Language
To alter system language on Windows 10, close running application, and follow the steps given below:
- Press Windows + I
- Click Time & Language > Add a preferred language.
- Select the language you want to add > Next
- Check the box next to Set as display language > Install
- This will make selected language default system language as the next reboot and Sign-in.
Change Regional Settings, Welcome Screen and New User Accounts
If you are relocating and want to change system language, you’ll need to update region settings.
To change regional settings on Windows 10, follow the steps below:
1. Open Windows Settings by pressing Windows + I key
2. Press Time & Language > Region
3. Click the down arrow to select a Country or region.

4. To change Regional format, click the down arrow.
5. Next, click the Language option present in the left pane.

6. Here, click Administrative language settings.

7. Hit the Administrative tab in the new window and click Copy settings.

8. Next, checkmark the box next to Welcome screen and system accounts & New user accounts > Ok > Ok.

9. Click Restart now button.
Afterward, you will see changed region settings according to the physical location you selected. Use the same steps when you want to change display language settings for complete Windows 10.
Adding New Keyboard
When language in Windows 10 is changed, a standard keyboard for that language is also added. To add another keyboard head to Settings (Windows + I) > Time & Language > Language. Select the language for which you want to add the keyboard > Options.
On the following screen, click Add a keyboard > choose the keyboard from the list.


Once done, you will see the selected keyboard under keyboards.
Note: When more than one input method is added, you see the selected keyboard in the system tray (the one with time and date). Either press Win + space bar or click the language to change input methods. If you press Windows key + spacebar do not leave Windows key until the language is selected

Additional Information
How to Remove a Language from Windows 10
If you have added a language to Windows 10 for a guest and now since the guest has left, would like to remove it. Follow the steps below:
- Open Windows Settings by pressing Windows + I keys
- Click Time & Language > Language
- Here, in the right pane, you will see all the installed languages.
- Select the language you want to delete and click Remove button

This will uninstall selected language from the Windows 10 operating system.
Note: If you have only one language pack installed you will not see a language indicator in the system tray
Manually Uninstalling Language Packs from Windows 10
If you don’t want to follow so many steps, you can uninstall the language pack using a simple command. To use it, follow the steps below:
Press Windows + R keys
This will open the Run window here enter Lpksetup /u
This will launch the Install or uninstall display languages box. Select the language you wish to uninstall and click Next.

The progress bar will tell about successful command completion. Once done restart Windows, the selected language pack will now be uninstalled from Windows 10.
Hope now you have understood how to change system language settings on Windows 110. You can follow these simple steps, whether you need to change display language settings, keyboard, or default system language settings.
If all this language change seemed exciting, check out the best language learning apps.