![]()
Download Article
Multiple ways to check your BIOS version on Windows and Mac
![]()
Download Article
A computer’s BIOS is the firmware interface between a computer’s hardware and its operating system. Like any software, the BIOS can be updated. Knowing your computer’s BIOS version can tell you if you have the most up-to-date version of the BIOS. Learn how to check your BIOS version from the Command Prompt, from your computer’s BIOS menu, on a Windows 8 computer, and how to check the firmware version of a Mac.
-

1
Click the Start menu, and then click Run.
- In Windows 8, right-click the Start menu, and then click Run. You can also access this menu by pressing the WIN + X keys.[1]
- In Windows 8, right-click the Start menu, and then click Run. You can also access this menu by pressing the WIN + X keys.[1]
-
2
In the Run dialog box, type cmd.
Advertisement
-
3
The Command Prompt window opens.
- The Command Prompt is a program lets you control your computer with text commands.
- Type wmic bios get smbiosbiosversion. The string of letters and numbers following SMBBIOSBIOSVersion is your BIOS version.[2]
-
4
Write down the BIOS version number.


Advertisement
-
1
-
2
Open the BIOS menu. As the computer reboots, press F2, F10, F12, or Del to enter your computer BIOS menu.[4]
[5]
- You may need to press the key repeatedly, as boot times for some computers can be very quick.
- Find the BIOS version. In the BIOS menu, look for text that says BIOS Revision, BIOS Version, or Firmware Version.[6]
-
3
Write down the BIOS version number.


Advertisement
-
1
Restart your computer. While the computer reboots, press and hold the Shift button until you see the boot options menu.
-
2
Open the Troubleshoot menu. On the boot options screen, click Troubleshoot.
-
3
Open UEFI Firmware Settings. On the Advanced options screen, click UEFI Firmware Settings.
- If you don’t see UEFI Firmware Settings, your computer didn’t have Windows 8 pre-installed, and you’ll need to get the BIOS version via the command prompt or the BIOS menu.
-
4
Click Restart. The computer reboots into the UEFI firmware settings screen.
-
5
Look for the UEFI version. Depending on your computer hardware, you’ll see different information. The UEFI version will usually be under the Main or starting tab.
-
6
Write down the UEFI number.


Advertisement
-
1
Open About This Mac. Click the Apple menu, and then click About This Mac.
-
2
Get the Mac system report. Click More Info, and then click System Report.
-
3
Get the Boot ROM Version and the SMC Version. Under Hardware Overview, write down the Boot ROM Version and SMC Version (system).[7]
- The Boot Rom Version is the software that controls the Mac booting process.[8]
- The SMC Version is the software that controls the power management on the Mac, such as when it goes to sleep.[9]
- The Boot Rom Version is the software that controls the Mac booting process.[8]


Advertisement
Add New Question
-
Question
Is there a way to do this without restating or using the command prompt?

Luigi Oppido is the Owner and Operator of Pleasure Point Computers in Santa Cruz, California. Luigi has over 25 years of experience in general computer repair, data recovery, virus removal, and upgrades. He is also the host of the Computer Man Show! broadcasted on KSQD covering central California for over two years.
Computer & Tech Specialist
Expert Answer
Yes, your BIOS version is listed in the device manager. So, go to your control panel or system preferences, open the device manager, and then scroll down and look for something called «firmware.» This will tell you your BIOS version.
-
Question
Can you look your BIOS up online?
Luigi Oppido is the Owner and Operator of Pleasure Point Computers in Santa Cruz, California. Luigi has over 25 years of experience in general computer repair, data recovery, virus removal, and upgrades. He is also the host of the Computer Man Show! broadcasted on KSQD covering central California for over two years.
Computer & Tech Specialist
Expert Answer
Yes! If you type in your operating system and the architecture you’re on (Dell, HP, etc.), you’ll be able to find your most recent BIOS version online.
-
Question
How can I update the BIOS on Windows XP?
sawyer bergeron
Community Answer
It relates less to what OS you have and more to what computer you have. Generally, the manufacturer will have a utility to update it. Only update if you have a real reason to (as in something isn’t working properly, and an update to the BIOS is known to fix it) as the process carries a non-zero chance of bricking your motherboard.

Ask a Question
200 characters left
Include your email address to get a message when this question is answered.
Submit
Advertisement
About This Article
Article SummaryX
1. Press Win + X.
2. Click Command Prompt.
3. Type wmic bios get smbiosbiosversion.
4. Press Enter.
Did this summary help you?
Thanks to all authors for creating a page that has been read 684,528 times.
Is this article up to date?
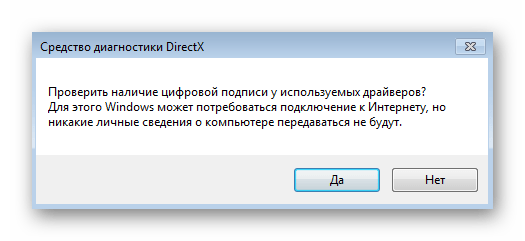
Если у вас возникли какие-либо проблемы с компьютером, и вы решили устранить их путем обновления BIOS, то перед выполнением этой процедуры нужно узнать версию биоса вашего компьютера. Для выполнения этой задачи существует несколько способов.
Перед тем как приступить к прошивке, необходимо знать, что обновление биос – это очень ответственная процедура и если вы неопытный пользователь, то подумайте, нужно ли вам это делать. Дело в том, что необходимо четко понимать, что вам даст перепрошивка BIOS. Если компьютер работает без проблем, то лучше отказаться от этой процедуры. В других ситуациях, если компьютер работает нестабильно или вам нужна поддержка новых видеокарт, процессоров и т.д., то обновление будет оправдано. В некоторых случаях обновление позволяет добавить поддержку виртуализации или даже снизить шум от вентилятора
И так. Вернемся непосредственно к теме статьи. Как узнать версию биоса? Давайте рассмотрим несколько способов.
Содержание
- При загрузке компьютера или ноутбука
- Непосредственно в самой BIOS
- Через компонент Windows «Сведения о системе»
- С помощью реестра Windows
- При помощи командной сроки
- С помощью дополнительных программ
- Speccy
- CPU-Z
- Заключение
При загрузке компьютера или ноутбука
Это один из самых простых способов. Достаточно при загрузке компьютера посмотреть на первые строки на экране. Там и будет указана версия вашего BIOS. Но т.к. эти строки отображаются на секунду или еще меньше, лучше при загрузке нажать клавишу Pause/Break и спокойно посмотреть нужную информацию.

На современных компьютерах и ноутбуках с биосом UEFI, при загрузке необходимые нам данные могут не отображаться. Для этого требуется какое-либо дополнительное действие. Например, для материнской платы Gygabyte нужно нажать клавишу F9.
Непосредственно в самой BIOS
При использовании этого способа нужно войти настройки BIOS (обычно с помощью клавиши DEL или F2). Далее необходимо найти пункт или секцию с названием Информация о системе (System Information) в которой и будут содержаться данные о версии биоса.

Через компонент Windows «Сведения о системе»
В этом способе будем использовать компонент Windows «Сведения о системе», который показывает информацию о конфигурации оборудования, установленных программах, компонентах и драйверах.
Для его запуска необходимо открыть окно «Выполнить» (комбинация клавиш “Windows+R”). Затем ввести и выполнить команду «msinfo32».

В результате чего должно загрузиться окно «Сведения о системе», в правой части которого есть пункт «Версия BIOS» с необходимой нам информацией.
С помощью реестра Windows
Если вы уверенно обращаетесь с реестром, то можете применить и этот способ узнать версию биоса.
- Откройте реестр, путем ввода в окно «Выполнить» (Win+R) команды regedit.
- Затем перейдите к следующей ветке реестра:
HKEY_LOCAL_MACHINEHARDWAREDESCRIPTIONSystemBIOS - С правой стороны найдите пункт BIOSVersion, значение которого и будет искомой версией биоса.

При помощи командной сроки
Еще один очень простой способ. Для его реализации достаточно открыть командную строку, ввести команду wmic bios get smbiosbiosversion и нажать кнопку Enter.

В результате выполнения команды на экране отобразится версия вашего BIOS.
С помощью дополнительных программ
Существует большое количество приложений, которые позволяют узнать характеристики вашего компьютера, в том числе и версию биоса. В рамках этой статьи не будем рассматривать все эти программы, а для примера разберем только две: Speccy и CPU-Z.
Speccy
Скачайте и установите эту программу, используя следующий адрес: https://www.piriform.com/speccy
После запуска приложение в течение нескольких секунд проанализирует вашу систему. Затем в левой части окна программы нажмите на пункт меню Motherboard и вы увидите информацию о вашем БИОС.

CPU-Z
Аналогично предыдущей программе также нужно скачать и установить CPU-Z. Адрес страницы приложения: http://www.cpuid.com/softwares/cpu-z.html
После открытия программы нужно выбрать вкладку Mainboard. На этой вкладке вы найдете секцию BIOS, в которой и будет содержаться информация о версии вашего биоса.

Заключение
Теперь вы можете выбрать для себя оптимальный способ узнать версию биоса и скачать нужную вам прошивку материнской платы. Процедура обновления BIOS для разных материнских плат может несколько отличаться, поэтому четко следуйте инструкции, которая должна быть на сайте производителя. В любом случае перед выполнением обновления не лишним будет сделать резервную копию биос и операционной системы.
Your BIOS version number isn’t something you need to keep tabs on at all times. The main reason you’d want to check what version it’s at is if you’re curious if there’s a BIOS update available.
Like most things in the technology world, your motherboard software (BIOS) occasionally gets updated, sometimes to fix bugs and other times to add new features.
As part of some hardware troubleshooting processes, especially those that involve new RAM or a new CPU that won’t work correctly, updating BIOS to the latest version is a good thing to try.
Below are six different methods for checking the BIOS version installed on your motherboard:
Methods 1 and 2 are best if your computer isn’t working properly. They are operating system independent.
Methods 3, 4, 5, and 6 are more convenient ways to check the BIOS version, require your computer to be working, and work in Windows 11, Windows 10, Windows 8, Windows 7, Windows Vista, and Windows XP.
Method 1: Reboot Your Computer & Pay Attention
The «traditional» way to check the BIOS version on a computer is to watch for the version notation that appears on the screen during the POST as your computer starts to boot.
-
Restart your computer normally, assuming it’s working well enough to do that. If not, kill the power manually and then start the computer back up.
If your computer is off right now, powering it on normally will work just fine.
-
Carefully watch as your computer first starts and note the BIOS version that’s shown on screen.
Some computers, especially those made by major manufacturers, show a computer logo screen in place of the POST results, which is what contains the BIOS version number. Pressing Esc or Tab usually removes the logo screen and shows the POST information behind it.
If the POST results screen disappears too quickly, try pressing the Pause key on your keyboard. Most motherboards will pause the boot process, allowing ample time to read the BIOS version number.
If pausing won’t work, point your smartphone at your computer screen and take a short video of the POST results that flash on the screen. Most cameras record 60 fps or higher, plenty of frames to step through to catch that BIOS version.
-
Write down the BIOS version number as shown on screen. It’s not always 100 percent clear which of the cryptic lines of letters and numbers on the screen is the version number, so log everything that might be.
Take a photo! If you’ve been lucky enough to pause the boot process at the POST results screen, snap a picture with your phone. This will give you something concrete to reference later on.
-
You should now have your BIOS version number.
The reboot method is great when you don’t have the benefit of a working computer and can’t try one of the more convenient methods below.
However, it can get really frustrating restarting your computer over and over if you keep missing the BIOS version notation. The POST results screen is usually really fast, especially as computers get faster and decrease boot time.
Method 2: Let the BIOS Update Tool Tell You
Updating BIOS isn’t something you do manually, not completely anyway. In most cases, you’ll use a special BIOS update tool supplied by your computer or motherboard manufacturer to do the job.
More often than not, this tool will clearly show the current BIOS version that’s installed, so even if you’re not quite ready to update BIOS, or not sure you need to, the BIOS update tool can be used just to check the current version.
You’ll first need to locate the online support for your computer or motherboard maker and then download and run the tool. No need to actually update anything, so skip those later steps in whatever instructions are provided.
This method works when your computer isn’t starting properly only if the BIOS update tool for your motherboard is bootable. In other words, if the BIOS update program supplied only works from within Windows, you’ll have to stick to Method 1.
Method 3: Use Microsoft System Information (MSINFO32)
A much easier way to check the BIOS version running on your computer’s motherboard is via a program called Microsoft System Information.
Not only does this method not require any restarting of your computer, it’s already included in Windows, meaning there’s nothing to download and install.
Here’s how to check the BIOS version with Microsoft System Information:
-
In Windows 11, 10, and 8.1, right-click or tap-and-hold the Start button and then choose Run.
In Windows 8, access Run from the Apps screen. In Windows 7 and earlier versions of Windows, select Run from the Start menu.
-
In the Run or search box, enter the following exactly as shown:
msinfo32A window titled System Information will appear on the screen.
-
Select System Summary if it’s not already highlighted.
-
On the right, under the Item column, locate the entry titled BIOS Version/Date.
Depending on how much you don’t know about your computer or motherboard, you may also need to know who made your motherboard and what model it is. If that information is reported to Windows, you’ll find those values in the BaseBoard Manufacturer, BaseBoard Model, and BaseBoard Name items.
-
Jot down the BIOS version as reported here. You can also export the results of this report to a TXT file via File > Export in the System Information menu.
Microsoft System Information is a great tool but it doesn’t always report a BIOS version number. If it didn’t for your computer, a similar program not made by Microsoft should be the next thing you try.
Method 4: Use a Third-Party System Information Tool
If Microsoft System Information didn’t get you the BIOS version data you need, there are several system information tools out there you can try instead, many that are much more thorough than MSINFO32.
Here’s how to do it:
-
Download Speccy, a completely free system information tool for Windows.
-
Install and run Speccy if you chose the installable version, or extract and then run Speccy.exe or Speccy64.exe if you chose the portable version.
-
Wait while Speccy scans your computer. This usually takes several seconds to a few minutes, depending on how fast your computer is.
-
Choose Motherboard from the menu on the left.
-
Note the Version listed under the BIOS subcategory on the right. This is the BIOS version you’re after.
The Brand listed here isn’t usually something that’s worthwhile to know. The BIOS update tool and data file you need will come from your computer or motherboard maker, listed as Manufacturer, and will be specific to your motherboard model, listed as Model.
If Speccy or another «sysinfo» tool doesn’t work out for you, or you’d rather not download and install software, you have a couple other methods for checking your computer’s BIOS version.
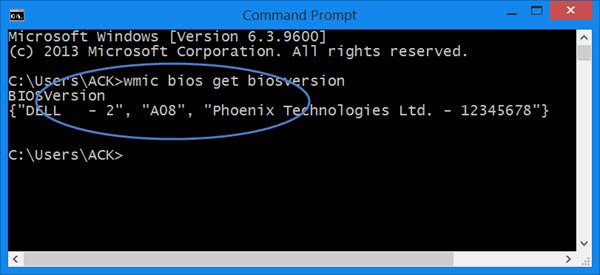
Method 5: Run a Command Prompt Command
A simple command can be used to print the BIOS version in Command Prompt. You might try this before the slightly more advanced method below, but only after trying the graphical programs above.
-
Open Command Prompt.
There are multiple ways to open Command Prompt, but in most versions of Windows, you can type cmd in the search bar or Start menu to find it. In all versions of Windows, executing the same command in the Run dialog box (WIN+R) works, too.
-
Type this command, followed by Enter:
wmic bios get smbiosbiosversion -
You should see the BIOS version appear just below the command you entered.
You can also enter the systeminfo | findstr «BIOS Version» command into Command Prompt to find the BIOS version information as it’s reported in the System Information tool explained above.
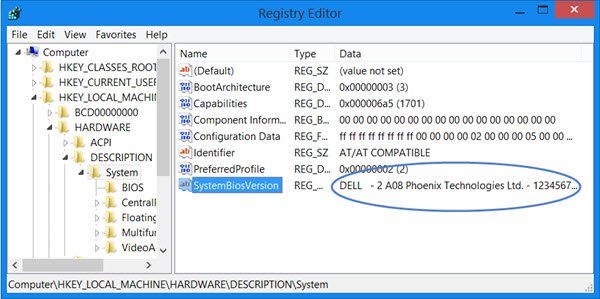
Method 6: Dig It up in the Windows Registry
Last but not least, and probably not that surprising to those of you in the know, a lot of information about BIOS can be found logged in the Windows Registry.
Not only is the BIOS version usually clearly listed in the registry, so is often your motherboard’s maker and your motherboard model number.
Here’s where to find it:
No changes are made to registry keys in the steps below but if you’re afraid you might make unintentional changes to this very important part of Windows, you can always back up the registry, just to be safe.
-
Open Registry Editor.
-
From the registry hive list on the left, expand HKEY_LOCAL_MACHINE.
-
Continue to drill deeper inside of HKEY_LOCAL_MACHINE, first with HARDWARE, then DESCRIPTION, then System.
-
With System expanded, select BIOS.
-
On the right, in the list of registry values, locate the one named BIOSVersion. Surprise…the value on the right is the BIOS version that’s installed right now.
-
Write down the BIOS version somewhere, as well as the BaseBoardManufacturer and BaseBoardProduct values, if you need them.
The Windows Registry can seem scary but so long as you’re not changing anything, it’s perfectly harmless to dig around.
Did you accidentally make changes in Windows Registry? It’s easy to reverse them if you backed up the registry to a REG file. see How to Restore the Windows Registry if you need help.
FAQ
-
What is a computer BIOS?
BIOS (basic input/output system) is an essential program that your computer’s CPU uses are part of the boot up process. It both begins the loading process for your operating system, and locates connected devices like the keyboard and mouse.
-
How do I access the BIOS on my computer?
Typically, one of the Function Keys (F1, F2, F10, etc) or Delete needs to be pressed during startup. Which F-key works will differ depending on the make and model of your hardware. That, or use Windows’ Advanced Startup options.
Thanks for letting us know!
Get the Latest Tech News Delivered Every Day
Subscribe

Open Command Prompt, type “wmic bios get smbiosbiosversion” in the window and hit Enter to check your BIOS version. Consult the documentation for your specific PC or motherboard on the manufacturer’s website for instructions on how to download and install the latest BIOS version.
You probably shouldn’t update your BIOS, but sometimes you need to. Here’s how to check what BIOS version your computer is using and flash that new BIOS version onto your motherboard as quickly and safely as possible.
RELATED: Do You Need to Update Your Computer’s BIOS?
Be very careful when updating your motherboard’s BIOS! If your computer freezes, crashes, or loses power during the process, the BIOS or UEFI firmware may be corrupted. This will render your computer unbootable — it’ll be “bricked.”
How to Check Your Current BIOS Version in Windows
Your computer’s BIOS version is displayed in the BIOS setup menu itself, but you don’t have to reboot to check this version number. There are several ways to see your BIOS version from within Windows, and they work the same on PCs with a traditional BIOS or a newer UEFI firmware.
RELATED: What Is UEFI, and How Is It Different from BIOS?
Check Your BIOS Version at the Command Prompt
To check your BIOS version from the Command Prompt, hit Start, type “cmd” in the search box, and then click the “Command Prompt” result — no need to run it as an administrator.

At the prompt, type (or copy and paste) the following command, and then hit Enter:
wmic bios get smbiosbiosversion
You’ll see the version number of the BIOS or UEFI firmware in your current PC.
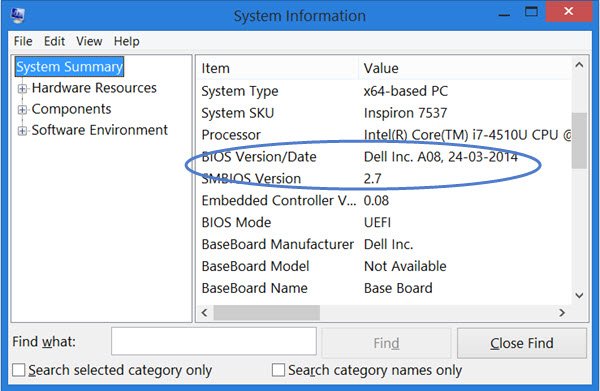
Check Your BIOS Version by Using the System Information Panel
RELATED: How to Open the System Information Panel on Windows 10 or 8
You can also find your BIOS’s version number in the System Information window. On Windows 7, 8, or 10, hit Windows+R, type “msinfo32” into the Run box, and then hit Enter.
The BIOS version number is displayed on the System Summary pane. Look at the “BIOS Version/Date” field.
Different motherboards use different utilities and procedures, so there’s no one-size-fits-all set of instructions here. However, you’ll perform the same basic process on all motherboards.
RELATED: How to Check Your Motherboard Model Number on Your Windows PC
First, head to the motherboard manufacturer’s website and find the Downloads or Support page for your specific model of motherboard. You should see a list of available BIOS versions, along with any changes/bug fixes in each and the dates they were released. Download the version to which you want to update. You’ll probably want to grab the newest BIOS version — unless you have a specific need for an older one.
If you purchased a pre-built computer instead of building your own, head to the computer manufacturer’s website, look up the computer model, and look at its downloads page. You’ll find any available BIOS updates there.
Your BIOS download probably comes in an archive — usually a ZIP file. Extract the contents of that file. Inside, you’ll find some sort of BIOS file — in the screenshot below, it’s the E7D14AMS.291 file.
The archive may also contain a README or other text file that will walk you through updating to the new BIOS. You should check out this file for instructions that apply specifically to your hardware, but we’ll try to cover the basics that work across all hardware here.
RELATED: What You Need to Know About Using UEFI Instead of the BIOS
You’ll need to choose one of several different types of BIOS-flashing tools, depending on your motherboard and what it supports. The BIOS update’s included README file should recommend the ideal option for your hardware.
Some manufacturers offer a BIOS-flashing option directly in their BIOS, or as a special key-press option when you boot the computer. You copy the BIOS file to a USB drive, reboot your computer, and then enter the BIOS or UEFI screen. From there, you choose the BIOS-updating option, select the BIOS file you placed on the USB drive, and the BIOS updates to the new version.
RELATED: What You Need to Know About Using UEFI Instead of the BIOS
You generally access the BIOS screen by pressing the appropriate key while your computer boots—it’s often displayed on the screen during the boot process and will be noted in your motherboard or PC’s manual. Common BIOS keys include Delete and F2. The process for entering a UEFI setup screen can be a bit different.
There are also more traditional DOS-based BIOS-flashing tools. When using those tools, you create a DOS live USB drive, and then copy the BIOS-flashing utility and BIOS file to that USB drive. You then restart your computer and boot from the USB drive. In the minimal DOS environment that appears after the reboot, you run the appropriate command — often something like flash.bat BIOS3245.bin — and the tool flashes the new version of the BIOS onto the firmware.
RELATED: How to Create a Bootable DOS USB Drive
The DOS-based flashing tool is often provided in the BIOS archive you download from the manufacturer’s website, although you may have to download it separately. Look for a file with the .bat or .exe file extension.
In the past, this process was performed with bootable floppy disks and CDs. We recommend a USB drive because it’s the easiest method on modern hardware — a ton of modern computers don’t even have CD or DVD drives anymore.
Some manufacturers provide Windows-based flashing tools, which you run on the Windows desktop to flash your BIOS and then reboot. We don’t recommend using these, and even many manufacturers who provide these tools caution against using them. For example, MSI “strongly recommends” using their BIOS-based menu option instead of their Windows-based utility in the README file of the sample BIOS update we downloaded.
Flashing your BIOS from within Windows can result in more problems. All that software running in the background — including security programs that may interfere with writing to the computer’s BIOS — can cause the process to fail and corrupt your BIOS. Any system crashes or freezes might also result in a corrupted BIOS. It’s better to be safe than sorry, so we recommend using a BIOS-based flashing tool or booting to a minimal DOS environment to flash your BIOS.
That’s it — after you run the BIOS-flashing utility, reboot your computer, and the new BIOS or UEFI firmware version loads. If there’s a problem with the new BIOS version, you may be able to downgrade it by downloading an older version from the manufacturer’s website and repeating the flashing process.
READ NEXT
- › The Only Safe Way to Update Your Hardware Drivers on Windows
- › What is Firmware or Microcode, and How Can I Update My Hardware?
- › How Bad Are the AMD Ryzen and Epyc CPU Flaws?
- › Latest Intel CPU Flaw Lets Thieves Crack BitLocker Encryption
- › How to Enable Intel VT-x in Your Computer’s BIOS or UEFI Firmware
- › Windows Spectre Patches Are Here, But You Might Want to Wait
- › How to Protect Your PC From the Intel Foreshadow Flaws
- › PSA: You Can Email Books and Documents to Your Kindle
Download PC Repair Tool to quickly find & fix Windows errors automatically
This post shows you how to check the current BIOS version in a Windows 11/10/8/7 computer, using Windows Registry, WMI Command, System Information Tool (MSINFO32.exe) or DirectX Diagnostic Tool (DXDiag). BIOS stands for Basic Input/Output System and is a type of firmware that is built into the hardware, used during and for the booting process of a computer.
Read: Check if your PC uses UEFI or BIOS.
You may need to check your BIOS version if you plan to update the BIOS. Of course, whether you want to do it or whether you should do it is another question. Anyway, there are several ways you can do this. Lets us have a look at them.
1] Using WMI Commands
You can use Windows Management Instrumentation to find out the details of your BIOS. To do so, open an elevated command prompt windows, type the following and hit Enter:
wmic bios get biosversion
2] Using MSINFO32
The built-in MSINFO32 or System Information Tool displays this information under System Summary. To open this tool, Run msinfo32 and hit Enter.
3] Using Registry Editor
When Windows loads, it stores the BIOS information and other details under the following registry key:
HKEY_LOCAL_MACHINEHARDWAREDESCRIPTIONSystem
Here you will see the details under System. You will also see additional details under SystemBiosDate, SystemBiosVersion, VideoBiosDate and VideoBiosVersion subkeys.
To see the BIOS version Run regedit and navigate to the mentioned registry key.
4] Using DXDiag
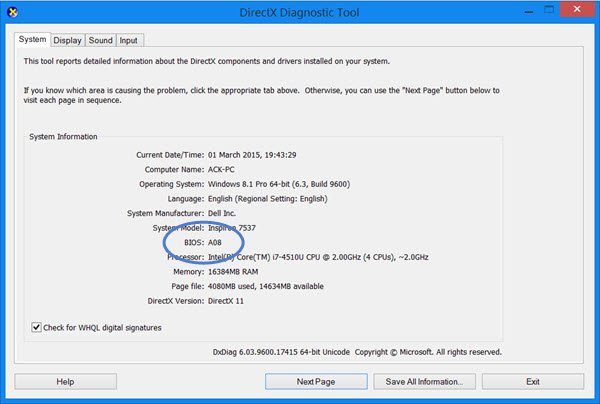
DirectX Diagnostic Tool or DXDiag.exe is basically meant to help you troubleshoot DirectX issues. But if you Run dxdiag to open it, you will see the BIOS version mentioned under the System tab.
Of course, apart from this, you can also use some 3rd-party system information tool like Speccy to see your BIOD version or see it when you enter your machine’s BIOS setup by pressing F10/F12 keys during boot-time.
Check this post if you want to find out Computer RAM, Graphics Card / Video memory of your Windows PC.

Anand Khanse is the Admin of TheWindowsClub.com, a 10-year Microsoft MVP (2006-16) & a Windows Insider MVP (2016-2022). Please read the entire post & the comments first, create a System Restore Point before making any changes to your system & be careful about any 3rd-party offers while installing freeware.
About Lenovo
-
Our Company
-
News
-
Investor Relations
-
Sustainability
-
Product Compliance
-
Product Security
-
Lenovo Open Source
-
Legal Information
-
Jobs at Lenovo
Shop
-
Laptops & Ultrabooks
-
Tablets
-
Desktops & All-in-Ones
-
Workstations
-
Accessories & Software
-
Servers
-
Storage
-
Networking
-
Laptop Deals
-
Outlet
Support
-
Drivers & Software
-
How To’s
-
End of Service Information
-
Warranty Lookup
-
Parts Lookup
-
Contact Us
-
Repair Status Check
-
Imaging & Security Resources
Resources
-
Where to Buy
-
Shopping Help
-
Sales Order Status
-
Product Specifications (PSREF)
-
Forums
-
Registration
-
Product Accessibility
-
Environmental Information
-
Gaming Community
-
LenovoEDU Community
-
LenovoPRO Community
©
Lenovo.
|
|
|
|
Содержание
- Способ 1: Экран включения ПК
- Способ 2: Меню BIOS
- Способ 3: Утилита msinfo32
- Способ 4: Утилита dxdiag
- Способ 5: Консольная команда
- Способ 6: Сторонние программы
- Вопросы и ответы

Способ 1: Экран включения ПК
Первый вариант определения версии BIOS на компьютере или ноутбуке под управлением Windows 7 подразумевает просмотр информации, которая на несколько секунд появляется на экране во время запуска устройства. Часто там присутствует не только название, но и версия микропрограммного обеспечения. Обратите внимание на изображение ниже, чтобы знать примерное расположение необходимой надписи и рассмотреть ее.
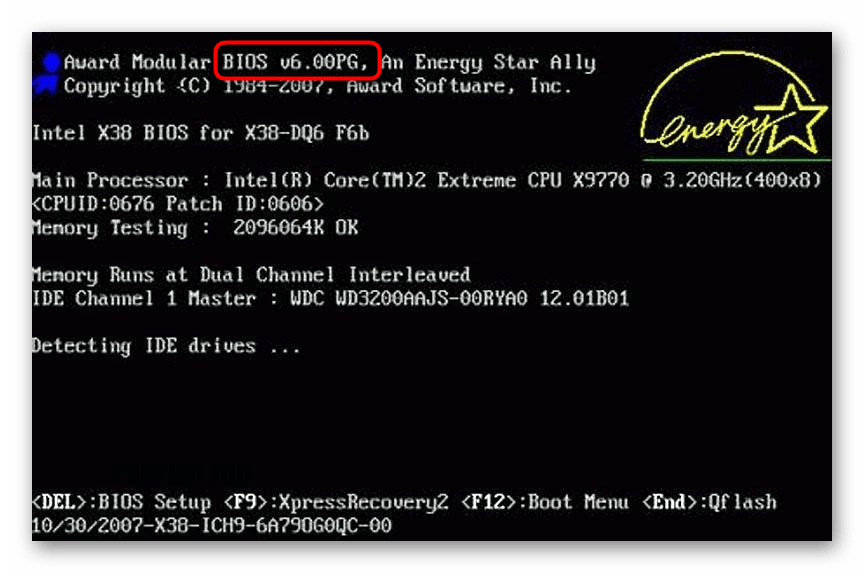
Если обнаружить строку с версией BIOS таким способом не удалось, вполне возможно, что в этой сборке она просто не отображается на экране загрузки. Тогда переходите к выполнению следующих методов.
Вы можете войти в сам BIOS и использовать его меню для определения версии микропрограммного обеспечения. Детально о входе в БИОС при включении компьютера читайте в другом нашем материале по ссылке ниже.
Подробнее: Как попасть в BIOS на компьютере

Искомая информация показана в нижней части после слова «Version».
Способ 3: Утилита msinfo32
Переходим к методам, реализация которых осуществляется непосредственно из-под операционной системы. В первую очередь рассмотрим стандартные средства, позволяющие за несколько секунд получить требуемую информацию.
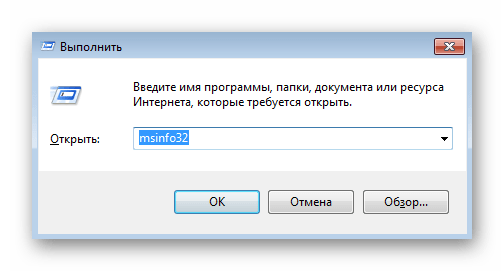
- Откройте «Выполнить», зажав комбинацию клавиш Win + R. Там введите
msinfo32и нажмите на Enter для подтверждения команды. - Перейдите в раздел «Сведения о системе», если он не был выбран по умолчанию, и дождитесь загрузки.
- Здесь вас интересует строка «Версия BIOS». На примере нет конкретной информации из-за использования виртуальной машины, однако у вас должны отображаться необходимые данные.

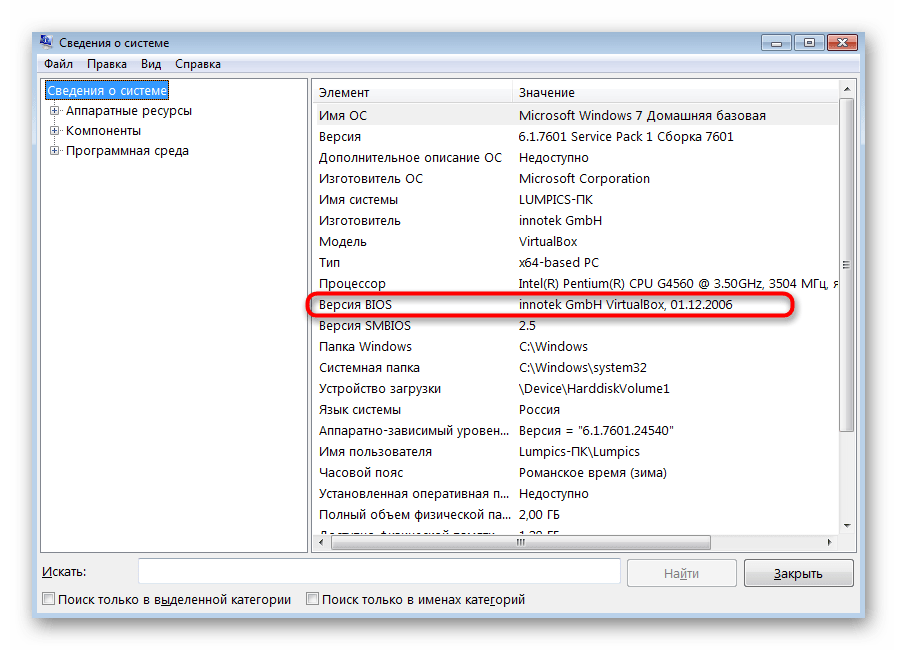
В этой же утилите присутствуют и другие разделы, позволяющие получить не только системную, но и аппаратную информацию. Мы рекомендуем ознакомиться с msinfo32, чтобы в будущем знать, в каких случаях можно к ней обратиться.
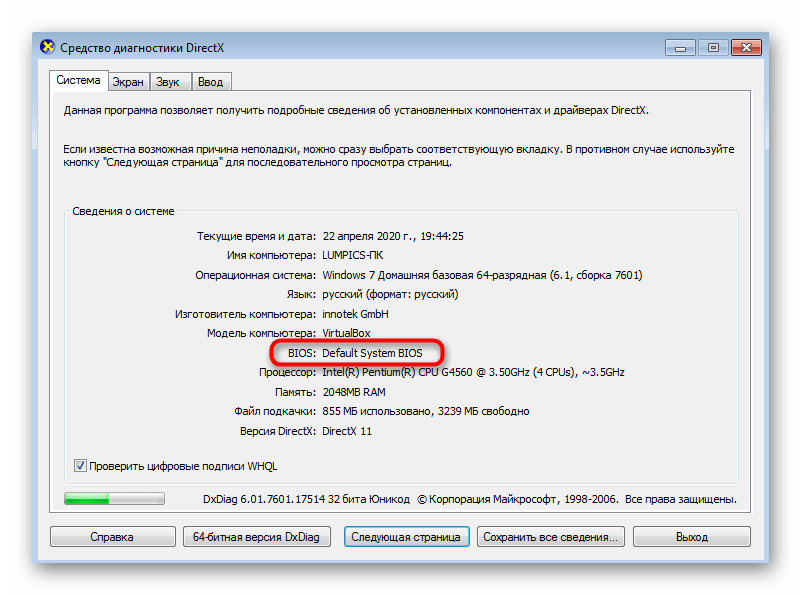
Способ 4: Утилита dxdiag
Следующая утилита тоже является системной, а устанавливается на компьютер автоматически вместе с основными составляющими DirectX. Ее использование мало чем отличается от описанного выше средства, но есть нюансы по поводу запуска и поиска нужной строки.
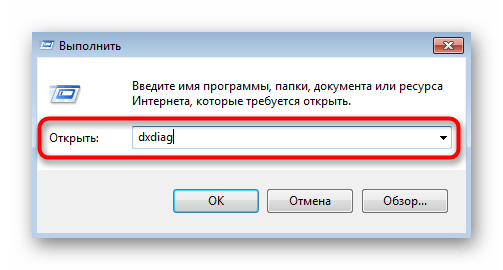
- Запуск этой утилиты так же происходит через «Выполнить». На этот раз там введите
dxdiagи нажать на Enter, чтобы подтвердить запуск. - При первом открытии средства диагностики подтвердите предупреждение. Больше на экране оно появляться не будет.
- В первой же вкладке «Система» находится блок «Сведения о системе». Отыщите там строку «BIOS», чтобы узнать версию микропрограммного обеспечения.

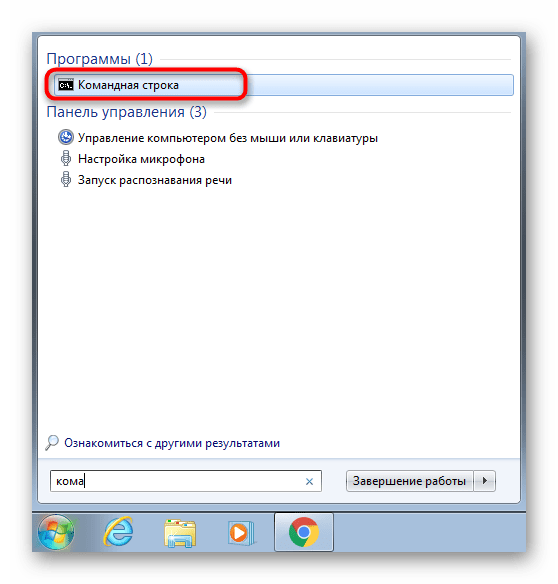
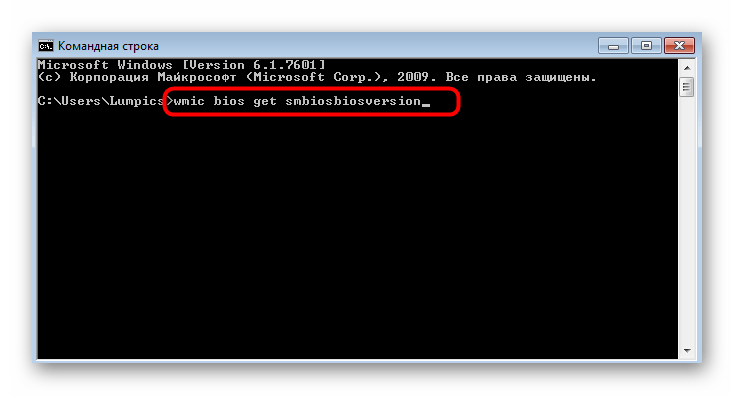
Способ 5: Консольная команда
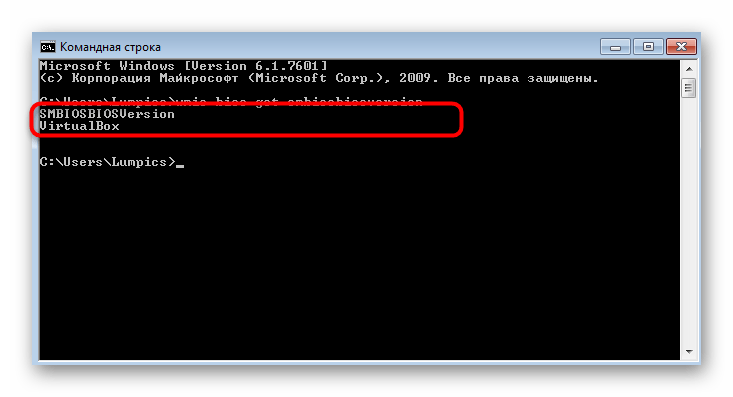
Если вы предпочитаете использовать Командную строку Windows 7 для выполнения повседневных задач или вас по каким-то причинам не устраивают предыдущие методы, воспользуйтесь консольной командой для определения версии BIOS.
- Запустите приложение «Командная строка» любым удобным методом. Например, ее можно отыскать через поиск в меню «Пуск».
- В консоли введите команду
wmic bios get smbiosbiosversionи нажмите на Enter. - Буквально через секунду отобразятся две новые строки, где находится информация о производителе БИОС и его версии.
Способ 6: Сторонние программы
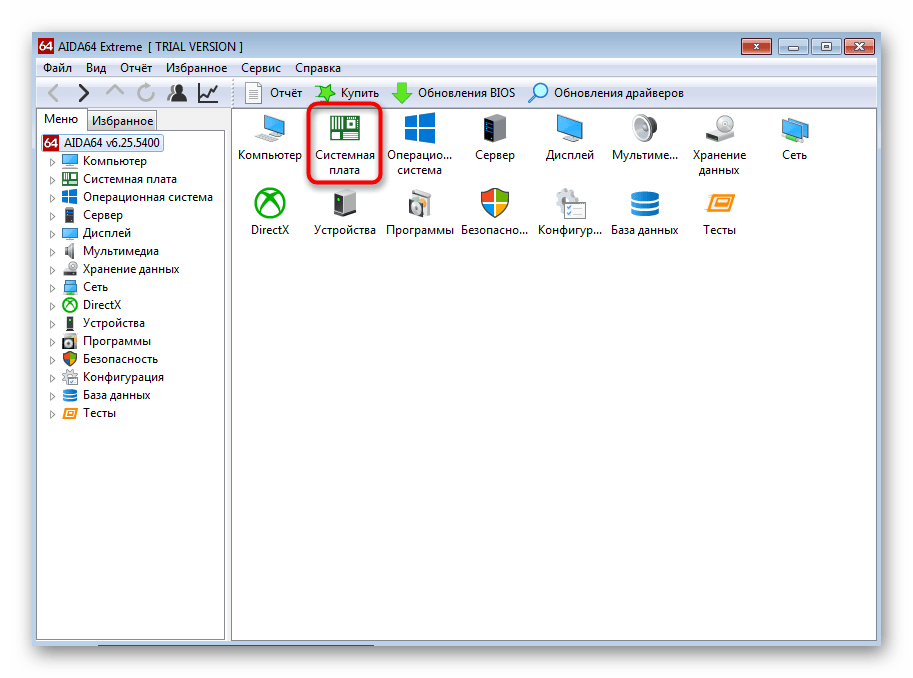
Существует пласт пользователей, кому проще получать подобные системные сведения через специальные программы от сторонних разработчиков. Мы учитываем предпочтения и таких юзеров, поэтому покажем, как воспользоваться одной из них — AIDA64 — для определения текущей версии BIOS в Виндовс 7.
Скачать AIDA64
- Воспользуйтесь ссылкой выше, чтобы скачать бесплатную пробную версию AIDA64 с официального сайта. После стандартной процедуры установки запустите софт и выберите категорию «Системная плата».
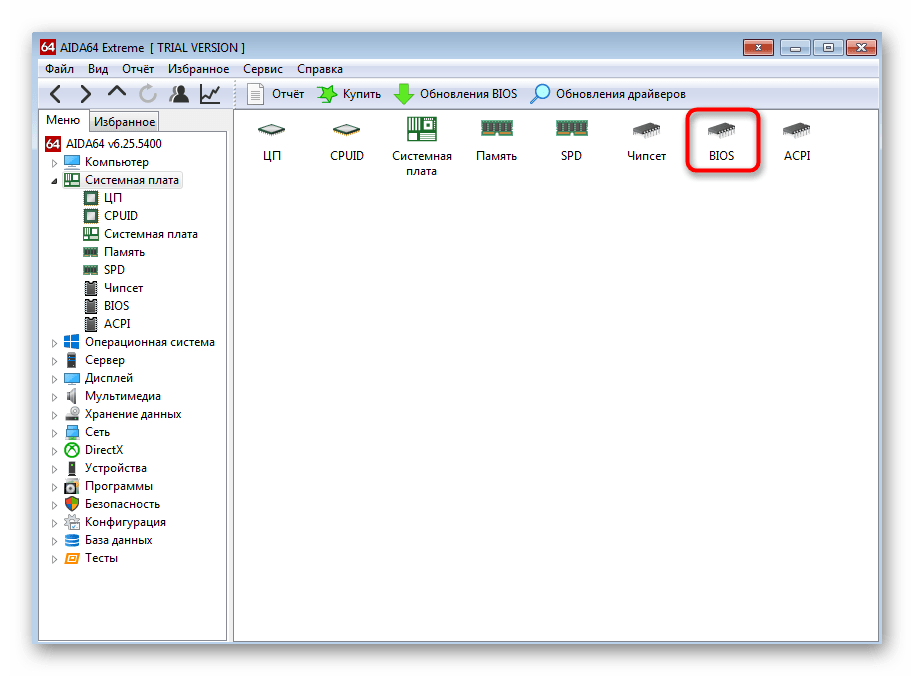
- Откройте раздел «BIOS» через список на левой панели или значок справа.
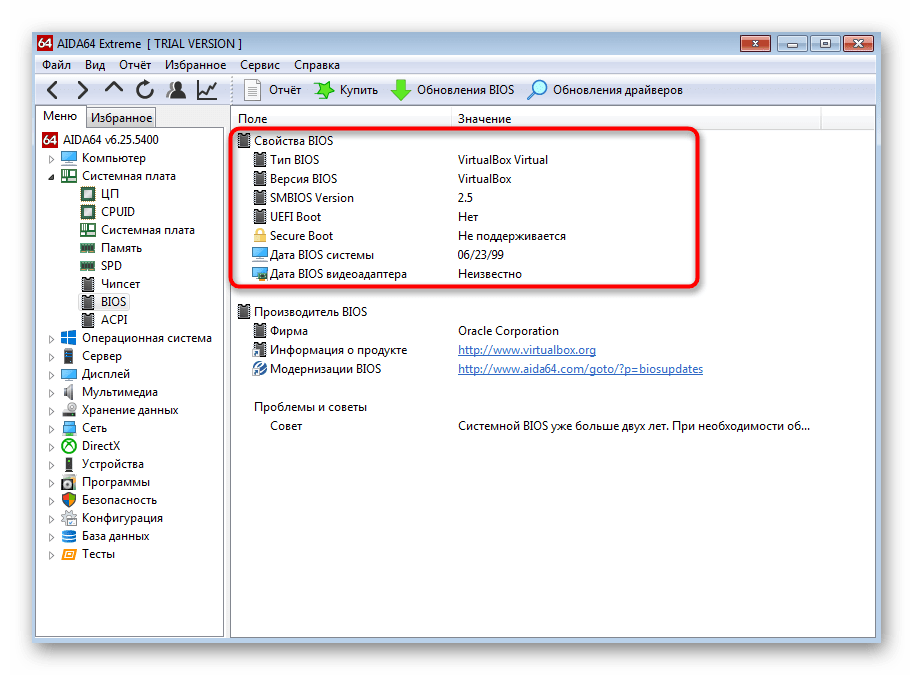
- Теперь вы можете узнать не только версию BIOS, но и дату его выпуска, производителя и даже найти вспомогательные ссылки.
Примерно такой же алгоритм действий следует будет выполнить и при использовании других подобных программ, которые позволяют получить системные и аппаратные сведения. Более детальные описания аналогов AIDA64 вы найдете в другой статье на нашем сайте, кликнув по заголовку ниже.
Подробнее: Программы для определения железа компьютера
Информация для тех, кто определяет версию BIOS для его дальнейшего обновления! Учитывайте, что некоторые производители микропрограммного обеспечения не позволяют перескакивать на несколько версий вперед. Вам сначала нужно будет загрузить и установить следующие сборки по очереди, которые идут после инсталлированной, чтобы постепенно добраться до актуальной. Вспомогательную информацию по этому поводу ищите далее.
Читайте также: Обновление BIOS на компьютере
Еще статьи по данной теме: