(Image credit: Windows Central)
On computers, the graphics card is an essential component that makes it possible to render every pixel you see on the screen when you’re navigating the Windows 10 desktop, running an app, playing a game, etc. Usually, devices have a graphics card from one of the three leading manufacturers, including NVIDIA, AMD, or Intel. Check out our very best graphics cards roundup for tons of options.
Although for the most part, if you’re a regular user, you don’t need to worry about the graphics specifications on your device, it might be something important for users who work with graphics-intensive applications or play games. Typically, because if you don’t have a card with a powerful graphics processing unit (GPU), it may not be possible for an application to perform correctly. Or, if you’re a gamer, you may not be able to play games, or you may need to determine the hardware to adjust the settings accordingly to prevent affecting performance.
Whatever your reasons might be, Windows 10 includes multiple ways to quickly find out the graphics card specifications using Settings, Device Manager, System Information, DirectX Diagnostic Tool, and Task Manager, and, of course, using the card’s control panel software.
In this Windows 10 guide, we’ll walk you through the steps to check which graphics card is currently installed on your computer.
- How to find out graphics card details using Settings
- How to find out graphics card details using Device Manager
- How to find out graphics card details using System Information
- How to find out graphics card details using DirectX Diagnostic Tool
- How to find out graphics card details using Task Manager
- How to find out graphics card details using control panel
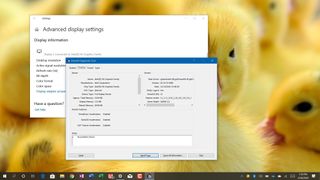
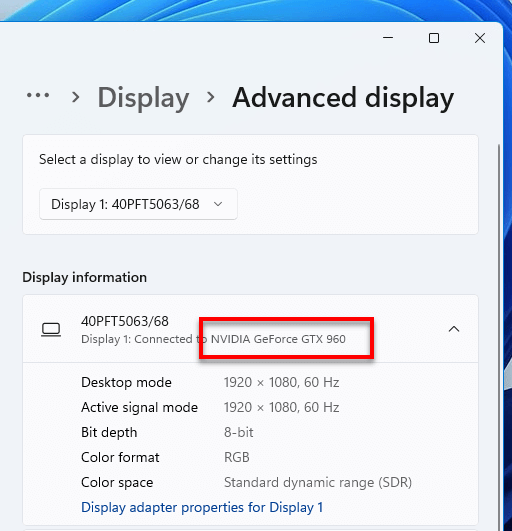
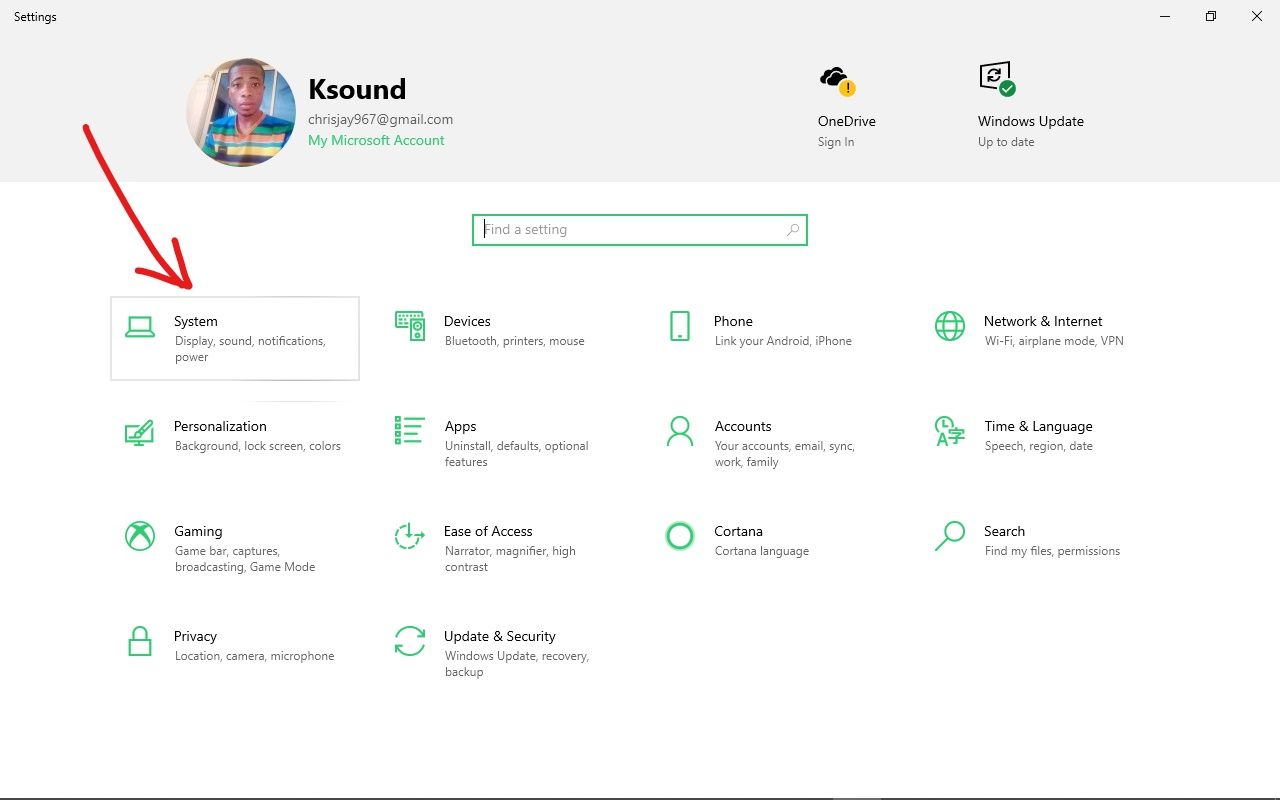
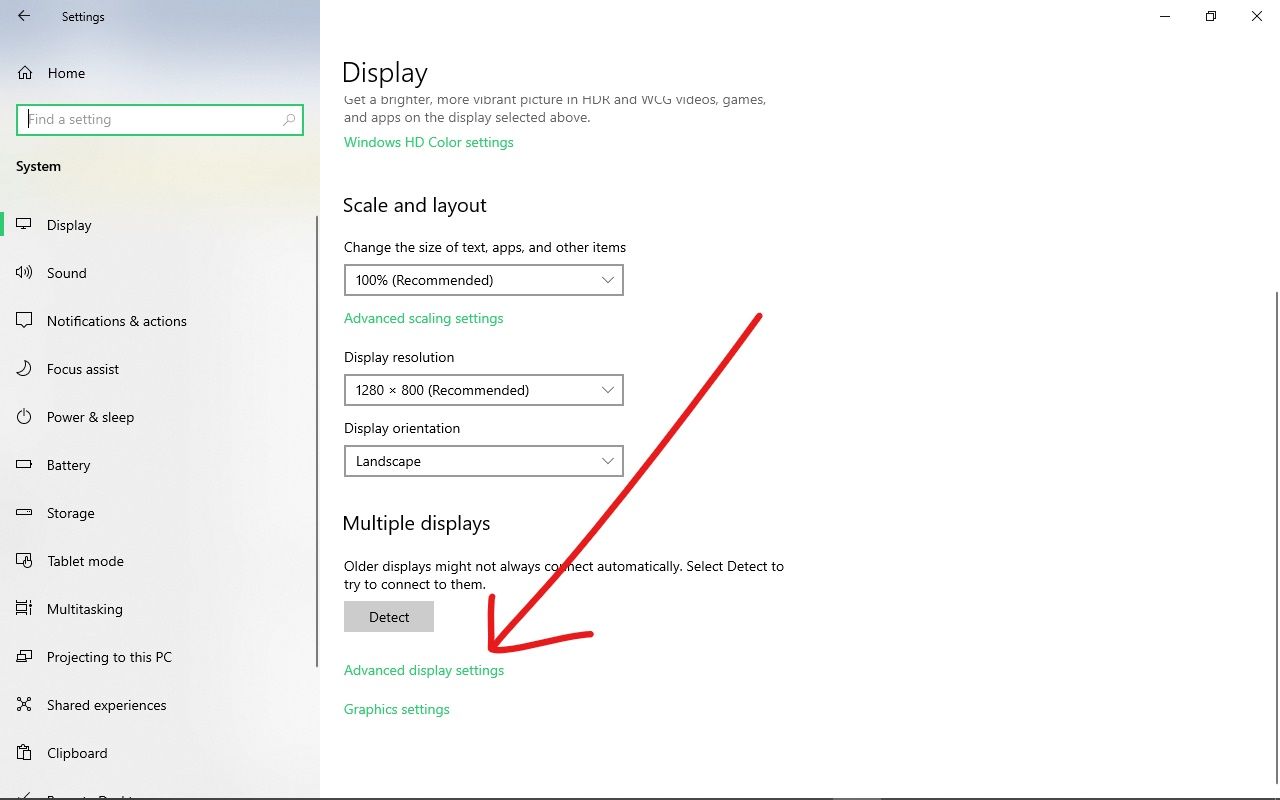
How to find out graphics card details using Settings
To find out the graphics card manufacturer and model using the Settings app, use these steps:
- Open Settings.
- Click on System.
- Click on Display.
- Under the «Multiple displays» section, click the Advanced display settings option.
- Under the «Display information» section, confirm the graphics card vendor and model.
Once you complete the steps, you will now have an understanding of the video card installed on your device.
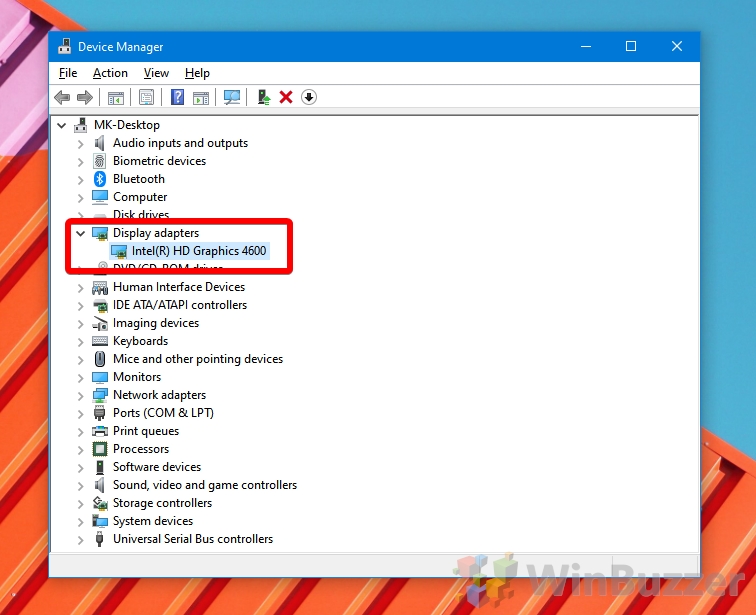
How to find out graphics card details using Device Manager
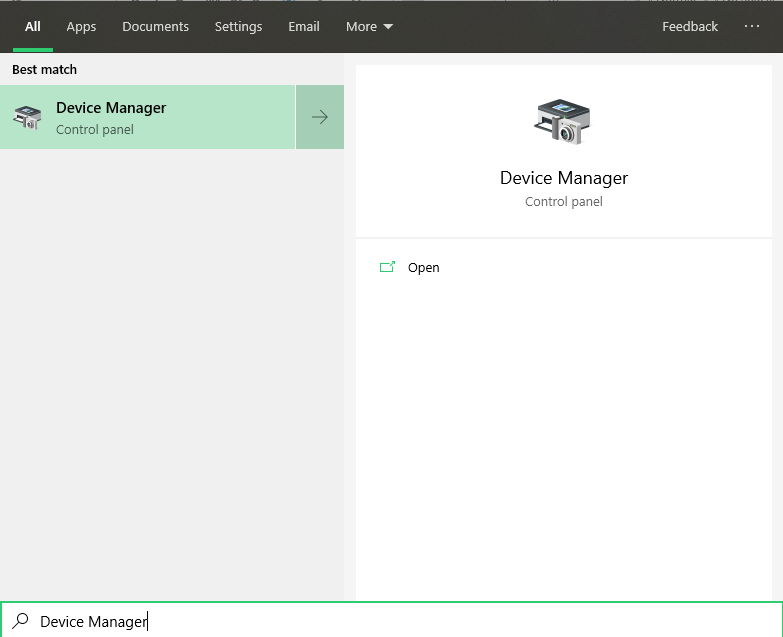
To determine the graphics card installed on your computer with Device Manager, use these steps:
- Open Start.
- Search for Device Manager and click the top result to open the tool.
- Expand the Display adapters branch.
- Confirm the manufacturer and model of the video card.
After you complete the steps, the graphics card information will be revealed.
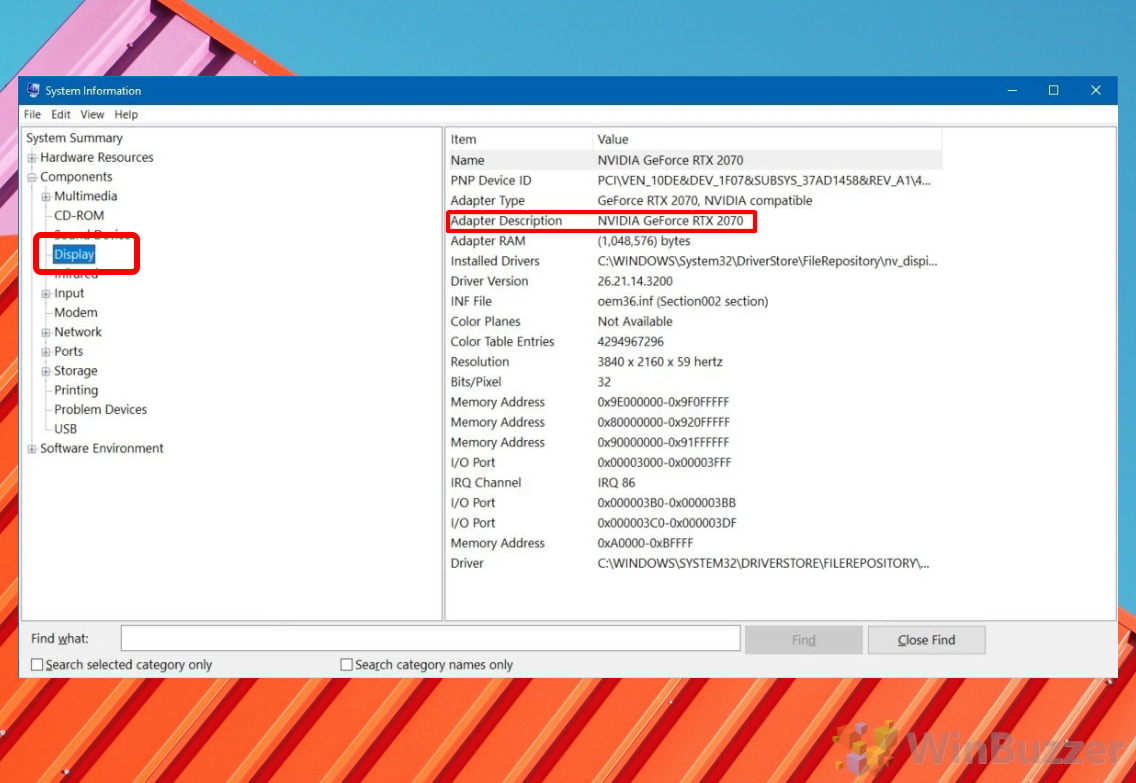
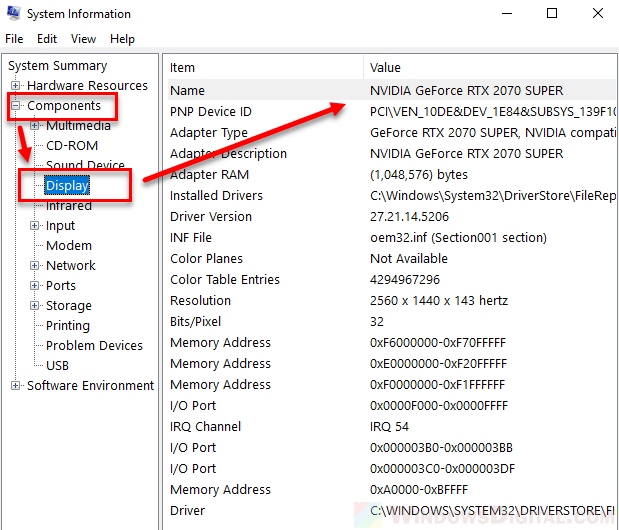
How to find out graphics card details using System Information
To check the graphics card on Windows 10 with System Information, use these steps:
- Open Start.
- Search for System Information and click the top result to open the tool.
- Expand the Components branch.
- Click on Display.
- Under the «Adapter Description» field, determine the graphics card installed on your device.
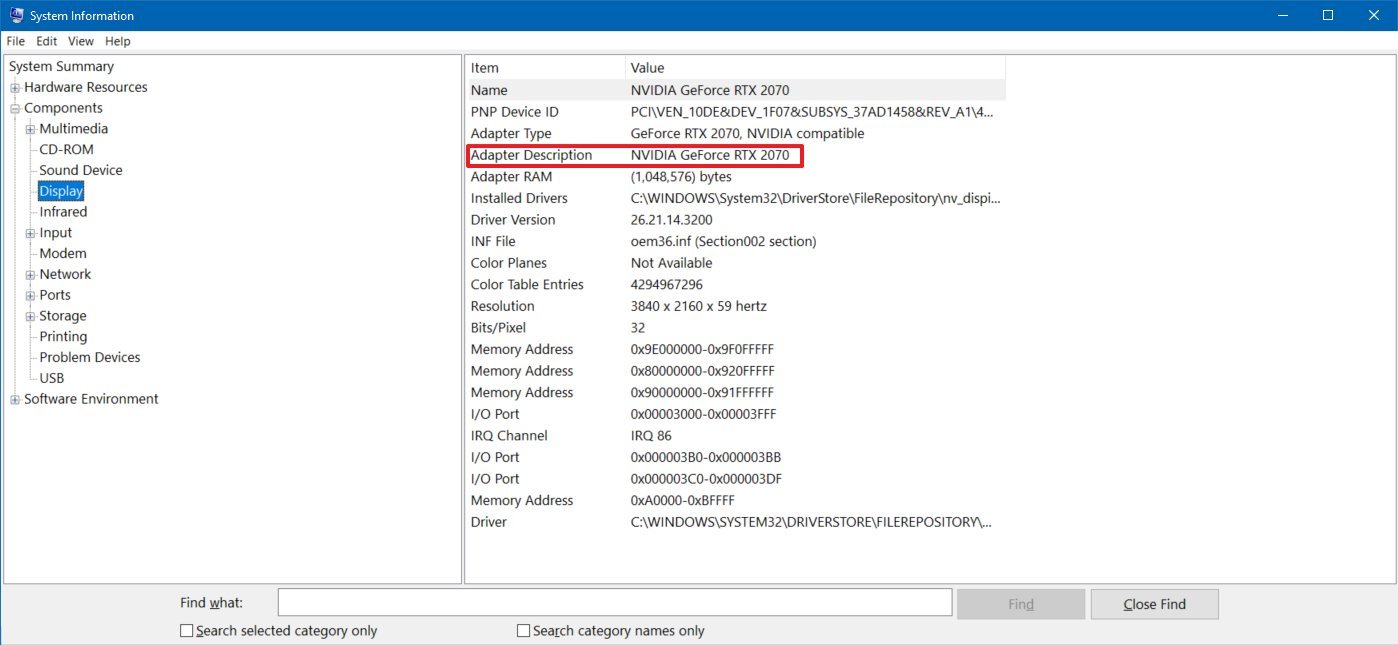
Once you complete the steps, you’ll know the graphics card make and model, as well as driver information and more.
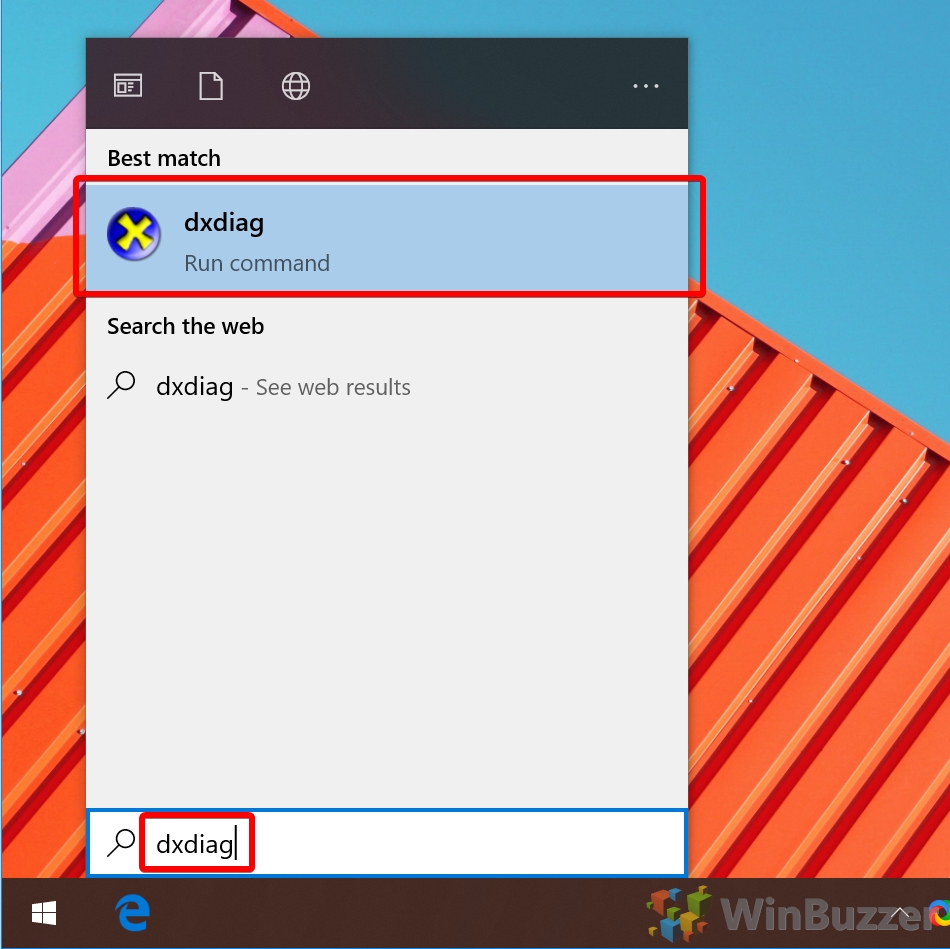
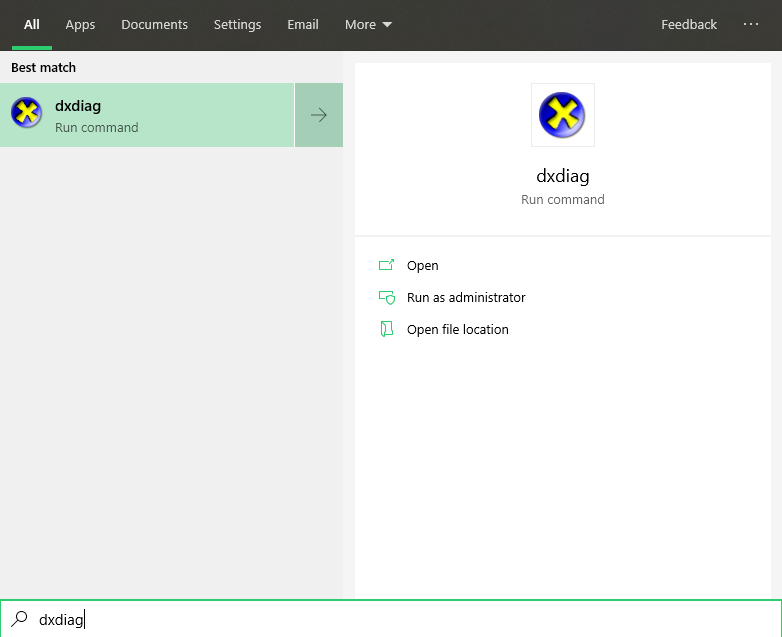
To find out the video card installed on your PC using DirectX Diagnostic Tool, use these steps:
- Open Start.
- Search for dxdiag and click the top result to open the tool.
- Click the Yes button (if applicable).
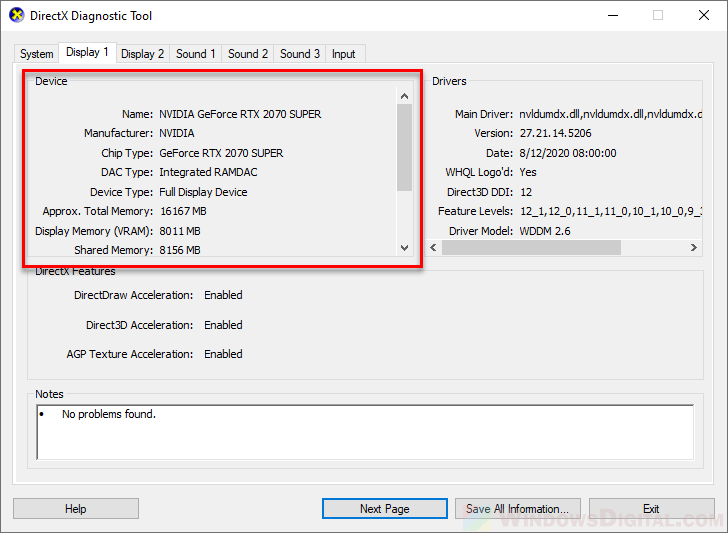
- Click the Display tab.
- Under the «Device» section, check the manufacturer and processor type of the graphics card.
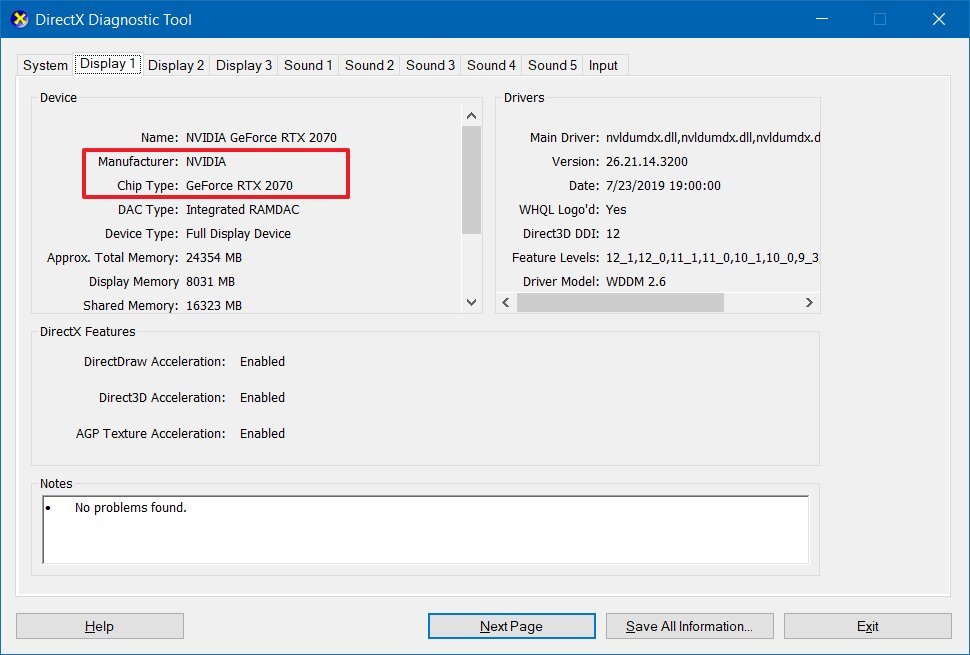
After you complete the steps, you’ll be not only able to understand the basic information about the video card, but also other details, such as the amount of memory built into the device and driver information.
How to find out graphics card details using Task Manager
To figure out the graphics card available on Windows 10 with Task Manager, use these steps:
- Open Start.
- Search for Task Manager and select the top result to open the tool.Quick tip: You can also use the Ctrl + Shift + Esc keyboard shortcut to open Task Manager.
- Click the Performance tab.
- Click on GPU.
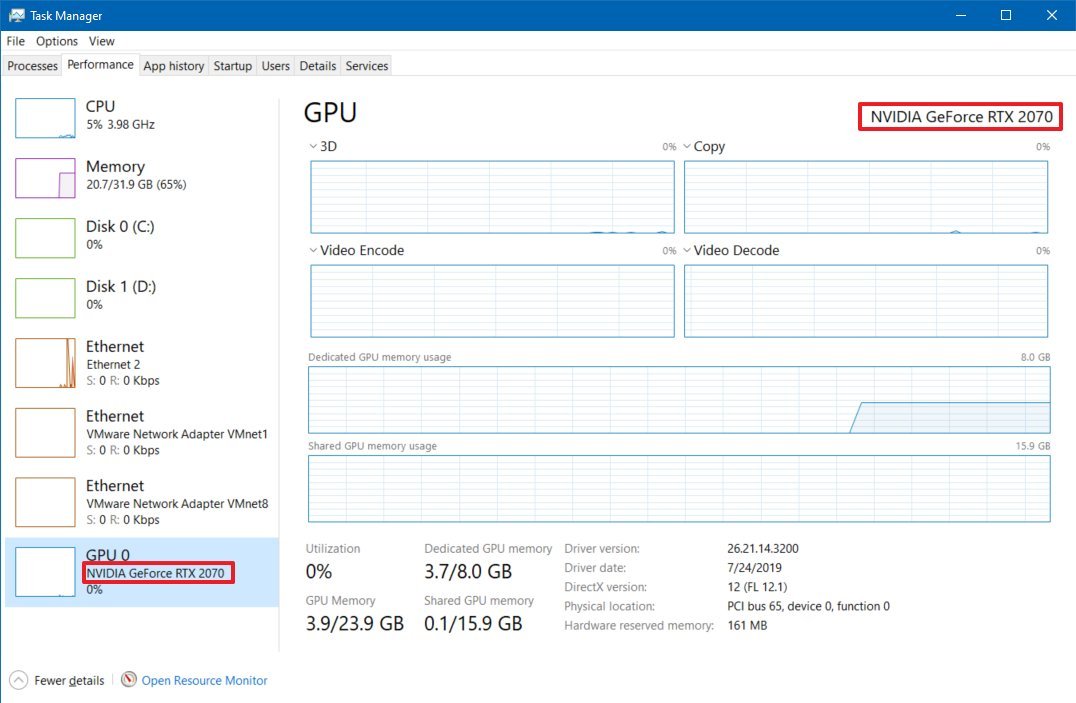
- Confirm the brand and model of the graphics card on the top-right corner.
Once you complete the steps, the Task Manager will display the manufacturer name and model, as well as a dedicated amount of memory, DirectX version, physical location in the motherboard, and current utilization details.
How to find out graphics card details using control panel
Alternatively, if you have a GPU from Intel, NVIDIA, or AMD, you can also use their control panel software that allows you to check the graphics card specifications, including settings to adjust many preferences.
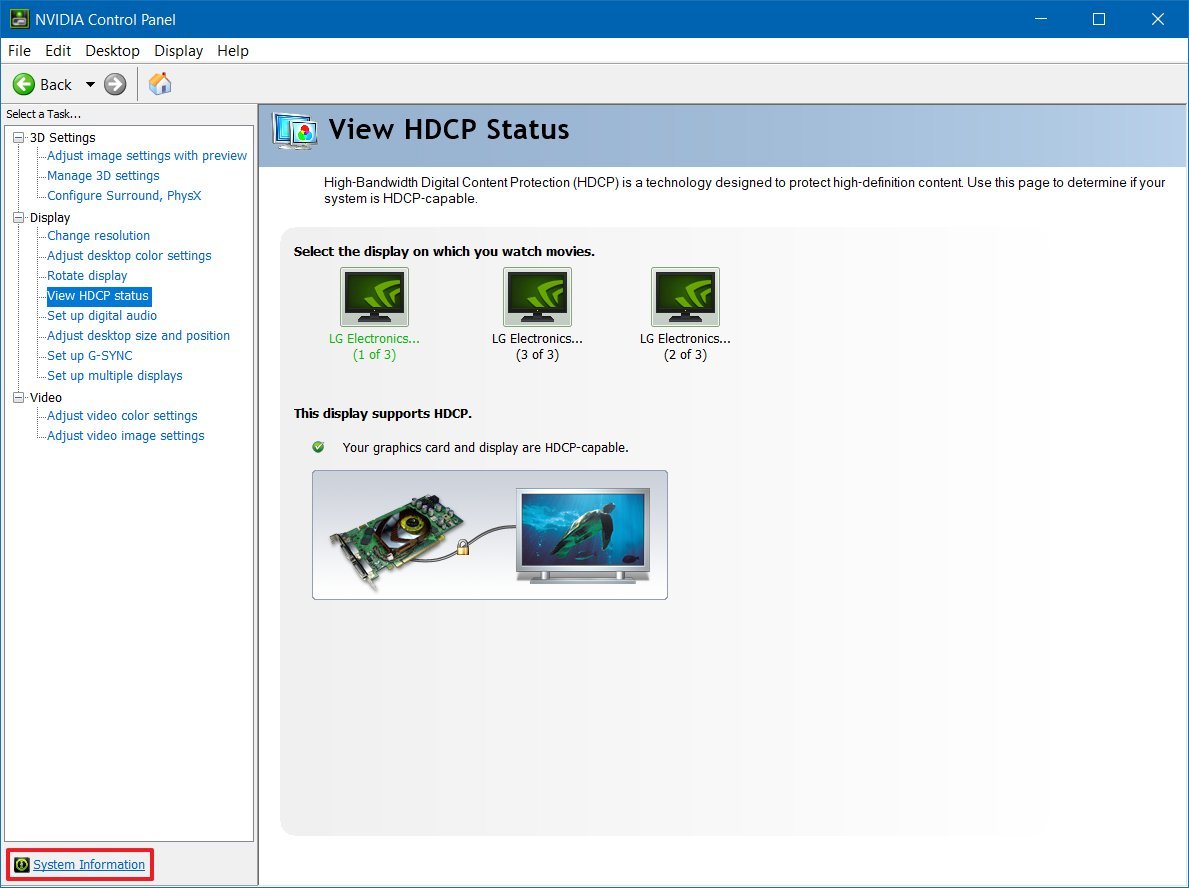
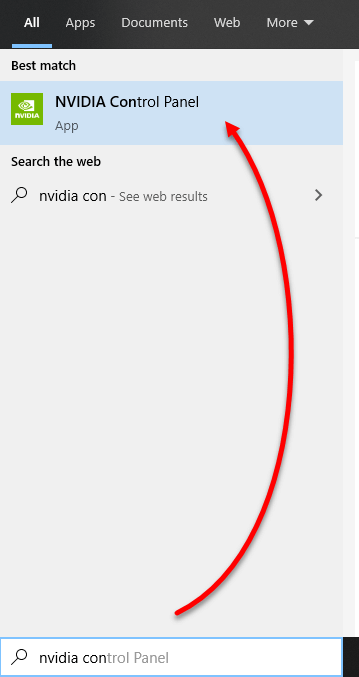
To check the specifications using the NVIDIA Control Panel, use these steps:
- Open Control Panel.
- Click on Hardware and Sound.
- Click on NVIDIA Control Panel.
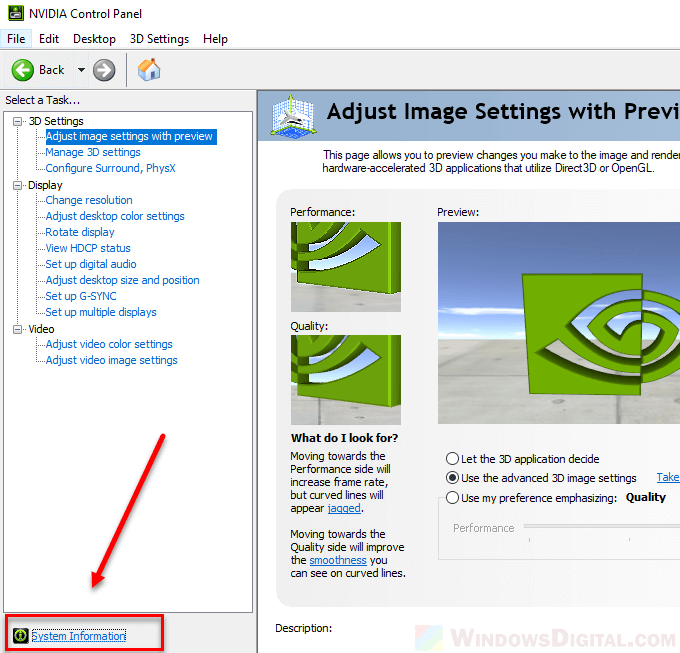
- Click the System Information option from the bottom-left corner.
- Click the Display tab.
- Under the «Graphics card information» section, confirm the graphics model on the left side.
Once you complete the steps, you’ll know the exact graphics card model. On the right side, you’ll also find various other details, such as the number of CUDA cores, clock speed of the processor, memory data rate, bandwidth, type, amount, and the video BIOS version.
Get the best of Windows Central in in your inbox, every day!
Mauro Huculak is technical writer for WindowsCentral.com. His primary focus is to write comprehensive how-tos to help users get the most out of Windows 10 and its many related technologies. He has an IT background with professional certifications from Microsoft, Cisco, and CompTIA, and he’s a recognized member of the Microsoft MVP community.
How to check graphics card? This post provides 5 ways to help you check the graphics card on Windows 10/8/7 PC or laptop. Detailed step-by-step guides are included.
Wonder what graphics card does the computer have, and how to check graphics card on Windows 10/8/7 PC/laptop? This post provides 5 ways to help you check Windows 10/8/7 computer graphics card easily and quickly. Find out the detailed step-by-step guide.
Tip: MiniTool Power Data Recovery — Professional free data recovery program enables you to easily recover deleted/lost files from Windows 10 computer, memory/SD card, USB flash drive, external hard drive, SSD, etc. 100% clean program.
Free Download
You can run Microsoft DirectX Diagnostic Tool to easily check the graphics card on Windows 10/8/7. Check the detailed guide below.
Step 1. You can press Windows + R key on computer keyboard to open Run window. Then type dxdiag and hit Enter to open DirectX Diagnostic Tool.
Step 2. Next you can tap Display tab, then you can check the detailed information of the graphics card on your Windows 10/8/7 PC/laptop, including graphics card name, manufacturer, its driver model/version/date, and more.

Recommended reading: 5 Best Free Photo Recovery Software to Recover Deleted Photos
How to Check Graphics Card on Windows 10/8/7 in Device Manager
You can also easily check graphics card in laptop or PC through Device Manager.
Step 1 – Open Windows Device Manager
You can click Start and type Device Manager. Then click Device Manager under best match result to open Windows Device Manager.
You can also press Windows + X key on the keyboard simultaneously, and click Device Manager to open it.
Step 2 – Check Graphics Card Detailed Info
Then you can find Display adapters, click and expand it. Then you will see the installed graphics card (s) on your Windows 10/8/7 PC/laptop.
Right-click on one graphics card and select Properties. Then it will pop-up a window which includes all the detailed computer graphics card information.
You can then check the general information, the driver information, device status and more of the computer graphics card.

Recommended reading: Top 5 Free Video Recovery Software to Recover Deleted Videos
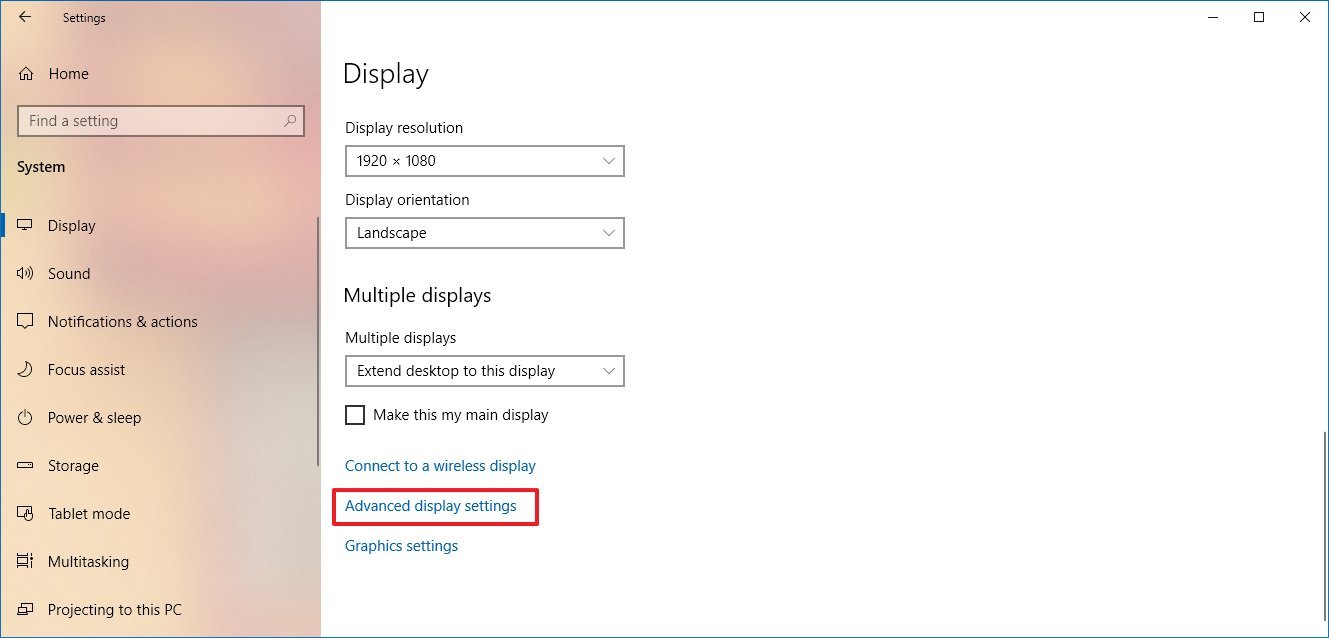
How to Check Graphics Card on Windows 10/8/7 from Display Settings
Another easy and quick to check graphics card on Windows 10/8/7 laptop or PC is to view display settings. Check the operation below.
Step 1. You can right-click the blank space on the computer screen and choose Display Settings.
Step 2. Then you can scroll down and click Advanced Display Settings to find out what graphics card your computer has and view its detailed parameters.
Recommended reading: How to Use Windows 10 Photos App to Edit Photos and Videos
How to Check Graphics Card on Windows 10/8/7 from Task Manager
You can also find out the computer graphics card info by using Task Manager on Windows 10/8/7 PC.
Step 1. Open Windows Task Manager
You can press Windows + X keys on the keyboard at the same time, and choose Task Manager.
Or you can click Start and type Task Manager. Select Task Manager to open it.
You can also press the shortcut key Ctrl + Shift + Esc at the same time to open Task Manager quickly.
Then click More details to check the detailed information of running tasks in Windows 10/8/7 PC.
Step 2. Find Out Computer Graphics Card Information
Next you can tap Performance tab, and click GPU option to check computer GPU information. You can check the GPU model, current usage rate, the graphics card driver, the version and its performance, etc.

Recommended: How to Open & Use Windows 10 Camera App to Capture Video/Photo
How to Check Graphics Card on Windows 10/8/7 through System Information
The last easy and quick way to allow you to check out the graphics card (GPU) or Windows 10/8/7 laptop or PC is to use System Information.
Step 1. Open Windows System Information
You can also press Windows + R key on the keyboard to open RUN window, then input msinfo32 and hit Enter.
Step 2. Check Windows 10/8/7 Laptop/PC GPU
Next you can expand System Summary -> Components -> Display, to check the detailed computer graphics adapter information incl. adapter model, adapter description, adapter RAM, installed drivers, and more. You can also check full specs of Windows 10/8/7 in this System Information window.
Bottom Line
If you want to find out what the graphics card your computer has, these 5 ways offered in this post can help you easily check graphics card in Windows 10/8/7 laptop or PC.
Video Guide:

Contents
- 1 How to Check Graphics Card on Windows 10 via Display Setttings
- 2 How to Find Your Graphics Card on Windows 10 via Device Manager
- 3 How to Check Graphics Card on Windows 10 via System Information
- 4 How to Check Laptop Graphics Card or PC GPU via Dxdiag
- 5 How to Check What Graphics Card You Have with Command Prompt
- 6 How to Check What Graphics Card You Have with PowerShell
- 7 How to Check Laptop Graphics Card or PC Graphics Card via Task Manager
- 8 How to Check What Graphics Card You Have with CPU-Z
- 9 How to Find Out Detailed Graphics Card Information with HWiNFO
Regardless of if you’re planning an upgrade or checking if your PC makes a game’s system requirements, it’s useful to know how to check a graphics card on Windows 10. Though users often turn to third-party tools to so, there are also plenty of ways to perform a graphics card check via your default OS tools.
While those with a PC GPU can often just open it up and look inside, many face confusion when wondering how to check a laptop graphics card. This can be especially difficult as some laptops have two graphics cards – the one integrated with the CPU and a dedicated one.
Graphics card check on Windows 10: Discrete GPU or integrated
As a result, we’re going to show you how to check what graphics card you have, but also how to determine which is your integrated graphics card. As a dedicated GPU is much faster for 3D rendering or gaming, this can be an important piece of information to get the most out of your device. Let’s get started:
How to Check Graphics Card on Windows 10 via Display Setttings
Windows display settings is one of fastest ways to answer the age old question of “what is my graphics card?”
- Open display settings
Right-click any empty space on your desktop and choose “Display settings”.

- Open Advanced Display Settings
Click “Display” on the left sidebar, then “Advanced display settings”.

- Check your Windows 10 graphics card model
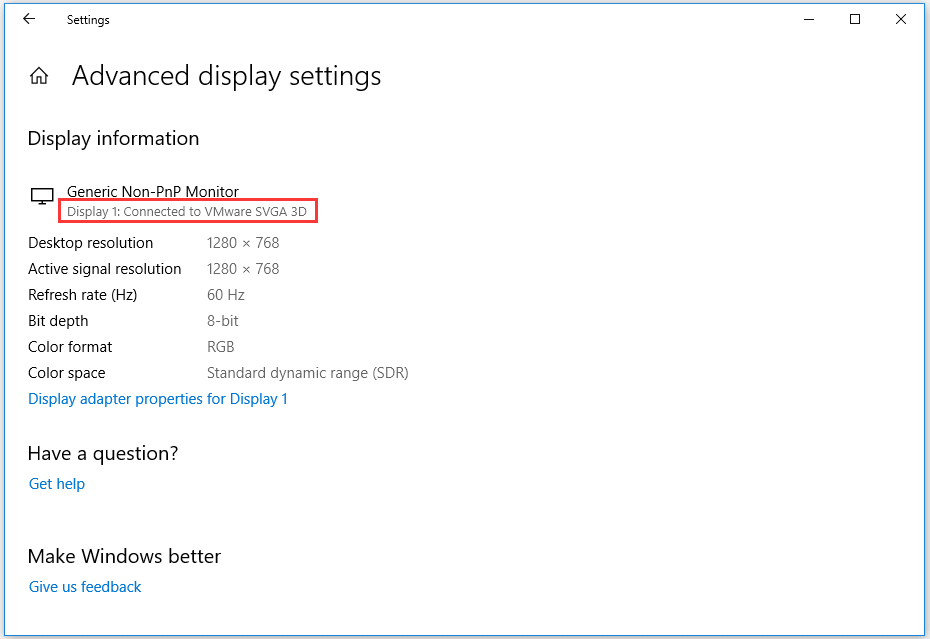
Under “Display information”, you’ll see the text “Display 1: Connected to [Your Graphics Card]”. Be aware that if you’re using a laptop this will probably be your integrated graphics card. You can check the other steps to find your dedicated one.


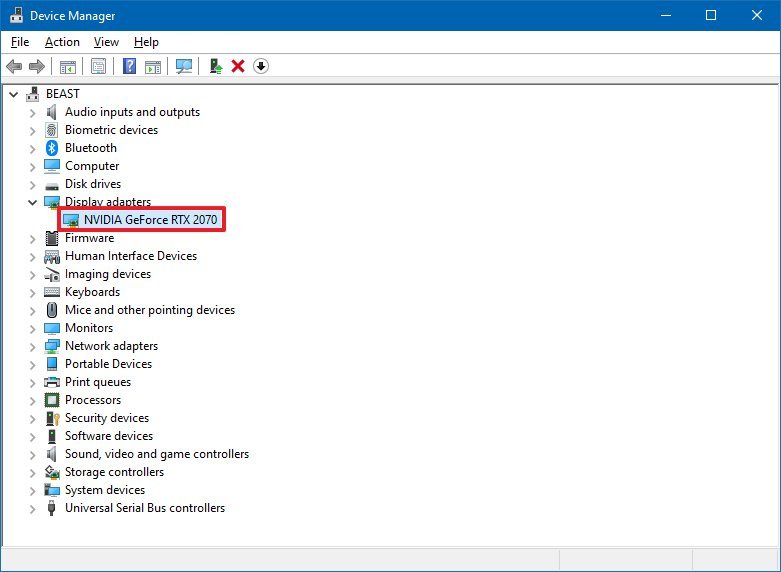
How to Find Your Graphics Card on Windows 10 via Device Manager
So long as you have drivers for your GPU, Windows 10’s device manager can be a very quick way to find all of your graphics cards.
- Open Device Manager
Press “Windows + X”, then click “Device Manager”.

- Check the graphics card in Windows 10 Device Manager
Scroll down the device list until you see “Display adapters”. Click the arrow next to it to expand the heading. The name of your dedicated and integrated graphics cards will be shown below. Your integrated graphics card will likely have “Intel” or “Vega” in the name, while a dedicated card will say “Nvidia” or “AMD Radeon”.

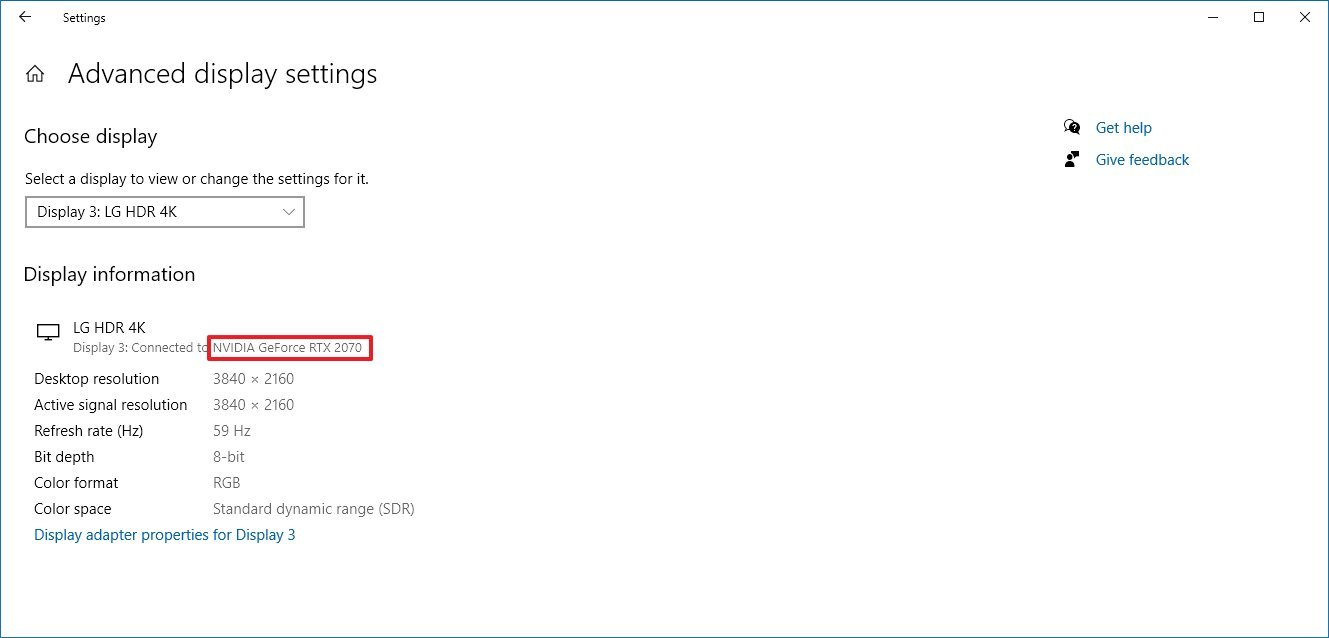
How to Check Graphics Card on Windows 10 via System Information
If you’d like a little more information without much complexity, Windows 10’s system information tool is for you.
- Open System Information
Press the “Windows” key and search for “System Information”, clicking the top result.

- Find the graphics card under the “Display” menu
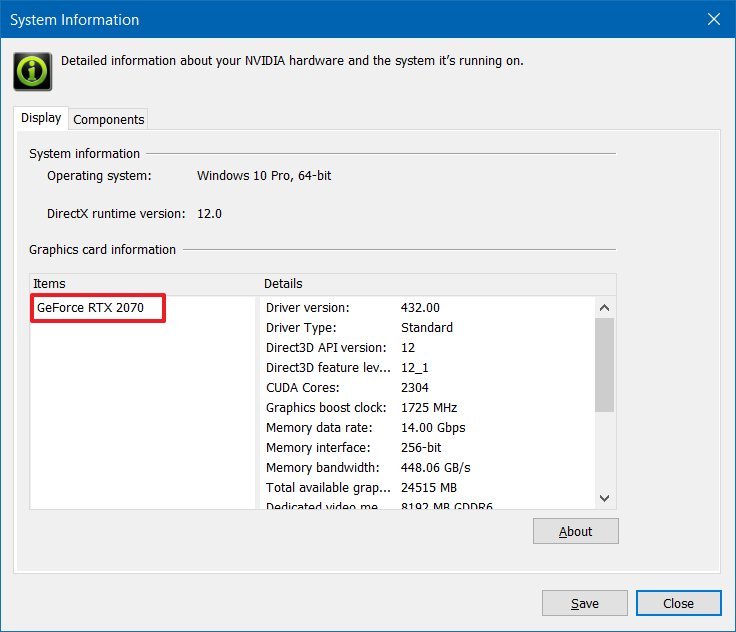
In the left sidebar, maximize the “Components” list and click on “Display”. You’ll see your graphics card information in the main pane, with the “Name” and adaptor description returning the name of the device. In this case, our PC graphics card is an Nvidia RTX 2070.

How to Check Laptop Graphics Card or PC GPU via Dxdiag
Dxdiag is a tried and tested way to perform a graphics card check, returning your GPU and its video memory.
- Open dxdiag
Press “Windows” and type “dxdiag”, clicking the top result. Click “Yes” to any prompts about unsigned drivers.

- Check display information
Click the “Display” tab and then the “Device” column for various details about your GPU such as the manufacturer and video memory, which is used to store textures and other information.


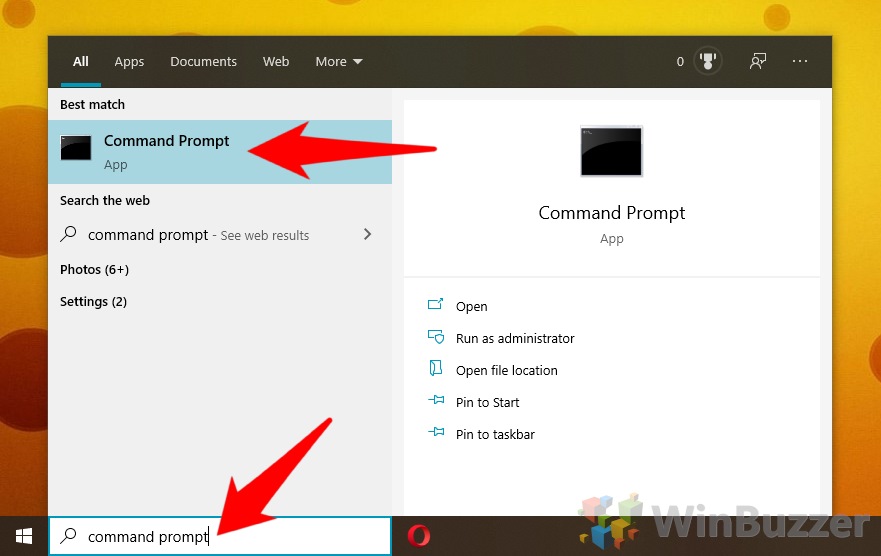
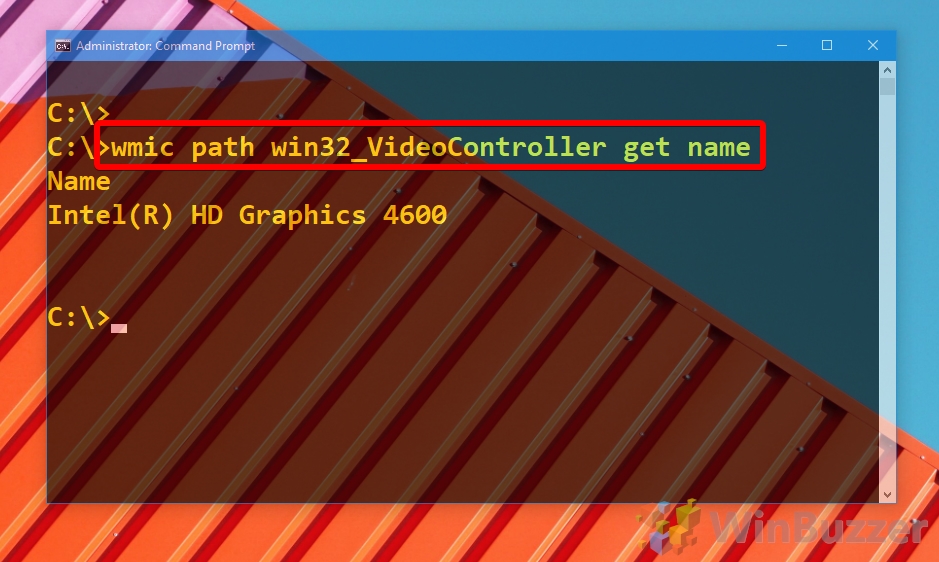
How to Check What Graphics Card You Have with Command Prompt
If you just need the name and not any other graphics card information, this can be achieved very quickly with Command Prompt.
- Open Command Prompt
Press “Windows” and type “Command Prompt”, clicking the top result.

- Enter the check video card command
To return just the name of your graphics card, type:
wmic path win32_VideoController get nameOr, if you’d like a more detailed reading, enter:
wmic path win32_VideoController get name, videoarchitecture, deviceID, adapterramYour VRAM will be returned in bytes.

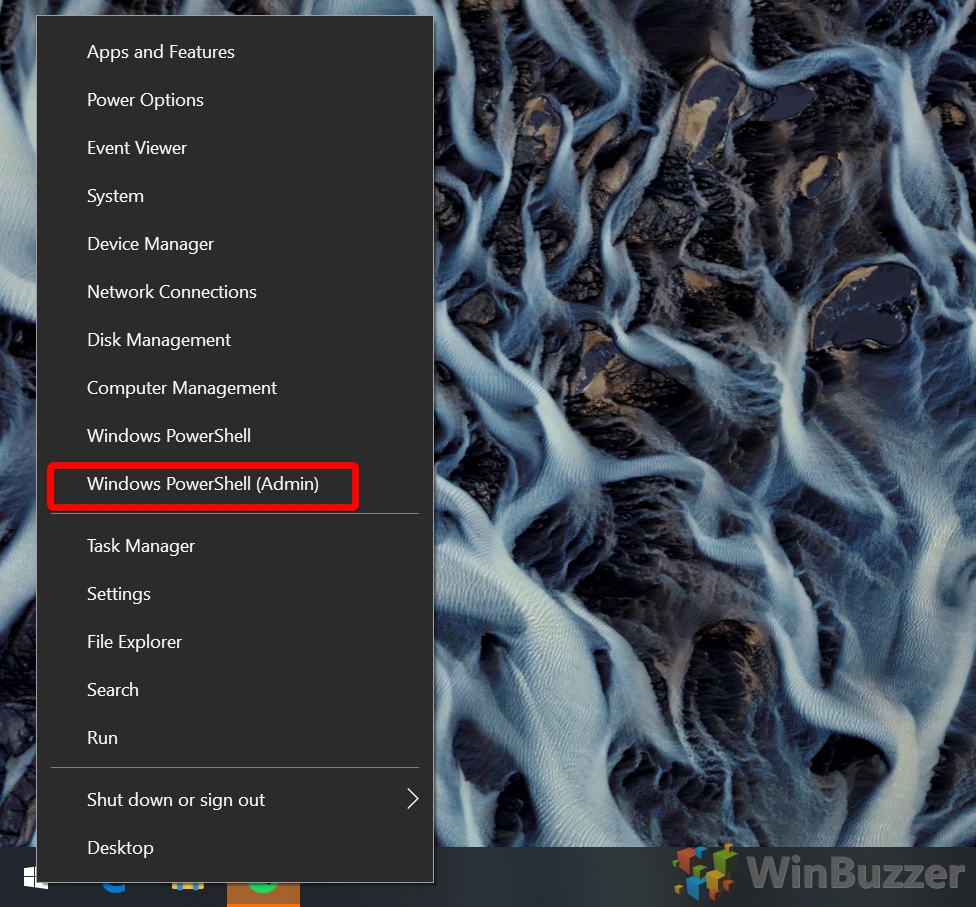
How to Check What Graphics Card You Have with PowerShell
It’s possible to perform a similar command with PowerShell, if you’re more comfortable there.
- Open PowerShell as an admin
Press “Windows + X” and click “Windows PowerShell (Admin)”.

- Check what graphics card you have with the following commands:
If you want all the information Windows has on your laptop or PC GPU, you can instead type
Get-WmiObject win32_VideoControllerfor a full list of properties. Check the “Description” field for its name.

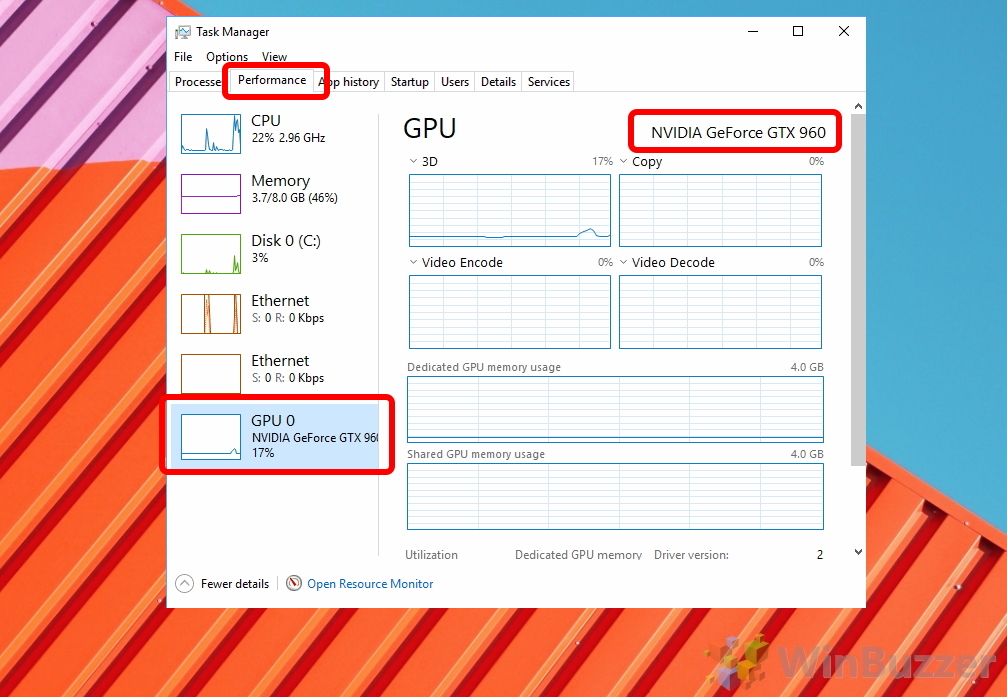
How to Check Laptop Graphics Card or PC Graphics Card via Task Manager
While this won’t work for those who haven’t updated for a while, you can find your graphics card on Windows 10 in Task Manager in the OS’ latest versions.
- Open Task Manager
Press “Windows” and type “Task Manager”, clicking the top result.

- Click “More details”

- Check your graphics card information
Click on the “Performance” tab and then “GPU” in the left sidebar. Your graphics card name will show in the top-right of Task Manager, as well as its utilization and dedicated memory usage.


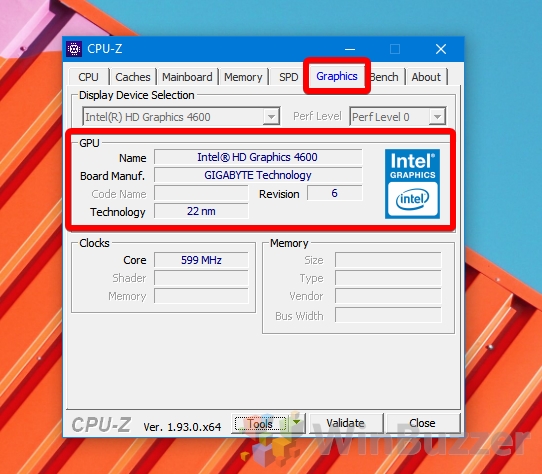
How to Check What Graphics Card You Have with CPU-Z
Though it’s not strictly necessary, third-party tools like CPU-Z are often installed on systems already and can provide more information.
- Check your GPU info with CPU-Z
Press the “Start” button and type “CPU-Z”, clicking the top result. Once it opens, click the “Graphics” tab and check the “GPU” section for your GPU name, clocks, memory, and technology. If you have more than one GPU, you can select it from the “Display Device Selection” dropdown at the top, with Intel and Vega graphics cards being integrated graphics.

How to Find Out Detailed Graphics Card Information with HWiNFO
HWiNFO is hardware information tool that provides a lot information than most tools. You can download it here.
- Perform a graphics card check with HWiNFO
Open HWiNFO via your Start Menu and check the “GPU” section in the top right for your graphics card information. You can switch the “GPU #0” heading if you have more than one card.

Now that you know your graphics card, you may want to check our tutorial on how to check your RAM and how to stress test a CPU.

If you are wondering what graphics card you have on your computer or if you want to find out your graphics card’s specifications such as brand, model, clock speed, video memory (VRAM) size, etc., you can easily check your graphics card using one of the methods below.
This tutorial will show you how to quickly check what graphics card you have and its detailed specifications on Windows 11 or Windows 10 laptop or desktop computer via Display Settings, System Information, DirectX Diagnostic or NVIDIA Control Panel. Use one of the methods below to find out if you have a built-in Intel integrated video card, or a dedicated one such as NVIDIA or AMD graphics card.
Also read: How to Force App or Game to Use Nvidia GPU or Integrated Graphics
Check graphics card via Display Settings
The easiest way to quickly check what graphics card you have on your computer is by going to the Advanced Display Settings and look at the Display information. Here’s how.
- Go to Start menu. Search for and open Settings app. Alternatively, you can open Settings by pressing Win + i key.

Windows 11

Windows 10
- Navigate to System > Display.
- In the Display settings window, scroll down until you see the “Advanced display settings” link. Click on it.

Windows 11

Windows 10
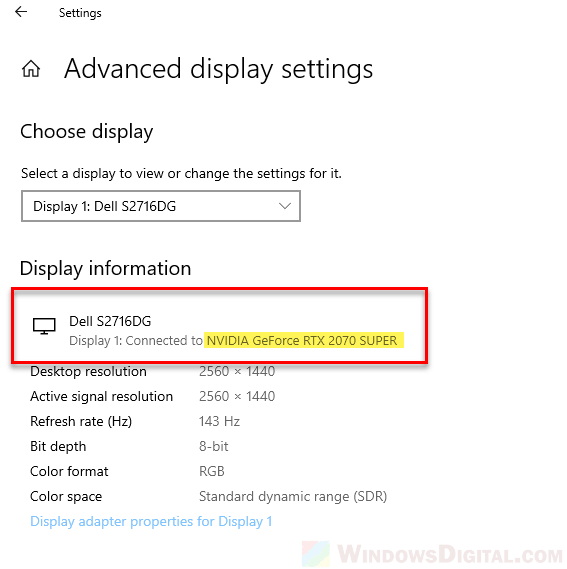
- On the next screen, under Display information, you can see what graphics card you have beside your Display information. In the screenshot example below, my PC is running NVIDIA GeForce RTX 2070 Super graphics card on a Dell S2716DG monitor.

Windows 11

Windows 10

This method only shows your graphics card’s brand and model along with some info about the monitor you’re using, the configured resolution, refresh rate, etc. To learn more about your graphics card’s specifications and other details, use other methods below.
System Information
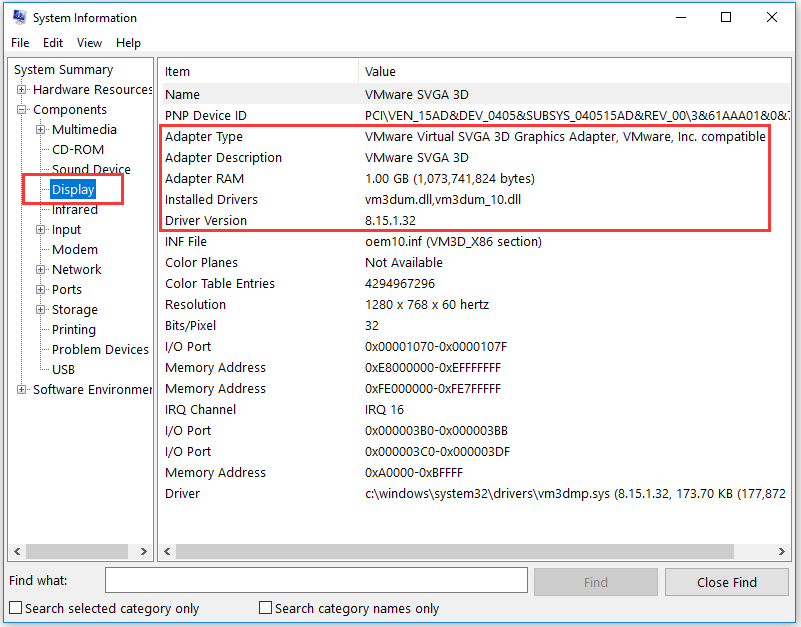
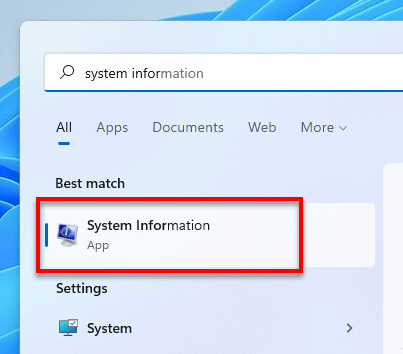
Another simple method to quickly learn about your graphics card on Windows 11/10 is by viewing them in the System Information window.
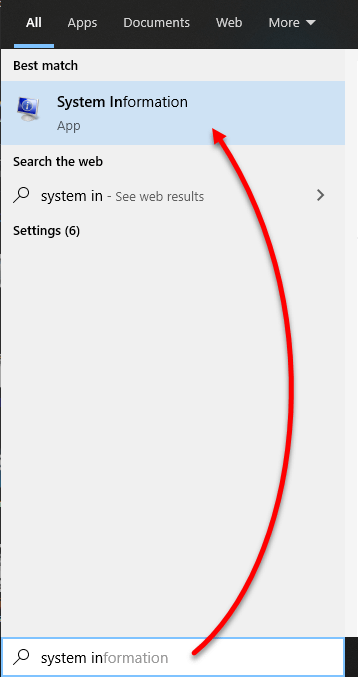
- Search for and open System Information via the Start menu.

Windows 11

Windows 10
- In the left sidebar, expand Components, then select Display.
- Your graphics card info will be shown in the right pane.
However, the System Information window only reveals your graphics card’s manufacturer, model, driver version and some minor details. To know even more about your graphics card, use other methods below instead.
DirectX Diagnostic
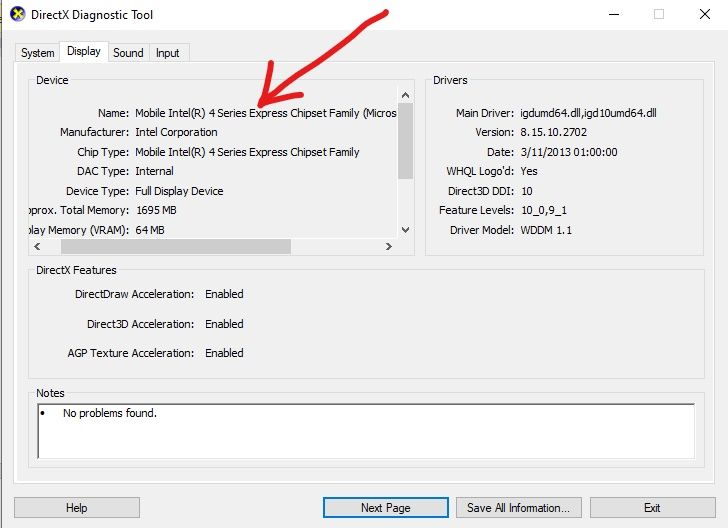
To learn more about your graphics card such as its chip type, VRAM memory (the X amount of GB you usually see on graphics card), and others, you can view them in the DirectX Diagnostic on Windows 11/10, or often known as DXDIAG. Follow the steps below to open DirectX Diagnostic to check your graphics card details.
- Go to start menu, search and open DXDIAG.

Windows 11

Windows 10
- In the DirectX Diagnostic Tool window, go to Display tab. If you have multiple Display, select your main Display connected to your graphics card. In most cases, it should be “Display 1“.
- From there, you can see your graphics card manufacturer, model, chip type, Display Memory (VRAM), etc.
Check NVIDIA graphics card’s clock speed, memory size, etc.
If you have a NVIDIA graphics card and want to check on its specifications, for example, the VRAM display memory (usually reads in GB), clock speed, Bus, drivers’ info, etc, you can check them directly on NVIDIA control panel, which usually comes with your NVIDIA graphics card’s driver when you install it. Here’s how to open the NVIDIA control panel and view your graphics card’s details.
- Go to start menu. Search and open NVIDIA control panel.

- In the control panel window, click on the System Information located at the bottom left of the window.

- Under the Display tab, click on your graphics card from the Items column. Its info and details will be shown in the Details column.
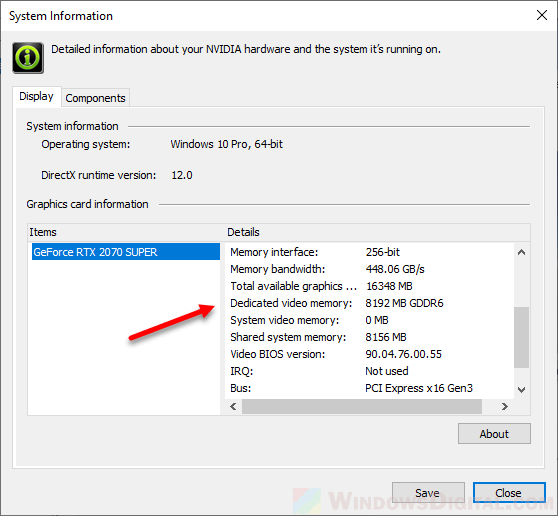
Tip: If you are looking for your graphics card’s VRAM memory, it’s listed as “Dedicated video memory“. For example, my NVIDIA GeForce RTX 2070 Super has a VRAM of 8GB, thus, it shows “8192 MB GDDR6” on my system information.
The graphic card information shown in the control panel includes: Driver version, Driver type, Direct3D API version, Direct3D feature level, CUDA Cores, Graphics boost clock, Memory data rate,Memory interface, Memory bandwidth, Total available graphics memory, Dedicated video memory, System video memory, Shared system memory, Video BIOS version, IEQ, Bus, Device ID and Part Number.
Introduction
A graphics card, which is also known as a video card, display card, or graphics adapter, is a piece of hardware that is installed in a computer. It is responsible for generating all the text and pictures that are displayed on your screen. Nowadays, every processor has a built-in onboard graphics card.
All computers have a Graphics Card that handles everything from drawing your desktop and decoding videos to rendering demanding PC/laptop games. Most modern PCs have Graphics Processing Units (GPUs) made by Intel and NVIDIA.
The GPU is usually the most critical component when it comes to playing PC games. If you don’t have a powerful enough GPU, you can’t play newer PC games or you may have to play them with lower graphical settings. Some computers have low-power “onboard” or “integrated” graphics, while others have powerful “dedicated” or “discrete” graphics cards and if you want to know what Graphics Card you are using in Windows 10 then you have to follow certain steps:
There are 4 ways to help you check Windows 10 Computer Graphics Card Information easily and quickly.
Method 1 — By using DirectX Diagnostic Tool
Step 1
From the Start menu, open the Run dialog box or you can Press the «Window + R» key to open the RUN window.
Step 2
Then type «dxdiag» and press Enter to open «DirectX Diagnostic» Tool.
Step 3
Click on «Display» tab, then you can check the detailed information of the Graphics Card on your Windows 10, including graphics card name, manufacturer, its driver model/version, and more.
Method 2 — Through Device Manager
You can also easily check graphics cards Information through Device Manager. Follow the below instructions to proceed.
Step 1
You can click Start and type Device Manager. Then click Device Manager to open Windows Device Manager. (Alternatively, you can press the «Windows + X» key, and click Device Manager to open it).
Step 2
Click on «Display adapters», then you will see the installed graphics card(s) on your Windows 10 PC.

Step 3
Right-click on graphic card and select Properties. Then it will pop-up a window, which includes all the detailed Computer Graphics Card Information.

Method 3 — Through Display Settings
You can also easily check the graphics card Information from the Display Settings.
Step 1
You can right-click the blank space on the computer screen and choose «Display» Settings.
Step 2
Click on «Advanced Display Settings».
Step 3
Then you can scroll down and click on «Display adapter properties» option, then you will see the installed graphics card(s) on your Windows 10.
Method 4 — Through System Information
Step 1
From the Start menu, open the Run dialog box or you can Press the «Window + R» key to open the RUN window.
Step 2
Type «msinfo32» and press Enter to open «System Information».
Step 3
Click on System Summary -> Components -> Display, then you will see the installed graphics card(s) and its information on your Windows 10.

Conclusion
By following any of the above methods, you can check the Graphics Card Information in Windows 10.
I hope you enjoyed this article. Follow C# Corner to learn more new and amazing things about Windows 10.
Thanks for reading this article.

You can also run Microsoft’s DirectX diagnostic tool to get this information:
- From the Start menu, open the Run dialog box.
- Type dxdiag.
- Click on the Display tab of the dialog that opens to find graphics card information.
How do I find my graphics card specs Windows 10?
A. On a Windows 10 computer, one way to find out is by right-clicking on the desktop area and choosing Display Settings. In the Display Settings box, select Advanced Display Settings and then choose the Display Adapter properties option.
How do I check my Nvidia graphics card Windows 10?
Press Windows Key + X to open Power User Menu and select Device Manager from the list of results. Once Device Manager opens, locate your graphic card and double click it to see its properties. Go to the Driver tab and click the Enable button. If the button is missing it means that your graphics card is enabled.
How do I know if my GPU is working properly?
Open Device Manager to check on the status of your graphics card. Open Windows’ Control Panel, click “System and Security” and then click “Device Manager.” Open the “Display Adapters” section, double click on the name of your graphics card and then look for whatever information is under “Device status.”
How do I check my GPU memory?
If your system has a dedicated graphic card installed, and you want to find out how much Graphics Card memory your computer has, open Control Panel > Display > Screen Resolution. Click on Advanced Setting. Under the Adapter tab, you will find the Total Available Graphics Memory as well as the Dedicated Video memory.
How do I check my graphics card memory Windows 10?
Windows 8
- Open the Control Panel.
- Select Display.
- Select Screen Resolution.
- Select Advanced Settings.
- Select the Adapter tab. You will see how much Total Available Graphics Memory and Dedicated Video Memory is available on your system.
How do I know which graphics card is running?
How can I find out which graphics card I have in my PC?
- Click Start.
- On the Start menu, click Run.
- In the Open box, type “dxdiag” (without the quotation marks), and then click OK.
- The DirectX Diagnostic Tool opens. Click the Display tab.
- On the Display tab, information about your graphics card is shown in the Device section.
How do I check my GPU temp Windows 10?
How to check if GPU performance will appear on your PC
- Use the Windows key + R keyboard shortcut to open the Run command.
- Type the following command to open DirectX Diagnostic Tool and press Enter: dxdiag.exe.
- Click the Display tab.
- On the right, under “Drivers,” check the Driver Model information.
Why is my GPU not showing up?
If you don’t see the NVIDIA graphics card listed under Device Manager, you can tell the graphics card is incorrectly detected by Windows. The common error that you would encounter is fail to install NVIDIA Graphics driver. The problem can be caused by many reasons.
How do I identify my Nvidia graphics card?
Click View and then click Show hidden devices. Click Action > Scan for hardware changes. Check if your Nvidia graphics driver shows up under Display adapters (aka.Graphics card, Video card, GPU card).
How do I know if my GPU is dying?
The Symptoms
- Computer Crashes. Graphics cards that have gone rogue can cause a PC to crash.
- Artifacting. When something is going wrong with the graphics card, you may notice this via bizarre visuals onscreen.
- Loud Fan Sounds.
- Driver Crashes.
- Black Screens.
- Change the Drivers.
- Cool It Down.
- Make Sure It’s Properly Seated.
How do you know if your CPU is dying?
How To Tell If Your CPU Is Dying
- The PC Starts and Turns Off Right Away. If you are turning on your PC, and as soon as it turns on, it shuts down again then it could be a symptom of a CPU failure.
- System Bootup Issues.
- The System Freezes.
- Blue Screen of Death.
- Overheating.
- Conclusion.
How do you check if a graphics card is installed or not?
Press Windows+R it opens up the run window. now type devmgmt.msc Expand Display adapters section and you should see your graphic card model. Alternatively since he mentioned that the drivers are installed, you can right click on the desktop and select the Graphic Properties option and check out for yourself.
How do I check my GPU on Windows 10?
How To Check GPU Usage in Windows 10
- First things first, type in dxdiag in the search bar and click enter.
- In the DirectX tool that just got opened, click on the display tab and under the Drivers, watch out for Driver Model.
- Now, open Task Manager by right-clicking on the taskbar down below and selecting task manager.
What series is the Geforce GTX 1060?
Announcing the GeForce 10-series products, Nvidia has introduced Founders Edition graphics card versions of the GTX 1060, 1070, 1070 Ti, 1080 and 1080 Ti.
How do I find my GPU memory manufacturer?
Right click on your desktop and click on display settings which should open a popup. Now open Display adapter settings which will display your GPU adapter specifications. It shows the GPU chip type, DAC type, BIOS information, dedicated video memory and system memory. On Windows 7 PC go to Windows >> Control Panel.
How do I open run in Windows 10?
Just press the Windows key and the R key at the same time, it will open the Run command box immediately. This method is the fastest and it works with all versions of Windows. Click the Start button (the Windows icon in the lower-left corner). Select All apps and expand Windows System, then click Run to open it.
How do I know my Nvidia graphics card?
How do I determine my system’s GPU?
- If no NVIDIA driver is installed: Open Device Manager in the Windows Control Panel. Open Display Adapter. The GeForce shown will be your GPU.
- If NVIDIA driver is installed: Right click the desktop and open NVIDIA Control Panel. Click System Information in the bottom left corner.
How can I find my computer’s specs?
Open the Charms bar, click Settings, and then click PC info. This will open up the System panel. In the System panel, you’ll be able to see what type of processor you have, how much installed memory (RAM) you have, and what type of system you have (32-bit or 64-bit).
How do you check which GPU I have?
You can also run Microsoft’s DirectX diagnostic tool to get this information:
- From the Start menu, open the Run dialog box.
- Type dxdiag.
- Click on the Display tab of the dialog that opens to find graphics card information.
How do I make sure my game is using GPU?
Here’s how to force your Surface Book to use your NVIDIA GPU, and check whether your games are using it as appropriate.
- Type Nvidia into the Start Menu to find the Nvidia Control Panel.
- Click Manage 3D Settings is selected in the left column.
- Select the Program Settings tab on the right side.
How do I find my default graphics card?
How to set a default graphics card
- Open the Nvidia Control Panel.
- Select Manage 3D Settings under 3D Settings.
- Click on the Program Settings tab and select the program you want to choose a graphics card for from the drop down list.
How do I reinstall my graphics card Windows 10?
Reinstall graphics or video driver in Windows 10
- Step 1: Right-click on the Start button on the taskbar and then click Device Manager to open the same.
- Step 2: In the Device Manager, expand Display adapters to see your graphics, video or display card entry.
How do I reinstall Nvidia graphics card?
Double click on Display adapters to expand the category. Right click the NVIDIA graphics card installed on your computer, then select Uninstall device (in some cases, this could be just Uninstall). In the example below, the graphics card is NVIDIA GeForce GT 640.
How do I check my GPU BIOS?
Press the appropriate key to enter the BIOS. Use your arrow keys to highlight the “Hardware” option at the top of your BIOS screen. Scroll down to find “GPU Settings.” Press “Enter” to access GPU Settings.
How do I run diagnostics on Windows 10?
Memory Diagnostic Tool
- Step 1: Press the ‘Win + R’ keys to open the Run dialogue box.
- Step 2: Type ‘mdsched.exe’ and press Enter to run it.
- Step 3: Choose either to restart the computer and check for problems or to check for problems the next time you restart the computer.
How do I check my computer for Windows 10 compatibility?
Step 1: Right-click the Get Windows 10 icon (on the right side of the taskbar) and then click “Check your upgrade status.” Step 2: In the Get Windows 10 app, click the hamburger menu, which looks like a stack of three lines (labeled 1 in the screenshot below) and then click “Check your PC” (2).
How do I find my computer model and serial number in Windows 10?
Find serial number of PC/Laptop in Command prompt
- Enter the following command. “ wmic bios get serialnumber”
- You can now see the serial number of your PC/laptop.
How do you make sure your GPU is being used?
How can I see which graphics card is being used?
- Click Start and then Control Panel. Select Classic View from the left side of the window.
- Double-click NVIDIA Control Panel.
- Click View and next Display GPU Activity Icon in Notification Area.
- Click the new icon in the notification area.
How do I force a game to play with my GPU?
Right-click the app you want to force to use the dedicated GPU. The right-click context menu will have a ‘Run with graphics processor’ option. Select ‘High-performance NVIDIA processor’ from the sub-options and the app will run using your dedicated GPU.
Can a CPU be used as a GPU?
TL;DR answer: GPUs have far more processor cores than CPUs, but because each GPU core runs significantly slower than a CPU core and do not have the features needed for modern operating systems, they are not appropriate for performing most of the processing in everyday computing.
Photo in the article by “Flickr” https://www.flickr.com/photos/daniel-rehn/14474133130
Contents
- First Method: Checking the Video Card Automatically
- Second Method: Using the Device Manager
- Third Method: Checking the Display Settings
- Fourth Method: Running the DirectX Diagnostic Tool
If you’ve ever attempted to install an image-heavy software program before, then you probably know the importance of a graphics card. Also referred to as a video adapter, video card, and display adapter, a graphics card is a computer component that is responsible for converting data into a signal that your monitor can understand. Basically, its primary function is to render an image on your screen. It is worth noting that a better graphics card generally means a higher quality of photos and videos. Naturally, it is preferred by gamers, video editors, and photographers.
You probably found this article because you were asking, “What graphics card do I have in my laptop?” Well, you will be delighted to know that we’ve got this topic covered. In this post, we will teach you how to check a video card through various methods. Make sure you read through this article to discover which option works best for you.
First Method: Checking the Video Card Automatically
We will begin with the easiest way to check your graphics card information. If you do not want to go through various sections in your PC, we recommend installing Auslogics Driver Updater. Once you’ve installed this tool, it will automatically recognize your computer’s hardware and software information. It only takes a few clicks to get the details you need. Here are the steps:
- Download Auslogics Driver Updater, then install it on your PC.
- On the left-pane menu, click Diagnostics. Here, you will see the computer hardware information, including details about the CPU, motherboard, memory, and the graphics card.
What’s great about Auslogics Driver Updater is it is meant not only for providing information about your PC’s hardware and software components. All you need to do is click a button, and it will scan your computer for missing, corrupted, or outdated drivers. Within a few moments, the tool will be able to repair, replace, and update problematic drivers. So, by using this tool, you can improve the performance of your computer.
Second Method: Using the Device Manager
To find out the graphics card on a Windows 10 computer, you need to check the Device Manager. This tool offers an efficient way to check the details of all the Windows-recognized hardware in your PC. So, if you want to acquire any information about your hardware devices, including your sound card, keyboard, and graphics card, you can turn to the Device Manager. To proceed, follow the instructions below:
- Go to your taskbar, then right-click the Windows icon.
- From the list, select Device Manager.
- Once the Device Manager is up, double-click the Display Adapters category to expand its contents. You will see the available video cards on your computer.
- Right-click your graphics card, then select Properties.
- A new window will appear, and it will show you details about the graphics card you selected. You can also check what’s indicated below the Device Status section to know if your video card is functioning properly.
Third Method: Checking the Display Settings
Another quick way to access information about your video card is by checking the Display Settings on your computer’s desktop. This tool is intended for customizing desktop settings, including image configuration. To begin, follow these steps:
- Go to your desktop, then right-click an empty area.
- Select Display Settings from the context menu.
- Scroll down until you see the ‘Display adapter properties’ link. Click it.
- A new window will open. You can go to the Adapter tab to see information about your video card, including the details about the graphics memory.
Another way to check your graphics card is by running the DirectX Diagnostic Tool. This utility is intended for testing DirectX functionality and troubleshooting problems related to sound and video hardware. It is also useful for checking the system information about your sound card and graphics card. To find out the graphics card on a Windows 10 computer, follow the steps below:
- You will begin by launching the Run dialog box. You can do this by pressing Windows Key+R on your keyboard.
- Once the Run dialog box is up, type “dxdiag” (no quotes), then hit Enter.
- It will take a few seconds for the app to load.
- Once the DirectX Diagnostic Tool is open, go to the Display tab. Here, you will see information about your display adapter, including its type and version.
- If you want to know if your device is functioning properly, you can check out the Notes section at the bottom.
These are the different ways to check your video card. If you have any questions about this topic, please feel free to ask them in the comments section below.
Do you like this post? 🙂
Please rate and share it and subscribe to our newsletter!
3 votes,
average: 5.00 out of
5
Loading…
![What Graphics Card Do I Have? How to Check Your GPU in Windows 10 [PC GUIDE]](https://www.freecodecamp.org/news/content/images/size/w2000/2021/10/pexels-francesco-ungaro-1670977.jpg)
Every computer has a graphics card that handles the rendering of every pixel you see on the monitor. This graphics card also plays a crucial role in displaying videos, running applications, and most especially, handling video game graphics.
Computers also have a graphics processing unit (GPU), which renders images and videos. Your computer has a GPU from either Intel, AMD, or NVIDIA.
If your computer doesn’t have a graphics card with a powerful GPU, you might be unable to play the latest games, run infographics, and use video-intensive apps. And certain apps might not render correctly.
In this guide, I will show you 3 ways you can check your GPU in Windows 10, so you can know what you have and whether you need to upgrade it.
Step 1: Click on the Start menu, search for “dxdiag”, and open it.
Step 2: You might be prompted to select “Yes”. Make sure you select “Yes” to proceed.
Step 3: Click on the Display tab and you will see your GPU vendor, model, and other info:
How to Check the GPU Through Device Manager
Step 1: To check the GPU of your Windows 10 computer under Device Manager, click on start or the search icon and search “device manager”. Then click on Device Manager or press Enter.
Step 2: Expand the Display adapters branch to view the model and vendor of your computer’s GPU:

How to Check the GPU Through Settings
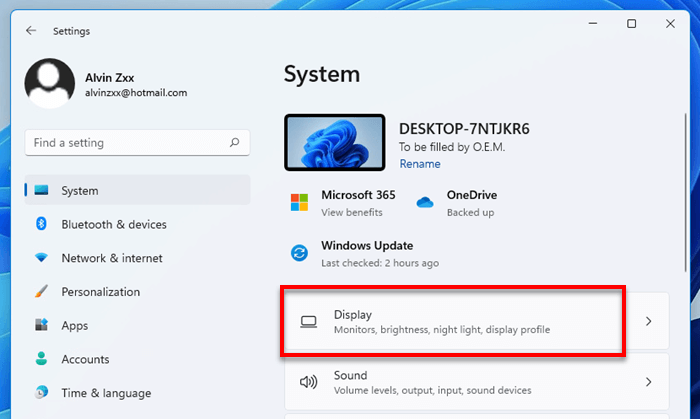
Step 1: To check your computer’s GPU in Settings, click on Start and click on the gear icon to open settings.
Step 2: Select “System” from the list you see:
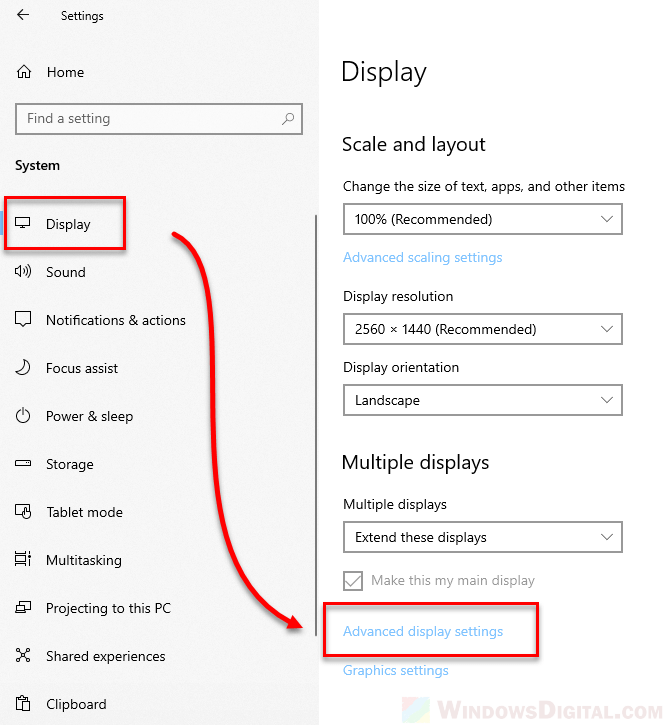
Step 3: Make sure “Display” is selected. Though its always the first in the list.
Step 4: Under “Multiple displays”, click on “Advanced display settings”:
Step 5: You should see the GPU info of the default display right away, including the model and vendor (Intel, AMD, NVIDIA).
If you have multiple displays installed, select the one for which you want to view the GPU info.

Conclusion
In this guide, you learned about 3 different ways you can check the graphics processing unit of your Windows 10 computer. This will help you learn more about your device and also know what next to do if the GPU is not powerful enough for your needs.
Thank you for reading. If you find this article helpful, please share it with your friends and family.
Learn to code for free. freeCodeCamp’s open source curriculum has helped more than 40,000 people get jobs as developers. Get started
What to Know
- To check which GPU is installed: Right-click Start. Then click Device Manager -> expand the Display Adapters menu -> select the GPU to get details.
- To check the card model: Either open your case and review the card’s sticker for the number or use a third-party program.
If you’ve delved at all into PC gaming, you’ve heard talk about graphics cards. Graphics cards are made by a variety of manufacturers, but everything you see on your screen is generated by a chip on that card, called a graphics processing unit (GPU).
If you want to learn a bit more about graphics cards, you’ve come to the right place. Here is how you check your graphics card on Windows 10, and a bit more on understanding how it all works.
How to Check Your Graphics Card Using Device Manager
Finding out what GPU you have installed on your Windows 10 computer is pretty simple; it will take a bit more work to find the model of the actual card you have.
-
Right-click the Start Menu on your Windows toolbar and select Device Manager.
-
A list of components in your PC will be listed under the appropriate categories.
-
Expand Display Adapters by selecting the arrow next to it, or by double-clicking.
-
Double-click your display adapter to see more details on it, like the port it is currently plugged into.
How to Check Your Graphics Card Model
In general, knowing your chipset is what you’ll need when dealing with the basics of a graphics card. If you need to go more in-depth and figure out the model of the actual card, you’ll have to do a bit more leg work. There are a few ways to do this.
How to Check Your Graphics Card by Opening Your PC
If your PC is easily accessible, the easiest way to figure out your graphics card is to open your PC and look at it.
Take care when dealing with the insides of your PC. Power everything down and discharge any static electricity to avoid accidental frying of parts.
Your graphics card should be easy to spot, since it plugs into the motherboard and has at least one fan attached to it. There should be a sticker on it that tells you the model number, though you may need to unplug it from your motherboard to get a better look at it.
If you unplug it, make sure to be careful and take note of where it plugs back in, otherwise you’ll be treated to a blank screen next time you turn your computer on.
Download a Third-Party Program to Check Graphics Card
There are a few third-party programs that can give you all sorts of specs on your PC hardware. They all work a bit differently, but two that are both free and safe are Speccy and CPU-Z.
If you download a third-party app, make sure you only download it directly from the manufacturer’s website.
These programs can give you a variety of details about the different hardware inside your PC, including your graphics card. Once you’ve downloaded the program and run it, select Graphics, find the name of your GPU, and look for the Subvendor or manufacturer name to determine who actually made your graphics card.
To reiterate, in most instances, you’ll be fine just opening the device manager to figure out your GPU. However, you may need the actual card information if there’s a warranty issue or other hardware problem you need to sort out.
What’s the Difference Between a Graphics Card and a GPU?
You’ll often see «GPU» and «Graphics Card» used almost interchangeably, but they are a bit different. The GPU is the actual chip that does the heavy lifting; they are generally made by one of two designers: Nvidia or AMD. The GPU is the powerful and expensive piece of hardware that delivers the actual graphics to your monitor.
A graphics card has a lot of other aspects to it besides the GPU, including cooling fans, voltage regulation, etc. They’re also made by a variety of companies with plenty of small differences, but you will often see the chipset (e.g. «Nvidia GeForce 1080» or «AMD Radeon 560») displayed as prominently, if not more so, than the model of the card itself.
Thanks for letting us know!
Get the Latest Tech News Delivered Every Day
Subscribe