To get your jdk location in Windows, run this at a command prompt:
where java
This lists any and all locations of java.exe, including from your JAVA_HOME. For example, the 3rd line here reflects my JAVA_HOME location, where I’m pointing to JDK 8:
C:Usersme> where java
C:Program FilesCommon FilesOracleJavajavapathjava.exe
C:Program Files (x86)Common FilesOracleJavajavapathjava.exe
C:Program FilesJavajdk1.8.0_202binjava.exe
Note for comparison that java -version does not reflect my JAVA_HOME location and in fact shows java version 11 instead of 8:
C:Usersme> java -version
java version "11.0.15" 2022-04-19 LTS
Java(TM) SE Runtime Environment 18.9 (build 11.0.15+8-LTS-149)
Java HotSpot(TM) 64-Bit Server VM 18.9 (build 11.0.15+8-LTS-149, mixed mode)
This is confusing because my Java compiles (e.g., via mvn) use JDK 8 since that’s what my JAVA_HOME is pointing to. (I’m not sure whwere the 11 version came from; possibly from when I installed maven.)
Determining the difference between the JRE and JDK you’re running has never been straightforward. Seems like java -version used to be a way to do this, but no longer.
Adding to the complexity, you can also supposedly get your Java version info from Control Panel > Programs > Java > About. For me, that shows Version 8. That’s despite java -version showing version 11.0.15. And it doesn’t change even if I point my JAVA_HOME to JDK 11.
Note that this answer is also helpful. In my case, that helped me determine that I have java.exe and javac.exe at C:Program Files (x86)Common FilesOracleJavajavapath and C:Program FilesCommon FilesOracleJavajavapath. Depending on which one I have listed first in my Path variable, I get different results when i run java -version or java --version. The former seems to work when Java 8 is listed first; the latter when Java 11 is first.
Java is a programming language that is platform-independent, popular, simple, secure, and statically typed. Before discussing let’s clear Java language needs a runtime platform so before going ahead let’s clear how java is present on the machine.
Java language comprises three components mainly:
- Java Development Kit
- Java Runtime Environment
- Java Virtual Machine
Runtime Concepts than only we will check whether Java is there on the Platform (Operating System + Architecture)
1. Java Virtual Machine
This is a machine–specific software which is responsible for byte code on that machine and converts it into machine-specific instructions.
JVM is different for Windows
JVM is different for Linux
JVM is different for Different Platforms
So as a programmer we don’t need to check presence on the machine as it is pre-installed in the machine. It is responsible for running Java code line by line.
2. Java Runtime Environment
It is simply a package that provides an environment to only run our java code on the machine. No development takes place here because of the absence of developmental tools.
3. Java Development Kit
It is also a package that provides an environment to develop and execute where JRE is a part of it along with developmental tools.
- JDK = JRE + Developmental Tools
- JRE = JVM + Library Classes
Now, The first and Foremost step is to check the Java Development Kit in Windows which is also known as JDK. There are lots of versions of Java. Depending upon the operating system methods there are several methods to find the version of Installed JAVA on your Machine:
Let us discuss 3 standard methods in Windows
- User needs to open Command Prompt and enter- ‘java -version’
- Open control panel and lookup for Java
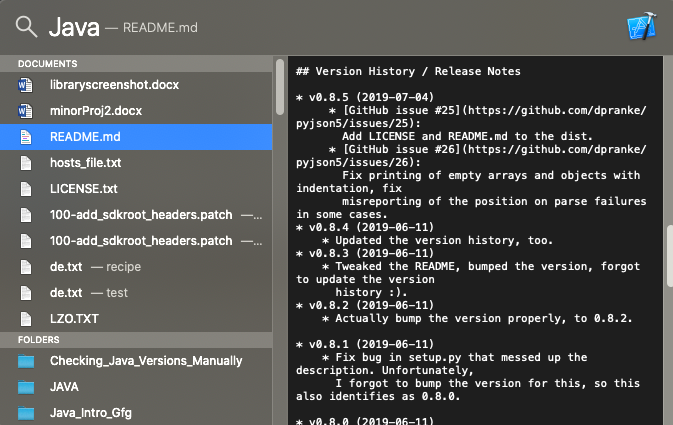
- Directories method- Click the Menu ‘Start’ and typing About.java or readme file
Taking one by one, showcasing in-depth individually
1. Command Prompt
The CMD (Command Interpreter is a command-line Interface. It supports a set of commands and utilities; and has its own programming language for writing batch files. Open CMD and search java -version. First, we have to an environment variable to the installed path location of the java folder. Otherwise, it will show invalid command. It is called ‘Terminal’ in the case of mac operating systems.
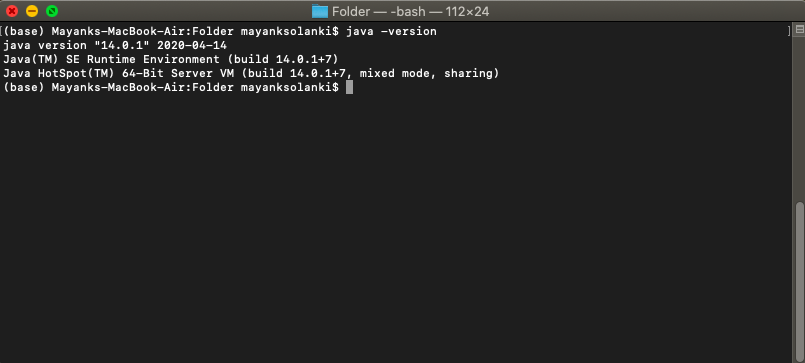
java -version // CMD/Terminal command to check java version on the machine
In the case of Windows OS: It is showing java is installed on the machine with version 1.8.0 (See carefully at line number 5)
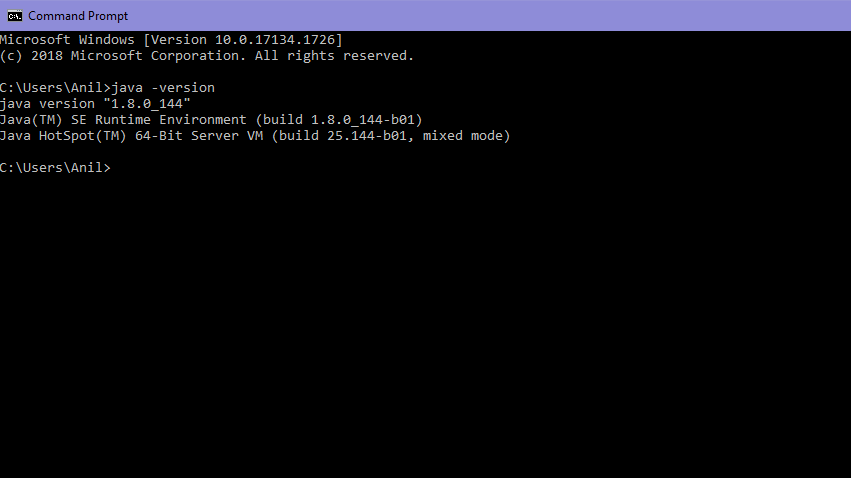
“1.8.0_144” is the version of the java
In the case of macOS: It is showing java is installed on the machine with version 14.0.1 ( see carefully at line number 2)
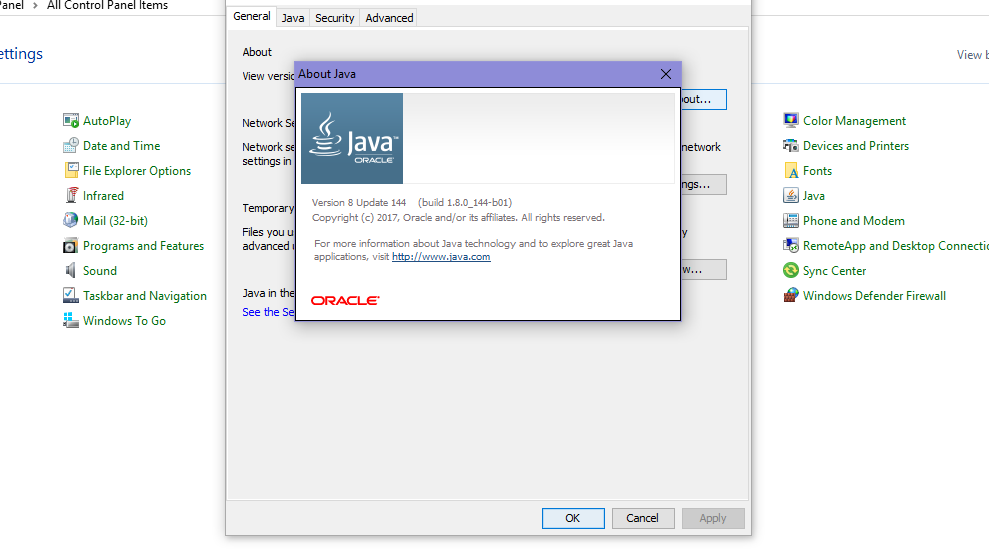
Second Method:
- Open Control Panel and there is an option of the java on the interface of the control panel
- Click on the java option and click about a small pop window will appear
In the case of Windows:
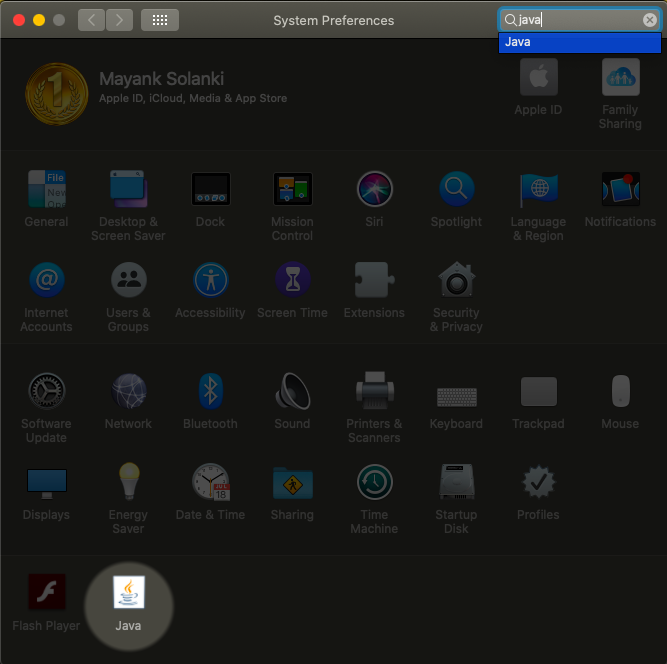
In the case of Mac: Click on the Java icon downside. System preferences in mac are the same as the Control panel in Windows.
Third Method:
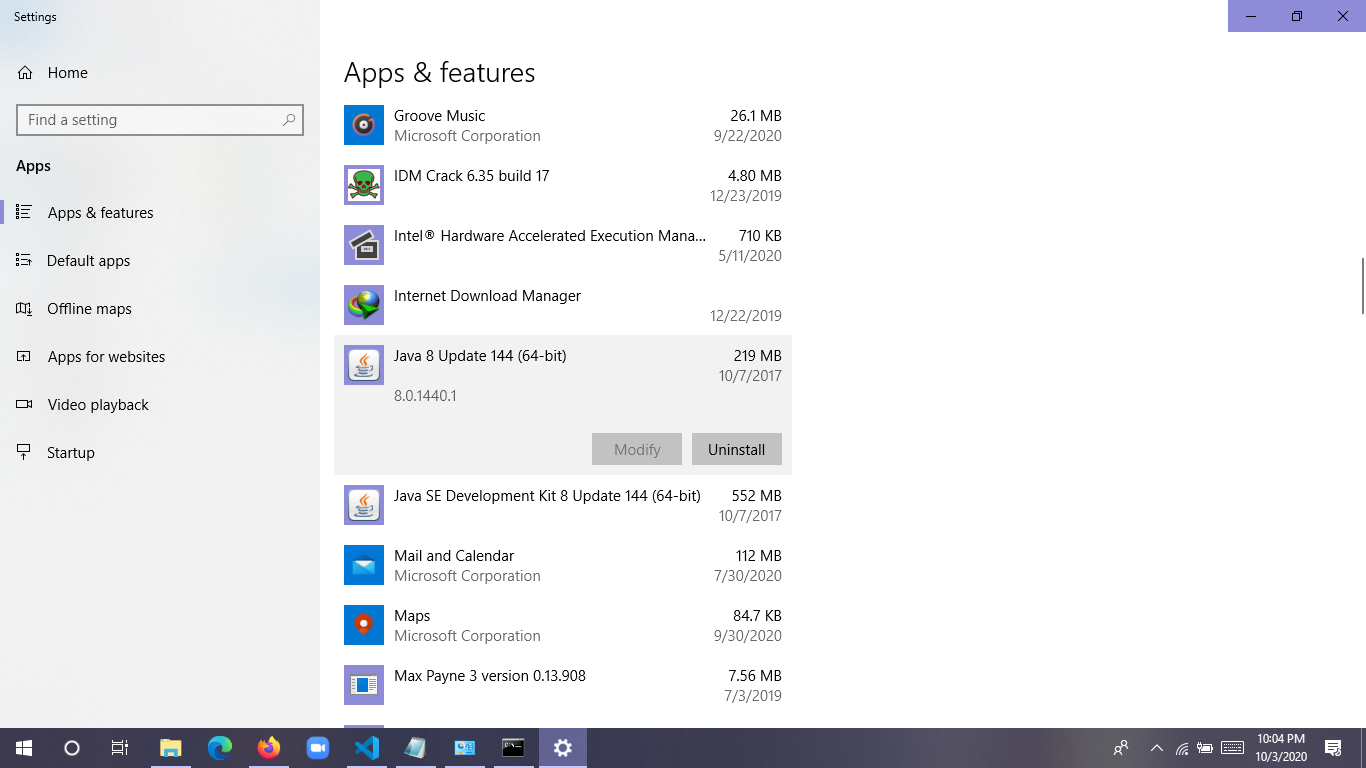
Search Program and features in the control panel and search JAVA Named option
In the case of Windows: Simply custom search- About Java
In the case of Mac:
Press the command button followed by a spacebar without lifting fingers from the command button.
A popup box will appear for less than a second followed by another pop-up as shown below:
![]()
Download Article
![]()
Download Article
Do you need to check if the latest version of Java is installed on your Windows PC? An easy way to see if Java is up to date is to type a quick command at the Windows command prompt. No matter which version of Windows you’re using, you can type «java -version» into the command prompt (cmd) to see the version number of your Java installation. This wikiHow article will teach you how to use the command prompt to find out which version of Java (or the Java compiler) is installed on Windows 10, 11, and earlier versions.
Things You Should Know
- The java -v command displays the installed version of Java, while javac -v displays the version of the Java compiler.
- If you see the error «Java is not recognized as an internal or external command,» Java is either not installed, or its path is not in the system environment variables.
- You can always download the latest version of JDK and JRE from https://www.oracle.com/java/technologies/downloads.
-

1
Click the Windows Start menu. It’s the icon with Windows logo. By default, it’s in the bottom-left corner of the taskbar.
- You can also press the Windows key to open the Start menu.
-
2
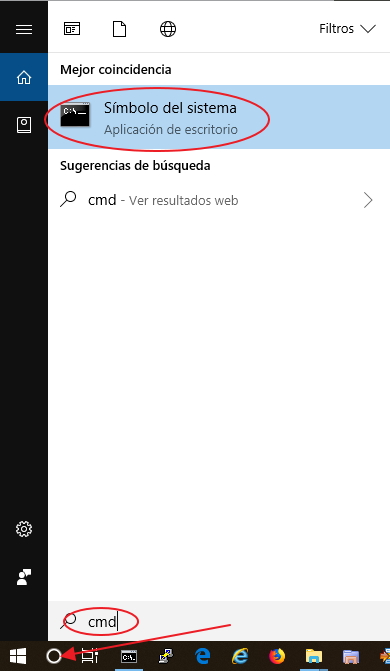
Type cmd. This displays the Command Prompt icon at the top of the search results.
Advertisement
-
3
Click the Command Prompt icon
. It’s the black square icon with a small white «C:» in the upper-right corner.
-
4
Type java -version and press ↵ Enter. Once you run this command, you’ll see the Java version next to «java version» on the first line.
- To check the version of the Java compiler, use javac -version.
- If you see an error that says «‘java is not recognized as an internal or external command, operable program or batch file,» Java is either not installed or not properly added to your path. Add Java to your system path to fix the error.


Advertisement
-
1
Right-click the Windows Start
icon. It’s the icon with the Windows logo. By default, it’s in the lower-left corner. Right-clicking this icon displays the System menu above the Start button.
-
2
Click Run. It’s the third option from the bottom of the System menu. This opens the «Run» program.
-
3
Type cmd.exe and click OK. Use the space next to «Open» in the Run program to type the command to open the Command Prompt.
-
4
Type java -version and press ↵ Enter. You’ll see the currently installed version of Java next to «java version.»
- To check the version of the Java compiler, use javac -version.
- If you see an error that says «‘java is not recognized as an internal or external command, operable program or batch file,» Java is either not installed or not properly added to your path. Add Java to your system path to fix the error.


Advertisement
-
1
Find out where Java is installed. If you’ve installed Java but you’re unable to check the version from the command line, you might just need to add the Java path to your system environment variables. But first, you’ll need to figure out where Java is installed:
- First, press Windows key + S and type java. If there are no results on your computer, you will need to install Java, which you can download from https://www.oracle.com/java/technologies/downloads.
- If Java is installed, right-click the Start menu and select File Explorer.
- Locate the Java installation directory, which will look something like this (depending on your version): C:Program FilesJava. If you don’t see a Java installation directory in C:Program Files, look in C:Program Files(x86)Java or C:Java.
- Open the folder number containing the most recent version number for JRE or the JDK, e.g. C:Program FilesJavajdk17.0.4.1 or C:Program FilesJava jdk1.8.X_XXX.
- Highlight the full path to the current folder at the top of File explorer and press Ctrl + C to copy.
-
2
Open your Advanced System Settings.
- On Windows 11, 10, and 8, press Windows key + S, type View advanced system settings, then click Advanced System Settings.
- On Windows 7, right-click My Computer, click Properties, then click Advanced.
-
3
Click the Environment Variables… button. You’ll see this near the bottom-right corner of the window.
-
4
Click New… under «System variables.» This is the bottom section. Adding a new item to System variables instead of User variables ensures that the Java path will be correct for all users on this PC, not just your own user account.
-
5
Type JAVA_HOME (for JDK) or JRE_HOME (for JRE). Create this variable name based on whether you installed the Java Development Kit or the Java Runtime Environment.
-
6
Paste the copied path to Java into the «Variable value» field. You can do this by right-clicking the bottom field and selecting Paste.[1]
-
7
Click OK to save your variable. Now that you’ve added Java to your path, you can successfully check your Java version from the command prompt. Just close the open command prompt window, open a new one, then run java -v to find your version.


Advertisement
Add New Question
-
Question
How do I check my version of Java with the command prompt?

Yaffet Meshesha is a Computer Specialist and the Founder of Techy, a full-service computer pickup, repair, and delivery service. With over eight years of experience, Yaffet specializes in computer repairs and technical support. Techy has been featured on TechCrunch and Time.
Computer Specialist
Expert Answer
-
Question
How do I set java path?
Hrithik Nitish
Community Answer
To check version from Windows command prompt, at first you have to download Java and then save the Java bin file address to Windows environment variable and than you have to open Command Prompt and enter Java where you have installed the Java version.

Ask a Question
200 characters left
Include your email address to get a message when this question is answered.
Submit
Advertisement
-
If you want to remove an older version of Java, try the Java Uninstall Tool for Windows.[2]
This simple tool displays all currently installed versions of Java and gives you the option to delete old unneeded versions. Visit https://www.java.com/en/download/uninstalltool.jsp and click I agree to the Terms and Want to Continue to launch the tool. -
You can also check your Java version in the Java Control Panel app, which you’ll find in the Start menu. Just click About in Java Control Panel to view the version number.[3]
-
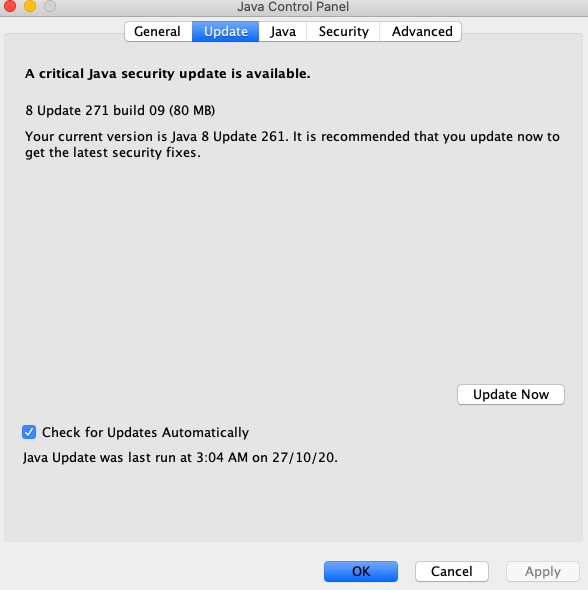
The easiest way to update Java is to click the Update tab on the Java Control Panel app and select Update Now.
Advertisement
About This Article
Article SummaryX
1. Click the Windows Start icon.
2. Type cmd to display the Command Prompt icon in the Start menu.
3. Click on the Command Prompt icon.
4. Type java -version in the Command Prompt.
5. Press Enter.
Did this summary help you?
Thanks to all authors for creating a page that has been read 444,962 times.
Is this article up to date?
Answer
As of December 31st, 2017, the following IBM JDK LPPs no longer have defect and development support. Best effort support is available if your IBM i OS VRM has a valid SWMA support contract.
5722JV1 All Options
5761JV1 Options 6,7,8,9,10,11,12,13
5770JV1 Options 11,12
How to determine what JDK versions and bit levels are installed?
To determine what JDK versions and bit levels are currently installed on your system, execute the «GO LICPGM» command on the CL command line. Then, enter option «10» and press ENTER. Finally, press the F11 key twice to view the «Product Option» column.
Scroll down the list of licensed program products until you locate the 57xxJV1 program products. If you are unable to locate the 57xxJV1 product ID in the list, then no JDKs are currently installed on your system.
If you need to install additional 57xxJV1 LPP options, please refer to the following URL to find which IBM i Standard Set media disc contains the JV1 option you wish to install.
Standard and Keyed Media Set — Master List
IBM recommends using JDK v8.0 as your default JDK version on your IBM i server. Information on how to download and install JDK v8.0 on the IBM i OS at IBM i 7.1 and later can be found in the following IBM Technical Document.
Support of Java Development Kit (JDK) 8.0 on the IBM i OS
Once you have located your 57xxJV1 licensed program product options, you can use the following table to match up the option to the JDK version and bit level.
Classic JDK = Original JDK version. This JDK is considered deprecated and supported on a limited basis. IBM does not recommend this JDK version be used. The IBM Technology for Java VM is the preferred JDK. For more information on the support of this JDK, please refer to the following URL:
IBM i Classic Java Virtual Machine (JVM) — Official Product Support Information
IBM Technology for Java = IT4J = IBM Recommended JDK due to its superior performance and reduced resource utilization compared to the Classic JDK.
NOTE: Only the IT4J JDKs exist at IBM i 7.1 and later.
|
IBM i 5.4 LPPs |
Product Option |
JDK Version |
JDK Bit Level |
|
5722JV1 |
Option 5 |
Classic 1.3 |
64 bit |
|
5722JV1 |
Option 6 |
Classic 1.4.2 |
64 bit |
|
5722JV1 |
Option 7 |
Classic 5.0 (1.5) |
64 bit |
|
5722JV1 |
Option 8 |
IT4J 5.0 (1.5) |
32 bit |
|
5722JV1 |
Option 10 |
Classic 6.0 (6.0) |
64 bit |
|
5722JV1 |
Option 11 |
IT4J 6.0 (1.6) |
32 bit |
|
IBM i 6.1 only LPPs |
|||
|
5761JV1 |
Option 6 |
Classic 1.4.2 |
64 bit |
|
5761JV1 |
Option 7 |
Classic 5.0 (1.5) |
64 bit |
|
5761JV1 |
Option 10 |
Classic 6.0 (1.6) |
64 bit |
|
IBM i 6.1 and 7.1 LPPs |
|||
|
5761JV1 |
Option 8 |
IT4J 5.0 (1.5) |
32 bit |
|
5761JV1 |
Option 9 |
IT4J 5.0 (1.5) |
64 bit |
|
5761JV1 |
Option 11 |
IT4J 6.0 (1.6) / 6.2.6 |
32 bit |
|
5761JV1 |
Option 12 |
IT4J 6.0 (1.6) / 6.2.6 |
64 bit |
|
5761JV1 |
Option 13 |
IT4J 1.4.2 |
64 bit |
|
IBM i 7.1 only LPPs |
|||
|
5761JV1 |
Option 14 |
IT4J 7.0 / 7.1 |
32 bit |
|
5761JV1 |
Option 15 |
IT4J 7.0 / 7.1 |
64 bit |
|
5761JV1 |
Option 16 |
IT4J 8.0 |
32 bit |
|
5761JV1 |
Option 17 |
IT4J 8.0 |
64 bit |
|
IBM i 7.2 only LPPs |
|||
|
5770JV1 |
Option 11 |
IT4J 6.0 (1.6) / 6.2.6 |
32 bit |
|
5770JV1 |
Option 12 |
IT4J 6.0 (1.6) / 6.2.6 |
64 bit |
|
IBM i 7.2 and 7.3 LPPs |
|||
|
5770JV1 |
Option 14 |
IT4J 7.0 / 7.1 |
32 bit |
|
5770JV1 |
Option 15 |
IT4J 7.0 / 7.1 |
64 bit |
|
5770JV1 |
Option 16 |
IT4J 8.0 |
32 bit |
|
5770JV1 |
Option 17 |
IT4J 8.0 |
64 bit |
| IBM i 7.3 only LPPs | |||
| 5770JV1 | Option 19 | IT4J 11 | 64 bit |
| IBM i 7.4 and 7.5 LPPs | |||
| 5770JV1 | Option 16 | IT4J 8.0 | 32 bit |
| 5770JV1 | Option 17 | IT4J 8.0 | 64 bit |
| 5770JV1 | Option 19 | IT4J 11 | 64 bit |
IBM i OS default JDKs — this is the JDK used if the JAVA_HOME environment is not configured system-wide or at the job scope.
IBM i 5.4 — Classic 1.4.2 64 bit
IBM i 6.1 — IT4J 5.0 32 bit
IBM i 7.1 — IT4J 6.0 32 bit
IBM i 7.2 — IT4J 7.1 32 bit
IBM i 7.3 — IT4J 8.0 32 bit
IBM i 7.4 — IT4J 8.0 64 bit
IBM i 7.5 — IT4J 8.0 64 bit
How to set up your environment to use one of the IT4J JDKs?
NOTE: We will not discuss how to set up and use the Classic JDK on the IBM i since IBM recommends the IBM Technology for Java (IT4J) JDK be used instead.
The IT4J JDK version and bit level is controlled through the JAVA_HOME environment variable. This environment variable can be set system-wide, for a specific job, or for a specific user profile.
NOTE: When the JAVA_HOME variable is set system-wide, this will change the default operating system JDK version and bit level and may negatively affect the user Java applications running on your server. IBM recommends controlling the JDK version and bit level by setting the JAVA_HOME environment variable at the job scope to customize the version and bit level for your specific Java application.
Commands to change the IBM i OS default JDK:
The JVM job would have to be restarted to pick up the change.
IT4J JDK 1.4.2 64 bit
ADDENVVAR ENVVAR(JAVA_HOME) VALUE(‘/QOpenSys/QIBM/ProdData/JavaVM/jdk14/64bit’) LEVEL(*SYS) REPLACE(*YES)
IT4J JDK 5.0 32 bit
ADDENVVAR ENVVAR(JAVA_HOME) VALUE(‘/QOpenSys/QIBM/ProdData/JavaVM/jdk50/32bit’) LEVEL(*SYS) REPLACE(*YES)
IT4J JDK 5.0 64 bit
ADDENVVAR ENVVAR(JAVA_HOME) VALUE(‘/QOpenSys/QIBM/ProdData/JavaVM/jdk50/64bit’) LEVEL(*SYS) REPLACE(*YES)
IT4J JDK 6.0 32 bit
ADDENVVAR ENVVAR(JAVA_HOME) VALUE(‘/QOpenSys/QIBM/ProdData/JavaVM/jdk60/32bit’) LEVEL(*SYS) REPLACE(*YES)
IT4J JDK 6.0 64 bit
ADDENVVAR ENVVAR(JAVA_HOME) VALUE(‘/QOpenSys/QIBM/ProdData/JavaVM/jdk60/64bit’) LEVEL(*SYS) REPLACE(*YES)
IT4J JDK 6.2.6 32 bit
ADDENVVAR ENVVAR(JAVA_HOME) VALUE(‘/QOpenSys/QIBM/ProdData/JavaVM/jdk626/32bit’) LEVEL(*SYS) REPLACE(*YES)
IT4J JDK 6.2.6 64 bit
ADDENVVAR ENVVAR(JAVA_HOME) VALUE(‘/QOpenSys/QIBM/ProdData/JavaVM/jdk626/64bit’) LEVEL(*SYS) REPLACE(*YES)
IT4J JDK 7.0 32 bit
ADDENVVAR ENVVAR(JAVA_HOME) VALUE(‘/QOpenSys/QIBM/ProdData/JavaVM/jdk70/32bit’) LEVEL(*SYS) REPLACE(*YES)
IT4J JDK 7.0 64 bit
ADDENVVAR ENVVAR(JAVA_HOME) VALUE(‘/QOpenSys/QIBM/ProdData/JavaVM/jdk70/64bit’) LEVEL(*SYS) REPLACE(*YES)
IT4J JDK 7.1 32 bit
ADDENVVAR ENVVAR(JAVA_HOME) VALUE(‘/QOpenSys/QIBM/ProdData/JavaVM/jdk71/32bit’) LEVEL(*SYS) REPLACE(*YES)
IT4J JDK 7.1 64 bit
ADDENVVAR ENVVAR(JAVA_HOME) VALUE(‘/QOpenSys/QIBM/ProdData/JavaVM/jdk71/64bit’) LEVEL(*SYS) REPLACE(*YES)
IT4J JDK 8.0 32 bit
ADDENVVAR ENVVAR(JAVA_HOME) VALUE(‘/QOpenSys/QIBM/ProdData/JavaVM/jdk80/32bit’) LEVEL(*SYS) REPLACE(*YES)
IT4J JDK 8.0 64 bit (IBM Recommended)
ADDENVVAR ENVVAR(JAVA_HOME) VALUE(‘/QOpenSys/QIBM/ProdData/JavaVM/jdk80/64bit’) LEVEL(*SYS) REPLACE(*YES)
IT4J JDK 11 64 bit
ADDENVVAR ENVVAR(JAVA_HOME) VALUE(‘/QOpenSys/QIBM/ProdData/JavaVM/jdk11/64bit’) LEVEL(*SYS) REPLACE(*YES)
Commands to set the JDK version and bit level at the JOB scope:
When setting the JDK version and bit level at the JOB scope, there are a couple of options you can use to set the JAVA_HOME environment variable. The method that is appropriate for you will depend on how you are invoking your Java application.
RPG Java Native Interface (JNI) applications and the RUNJVA/JAVA CL command
IBM recommends you set the JAVA_HOME by executing the ADDENVVAR CL command with LEVEL(*JOB) at the beginning of your program. You would use the same ADDENVVAR command listed above for the JDK version and bit level you wish to use, but the LEVEL parameter would be set to *JOB.
For example: To set my JOB to use the IT4J 8.0 64 bit JDK, I would execute the following CL command at the beginning of my program.
ADDENVVAR ENVVAR(JAVA_HOME) VALUE(‘/QOpenSys/QIBM/ProdData/JavaVM/jdk80/64bit’) LEVEL(*JOB) REPLACE(*YES)
QSH CL Command
With this CL command, you can set the JAVA_HOME environment variable using the ADDENVVAR CL command BEFORE the QSH CL command is called or with the «export» Qshell command before the «java» command is executed.
ADDENVVAR CL command — You would use the same ADDENVVAR command listed above for the JDK version and bit level you wish to use, but the LEVEL parameter would be set to *JOB.
For example: To set my JOB to use the IT4J 8.0 64 bit JDK, I would execute the following CL command at the beginning of my program.
ADDENVVAR ENVVAR(JAVA_HOME) VALUE(‘/QOpenSys/QIBM/ProdData/JavaVM/jdk80/64bit’) LEVEL(*JOB) REPLACE(*YES)
«export» Qshell command
— This command can be invoked a number of ways but must be invoked in the same shell as the «java» command. You can use the values from the VALUE parameter on the ADDENVVAR CL commands listed above for the JDK version and bit level you wish to use.
i.e. IT4J 8.0 64 bit JDK — The Qshell command would be:
export JAVA_HOME=/QOpenSys/QIBM/ProdData/JavaVM/jdk80/64bit
Here are the different methods the «export» command can be invoked.
— In the QSH CL command in the same shell before the «java» command.
i.e. QSH CMD(‘export JAVA_HOME=/QOpenSys/QIBM/ProdData/JavaVM/jdk80/64bit;java MyProgram’)
— In a Qshell script that is then executed by the QSH CL command.
i.e. The shell script would contain the following lines:
export JAVA_HOME=/QOpenSys/QIBM/ProdData/JavaVM/jdk80/64bit
java MyProgram
Then, the QSH CL command would be:
QSH CMD(‘shellScript’)
— For a specific Qshell/PASE user. NOTE: This will affect all JVMs created in Qshell and PASE for this user profile.
i.e. Create a file named «.profile» in the user profile’s home directory and include the following line.
export JAVA_HOME=/QOpenSys/QIBM/ProdData/JavaVM/jdk80/64bit
If the home directory for my JVM user was /home/jvmuser, I would create a file called «.profile» in the directory /home/jvmuser. Then, I would edit the /home/jvmuser/.profile file and include the «export» command as you see in the example above.
After the «.profile» is set up, any JVM created in Qshell or PASE by the user profile will use the JVM version and bit level specified by the export JAVA_HOME command.
— For all Qshell shells (global setting). NOTE: This will affect all JVMs created in all Qshell shells.
i.e. Create a file named «profile» in the /etc directory and include the following line.
export JAVA_HOME=/QOpenSys/QIBM/ProdData/JavaVM/jdk80/64bit
After the «/etc/profile» is created with the «export JAVA_HOME» command, any user creating a JVM via Qshell will use the JVM version and bit level specified.
[{«Type»:»SW»,»Line of Business»:{«code»:»LOB57″,»label»:»Power»},»Business Unit»:{«code»:»BU058″,»label»:»IBM Infrastructure w/TPS»},»Product»:{«code»:»SWG60″,»label»:»IBM i»},»ARM Category»:[{«code»:»a8m0z0000000CH5AAM»,»label»:»Java Development Kit»}],»ARM Case Number»:»»,»Platform»:[{«code»:»PF012″,»label»:»IBM i»}],»Version»:»All Version(s)»}]
- Details
- Written by
- Last Updated on 26 August 2019 | Print Email
This article describes some ways which you can use to check version of Java on your Windows computer. More exactly, the version of Java Runtime Environment (JRE) or Java Development Kit (JDK).
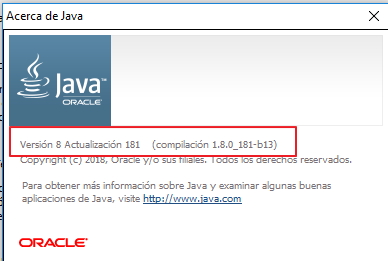
If you have OracleJDK installed on your computer, simply click menu Start, type about java into the search area, then click the About Java icon in the result. You can see the current version of Java in the following dialog:

Or you can go to Control Panel, switch to Large icons view and click the Java logo:
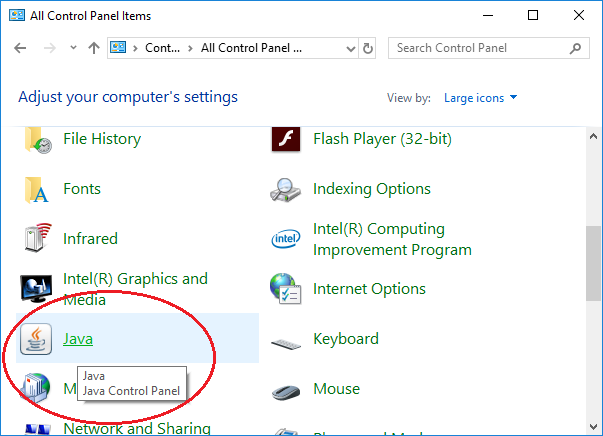
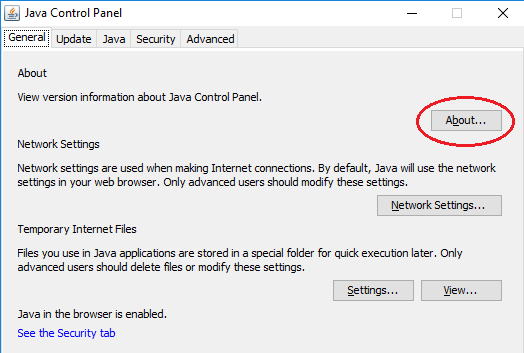
Then in the Java Control Panel dialog, click About button as shown in the following screenshot:
The second way (more familiar with programmers) to check Java version is opening a command prompt and type the following command:
java -version
Suppose that the PATH environment variable is updated for Java, you should see the following result:

Here, the version of Java is 1.8.0, and 201 is the update number. Each version can have several update numbers — the higher the more recent it is.
Note that “Java(TM) SE Runtime Environment” meaning that you’re using Oracle JDK. In case you’re using OpenJDK, the output should be:

If JDK/JRE is not installed or somehow the PATH environment variable is not updated for Java, you can see the following message:

Note that there can be multiple installations of JRE and/or JDK on a computer. In that case, the version of Java you see in the console is of the first JRE/JDK found in the list of environment variables.
To check the version exactly, you need to go to the bin directory of a JDK/JRE installation, for example:
cd C:Program FilesJavajdk1.8.0_201bin
And type the java –version command.
Related Topics:
- Java versions history
- How to set environment variables for Java using command line
- Understand 9 features of Java programming language
- What are JVM, JRE and JDK
- How to write, compile and run a hello world Java program for beginners
- How to get Java Certificates — 5 Steps to Become a Certified Java Programmer
About the Author:
 Nam Ha Minh is certified Java programmer (SCJP and SCWCD). He started programming with Java in the time of Java 1.4 and has been falling in love with Java since then. Make friend with him on Facebook and watch his Java videos you YouTube.
Add comment
Verify java version on Linux, Windows or Mac in multiple ways. You can even verify Java version online, by even using a browser. Java commands and Java Gui are the most popular ways to verify Java version. In Windows, Linux and Mac, commands and GUI differs somewhat. Lets see how we can verify Java installation is complete and what version is installed on your machine
Java version is verified using the command ‘java -version’ on windows, Mac and Linux. From GUI, Java control panel’s about section, Java version is clearly visible. Oracle’s online page for Java verification is the fastest way to check Java version, using Java enabled browser.
Steps to Verify Java version on windows using Java control panel
- Click on start button and start menu.
- Navigate through the ‘applications and programs’ listed unless you see the Java folder
- Click on Java folder, choose ‘About’ option.
- You can now check the Java installed version.
Steps to check Java version on windows using Command prompt
- From start menu or run box, Open the Command Prompt.
- Write the command:
java -version - The output of this command will show the Java version installed on your window machine.
- Click on start button and start menu.
- Navigate through the ‘applications and programs’ listed unless you see the Java folder
- Click on Java folder, Java control panel will be opened.
- In General tab, press the ‘About’ button.
- You can now check the Java installed version.
Steps to check Java version on Linux using Java control panel
- In Linux, search the application “Java control panel”
- From the search list, Open the Java control panel.
- On General tab, press the button ‘About…’
- It will open a popup which will show the installed Java version and details.

Steps to check Java version on Linux using terminal
- Press
ALT+CTRL+Tor Open the terminal from search. - Enter the command:
java -version - The terminal will show the installed Java version on your Linux machine.
Steps to check Java version on Mac using Java control panel
- From upper left side of screen, select the Apple icon
- Navigate to System preferences.
- Press Java icon, it will launch Java control panel
- In General tab, press the button ‘About’
- You will see open a popup with details of Java installed version.
Steps to check Java version on Mac using terminal
- Open the terminal window.
- Enter this command:
java -version - The terminal window will show the installed version of Java on your Mac machine.
Steps to check Java version online
- Open the oracle’s Java verification web page.
- Press the button ‘Verify Java version’
- Accept the agreement and press Continue button
- Select Run to continue option
- The web page will show the Currently installed Java version.
- if you have recently finished Java installation, then restart your browser to enable, Java in the browser. Make sure JavaScript is enabled in the browser.
Where Java is installed?
You can find the Java installation path on Ubuntu using following command:
which javac
It will give path of Java installation directory, if you have multiple versions installed, then only the default Java version (set in your system) wll be displayed.
/usr/bin/javac
You can find the Java installation path on Ubuntu using following command:
where javac
It will give you Java installation path
C:optjdk-8.0.2binjavac.exe
How to switch Java version
You can have multiple installed versions of JDK on one machine. At any time, You can decide which Java version you want to make default version and should be used from command line automatically. The update-alternatives command is very helpful in switching between JDk versions, it will list all the installed Java versions. From that list, you can select which is the default version, you can want to keep.
sudo update-alternatives --config java
All available Java versions will be listed as shown below, with a sequence number. You can select any Java version using these sequence numbers. An Asterisk (*) mark shows that this Java version is currently being used as default version.
There are n choices for the alternative java (providing /usr/bin/java).

Selection    Path               Priority              Status
------------------------------------------------------------
  0        /usr/lib/jvm/java-11-openjdk-amd64/bin/java      1111      auto mode
* 1        /usr/lib/jvm/java-11-openjdk-amd64/bin/java      1111      manual mode
  2        /usr/lib/jvm/java-8-openjdk-amd64/jre/bin/java   1081      manual mode
  3        /usr/lib/jvm/java-8-oracle/jre/bin/java          1081      manual mode

Press <enter> to keep current choice[*], or  type selection number:
Java version history
The Java language has undergone several changes since JDK 1.0 also as numerous additions of classes and packages to the core library. The evolution of Java language has been governed by the JCP (Java Community Process), which uses JSRs (Java Specification Requests) to specify changes and propose changes, for additions to the Java.
In addition to the language semantics, lots of other changes have been made to the Class Libraries over the years, which has now grown from a couple of hundred classes to over three thousand. Entire new APIs, like Swing and Java2D, are introduced, and lots of of the first JDK 1.0 classes and methods are deprecated.
| Year | JDK release |
| 1995 year | JDK Beta |
| 1996 Jan | JDK 1.0 |
| 1997 Feb | JDK 1.1 |
| 1998 Dec | J2SE 1.2 |
| 2000 Mat | J2SE 1.3 |
| 2002 Feb | J2SE 1.4 |
| 2014 Sep | J2SE 5.0 |
| 2006 Dec | Java SE 6 |
| 2011 July | Java SE 7 |
| 2014 Mar | Java SE 8 (LTS) |
| 2017 Sep | Java SE 9 |
| 2018 Mar | Java SE 10 |
| 2018 Sep | Java SE 11 (LTS) |
| 2019 Mar | Java SE 12 |
| 2019 Sep | Java SE 13 |
| 2020 Mar | Java SE 14 |
| 2020 Sep | Java SE 15 |
| 2021 Mar | Java SE 16 |
| 2020 Sep | Java SE 17 (LTS) |
OpenJDKs list with download links
There are lots of OpenJDKs builds available, most of them are available to use freely for commercial purpose. But still few have different type od supports or licenses. Following is the list for different available OpenJDK builds.
| OpenJDK Builds | Long Term Support | Permissive license |
Commercial Support |
| AdoptOpenJDK | Yes | Yes | Yes |
| IBM SDK | Yes | Yes | Yes |
| Alibaba Dragonwell | Yes | Yes | No |
| Amazon Corretto | Yes | Yes | No |
| Azul Zulu | Yes | Yes | Yes |
| BellSoft Liberica JDK | Yes | Yes | Yes |
| ojdkbuild | Yes | Yes | No |
| Oracle OpenJDK | No | Yes | No |
| Red Hat build of OpenJDK | Yes | Yes | Yes |
| SAP SapMachine | Yes | Yes | No |
What is Java Auto Update? How do I change notify settings?
Java Update feature is a feature that keeps your computer up-to-date with the newest Java releases. once you have auto update enabled, your system periodically checks for latest versions of Java. When a latest version is found we ask your permission to upgrade your Java installation. you can schedule how often to see for updates, or check manually at any time.
Change Automatic Java Update Settings
- Open the Java control panel window.
- Click the Update tab and open settings section.
- select the Check for Updates Automatically check box, To enable Java Updates automatically.
- For disabling Java Updates, un-select the Check box for Updates Automatically check box.
Change the Java Update Schedule
- You can also change the frequency for Java updates: monthly (default), weekly, or daily
- On Update tab in Java Control panel window, click button Advanced
- Advanced Settings dialog appears for the Automatic Update .Change frequency here using date and time for the Java Update and Click OK.
- Java Update scheduler will now check for latest Java updates and notify you at the scheduled frequency.
- For daily updates, you’ll select the time of the day for the update. For weekly updates, you’ll select the day of the week and therefore the time of the day. For monthly updates, you’ll select the day of the week and therefore the time of the day. Monthly updates check weekly and notify you within 30 days that an update is out there , however, if an update is taken into account critical you’re notified within every week of its release.
Change the Notification Options
There are two choices for changing notification options:
Before installing: Use this feature to download automatically and be notified before installing the Java update.
Before downloading: this is often the default . Use this feature to be notified before downloading and installing the Java update.
Manual Update Option
From the Java control panel Update tab, you’ll manually check for an update any time by clicking on the Update Now button located at rock bottom of the Update tab on the Java control panel . Java Update can only be run if the system is connected to the web . Alternatively, you’ll go to Java.com to find the newest Java version. After updating the Java version, you would like to shut and restart the Java control panel to load the updated control panel .
Conclusion
The choice of Java version depends upon your requirements and decision, but to verify Java version, options remain the same. Same commands can be used to check Java version for any JDK. If you want o have new Java installation and looking for Java installation detailed steps, then you can refer to my detailed guide on How to install Java.
First of all, you must know that Java is a programming language and you need some packages installed on your computer to run it. Before we check for any version you must know what are you looking for. So let’s see some definitions in the Java world.
- Java -> “Java” is the name that Sun gave to their programming language. Java is NOT an acronym and it does NOT stand for “Just Another Vague Acronym” or anything like that. This is the main programming language that is used to develop software, programs, apps, or any other fancy stuff.
- JRE -> Java Runtime Environment this is the installation package that provides an environment to (YES) run and NOT to develop the Java applications. This is normally used by end-users. If you are unsure about what kind of java you are looking for, THIS is what you are looking for.
- JDK -> Java Development Kit witch contains just the tools for developing apps under Java.
- SDK -> Software Development Kit which has support for developing apps in different programming languages like Scala, JRuby, and Java among others. It is often used in Android development for example.
- JVM -> Java Virtual Machine normally comes with both JDK and JRE and it’s the one in charge of executing the Java language code in general.
How to check Java package/JRE version
There are a few methods out there to find under the hood Java version that you have installed on your PC. Windows lets you directly search for the Java components under Start Button. Just type java and look for Java Configuration. Click on it and you should see the Java Configuration panel:

Click on the About Java menu and a new window with the Java version will open
You can also try and type About Java directly into windows search to access the “about java” section and check its version
How to check Java version using CMD
Another way to do it is using CMD (Command Prompt). Just search for it under your windows bar start button or press the Windows button + R and type CMD
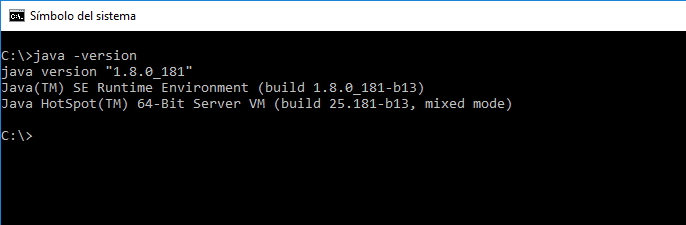
Type java -version inside CMD window. If you have Java installed you will see something like this.
java -version error – No Java Installed
On the other hand, if you do not have Java installed you will see a java is not recognized as an internal or external command message
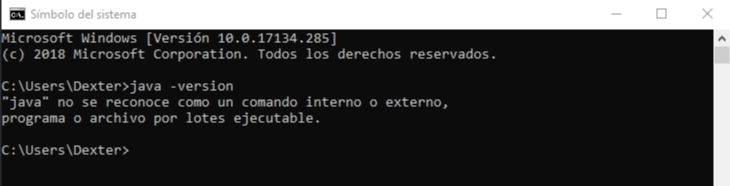
If you see this error, just head to the java website at java.com to download the latest Java package.
Check if JDK is installed and his version
To simply check if JDK is installed just type javac in your terminal and you should see lots of available commands

If you have The JDK installed, just type java -version in your terminal and this will bring up the JDK version

Just to make it clear, SDK stands for Software Development Kit which has support for developing apps in different programming languages, not just JAVA. It is used by Microsoft and Google Android for example.
Check Microsoft SDK version
To check for your windows installed SDK version you should open your registry editor and navigate to HKEY_LOCAL_MACHINESOFTWAREMicrosoftMicrosoft SDKsWindows. To open Registry editor press the Windows button + R, write regedit, and press ENTER.

First of all, you must know that Java is a programming language and you need some packages installed on your computer to run it. Before we check for any version you must know what are you looking for. So let’s see some definitions in the Java world.
-
- Java -> “Java” is the name that Sun gave to their programming language. Java is NOT an acronym and it does NOT stand for “Just Another Vague Acronym” or anything like that. This is the main programming language that is used to develop software, programs, apps or any other fancy stuff.
- JRE -> Java Runtime Environment this is the installation package which provides environment to (YES) run and NOT to develop the Java applications. This is normally used by end users. If you are unsure about what kind of java you are looking for, THIS is what you are looking for.
- JDK -> Java Development Kit witch contains just the tools for developing apps under Java.
- SDK -> Software Development Kit witch has support for developing apps in different programming languages like for example Scala, JRuby and Java among others. It is often used in Android development for example.
- JVM -> Java Virtual Machine normally comes with both JDK and JRE and it’s the one in charge of executing the Java language code in general.
How to check Java package/JRE version
There are few methods out there to find under the hood Java version that you have installed on you PC. Windows let’s you directly search for Java component under Start Button. Just type java and look for Java Configuration. Click on it and you should see the Java Configuration panel:
Click on About Java menu and a new window with the Java version will open
You can also try and type About Java directly into windows search to access the “about java” section and check it’s version
How to check Java version using CMD
Another way to do it, is using CMD (Command Prompt). Just search for it under your windows bar start button or press windows button + R and type CMD
Type java -version inside CMD window. If you have Java installed you will see something like this.
java -version error – No Java Installed
On the other hand if you do not have Java installed you will see a java is not recognized as an internal or external command message
If you see this error, just head to java website at java.com to download the latest Java package.
Check if JDK is installed and his version
To simply check if JDK is installed just type javac in your terminal and you should see lots of available commands
If you have The JDK installed, just type java -version in your terminal and this will bring up the JDK version
Check SDK version
Just to make it clear, SDK stands for Software Development Kit which has support for developing apps in different programming languages not just JAVA. It is used by Microsoft and Google Android for example.
Check Microsoft SDK version
To check for you windows installed SDK version you should open your registry editor and navigate to HKEY_LOCAL_MACHINESOFTWAREMicrosoftMicrosoft SDKsWindows. To open Registry editor press Windows button + R, write regedit and press ENTER.